Ultimate 5" Freestyle build
 By Jakob JFPV on May 02, 2020
This is my new FPV-Freestyle build for this season. it is my first build using 6S Batteries and the Flightone FC. My goal was to build a quad that has top-notch performance for freestyle but still does not cost as much as a high-end build. In the following paragraphs, I will explain why I chose every single component in detail and I will also evaluate on its benefits, drawbacks and performance.
Frame
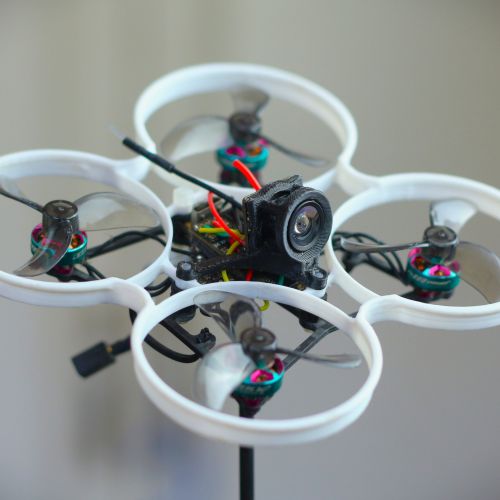
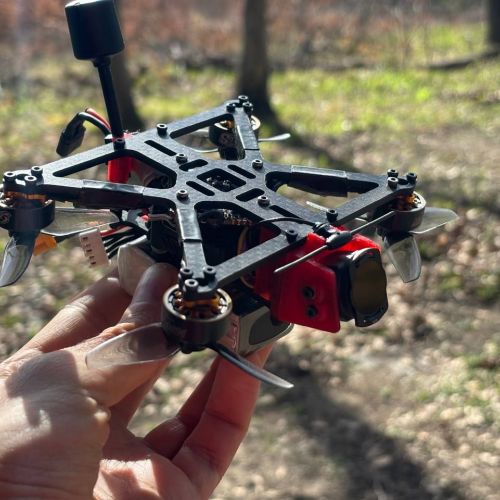
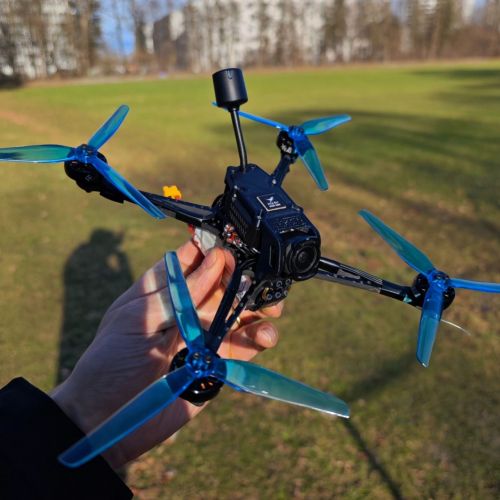
The frame I chose is the SpeedyBee FS225 Frame which is an awesome looking, well thought-out and very durable frame. I didn't see any builds on this website and, thus, I was a bit sceptical at first. However, I feel like this frame is totally underrated (popularity-wise) as it is very well manufactured and definitely looks, feels and performs like a premium frame. Many people argue that 70$ is a weird price point because for 30$ more you can get a high-end frame like the apex or an Armattan one and for 30$ less you can get a Source One frame. I personally don't agree with these thoughts because in my opinion there is no need to spend more money. The FS225 is just one of the best Freestyle frames and even costs a bit less than comparable frames. In addition, the quality of this frame is just superb and not comparable to a Source One or similar frame. The chamfered edges feel really nice and it doesn't look as massive as the TBS frame. You also save about 30 grams of weight which is an enormous amount if you consider just the frame. To be clear, I don't claim that the Source One is a bad frame, I just think that the FS225 has a lot of benefits for the extra money. The only thing I dislike about this frame is the FPV camera protection. While other frames (f.eg. by Armattan) have a camera cage that is curved outwards to reduce the probability of an impact on the camera, the FS225 has the camera mounting "spacers" turned inwards. I think that this looks good but isn't the best for protection. The last thing I wont to mention about this frame is that the battery straps are manufactured of premium materials and they are very durable (metal loop and synthetic leather strap). If I secure my battery with two of these I can make sure that my battery will stay in place even in hard crashes.
Motors
The T-Motor Pacers are my motor choice for this quad becuase, again, I think that there are nearly no drawbacks to a premium motor like the F60 Pro iV and you can save a bit of money. Primarly, I thought that this motor is aimed for racing, but after a couple of flights, I can clearly state that this is a very smooth and powerful freestyle motor as well. It also looks awesome if you ask me. 36.9 grams is a bit on the heavier side for a 2207.5-sized motor but as a freestyle pilot I am perfectly fine with that. Nevertheless, more important for me is the heat distribution. After a flight with theses motors and stock Flightone PIDs, these motors were not getting hot in any way. In comparison to my 4S JohnnyFPV Motors these ones were way cooler. I don't know exactly if it are the motors or the Flightone software (I guess it is both of them), but this combination just performs very well. I am also a huge fan of the unibell design and the screw on the bottom for removing the bell of the motor. I didn't crash that much yet, but I think that this is a very durable motor and hard to destroy. All in all, I think that for 20$ these are one of the best motors to get right now.
ESCs
On my older build, I flew the Hobbywing Xrotor 4in1 40a ESC and I really liked it and therefore, I decided to go with their new version. I know that the Hobbywing Xrotor Micro 4in1 60a ESC has been out for a while (about a year) but I still think that it is one of the best ESCs. For sure, it is an exceptionally durable ESC and it is very hard to burn it out. For me, DShot 1200 and BlHeli_32 support as well as a current sensor and high reliability are very important. This ESC includes all of these features and is a bit expensive, but definitely worth the money. In some forums, I read that some people couldn't get the BlHeli_32 Telemetry to work with the Flightone RevoltOSD, but I can confirm that it works well in my case. I get fairly accurate current and voltage measurement with this ESC in my OSD. I compared the voltage that the osd shows to my ISDT battery checker and with the stock Flightone settings, so no calibration, it was off by about 0.3 volts (overall, not per cell). One thing I also highly appreciate on this ESC is that the leads for the battery connector and the capacitor come preinstalled out of the box so you don't have to mess with the position of the capacitor. Some people say that the capacitor has a too low voltage rating (I believe it is roughly 30V) and that you should use a 50V cap (f.eg. from panasonic) but so far it worked well for me. As a freestyle pilot, I won't push the limits of this ESC anyways, but if I run into some issues, I will update this post. Another thing that I want to point out is that I really like the two different solutions for connecting it to the FC (connector and pins for soldering). Even with an Flightone FC, the appropriate connectors are included in the box. This just insures a very clean build. The o-ring rubbers also come preinstalled so you have less vibrations. The pads for soldering the wires also have gotten a bit bigger in comparison to the previous version, so especially beginners will have no trouble with soldering these.
FC
I always flew Betaflight in the past so I wanted to try out something new for this build. Since FalcoX came out, I have seen an increasing amount of people trying out their new firmware and results have always looked great for me in YouTube tests. I bought the Flightone RevoltOSD Skitzo edition as I couldn't find any other Fightone FC in stock. I think that Flightone really goes into the right direction with their Hard- and Software because it is just so easy to set it up. Wiring the ESC is quite simple if you follow the wiring diagram on their homepage and if you want to, you could use connectors for nearly everything (Camera, VTX, Receiver, ESC). The only think I really didn't like about it when building it, is that you have to install the rubber rings yourself. That is just a tiny detail but I personally really struggled with putting them in.
The Flightone software is just great in my opinion because you can either use a computer or just the OSD (after you flashed the firmware) to set it up. Setting up things like motor direction, receiver type and FC orientation is so much easier than in Betaflight. Even PIDs and Rates offer presets from top Flightone team pilots. That way beginners as well as experts can concentrate more on flying than on constantly changing settings on your FC. The OSD layout is very simple as well and provides you with the opportunity to change nearly all of the settings like PIDs, Rates and VTX settings (if you use SmartAudio) in your OSD. I hope that in the future they will include all of the advanced options (like switching from DShot to Multishot) in the OSD. I didn't do any PID tuning on this quad, but nevertheless it handles propwash extremely well. Overall, I am extremely impressed with the Flightone FC and I think that I will stick with it in my future builds.
Propellers
I chose the T-Motor 5143s props in combination with these motors because I wanted to have good control, smoothness and responsiveness. Therefore, I gave up some top end speed that you normally wouldn't need for freestyle. I was a huge fan of the original T-5143 props and the s-version is even more durable. I like the idea of the 5.1 inch sized props because they fit on (nearly) any 5 inch frame. The T-Motor props offer great responsiveness and in comparison to the Ethix S3 Watermelon props they are slightly smoother.
FPV Camera
I chose the Caddx Ratel for this build because the FS225 only allows micro sized cameras (or smaller) to be mounted. Until now, I just flew CCD cameras on my quads and I wanted to try a CMOS camera for comparison. The Caddx Ratel has also a good price point and a top image. When I flew this camera for the first time, I was certainly fascinated by the vivid colors. I can compare this camera to a Runcam Swift 2 which I run on my other freestyle copter. The Caddx Ratel has more vivid colors, better contrast and in my opinion a much better image overall. I also think that you see details fairly well in the FPV feed. I prefer the 2.1mm Lens over 1.8mm one because I don't like too much distortion on my camera. The angle is also more similar to the GoPro FOV so that enables me to get better cinematic framing if I have to do that. I hope that this camera is durable as well because I think that the camera protection of the SpeedyBee frame isn't the best.
VTX
The VTX i selected is the TBS Unify Race2. I picked it because for my needs it is perfect in a lot of ways. The price is cheaper in comparison to other VTXs from TBS like the Unify Evo or the Unify Pro HV. For this reason, you have to compromise on the output power a bit but 400mw is more than enough for my flying as I don't plan to do any long range flights on this setup. You also need to solder the pins to the FC so you can't use a typical connector. The enormous advantage I see in this VTX is primarily the MMCX connector. I broke a lot of U.FL connectors in the past and had many issues with them popping off mid flight. TBS fixed this issue with screwing the U.FL to the VTX in more recent VTXs. Although I don't own any of them, I still think that MMCX is a better choice and way easier to dis- and reconnect. In direct comparison to other video transmitters from TBS, the Unify Race2 also includes a proper plastic "case" on top which should also enhance the heat distribution. But I think that even on 25mw this VTX gets incredibly hot, so I wouldn't leave it turned on for too long if you don't fly. In flying conditions where you usually have a lot of airflow, however, temperature is fine. I put a lot of thoughts on how to mount the VTX on this frame best and at the end I came up with a pretty weird solution which works surprisingly well. Because the Capacitor is located at the rear of the Frame and I put the Crossfire Nano RX under it, I couldn't mount it on the bottom plate where I would usually put it. The top plate is also a bad place because I have to put a battery strap on that position. Therefore, I put a heat shrink on two opposite spacers and then there is enough pressure to secure the VTX in between. It won't cause too many vibrations either because the heat shrink acts as a little dampener. Then I put a thin layer of double-sided tape on top of the capacitor and attached it to the VTX. This probably isn't the best solution for mounting it but in this case, I couldn't find a better space for. it.
FPV Antenna
I picked the TBS Triumph Pro with straight MMCX connector as an antenna. I have a different approach to the usual mounting when it comes to antennas and I will explain now why. I don't really like SMA adapter cables any more because they take up a lot of space, they are heavy and the antenna that features an SMA connector is usually heavy as well. Antennas that come with an MMCX connector are lightweight and easier to install. The only problem is that it doesn't stay in place when you want to have enough cable length available at the rear so that you can tilt it up and insure a proper orientation. That's why I came up with a 3d printed TPU part that fixes this problem. I run this mounting solution now on two on my freestyle quads and it works so well that I continued to use it on this build. The way it works is that I have a small shaft of TPU that is attached to one of the rear spacers. I print it closed, then I cut it open, fit the antenna throuhg it and put two zip ties around it. This solution is lightweight and nearly indestructible because TPU is such a tough material. The shaft points the antenna upwards by around 45 degrees and insures better video reception than a usual mount where the antenna is just run straight out of the back.
I designed this part on Fusion360 and put it on Thingiverse, so if you are interested and if you want to download it or just look it up, you can find it here: https://www.thingiverse.com/thing:4328108
Receiver
I fly a Spektrum DX8 with the full-sized crossfire module so there was no doubt that I selected the Nano RX for this build. I really love TBS hardware because it just works and you don't have to worry about your RSSI getting low. Because I broke some Immortal T antennas before, I decided to try the stock antenna that comes with the normal receiver (no SE). I mounted it with zip ties and a heat shrink in the back and I think that it should be pretty durable and offer good reception. It also reduces weight slightly.
Batteries
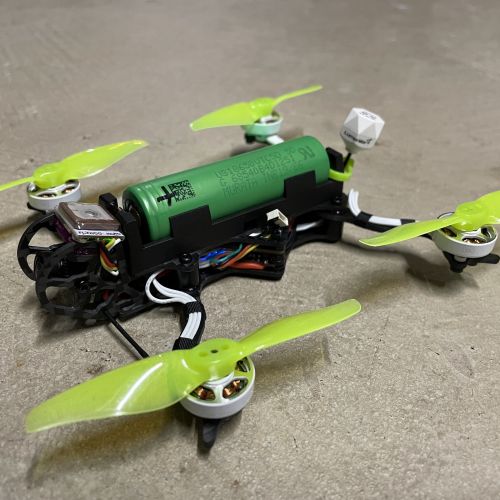
As this build is aimed for 6S, I obviously picked a 6S battery. I see many people using a 1300mah battery but I personally don't really see the point because with my former 4S builds I always ran 1300mah batteries and even 1050mah on 6S would provide me with longer flight times. 1300mah 6S batteries would just increase the weight and that is really unnecessary for me, if you consider swapping batteries more often. The CNHL batteries are slightly cheaper than the Tattu R-Line V3 packs. For freestyle, I don't push that many amps anyways, so that saves me a bit of cost. The CNHL packs also look good and after the first flights I made, they didn't get hot at all. With this build and moderate flying so some more aggressive tricks and cruising mixed throughout the pack, I get about 3 minutes and 10 seconds of flight time.
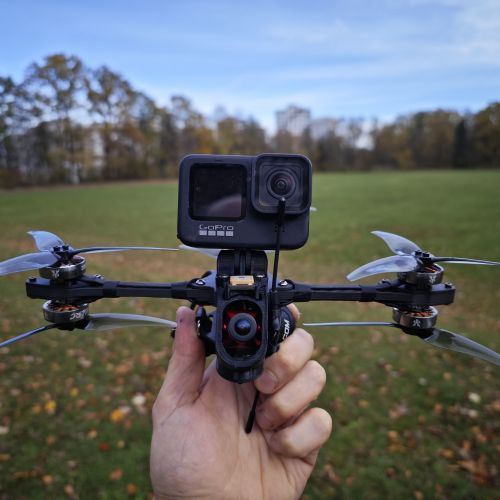
HD Camera
I still have a GoPro Hero 5 Session which I absolutely love using for freestyle. I think that it is very unfortunate that GoPro discontinued it and that manufacturers like Runcam or Caddx try to produce a copy but all of them just suffer of poor image quality in my opinion. The Hero 5 Session is very durable and lightweight. Speedybee sells their own TPU mounts but I didn't want to buy that one because I own a 3d printer myself. I searched for a mount on Thingiverse but I couldn't find any. Following, I decided to create one myself. With the TPU mount I made, I wanted to make sure that a TBS JelloGuard can fit because it enhances the look of the video and and reduces the jello effect. The mount fits perfectly on top of the frame and is secured with the 4 front screws. It is also designed to be as lightweight and robust as possible.
The mount is available for download here: https://www.thingiverse.com/thing:4328067
Final thoughts, overall specs and performance
With all of these components the quad has an AUW (all up weight) of 673 grams. That is a good weight for a 5 inch freestyle copter with GoPro. In comparison to my former 5 inch freestyle quad which had an AUW of about 645 grams, I can definitely feel the difference between 6S and 4S. It seems like I don't notice the weight of the quad because in the air it feels lighter and less sluggish than my 645 gram 4S Reverb. I also notice an enhanced propwash handling (due to Flightone) and smoothness. Stick feel on this quad is very snappy and locked-in and I can perform all the tricks that I would normally do in a simulator without having to worry about a lack of power or responsiveness. I prefer a "juicy" flight style that was made popular by Johnny FPV originally and I think that this setup perfectly suits my demands. It feels durable as well and I hope that I can proof that in the future. I will edit a flight video of this build soon and I will link it here once it is uploaded on my YouTube channel.
If you want to support me, I would highly appreciate it if you follow me on YouTube and Instagram. Both use the nickname Jakob JFPV. The links are provided below. Future flight videos will also be uploaded there more frequently.
YouTube: https://www.youtube.com/channel/UC1d9zHOls8fl0ZMSczUzGvg
Instagram: https://www.instagram.com/jakob_jfpv/?hl=de
EDIT: Here is a flight video of this quad:
If you have got any questions regarding this build, do not hesitate to leave a comment below!
Photos


Part List
Frame |
SpeedyBee 5" Freestyle Frame
Getfpv.com
|
$69.99 |
Flight Controller |
FlightOne SKITZO RevoltOSD Flight Controller
(16 builds)
Getfpv.com
|
$42.99 |
ESCs |
Hobbywing XRotor Micro 60A 6S 4-in-1 BLHeli_32 ESC
(83 builds)
Airbladeuav.com
|
$84.99 |
Motors |
4 x T-Motor PACER 2207.5 1950Kv MotorDefault Title
(2 builds)
Racedayquads.com
|
$79.96 |
Propellers |
T-Motor T5143s Tri Blade Propellers CW/CCW (4 Pieces)
(3 builds)
Phaserfpv.com.au
|
See Site |
FPV Camera |
Caddx Ratel Starlight 1200TVL HDR Low-Light Micro FPV Camera
(114 builds)
Getfpv.com
|
$29.99 |
FPV Transmitter |
TBS Unify Pro 5G8 HV - Race 2 (MMCX) VTx Video Transmitter
(26 builds)
Pyrodrone.com
|
$29.95 |
Antenna |
Team BlackSheep TBS Triumph Pro (MMCX 90°) RHCP
(7 builds)
Heli-nation.com
|
$19.95 |
Receiver |
TBS Crossfire Nano Rx - FPV LONG RANGE DRONE RECEIVER
(1488 builds)
Team-blacksheep.com
|
$24.95 |
Batteries |
CNHL Black Series 1100mAh 22.2V 6S 100C Lipo Battery
(32 builds)
Chinahobbyline.com
|
$27.99 |
Guides & Reviews

AirbladeUAV has done it again and this time they've brought long range to the 5" class! Based on the popular Transformer Mini, the new Transformer 5" Ultralight adopts a lot of the same design philosophies with larger props and more payload capacity. It can fly upwards of 20 minutes on a 4 cell Li-Ion battery pack and in ideal conditions it's got a range of over 4 to 5 miles. In this guide I'll walk..
Read more
With the release of the DJI FPV Drone cinematic FPV has become a lot more accessible, but you certainly don't want to crash a $750 drone! The QAV-CINE Freybott is a compact, lightweight cinematic FPV drone that can take a hit and keep going. It's a lot safer to fly indoors and around people. With a naked GoPro or the SMO 4k you can capture some great stabilized footage. In this guide I'll show you..
Read more
Nice carefully planned build and I enjoyed reading your thoughts behind the component choices. Looking forward to your video and further thoughts. I just jouned the F1 Falcox rank via the same FC on AstroX J5 a few weeks ago having only flew BF before. Most of my favorite FS pilots ( Blackbird, Alexandre FPV, Fabian FPV) are rocking F1 so I was curious to try it. It does feel locked in with nice control with snappy moves. I'm a convert and will change my Reverb from BF to Revolt OSD.
Thank you! These were exactly my thoughts about FL1. My favorite pilots also include these three you mentioned. It seems like FL1 really makes a drastic differnece if you prefer this type of flying. Flight footage is comming
The flight edit is now on YouTube:
I have flown about 15 packs now and I can clearly say that FL1 gives me perfect control in most situations. It even handles wind pretty well. These flights were done during heavy winds and the footage looks still quite smooth. I flew two packs today in perfect conditions (no wind) and the footage from these flights proves that the slight wobbles in this YouTube video are due to the wind. Concluding, i am really happy with the way this quad flies.
Sweet moves and control. 1:25 puff of dust from the brief road contact was cool. Really enjoyed your video.