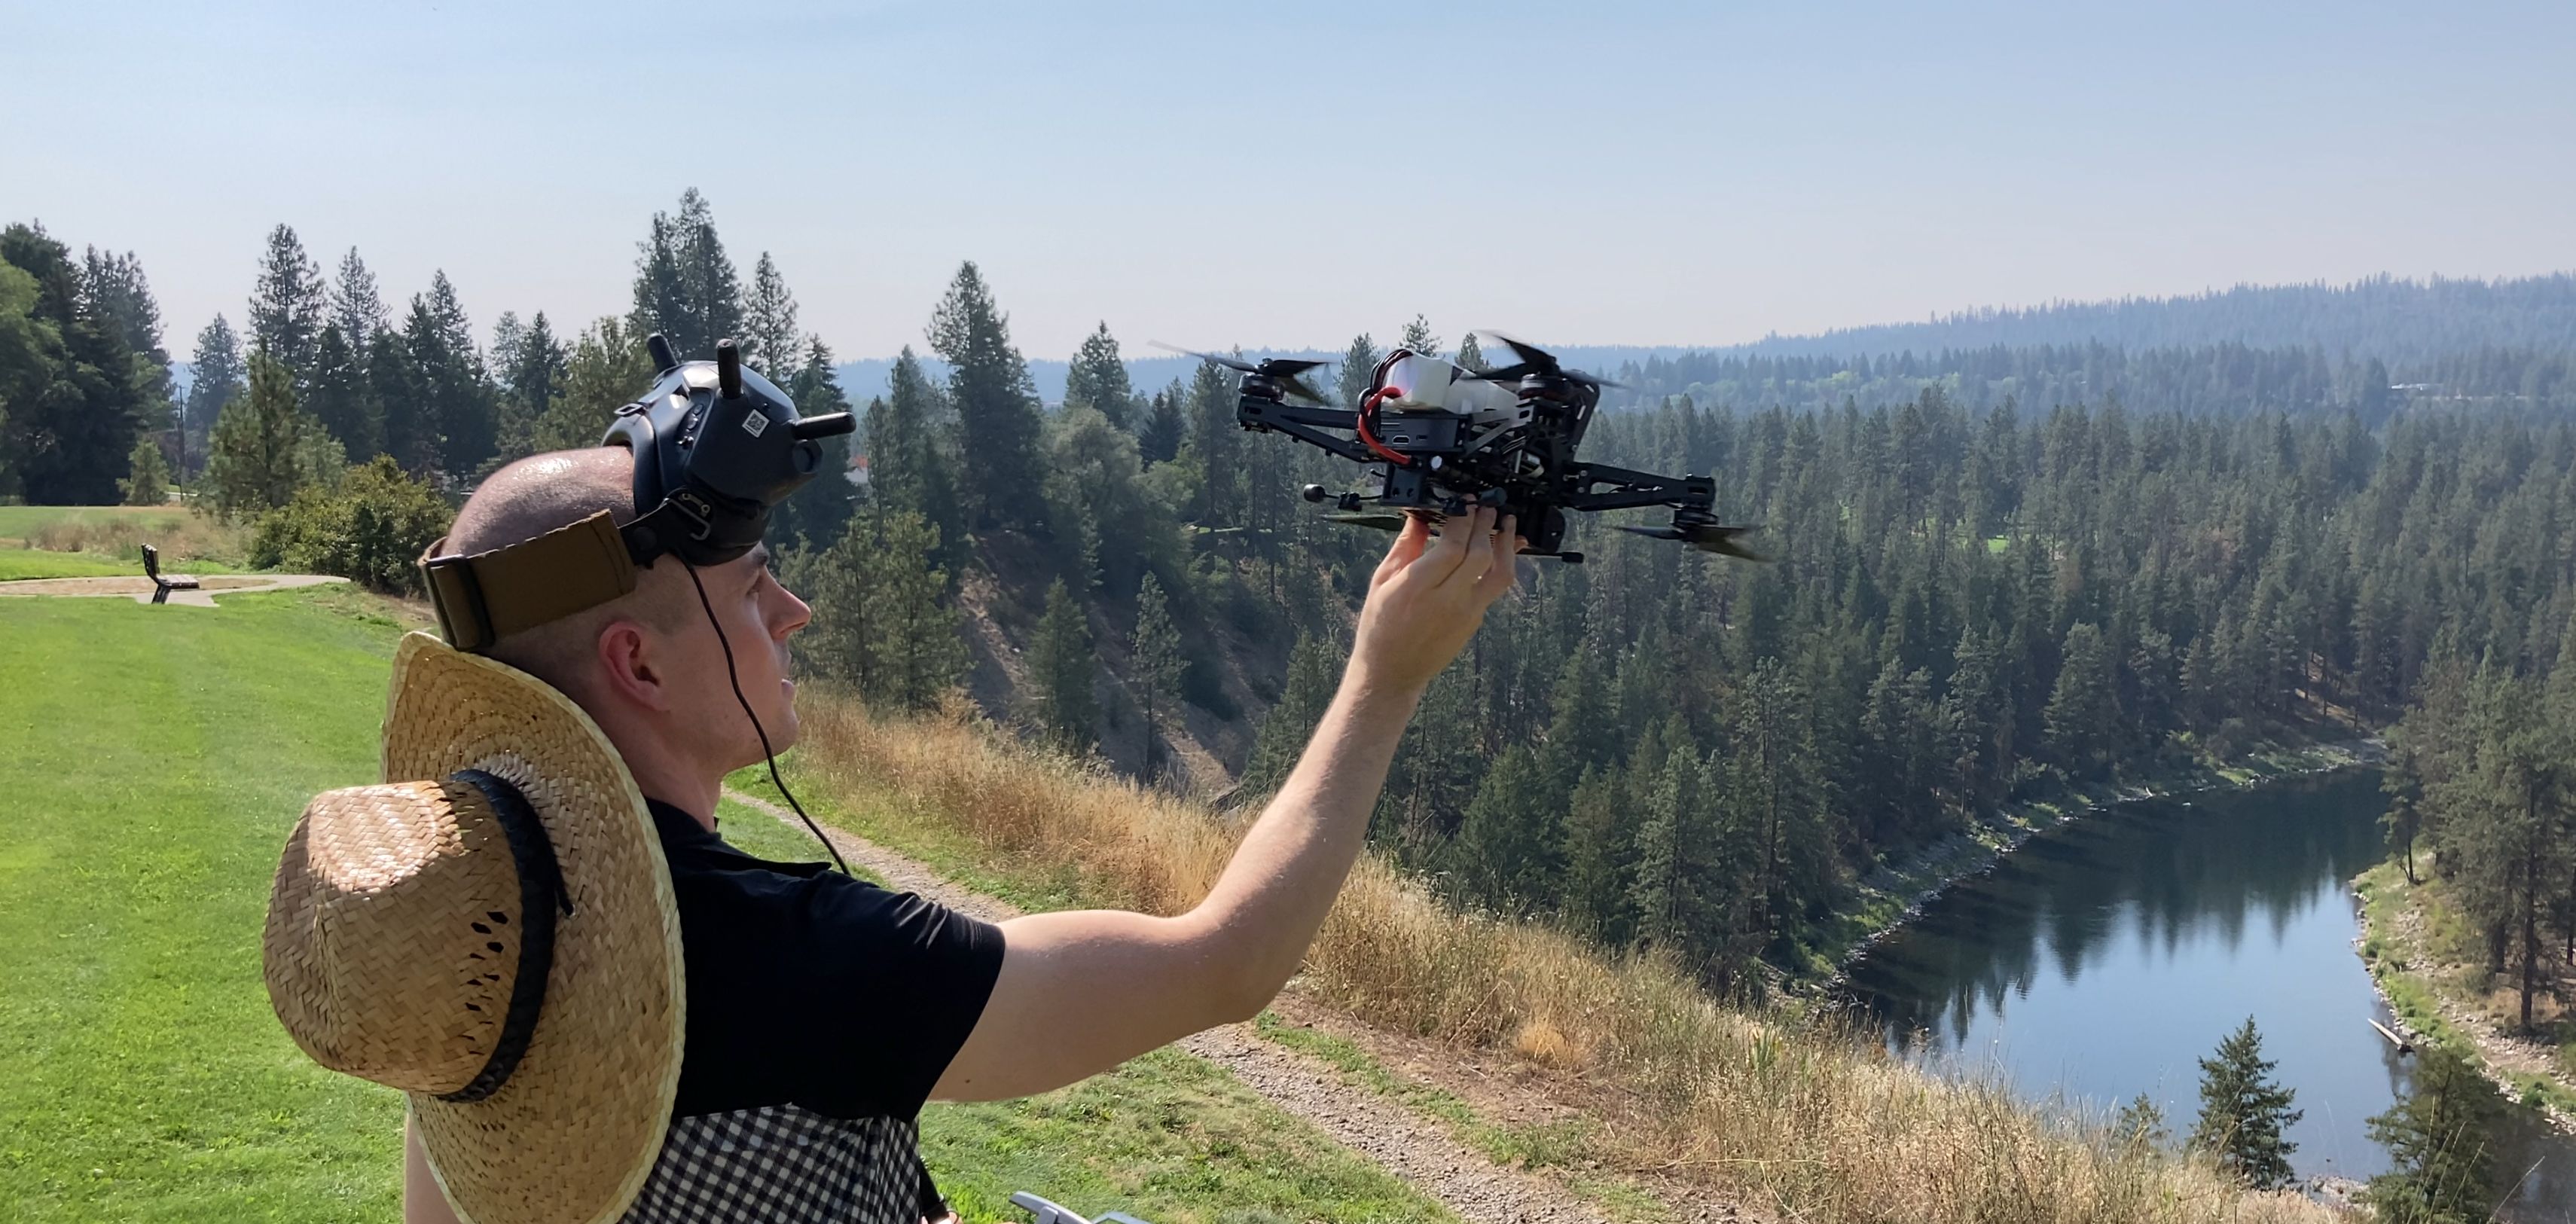
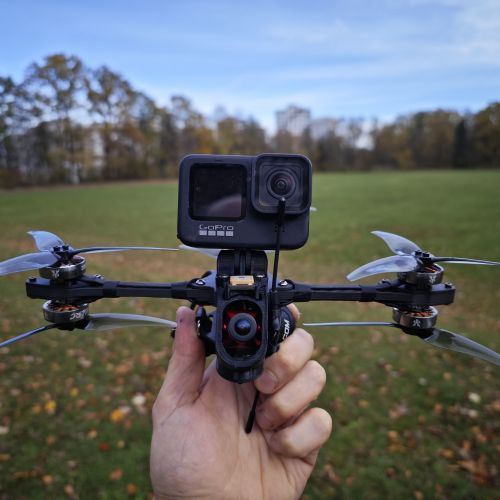
Flying Squirrel
 By Straw Hat Sam on Nov 02, 2023
To purchase this frame kit visit: https://strawhataerial.com/collections/flying-squirrel
To get a BNF fully built Flying Squirrel please fill out this form: https://neartail.com/sm/vD0QgQFHL
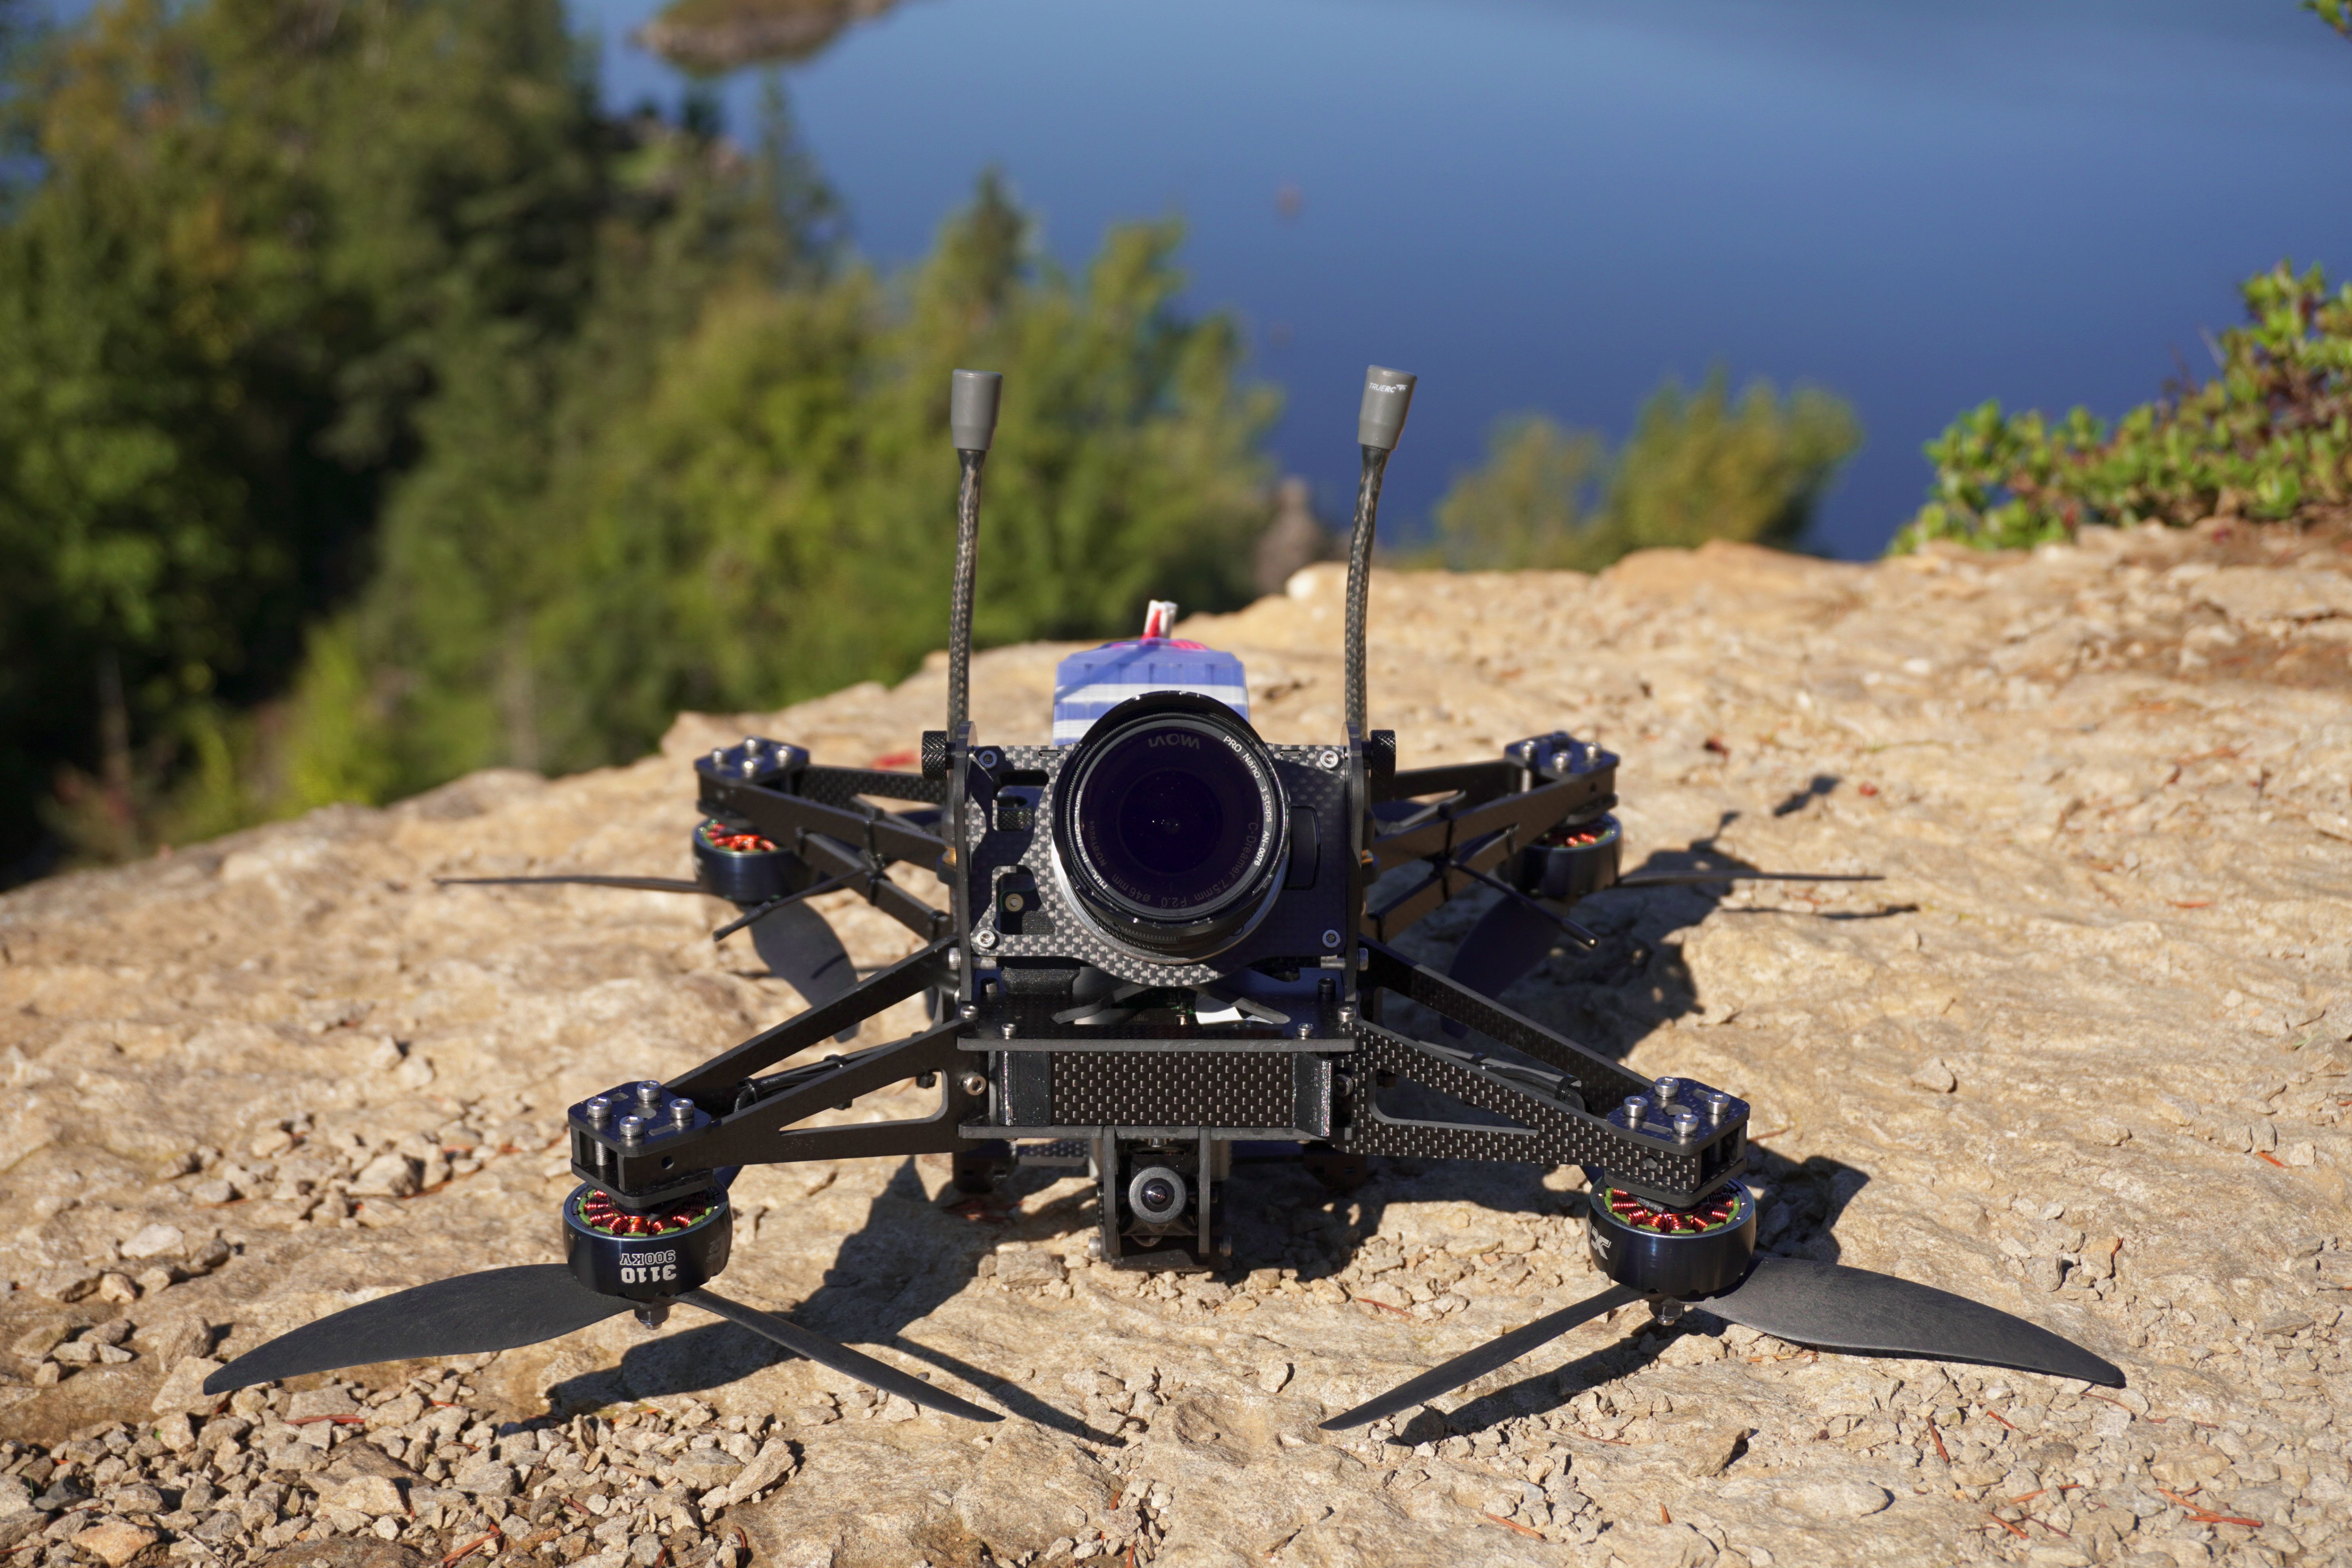
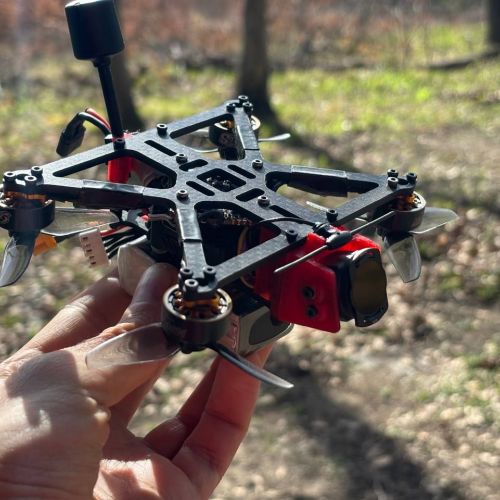
The Flying Squirrel is the generation naked Blackmagic FPV drone concept with the main goal of improving flight performance in multiple categories. Feeling like I could improve on Le Pigeon, I wanted a drone that was faster, more nimble, lighter weight, more compact, and had improved acro abilities (and thus windy conditions tolerance). This is the final design of what I came up with:
DESIGN BLOG
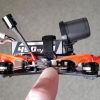
This design took me many iterations and complete re-designs to achieve a frame that I was happy with. Originally I was going to call this drone the "Stormcrow" and I made several versions of a design where the BMPCC4K cage could be removed to make the drone into a mini cinelifter like the Vulture capable of carrying other cameras too:
The problem with this concept is that the naked BMPCC4K cage would block the airflow to the rear propellers at a variety of speeds and would probably result in shakier footage. Also trying to fit the naked cage onto the frame and make it also compatible with other cameras made things not fit together well and would result in an inelegant design.
So I decided to cast aside the notion of interchangeability and move forward with a design that fully integrates the camera into the frame AND fully encloses all the electronics to prevent dust and debris contamination. The issue with this design was it would be too heavy with all the shrouds and 3D printed bezels. It would also have a BOM (bill of material) list of probably 100 - 150 line items long and many 3D printed parts. As I am progressing in my designs, I am finding it is crucial to limit the number of 3D printed parts if there is any hope of manufacturing drone frames on a largish scale.
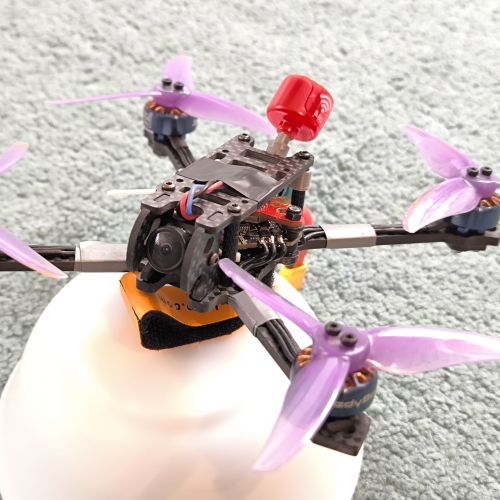
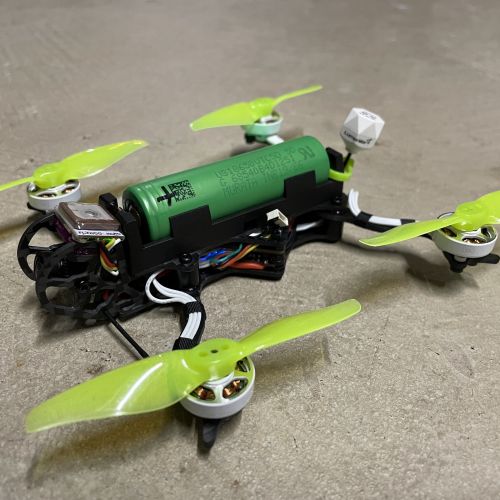
At this point I started to realize that my true priority was making the flying experience more enjoyable and this meant stripping as much weight as possible without compromising the footage quality and PID tuning. My first built prototype was a success and I could already tell that I was onto something worth pursuing:
I then began refining aspects of the frame in order to acheive improved flight perfomance, especially in the acrobatics category. I found that a pretty magical setup for freestyle is to use 6 inch props and 2806.5 1700kV motors (part specs are below this blog). This setup was probably the most connected to a drone I've ever felt due to the optimum center of gravity and ideal motor-prop combination:
I had an itch in the back of my mind that lingered though... Something about this design didn't sit right with me. It flew amazing and it was pretty light weight, but I felt like there was a better way to design the frame to shave off a few more grams. In addition, gyroflow didn't work well with this frame design because the lens assembly is isolated from the rest of the PCB which is hard mounted to the drone. The gyro chip for the BMPCC4K is located on the main motherboard of the camera, but if the sensor is not directly connected, and has the ability to wiggle around even just a little bit, the data and image won't line up properly and the stabilization won't work well.
So I flipped everyhting 90 degrees and laid out the PCB longitudinally just like the original Le Pigeon. This was the most obvious arrangement from the beginning, but the fundamental issue with this design is, "How does one provide vibration damping/isolation with such a setup?" Surely, there needs to be some kind of damping solution, as Le Pigeon has proven with the BetaGels used to mount the naked cage. But I had a hunch... Based on how well the previous iterations of the Flying Squirrel flew I surmised that if I rigid mounted everything, the vibrations would not be enough to impact the footage as long as the frame was stiff enough. This is because the damping is actually incorporated into the frame design itself. The way I attached the arms and side plates using 90 degree aluminum T brackets, the carbon is interlocked like a jigsaw puzzle, but also not directly connected, unlike other vertical arm designs. I hypothesized that this mounting regime was causing localized vibration energy dissipation and in effect, damping the vibrations all throughout the structure.
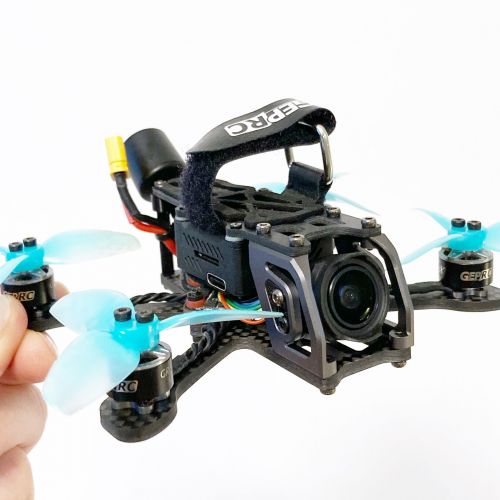
I took the risk and redesigned the Flying Squirrel from the ground up yet again in order to test this theory. Thankfully is seemed to work out successfully and I had finally achieved not only a design that I was aesthetically pleased with, but one that handled gyroflow stabilization quite nicely:
Next I wanted to push the drone a bit more and see how it faired at higher speeds. I also took it out to the mountains for some higher altitude flying as well. The conclusion I came to after this trip was that I needed more speed and better endurance even if it costs me a bit of weight:
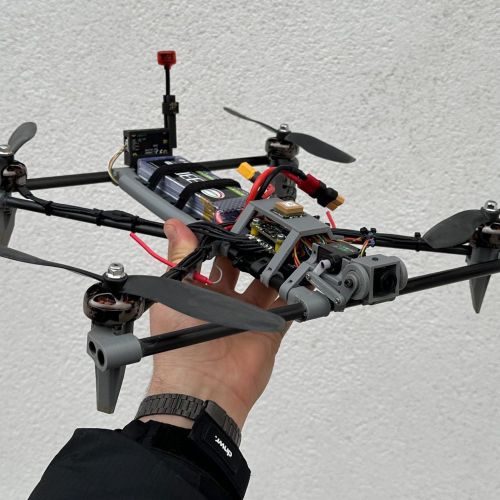
So back to the drawing board! I wanted to try out 8 inch props on the Flying Squirrel since they actually did fit if all four motors were inverted. So I rigged up a franken-squirrel that was totally jank, but barely fit 8 inch props and larger motors so I could test to see if I in fact did get better flight time and cruising speed with 8 inch props.
Not only was cruising speed and endurance enhanced, I actually liked how it handled! I was surprised at how well the drone handled fast snap maneuvers and the prop wash was barely noticeable in many split-S and hard turns. I decided then that I wanted to make the Flying Squirrel primarily an 8inch drone because acro ability did not seem to be compromised by 8 inch props and the benefit over 6 and 7 inch is the improved flight time and cruising speed. Then I thought, "Since we are going fast, why not go faster?" and I wanted to see if I could design the frame so it could handle 8S voltage in order to unlock more power and less battery sag. After creating my 7th prototype I could see it was indeed possible:
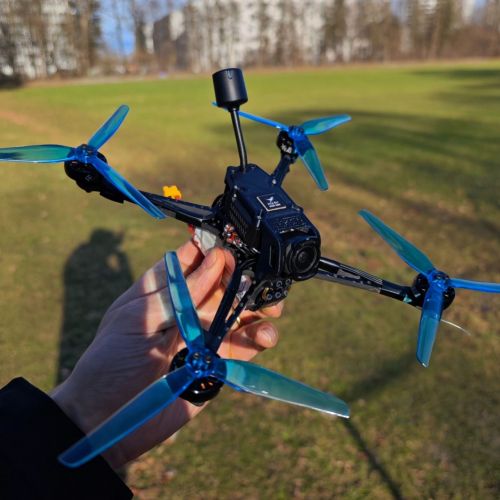
So I basically completed my goal of recreating my FPV dream machine, something that not only flew better than Le Pigeon, but had better workflow and on-set experience. I wanted a drone that I would be excited to take out and fly, not something that was a pain in the butt. So now the Flying Squirrel is my new favorite FPV rig!
TUTORIALS
COMPONENTS
The components you choose for your Flying Squirrel ultimately depend on what kind of setup you would like:
6 INCH 6S ULTIMATE ACRO (3-5 minute flight time) 1400-1450g AUW
PROPS:
- HQ 6x4.5x3 durable grey (TESTED GOOD): https://strawhataerial.com/products/hqprop-d6x4-5x3-grey-for-cinewhoop
MOTORS:
- Brother Hobby 2806.5 1700kV (TESTED GOOD): https://shop.addictiverc.com/products/brotherhobby-lpd-2806-5-1700kv
- XNOVA 2806.5 1700kV (TESTED GOOD): https://shop.addictiverc.com/products/xnova-2806-5-freestyle-smooth-line-motor-1700kv?variant=43551561547930
Most 2806.5 - 2808 stator size motors will work as long as the kV is about 1700. The difference between the Xnova and Brother Hobby motors is that the Brother Hobby ones are more efficient, but the XNOVAs are more powerful and less efficient. There is no major difference in acro handling ability between the two motors. I prefer the Brother Hobby ones over the XNOVA (for 2806.5) because they are easier to tune and the flight time is better.
ESC:
- Aikon 55A V3 (TESTED GOOD): https://pyrodrone.com/products/aikon-ak32-55a-4in1-6s-esc
This is my favorite 6S ESC and it has proven to be reliable even after dozens of solder-resolder cycles with all my prototype testing. This ESC is also suitable for 7 inch and 8 inch 6s setups.
FLIGHT CONTROLLER:
- T-Motor F7 Pro (TESTED GOOD): https://pyrodrone.com/products/t-motor-f7-pro-flight-controller-30x30mm
- Foxeer F722 V2 (TESTED GOOD): https://pyrodrone.com/products/t-motor-velox-cine-f7-f722-flight-controller-30-5x30-5mm
- Aikon F7 HD V2.1 (TESTED GOOD) https://pyrodrone.com/products/aikon-f7-30x30-v2-hd-flight-controller-w-osd
I recommend a flight controller that has an MPU6000 or BMI270 gyro. Flight controllers these days seems to be one of the most hit-or-miss components usually due to a faulty gyro. For example the Aikon F7 HD V2.1 FC is a good choice and actually works with 8S voltage input (with a small cap soldered to VBAT and GND circuit), but I did get a board one time that definitely had a faulty gyro. To diagnose this for certain you need to use blackbox. Usually one axis will be significantly noisier than the other and the noise is usually broadband (covers a wide range of frequencies). To test for sure if there is something wrong with the gyro sensor, rotate the FC 90 degrees and re-install and re-configure. After flight testing if the noisy axis switched from Pitch to Roll (or vice-versa) you know it's the FC, not the drone.
BATTERIES
- RDQ 1800mah 6S 100C (TESTED GOOD): https://www.racedayquads.com/products/rdq-series-22-2v-6s-1800mah-100c-lipo-battery-xt60?keyword=1800mah
- CHNL 2200mah 6S 70C (TESTED GOOD): https://chinahobbyline.com/products/cnhl-gplus-series-2200mah-22-2v-6s-70c-lipo-battery-with-xt60-plug
- GNB 2600mah 6S 110C (TESTED GOOD): https://pyrodrone.com/products/gaoneng-gnb-2600mah-22-2v-6s-110c-lipo-battery-xt60?_pos=2&_sid=1dea86198&_ss=r
7 INCH 6S HAPPY MEDIUM? (4-6 minute flight time) 1500 - 1550g AUW
The 7 inch setup is the least tested platform I have tried on the Flying Squirrel. It is hard for me to draw major conclusions, but from what I felt with the components I tried, cruising speed and endurance was only mildly better than a 6 inch setup spec'd out with the components above. I think that I need to figure out a better motor-prop combination for 7 inch. From what I have learned so far though I can suggest these parts for testing:
PROPS:
- HQ 7x4.5x3 (TESTED GOOD): https://pyrodrone.com/products/hq-prop-macroquad-7x4-5x3-tri-blade-7-glass-reinforced-prop-ccw-1pc
- HQ 7X3.5x3 (TESTED GOOD): https://pyrodrone.com/products/hqprop-7x3-5x3-light-grey-2cw-2ccw-poly-carbonate
- GEMFAN 7050-3 (UNTESTED): https://pyrodrone.com/products/gemfan-hurricane-7-7050-3-pc-durable-tri-blade-propellers-2cw-2ccw-choose-color
- GEMFAN 7043-3 (UNTESTED): https://pyrodrone.com/products/gemfan-hurricane-7-street-league-spec-7043-3-pc-durable-tri-blade-propellers-2cw-2ccw-choose-color
- GEMFAN 7535-3 (UNTESTED): https://pyrodrone.com/products/gemfan-cinelifter-7-5-7535-7-5x3-5x3-tri-blade-carbon-fiber-nylon-propellers-2cw-2ccw
MOTORS:
- Brother Hobby 3008 1500kV (UNTESTED): https://pyrodrone.com/products/brother-hobby-avenger-3008-fpv-motor-1500kv
- XNOVA 2810 1400kV (UNTESTED): https://pyrodrone.com/products/xnova-2810-freestyle-smooth-line-motor-1400kv
- T-Motor 3008 1500kV (UNTESTED): https://pyrodrone.com/products/t-motor-velox-victory-v3008-cinematic-fpv-drone-motor-1500kv
- Brother Hobby 2810 1500kV (TESTED GOOD): https://www.racedayquads.com/products/brotherhobby-avenger-2810-1500kv-motor
- T-Motor 2810 1350kv (UNTESTED): https://pyrodrone.com/products/t-motor-f100-2810-1350kv-long-range-cinelifter-motor
For any setup with the Flying Squirrel I recommend running 48kHz PWM frequency for smoothest results. Because of the higher PWM, less torque is applied to the propeller, so to compensate, use a larger stator than you would normally would. For 7 inch, I recommend trying 2810 or 3008 size motors.
ESC:
- Aikon 55A V3 (TESTED GOOD): https://pyrodrone.com/products/aikon-ak32-55a-4in1-6s-esc
FLIGHT CONTROLLER:
- T-Motor F7 Pro (TESTED GOOD): https://pyrodrone.com/products/t-motor-f7-pro-flight-controller-30x30mm
- Foxeer F722 V2 (TESTED GOOD): https://pyrodrone.com/products/t-motor-velox-cine-f7-f722-flight-controller-30-5x30-5mm
- Aikon F7 HD V2.1 (TESTED GOOD) https://pyrodrone.com/products/aikon-f7-30x30-v2-hd-flight-controller-w-osd
BATTERIES
- CHNL 2200mah 6S 70C (TESTED GOOD): https://chinahobbyline.com/products/cnhl-gplus-series-2200mah-22-2v-6s-70c-lipo-battery-with-xt60-plug
- GNB 2600mah 6S 110C (TESTED GOOD): https://pyrodrone.com/products/gaoneng-gnb-2600mah-22-2v-6s-110c-lipo-battery-xt60?_pos=2&_sid=1dea86198&_ss=r
- RDQ 2800mah 6S 100C (UNTESTED): https://www.racedayquads.com/products/rdq-series-11-1v-6s-2800mah-100c-lipo-battery-xt60?keyword=2800mah
8 INCH 6S EFFICIENCY (4-13 minute flight time) 1550 - 1650g AUW
This setup will provide the best flight times with a 6S operating voltage. Mostly because these particular T-motor 3008s are quite smooth and efficient. I flew this setup for 13 minutes straight (just cruising around, throttle about 40-50%) with two 2600mah Li-ion packs in parallel. Where this setup is lacking is stability in windy conditions. Gyroflow may be necessary to compensate for bumps and jiggles in the wind because the motor torque will not be sufficient to eat through the turbulence.
PROPS:
A note about composite propellers, there are rare reports of exploding props like these in cold weather conditions. So if you frequently fly in temperatures at or below freezing (0C), I would steer away from 8 inch propellers unless you want to find a good motor for these PC props: https://pyrodrone.com/collections/macroquad-and-xclass-propellers/products/hqprop-8x3-7x3-grey-1cw-1ccw-poly-carbonate. The Xnova 2812 1100kV motors might acually work with these props, but I haven't tested this yet.
MOTORS:
- T-Motor 3008 1155kV (TESTED GOOD): https://pyrodrone.com/products/t-motor-velox-victory-v3008-cinematic-fpv-drone-motor-1155kv-1
This motor setup may require 24kHz PWM frequency instead of the usualy 48kHz because of the undersized stator. Play around with this to see the trade-offs.
ESC:
- Aikon 55A V3 (TESTED GOOD): https://pyrodrone.com/products/aikon-ak32-55a-4in1-6s-esc
FLIGHT CONTROLLER:
- T-Motor F7 Pro (TESTED GOOD): https://pyrodrone.com/products/t-motor-f7-pro-flight-controller-30x30mm
- Foxeer F722 V2 (TESTED GOOD): https://pyrodrone.com/products/t-motor-velox-cine-f7-f722-flight-controller-30-5x30-5mm
- Aikon F7 HD V2.1 (TESTED GOOD) https://pyrodrone.com/products/aikon-f7-30x30-v2-hd-flight-controller-w-osd
BATTERIES
- 2X Parallel Auline 2600mah Li-Ion SONY VTC5A 18650 (TESTED GOOD): https://www.getfpv.com/auline-sony-vtc5a-18650-2600mah-6s1p-22-2v-li-ion-battery.html
- Upgrade Energy Dark Li-Ion 5600mah 6S 30C (UNTESTED): https://www.getfpv.com/upgrade-energy-dark-lithium-red-5600mah-6s-22-2v-30c-li-ion-battery-xt60.html
- CHNL 2200mah 6S 70C (TESTED GOOD): https://chinahobbyline.com/products/cnhl-gplus-series-2200mah-22-2v-6s-70c-lipo-battery-with-xt60-plug
- GNB 2600mah 6S 110C (TESTED GOOD): https://pyrodrone.com/products/gaoneng-gnb-2600mah-22-2v-6s-110c-lipo-battery-xt60?_pos=2&_sid=1dea86198&_ss=r
- RDQ 2800mah 6S 100C (UNTESTED): https://www.racedayquads.com/products/rdq-series-11-1v-6s-2800mah-100c-lipo-battery-xt60?keyword=2800mah
8 INCH 6S DREAM MACHINE (4-7 minute flight time) 1600 - 1650g AUW
These components will give you a machine that creates super smooth footage with minimal to zero stabilization necessary for most clips. The control feel and throttle response of this setup feels very much in control like the 6S acro configuration, but feels heavier, much faster cruising speed, and better flight time.
PROPS:
- GEMFAN 8060-3 Glass Nylon (TESTED GOOD): https://pyrodrone.com/products/gemfan-8060-3-8-reinforced-carbon-nylon-tri-blade-cinelifter-macro-quad-propellers-1cw-1ccw?_pos=1&_sid=809d76dd3&_ss=r
A note about composite propellers, there are rare reports of exploding props like these in cold weather conditions. So if you frequently fly in temperatures at or below freezing (0C), I would steer away from 8 inch propellers unless you want to find a good motor for these PC props: https://pyrodrone.com/collections/macroquad-and-xclass-propellers/products/hqprop-8x3-7x3-grey-1cw-1ccw-poly-carbonate. The Xnova 2812 1100kV motors might acually work with these props, but I haven't tested this yet.
MOTORS:
- XNOVA 2812 1100kV (TESTED GOOD): https://quadstandardlabs.com/buy-now/ols/products/xnova-2812-cinelifter-motor/v/XNV-281-1100
ESC:
- Aikon 55A V3 (TESTED GOOD): https://pyrodrone.com/products/aikon-ak32-55a-4in1-6s-esc
FLIGHT CONTROLLER:
- T-Motor F7 Pro (TESTED GOOD): https://pyrodrone.com/products/t-motor-f7-pro-flight-controller-30x30mm
- Foxeer F722 V2 (TESTED GOOD): https://pyrodrone.com/products/t-motor-velox-cine-f7-f722-flight-controller-30-5x30-5mm
- Aikon F7 HD V2.1 (TESTED GOOD) https://pyrodrone.com/products/aikon-f7-30x30-v2-hd-flight-controller-w-osd
BATTERIES
- CHNL 2200mah 6S 70C (TESTED GOOD): https://chinahobbyline.com/products/cnhl-gplus-series-2200mah-22-2v-6s-70c-lipo-battery-with-xt60-plug
- GNB 2600mah 6S 110C (TESTED GOOD): https://pyrodrone.com/products/gaoneng-gnb-2600mah-22-2v-6s-110c-lipo-battery-xt60?_pos=2&_sid=1dea86198&_ss=r
- RDQ 2800mah 6S 100C (UNTESTED): https://www.racedayquads.com/products/rdq-series-11-1v-6s-2800mah-100c-lipo-battery-xt60?keyword=2800mah
8 INCH 8S CRACK SQUIRREL (5-9 minute flight time) 1650 - 1700g AUW
This is the highest performance setup I have tested with th Flying Squirrel and it will blow your mind. I don't recommend going this route unless you actually have a need for frequent shoots chasing fast cars, motorcycles, or the occasional airplane or helicopter. The 8S voltage improves battey sag by a very noticeable margin, most flights not even sagging at all below 3.3V per cell. The cost of going this route is heavier batteries, higher cost, and increased complexity.
PROPS:
- GEMFAN 8060-3 Glass Nylon (TESTED GOOD): https://pyrodrone.com/products/gemfan-8060-3-8-reinforced-carbon-nylon-tri-blade-cinelifter-macro-quad-propellers-1cw-1ccw?_pos=1&_sid=809d76dd3&_ss=r
A note about composite propellers, there are rare reports of exploding props like these in cold weather conditions. So if you frequently fly in temperatures at or below freezing (0C), I would steer away from 8 inch propellers unless you want to find a good motor for these PC props: https://pyrodrone.com/collections/macroquad-and-xclass-propellers/products/hqprop-8x3-7x3-grey-1cw-1ccw-poly-carbonate. The Xnova 2812 1100kV motors might acually work with these props, but I haven't tested this yet.
MOTORS:
- XING 3110 900kV (TESTED GOOD): https://pyrodrone.com/products/iflight-xing2-3110-fpv-motor-unibell-900kv?_pos=1&_sid=39a31f499&_ss=r
ESC:
- iFlight Succex 80A 8S (TESTED GOOD NO LONGER AVAILABLE):https://www.xt-xinte.com/IFlight-SucceX-80A-2-8S-BLHeli_32-Dshot600-4-in-1-ESC-4in1-Brushless-2-8S-for-RC-Multirotor-X-CALSS-Cinelifter-Drones-Taurus-X8-p922507.html
- Foxeer Reaper 65A 8S (UNTESTED): https://www.racedayquads.com/products/foxeer-reaper-f4-128k-32bit-65a-3-8s-30x30-4in1-esc?currency=USD&variant=39815471956081&stkn=ed68f1cb6bdd&gclid=CjwKCAjwkY2qBhBDEiwAoQXK5XEnHqpJHmM5GDyIHzYg44C36WD9nx6qiJU338HjSrFBk6Lpi2s08BoC7csQAvD_BwE
- T-Motor F55A Pro III 3-8S (UNTESTED): https://pyrodrone.com/products/t-motor-f55a-proiii-3s-8s-blheli32-4in1-esc-30x30mm?gclid=CjwKCAjwkY2qBhBDEiwAoQXK5W2KHq6e92PTAlgoKrIM50I9kKm_z90KkVxAz0LAG-MkD3ULNM7wFhoClO8QAvD_BwE
- TMOTOR C80A-4IN1-8S Dual Mosfets (UNTESTED): https://shop.tmotor.com/products/tmotor-c80a-4in1-8s-fpv-drone-motor-esc
FLIGHT CONTROLLER:
A note about flight controllers: there are not a lot out there that are spec'd to handle 8S voltage. BUT I have tested two FCs that are rated to 6S only, but flew perfectly fine on 8S and showed accurate battery voltage monitoring. The caveat is that for both of these FCs, I soldered a 50V 100uF capacitor to either the VBAT and GND circuits or 5V and GND circuits of the flight controller to further filter the extra noise from the higher voltage.
- Foxeer F722 V2 (TESTED GOOD): https://pyrodrone.com/products/t-motor-velox-cine-f7-f722-flight-controller-30-5x30-5mm
- Aikon F7 HD V2.1 (TESTED GOOD) https://pyrodrone.com/products/aikon-f7-30x30-v2-hd-flight-controller-w-osd
The following flight controller options ARE rated to 8S voltage, but I have not tried either one because I generally steer away from H7 processor flight controllers because I was waiting for Betaflight to work more nicely with these processors. But, perhaps the work has already been done and now there are no more issues, so it's worth trying out these options first before the ones above:
Foxeer H7 MPU6000 (UNTESTED): https://pyrodrone.com/collections/30x30mm-flight-controllers/products/foxeer-h7-mpu6000-fc-8s-dual-bec-barometer-x8-30x30mm
BrainFPV Radix 2 HD (UNTESTED): https://www.defiancerc.com/products/brainfpv-radix-2-hd-flight-controller?variant=40562588844101¤cy=USD&utm_medium=product_sync&utm_source=google&utm_content=sag_organic&utm_campaign=sag_organic&srsltid=AfmBOopPm-RjQU7Jo7iSJaGQbP5LjrJodX9V-5W-twaBZLKYSTpBD3njFAs
BATTERIES
- 2X in series Auline 3300mah 4S 45C (TESTED GOOD): https://www.au-line.com/products/u33445-1
- GNB 2600mah 8S 120C (UNTESTED): https://pyrodrone.com/products/gaoneng-gnb-2600mah-29-6v-8s-120c-lipo-battery-xt60
TUNING
The starting point for getting a good tune with your Flying Squirrel is making sure your ESC settings are correct. This is the setup I use for all the aforementioned configurations, from 6 inch 6S all the way up to 8 inch 8S. The only exception is the 8 inch efficiency setup which may require 24kHz PWM frequency. I do not currently recommend using "by RPM" PWM frequency.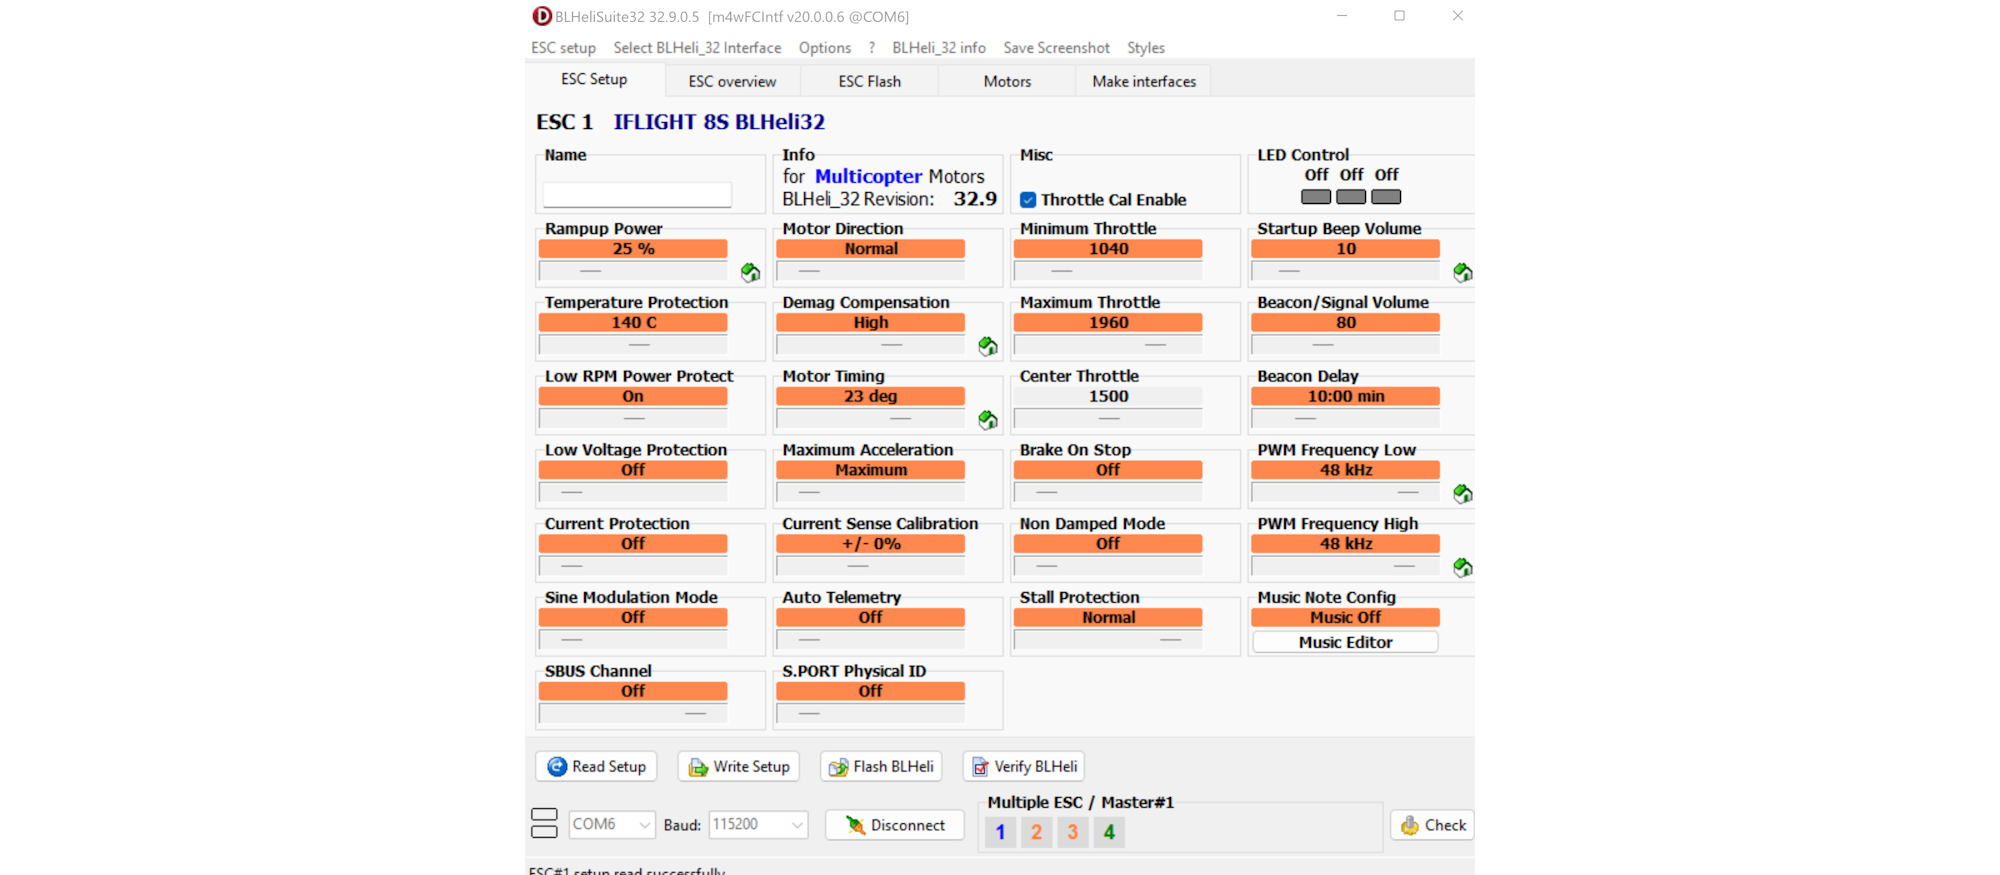
6 INCH 6S ULTIMATE ACRO
This is the easiest setup to tune and I recommend starting with SupaflyFPV 6" Freestyle preset in Betaflight and adjusting PIDs and filters from there as needed: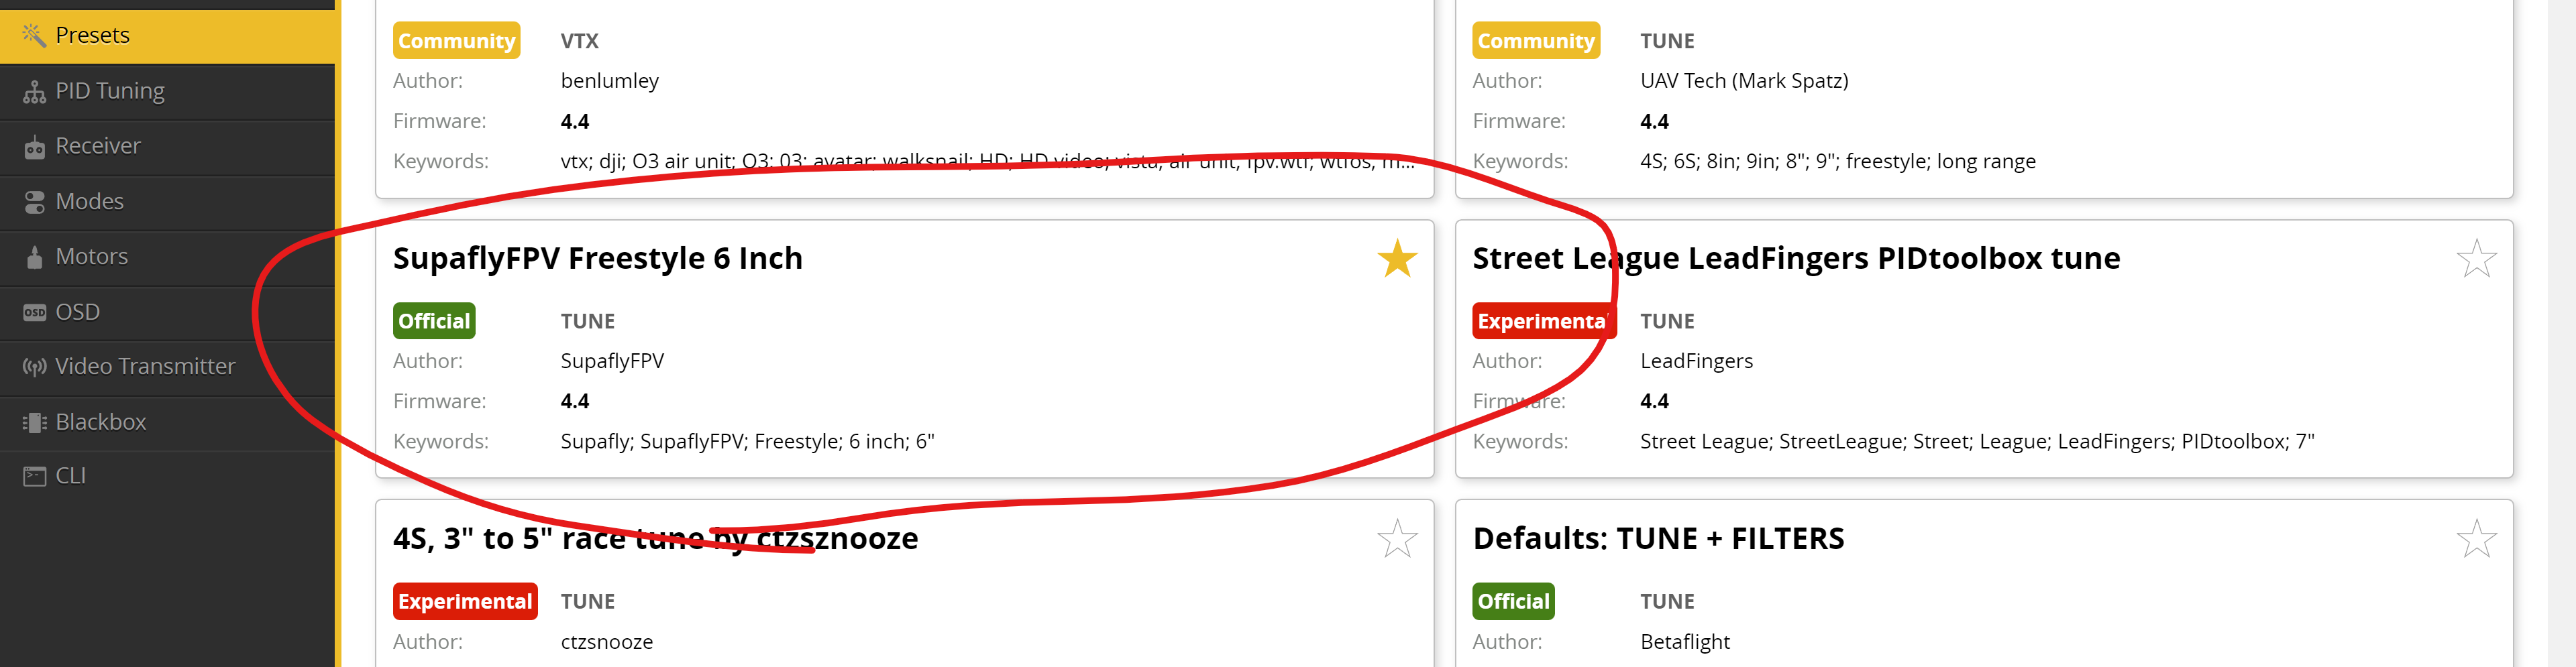
7 INCH 6S HAPPY MEDIUM?
7 inch is also pretty easy to tune and once again the SupaflyFPV 7" Freestyle preset will be a good starting point: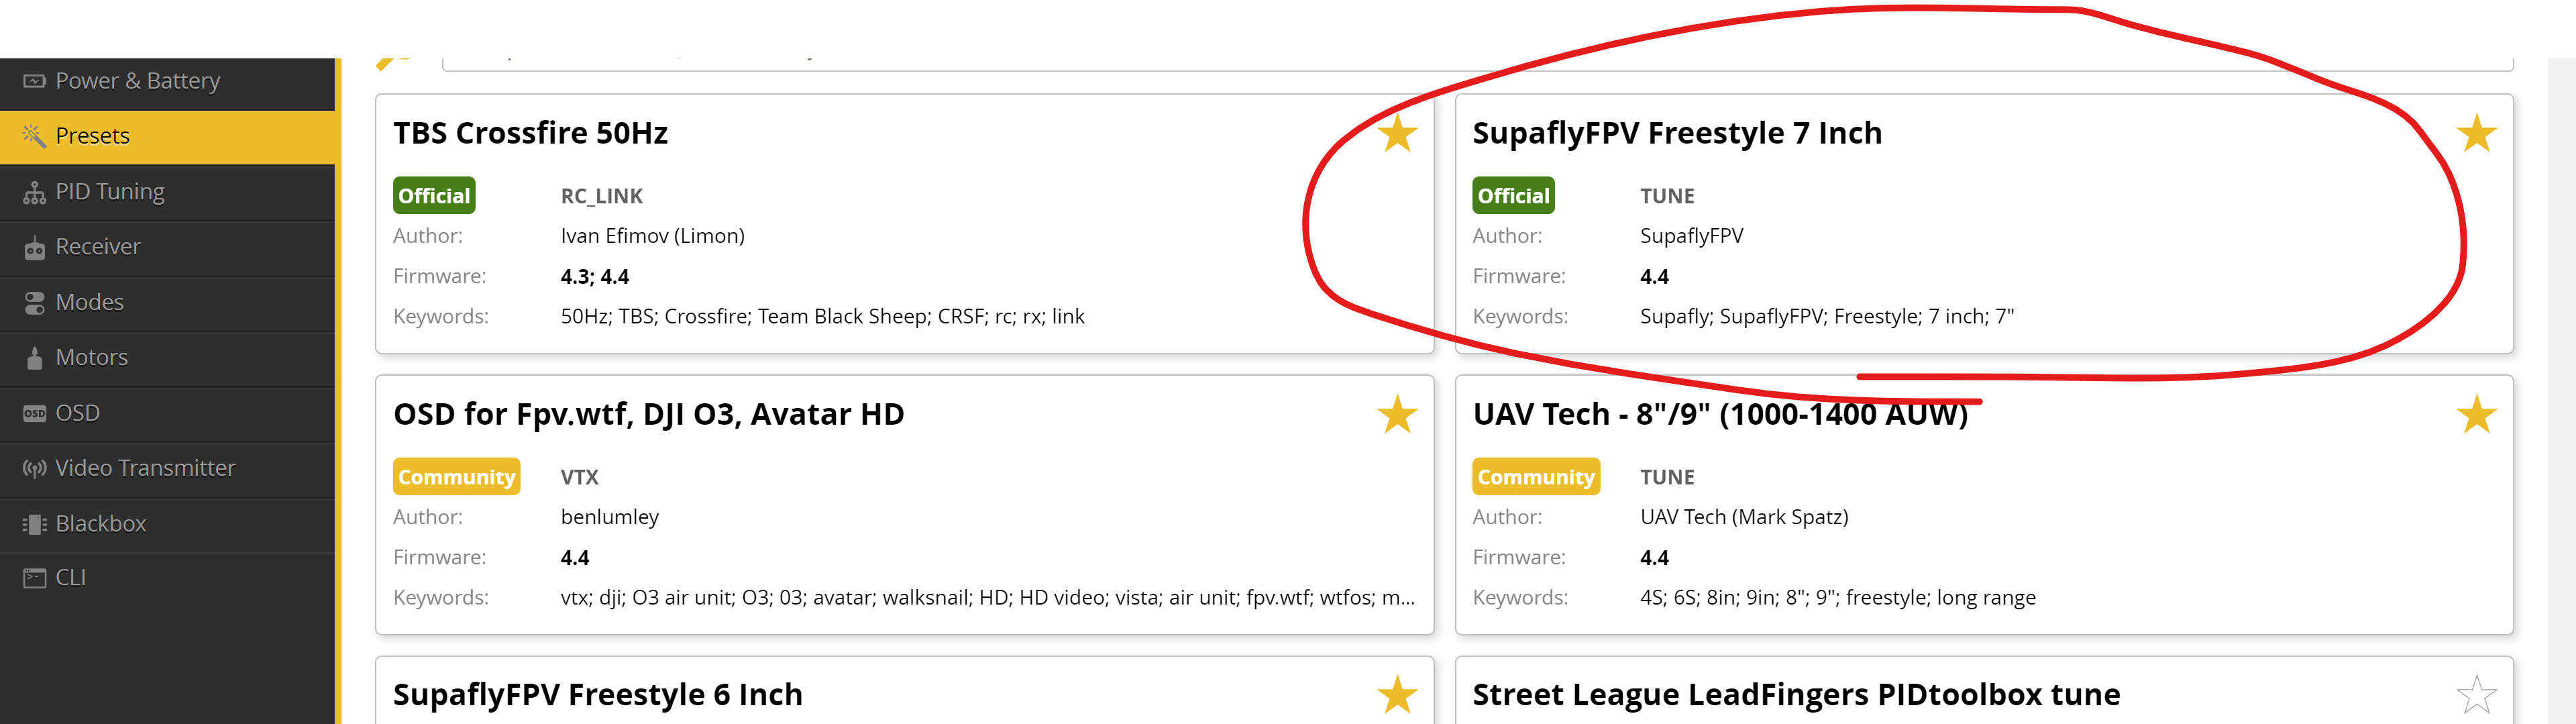
8 INCH 6S
You may use this same tune for the 8 inch efficiency setup and the 8 inch "dream machine" setup. The cutoff portions of the screenshots are all still standard (default) settings: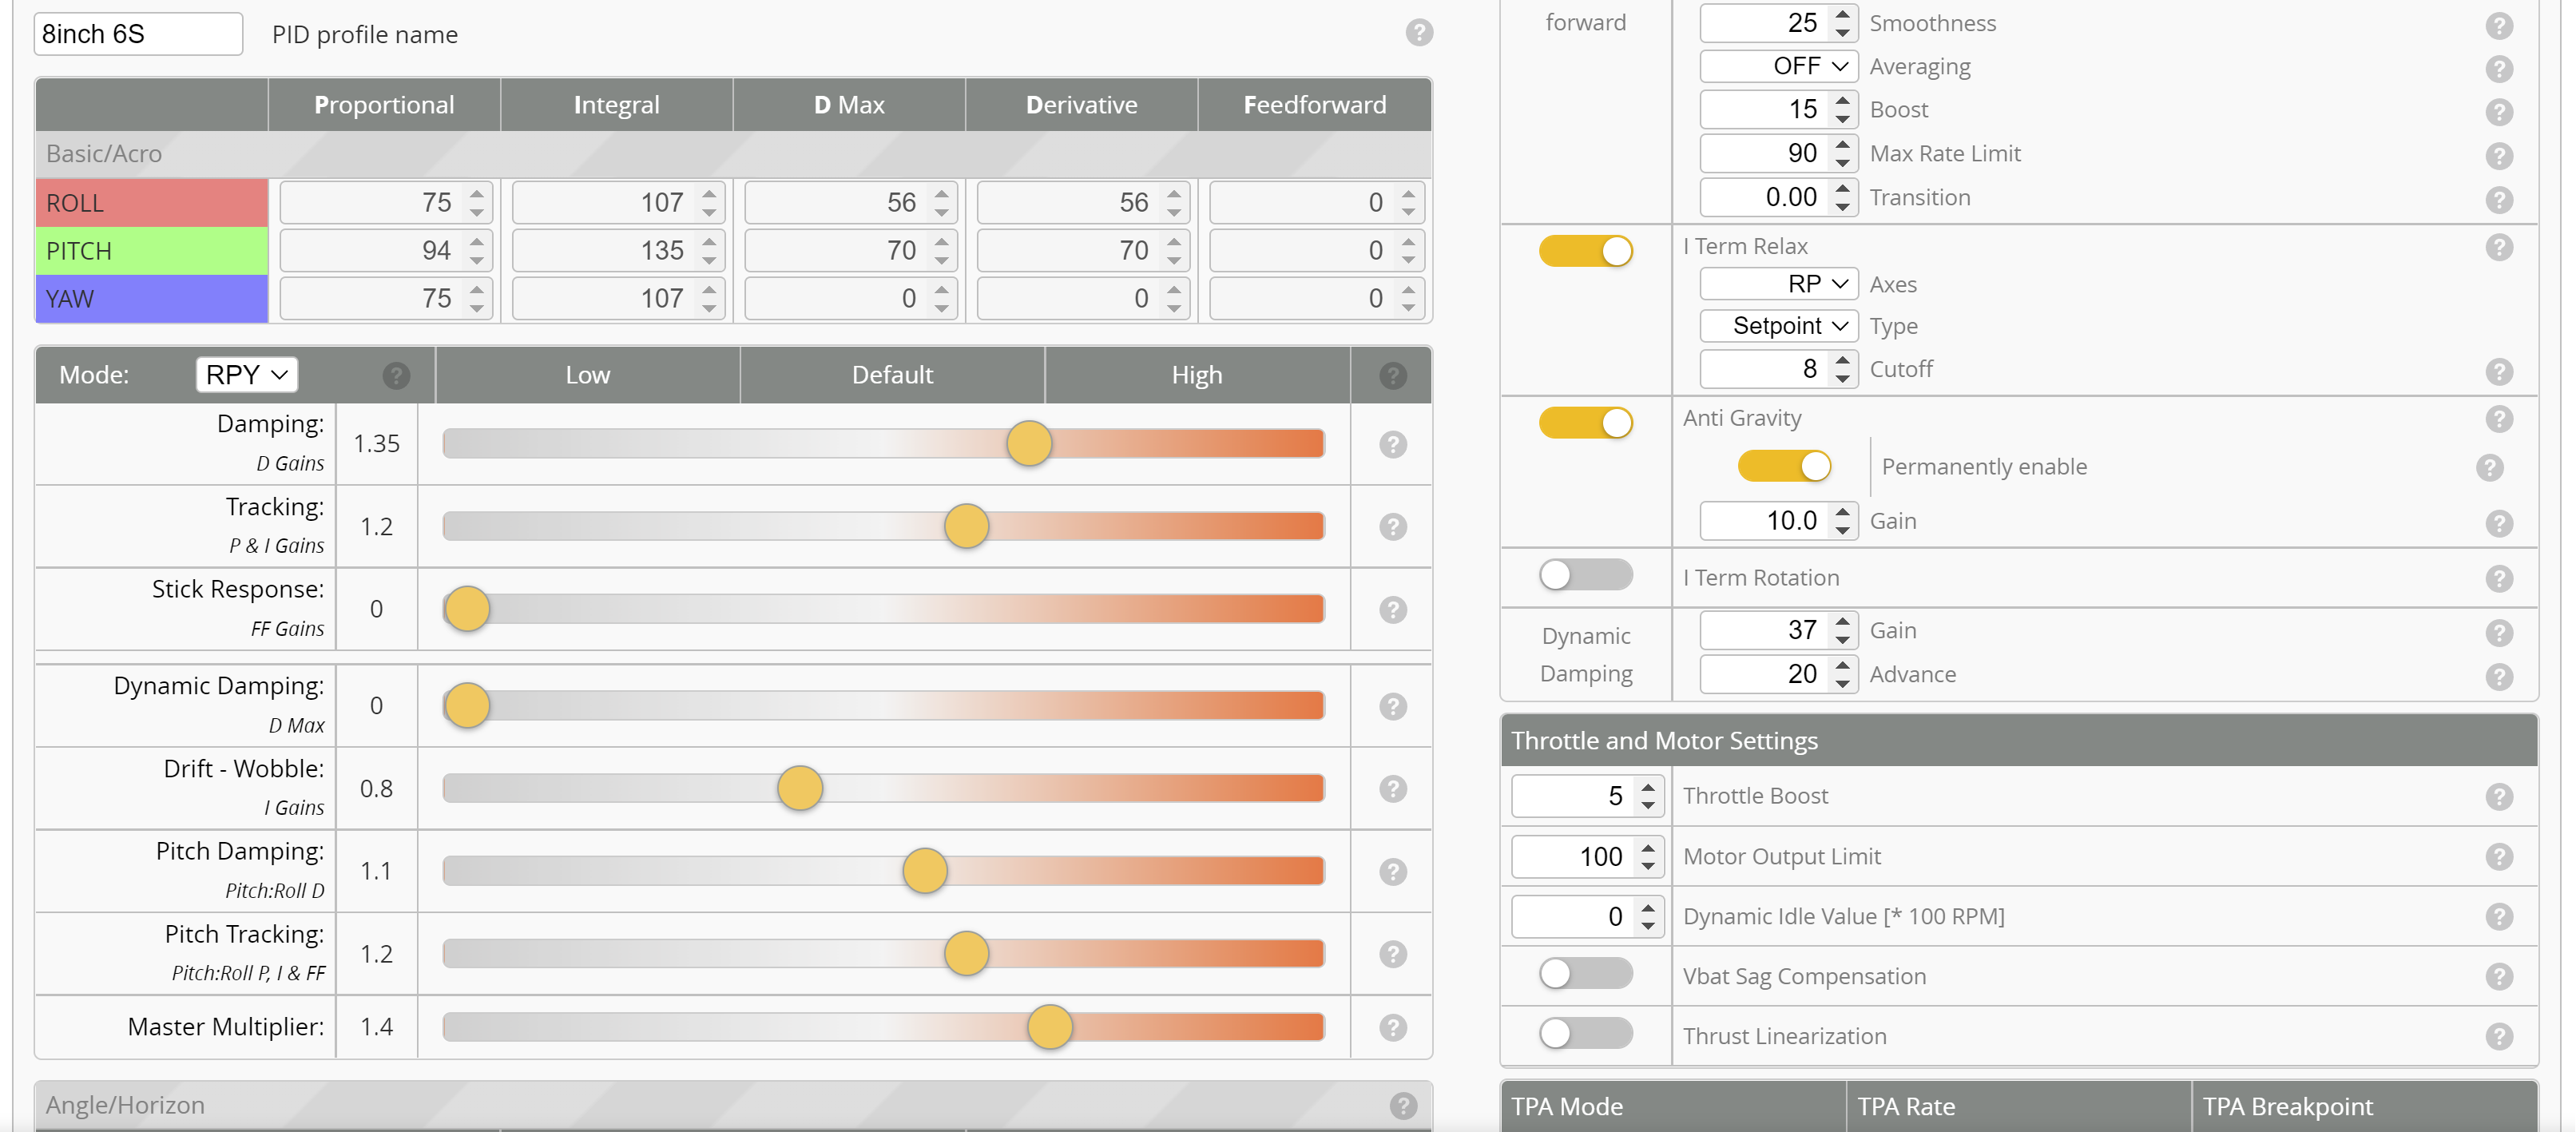
8 INCH 8S CRACK SQUIRREL
PROCEED WITH CAUTION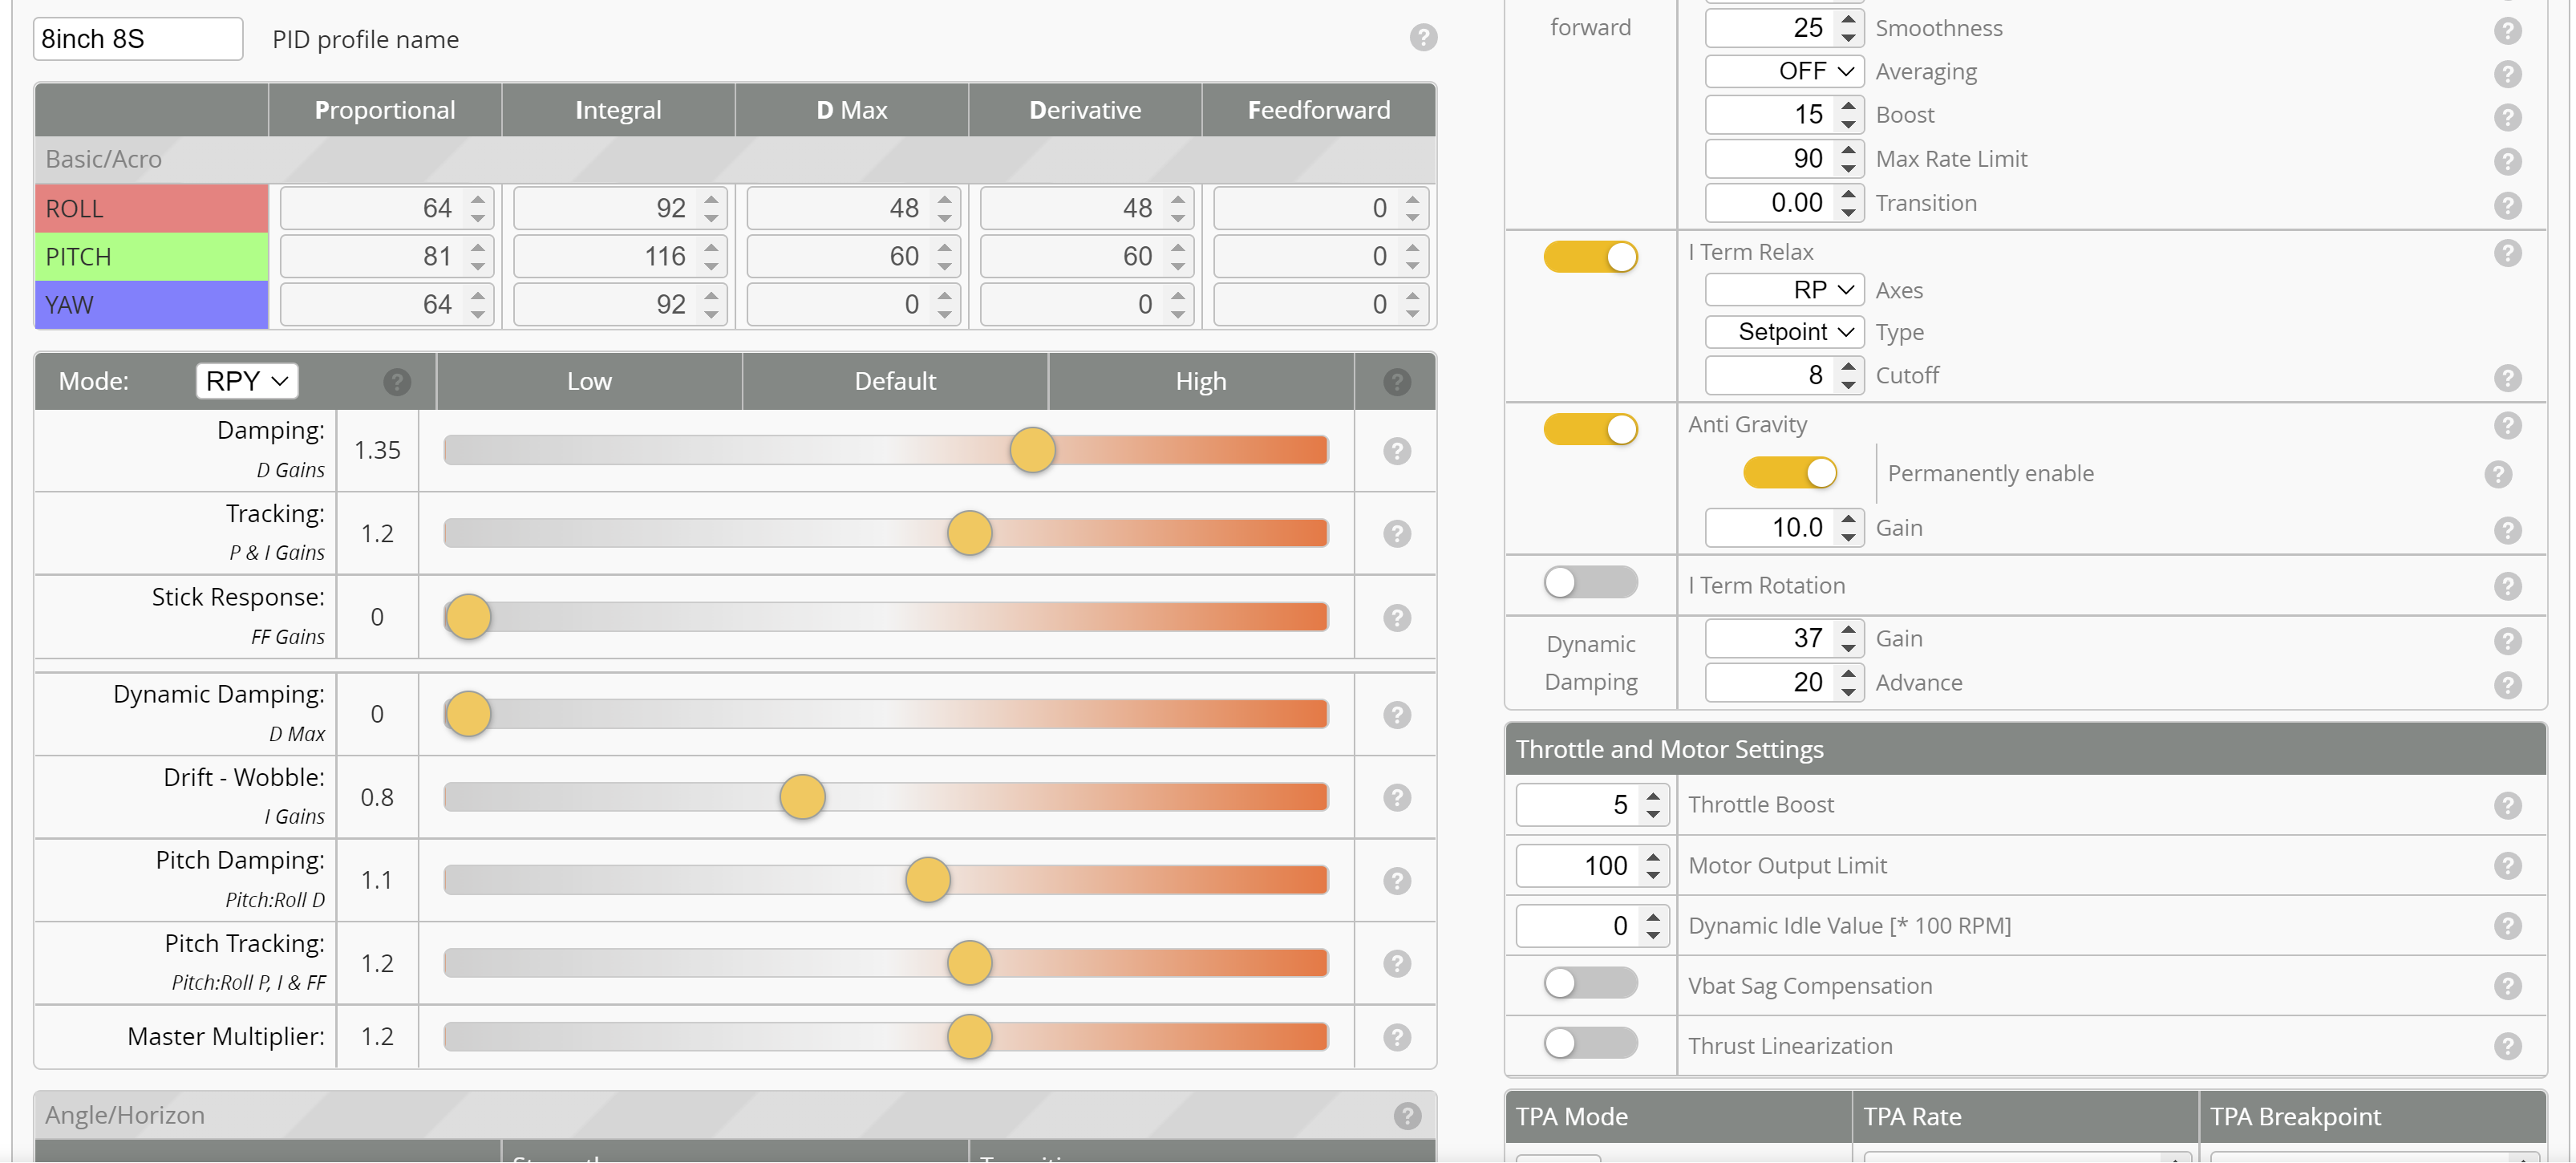
8 INCH FILTERS
You can use the same filtering for 8 inch 6S and 8S setups. Note that dynamic gyro notch filtering is crucial for the 8 inch Flying Squirrel so don't ever disable this.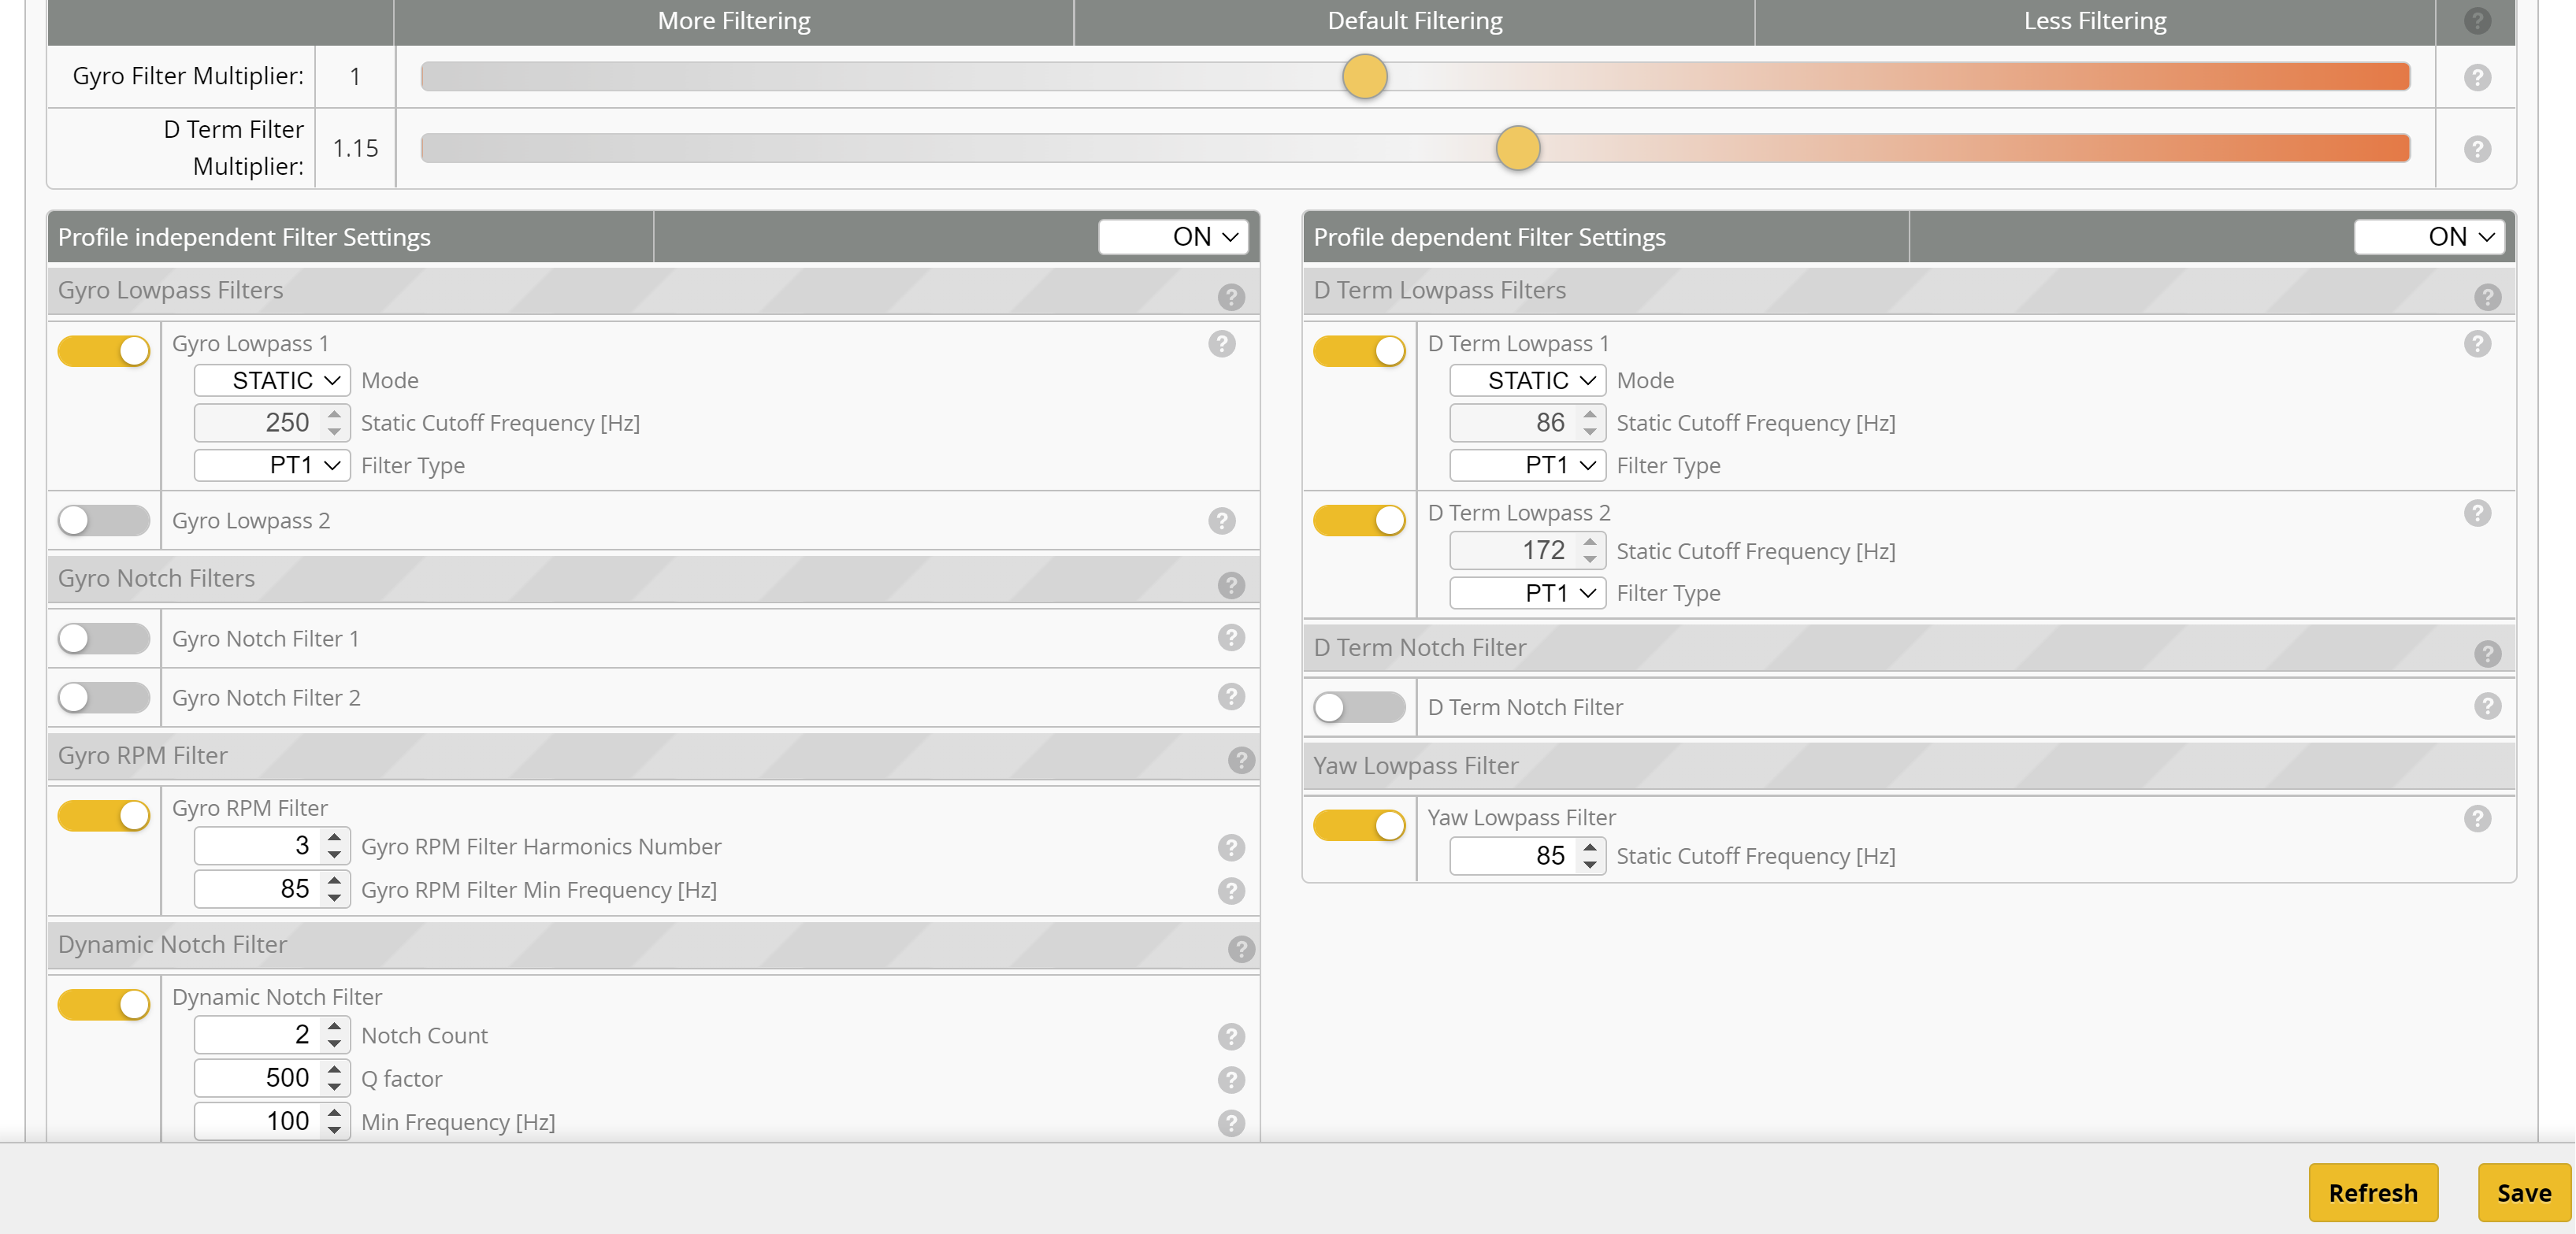
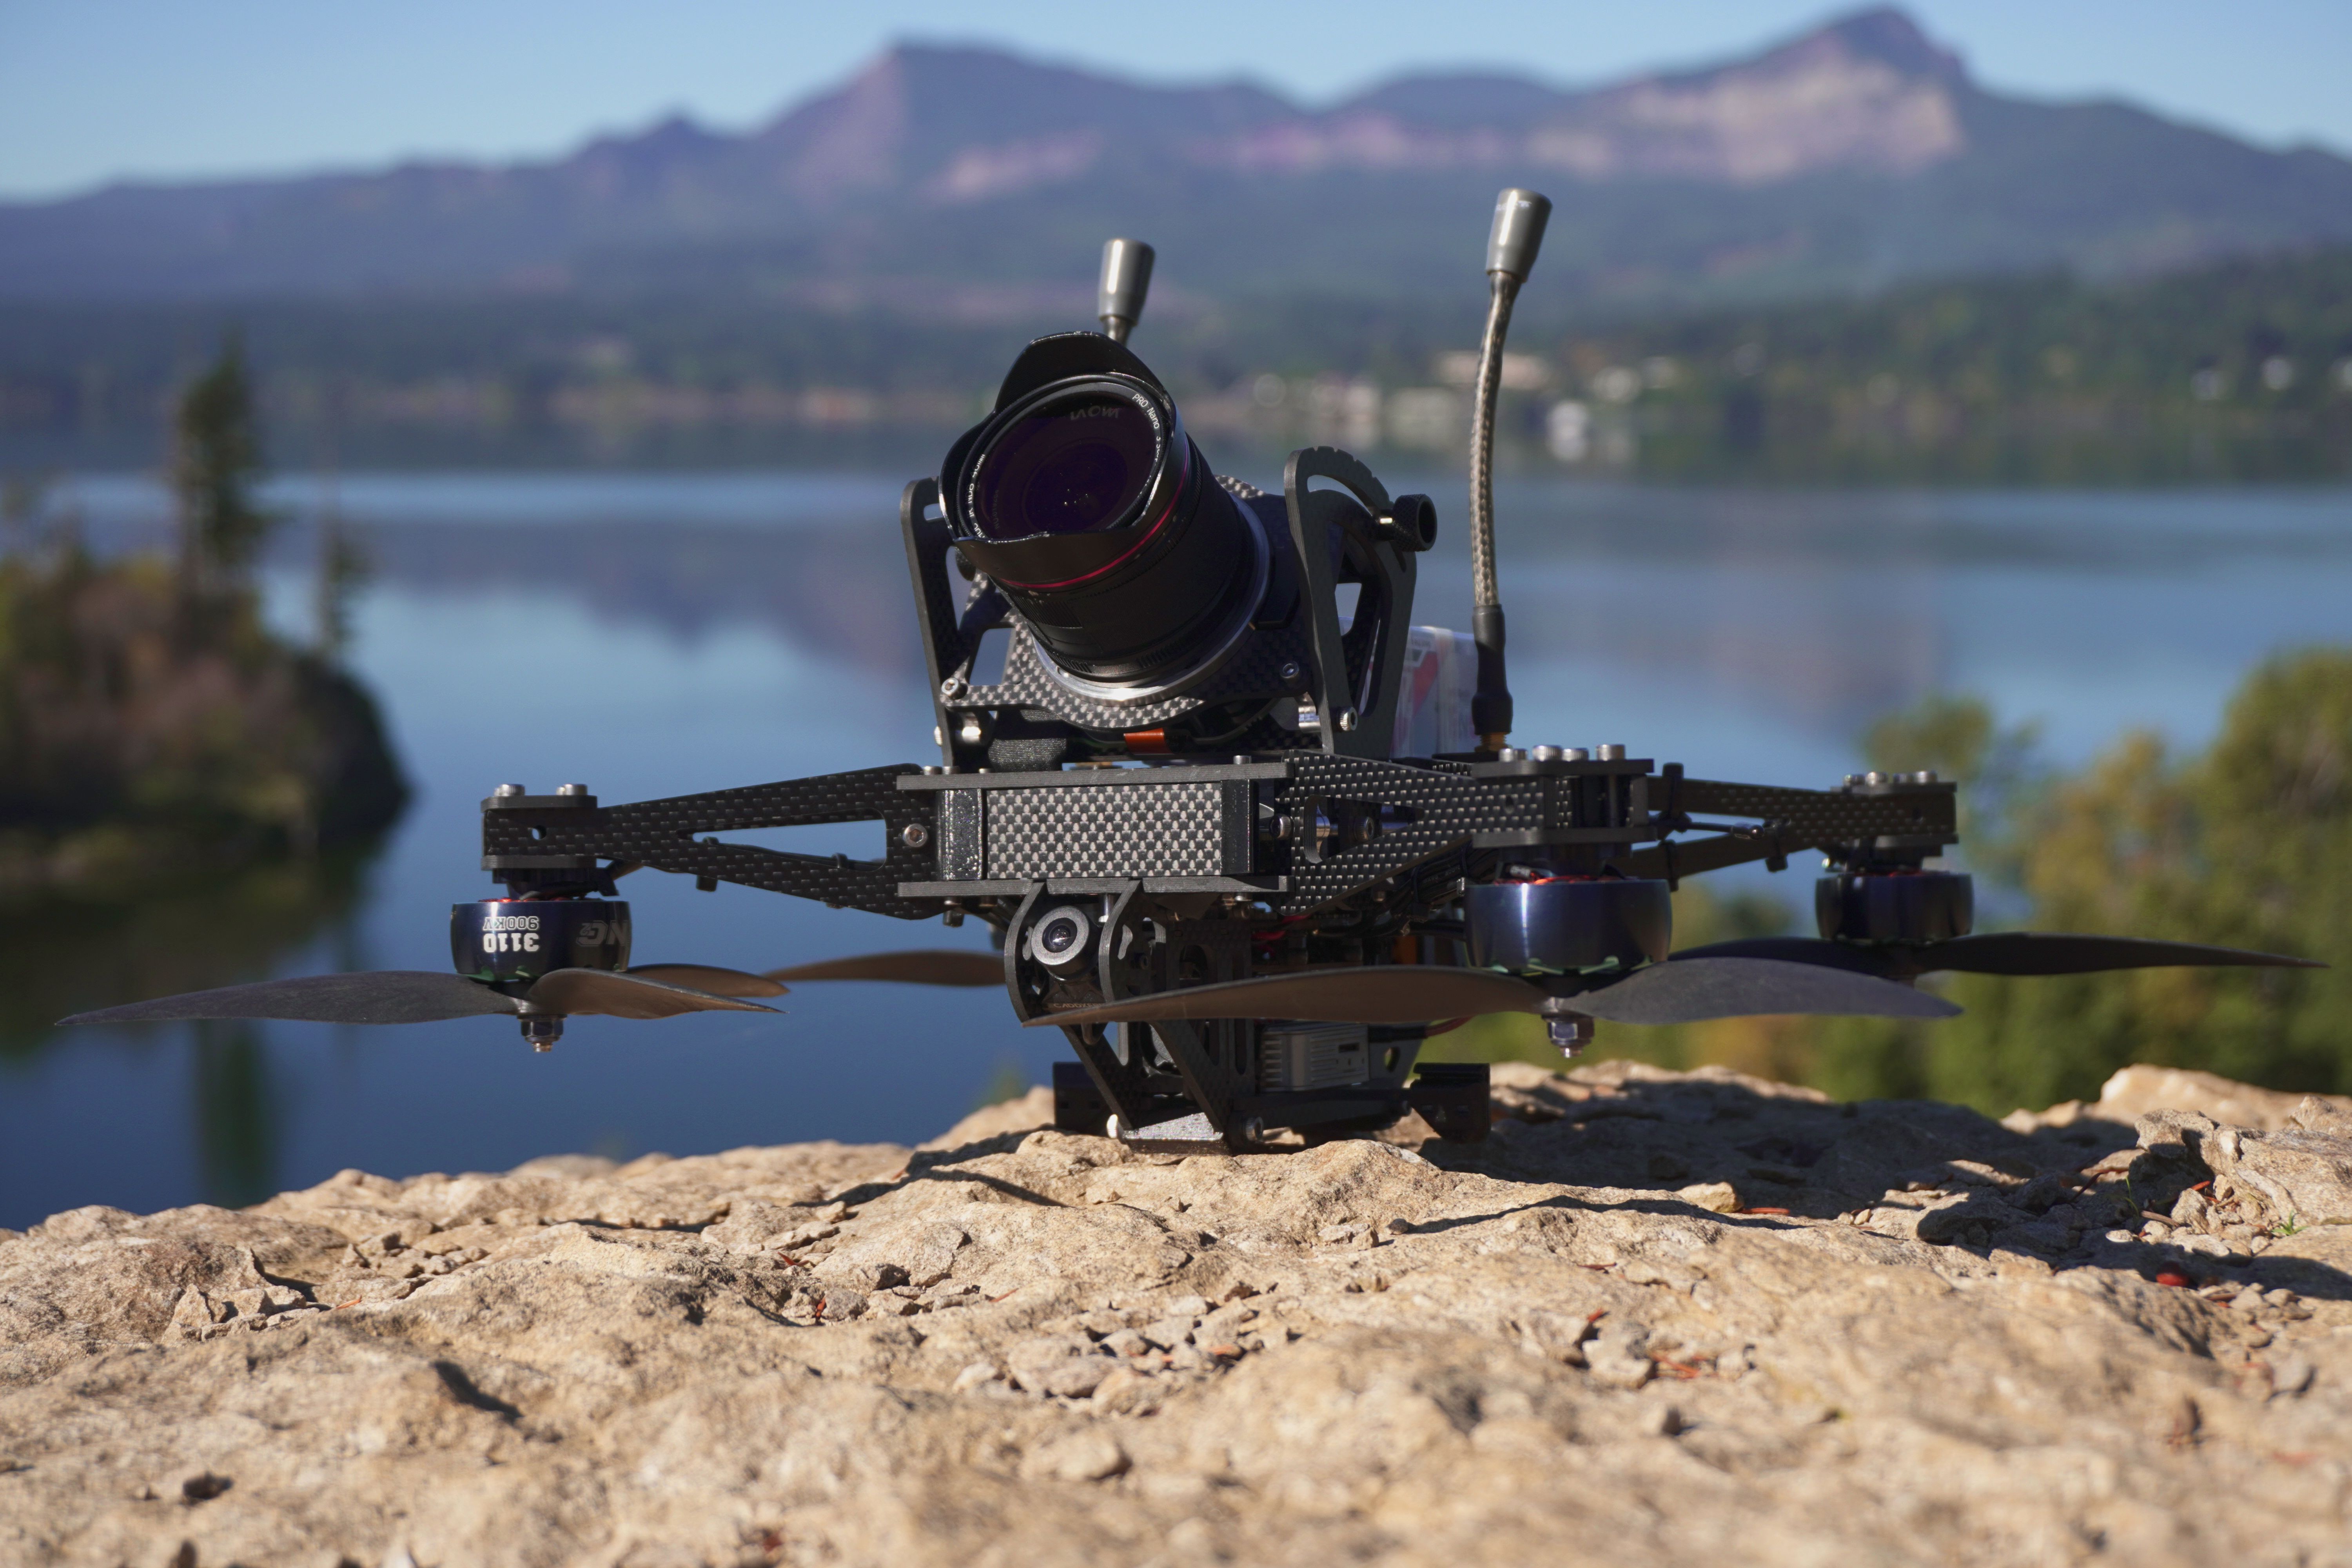
Photos
Part List
Frame |
Flying Squirrel Frame Kit
Strawhataerial.com
|
$669.00 |
Flight Controller |
T-Motor F7 Pro Flight Controller - 30x30mm
(5 builds)
Pyrodrone.com
|
$89.90 |
ESCs |
Aikon AK32 V3 55A 4in1 6S ESC - 30x30mm
(16 builds)
Pyrodrone.com
|
$74.99 |

What a build! What a post! Not from this universe. Awesome. Would love to fly this one time. It is hot.


Guides & Reviews

AirbladeUAV has done it again and this time they've brought long range to the 5" class! Based on the popular Transformer Mini, the new Transformer 5" Ultralight adopts a lot of the same design philosophies with larger props and more payload capacity. It can fly upwards of 20 minutes on a 4 cell Li-Ion battery pack and in ideal conditions it's got a range of over 4 to 5 miles. In this guide I'll walk..
Read more
With the release of the DJI FPV Drone cinematic FPV has become a lot more accessible, but you certainly don't want to crash a $750 drone! The QAV-CINE Freybott is a compact, lightweight cinematic FPV drone that can take a hit and keep going. It's a lot safer to fly indoors and around people. With a naked GoPro or the SMO 4k you can capture some great stabilized footage. In this guide I'll show you..
Read more
Just wow.