
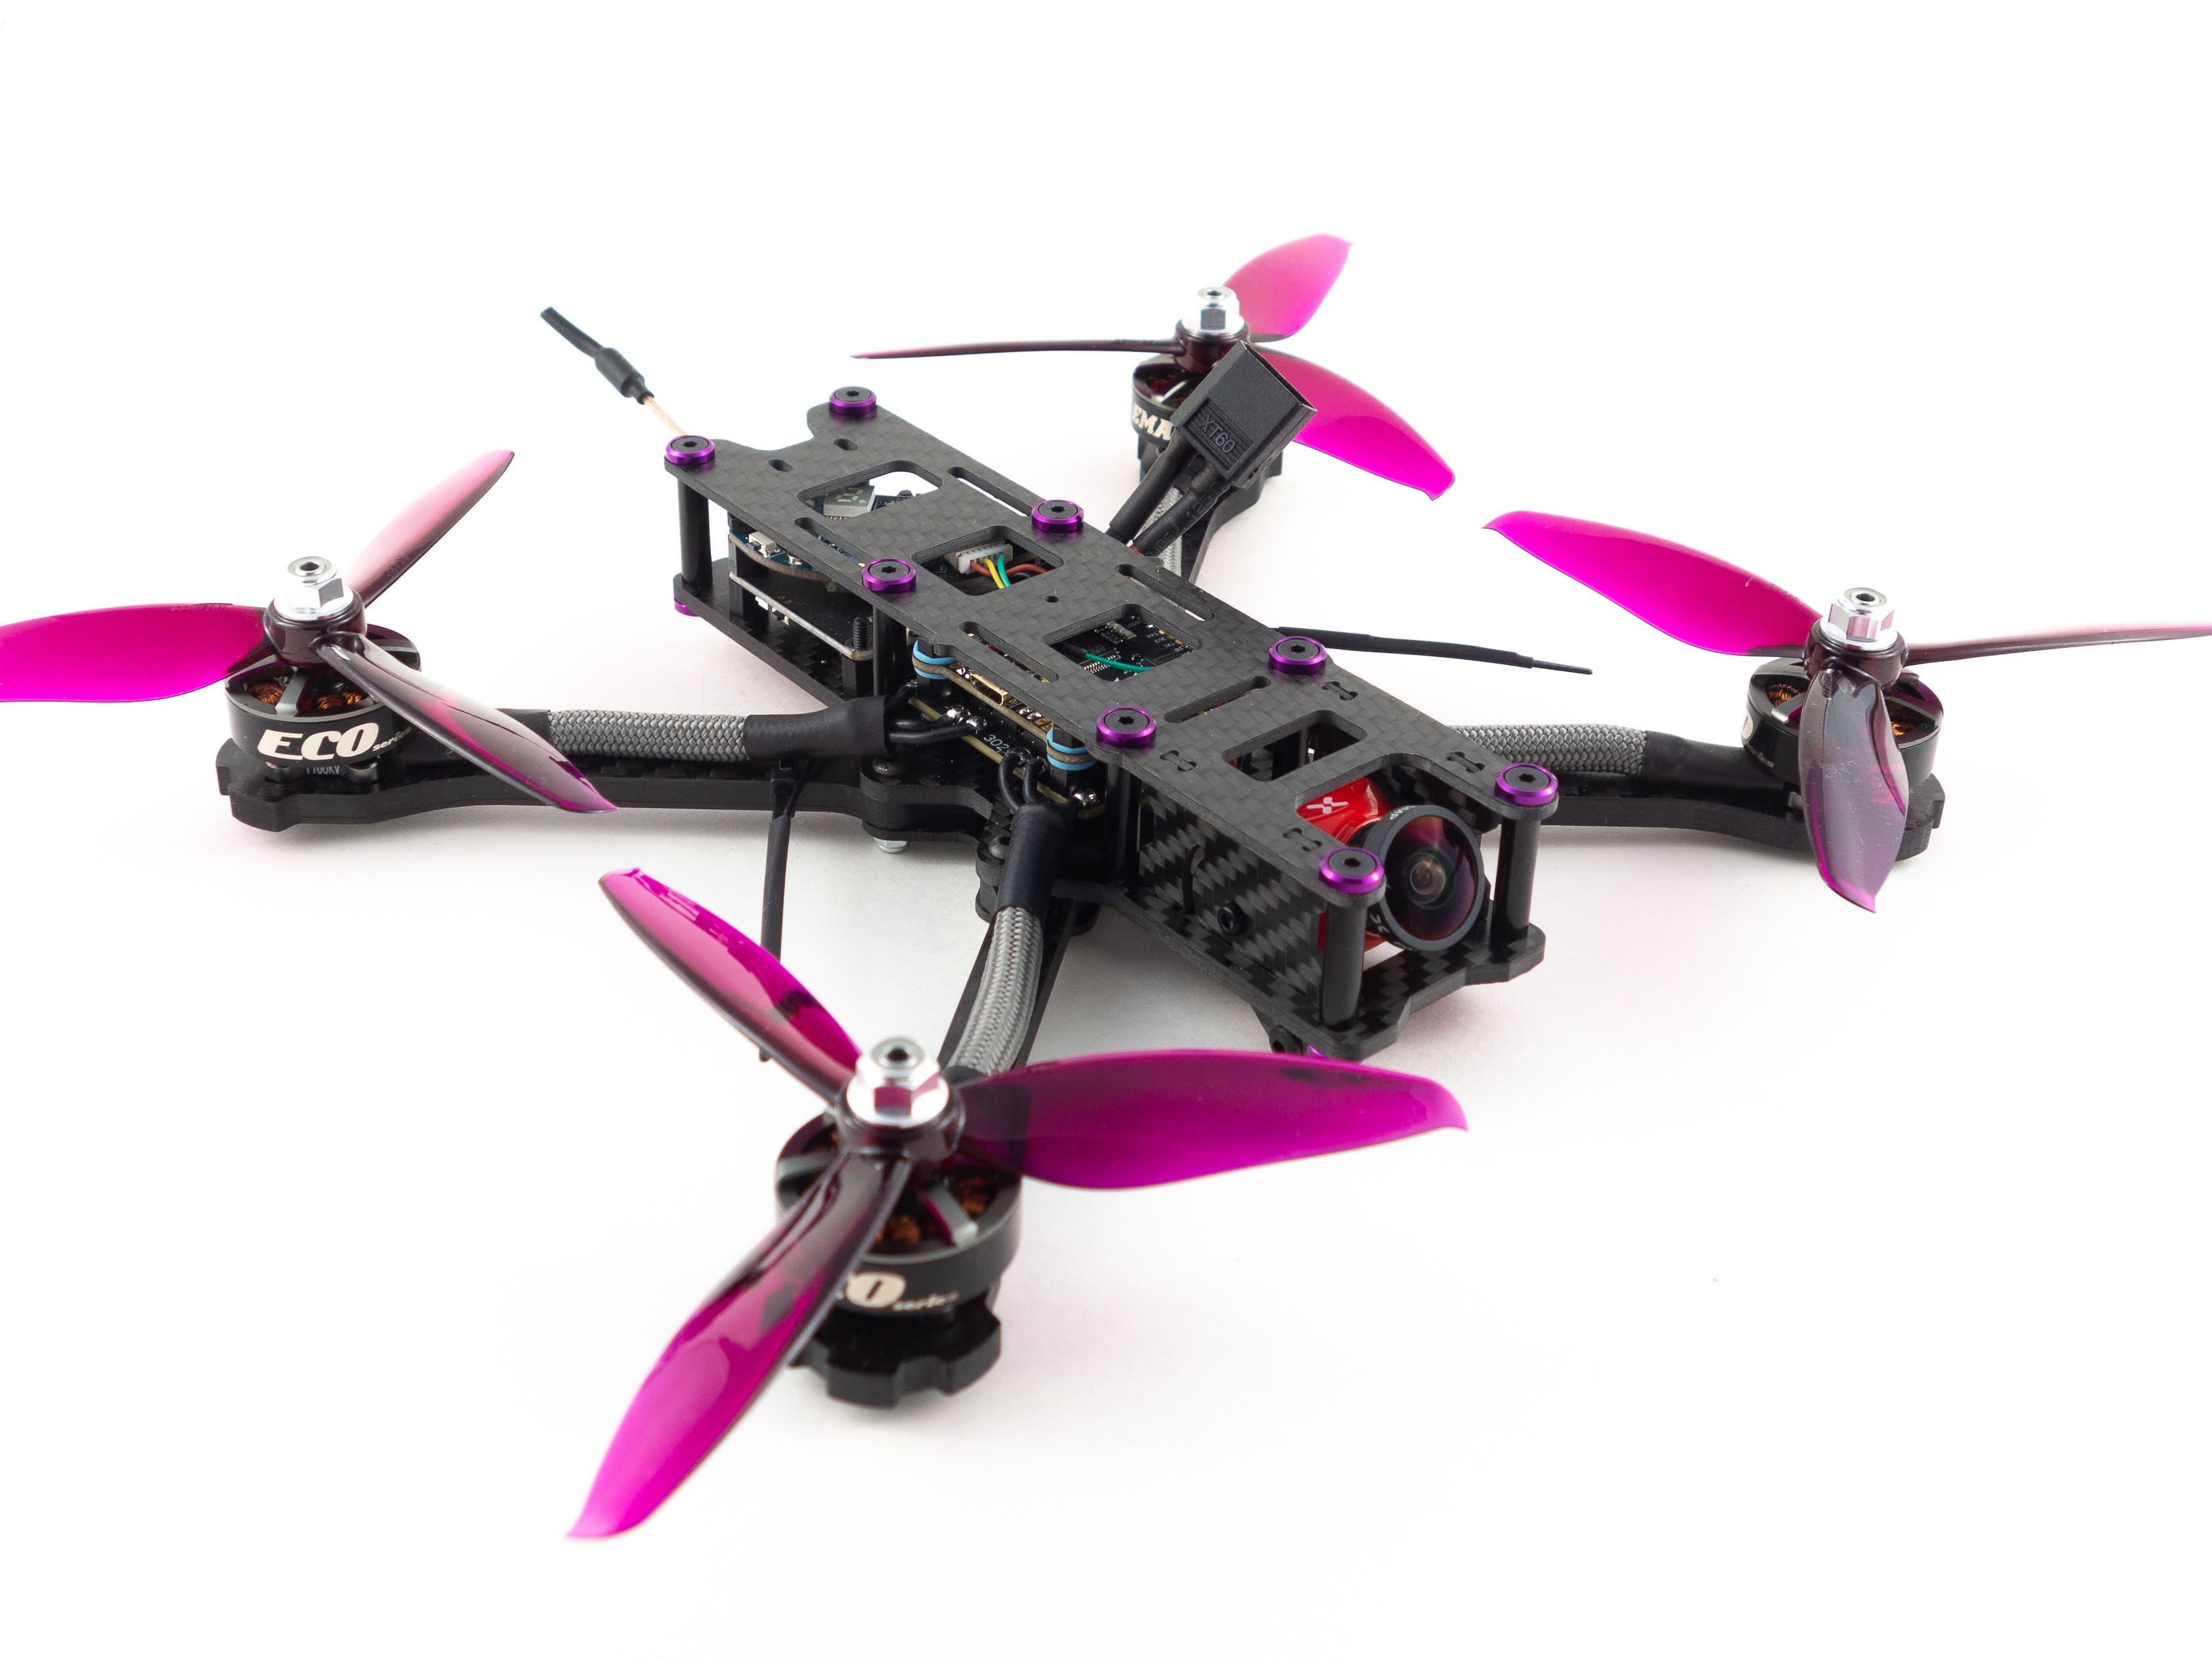
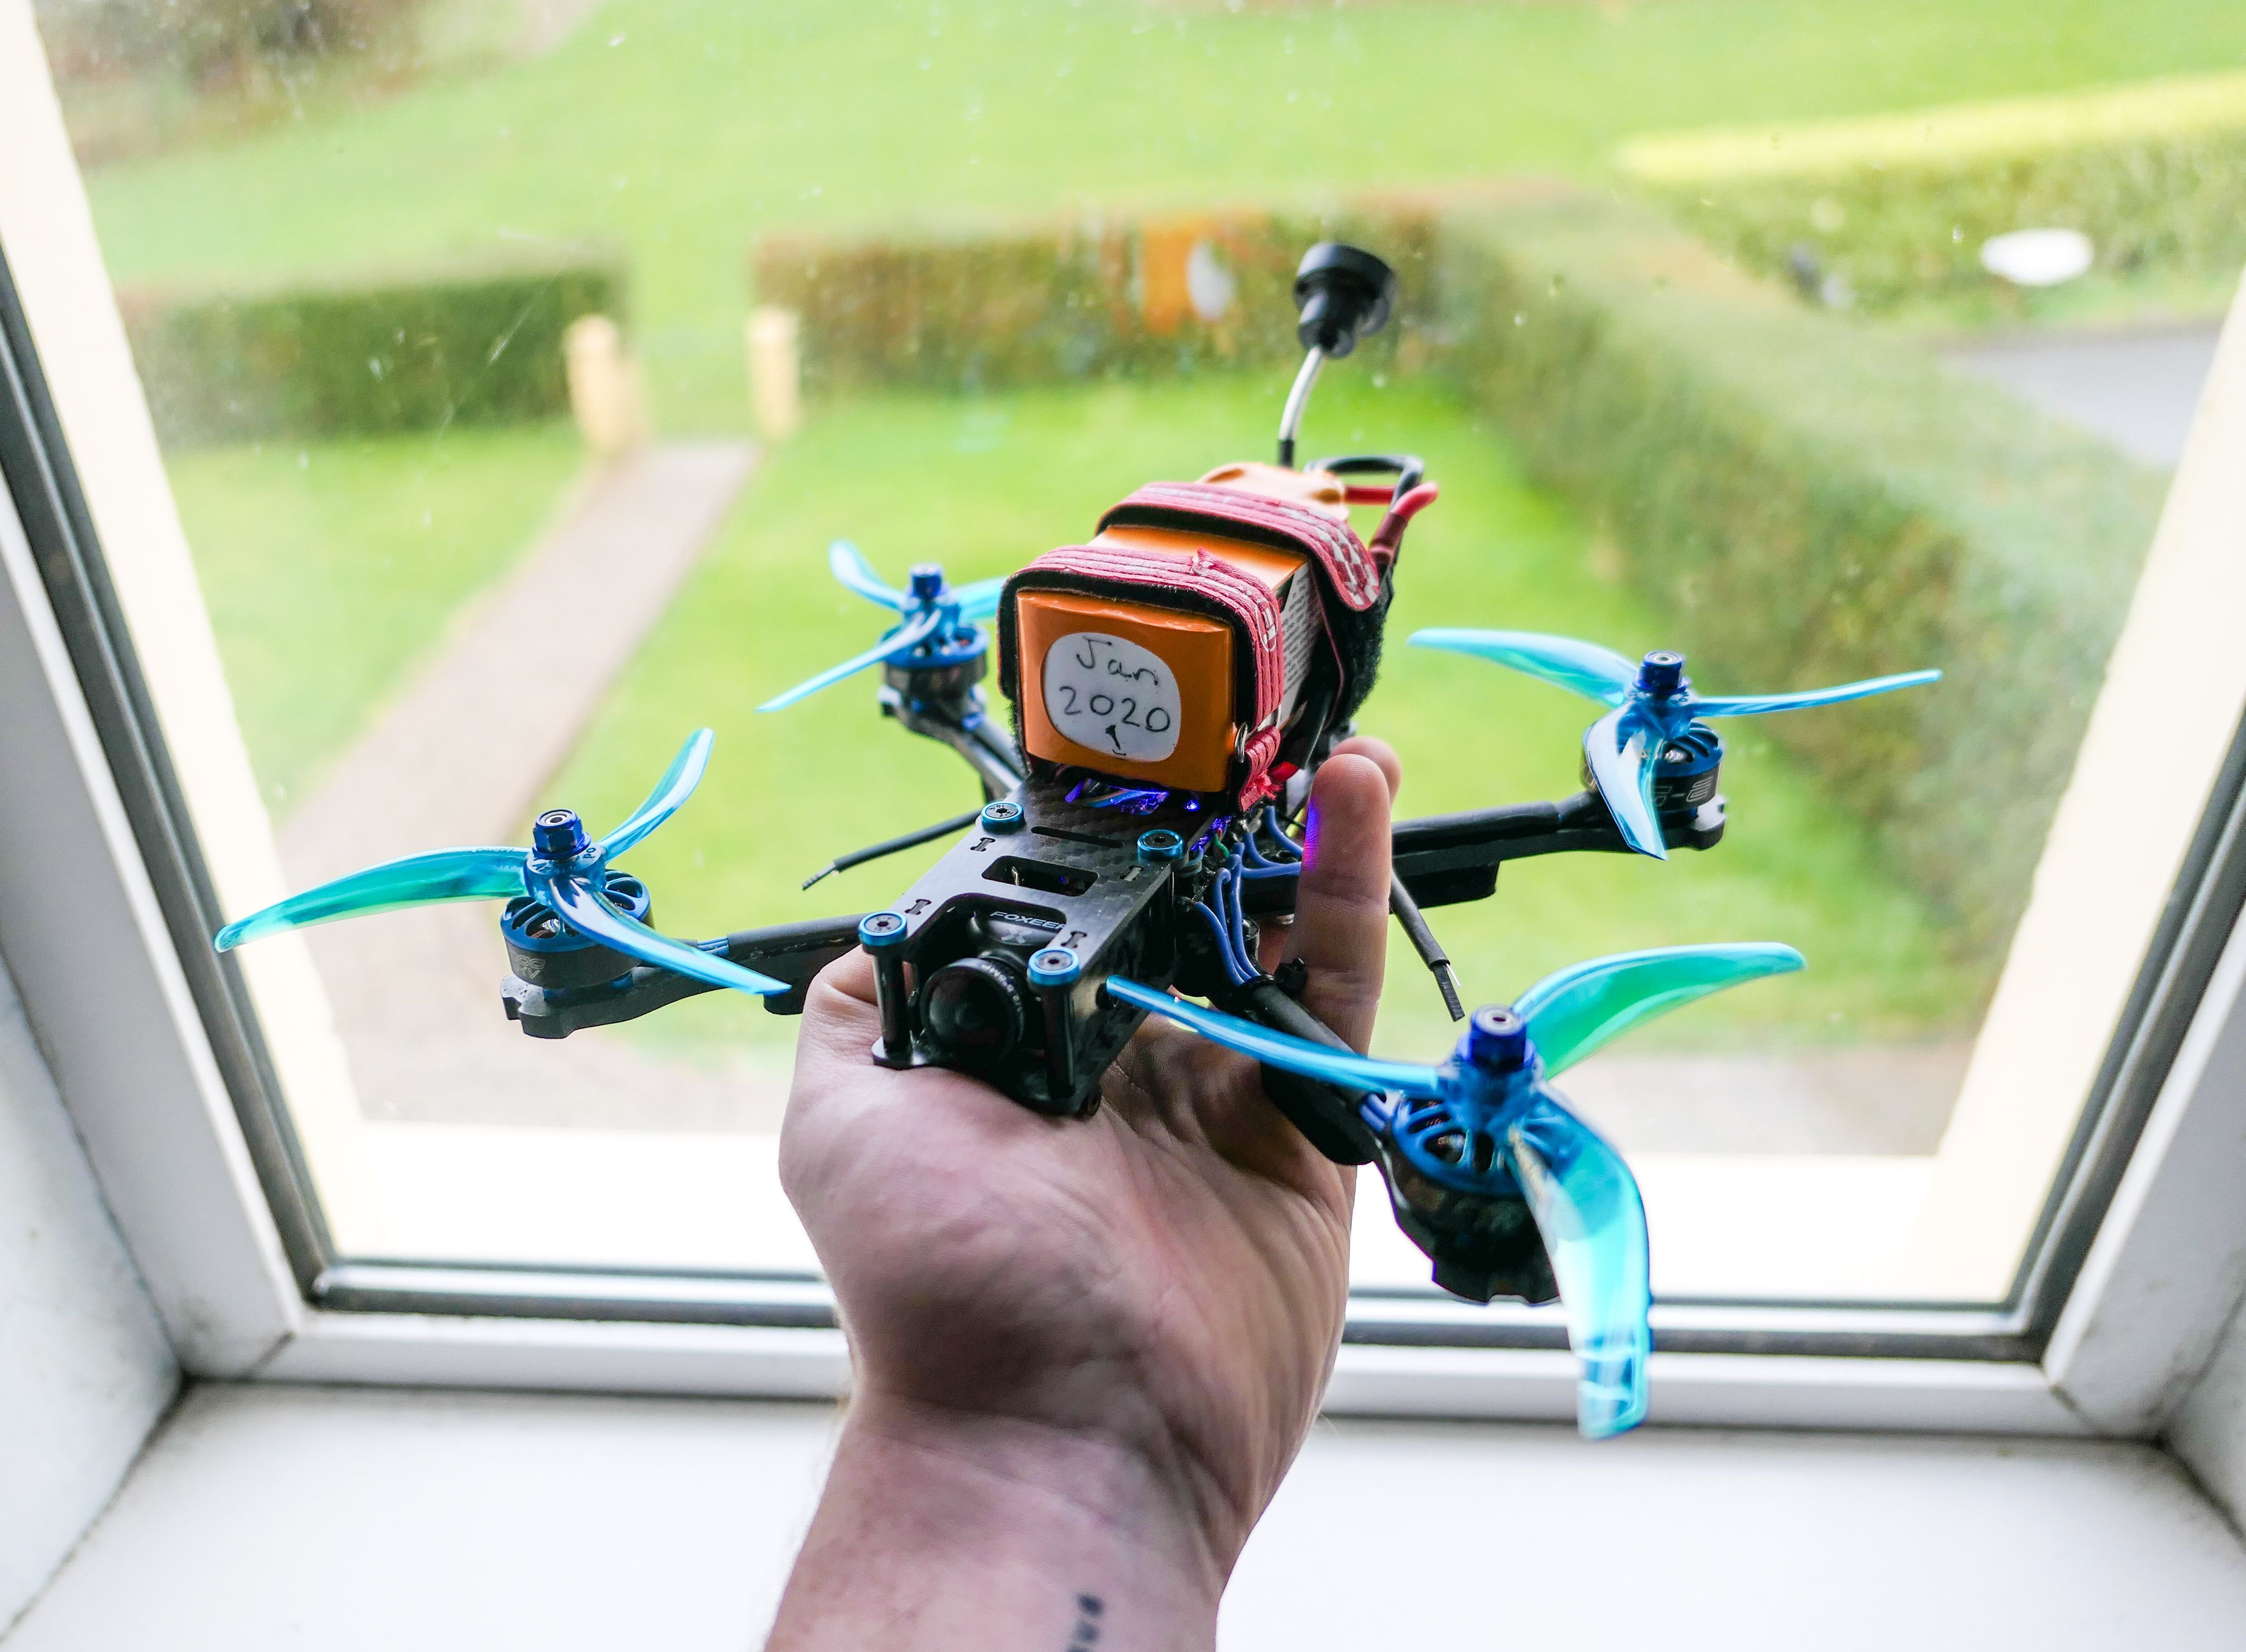
This is the 4th installment to my popular "Wizard Killer" series, and is based on the popular Wizard X220HV 6S. As usual, the goal was to build a substantially better quad, yet come in below the retail price of the BNF kit. Here are some of the improvements:
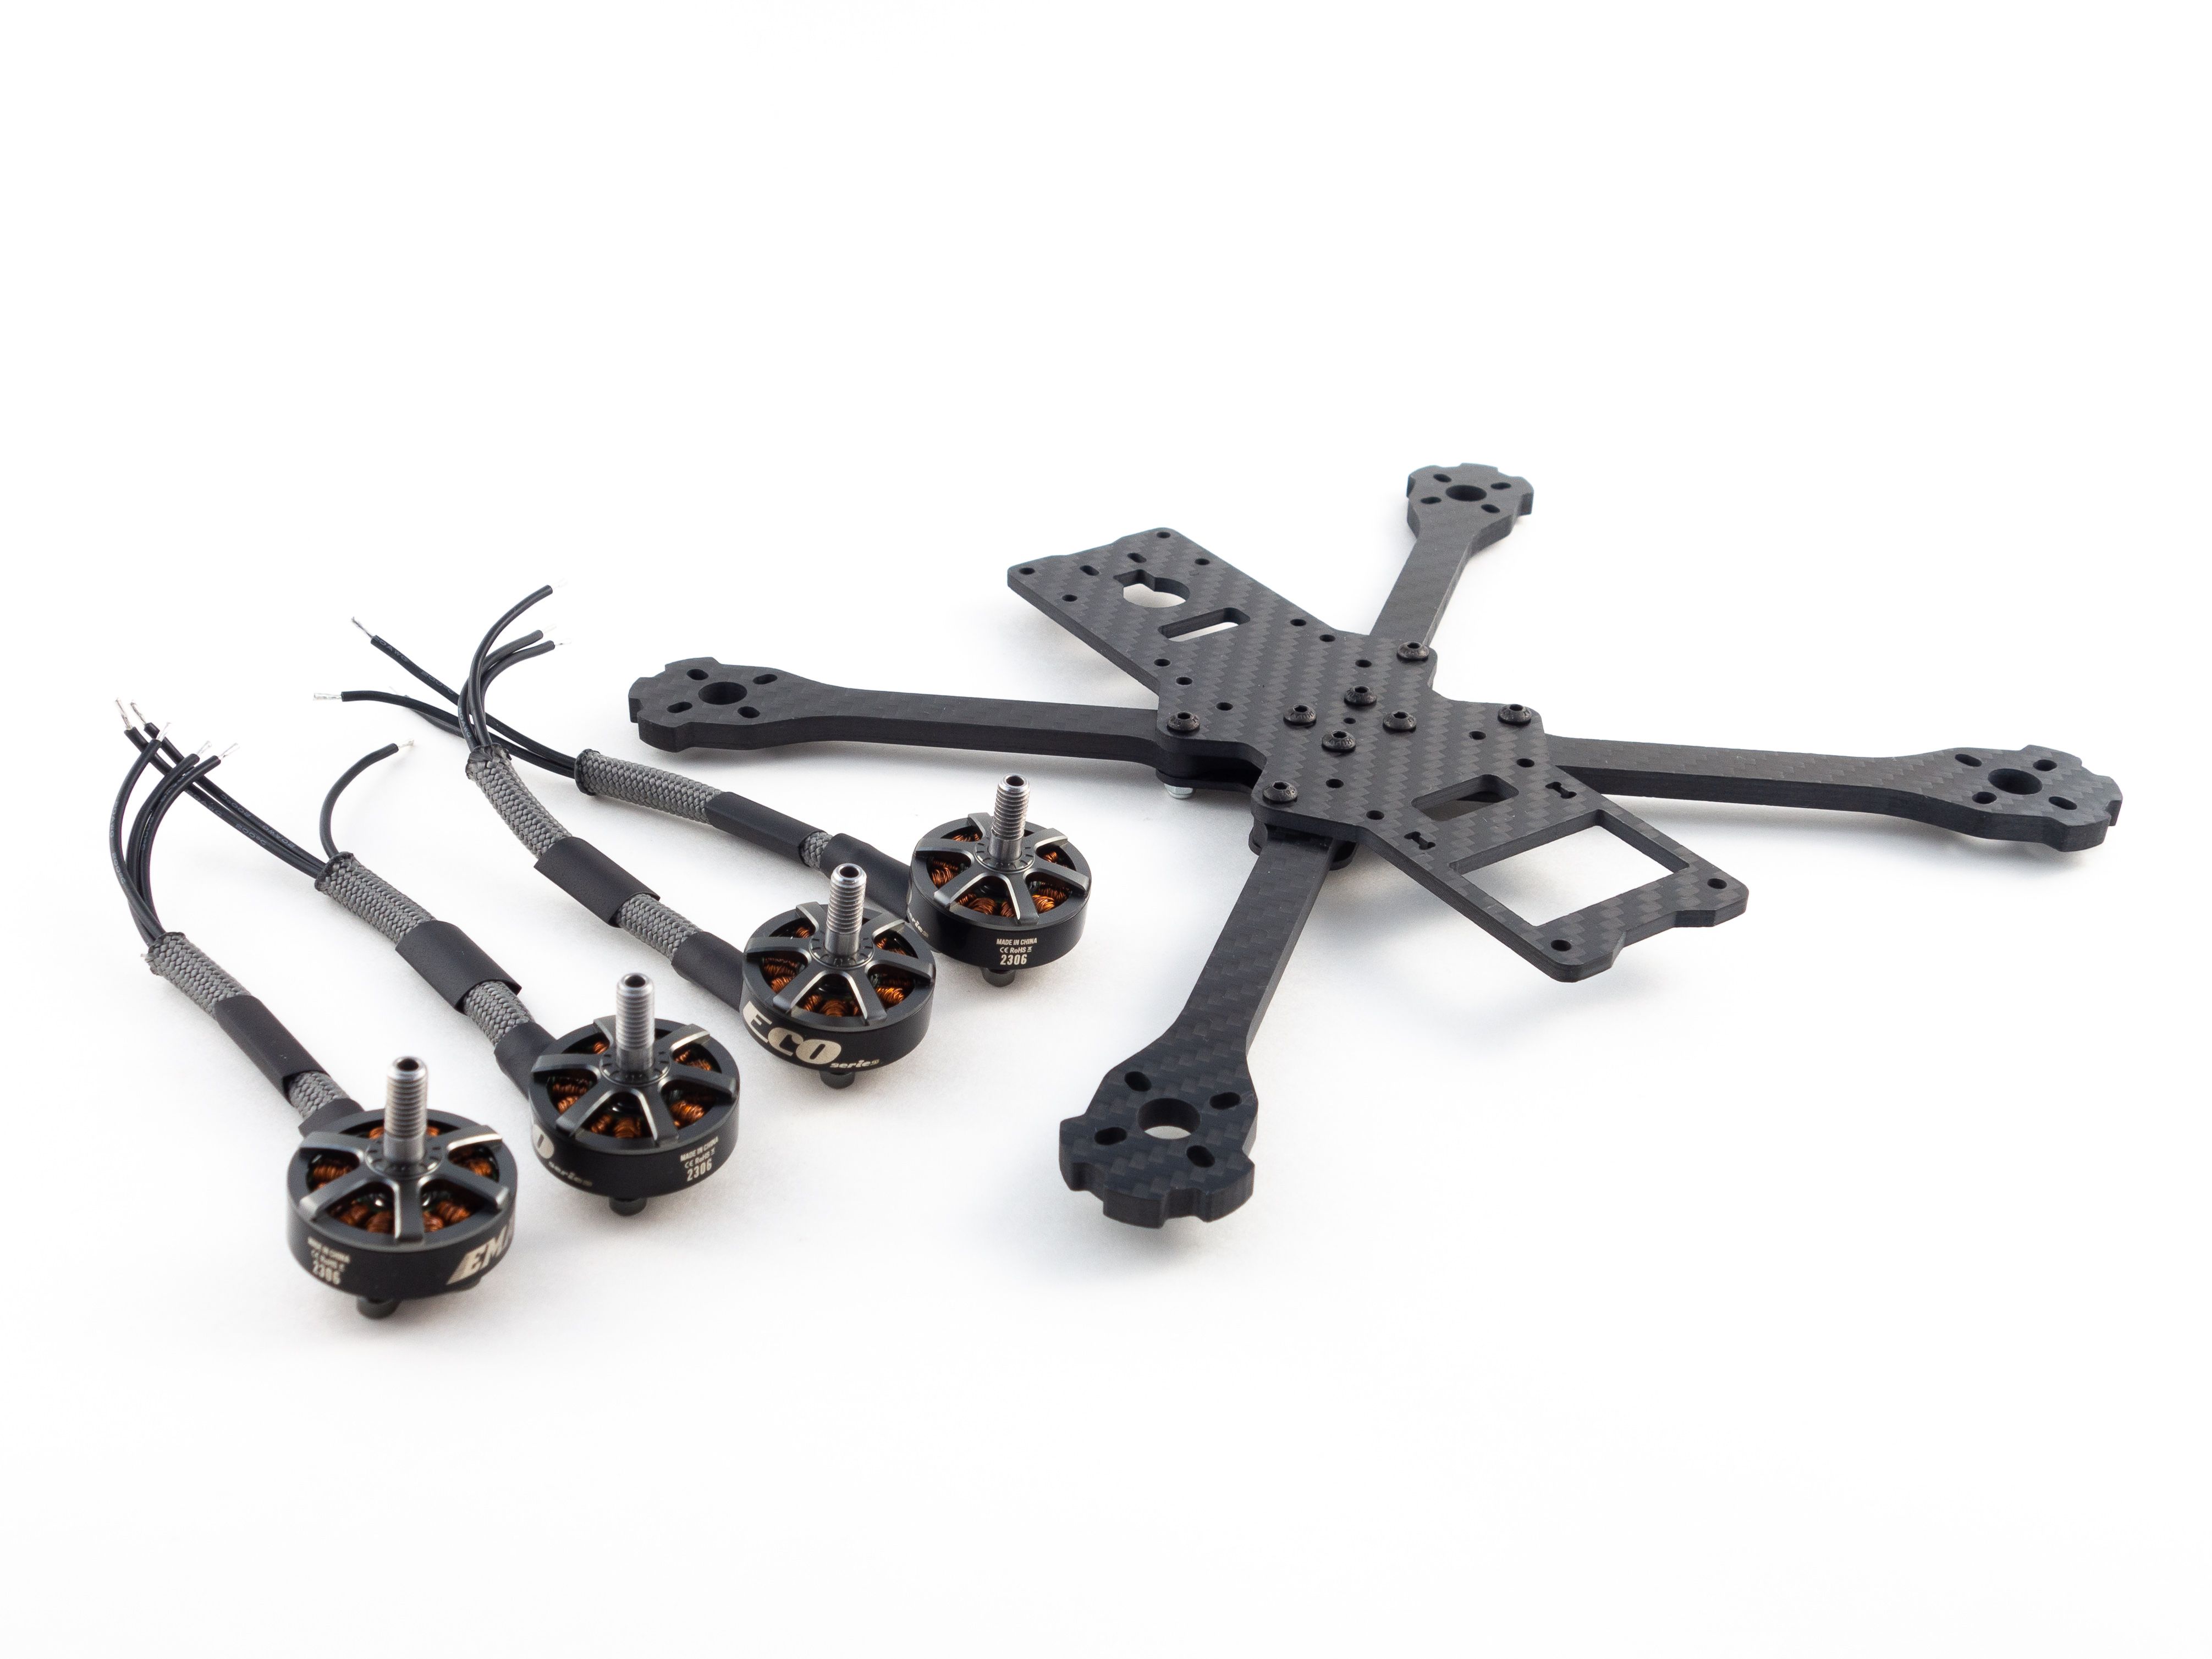
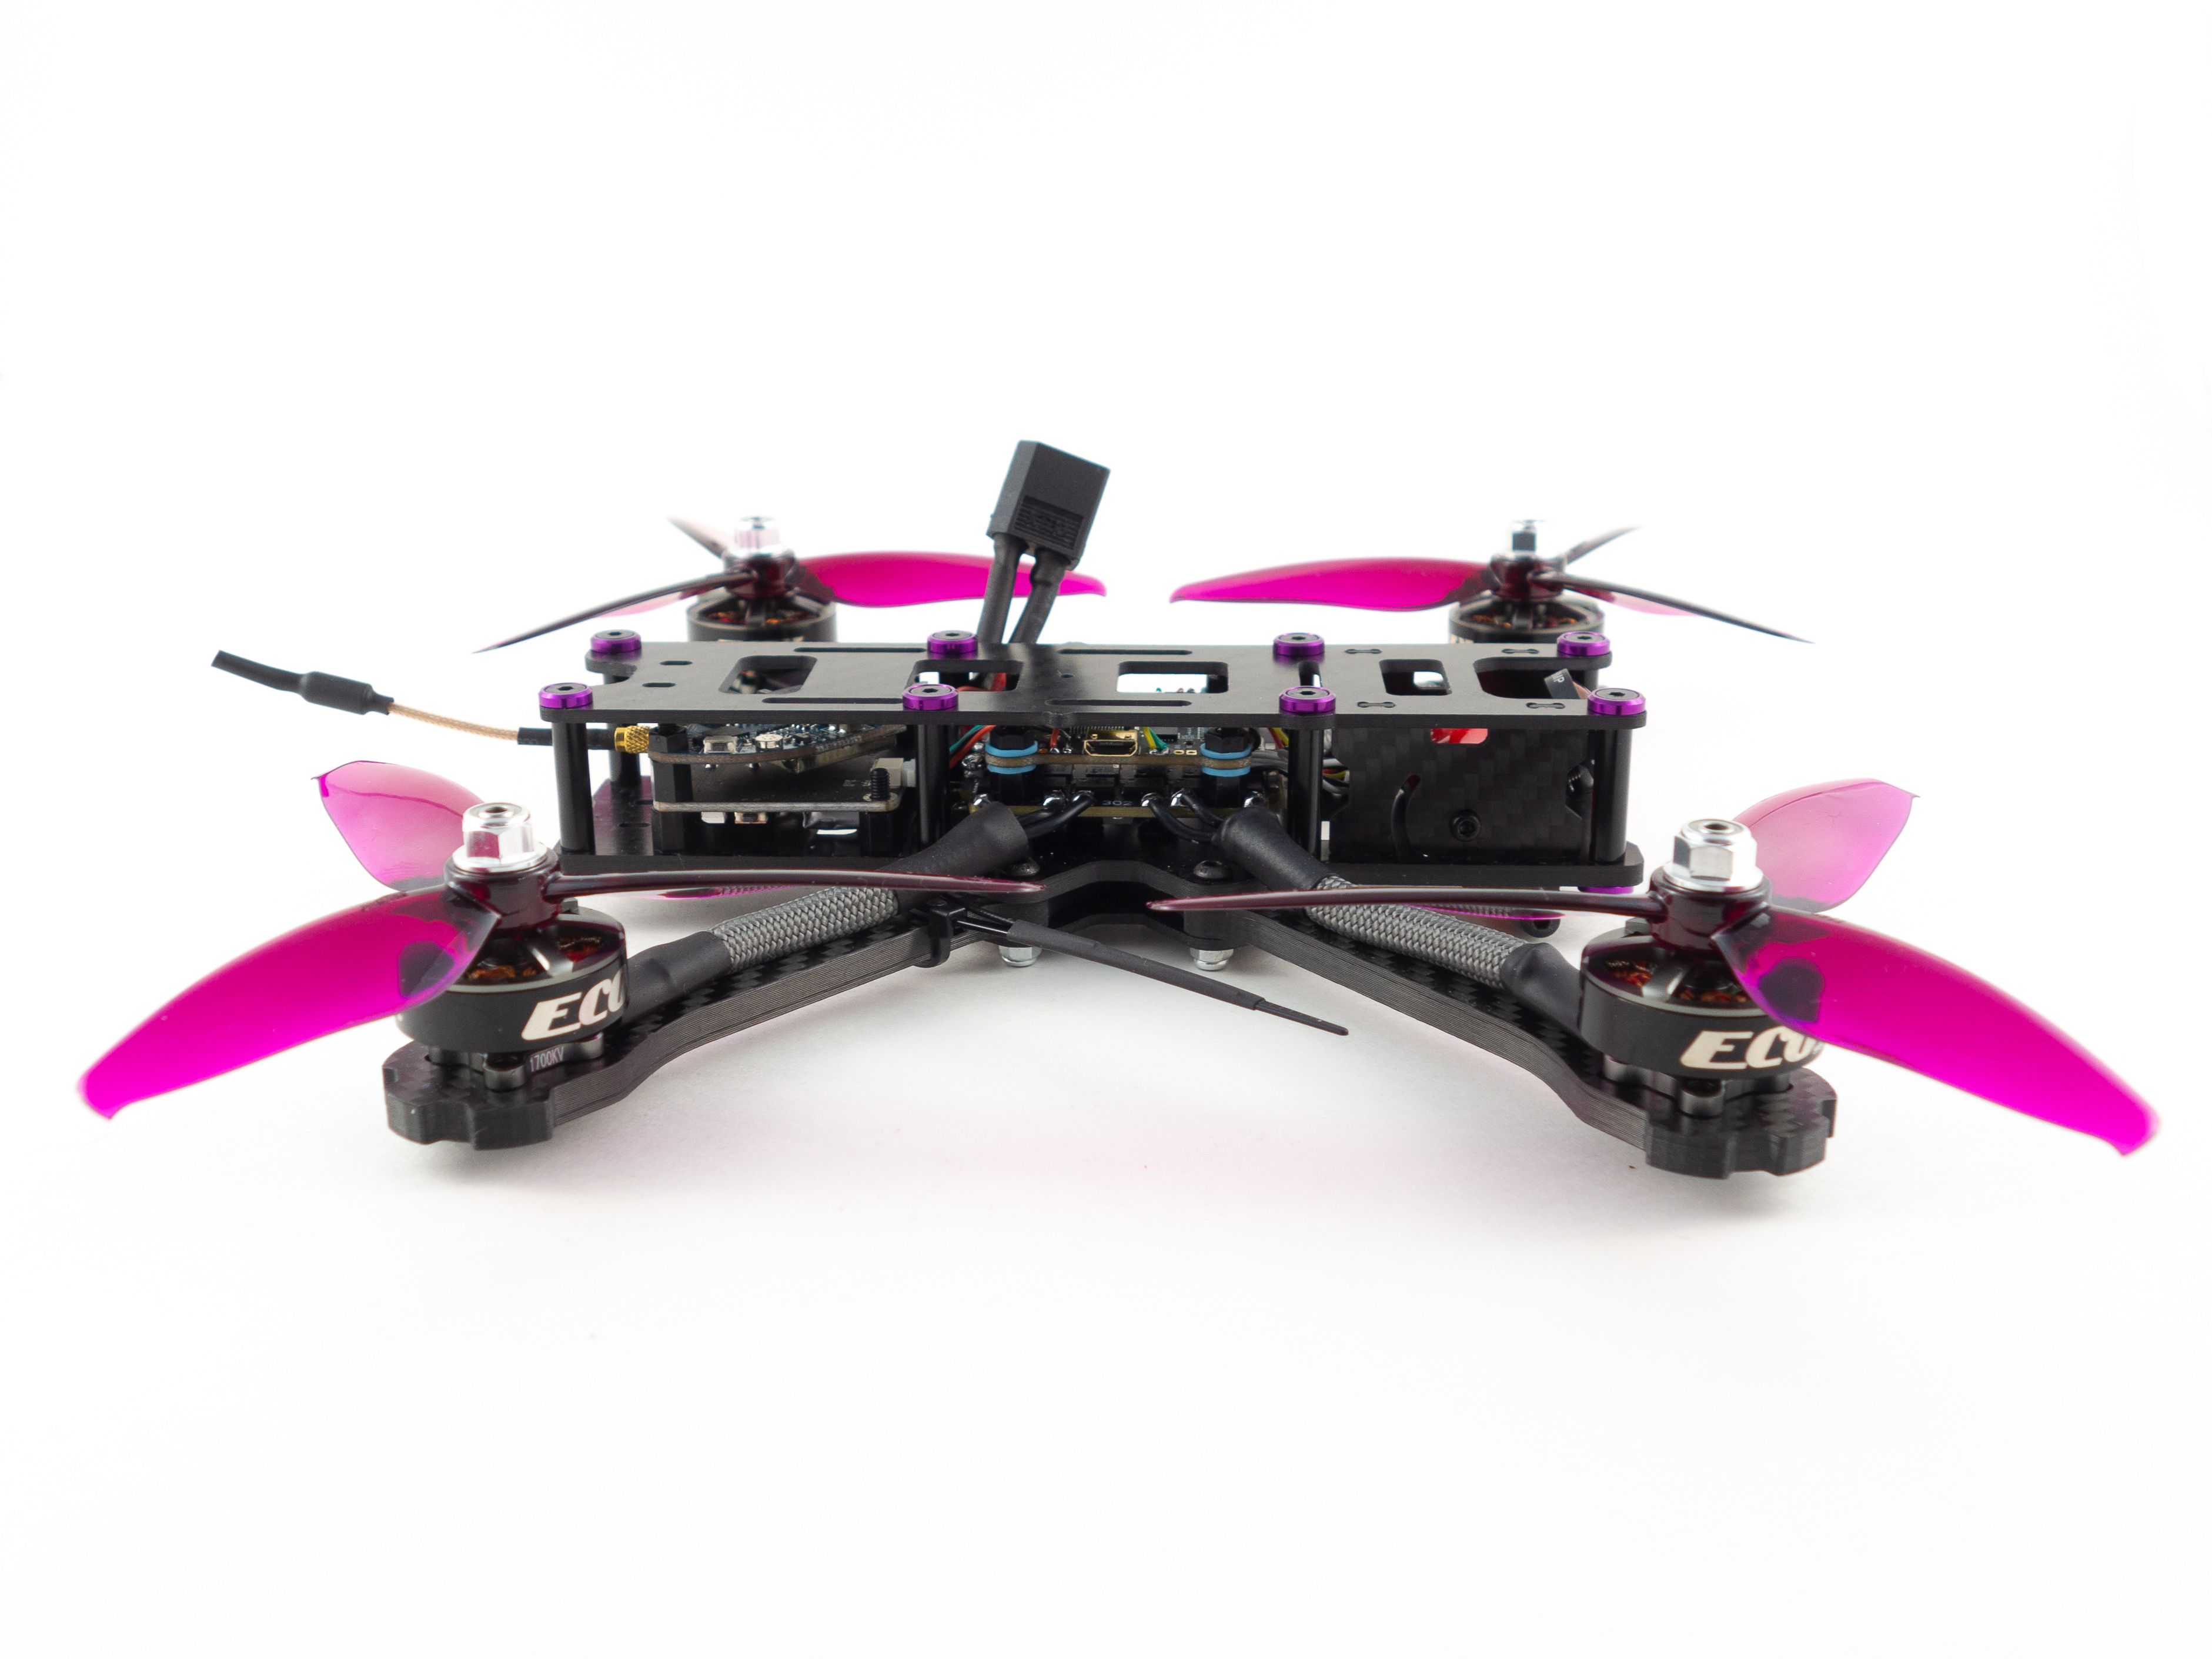
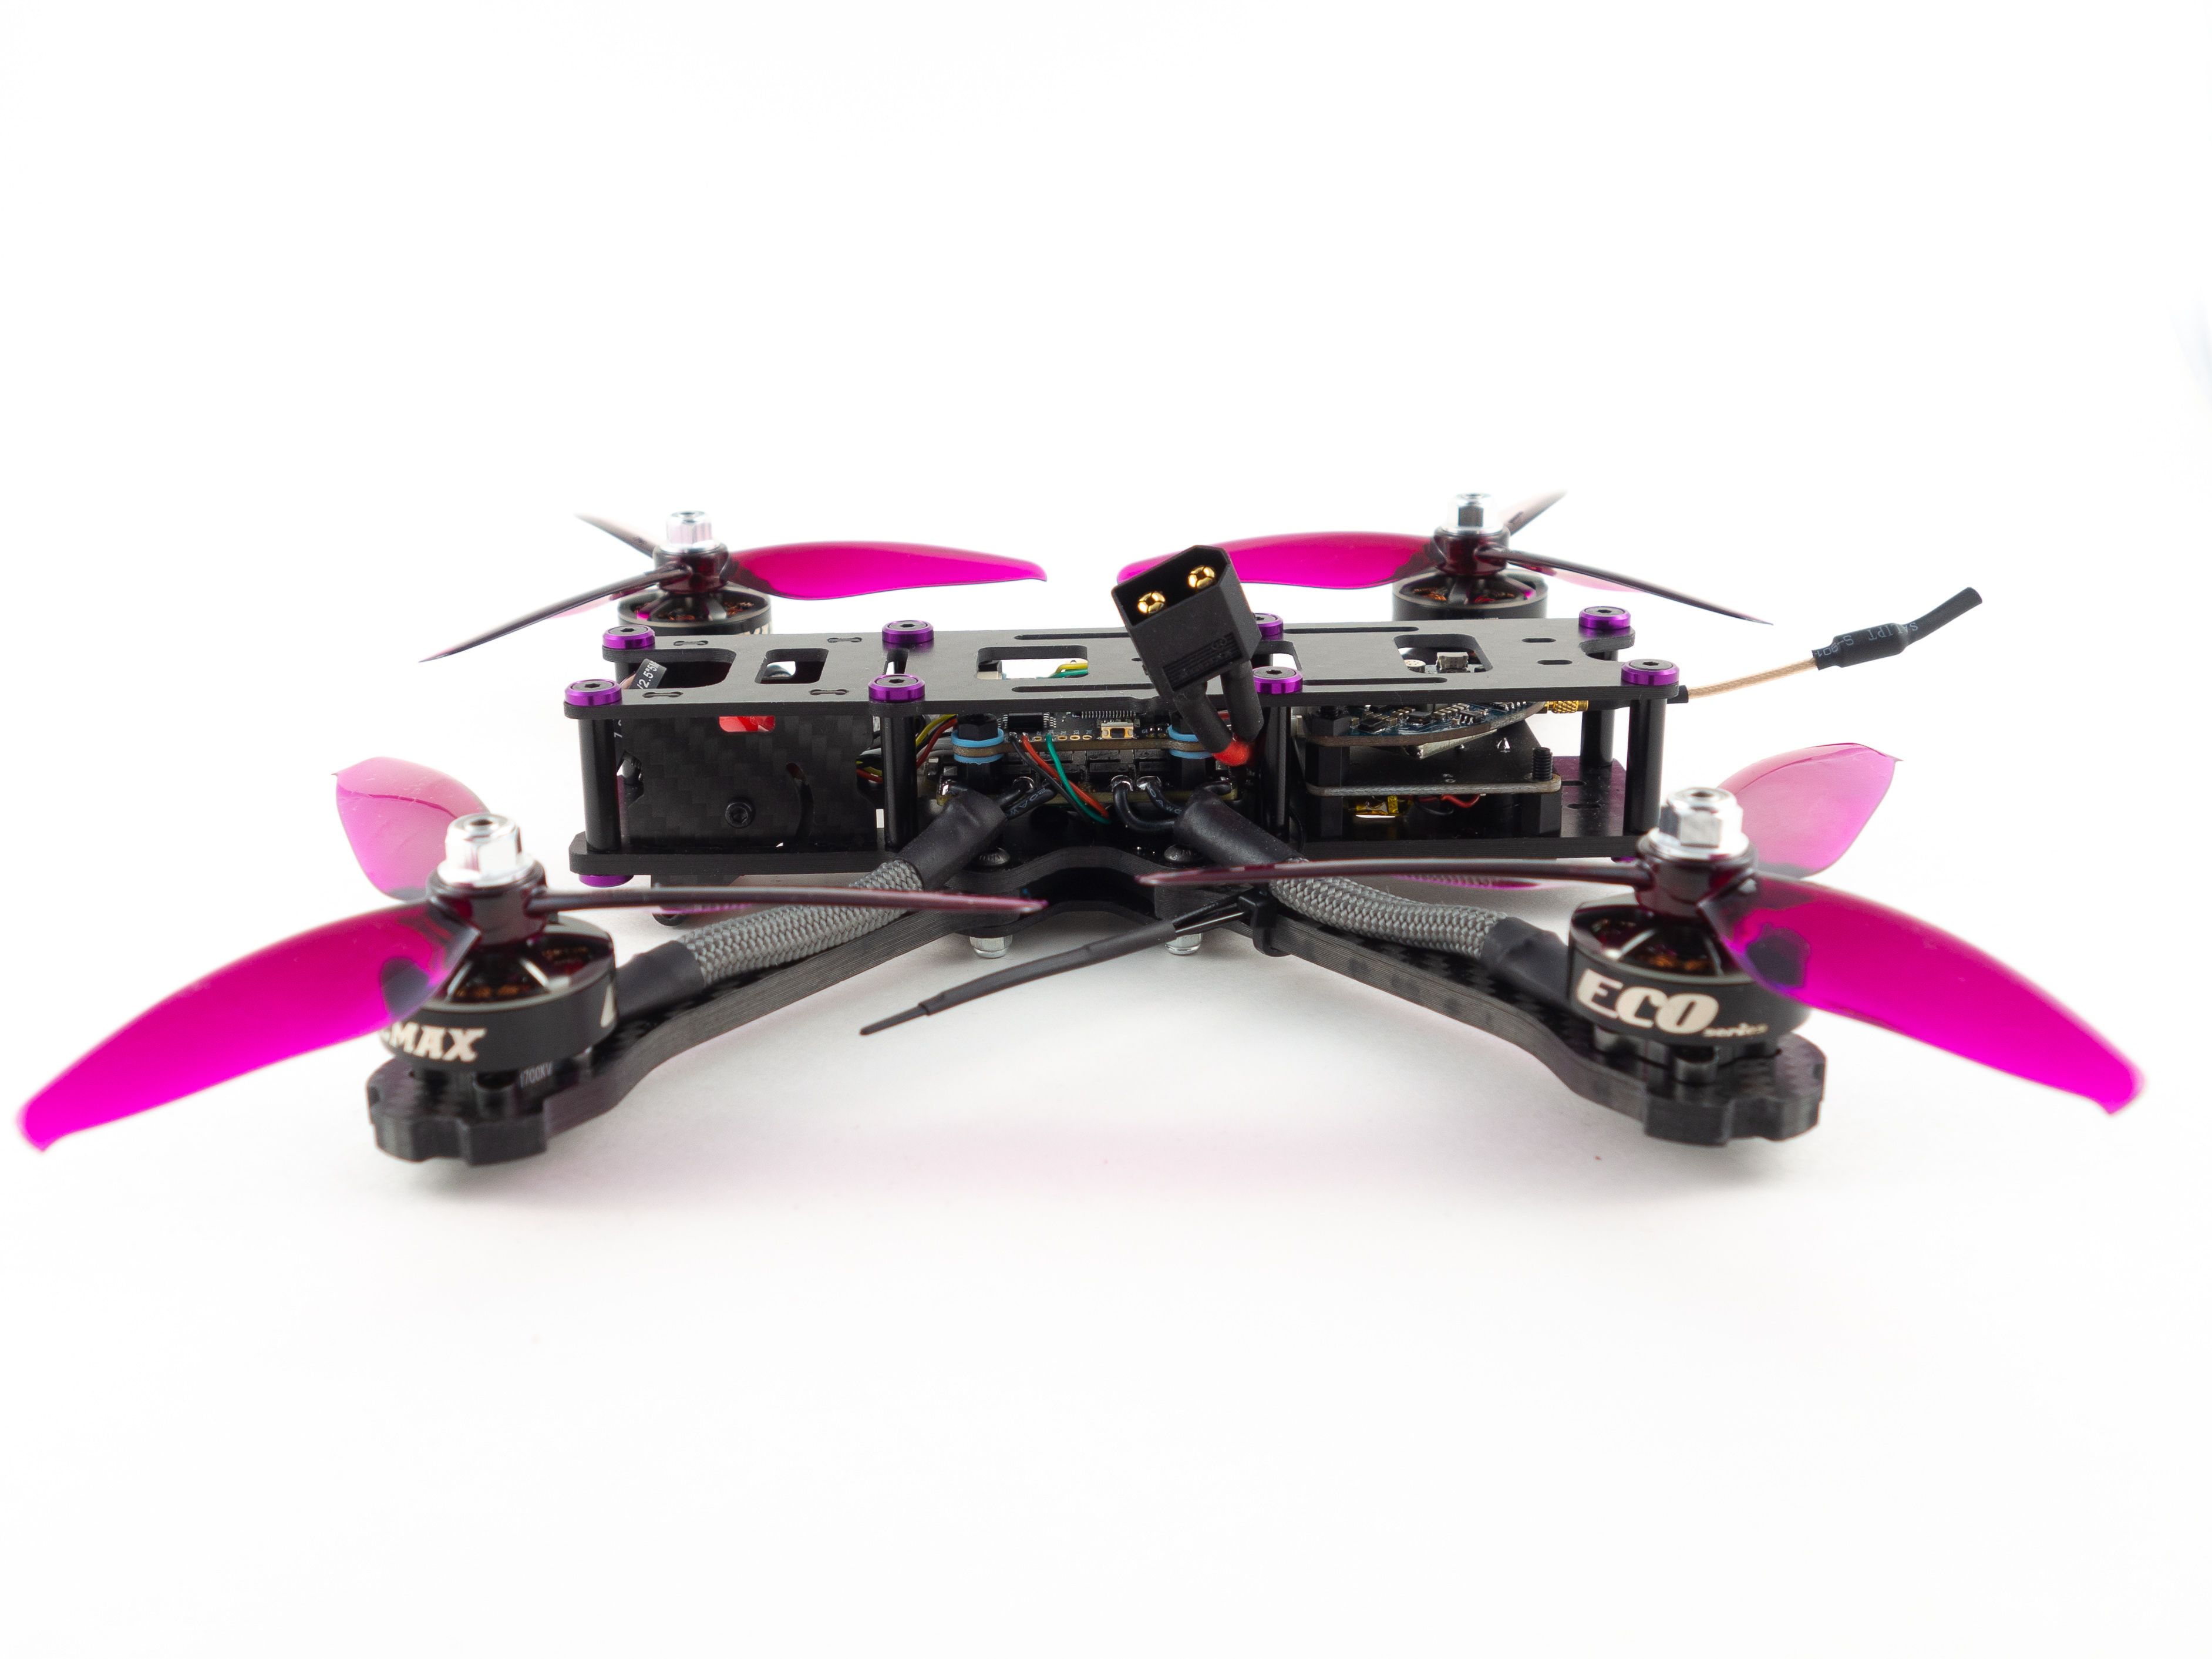
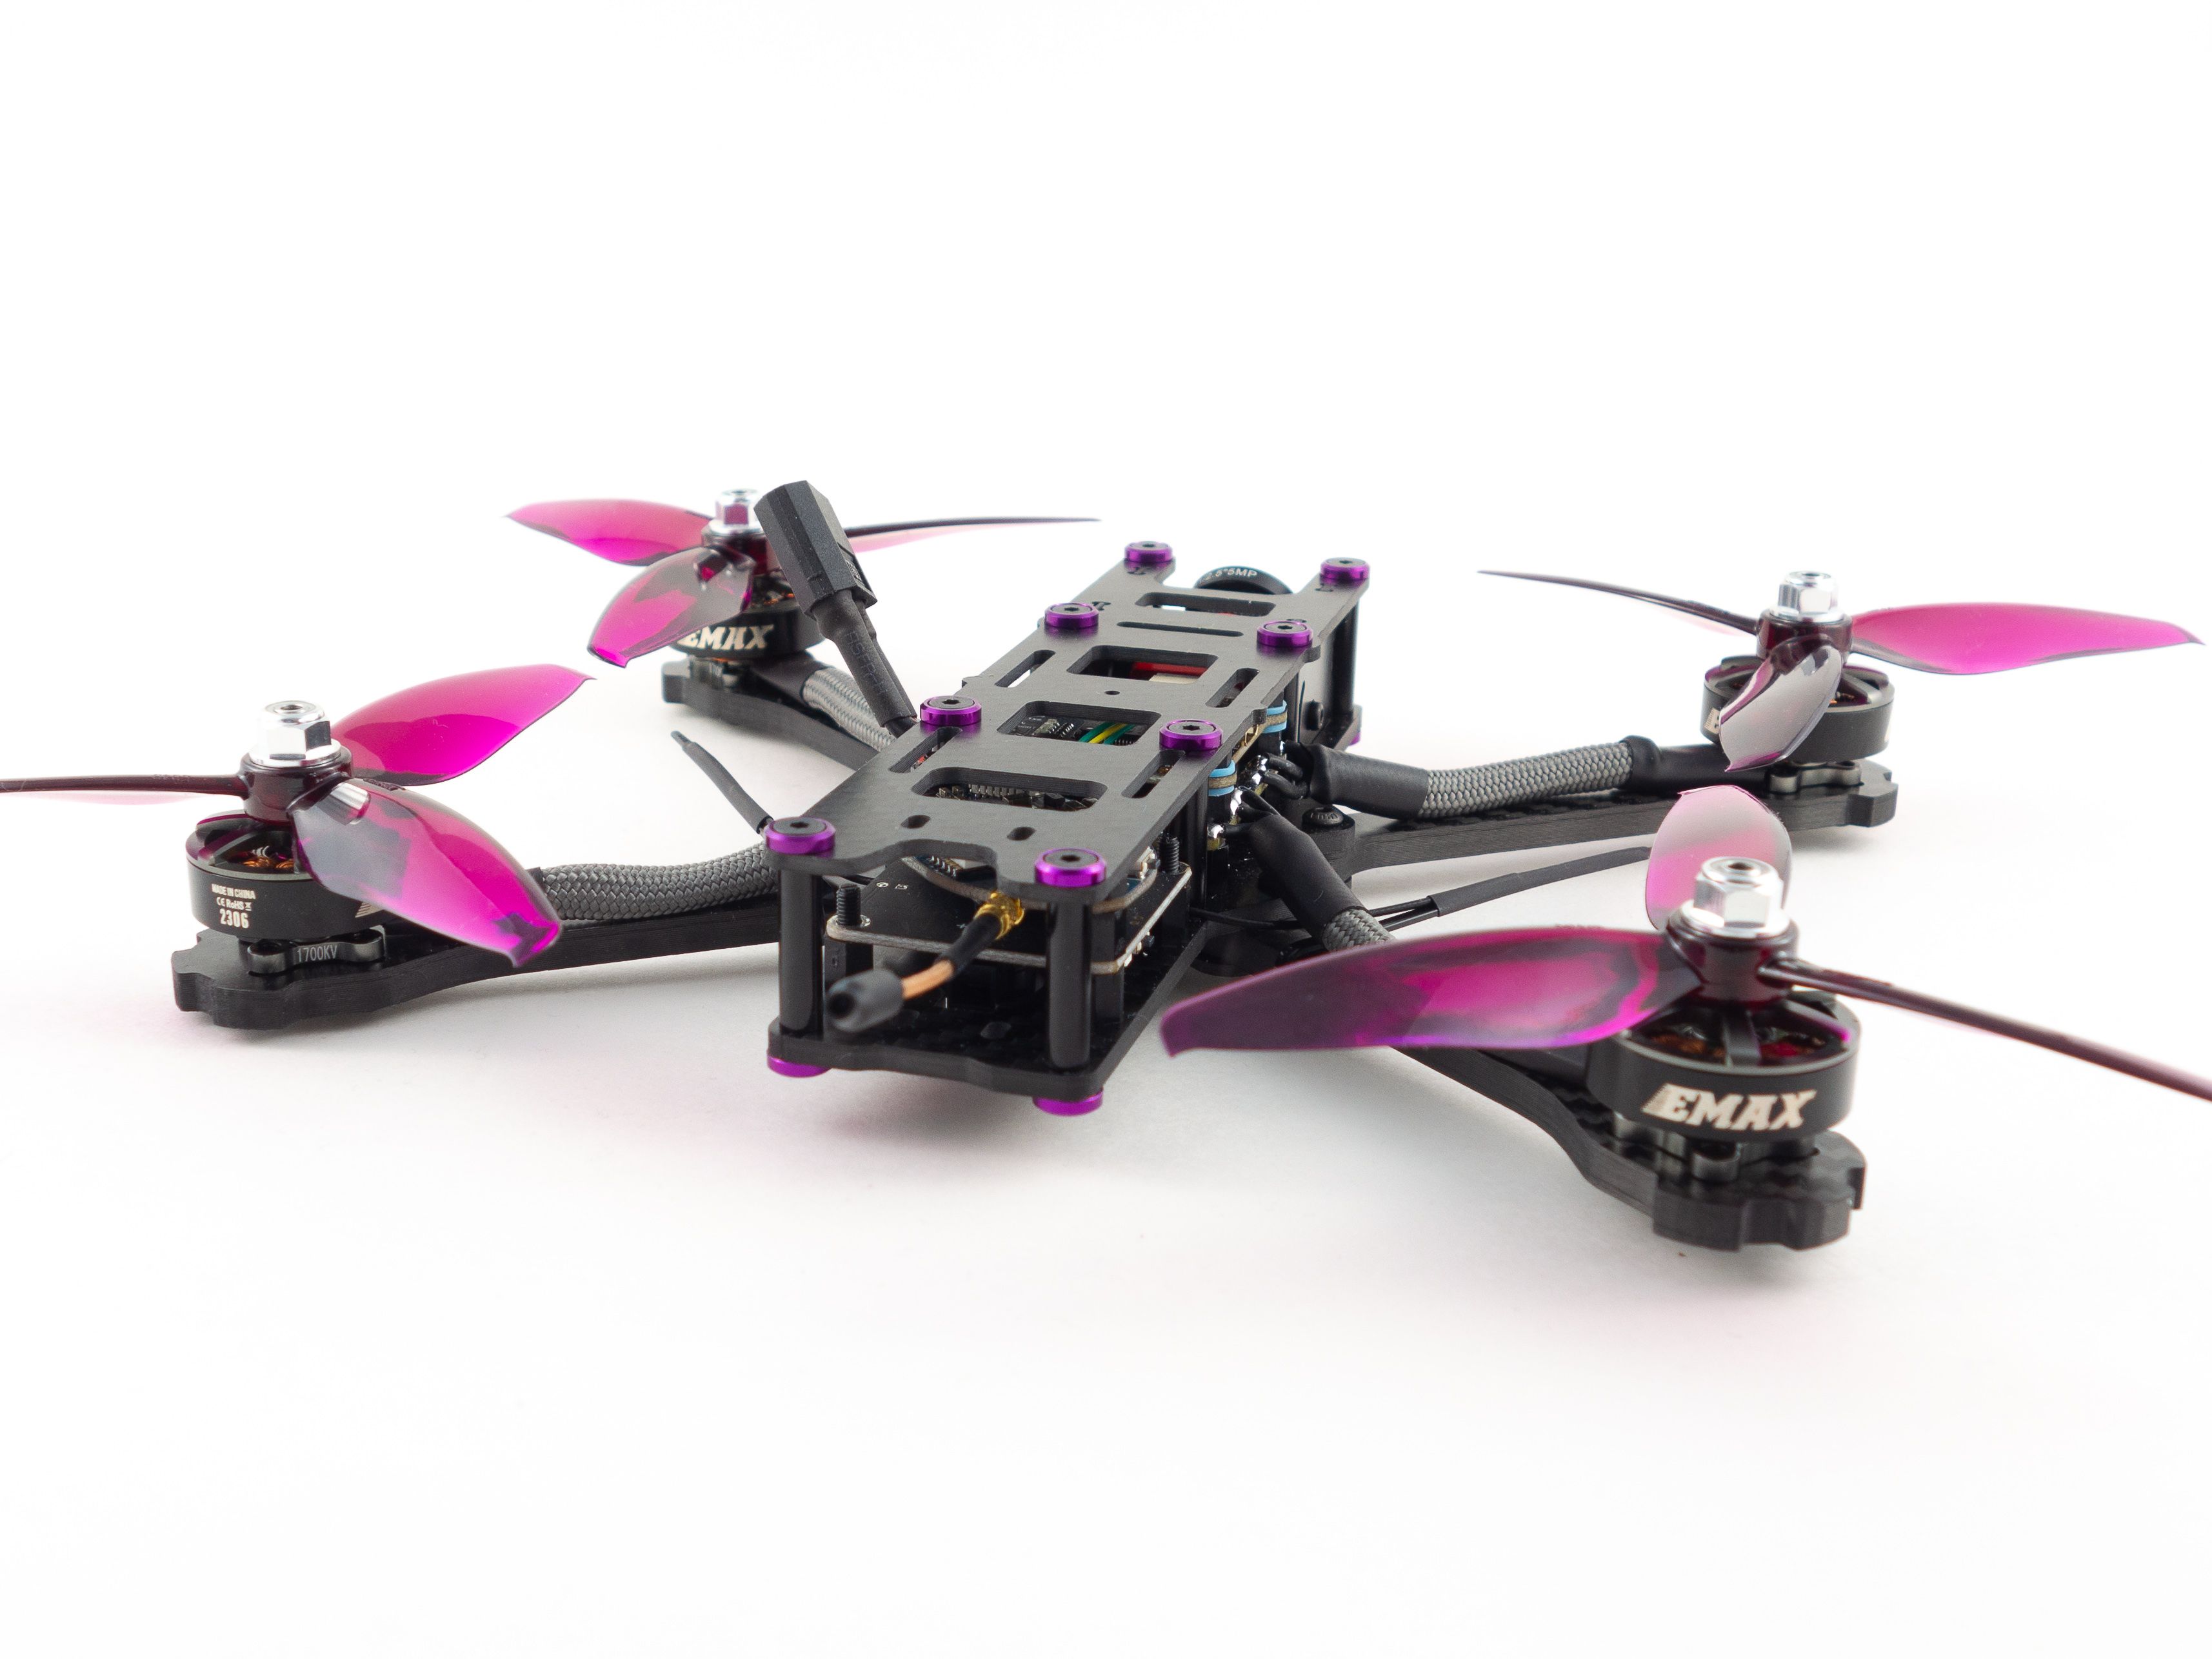
- Higher quality EMAX ECO 2306 1700kv motors
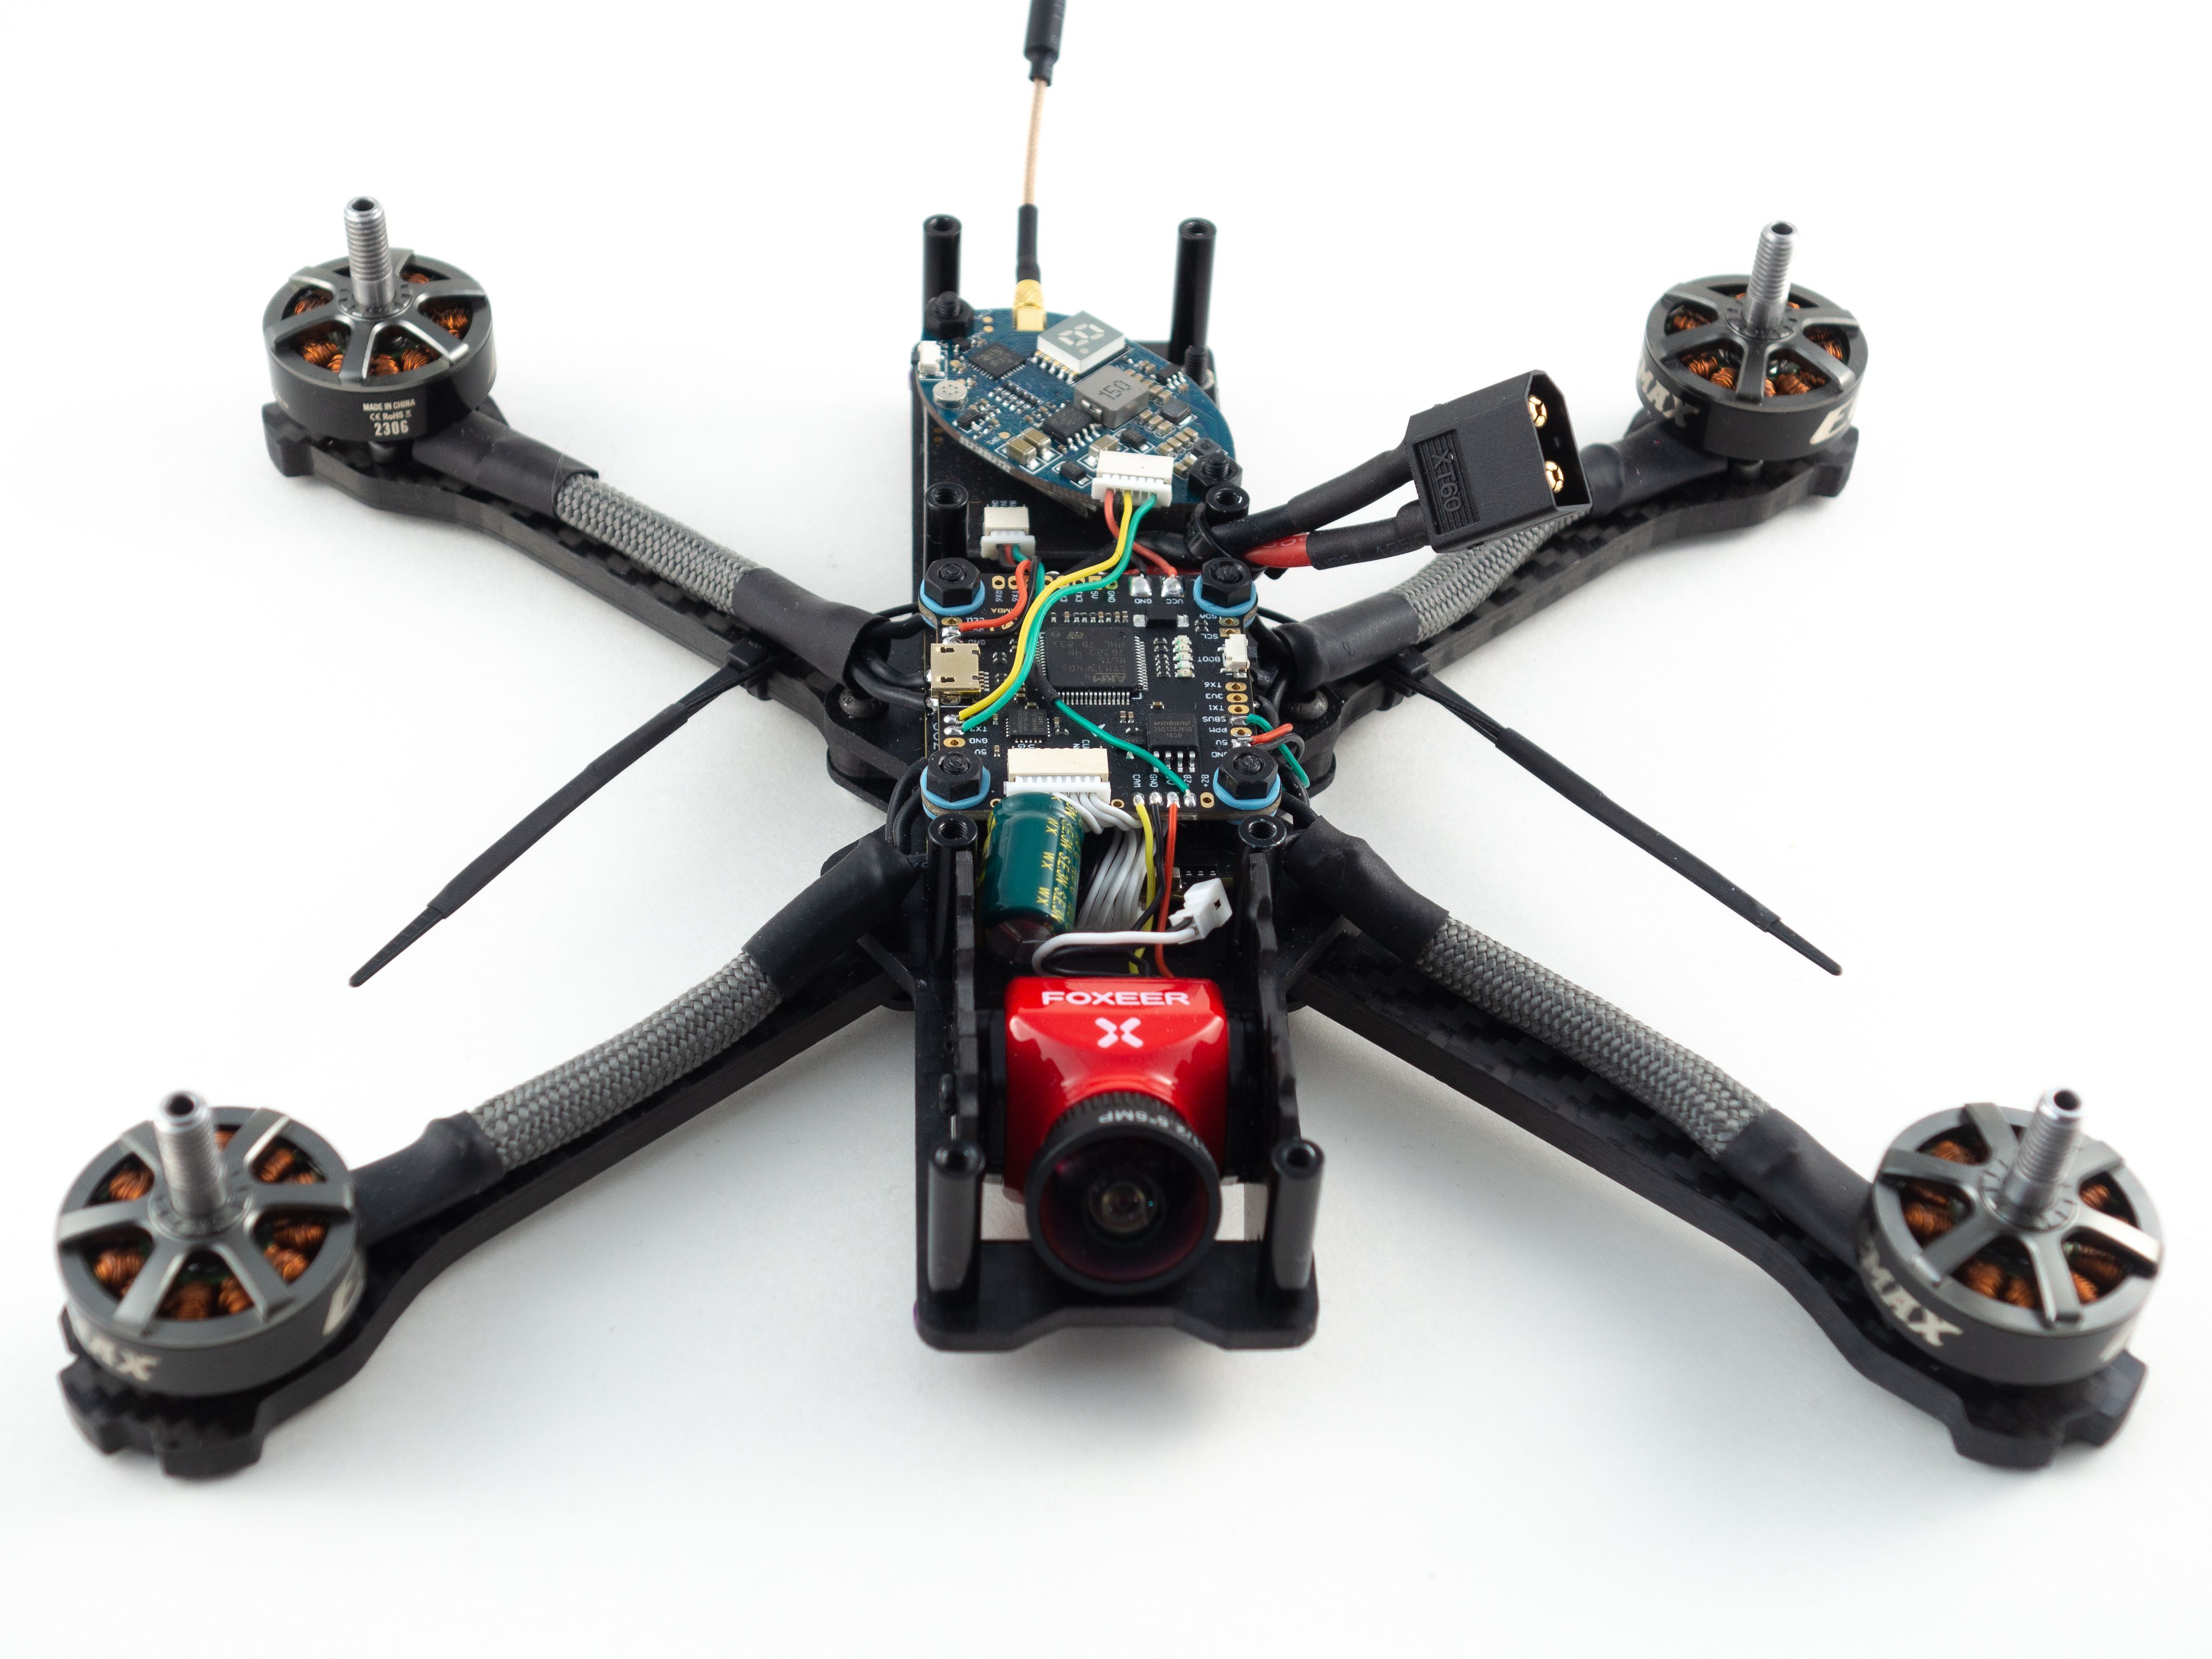
- Foxeer's top-of-the-line Falkor mini camera
- Eachine 25mw-1000mw Leaf VTX with microphone
Tools
This isn't the most challenging build, but it does require soldering a number of wires. I counted at least 28 wires to various pads. I highly recommend a quality iron like the Hakko 888D and Kester 63/37 solder. Otherwise here is a comprehensive list of tools require to put this together.
- Soldering iron
- 2.0mm hex driver
- Industrial Tweezers
- Wire cutter/stripper
- Scissors
- Heat gun or lighter
- Ruler and cutting mat
- Multimeter
Additional Supplies
- A variety of heat shrink tube sizes
- Blue Loctite
- Zip ties (small)
- 63/37 leaded solder
- Liquid soldering flux pen
Hardware
I used countersunk washers and flat top screws to attach the top plate, but these aren't necessary. I just used them to add a little color. The frame and motors include all the necessary screws and hardware.
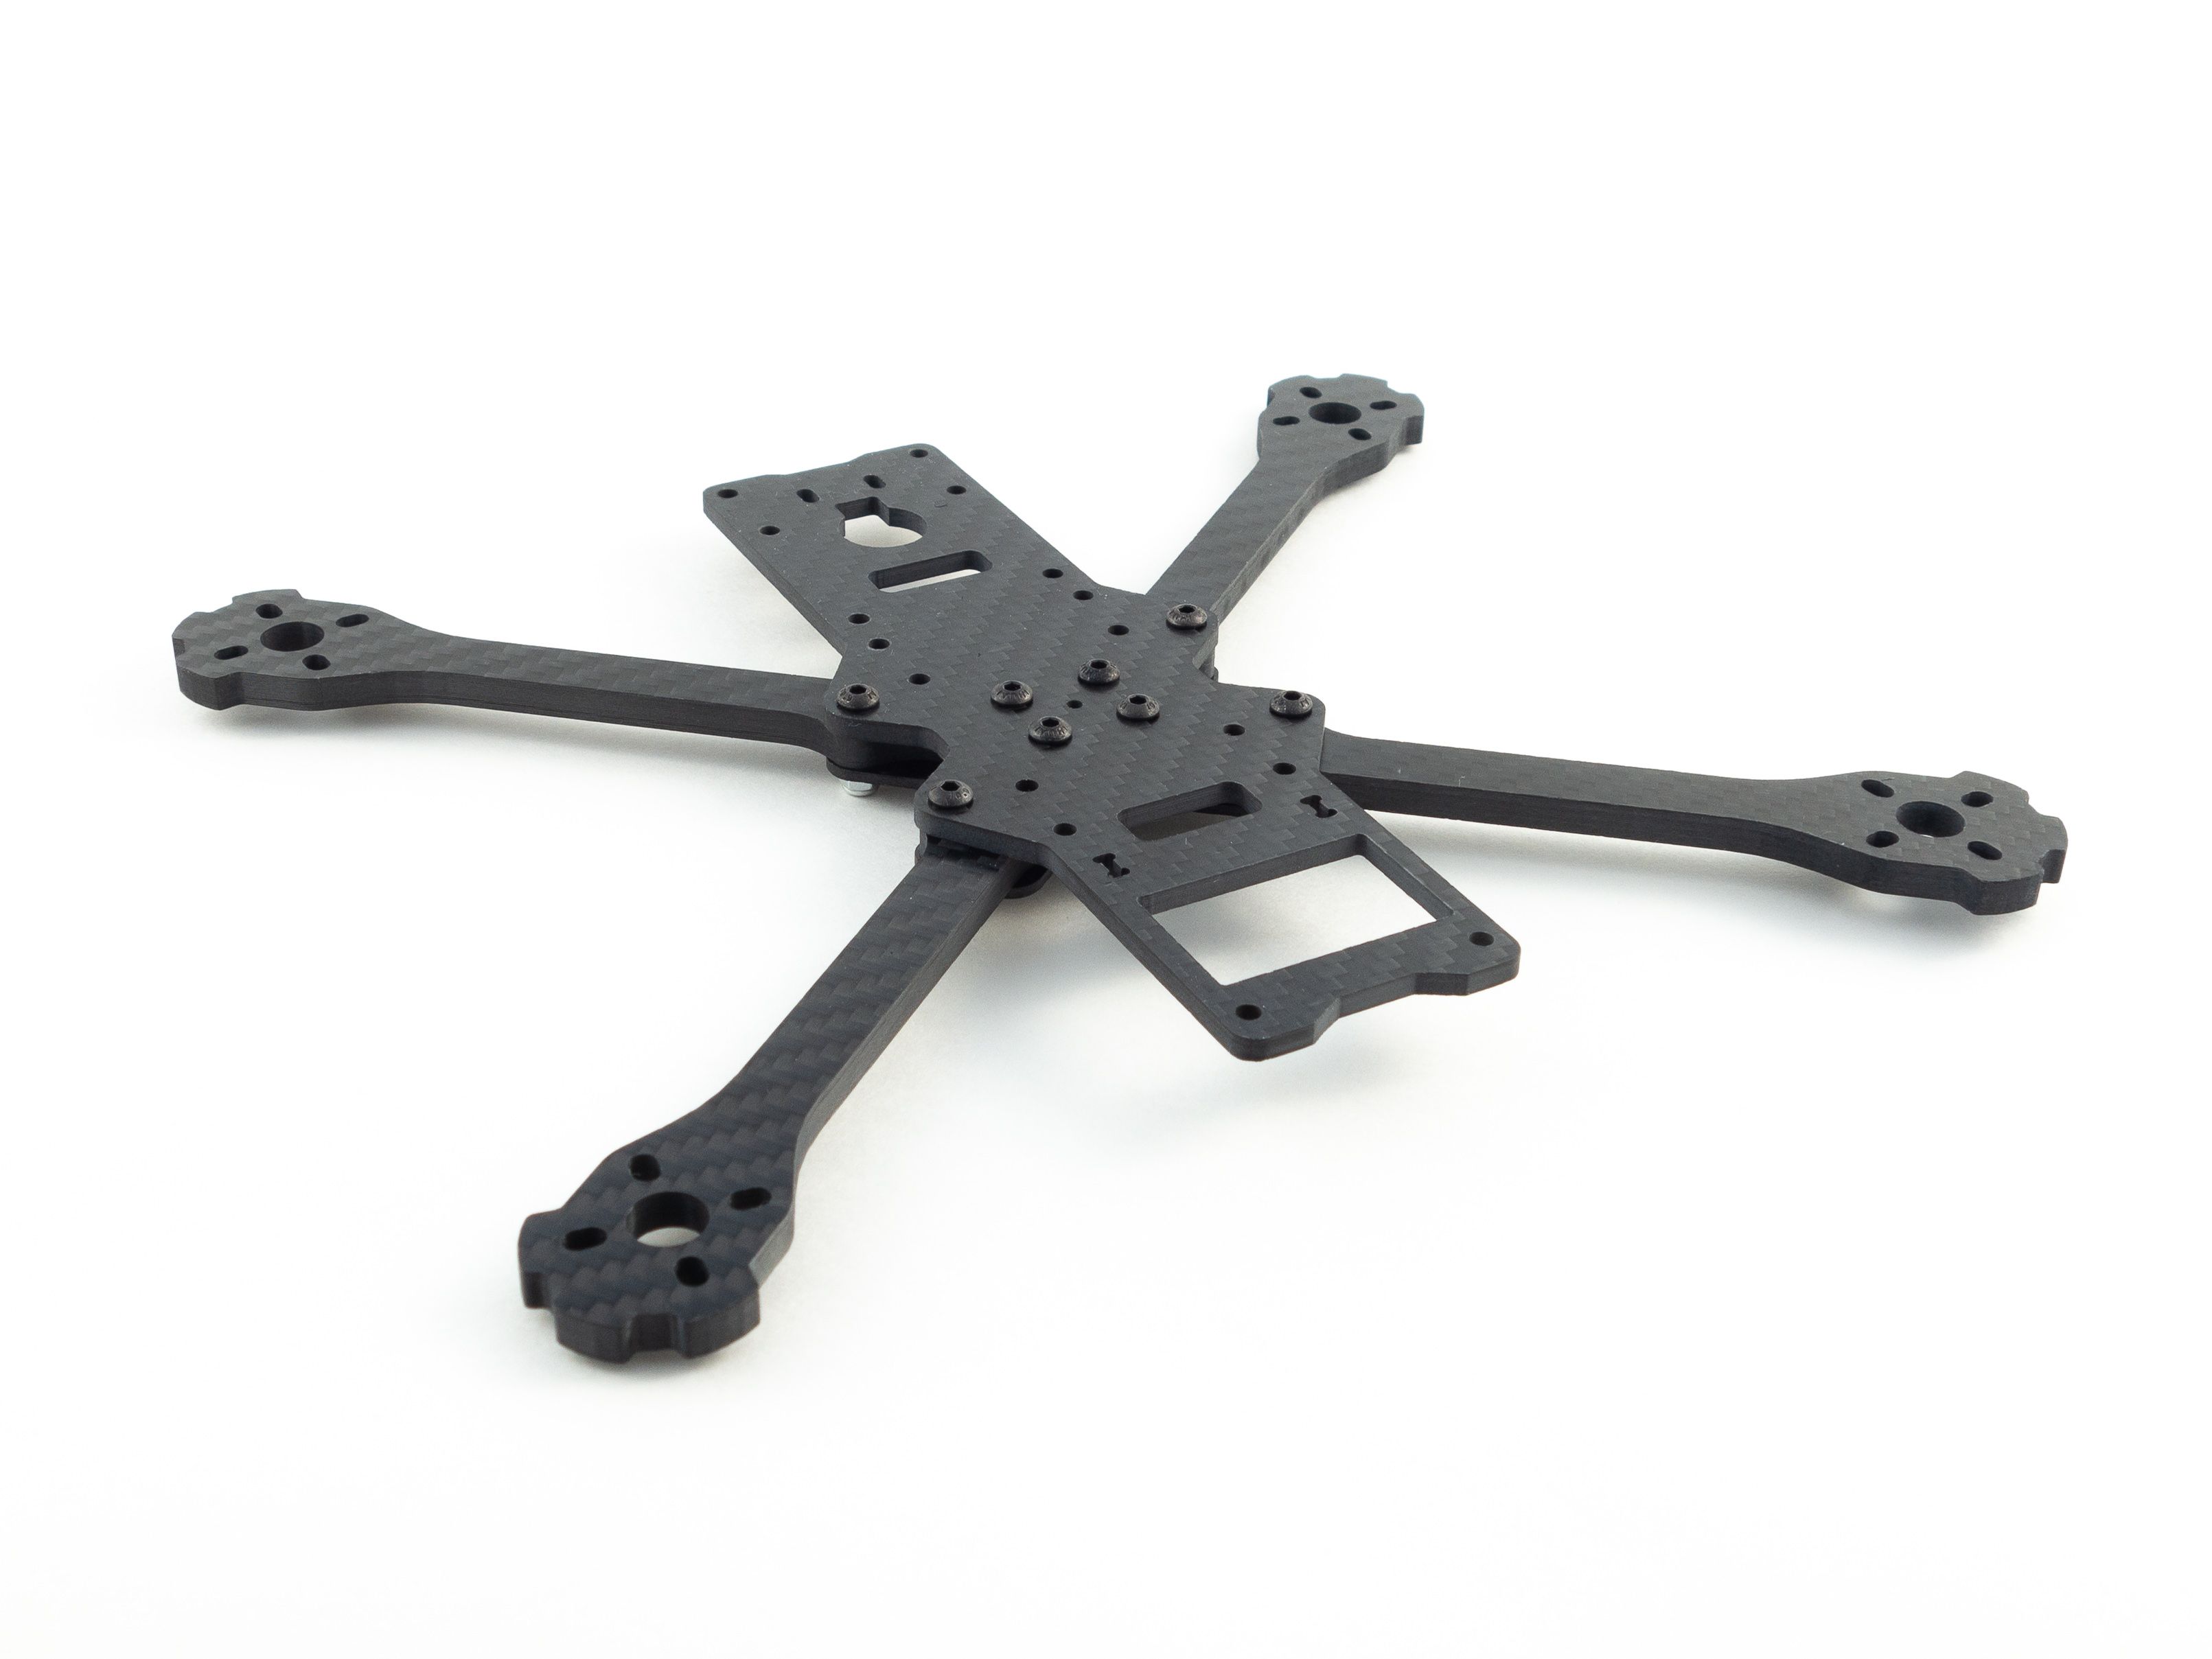
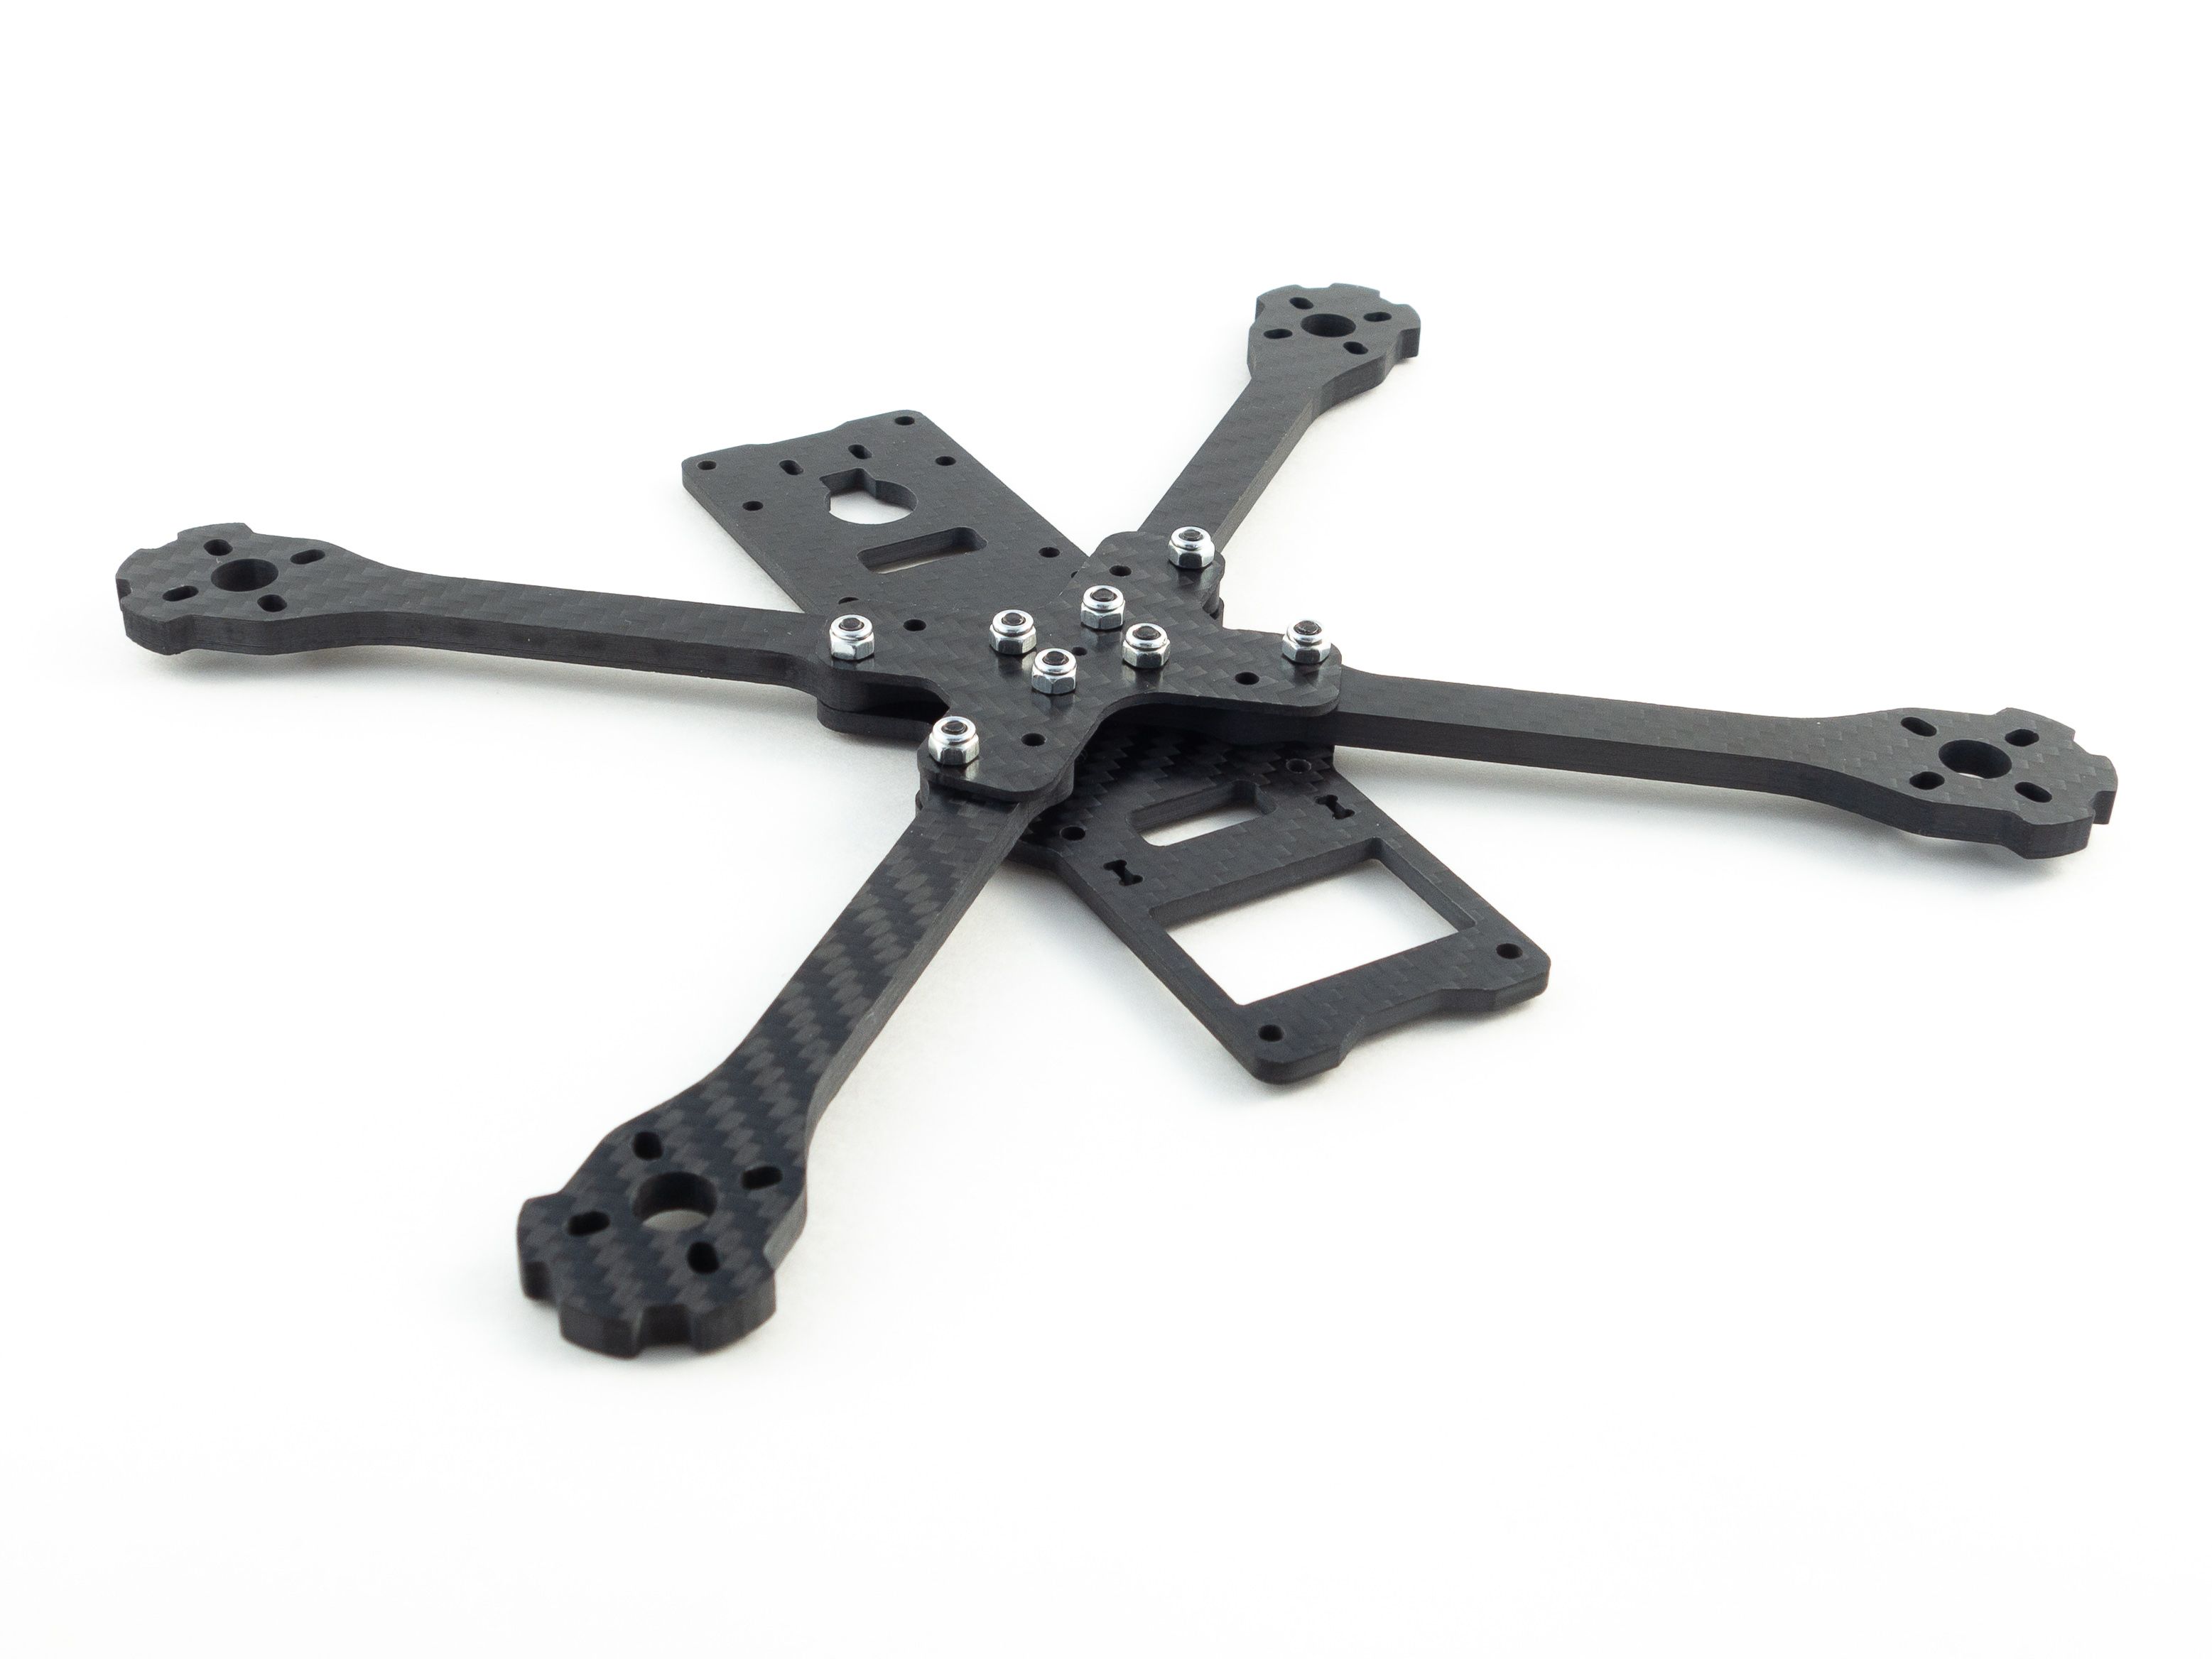
Frame Assembly
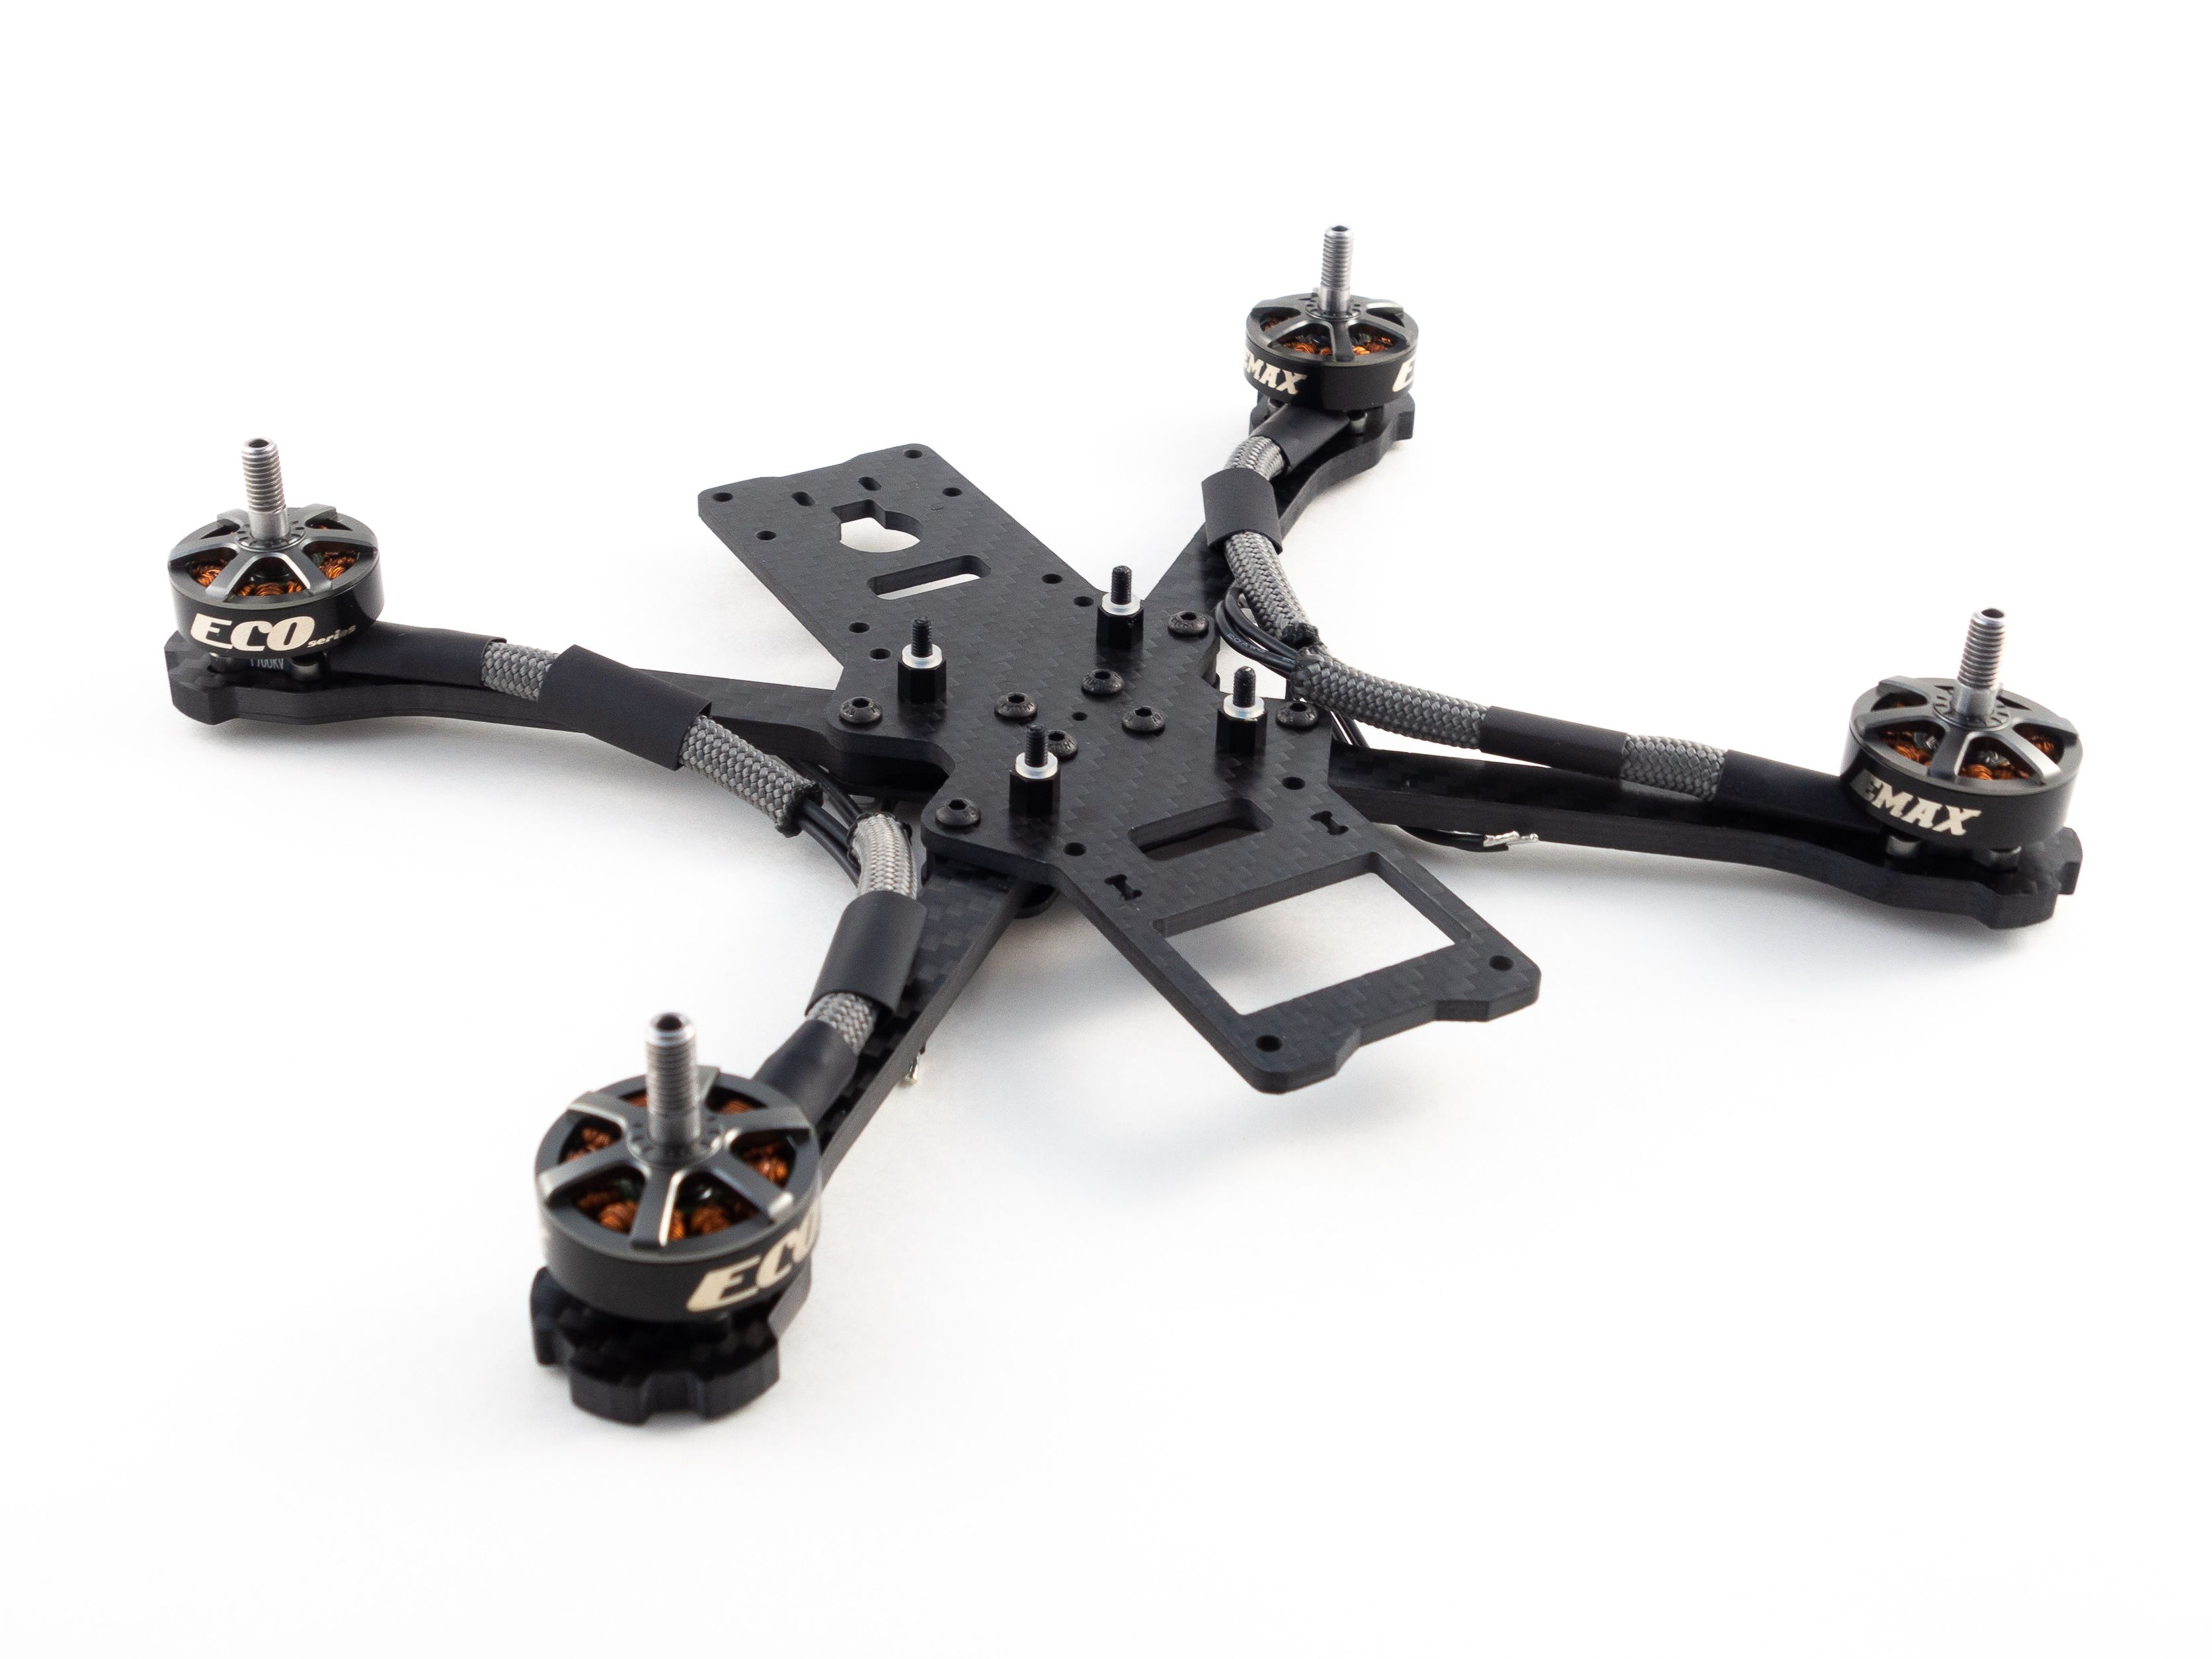
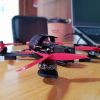
The X220HV frame is a nice upgrade to the more traditional Martian II used on all my previous builds. The stack space has been reduced from 35mm to 20mm, and we now have mounts for two stacks. This does limit what stack you can use, but the Diatone Mamba just squeaks by at 19mm tall. It also features a "chin" which allows for mini cameras as well as micro cams.
Assembling the frame is very straightforward. The arms mount under the bottom plate with the screws pointed downward into the silver lock nuts. Don't tighten everything down until you've got all the arms in place because you may need to wiggle them a bit.
Motors
While it's optional I like to sleeve my motor wires with 1/4" Para-Max. It's also a great way to add a little color to your build. Keep in mind that the traditional 550 Paracord is too narrow for all 3 motor wires.
- Cut 4 pieces of cord to 7 cm lengths, remove the inner core and, with a lighter, melt the ends to prevent frays.
- Sleeve the motor wires and add a couple pieces of 12mm shrink tube to cover the ends.
- Screw the motors onto the arms using the included "For 4mm thick arms" screws and blue Loctite.
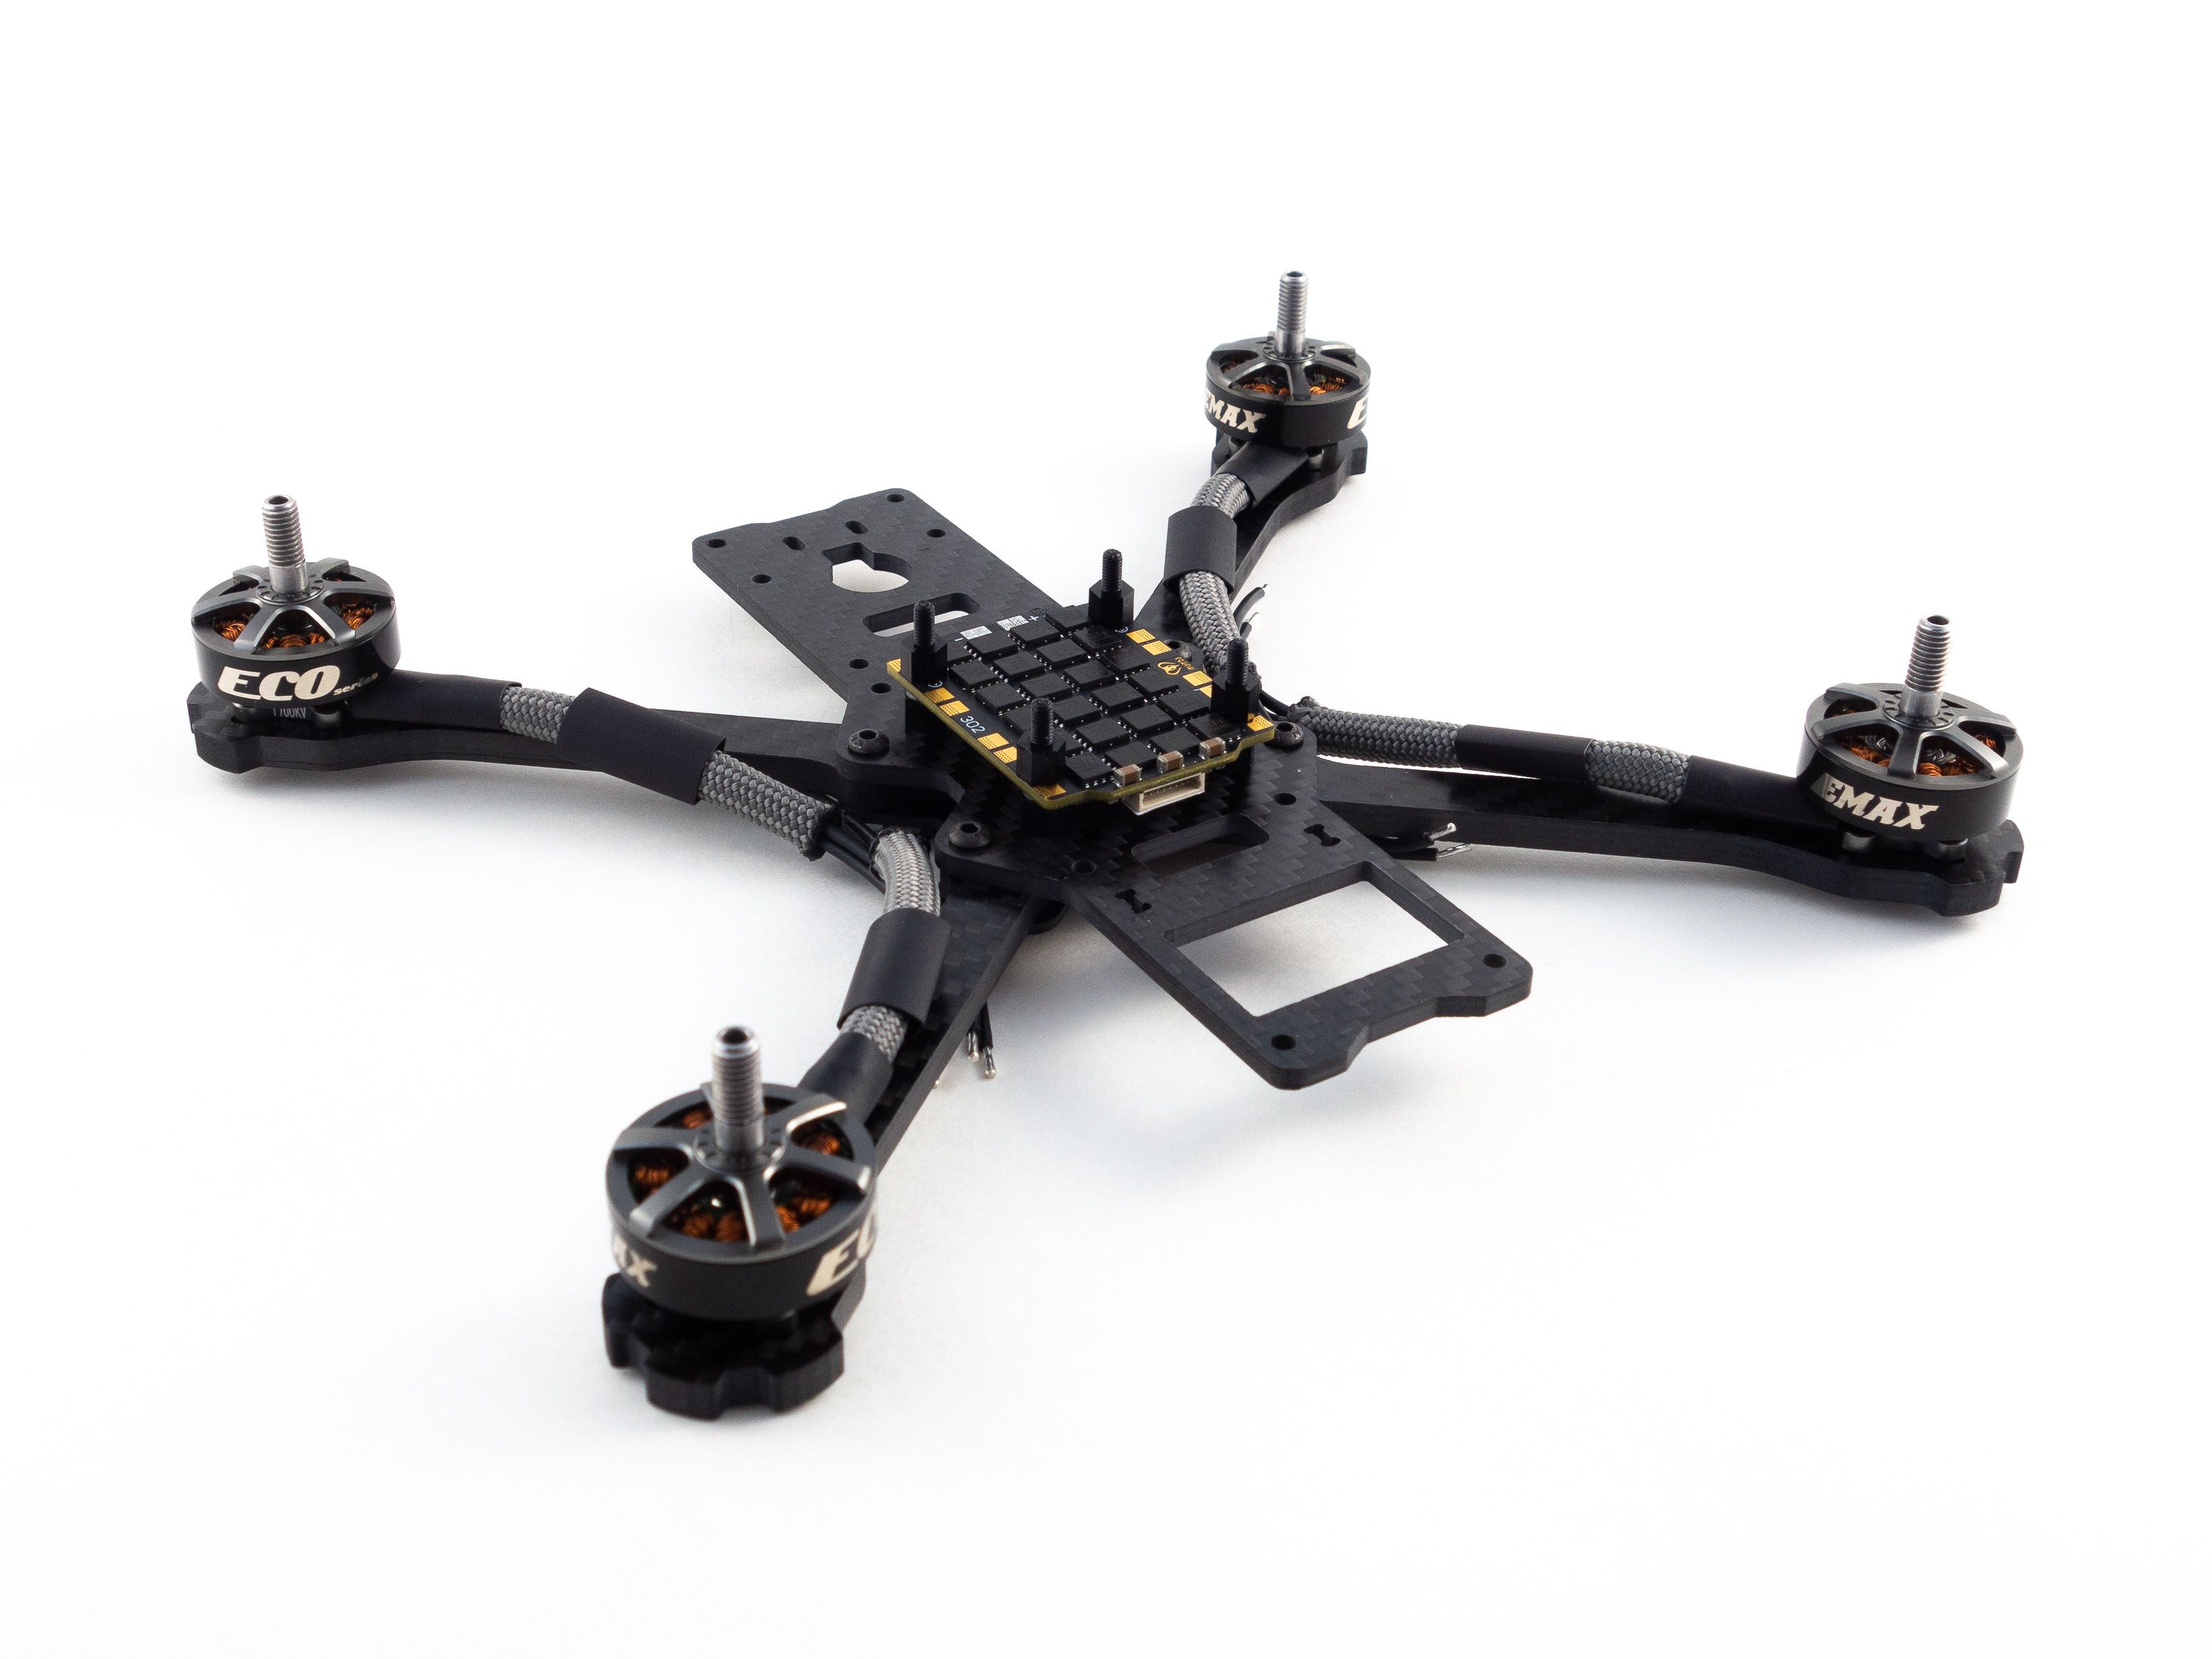
- Use the long screws included in the frame kit to mount the 4-in-1 ESC.
- Disassemble the Mamba stack and secure the bottom set of standoffs to the frame.
- Mount the 4-in-1 ESC and secure it with the next set of standoffs.
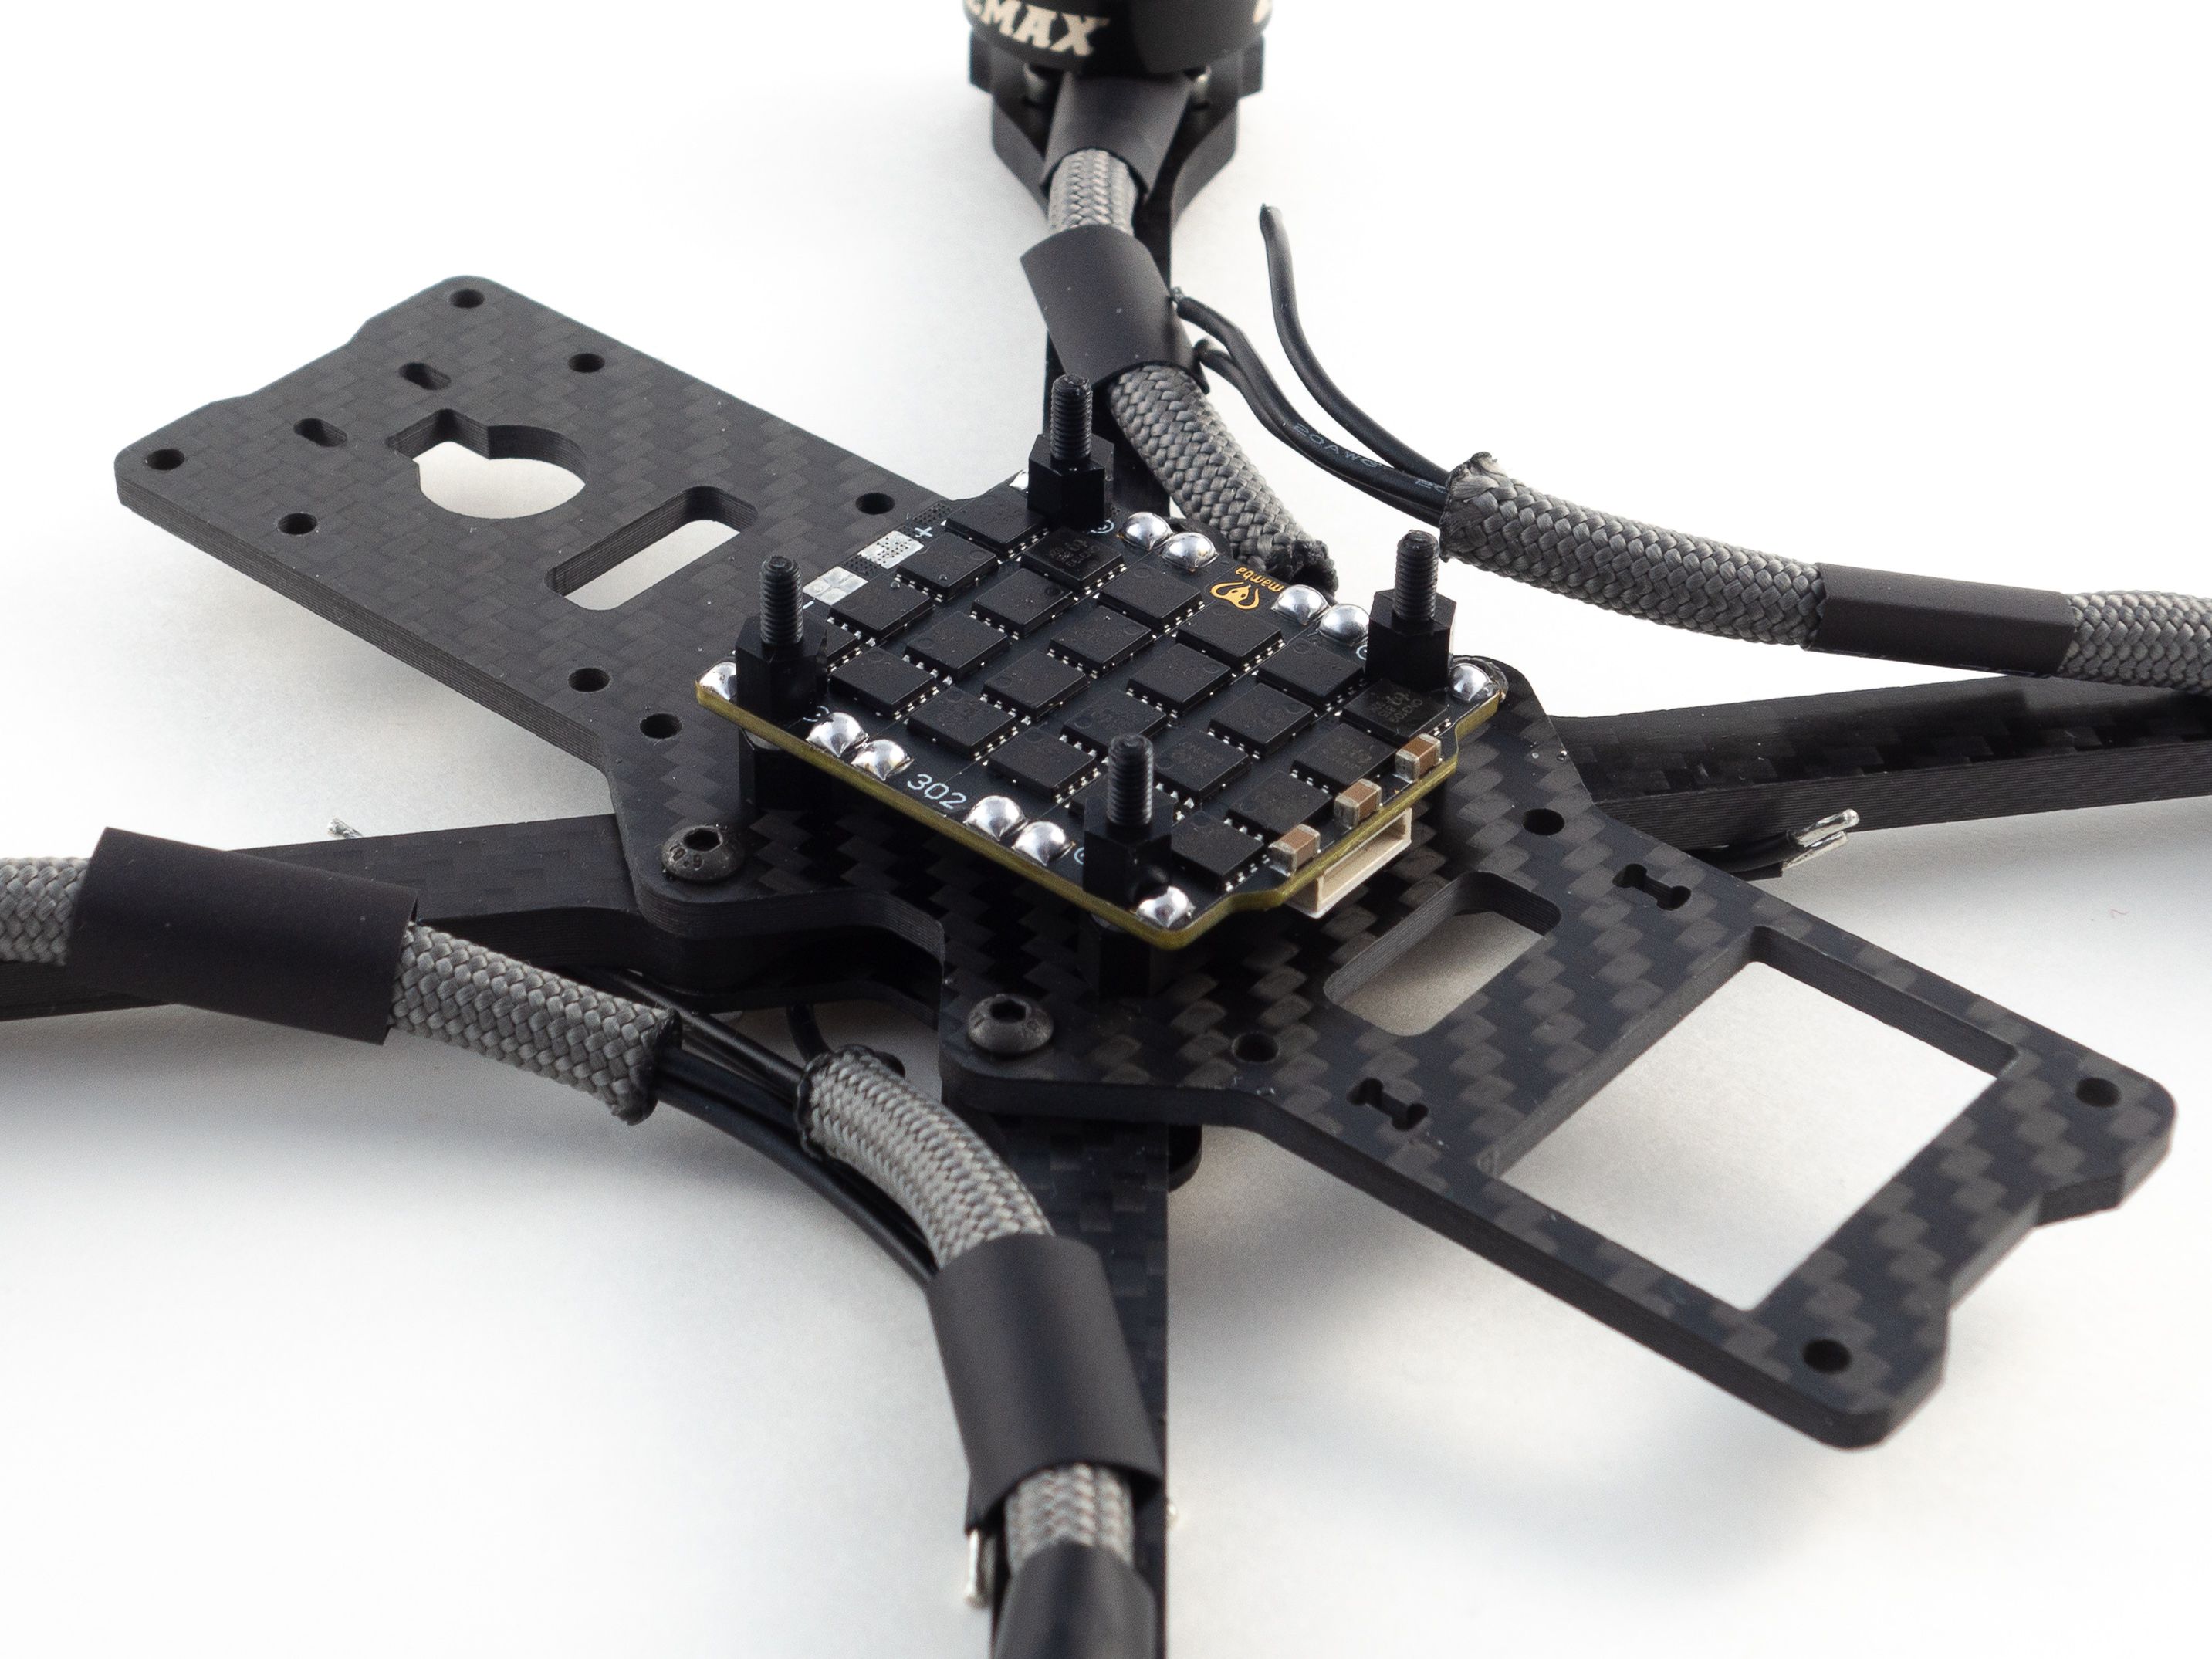
- Flux and tin each motor pad ensuring each is completely coated with a bubble of solder.
- Solder with the middle standoffs in place because the solder will prevent you from screwing them on later.
- If you're right-handed start from the rightmost motor pad and solder all 6 wires from right to left.
- If you're left handed start from the left.
- Cut each wire to length as you go, not all at once.
- Keep a flux pen handy because the middle pads are extremely close together and tend to bridge if you aren't careful.
- Position the shrink tube over the ends of the cord and melt it. You can use a heat gun to make quick work of this.
Power Connector
The flight controller comes with everything you need. Just look under the instructions at the bottom of the container.
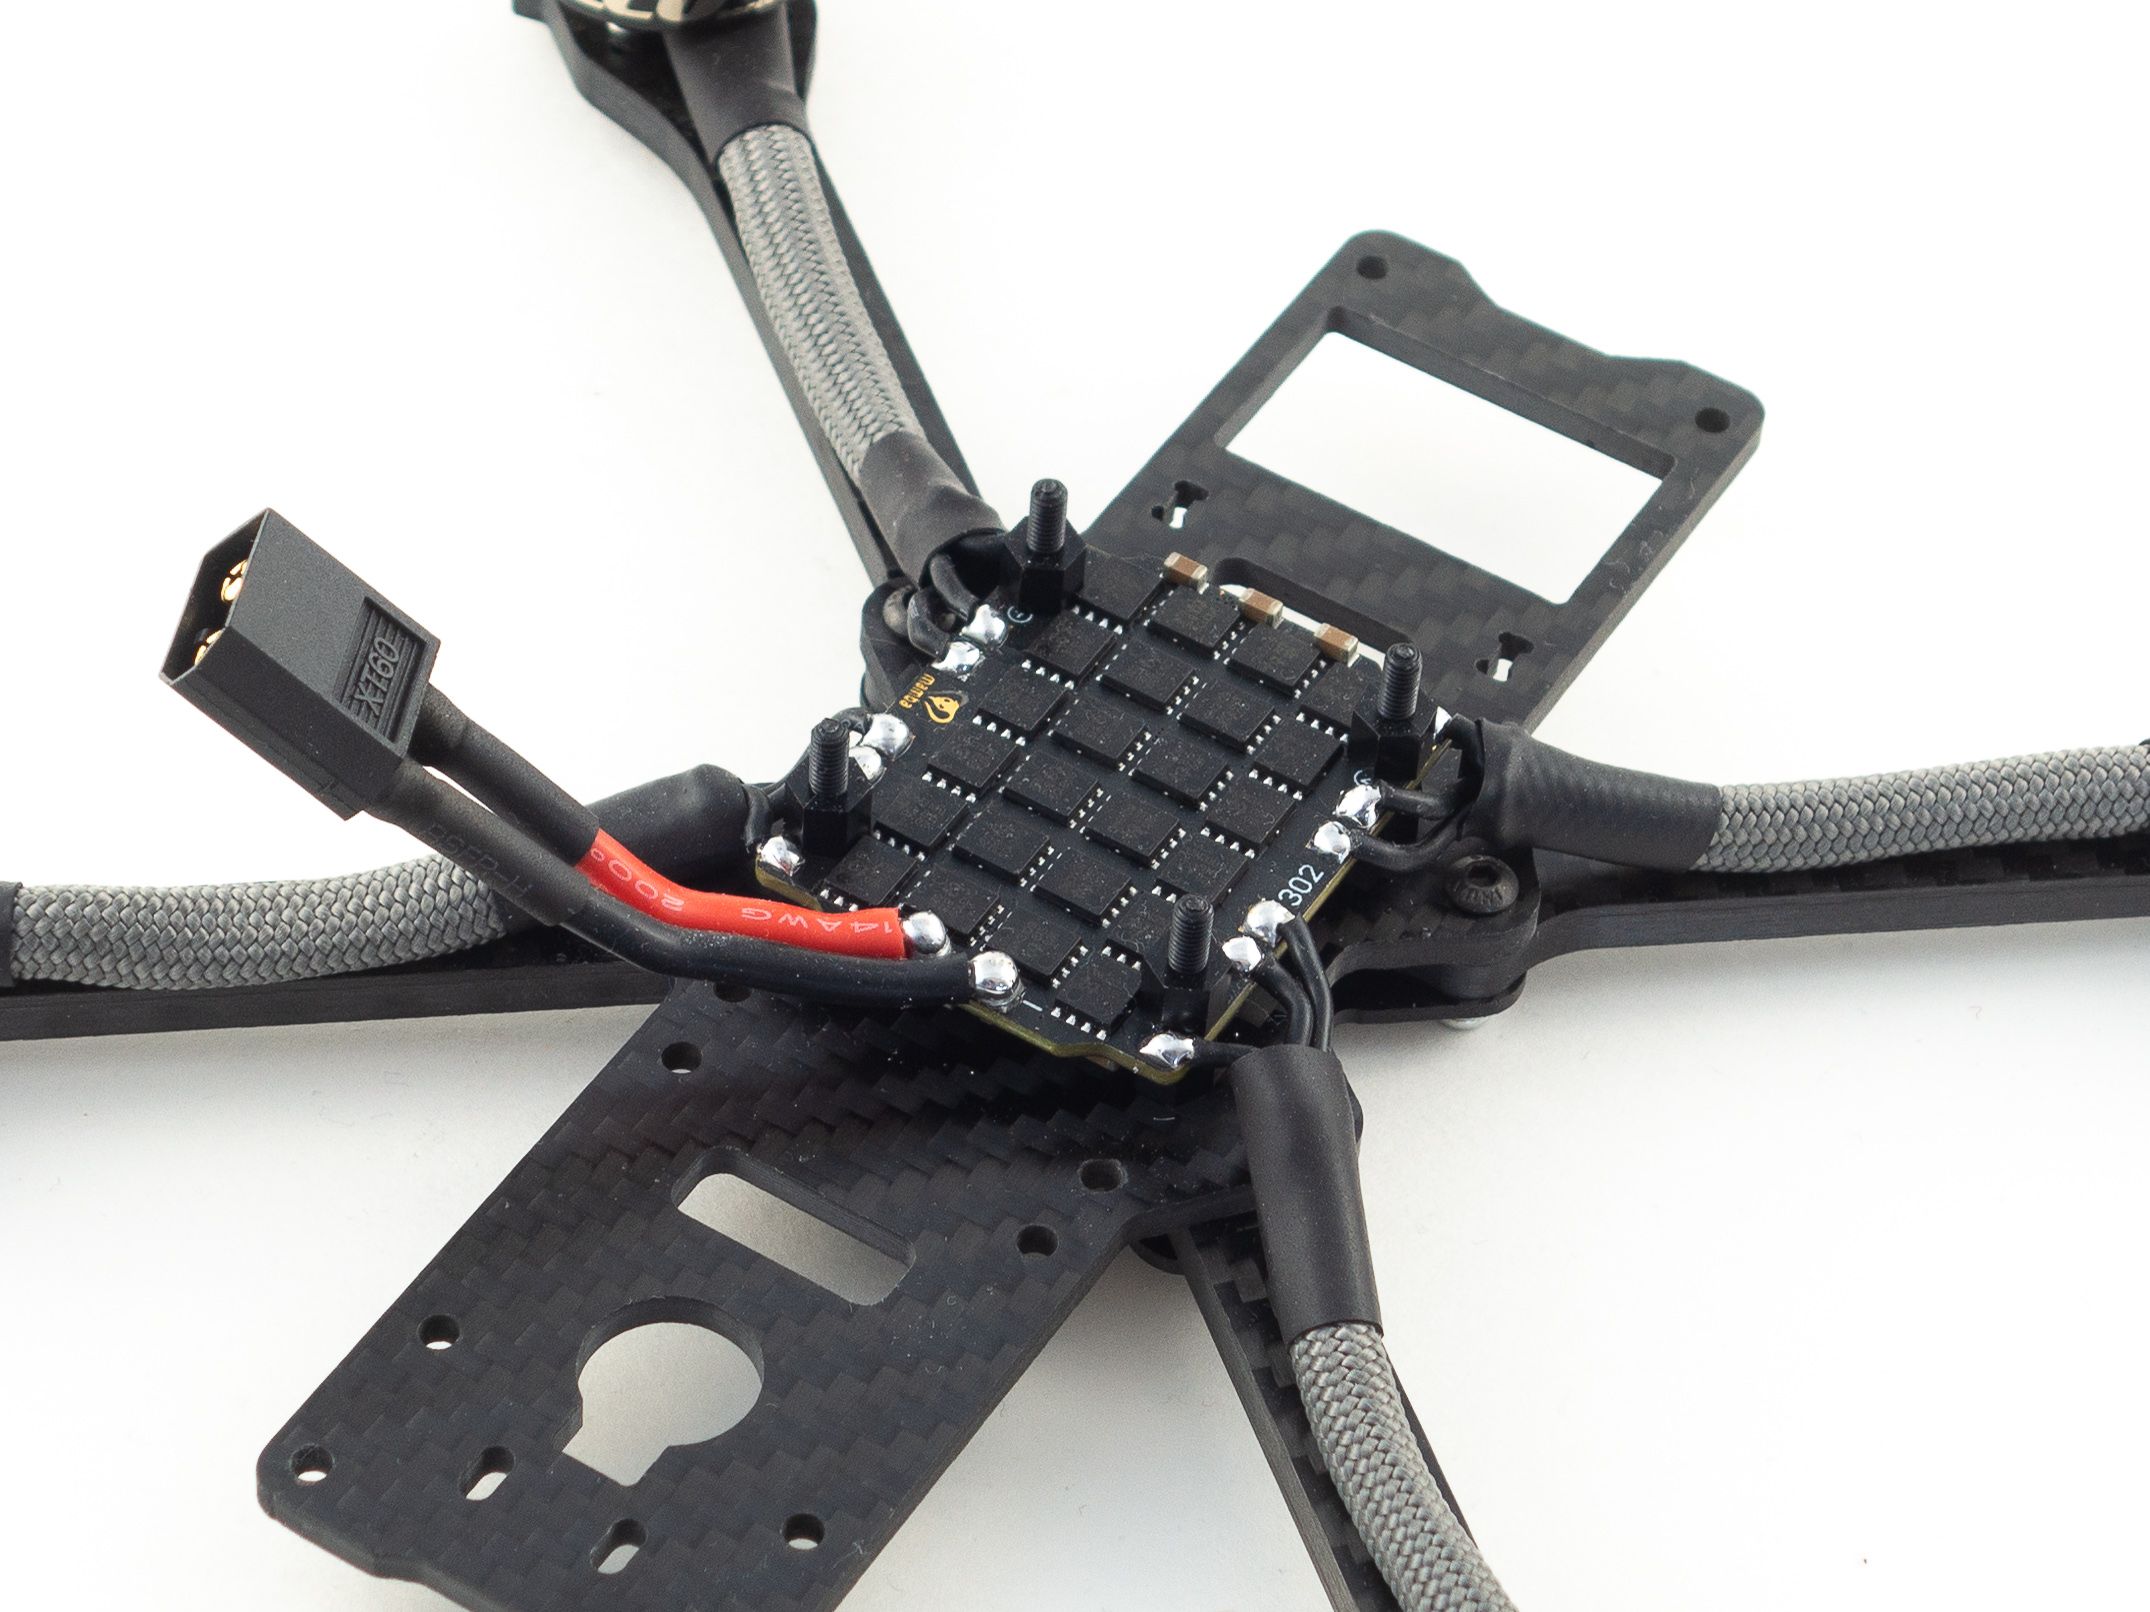
- Fill the XT60 wire wells with a bit of solder.
- Solder the red and black wires ensuring red is on the + side of the battery connector.
- Add shrink tube to cover the wire around the XT60 connector.
- Flux and add solder to the battery pads on the 4-in-1 ESC.
- Solder the battery leads at an angle toward the side so it's accessible from the top of the quad.
- You'll need to cut one wire slightly shorter than the other to make this work.
There is a known issue with the X220HV BNF kit where the battery lead creates video noise being in such close proximity to VTX. It's much better to send the battery lead out the side.
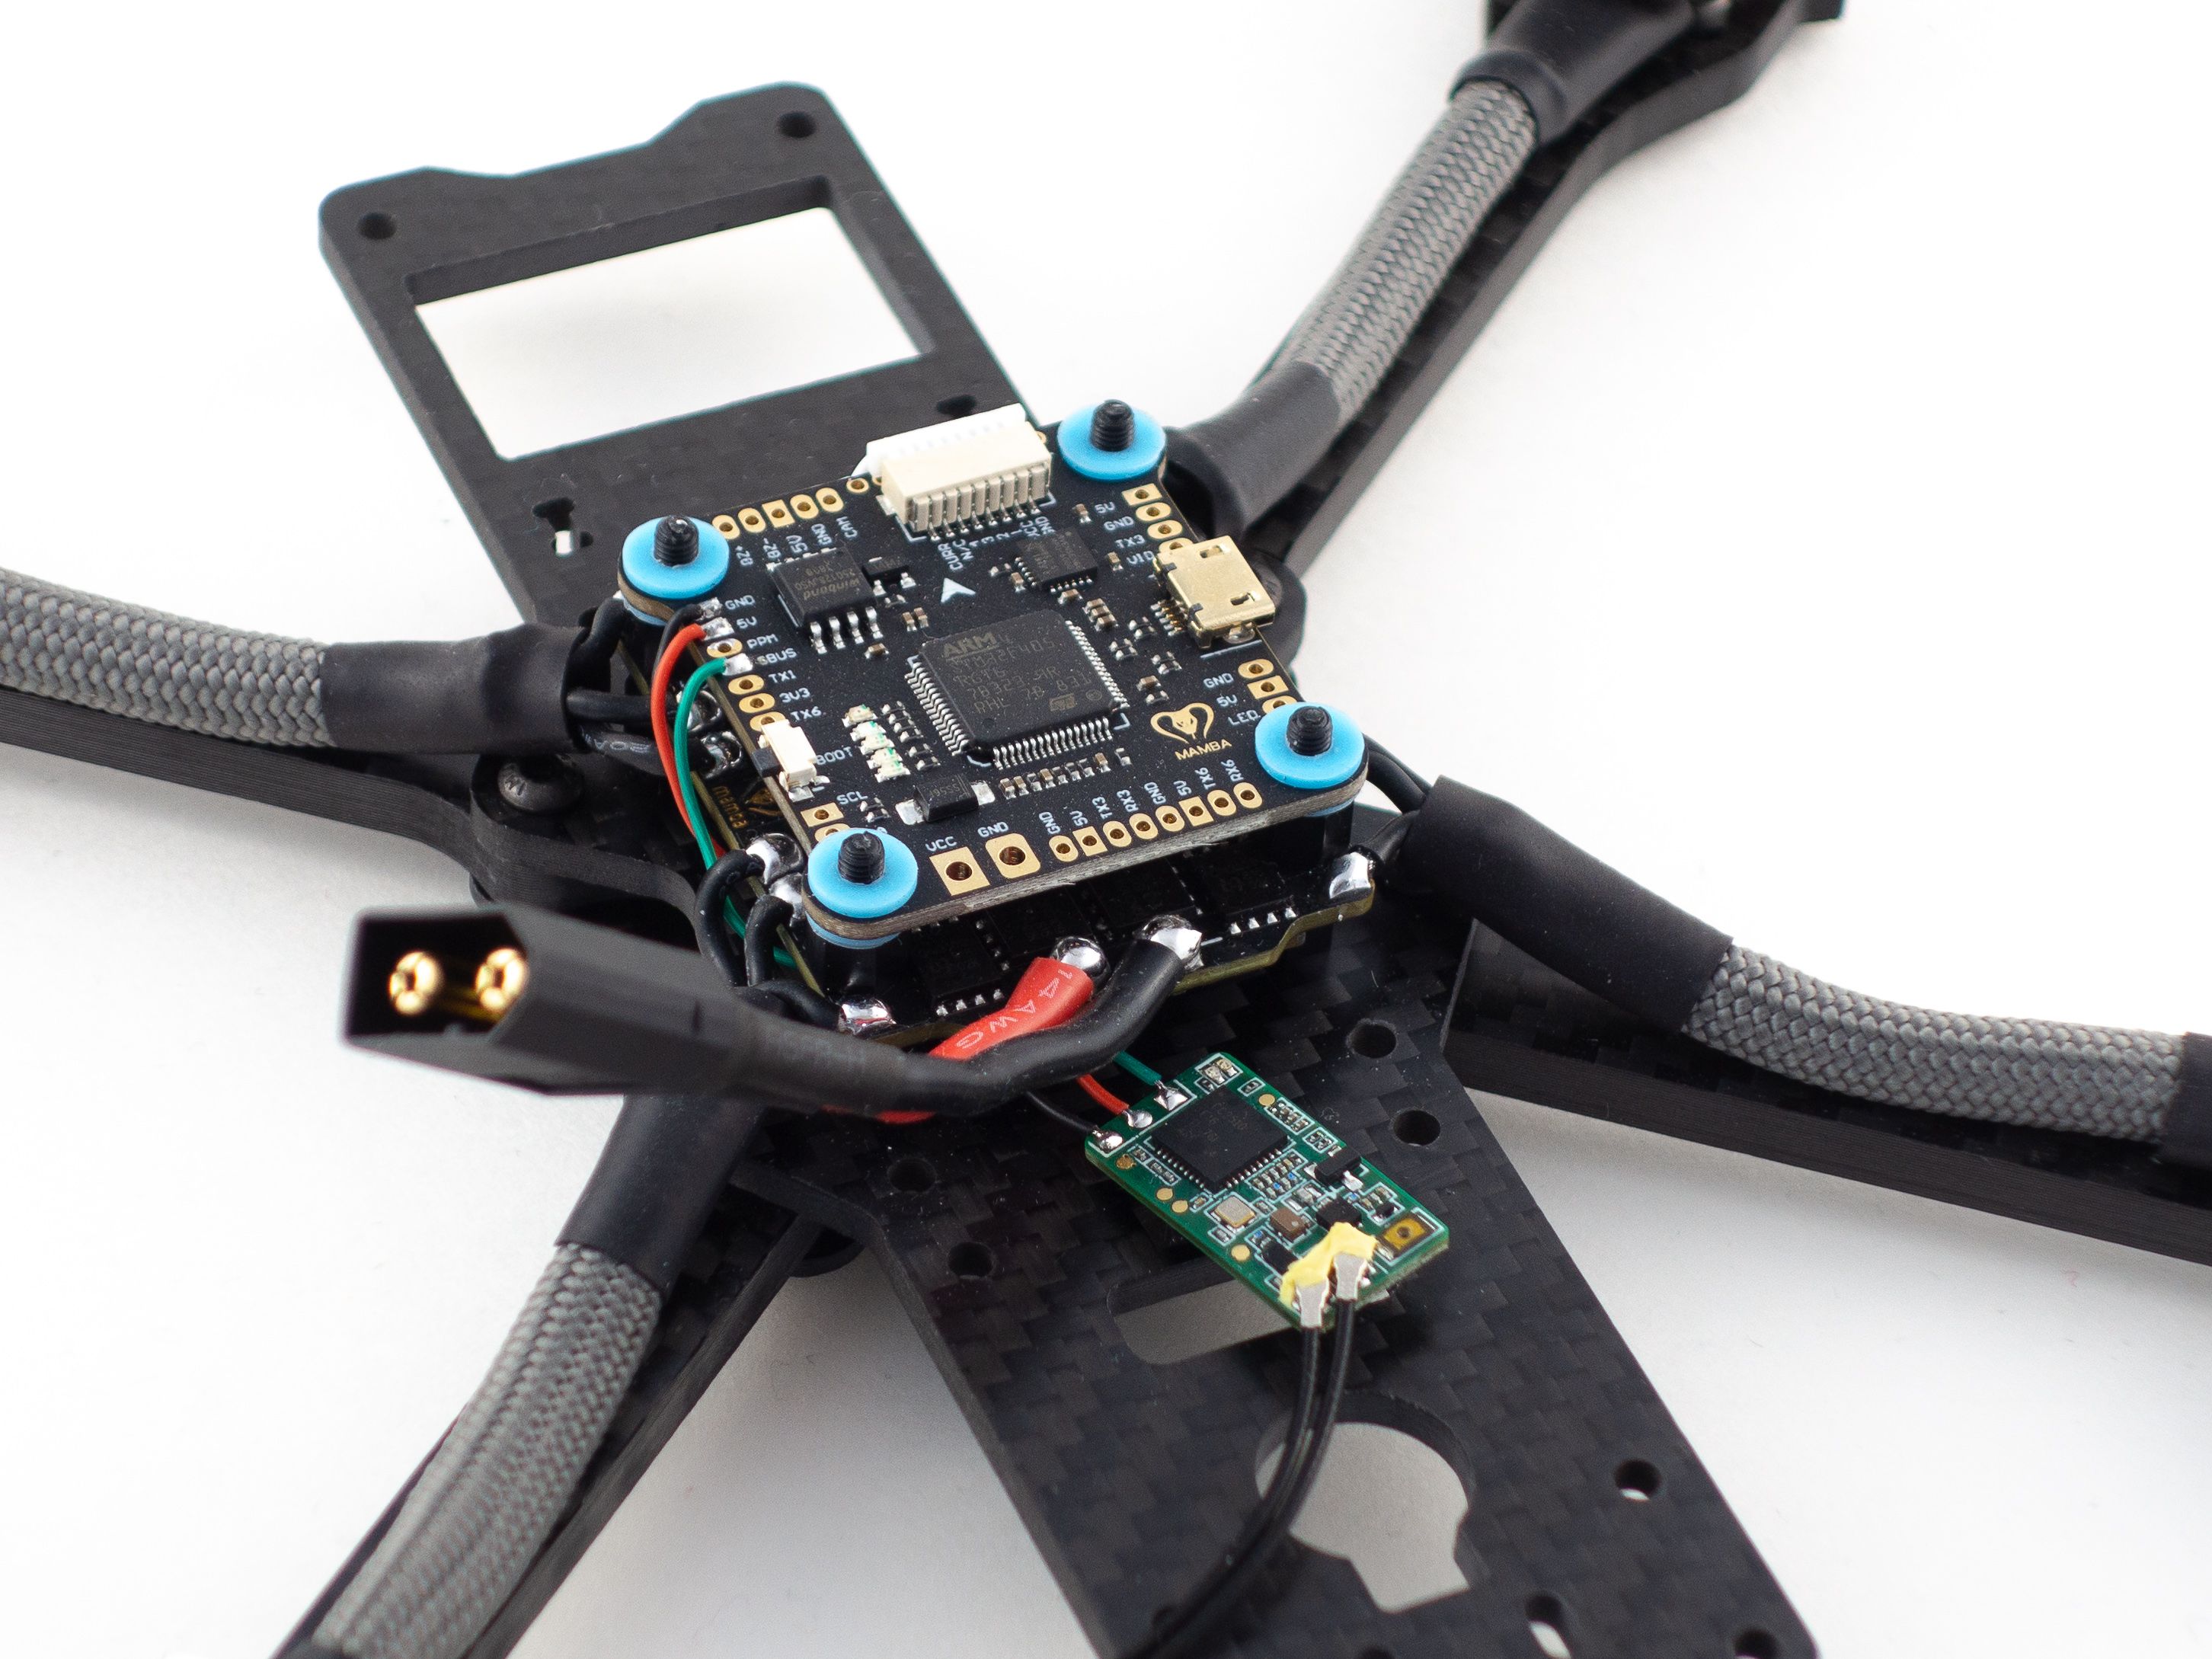
Binding the Receiver
Now that you've got power you can add the receiver and bind it. I used the FrSky XM+, but you'll need to choose a receiver that matches your radio. It's best to slide it under the rear of your 4-in-1 ESC. Just leave the bind button exposed to make it accessible for the future.
- Solder 3 wires to the 5v, GND and SBUS pads on the receiver.
- The camera comes with lots of spare wire, so borrow some red, black and green from there.
- Add your flight controller to the stack and re-connect it to the 4-in-1 ESC with the included wire harness.
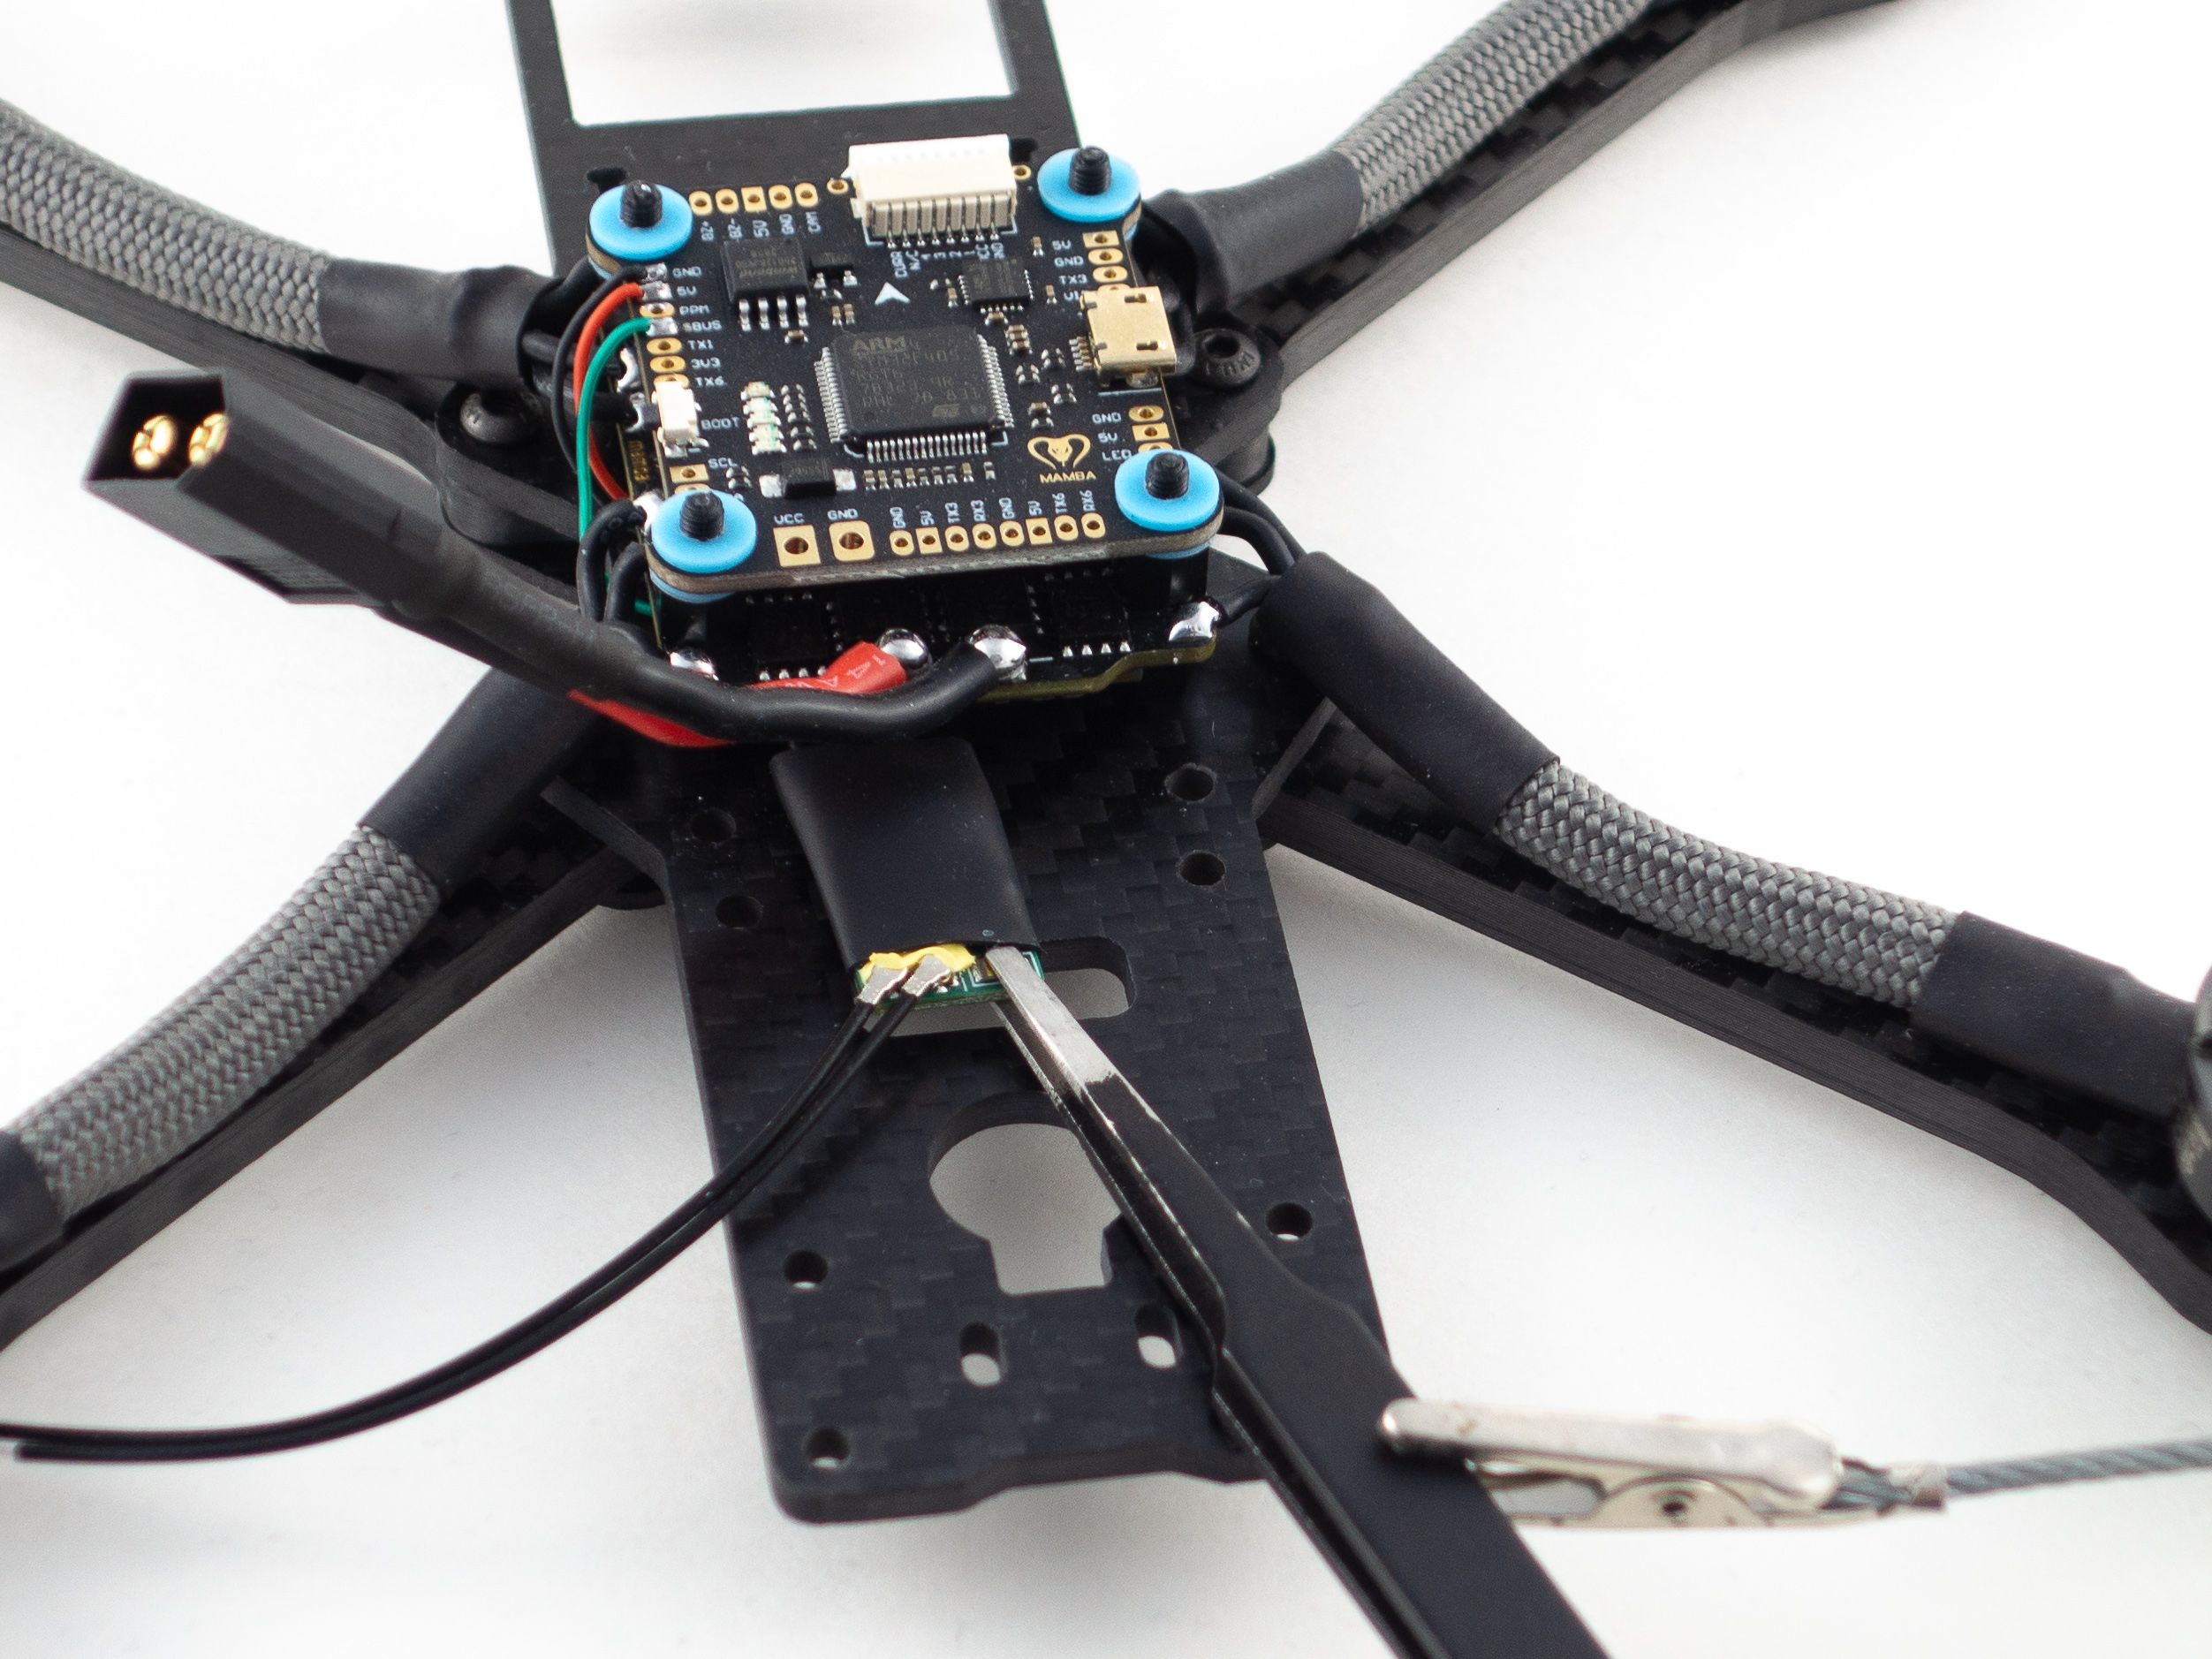
- With the receiver in position feed the wires under the 4-in-1 ESC and solder them into place on the flight controller.
- Bind your receiver
- Be sure to double check that you don't have continuity between your main battery leads.
- Add enough shrink tube to the receiver to protect it from shorts against the frame or 4-in-1 ESC.
- Hold your receiver bind button and plug your main battery in. (It's helpful to clamp this button down with tweezers to free your hand)
- Put your radio into bind mode and ensure you're bound.
- Now that you're bound you can tuck your receiver away under the stack.
- Attach small zip-ties to your rear arms and shrink tube the antennas to the zip ties.
- Secure your flight controller with the included nylon nuts.
Beeper
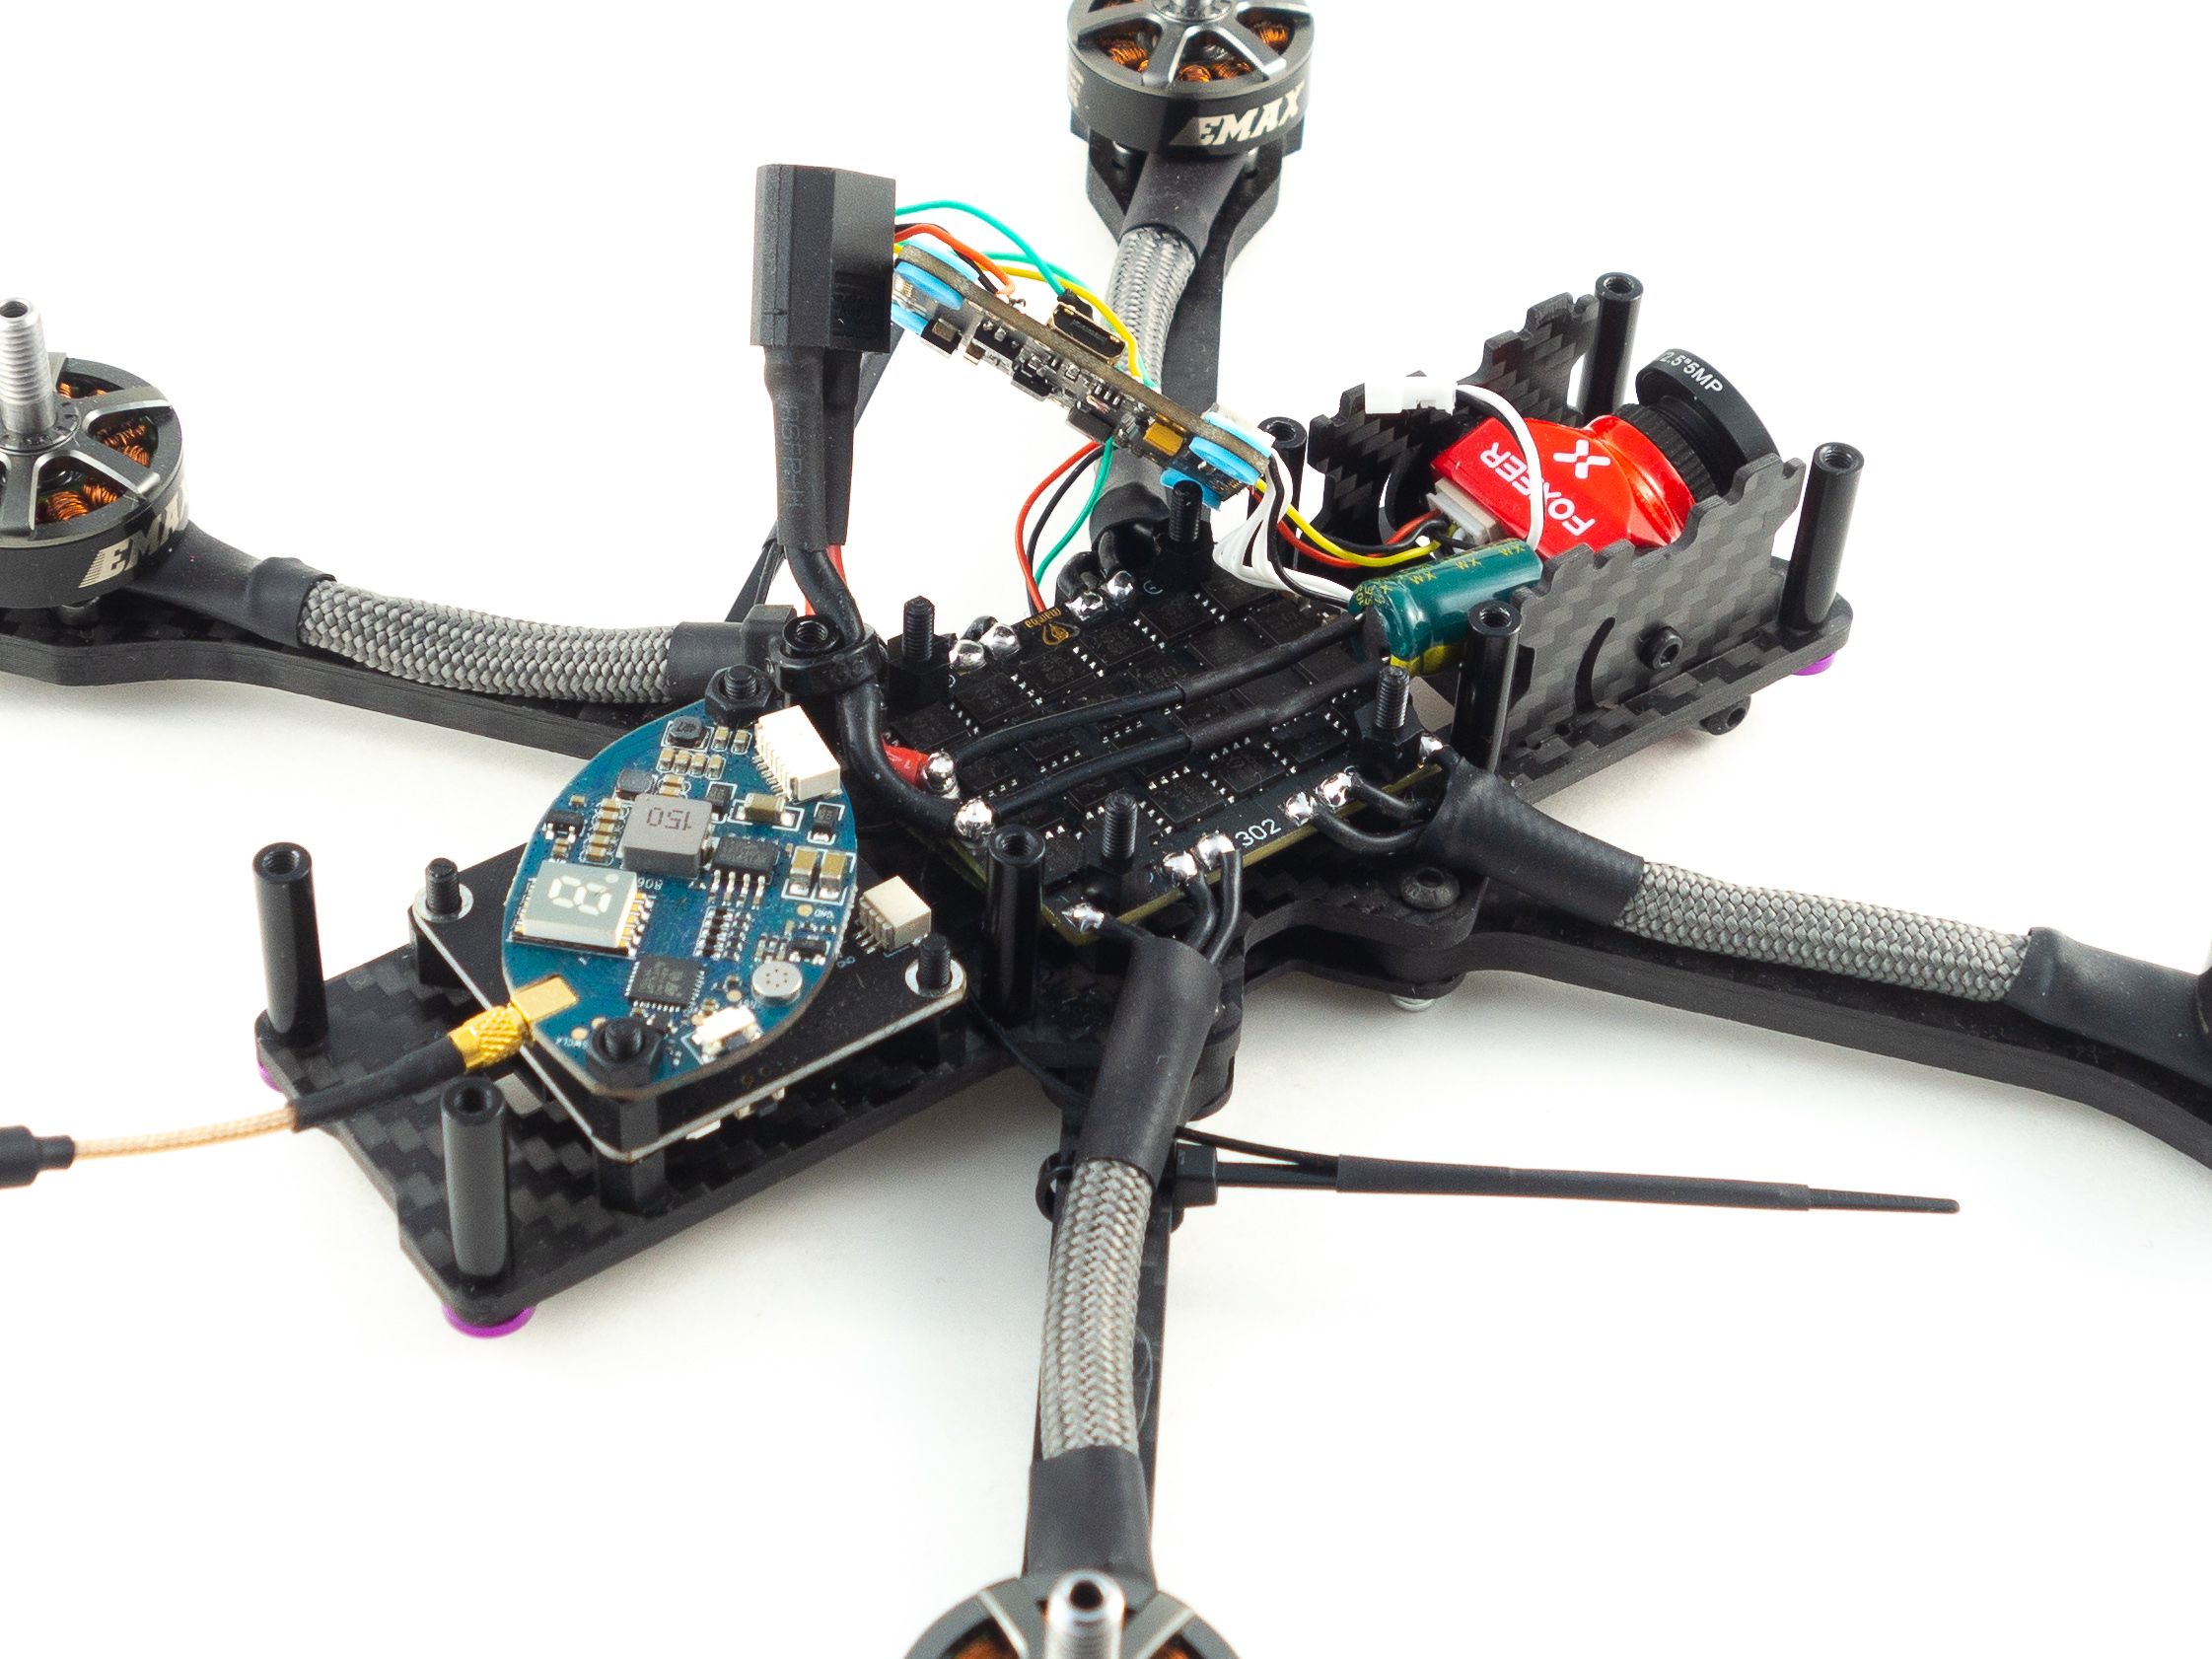
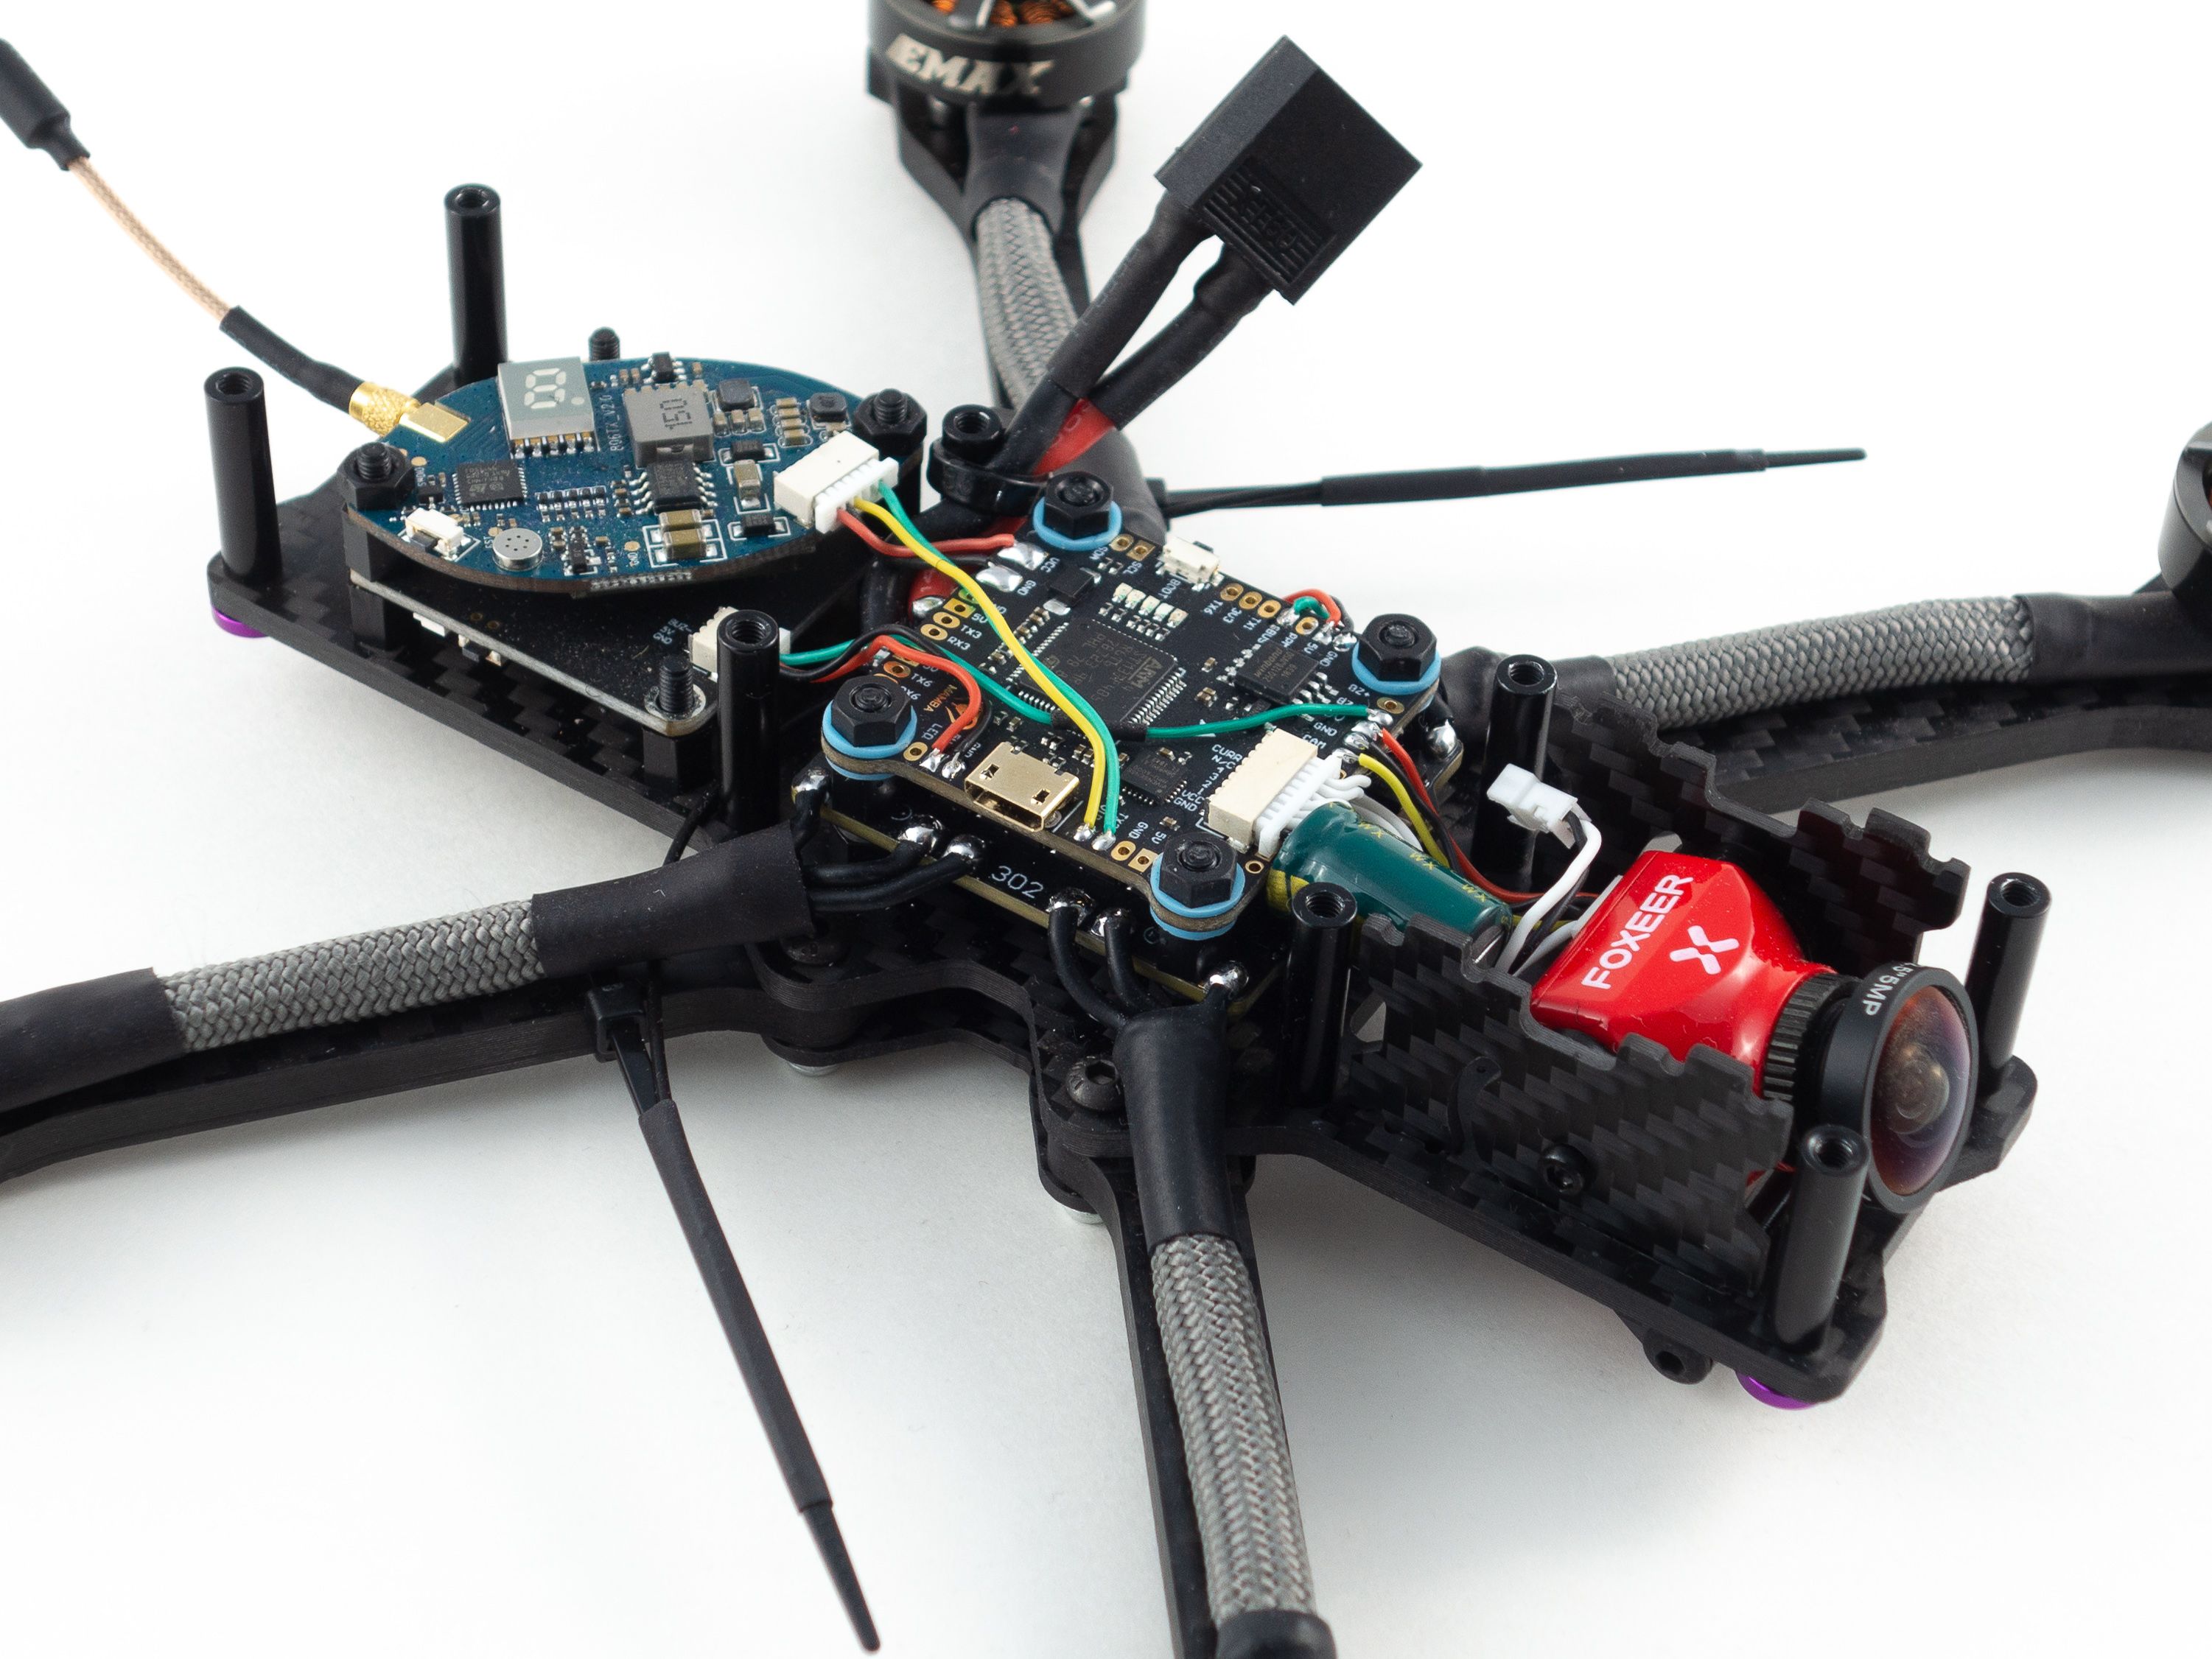
This is entirely optional, but I decided to include it to match the stock X220HV. This particular beeper has an integrated lipo battery, so even if you eject your primary battery it'll still beep. Since the BAT- pad is on the far end of the flight controller you'll need to extend the wire to reach it. Again you can borrow some wire from the camera, and don't forget to cover the joint with shrink tube. After that you just need to solder the 5v and GND wires to a couple nearby pads.
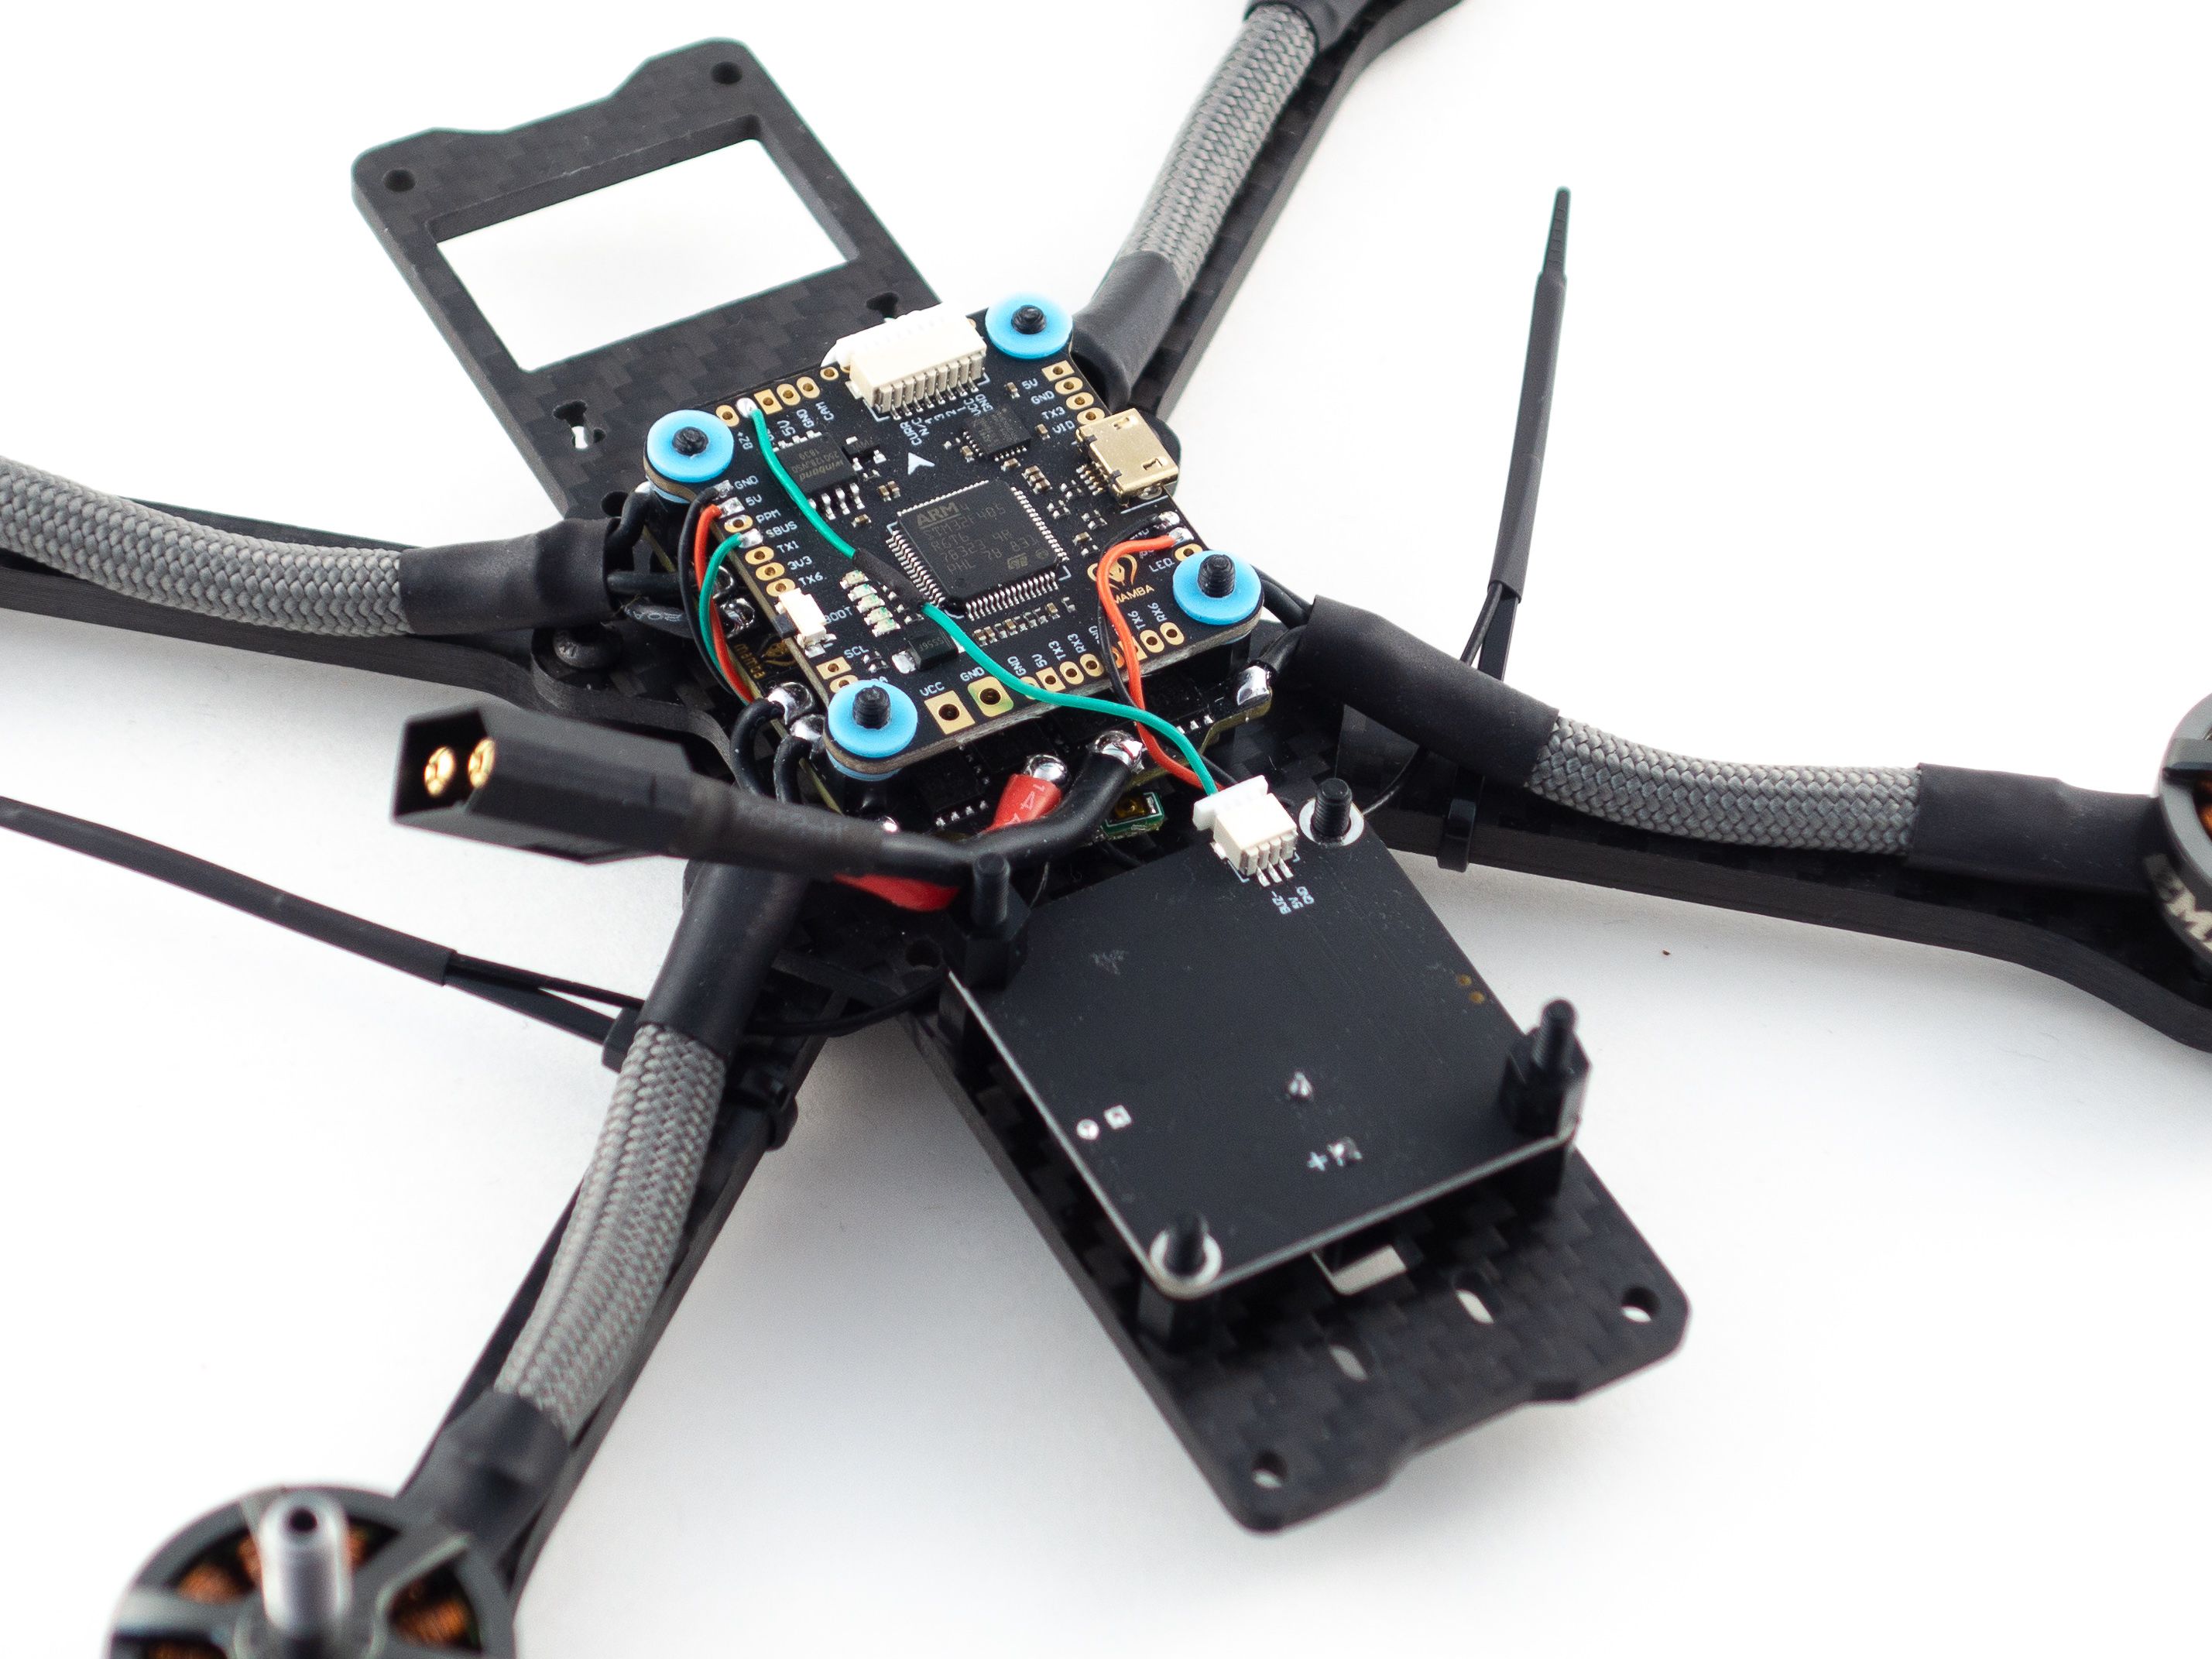
Video Transmitter
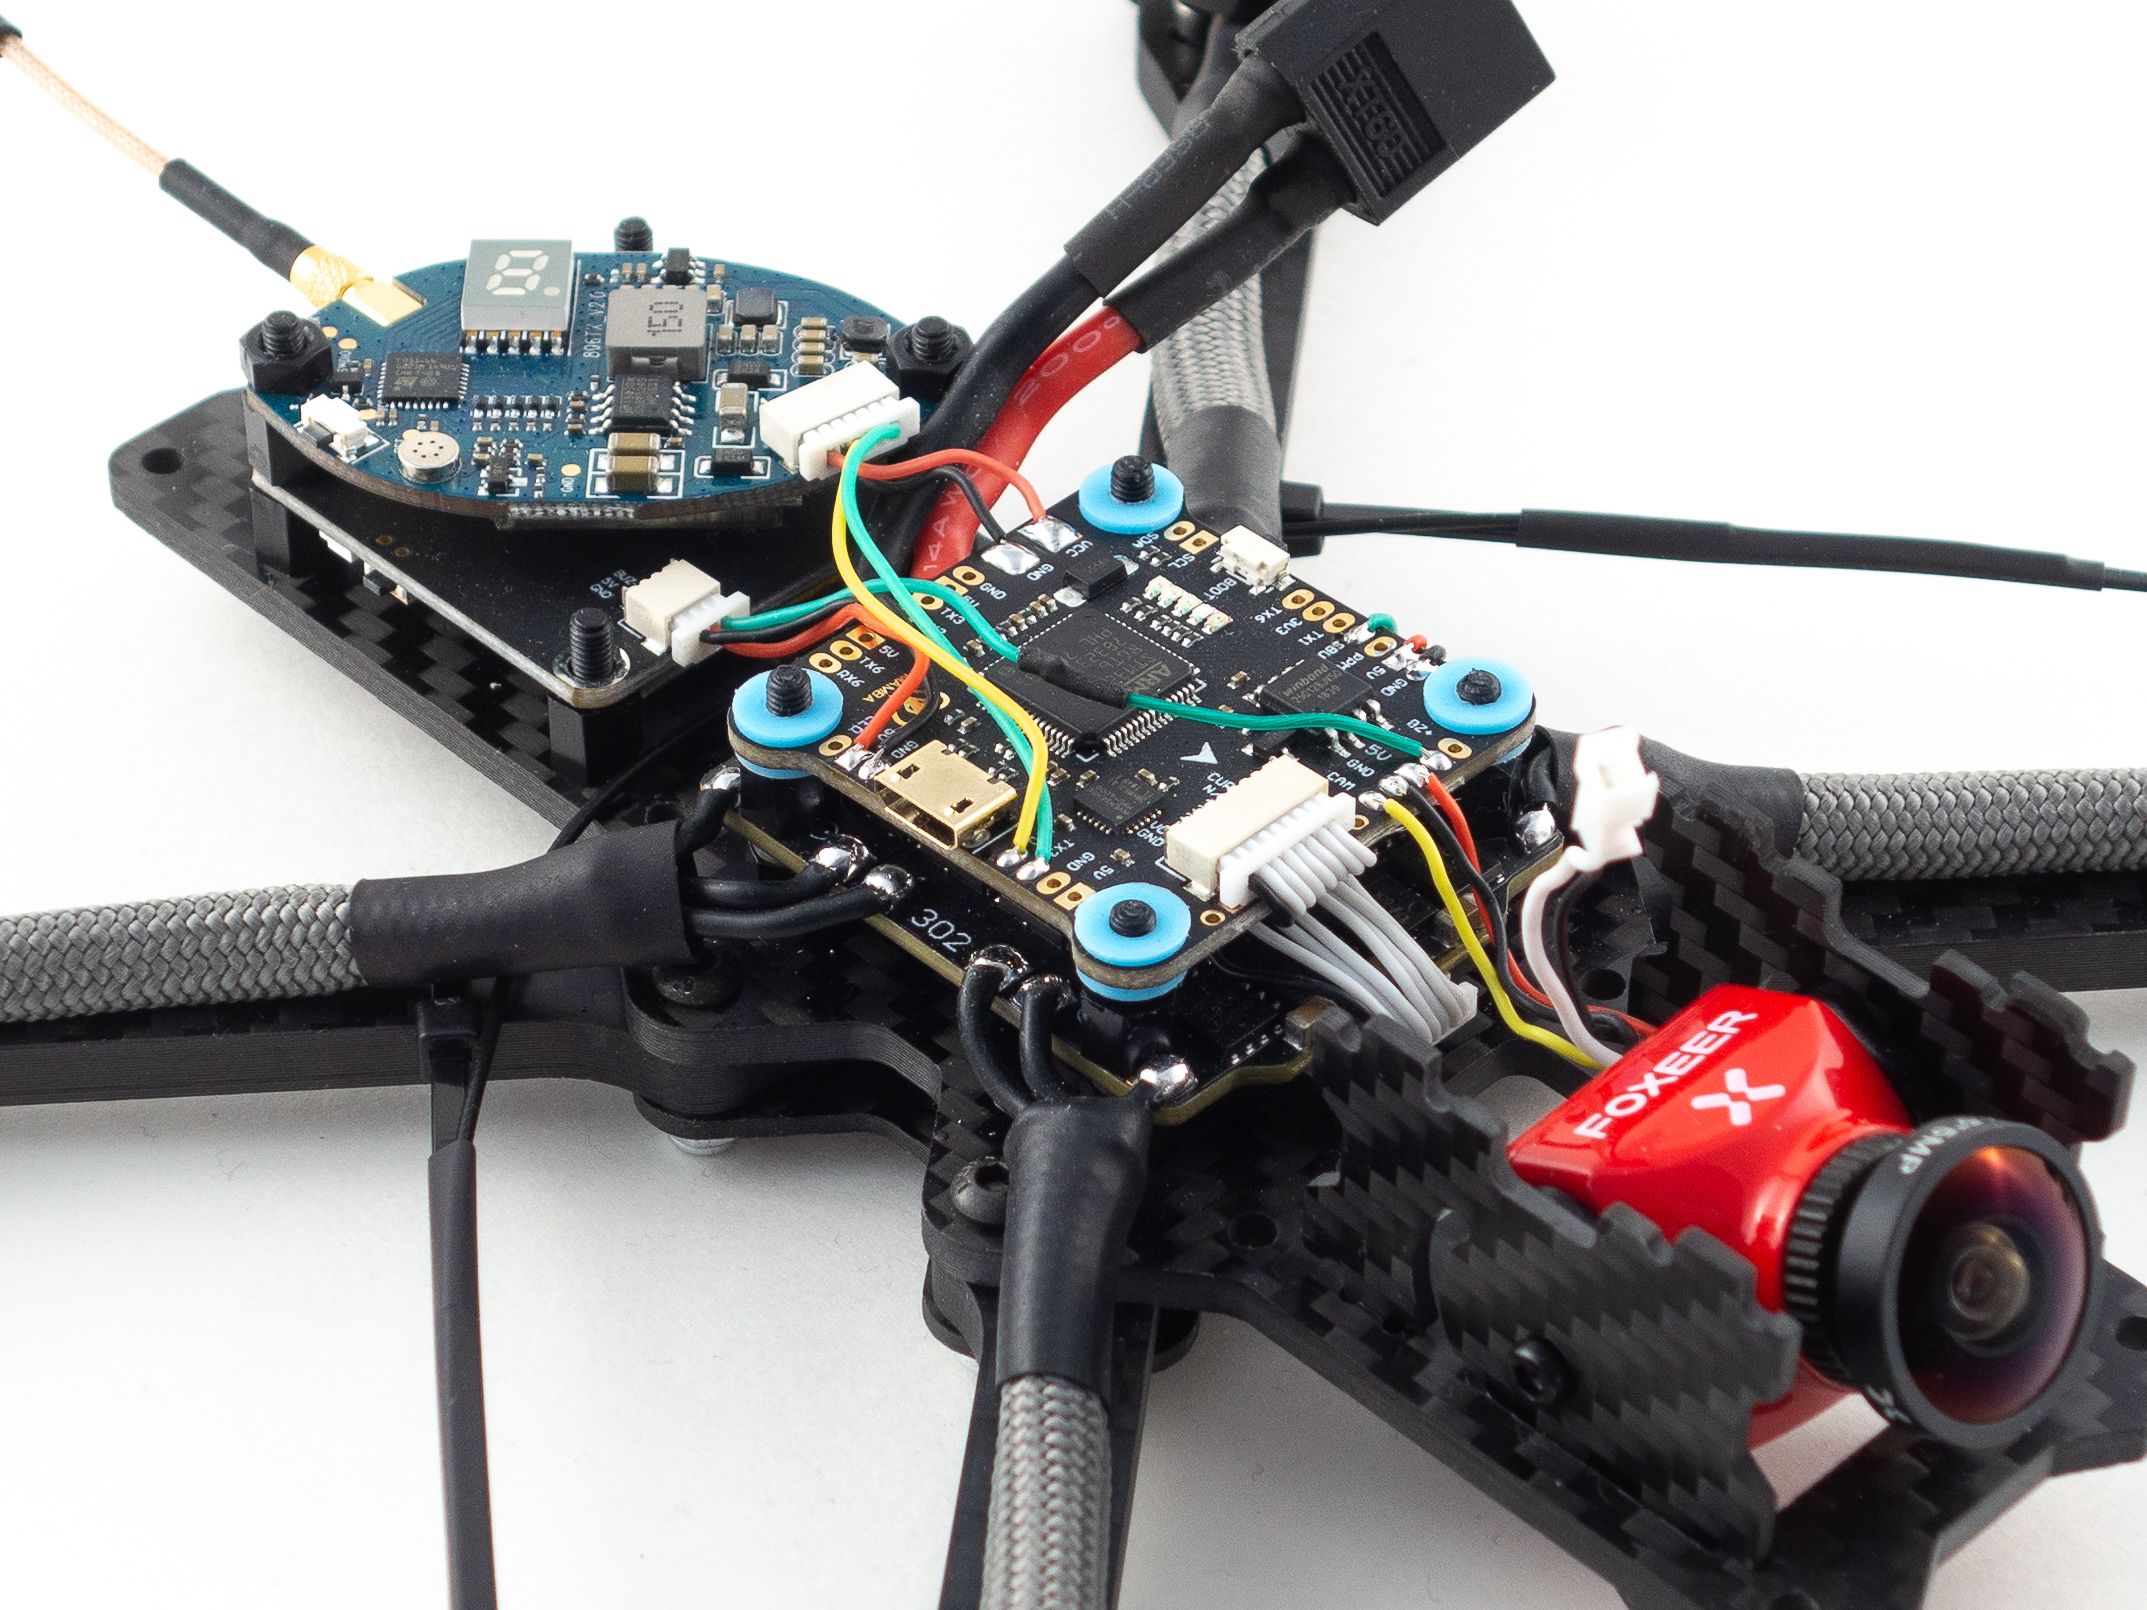
Once the beeper is mounted you can add two more standoffs to mount the VTX. You won't need the 5v output from the VTX so be sure to remove the purple wire. I decided to power the VTX straight from the battery. It's rated for up to 25v, so it can handle a 6S battery. The VCC and GND pads are conveniently located directly beside the VTX and the TX3 and VID pads are beside the USB. Just solder those four wires and the VTX is installed.
Unfortunately the VTX I used for this guide is no longer available. I've listed an alternative below in the part list.
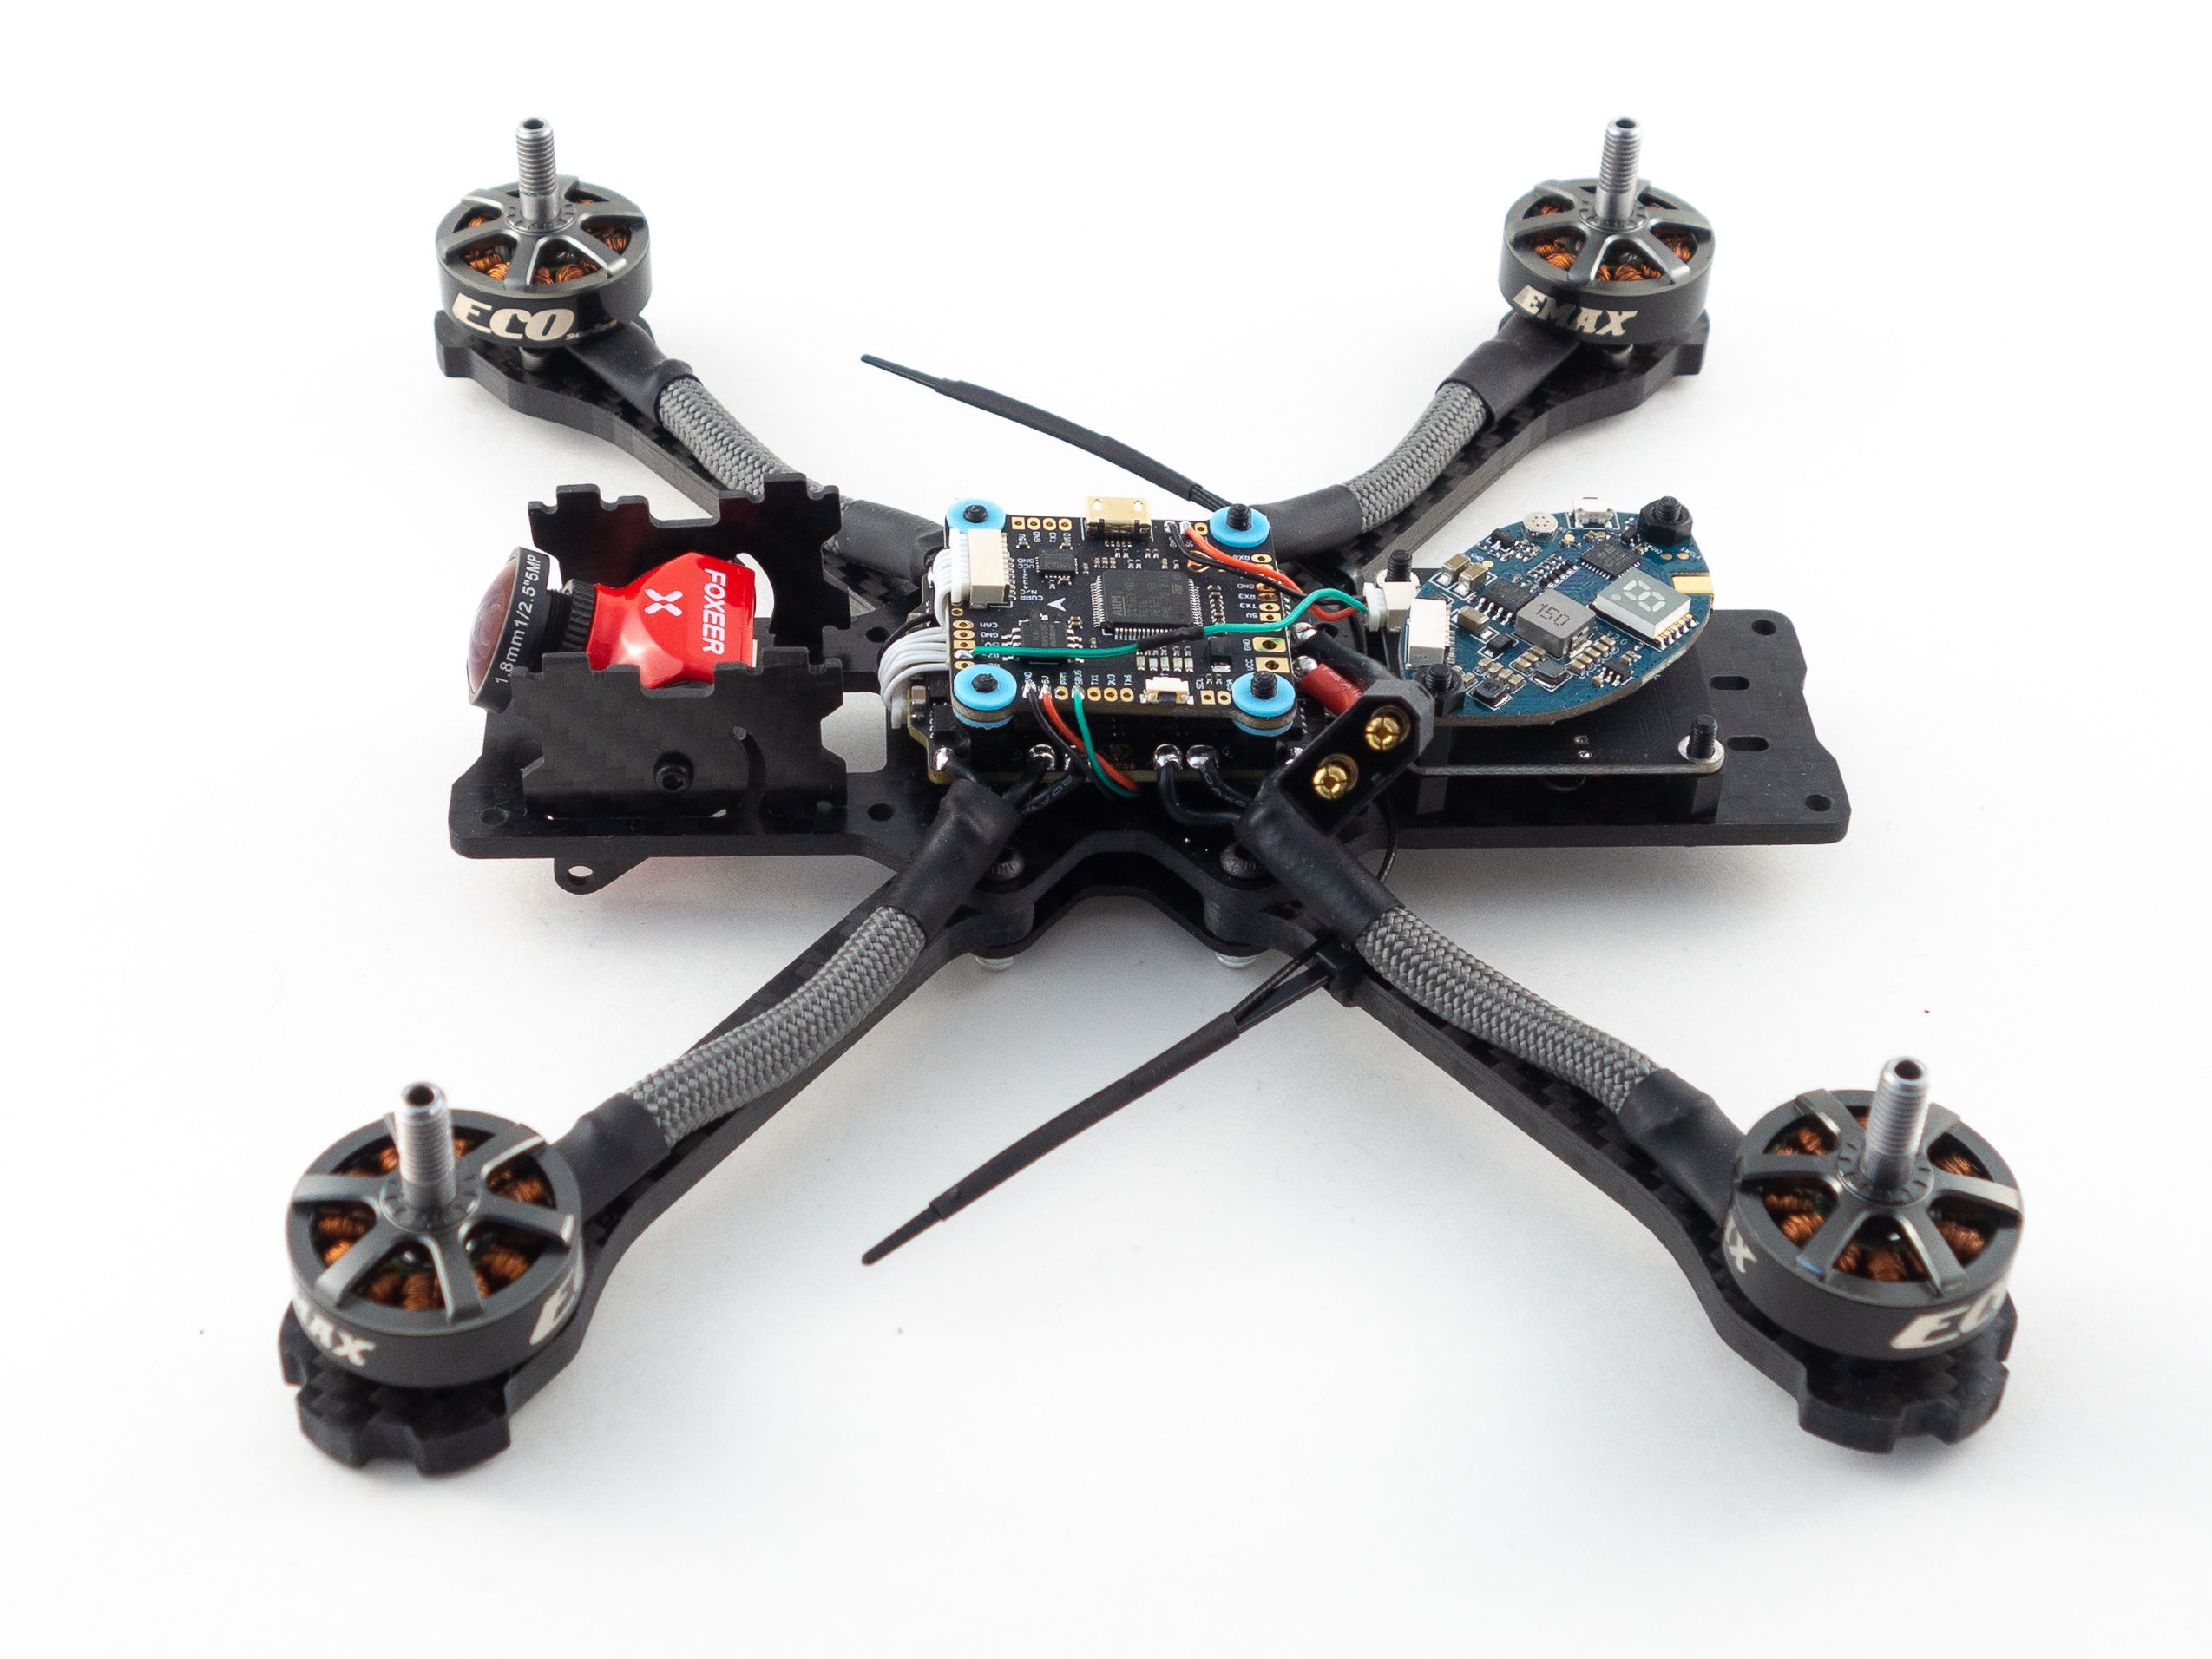
Camera
Before you add the camera make sure the carbon fiber side-plates fit into their slots. I had to file the little tabs down a bit to get a good fit. Once you've ensured they fit you can screw them onto the camera using the included camera bracket to get the correct width. Make sure you've got the camera and the bracket right side up! Mount the camera onto the frame by sliding the tabs into the slots.
You don't need the purple wire, so remove it from the wire harness before plugging it in. Cut the red, black and yellow wires to length offering enough slack for a range of camera angles. Solder them to the nearby CAM, 5v, and GND pads on the flight controller.
At this point you can test your FPV feed and disable the camera OSD. It's redundant and the Betaflight OSD has a lot more features.
- Make sure the antenna is connected to your VTX.
- Plug the camera joystick into the camera.
- Plug a lipo battery into your rig and tune in to your FPV feed with your headset.
- Center press the camera joystick to bring up the menu.
- Select "Special Setting" and "Close" Name, Voltage and Timer.
- Return and Save.
Capacitor
This is a really tight build so I originally left the capacitor out, but considering it's such a high voltage rig I came back and added it. Unfortunately there isn't space between the stacks, so you'll need to solder wires to the capacitor and place it in front of the flight controller. Just make sure the striped side of the capacitor is soldered to the negative power lead.
Finishing Up
Now all you need to do is mount the top plate and add the finishing touches. Here are a few tips to help prevent damage during flight:
- Zip-tie the main battery lead to the nearest standoff. That'll help prevent damage to your stack in the event of a battery ejection.
- Zip-tie the motor wires to the arms so they don't get snagged by a tree branch.
- Make sure the battery straps go under and over the top plate to prevent damage to the electronics.
- I suggest 16x230mm battery straps for 6S batteries.
- Add a sticky battery pad between the battery straps to prevent the battery from ejecting.
- Add a sticky pad under the HD camera mount so it doesn't slide around.
- The stock antenna might be hard to secure considering it's stiffness and placement, but if you use a different antenna be sure to secure it with zip-ties so it can't get into prop-strike range.
Betaflight Configuration
If you don't already have them, you'll need to download Betaflight Configurator [Download] and the BLHeli Configurator [Download].
- First go to the Firmware Flasher and choose "FURYF4OSD" as well as the latest stable release of Betaflight.
- Click "Load Firmware [Online]" and then "Flash Firmware" to update your flight controller. Once complete, click "Connect"
- On the Ports tab
- On UART1 click Serial RX for your receiver.
- Set the UART3 Peripherals to "VTX (TBS Smart Audio)".
- Click Save and Reboot
- On the Configuration tab
- Under ESC/Motor Features select DSHOT600
- If want to fly "props out" with reversed motors, select "Motor direction is reversed" below the illustration. (This is optional)
- Under System configuration set PID loop frequency to 8 kHz.
- Under Receiver choose your receiver mode. For the XM+ choose "Serial-based receiver" and "SBUS"
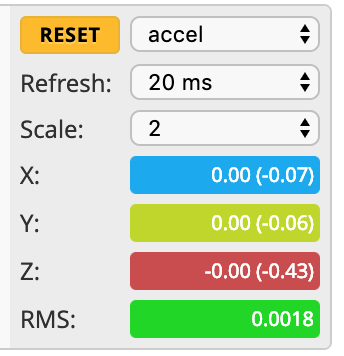
- Under Arming set the Max arm angle to 180 (Only if you keep the accelerometer turned on)
- Under Other Features enable: Airmode, OSD, Anti Gravity and Dynamic Filter
- Under DSHOT Beacon Configuration enable the beacon
- Click Save and Reboot
To complete the remaining steps you'll need to apply lipo power to your build:
- On the Receiver tab ensure your pitch, roll, throttle and yaw are being applied correctly. Adjust your transmitter and Channel Map as needed.
- On the Modes tab
- Assign an Aux switch to arm and disarm your quad.
- Assign another Aux switch to enable Horizon or Angle mode if you need them.
- Assign the Beeper and "Flip over after crash" to a 3rd and/or 4th switch. I like to assign them both to a single 3 point toggle switch.
- On the Motors tab enable the motor test and apply a small amount power to check the rotation of each motor. Take note of any that need to be reversed.
- Disconnect from the Betaflight Configurator and open BLHeli Configurator
- Connect and Read Settings
- Flash all ESCs to the latest firmware available.
- Reverse the motor direction of any motors that need it. (The numbers correspond to the same numbers in Betaflight)
- Save and reconnect to Betaflight Configurator to test the motor direction.
- On the OSD tab
- Check all of the features you want and arrange your OSD as desired.
And that's it! The default Failsafe settings are generally fine, but make sure they work by arming your quad, applying a small amount of throttle and turning off your transmitter. It should shut down after a short moment.
Challenges
I had an issue with my OSD not showing up. It turns out the Foxeer Falkor was set to PAL by default and I have all NTSC electronics. I had to switch it using the camera controller.
Maiden Flight
When installing your props make sure to pay attention to the rotation direction illustrated on the Configuration tab in Betaflight. If you are flying "props in" then the leading edges of each prop needs to rotate toward the front and rear of the quad. If you are flying "props out" then the leading edges need to rotate toward the sides of the quad. Make sure the lock nuts are tight, but they don't need to be extremely tight. Conduct your first hover test in a safe place where you won't damage anything or hurt yourself.
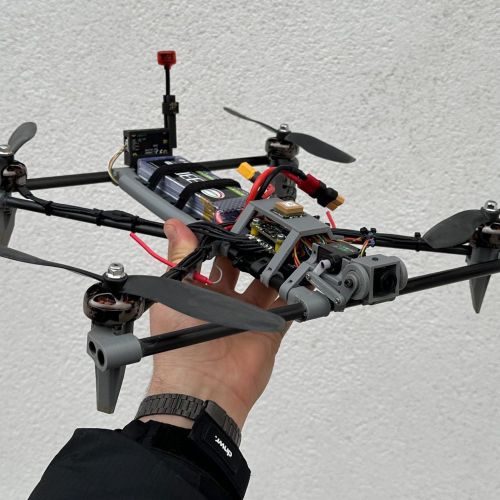
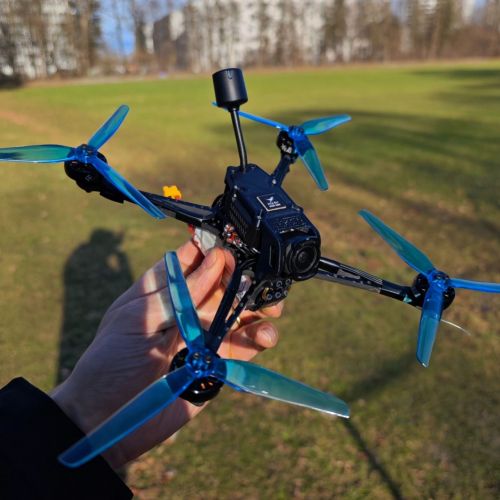
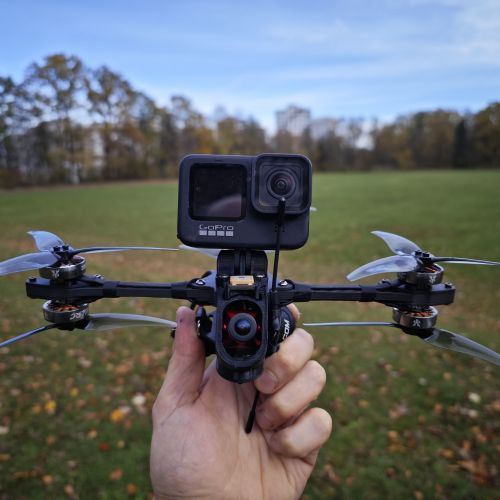
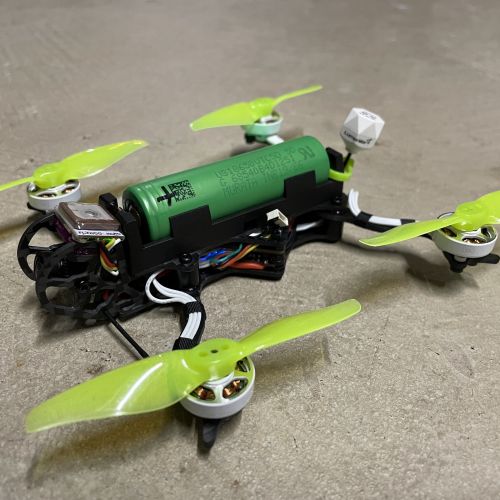
Photos
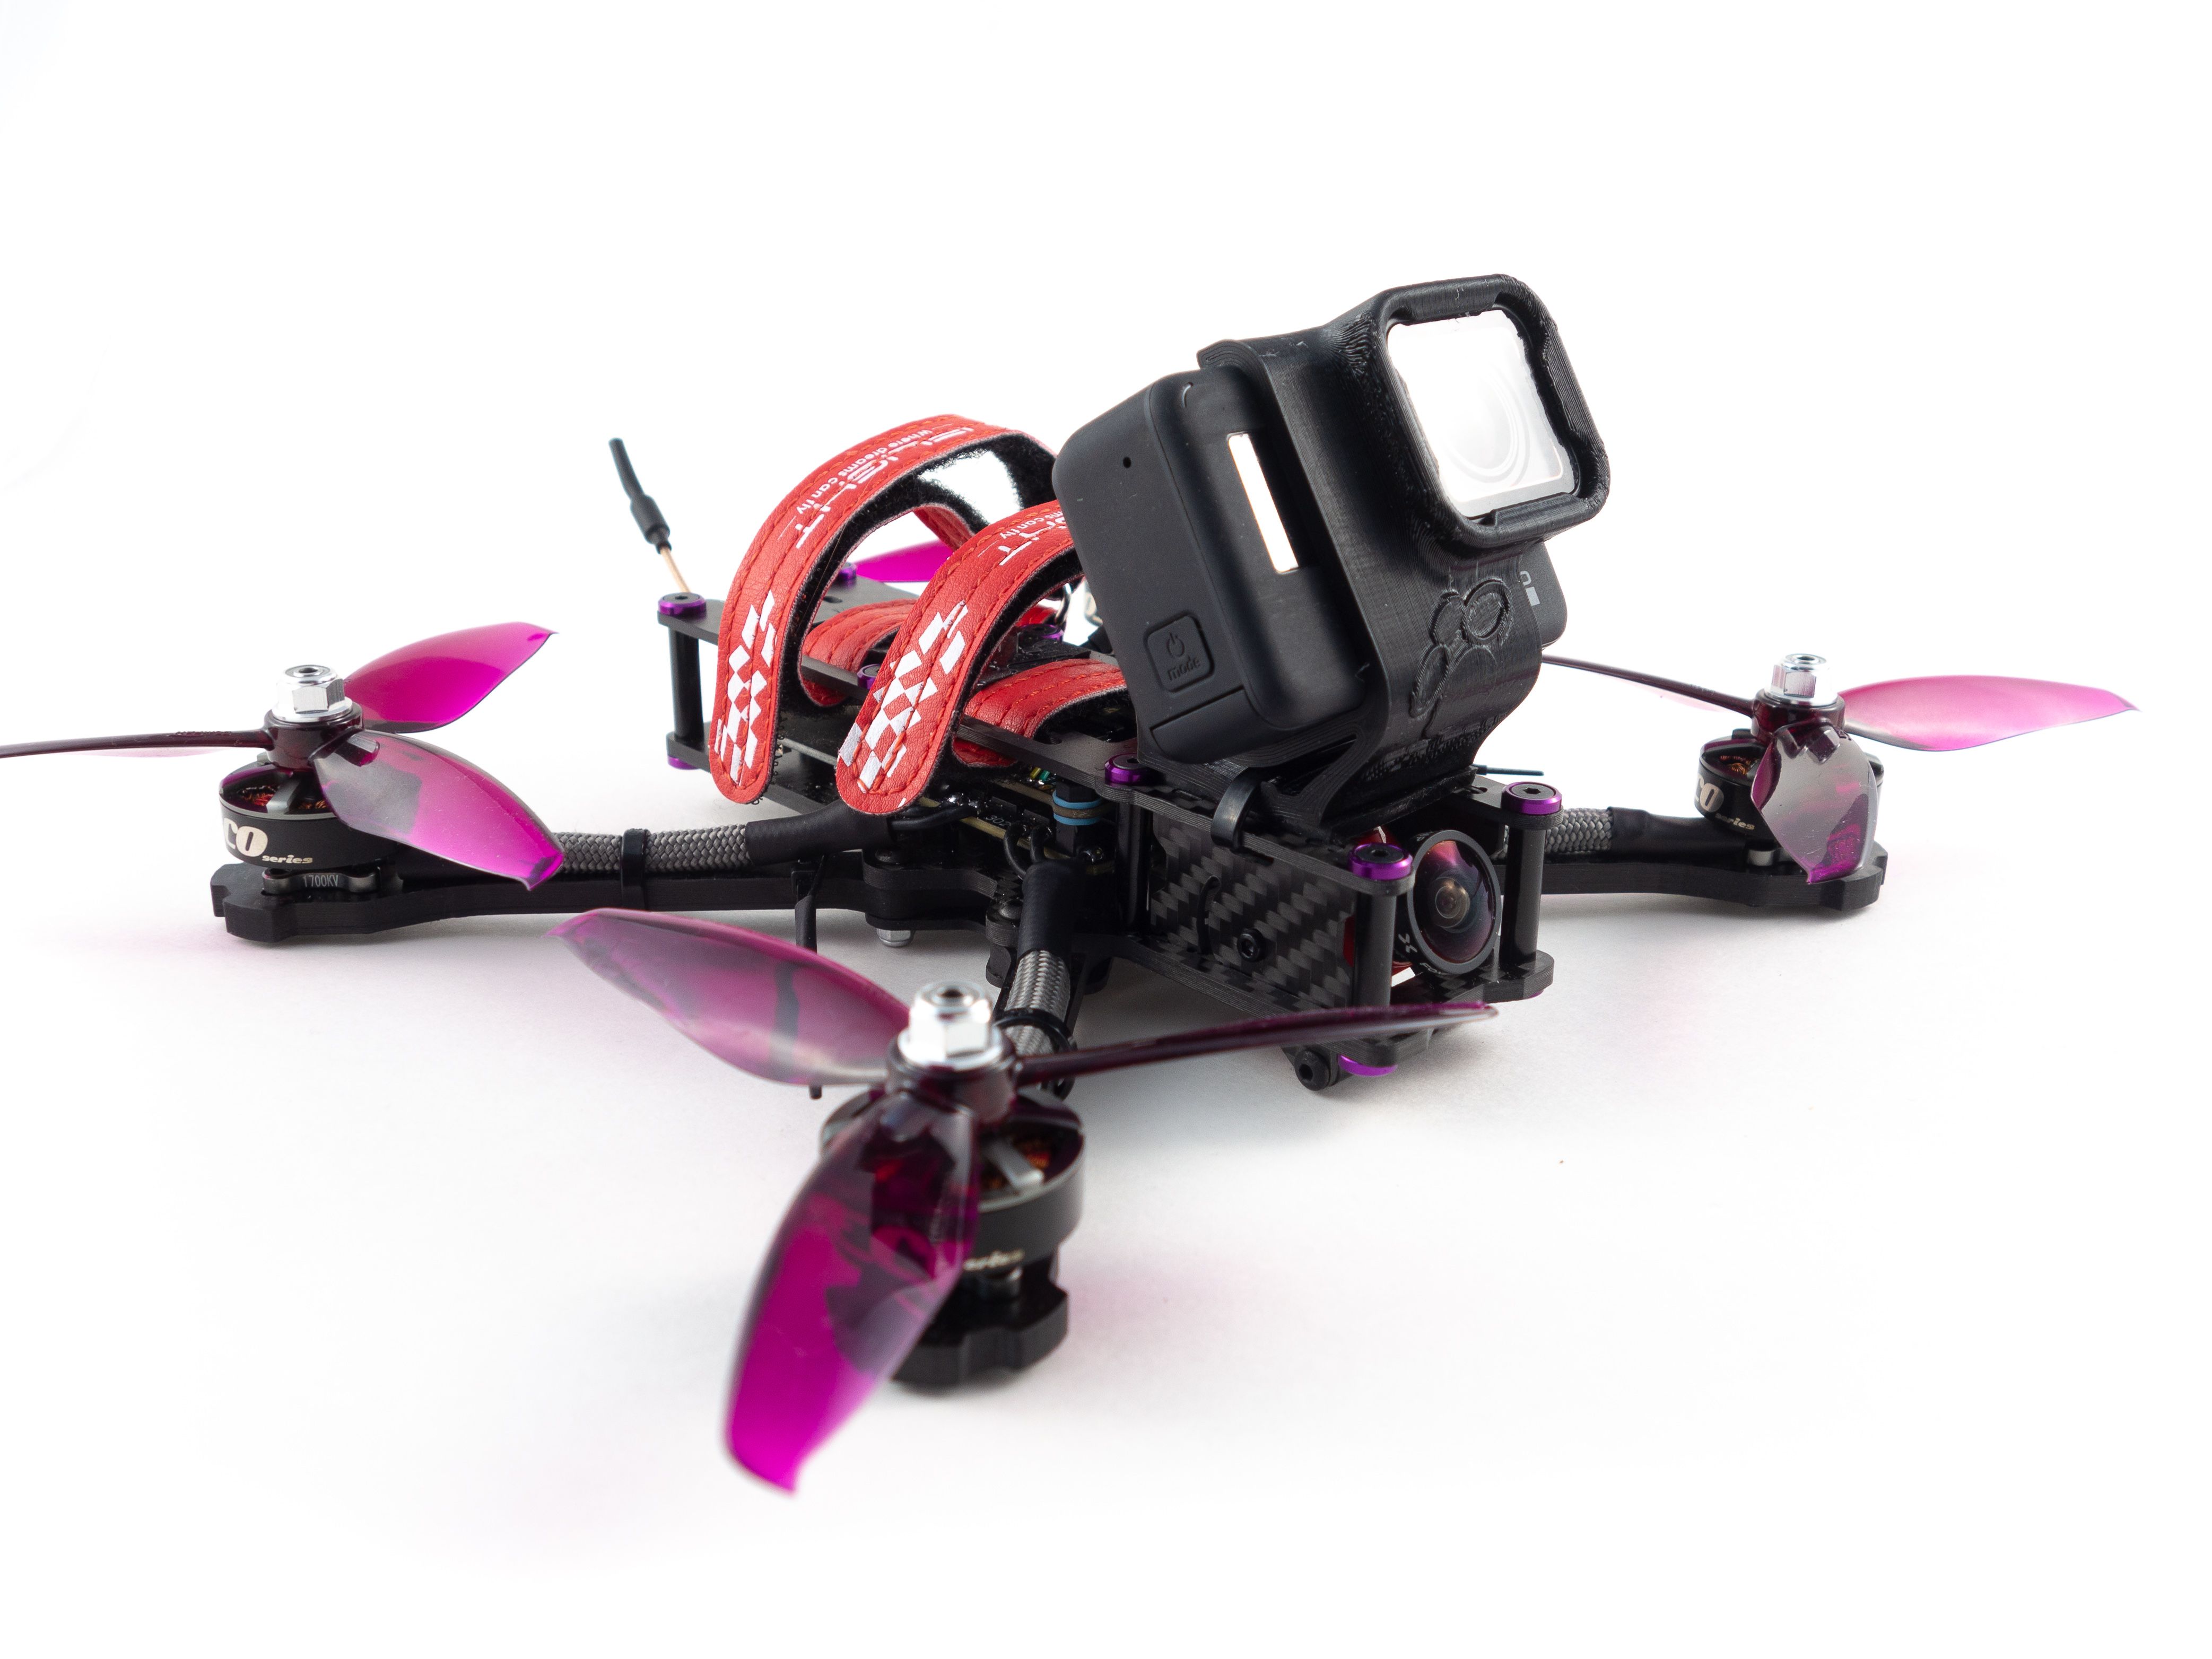
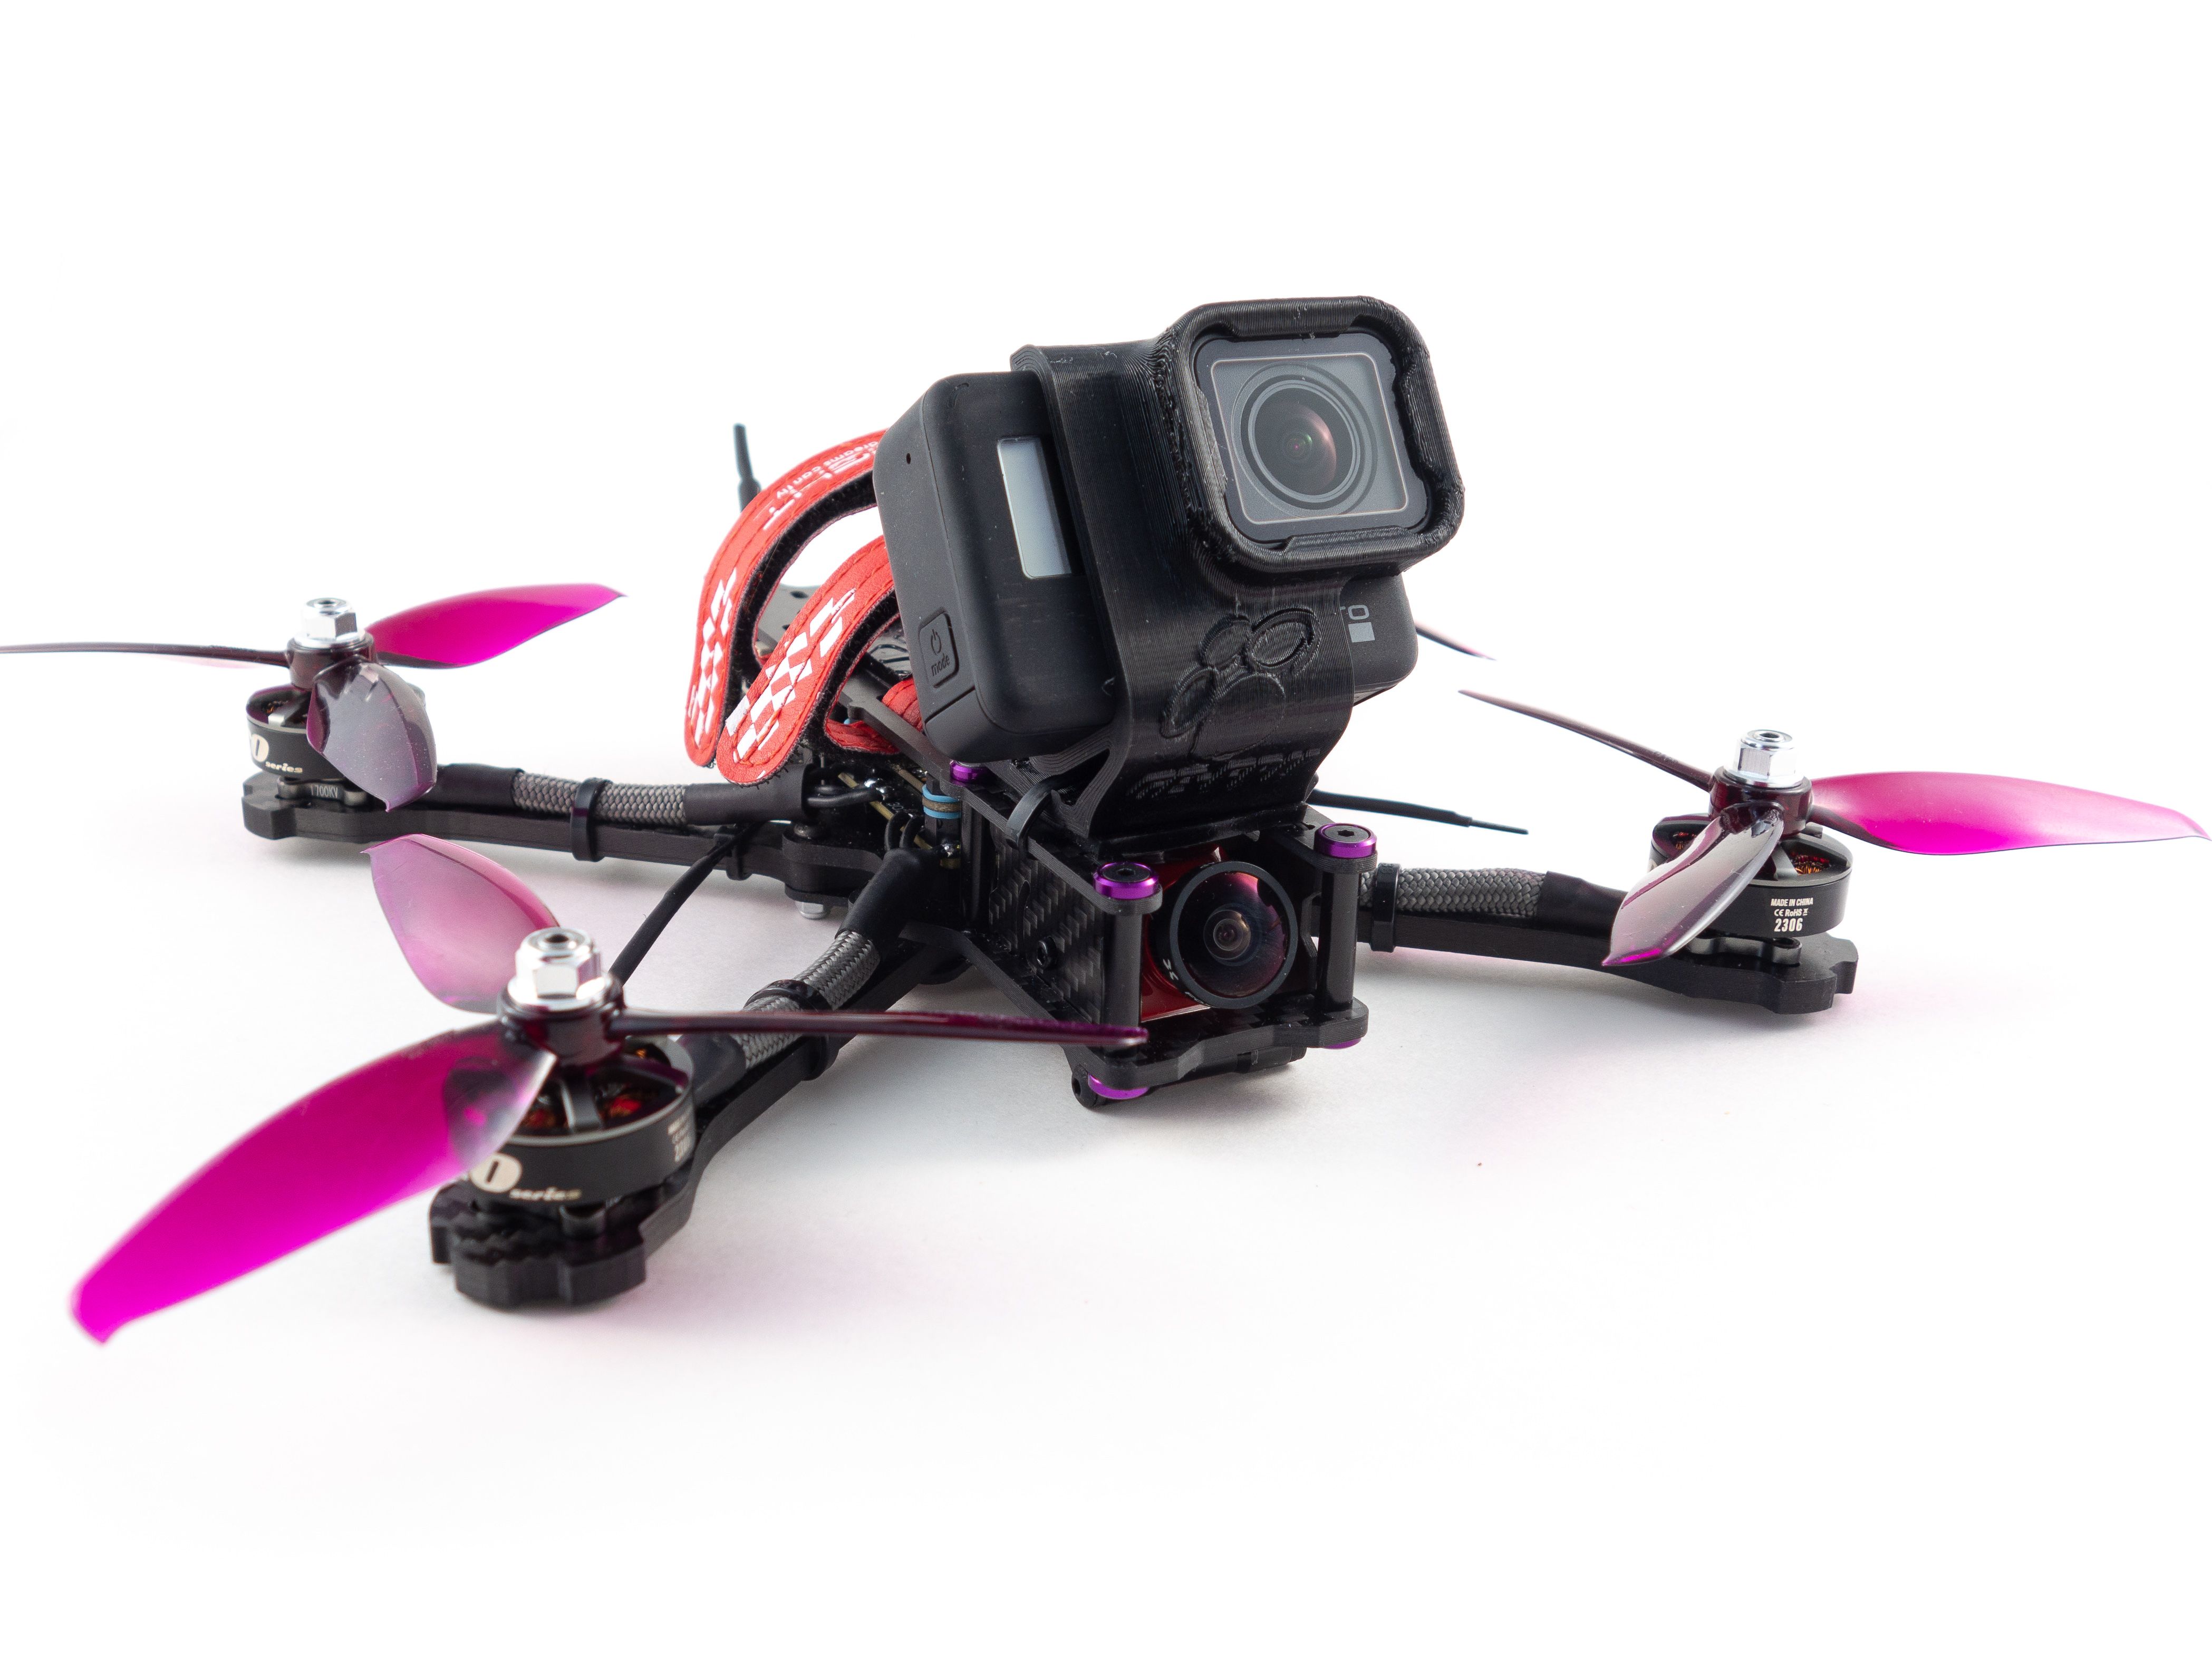
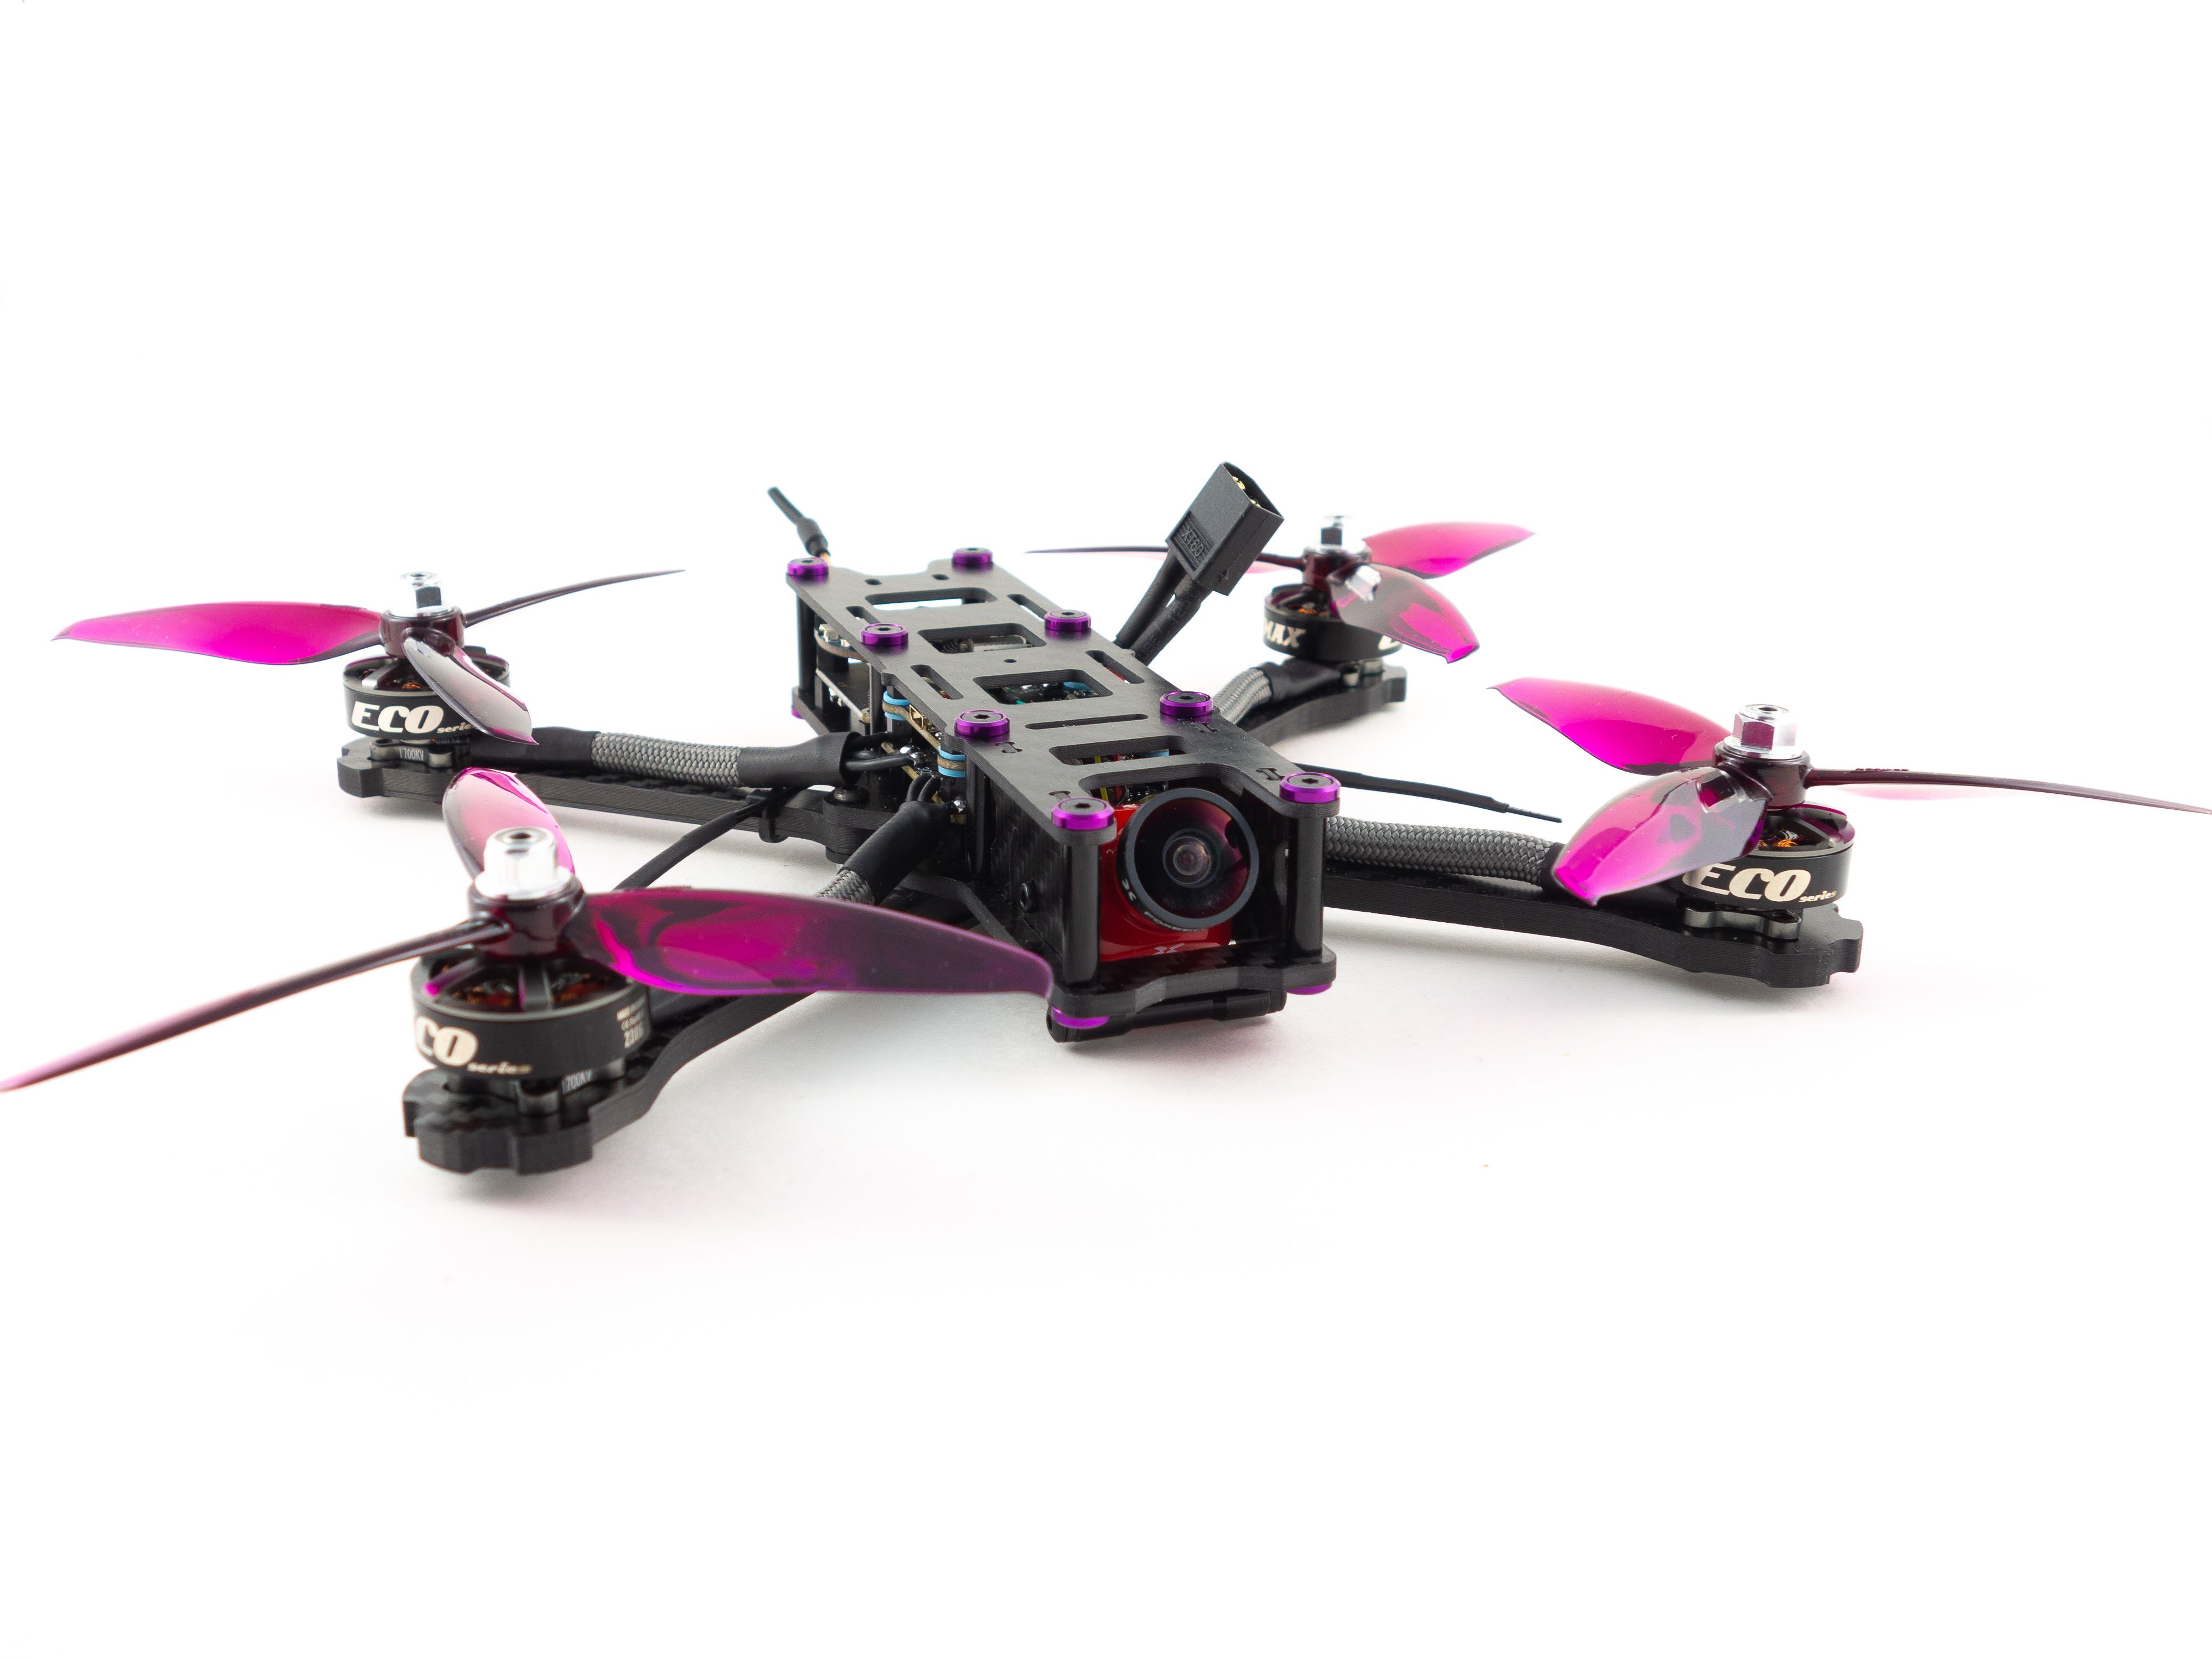
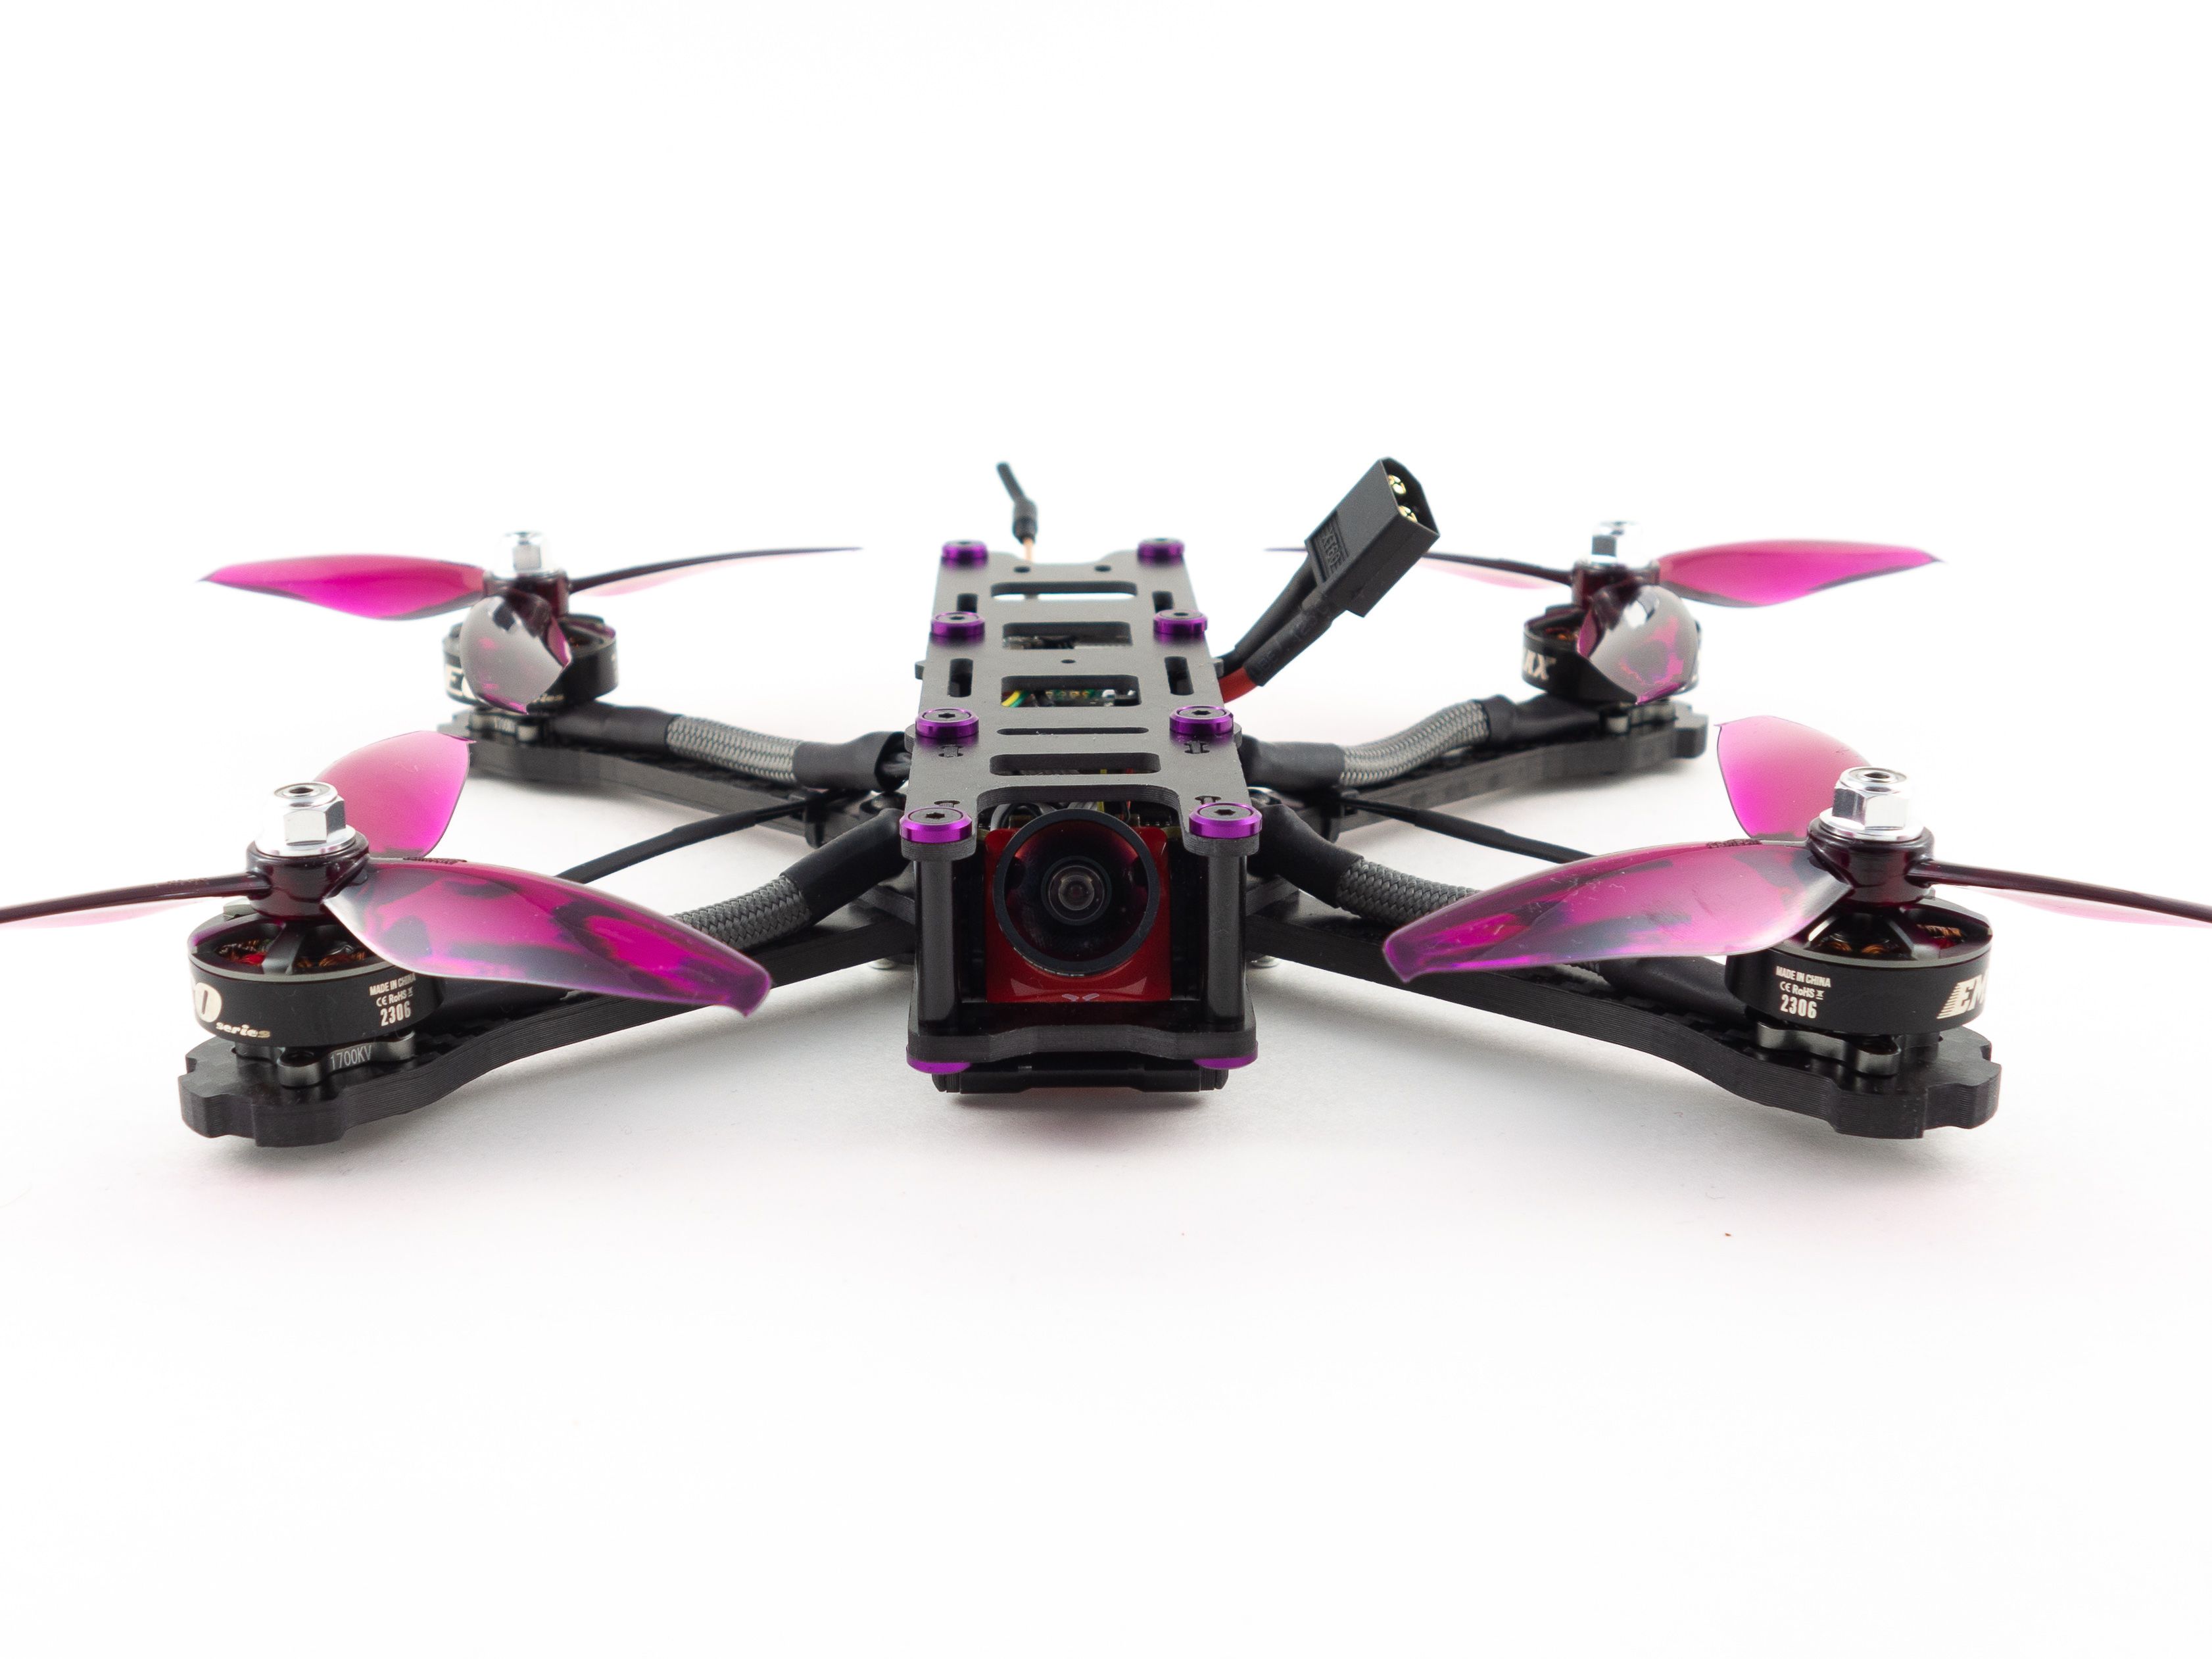
Part List
Show stores (2)
the receiver and VTX you have in the parts list are out of stock. I have pretty much everything else from the list. can you recommend some newer ones i could use? im not really worried about cost. thanks man
Could you recommend a receiver and VTX that will let me fly this longer range? I have EV200D goggles and rapidfire module. Frsky X-Lite Radio. I started building this a couple years ago, then had a kid and put it away. Never got it running, but have all the parts. Thanks man. Awesome site.
range?
Hi Whiffles,
I seem to have somehow lost 3 out of 4 of my ESC mounting screws (the ones that go from below the frame into the standoffs. What size screw are they? I can't find information from the frame kit nor the stack.
Cheers.
hey im pretty much copying this aside from the vtx and reciever... just wondering what your pid tuning looks like. thanks for the guide btw :)
I'm planning to build a 4s version of this quad as my first build. However, since this is my first time I'm a bit intimidated by buying all the parts separately. I also came across a freestyle beginner drone bundle by Joshua Bardwell. How do these two quads compare?

Have a look at some of my newer builds. I don't believe this VTX is available anymore and there are newer cameras and stacks as well. The motors are still good and the frame is just fine. What makes this hobby fun is mixing and matching the parts according to your taste. Put together a mockup here on the site with some parts you're considering and join our Facebook group for feedback.

So im planning on building this but i maybe want to put 2207 2150 kv motors on it (or something in that range) because of this video (https://www.youtube.com/watch?v=vGkmX-PDtRI&list=PLnotUcUiT-Ixc2_qVMzxO7nFrR0AUs-v3&index=31&t=0s) and then using a throttle curve. I want to do it because it can go faster but also slow down when i want. But i dont know if the higher kv might cause problems with this build. So are there any obvious reasons why is shouldn't do it?
That's a pretty high risk environment. I generally avoid flying over water as it could mean a total loss. If I were wind surfing I wouldn't want a 5" flying around me. They're pretty powerful little machines. You may want to consider a cinewhoop style build like this, but with little to no experience you'll have to expect losing it in the water. I'd start with a micro and practice with that first. There's a steep learning curve to piloting these well.
I have a problem with my ESC. Im using the same stack in my build. When I try the motor tests, only 3 of the 4 motors spin. Motor 4 is just dead, it doesn´t beep when I plug in the battery (I checked the vibrations and compared it to the other ones that worked, there were none). The ESC doesn´t get recognized in the BLHeli Configurator as well, I tried BLHeliSuite but even that didn´t work. I don´t have continuity between the main battery leads and the ESC looks fine, it doesn´t have a FET that is damaged, so that you can see it with your eyes. I also checked for continuity between the positive battery lead and the motor wires on the ESC and did this as well for the negative and I don´t have continuity. Joshua Bardwell suugested this for diagnosing a burnt FET. I´m pretty anoyed and confused at this point, as this is my first build. Does this just mean that I have to buy a new ESC becaus the one that I have is unfixable and dead or is it possible to fix this issue somehow? I would be really grateful for any help.
This was my first build and I'm very greatful for the level of detail you provided.
I had to use a few different parts due to availibility like the xing 1700kv motors, akk infinite mk2 vtx and the props but it flies great and has more than enough power for me. I got stuck with setting up the vtx but Joshua Bardwell has a good video for setting up the vtx tables and now everthing is working perfect besides a finicky rssi ouput but I'm sure its something I'll figure out soon too.
These builds are great for the hobby for fpv and looking forward to seeing many more from you.

Can you recommend a cheap 6s charger? I'm looking to buy a charger but all of the cheaper ones I'm looking at are 4s.
Would I be able to swap the 1700kv motors for the 2400kv motors and go with a 4s batter instead? What's the benefit of 6s over 4s?
Sorry if these are super basic questions, I'm looking to make this my first build, but I'm a total beginner!

Hey, man! Glad you're in, now you get to experience all the fun as well as all the head scratching confusion that we all endure.
It could be the motor, but sometimes bearings will get a little debris in them (sand is the worst) or the magnets will attract things, (solder flakes. etc) and make them and sound a little janky. I used to obsess over it but usually, its sorts itself out assuming the motor is all good and you remove visible junk from the magnets.
I just wanted to bring up a couple things that can cause jello that I didnt see mentioned....
First, bent (unbalanced) props, even one tiny wreck can lead to the prop causing oscillations unfortunately, especially if youre using less durable props that dont hold their shape well. Always good to check after crashes. The dynamic filtering in Beltaflight does help alot with this now though. Usually you can tell something is off because it sounds deeper and grunty(er?).
Second, wind. If its windy enough, you could have the cleanest, buttery, noise free quad and stong gusts will still cause jello.
It also helps to have an HD cam. It gives you something to compare against your board cam, and potentially help you isolate the issue faster. This is a stretch, but one time i troubleshot jello issues to the point where I replaced the entire quad... Come to find out, it was the "camera angle" setting in the version of BF I was using. I set it to zero, Jello gone. I shit you not.
I've had the same issue as Boghey, looked exactly like his footage. for me it was the camera. The PCB with the image sensor on it had a tiny bit of room within the camera case. If I shook it it at the right angle, it would click inside the case.
A dot of hot glue, blue tag, sticky tape or rubber will fix it. Or contact RunCam.
Hey @Whiffles, I am habing trouble with my motors and other components of the board heating up. Instead of using the 1700KV motors i used 2400KV motors and instead of the 1100mAH 130C battery that you recommended, i used a 1300mAH 75C battery still a 6S. Do you think that could be my issue or do you think its something else.

Thanks @Whiffles for this as I am trying to get myself into the hobby. I just finished building the whole thing and trying to flash the firmware. I managed to connect to the FC via BetaFlight, but unfortunately when I was trying to flash the firmware, I keep getting error - *No response from bootloader; programming FAILED
I used ImpulseRC Driver Fixer and it give me error when entering bootloader as well - *An error occurred while entering bootloader: Unexpected number of devices detected
Appreciate if I could get some help in rectifying the issue.
Thanks!
I'm having some issues connecting to my PC. I've installed all of the drivers in Betaflight and the PC just isn't recognising the board. It did to begin with, with Windows telling me that the device was malfunctioning. After a PC reboot I get no indication anything has been plugged in. I've tried 3 different PC's now and still nothing at all. The lights on the FC are still lit up. I've put it into boot mode and all. Zadig doesn't recognize any device so I can't change the drivers etc.
Any suggestions? Could I have messed up and soldered something wrong?
Thanks.

Would you recommend this or a Cinewhoop for cinematic video?
Hello there,
so i've gone through a bit of trouble, its my first selfbuild quad. But could figure everything out by myself, somehow... There is just this last thing. It's the VTX. I'm not to sure how to wire it correctly. I've got the Eachine nano vtx, other than that, everything is the same as yours. The esc changed a bit, but alright. Can you please help me with that? I have it on vcc and ground, and on Tx3 and video. i left the other 5v out and gnd free. It just shows a red light, no more... Is it wired correctly?
Speedy Bee is also sold out, Any suggestions on a substitute? I have all the parts, but forgot to order this.
Hi , i try to get smartport on a softserial pin (PPM pin used as a softserial TX), but i have lot of troublee with thaat. Do you know how to have telemetry with r9 mm on this fc? I have gps on uart 6 , smartaudio on uart 3 et serial rx on uart 1
Thank you
Is the wiring the same for the speedybee and leaf?

Hi Wiffles-
Thanks for all of the support getting me up and running. Everything is in good working order except one minor issue- Since I toasted (2) of the eachine VTX's I had to get the new SpeedyBee one you recommended. I am not able to get the SmartAudio features to be able to change the band/channel from OSD. I've connected the IRC to TX3 and verified the connections are good. I've also set my UART3 to VTX (IRC Tramp) as the manual instructed. Still can't get it to communicate. Running BFLT 4.0.6
Hmm, I think I've encountered this before but I can't recall exactly how I resolved it. It's usually a matter of using the wrong menu or choosing the wrong option in the ports tab. A more unlikely issue is that you've got the wrong Betaflight distribution flashed to your board. Are you running the Diatone Mamba MK2? Sorry I can't get back to you very quickly lately. I'm traveling.
Which is the lenght of the Suleve M3CH4 hex screw 6-20mm ? And the Head Washer is M3 or M4 type ? Thank you !
the vtx isnt available anymore. do ypu know of any others that could work this this build thats sold on banggood
@Whiffles - thanks again for this build - it was a lot of fun to put this together as my first build. Everything went together pretty smoothly, but I do have (2) remaining issues open with it.
1) Is there a way to get it to read current draw to display on the OSD?
2) Is there a way to get the VTX mic audio through my Fatshark Attitude v5? All I get is a loud distorted humming sound.
So I was in the middle of assembling this build when I realized the FC that I was working with was slightly different than the one used in this build. The link is sneakily redirecting you to the MK2 version of the flight controller. I haven't found a clean list of what the changes are so far, but they've obviously relocated and changed a few things on the board.
Hey man, awesome post! I plan on building this and was just wondering if the xt60 connector is included with something else I purchase and also the capacitor?
Hey Whiffles, do you recommend the new F7 FC + BLHeli32 ESC combo? Do you think it's worth the price difference? Or maybe I should put in some extra $ and get something like Holybro F7 FC + BLHeli32 ESC?
Thanks for the detailed guide, however just one question; what Capacitor are you using on this build?
Thanks :)
i just finishing mine with your recommend part but these screw cw for these 4 motor don't cause any issue with vibration because there are 2 screw which could get off because the rotate?
Awesome build! already ordered everything to make my own, just wondering if the frame comes with the rear standoffs included,does it? thanks a lot and keep it up!
Again, awesome build! Do you think a Cadxx turttle would fit on this? I wonder because if it fits on the Diatone R349 which is 3 inches, why not? Wonder if it's about the height or the lenght.

Hey Whiffles, great build!! As many others have mentioned, this will likely be my first build. I have a Diatone GT R349 3" which I love but I would like to try a proper 5" now.
I have many hours on the simulator and I primarily fly freestyle. I would say my flying skill is intermediate to advanced, based on flight videos I've seen.
I'm curious what the best option for someone like me would be: 1700kv 6S or 2400kv 4S ?
Also, if I build it as 4S, would I be able to swap the motors out for 1700kv and run 6S on it at some point in the future?
Lastly, what capacity 4S would you recommend for this build if I choose to build it as a 4S?
Thanks again for sharing your builds and for any help you can provide!!!

If I build a 5" I'm thinking one money-saving measure would be to use a Runcam Split instead of having to shell out for a GoPro. Would it be easy to swap the Foxeer for a Split on this build?
I'm not sure you'll have enough room. You'd have to put the Split board behind the main stack and run the long cable to the camera. I'm not sure if the cable is long enough. You'd have to exclude the beeper board to make room for it as well. Personally, I don't find the quality of the Split footage to be very good. You're probably better off buying an external cam like the soon to be released Runcam 5 or the Foxeer Box 2. Or if you want to use the Caddx Tarsier then you may want to consider a different frame.
Nice looking build! What is the sleeve you used to protect the ESC wires? Can you post link or specs?

Hi. I am planning of building it as my forst build but i was thinking to go for the TBS Source One or Rotor Riot CL1 frame with 2400kv motors. Are there any drawbacks using this? Thanks
You should be just fine, but those frames only offer 20mm standoff mounts in the back. You won't be able to use the buzzer and you may want to consider a different VTX if you want to mount it in the back. You can use this VTX, but you'll have to stack it above the FC. I think those frames supply 30mm standoffs so height shouldn't be an issue. You just won't have a very low profile build. The X220HV is 10mm shorter.

Did you end up getting video noise on throttle with the vtx direct to lipo? Also have you tried flying the 1700kv motors on 4s, what was the flight time like?
Thats awesome to hear, I had the Eachine TX805 at the practice race on Sunday, they confirmed that the 25mw was spot on so I was allowed to race, really wish manufacturers kept to what was listed. Since you put a falkor in your build, it includes a direct harness for the tbs unify, almost plug and play.

Moxfpv if you are running the cam directly off the power from your vTx, especially if your lines are during throttle changes (and 2x especially if your OSD flickers) you likely need to ground the cam directly to the FC. No need to remove the ground from the vTx to the cam, just add another one. If you are lucky you can just pull open a section of the insulation on the ground wire near a ground pad on your FC and solder it on, effectively making a direct ground shared between the cam, FC, and vTx all with one wire.
awesome budget build! doesnt look to hard either even tho theres a bunch of wires to solder on. i really need to finish some of the builds ive been working on lol just need time to do it.
Hello,
On my build the amperage, and battery mAh draw isn't working.
Any ideas?
Thanks
Hi, big bro iam back again after years to keep me updated and if possible resurrect my drone hobby. So with new age freestyle fpv droning I have few questions regarding it.
1) Can you suggest a budget fpv drone setup with 'Longer Flight Time' and portability? as I mostly use it to shoot freestyle videos with Gopro.
2) Good 'Flight Controller' that supports OSD, Battery percentage and if possible GPS/RTH.
3) I already own a Futaba 10j, how good it is for FPV? and can you sugget some compatible Rx for it?
yeah, came across this frame , keeping in mind the propellers should'nt come in gopro view
what are your thoughts about this frame?
btw any good 6" bangood/clones?
(ps: i went across pro flyers frames like johnny fpv, reverb 6" , armattan 6", super g+ but they are too costly and few clones have no proper spares)
did the mamba stack catch fire or smoked for anybody??
is 6s good for beginner??
hi, i am planning on building this. i was wondering way the pricing shown above is so much less than on the website eg: the frame above is $ 28.55 as opposed to $40.62 on banggood. regards Mike

Hey I just bought the Mamaba stack and it works but the motors are being held at very staggered speeds. It's really hard to explain but if you do a roll with my quad it doesn't roll smoothly and it's like the esc's are doing 15 short speed burst in a row. Can anyone help???
You really shouldn't need to tweak the notch filters. The stock settings should be fine. I wonder if you've just got a lot of vibrations from the motors. I'd try mounting your stack on vibration dampening standoffs. I know the Mamba already has some dampening built in, but maybe you need even more. Try mounting the 4-in-1 on these.

Great write up. Thanks for putting this together. I booked marked your iFlight XL5 V3 - The Easiest Build I've ever Done, and this one caught my eye now. My one and only build was a 2.5 inch using Mamba mini stack. This looks like its easier to work with. May need to try it, I want to keep learning. Keep up the good work!
Guides & Reviews

AirbladeUAV has done it again and this time they've brought long range to the 5" class! Based on the popular Transformer Mini, the new Transformer 5" Ultralight adopts a lot of the same design philosophies with larger props and more payload capacity. It can fly upwards of 20 minutes on a 4 cell Li-Ion battery pack and in ideal conditions it's got a range of over 4 to 5 miles. In this guide I'll walk..
Read more
With the release of the DJI FPV Drone cinematic FPV has become a lot more accessible, but you certainly don't want to crash a $750 drone! The QAV-CINE Freybott is a compact, lightweight cinematic FPV drone that can take a hit and keep going. It's a lot safer to fly indoors and around people. With a naked GoPro or the SMO 4k you can capture some great stabilized footage. In this guide I'll show you..
Read more
hey Whiffles,
Just wanted to say thanks for this great build and also share an issue I had that will hopefully help others. It flew great on maiden but I always had a problem with what appeared to be oscillations. I checked everything numerous times to no avail. The problem all along was a loose board in the FPV camera (came that way from factory). The CMOS sensor was shaking around inside the camera housing. I secured the board with some double-sided foam tape, no more shaky FPV video! Of course it was the last thing I checked lol, I'm just glad it's fixed.
Now that everything is dialed in, I'm able to see how well this build flies! Btw, Betaflight 4.3.1 runs great on this build. The 5" presets work really well.
Thanks again and happy flying!