Squashed Brushless Whoop
 By flowwithchaos on Feb 14, 2018
Overall I was motivated to build this brushless tinywhoop primarily because I was tired of replacing brushed motors so often (5 hours? seriously?) and I wanted more features. I wanted this build to have as low as a profile as possible (squashed), support telemetry, and OSD (which it does :-) ). I'm not a fan of whoops with the camera mounted on top. Also using an AIO camera/VTX with a vertical antenna is just not durable. The weight comes in at 24g. Its on the heavier side for a whoop but this thing moves! When you have the space to fly and you can punch the throttle its great, but when I'm racing in small spaces indoors its noticeable, not as floaty as my 19g brushed whoop. Overall I'm really happy with how it came out. For a race where every gram counts this isn't the best choice, but for everyday flying (during the winter and city living) its awesome. Warning though, if you do not like building stuff, soldering, etc this build is probably not for you, it was a pretty time consuming, and complex. Its great to see the Tinywhoop brushless getting so popular and the technology evolving!
As for the individual parts:
Frame I went with the Rakon Heli frame due to its ability to mount 16mmx16mm stacks. So far I love it. Its really durable and I like the option of being able to mount other things to the carbon fiber frame (like my camera mount). However all tiny screws make it a pain in the ass! to assemble.
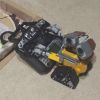
FC This is actually the second version. The first version had the FuriousFPV Racewhoop and a FrSky XM SBUS Micro Receiver. I swapped both out for the tinyfish FC which supports telemetry, shed some weight and cleaned up the stack. However in the processes something I overlooked was the MNOVA VTX requires 5v input while the tinyfish does not output 5v. To get 5v to the VTX I needed a voltage stepup converter. Luckily I had a Wolfwhoop VTX that included one I bought here however I believe the one I linked on Banggood should work. You can see the voltage booster at the back shrink wrapped between the ducts. The diagram for the FC can be found here.
ESC The FuriousFPV ESC was recommended by Rakonheli. It supports 2S which will be nice if I want to reuse this ESC for a pepperf1sh eventually. The tinyf1sh ESC is slightly lighter however it only supports 1S. The wiring diagram can be found here.
Motors I couldnt find the Racestar motors when I was purchasing parts for this build and I hate the month lead from Banggood so I took a chance on these DLFPV motors from amazon. Due to so many complaints they are no longer being sold. The QC on them is pretty awful so I would not recommend them. I'm happy with the KV so I'm going to buy a pair of Racestars next, if anyone has good experience with another manufacturer please let me know!
Props I've heard good things about Rakonheli's props so gave em a shot for this build. They are much more durable then the cheap betafpv ones I have on my brushed whoop. I have about 4+ hrs on them and havn't had to replace any yet.
Camera This is the only camera I have found to fit in between the ducts. Its a really tight spot (around 10mmx10mm). You can also find it on Amazon for $20 but youll get it faster. The QC is also pretty bad with this camera. The lens housing always pops off. I tried gluing it with crazy glue DO NOT DO THIS. The gasses released must have screwed up the CMOS sensor, now the video is kinda smudged but still viewable. I have a replacement I am going to try hot glue on the outside. I also had a solder pad rip off I've been through 2 so far :-(. If anyone knows of any other options please let me know.
VTX The MNOVA VTX is probably the most sophisticated VTX I've used. The RX/TX from the FC is connected to the TX/RX on the VTX allowing you to change PID settings, VTX channels, and other things all from your controller. The interface using the controller is awful but it beats trying to decode the LEDs to set channels. The manual for MNOVA can be found here to help you wire it up.
Instructions
- First print out my mounting parts linked below
- Assemble the frame but don't attached the battery holder or the front two screws to attach the frame to the ducts (well do this later).
- Next wire up the stack which is the biggest challeng. The solder pads are extremely small, you'll need a needle style solding tip. Use the diagrams I linked to on how to wire it up. Youll have to wire the power booster from the ESC power pads to the VTX power pads.
- Assemble the stack: Feed the M2 nylon screws through the ESC then the frame-ESC mount (pay close attention to the orientation of the frame-ESC mount, the pads should face up). Place the 2mm spacer on top the frame-ESC mount, feed through spacer and then through the FC. Next stack the 4mm spacer, feed the screw through the spacer and the VTX. Top with the nut. Repeat for other 3 holes. To summaries the order should be from bottom to top: ESC, frame-ESC mount, 2mm spacer, FC, 4mm spacer, VTX, nut. The reason for the 2mm spacer is to raise the USB on the FC high enough to clear the frame. Also using tweezers makes this process a lot easier.
- With the stack assembled screw in the frame-ESC mounts so the frame.
- With the stack mounted, attach the motors and solder the motor leads to the ESC.
- Next screw on the camera mount. Measure and wire up the power/ground/signal for the camera.
- Attach the battery holder and props.
- Fly!
I hope you enjoyed this build, let me know if you have any questions/suggestions. Thanks for looking!
Photos


Part List
Show stores (7)
I see you used the rakon frame but did you buy it from Rakon? They seem to have 2 different frames one says it's for 703 and one says it's for 703 and 603. The link on yours is to rakons site but the sell the 703 at helination. I'm trying to figure out the difference because rakons shipping is crazy slow. Thanks.

For this build I ordered from Rakon and yea it was super slow. Looking at my receipt it has an SKU of 66BLW981. However I did redo this build with the sunnysky frame and I ended up ordering that through Heli-nation via Amazon. https://www.amazon.com/gp/product/B076YVKDM8/ref=od_aui_detailpages00?ie=UTF8&psc=1 The sunny skys ended up being too heavy though. So it depends on which motors you have. The sunny skys have a different mounting pattern. It flew but didnt have the pop like it did with the originally 0703s. Hope that helps.
Ok thank you. So your saying changing the frame to the Amazon sold rakon frame made it not fly as well? Or did you change motors too? I'm basically trying to figure out whether to use the betafpv 603 motors or 703 and if I can use them on the Amazon sold rakon frame. I've emailed rakon but probably wont get a response for a month if at all lol. Any suggestions? Thx again.
The Amazon one I linked to is only for SunnySky motors. So yes I changed motors to the SunnySkys and then got that frame. However the SunnySky motors are heavier and you could tell, I didnt like the performance. 0603s are going to be more effecient but slower so depends on what you want. Also if I did this build again Id use a tbs unify nano, not that furious vtx, it kinda sucks.

Hello just found this build and am wondering what type of batteries you you for this
Thanks!
Hey, so this build since I've originally wrote it up has changed alot. The best performance I was having was with the DLFPV 0703s and a 550mah LiHV battery these particularily https://www.amazon.com/gp/product/B077HW99TD/ref=oh_aui_search_detailpage?ie=UTF8&psc=1
One of my 0703s got busted and per some suggestions I gave the 0603s a try which was a bad idea, quad lost all its power most likly because this is a bit heavier than some of the ESC+FC brushless whoops I've been seeing at like 19/20 grams. I switched to the Sunnysky 0703s because they use beraings and are more durable and smoother but are heavier. On the 550mah batteries it was ok but not what I wanted. Im currently in the process of converting to 2S using 2 250mah LiHV batteries. I use these, https://newbeedrone.com/products/newbeedrone-high-voltage-nitro-nectar-210-30-60c-mah-battery Hope that helps.
An option to consider on the camera lens fixing would either by trying thin aluminum tape on the threads (may not work, it's going to need some mechanical force to compress into the threads). The other one would be a single dab of 242 Loctite applied with a pin - let it dry first, then try and tighten that in.

Nice. I know exactly what you mean about it being a complicated build, everything is so tiny and my eyes don't like that. My build is here: https://rotorbuilds.com/build/9067 I've had good luck so far with the Boldclash motors, you might want to check them out. Sunnysky also makes some I've heard good things about.


Nice build! Hi - i'm hoping you can help with a couple of questions! I have the same FC and 4in1 ESC for my tiny shark. 1. Should the FC power up when connected to betaflight via the USB cable? Mine does not. 2. Flashing - i jumped the boot pads, and attempeted to flash, but betaflight indicates it was unsuccessful. I'm kinda stuck and not sure where to go from here. Any help? Thanks! Mike
Hey Mike, Thanks! 1. Yea some of the smaller FCs don't have the circuitry to power off of the USB, you'll need to connect a battery. 2. Good thing is it can't be bricked. Are you locked out? If so I believe all you have to do is a full wipe to get back in. Try again though maybe there wasnt good contact? Are you sure you have enabled "No reboot sequence" in the configurator? I actually don't have this whoop anymore, I ended up using the parts in a 2S pepperfish build but I did upgrade to Betaflight 3.5 with the FF_KOMBINI target and it did work jumping the pads.
Thanks for the quick respons and the good ideas! I tried all those things...and had on the 'no boot sequence' enabled, but still the same result ..i'll check my USB cable and check the boot pad jump...These boards are so small its hard to even see what you've done with a magnifier!
Are you sure your usb cable allows for data transfer and not just for charging? I've made this mistake many times.
YES! I had the wrong cable. I'll mark this cable "DATA - DO NOT REMOVE" haha. The board was sucessfully flashed. Thanks for the help! :)