
This is my "v2" of this build using the Rakonheli 76mm frame. I did not publish the first iteration since there were flaws and I knew there could be improvements.
- The v1 build did not have good placement of the receiver. It was chilling out front and took a pretty good beating. In this iteration, the receiver now sits between the XT30 "harness" and the carbon fiber frame,. It is now protected and stays put.
- On the v1 build, the camera/vtx needed to be removed to access the USB port, which was obviously a PITA for frequent betaflight changes.
- On the v1 build, the motor wires were soldered on from the outside-in, and susceptable to damage. On the rebuild I soldered them runnning inwards, protecting them.
Upon powerup:
- I highly recommend the use of a "smoke stopper" or regulated power supply to limit the current to the ESC/FC. A regulated power supply set to 6v, 0.75A should allow you to power the unit for programming/testing
- I highly recommend upgrading the FC to the latest Betaflight, and upgrading the ESC's using BLHeli. Your hardware has probably been sitting on a shelf for months, and they have released updates since they were programmed at the factory.
Issues:
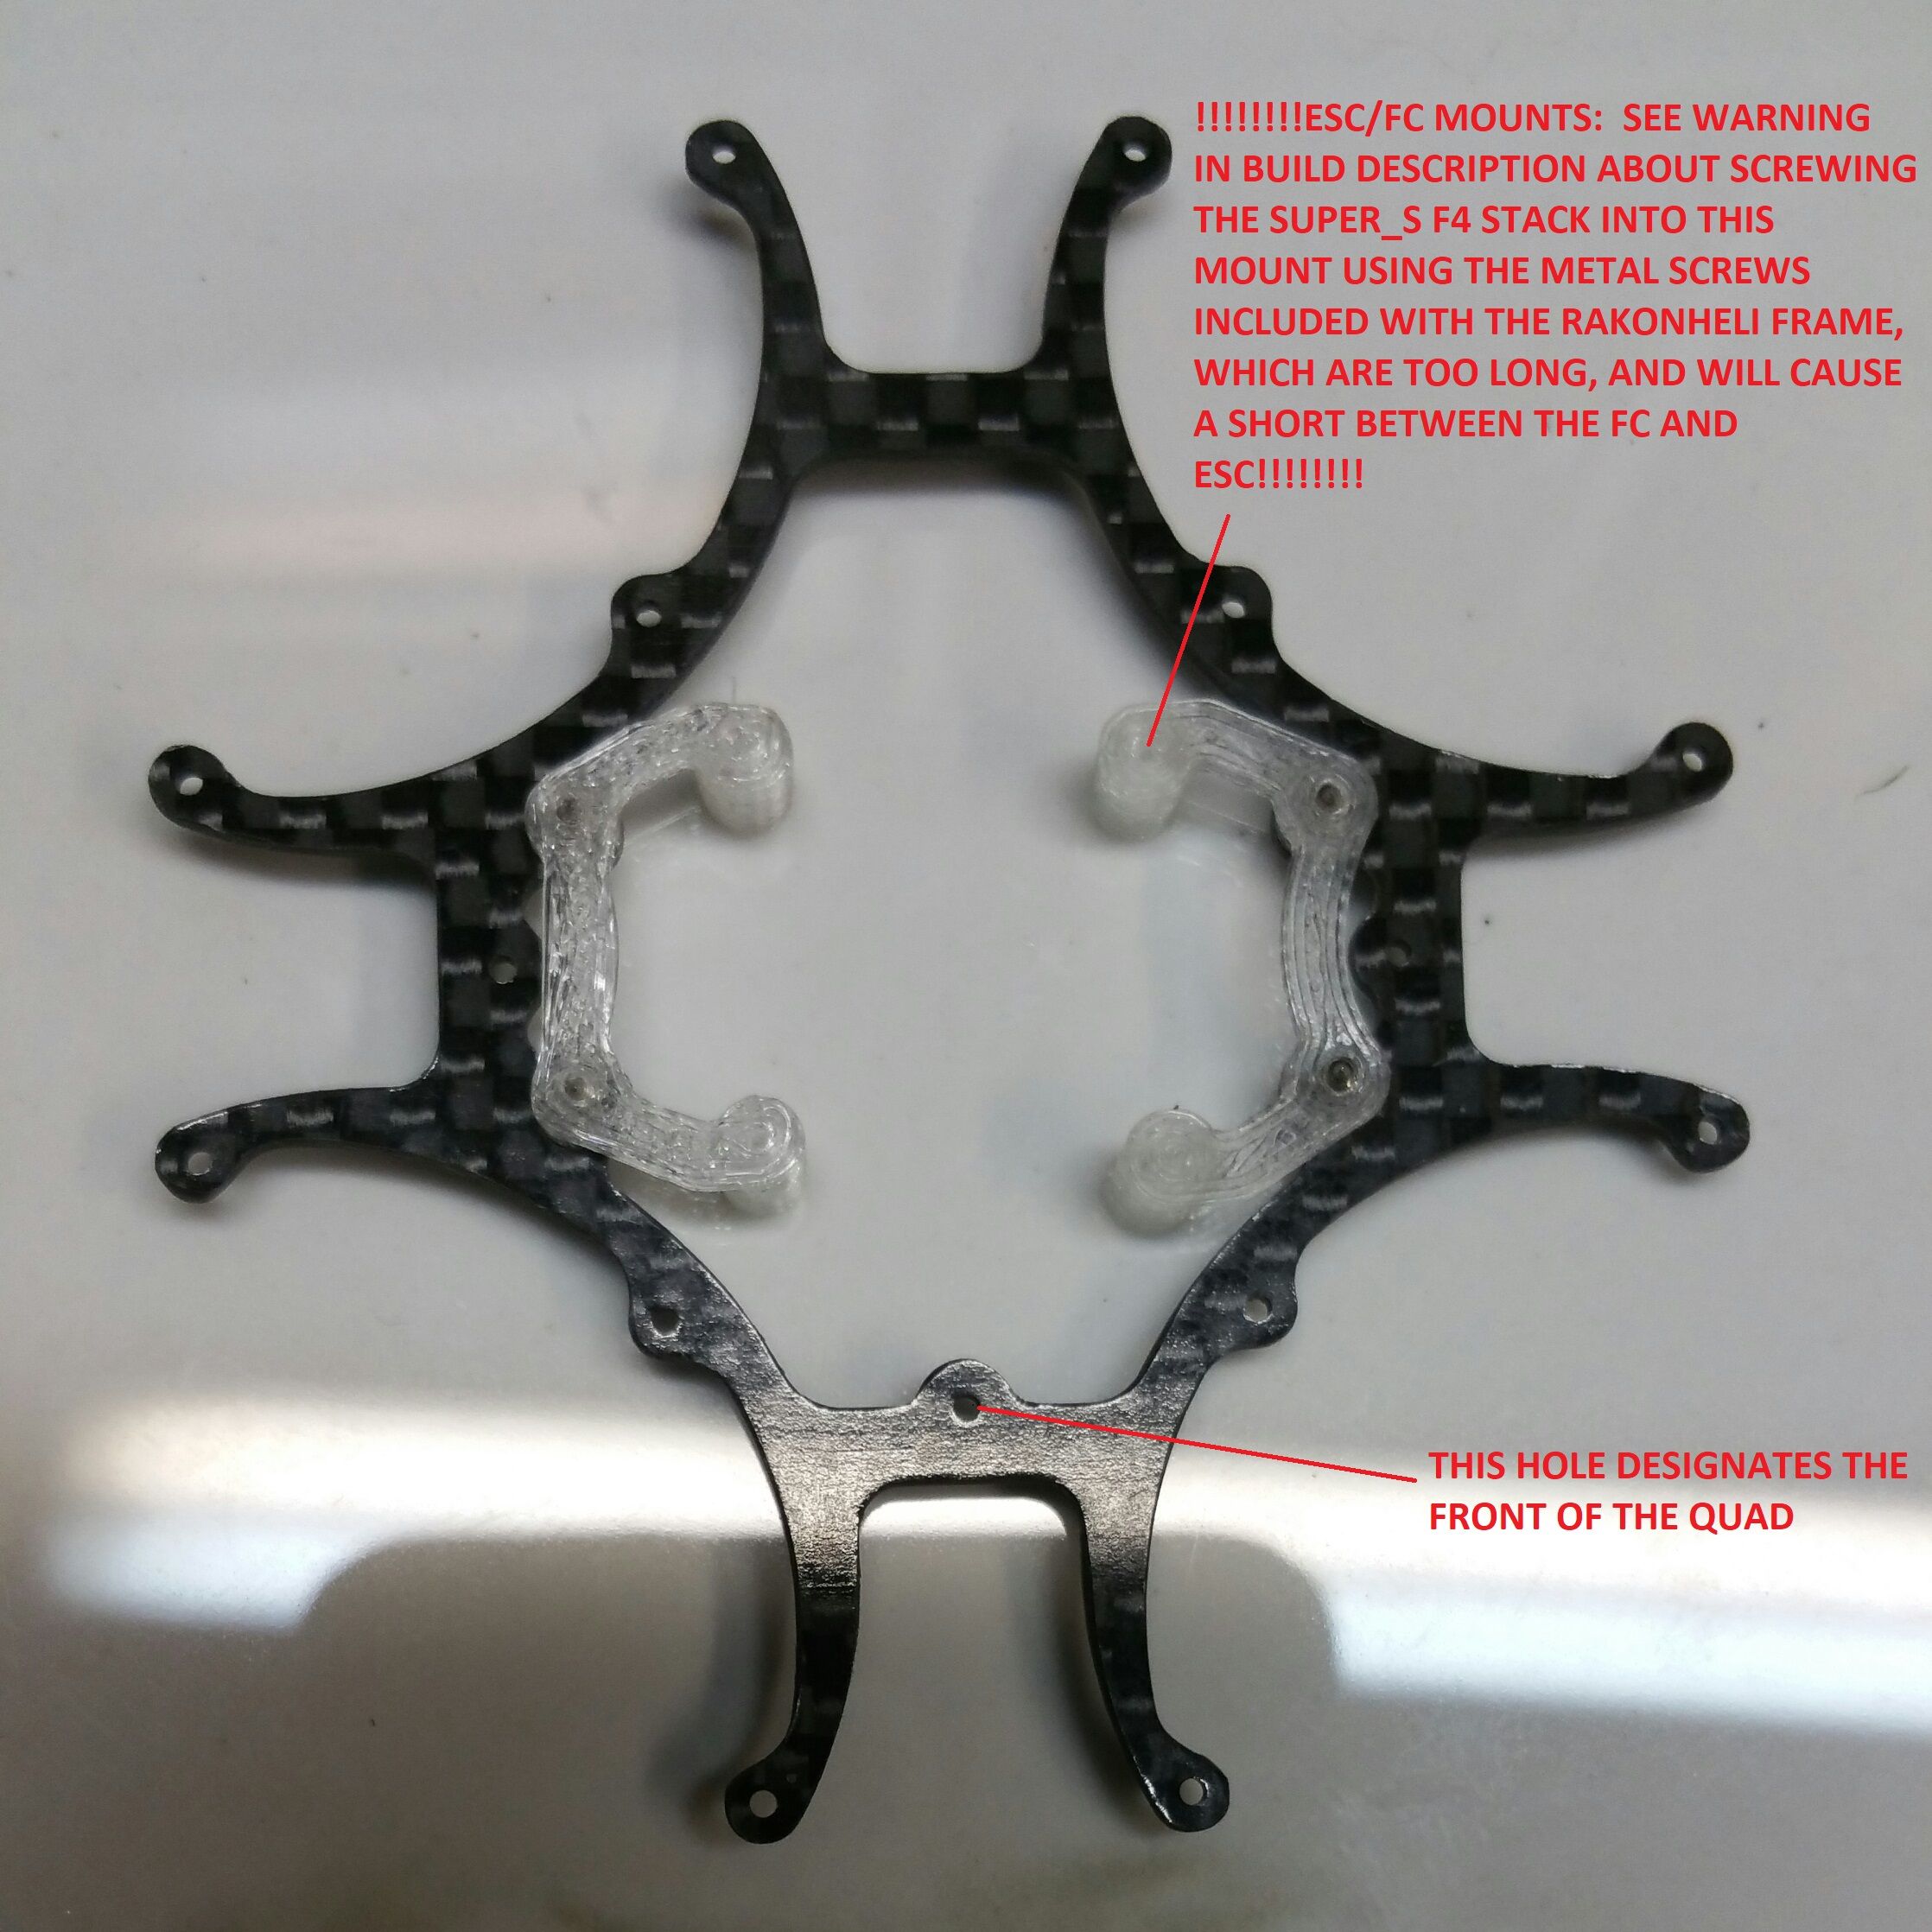
Issue #1: Possible short between FC and ESC if not done CORRECTLY
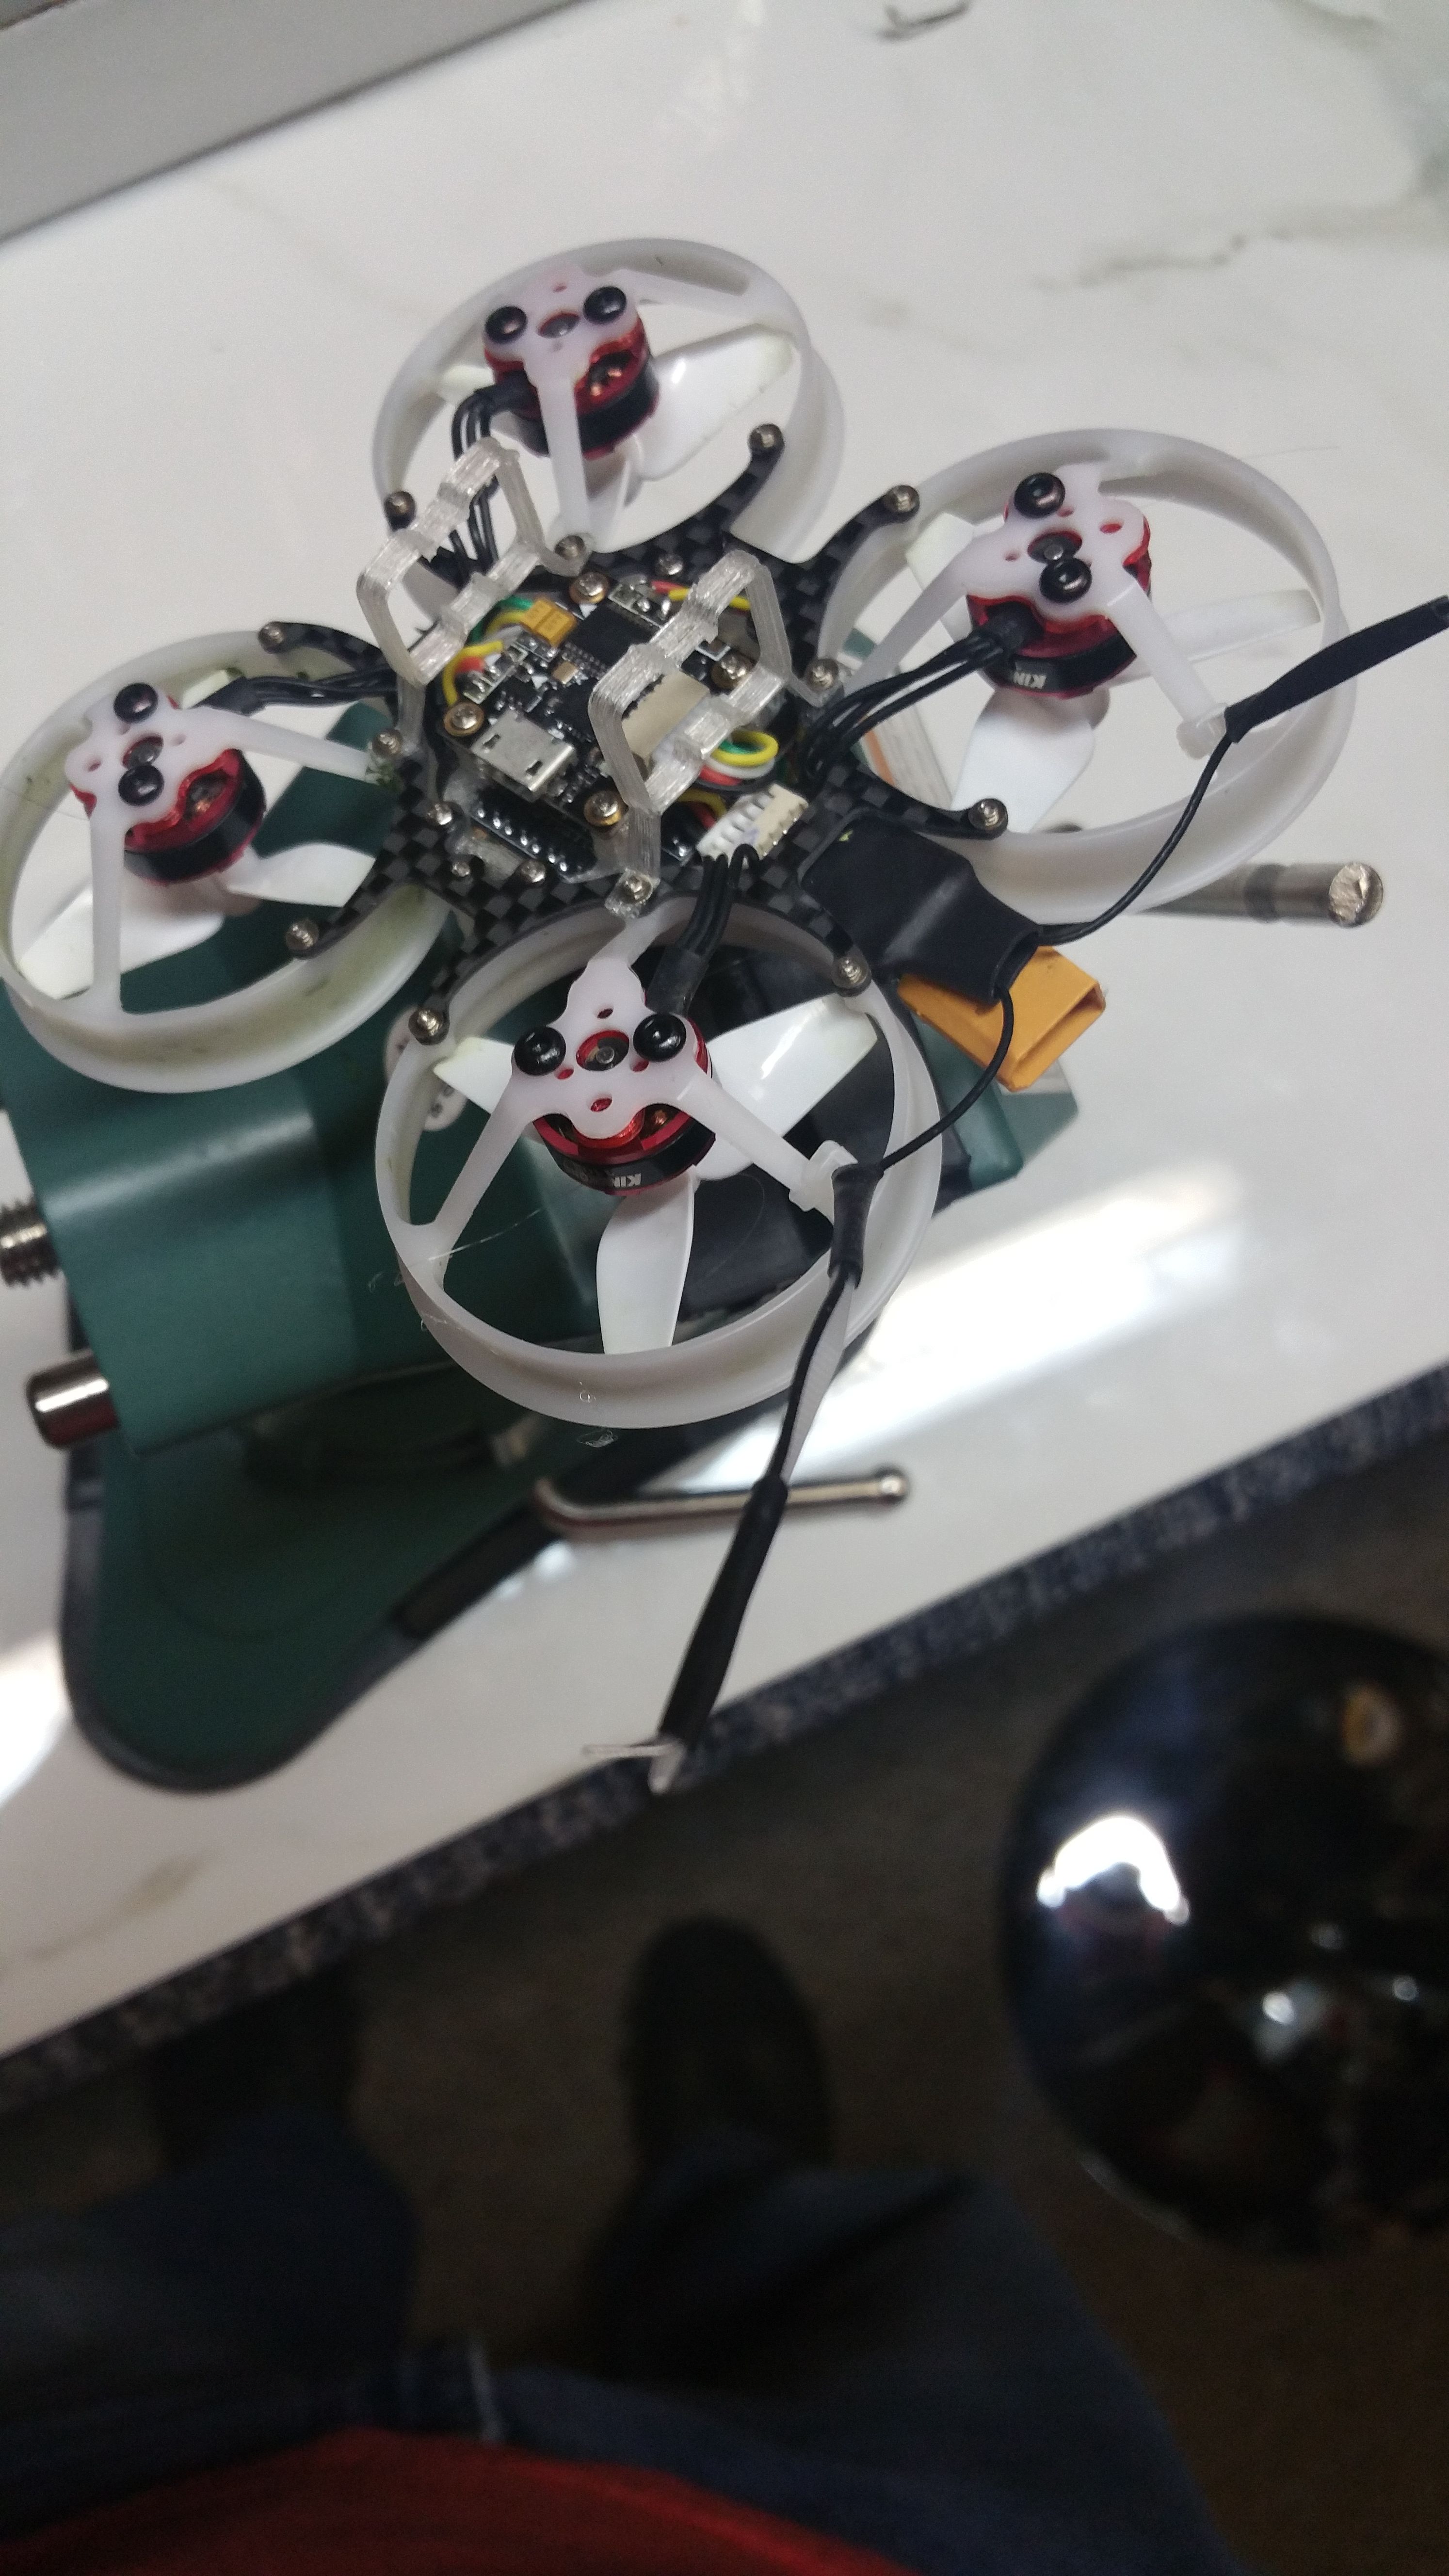
I found this out the hard way and toasted a stack. For reference, see the attached photos with the FC mounts attached to the frame/mounts
- The mounting holes on the ESC are tied to B+
- The mounting holes on the FC are tied to B- (Ground).
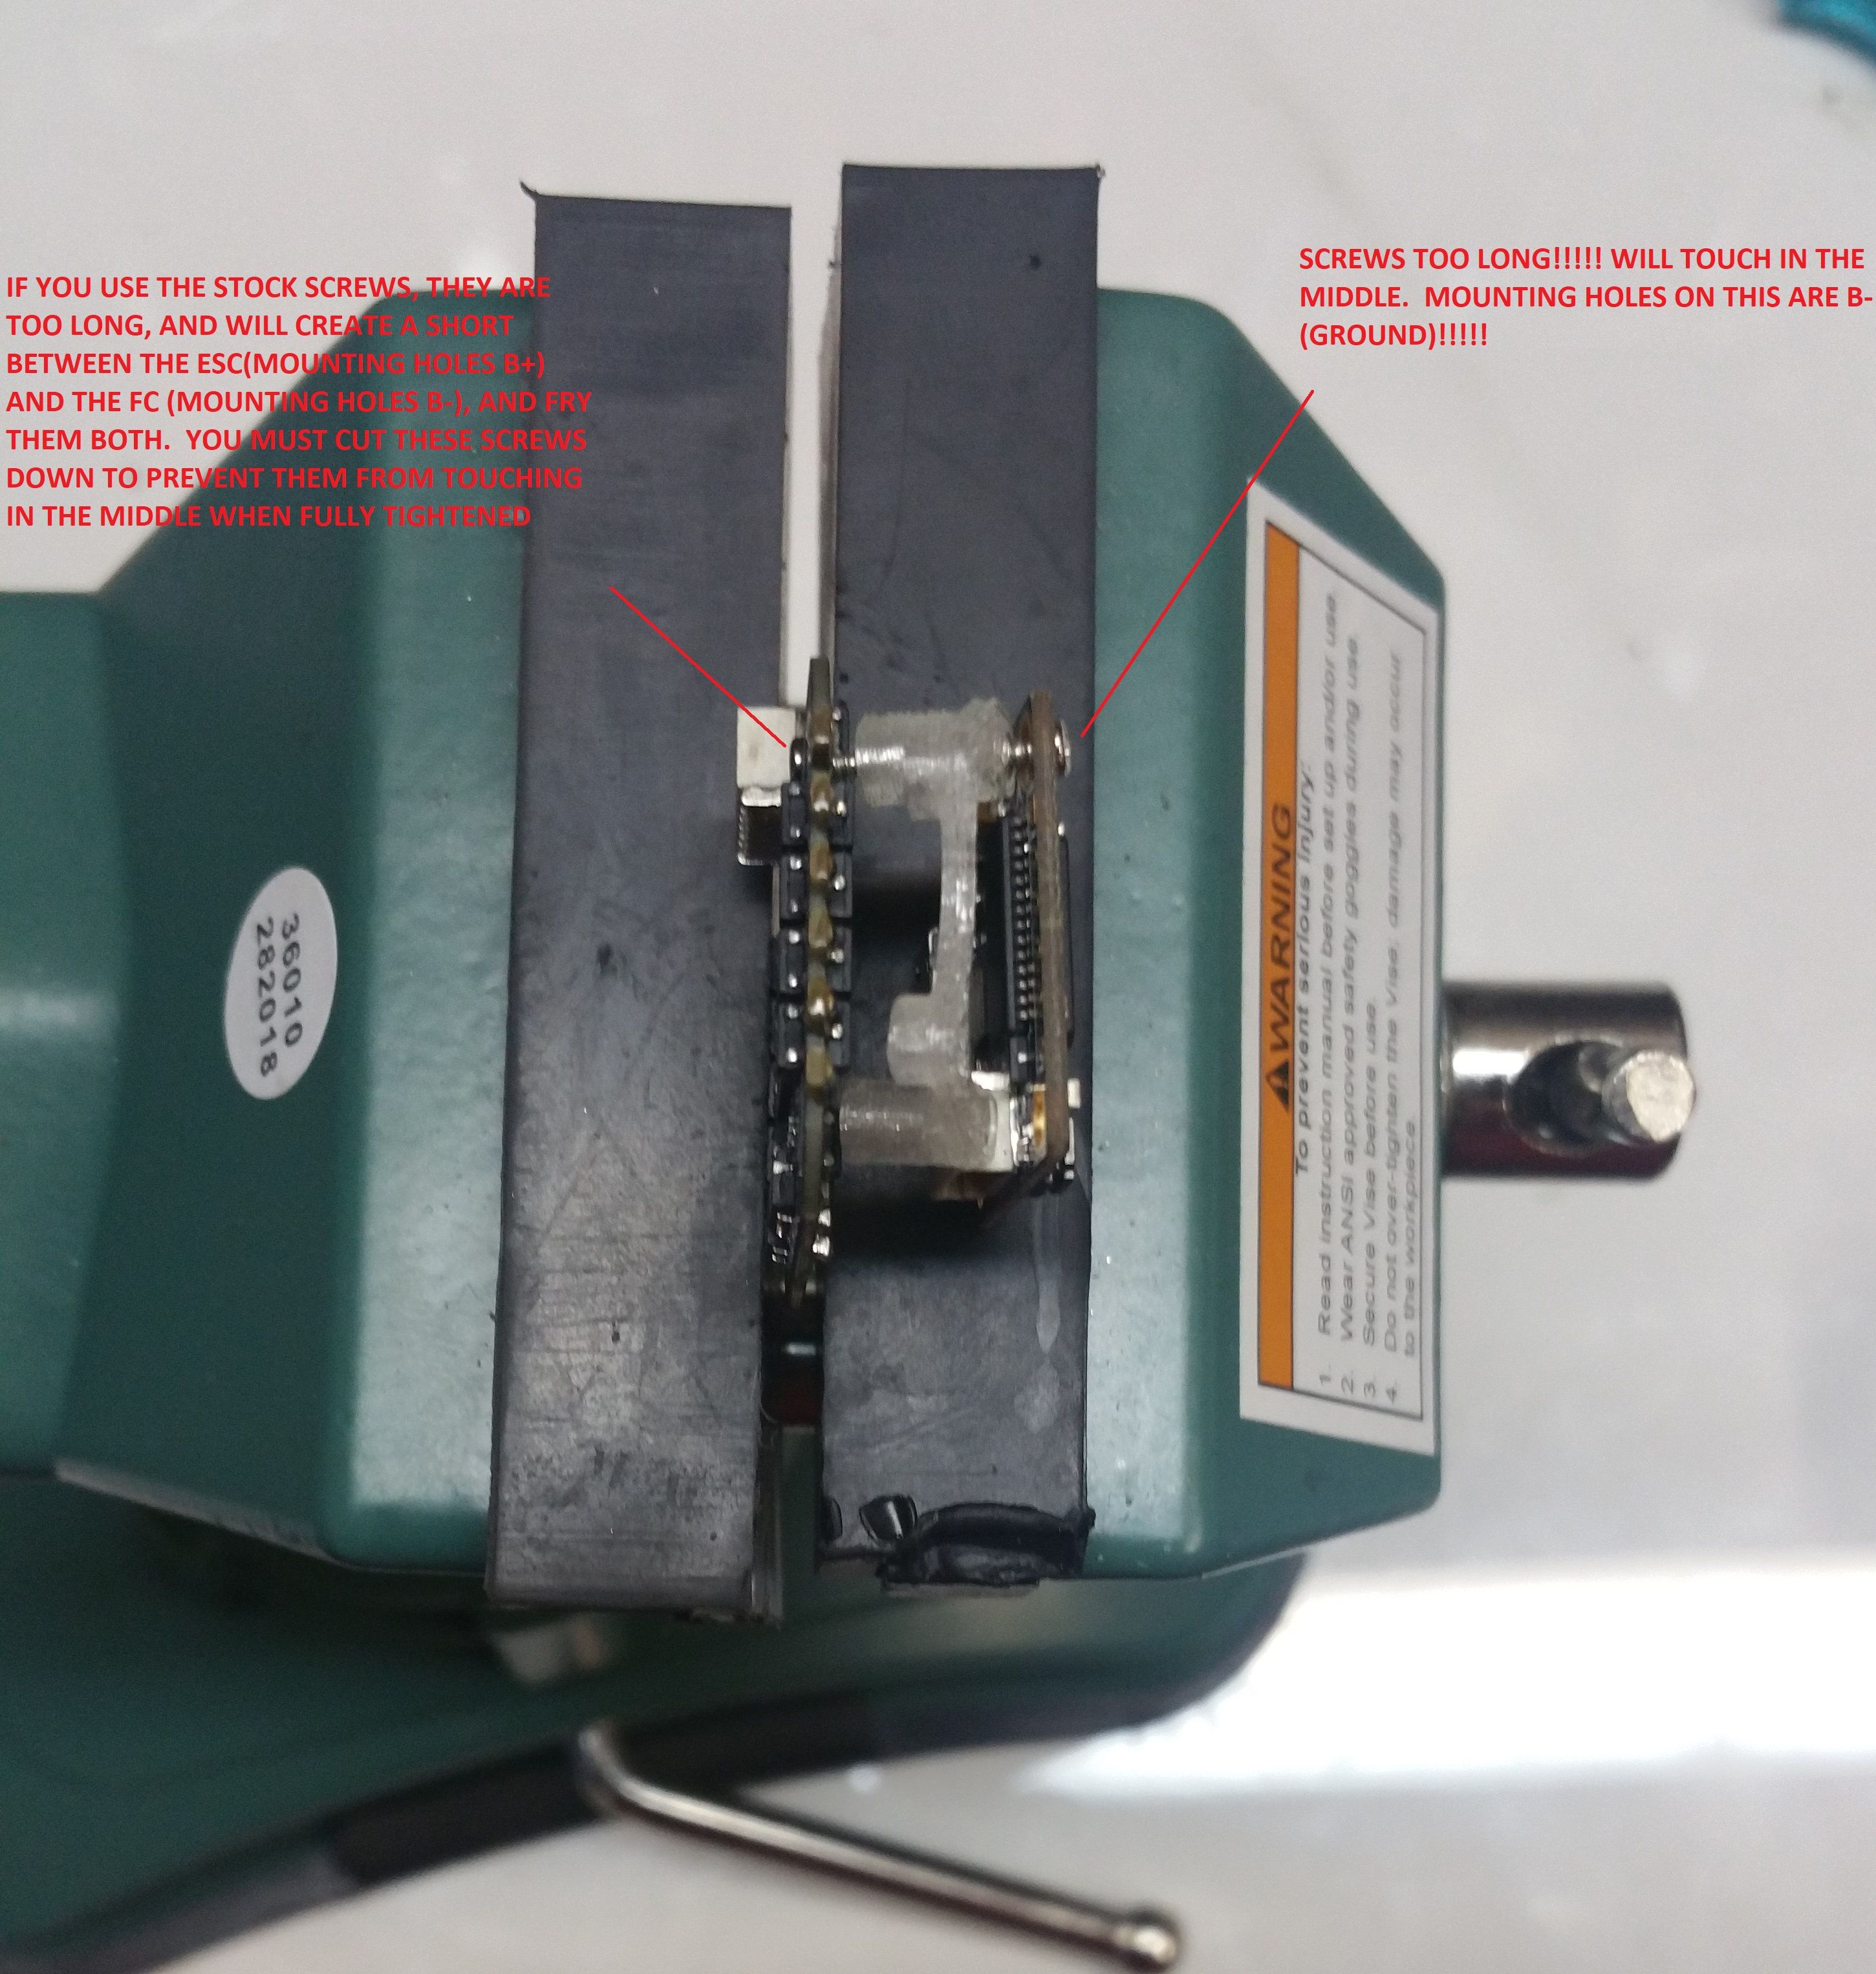
If you use the screws supplied by Rakonheli to secure the FC to the mount and the ESC to the mount on the other side, you will have a dead short between B+ and B-, and let the smoke out. Shortening the screws so they do not touch in the middle is how I, and others, have solved this. I just cut a thread or two past the taper of the screw's point with a pair of diagonal cutters and it worked fine for me.
Testing and proof of this issue:
On the ESC, I went from the mounting holes of the ESC to the B+ pad with an ohm meter, and its a dead short. I then went over to the Flight Controller, and put the meter from the USB housing (known good ground ) to the mounting holes, and its a dead short. This confirms that the mounting holes on the FC are GND, and the mounting holes on the ESC are B+.
I have a degree in electronic engineering, and have done electronic repair on everything from robotics PCBs, television PCBs, VCRs back in the day, car audio head units, amplifiers, PCs, PC power supplies, and everything in between. I have NEVER seen mounting holes tied to B+, but it is what it is.
Issue #2: Arming:
I did find an anomoly with arming: This issue only seemed to appear after the rebuild to this v2 build. If I do not disconnect via the connect/disconnect button in the top right of Betaflight after saving my configuration, the FC will not arm due to MSP violation. The sequence that fixed the issue for me is as follows:
- Open Betaflight, make whatever changed desired.
- Go to configuration tab, click save and reboot.
- Once flight controller automatically reconnects after reboot, click the disconnect button at the top right.
- Quad will now arm correctly.
I'm not sure if this is an issue with the Super_S F4 FC or what, I just know that the above procedure fixed the issue for me.
Issue #3: Motor height/prop selection:
The 1103 motors sit pretty low in the ducts. Using the first type of propellers included in the build list, they will hit the bottom of the ducts if pressed on all of the way. I then added " vibration dampeners" (see parts list) which raise the height of the motors. the vibration dampners raised the motors enough to make it usable if the props are pressed on but not seated all of the way (appx 1-1.5mm off of the bottom). If pressed on all of the way, they will still hit the bottom of the ducts. I had a couple of occasions where the props came come off in a crash. I have ordered 1535 props (see parts list), which bolt to the head of the motor. Not sure if this will raise them enough, when they come in, I will see if it will correct the issue.
Update: My racerstar 1535 props came in today. This did not solve the issue with the motors sitting so low in the ducts and the props hitting them. .Perhaps a 10000kv motor would be taller and would solve the issue?
Update 10/11/18: So digging into this a little more, I did some measuring. The KingKong motors in the list below are 12.7mm from the bottom of the motor to the tip of the shaft . I have ordered AOKFLY 15000kv motors which are 14.8mm from the bottom of the motor to the tip of the shaft. installing the AOKfFLY motors (link included below) will raise the props 2.1mm, hopefully enough for the 1535 props to clear the ducts.
Assembly
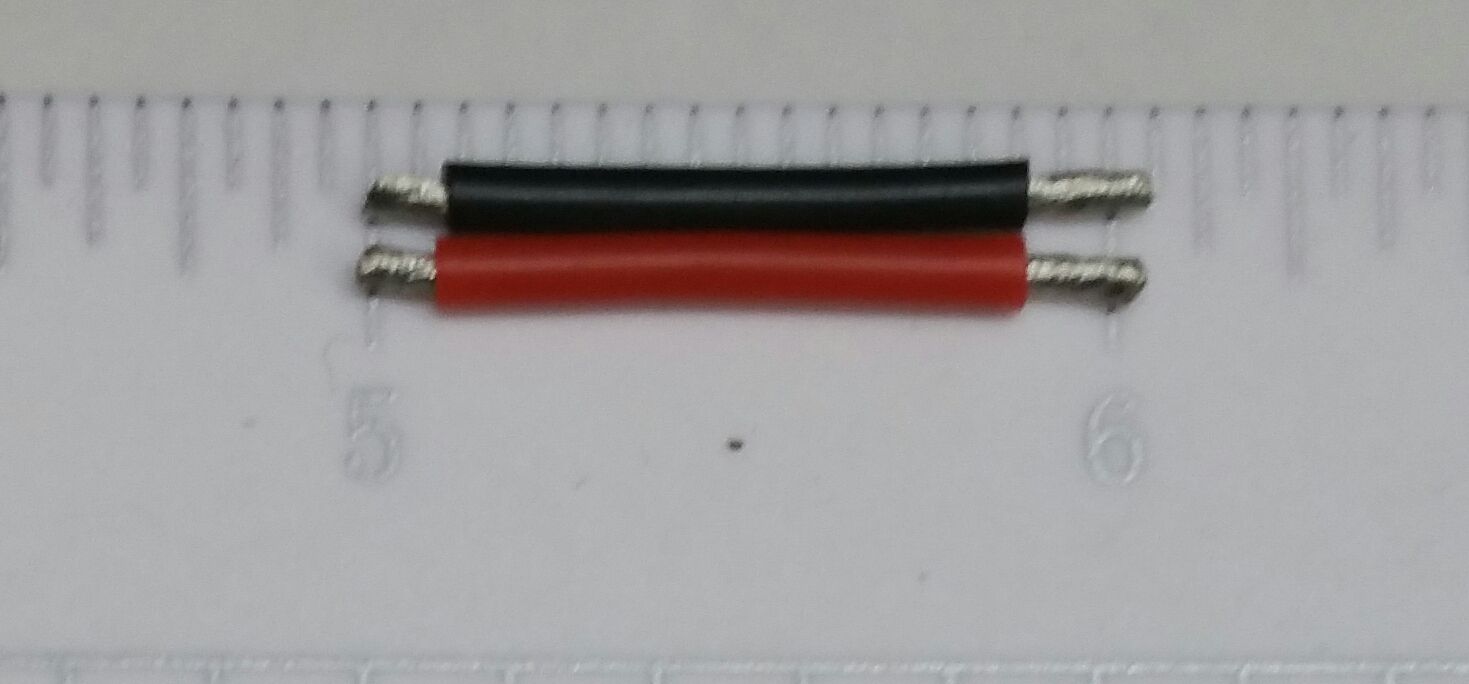
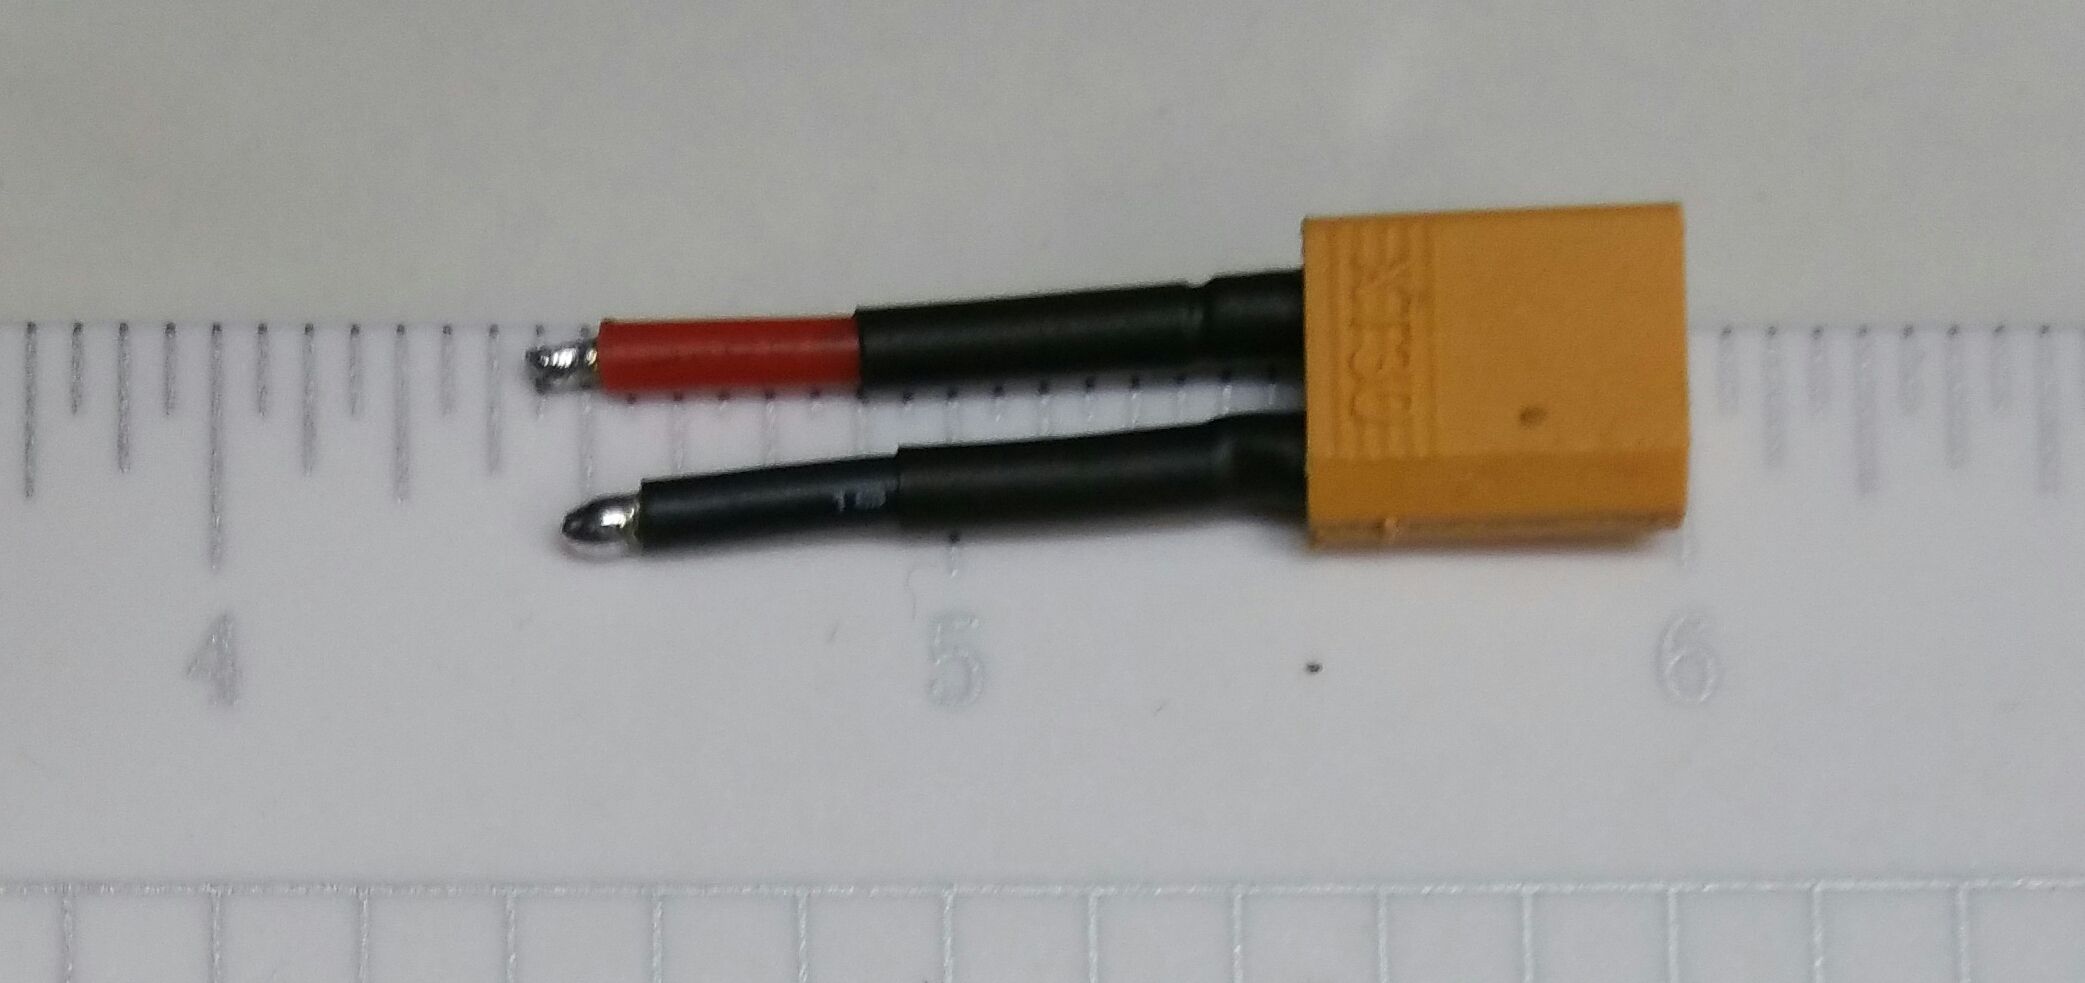
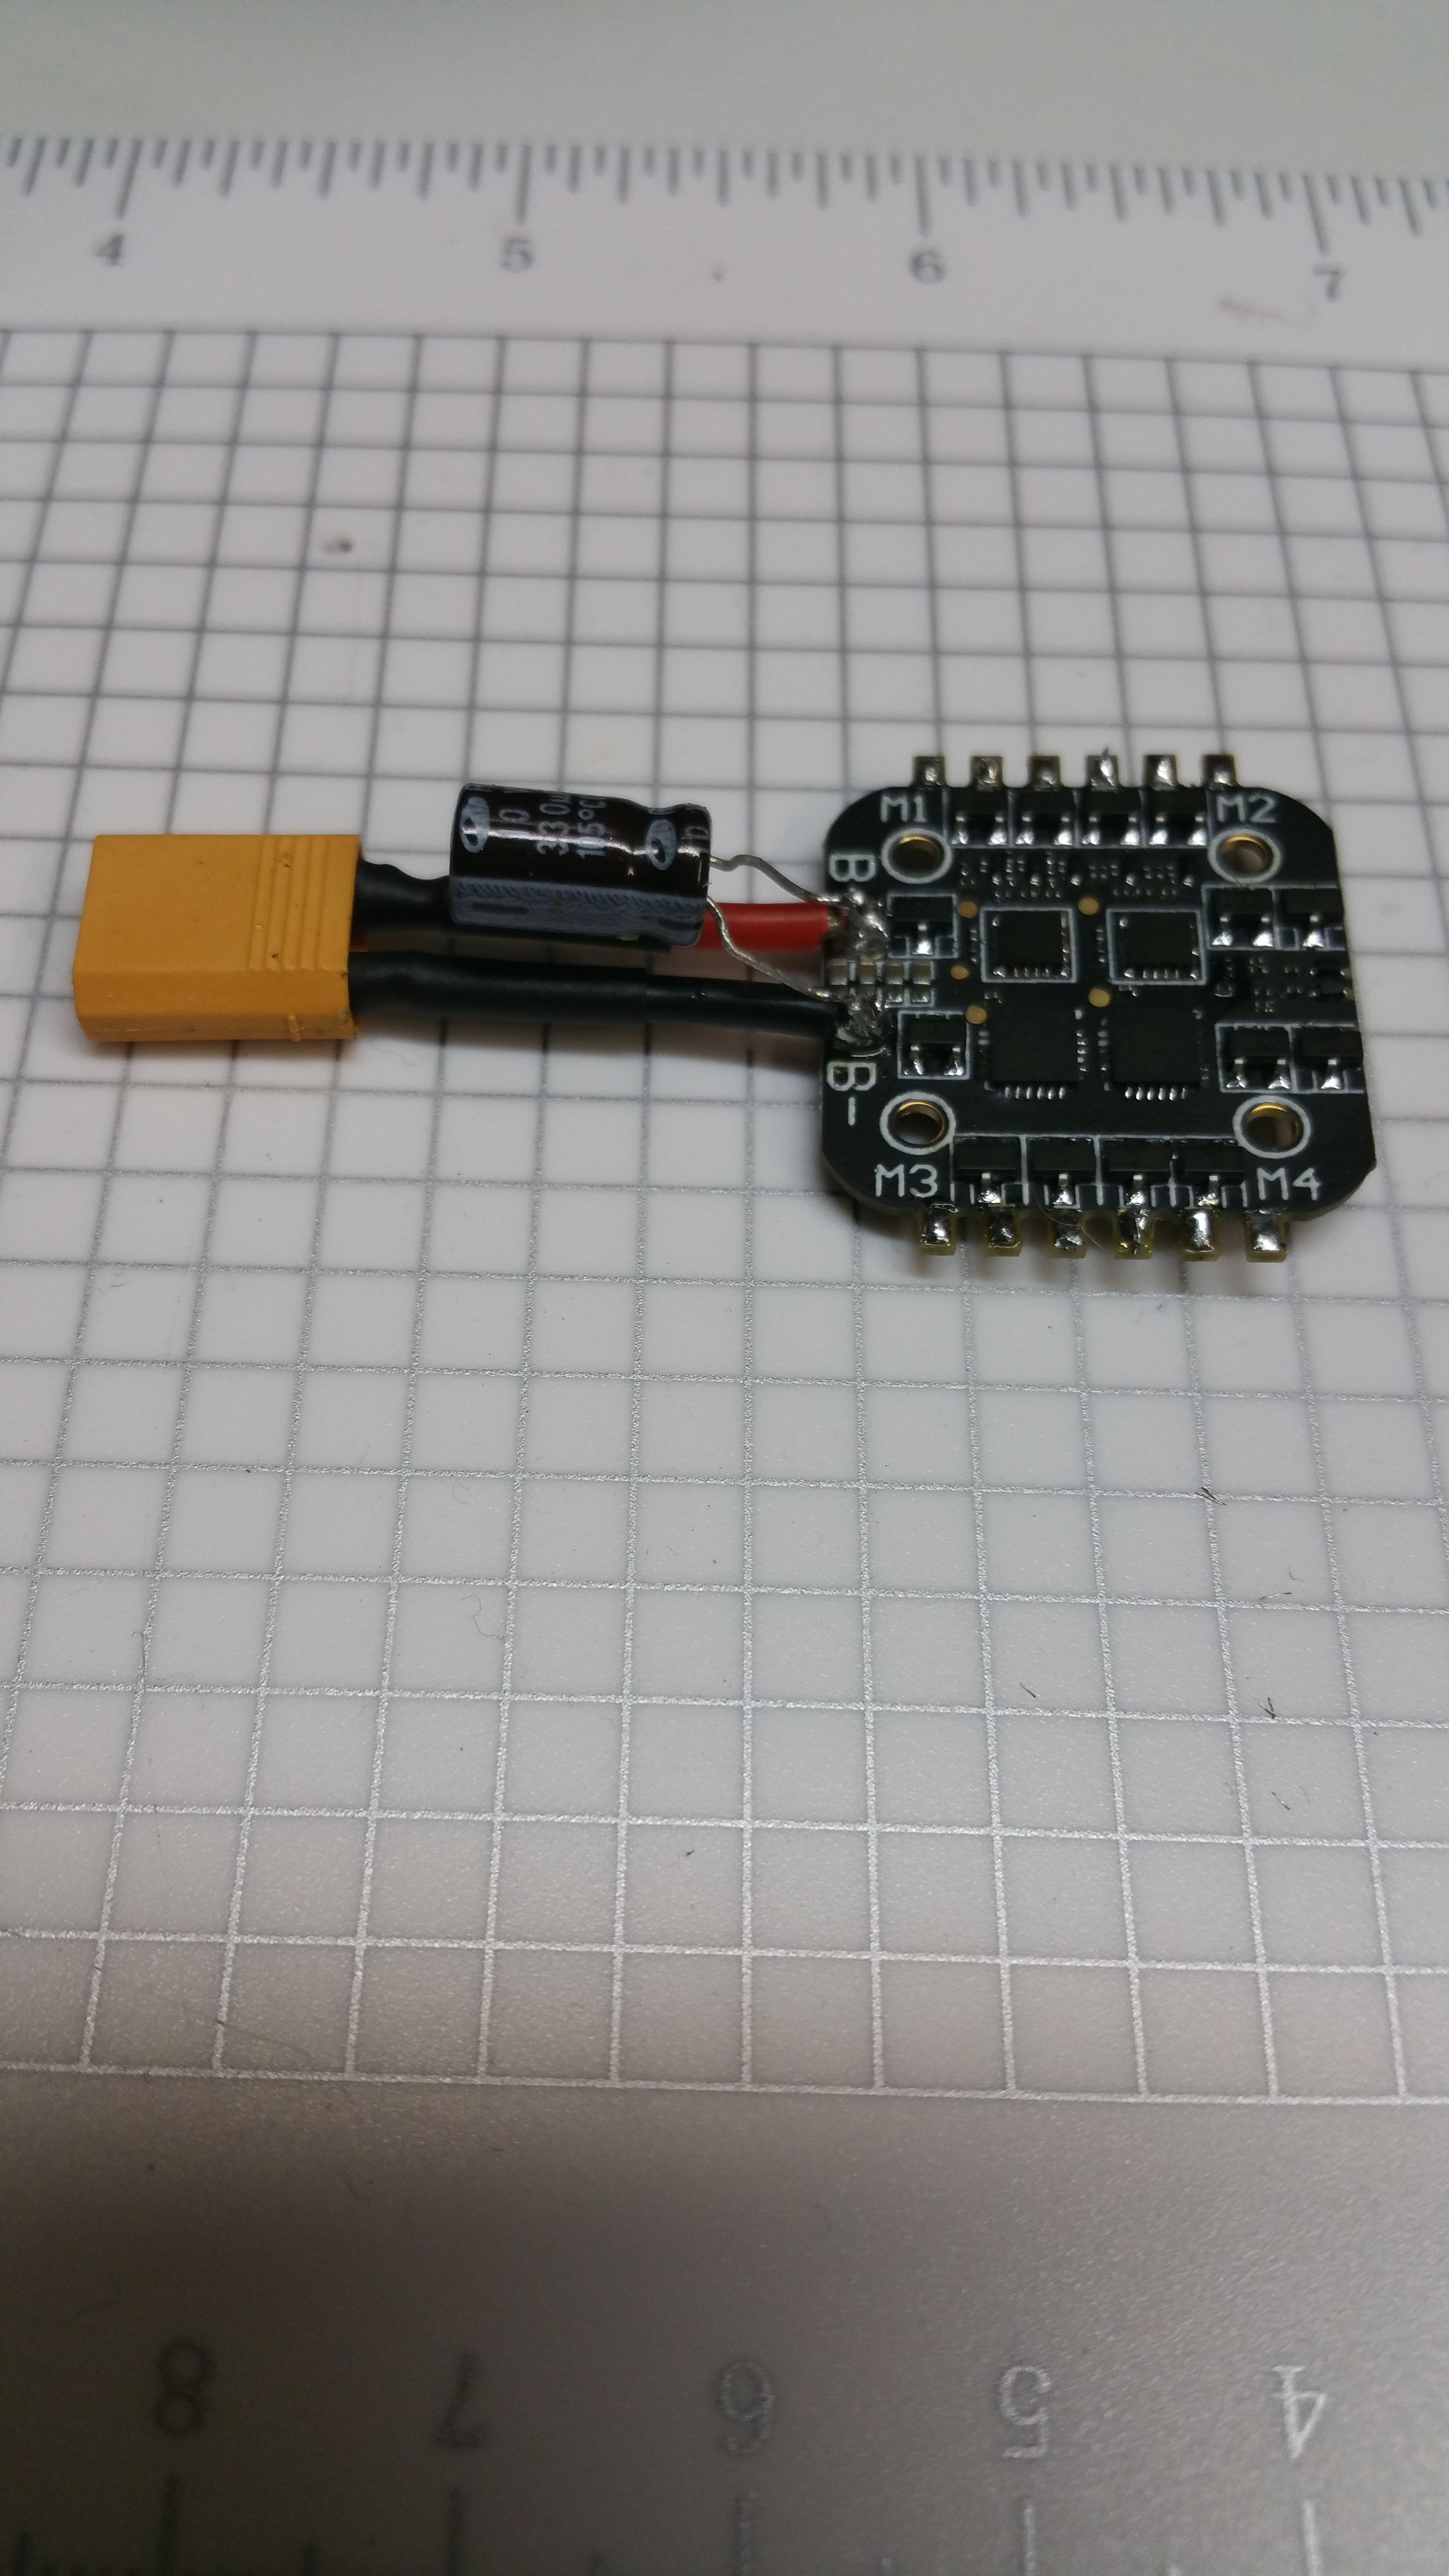
Build the Battery connector as illustrated in the image:
Prep the ESC:
- Pre-tin the B+ and B- pads of the ESC with the soldering iron and solder
- Solder the lead you just created onto the FC B+ B- pads:
- Solder on the 330uF 10V capacitor as well to help with noise and voltage fluctuations.
- Make sure polarity is correct on the cap when you solder it on.
- Pre-tin the ESC motor pads with the soldering iron and solder
- Pre-tin the motor leads of the ESC with the soldering iron and solder
- While you have the soldering iron hot, now is a good time to convert all of the the Turnigy Nano batteries to XT30 female. This has been proven over and over again to help with voltage sag and runtime. Cut the leads as long as possible, which will leave nothing left on the old connector. This will leave enough length to allow for convenient plug/unplug of the battery packs to the quad. Throw the original connectors in the garbage.
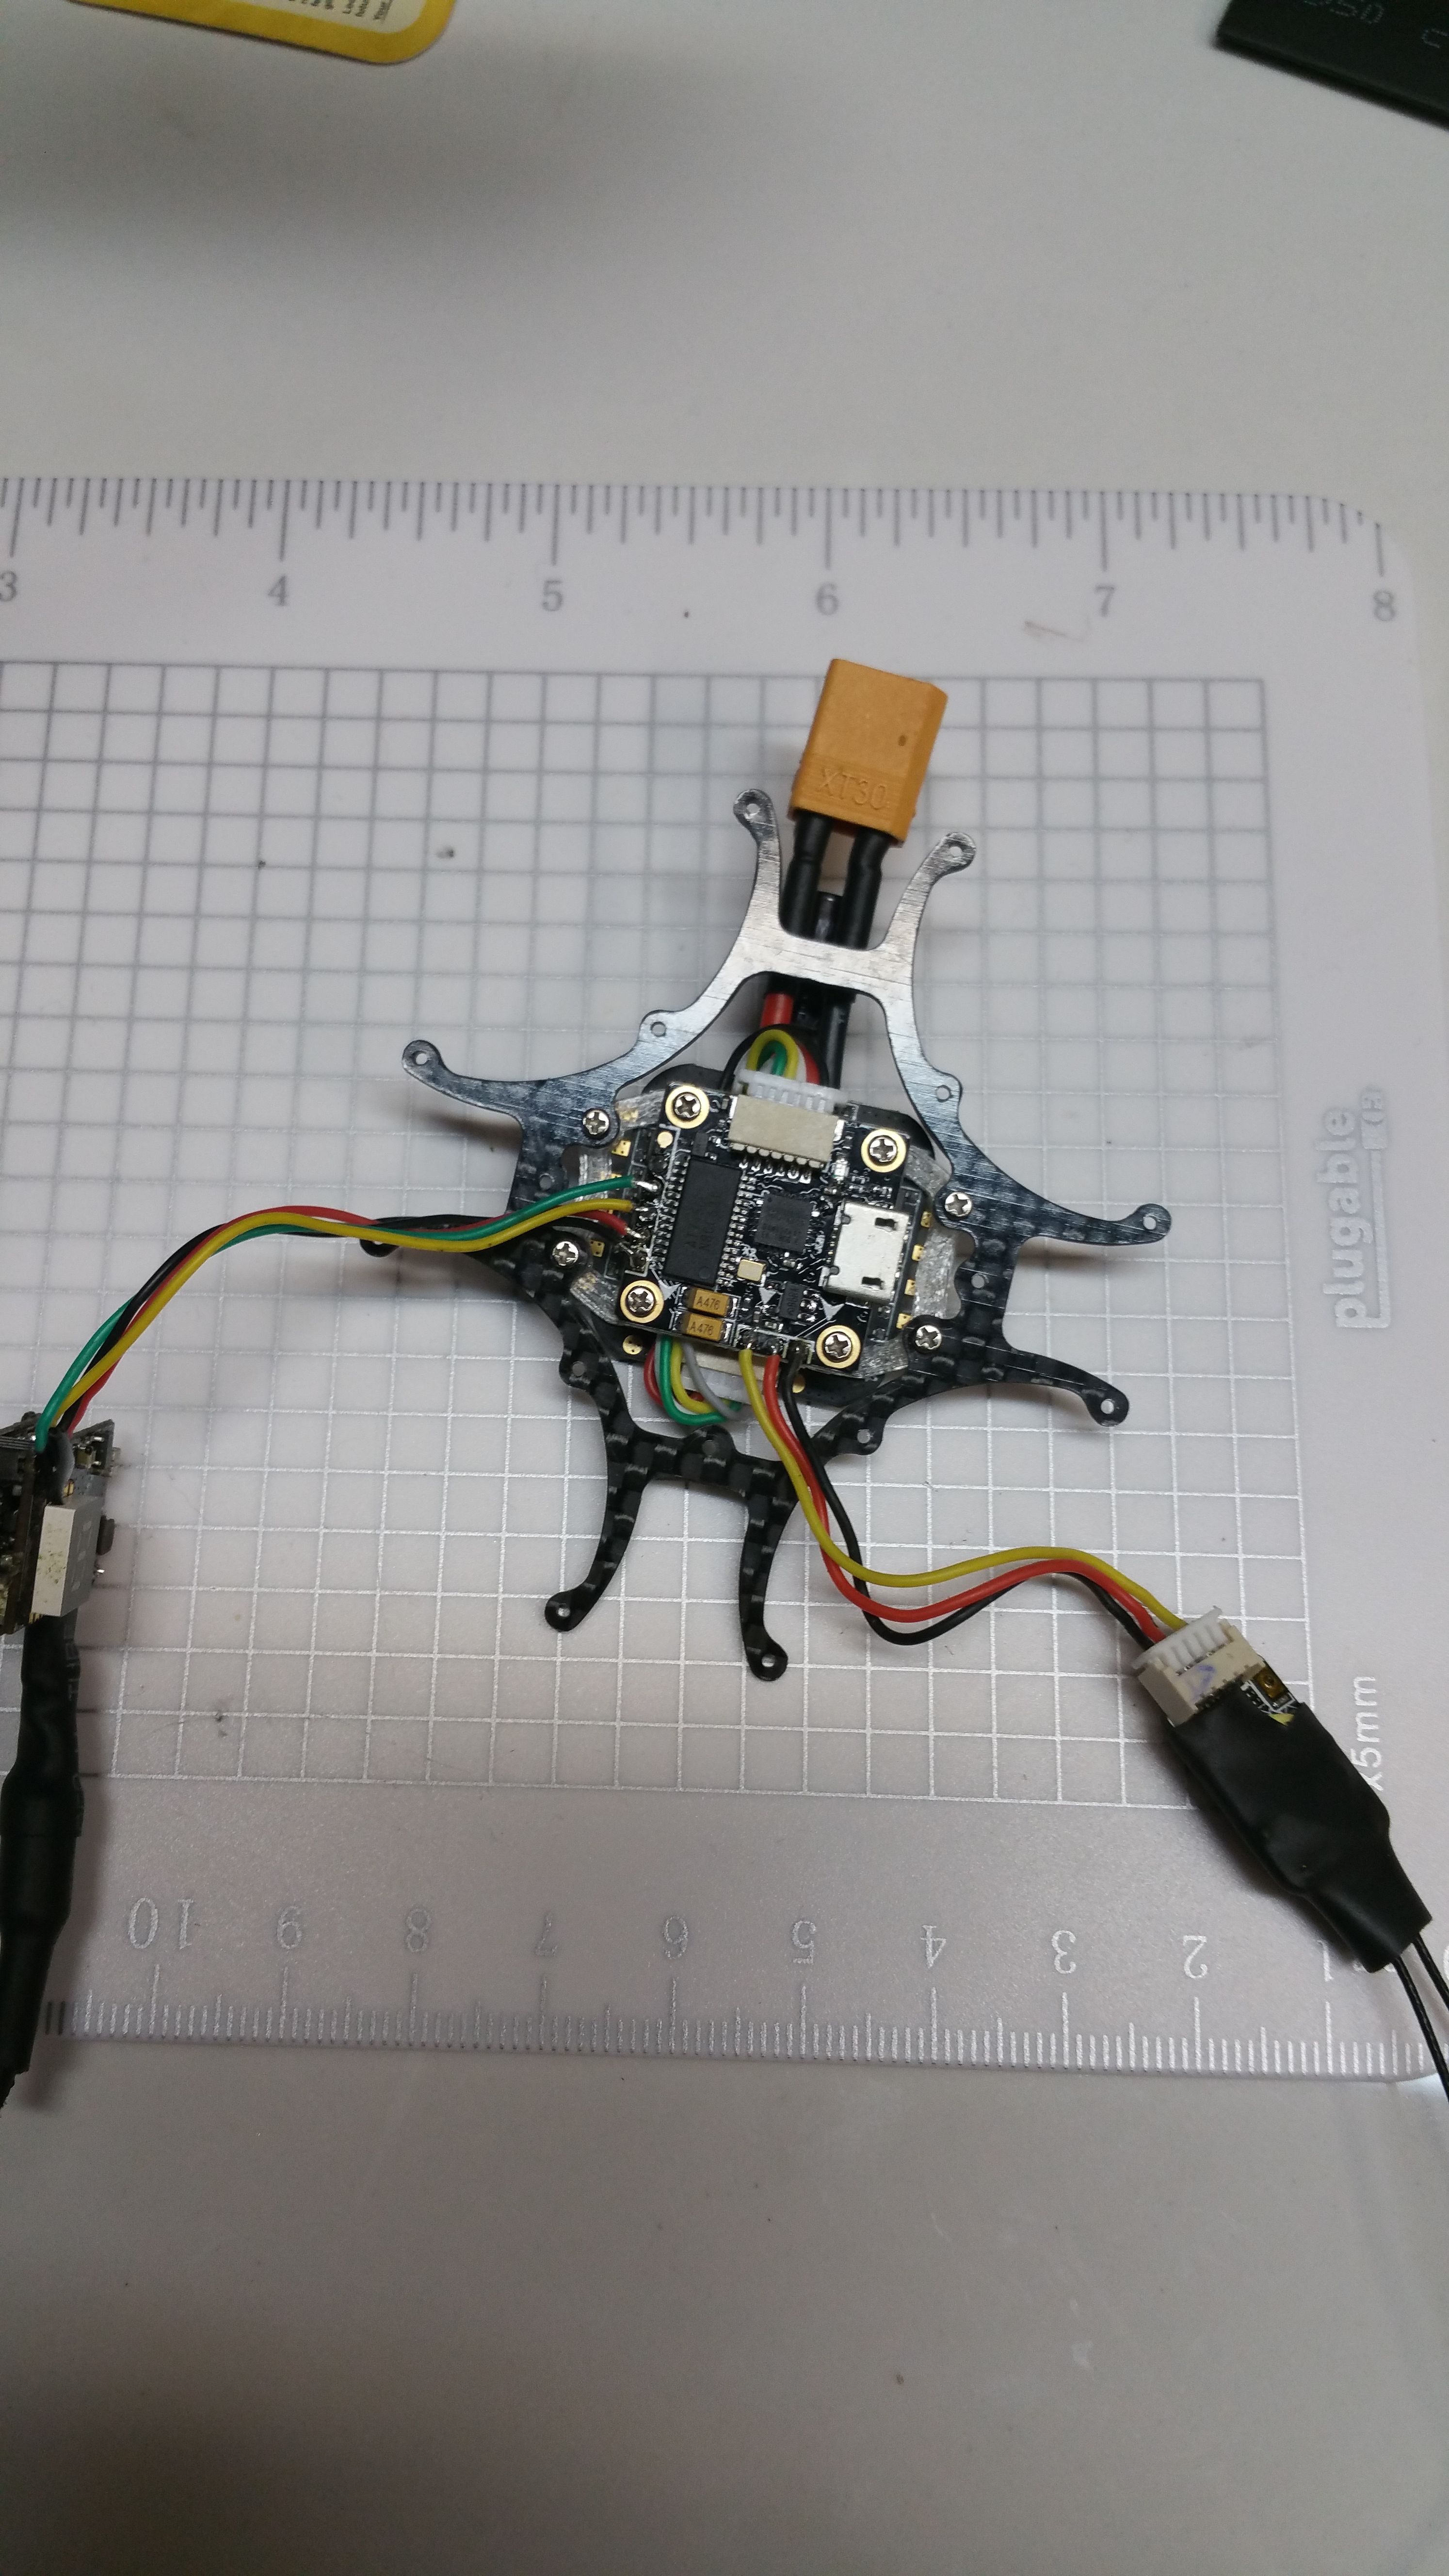
Mount the FC and ESC to the chassis, paying attention to the orientation of the boards, plug locations, and cable routing. This will leave enough space later in the assembly process for other items.
- Attach the Camera: Solder on the Wolfwhoop P1. Place a piece of heat shrink over the antenna as far as possible to support it in future crashes.
- Solder on the R-XSR receiver. Place a piece of heat shrink over the receiver to support it, and its leads, in future crashes. Cut out a corner of the heat shrink prior to shrinking so you dont shrink over the bind button.

Solder on the motors:
- Do not shorten the motor leads, you will use all of the length.
- Do not worry about rotation and what lead goes where at this point. This can be corrected later during powerup and testing in one of two ways: 1. Swapping any two leads of a motor will change rotation. or 2. Change rotation in BL Heli when you go in there to program and upgrade the ESC's
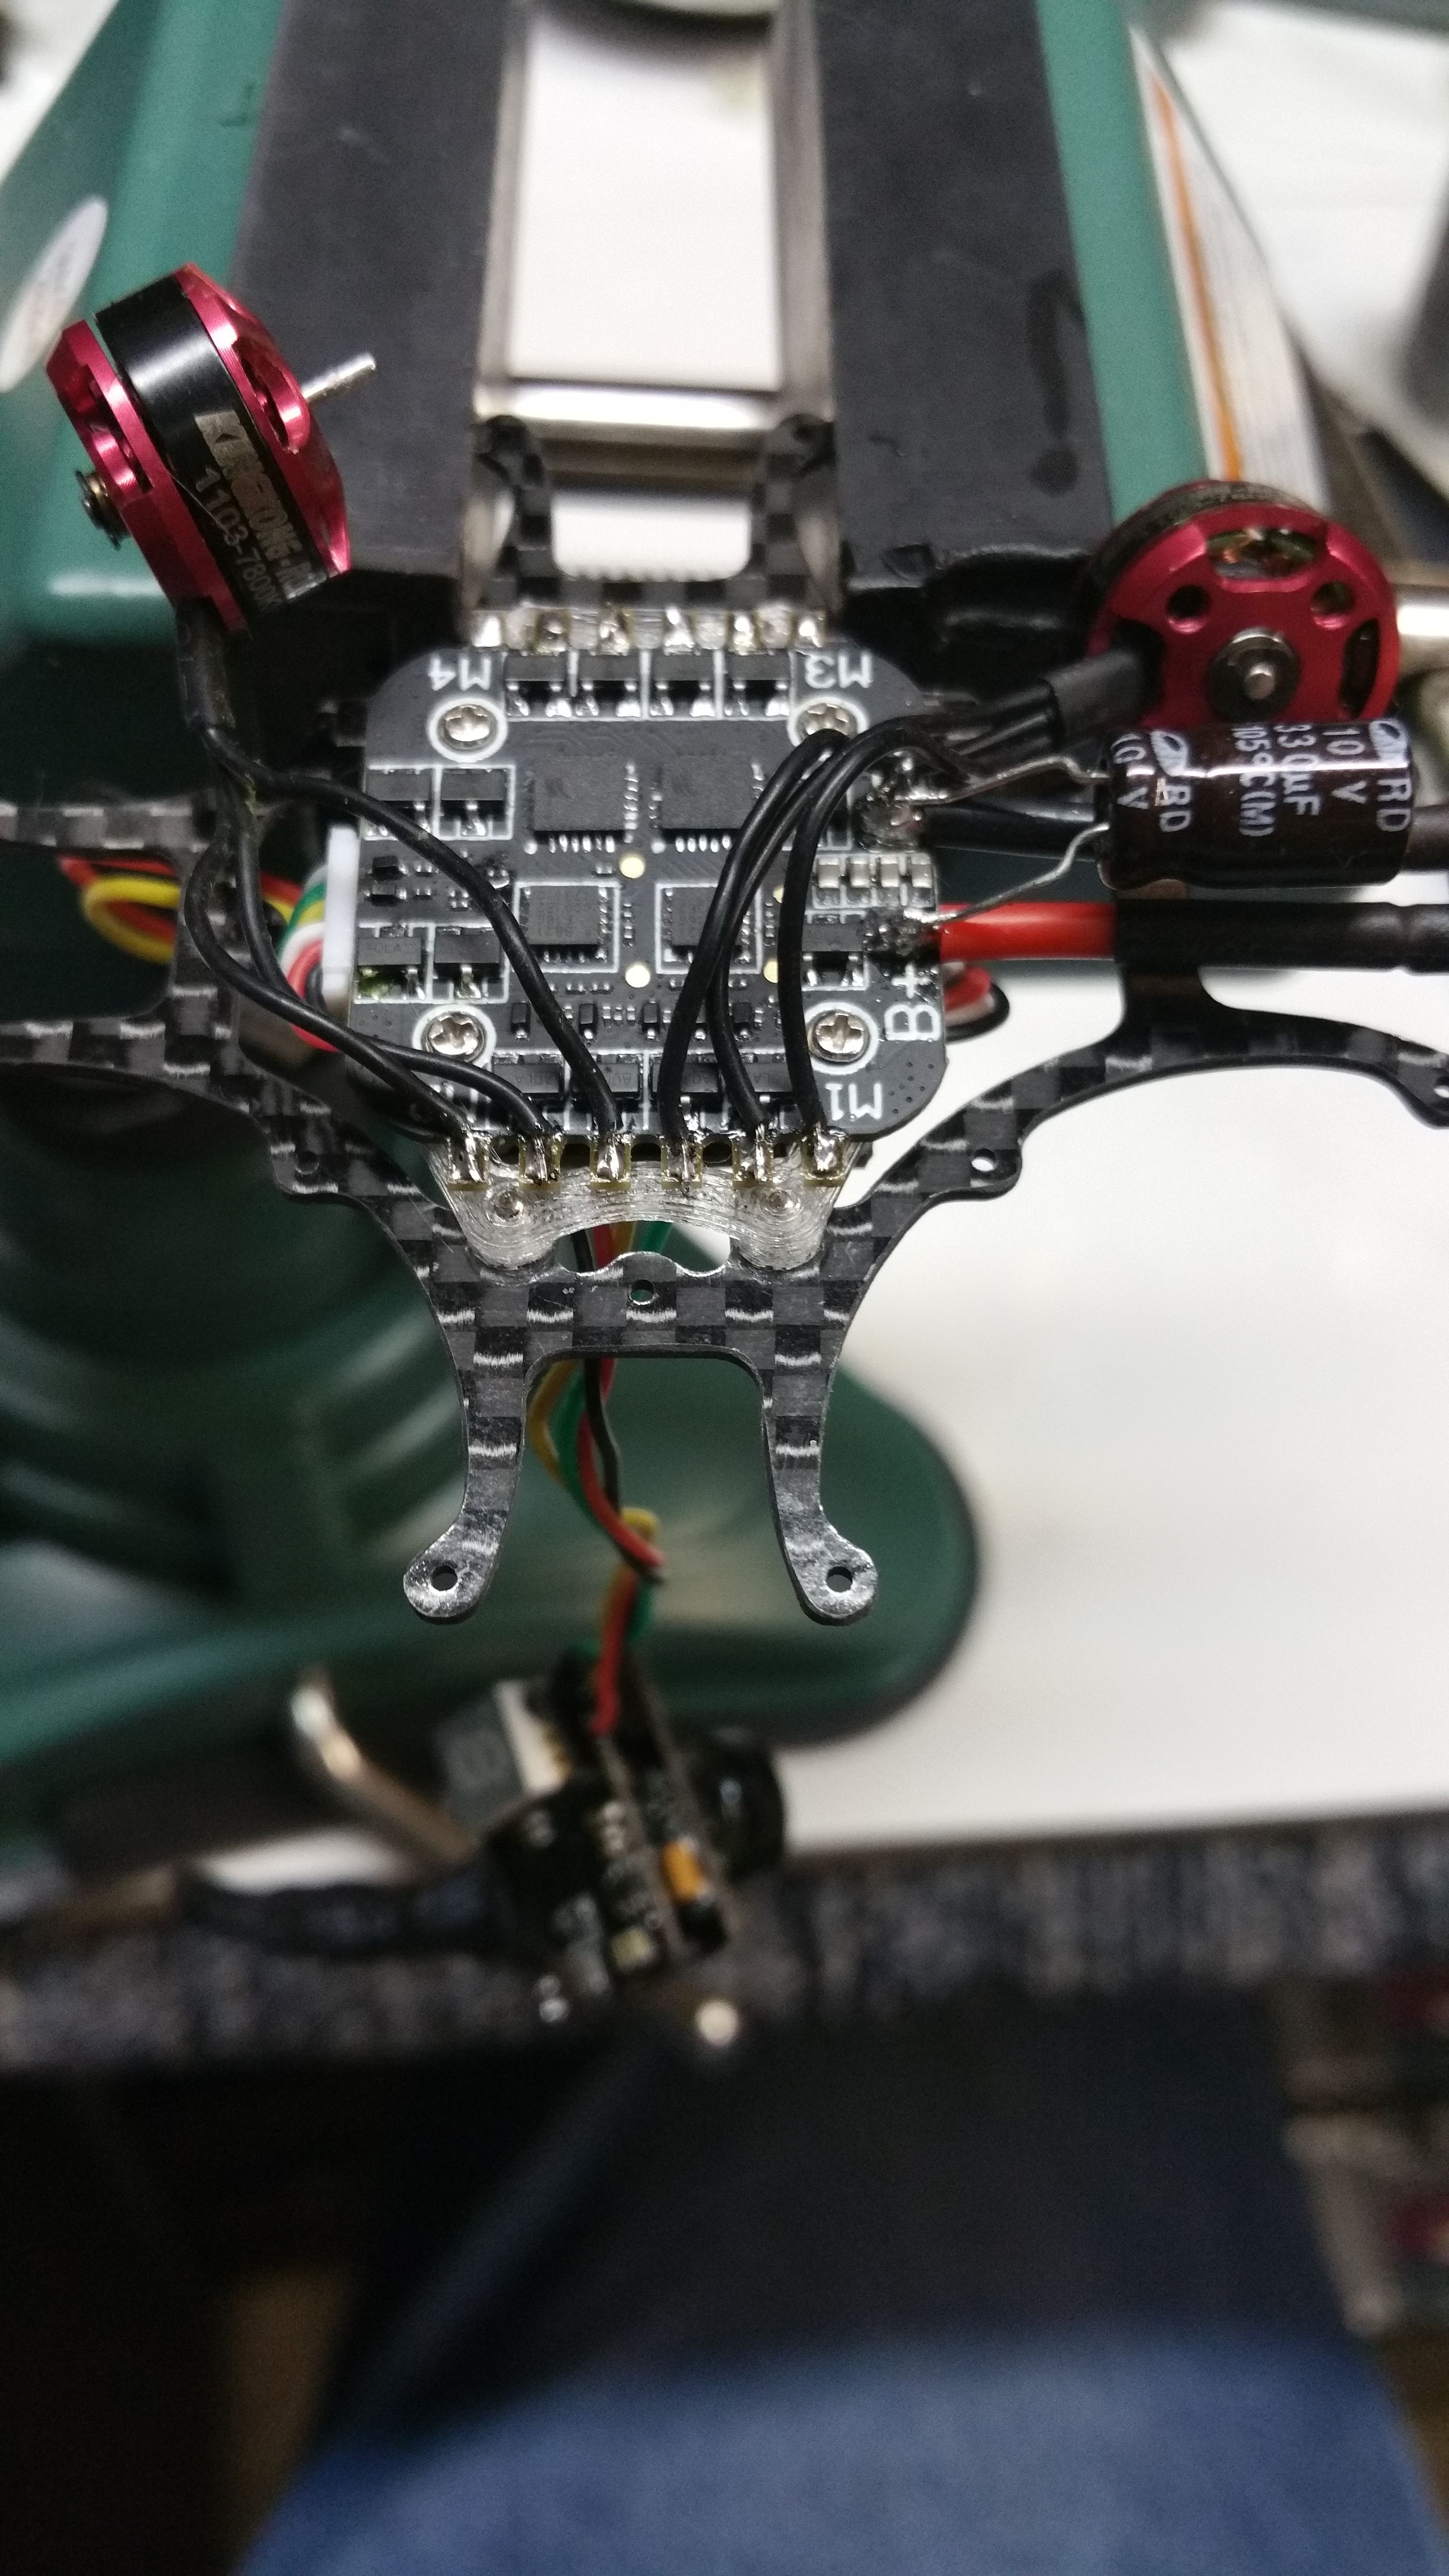

Attach the motors to the chassis. Pay attention to which motor goes where in the picture, It will be necessary to remove the ESC/FC mount to feed the motors through the frame correctly. In the below picture, you will see I have heat shrink over my motor leads. In version 1 of this build, I cut my motor leads short since i used outboard routing of the leads. This left the leads too short, for this build. I had to solder them back on, which required the heat shrink. over the joint of the extensions . If you do not cut your motor leads, your leads will be the correct length, and you will not have this on yours, making for a sano install:

I recommend using the PIDs and programming from the Beta 75x, project. If you have not already done so, I recommend joining the Facebook group "2s Power-Whoop", and then start reading and learning. As with the Beta 75x, this is a " props out" out installation. You must set "motor direction reverse " in Betaflight->Configuration->Mixer, and attach the props in the correct orientaiton. More about props out:
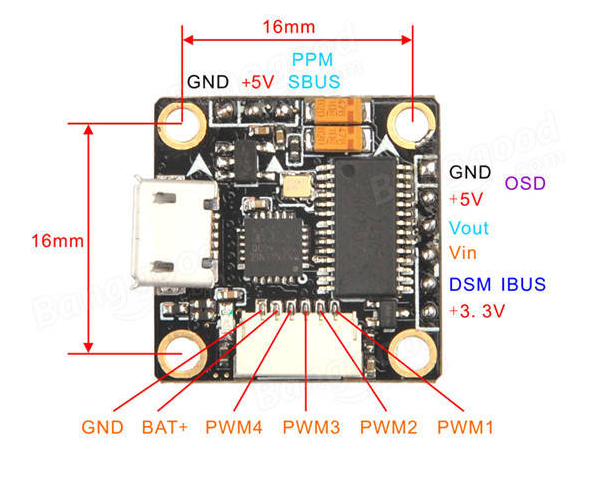
The FC is mounted upside down, allowing access to the USB port. After construction. in betaflight, you must set Configuration->Board and Sensor Alignment-> Roll Degrees to 180, and recalibrate on a LEVEL SURFACE.
Follow the instructions here to push Nate Payne's PID's and programming to the FC:
https://docs.google.com/document/d/1xlaGtkMGJUP1UwcJw1xqIG9TCuA0a7NtbvzOQrsN7hM/edit?usp=sharing
- I feel it necessary to give credit to the members that have contributed to the programming developed for the Beta 75x, which I am using to run this quad. This is an excerpt from the programming document linked above, created by Nate Payne:
Credits from the Beta75x project:
This information doesn’t come just from me (Nate Payne). Several people have made large contributions. It has been really cool to see the FPV community rally together and make these tiny quads fly even better! Among them, I especially want to thank Patrick J. Clarke (Project Mockingbird), Travis Schrock (NFE Silverware), Michael Anderson (Tiny Whoop Team Pilot), and of course, the other members of Team Props Out: Brenden Guffin, Daniel Sugano, and Murland W. Fish!
Continuing on.....
Install the R-XSR Receiver:
- Install two small zip ties as illustrated on the duct braces.
- Feed the R-XSR back into the chassis between the frame and the XT30 connector. Attach the pigtail.
- Run the wires through two small pieces of heat shrink to attach them to the tip ties
Cut the inside braces out of the dual 1s mount allowing you to insert a 2s battery. Install the braces onto the chassis
- This configuration gives fairly good range. I have a few metal buildings and a lot of trees, and I still get good reception out to about 75 yards set on 100mw
- I get over 3 minutes of fly time at 100mw
- This configuration allows for RSSI via Betaflight OSD, as well as the "graph bars"supplied via the FatShark Rapidfire module.
I have been working on documenting this RotorBuild for a few days now, and I'm done typing for a bit. I'm going to go flying, and start working on a 4" build. I'm going to going to publish this build, as I feel that it is complete enough to get you going. I will update it as i gather more data.
Photos


Part List
Show stores (4)
I just found your build, man i love your level of detail! thanks!! do you have dvr footage by any chance?

i have had to replace 1 carbon frame and probably 4 or 5 ducts. Â the frame was my fault because i didnt put washers on the frame screws to reinforce the attachment points. Â i did that on this v2 build and i have not broken a frame since. Â i did not have any issues with the ducts until the temp dropped below 55 degrees outside. Â when its 80 out, they are flexible, not so much after it cooled off outside. Â every time i broke a duct, i hit something solid, going fast, like concrete, telephone pole, Â swingset, etc.... Â even with the 7800kv motors, this thing is extremely fast, so crashing it into solid objects at speed yields damage
I like how detailed you are! i just have 1 question tho. Why go with 7800kv? I mean wouldnt hurt to use a 10000kv or even a 8000kv?
with his being my first build, i didnt want anything to aggressive to learn acro on, and wanted runtime. Â i will probably go with 10000kv as an upgrade after one of the 7800's goes bad or gets damaged. i didnt realize i had so much pet hair in my house until i picked up the quad off the floor once. Â lol!


ps. i actually found out you can do 3s on the super_s flight controller. Please try it out!! it would be cool to see a 3s whoop!! im sure your 7800kv motors will work just fine considering thats just 40mm props. ive tried doing 3s on my super_s f4 fligth stack with 8000kv 3" props so please try!!