
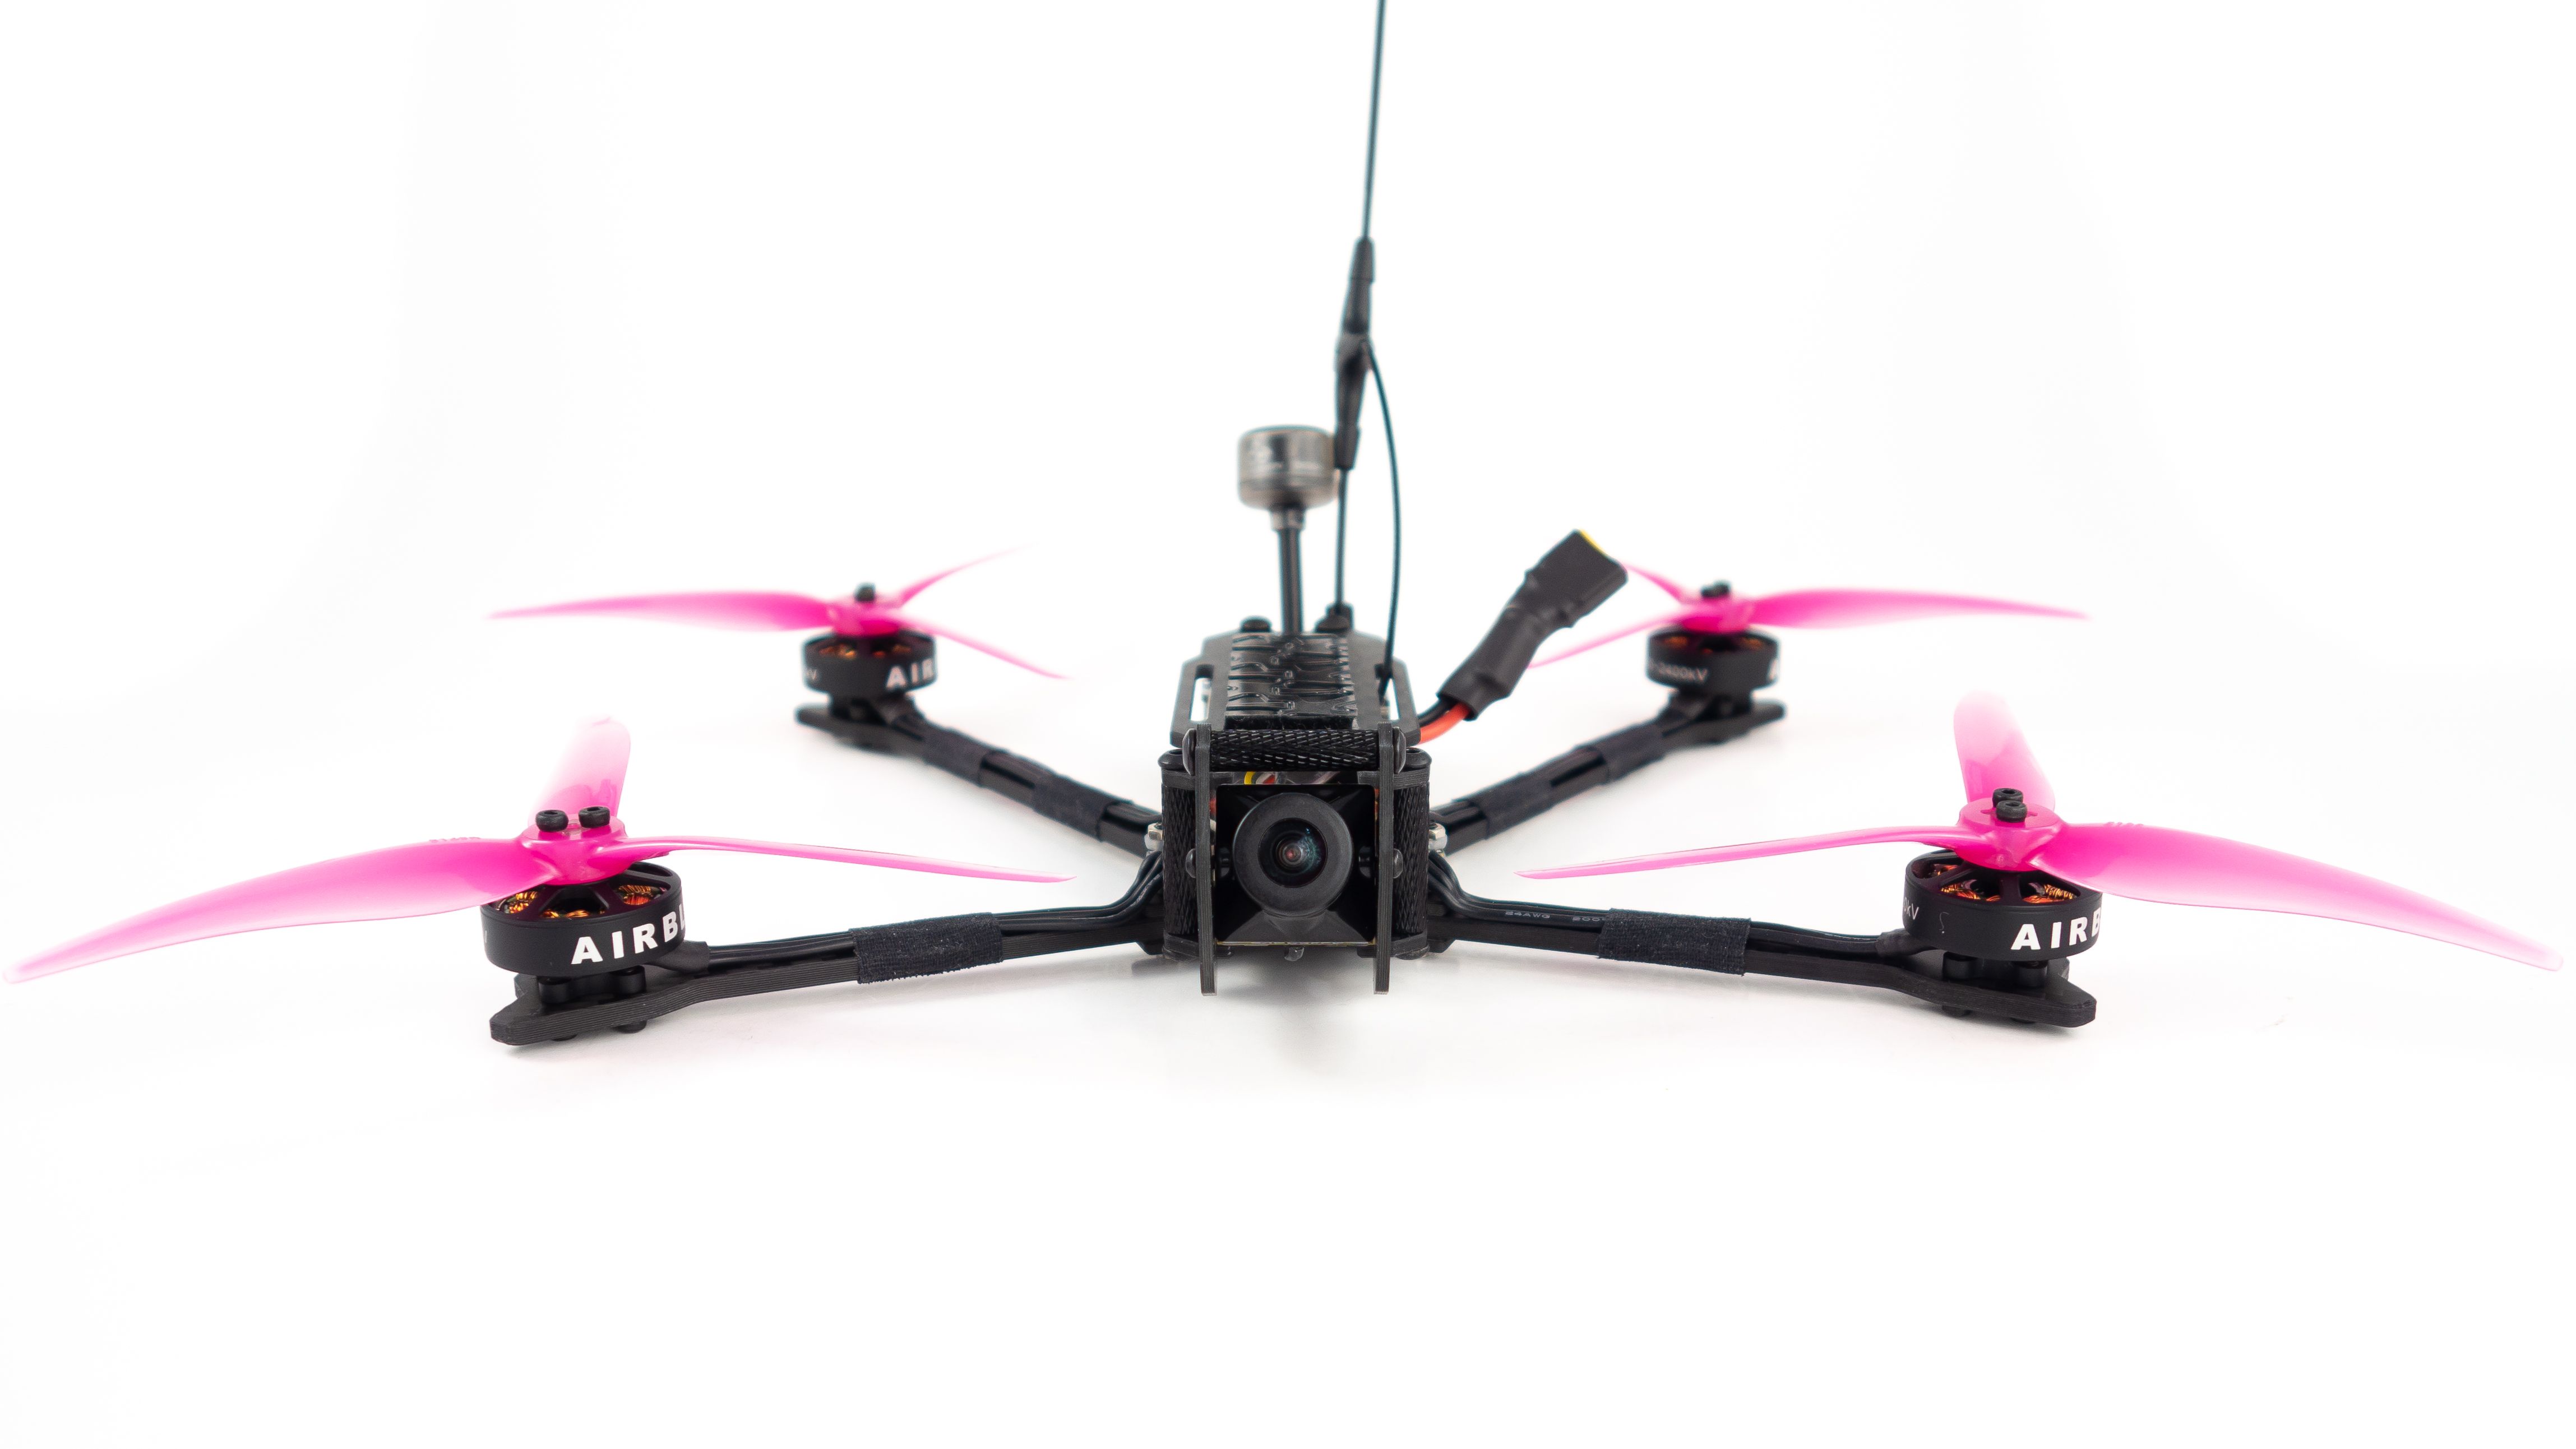
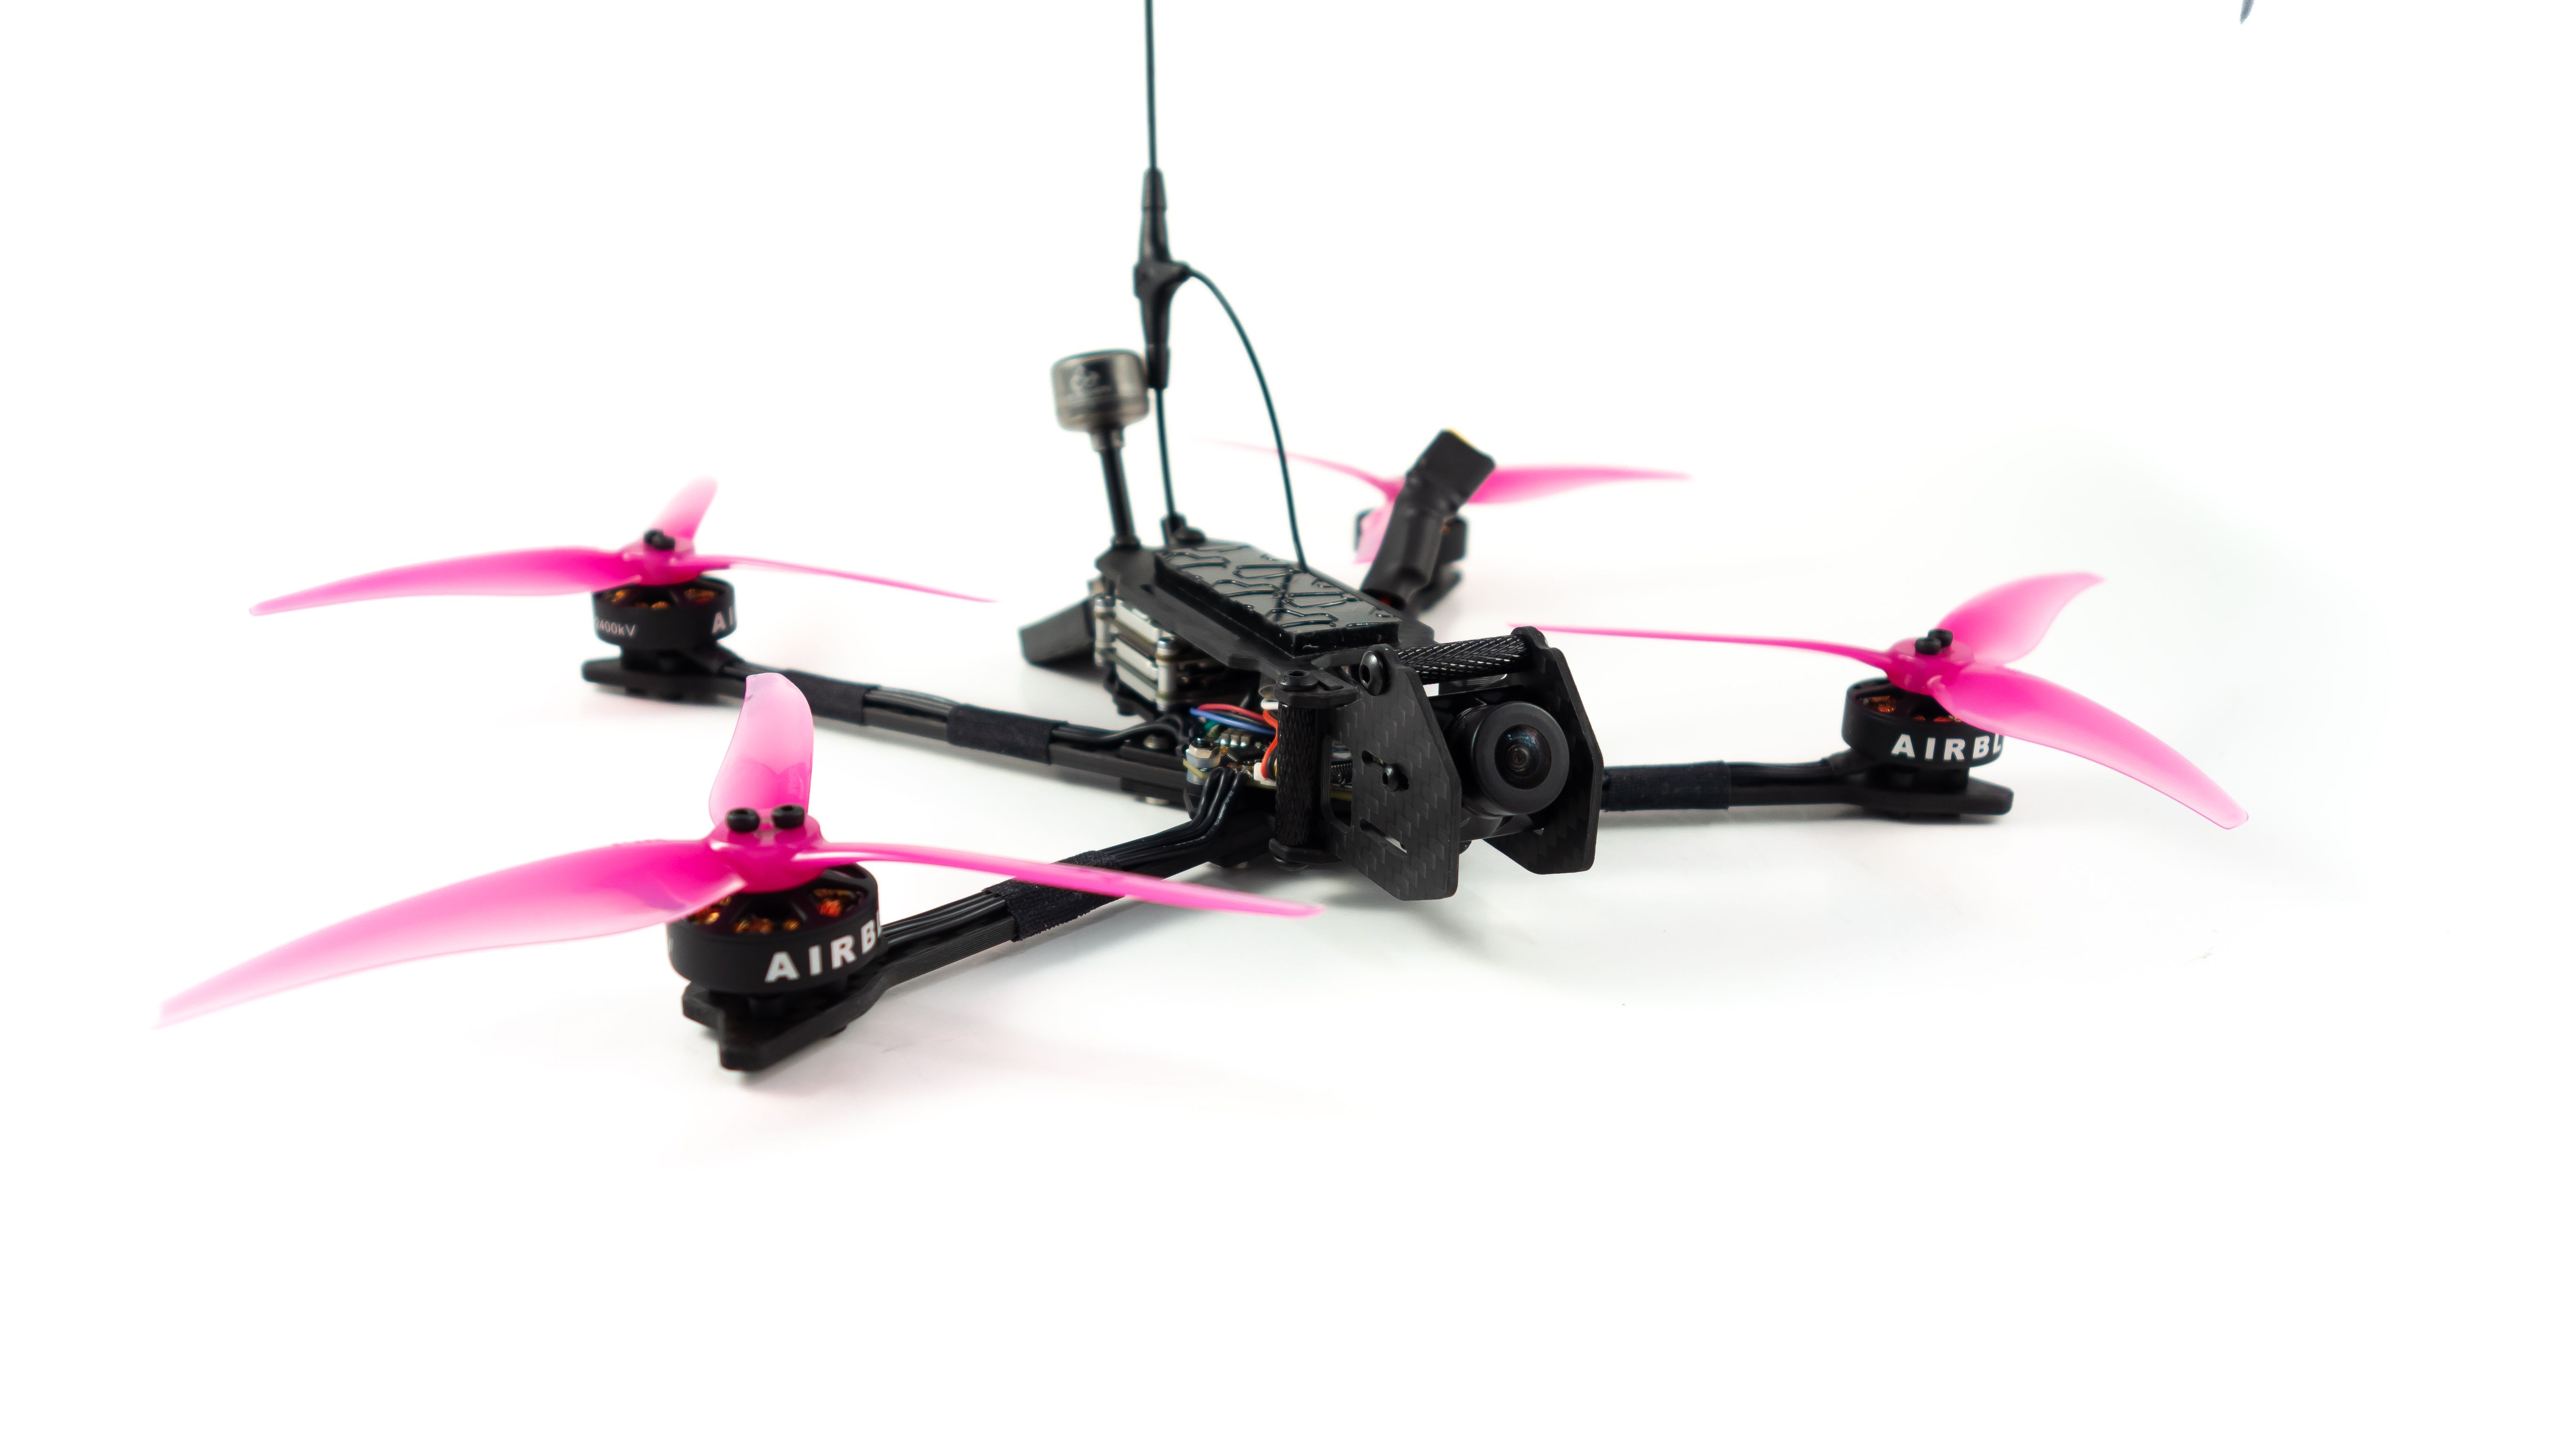
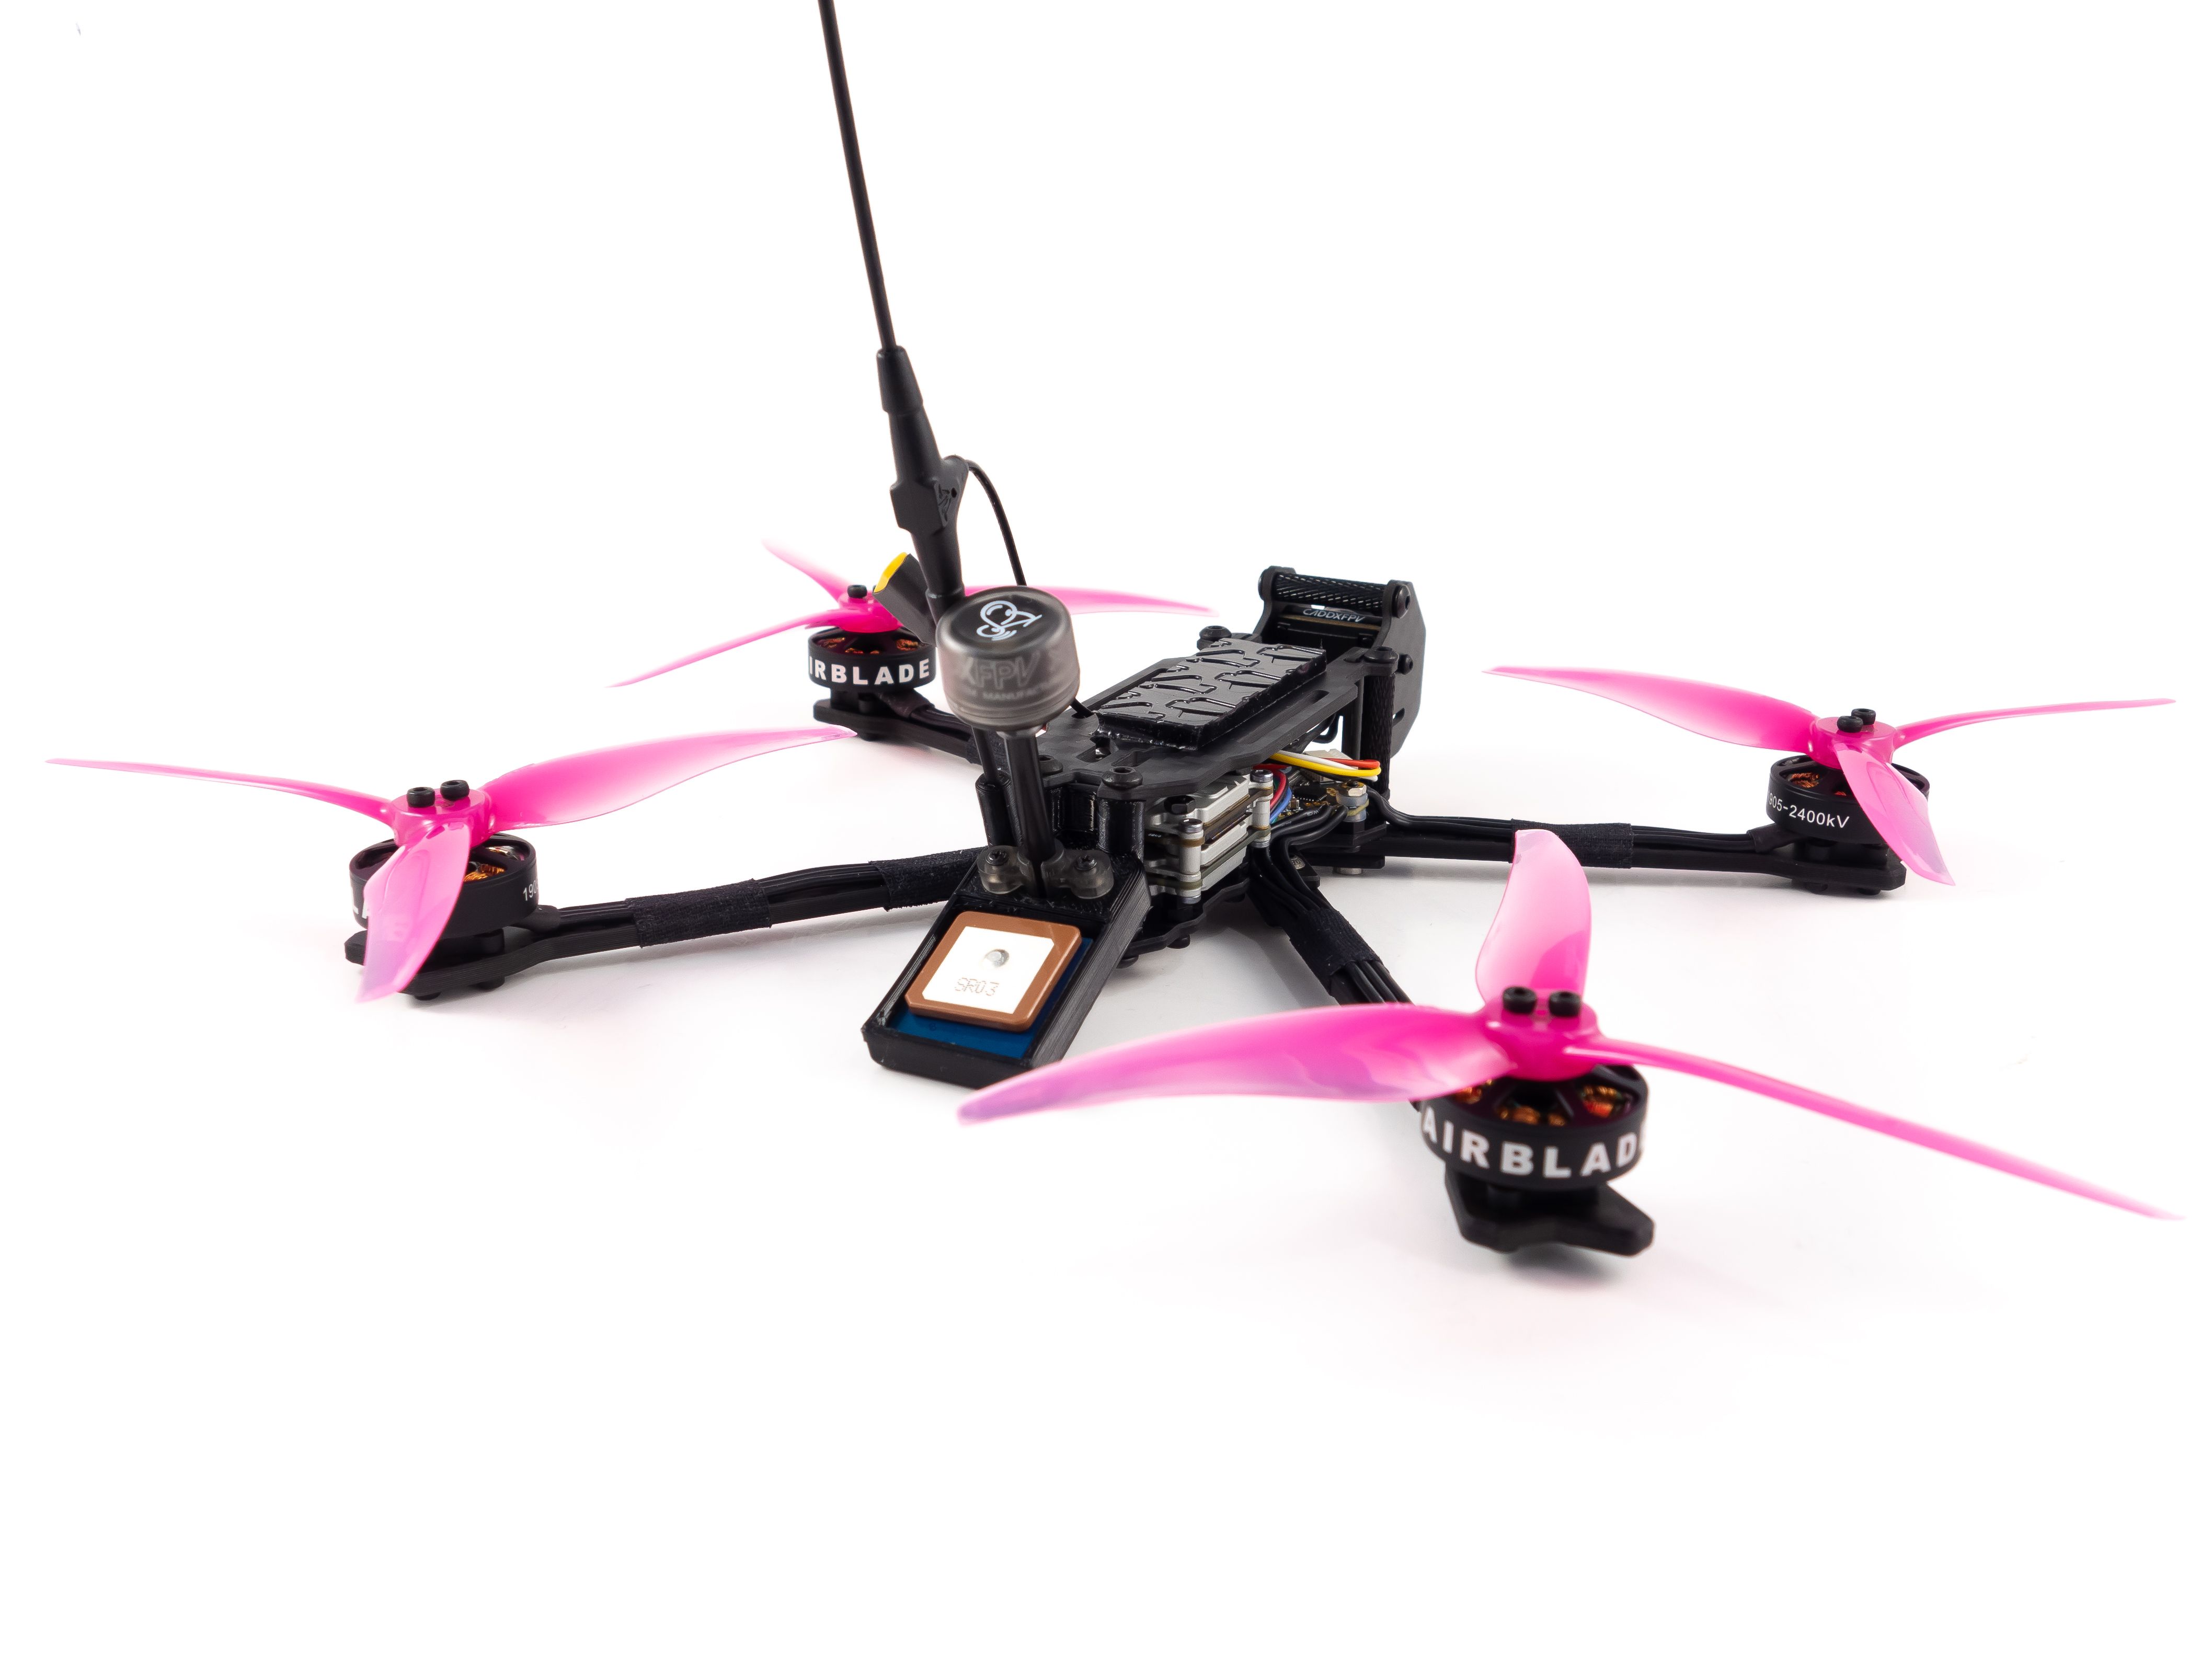
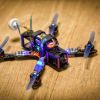
AirbladeUAV has done it again and this time they've brought long range to the 5" class! Based on the popular Transformer Mini, the new Transformer 5" Ultralight adopts a lot of the same design philosophies with larger props and more payload capacity. It can fly upwards of 20 minutes on a 4 cell Li-Ion battery pack and in ideal conditions it's got a range of over 4 to 5 miles. In this guide I'll walk you through the entire build process from start to finish.
Tools
This build requires steady hands for the soldering. I highly recommend a flux pen, 63/37 leaded solder and a quality soldering iron. These are the tools and supplies you'll need. My particular tools are listed in the Gear section below.
- Soldering iron
- 1.5mm and 2.0mm hex drivers
- Precision Tweezers
- Precision Screwdriver set
- Wire cutter/stripper
- Scissors
- Ruler and cutting mat
- Multimeter
Additional Supplies
- A variety of heat shrink tube sizes
- Blue Loctite
- Friction/Cloth tape
- Zip ties (small)
- 63/37 leaded solder
- Liquid soldering flux pen
- M2 screw and nut kit
Hardware
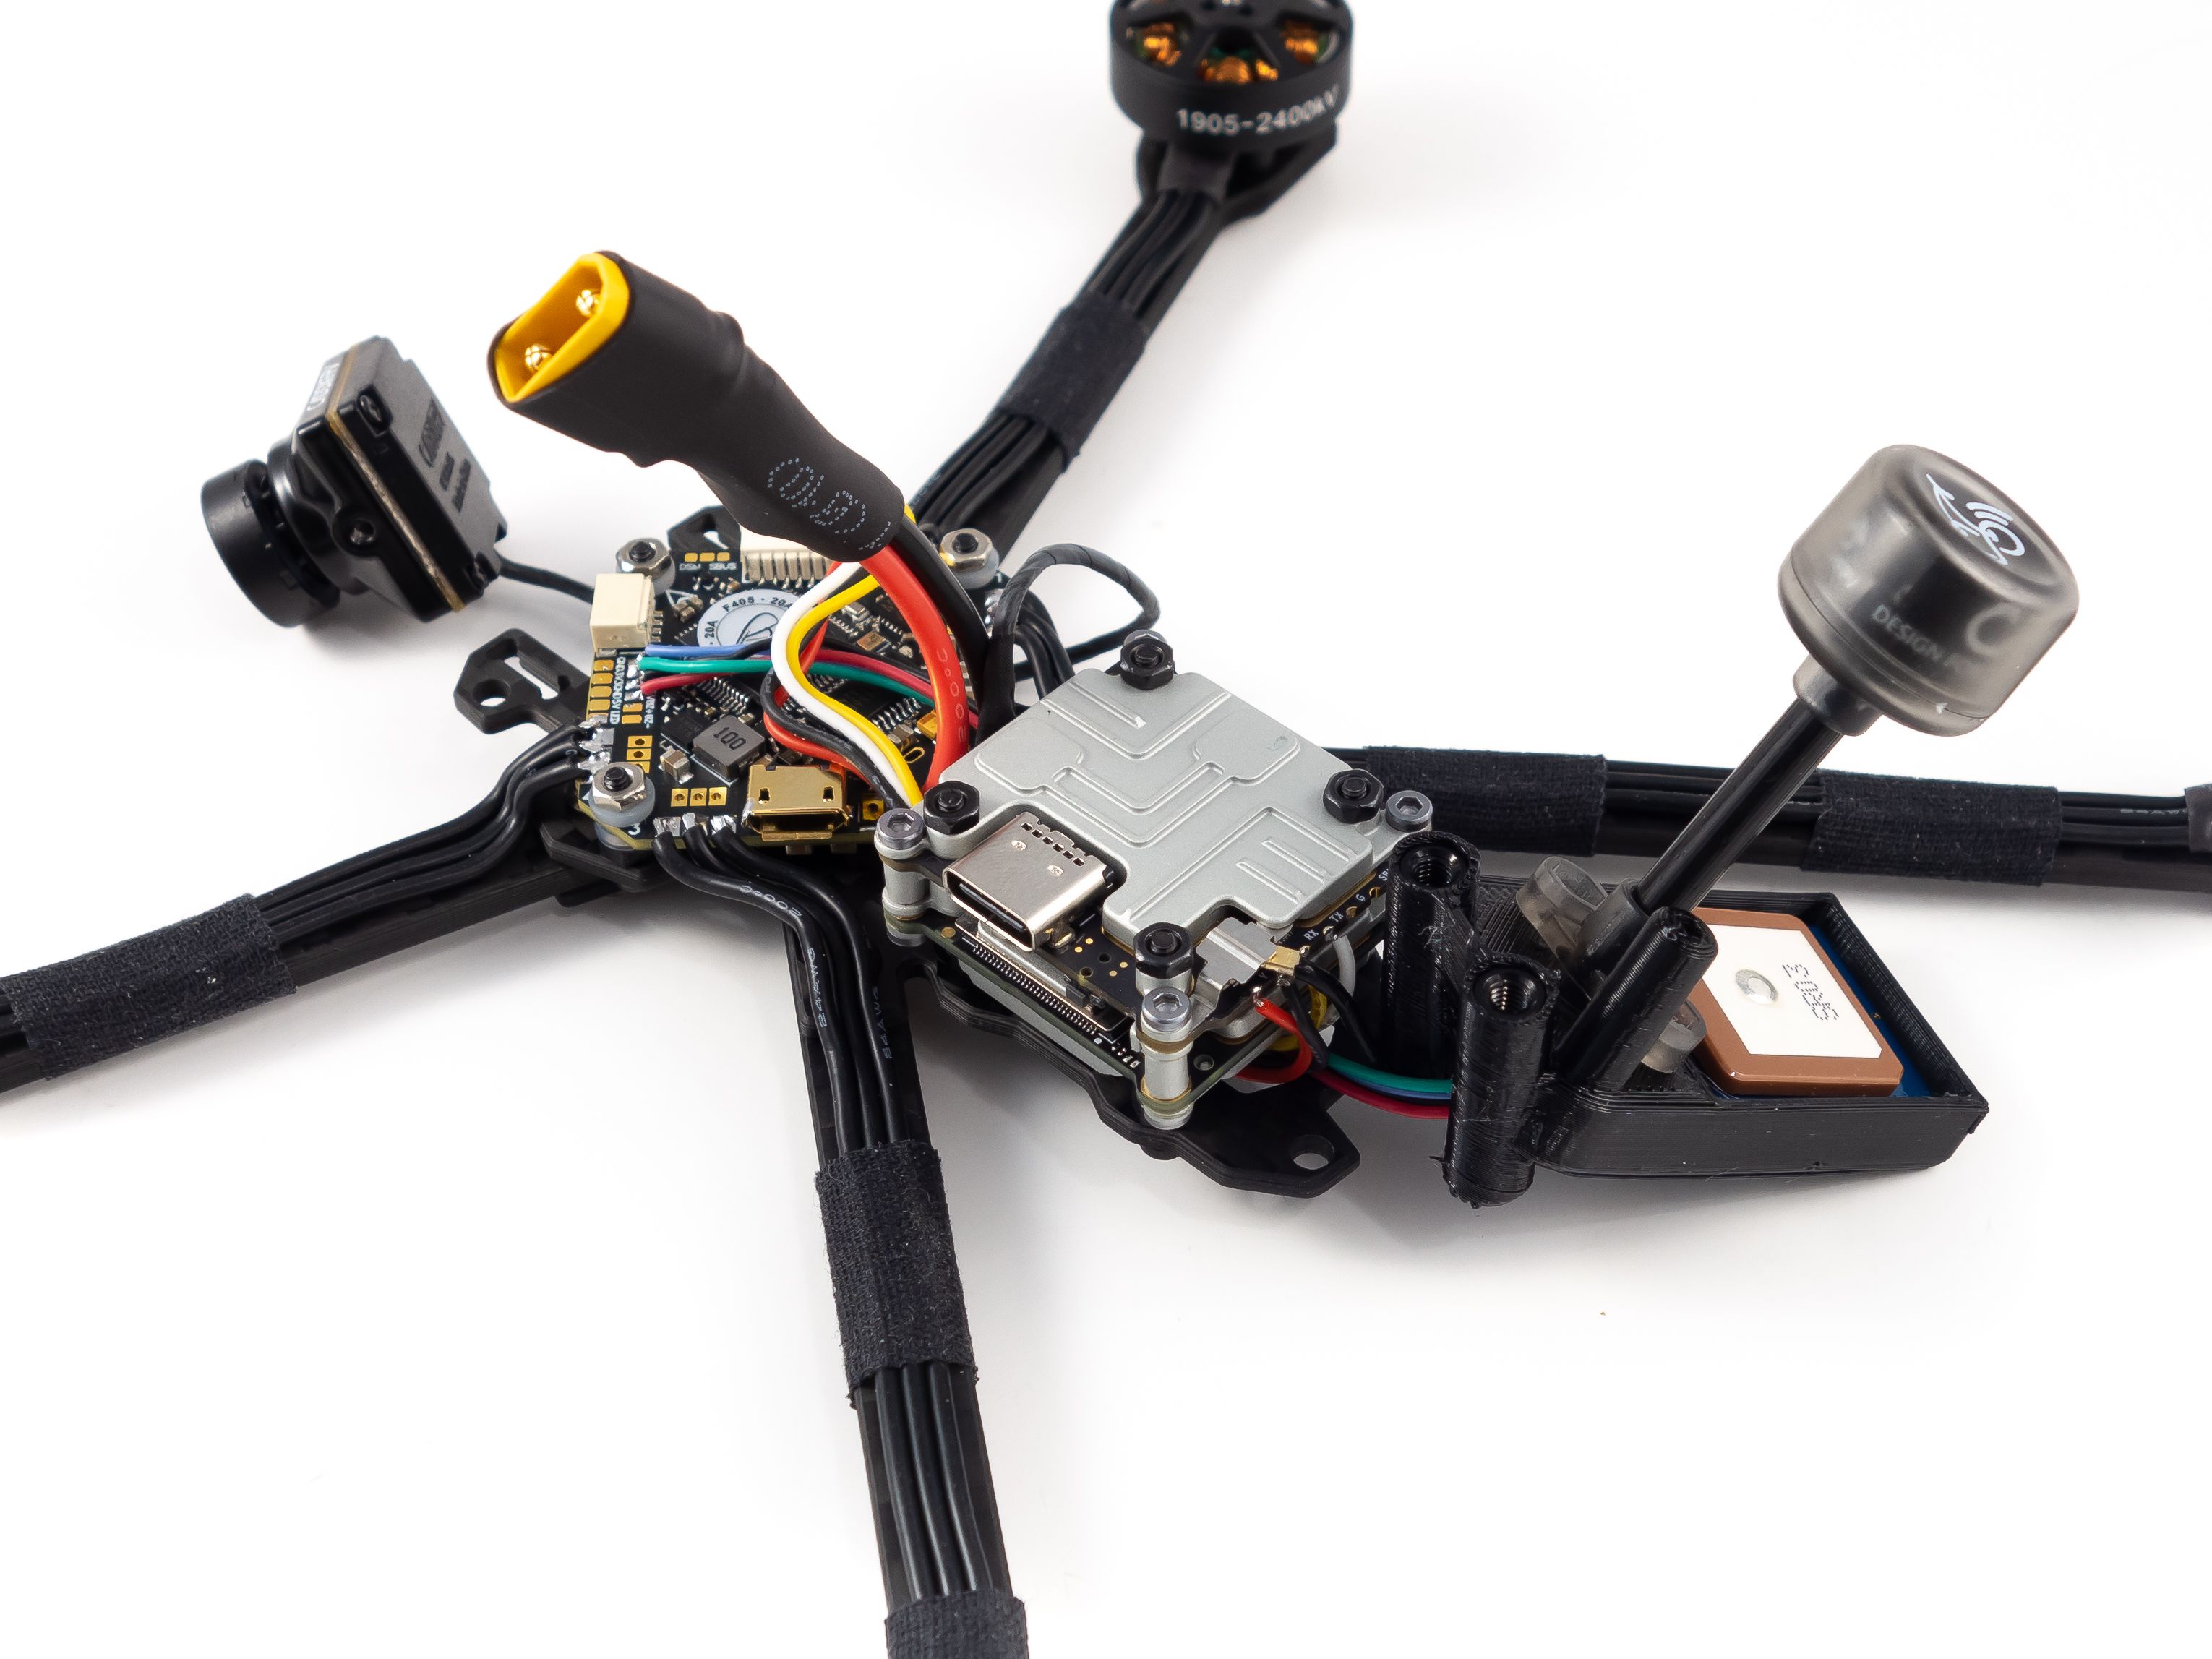
The frame doesn't come with all the mounting hardware for the components so you'll need a set of M2 screws and nuts to mount the Caddx Vista. The flight controller comes with mounting hardware but I recommend using M2 nuts or grommets to give it a little more space above the frame. The naked GoPro camera mount requires a 20mm aluminum standoff and additional M3 screws. These are not included.
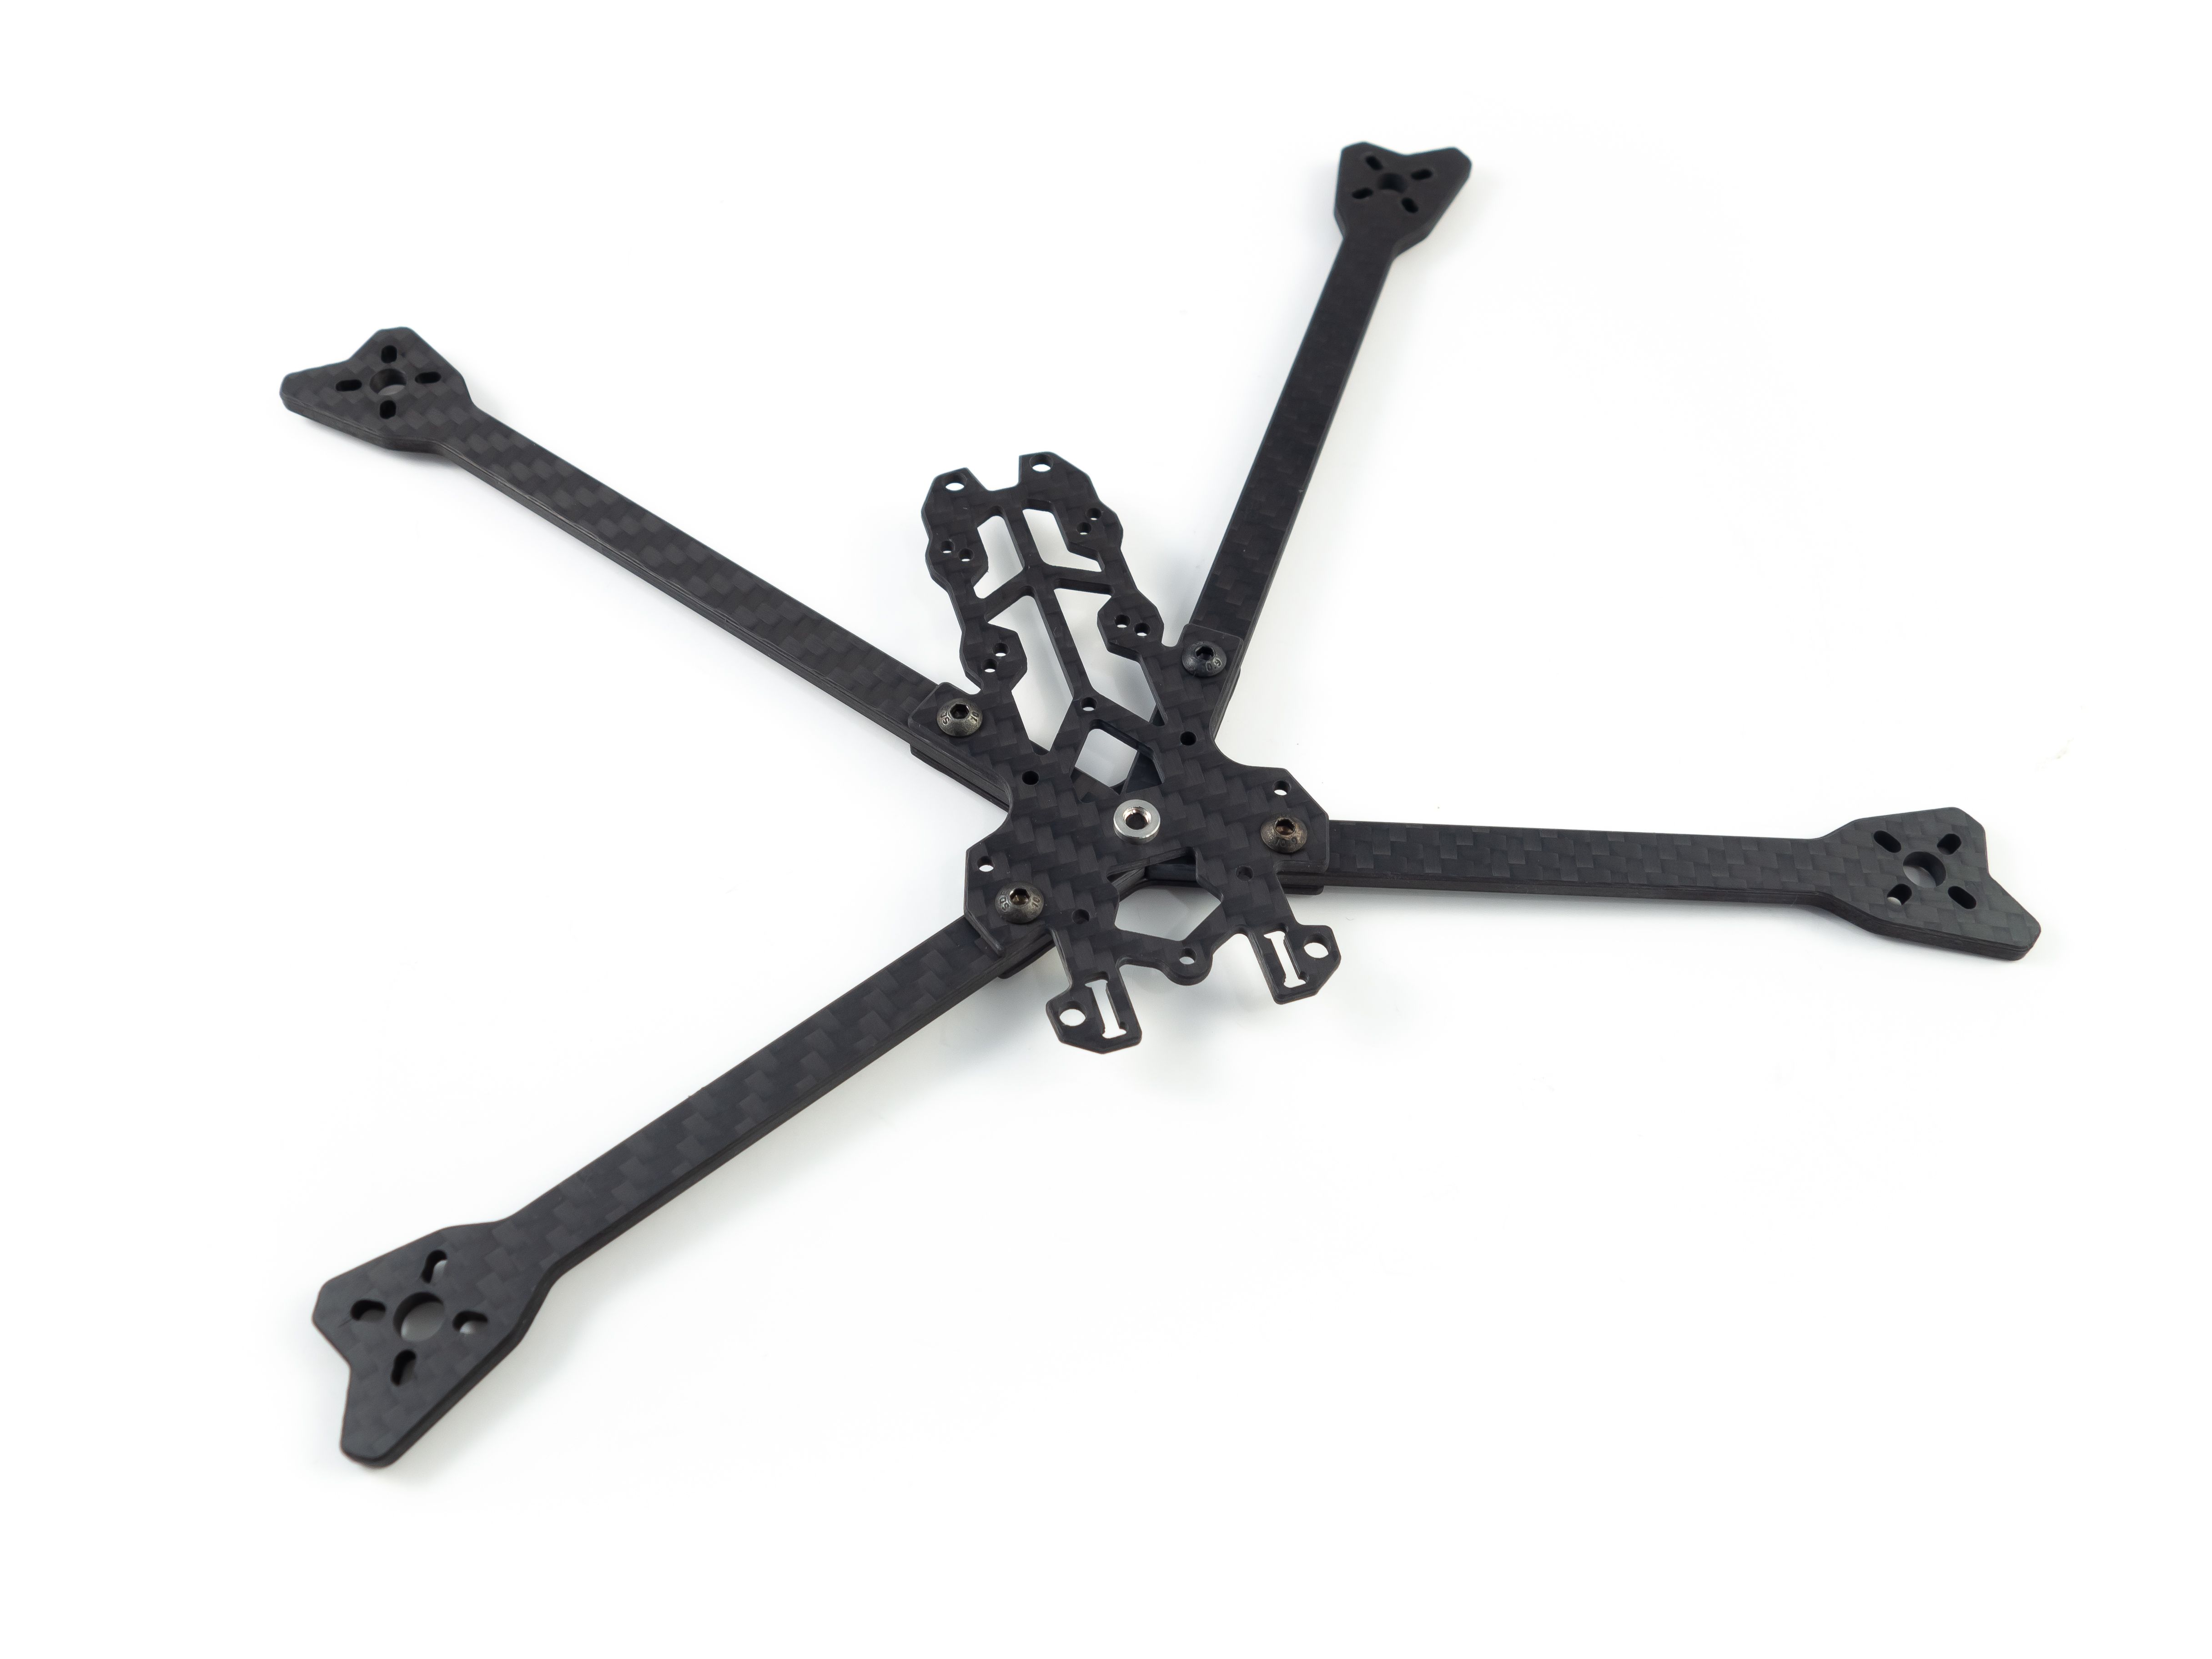
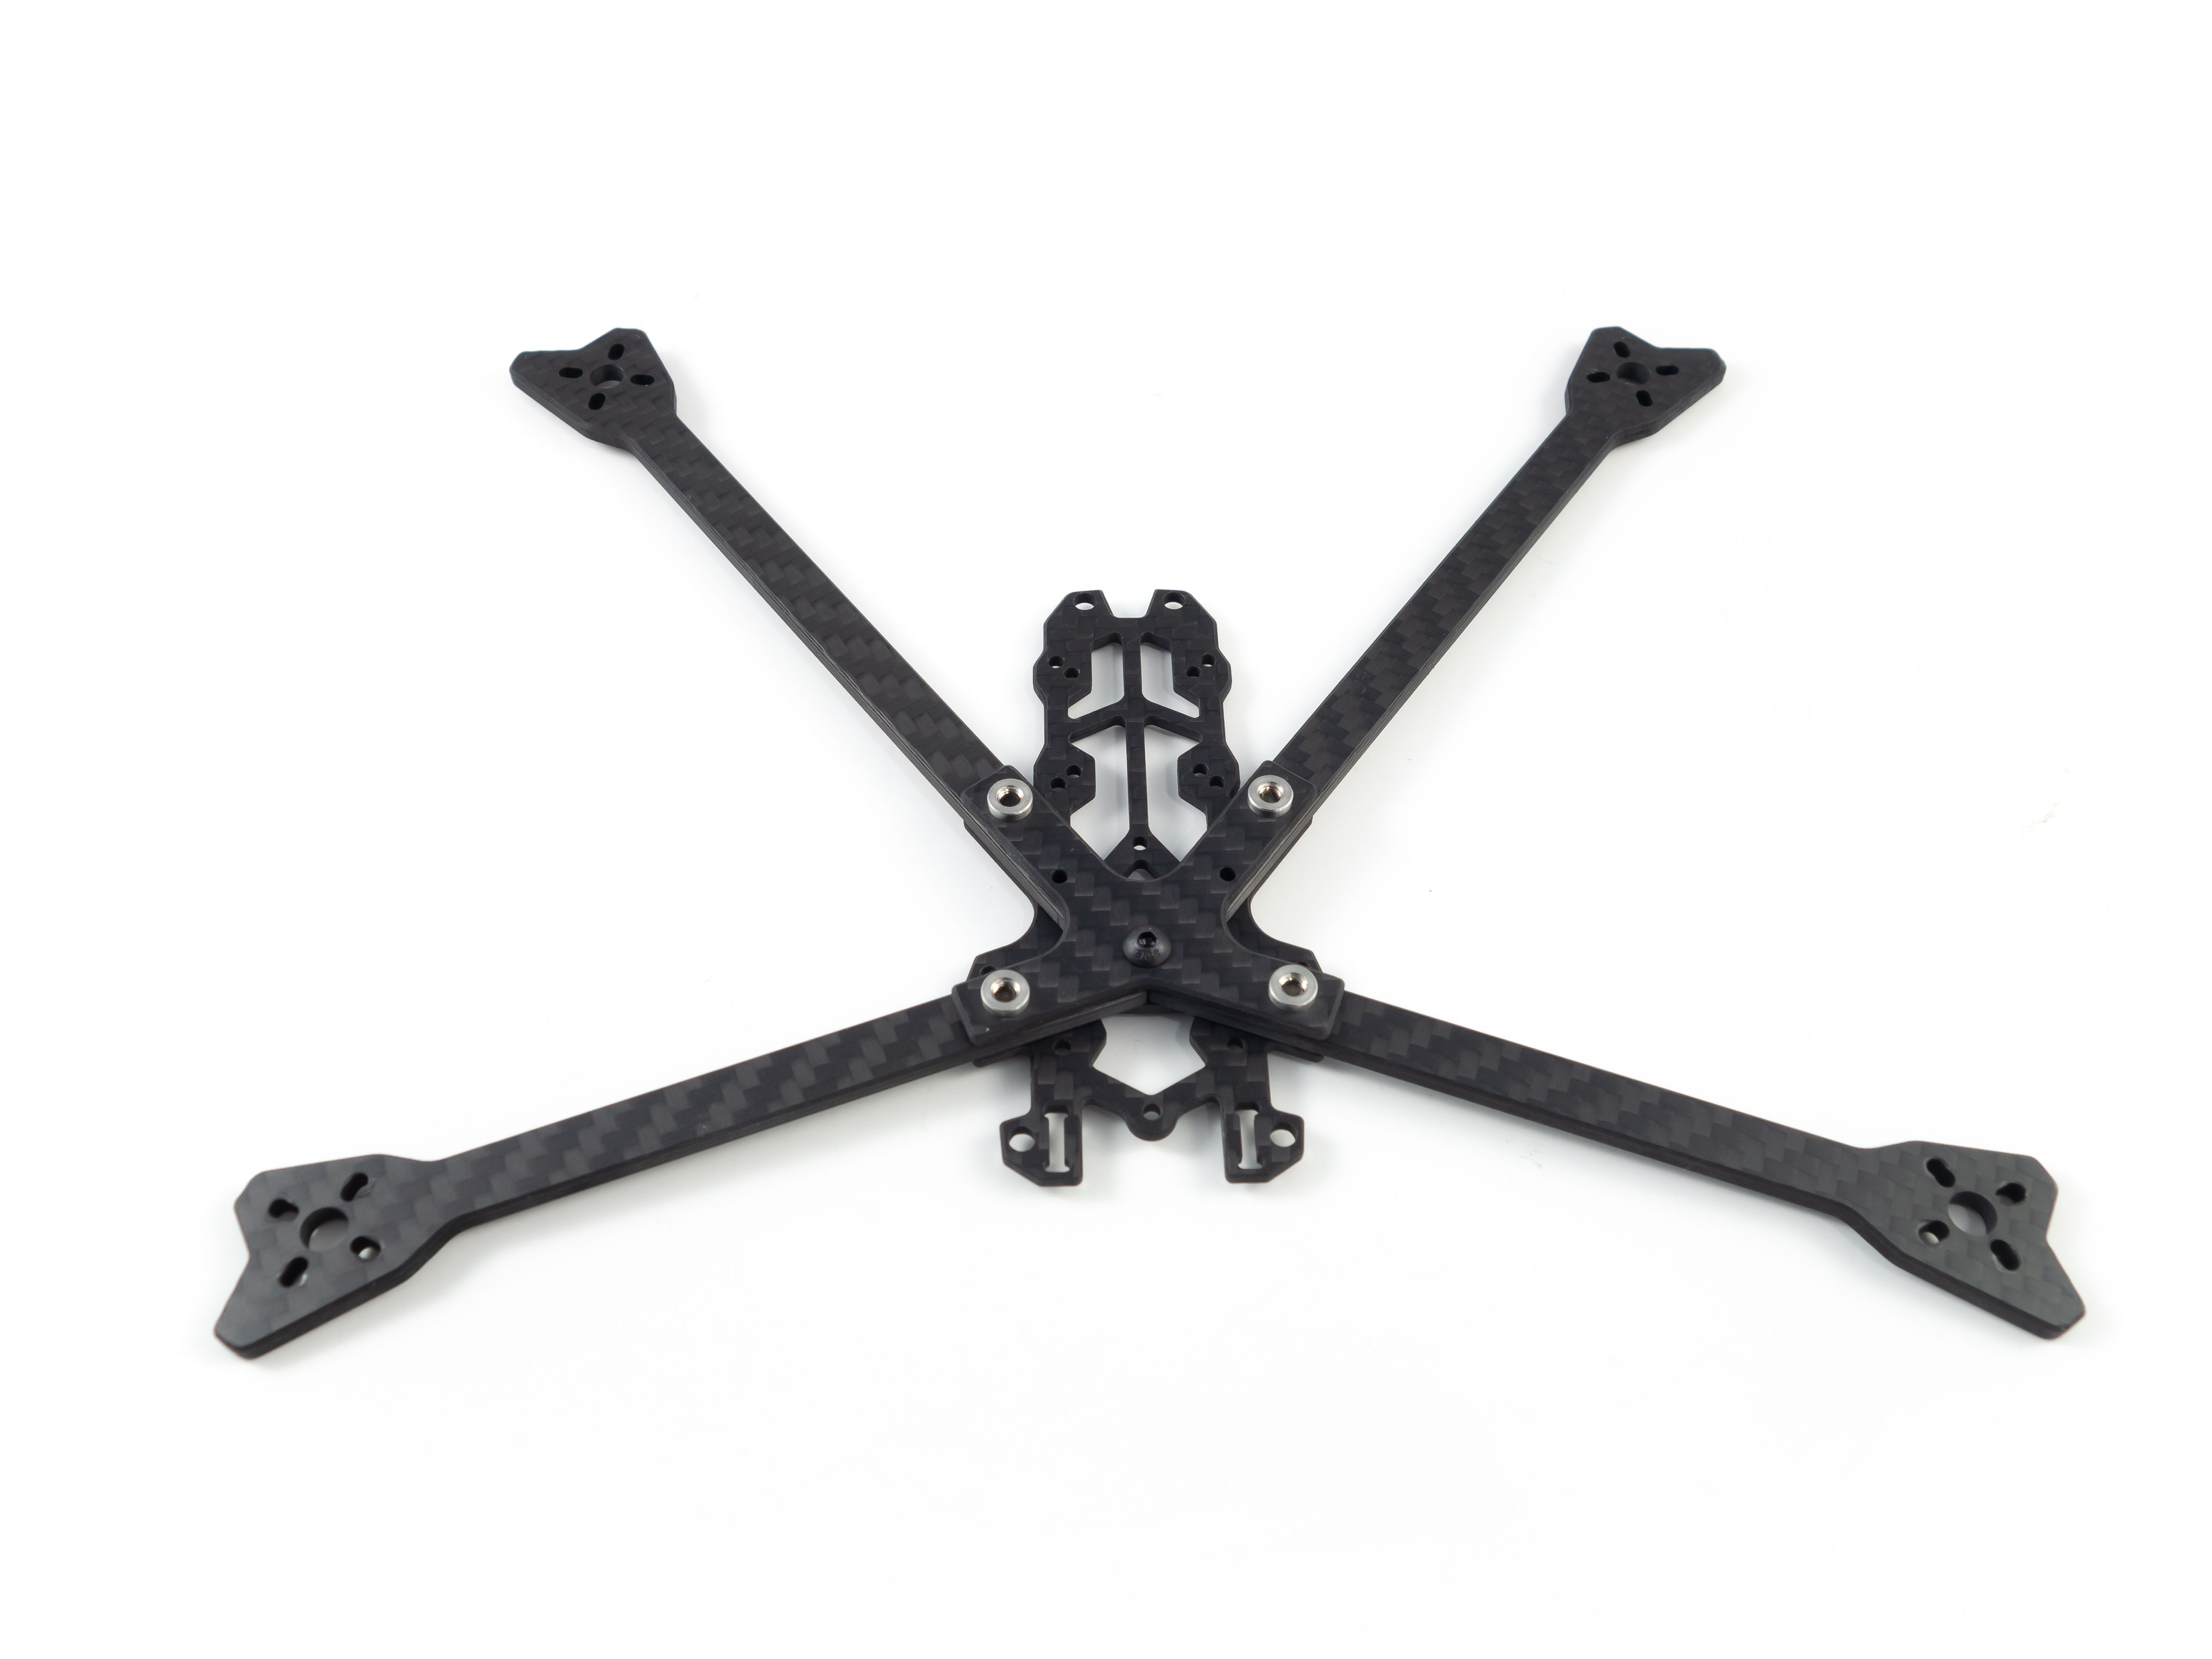
Frame Assembly
Look carefully at the photos. Make sure each of the arms are oriented correctly and that the push nut is facing upward. The smaller bracket piece attaches to the very bottom with the push nuts pointed downward. Loosely screw one arm in at a time from the top and once they're all lined up add the center M3 screw through the bottom.
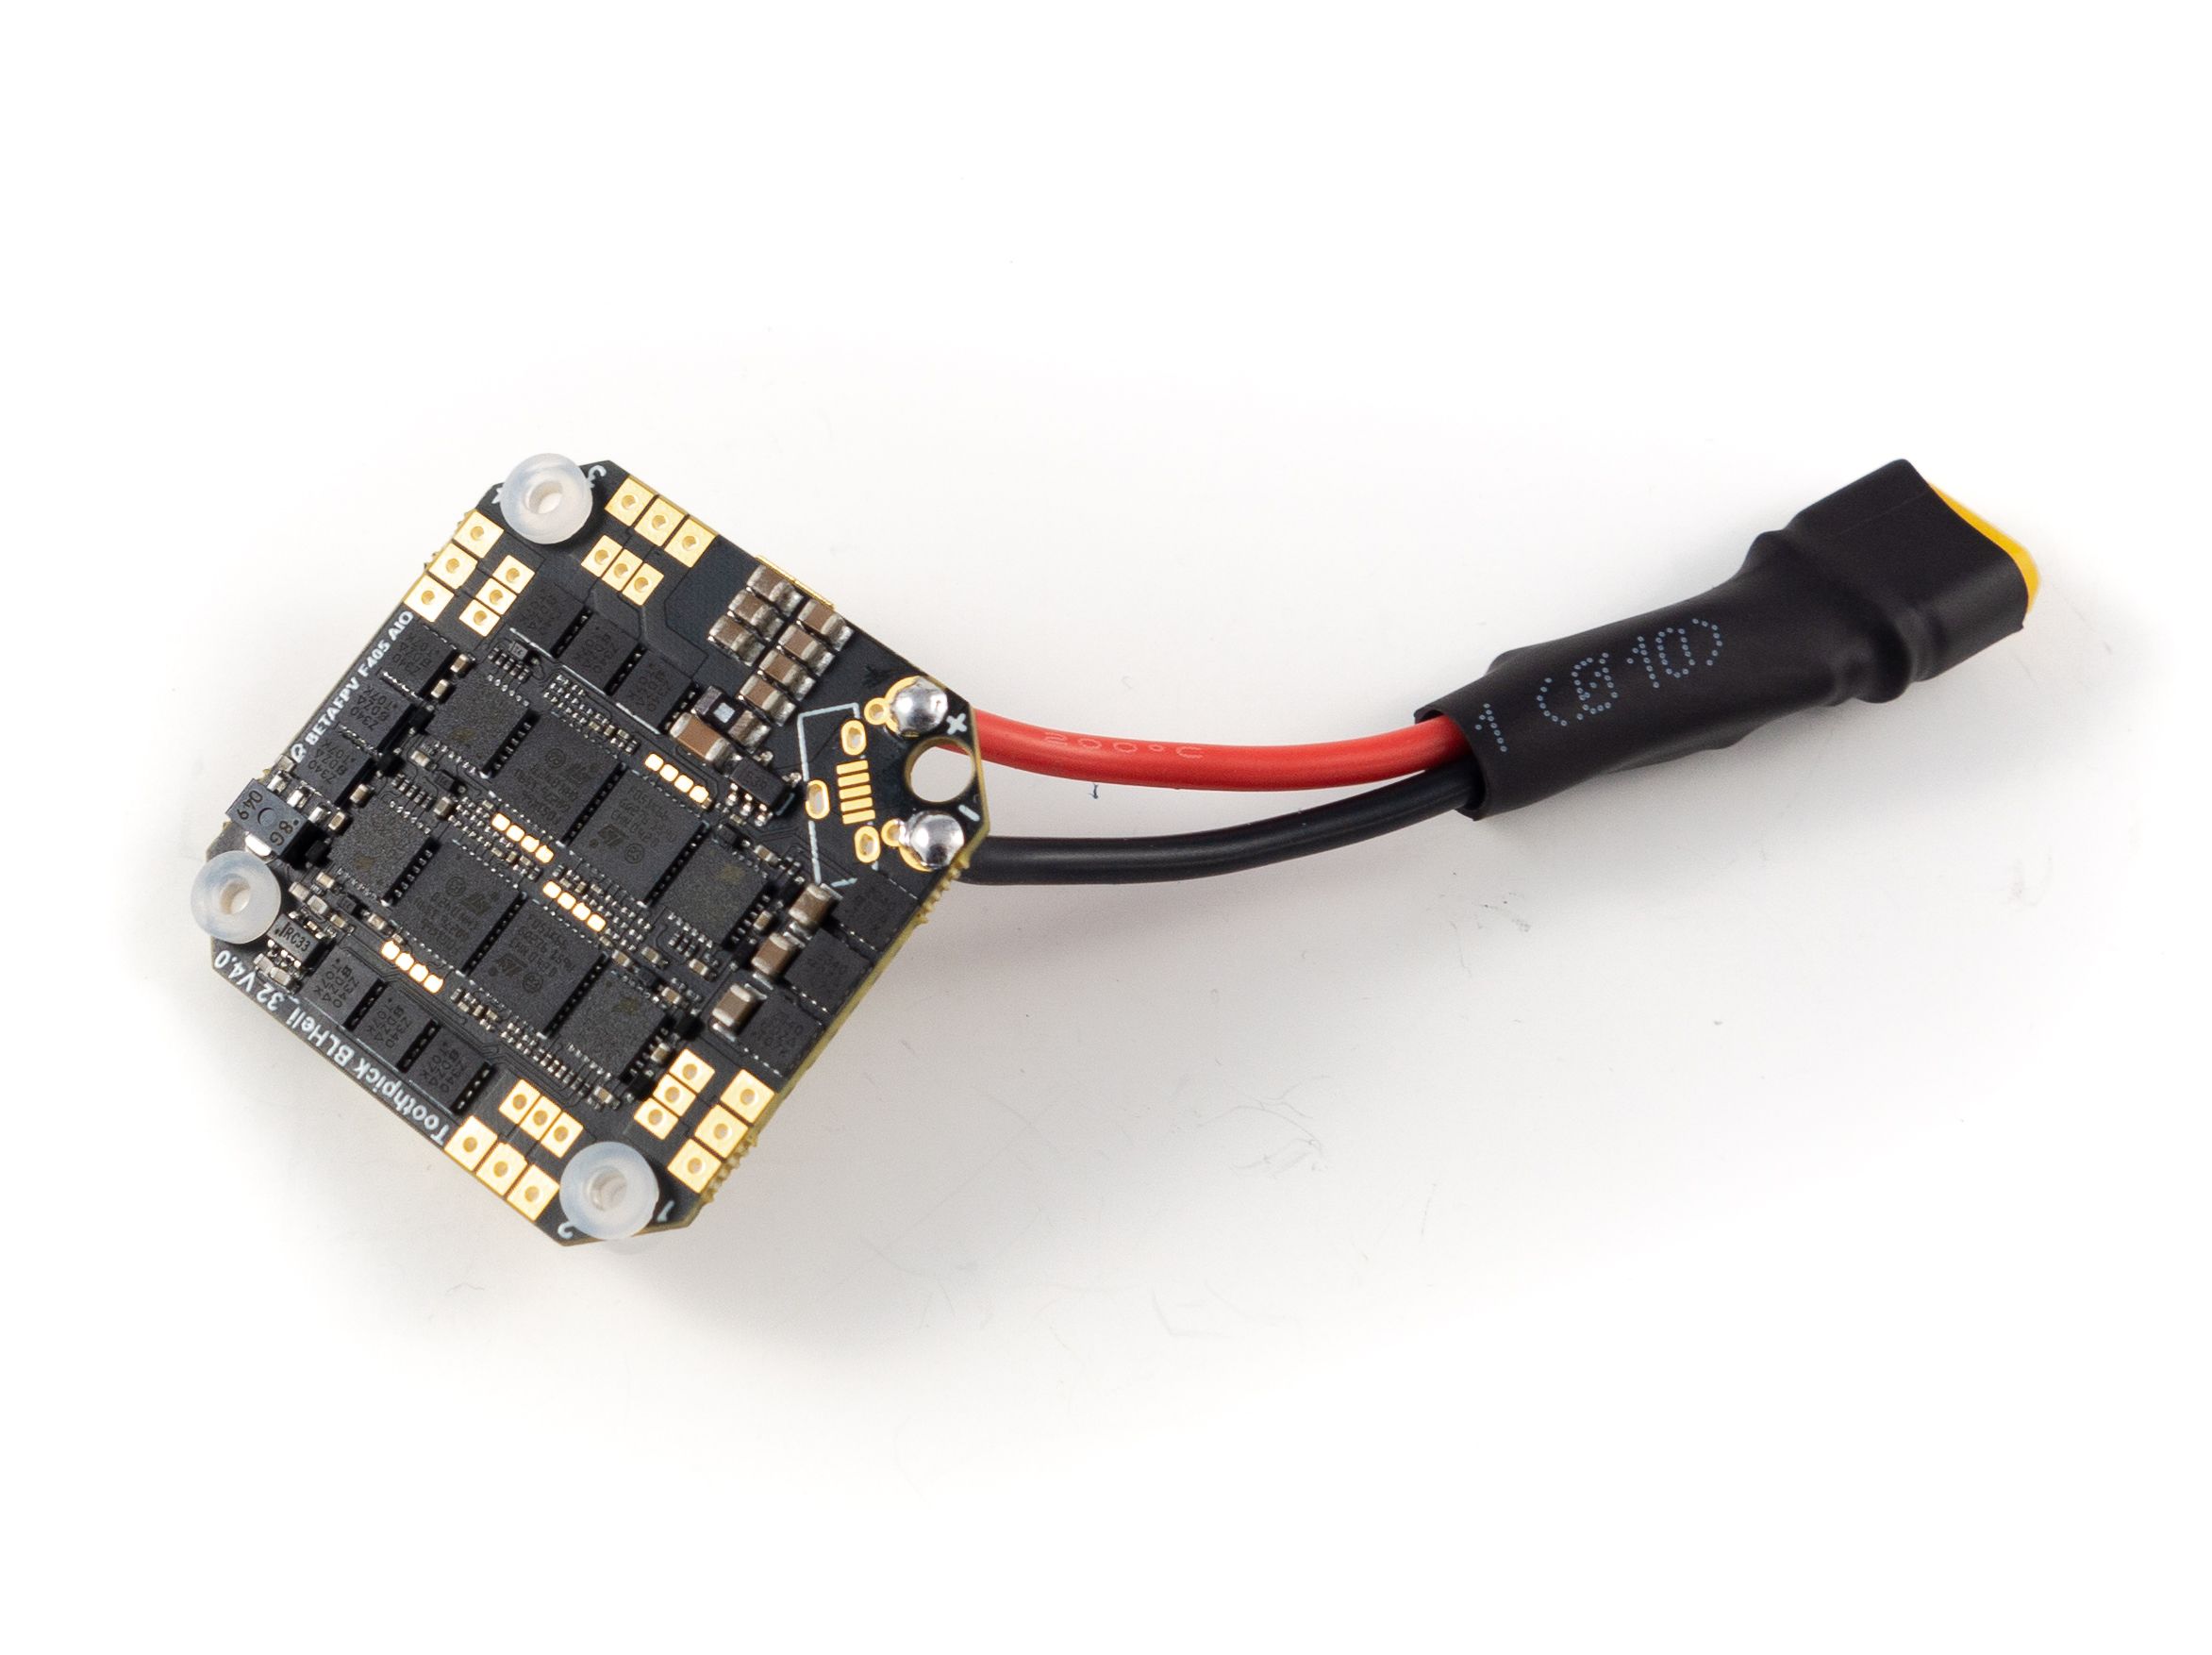
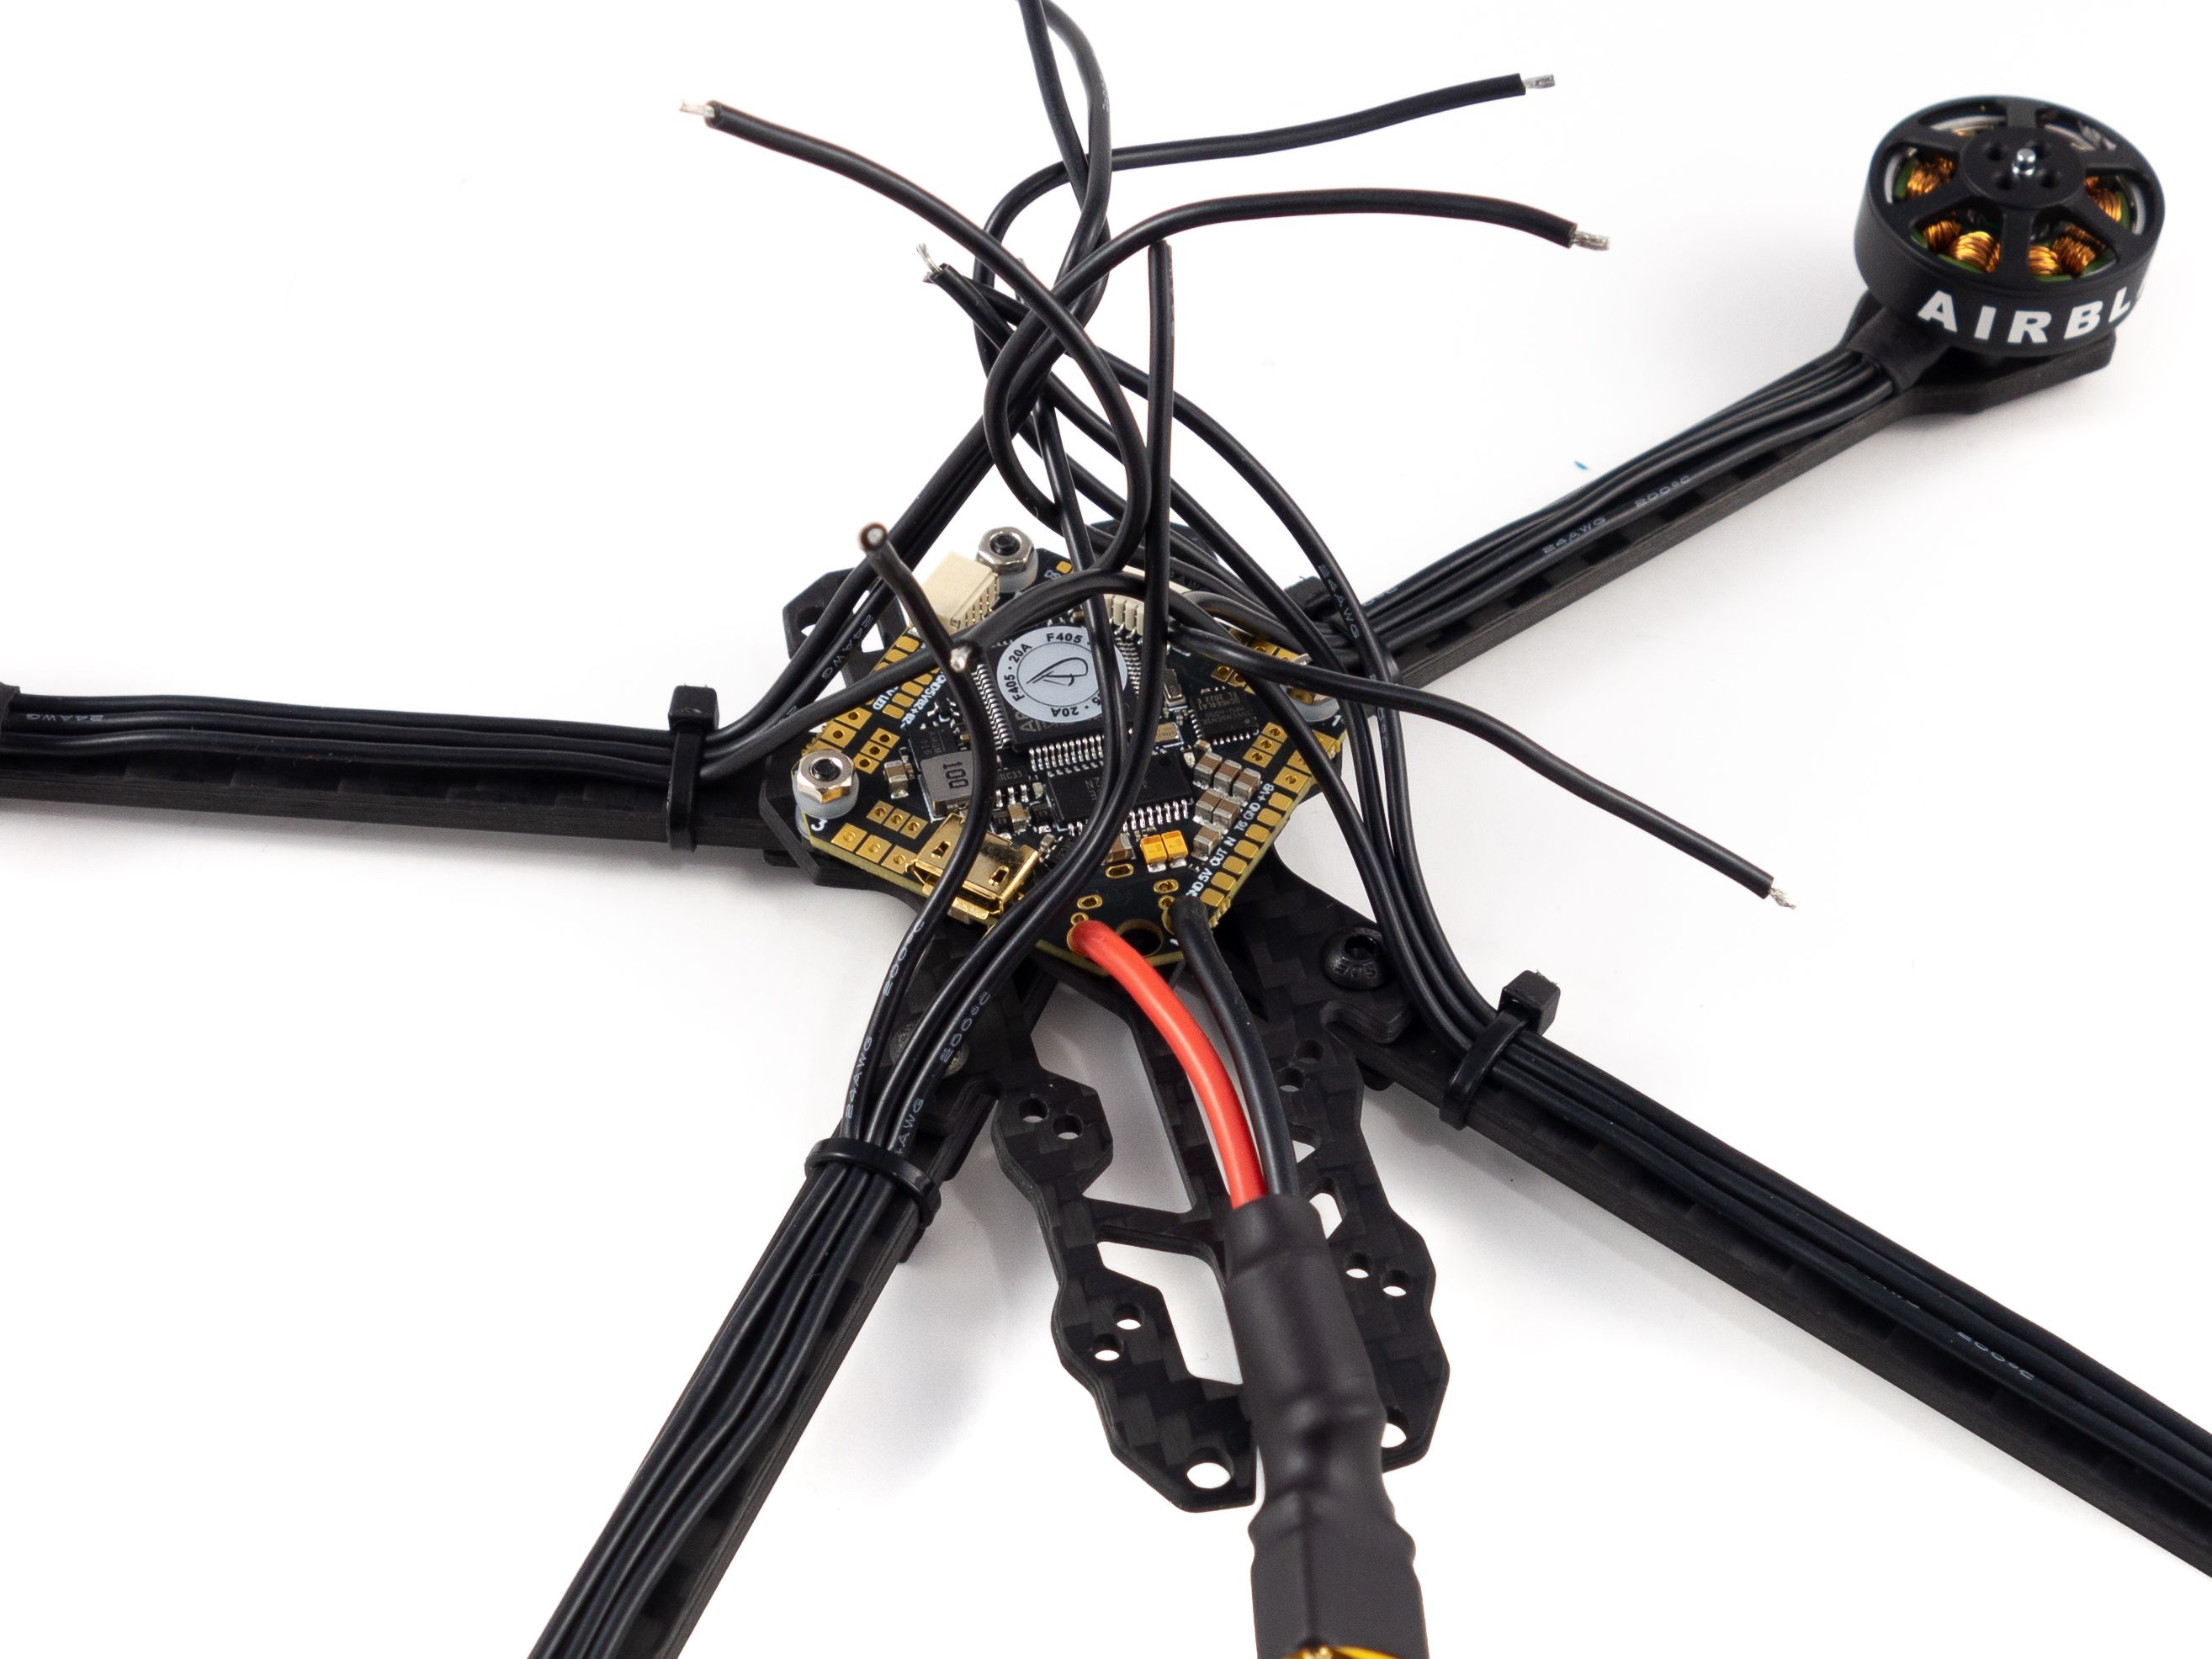
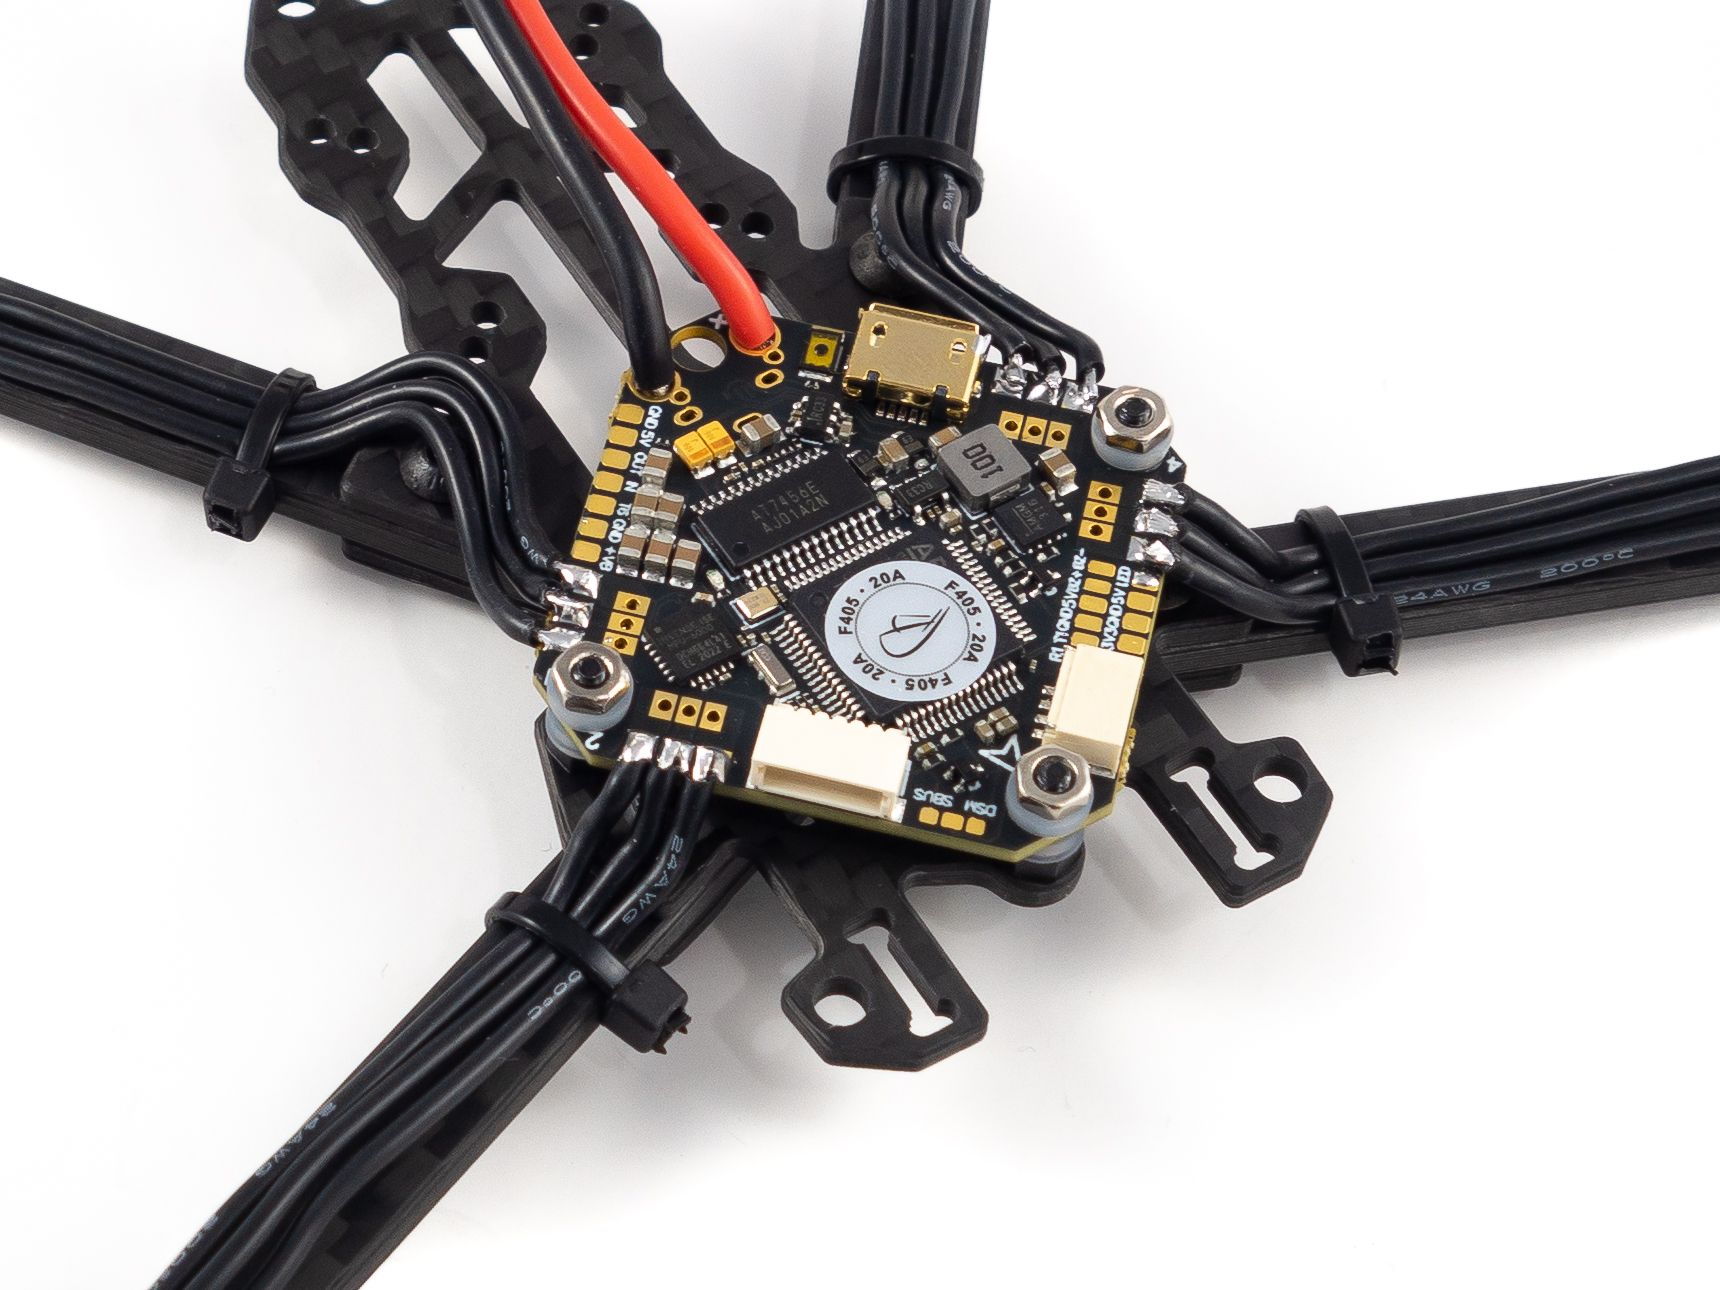
Mount the Flight Controller
To solder the power lead, flip the board upside down and squish it down onto some Fun Tak. Route the wires upward into the holes and solder them.
To mount the flight controller use the included 10mm M2 screws. Now I only used three mounting points because the battery leads tend to get in the way of the 4th mounting hole, but if you can get the 4th in there it's recommended. At the very least the battery lead needs to be firmly zip-tied to the top plate to protect the flight controller from a snap if the battery ejects.
Secure the 10mm M2 screws using the nylon M2 nuts included in the hardware kit linked below. Insert the dampeners into the holes around the board. A neat trick is to wrap dental floss around one end to pull it through the hole. Slide the board onto the screws and secure it with the included chrome M2 nuts.
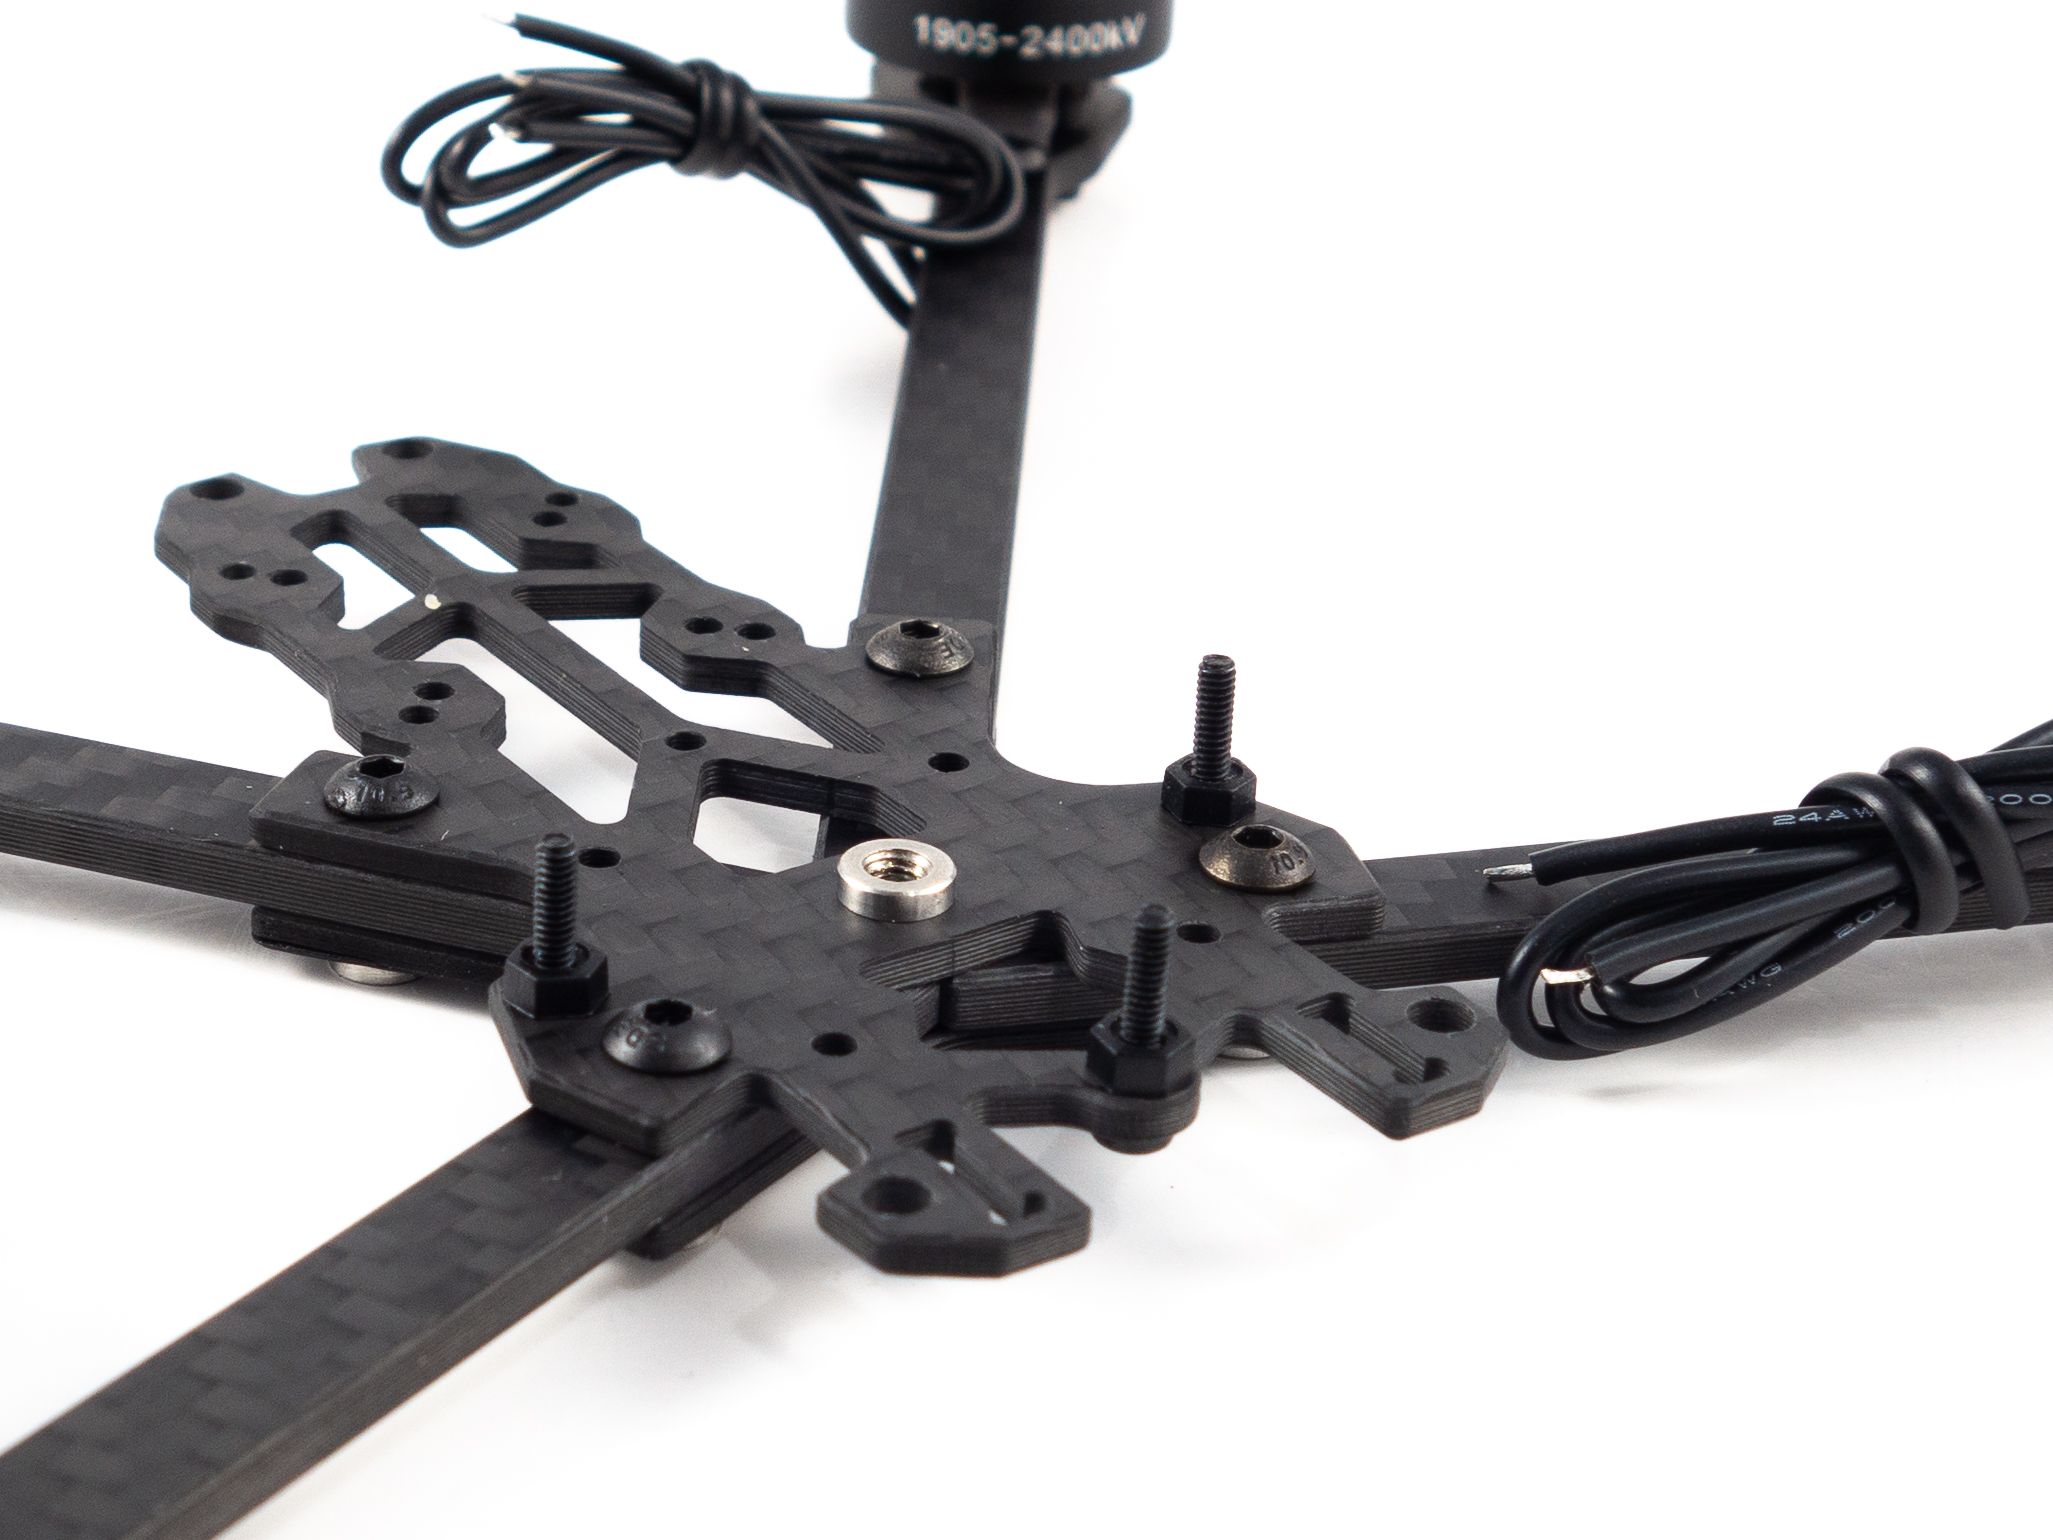
Motors
Here I've chosen the AirBlade Superman 1905 2400kv motors. 2400kv offers a little more power at a slight cost to efficiency. If you're looking for slightly longer flight times you might want to choose either the 2100kv or 1800kv motors.
To mount the motors use the included 6mm M2 screws. You may want to use blue Loctite to secure the screws, but this is optional. If you don't, be sure to check the screws during your pre-flight check. Pull the wires tight and zip-tie them to the arms to keep them straight. Here's my soldering process:
- Flux and add a small drop of solder to each motor pad. It should be just enough to cover all the copper.
- Cut each wire to length as you go, not all at once. Be careful not to cut them too short.
- Tin each wire before soldering.
- Take your time and lightly tap the tinned wire to the pad.
- The key here is to use as little solder as necessary.
Once this is done you can wrap the wires with tape. I used friction tape, but you can also use cloth tape or even electrical tape. Be creative.
You can optionally purchase the arm braces and attach them below the arms using the motor screws. You'll need longer screws for these though.
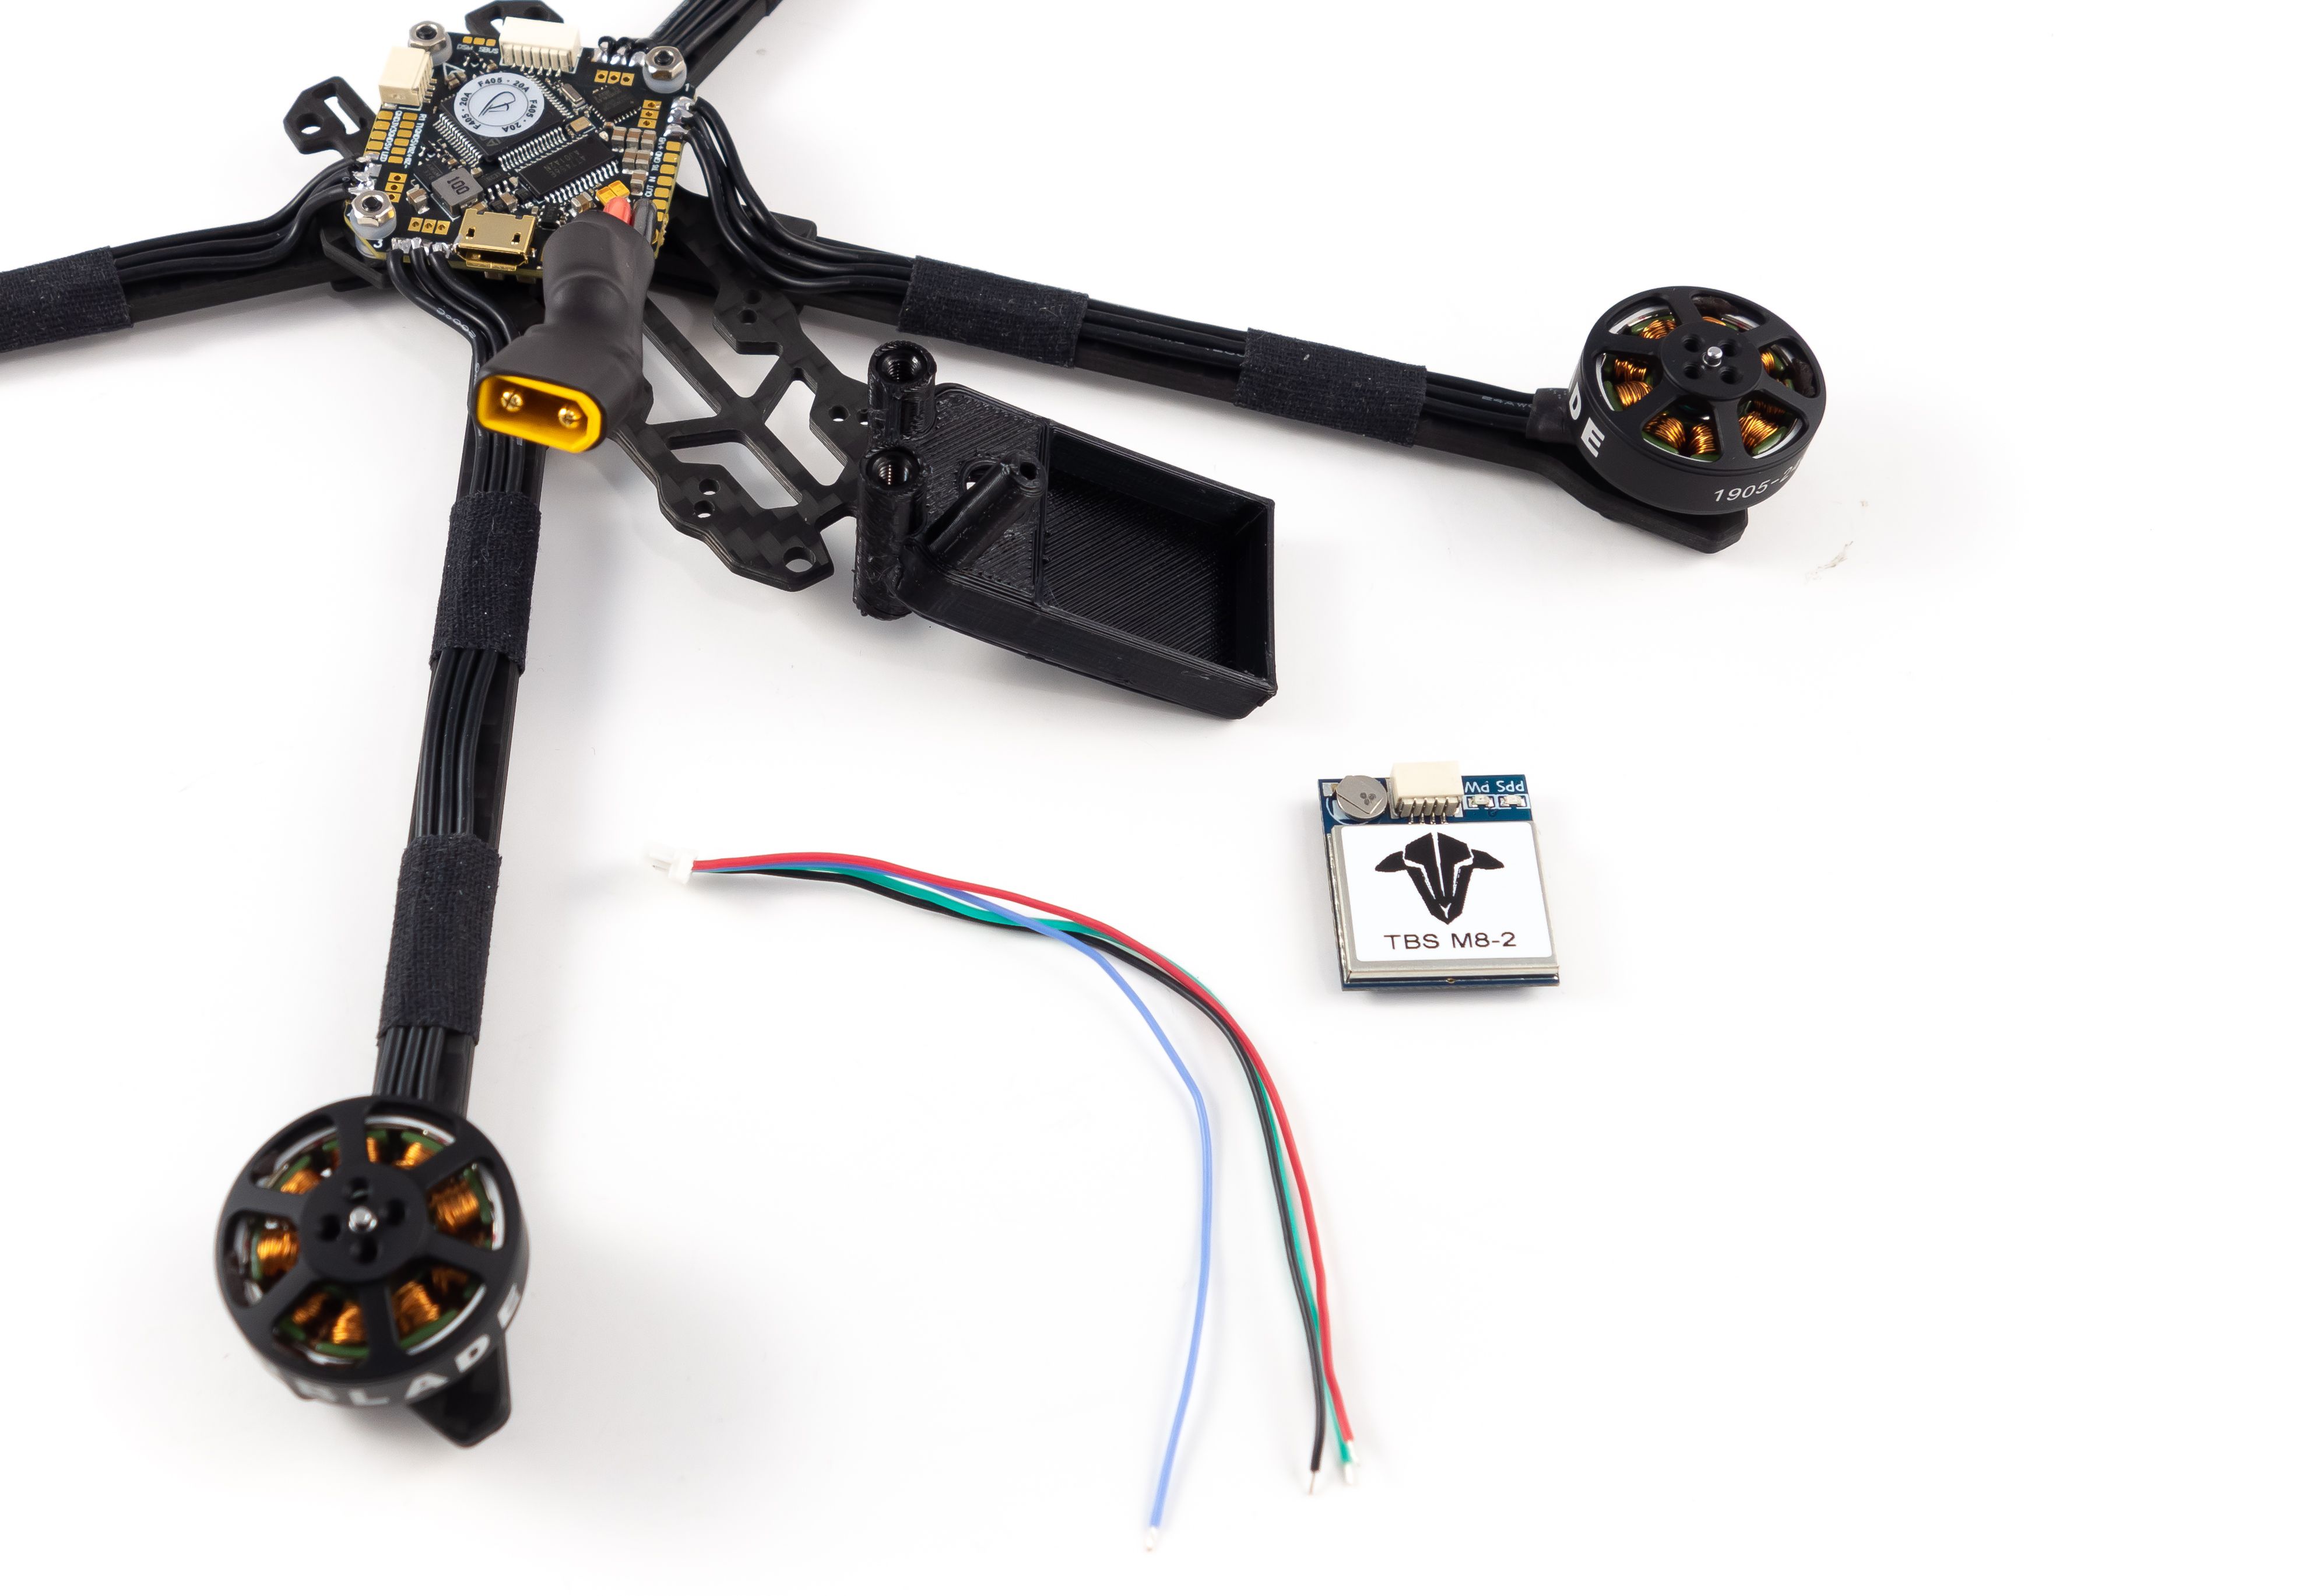
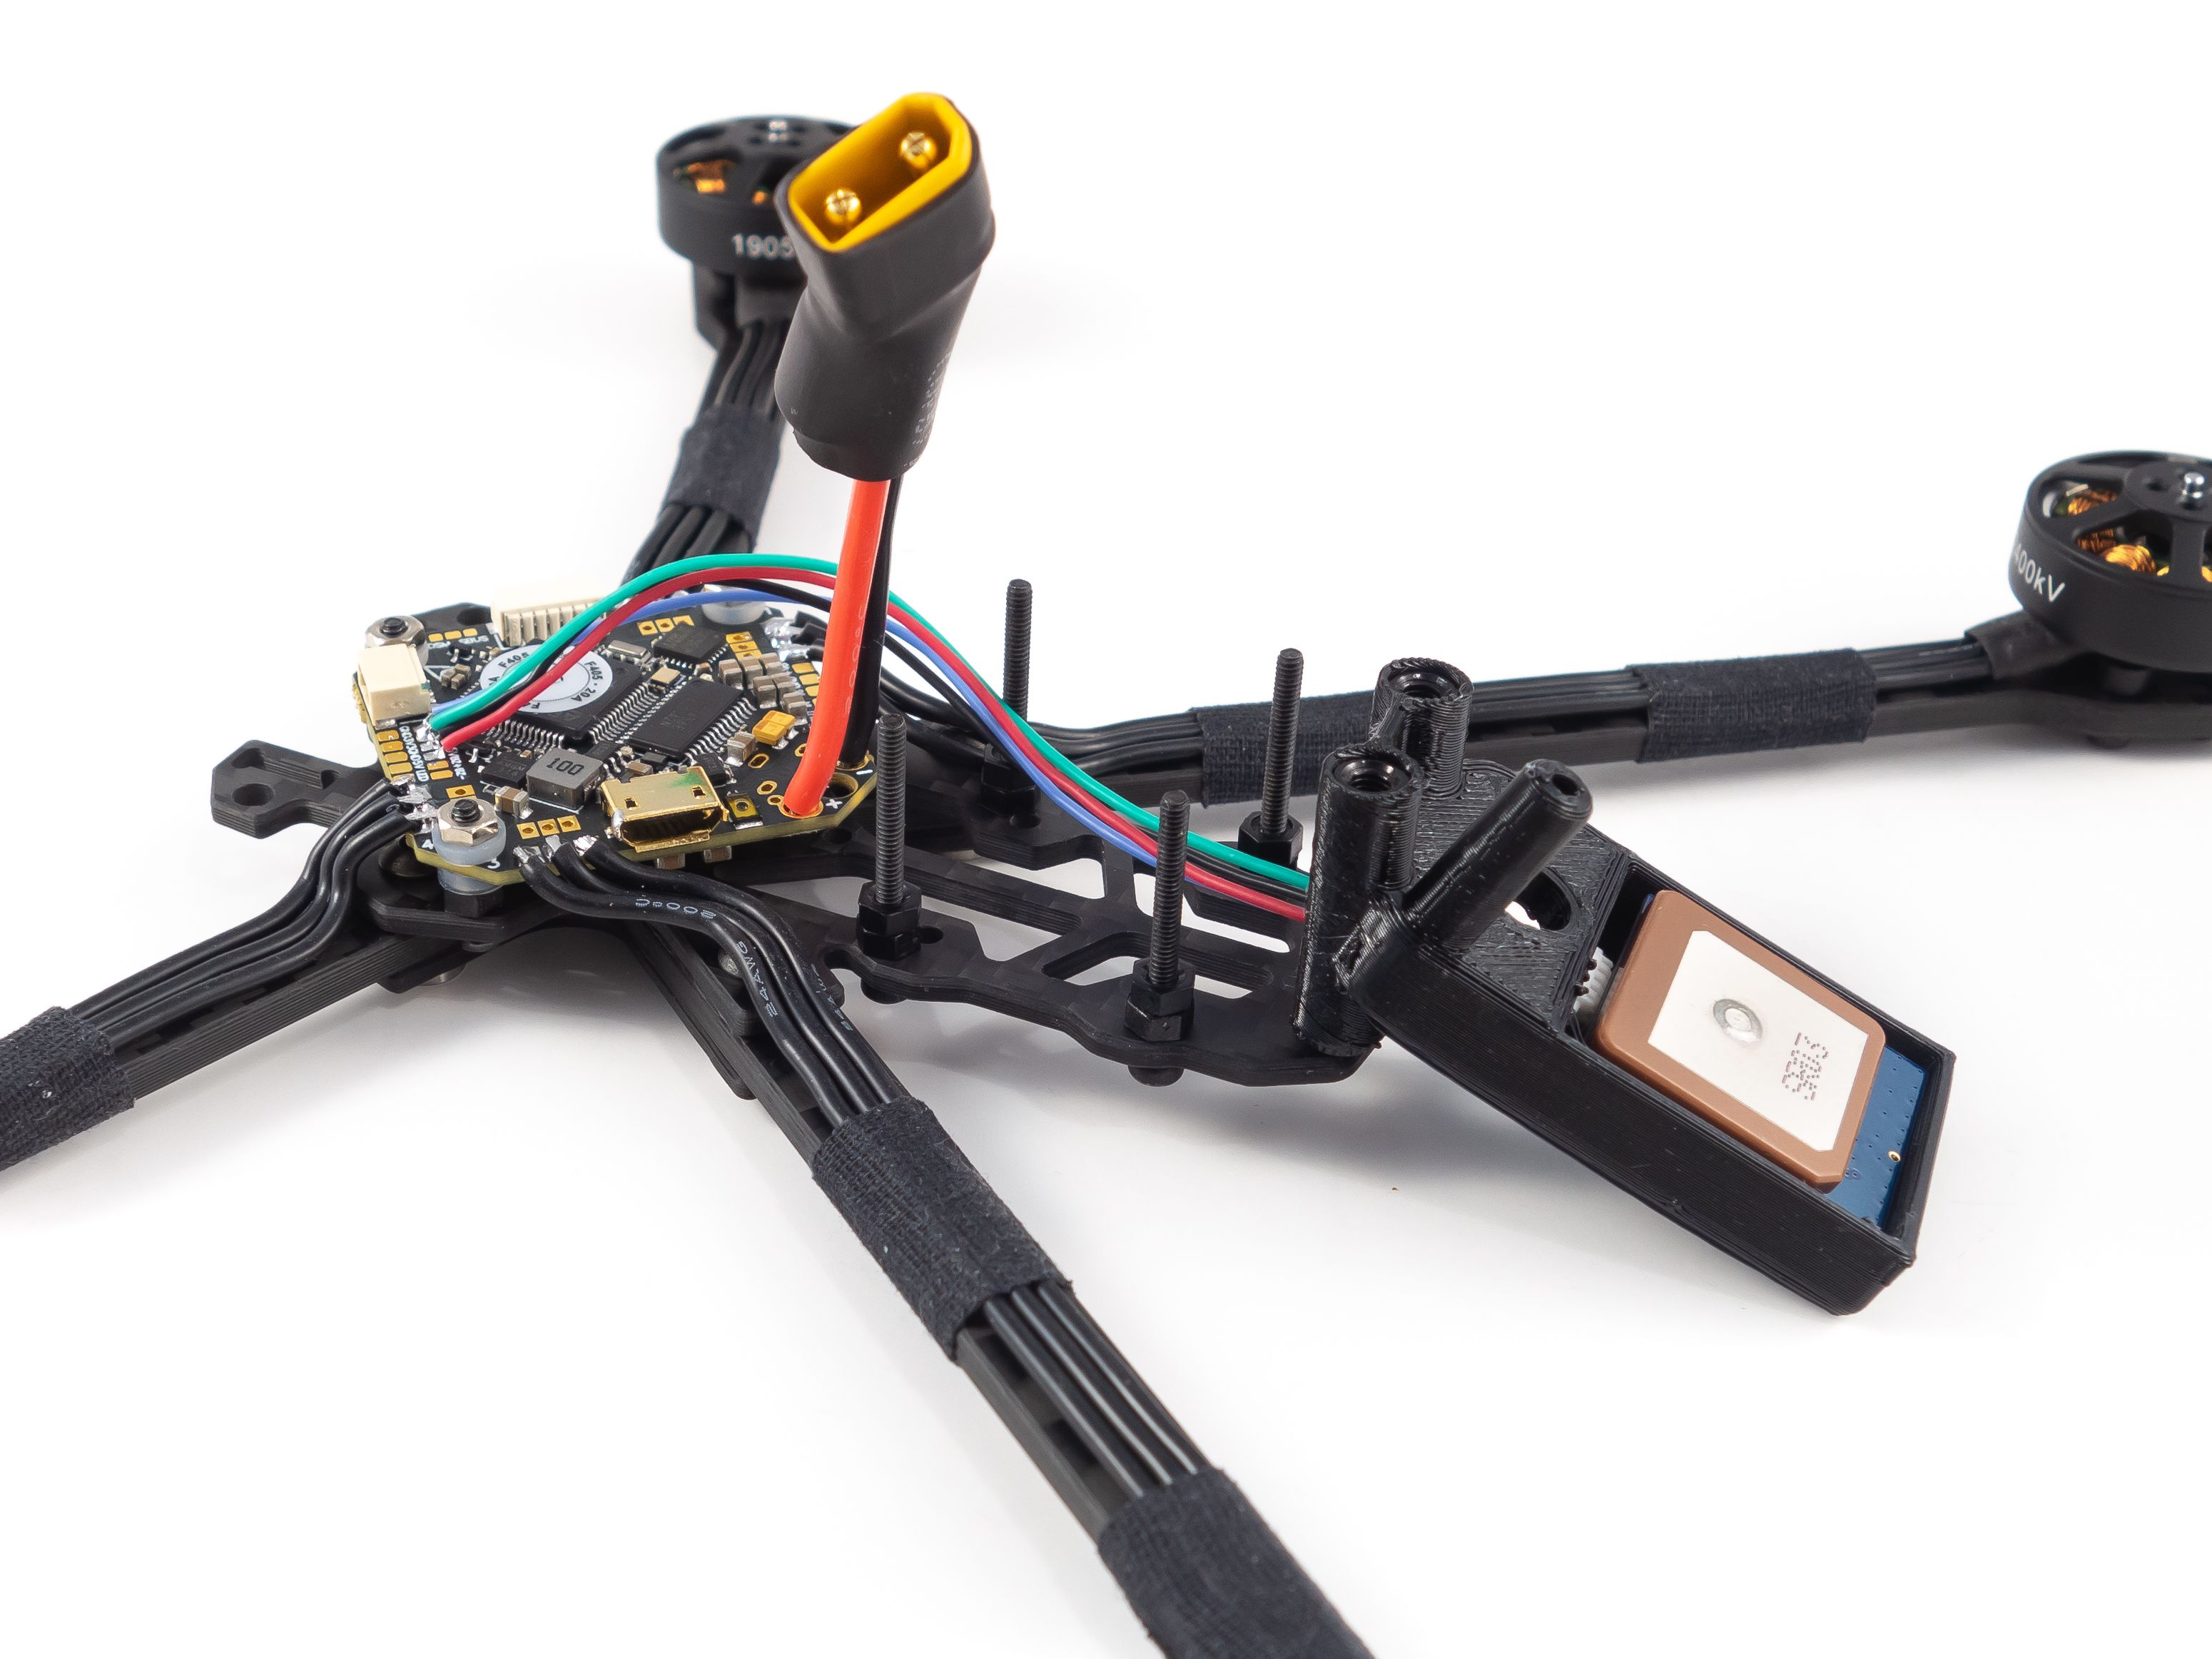
GPS
Here you'll need a 3D printed TPU mount. You'll have to purchase it separately or print it yourself. Slide the rear standoffs into the mounting sleeves and secure just the right standoff to the frame using one of the included M3 screws. You'll want to leave the left screw off to make it easier to plug in the antenna later.
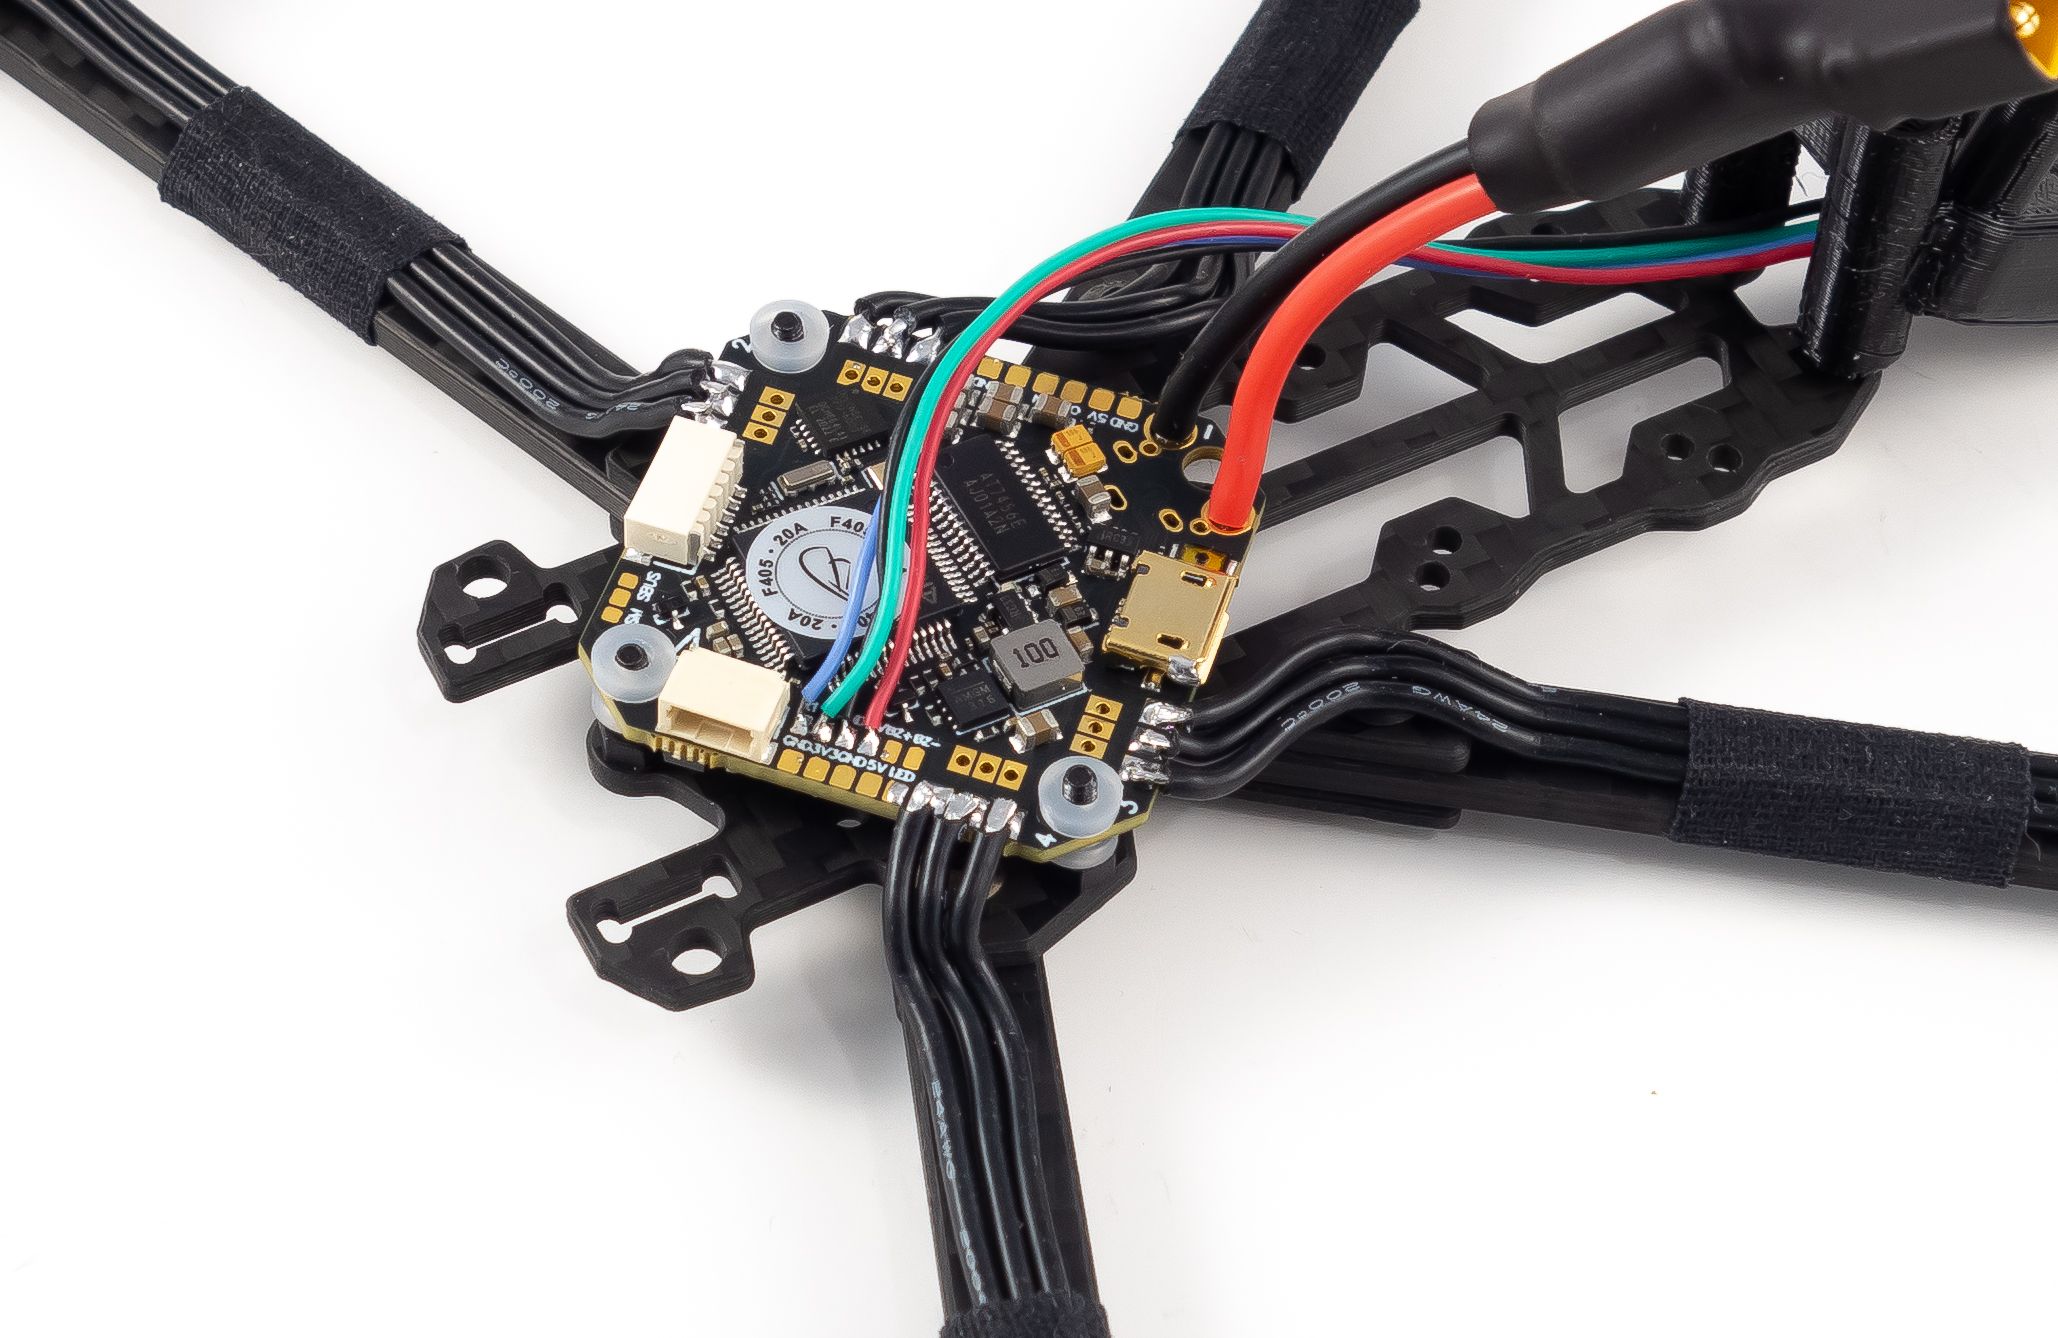
- Feed the GPS wires through the small hole in the GPS compartment.
- Solder the wires to the 5v, Ground, TX1 and RX1 pads. Whenever you wire a GPS to a flight controller it's always TX -> RX and RX -> TX. In this case the blue wire goes to RX1 and the green wire goes to TX1.
- Be sure to give the wires enough slack to lay across the bottom of the frame. The Caddx Vista will float above them.
- Plug the GPS in and secure it with some double sided tape. The logo faces down.
After you've wired the GPS you may want to give it some time to download your local satellite data. Since you haven't wired the Caddx Vista yet you don't need to worry about overheating issues. Plug a lipo in and let the GPS sit for 10-20 minutes outdoors. You'll get a 3D fix much faster when it comes time to fly. No need to set it up in Betaflight yet. All it needs is power.
Binding the Receiver
Here we're using the TBS Tango 2 with a TBS Nano receiver. You'll need to refer to the flight controller documentation to learn how to wire a different radio and receiver. This can be found on the product page linked below. The flight controller provides a plug, so all you need to do is solder the 4 wires to the receiver and plug it in. You'll also need to bridge a couple pads on the flight controller to indicate what type of receiver you used.
Bind process:
- Turn your radio on and put it into bind mode.
- Power up the quad with a lipo battery.
- The radio should indicate a successful bind and it may request a firmware update for the receiver. Let that complete.
- When the light turns solid green you're bound.
You can unplug the receiver or tuck it away for now to complete the rest of the build. Leave the antenna off.
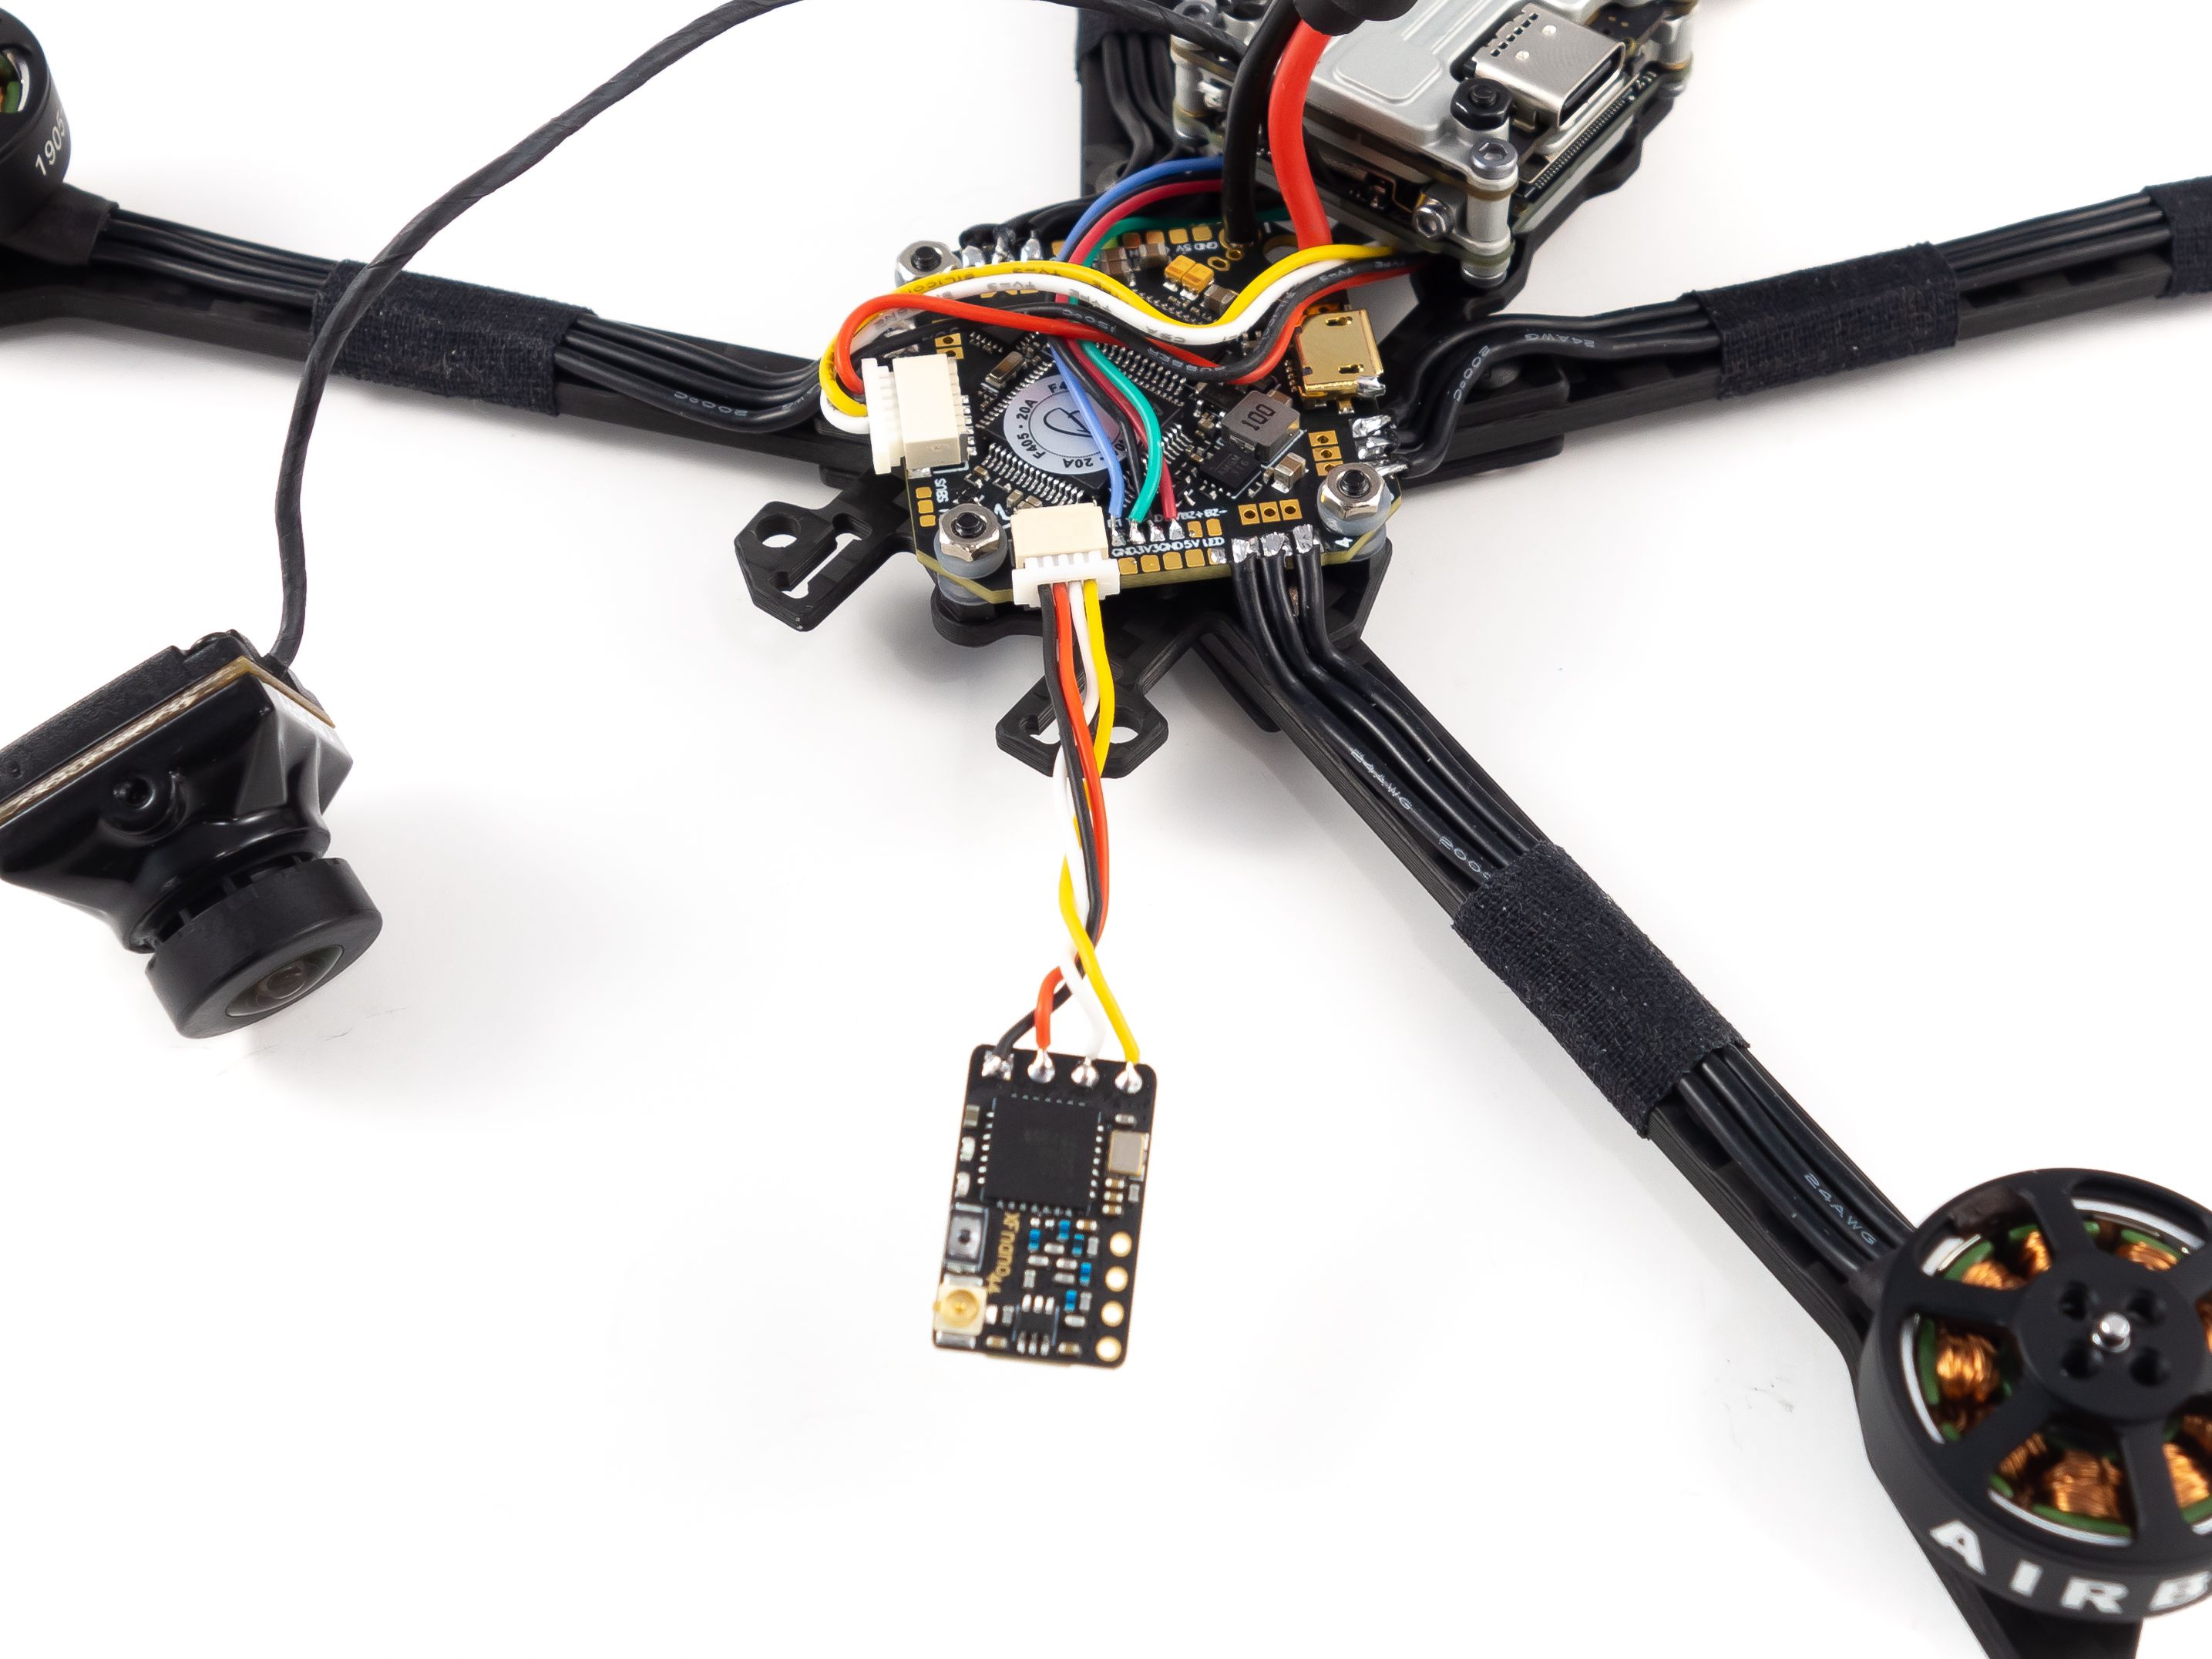

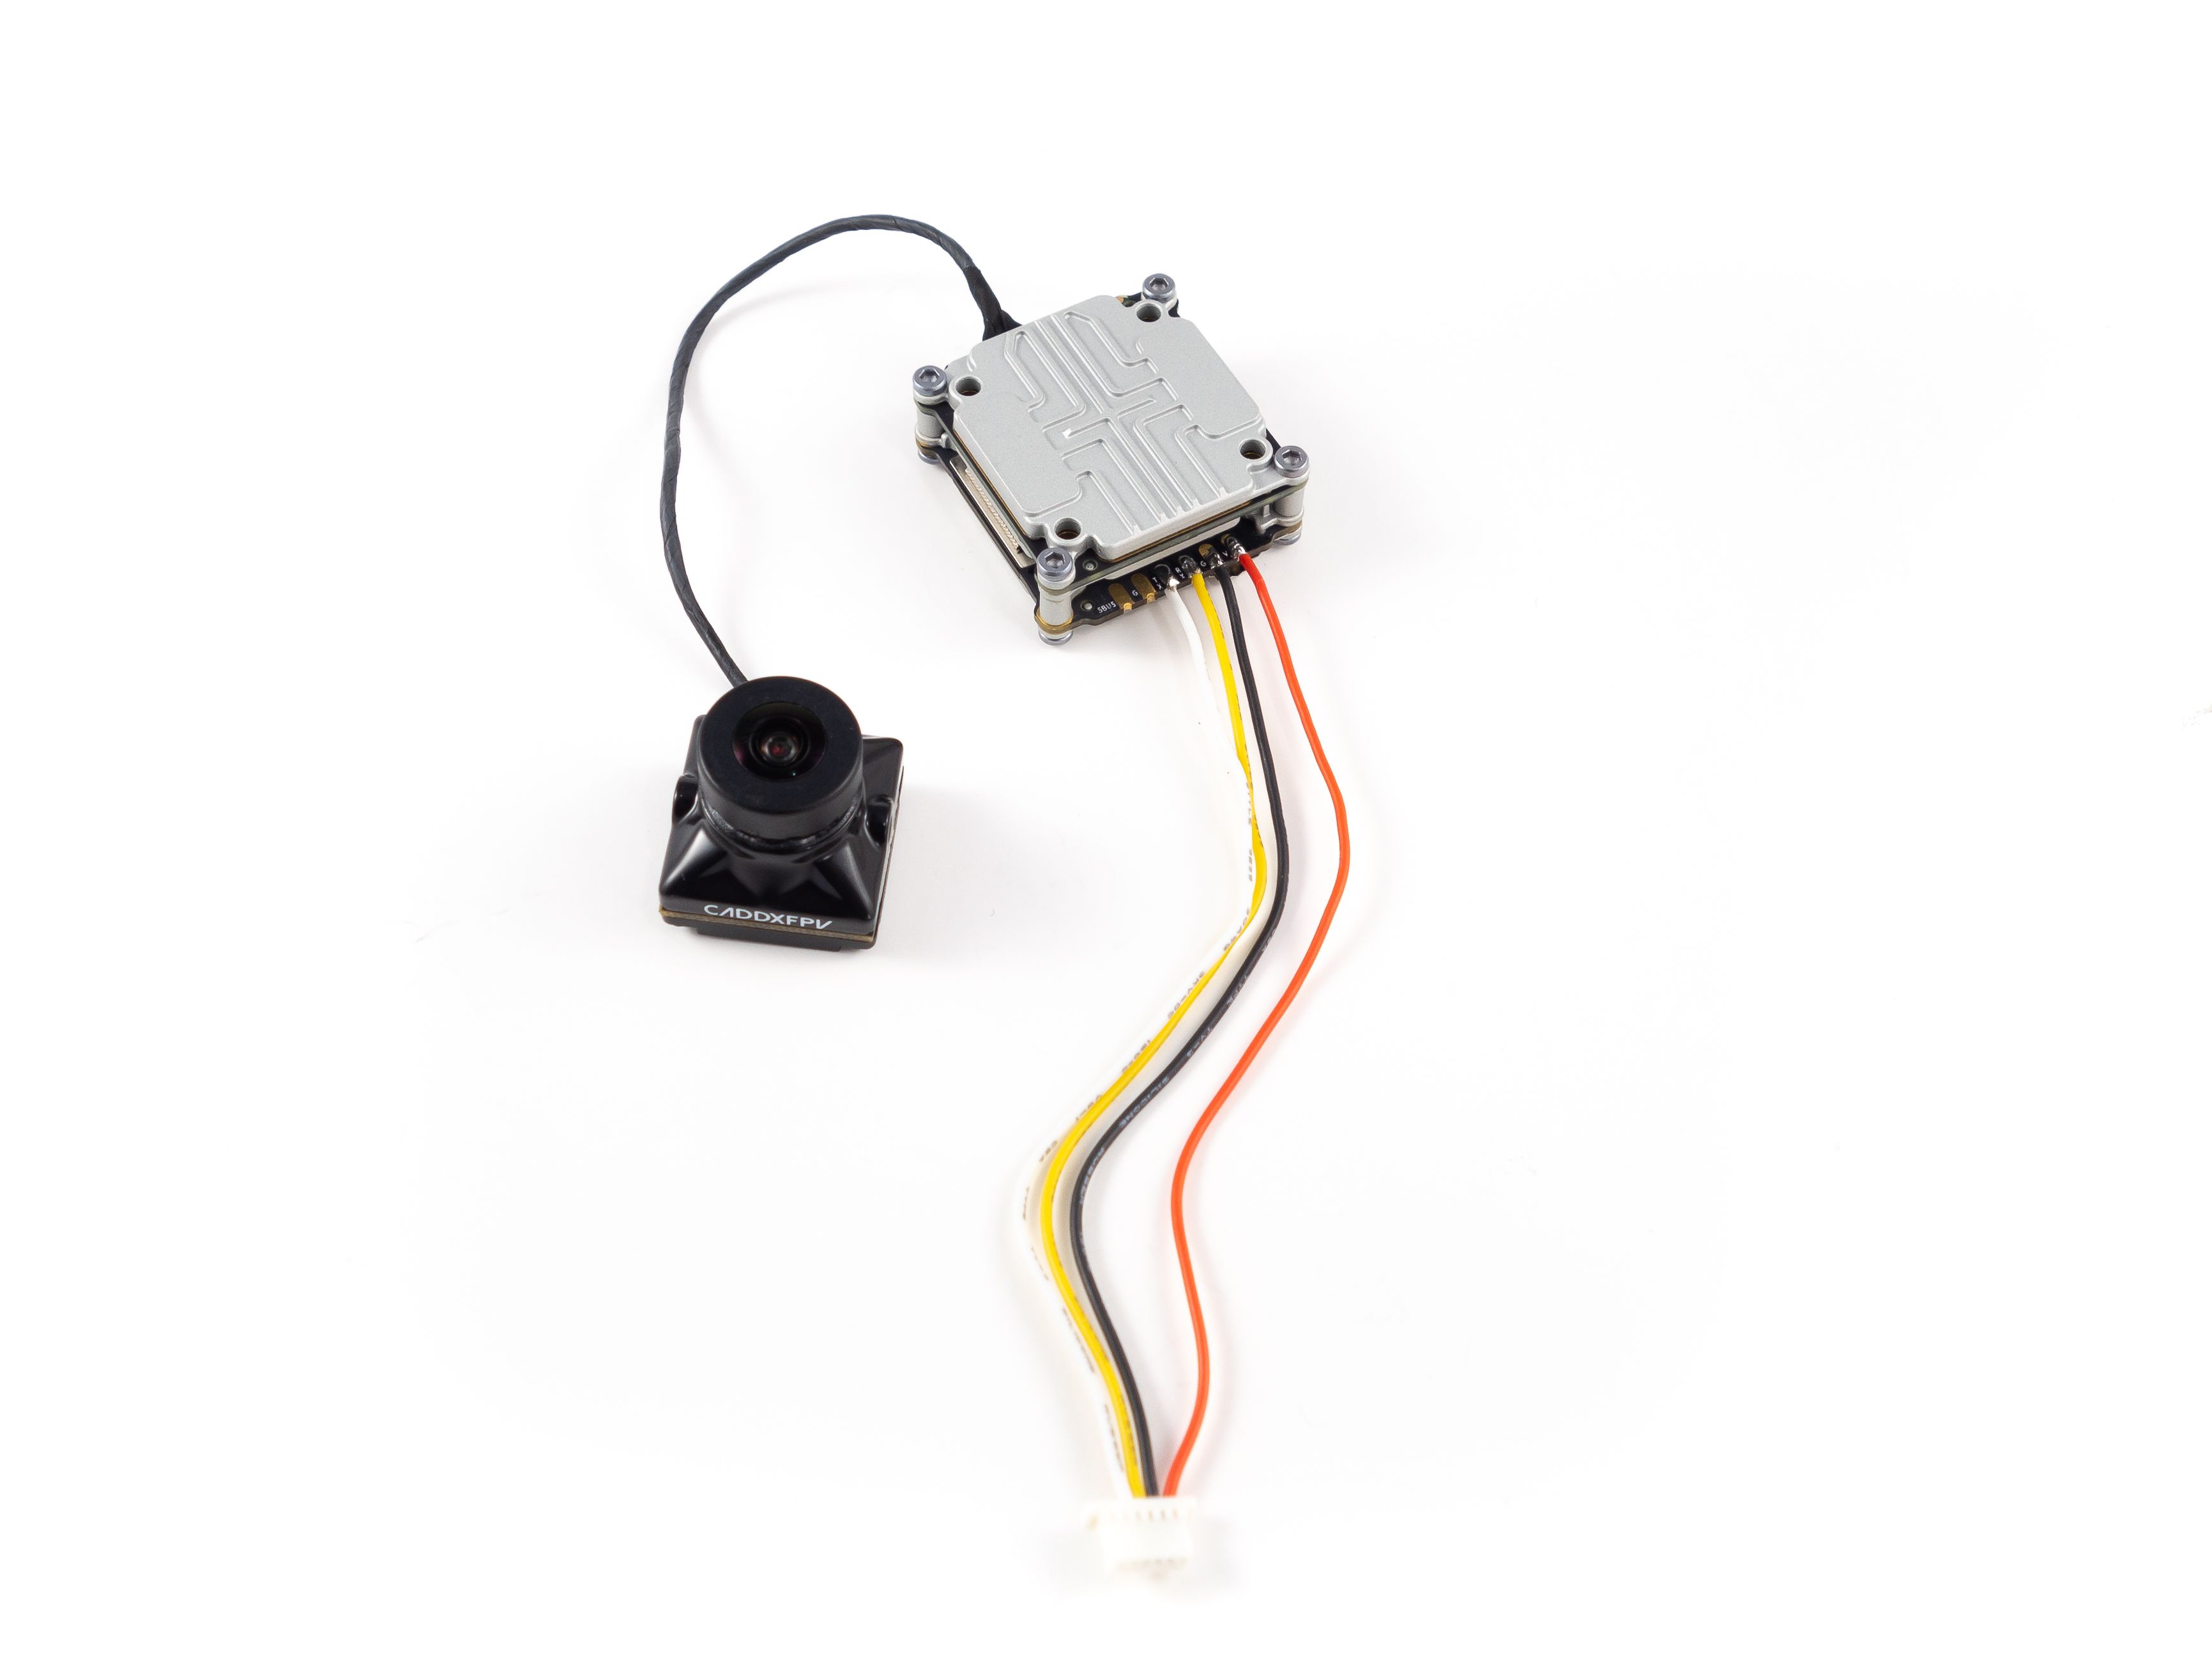
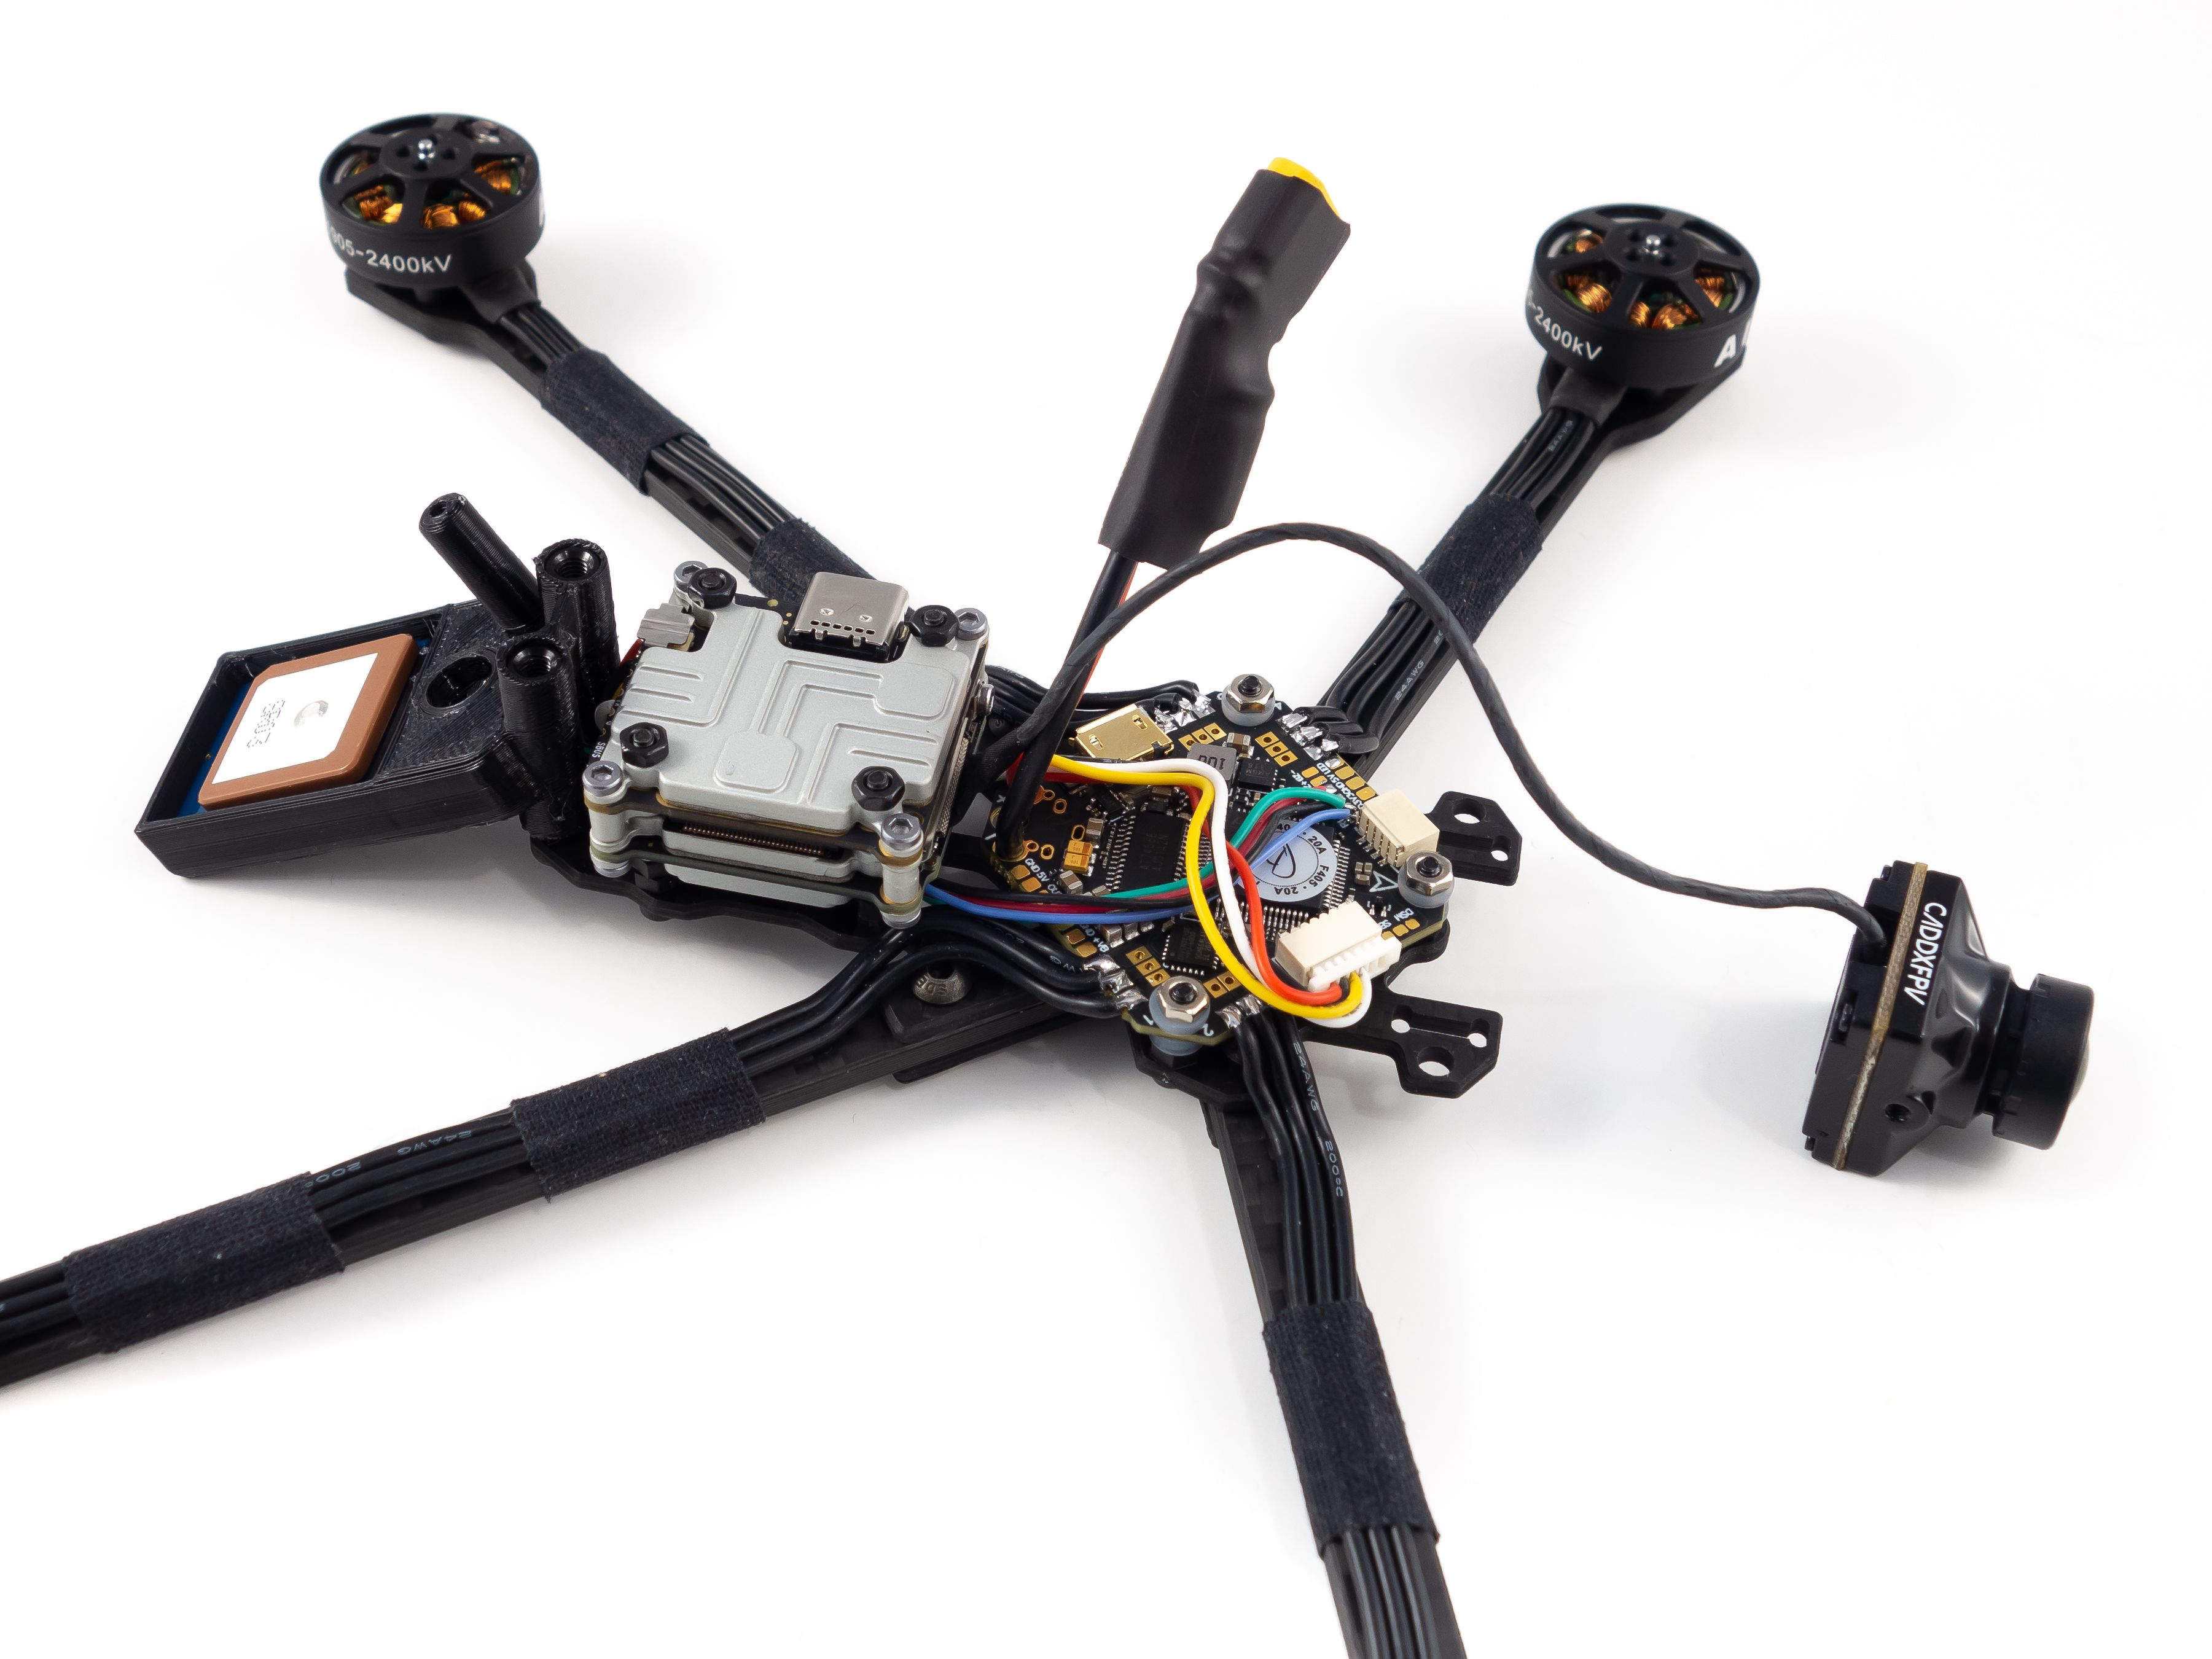
Video Transmitter
Take your Caddix Vista and flip it over to reveal the pads. If you're using Crossfire you can exclude the SBUS and Ground pads. Solder the included wires to the Bat, Ground, RX and TX pads. You can trim the wires a bit, but it's better to have too much than too little. They'll need to wrap under the air unit from the very back all the way to the front of the flight controller.
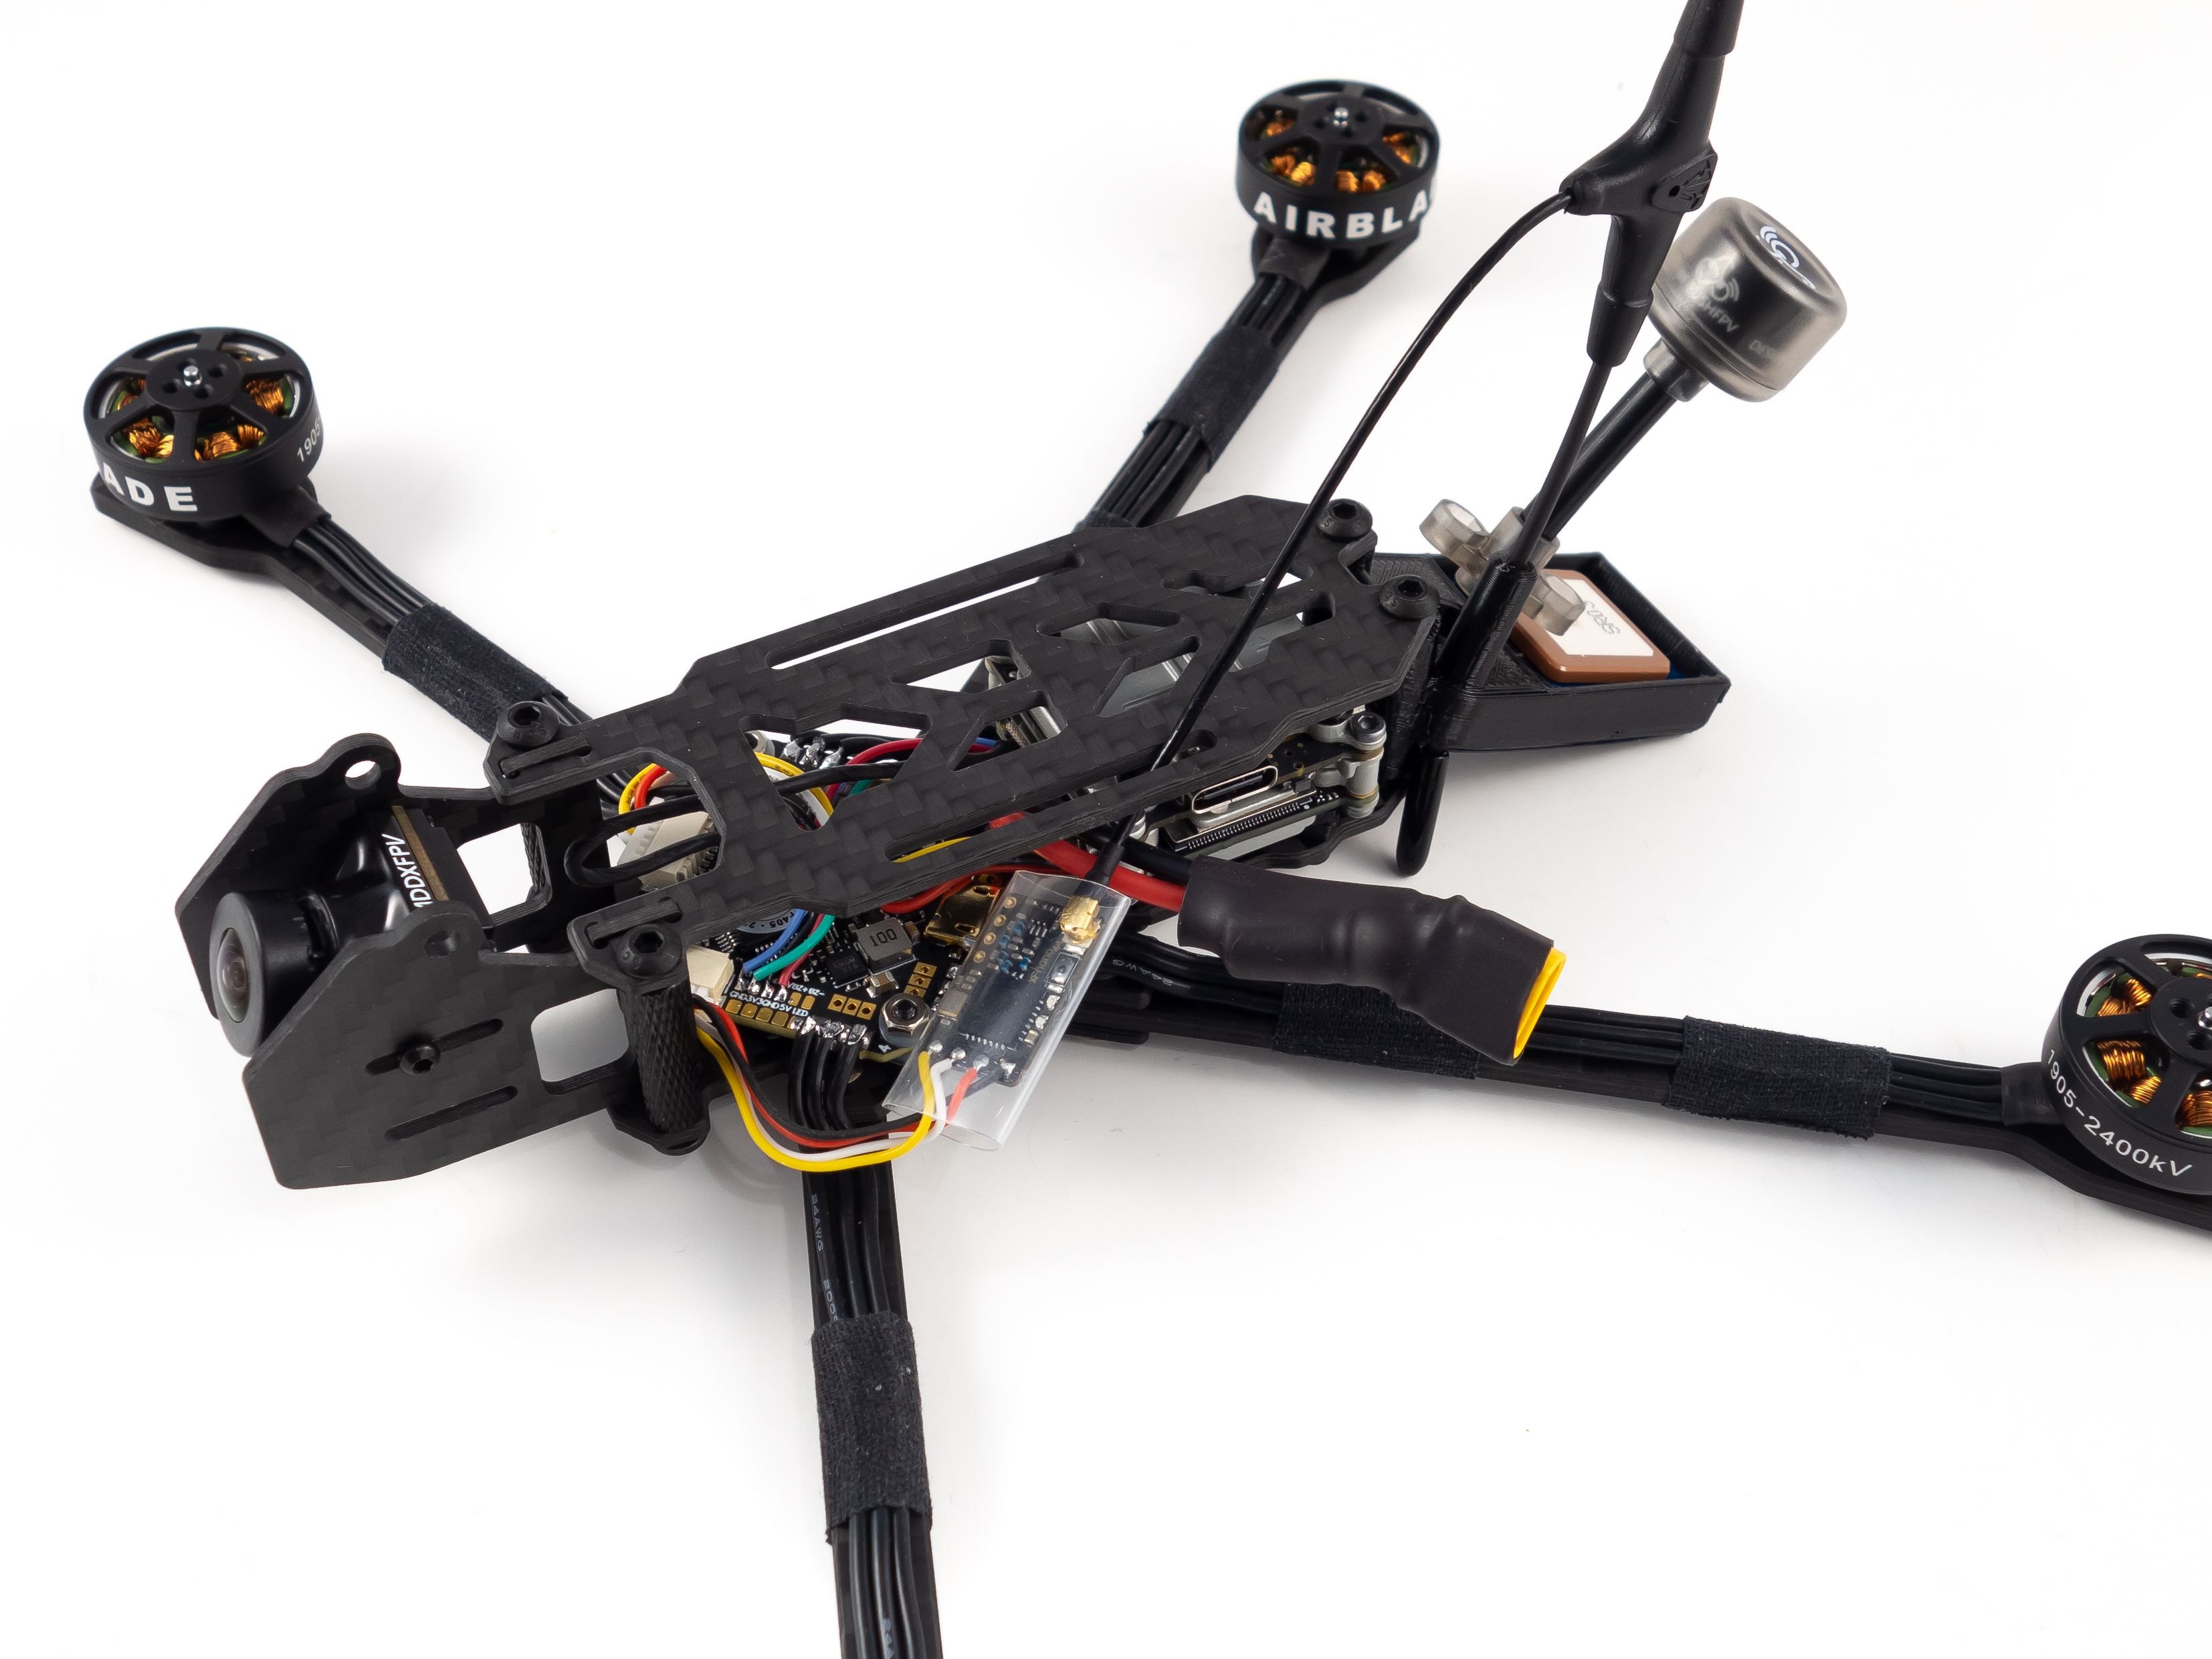
Mounting the air unit:
- Get 4 M2x20mm screws and secure them to the frame with M2 nuts. Use either M2 grommets or double up the M2 nuts to give the air unit some breathing room below.
- Slide the air unit down over the 20mm screws and secure it with M2 nuts.
- Feed the wires under the air unit alongside the GPS wires.
- Plug the air unit in to the flight controller and carefully fold the wires back so they don't hang off the side.
- Attach the side plates to the front camera using the shortest M2 screws and insert them into the bottom of the frame.
- Connect the antenna to the air unit. Swivel the GPS mount out like a door. Feed the antenna through the hole. Unscrew the antenna bracket on top of the air unit and carefully plug the antenna in. Secure it with the metal bracket and screw the other standoff in.
The hole in the GPS mount was intended for an SMA antenna, so you can upgrade to either the TrueRC OCP 5.8 SMA Long or the TrueRC Singularity SMA 5.8Ghz Antenna (Long) LHCP antenna for better video range. You'll just need a short U.FL to SMA adapter.
Finishing Up
Now let's take care of all the finishing touches. This should cover everything except the propellers. You don't want to put those on until everything is fully configured and tested in Betaflight.
- Add the standoffs to the front of the frame.
- Add the top plate and secure it with the included M3 screws.
- If you're using Crossfire mount it to the GPS holder.
- Take off one of the antenna caps and slide the antenna through the holder. Put the cap back on.
- Send the antenna cable through the top plate.
- Put some shrink tube on the receiver and connect the antenna.
- Use some small sharp point screws to secure the antenna holder to the GPS mount.
- If your screws are too long you can flip the antenna holder over so the screw-wells point downward.
- Add a sticky battery pad and a battery strap.
- You might want to use a small zip-tie to wrap around your receiver and all the wires to keep them tidy.
- Firmly zip-tie the battery lead to the top plate to protect the flight controller from battery ejections.
Betaflight
Now let's hop on over to our computer and configure the flight controller. Download Betaflight Configurator Download and the BLHeli_32 Configurator Download. Use a Micro-USB cable to plug your quad into your computer.
Flash the Firmware
This is optional and unless you need a particular feature in a newer version of Betaflight you can skip this step.
- Go to the Firmware Flasher and choose "Release", "BETAFPVF405" and the latest stable release of Betaflight (At this time 4.2.9)
- Leave the remaining options unchecked.
- Click "Load Firmware [Online]" and then "Flash Firmware" to update your flight controller. Once complete, click "Connect"
Ports Tab
- Set UART1 Sensor Input to "GPS"
- Set UART3 to Serial RX
- Set UART4 to Configuration/MSP
Configuration Tab
- Under Mixer set "Motor direction is reversed" if you want to fly "props out". This is what I use.
- Under ESC/Motor Features select DSHOT600
- Under System configuration set Gyro update frequency & PID loop frequency to 8 kHz.
- Under Personalization set your FPV handle
- Under Receiver choose your receiver. If you used Crossfire choose "Serial-based receiver" and "CRSF"
- Under Arming set the Max arm angle to 180 (Only if you keep the accelerometer turned on)
- Under Other Features enable: Telemetry, Airmode, OSD and Dynamic Filter
- Under DSHOT Beacon Configuration enable "RX_SET" and change your beacon tone to 2.
Click Save and Reboot
PID Tuning Tab
Here you can ignore most of the settings unless you really know what you're doing. Mainly you want to go here to change your Rateprofile Settings. Choose some rates that feel comfortable to you. I prefer slower rates like .75, .75, 0.
Configure the GPS
- Go to the Configuration tab and toggle GPS on.
- Set the protocol to UBLOX.
- Save and Reboot.
- Check the "Enable Expert Mode" box on top.
- Go to the Failsafe tab and change stage 2 to GPS Rescue. Use the default settings.
Click Save and Reboot
By default the quad won't arm until a GPS 3D fix has been met. This may require some waiting after plugging your lipo in. If you'd like to disable this you can go to the CLI and type set gps_rescue_allow_arming_without_fix = on and save. Keep in mind that if you do this and take off before you've got a 3D fix GPS rescue won't work. Your distance to home and home direction arrow won't work either. It's best to wait for the 3D fix which is indicated by at least 6 satellites in your OSD.
Another thing to keep in mind is GPS rescue won't bring your quad back and land where it began. It'll steer the quad back toward you and once an RX link has been recovered you'll regain full control. Don't let it drop. You can avoid this by putting GPS rescue on a switch in the Modes tab. If you do have a failsafe flip the switch and it'll continue to return to you even after recovering the RX link. You always want to land manually though. It won't land gracefully on its own.
OSD Tab
On the OSD tab check all of the values you want and arrange your OSD as desired. I like to line them up across the top, one row down. These are the values I use from left to right:
- GPS speed
- Home distance
- Home direction
- RSSI value
- GPS sats
To complete the remaining steps apply lipo power and turn your radio on
DJI Bind
- Bind your Caddx Vista to your DJI goggles by pressing their respective bind buttons.
- Make sure you've got a video link and choose a Player channel.
- Set your display preferences in the goggles. I like High quality on 50mbps with Focus mode off.
Receiver Tab
- Ensure your pitch, roll, throttle and yaw are being applied correctly. Adjust your transmitter and Channel Map as needed.
- I like to add 3 to both deadbands to smooth out gimbal jitter.
- Set your RSSI channel
- For Crossfire go to the Crossfire menu on your radio, choose your receiver and set a channel to "LQ". I put it on channel 12 which is AUX 8 in Betaflight.
- Go to the Telemetry page on your radio and Discover sensors. You should see all your telemetry data appear.
Modes Tab
- Assign an Aux switch to arm and disarm your quad.
- Assign another Aux switch to enable Horizon or Angle mode if you want them.
- Assign the Beeper and "Flip over after crash" to a 3rd and/or 4th switch.
- Assign GPS Rescue to a switch.
Save
Motors Tab
Enable the motor test and check the rotation of each motor.
- Do this by sliding the master to around 1040 so you can rub the side of each motor with your finger to determine the rotation.
- Refer to the image on top and take note of any that need to be reversed.
- You might also want to ensure each motor is in the correct position by referring to the numbers in the image and powering them one by one.
- If any motors need to be reversed continue on to BLHeli 32 Suite
BLHeli 32 Suite
Disconnect from Betaflight Configurator and open BLHeli 32 Suite
- Connect and click "Read Settings"
- Reverse each motor that needs to be reversed. This is done by de-selecting the ESCs with the correct motor rotation at the bottom and changing the motor direction for the motors that need it. Click "Write setup" to save.
- Reconnect to Betaflight Configurator to test the motor rotations.
HD Camera Mount
You can mount a Naked GoPro or an SMO 4K up front with a 20mm aluminum standoff and M3 screws mounted above the flight camera. I've linked the models to print the mounts in the part list below.
Photos

Part List
Show stores (3)
Awesome guide, Whiffles! Super clear and detailed from start to finish — really appreciate the pro tips along the way (especially the GPS setup trick). Can’t wait to try this build myself! 👌🔥


Guess I'll comment on your build since you have zero way to contact the site; delete builds, where can I?
Report spammers, you have nothing to do this and your site is getting overrun with obvious fake accounts. Where to report spammers????????????????????????????????????????????????????????????????????????????????????????????????????????????????????????????????????????????????????????????????????????????????????????????????????????????????????????????????????????????????????????????????????????????????????????????????????????????????????????????????????????????????????????????????????????????????????????????????????????????????????????????????????????????????????????????????????????????????????????????????????????????????????????????????????????????????????????????????????????????????????????????????????????????????????????????????????????????????????????????????????????????????????????????????????????????????????????????????????????????????????????????????????????????????????????????????????????????????????????????????????????????????????????????????????????????????????????????????????????????????????????????????????????????????????????????????????????????????????????????????????????????????????????????????????????????????????????????????????????????????????????????????????????????????????????????????????????????????????????????????????????????????????????????????


Rookie here. My question is can I put a ELRS rx in this instead of crossfire and is it advisable or no? I have a ELRS 2.4g radio that i was hoping to use. What considerations and modifications would need to be made aside from changing the radio/rx?
Great write up and tutorial video. Thank you for the excellent documentation and flight video. 'Wondering how do you get such clean photographs and clean backgrounds for your photos?
great build. I can't seem to start a new post, otherwise I would. I want to build a long range freestyle drone which has a DJI like gimbal underneath to fit a gopro. As I live in Europe, the Drone itself has to be atleast under 250g but preferably way under that. What's my best startingpoint? I have seen articles on how to build one, but they don't seem to recommend components with Amazon links for example.
Thanks for helping me out in advance
Outstanding write-up! I was thinking about following this build, but unfortunately it appears airblade is no more (at least at this time). Drat
Ground station. If you want to achieve long range FPV flights, use a good directional antenna array. This means changing the antenna scheme. If you choose to fly in FPV on 2.4 GHz, I recommend getting the TBS ground station, and combine it with the Yagi antenna (2.4 GHz – 11 dB).
anonigviewer
bingenerator
I always enjoy reading quality content with accurate information like this, you can check it out run 3
pg เว็บตรง เชื่อถือได้ เกมสล็อต ออนไลน์จำเป็นต้องยกให้ pg slot เล่นผ่านเว็บ ตรงเล่นได้มากมายแล้วก็หลากหลาย ไม่มีเบื่อนี่เป็นอท้องทุ่งจักรเกม ผู้ให้บริการคาสิโนออนไลน์

This is an excellent article. This is, in my opinion, one of the best posts ever written. Your work is excellent and inspiring. Thank you very much. slope
Exellent!
I have 2 questions. I just started to look into this hobby Im an electrician so the soldering should be easy.
But my questions are is that a recommended build for beginners and people flying for the first time cause i dont wanna start at the low end and have to immediately upgrade and my other question is do i need that expensive goggles or can i use some for like 100 dollars and the controller for 100. Trying to not spend more than 450 in total.
Rule of thumb for any beginner. Start with good budget gear. Not the "expensive fancy budget" but gear that is approved through years. In FPV related hobbies (planes and sometimes cars and boats count too) you will keep radio and googles for years and possibly use between many models in future. For example many who upgrade to higher range gear, now are selling their used FlySky and FrSky radios for pennies. Those are more than good for people like you. As people above said - start with analog video. It is cheap, but good enough. If you like the thing in whole, you can move to digital FPV later. Beginner googles - EV800D or similar with built-in DVR.
A thing worth to know about googles and FPV - get googles with built-in DVR and make a habit to turn it on at begin of each fly. Will spare you a lot of time in finding crashed thing somewhere in jungles :)

Whiffles, thats a super nice quad, hey do you have any youtube fly footage of it ? BTW , with ELRS you rely on the LQ meter not the RSSI one, you can have a poor RSSI but as long as your LQ is High you can go far far away , Cheers. Rolo.

really nice. So at 192g and with 4S li-ion batterie, that would be a total weight of 192g + (4x45g(18650) ) = >372g


how is the battery compared to the stock frame?