XL8 X4 Quad
 By Dragunovgeorge on Oct 20, 2018
Right well this is my first build writeup and prompted by the lack of info on using the JR XBus receivers with Betaflight. The beauty of this setup for me is that with the following apps, I am able to set up & flash the flight controller, and configure the escs all from my Samsung S9 (which is with me in the field as a fpv monitor) using its OTG (on the go) functionality:
• Speedy Bee
• Drone Flasher
• BLHeli_32
I use an Eachine ROTG02 mounted on the back of my XG8 that plugs into my phone with the FUAV app to use my phone as a monitor to avoid taking extra powerpacks/monitors/receivers.
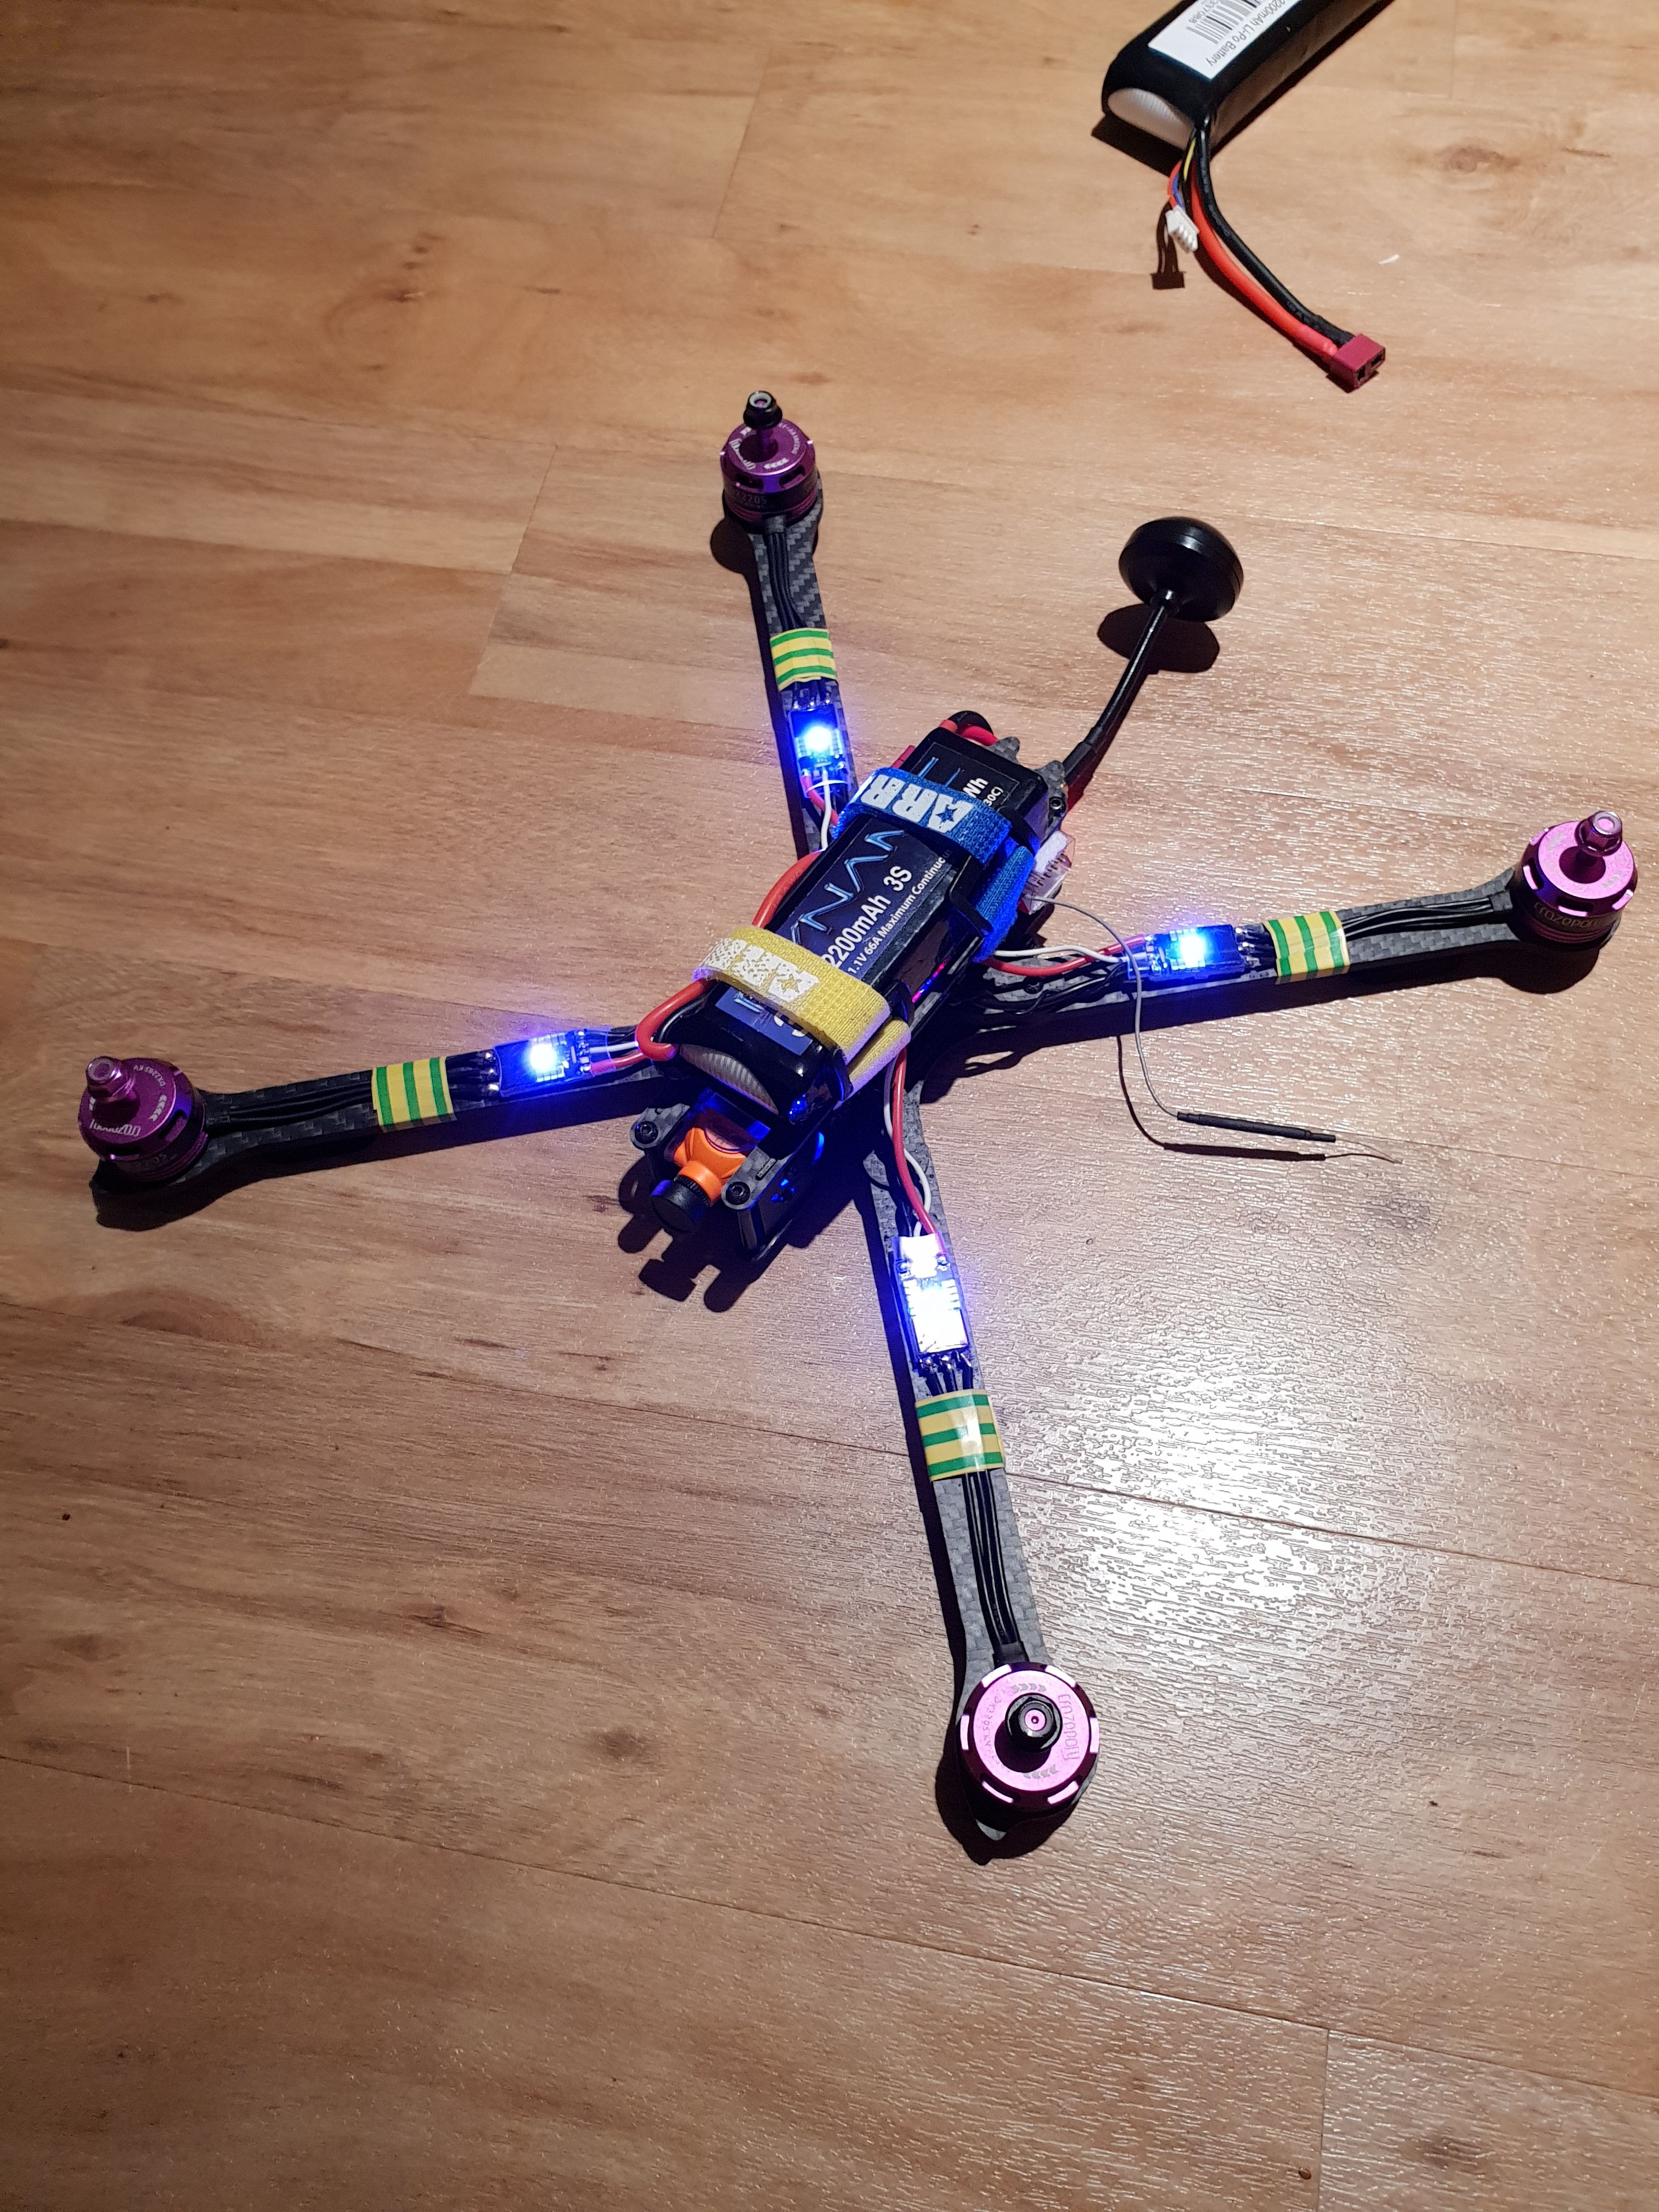
So my aim was to make a larger than 250 build (but smaller than my 650 DJI Tri-copter) running Betaflight that was light (auw of 550g with a 3S 2200mah), able to capture HD video, would work with my JR Pro XG8 and had a decent enough fc that it could cope with whatever I wished it to do.
Parts:
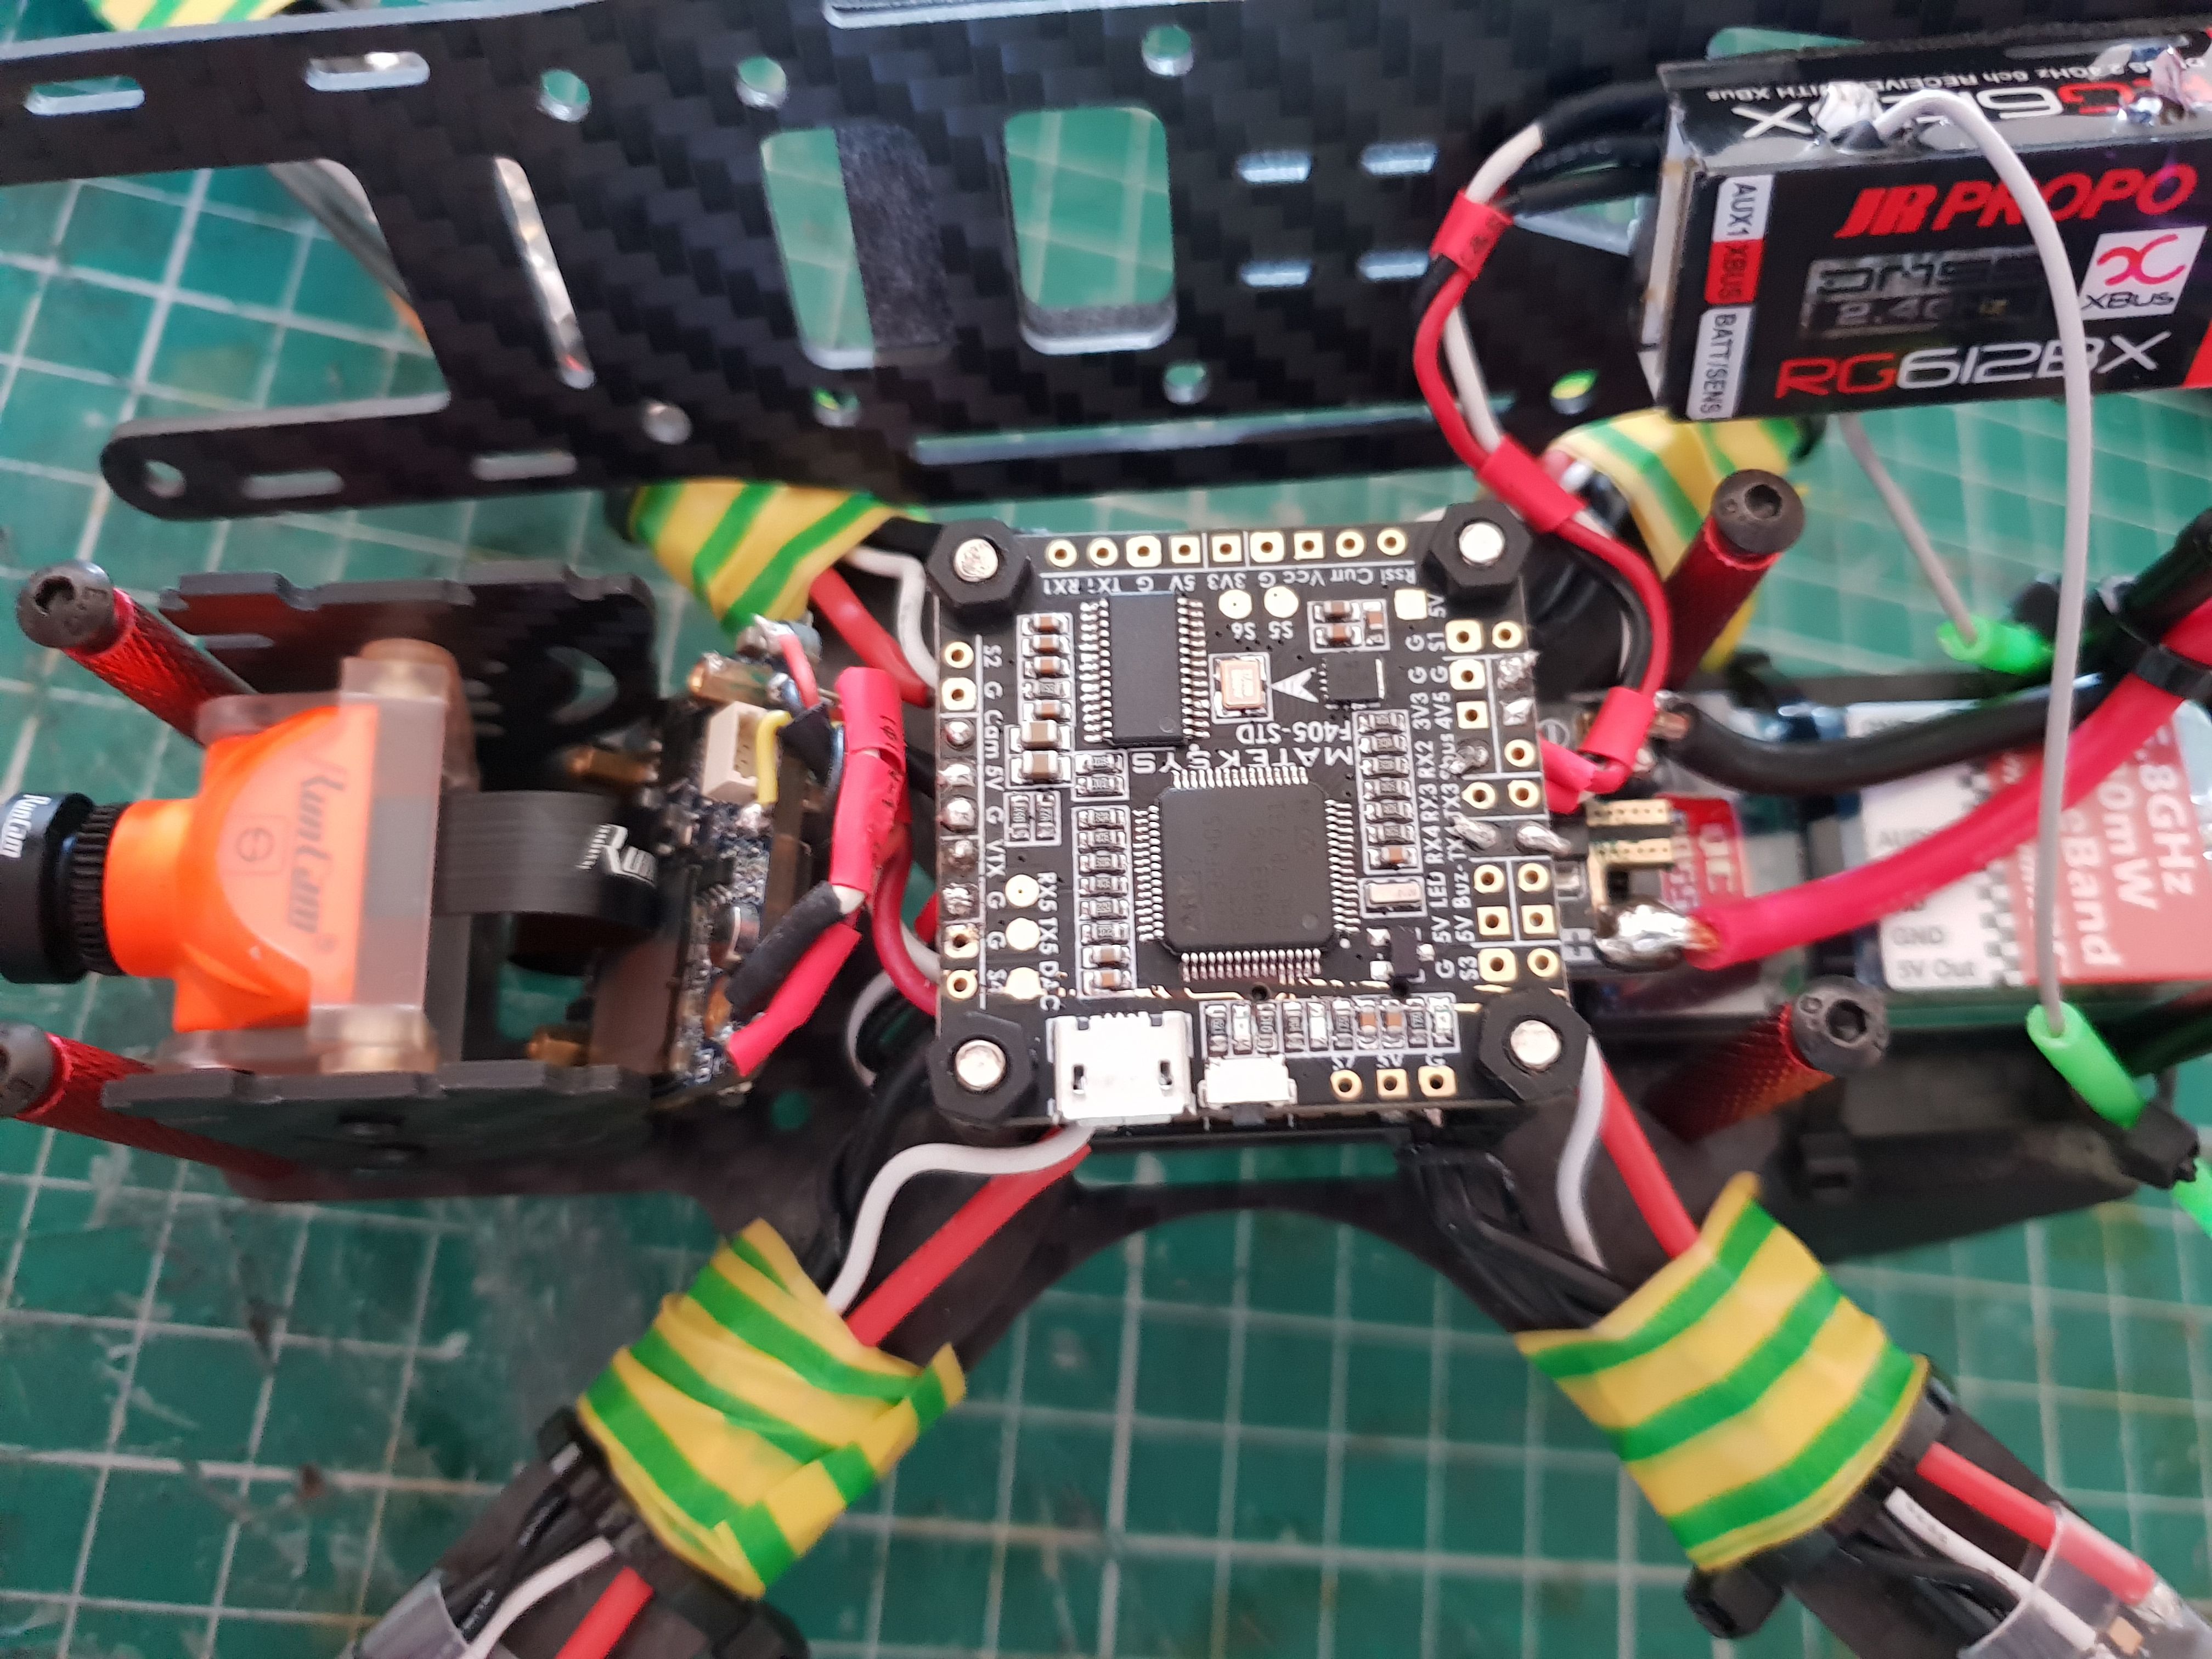
• Matek F405-STD Flight Controller
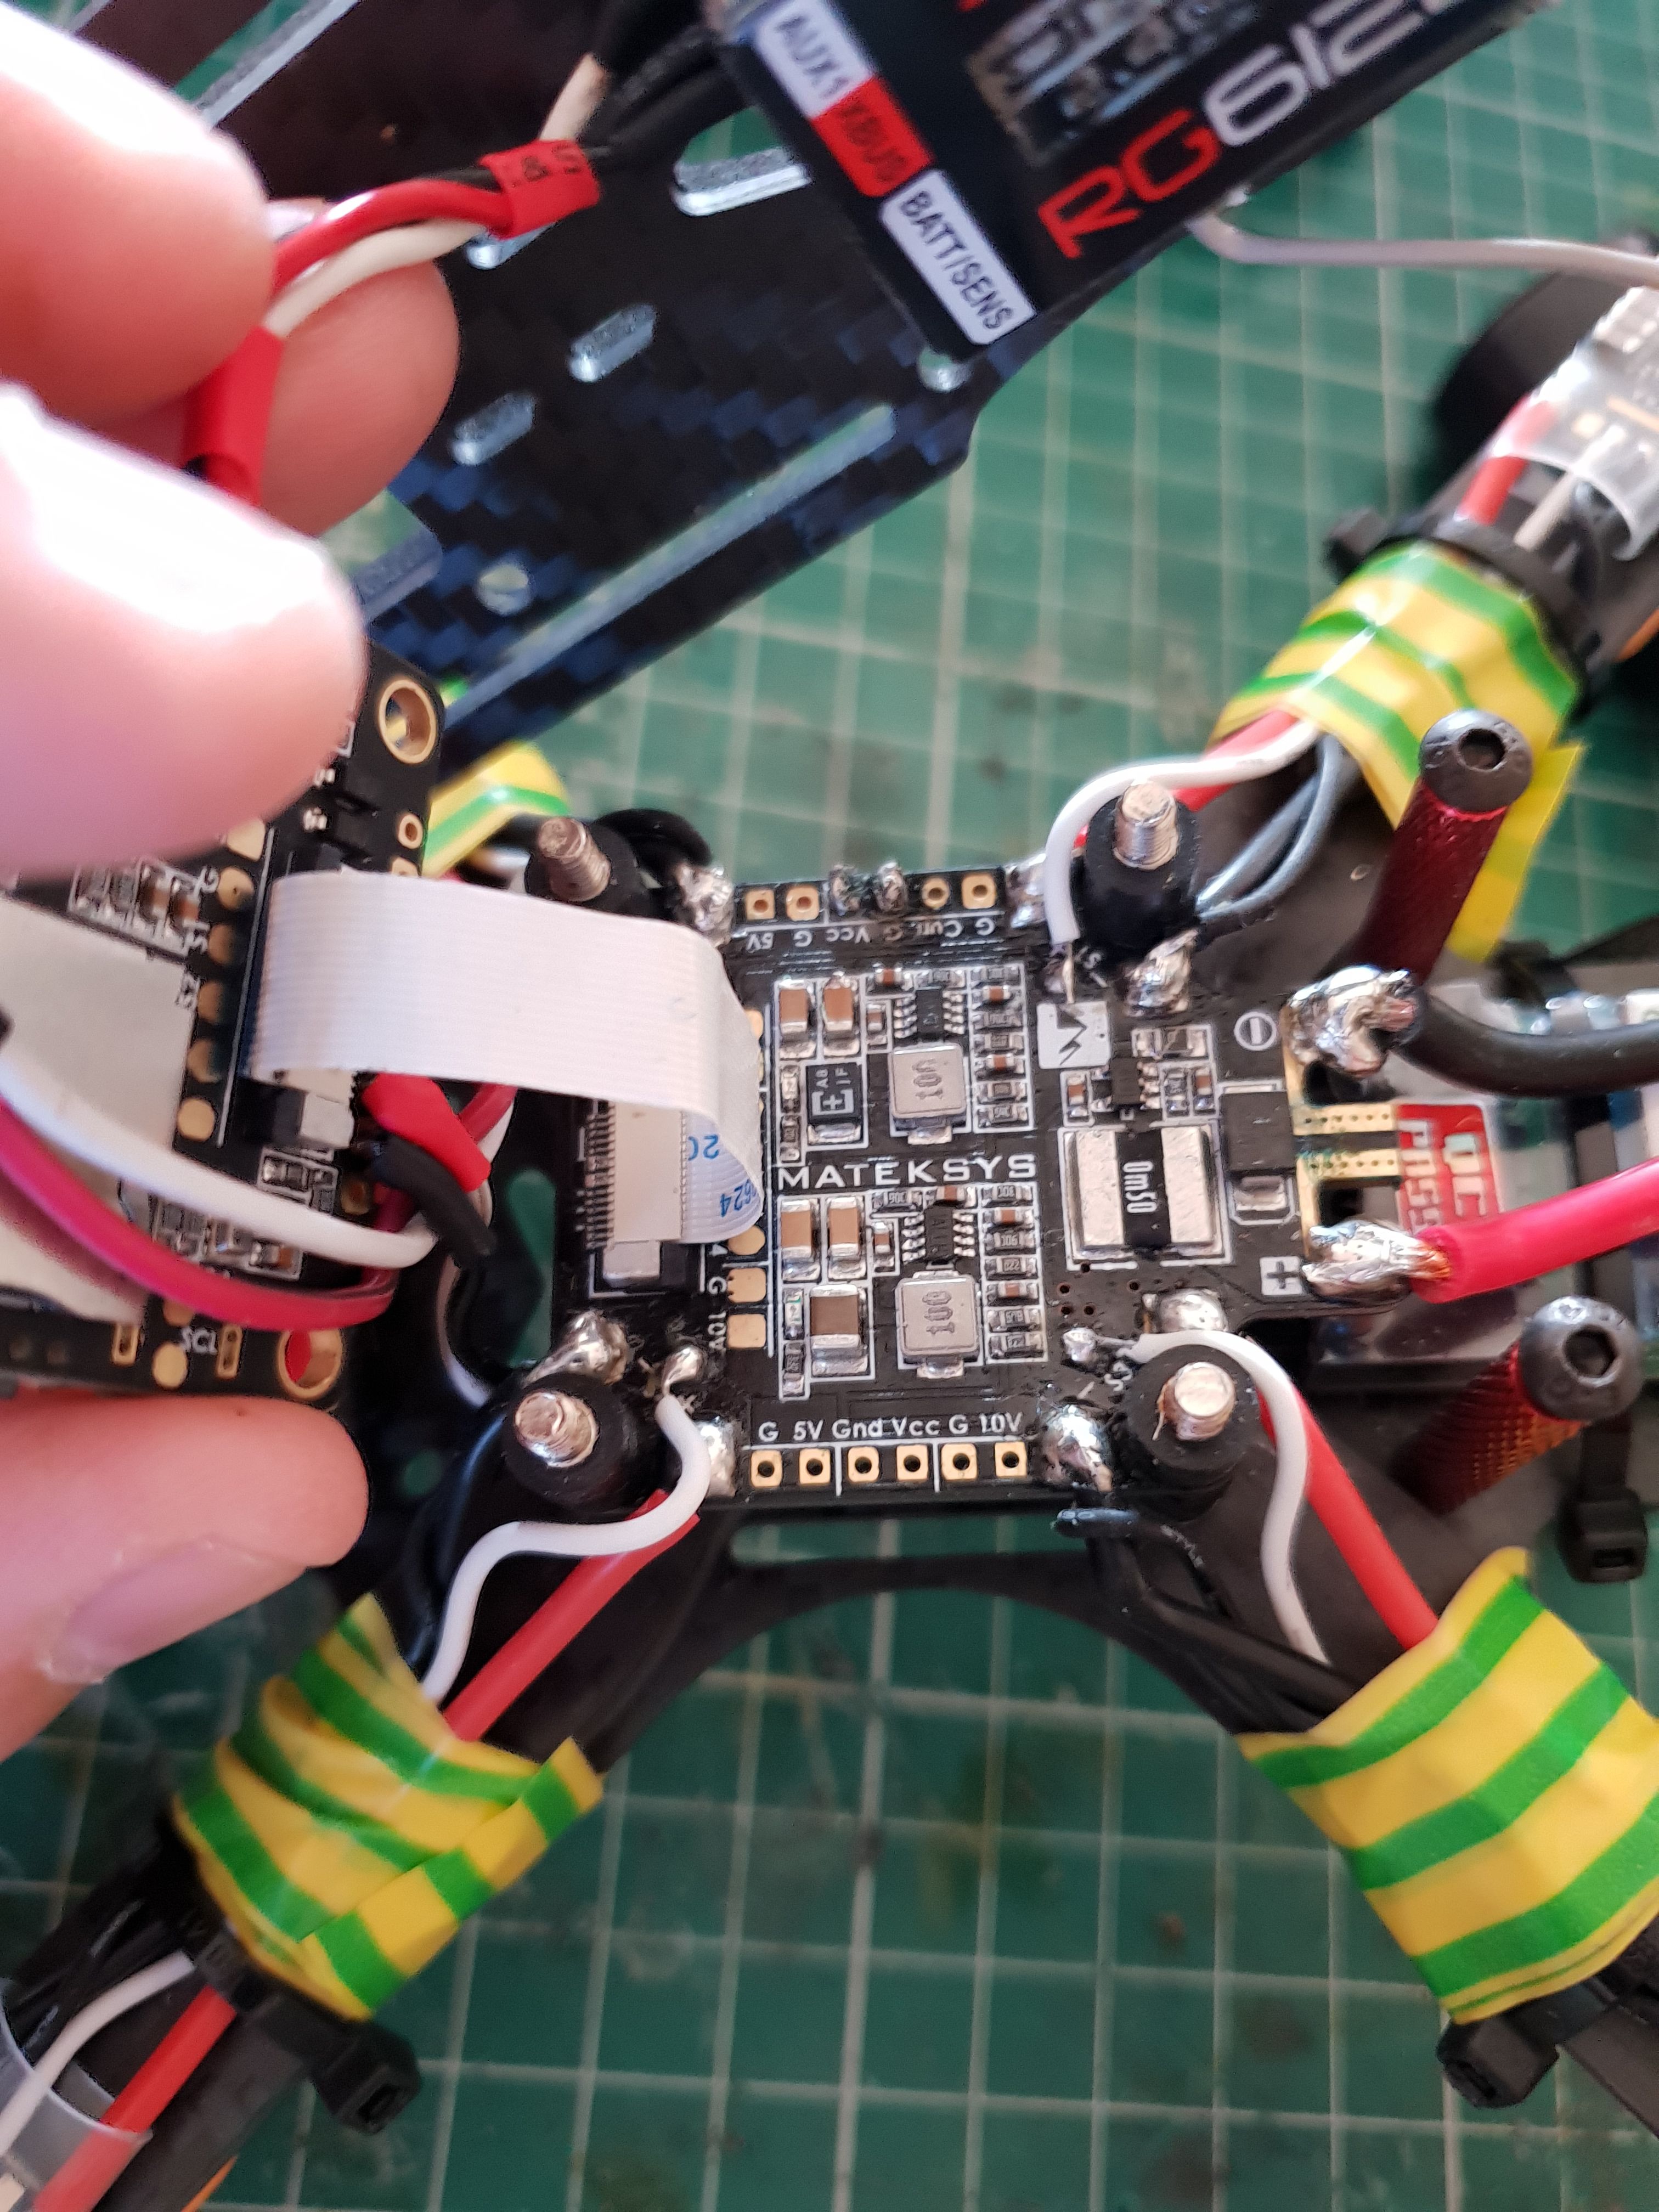
• Matek FCHUB-6S PDB (ribbon cable connection to fc)
• JR XG612B XBUS Receiver
• Makerfire 35a Brushless ESC (4pcs) BlHeli/DSHOT (no bec)
• Crazepony 2205 2300kv Motor (4pcs)*
• ImmersionRC 200mW VTX
• RunCam Split Mini 2
• XL8 (360mm) Frame Set
• 7x3.5x3 HQProps
*I may swap out to a lower kv motor if I get the chance however I had these around
So here we go...
Receiver setup & wiring
On the XG8 transmitter (should be similar for others)
• System list > X.BUS > Bus Type: Mode.B
The RX is connect to the fc as follows:
• Signal - RX2
• Positive - 4v5 (from the sbus connection)
• Ground - G (again from the sbus connection)
In Betaflight:
• Ports > UART2 set to RX
• Configuration > Receiver > Receiver mode: Serial based receiver (Speksat, SBus...)
• Configuration > Receiver > Serial Receiver Provider: XBUS_MODE_B
use this for an official JR Receiver. The other Mode B is for JR DMSS compatible receivers
Now in Betaflight you will notice that none of your stick inputs match the channel outputs so this an be corrected as follows:
In Betaflight CLI tab:
• Enter 'MAP AER1T234'
• Enter 'SAVE'
• Exit CLI and reboot
If you should check the channel mapping again and see if the ranges are correct... both times I've done this they weren't so we can correct this. Note down the current ranges for your channels and then....
In Betaflight CLI tab:
• Enter 'RXRANGE' which will give the 4 current ranges
• Enter 'RXRANGE 0 0950 2049' only using the actual ranges you noted earlier for channel 1
• Repeat this replacing 0 with 1 for channel 2, 2 for channel 3, 3 for channel 4
• Enter 'SAVE'
• Exit CLI and reboot
Check the channel mapping which should all be sorted.
Motor setup & wiring
Now for the FCHUB-6S PDB wiring which I connected to the fc using the ribbon cable to avoid extra wiring & soldering.
If you position the pdb so that the battery connection is facing the rear of quad, the pdb motor positions match the Betaflight positions which are:
- Rear right
- Front right
- Rear left
- Front left
The power is soldered positive, the signal to the signal pad, and the 2 negative both soldered to the negative pad. For the motor wires I soldered these in a way that looked tidy as I can reverse the motor direction through the BLHeli app as I don't any to run these bidirectional at the moment.
In Beaflight:
• Configuration > ESC/Motor Features > select the correct protocol which for me is DSHOT300
• Modes > Flip over after crash - zer to an Aux Channel (turtle mode available when using DSHOT)
VTX setup & wiring
The wiring of the vtx is fairly straightforward as is has 2 sets of connections, the 1st being the power for the device and the 2nd being the video signal. The pdb has 3 power out options
• G / 5V - this is a 5 volt supply
• G / Vcc - this is a voltage supply equal to the pack
• G / 10V - this is a 10 volt supply
Now simply put, match the supply to the requirements of your vtx. As I don't intend to use more than a 4S lipo I selected the Vcc. If I were to use 6S then I'd use the 10V. Just select the one that suits your setup.
If you wish to take use the fc's odd, then the final connections to make are the video/gnd inputs to the vtx which are wired to the VTX & G on the front edge of the fc.
Runcam Split Mini 2 setup & wiring
If you choose to use the 'soldering method', this camera has 5 connections:
- Video
- GND
- VCC (5-20V)
- TX
- RX
The front edge of the flight controller has:
• Cam - connected to Runcam Video
• 5V - connected to Runcam VCC
• G - connected to Runcam GND
The final connections for the Runcam are
• TX - connected to RX4
• RX - connected to TX4
These connections enable remote control over the camera. In Betaflight
• Ports > UART4 set to Runcam Device
This provides the following options that can be assigned to any available Aux signal.
• Modes > Camera wifi (this is used to confirm selection in the cameras OSD menu - once i set everything up I no longer had this configured)
• Modes > Camera power (is used to start/stop recording) and is the only option I still have configured)
• Modes > Camera change mode (switches between camera & the menu options)
Betaflight settings
I'll be completely honest this section is mainly down to preference. The main one to consider is
• Modes > Arm > set to a free Aux channel (once the quad is armed it automatically enters Rate mode
Under the OSD menu I have most options disabled with the exception of voltage, horizon and mah drawn.
And that pretty much covers everything :)
I have only run a few packs though this but it has easily enough power, is stable and without pushing the packs I got 8 mins flight. My next flights will be monitoring the mah & battery voltage to see how long i can actaully get on a flight.
Anyway if you read through this all then well done, and I hope it can help a atleast one person.
Photos

Part List
Show stores (9)
Dragunovgeorge, i plan to do the same thing....add some 2205/2300 extra motors to this frame, and move an old set up into it. What size battery are you using. After a year, any comments or changes to this build?
mike

Guides & Reviews

AirbladeUAV has done it again and this time they've brought long range to the 5" class! Based on the popular Transformer Mini, the new Transformer 5" Ultralight adopts a lot of the same design philosophies with larger props and more payload capacity. It can fly upwards of 20 minutes on a 4 cell Li-Ion battery pack and in ideal conditions it's got a range of over 4 to 5 miles. In this guide I'll walk..
Read more
With the release of the DJI FPV Drone cinematic FPV has become a lot more accessible, but you certainly don't want to crash a $750 drone! The QAV-CINE Freybott is a compact, lightweight cinematic FPV drone that can take a hit and keep going. It's a lot safer to fly indoors and around people. With a naked GoPro or the SMO 4k you can capture some great stabilized footage. In this guide I'll show you..
Read more


Hey my pilot name was Zackthirlls and I was sponsored thru JR radios when drones where first coming out and the xbus protocol is very fast just not used but I'm glade u figured it out or I would have been happy to walk you thru it. I have taken a long break from flying and racing and I am just now looking to get back into it and think I'm just going to go the common Taranis as it's just much easier and setup takes seconds but look forward to flying really soon