
12/30/18-This is my second build. My first one was a 3" built on the iFlight iX3 V2 frame. Due to the weather I've only flown it a few times outside and only by line of sight until I feel more comfortable with the goggles. It's a great rugged frame and it will provide plenty of hours of fun. However, I got the bug to build another drone but this time a 5". I decided to chronicle my build for each component as I go along for those other beginners out there. I prefer to buy all my components from Getfpv.com as they are quick to ship (arrives 2-5 days) and seem to have most items in stock. I gave up on Banggood on my first build when i had to wait 5 weeks for 3 items and the other 8 items went on backorder after I ordered. So here's the component breakdown:
FRAME - Xilo Phreak 5"
You can read the details on this frame at Getfpv.com but for the most part I was looking for a durable and affordable 5" frame. This is a stretched X, carbon fiber airframe. The airframe features removable 4mm carbon fiber arms and 2mm thick top and bottom plates. 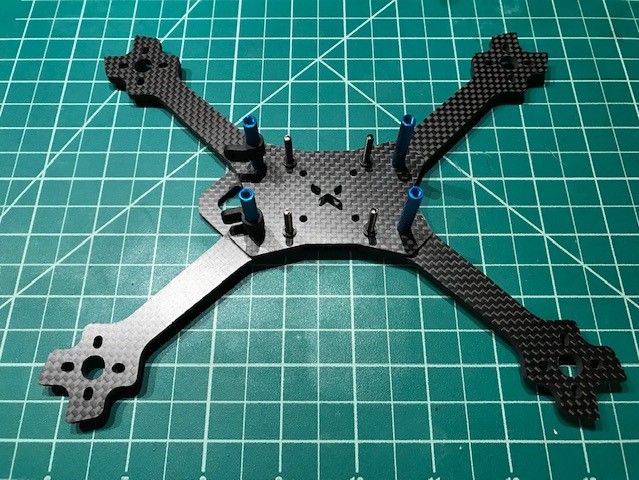 The arms are sandwiched between the bottom plate and 2mm battery plate. Each arm is secured in place with just 2 screws but a notch in the arm allows you to only loosen one screw to remove the arm. This XILO frame kit includes a set of molded rubber camera brackets for mounting of your micro sized FPV camera. This frame can accomodate both a 20mmx20mm or 30.5mmx30.5mm stack. I used the largest screws provided with the frame to attach battery plate, arms and bottom plate to the standoffs. Then I used the long M3 screws provided with the DALRC ESC stack to go through the frame and press nuts as shown. The standoffs are 28mm and should be plenty to fit my stack, vtx and Runcam Split 2s board. If anything, who can argue that this isnt one of the best box logos you have seen on a quad frame.
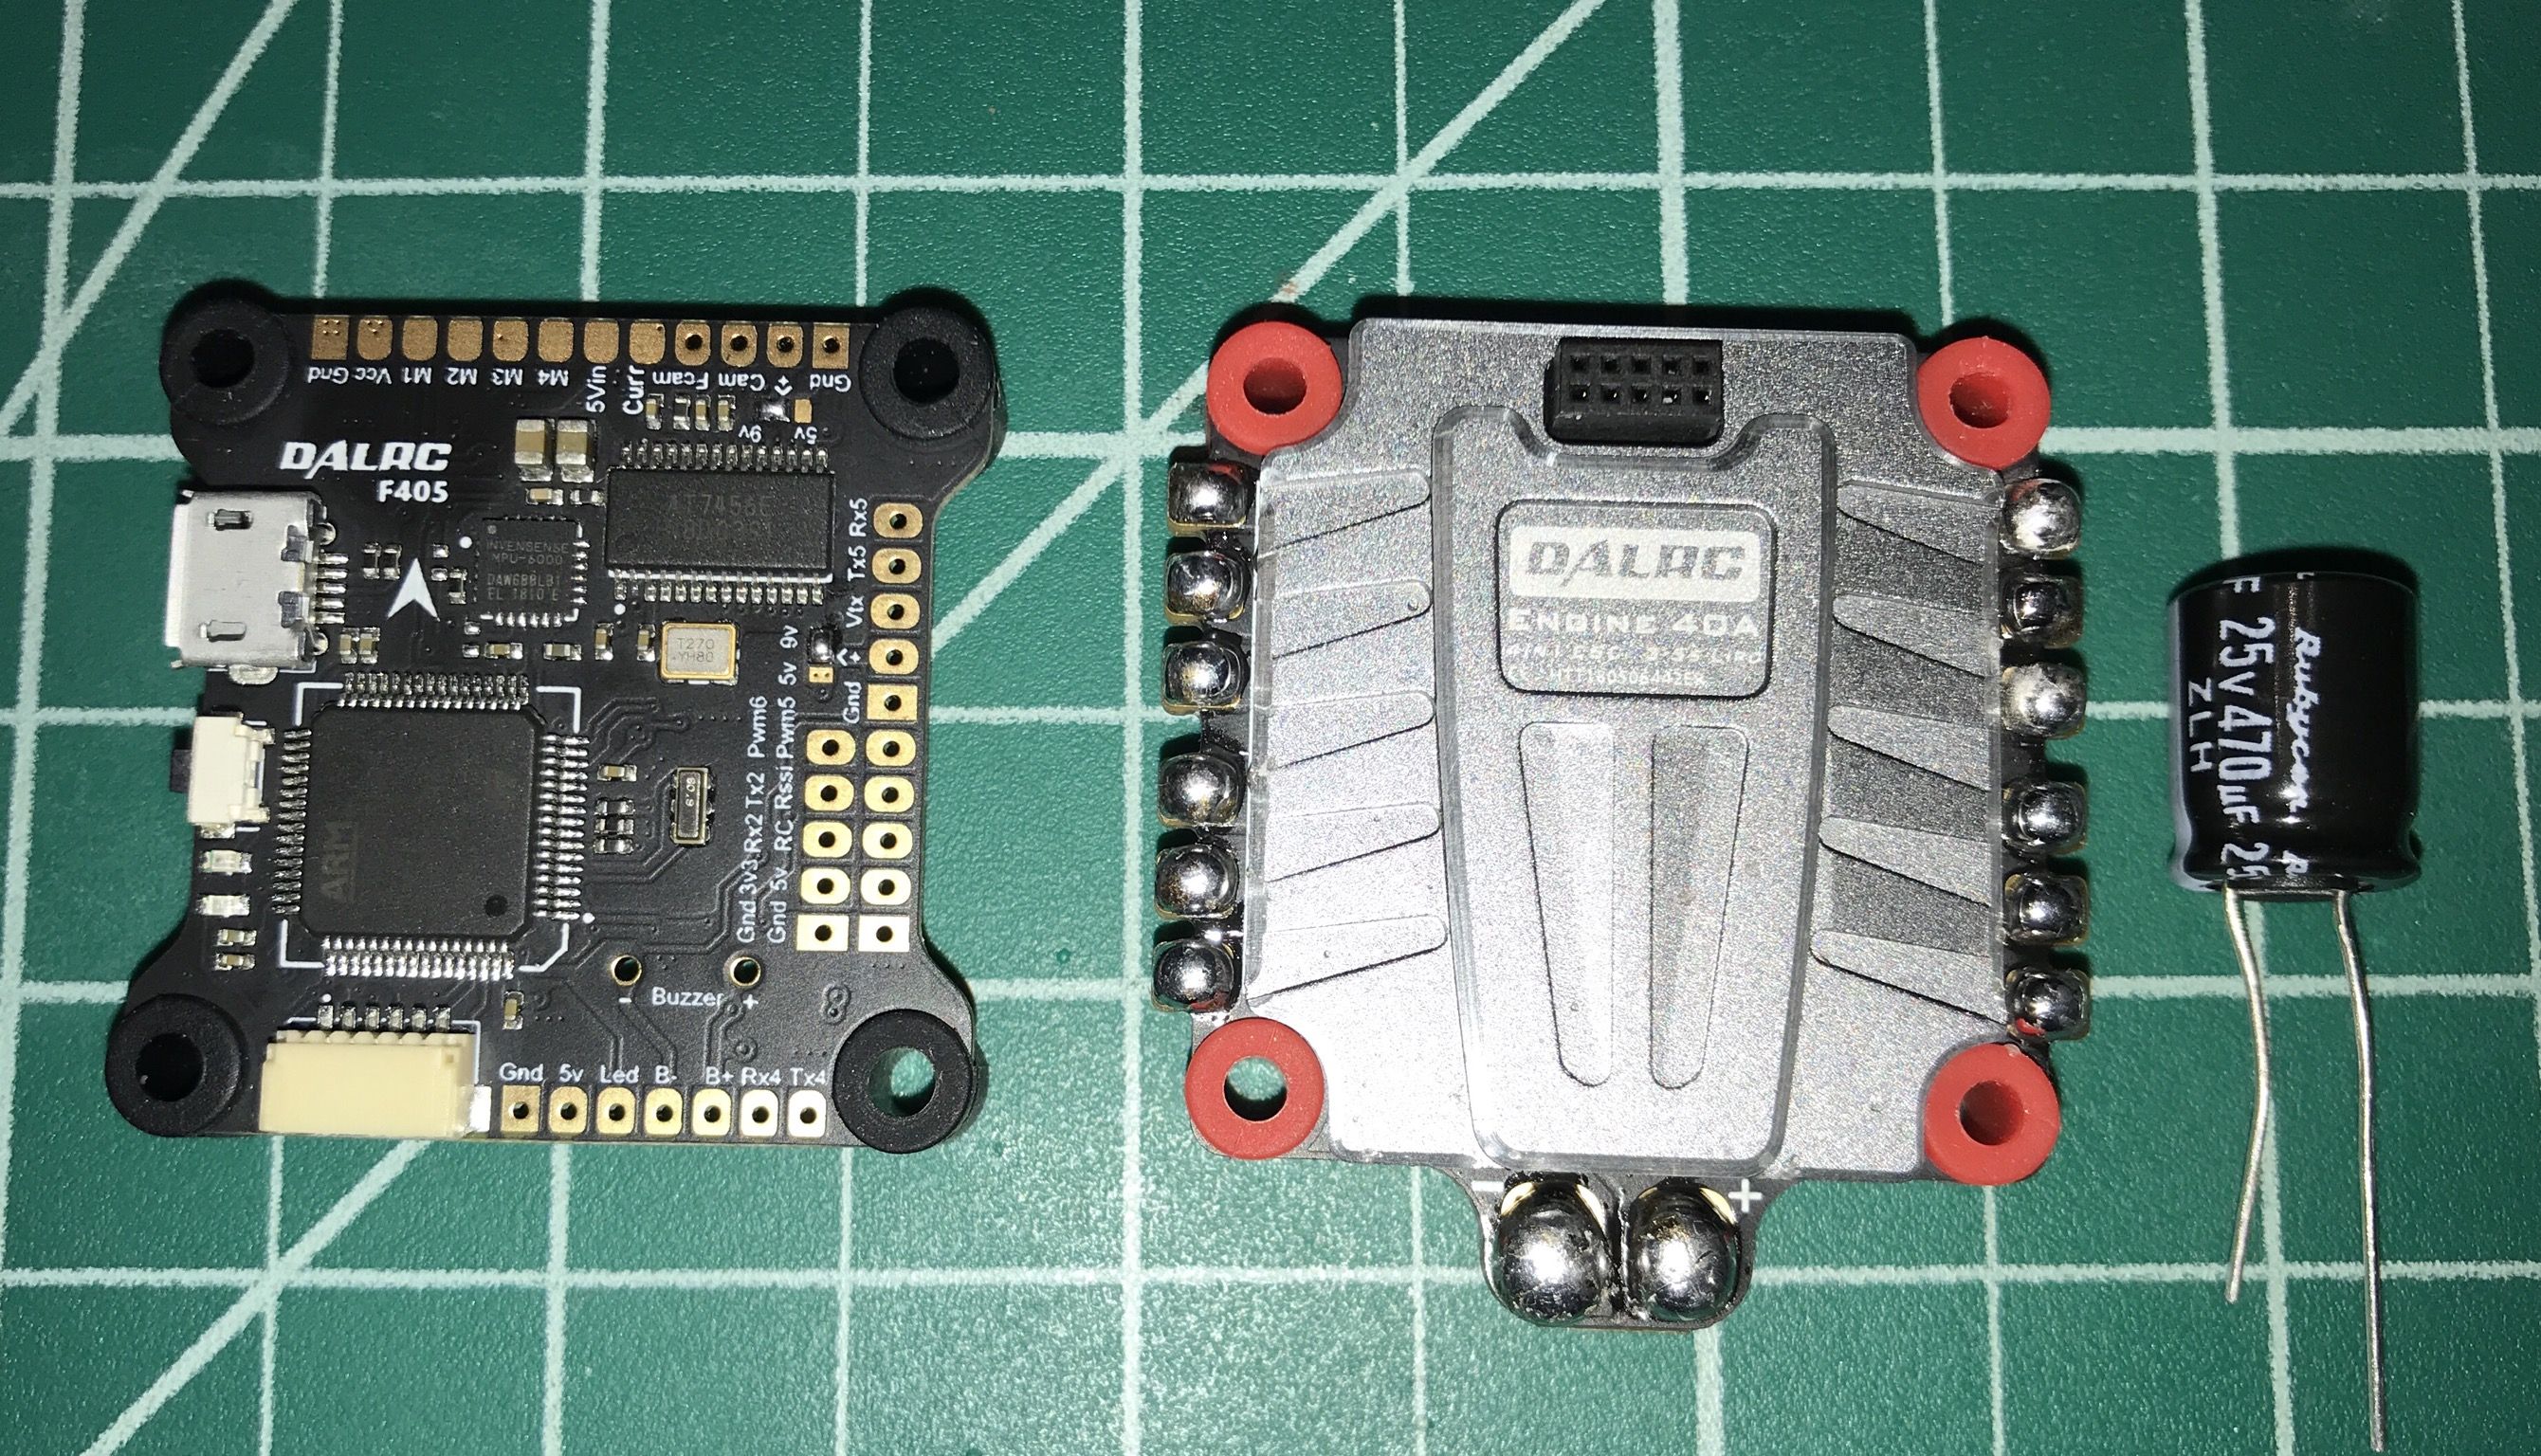
ESC/FC - DALRC 40A 4in1 ESC and F405 Flight Control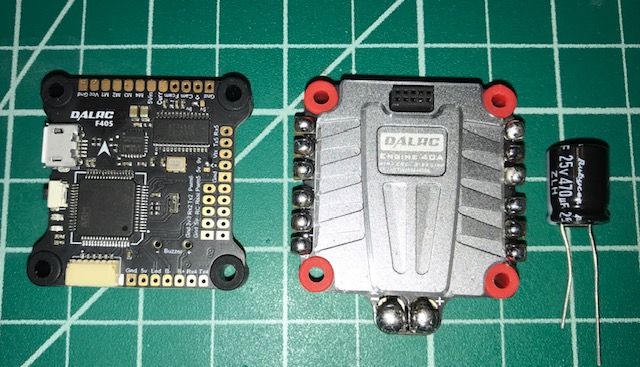
I chose the DALRC ESC/FC stack for several reasons. . First, it was highly rated and tested by Drone Mesh on YouTube, second, the ESC has BLHeli32 and supports DShot1200 and then it comes with the damper balls and a 470uF capacitor and finally the ESC just looks flat out cool with the radiator cover! The FC also comes with the damping balls and connecting pins to attach to the ESC so it eliminates any wiring between the two. The board is very well laid out for soldering all your components.
MOTORS - DYS Samguk Series Wu 2206 2400kv  So there are mixed reviews on this budget motor but I take a lot of credence from Stu @ UAVFutures and his review had me sold on these. For $9.99 a motor you get great performance and at this price you can buy a few extras if anything happens and still spend less than many of the other brands out there. For a beginner in this hobby, I'm not sure why you would spend any more for a motor. The wire leads at 6in (152.4mm) are plenty long to reach the 4in1 ESC for a 5" build and pretty sure they would be long enough for a 6". The motor mount screws are M3 6mm so should be plenty to go thru 4mm arm and secure the motor mount. The motors weigh in at 31.6g and with mounting screws and prop nut you are pushing 33g a motor.
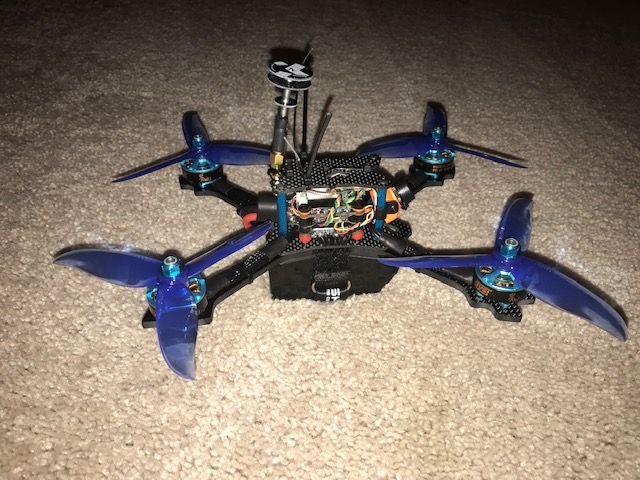
Attaching Battery Leads/Capacitor/Motors
So I real struggle soldering the big 14 gauge battery leads to the pads. I even used a larger solder point and still struggle getting the solder to melt on pads and wires to form a nice smooth solder. Needless to say, they dont look great. i also attached the capacitor and shrink wrapped it to the battery lead and I think it does a good job of hiding it and keeping it out of the way. For the motor wires, I've seen several builds with the wires going under the ESC and bending around to the solder points and I think those always look really sharp so this is my attempt. Overall, I am pleased with how it came together and once again the DALRC radiator cover on the ESC with the wires coming out reminds me of a hot rod with manifold cover and exhaust pipes. I finished off the motor leads by covering in 1/2 PET black braided sleeve with shrink wrap holding the ends.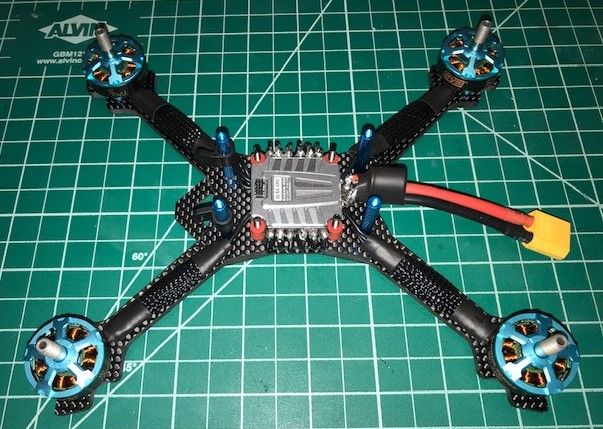
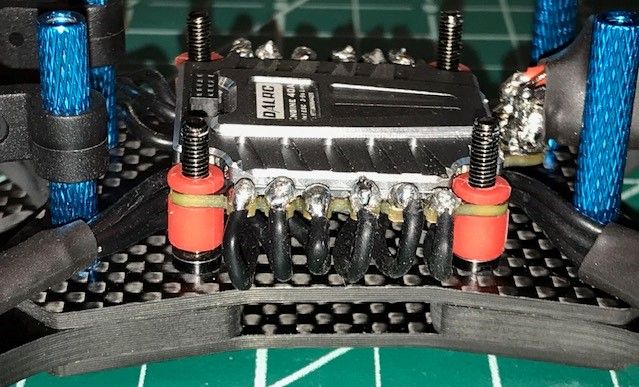 I dont currently have a smoke stopper (have one on order) but I religiously use my continuity checker on my multimeter to ensure I have no shorts or current flow between negative and positive leads as well as a visual check of all wire solders with a magnifying glass to ensure no stray wires or solder close to other connections. All checked out, so I had no problem hooking up USB and battery to get FC and ESCs updated. As stated earlier the DALRC FC mounts to the DALRC ESC via pins so no need to wire anything between the two which is quite convenient and makes for a clean build. At this point the quad weighs 234g.
Flashing FC and ESC Firmware with Betaflight and BLHeli32Suite
I had Betaflight and BLHeli Configurator on my computer from my first build but since these are BLHeli32 ESCs you have to download BLHeli32 Suite to update this ESC. The FC easily connected to Betaflight and after making a backup of the firmware, I downloaded and flashed the updated firmware. From there I went to the motors tab, connected a Lipo battery to the leads (no smoke, imagine that) and spun up each motor. Motors 2 & 3 were reversed and made note of that. Then I disconnected from Betaflight and connected to BLHeli32 where I flashed the updated firmware for the ESCs and then reversed the motors on 2&3 in the software to get them going in the right direction. After saving all changes, I verified that all motors spun correctly. I read that you can add start up musical tones for the motors with BLHeli32 so I downloaded 28 tones and will add one once I have a chance to get back to this build. I'm thinking Star Wars. 1/4/19- added the Star Wars imperial march tones to motors....this is a cool feature. RECEIVER - FrSKY R-XSR
On my 3" build I used the FrSky XM+ receiver which works perfect for that size. The R-XSR is about the same size but offers full telemetry which is something I'm looking forward to trying. I plan to mount under the ESC and use zip ties on the rear arms to attach antennas. 1/5/19- no room under stack so i will mount the receiver on top of the stack with mounting tape as I did with my previous build. The DALRC F405 FC has a solder pad labeled "RC" (UART 1) that the wiring diagram shows for SBUS, so I am assuming it will accept an inverted signal. The wiring diagram also shows the Smart port going to the RSSI solder pad (TX4) on the FC so once again assuming i can use the inverted signal. 1/1/19-After reading some Reddit article that assumption is wrong. I will need to take the uninverted signal from the small pad on R-XSR to the RSSI pad to get telemetry. I first updated the R XSR firmware whichis quite convenient to do with the included pigtail that matches up perfectly with the Taranis QX7 "Smartport" connection next to SD card slot. Today I wired and soldered up the receiver as noted above and wiring diagram below. The uninverted Smartport pad is extremely small but I used my smallest solder point to tin and just had some patience soldering the wire to it. Receiver was bound to transmitter (Taranis QX7) and then went into Betaflight and verified in receiver tab that all channnels worked. Also verified that my Taranis was receiving telemetry from receiver. The best resource for finding out how to do anything or understand a topic better is reading Oscar Liang articles. Project Blue Falcon also has a full YouTube series on setting up telemetry on the Taranis.
CAMERA/VTX - RunCam Split 2S and TBS Unify Pro (Race)
Choosing this VTX was easy as it works great on my other build and has Smart Audio to change VTX settings with the Taranis. This is my first attempt using the Split and I've done enough research on wiring to VTX and FC but the proof will be if it all works once I get all the UARTs setup and configured. I will post the wiring diagram I used between receiver, camera, VTX and FC once it is complete and working.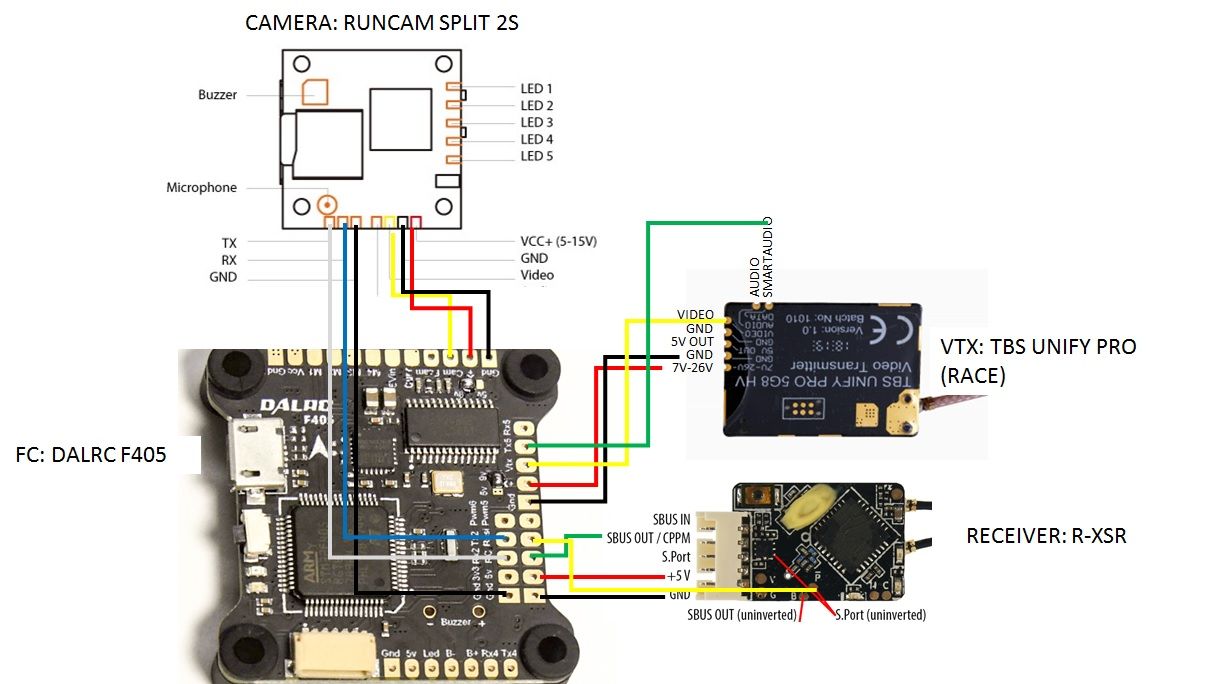
1/2/19 UPDATE- I just received the Split and a quick check for fit and due to the micro USB connectors on its board it will need to standoff further from the FC, so to get the complete stack to fit with VTX under top plate I had to purchase 35mm frame standoffs to replace the 28mm ones. 1/4/19 - I had to order another VTX because I was sent an older version (no separate SmartAudio and Audio pads). Getfpv gave me credit for the one I had instead of returning. This is the wiring diagram on the left that I used to plan for all the connections. 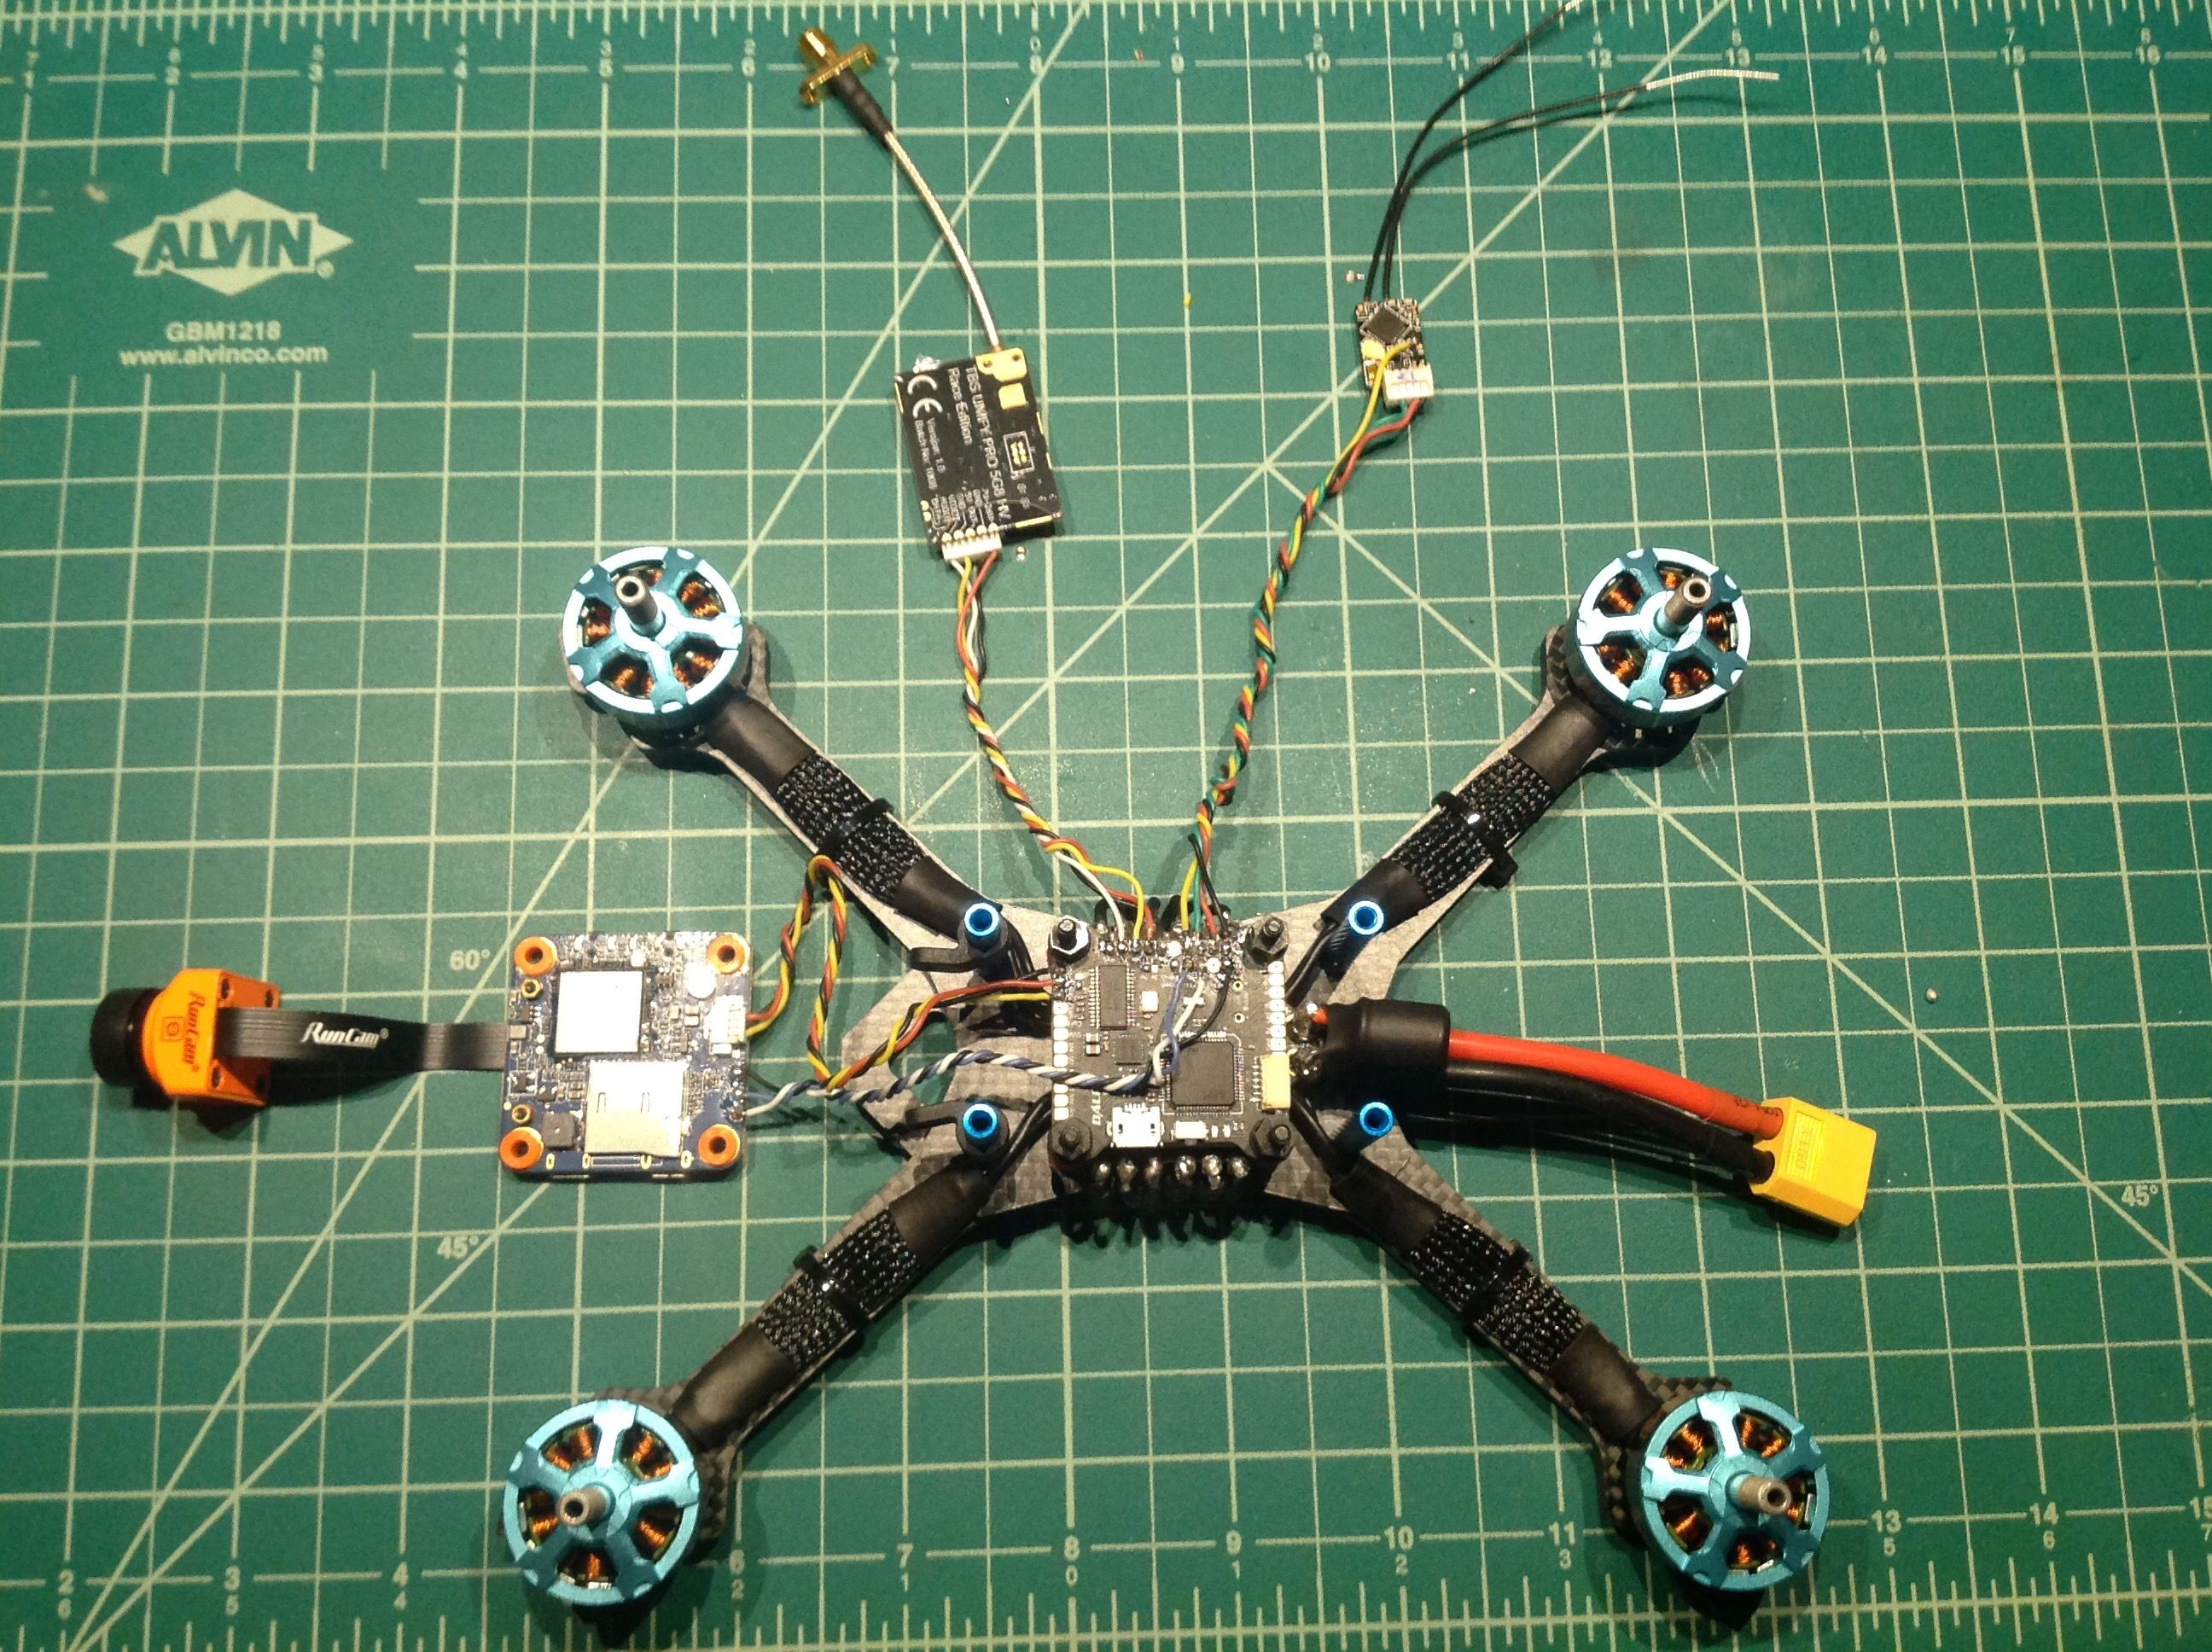 . 1/7/19-This is what it looks like wired and soldered to plan. I plan to power up and set UARTs later this week.
You'll notice that I will be powering both the Runcam Split and VTX off the individual filtered 9V power pads on the DALRC F405 ( this is a nice feature of this board). I've read that the Runcam can pull some higher current draw and didnt want to put that burden on the VTX and I hope the extra filtering will keep my video feed fairly clean.
1/9/19 - Today I setup the UARTS in Betaflight, attached the battery and vtx antenna, turned on my goggles and transmitter and everything worked as planned. The fpv video feed looked great. From there i proceeded to mount the Runcam Split board on the stack, , attached the R-XSR on top of it with foam tape, attached camera to soft mounting brackets, and then spent 30 minutes trying to figure out how to mount the vtx and antenna to the top plate. Because the top plate is small and narrow and doesnt really have a good antenna mounting spot I really felt like this took longer than it should have and probably the biggest issue with this frame. I'm not satisfied yet with the angle of the antenna but here is the assembled unit. 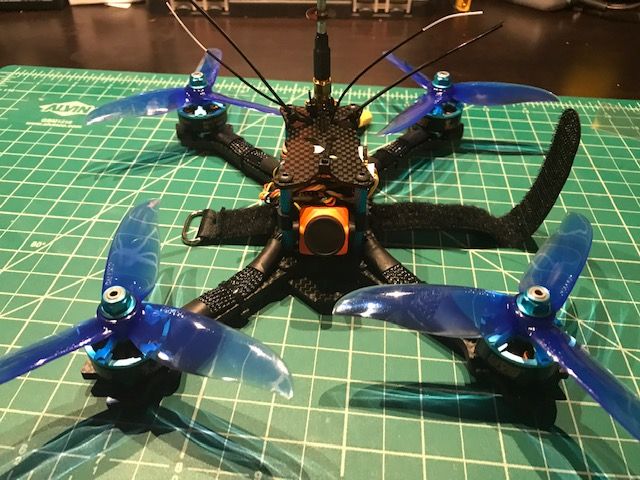
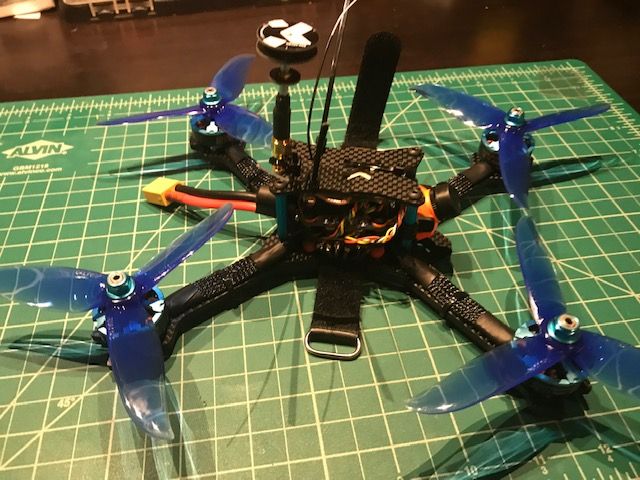

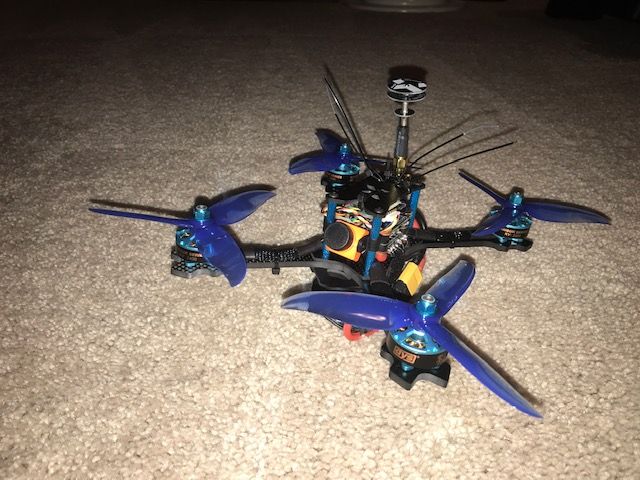
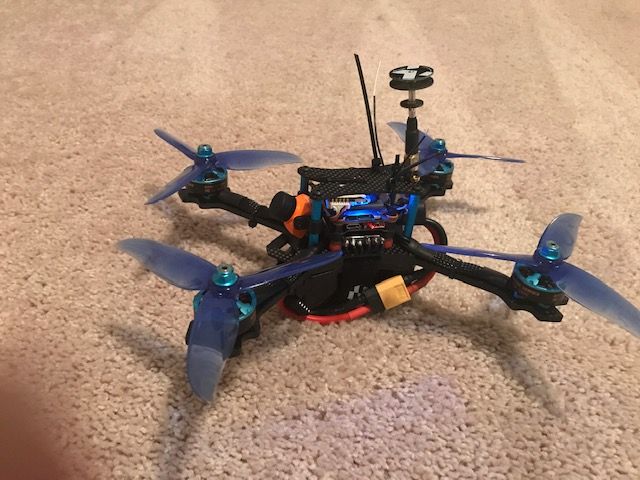
Still need to attach receiver antennas to tie downs but overall she looks great to me Added the props and battery and test hover in house was amazingly smooth and powerful. Cant wait to start capturing HD video. UPDATE: Below in the comments you will see a link to some HD video from its maiden flight. The fpv feed was clean & outstanding and no interference in any of the video and did not notice any latency. Also no jello or any vibration but owe that to soft mounting all boards. There is a lot of untapped power in this drone as I haven't even moved the throttle to halfway yet or pushed it hard and it seems fast and stable. A couple thoughts about this build: I dont like the fact that the props are totally in the HD feed and a H frame would be better or one that moves the camera further in front of the front arms. UPDATE- Moving the camera to the top of the standoffs removed the props from the picture. Using a 4in1 with FC and split board makes this profile too tall for my liking so I would recommend using a frame where I can mount boards side by side, use individual ESCs, or an AIO board
Photos


Part List
Frame |
XILO Phreak FPV Racing Quadcopter
(5 builds)
Getfpv.com
|
$34.99 |
Flight Controller |
DALRC F405 Flight Controller
(6 builds)
Getfpv.com
|
See Site |
ESCs |
DALRC Engine Pro 40A 3-5s BLHeli32 4-in-1 ESC w/ 5v 3A BEC
(13 builds)
Getfpv.com
|
See Site |
Motors |
4 x DYS Samguk Series Wu 2206 2400kv Motor
(29 builds)
Getfpv.com
|
See Site |
Propellers |
DAL 5x4.5 - 3 Blade, Crystal Blue Cyclone Propeller - T5045C (Set of 4)
(3 builds)
Getfpv.com
|
$2.99 |
FPV Camera |
RunCam Split 2S FPV / HD Camera
(9 builds)
Getfpv.com
|
$79.99 |
FPV Transmitter |
TBS Unify Pro HV 5G8 - Race (SMA)
(555 builds)
Getfpv.com
|
$29.99 |
Antenna |
XILO Pagoda 2 5.8GHz Antenna (RHCP)
(3 builds)
Getfpv.com
|
$4.99 |
Receiver |
FrSky R-XSR 2.4GHz 16CH ACCESS/ACCST Micro Receiver w/ S-Bus & CPPM
(937 builds)
Getfpv.com
|
See Site |
Guides & Reviews

AirbladeUAV has done it again and this time they've brought long range to the 5" class! Based on the popular Transformer Mini, the new Transformer 5" Ultralight adopts a lot of the same design philosophies with larger props and more payload capacity. It can fly upwards of 20 minutes on a 4 cell Li-Ion battery pack and in ideal conditions it's got a range of over 4 to 5 miles. In this guide I'll walk..
Read more
With the release of the DJI FPV Drone cinematic FPV has become a lot more accessible, but you certainly don't want to crash a $750 drone! The QAV-CINE Freybott is a compact, lightweight cinematic FPV drone that can take a hit and keep going. It's a lot safer to fly indoors and around people. With a naked GoPro or the SMO 4k you can capture some great stabilized footage. In this guide I'll show you..
Read more


Slick man, lets see some of that crispy Split footy!
im a rookie at flying still but guarantee after this wet and cold weather departs i'll be giving it my best and post my rookie video
can't wait!
Nothing great as this is my rookie FPV flight but looking forward to getting more practice so I can get a little more daring in freestyle
https://drive.google.com/file/d/1UUkM378wtYncUUT_XimC8dCBLKq_siYR/view?usp=sharing
no shit. This weather sucks!