First Build - TBS Source One - Mamba F722 - Spektrum - DJI / Caddx - EMAX - CNHL
 By lanzo84 on May 15, 2020
TBS Source One - Mamba F722 - Spektrum - DJI / Caddx - EMAX - CNHL
So I have been flying RC Gliders, Planes and CP Helis for years. Never much interest in quads as I was under the impression that these things "flew themselves" and were more "Kids Toys" and that to me, after learning to fly a Heli was just cheating and did not seem that much fun.
After being inspired by @blackmarketfvp on TikTok (Also on Instagram) with the below video, I decided that I had to build one of these bad boys as all my misconceptions were destroyed by that video: https://vm.tiktok.com/TRPqn1/
So a few things first - I already have Spektrum radio gear, so I wanted to reuse the gear I had as all my other aircraft are Spektrum and I did not want multiple controllers. Maybe at some point, I will get a Jumper T16 as my old DX6i was not really up to the task and needed many workarounds to make it work...More on that later.
As a total quad noob, with no friends in the hobby, I was going it alone and it felt to me that my choice of components were often not the most "beginner" friendly. But I got it working and I got in the air!
This build is also being broken into 2 stages as the DJI FPV system was not in stock for a month, but I was keen to get in the air. As I am used to flying line of site, I thought this might be better anyway.
To keep this short(er) I will focus more on the challenges I faced and how I overcame them:
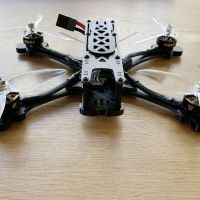
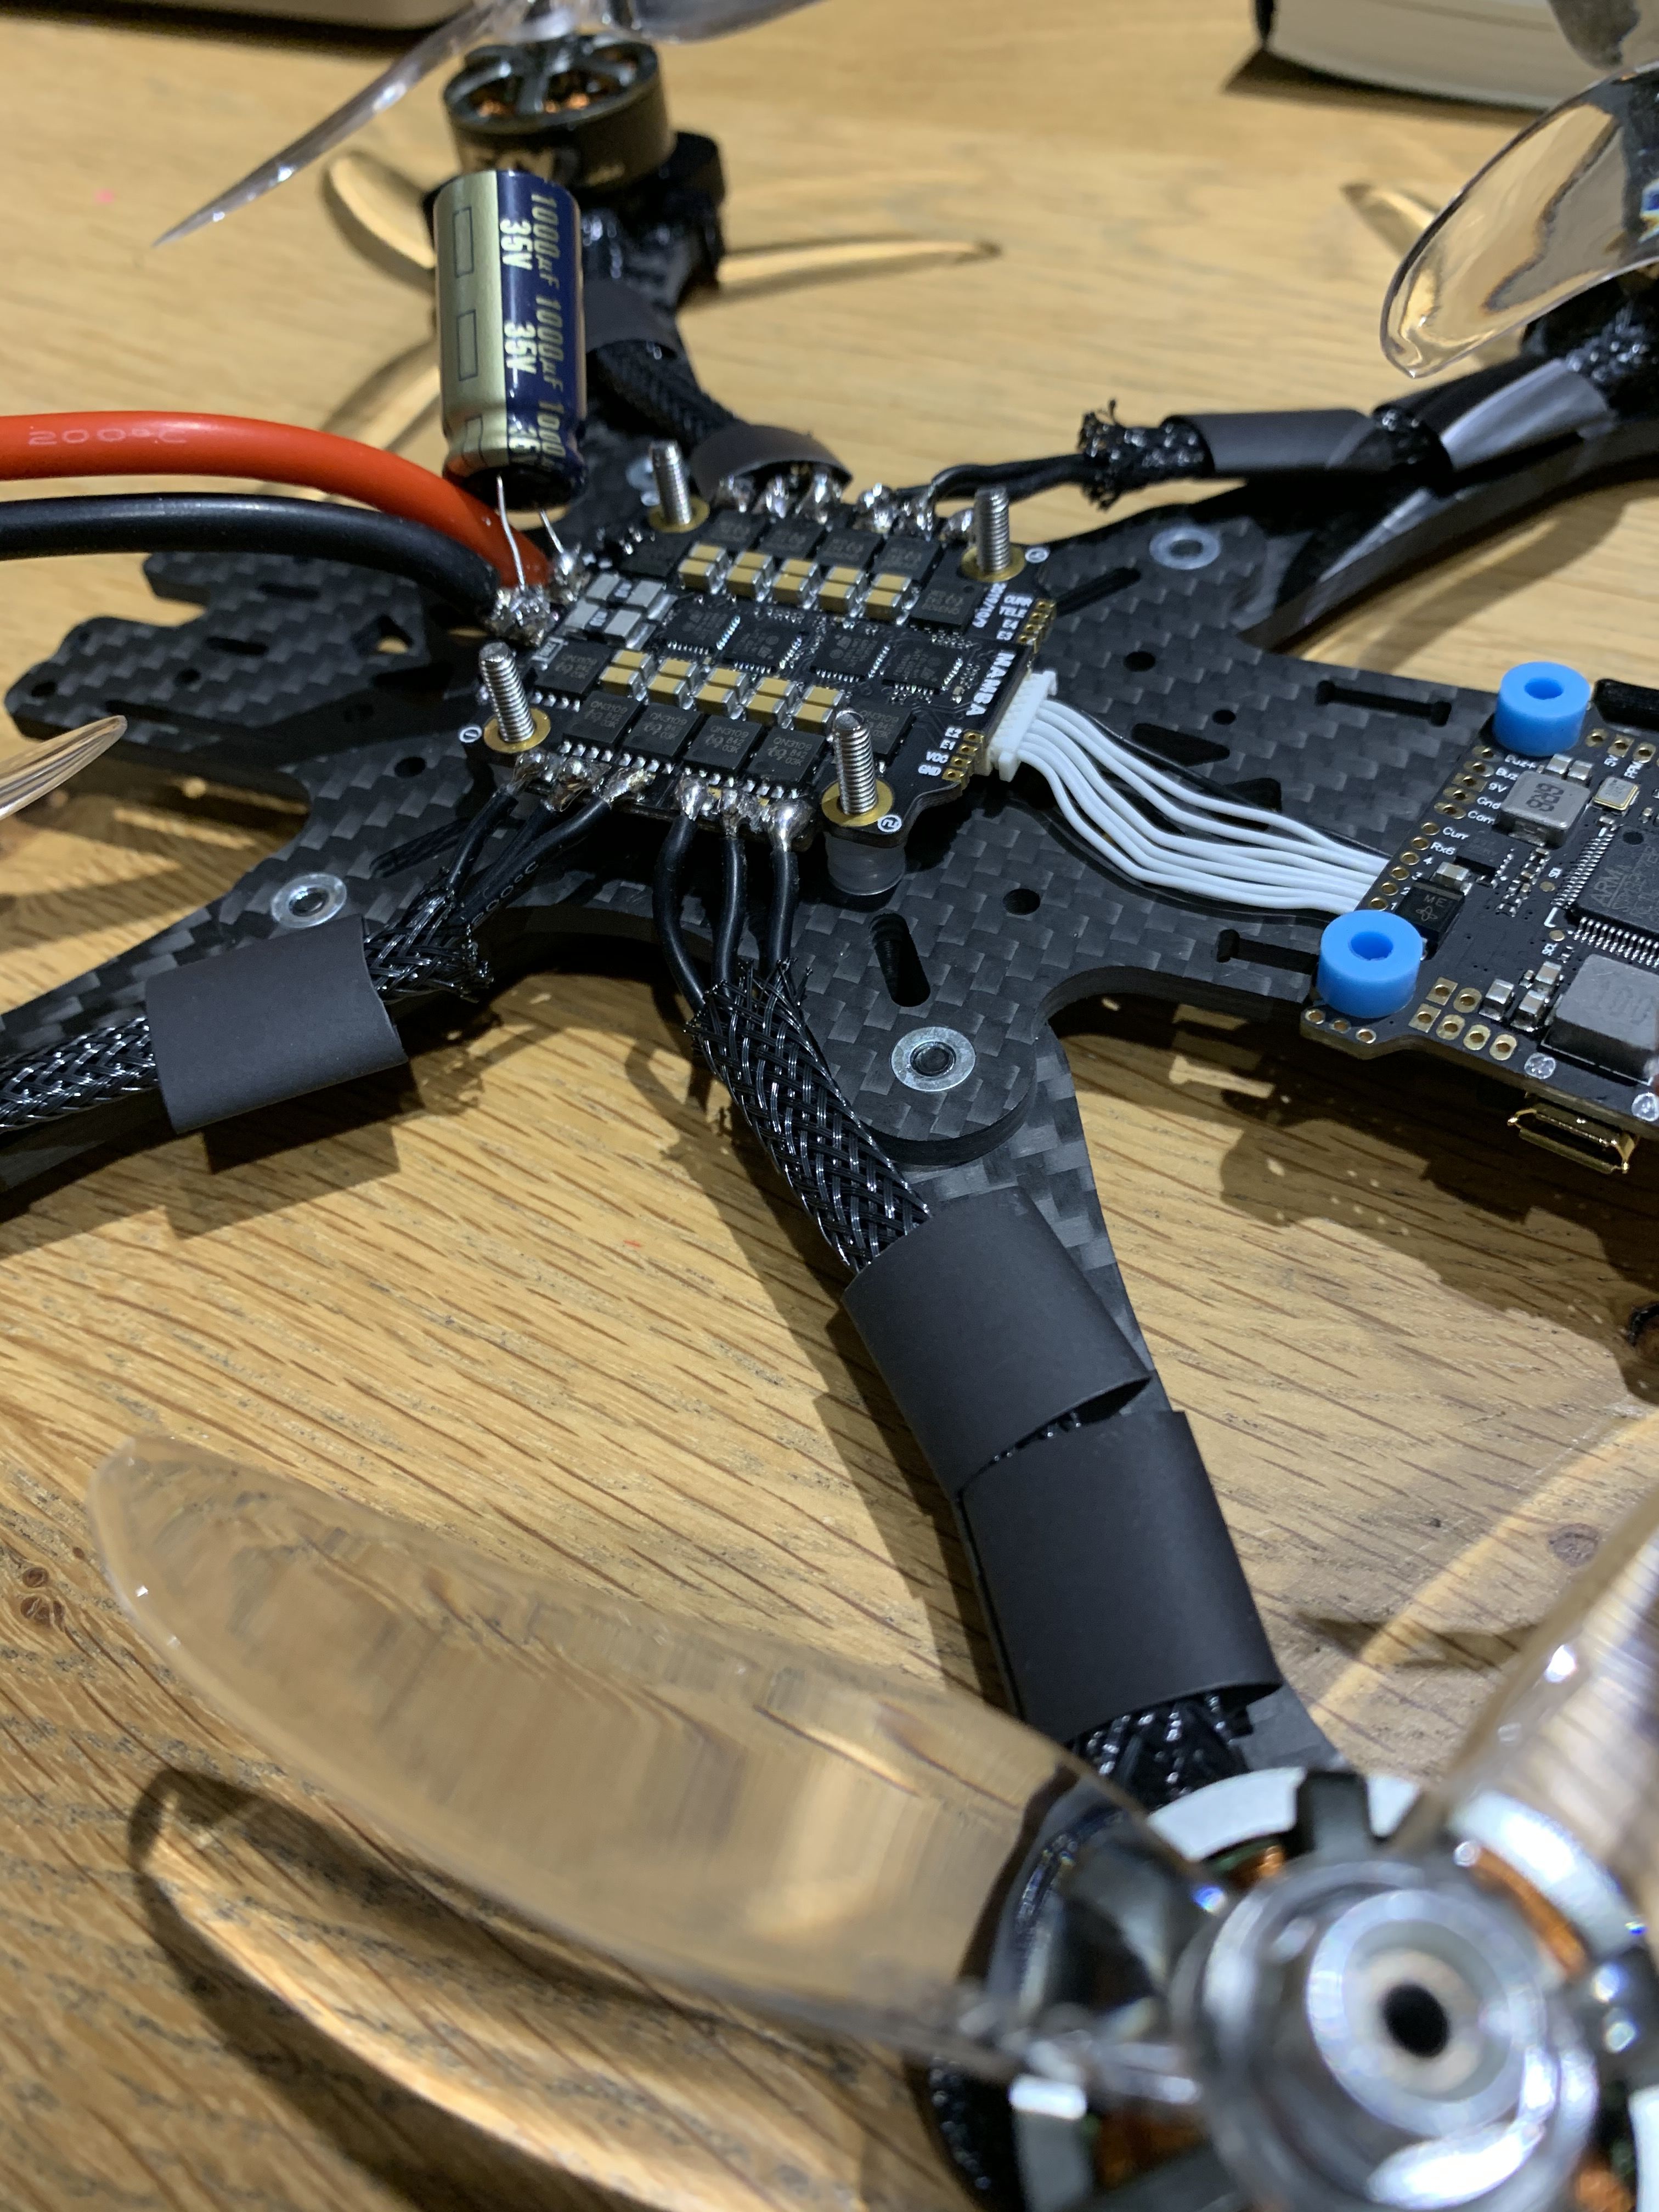
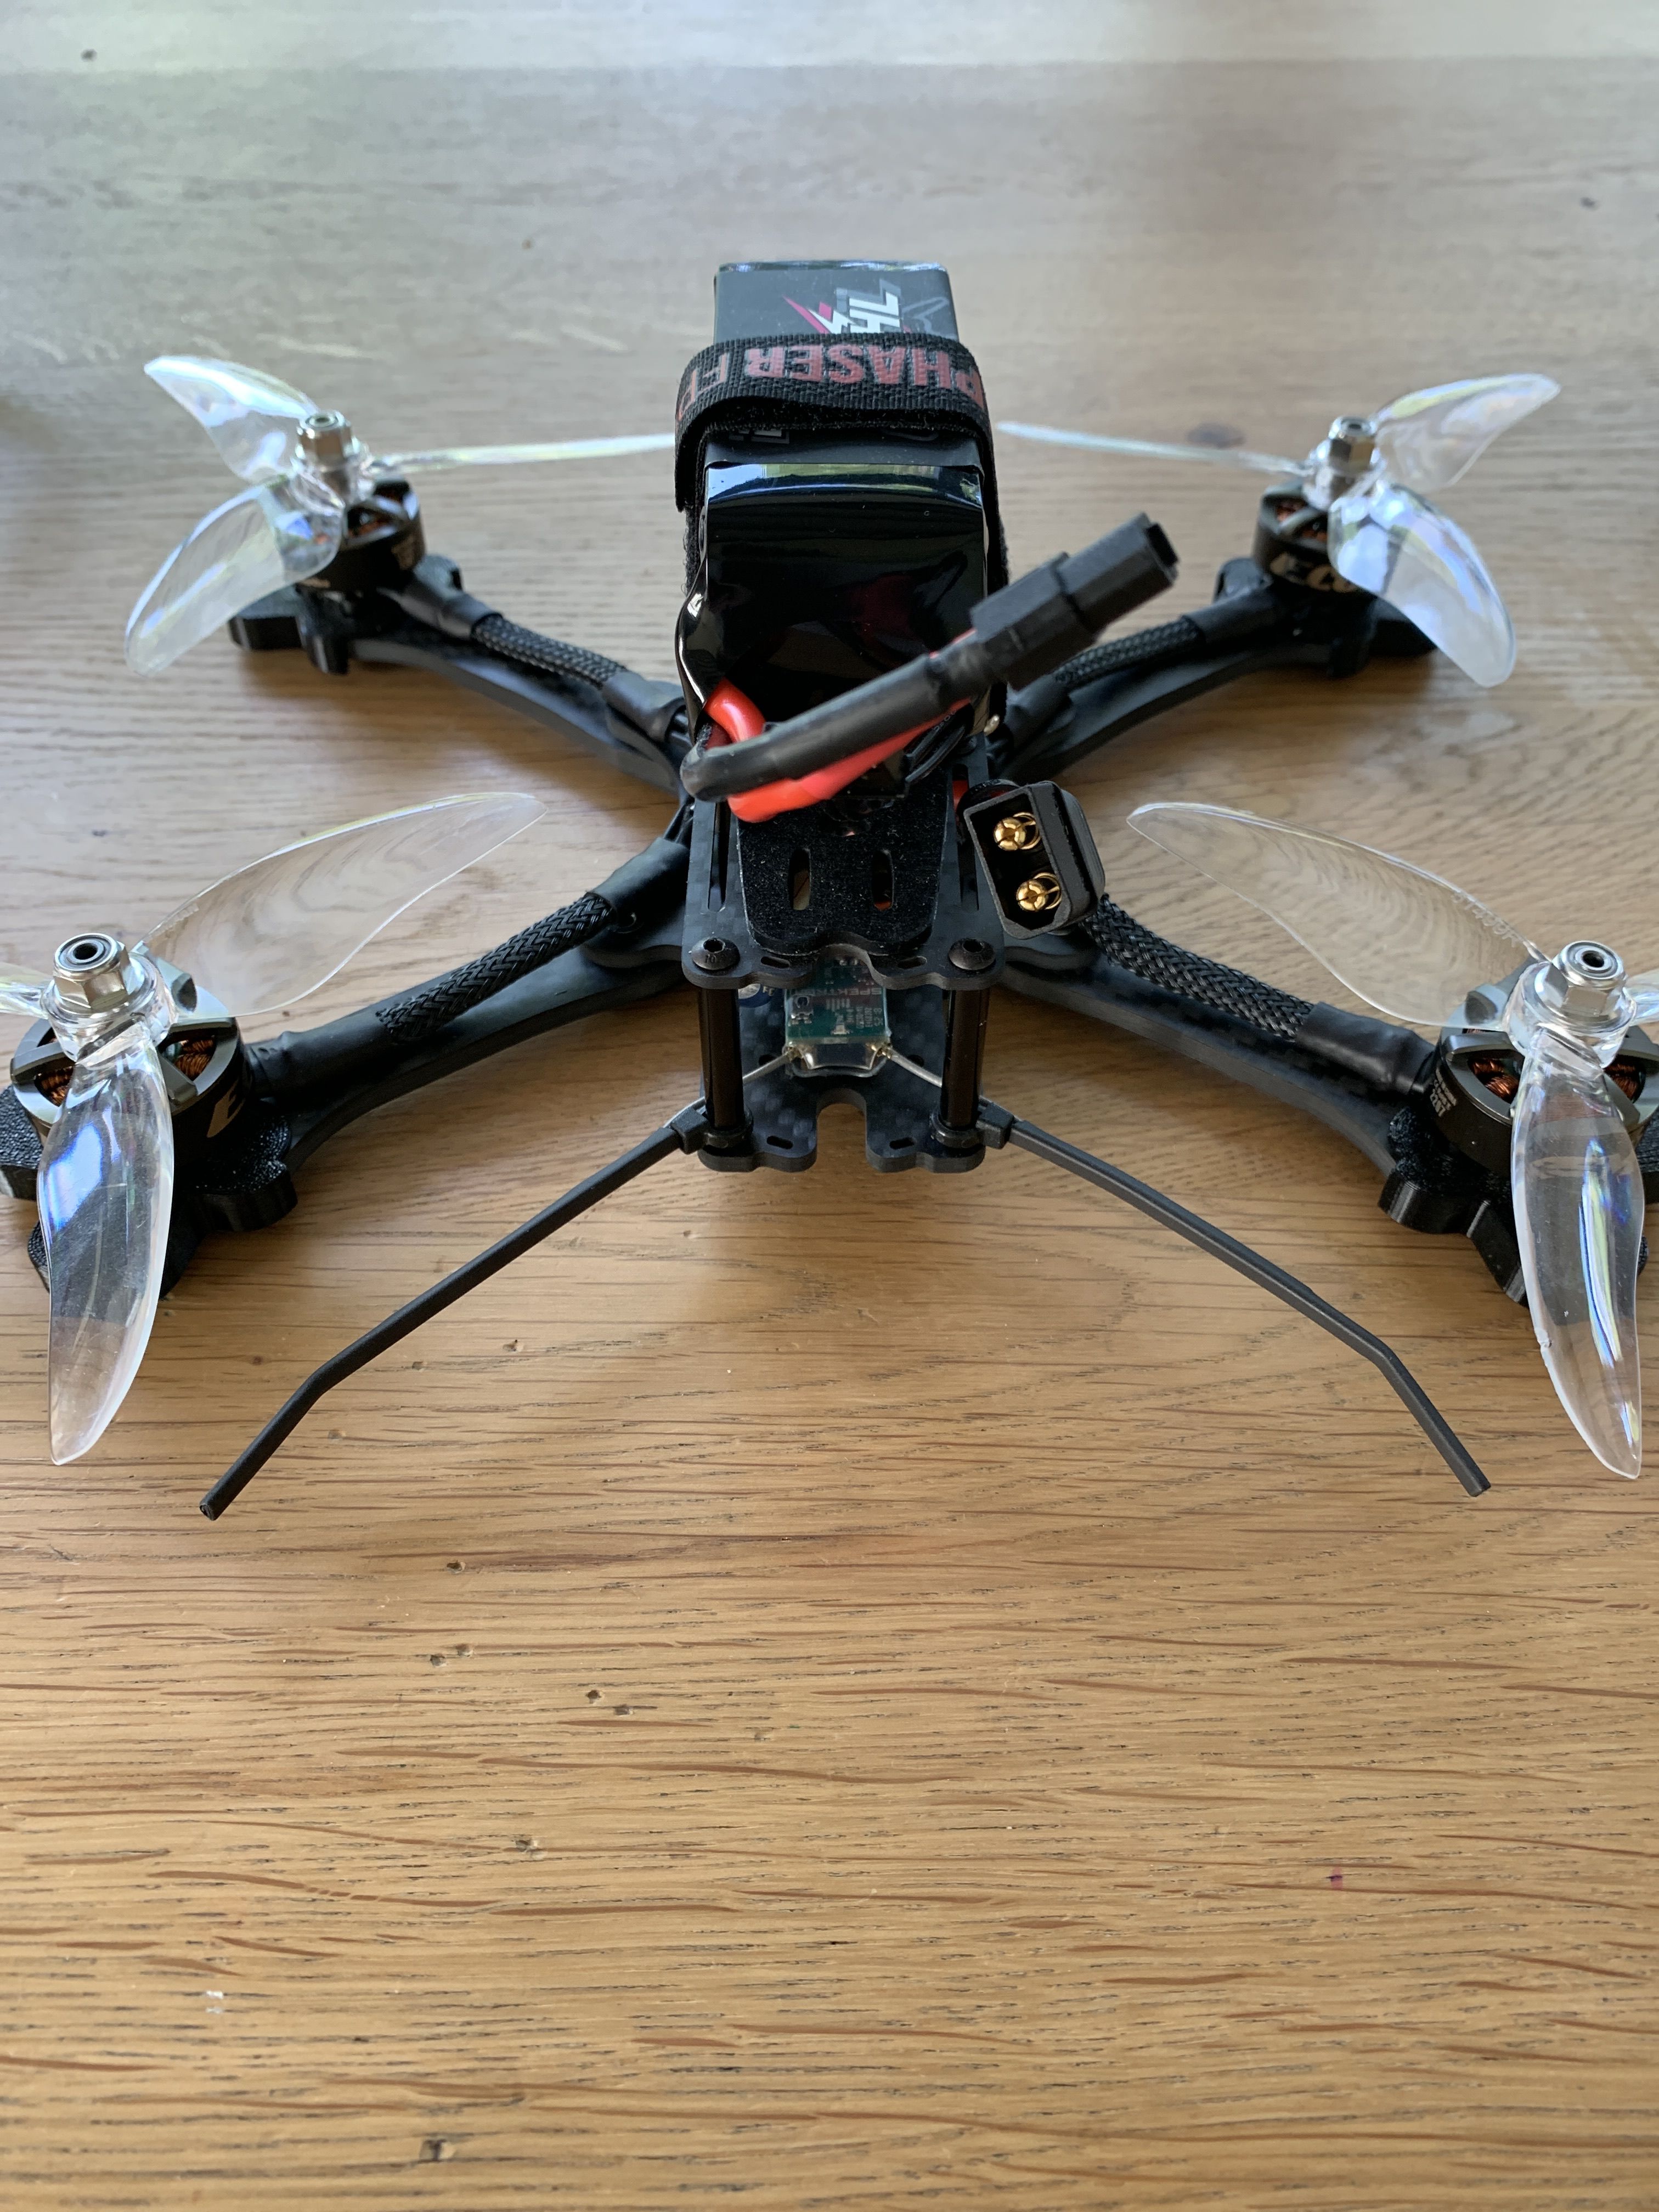
The Frame and ESC and FC
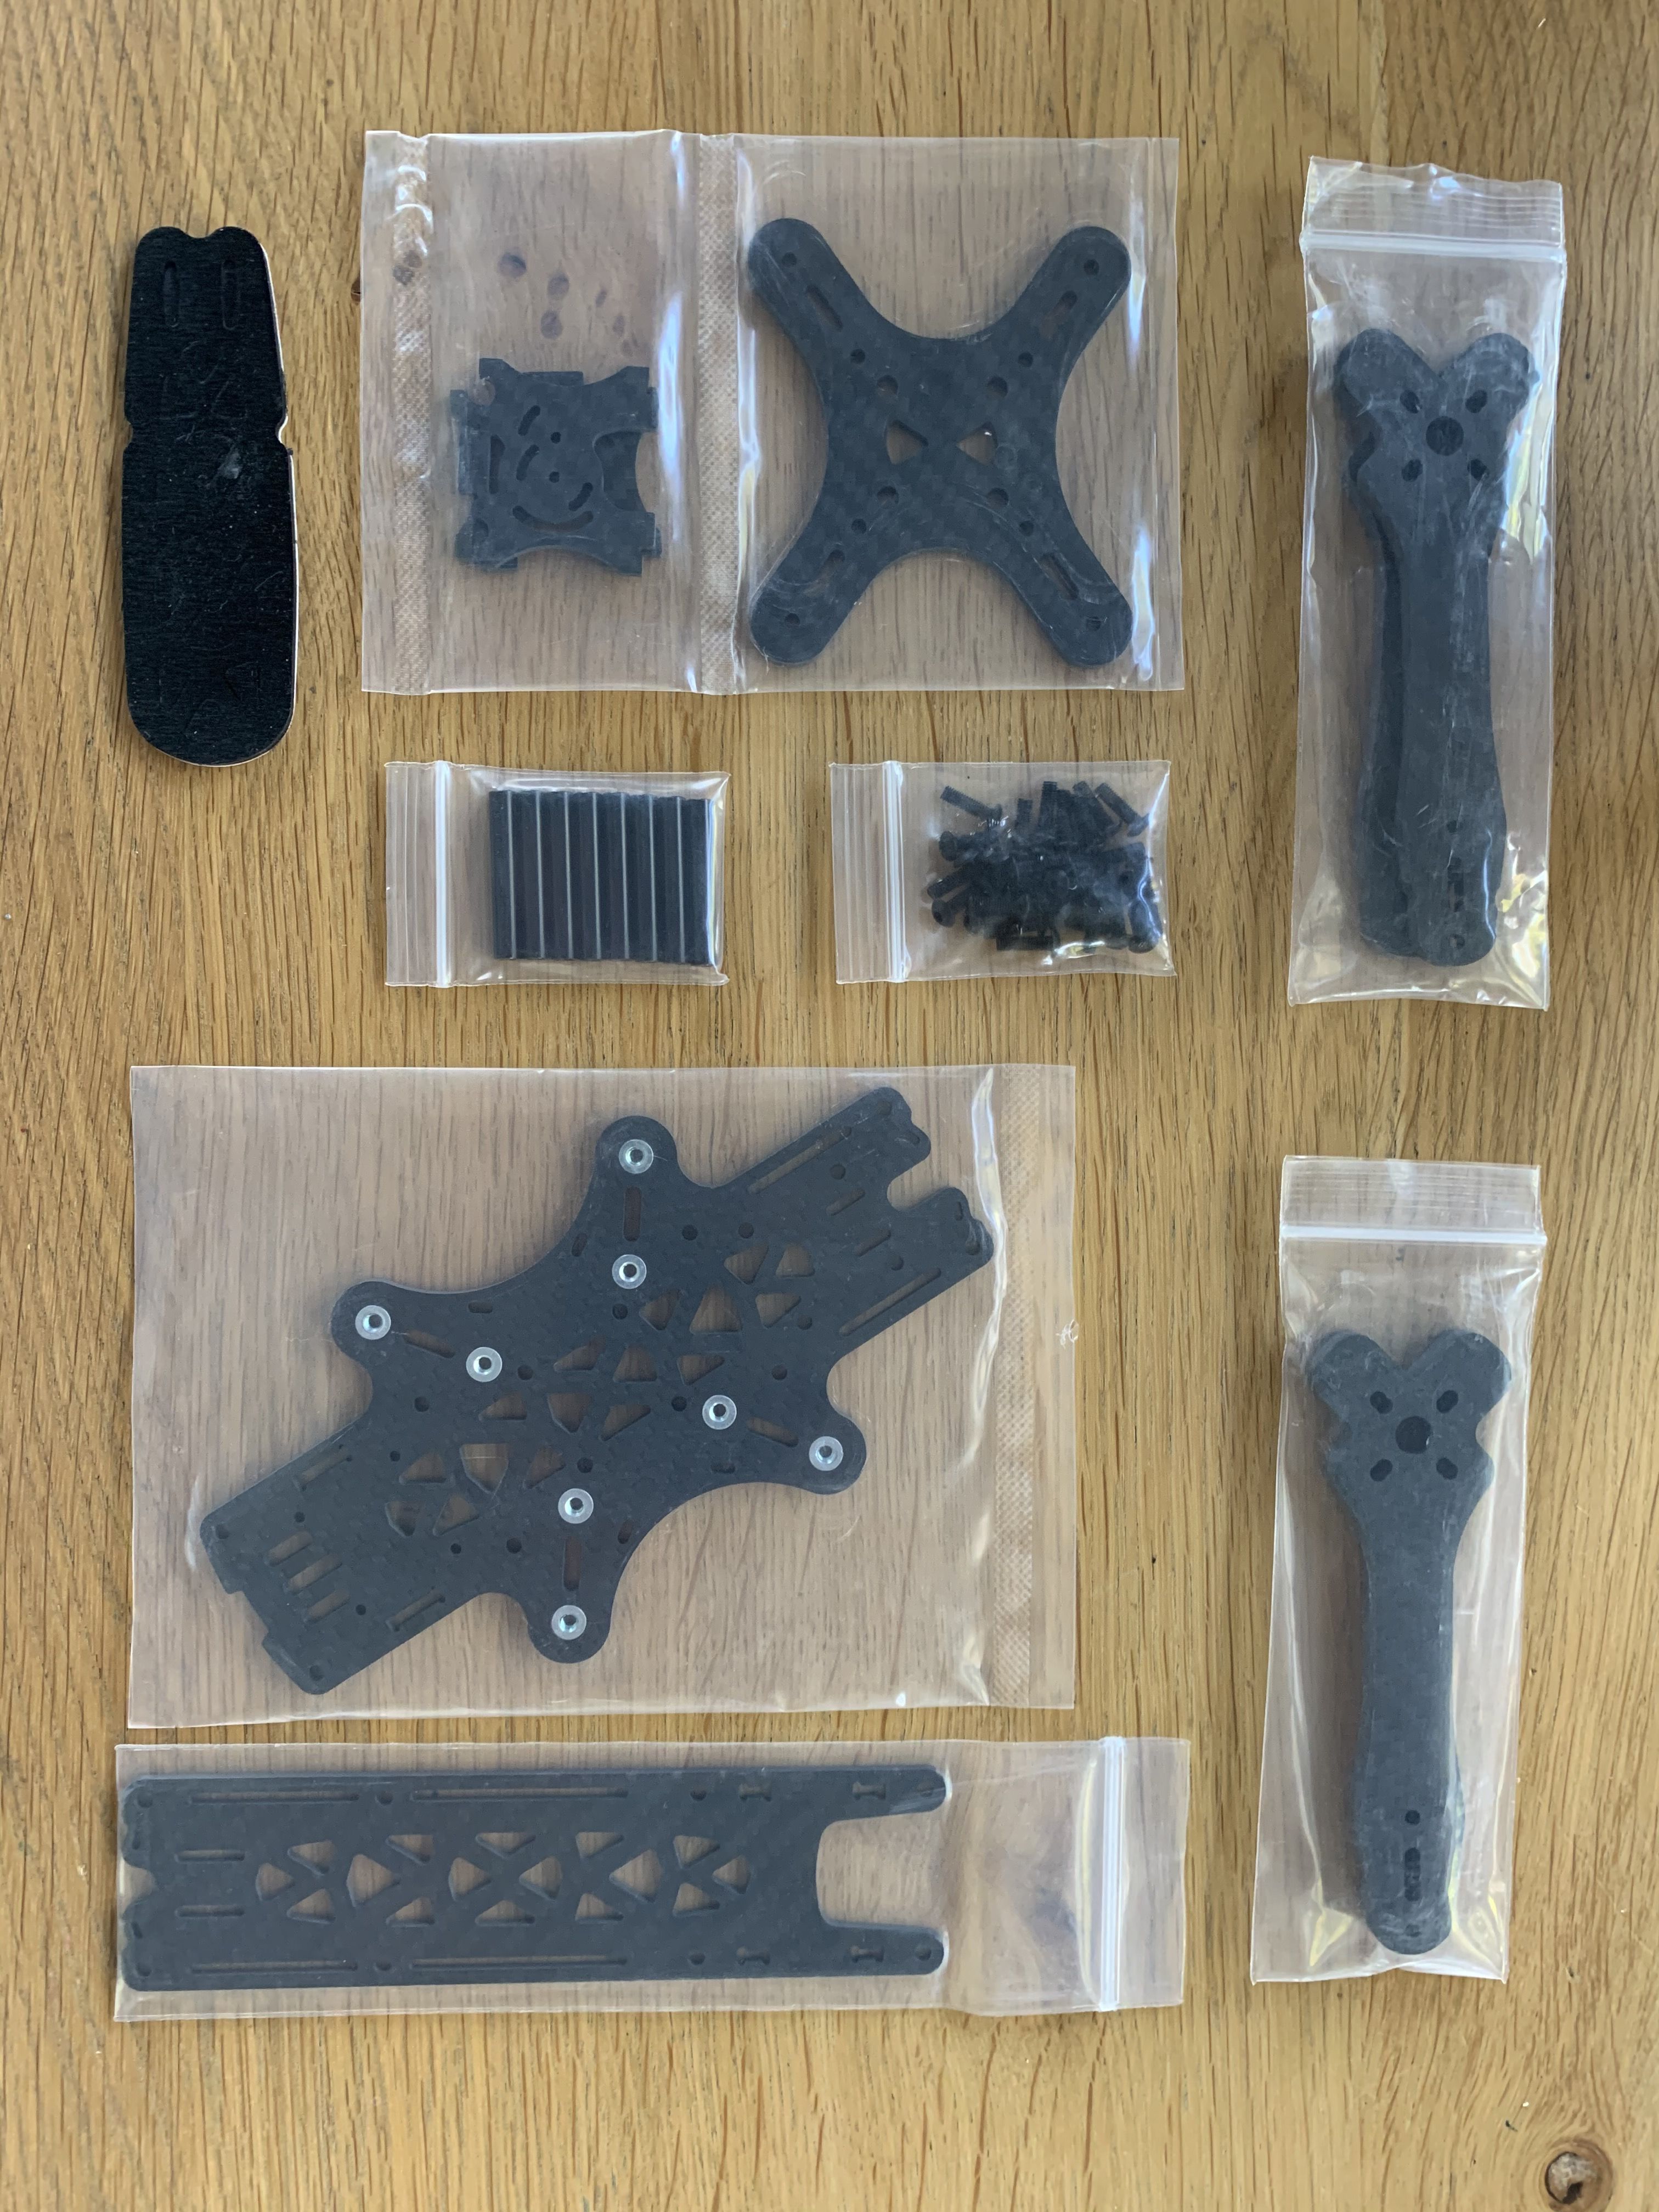
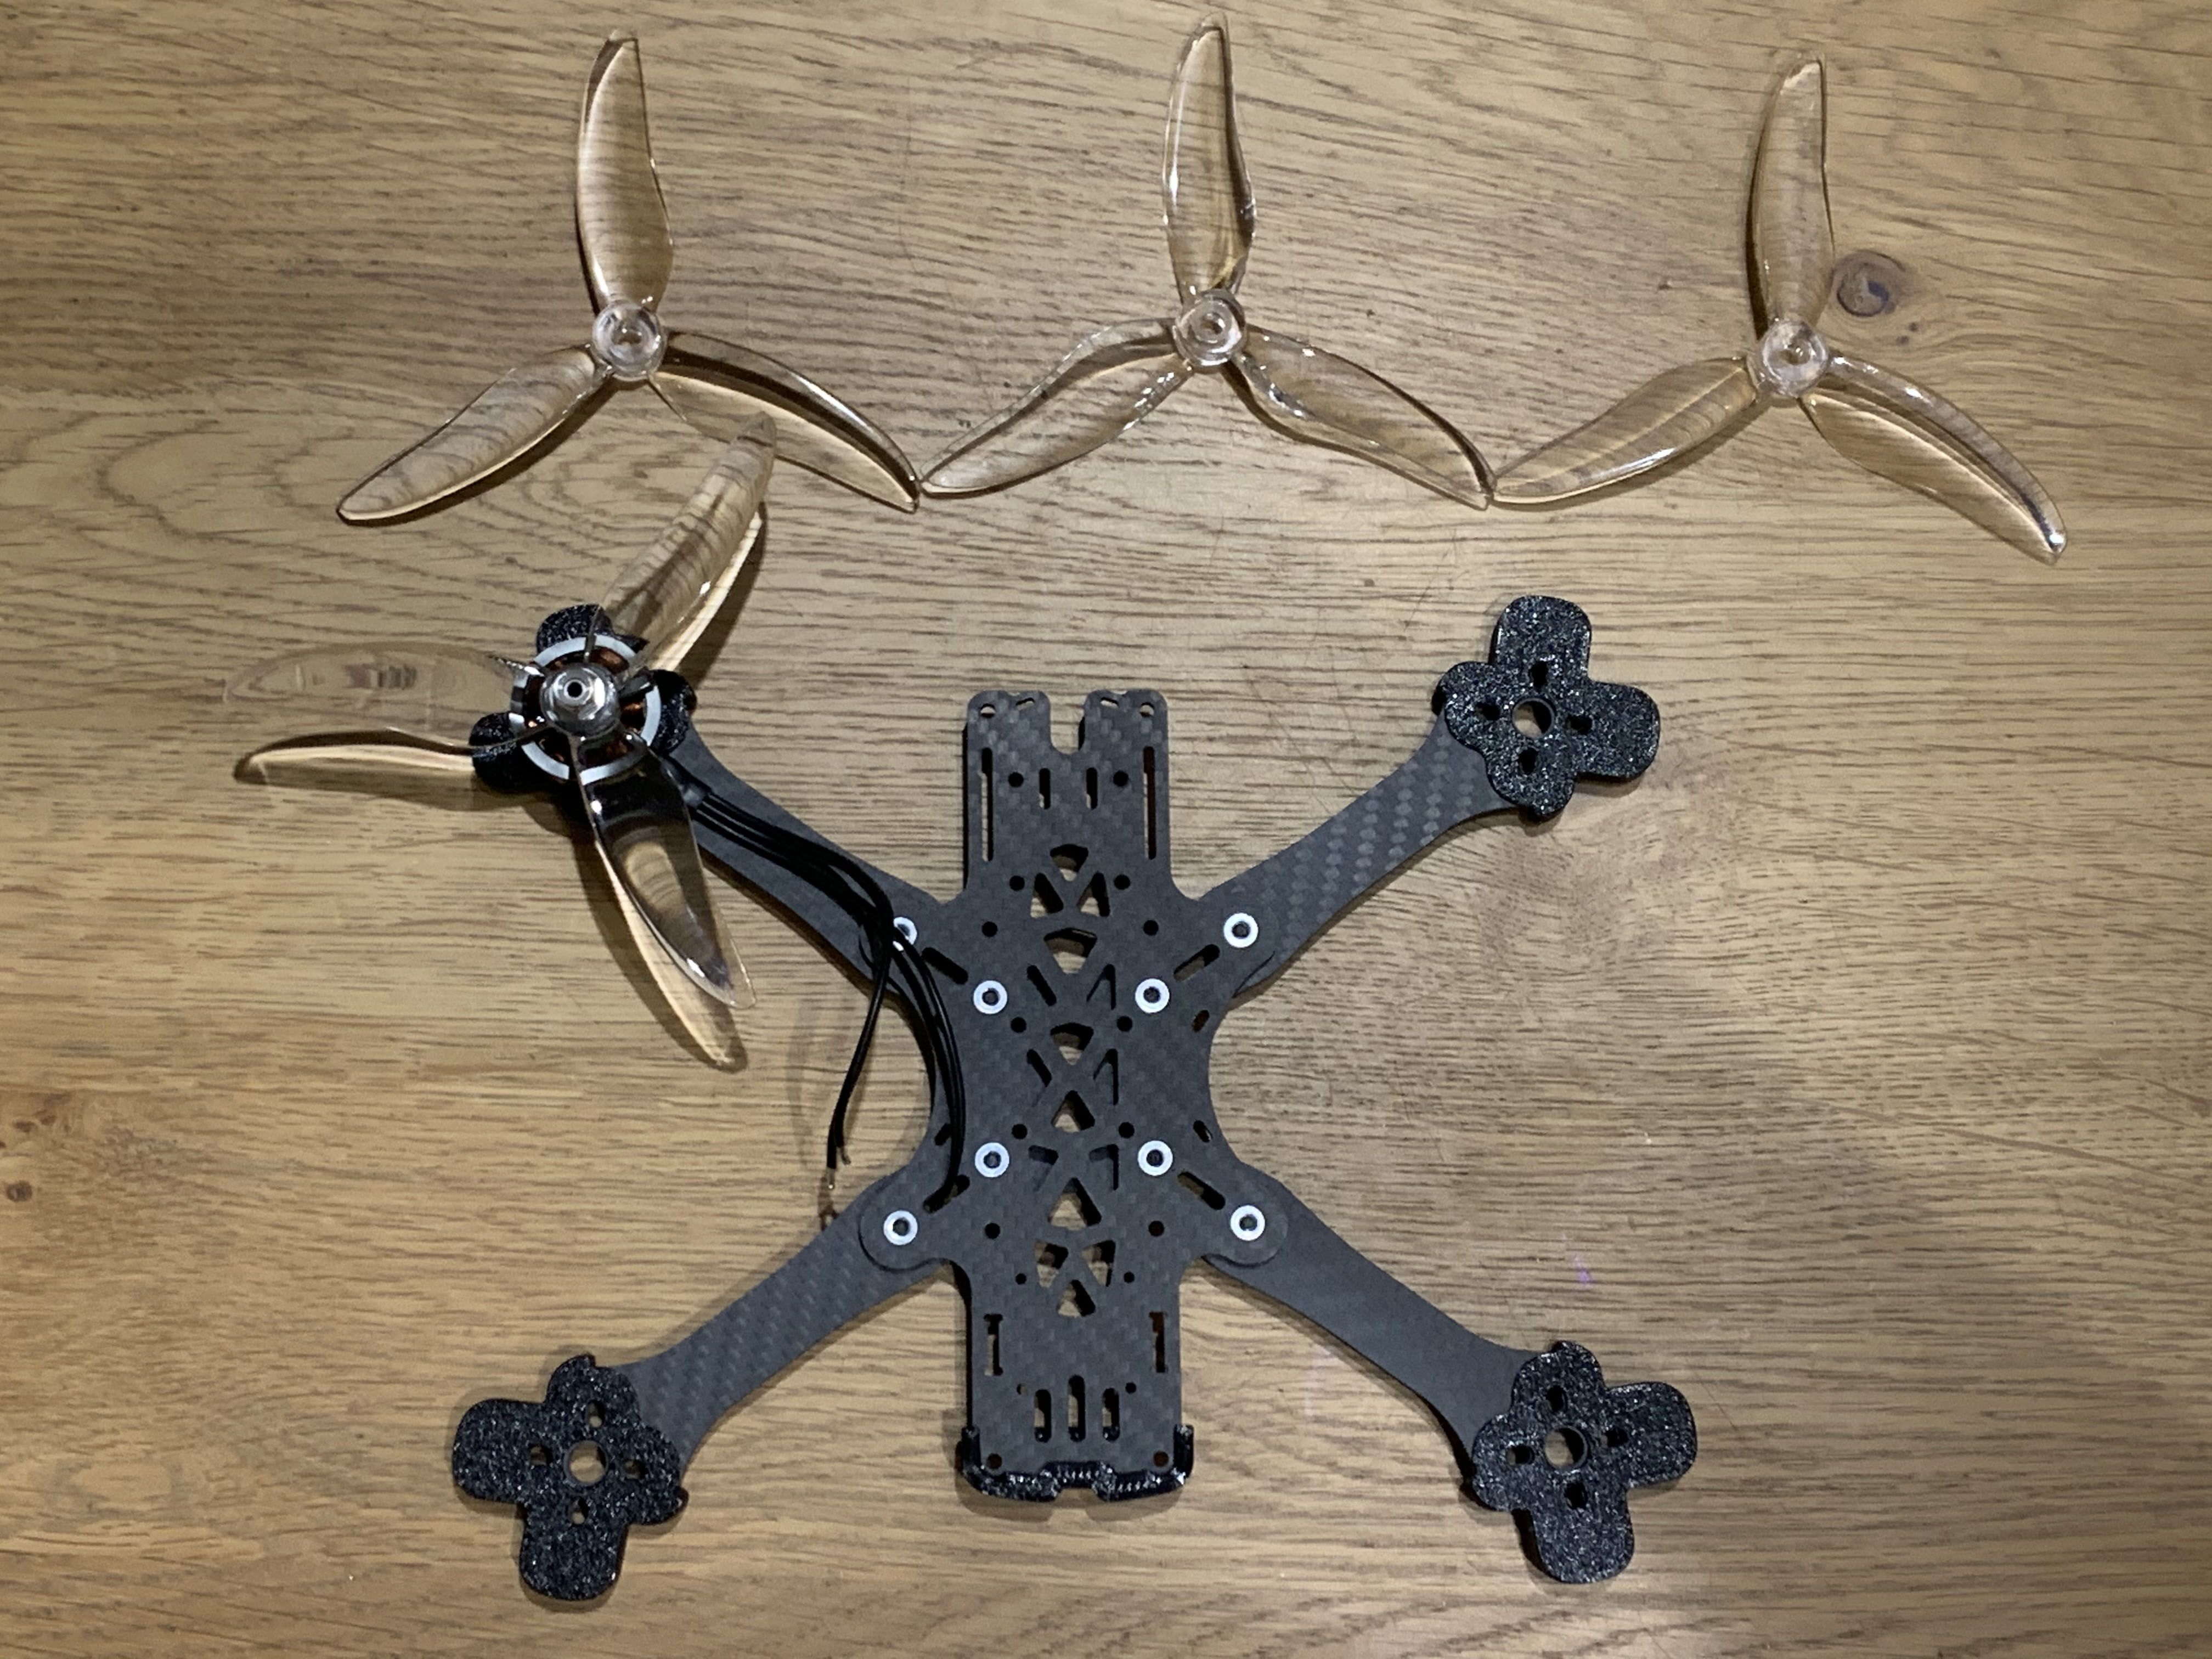
- The TBS Source One is SOLID - I used the soft mount edge protectors on the arms and nose. Maybe invest in 5mm M3 (supplied was 3mm and 4mm) bolts for the motor mount using these protectors. Installing the EMAX ECO 2207 was a breeze.
-
Use some "snake skin" cable sleeve to get a nice clean look like this: we careful when heating the heat shrink, the snake skin melts EASILY.
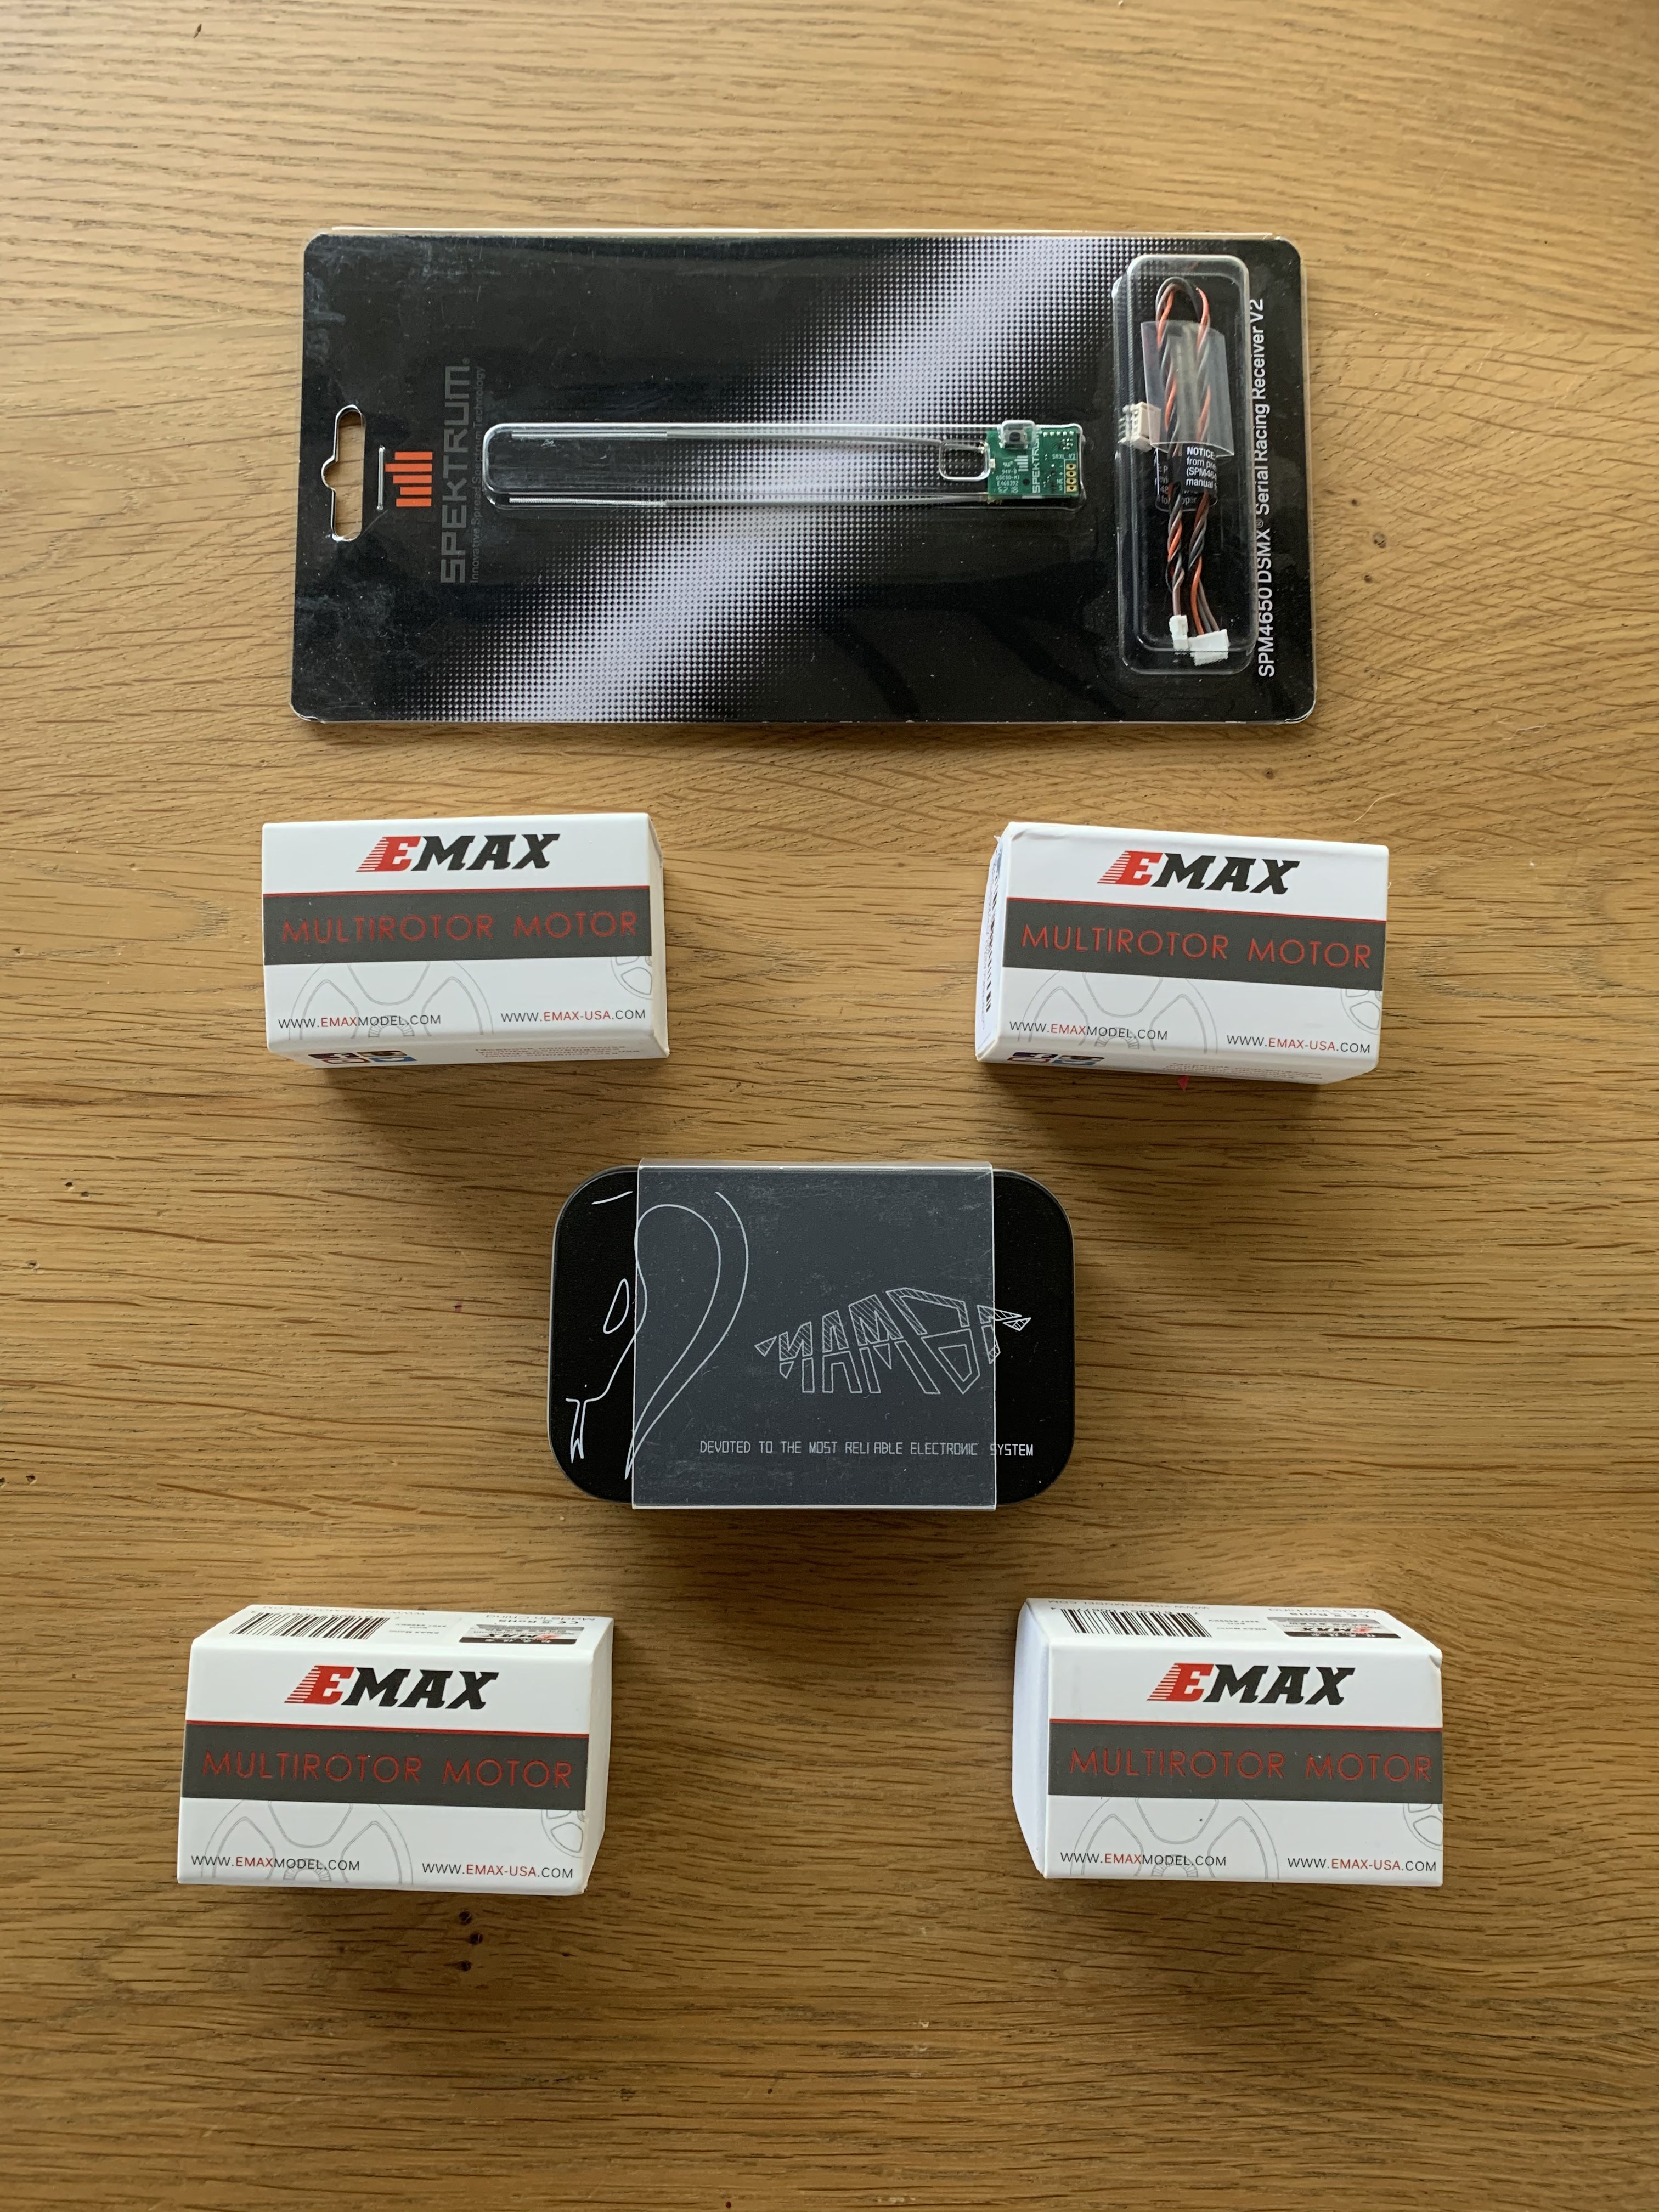
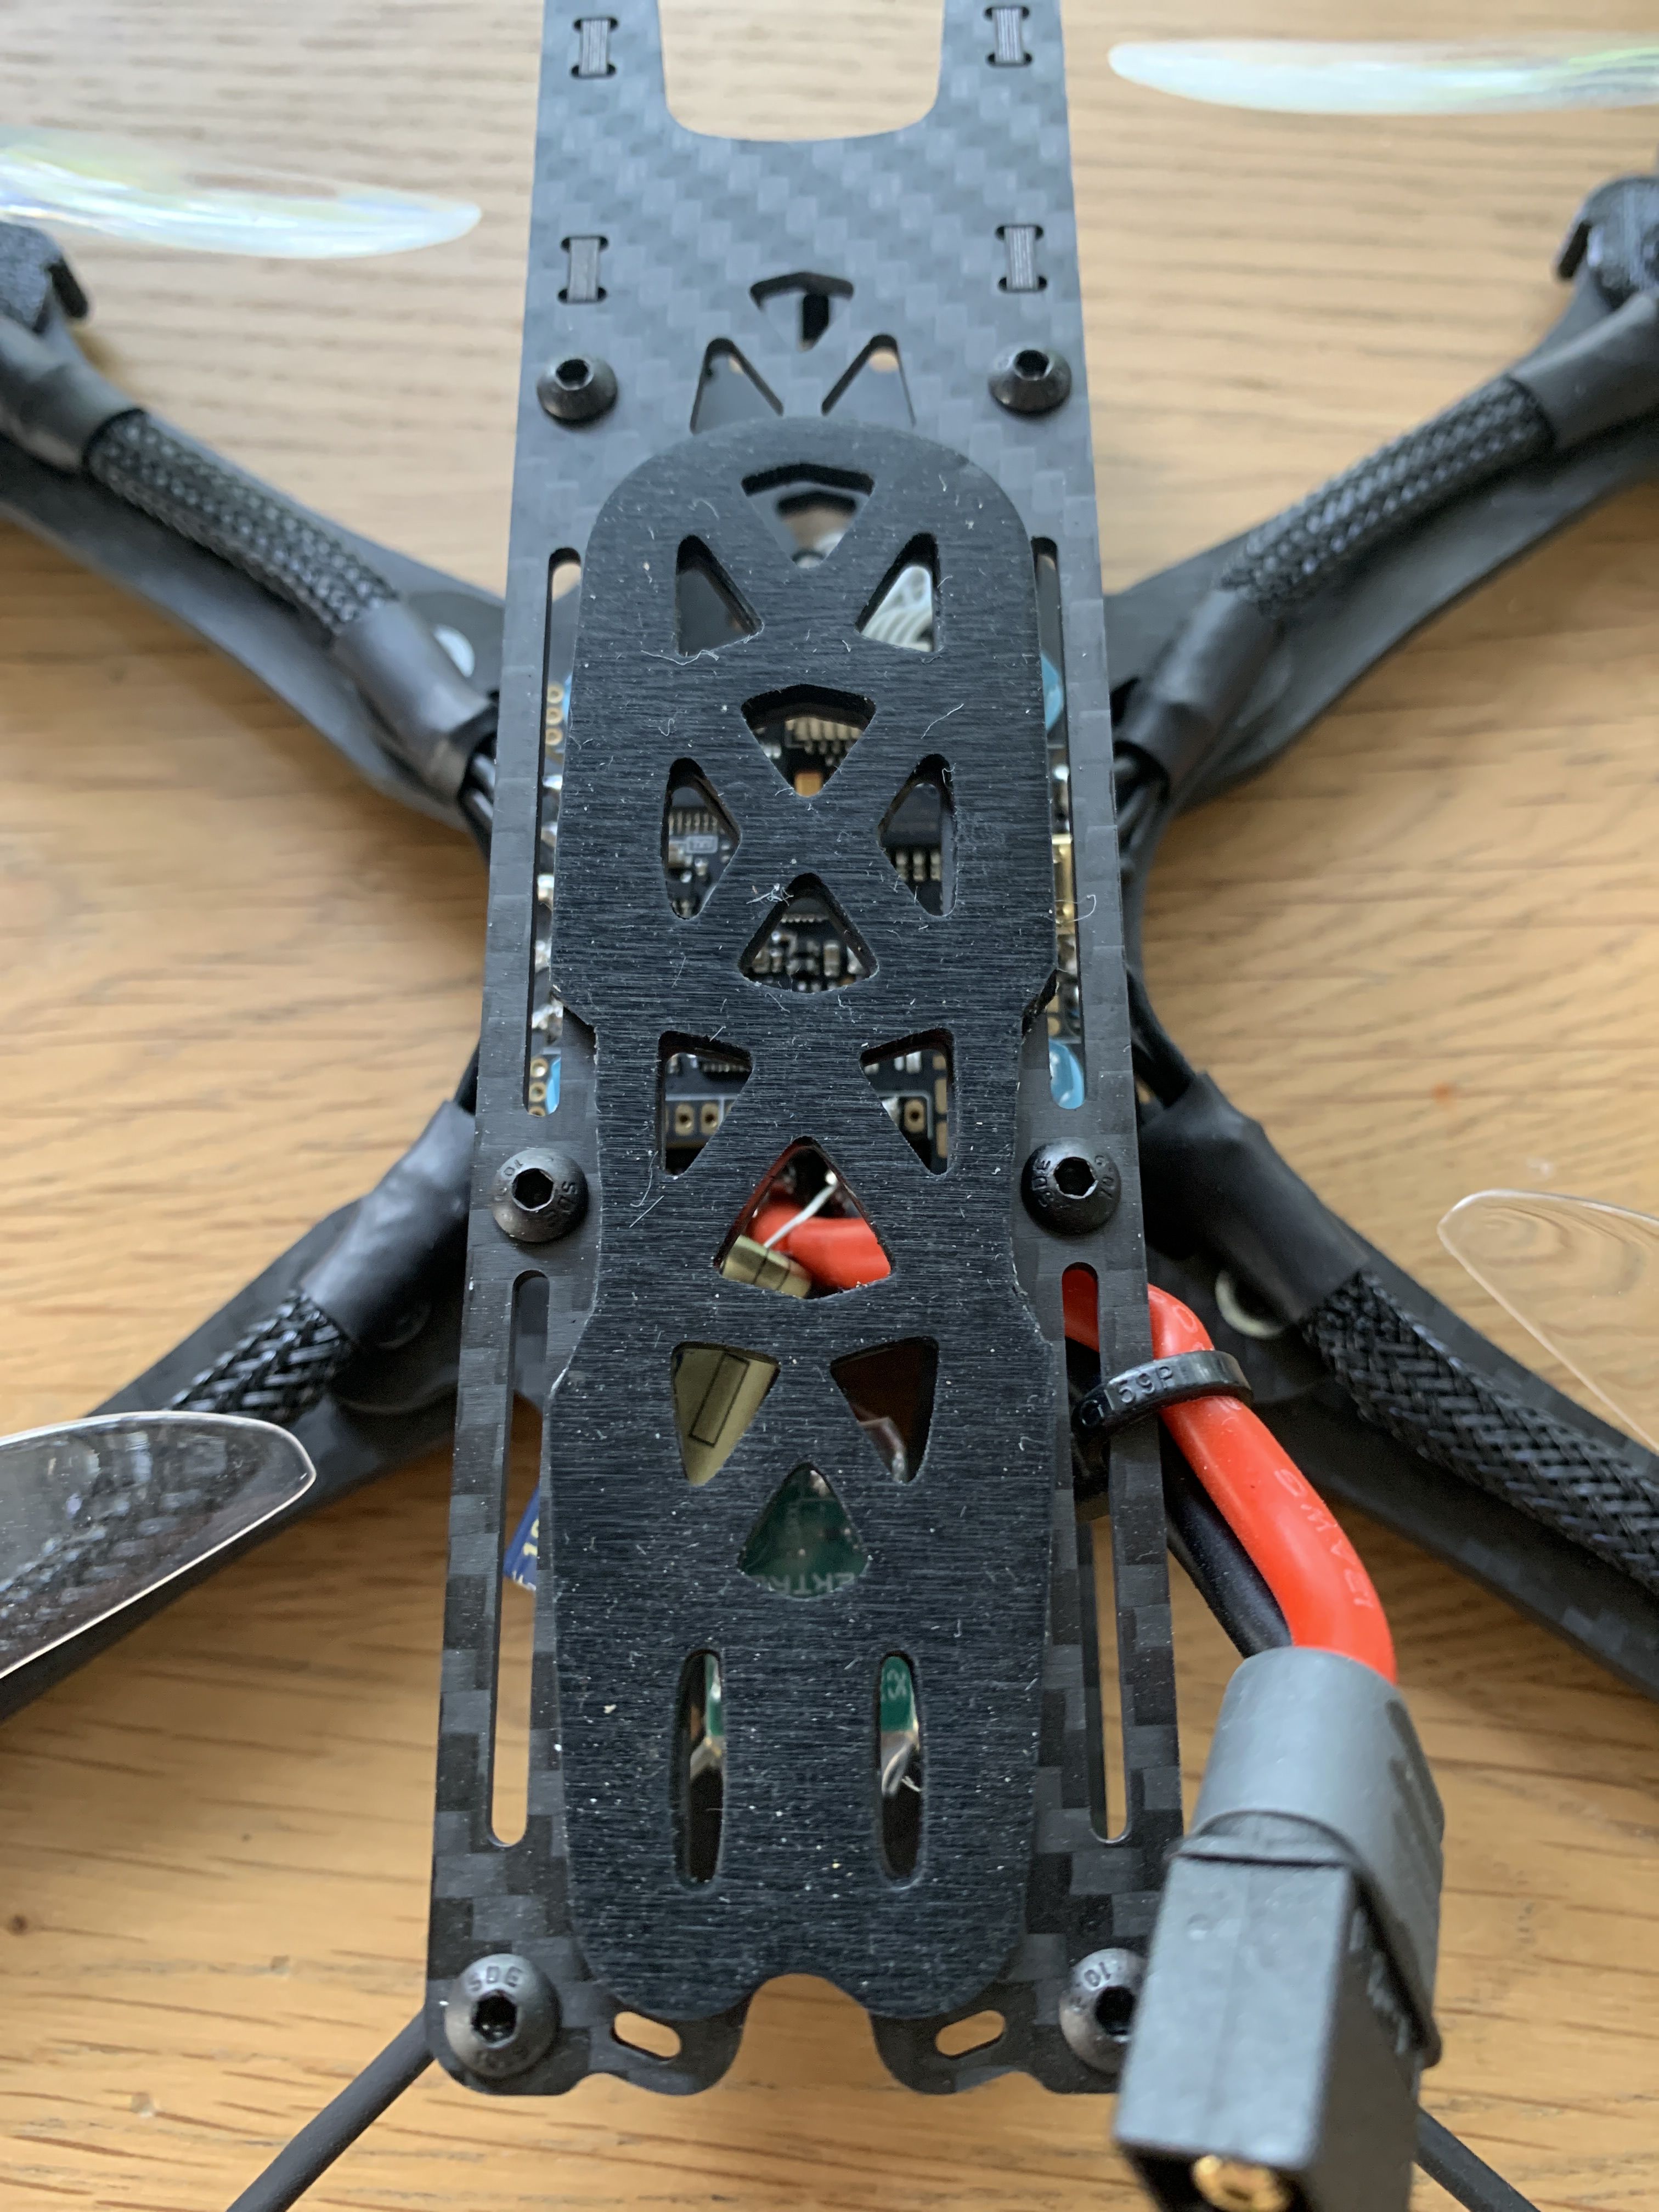
- Soldering up the Motor tabs on the Diatone Mamba 722 was easy. Nice BIG tabs. Do a bench test prior to soldering the left and right wires of each motor if you dont want to have to switch motor direction in software later. YOU CAN'T SWITCH DIRECTION IN BETAFLIGHT! You have to install a 2nd bit of software Called "BLHeliSuite32xm" (Not the same as BLHeli) to modify the setting of the Mamba ESC and reverse a motor. Get the wires right to avoid this. Use blu-tack to stick the wires down and bench test if you want to save installing BLHeliSuite32xm (you will need to solder the XT60) connector first to do this - to get power to the motors).
-
When you solder the battery wire, cut one of the cables slightly shorter so you can get the wire out the side of the frame easily (otherwise it will be in the way of your FPV antenna).
-
As I was running 4s battery not 6s, I was not sure if I needed the capacitor supplied with the Mamba. It's 1000uf and 35V. I installed it anyway. So far so good.
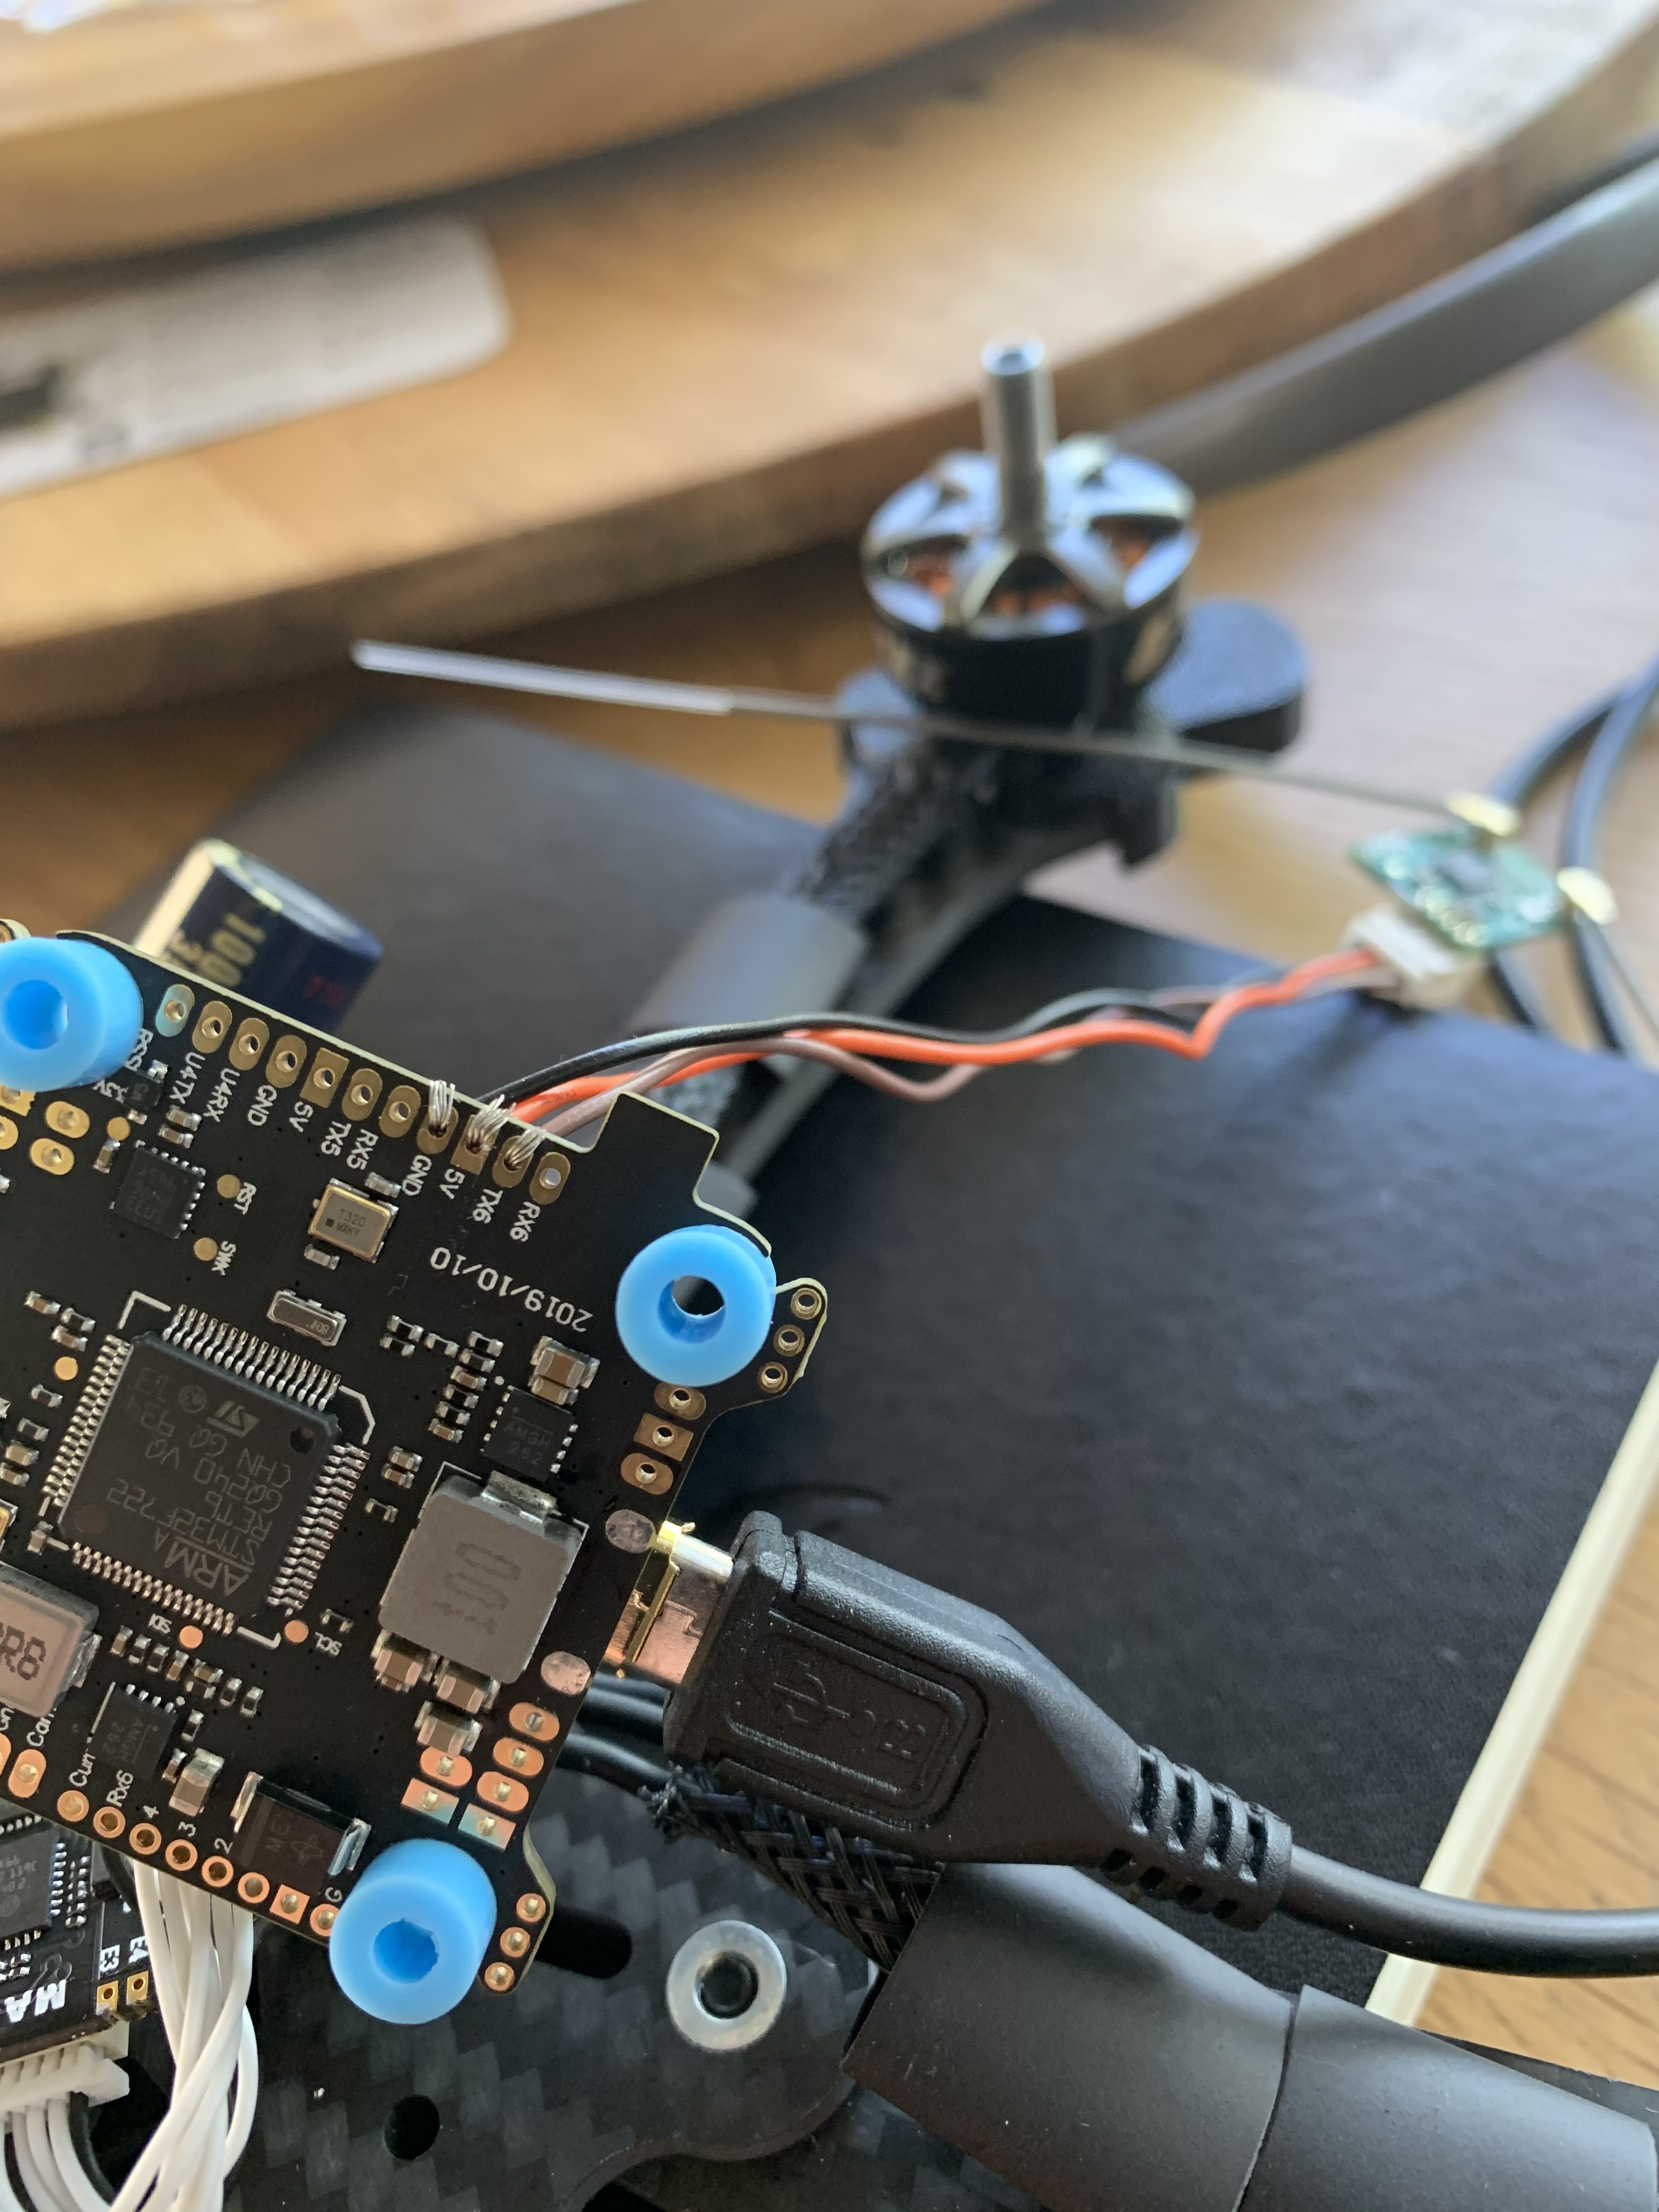
- Installing the FC. I was not able to mount the MAMBA 2020 version of the FC in the TBS Source One frame at all with the supplied hardware. The bolts from Source One and the Mamba screws were way too short. The solution is you MUST buy 25mm or 30mm M3 bolts and mount these straight through the bottom to hold the arms and mount the FC. 25mm was tight - but doable. Had to really squish the rubber vibration grommets. Next time I will use 30mm screws. They say heat is an issue for the Mamba F722 - so leave plenty of space. Another reason to use 30mm bolts.
The RX - Some Challenges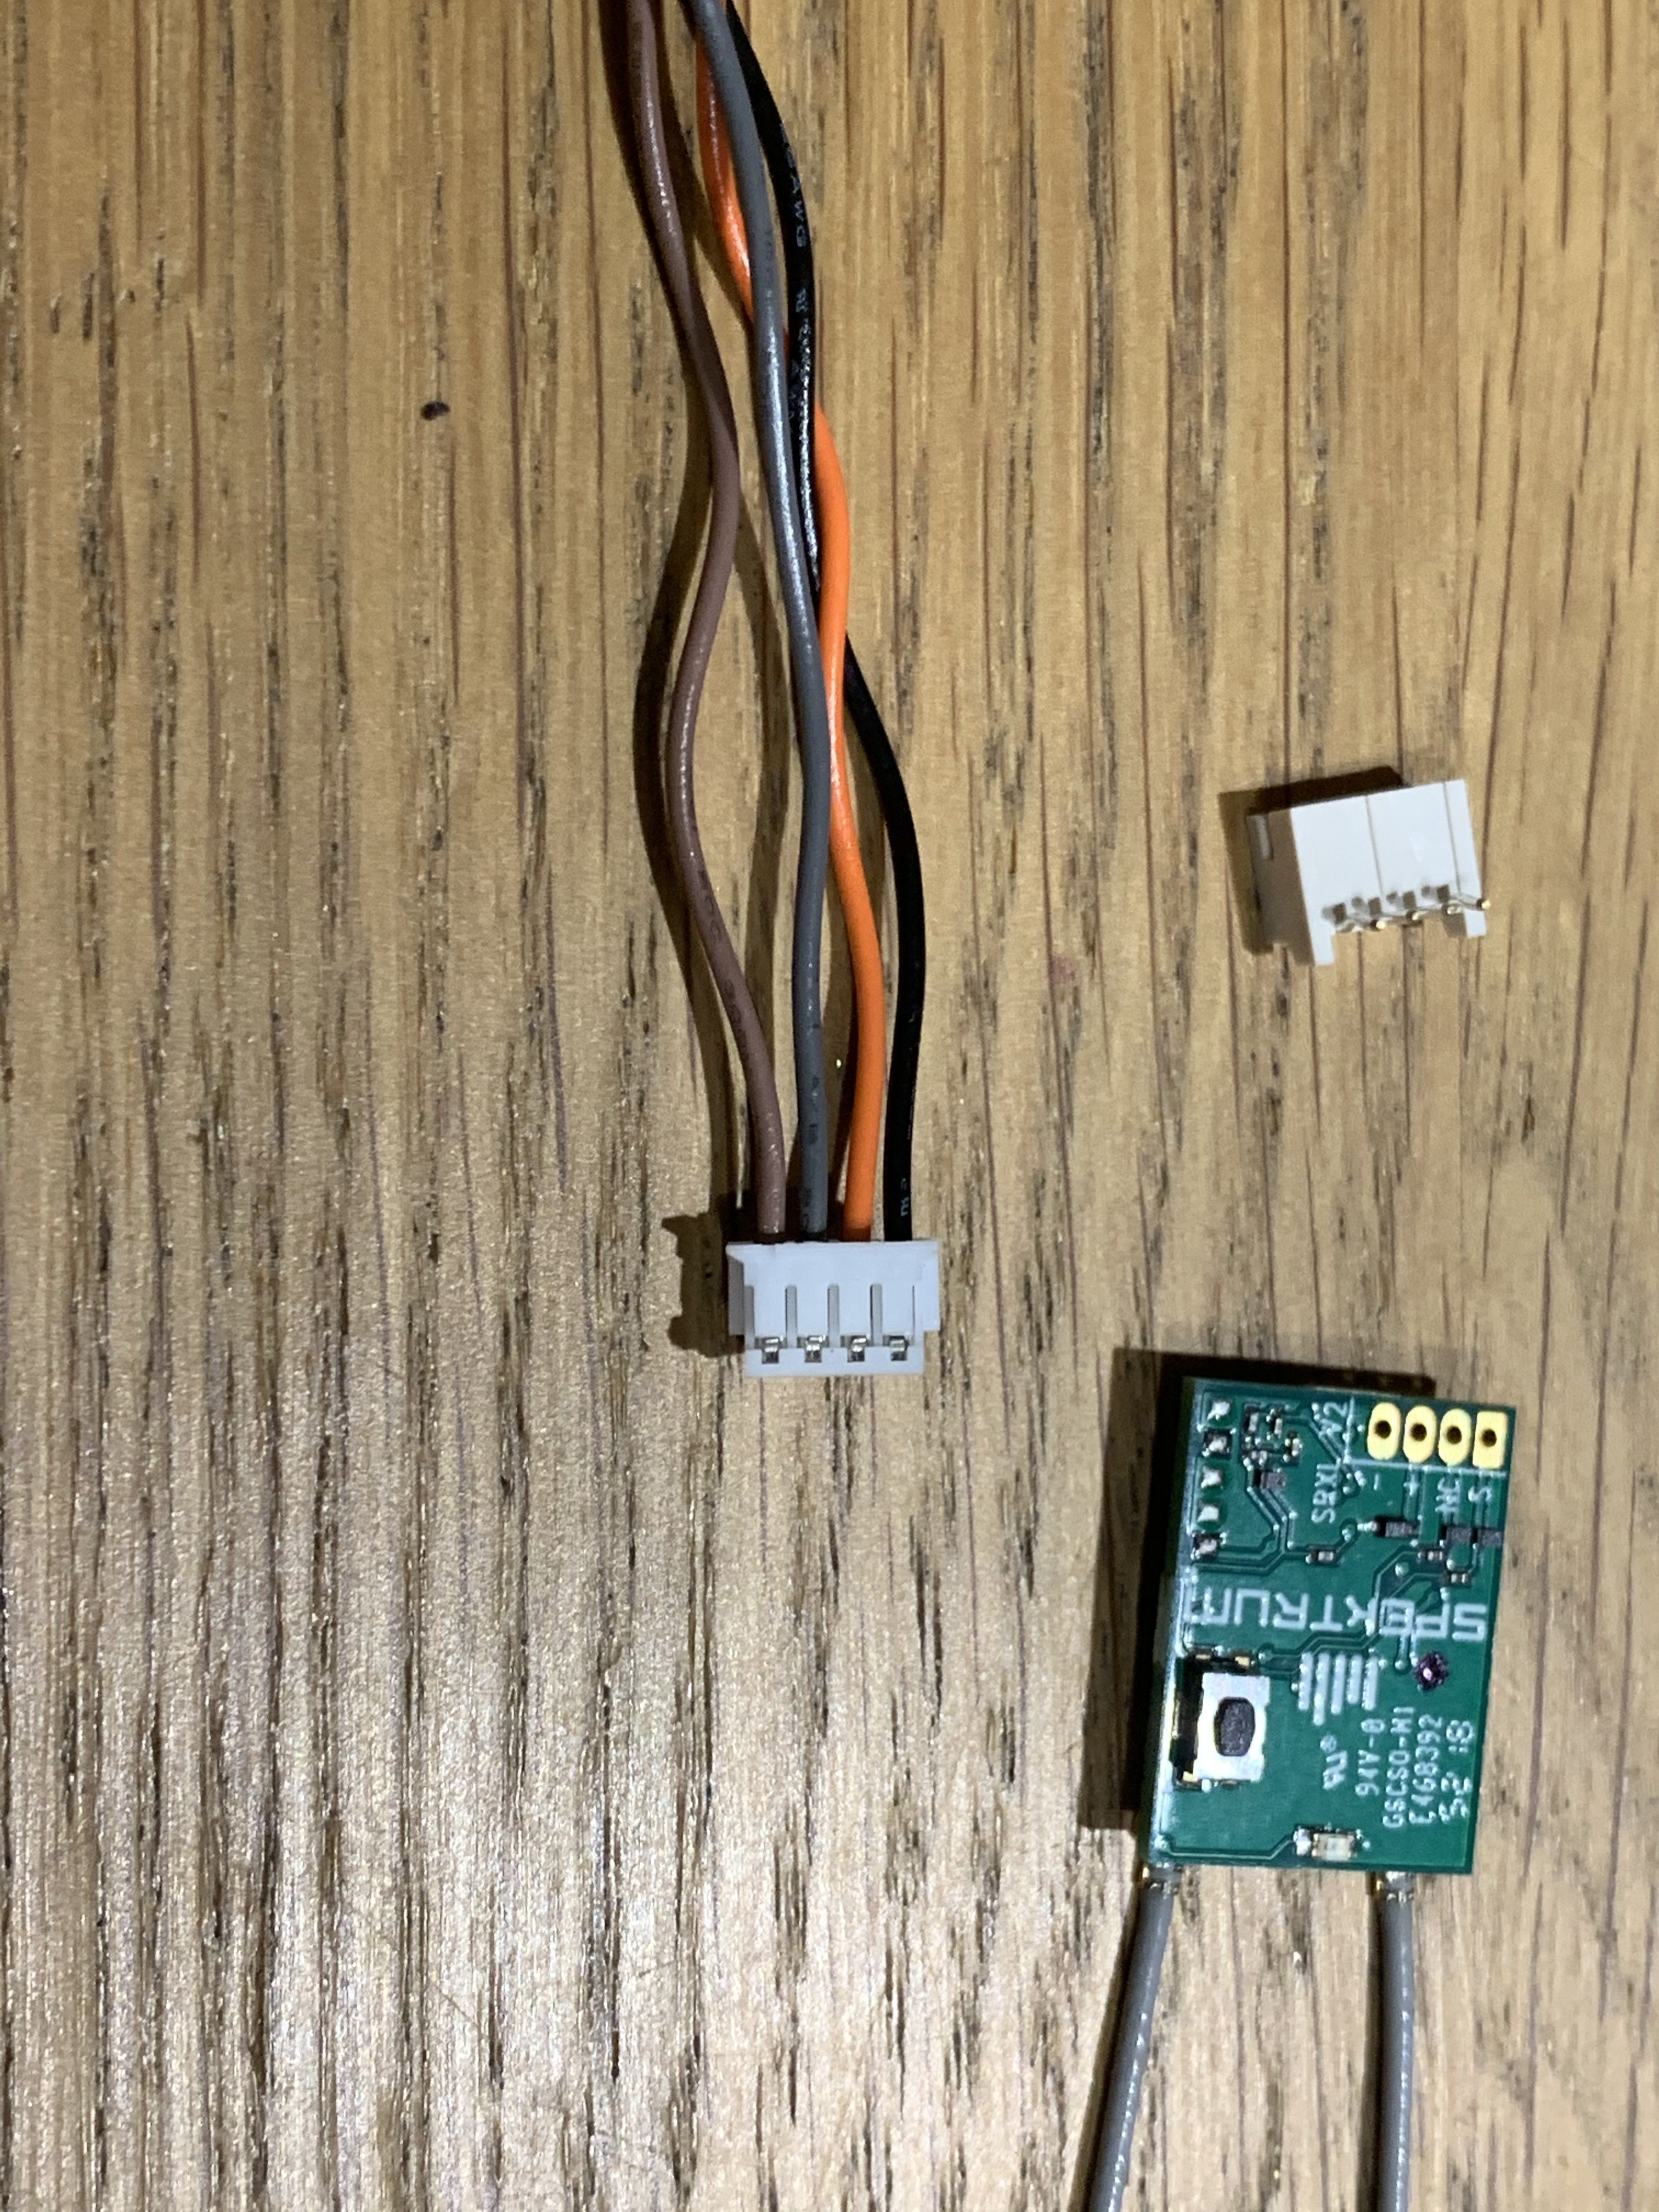
-
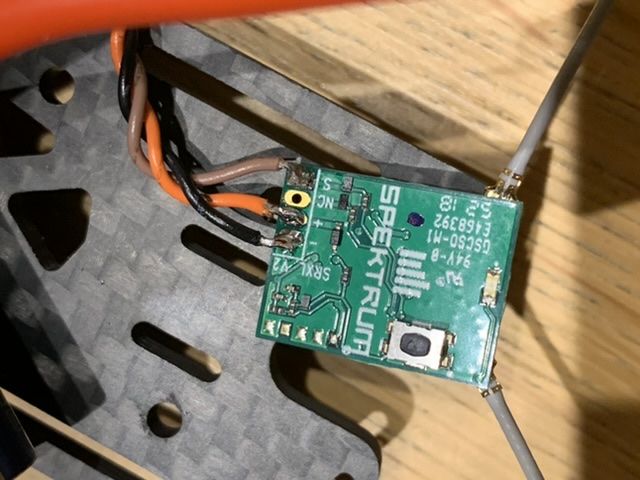
Next was the RX. I used Spektrums new RX designed for Quad racing, the SPM4650. It's very small and has TINY tabs. A shock for a beginner. I used the supplied plug (not soldered in) to bench test. There is VERY limited information on this unit as it is new and not popular. A few tips for people going down this road.
- Betaflight version 4.1 and higher supports the Spektrum SPM4650 with the bi-directional serial information functionality (should your TX support it) You do not need to follow the complex manual betaflight setup steps that people are showing (including Spektrums official videos) as they are using older versions of Betaflight. You can simply set up your Spektrum RX in the Receiver section by selecting top dropdown of: "Serial based Receiver SpekSAT..." and choose "Spektrum SRXL2 '' from the 2nd dropdown option (I wasted a LOT of time screwing around with the manual steps and CLI script settings that actually no longer work). Simply use the Betaflight configurator UI in Betaflight configurator to setup your Spektrum SRXL2 compatible RX. One more piece of information that I could not find online and decided to 'risk it' was if an older DX6i would connect to the latest Spectrum technology with SRXL2 bi directional bus. The answer is YES. Obviously my old controller does not handle the live info feed from the quad, but I can control the Quad. As long as your TX supports DSMX then it will work!
-
To install Betaflight 4.1you need the latest version of the configurator 10.6.0 or higher!
-
I used UART6 of the Mamba F722 board, You need to wire Spektrum negative to Mamba GND, Spektrum positive to Mamba 5V and Spektrum S (signal) wire to Mamba TX6 (Yes TX not RX). Remove the Grey wire from the Spektrum (you dont need it). Replace Spektrum wires with silicon wires if you have them the PVC wires are rubbish. Last step is to enable "Serial RX" on UART6 of the "Ports" page in Betaflight.
-
The tabs on the Mamba are really small and close together. If you are a beginner, practise on some scrap metal first. And use a flux pen, this will allow the solder to jump and stick to the tab from the Iron far more simply.
-
Heatshrink the RX and use strong double sided tape to position it.
-
Binding was easy, but you must move more than 2m away to get a bind...not sure why.
- One more note on Spektrums new SRXL2 Serial communication Tech - this is between the RX and the FC. Not the TX and RX. So communication with the RX and TX is still DSMX.
.
.
.
Installing the FPV Gear:
-
This section is TBC as my gear has not arrived yet.
-
I wanted to go straight to a digital FPV system as I currently dont own any gear. The Source One cannot easily fit the DJI Air Unit in. I considered opening the using up and removing the bulky aluminium case, but apparently it may overheat as the case doubles as a heatshrink.
- Decided on the Caddx Vista Air Unit instead. Much much smaller and compatible with DJI goggles. Downside is no SD card so no HD recording on the unit. You will need to record goggle video instead or use a gopro/something else to record.d. The wiring of the Caddx air unit onto the Mamba is (from my research).
NaNundefinedRed = Power + so wire direct to + of battery lead (4s or 6s)
NaNundefinedBlack = Power - so wire direct to - battery lead (4s or 6s)
NaNundefinedYellow - CADDX RX (So wires to UART TX pad)
NaNundefinedWhite - CADDX TX (So wires to RX pad)NOT USED
NaNundefined(Yellow (SBUS) and Brown (Signal Ground) removed as I am not using DJI controller - You need yellow if using DJI controller, the Signal Ground is rarely needed and not on a Mamba FC)
*Note: don't connect the larger official DJI air unit directly to battery leads without a BEC if using 6S as it's not rated that high. Caddx unit is fine to direct wire for 4S and 6S)
Finalising the Build:
- Everything else went together easily.
-
Cable tie your Battery plug tight or it will hit the props.

-
I mounted my RX and Capacitor far back for simplicity for now, but will move this when the FPV system arrives.d. Battery rubber pad did not fit in the incorrect spot as the screw cutouts were in the wrong spot. I have to slice larger screw cutouts.
- I used a single 220mm x 20mm anti slip battery strap. Holds really firm.f. Cable-tied and heat shrunk the RX antennas into the heat shrink - Looks neat and extra protection.

Other Challenges:
-
New CNHL 1500mah 100C 4S battery had weird readings on cell 3 with resistance check. So I returned it and got another one from the supplier.b. The RX died after soldering it the first time (bench test was fine) so maybe it was faulty. Not sure. It was replaced under warranty.
-
The Spektrum DX6i is NOT an ideal controller. It is now working, but to get it to work I had to do some work arounds - see detailed info in the betaflight setup below.
-
I had one reversed motor (fixed it in BLHeli32 ESC software).
-
USB cable was faulty - Spent HOURS trying to work this out - I installed every possible driver on both macs and pc's - changed the cable and all was good!
-
Using a Mac rather than PC and getting the USB drivers correct - All you need for Mac is "Mac_OSX_VCP_Driver" available here: https://www.silabs.com/products/development-tools/software/usb-to-uart-bridge-vcp-drivers-
-
On Mac OS Catalina - Betaflight Configurator and BLHeliSuite32xm WILL NOT INSTALL - You must try and install - then go to the Mac "Security & Privacy" settings area and allow the app (at the bottom of the settings page) then try installing again. There will be a prompt to allow it.
-
If you change anything in the CLI scripting area type "save" when you finish (without quotes) or it does not take effect (also waisted a bit of time on this)
-
On the bench when I spooled the motors and slowed them when testing the TX - they kept building speed by themselves. THIS IS NORMAL! It is because the quad thinks it should be accelerating but is not going up, so the FC tries to compensate.
- To get motors to spin when not connected to Betaflight, you must have the 'ARM' mode switch setup in 'Modes' tab and the USB cable must be removed from the Quad. Also make sure you Quad is flat and that your Throttle is at the bottom (below stick low threshold).
First Flights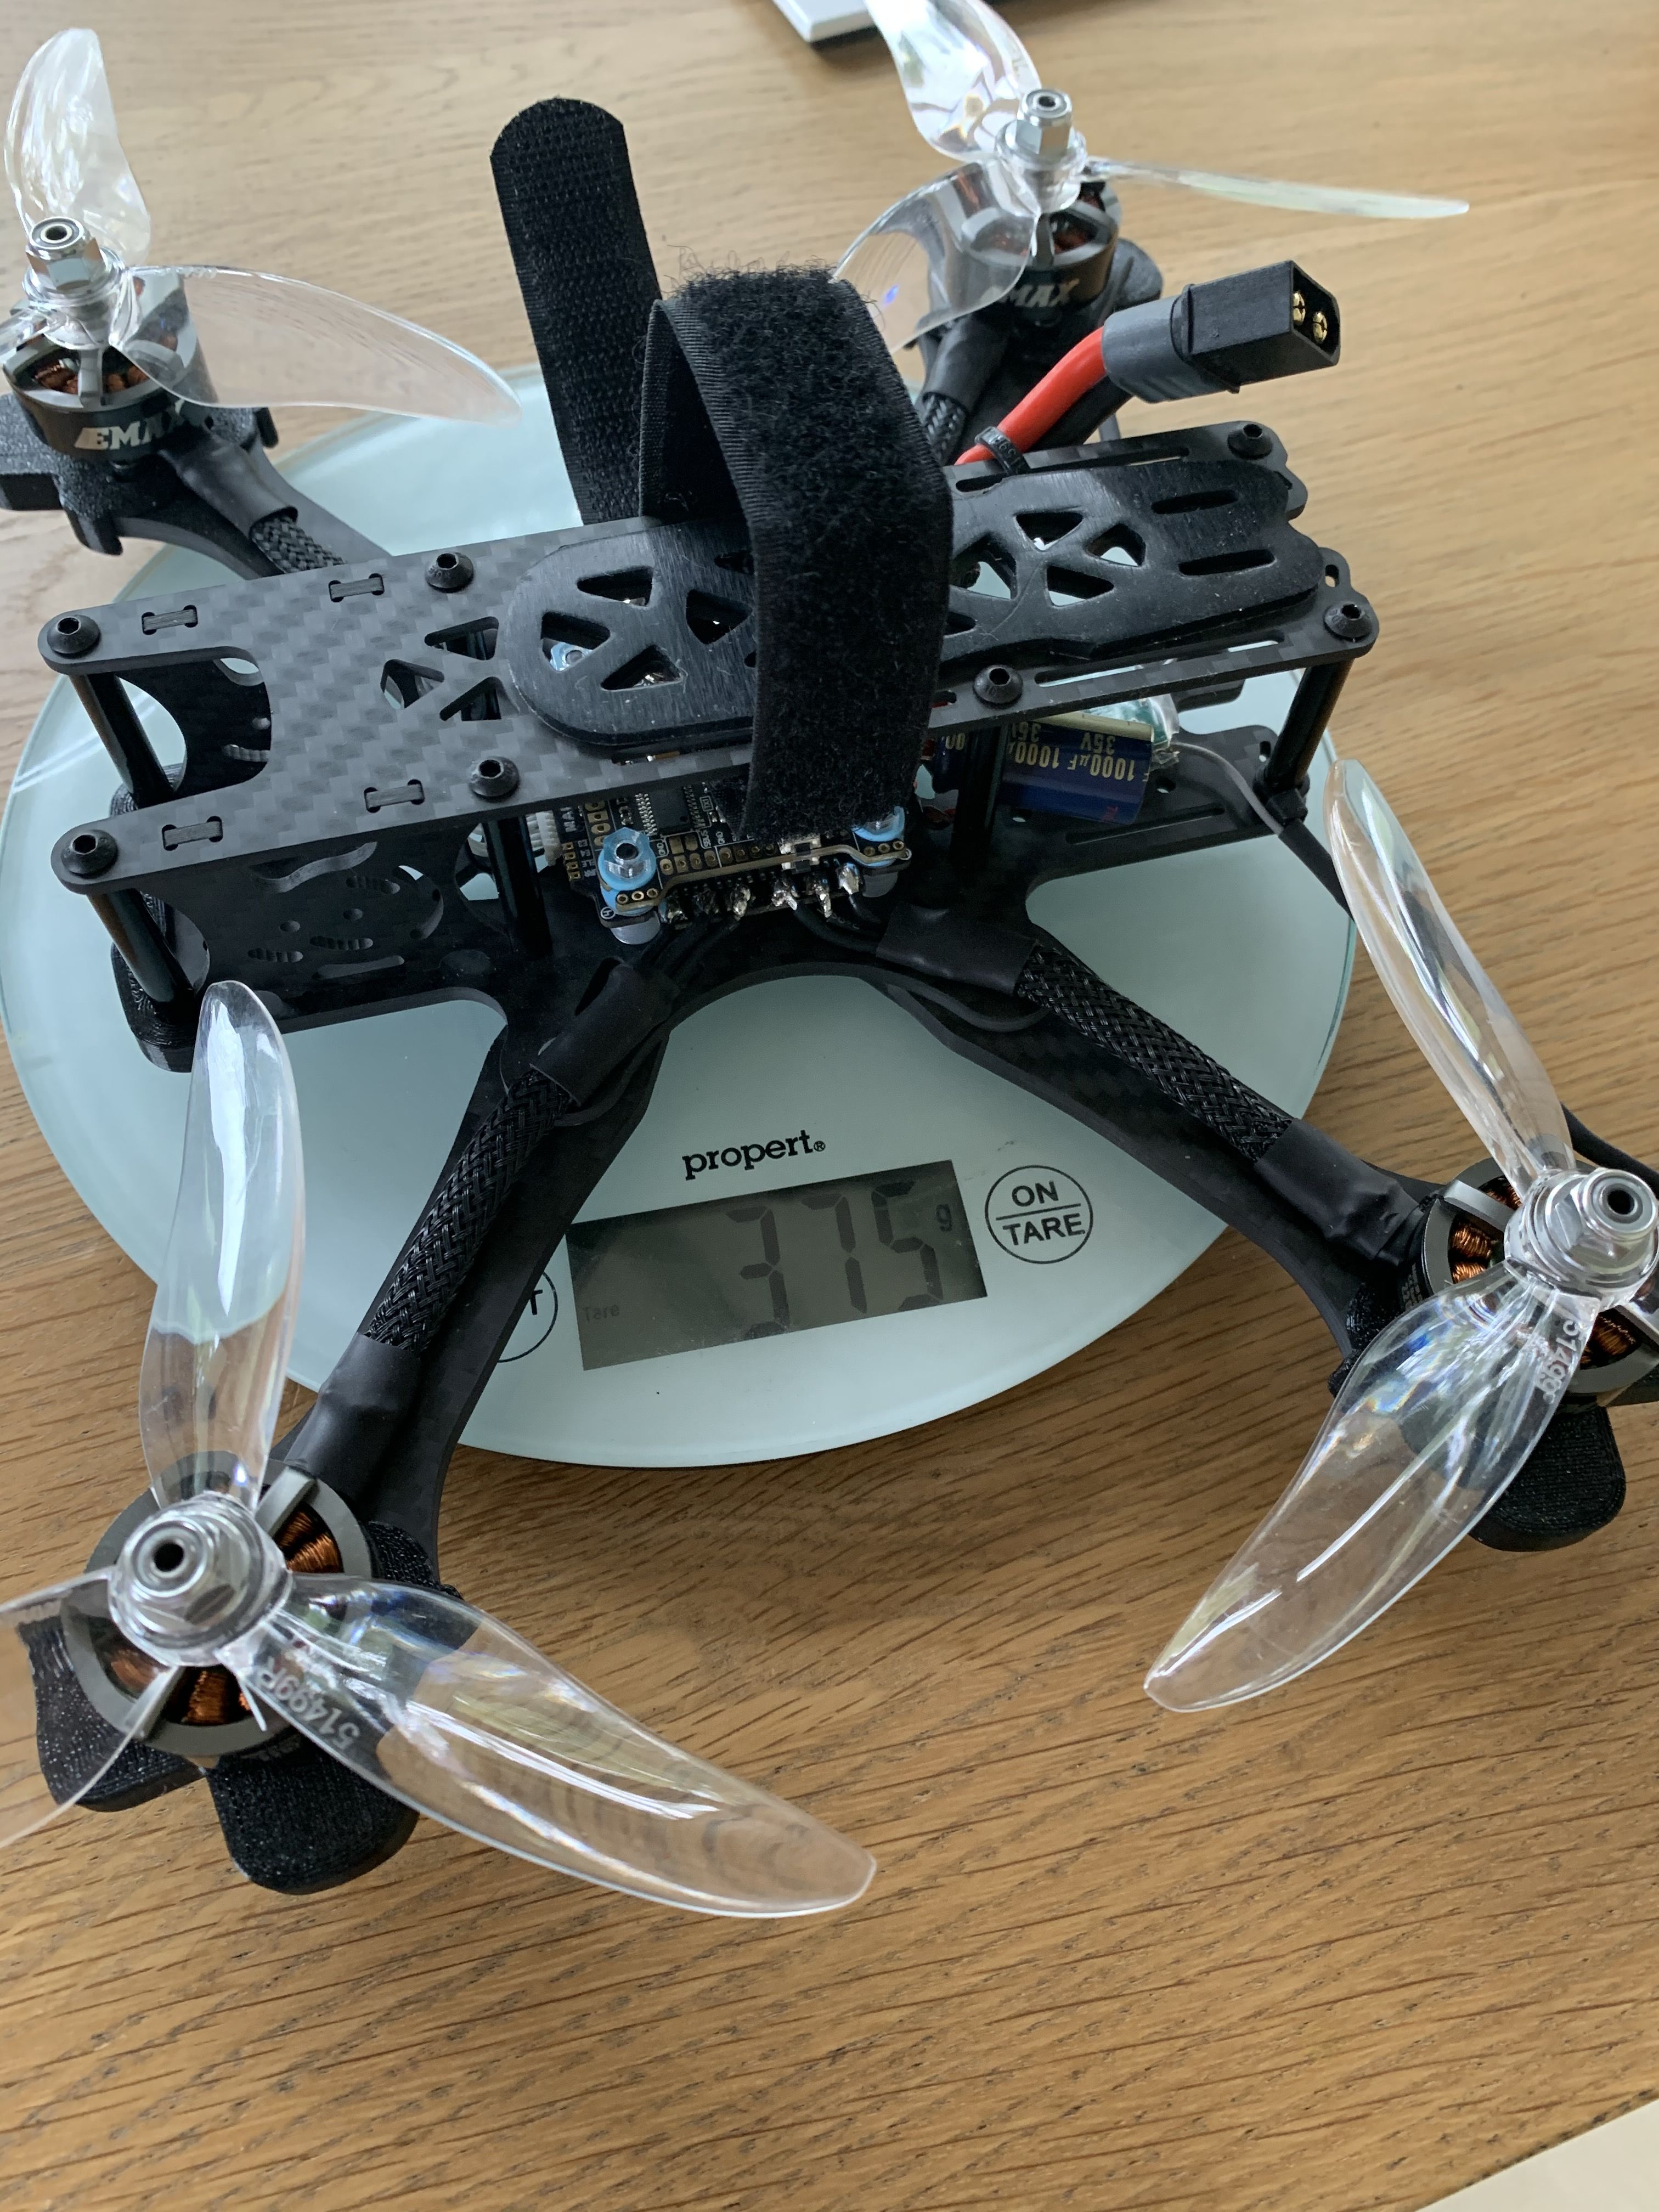
Flew perfectly first try.
https://vm.tiktok.com/T2YkuQ/
I dont have much to compare to, but Holy S#IT - It's fast, really fast. Without the FPV gear weighing it down, its like a missile. Hope the gear does not weigh it down too much :)
It flies more like a helicopter than an airplane. A more stable helicopter. In saying that these don't fly themselves and are not toys. Really looking forward to getting my FPV gear!
Final Weight (no FPV Gear) = 555 grams
Weight without Battery = 375 grams
.
.
.
.
.
.
.
.
.
My Betaflight setup for anyone doing a follow along (I only photographed the sections that I changed):
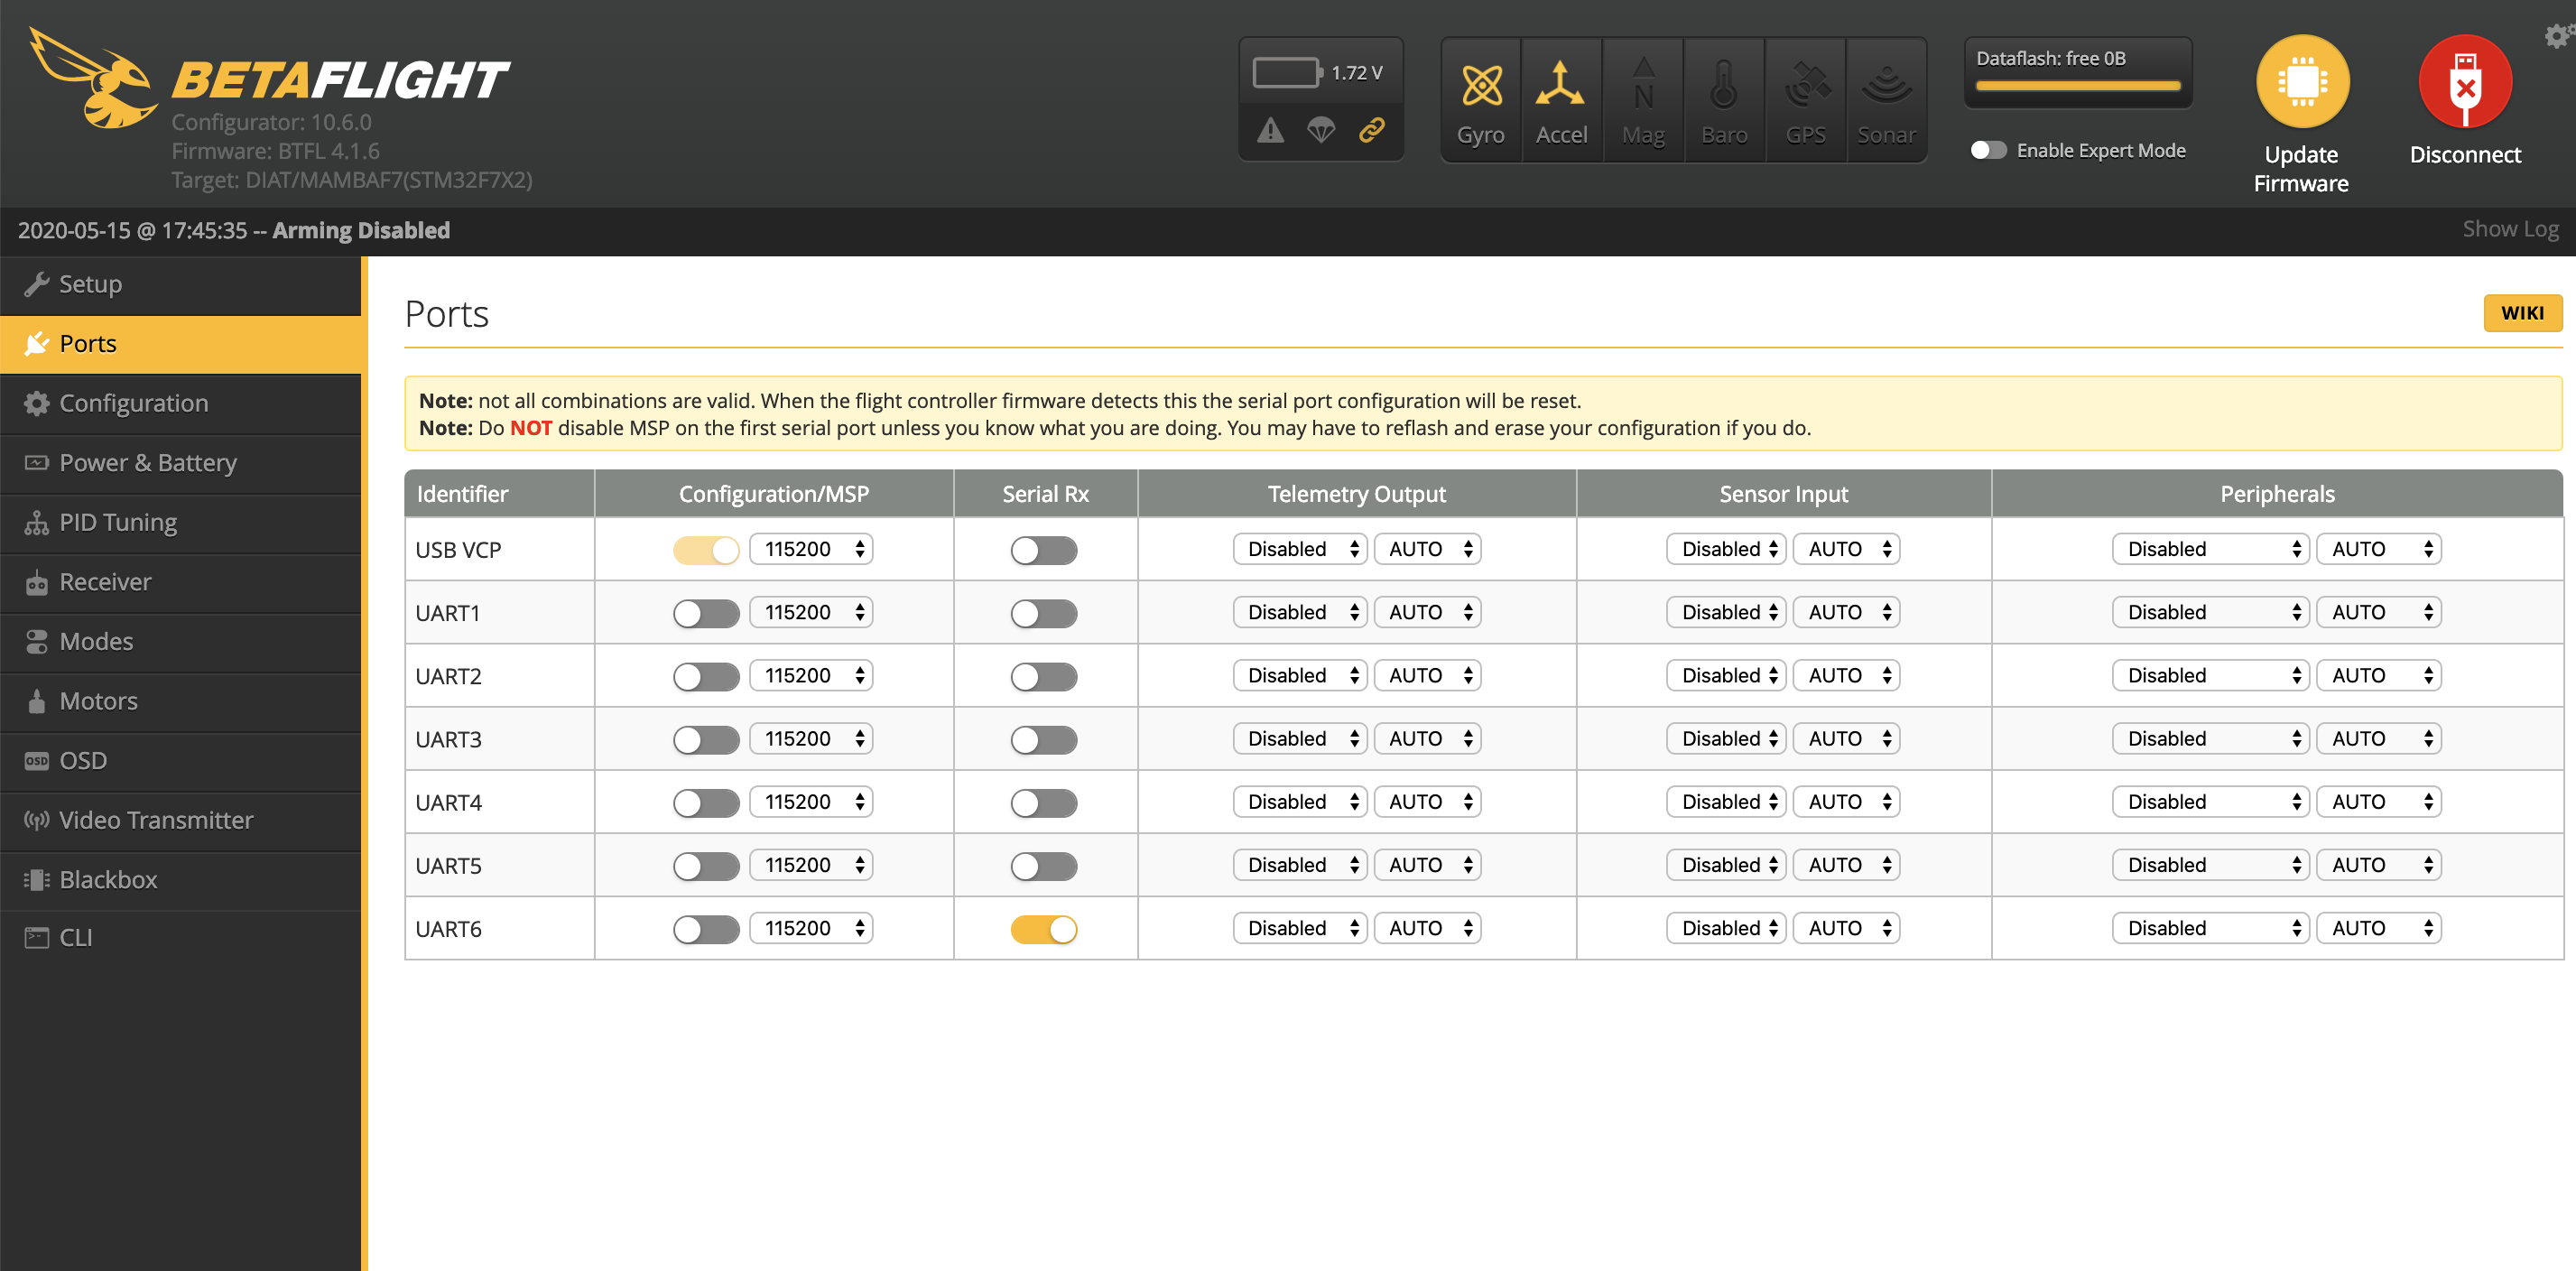
Ports - UART6 is my Spektrum RX - Hence "SerialRx" is enabled
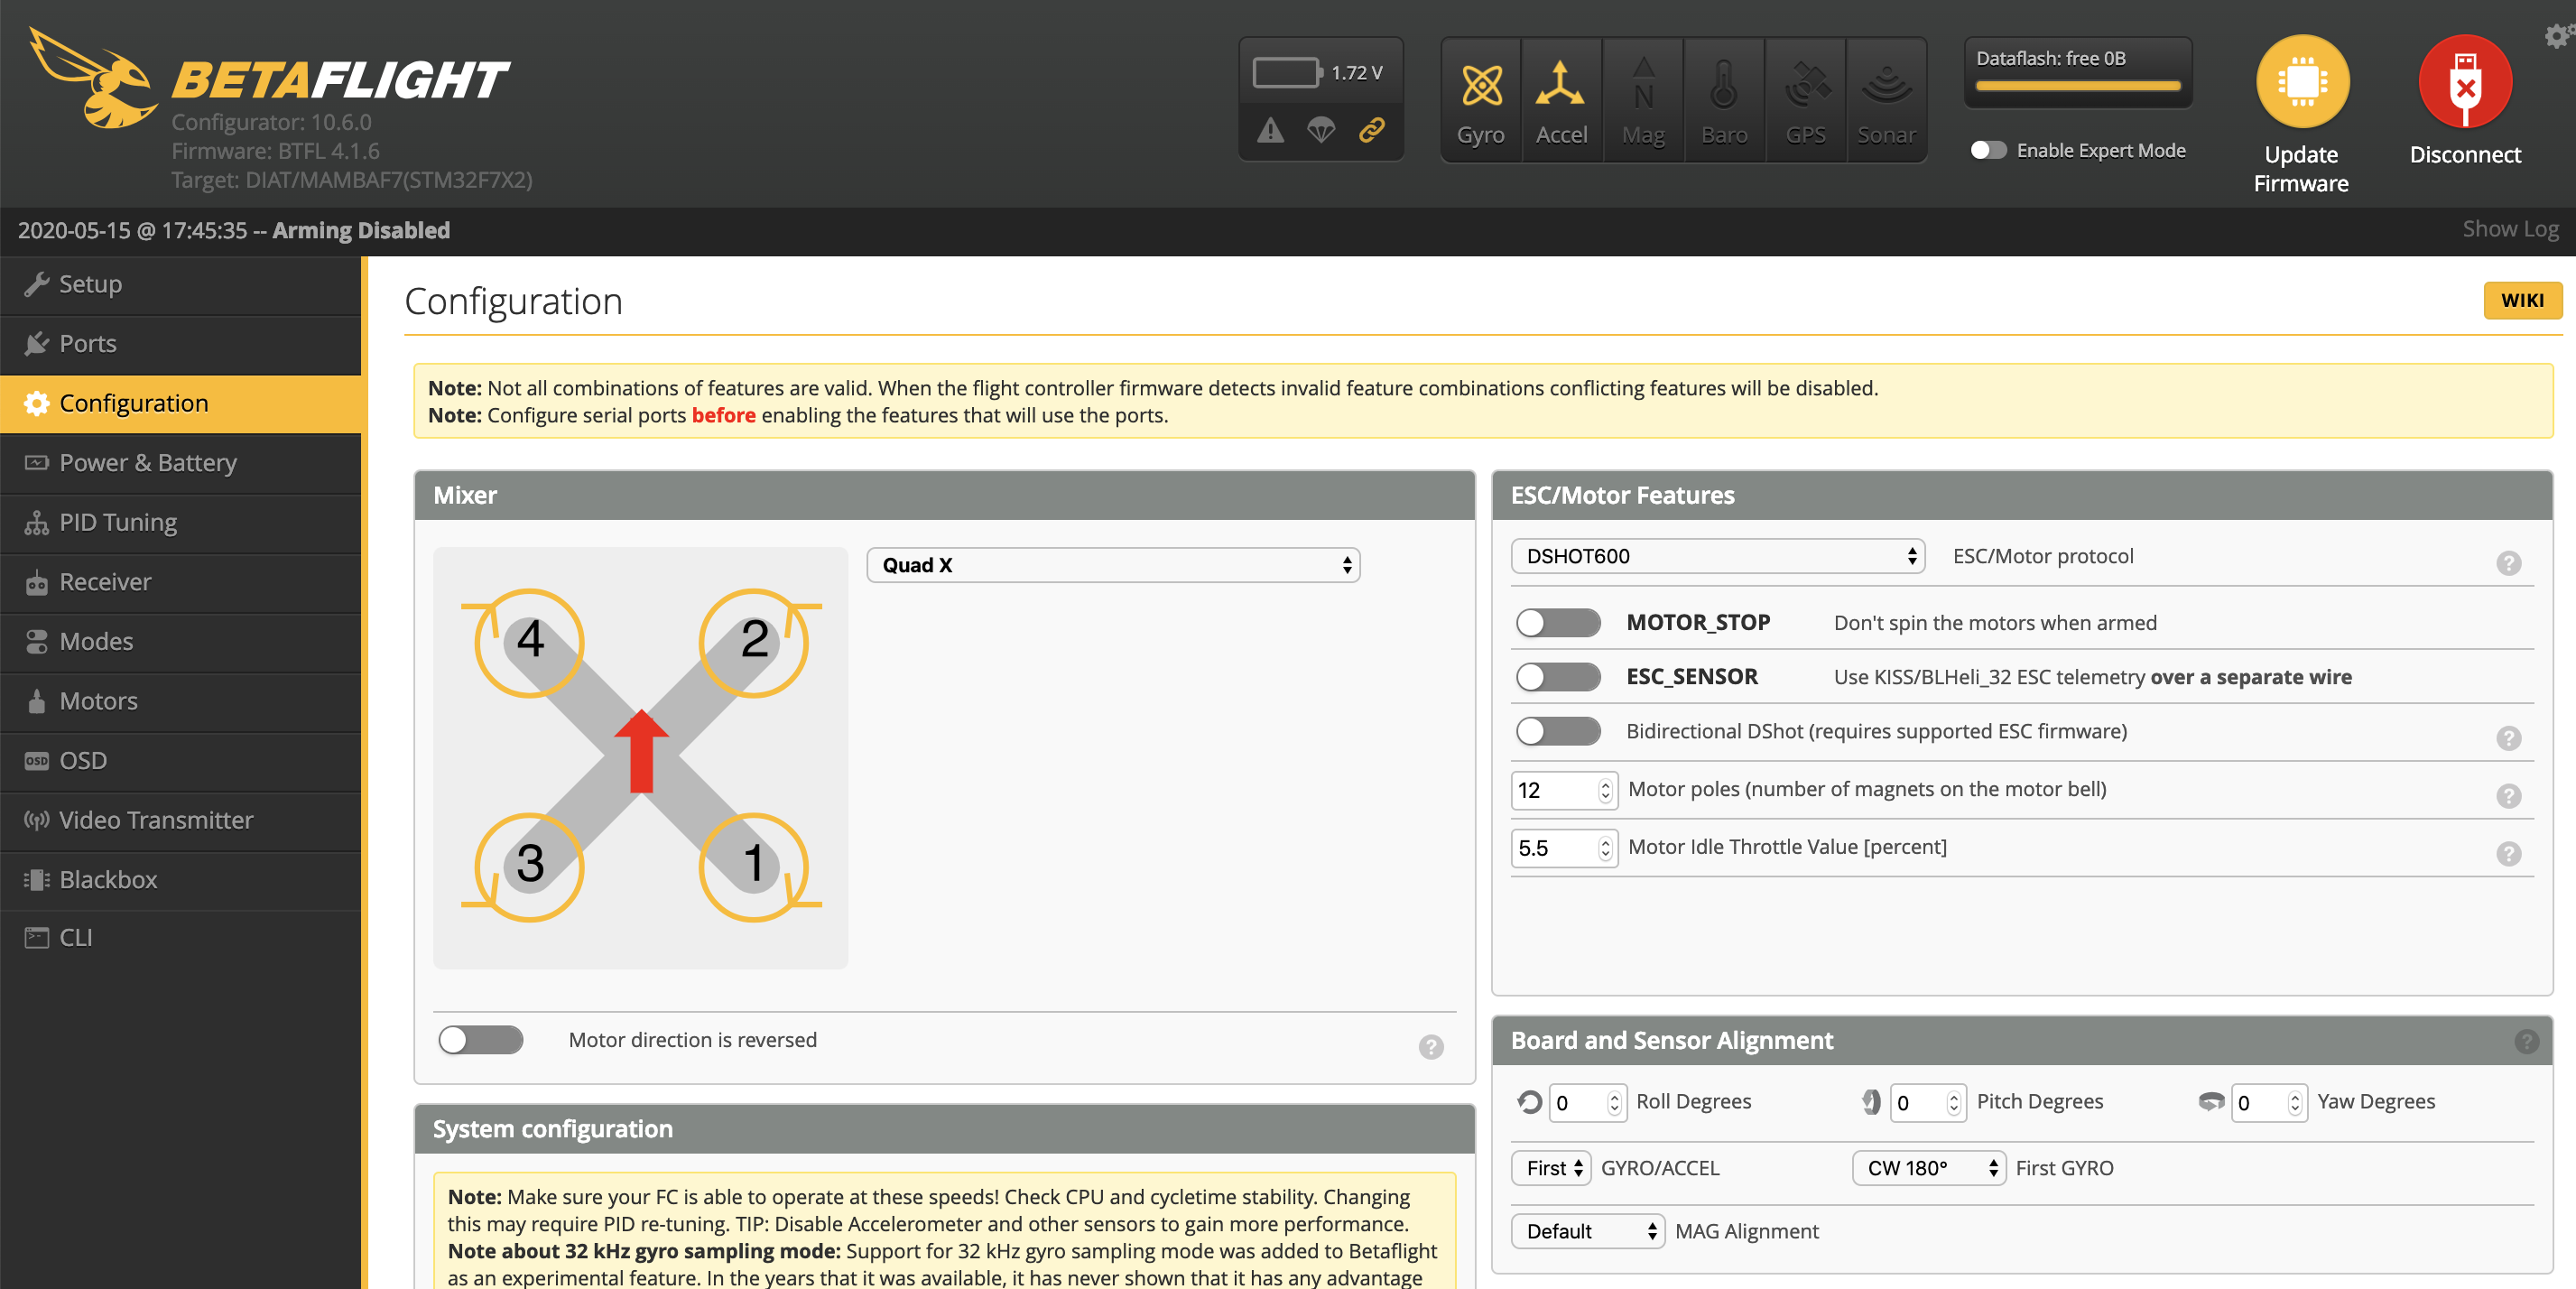
Configuration - EMAX Eco Motors are 12 Poles not the default 14 (That is the number of coil sections you can count looking from the top)
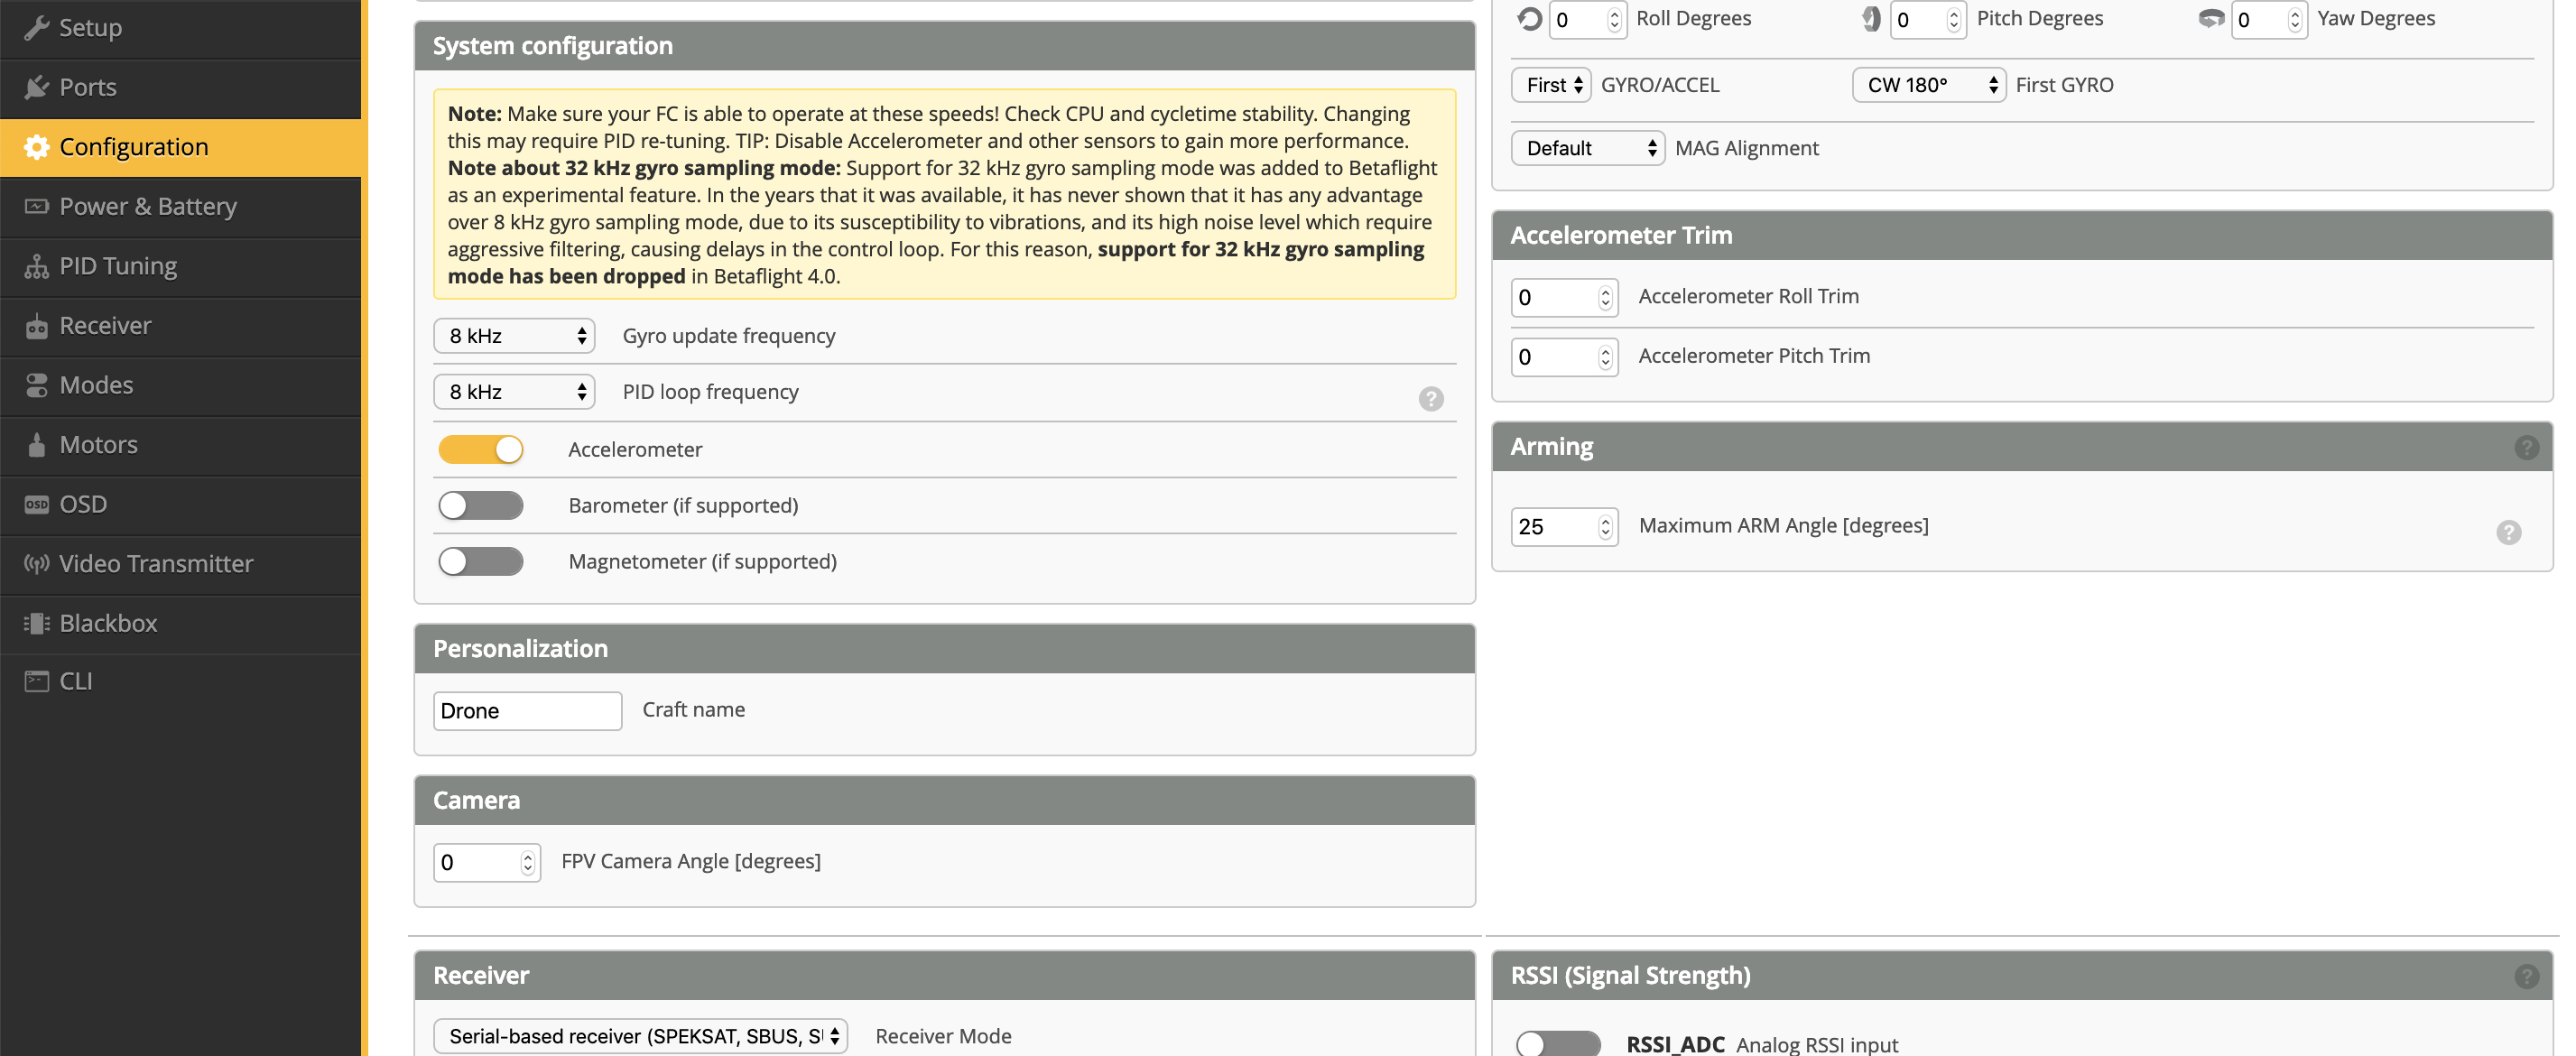
Configuration - PID loop frequency changed to 8 kHz
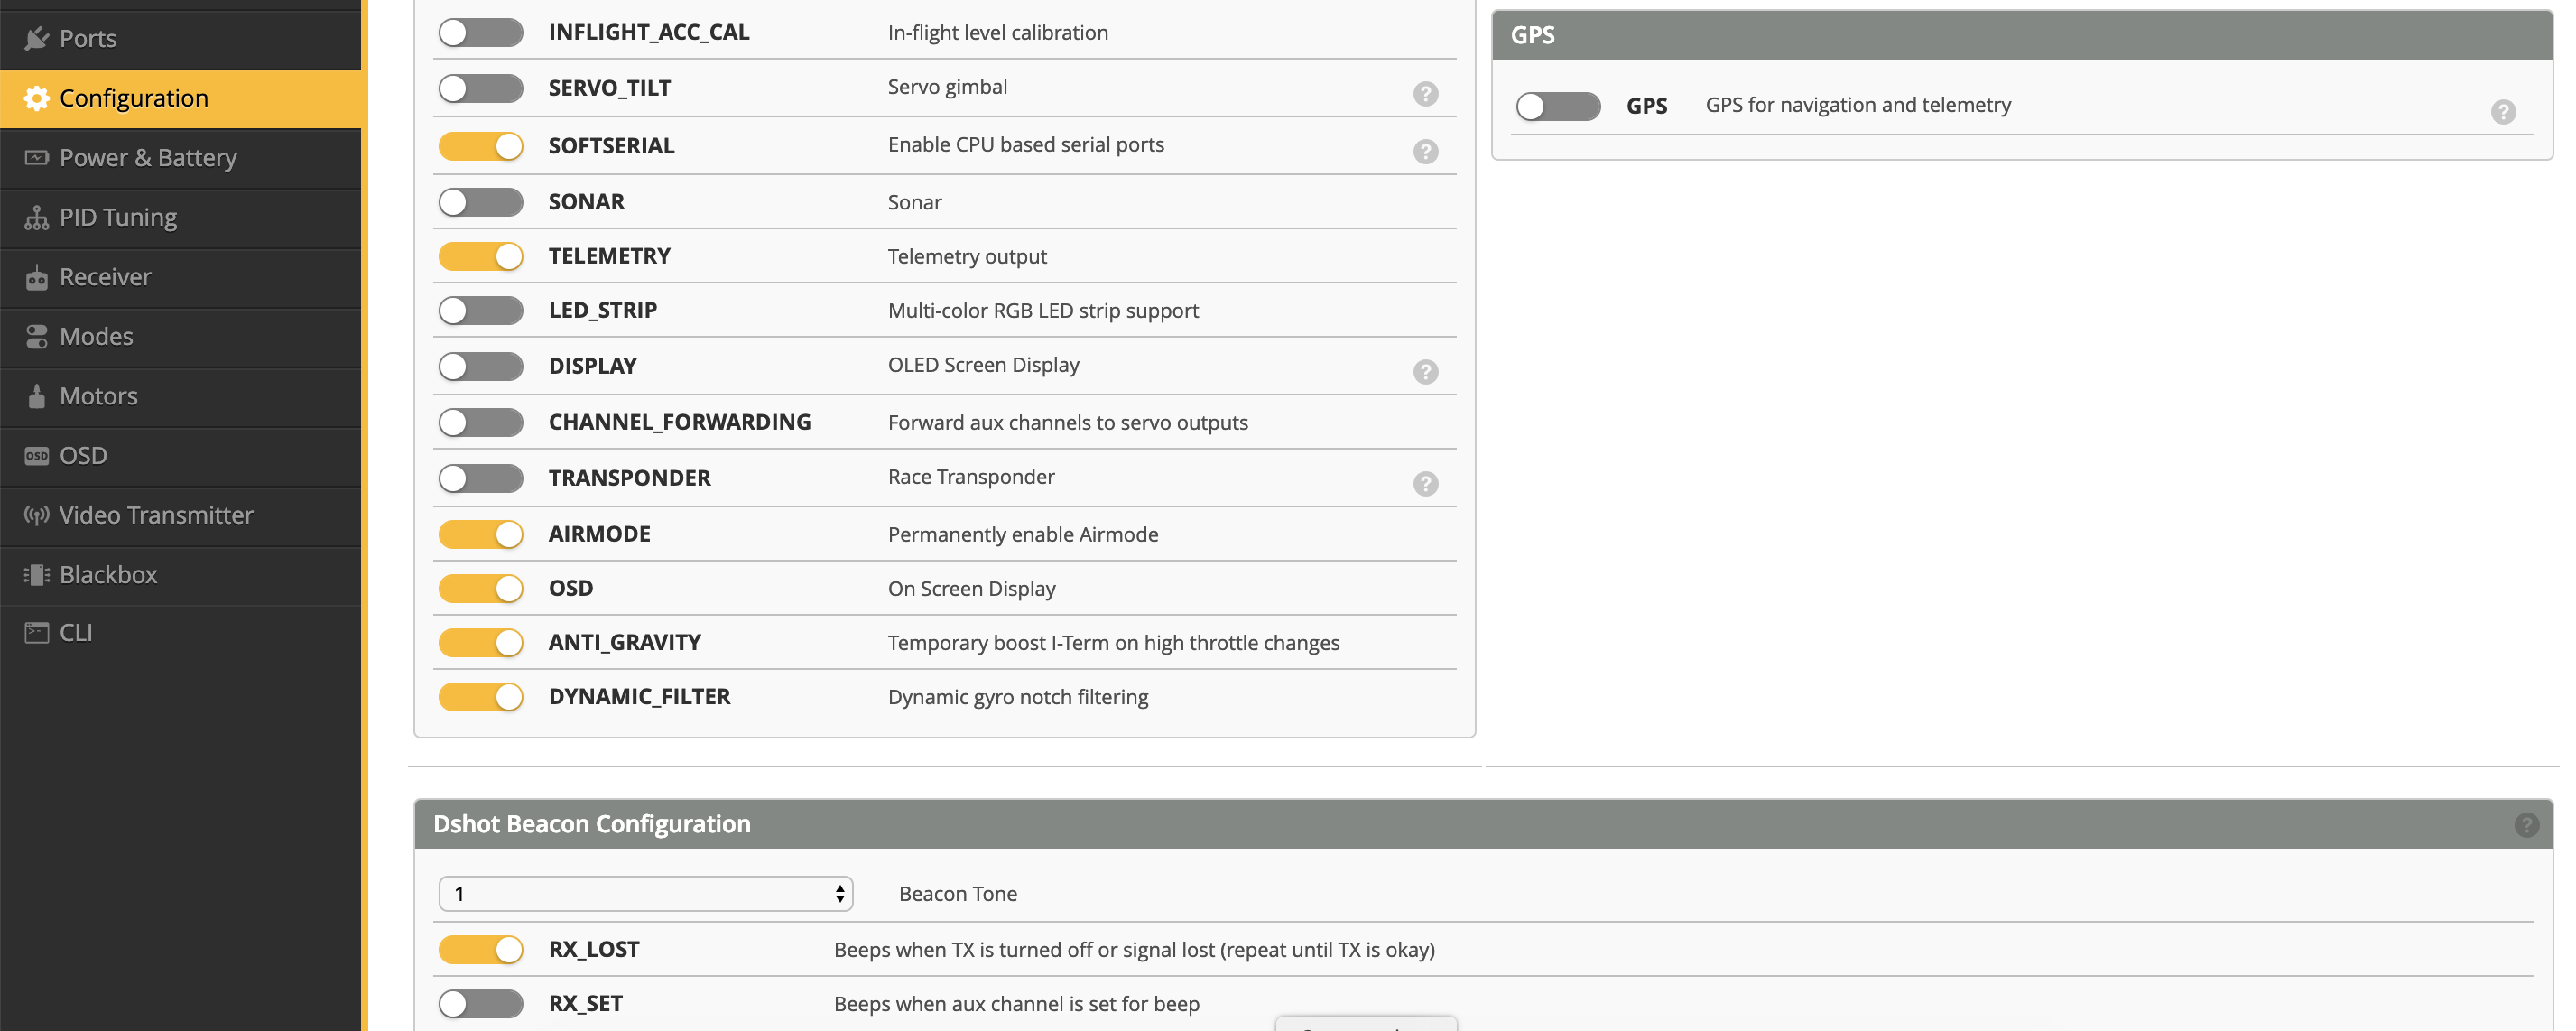
Configuration - Ensure AIRMODE and ANTI_GRAVITY are enabled...It will fly better. RX_LOST will make the Quad beep when there is no signal
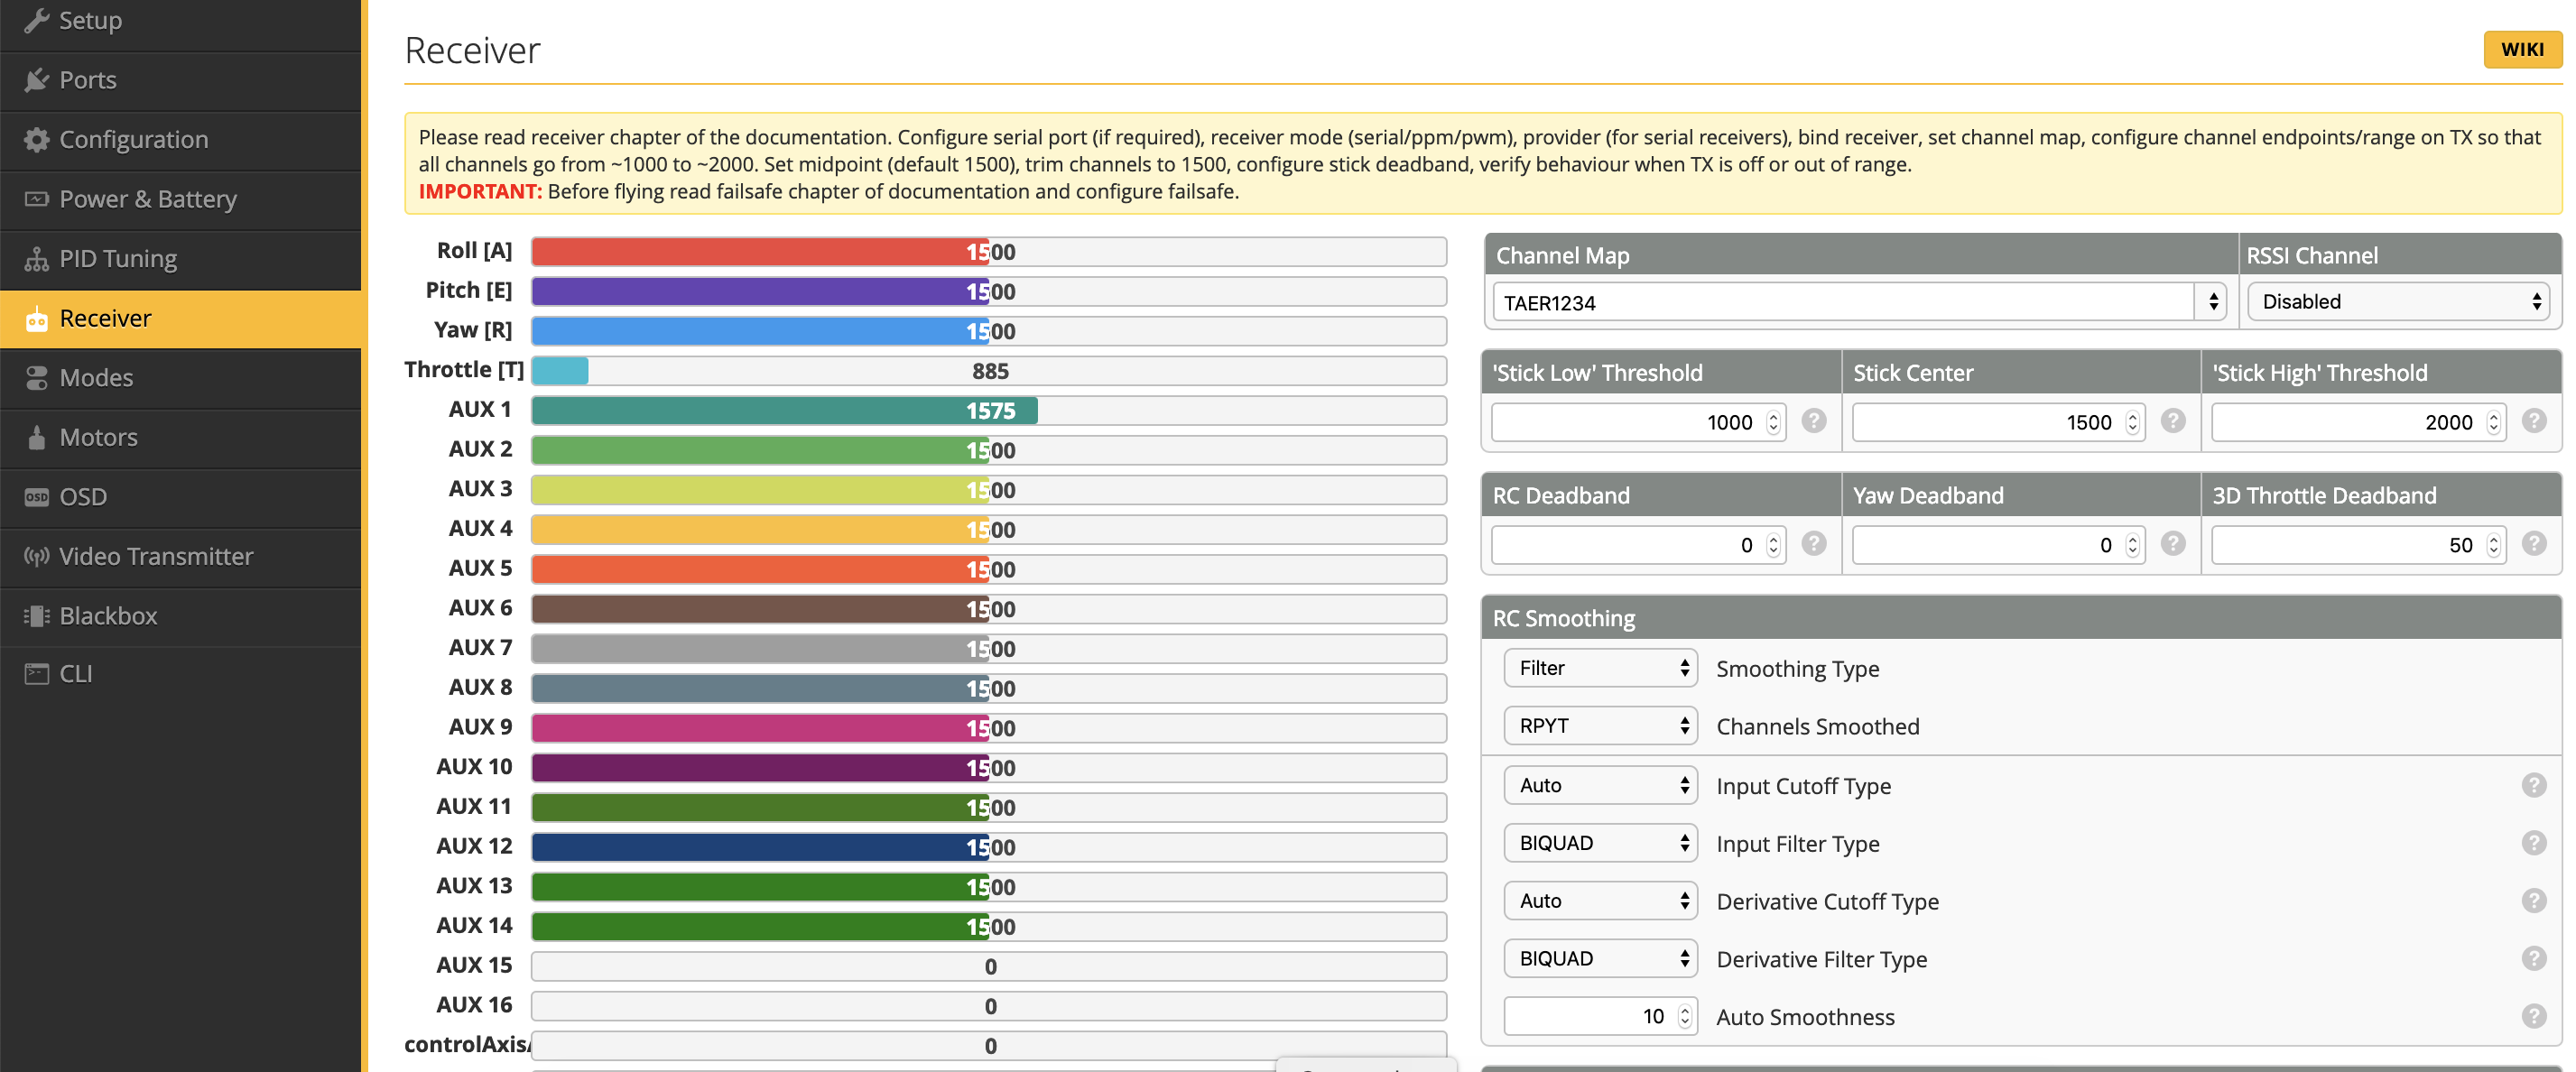
Receiver - Make sure Your throttle at its lowest is below the "Stick Low" setting - "Channel Map" is your Mode setup (it's a bit weird) changing the letters ("TAER" os correct for me as Mode 1 Spektrum) before the 1234 will change the order of your mapping.
- T = Throttle, A = Ailerons (Roll),
- E = Elevator (Pitch)
- R = Rudder (Yaw)
Click save after each letter order change, it's a bit of trial and error. I also adjusted my throttle end point in the Spektrum TX settings to get it under 1000 instead of changing that value in Betaflight
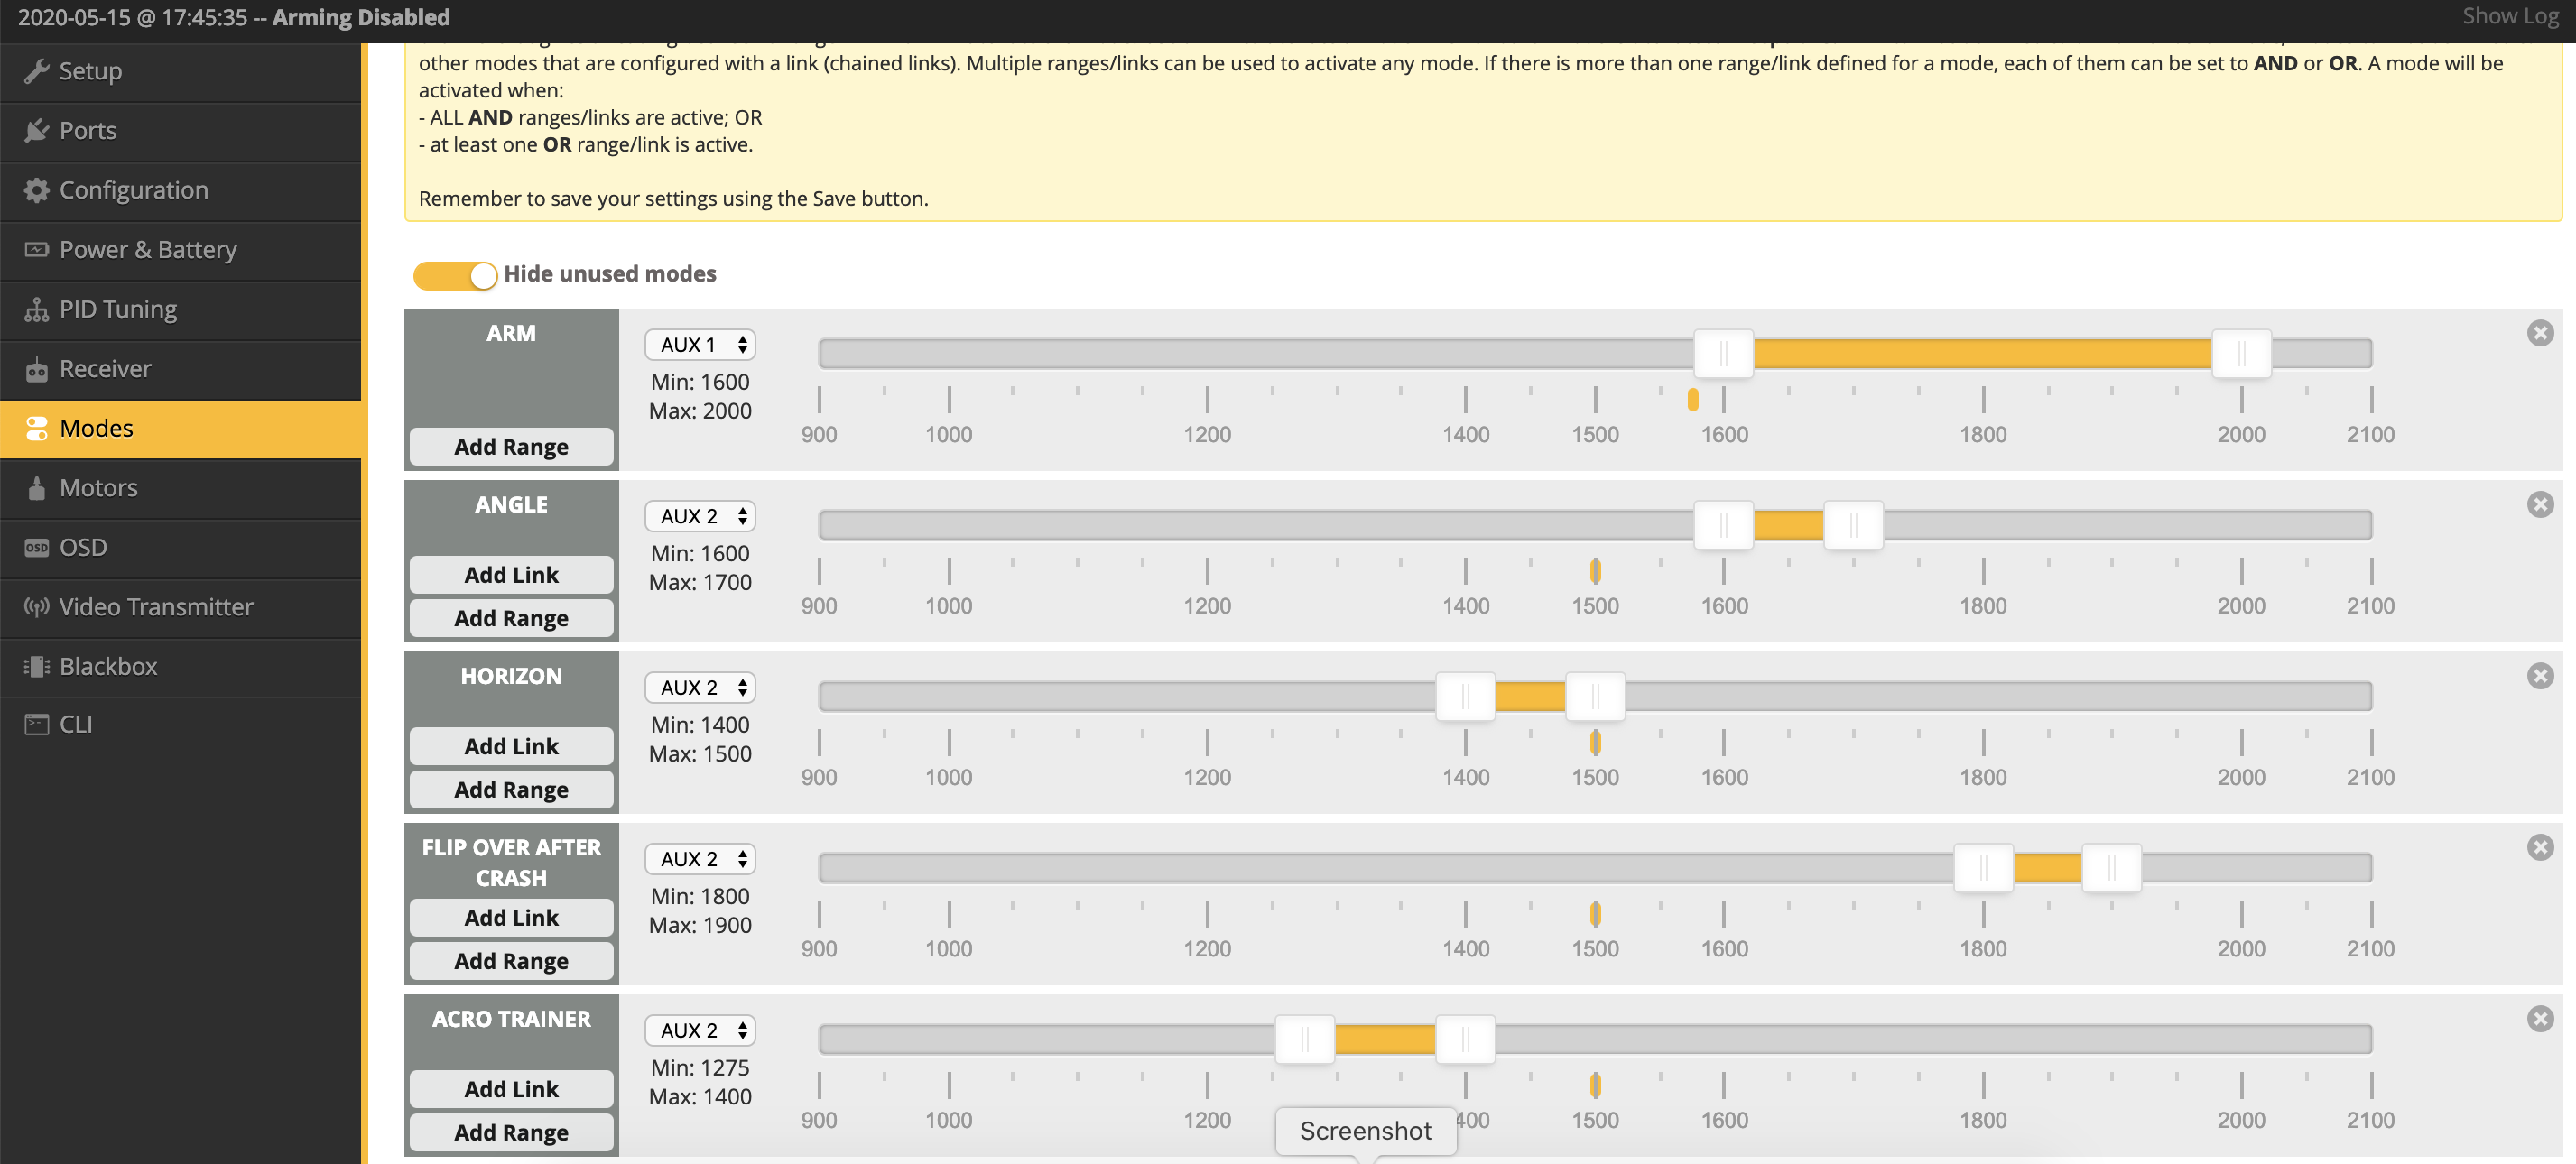
Modes: You MUST have ARM setup as a minimum, or Quad wont start at all .Google what the other modes mean, but in essence:
- Angle = Beginner (Self Level - Can't roll Quad)
- Horizon = Intermediate (Self Level - Can roll Quad)
- Acro Trainer = Advanced (No Self Level - Quad Roll is slowed)
- Acro Mode (the default) = All modes off, which is like switching all safety features and traction control off in your car. It's fun, once you're ready!!
- Flip Over after crash - does exactly that...
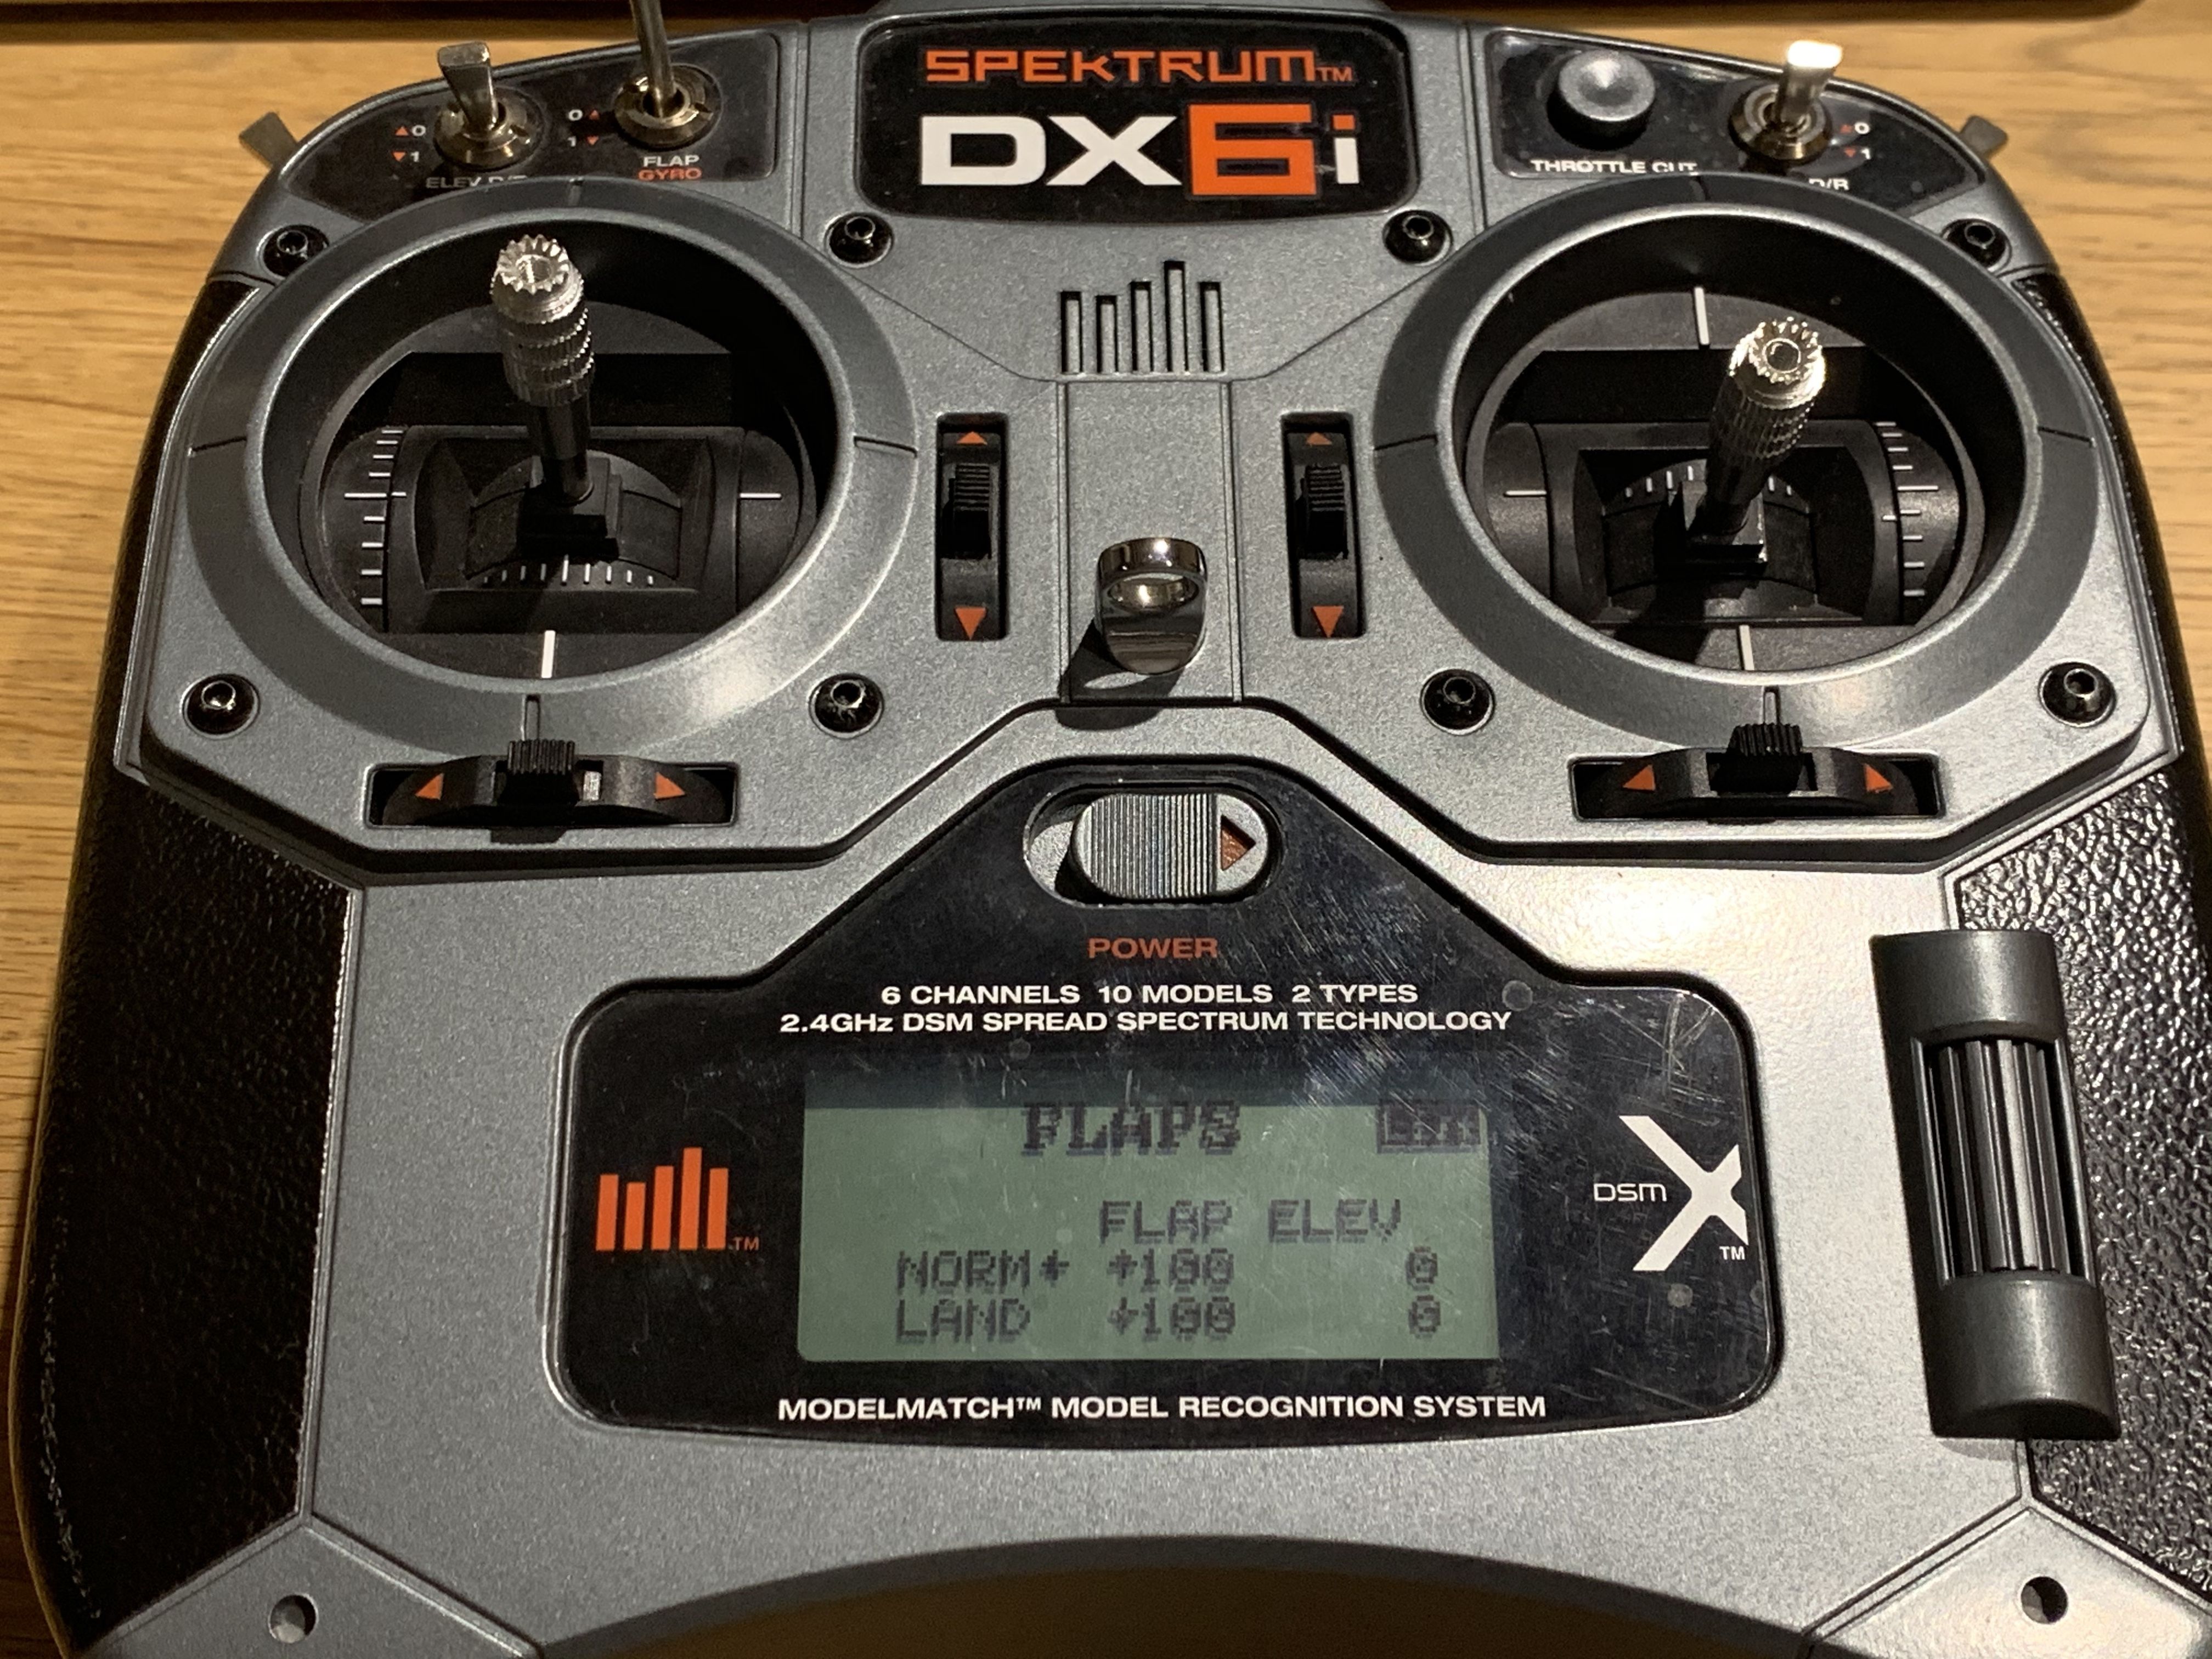
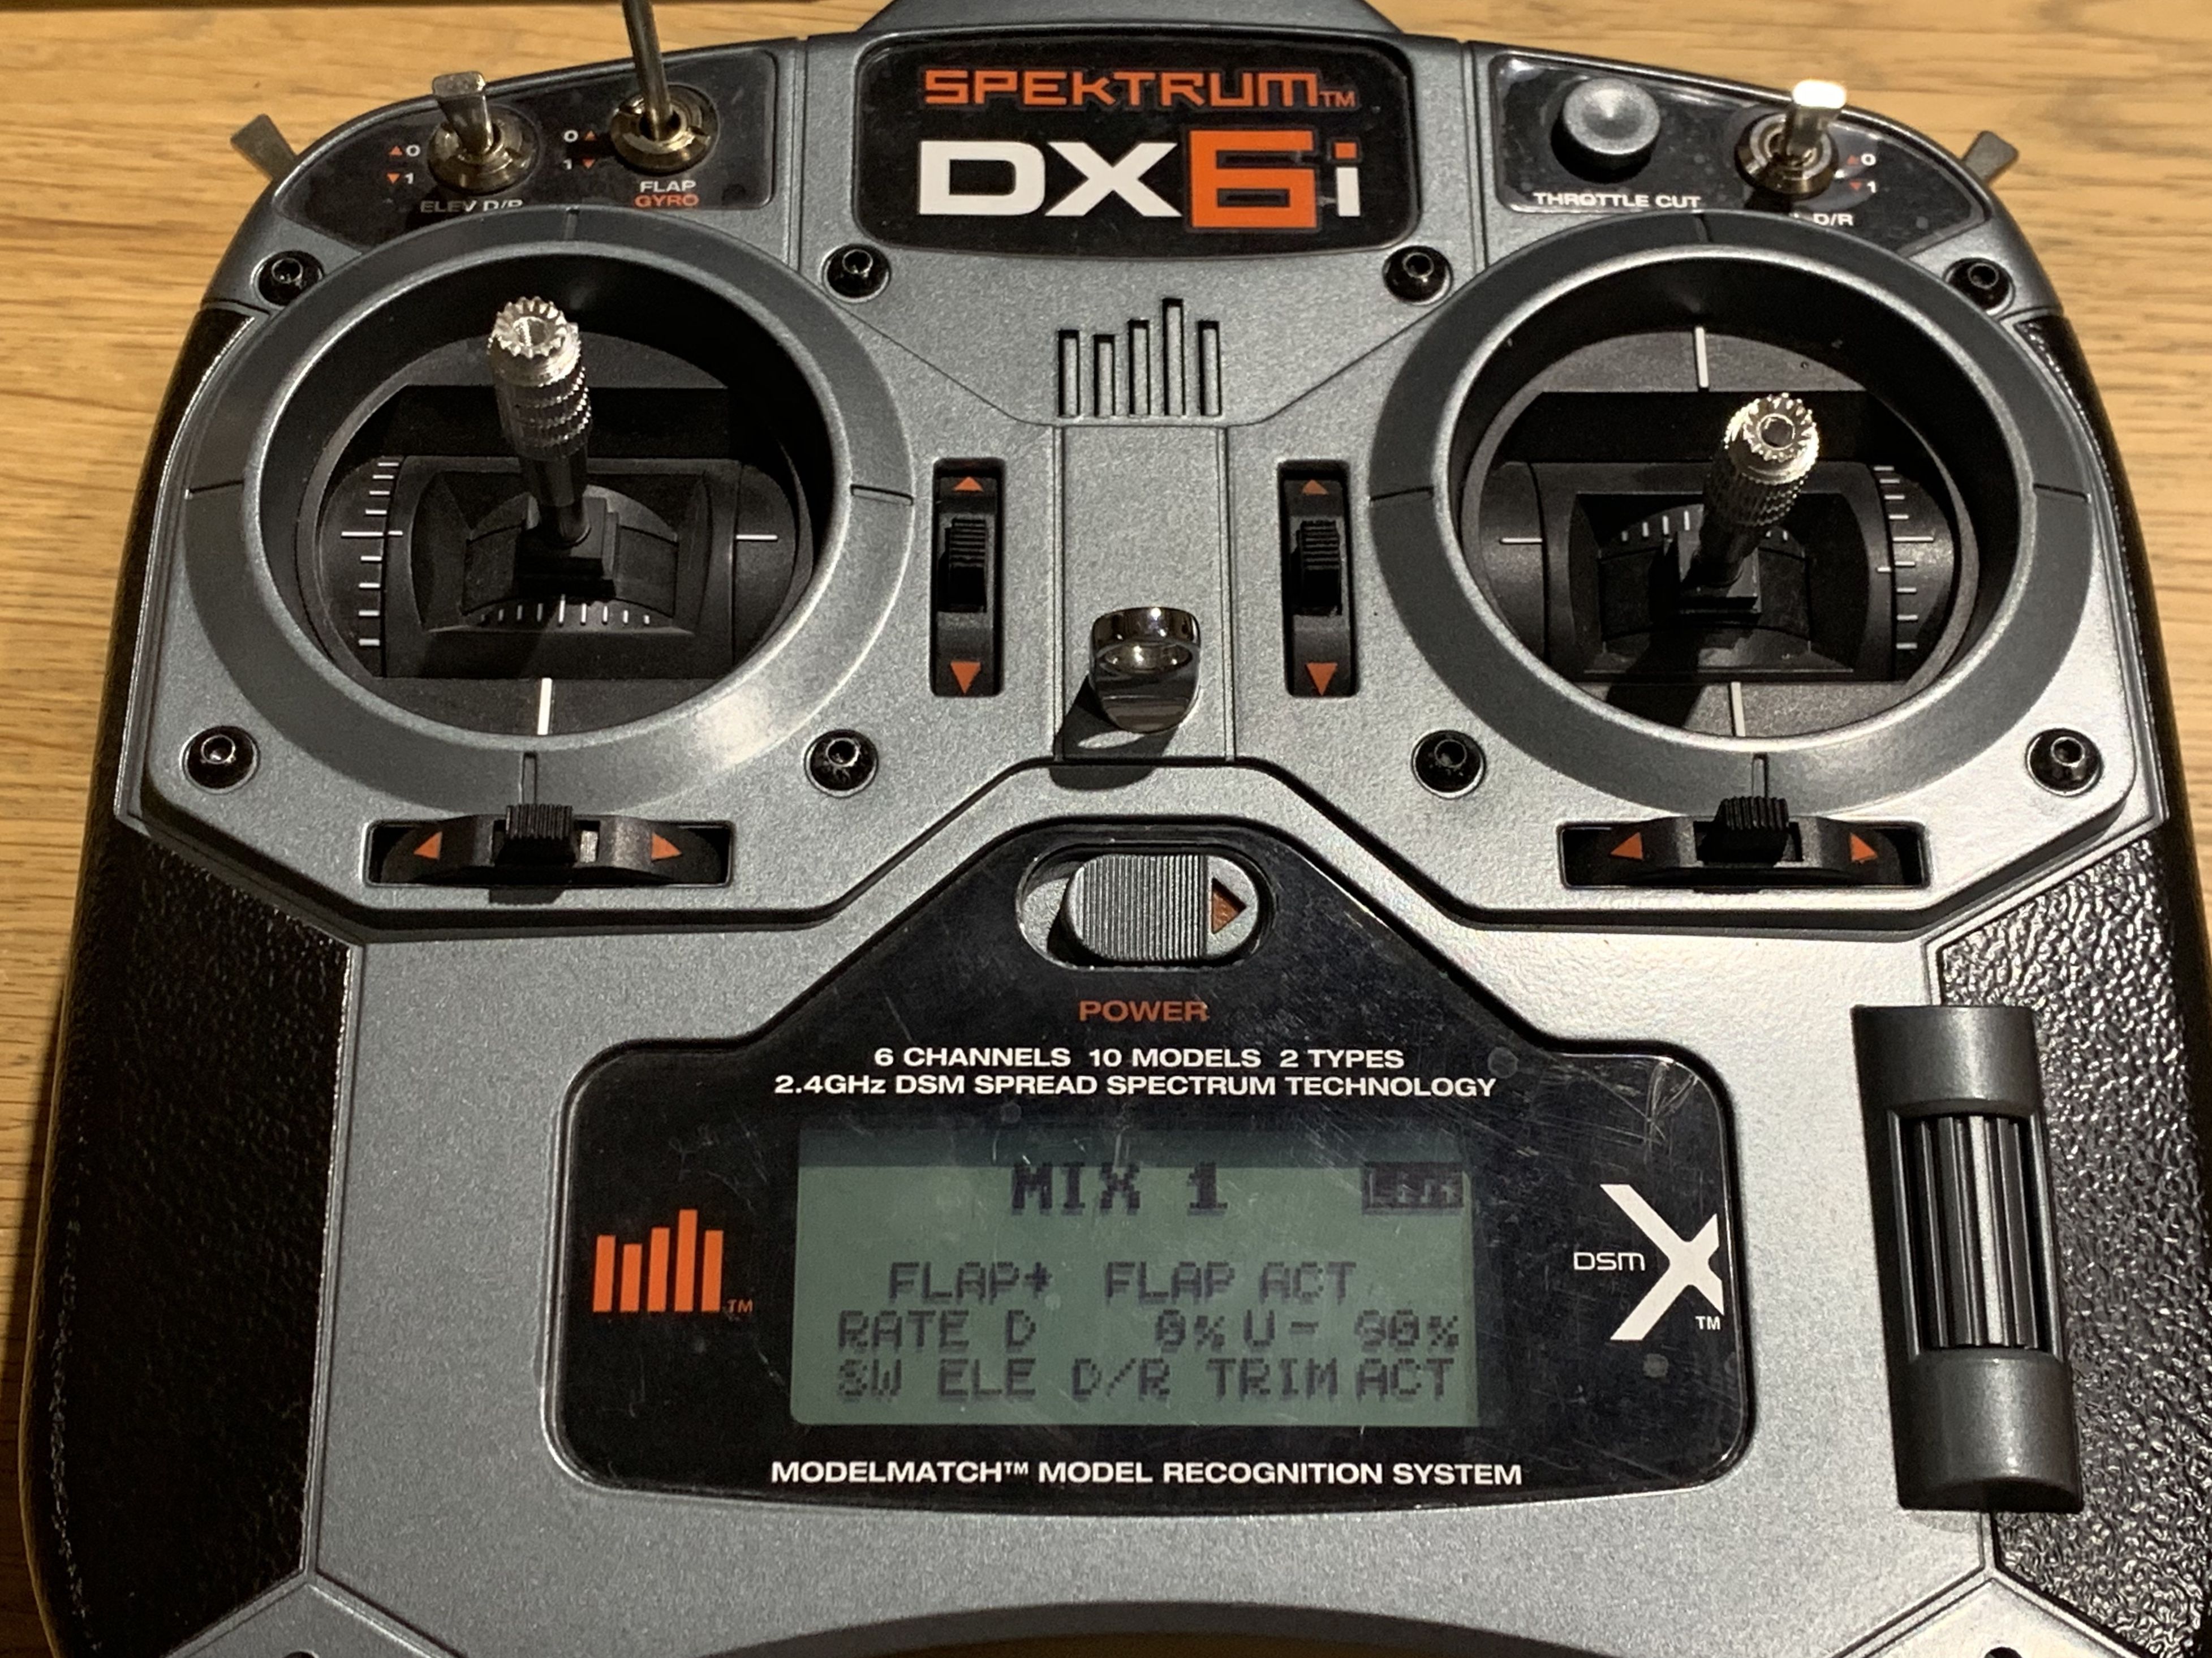
My Spektrum DX6i only has 2 AUX channels - "Gear/ FMode" switch = AUX 1 and the "FLAP Gyro" switch = AUX 2. I used AUX 1 for the ARM mode to Arm and Disarm the Quad. I used AUX 2 for the other 5 modes by using settings in the TX to give me effectively 5 different positions for the AUX2 by using combinations of the "Elev D/R" switch, "Flaps/Gyro" switch, "AIL D/R" switch. Here is what I did:
-
In Spektrum DX6i - Setup the Flaps Like this:
-
In Spektrum DX6i - Setup the Mix 1 Like this:
- In Spektrum DX6i - Setup the Mix 2 Like this:
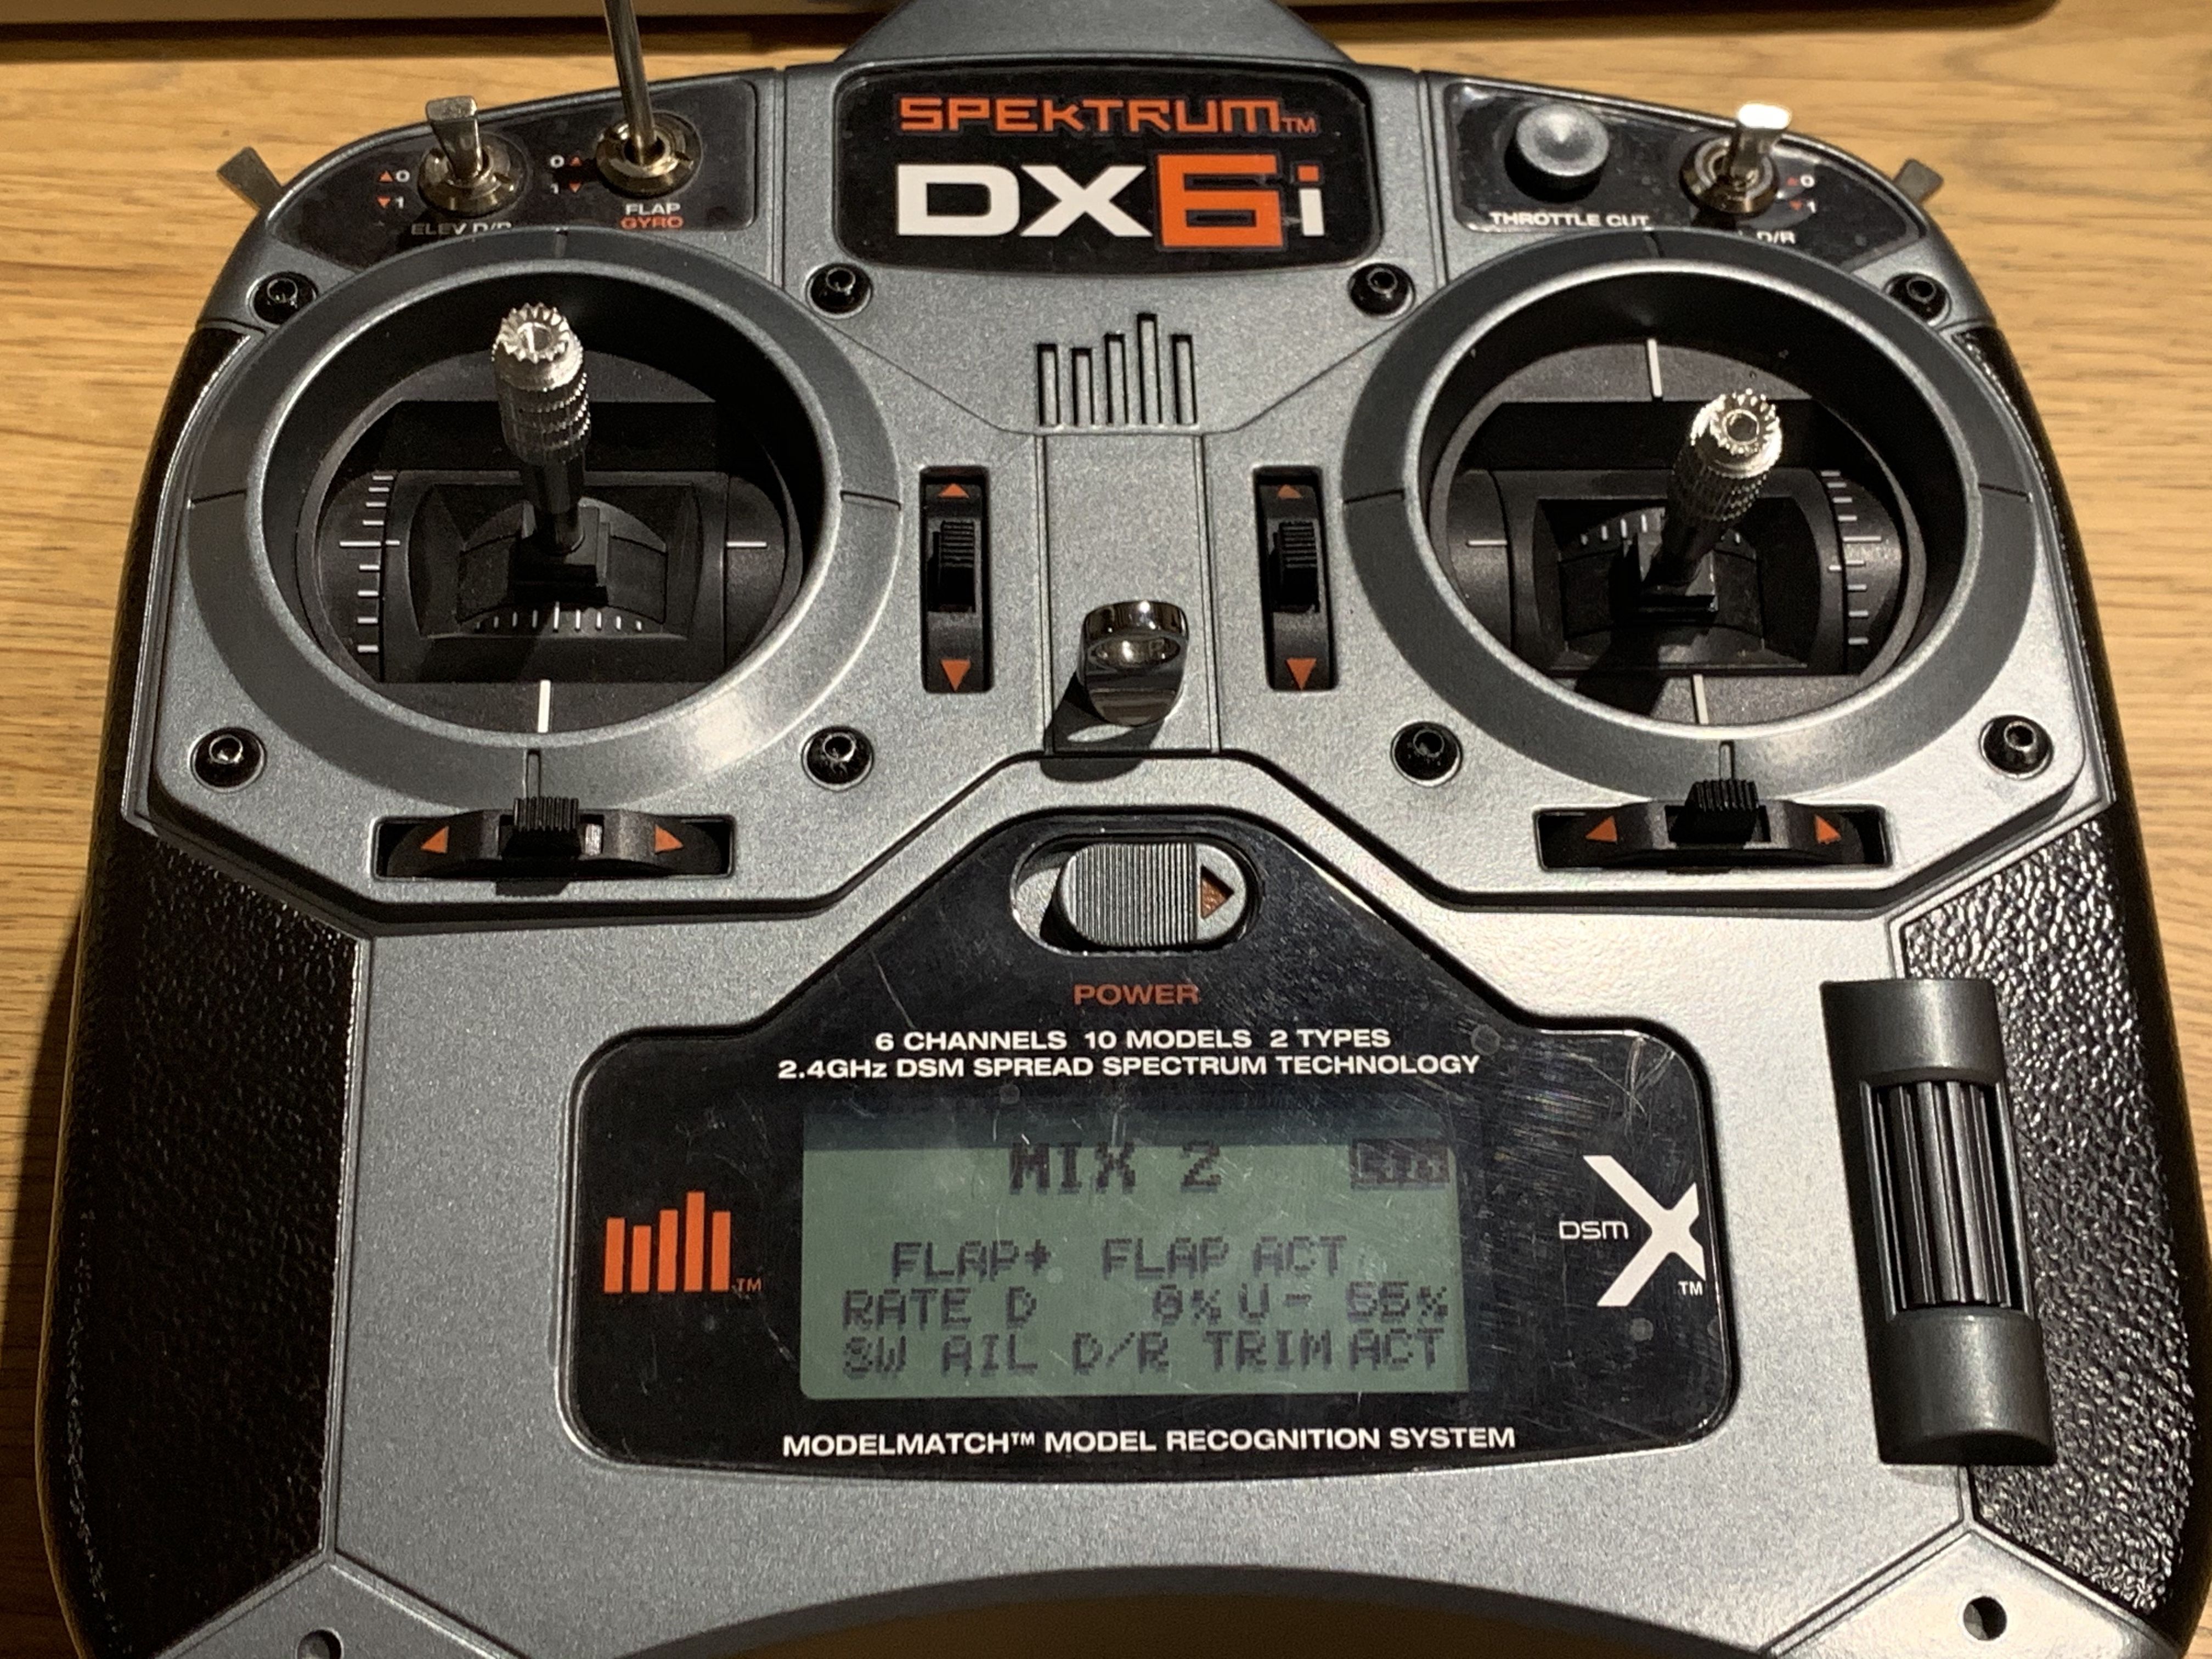
NOTE: Always set up a TX that does not have a Quad model type as an "Airplane" not a Heli!!
The end result of my settings in the DX6i and the mapping ranges setup in the modes tab is:
- "Gear/ FMode" - Arms/ Disarms the Quad
- "Flap Gyro" - Flips the Quad if upside down after a crash
- "Elev DR" Switch AND "AIL D/R" switch both set to ON (1) = Angle Mode (beginner)
- "Elev DR" Switch set ON (1) AND "AIL D/R" set OFF (0) = Horizon (Intermediate)
- "Elev DR" Switch set OFF (0) AND "AIL D/R" set ON (1) = Acro Trainer (Advanced)
- Both "Elev DR" AND "AIL D/R" set to OFF (0) = Acro (no stability assistance - you are on your own...)
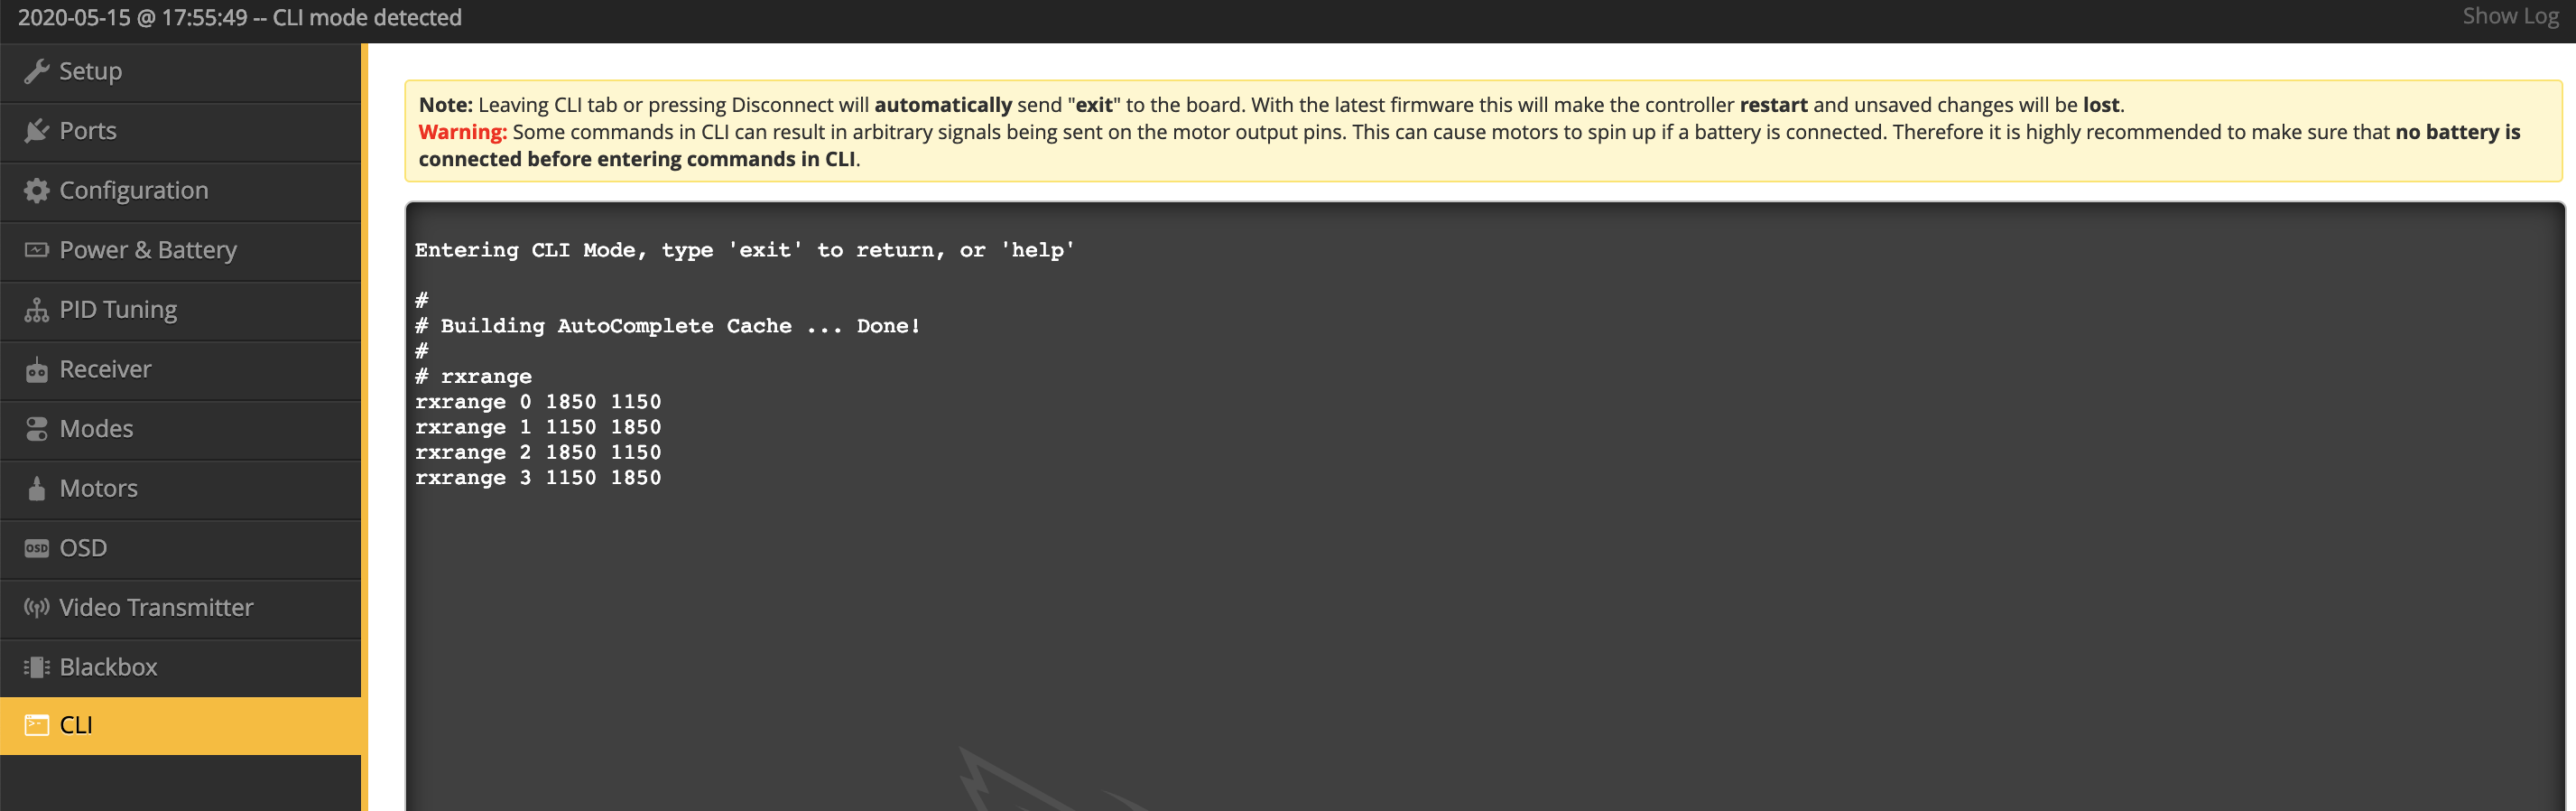
CLI - This is the scripting screen, you should not really need it for a basic setup. If you do need it, type your command in the box at the bottom and hit enter. NOTHING is saved until you type the "Save" command and hit enter.
I used CLI script settings to:
- Reverse some channels.b) Alter the expected range that my TX is sending the FC. The FC is expecting a range between 1000 and 2000 with middle points of 1500. My Spektrum was only sending around 1150 - 1850. Which was causing weirdness. Note it is better to adjust the end points in your TX if you can. My Spektrum DX6i could not adjust enough and only one direction.
Both these issues are solved with the same CLI command which is "RXRange" - If you type that and enter, it will show you your current settings. By default all channels will be set 1000 - 2000. To modify settings type the full line for each channel 0-3 that you wish to change and hit enter. So to flip channel 0 if it was starting as "rxrange 0 1000 2000" just reverse the raneg by typing "rxrange 0 2000 1000" and hit enter. So on and so forth. TYPE "save" and hit enter when you're done.
To adjust the normal range that your FC is expecting, change the values 1000 and 2000 to what you need. (Calibrate your TX prior to this is possible) - So in my settings above, I reversed Channel 0 and Channel 2 and changed the expected range for all channels.
Note: Check the range your TX is sending in the "Receiver" tab and move the sticks around and note the high and low values per channel.
Channels are mapped as:
- 0 = Ailerons (Roll)
- 1 = Elevator (Pitch)
- 2 = Rudder (Yaw)
- 3 = Throttle
Setting up the Props (For all the NOOBS out there like me - who want all the info in one spot)
- The props are not all the same; you have CW and CCW props.
- Motors spin in different directions to match the props.
- Test motor direction in Betaflight (ALWAYS with props removed!!!!) and start motors in the motors tab. Touch the edge of the case when moving slowly and feel the way it pulls your finger
- Regular setup is: - Front Left spins ClockWise- Front Right Spin Counter ClockWise, - Rear Left Spins Counter ClockWise - Rear Right Spins ClockWise.
- When installing the props, push them all the way down first (they will be tight). Then screw them down tight enough that they dont slip but dont over crank it.
Hope this helps / inspires anyone especially someone attempting a first build
Photos
Part List
Show stores (8)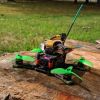
Nice write up!
One note, you might want to setup your RX antenna in an "L" shape, with one vertical, and the other sticking straight out the back of the quad. I've moved to Crossfire, but was running Spektrum and unlike Frsky, Spektrum tends to be more sensitive to antenna placement (I had my antenna setup as you showed in the pics, and failsafed regularly until moving to the "L" configuration). Also, make sure to enable Telemetry and add RSSI to your OSD. It’s a great feature of SRXL2!
Guides & Reviews

AirbladeUAV has done it again and this time they've brought long range to the 5" class! Based on the popular Transformer Mini, the new Transformer 5" Ultralight adopts a lot of the same design philosophies with larger props and more payload capacity. It can fly upwards of 20 minutes on a 4 cell Li-Ion battery pack and in ideal conditions it's got a range of over 4 to 5 miles. In this guide I'll walk..
Read more
With the release of the DJI FPV Drone cinematic FPV has become a lot more accessible, but you certainly don't want to crash a $750 drone! The QAV-CINE Freybott is a compact, lightweight cinematic FPV drone that can take a hit and keep going. It's a lot safer to fly indoors and around people. With a naked GoPro or the SMO 4k you can capture some great stabilized footage. In this guide I'll show you..
Read more


Lanzo, great write up! im in the process of building my first FPV mini, a Diatone Y4.
I was given the bare frame... now im close to $1000 into it as i didnt have goggles, controller, camera, etc.! other than the frame, my build is almost identical to yours! Im using a DX8... i wasnt aware of the Spektrum rx you used... ive got one on the way.
Are you planning to use Spektrum? If you are, I would HIGHLY advise against it. I switched to TBS Tango 2 shortly after I finished the initial build. The Spektrum had a failsafe and I crashed very badly the first time I flew it FPV. After research, the Spektrum tech is just not ideal for FPV. I got weird interference even just a few hundred meters away if the drone was not aiming the antenna at me. So even with clear line of sight, the control signal was glitchy with Spektrum. Even though I had perfect video, the controller was glitchy and then failed. The TBS Tango and nano rx gear solved that. Perfect signal now. I am now flying DJI digital for Video (using caddx on the drone) and TBS for control. If you go DJI you can also use their controller. But I prefer the Tango.
thanks for the heads up! i currently fly a DX8 as well as a Futaba 14SG. Im sinking a "bundle o cash" on getting into FPV with DJI V2's, cams, controller etc, so i would hate to dig a crater because of my transmitter. just curious, why the Tango over DJI?
I have heard the DJI is great. My decision was based on:
a) liked the design of the hardware better (this was the main reason)
b) cheaper
c) liked the idea that I had a seperate signal for control. i.e if vision dropped behind a tree or something i could power up or hit failsafe switch and chances are the tango would still have a connection.
d) TBS has more telemetry options (i think)
after a lot of reading and youtubing, i am in complete agreement. the separate control is huge! the TBS does have more telemetry options, and apparently the TBS in combination with the crossfire has better range. i only have a couple 450 helis on Spektrum and a few foamie fixed wing. my bigger helis are all on Futaba. So may as well have a dedicated tx for quads!
i dug out a couple older quads that are on NAZE32! im thinking they need an upgrade now as well.