Fatshark SharkByte TX5S.1 65mm 1S using Boost Regulator
 By jason.gauruder on Oct 30, 2021
dont do this boost regular stuff anymore!!!
get the hdzero lite whoop bundle instead!!!
https://www.hd-zero.com/product-page/hdzero-whoop-lite-bundle
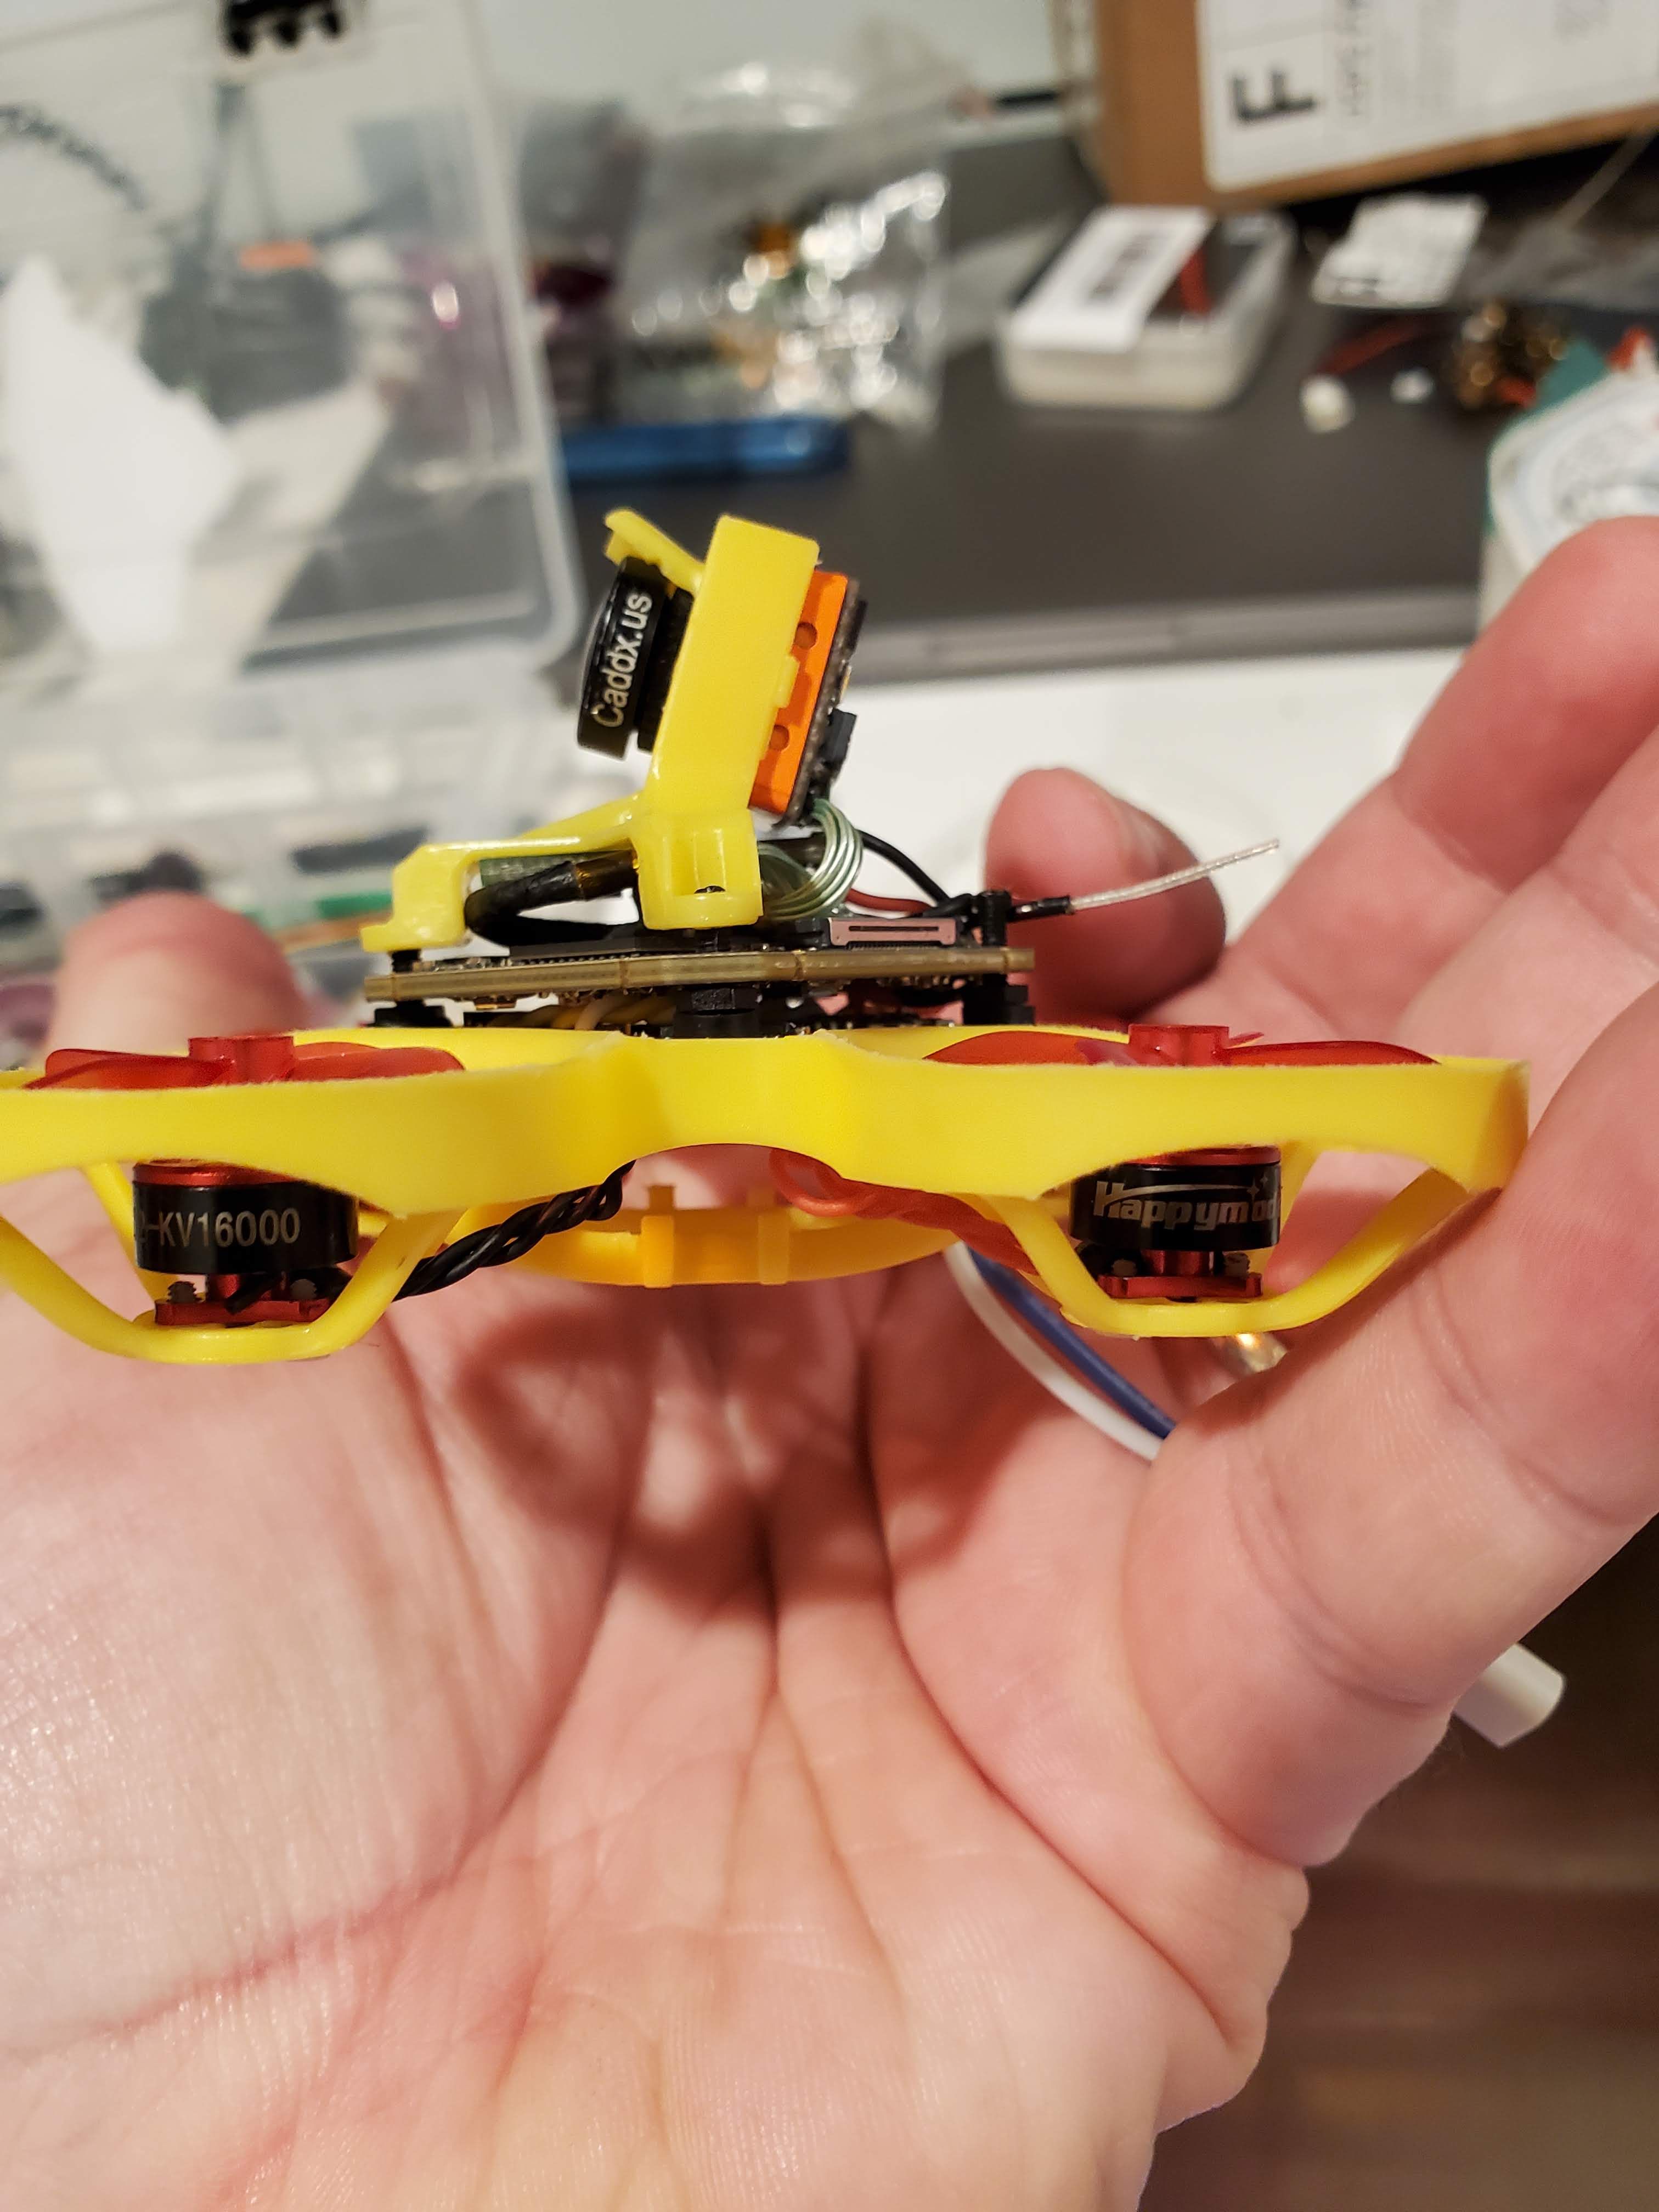
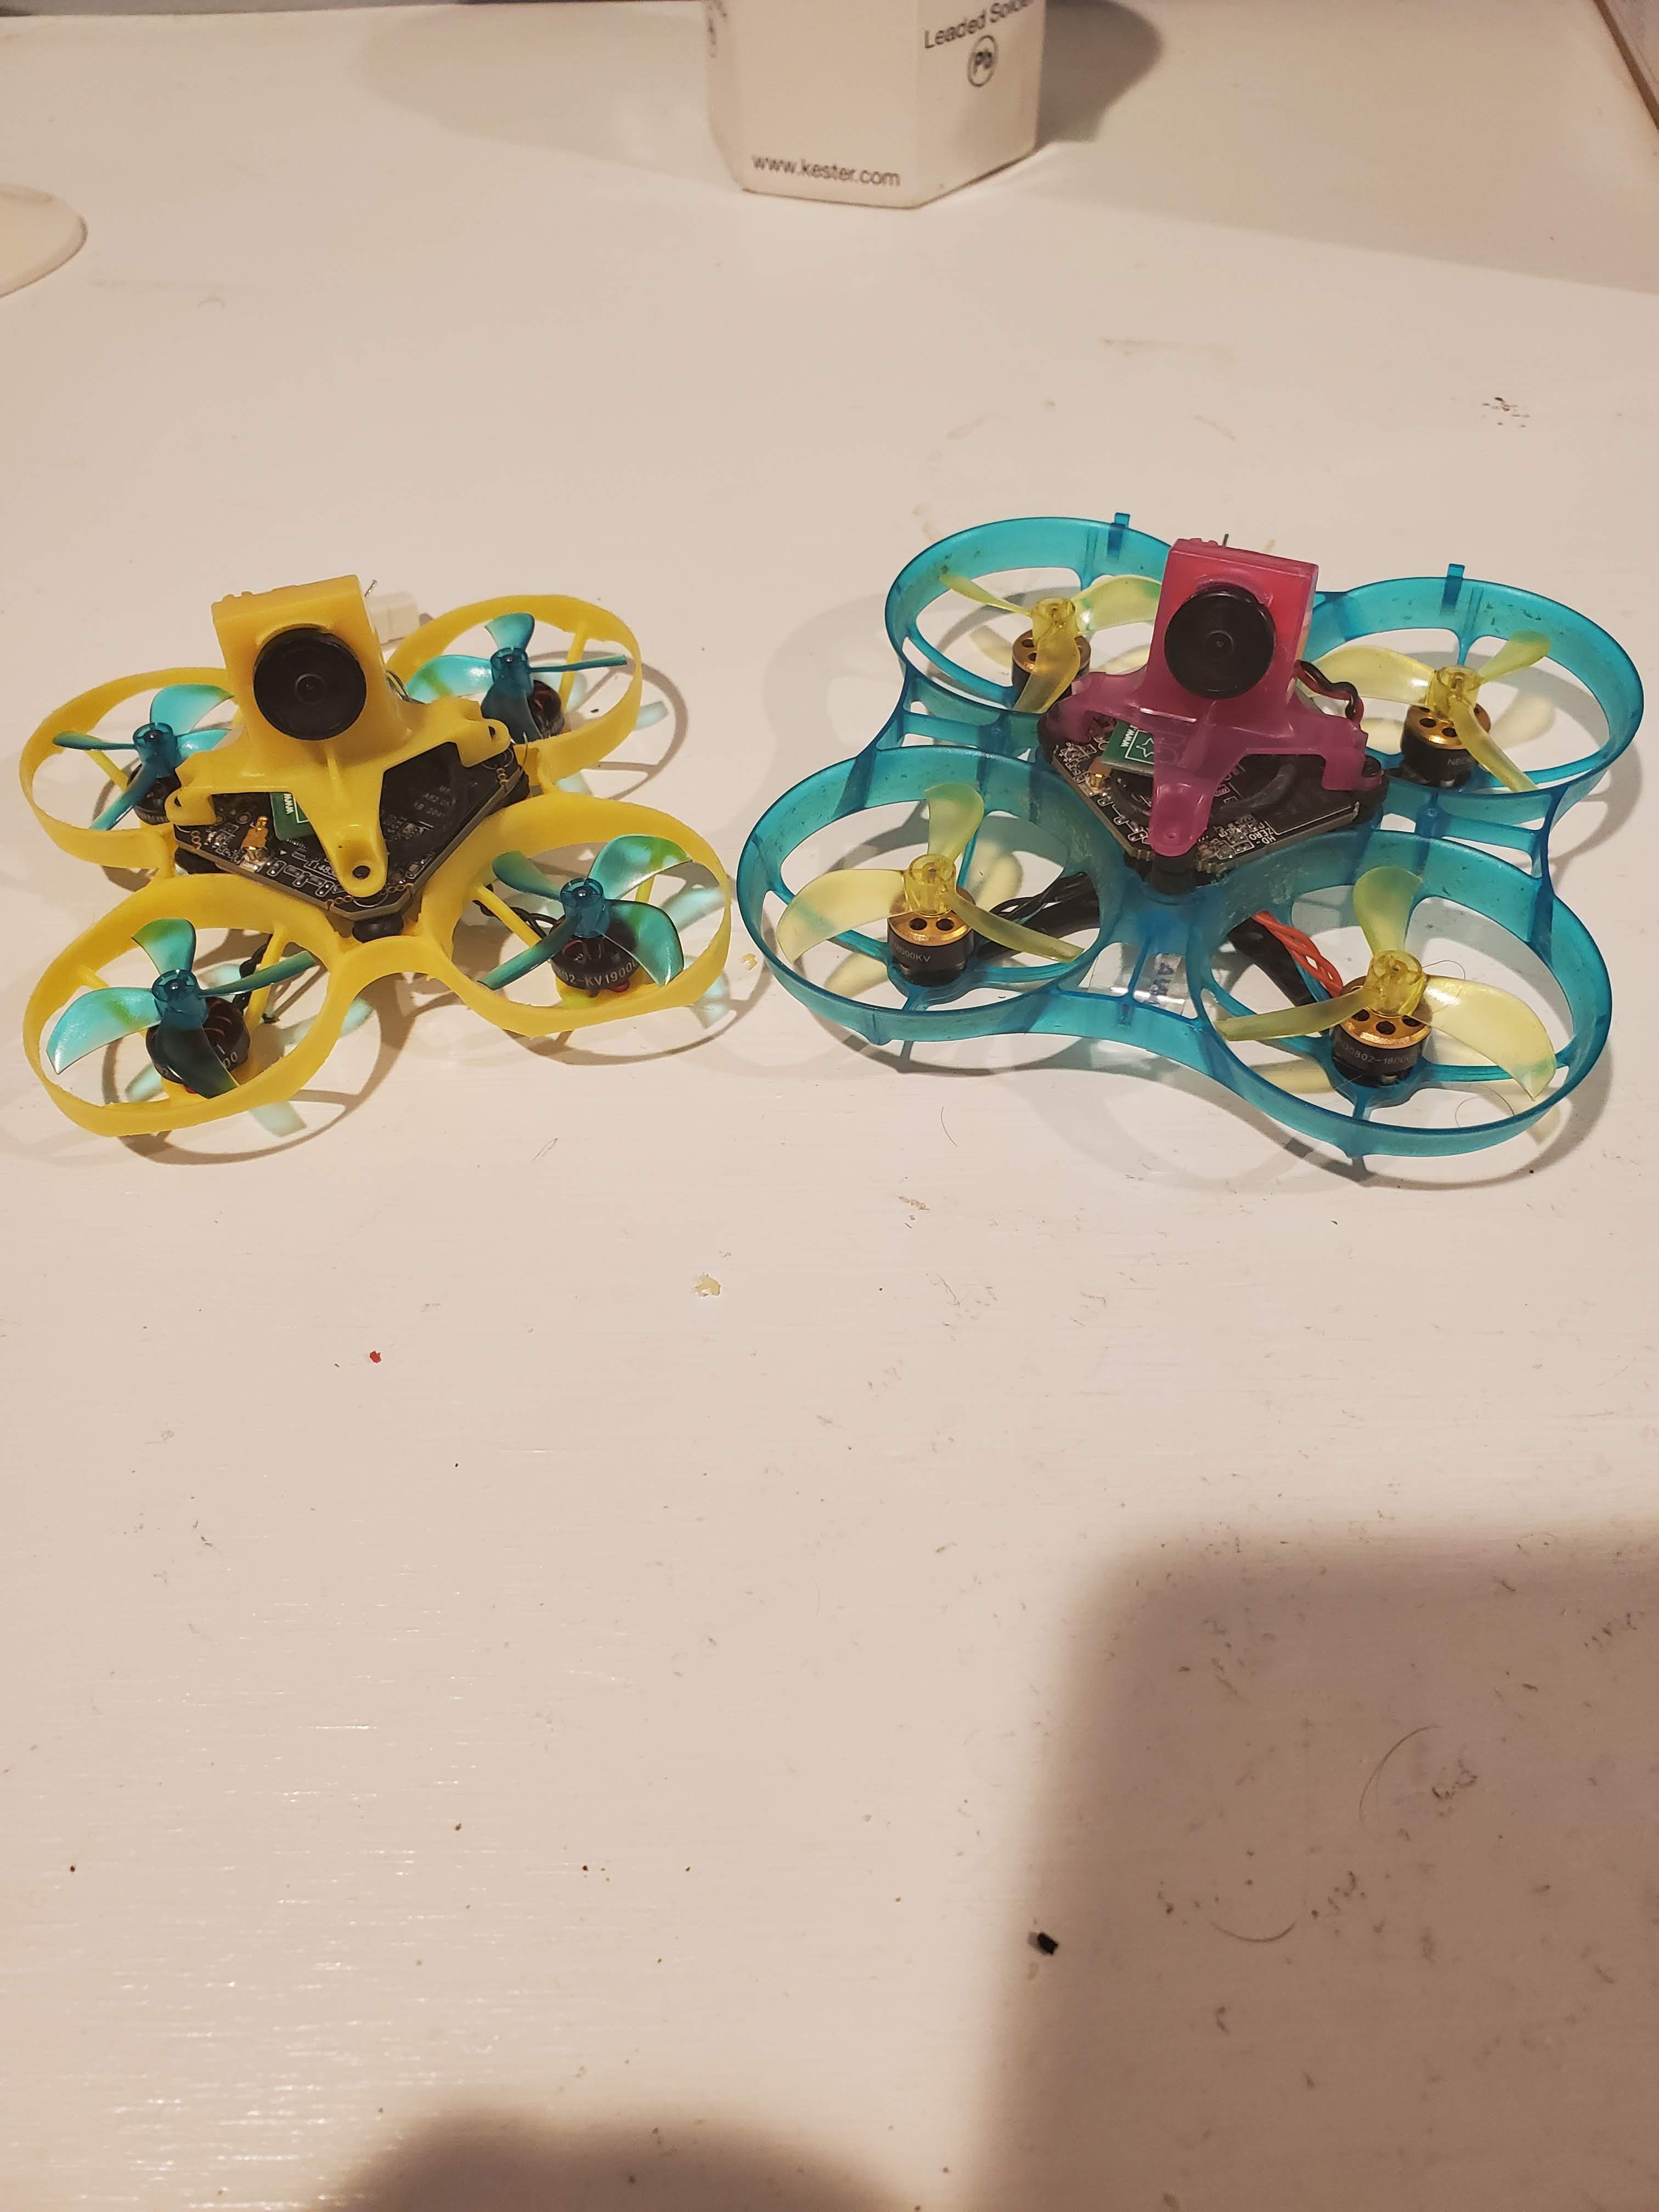
Here is my first HD-ZERO/SharkByte Digital 1s build using a 65mm frame. This is meant for a demonstration only. Could you "race" in a whoop race with it ? not competively. But I'm getting excited for a hopefully not too distant 1s whoop board offering from HD-ZERO !
Here is the parts list :
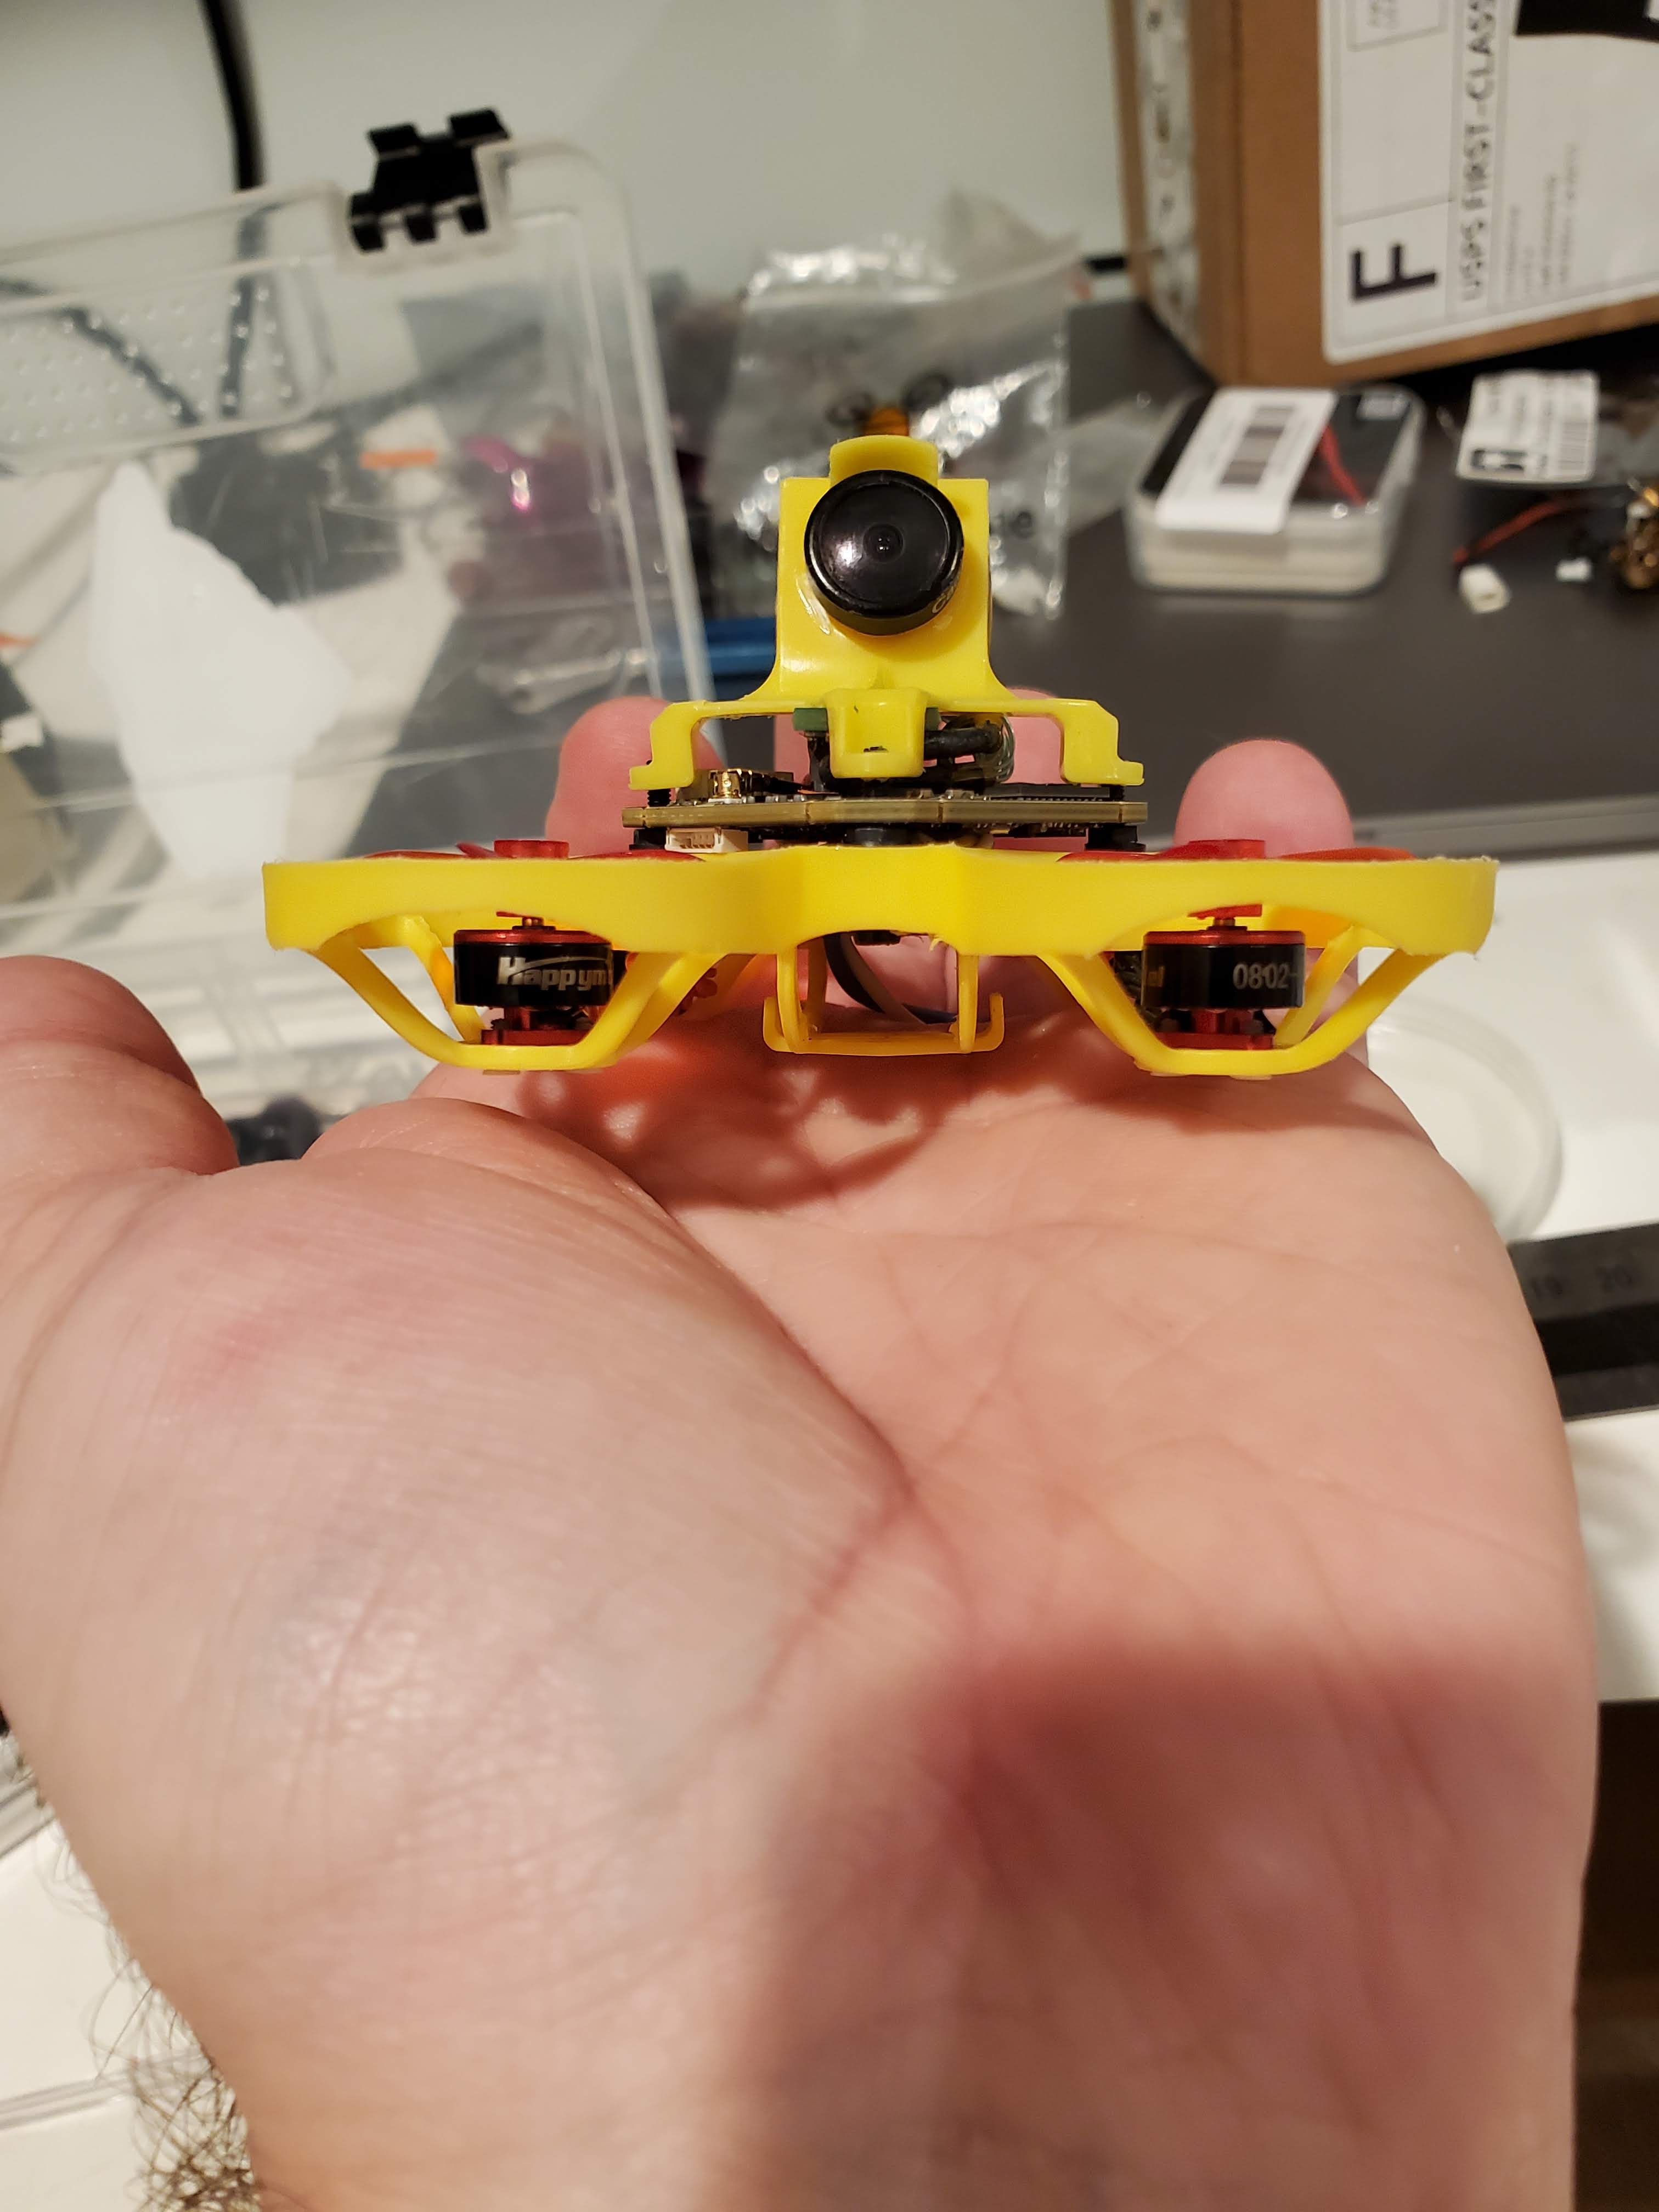
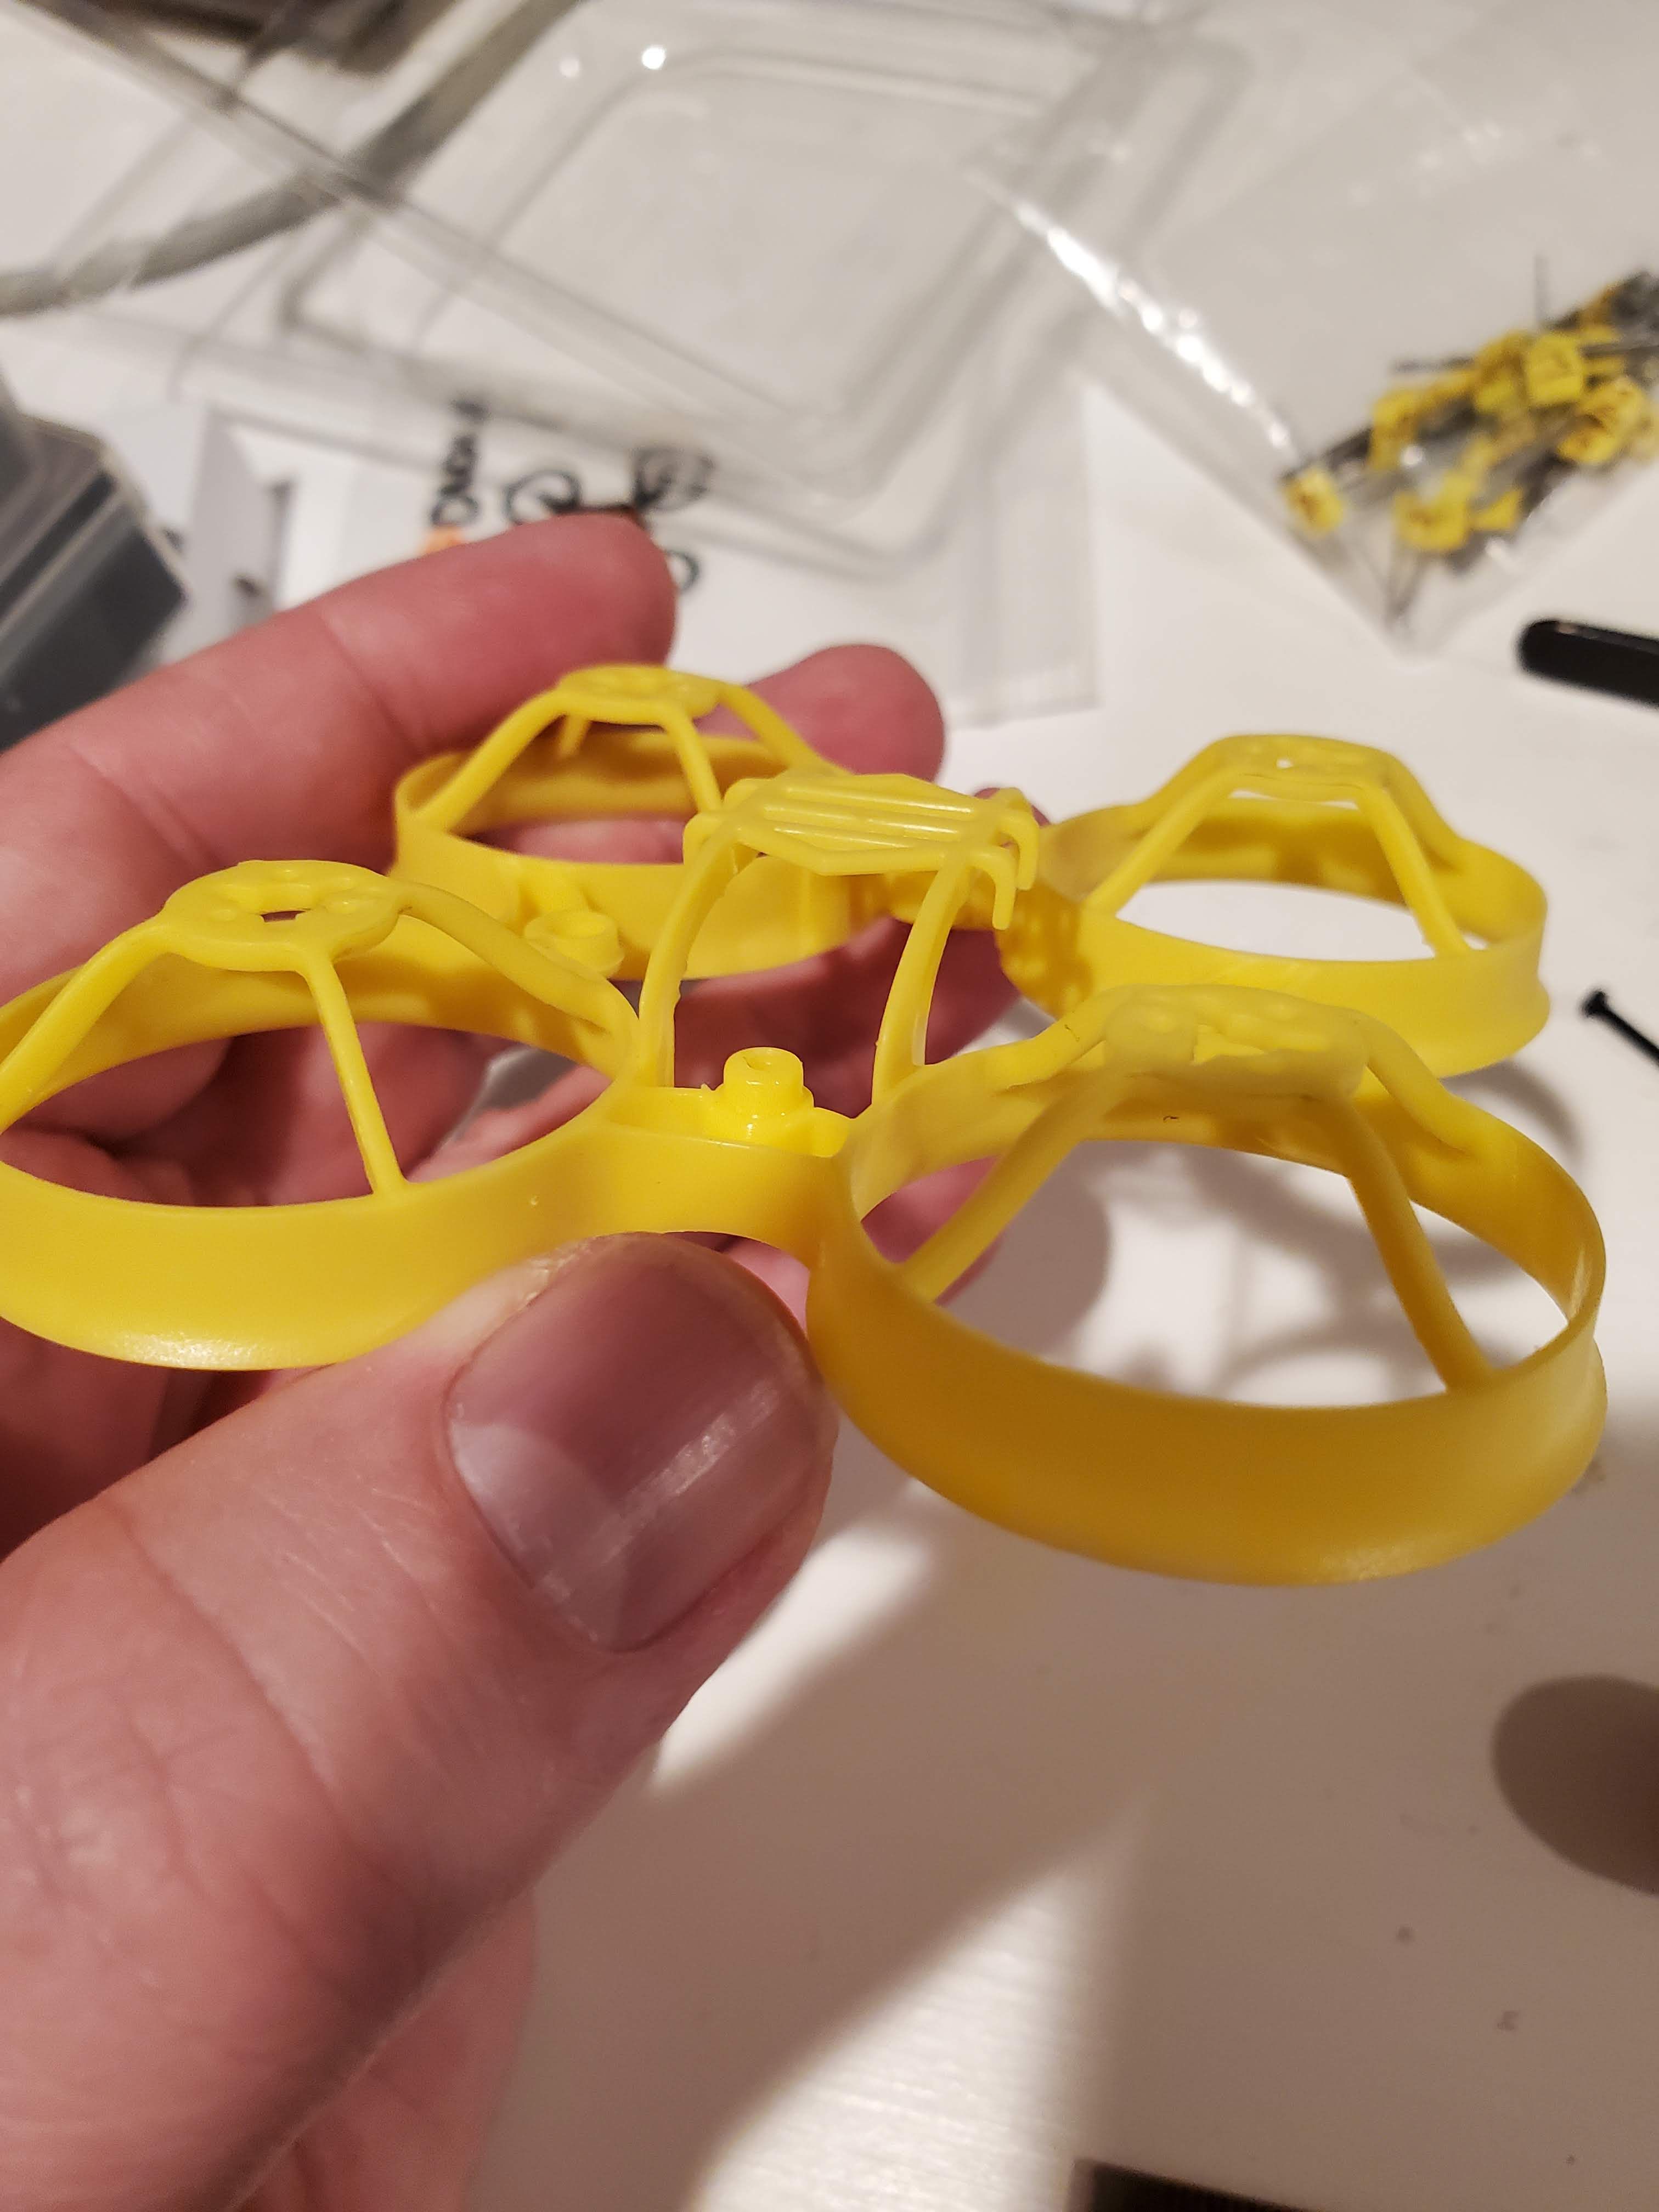
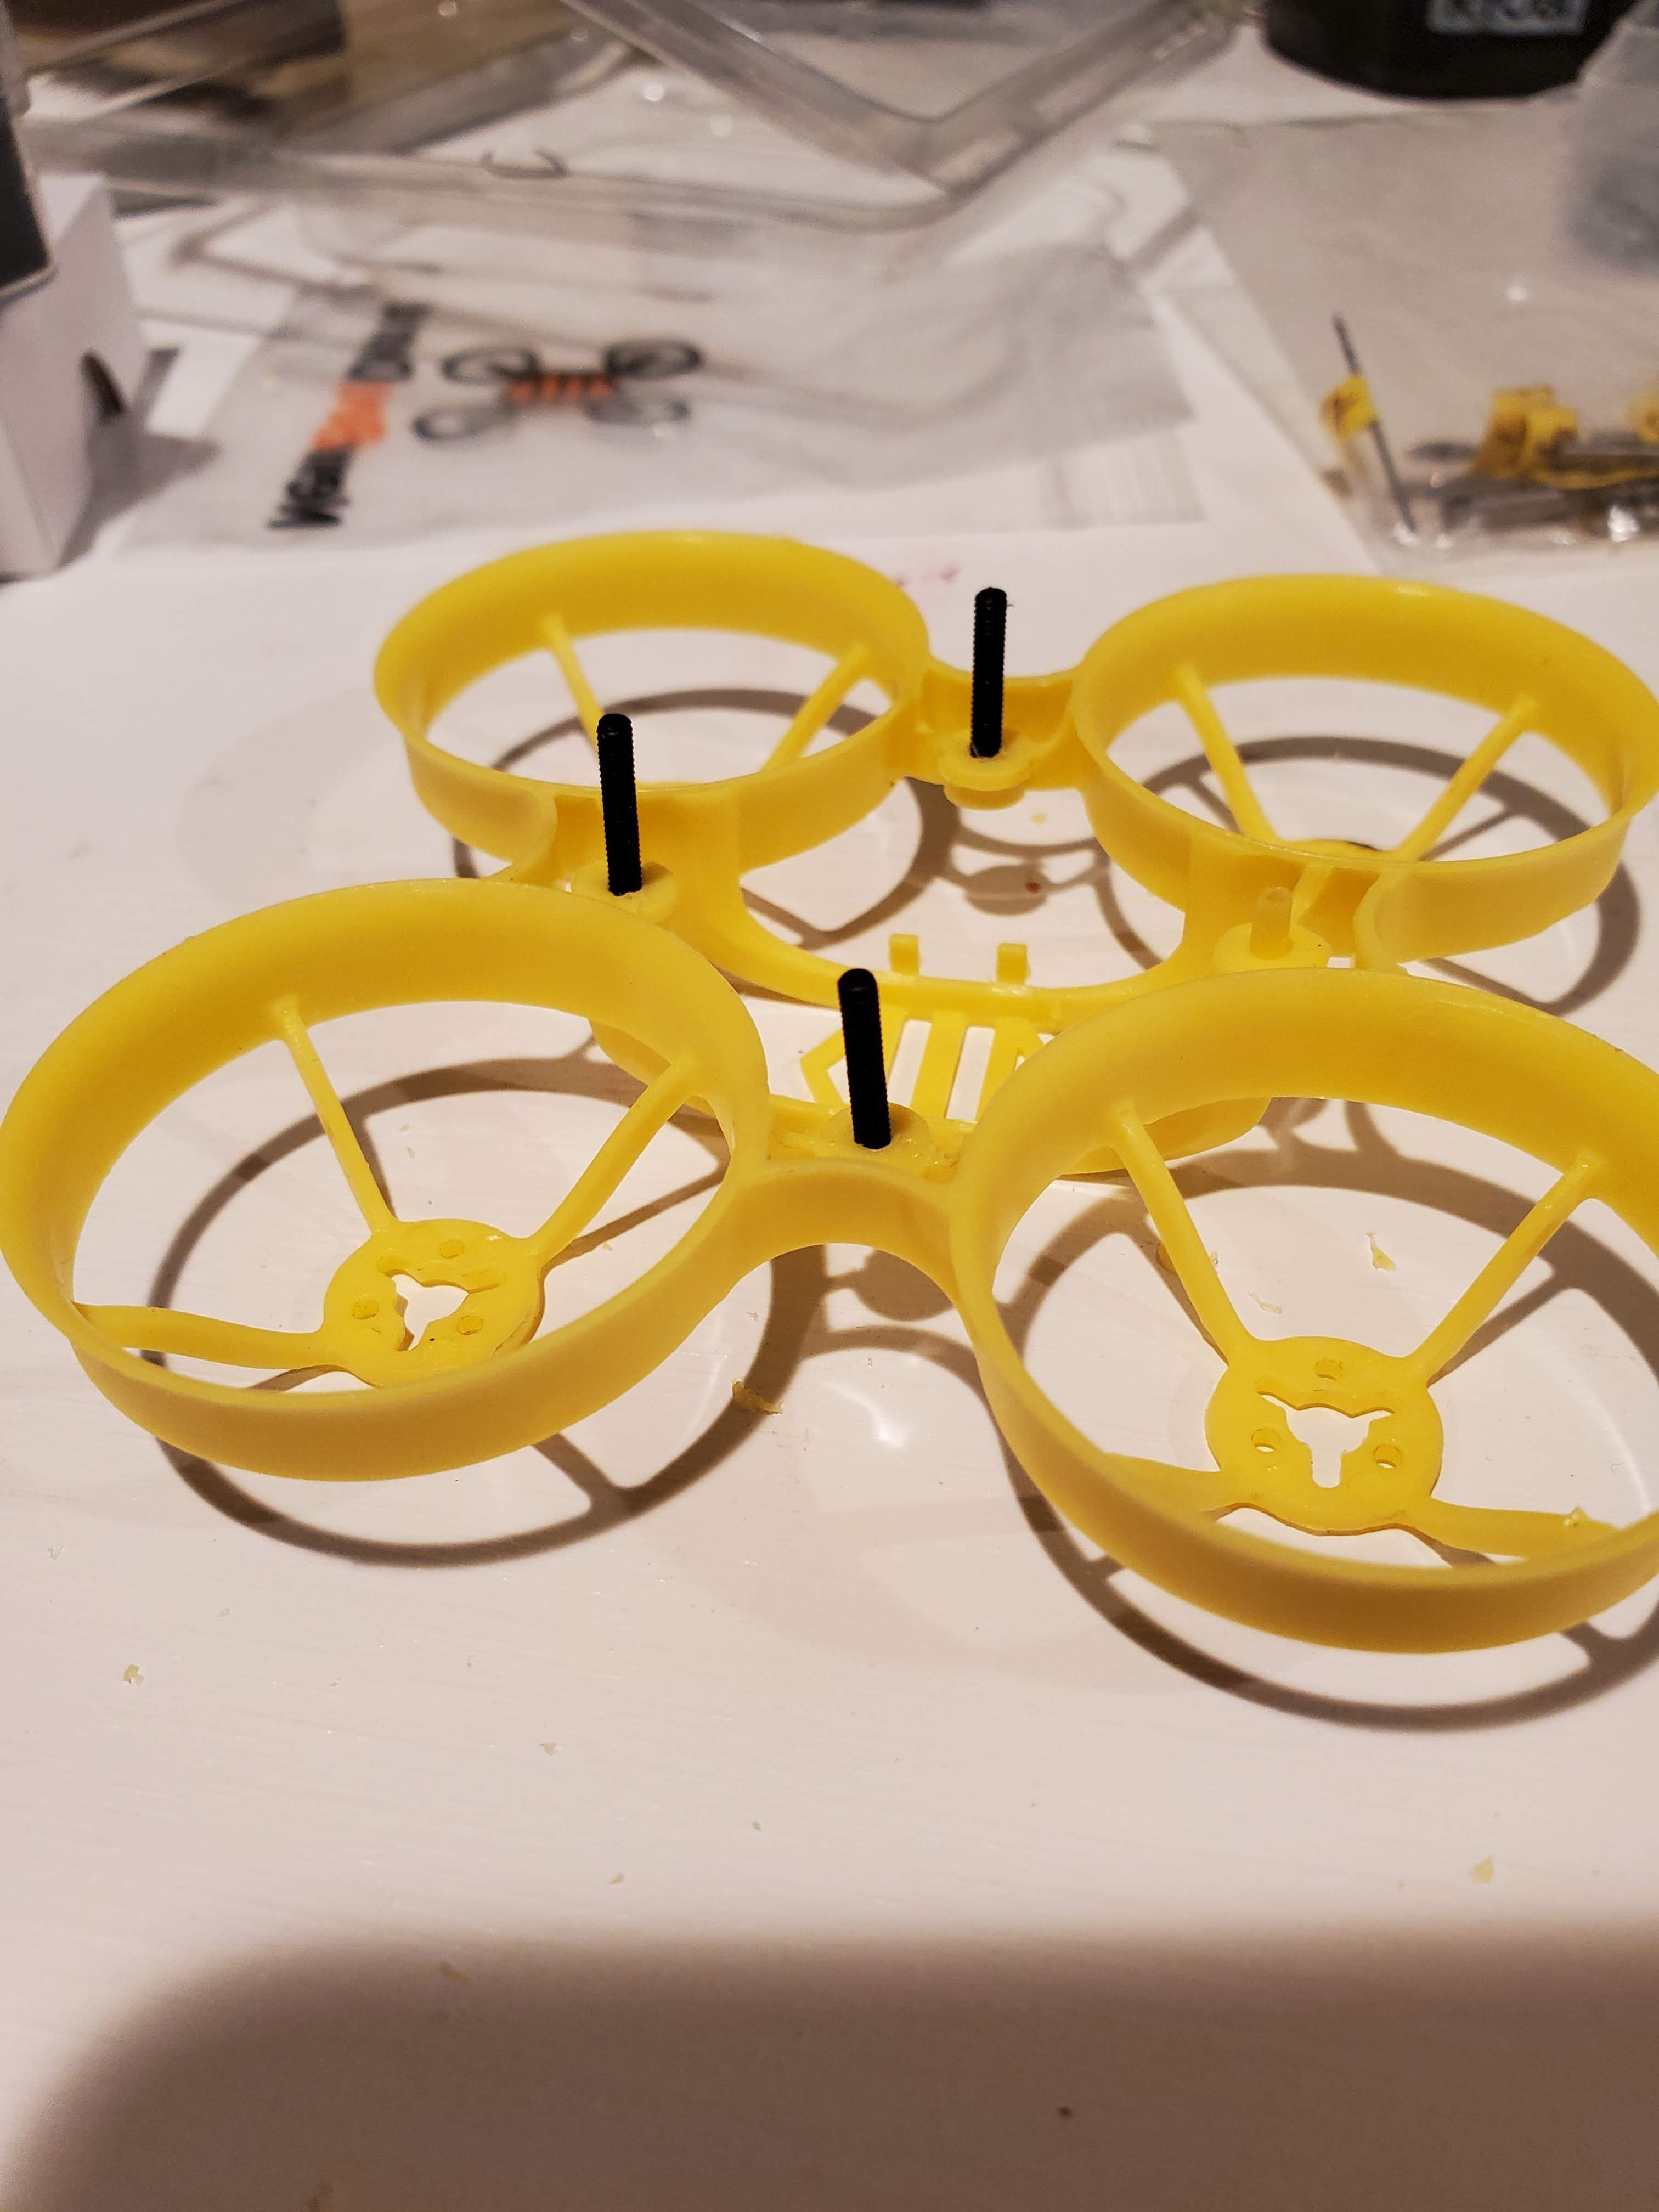
NewBeeDrone 65mm Cockroach Brushless Frame
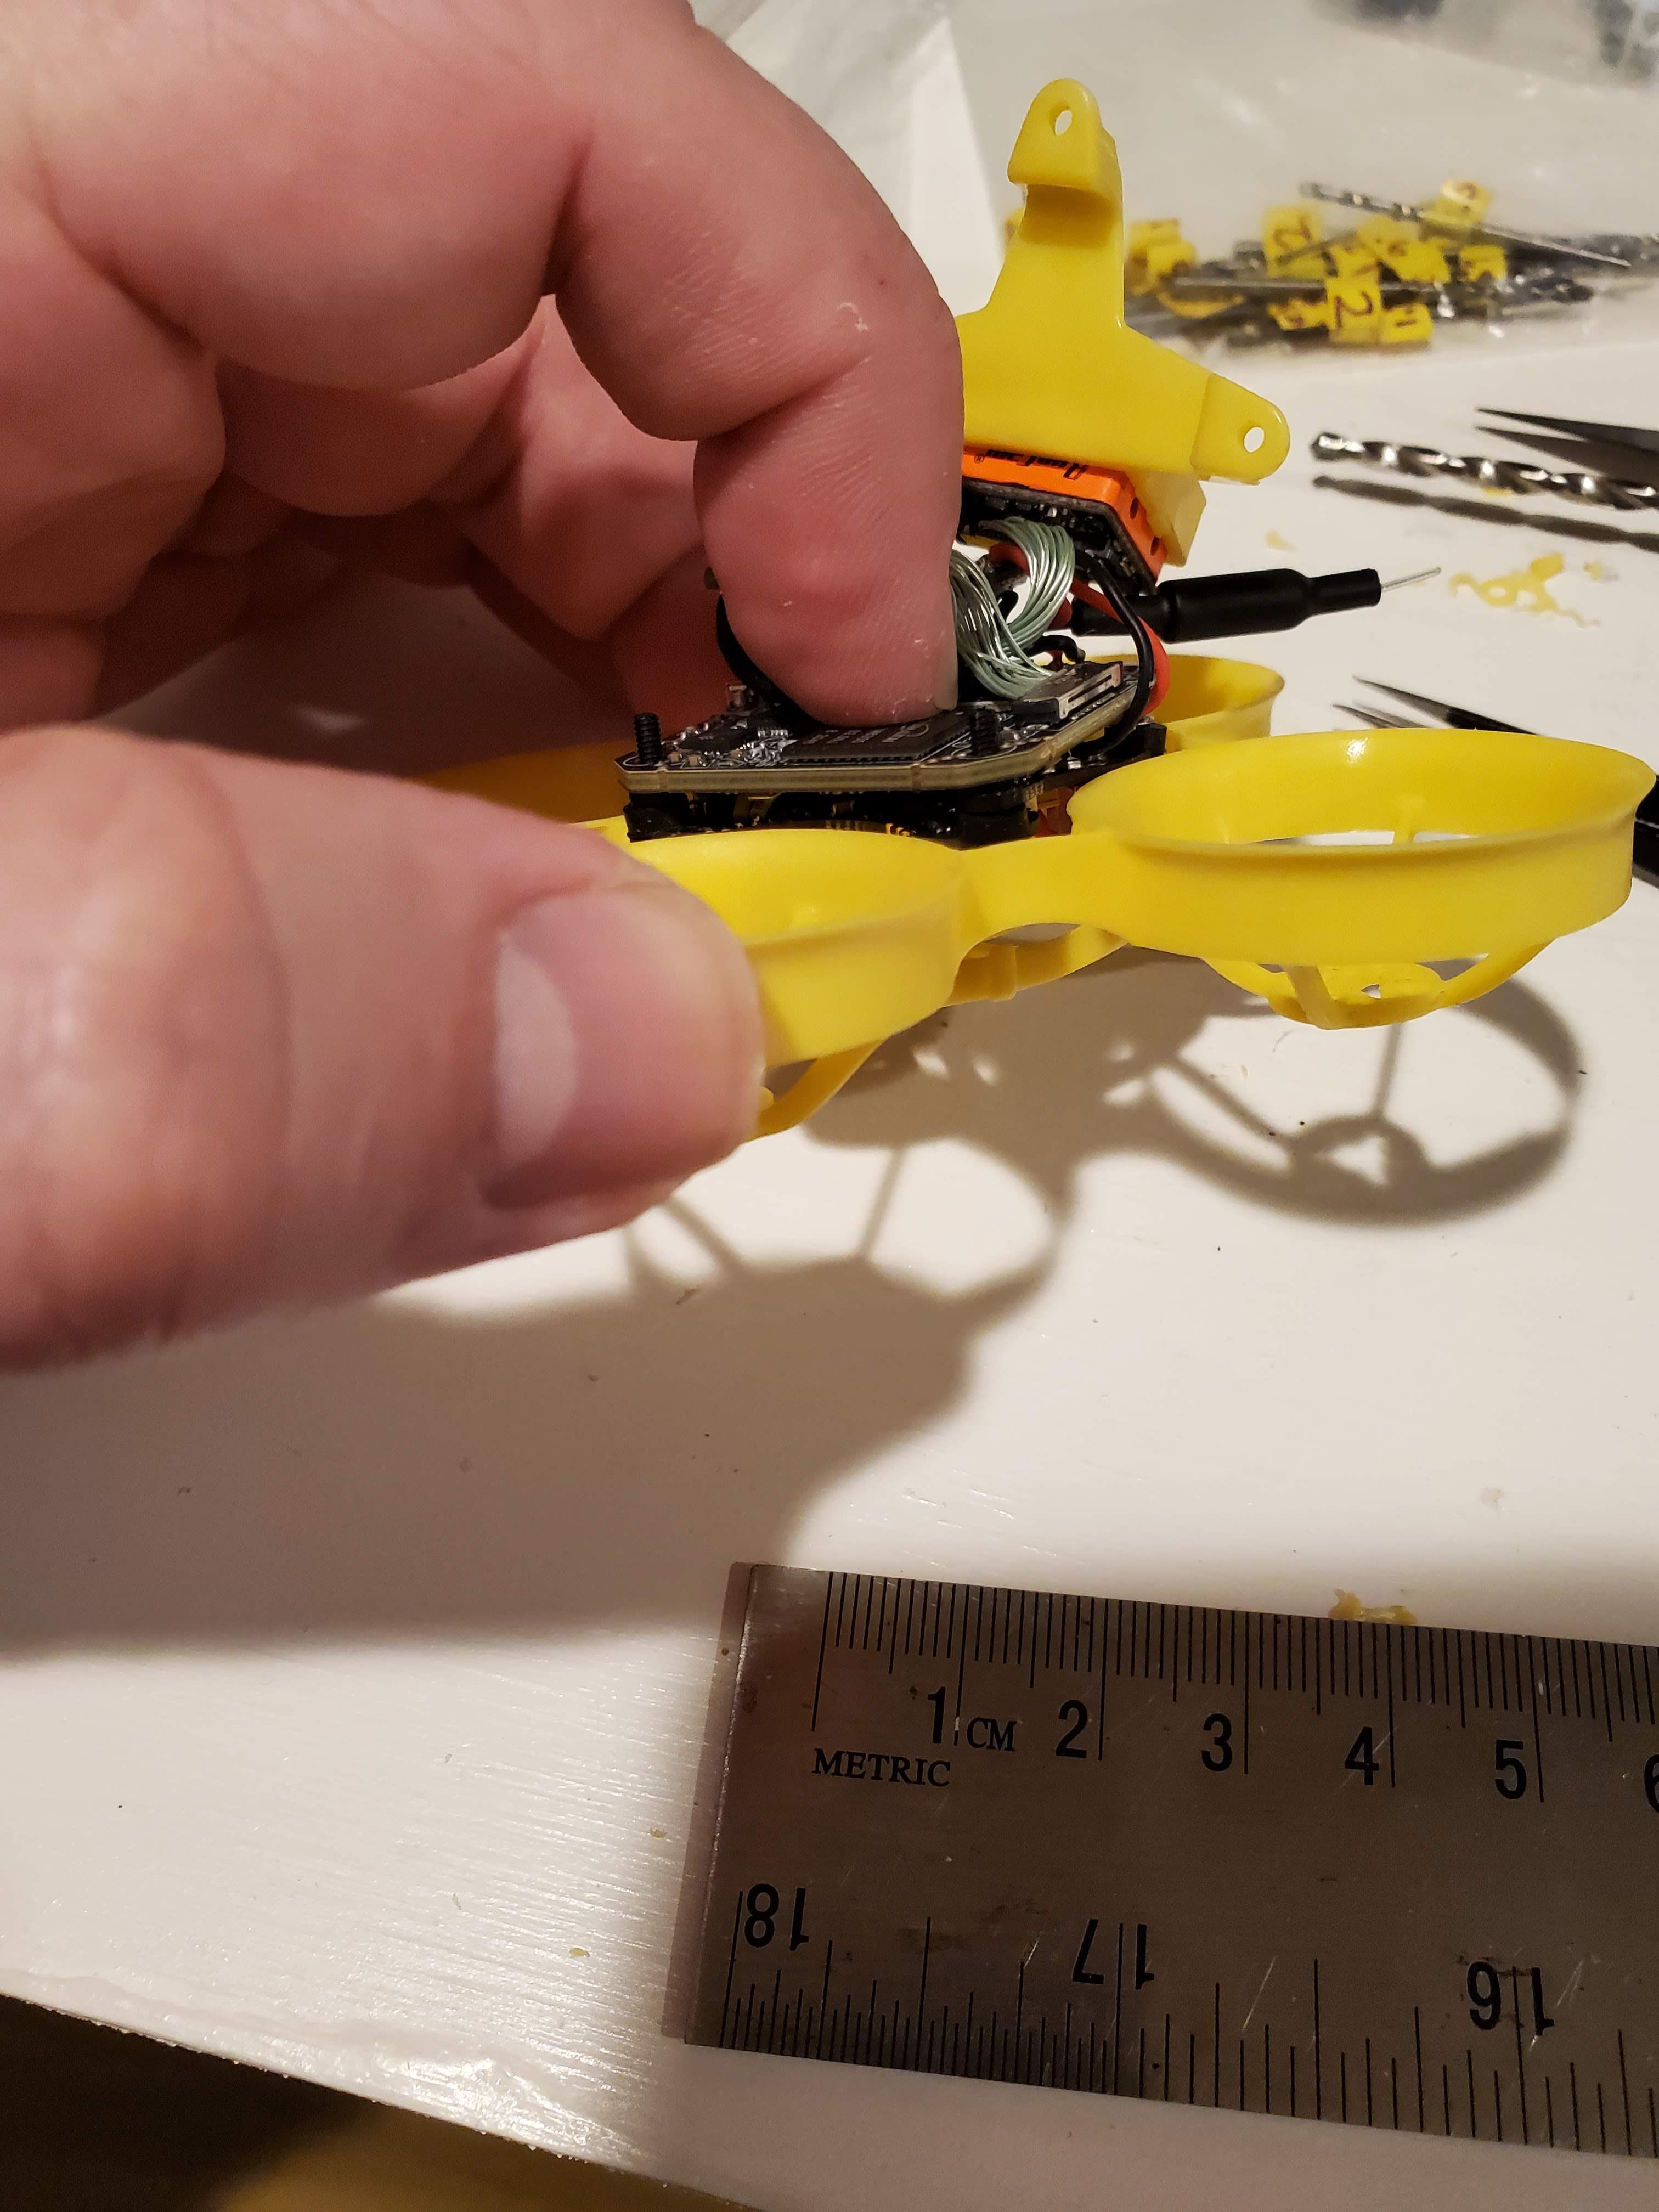
note : NBD now only sells the "super durable" version which I assume will work the same way and can be modified in the same manner I modified the "original" cockroach brushless 65mm frame. The key is carefully drilling out 3 of the 4 fc mounting posts to accept the nylon bolts to make a "stacking" orientation of FC + TX5S.1
https://newbeedrone.com/products/brushless-cockroach-frame
NewBeeDrone BeeBrain V2 Camera Color Mount
https://newbeedrone.com/collections/all/products/beebrainv2-camera-color-mount
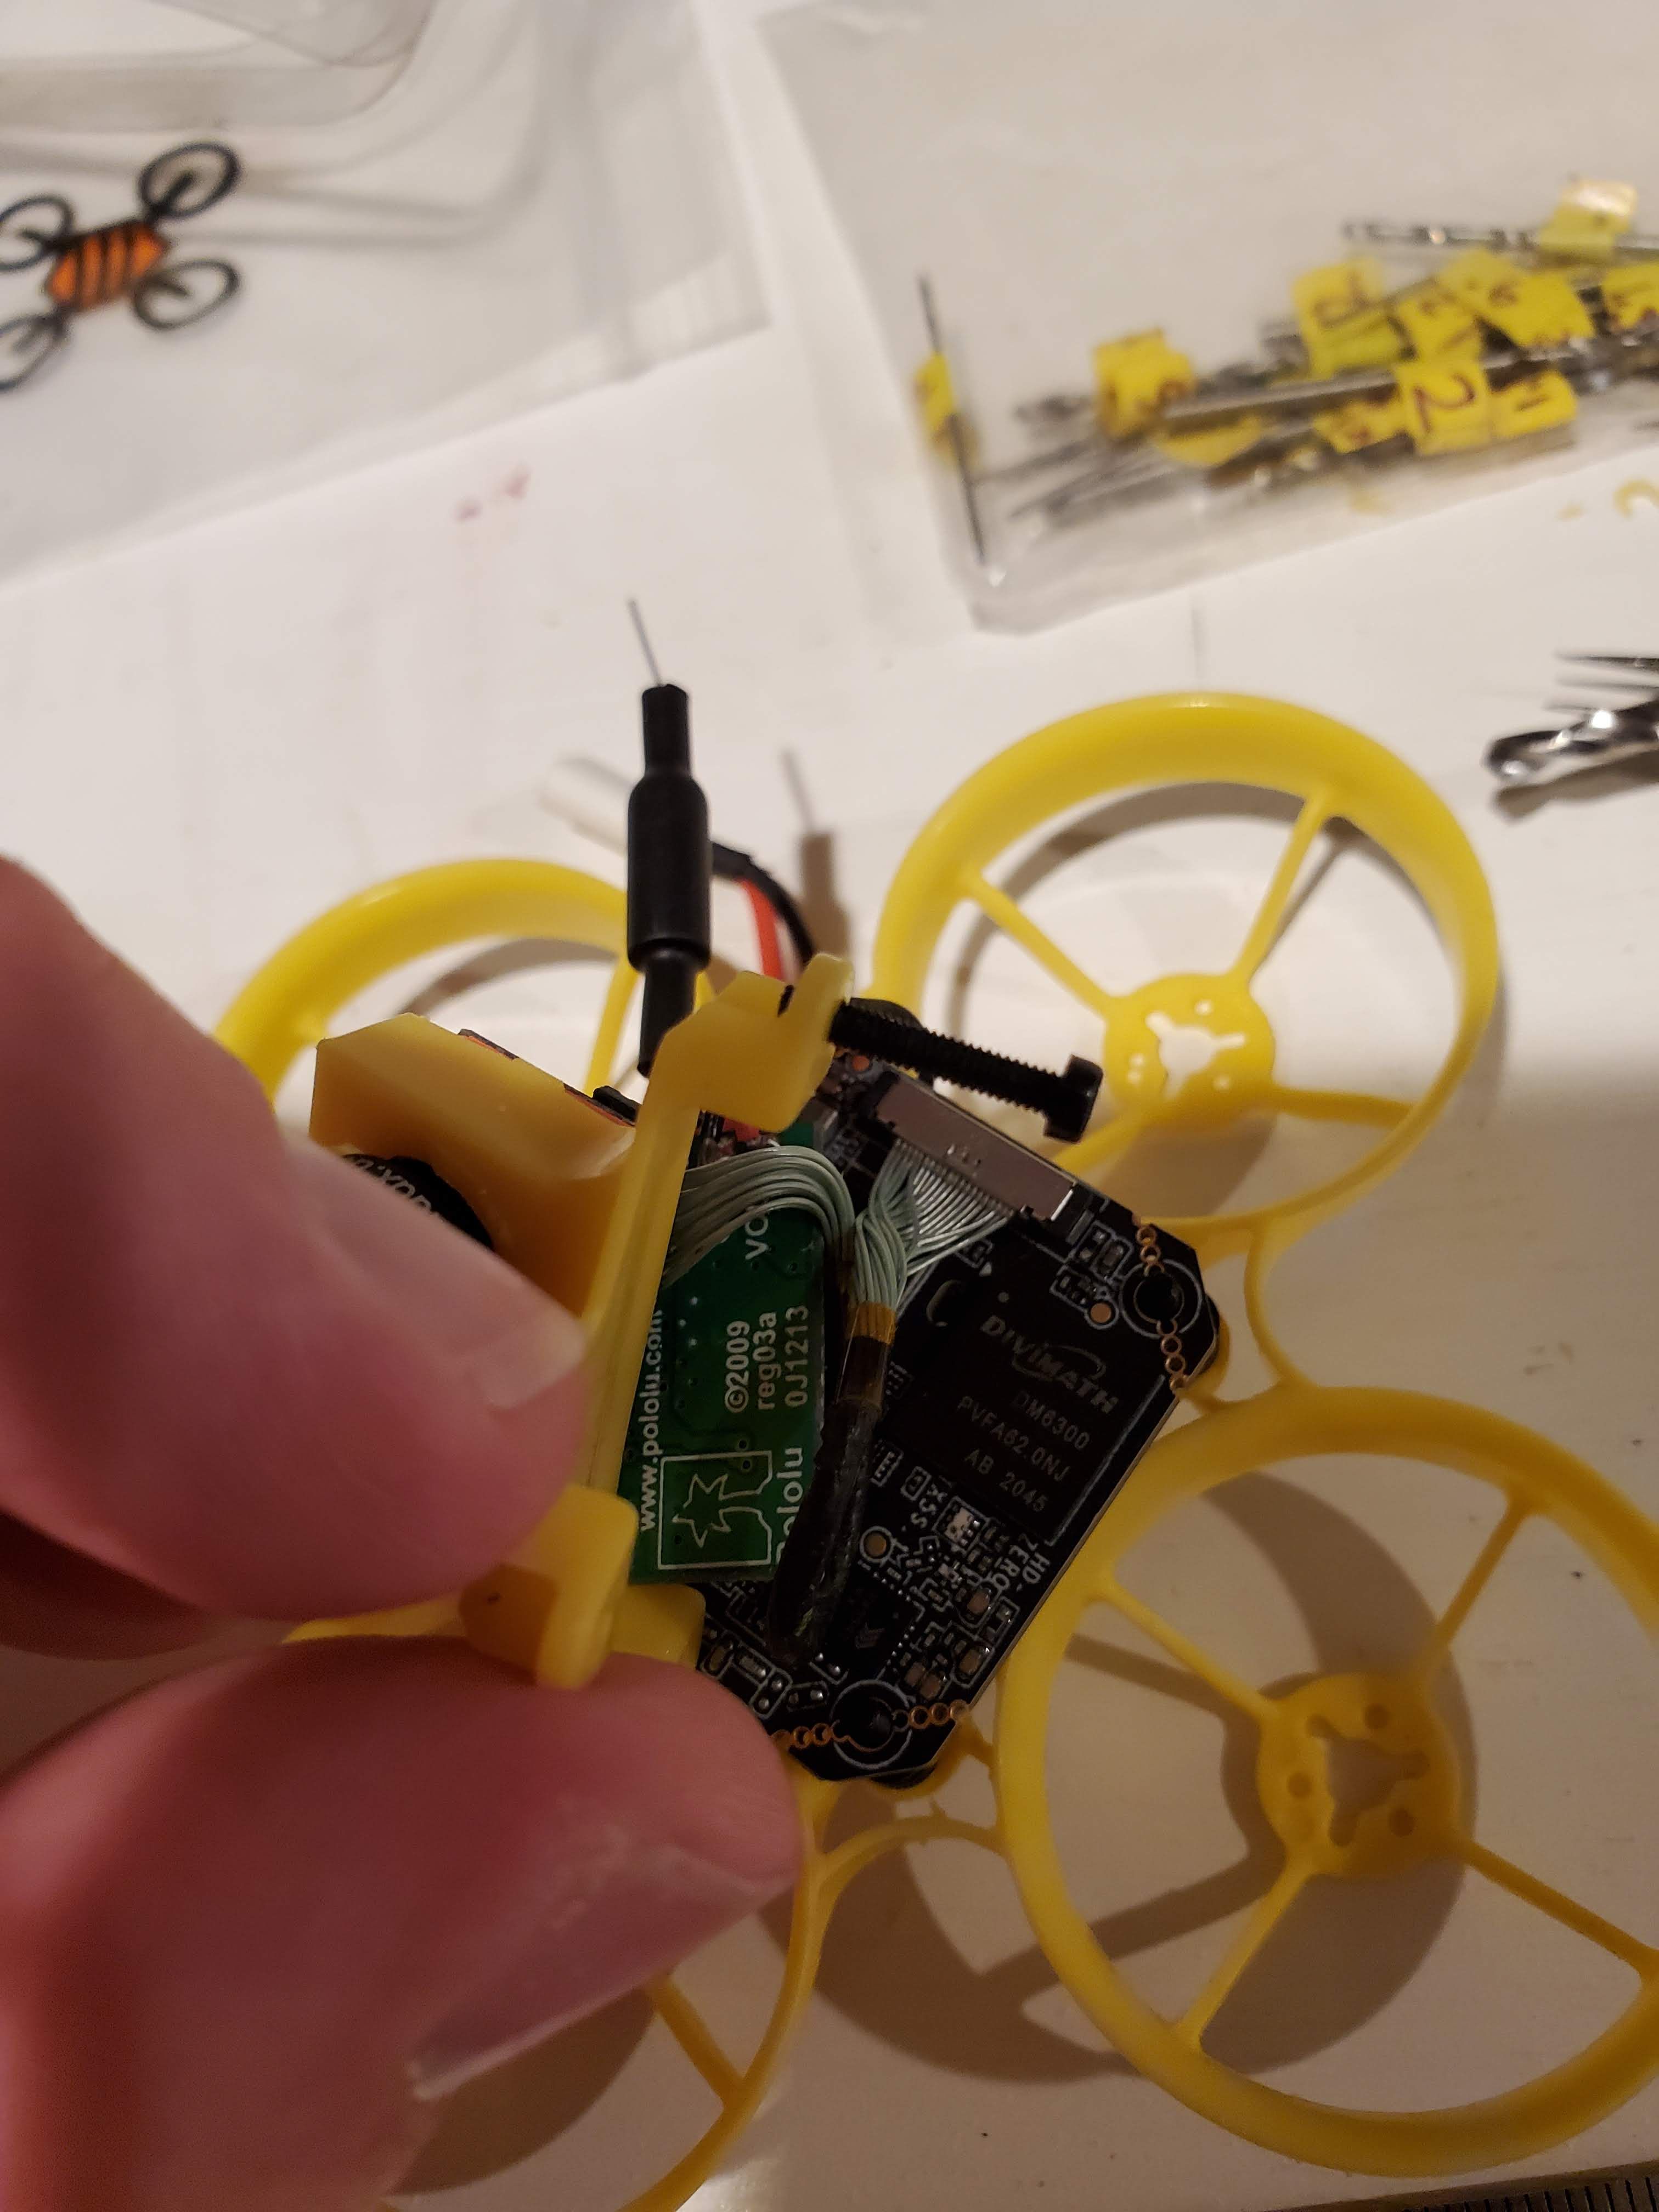
NBD Hummingbird Pro 1s AIO FC,
Firmware "betaflight_4.2.9_HUMMINGBIRD_F4_PRO_BASE_NOBEESIGN_b75650c.hex" @ https://github.com/newbeedrone/nbd-betaflight/releases/tag/4.2.9-v1.0
Betafpv BT2.0 connector
Happymodel EX 0802 19000Kv Whoop/Micro Motor (direct soldered)
https://www.racedayquads.com/products/happymodel-ex-0802-19000kv-whoop-micro-motor-for-mobula-6-hd-cw
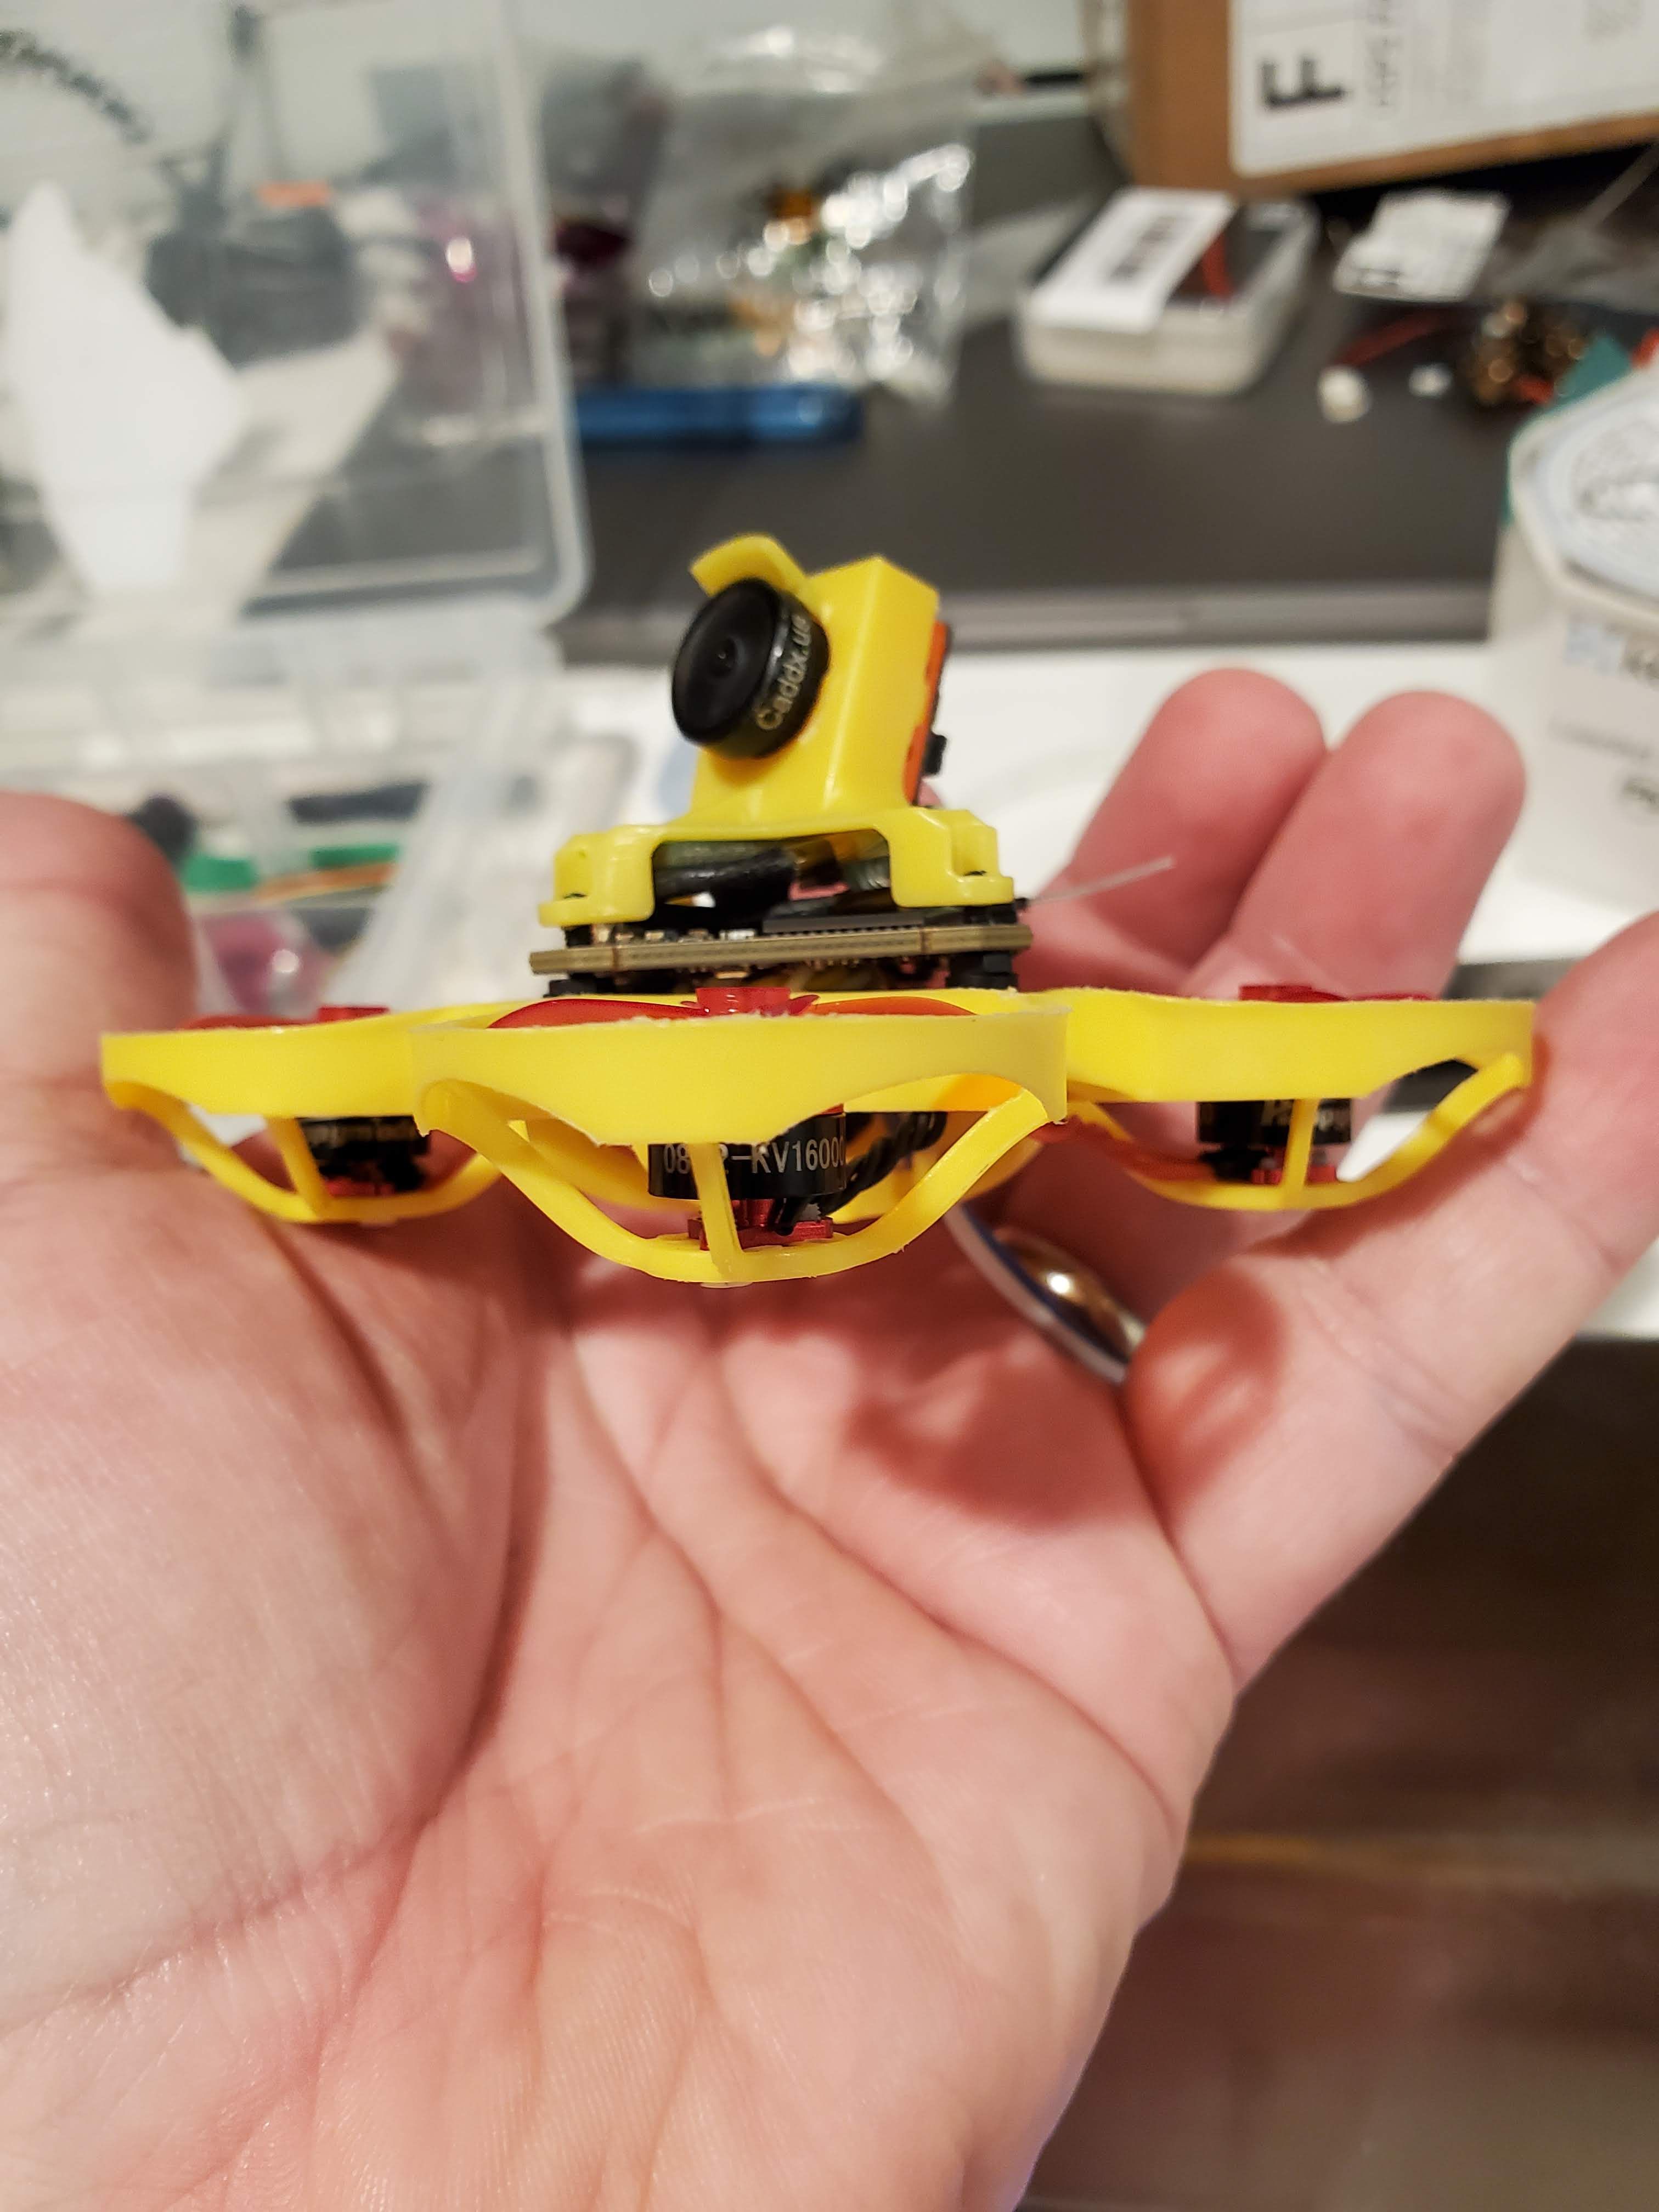
NBD Azi Tri-blade 40mm
GND or RDQ 380mah 1S 60C (PH2.0 replaced w/ BetaFPV BT2.0)
SB Whoop Board TX5S.1 w/ homemade monopole antenna (VRX and VTX FIRMWARE 20102021 from hd-zero.com/support)
Example "how to" antenna :
https://oscarliang.com/make-simple-whip-antenna-5-8ghz-linear-polo/
RunCam Shark Byte Nano Digital FPV Camera, CADDX EOS2 LENS
default length (80mm) mipi cable (will change to 40mm once it arrives from shipping !)
RENY motor screws
RENY (Natural) Micro Flat Head Screw (Phillips) M1.4 4mm (Item # RENYMF144 from solidspot.com)
(100pcs/bag)
Black Nylon Pan Head Machine Screw Metric Thread Round Head Bolt Assortment Set Kit 120pcs M2.5
https://www.amazon.com/dp/B07XHWGRGW/ref=cm_sw_r_awdo_navT_g_3ECQRM2EZY8D8EPJYFC6
RunCam HD SharkByte Camera
https://www.racedayquads.com/products/runcam-nano-hd-fpv-camera-for-fatshark-shark-byte
Caddx EOS2 Camera (for the lightweight lens !)
https://www.racedayquads.com/products/caddx-turbo-eos2-1-3-cmos-1200tvl-ntsc-2-1mm-lens-16-9-fpv-camera
Pololu 4-25V Adjustable Boost Regulator
https://www.pololu.com/product/799
Key Points of Boost Regulator :
I set Boost Regular to approx 60% of its max setting (~7V volts) using the built in trimmer potentiometer
The Pot has physical "stops" as you turn clockwise (higher voltage to ~25V max) or counterclockwise (lower voltage to ~4V min). You can test various settings on the lower limits and you will see at what setting the VTX board powers up (but does not output video) and gradually increase clockwise until the red and blue lights come on the VTX. Do not make changes using the POT while power applied (not sure what will happen, but I tried to avoid doing so). I estimate for me it was about 60% of the total available physical clockwise movement that is allowed.
Soldered Vin and GND to FC input leads
Soldered Vout to TX5S.1 "V" (Voltage) pad
GND is shared/common from input GND ("negative" on FC input lead) and TX5S.1 "G" (ground) pad
No Capacitor used in this application.
TX5S.1 using FC UART2 TX/RX pads (per SB instructions TXRX and RXTX)
Note, make sure to get the Pololu 799 and not the 791. I previously used the 791 and I could only drive the 1s battery down to 3.2V before video would cut out. The 799 appears to be superior in that i can drive the 1s battery down to 2.8v or lower (not a good idea for the battery perhaps, but can do it)
The Caddx EOS2 lens was used because ::
1) saves approx 1gram in weight over stock lens
2) does not stick out as much
3) works rather well with the NewBeeDrone BeeBrain V2 Camera Color Mount
4) the image is "acceptable". I think the indoor LED lighting in my house appear more "blown out" compared to the stock lens, but it is acceptable to my eye. The weight savings and fitment was key for this build.
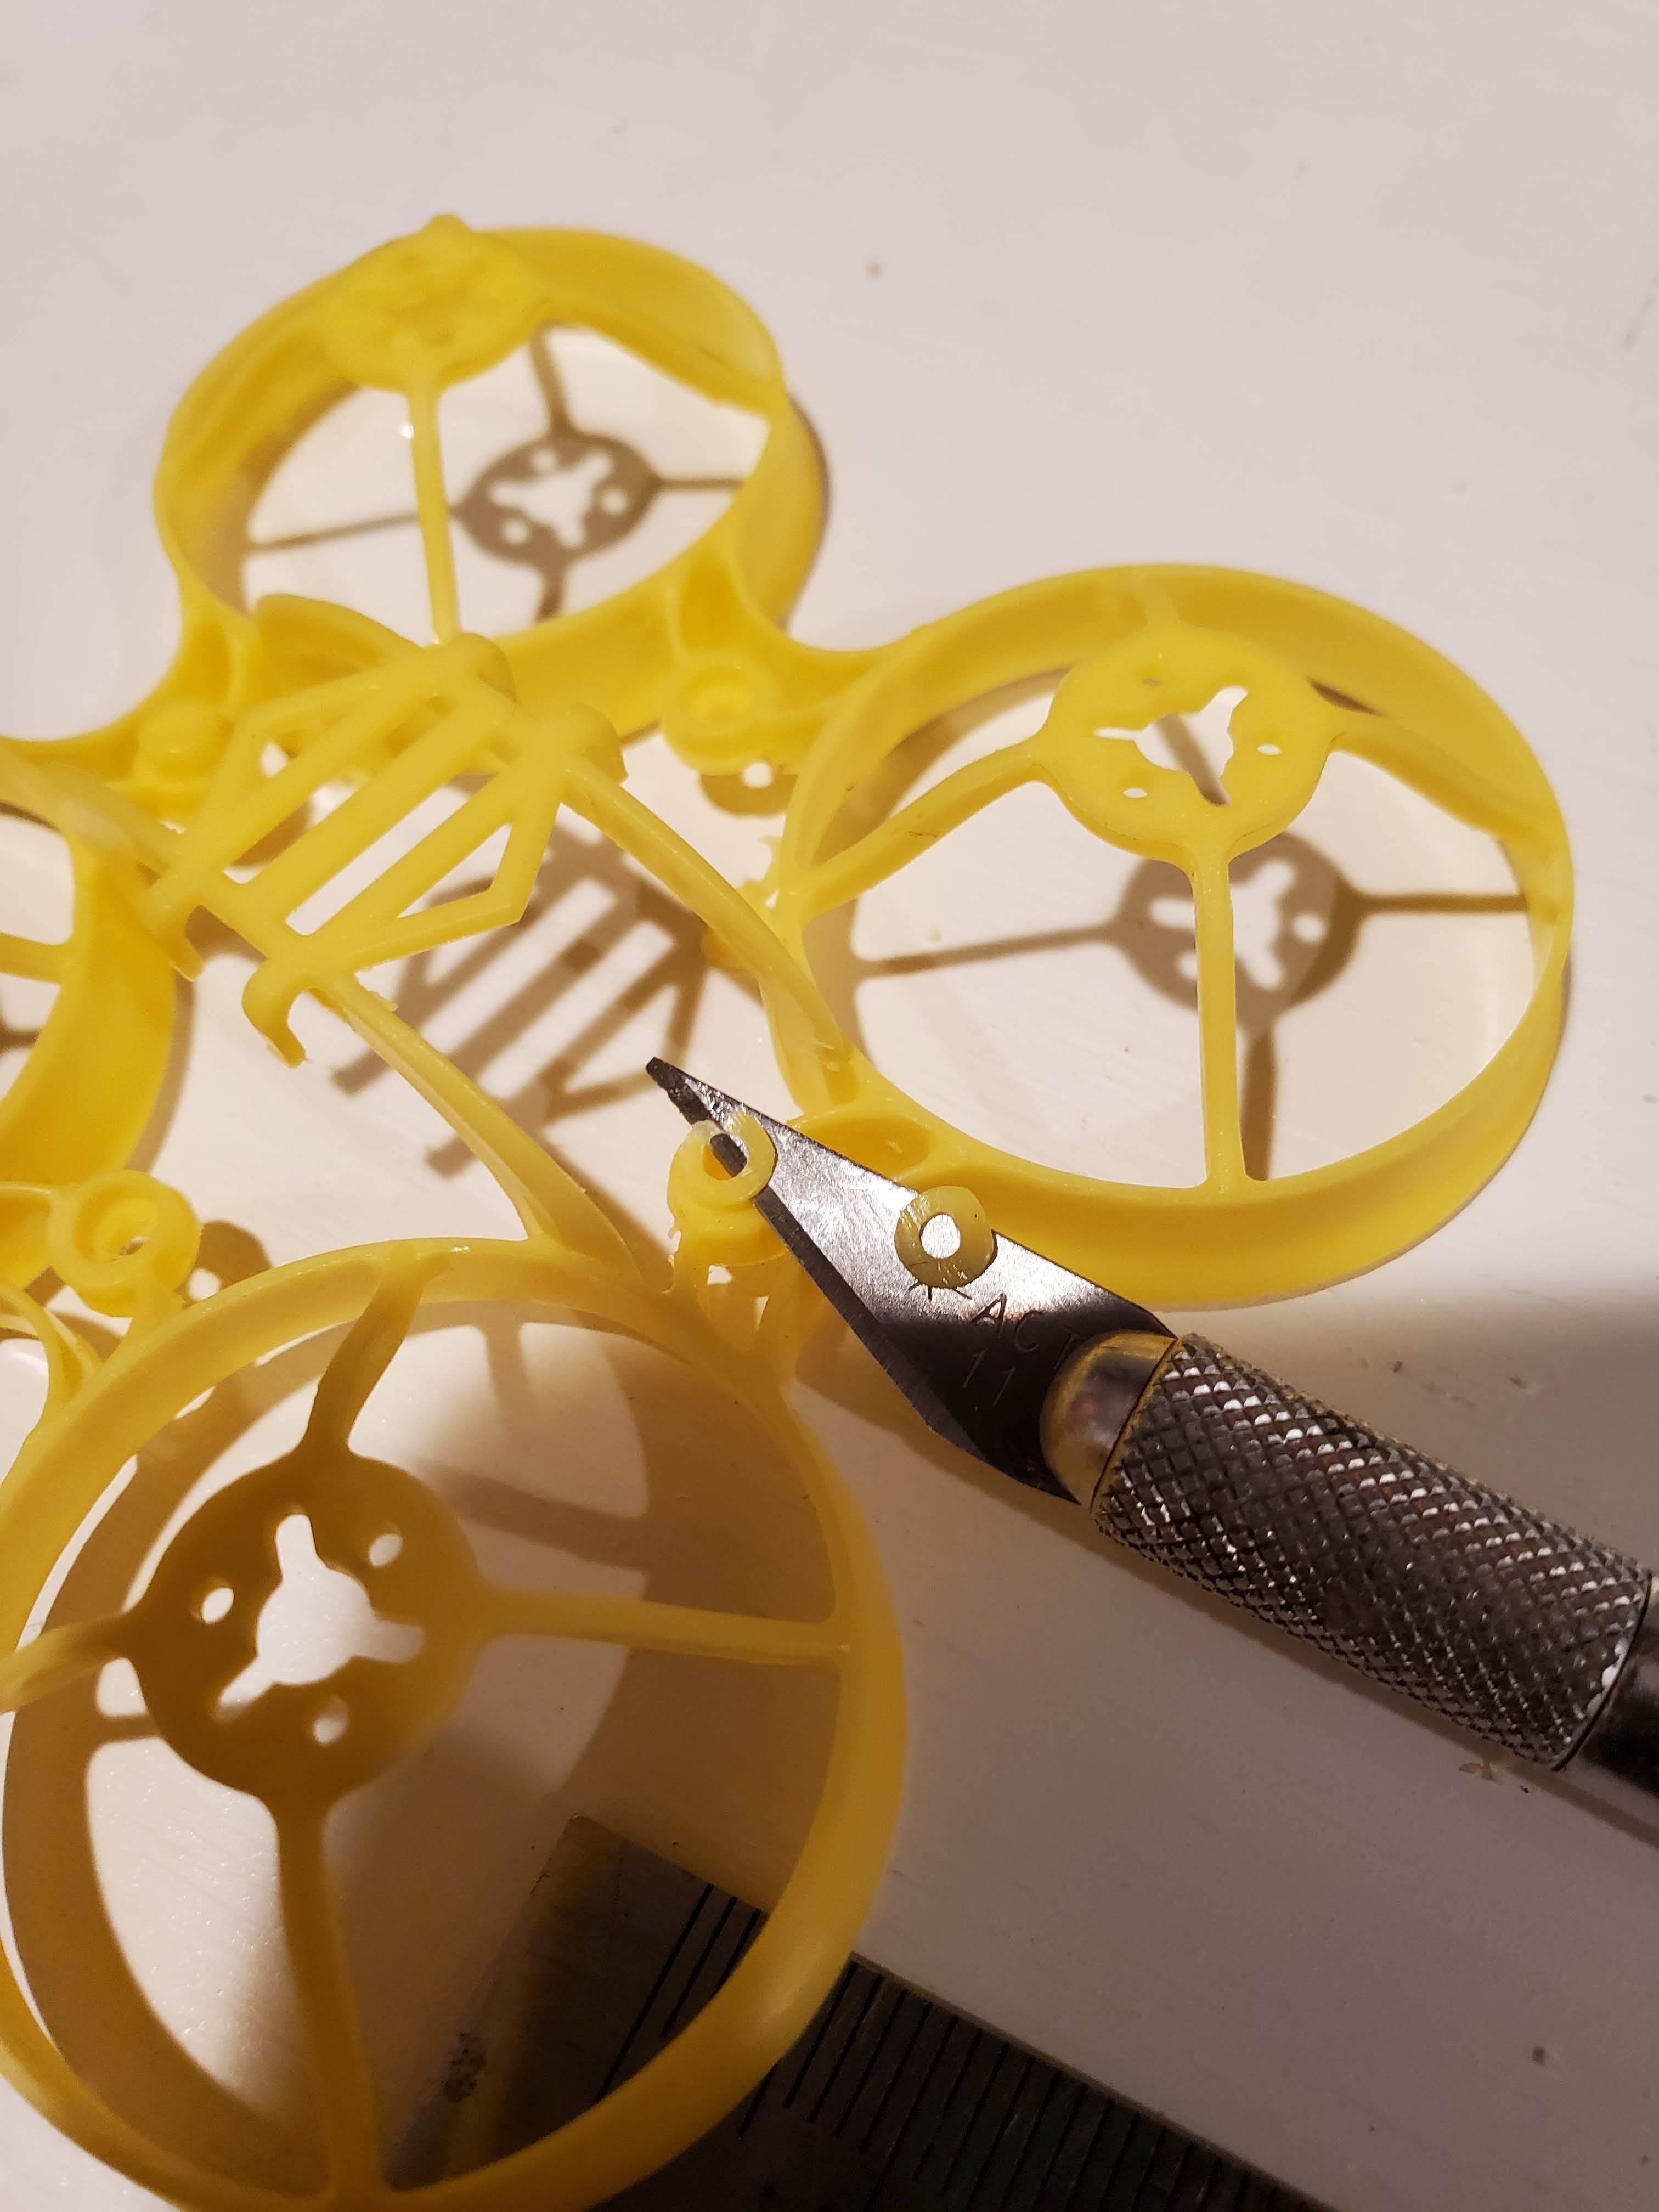
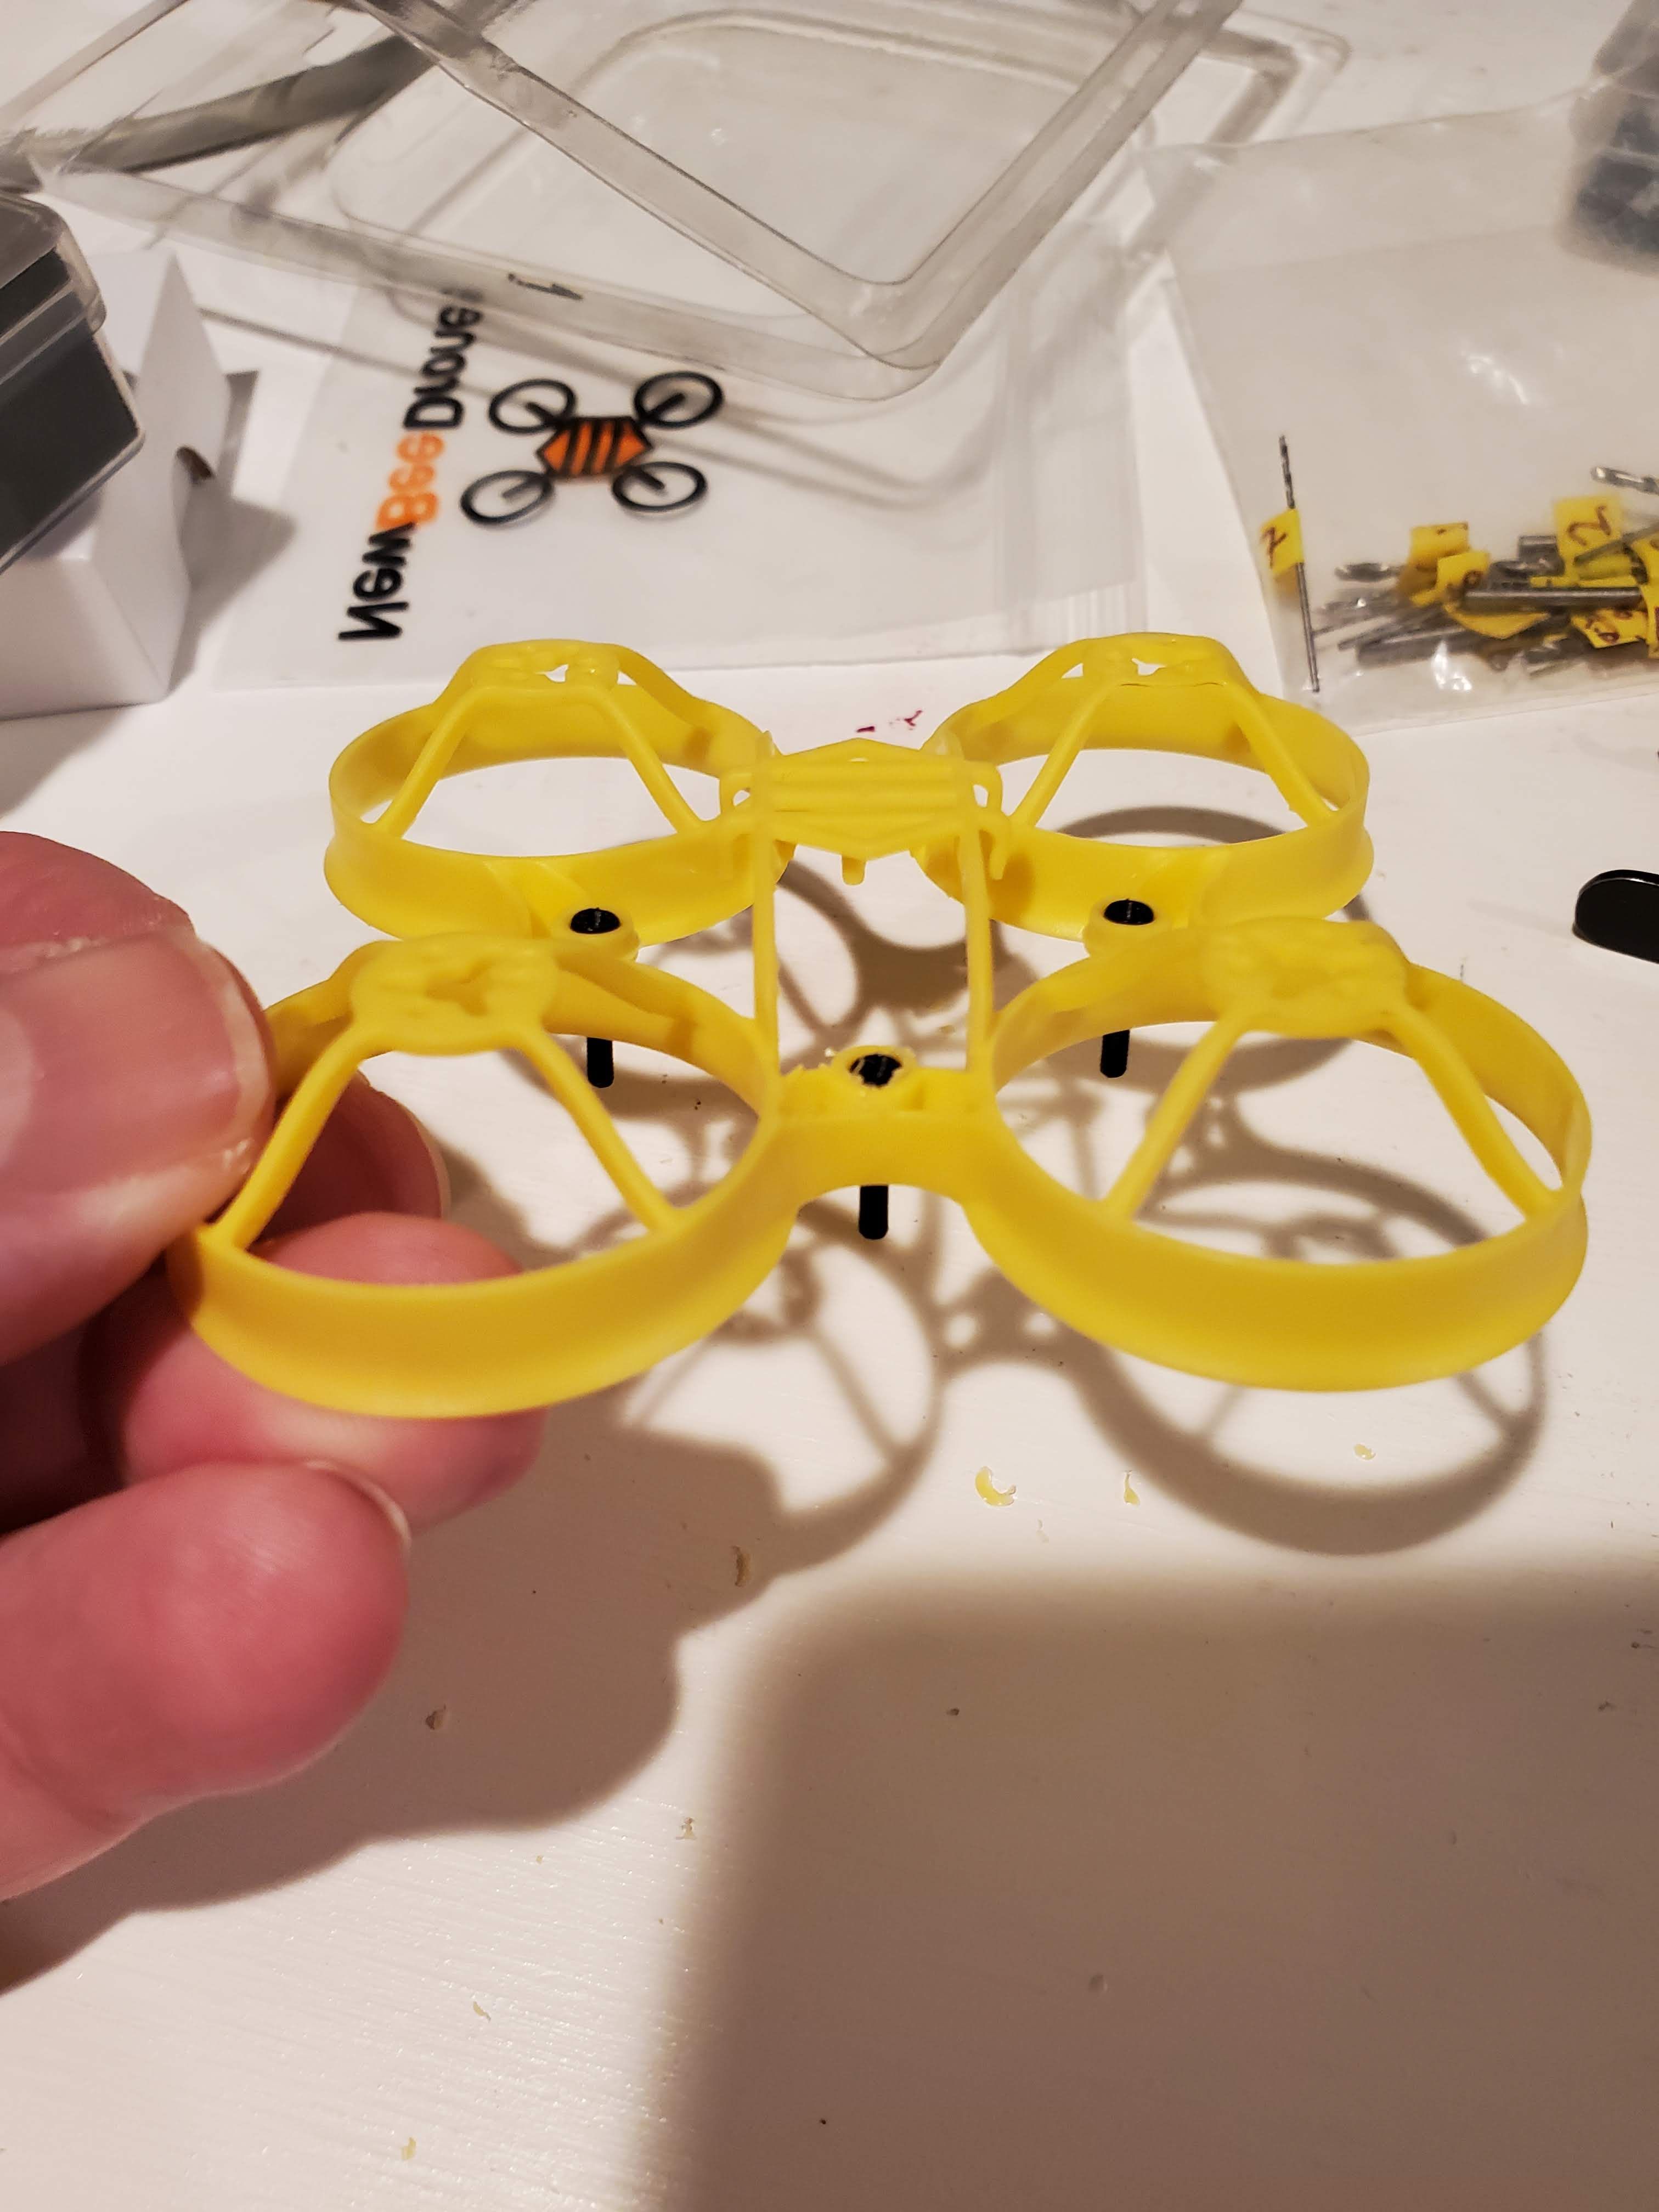
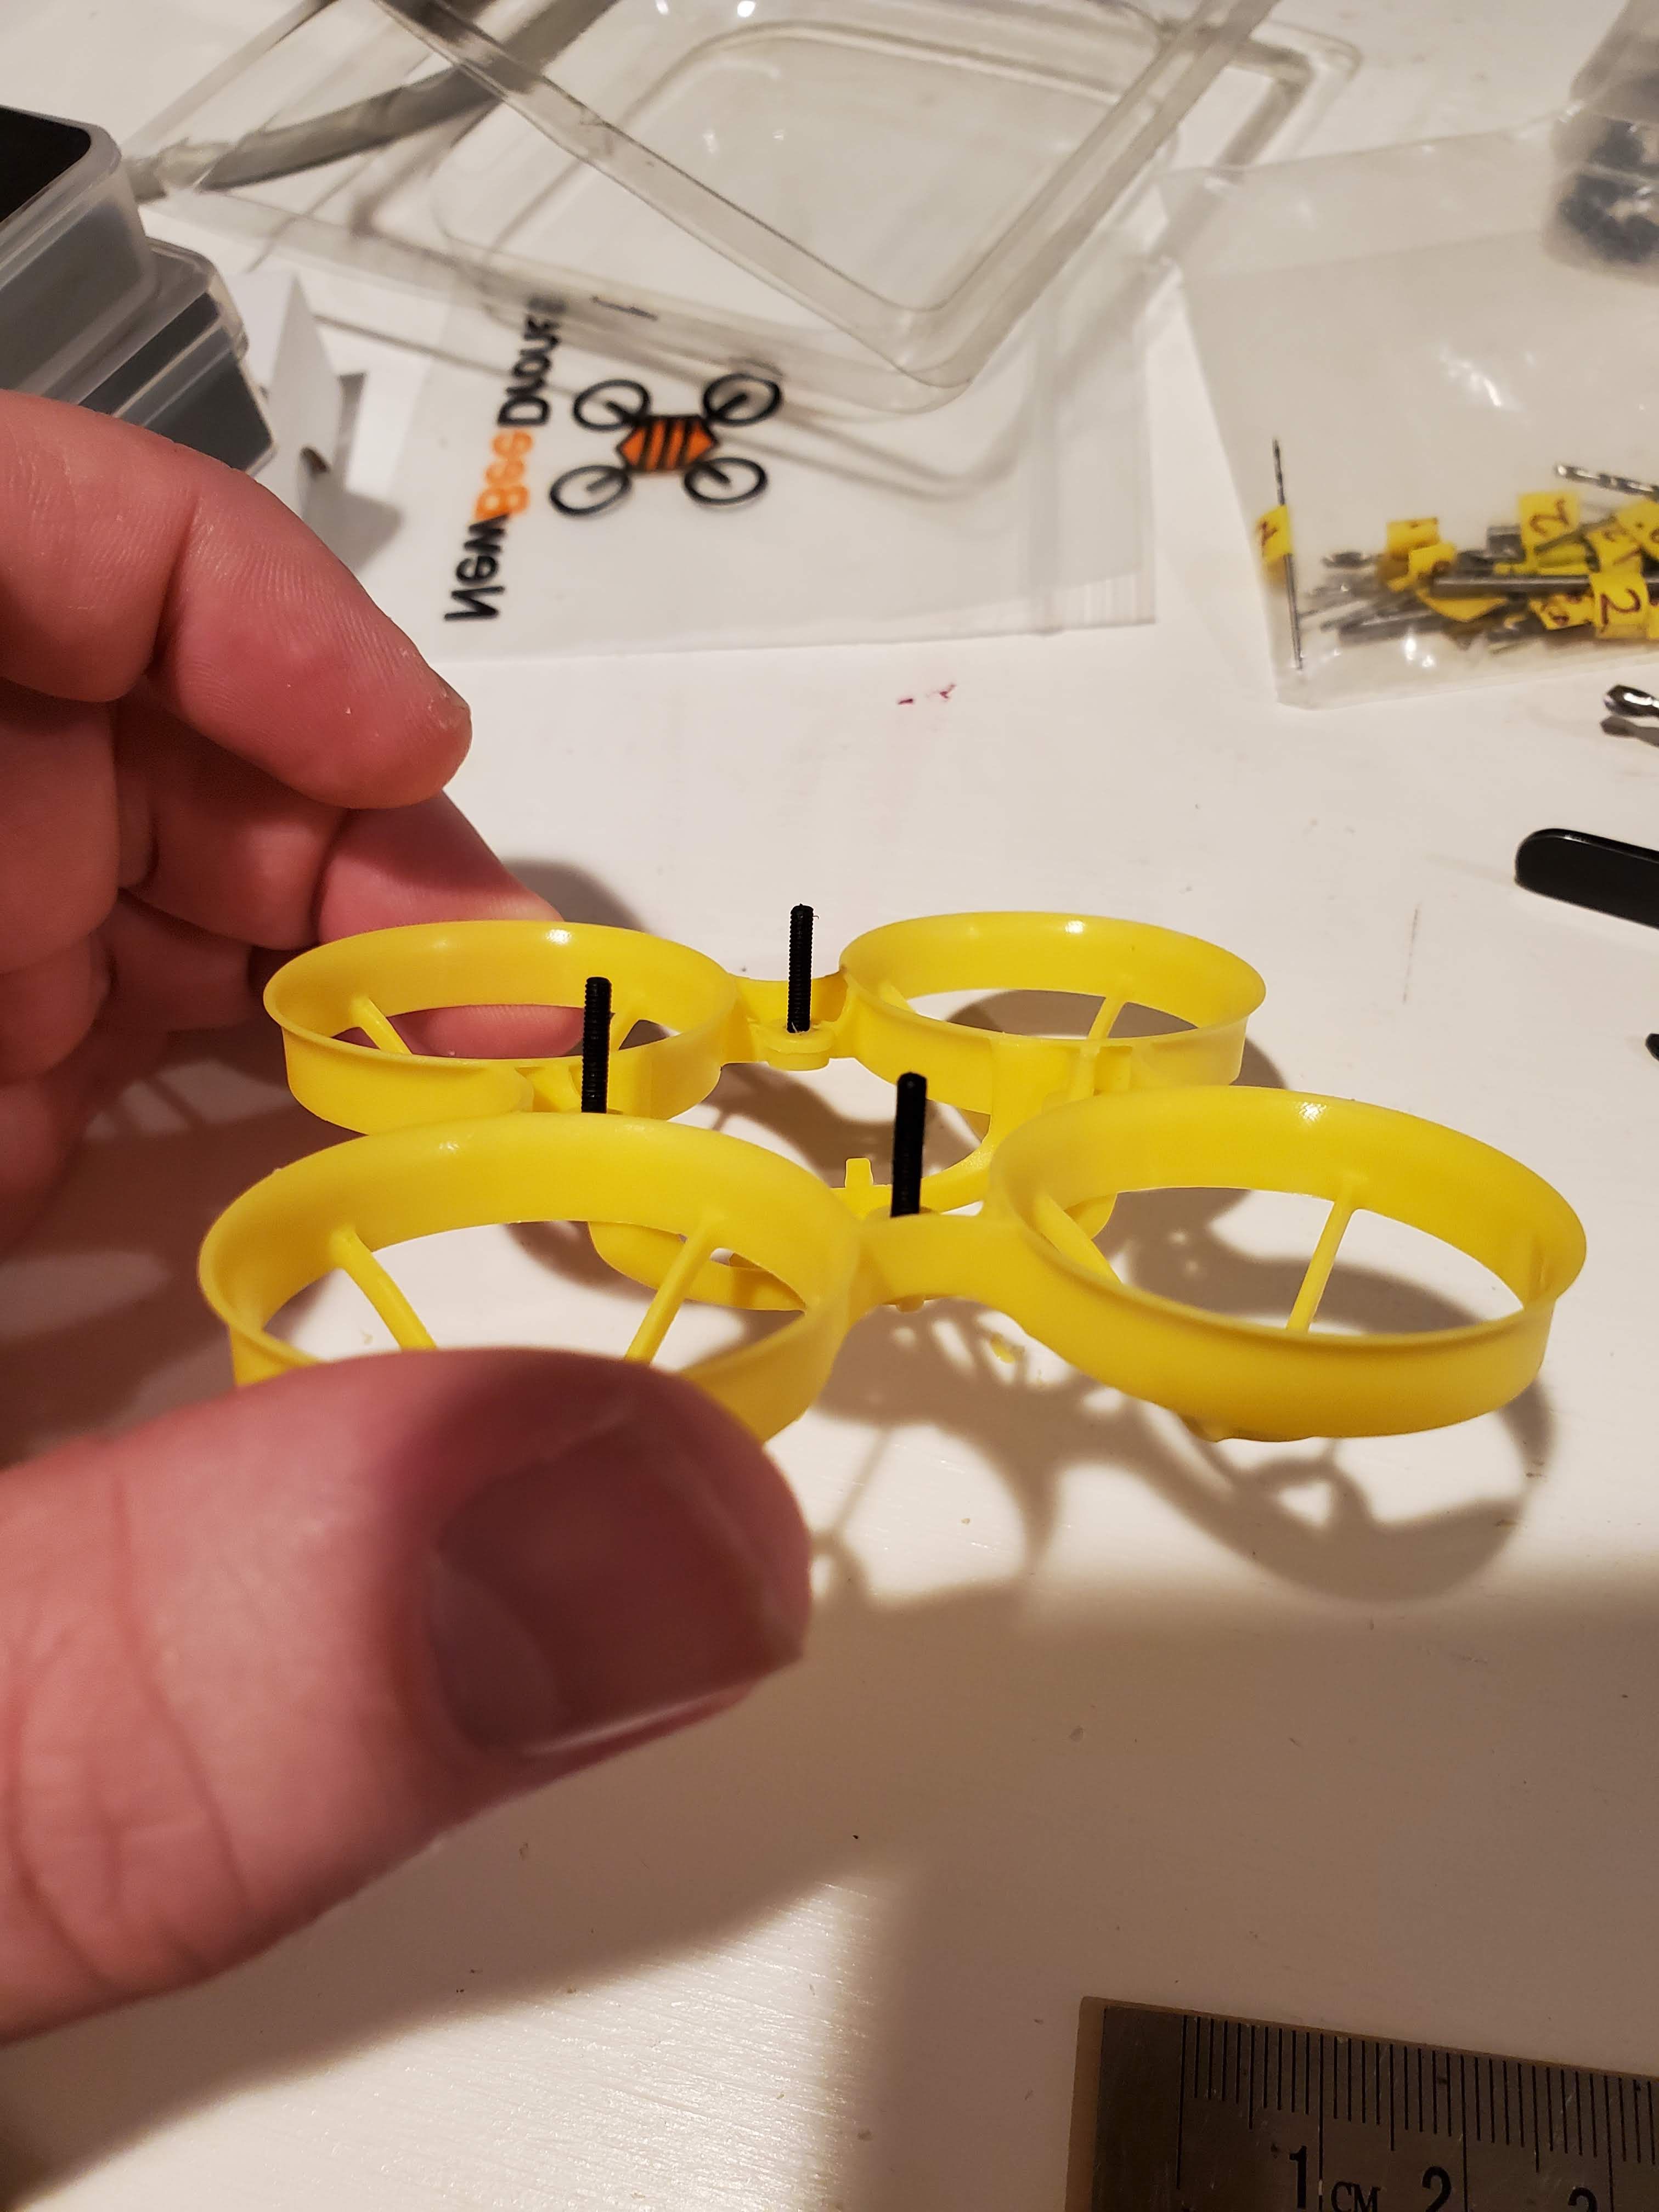
The trickest part of the build is carefully drilling out the frame FC mounting posts to accept the 12mm nylon bolts.
-you can leave the rear FC post untouched since the canopy we are using only goes through the front and two side post holes that we will make
(in this particular frame example shown for this build, i did drill out the back hole, but later determined i really did not need to when i drilled out a 2nd frame to document)
use an xacto blade to cut off the top screw holes (again, leave the rear intact)
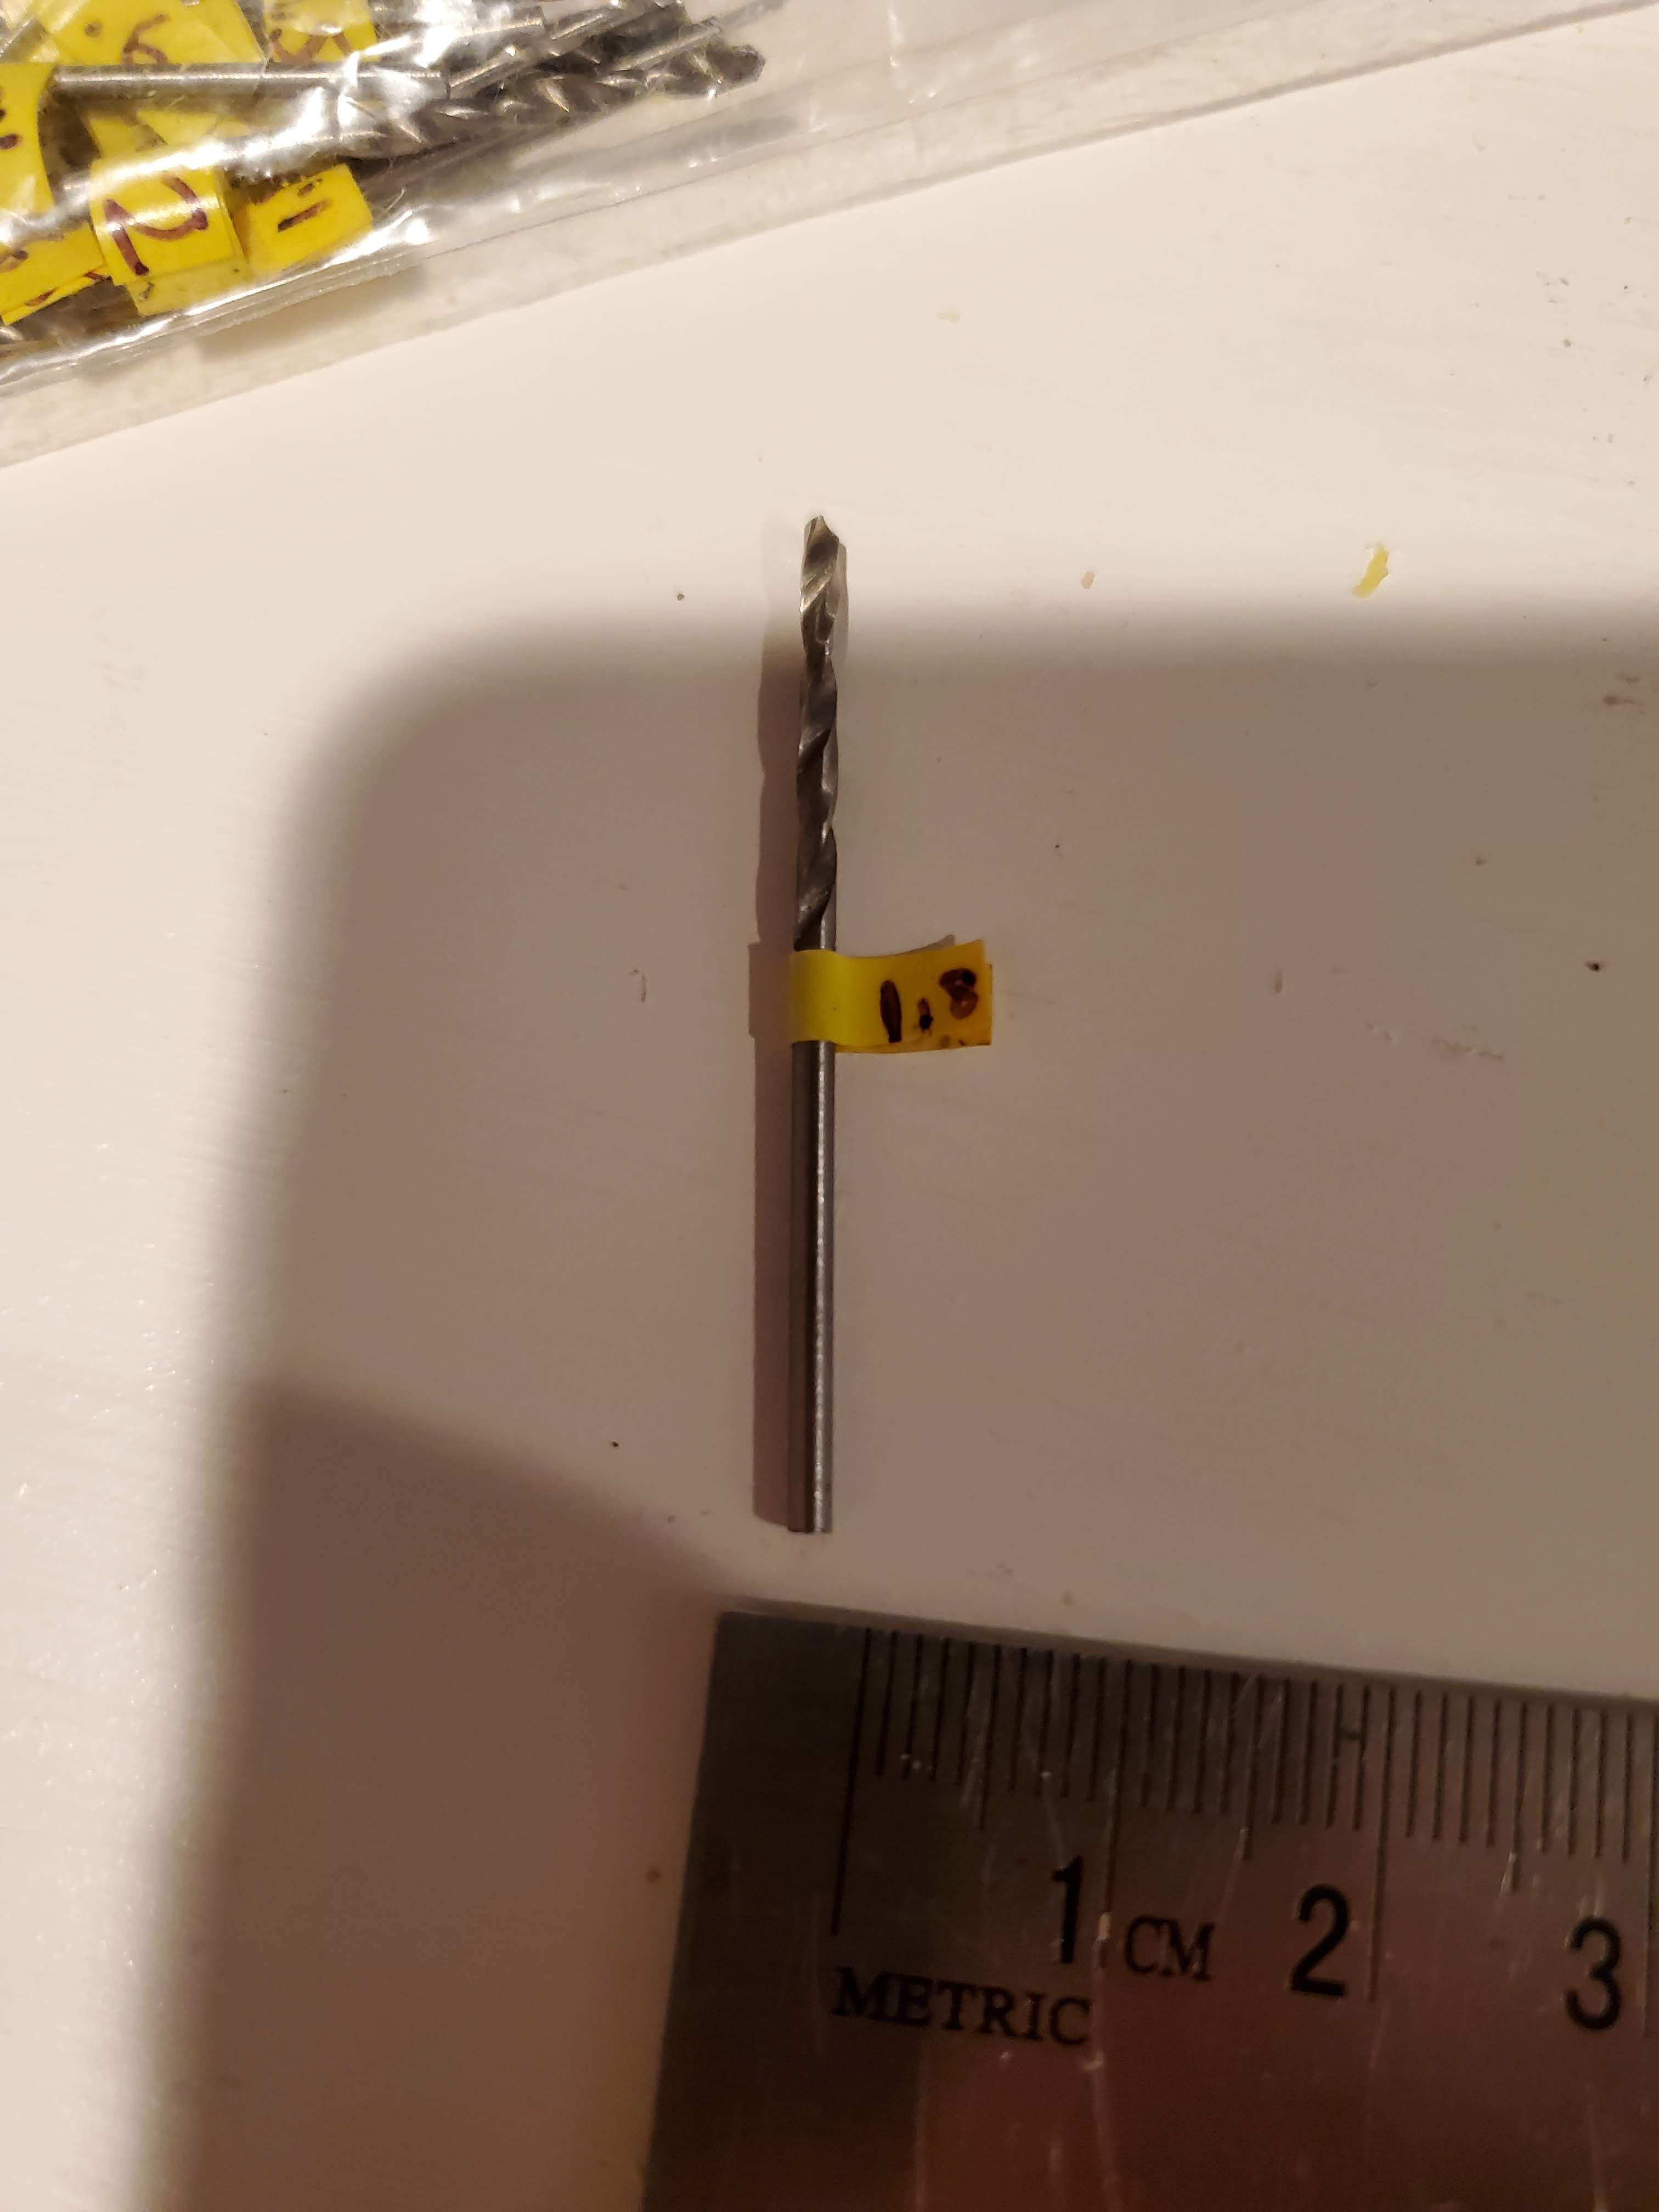
Then, I used a cordless drill with a 1.8mm drill bit from this kit below from amazon to drill out the middle using the location of where the screw hole post previously was located as my guide.
Precision Pin Vise Hand Drill with 25pcs Micro Twist Drill Bits Set (0.5-3.0mm) Mini Hand Drill Rotary Tool for PCB,Metal,Wood,Jewelry,Plastic,Resin Manual Making DIY Assembling Drilling https://www.amazon.com/dp/B010BV7190/ref=cm_sw_r_awdo_navT_g_VSQK85ZATBRPQWYHMAB7
with the same hand drill from the hit above, i used the 3mm or 1/8" bit to carefully bore out enough material to allow the head of the nylon screw to sit as flush as possible with the frame - so basically the top of the screw head becomes level with the frame material. Take your time here as you don't want to go too deep and ruin your 1.8mm holes. This is only required on the front hole as the side holes are already bored out (at least they were on my 65mm brushless cockroach frame - again, i have the "original" not the "super durable" newer version.
You want the screw to be able to turn when seated in the hole. These nylon screws strip VERY EASILY ! Go easy and make sure screws more easily/smoothly
You can choose or not whether to trim material from the 65mm frame to save some weight. it takes some time and you can save between .5 and .75grams depending on how much and where you shave away plastic (again, this was for me on the original NBD 65mm brushless cockroach frame).
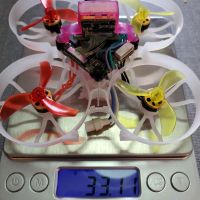
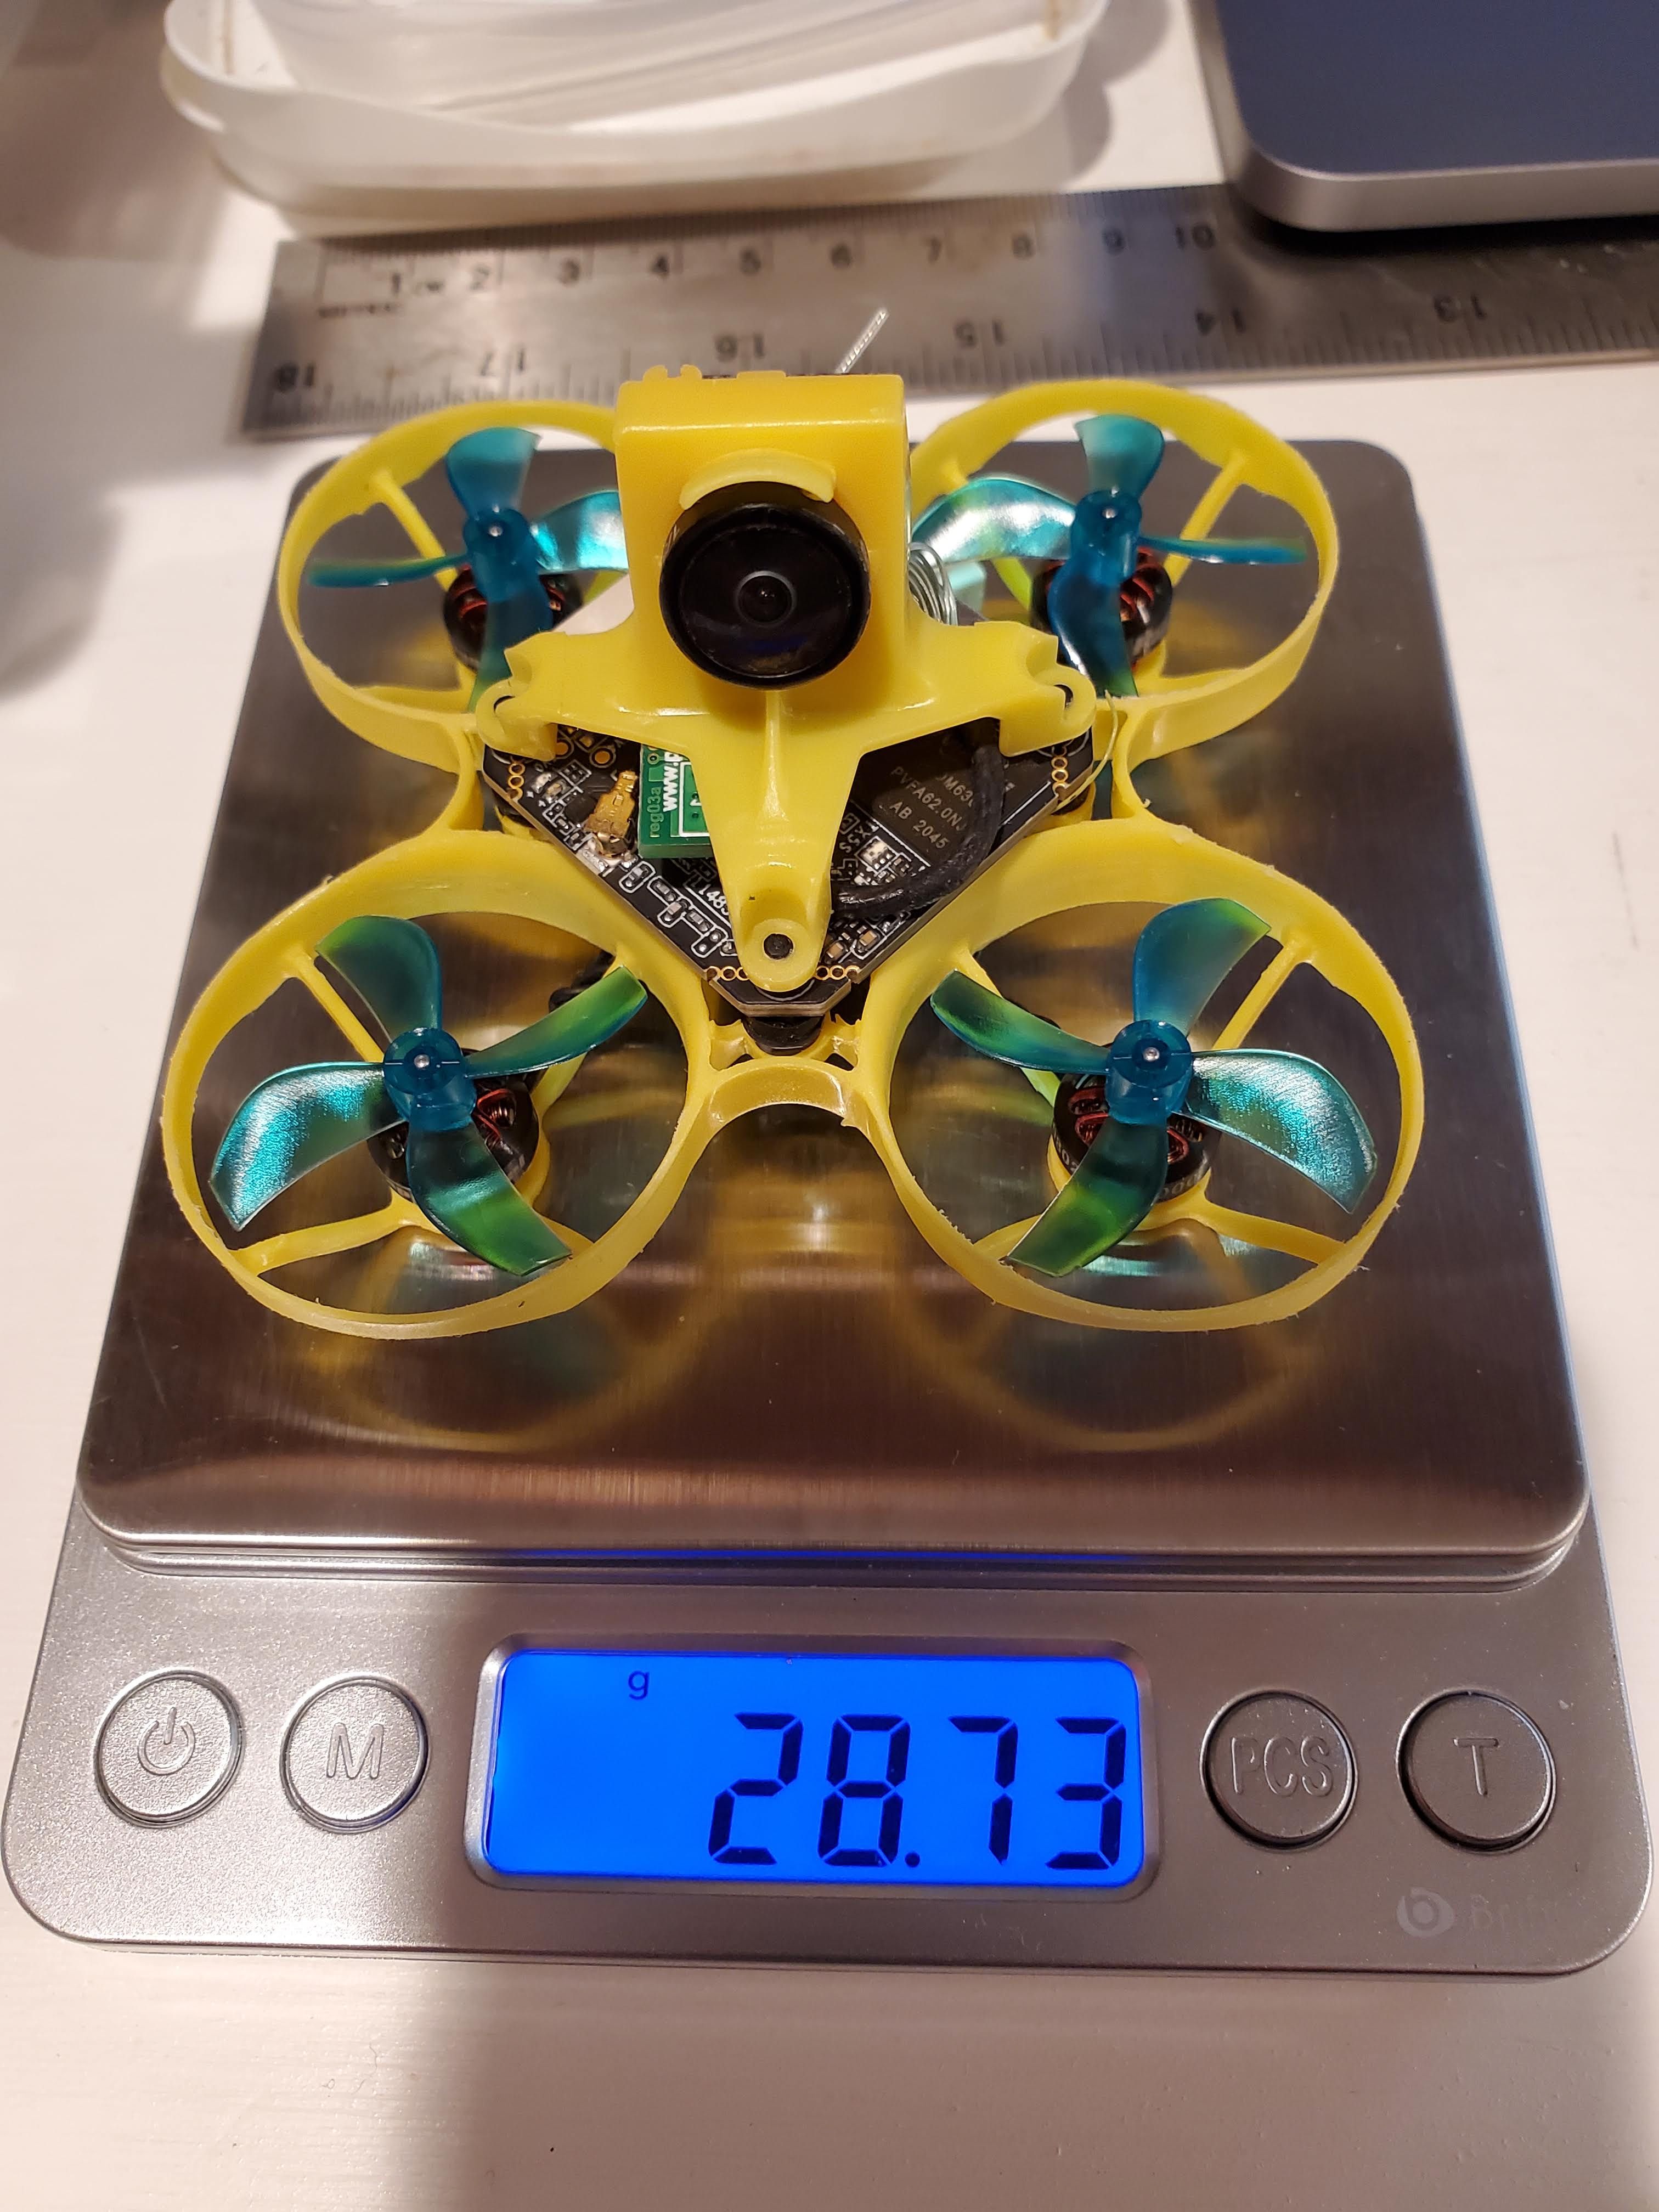
You should aim to get a build under 30g - under 29g is better.
with the motors I chose , my hover point is around 63-66% of my throttle. I'd love to get it closer to 50s, but i started out in 70s/80s (on lower kv motors - 14000kv and 16000kv tested) which was horrible for control (my thumb overextended on the controller too much for most of the flight)
Make sure to run the nylon screws through the canopy holes on their own one time - this helps pre-thread those canopy mounting holes and makes for a nice smooth connection that you don't have to over torque during final assembly. Again, those screws are soft. I went through a couple (ruined the heads) during my initial build process until i found that getting things smooth/free was the way to go.
Use nylon nuts to make sure the FC grommets are snug down to the frame, but do not overtighten. Goal is to just make sure the FC is isolated as much as possible from vibration and is not "floating around" on the nylon bolts.
Was stumped with how to get osd element "vtx channel" to work since canvas firmware 09042021. Was just getting the dreaded triple question marks "?:?:?" Instead of actual band:channel:power displayed. The hdzero discord group directed me to use SA (smart audio) which on face value makes no sense because you are not actually connecting a physical wire from a uart to a pad on the tx5s1. Nor is SA use mentioned in any official Fatshark sharkbyte user manual. The tx5s1 itself does not support SA. But SA function needs to be enabled in BF on an open free uart so that the vtxtable can be created. What a pain. But nonetheless it works with firmware 23072021 or newer so now when I change channel or power, the osd now reflects the change. No more triple question marks.
Note just to make sure I had a free and clear uart1 for SA I flashed the NOBEESIGN hex file "betaflight_4.2.9_HUMMINGBIRD_F4_PRO_BASE_NOBEESIGN_b75650c.hex" from the github link below.
Uart 2 is still used for MSP with the vtx.
https://github.com/.../nbd.../releases/tag/4.2.9-v1.0
I used bluejay esc firmware v14 , 48khz, with 0 degree motor timing and low demag compensation.
i used the project mockingbird betaflight tune from here and i added the dual axis steering to my radio as descibed in the guide :
http://projectmockingbird.squarespace.com/pmb-setup-guides/nbdacrobee65v3pmb
note : i did not use jazzmaverick firmware, i used bluejay.
With the new GNB or RDQ 380mah 1s 60C batteries I can get about 2m45s (driving the battery down to 3.1v) of a basic indoor angle flight, not pushing it too hard, but also going up and downstairs.
I'd love to get 3min, maybe once I get the 40mm MIPI and shave another 1/3rd of a gram perhaps I can get closer to that target.
Indoor flight example :
Photos

Part List
Show stores (6)Guides & Reviews

AirbladeUAV has done it again and this time they've brought long range to the 5" class! Based on the popular Transformer Mini, the new Transformer 5" Ultralight adopts a lot of the same design philosophies with larger props and more payload capacity. It can fly upwards of 20 minutes on a 4 cell Li-Ion battery pack and in ideal conditions it's got a range of over 4 to 5 miles. In this guide I'll walk..
Read more
With the release of the DJI FPV Drone cinematic FPV has become a lot more accessible, but you certainly don't want to crash a $750 drone! The QAV-CINE Freybott is a compact, lightweight cinematic FPV drone that can take a hit and keep going. It's a lot safer to fly indoors and around people. With a naked GoPro or the SMO 4k you can capture some great stabilized footage. In this guide I'll show you..
Read more


Awesome detailed post dude. Regarding the flight time, have you tried flying in acro mode? I think it may help increase the flight time because the motors are not trying to correct the angle all the time.
Thanks for your comment ! yes i 100% agree. Acro would give longer flight times but indoors in a tight area I just cannot handle acro. (I've seen guys do it and i am amazed when i see it done). indoors angle mode on my 75mm build with new 450mah (GNB 60C) batteries I get consistent 3min30s (landing at 3.1 V). I've yet to try outdoors/acro with my new batteries on the 75mm. I suspect cruising around I may get near 3m45s or longer. The 75mm build is a lot more forgiving with this extra digital HD component weight than the 65mm. But it is a fun tinkering around project !