
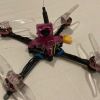
This is the Catalyst Machine Works Whoopmaster 4"
I've been using a the guts of a 5" Luminier QAV2-R in the JohnnyFPV frame for about a year now and really happy with it. I also haven Slammed Squirt I pieced together from some IFlight BNF's that I blew up learning on. I've never really been happy with the squirt feels, so it's used sparingly.
I liked the bigger props, and ability for the rear mount action cam. The biggest thing for me though is that the prop protection is small enough that it doesn't appear it will get pushed around in the wind.
On to the build:
The frame has a ton of parts, but if you follow the video on the product page it comes together pretty easy. It's really hard to tell the difference in the arms to have them the right direction, and it may be smart to do a dry build without using the press nuts for the gopro mount as you decide what side you want the VTX antenna and XT-6 plug. I did not build this as a wet conditions drone, but did get the parts to do it and may once I've worked out all the kinks.
It is super cool to have the whole frame assembled and have simple access to the guts. For the guts I went with a Caddx Vista Air Unit with full size dji cam, Holybro Kakute H7 Mini w/Tekk032 F4 Bigfet 4in1 50A ESC stack, and TBS Nano Diversity. I used the Tmotor F40 2400kv motors as suggested by CMW for this 6" build. Everything came together without to much difficulty, but I did run into a few challenges along the way.
The fpv cam mount is designed for the smaller cameras, so the standard DJI AU cam won't fit. I tried and tried and it's close, but it didn't work. I ended up using a spare set of Shendrone Squirt cam mounts and those worked perfect once you shaved just a little off the bottom where it needed some prop clearance.
This frame is designed for a Caddx Vista, but I think with some ingenuity it could fit an air unit. I would rather have an air unit and may explore that later. The options for placement of the Caddx Vista are endless, but depend on the length of you antenna. I think the best spot is in the front where I've placed it now. In the process of building I tried the following for antenna's for the Caddx Vista:
UFL to SMA with standard antenna - result - it's too short and blocked by the battery so range is poor
UFL to SMA with Foxeer antenna - result - this antenna is longer- but I think it's RHCP cause my range was worse
True RC Carbon Matchstick UFL - result - I had to use tape to try and keep it secure with the TPU mount - range was slightly better than standard DJI antenna
Iflight Long Range UFL - result - this fit well and by far has the best range, however it is easily moved and if I crash and land on it I'm sure to damage it.
My gut says the best option is a UFL to right angle SMA, then using a long range SMA antenna that reaches above the battery.
All the guts attach to the top plate, so I installed the ESC board first. In order to leave room for a velcro battery strap I added spacers between the top plate and the ESC. This was straightforward and easy. Soldering the motors was straightforward. The battery lead was a little more challenging. You need to make sure the cable is long enough to reach without affecting the FC, or ending up in the line the props. I ended up using some zipties to make sure it would stay where I want it. For the FC I mounted it so that when the quad is on the table the it is correct. This meant as I was building it I had to flip it so I was looking at the bottom of the FC. I guess you could do either way. There is one with this FC board/frame combo. The USB C connection is in the middle and you can't access it when the standoff's are installed. I had a mini USB C extension cable that I thought would work, but it must have been damaged as I couldn't get it to connect. For now I have one of the standoff's removed and with the right cable if I'm super careful it's all good. As a side note- This board comes flashed with 4.3. As of today it will not work. You will get RX_FAILSAFE and once you go to the receiver tab you will notice the RC connection is not working right. In 4.2 there is something wrong with the access to the onboard Blackbox flash. I can't get it to work. I have tried both versions of the firmware available. It also seems I need to be using BF 10.7 configurator in order to have bi-directional d-shot stick.
For the TBS Nano Diversity the mounting of two immortal T's is a bit wonky. I've been trying different set-up, but I think I'm just gonna switch it TBS Nano RX Pro and do one antenna. For now I have the RX kinda laying in the bottom TPU. I don't really like it here and will move it to the back after I get a different RX. That should clean up the area around the FC.
On to the good stuff. The first flight with stock everything and was good. I was missing a bunch of screws in the frame (from swapping antennas) but it still flew pretty good. Once I got all the screws and bottom plate on it flew even better. I can't currently get any blackbox data it is all guess work and feel on tuning, but I slowly tweaked and guessed my way through some settings and it's flying really good. I've only done yard laps so far, but it both rips and cruises, and goes slow when needed. It feels stiff and durable.
Early Flight Videos:
Flight 2 (after some sketchy guess tuning)
Photos


Part List
Flight Controller |
Holybro Kakute H7 Mini W/Tekko32 F4 BigFET 4in1 50A ESC STACK - DJI PNP 20x20mm
(2 builds)
Pyrodrone.com
|
$128.99 |
Motors |
4 x TMotor F40 PRO II - 2400KV
(24 builds)
Getfpv.com
|
$99.60 |
FPV Camera |
Caddx DJI Digital HD FPV Camera
(164 builds)
Getfpv.com
|
See Site |
FPV Transmitter |
Caddx Vista Unit for DJI Digital HD FPV (No Camera)
(92 builds)
Getfpv.com
|
See Site |
Antenna |
iFlight Albatross 180mm IPEX U.FL HD Antenna - LHCP For Chimera5
(2 builds)
Pyrodrone.com
|
$6.99 |
Receiver |
TBS Crossfire Nano Rx FPV Long Range Drone Receiver
(1503 builds)
Pyrodrone.com
|
$29.95 |
Batteries |
Gaoneng GNB 1550mAh 22.2V 6S 120C Lipo Battery - XT60
(2 builds)
Pyrodrone.com
|
$38.99 |

Nice build, I am going to build mine this week hopefully. But you meant a 4" build, not a 6" one, right? :)

Guides & Reviews

AirbladeUAV has done it again and this time they've brought long range to the 5" class! Based on the popular Transformer Mini, the new Transformer 5" Ultralight adopts a lot of the same design philosophies with larger props and more payload capacity. It can fly upwards of 20 minutes on a 4 cell Li-Ion battery pack and in ideal conditions it's got a range of over 4 to 5 miles. In this guide I'll walk..
Read more
With the release of the DJI FPV Drone cinematic FPV has become a lot more accessible, but you certainly don't want to crash a $750 drone! The QAV-CINE Freybott is a compact, lightweight cinematic FPV drone that can take a hit and keep going. It's a lot safer to fly indoors and around people. With a naked GoPro or the SMO 4k you can capture some great stabilized footage. In this guide I'll show you..
Read more


impressive build!
really
countless hours led to a well made craft! i also built a squirt v2 build an wasn't happy with the way it flew do to its ducts. been researching a new whoop that had no problem carrying a full size GoPro. this frame as caught my interest.