PicklePick 35 HDZ Lite - the 3.5 inch HDZero Digital ultralight toothpick
 By caffeine goat on May 29, 2022
Introduction
The build was inspired by KebabFPV's Babytooth. Don't get me wrong, Babytooth is amazing and I'd go for it except that I'm a strong believer in using 3.5-inch props instead of 3" for the better efficiency, power, and lower noise. Since I've also picked a very interesting time to join the hobby, I have decided to avoid analog video altogether, and go straight to digital. However, DJI was a bit too pricey and heavy to stomach for the first builds, and so I shifted my attention onto HDZero.
It was perfect.
The whoop VTX board with a whoop-sized AIO with a built-in receiver together made for a very lightweight, low profile, and clean stack that included all of the latest developments in the FPV space - ELRS and HDZero, and so I felt like it was simply meant to be.
I wanted a small, lightweight, non-offensive kwad with a digital video link, and so I started planning.
Frame choice
I was very much fond of the Babytooth frame save for the prongs for the antenna (I was planning to mount the antenna horizontally through the canopy instead of ziptying it to an arm) and obviously the size - stepping things up to a heavier VTX and a heavier camera prompted for better weight carrying capabilities, so moving up to 3.5" seemed like the way to go about it.
Luckily for me, after perusing here on Rotorbuilds I stumbled across the PicklePick - a fork of Babytooth that came in a variety of sizes, and was readily available at CNCDrones (the CNCMadness storefront meant specifically for kwads).
I ordered a few frames in a couple of thicknesses - 2.5mm and 3.5mm (I think), and 2.5mm seems to be plenty strong for this size of kwad. If it keeps breaking I will move to 3.5mm, simple as that.
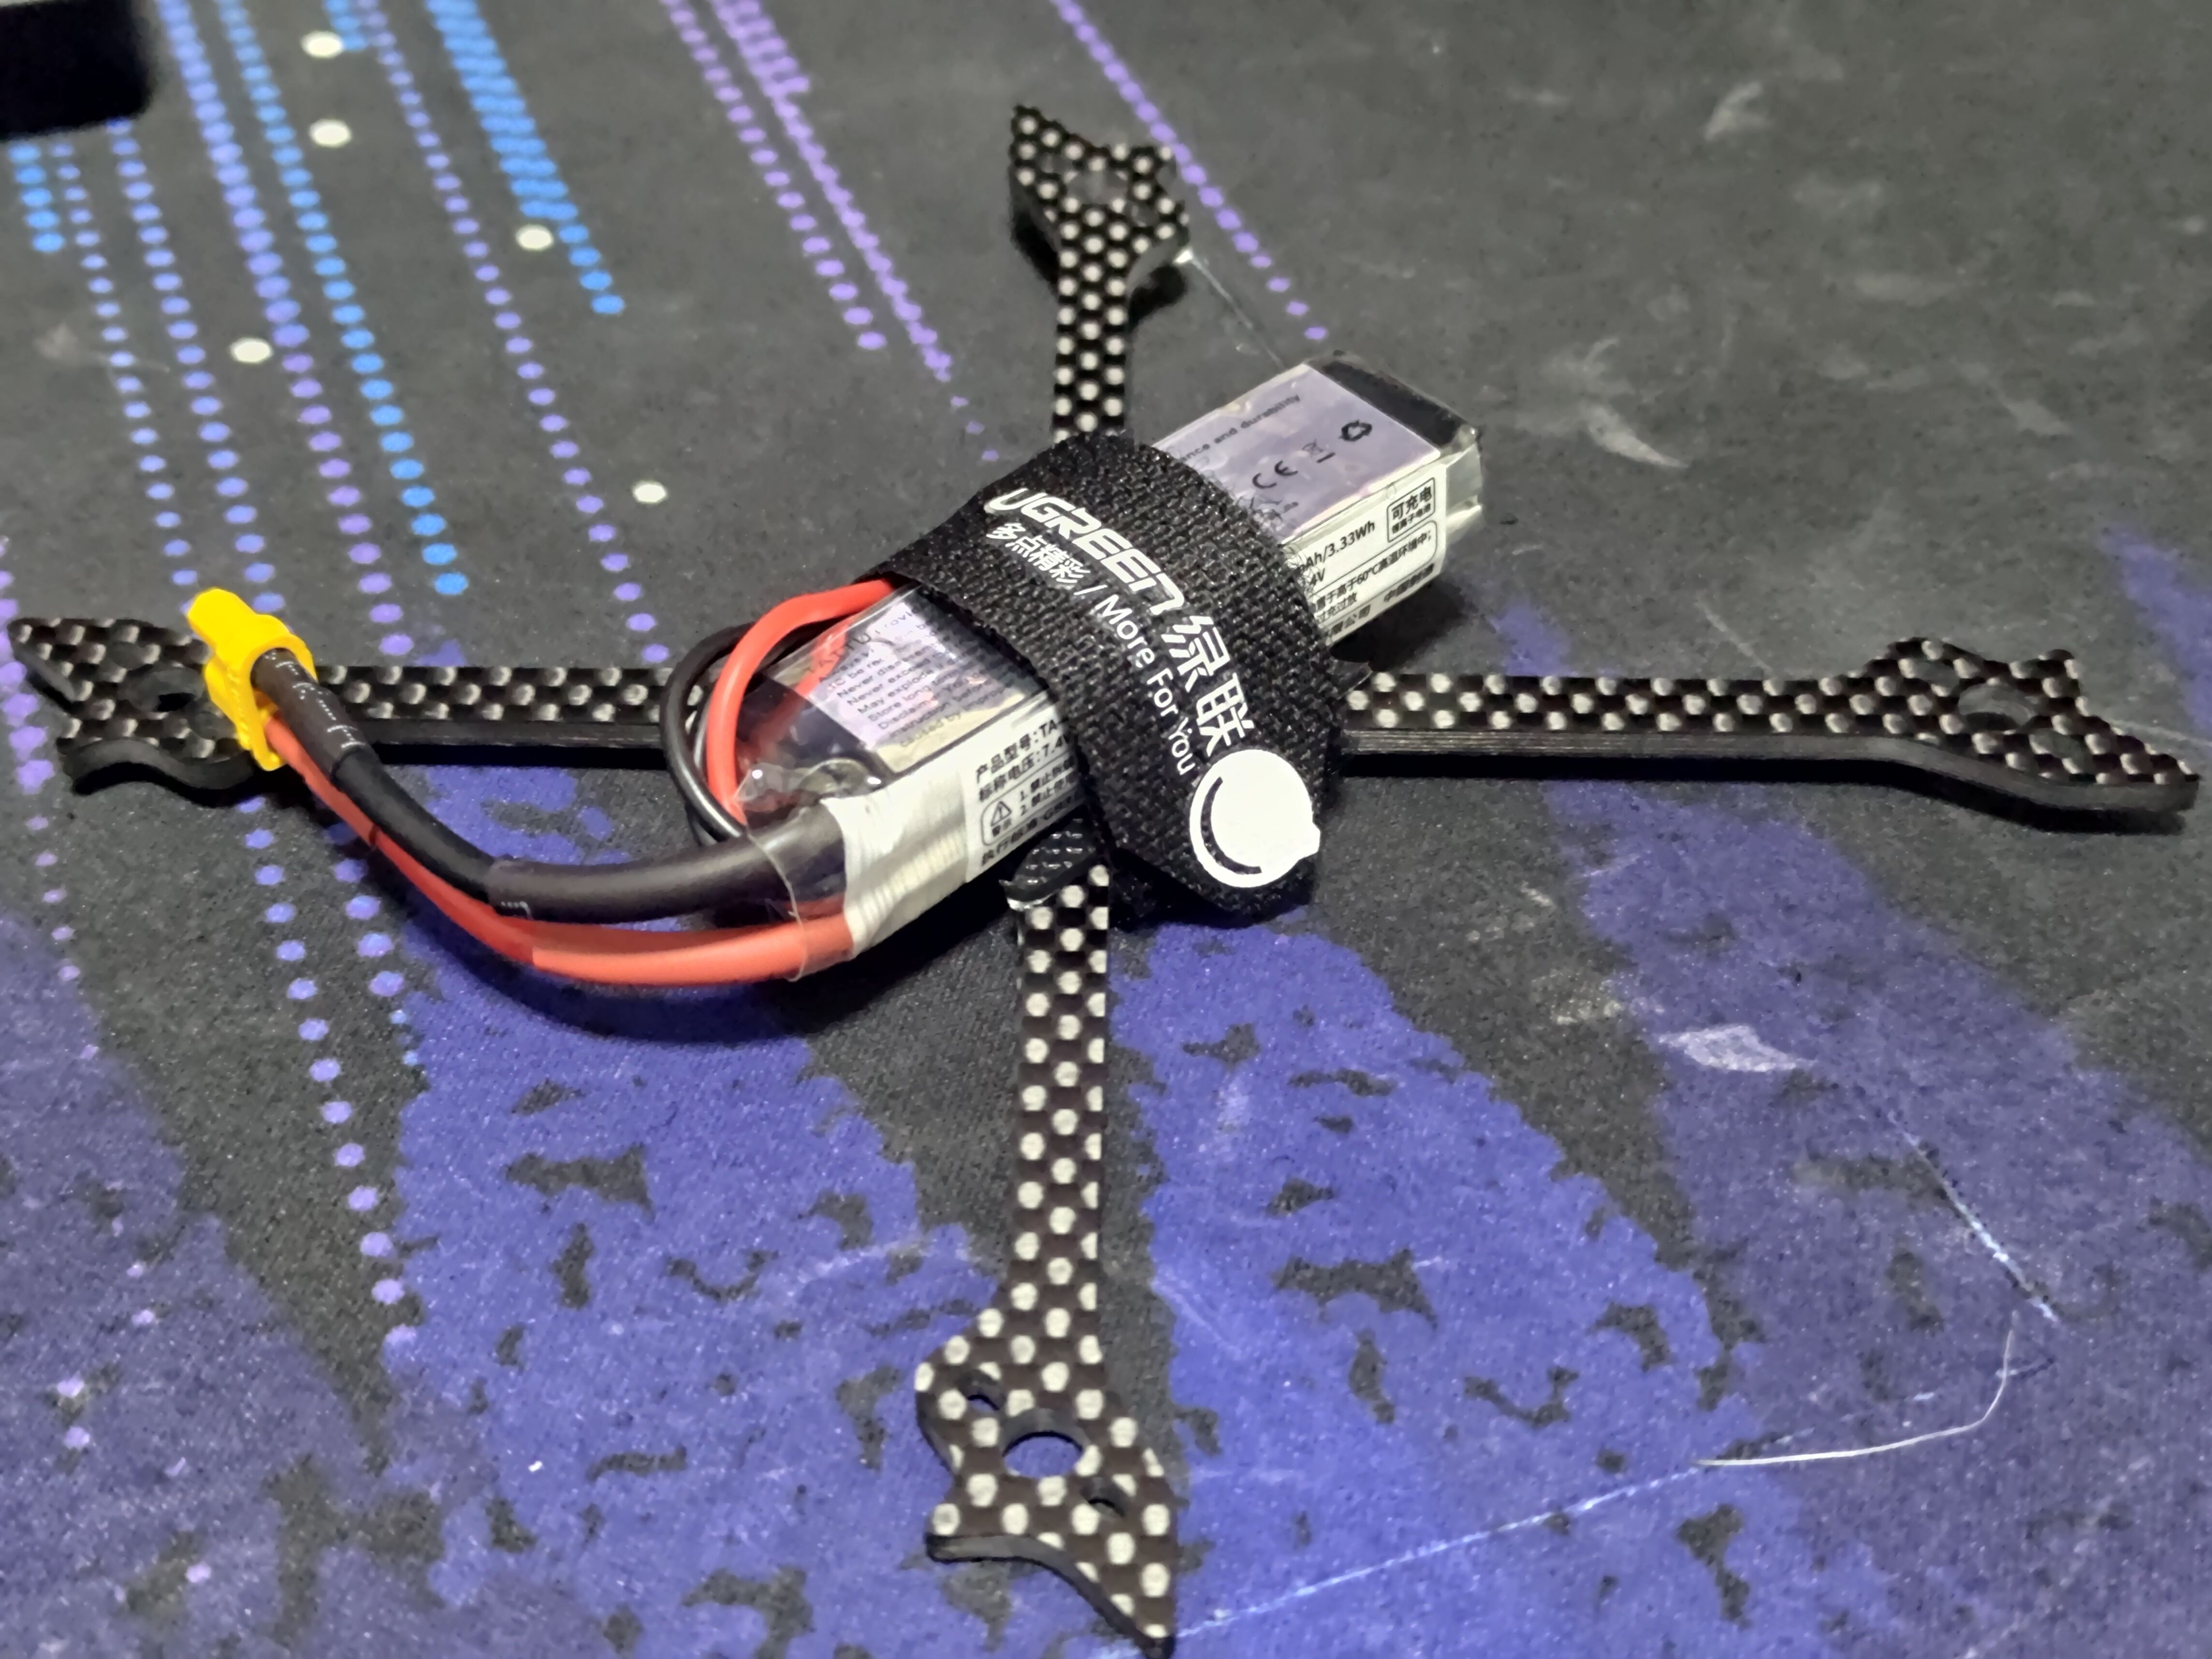
The frames came with no hardware so I had to improvise. To mount the battery, I cut the spare piece of landing platform foam from a Cinelog35 frame to fit on the bottom of the PicklePick, and got a strip of velcro from a cable tie cutting it to length. The idea is that you fasten the velcro around the battery first, remove the battery, fasten it just a little tighter, and then along with the compressing foam this should provide a safe and secure mount for the battery without the need to ever unfasten the velcro again. Perfect.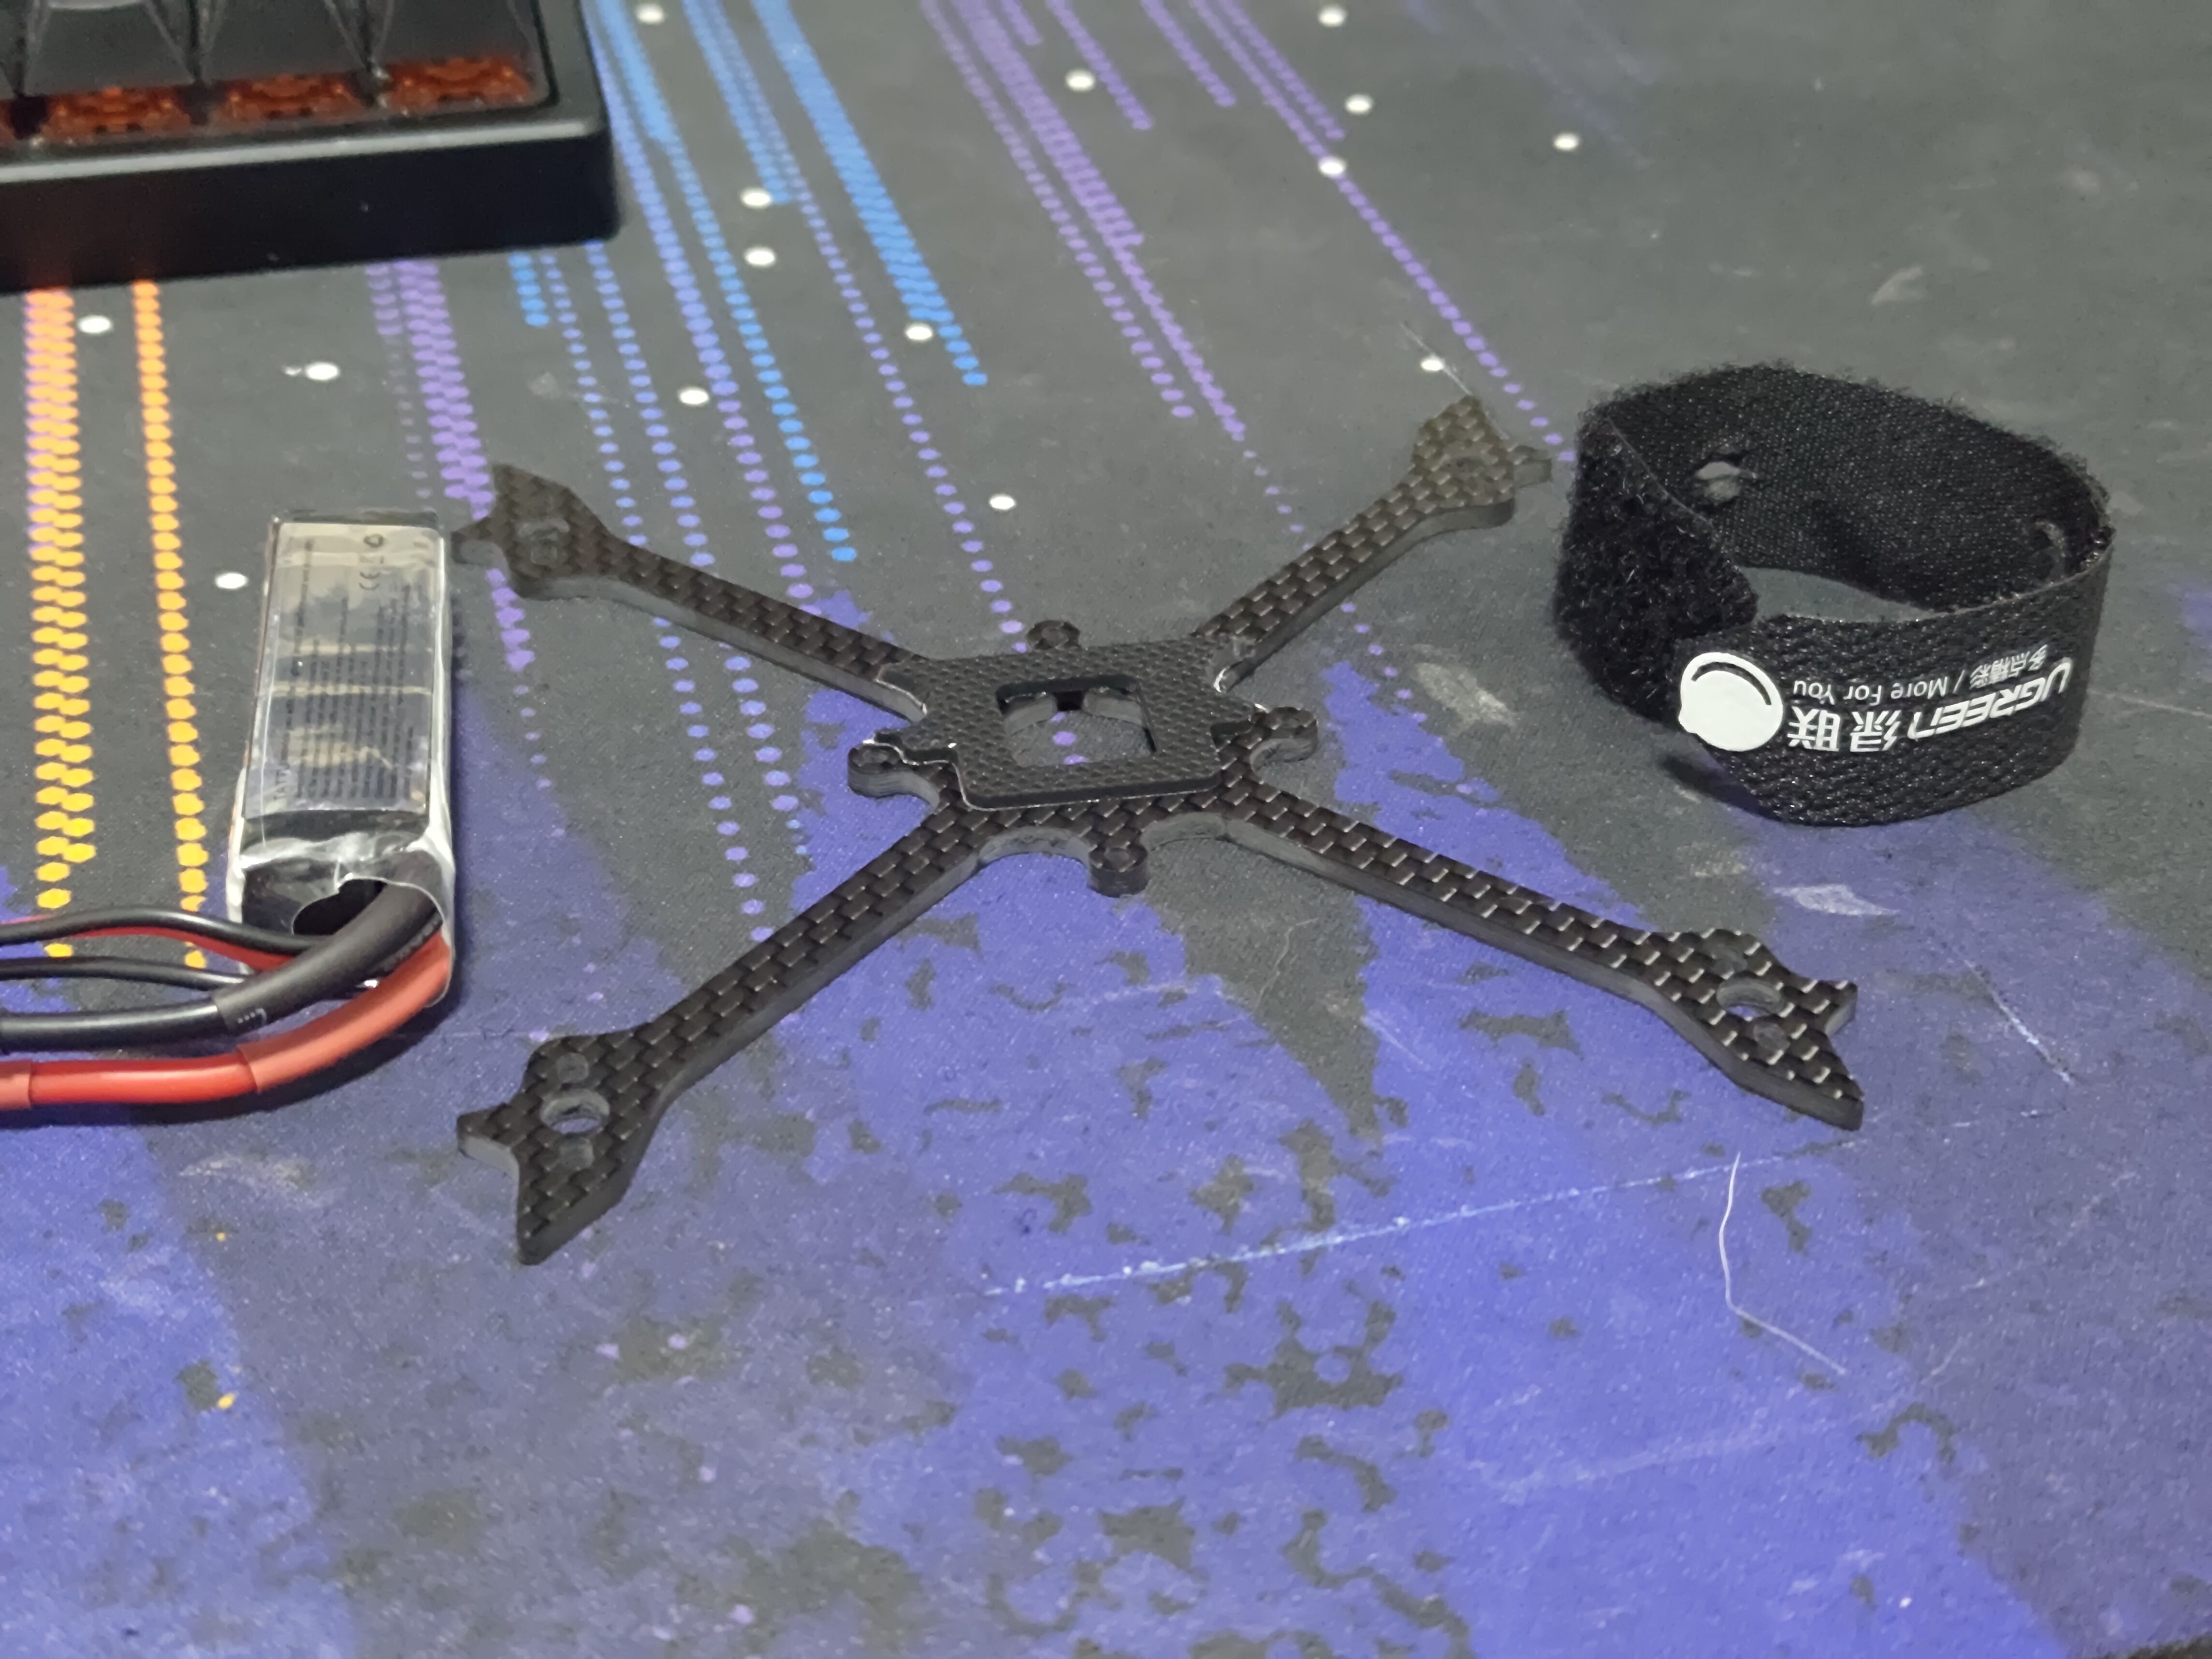
P.S.: One thing to note is that the mounting pattern on the PicklePick is 26.5x26.5mm and not 25.6x25.6! Pay attention to that when picking your components for this frame. Some have oblong holes to fit on both mounts, some have half-cut holes and are made for 25.6mm spacing - they will also work on both. And then obviously stuff like GepRC and BetaFPV AIOs will work natively with that mount.
Motor choice
I'm in love with the design of FPVCycle motors, and I wanted to go for the white-red colour scheme. KebabFPV uses FPVCycle 13mm 1S motors on his 1S Babytooth, and since HDZero requires at least 2S voltage, I stepped it up to 2S batteries and FPVCycle 13mm 6350KV motors.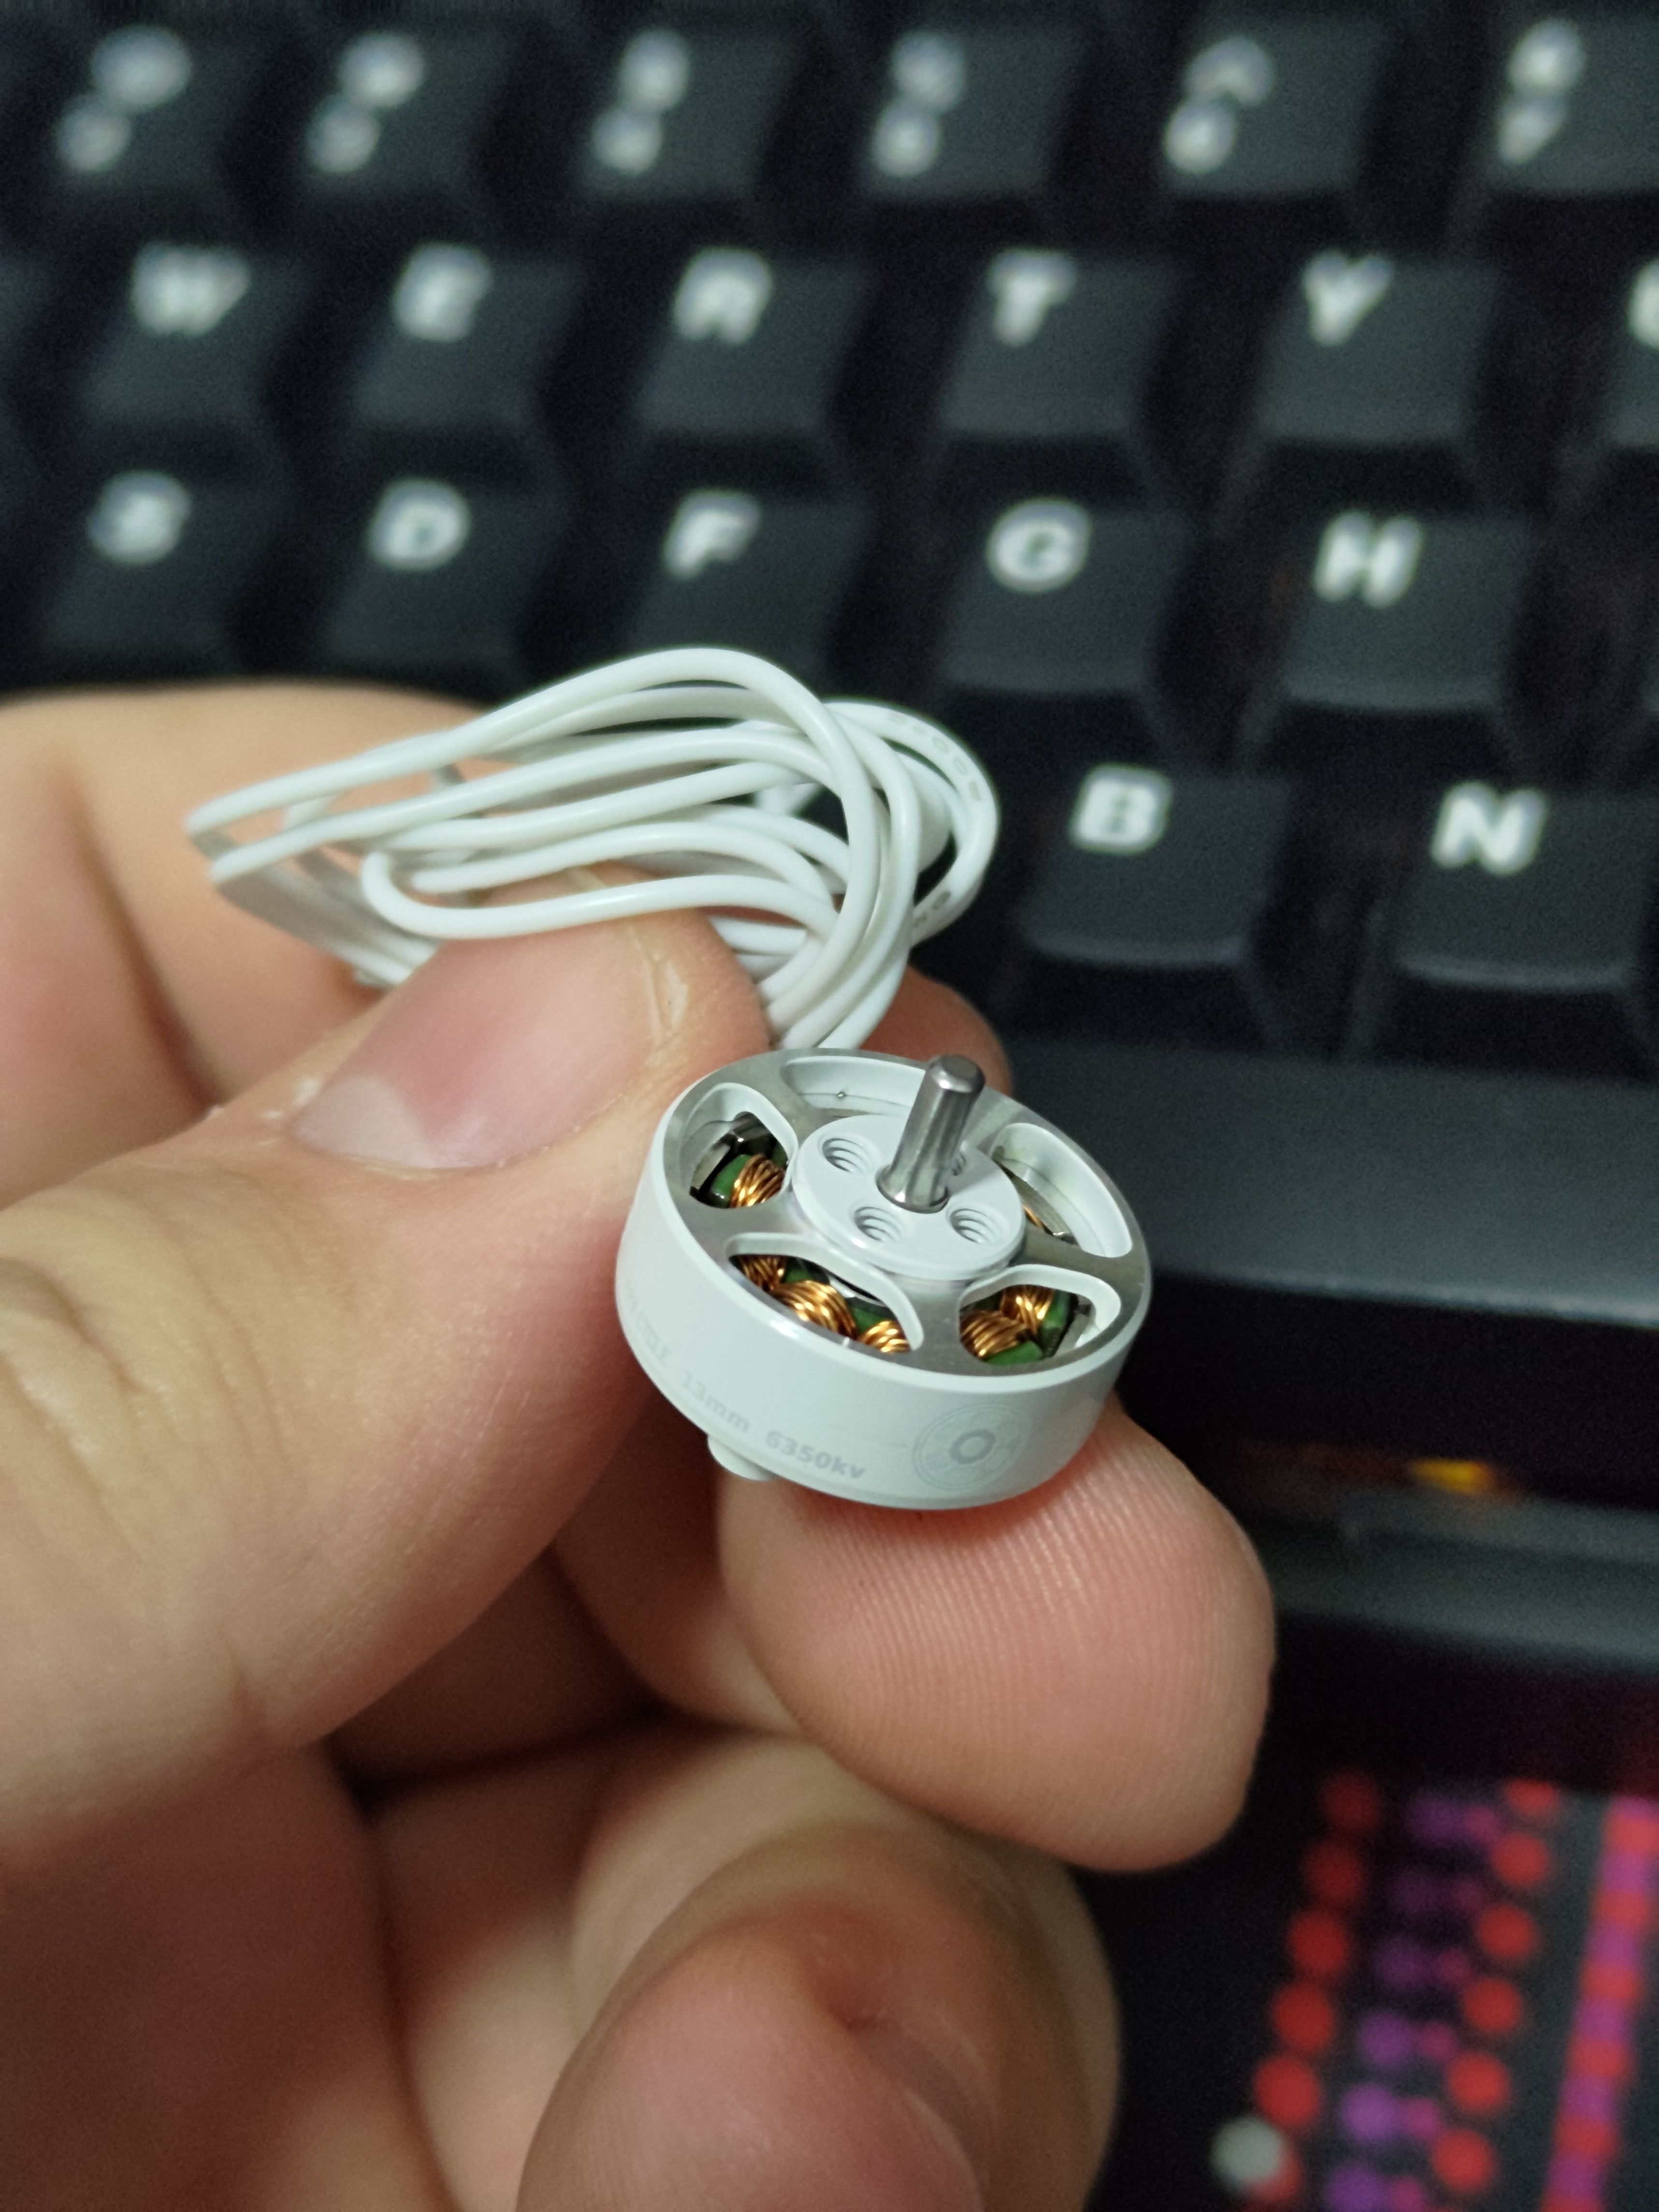
AIO choice
This was a little sketchy because I wanted a clean build, so I was looking for a board with built-in ELRS, but no VTX. JHEMCU must have read my mind because they made exactly that, although I would appreciate at least 10A ESCs for this build. In theory, 5A per motor should be fine. These motors are pretty efficient. (Update from the future: it's almost fine. ESCs are holding for now but the motors try to pull over 20A on full throttle punches. Limiting motor output might help a bit)
The onboard ELRS receiver is properly connected to a UART and supports flashing through Betaflight passthrough which might be the first AIO that does that. Others are way more finicky to flash.
VTX and camera
HDZero Whoop VTX and Runcam Nano HD with an upgraded glass lens. Duh.
But to be serious, this is probably the best combination for an ultralight digital toothpick at this point unless you want to go to 4S and beefier motors, at which point you can slap an HDZero Micro v2 camera on it and maybe add a Go 2 as well.
Test fit
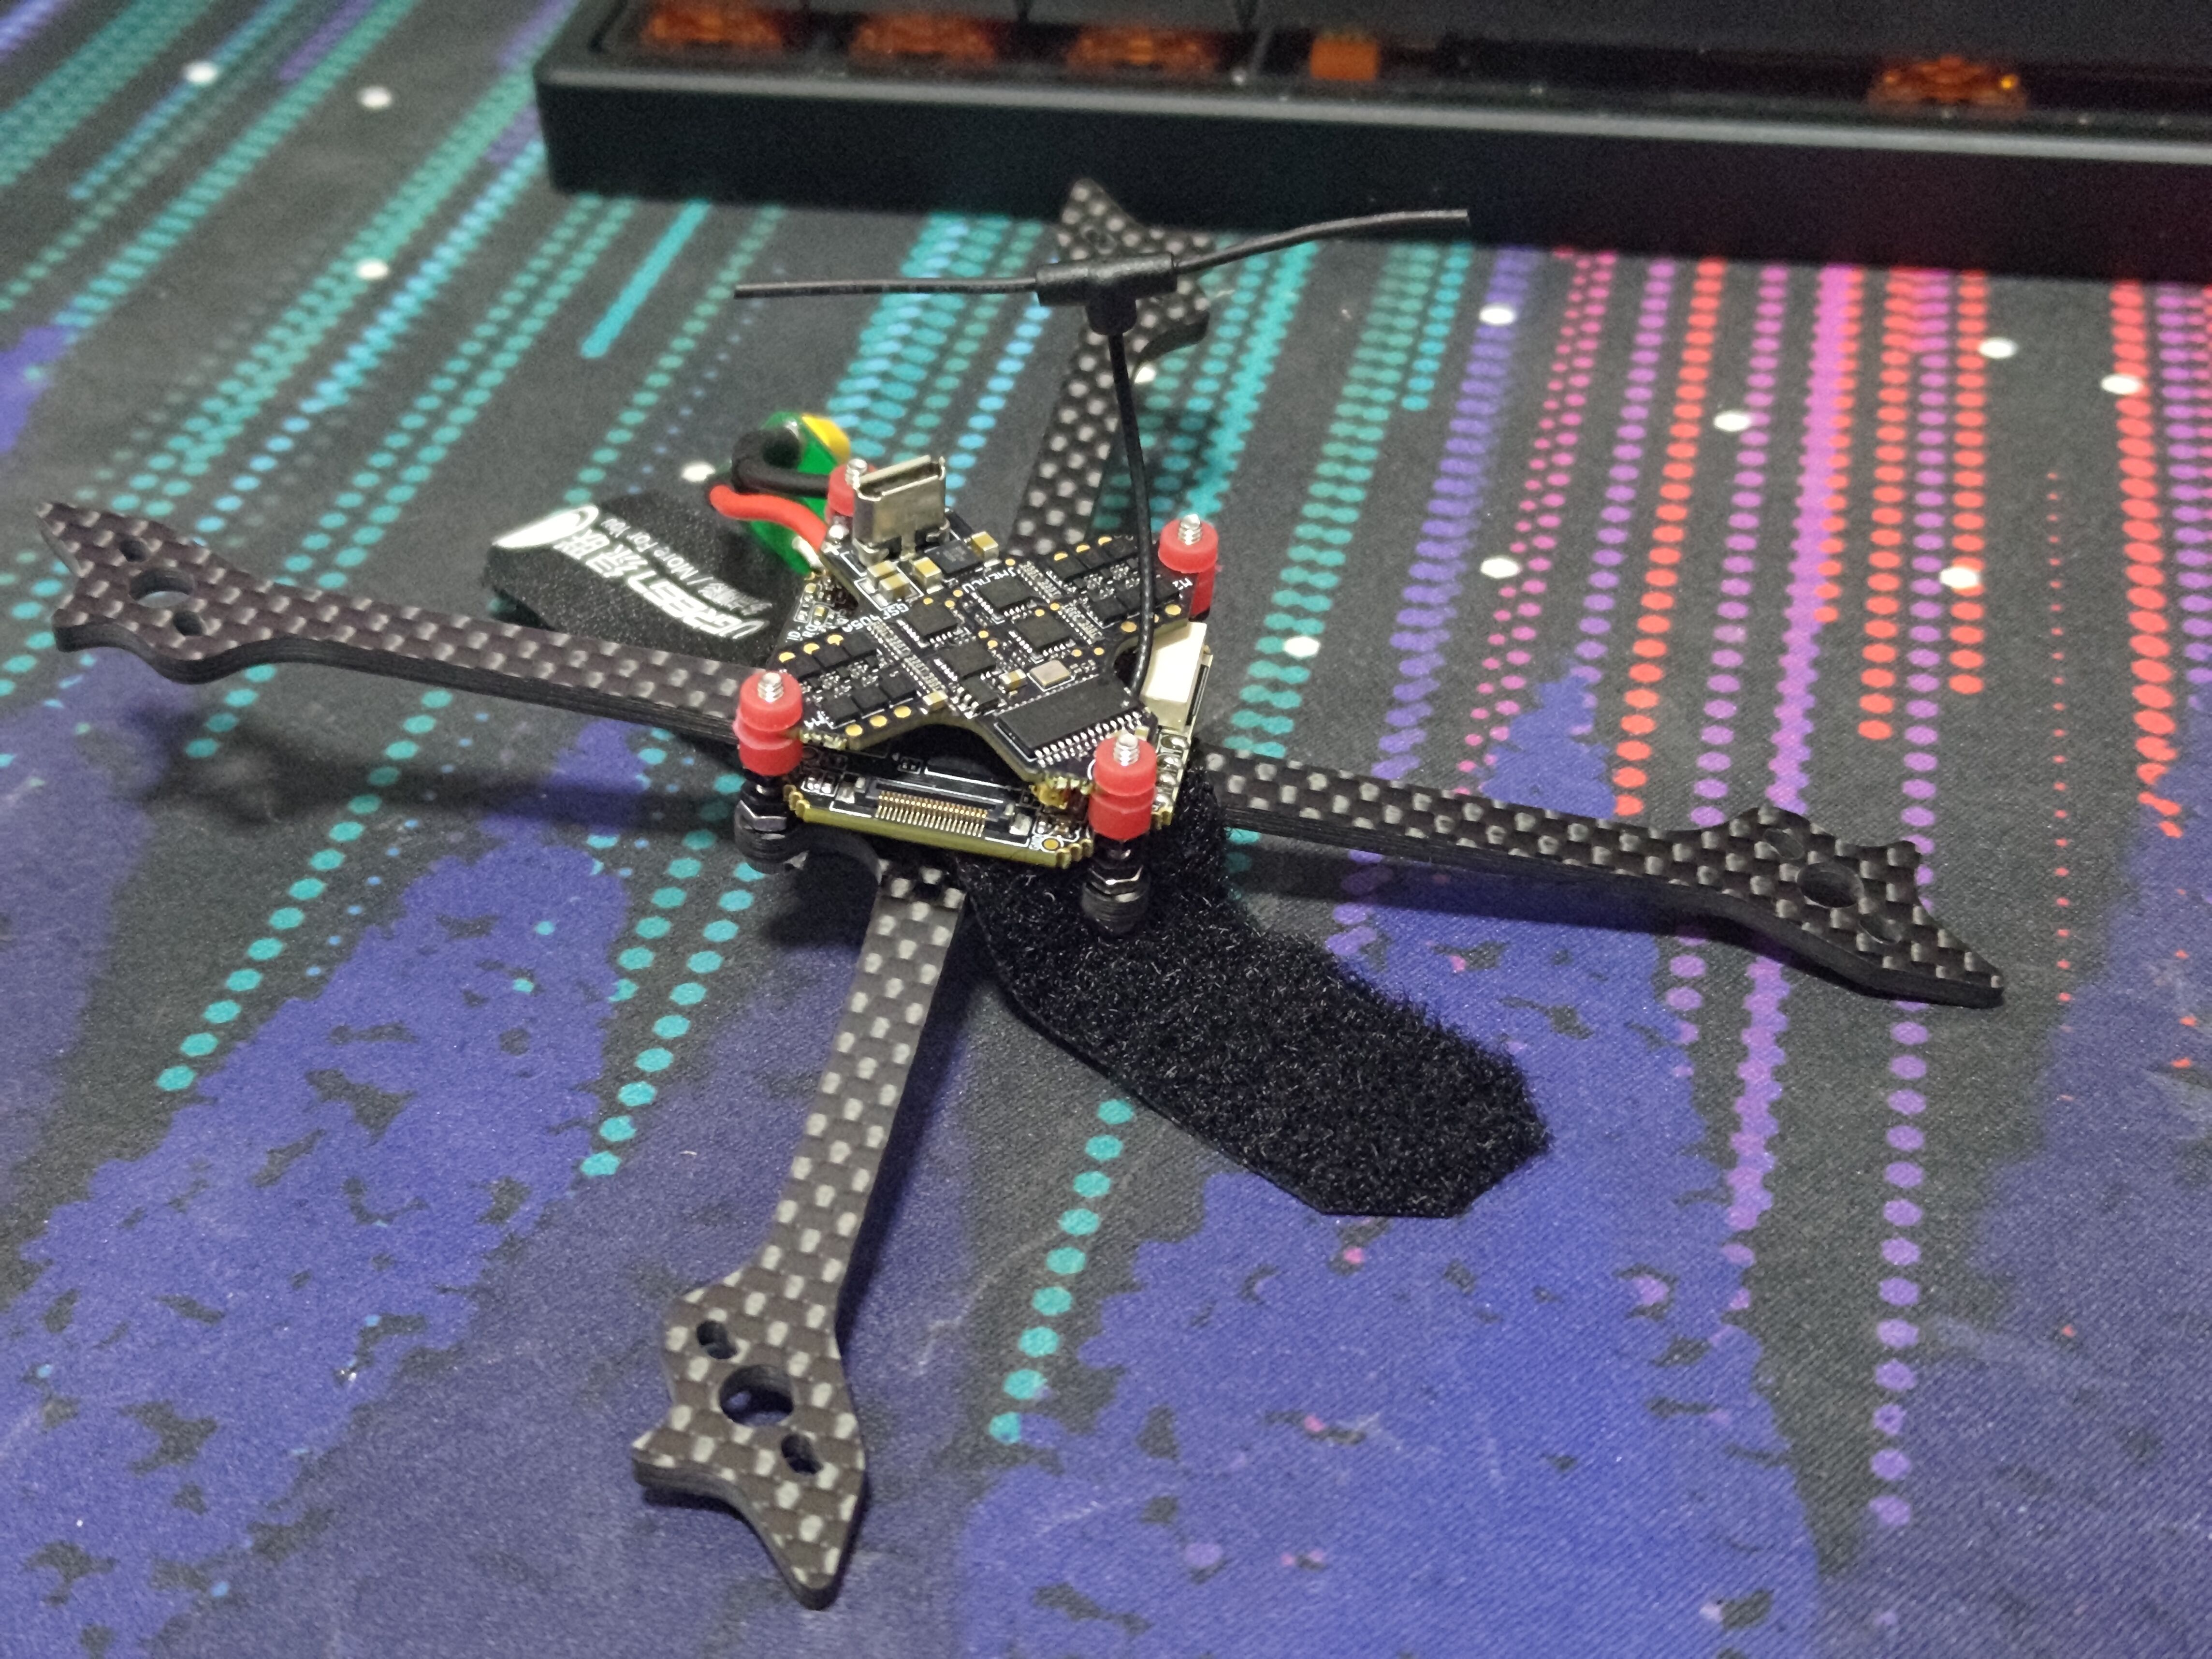
At first I was planning on using a combination of M2 nuts to secure the screws to the frame and then the rest of the stuff to the screws, but that proved to be too annoying, and so I just went with two sets of silicone gummies for both the VTX and the AIO. I ended up using 16mm M2 screws.
Notice how the corners are broken off the Whoop VTX since otherwise the mounting pattern was one millimeter too wide for it, and the AIO is upside down with the USB port facing up. You don't need to remove the canopy to access the port, but you do need to set the custom orientation for the board, and reorder the motors in Betaflight.
Building
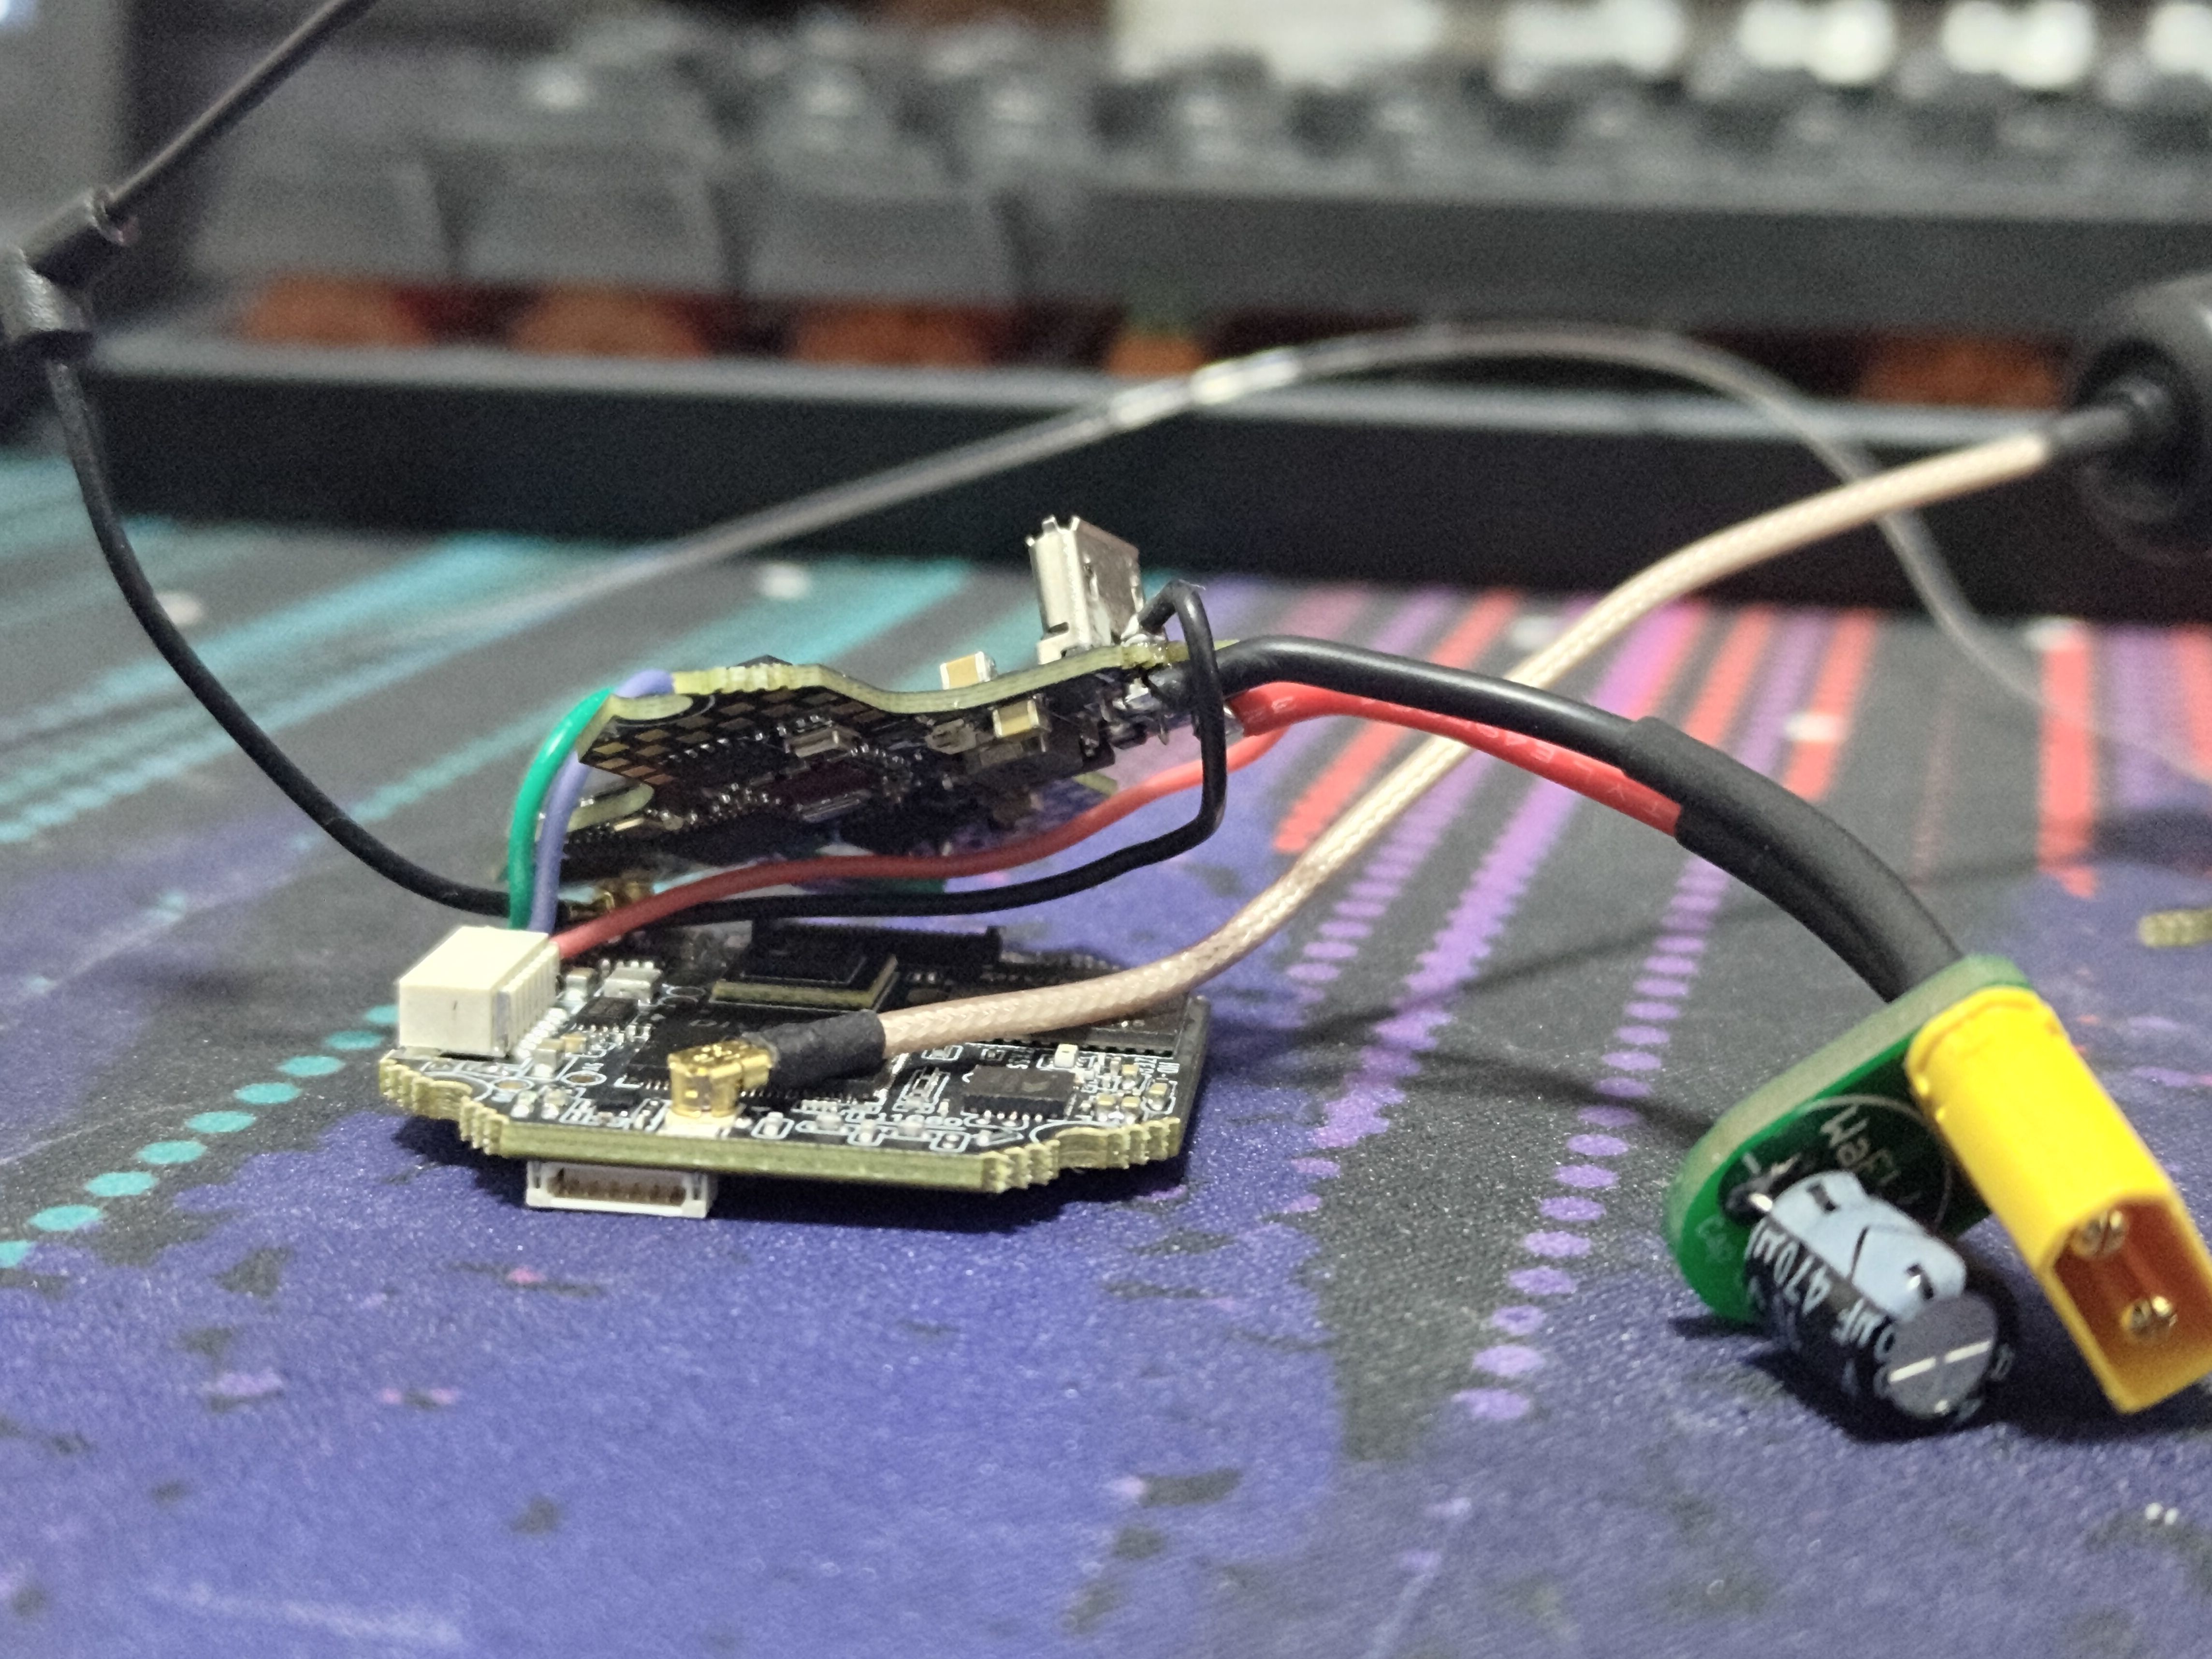
No space for a capacitor inside the quad, so I moved it out to the end of the battery lead. Put a shrink tube on top of it.
Otherwise the wiring is pretty straightforward, you only need to solder the power lead to the AIO and the AIO to the VTX (and the motors to the AIO, but that's a given).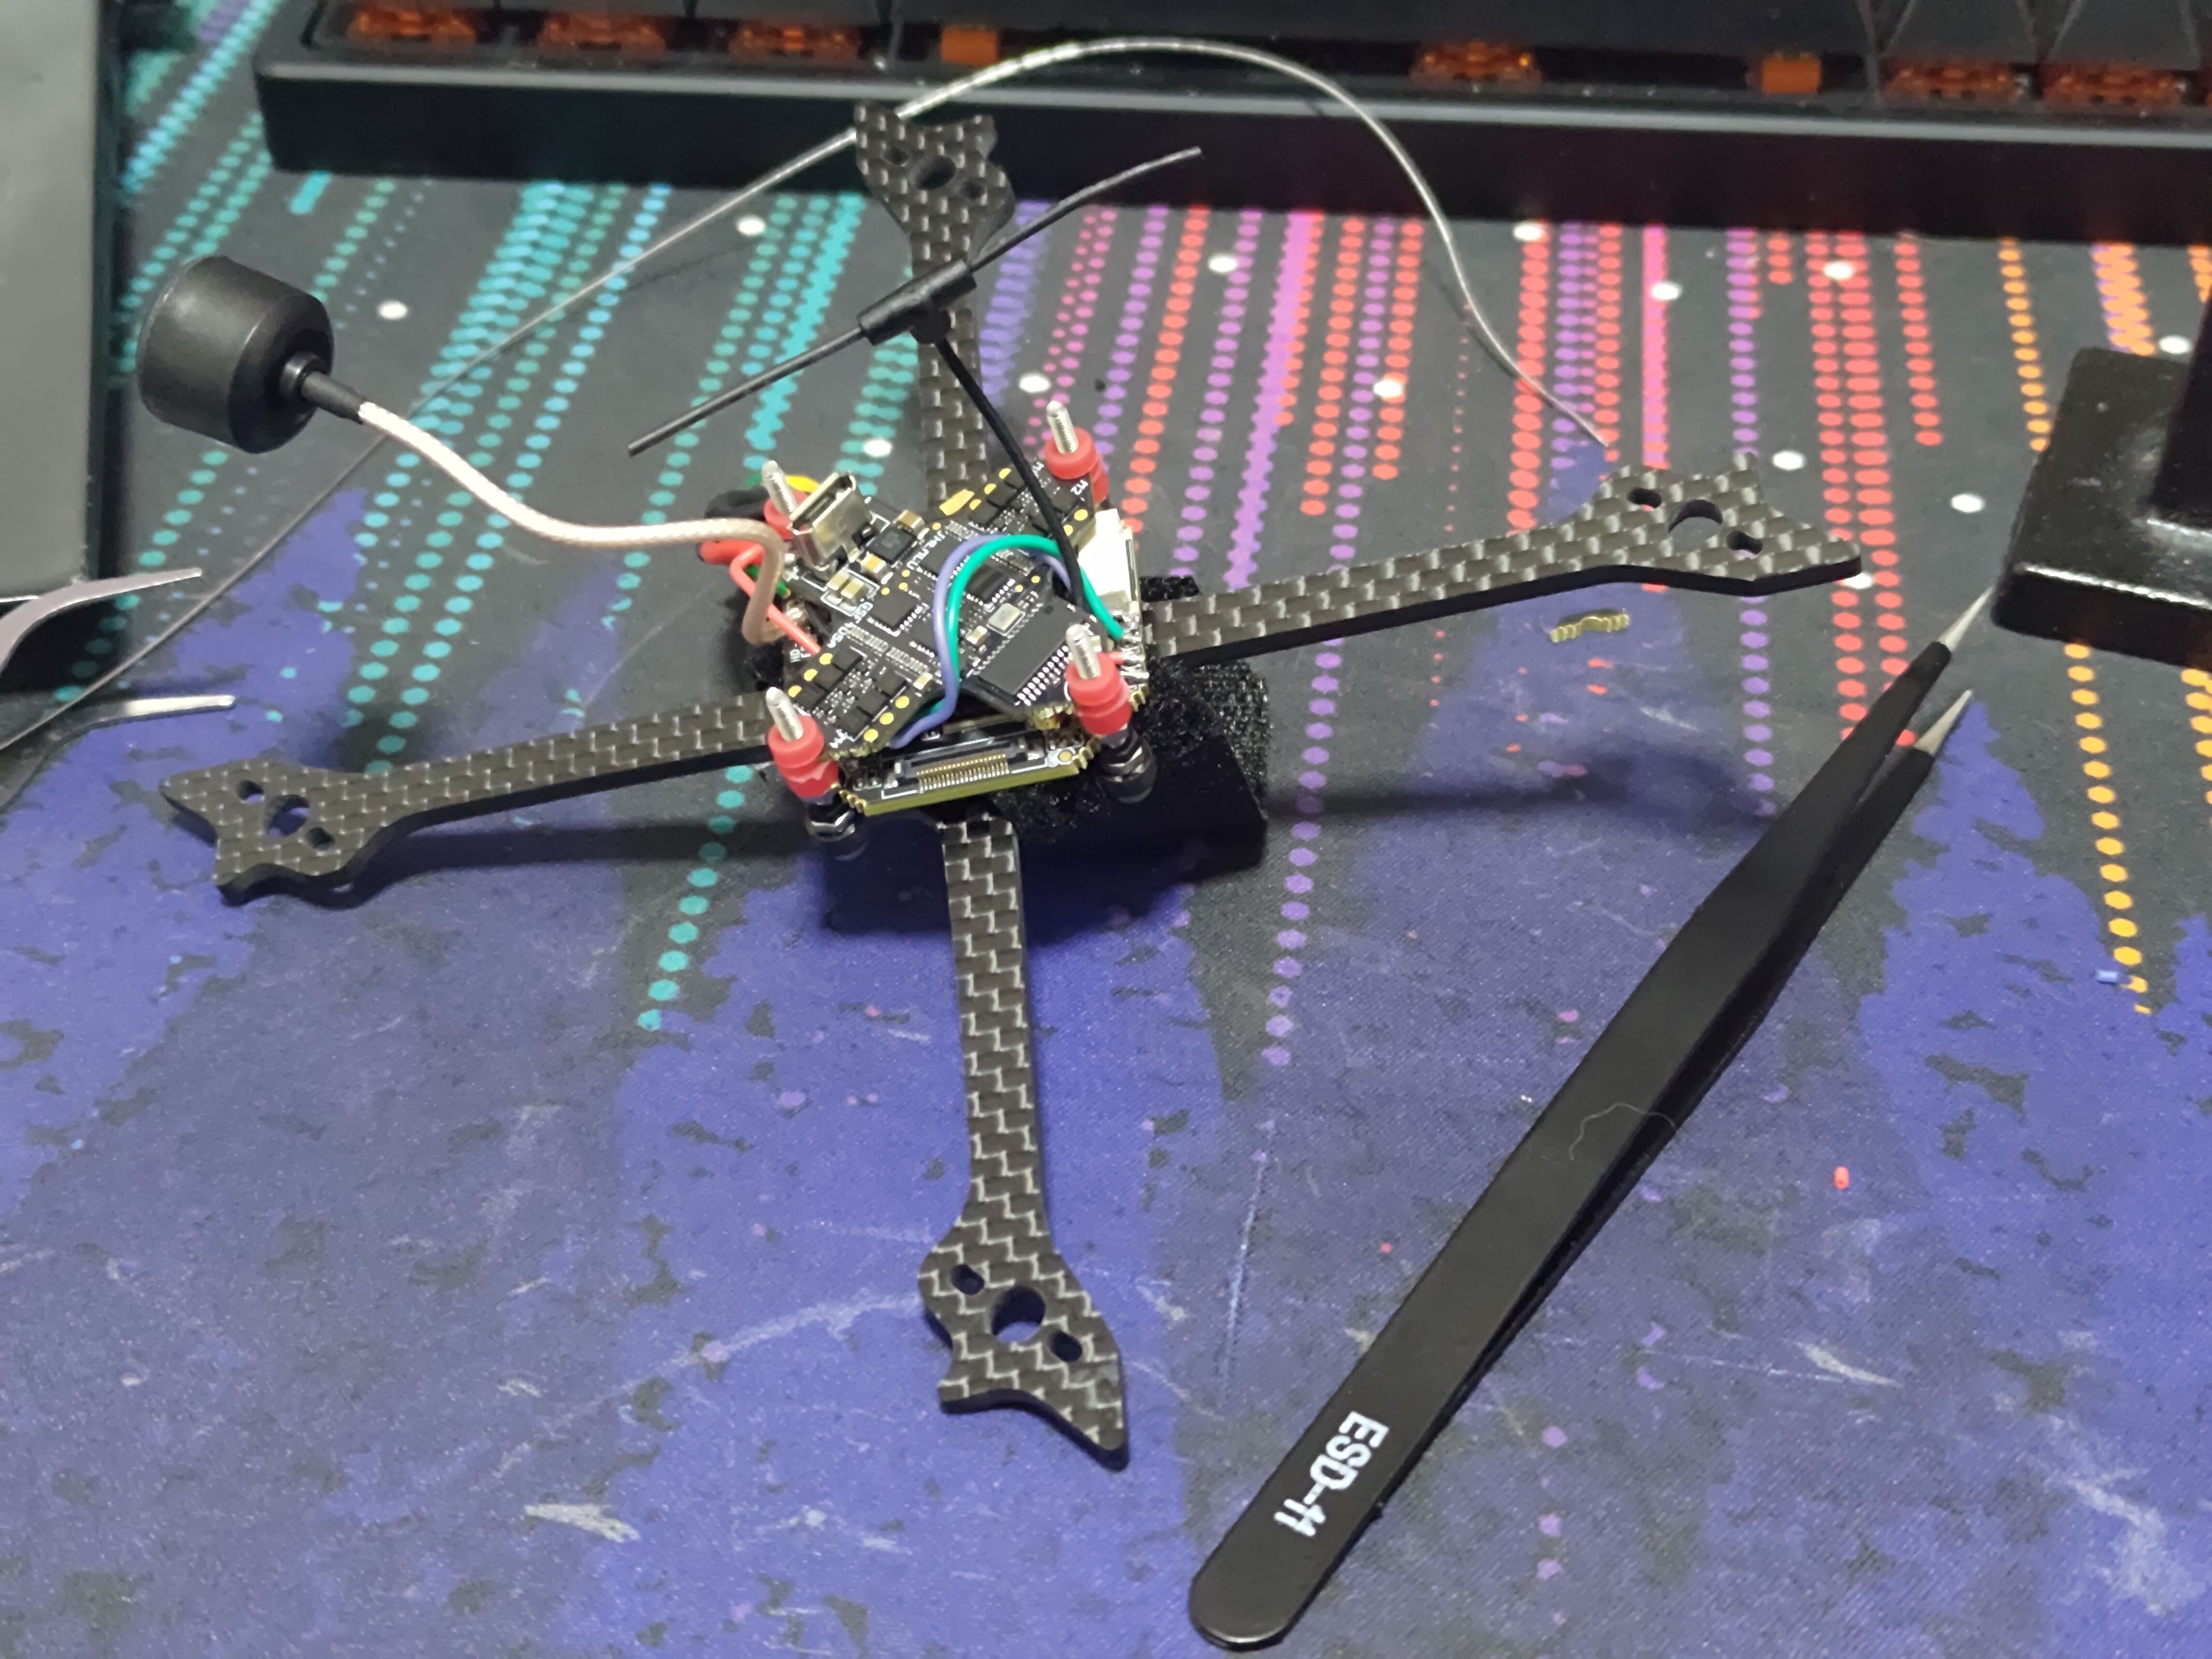
Putting everything on the frame. Ignore the M2 nuts, they didn't make it to the final build. Just use the gummies, the canopy will hold everything together. Also hooking up all the antennas at this point.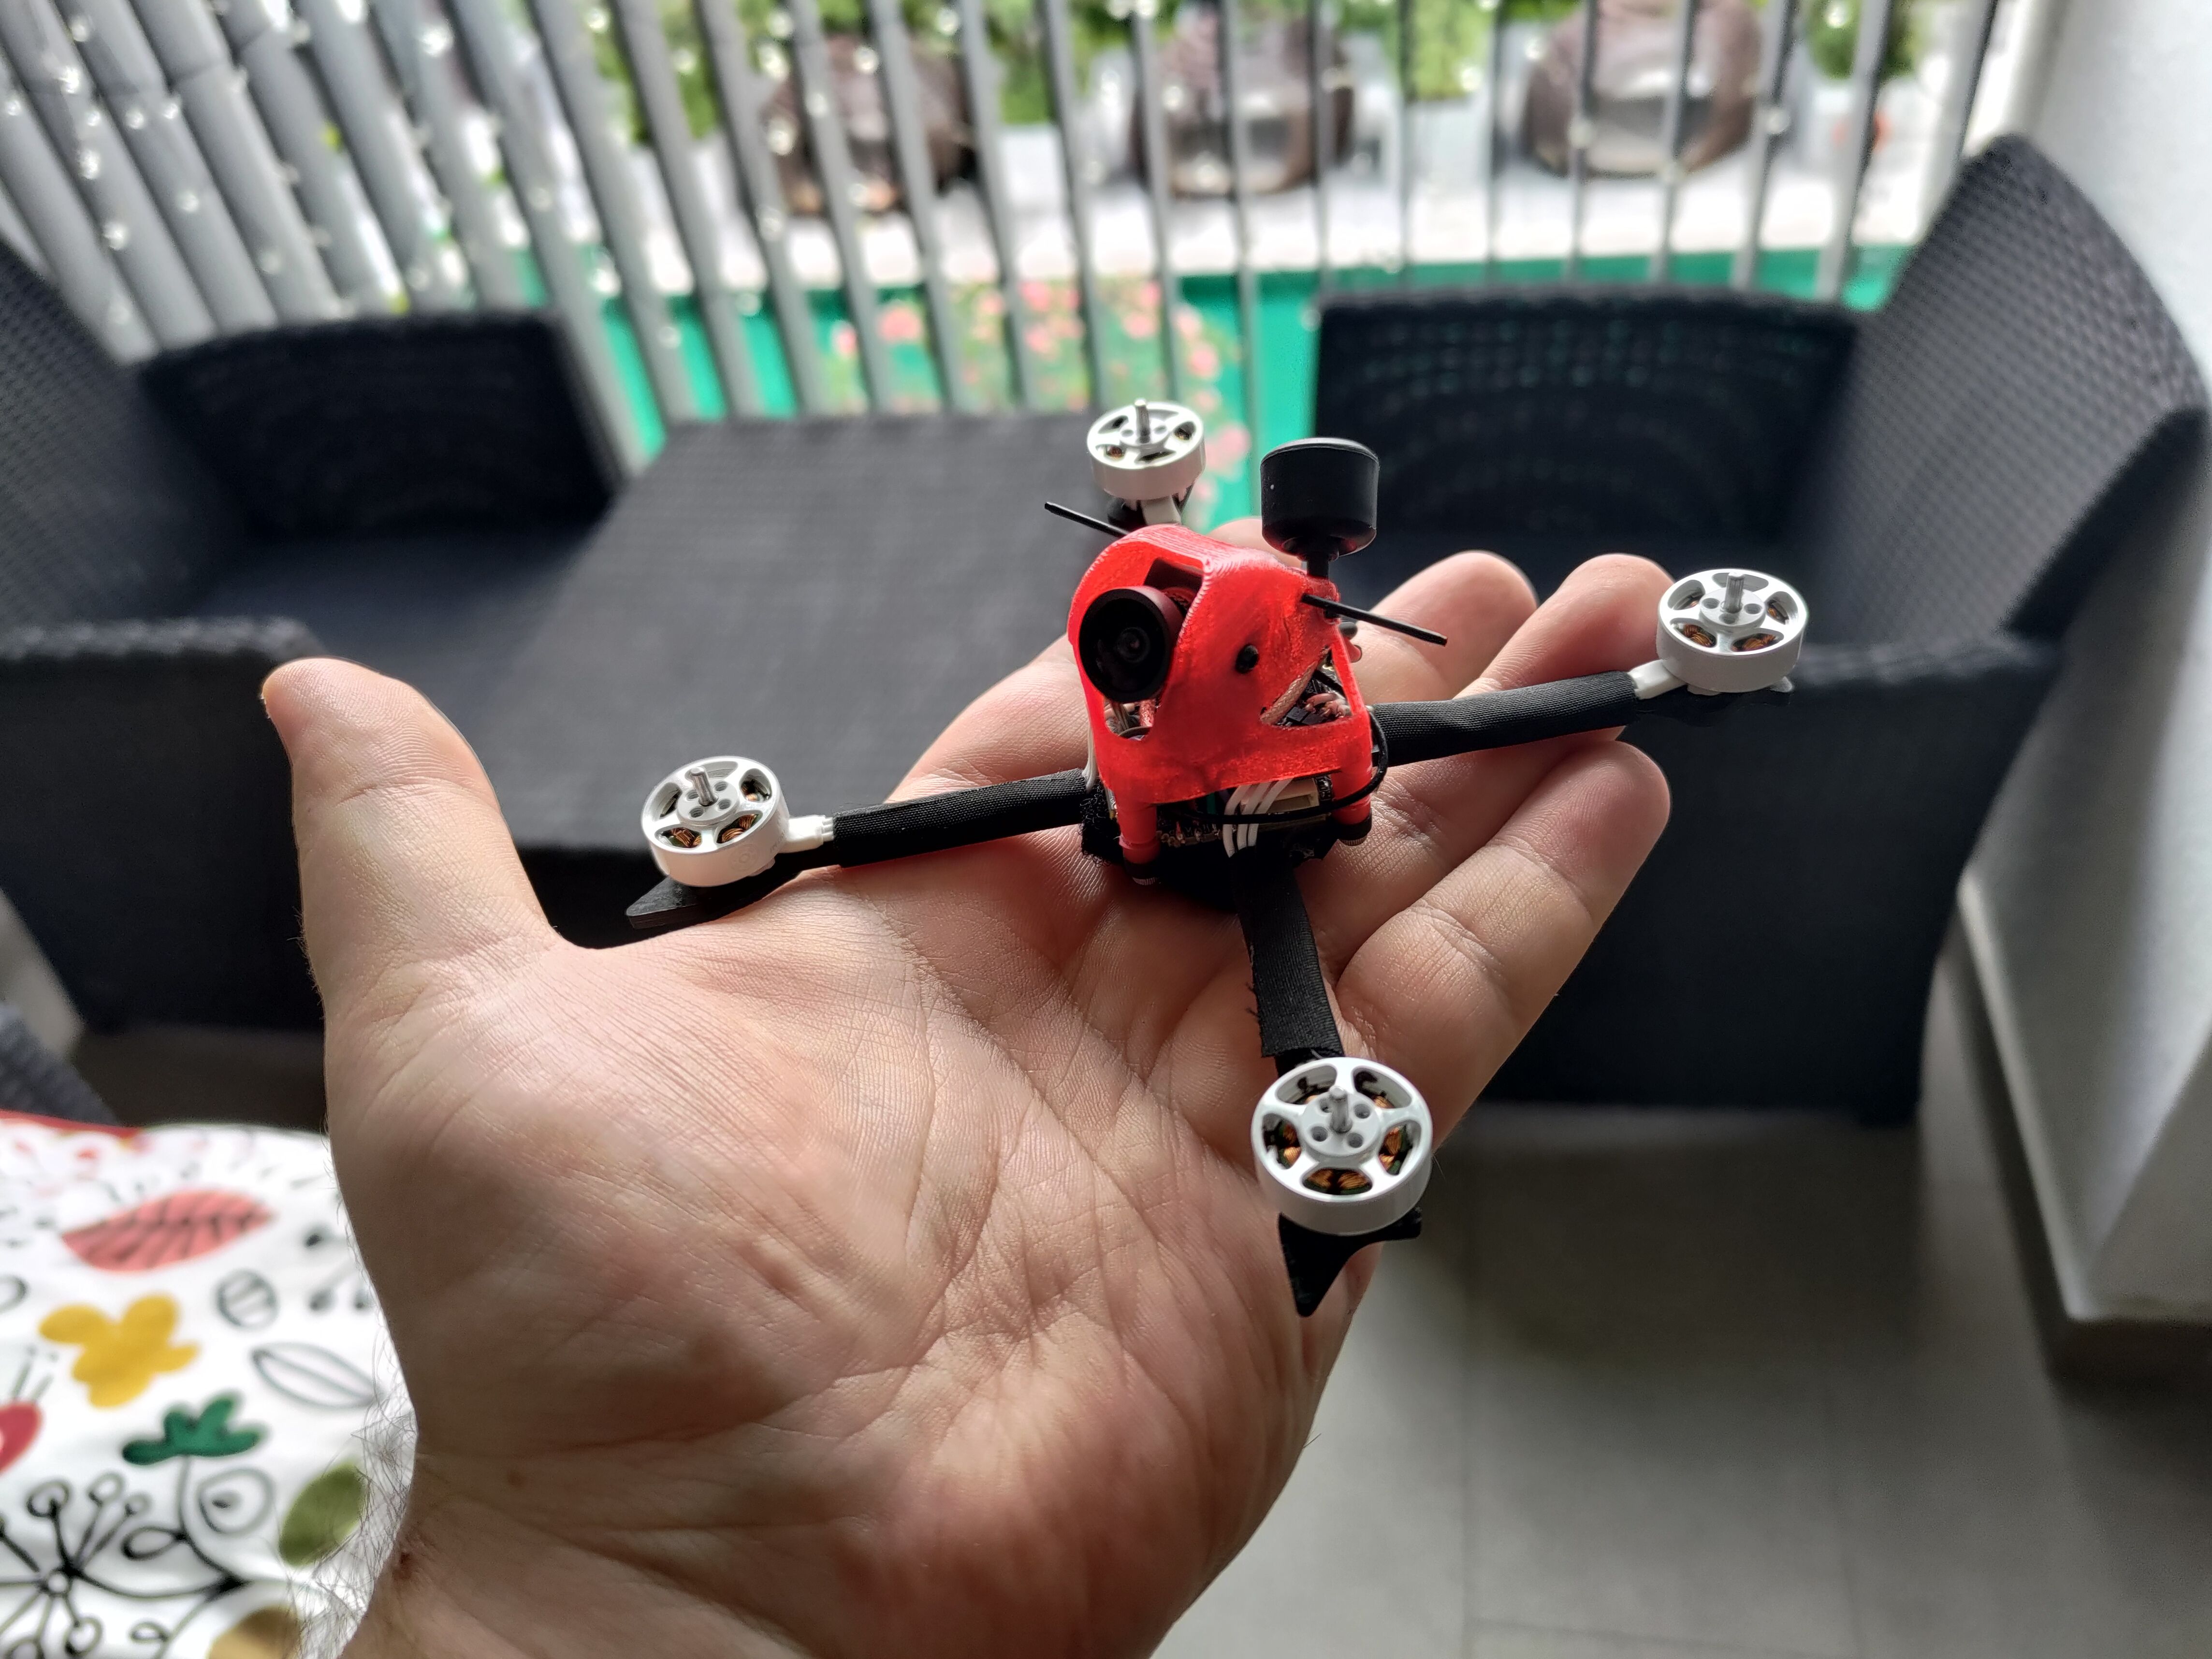
Motors and canopy go on, it's just about done at this point.
I had to burn holes in the canopy with a soldering iron for the ELRS antenna as well as for the ziptie to hold the Triumph Pro. You might as well cut off the canals for the V-antenna because this build doesn't need them, and it looks more sleek without them.
Props
Oh boy, that was a pain in my bum for awhile.
You see, Gemfan and HQProp only made 2mm T-mount props in the 3" size, and I want the 3.5", so the solution would be to drill out a 3.5" prop, except that the tool for that that FPVCycle sells has been out of stock since forever, and I didn't have that much patience or the skill to do a straight hole manually.
...
...so basically I coaxed Gemfan into making new 2mm T-mount inserts for their hybrid M5/T-mount 3.5" Hurricanes. You can pick those on their store page now, and hopefully at reseller stores in the near future as well. No need to thank me, better go give Gemfan some love because without their cooperation this build would be impossible in its current form.
Final build
Two words: Beautiful and Badass.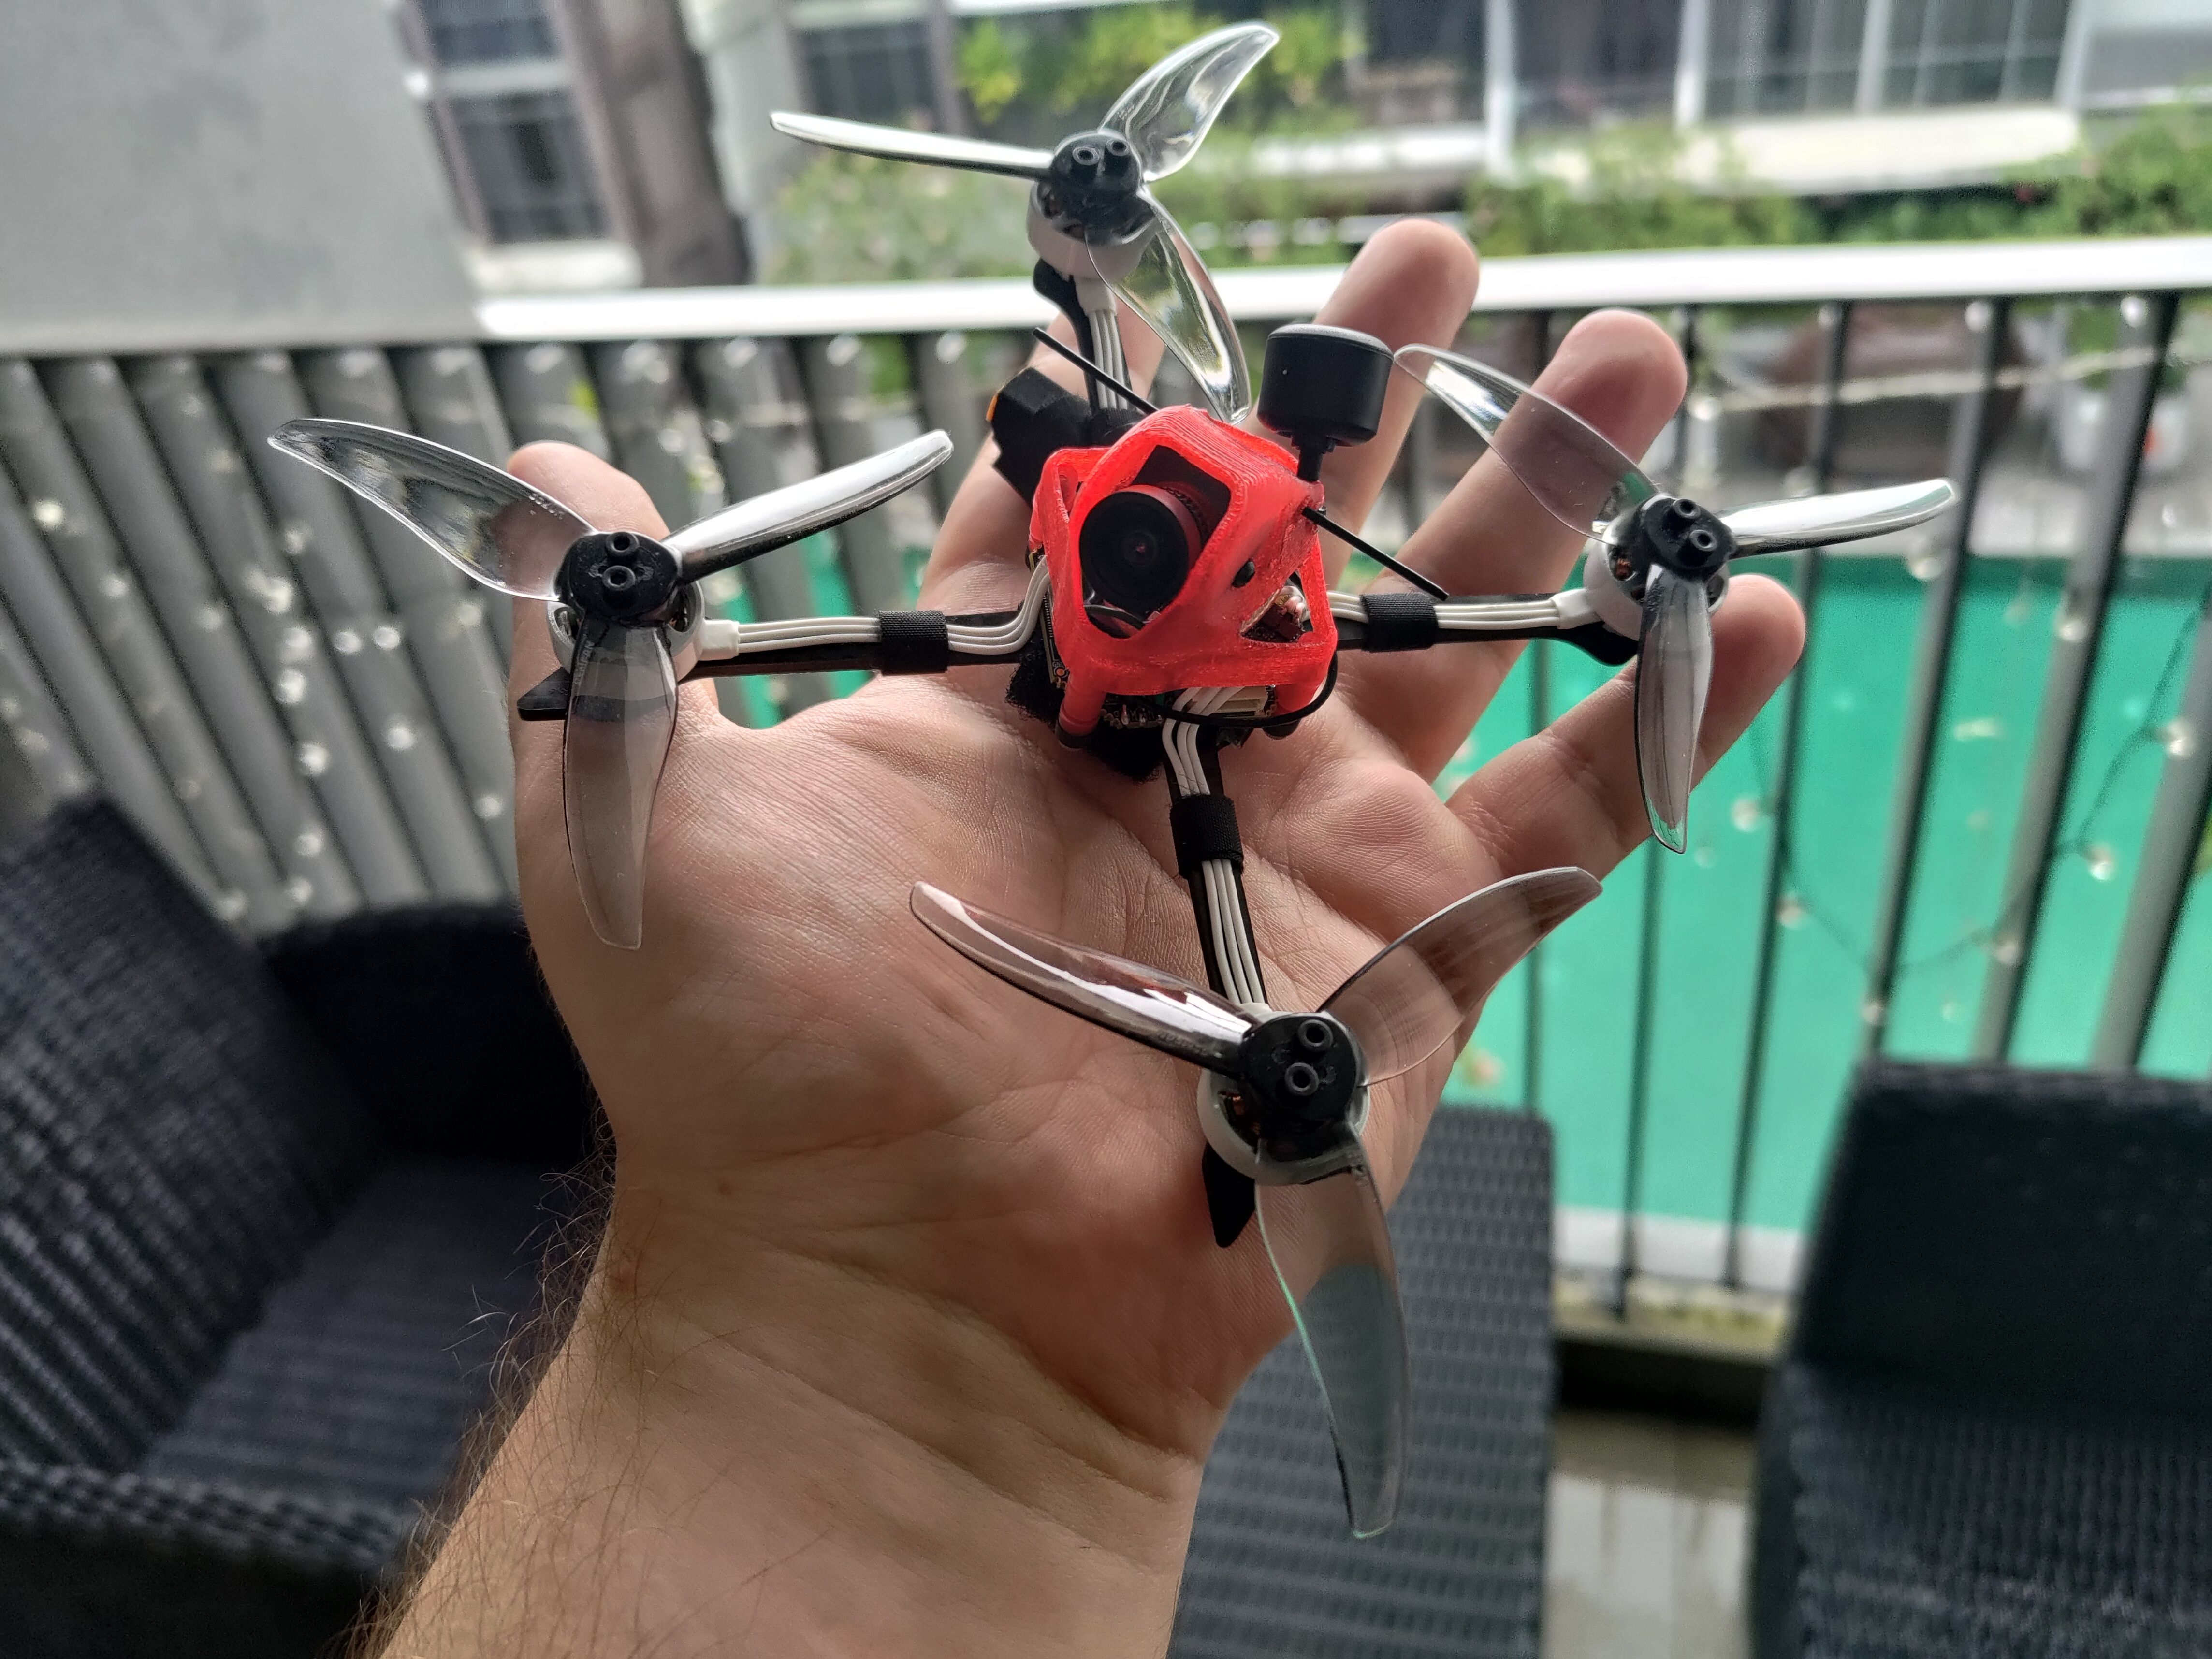
I love it.
Actually flying the darn thing
Well, heck. The darn thing actually flies. 5A ESCs the JHEMCU AIO comes with are barely just enough, the quad tries drawing around 22-24A during extreme throttle punches or when coming out of dives, but the ESCs are holding for now. I will ride out this AIO until it dies and probably upgrade to 10A or 12A after that.
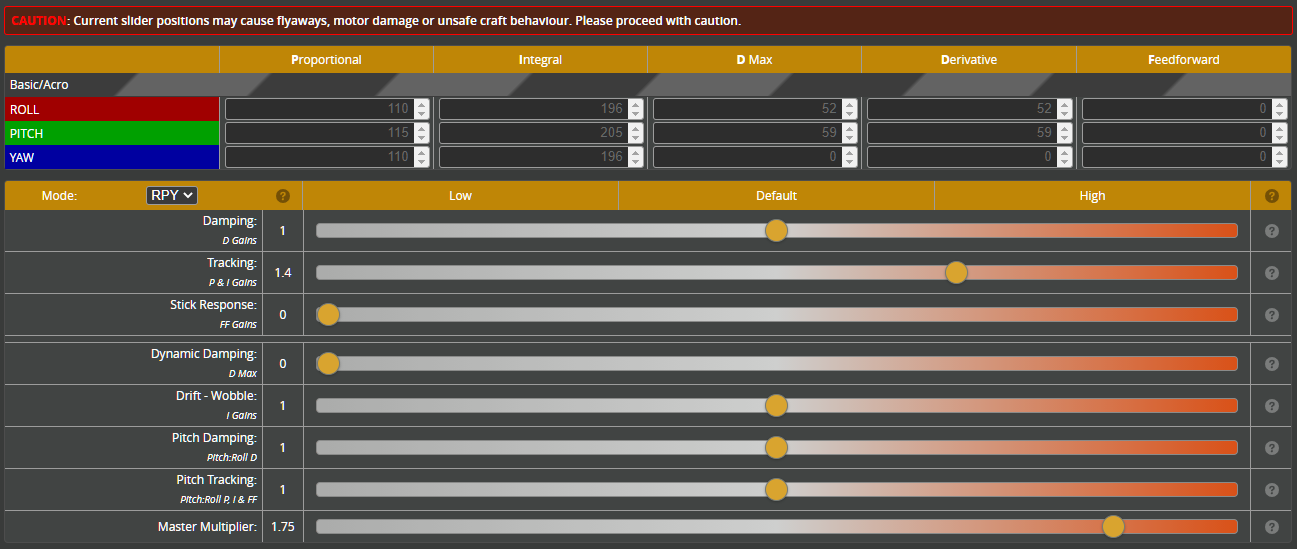
With the default Betaflight 4.3 tune it flew like shit, so I armed myself with Chris Rosser's tuning guides, and started tuning the toothpick. Interestingly, the noise graph is really clean, I got what looked like some frame resonance in the 150Hz range, and the rest was just motor noise and its 2nd and 3rd harmonics. Having set up the filters to deal with that, I went to fiddle with the master multiplier and with each 0.1 increase the quad flew noticeably better. I stopped at 1.5 when my tablet's battery died, I know I can probably push it even higher and then dial down the P term to deal with the bounceback I noticed after some quick maneuvers.
Here's some DVR for y'all to prove that I'm not crazy.
https://streamable.com/zozq5d
The AUW came out to be only 99g. I was aiming for a lighter build but I think it actually benefits from its current weight - you can sort of fling it around, and it does have a bit of a hang time after a throttle punch, so in theory it should replicate a lot of what makes 5 inch freestyle quads so good. I might have accidentally landed at a very good configuration somehow?
The tune
Still a WIP, but it's more flyable than the out-of-the-box build. You can iterate upon it, I was busy building a v2 of the pick.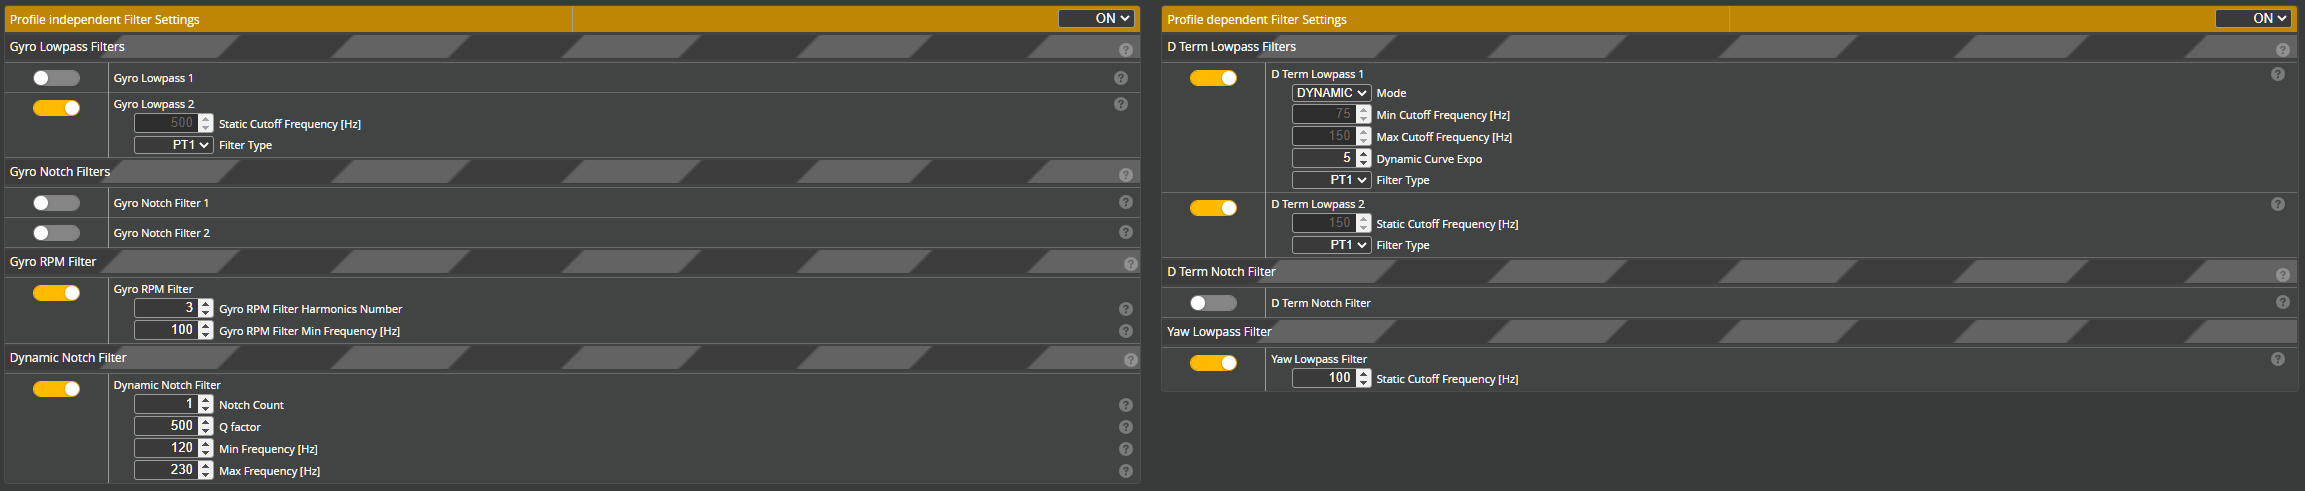
Conclusion
I took a bit of a risk when I decided to build my first freestyle quad instead of buying a prebuilt, and chose such an unconventional setup on top of that, but it totally paid off. Even with an unfinished tune it flies fine, it looks every bit as dashing as I had hoped, it's quiet to a degree that made it actually hard to tune, and it should be reasonably safe to fly around other people. Total success, I guess?
Photos
Part List
Show stores (7)
DVR looks shakier than what it should. Did you ever do the ESC upgrade and did that change something?

Really beautiful build and great write up - thanks! I've just built my first HDZero toothpick and am looking for a better canopy, as that glass lens looks very fragile sticking out of the front of the one I have 😬
prop screws make me sad :( thats lots of weight in the most important part of the quad! get rid of emmmmmmm! otherwise. i freakin love this build!

What I've come to realise is that the weight actually contributes to how it flies. This quad was never meant to smash low weight records, and at 100g it has a decent amount of fling normally only found on larger, much heavier quads. And, despite the weight, it still has stupid amounts of power to do anything you may want it to do.


Very cool build. I wonder what some 2 blade 3.5" props would feel like on this build?? It might favor the lower rotating mass