
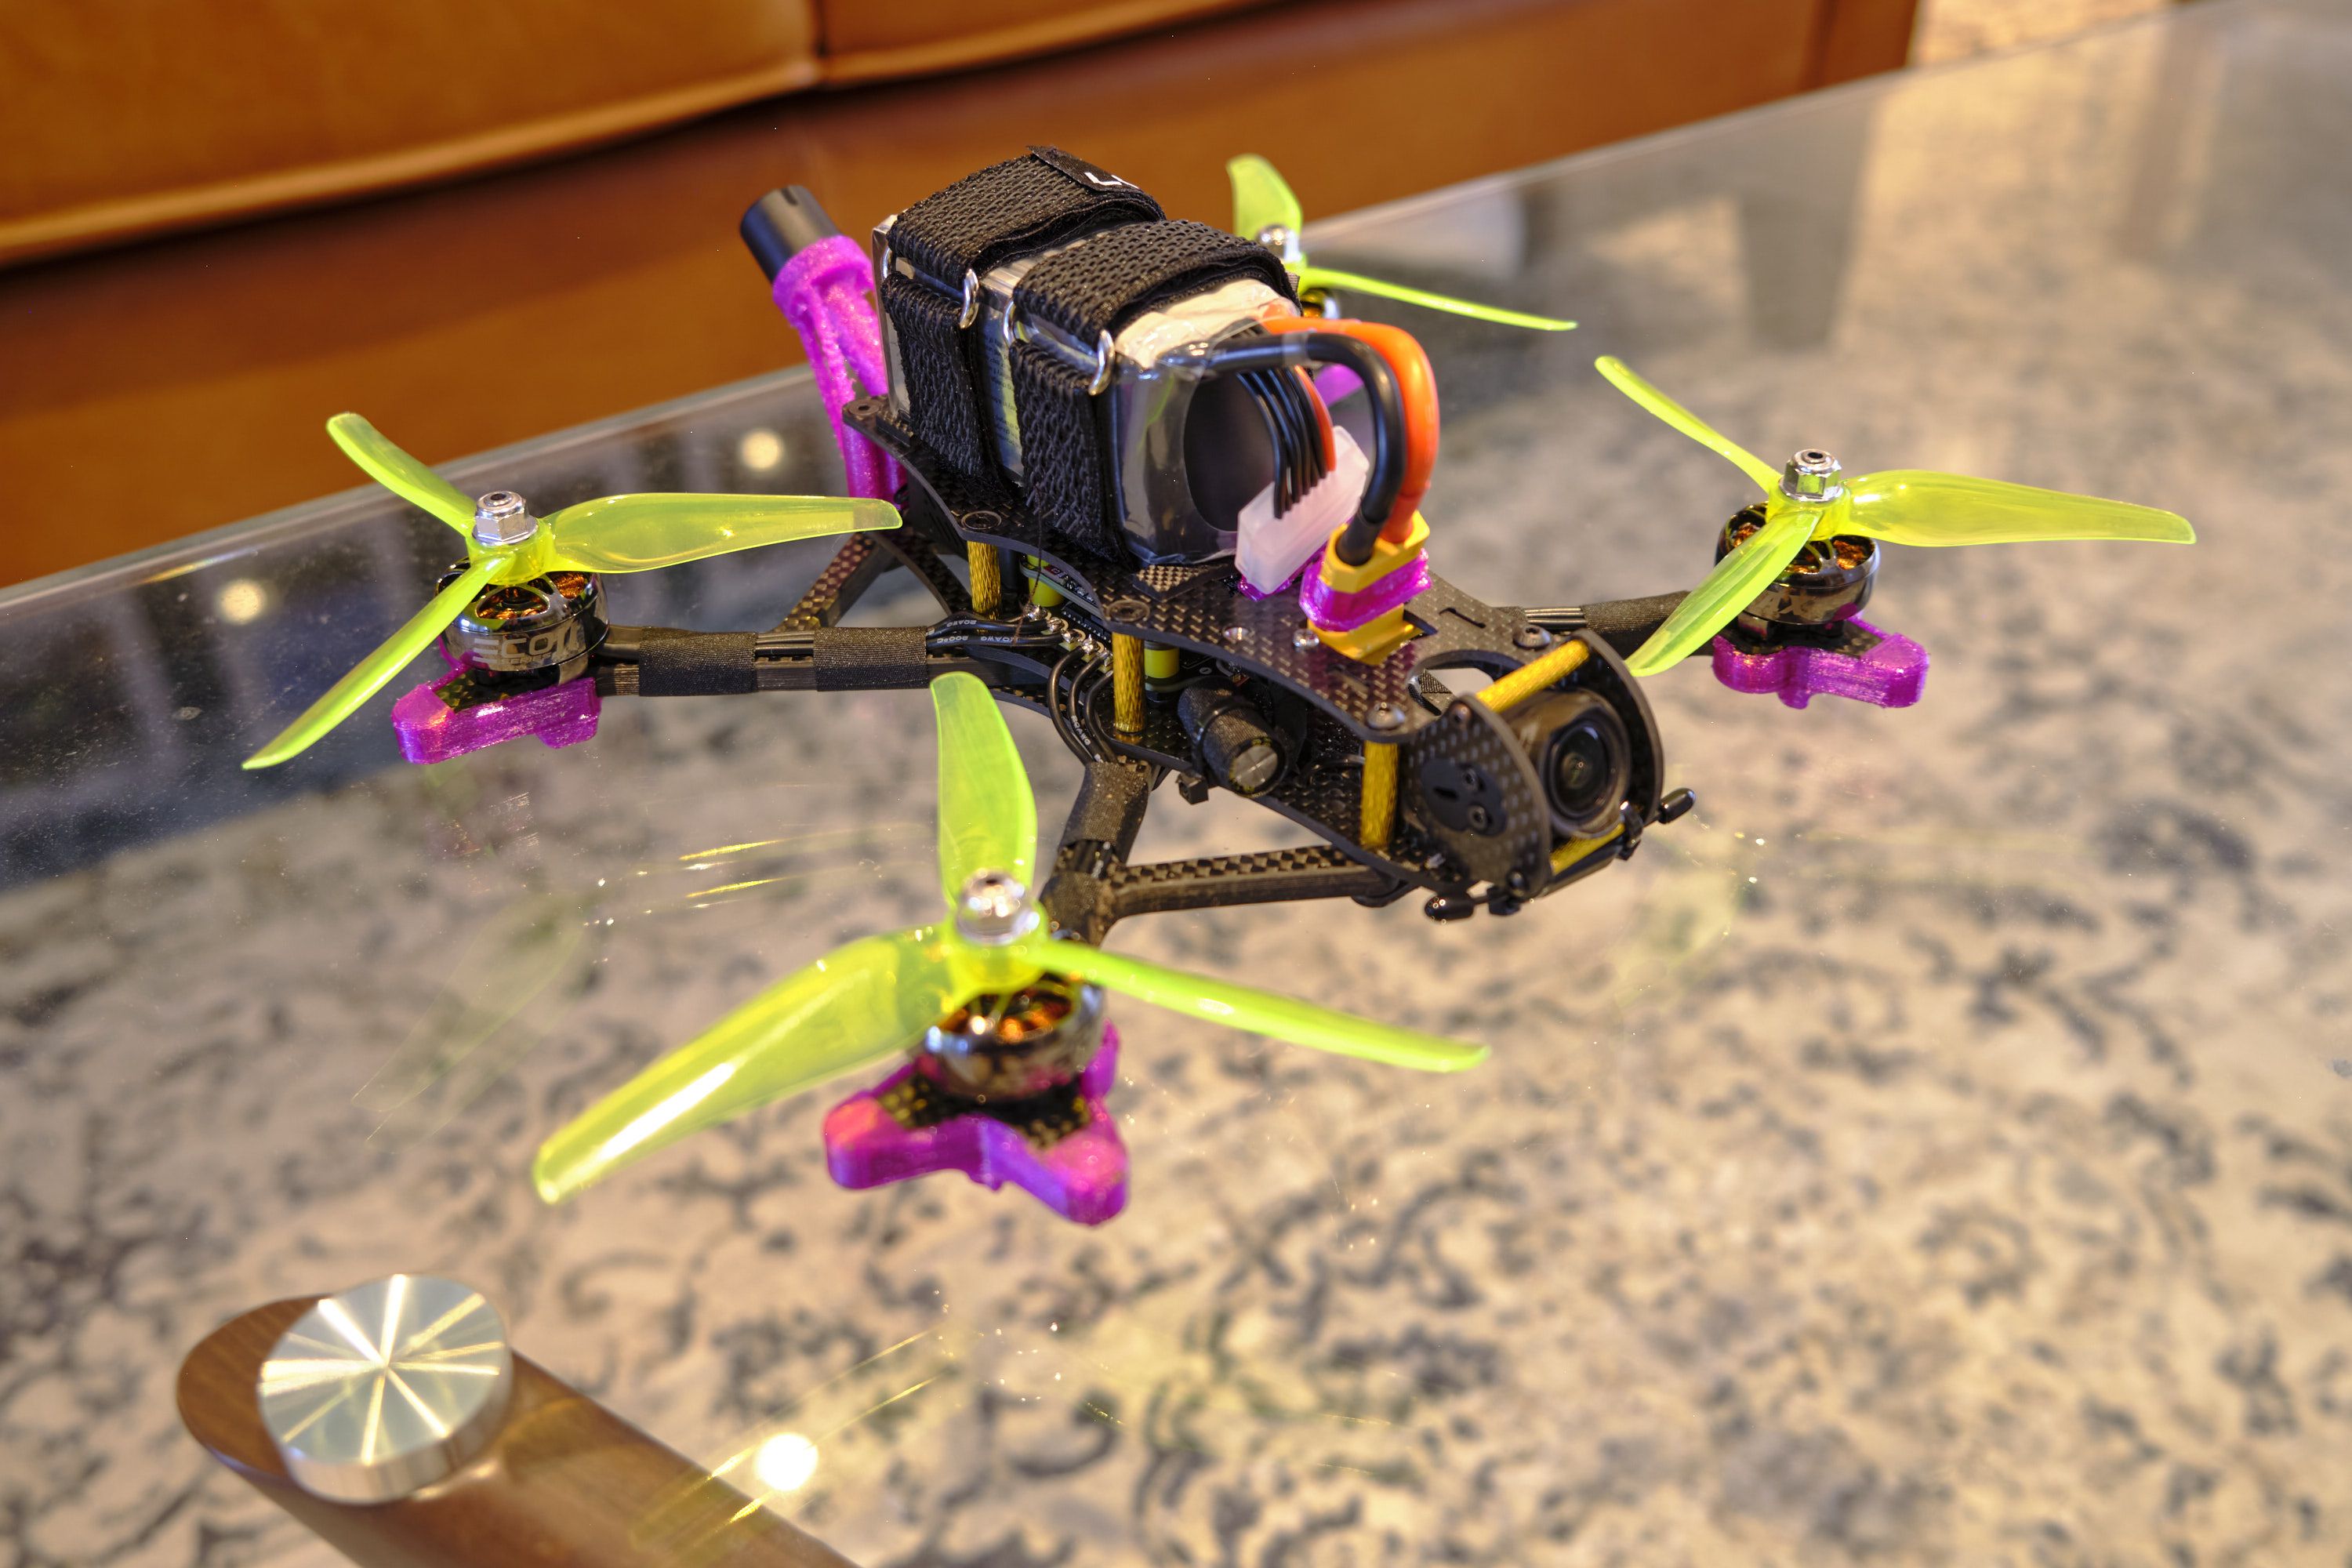
As a somewhat new drone pilot, and after flying a DarwinFPV Baby Ape Pro V2 for a little while, I wanted to get into the digital system, specifically the O3 Air unit. Since I wanted such a heavy video system, I knew I would have to go with a 5" drone, and with Chris Rosser and Joshua Bardwell's videos on the AOS 5 frame, it was the obvious choice to pick. All the other parts were chosen to be as cheap as possible while still maintaining all the features that I thought were important at the time of the build. The ultimate goal was to build a freestyle quad that would be cheap to repair while being robust enough to never need an upgrade in the next 3 years. This drone is great for freestyle but is shockingly smooth so could also be used cinematically if you wanted to. Great range for surfing mountains or coasts as well.
The frame was purchased and delivered quickly from CNC Drones, I chose to get the countersunk version to avoid fasteners on the top of the drone (battery interference) but I think that I probably could have gotten away without them since the batteries fit snugly between the bolts on the frame. Make sure to spend a lot of time deburring the edges that wires will protrude from, in this build that is roughly the entire underside where wires are routed, and the battery strap holes. I had a crash due to a bad ESC and both battery straps were cut in half after a 200 ft fall onto grass (nothing else broke!). I chose the frame due to Chris Rosser's analysis and design, being an engineer myself a lot of what he said resonated (ha) with me and the frame seemd to hit all the boxes I wanted. Huge customization for variant ESC/FC/VTX stacks anywhere on the quad, stiffness, an array of pre-made custom 3D printable parts, large community support, and it was also a way to pay back Chris for all his great videos on drone stuff!

I chose the speedybee F405 V3 mostly due to the cost and at the guidance of JB's site (https://www.fpvknowitall.com/) reccomending it as a great FC/ESC combo. Hard to beat the price but as I mentioned earlier my ESC was bad and caused a crash that forced me to buy another ESC...quality may be lacking, but if you want to roll the dice it could be a big payoff.

I chose the EMAX ECO II motors again due to JB's reccomendation (https://www.fpvknowitall.com/) as a budget motor that hits above it's weight. So far they have been great, very powerful and very responsive. They have plenty of power for freestyle and are very smooth for cruzing. Normally I would have gotten the 2207 for an additional 6% more power, but they were not in stock so I settled for the 2306 version (but have no regrets).
Propellers were something I could get quickly and in stock and there wasn't much research conducted on what was best. I was hoping for black so they would be less visible but only this neon yellow color was available. However, after doing more research on props in general, these props (Nazgul F5) are actually highly rated and well optimized props, so I will likely stick with them until I find something better further down the road (Toroidal or Zipline?).

I chose the DJI O3 Camera system which was a large price hike to get into, but is totally worth it. I think for anyone doing freestyle the time to transition over is here. Analogue video is just horrendous and I always had trouble with breakup and range on my smaller drones. This O3 system not only looks gorgeous, but people can watch along (DJI Fly App plugged into Goggles V2) and the range is super far. I've gone irresponsibly far without even realizing and the system just keeps on going, it's really incredible.
I have a Radiomaster TX12 in ELRS, so an RP1 receiver was the obvious choice. It is super small, has incredible range, and is stupid easy to set up. Simiply enter the bind phrase and you're off to the races. It is crazy how plug and play this system is, and I don't know why anyone would choose another. Go ELRS!
There are a bunch of 3D printed parts on the frame, and I've tried to link most of them below, but the rear antenna mount was custom designed by me to reduce the resonant frequency that other mounts for this system had. The layer adhesion with TPU filiaments is very good so I designed a mount that uses 'ropes' to create a tension stabilized mount. I've linked a similar one below.
Assembly: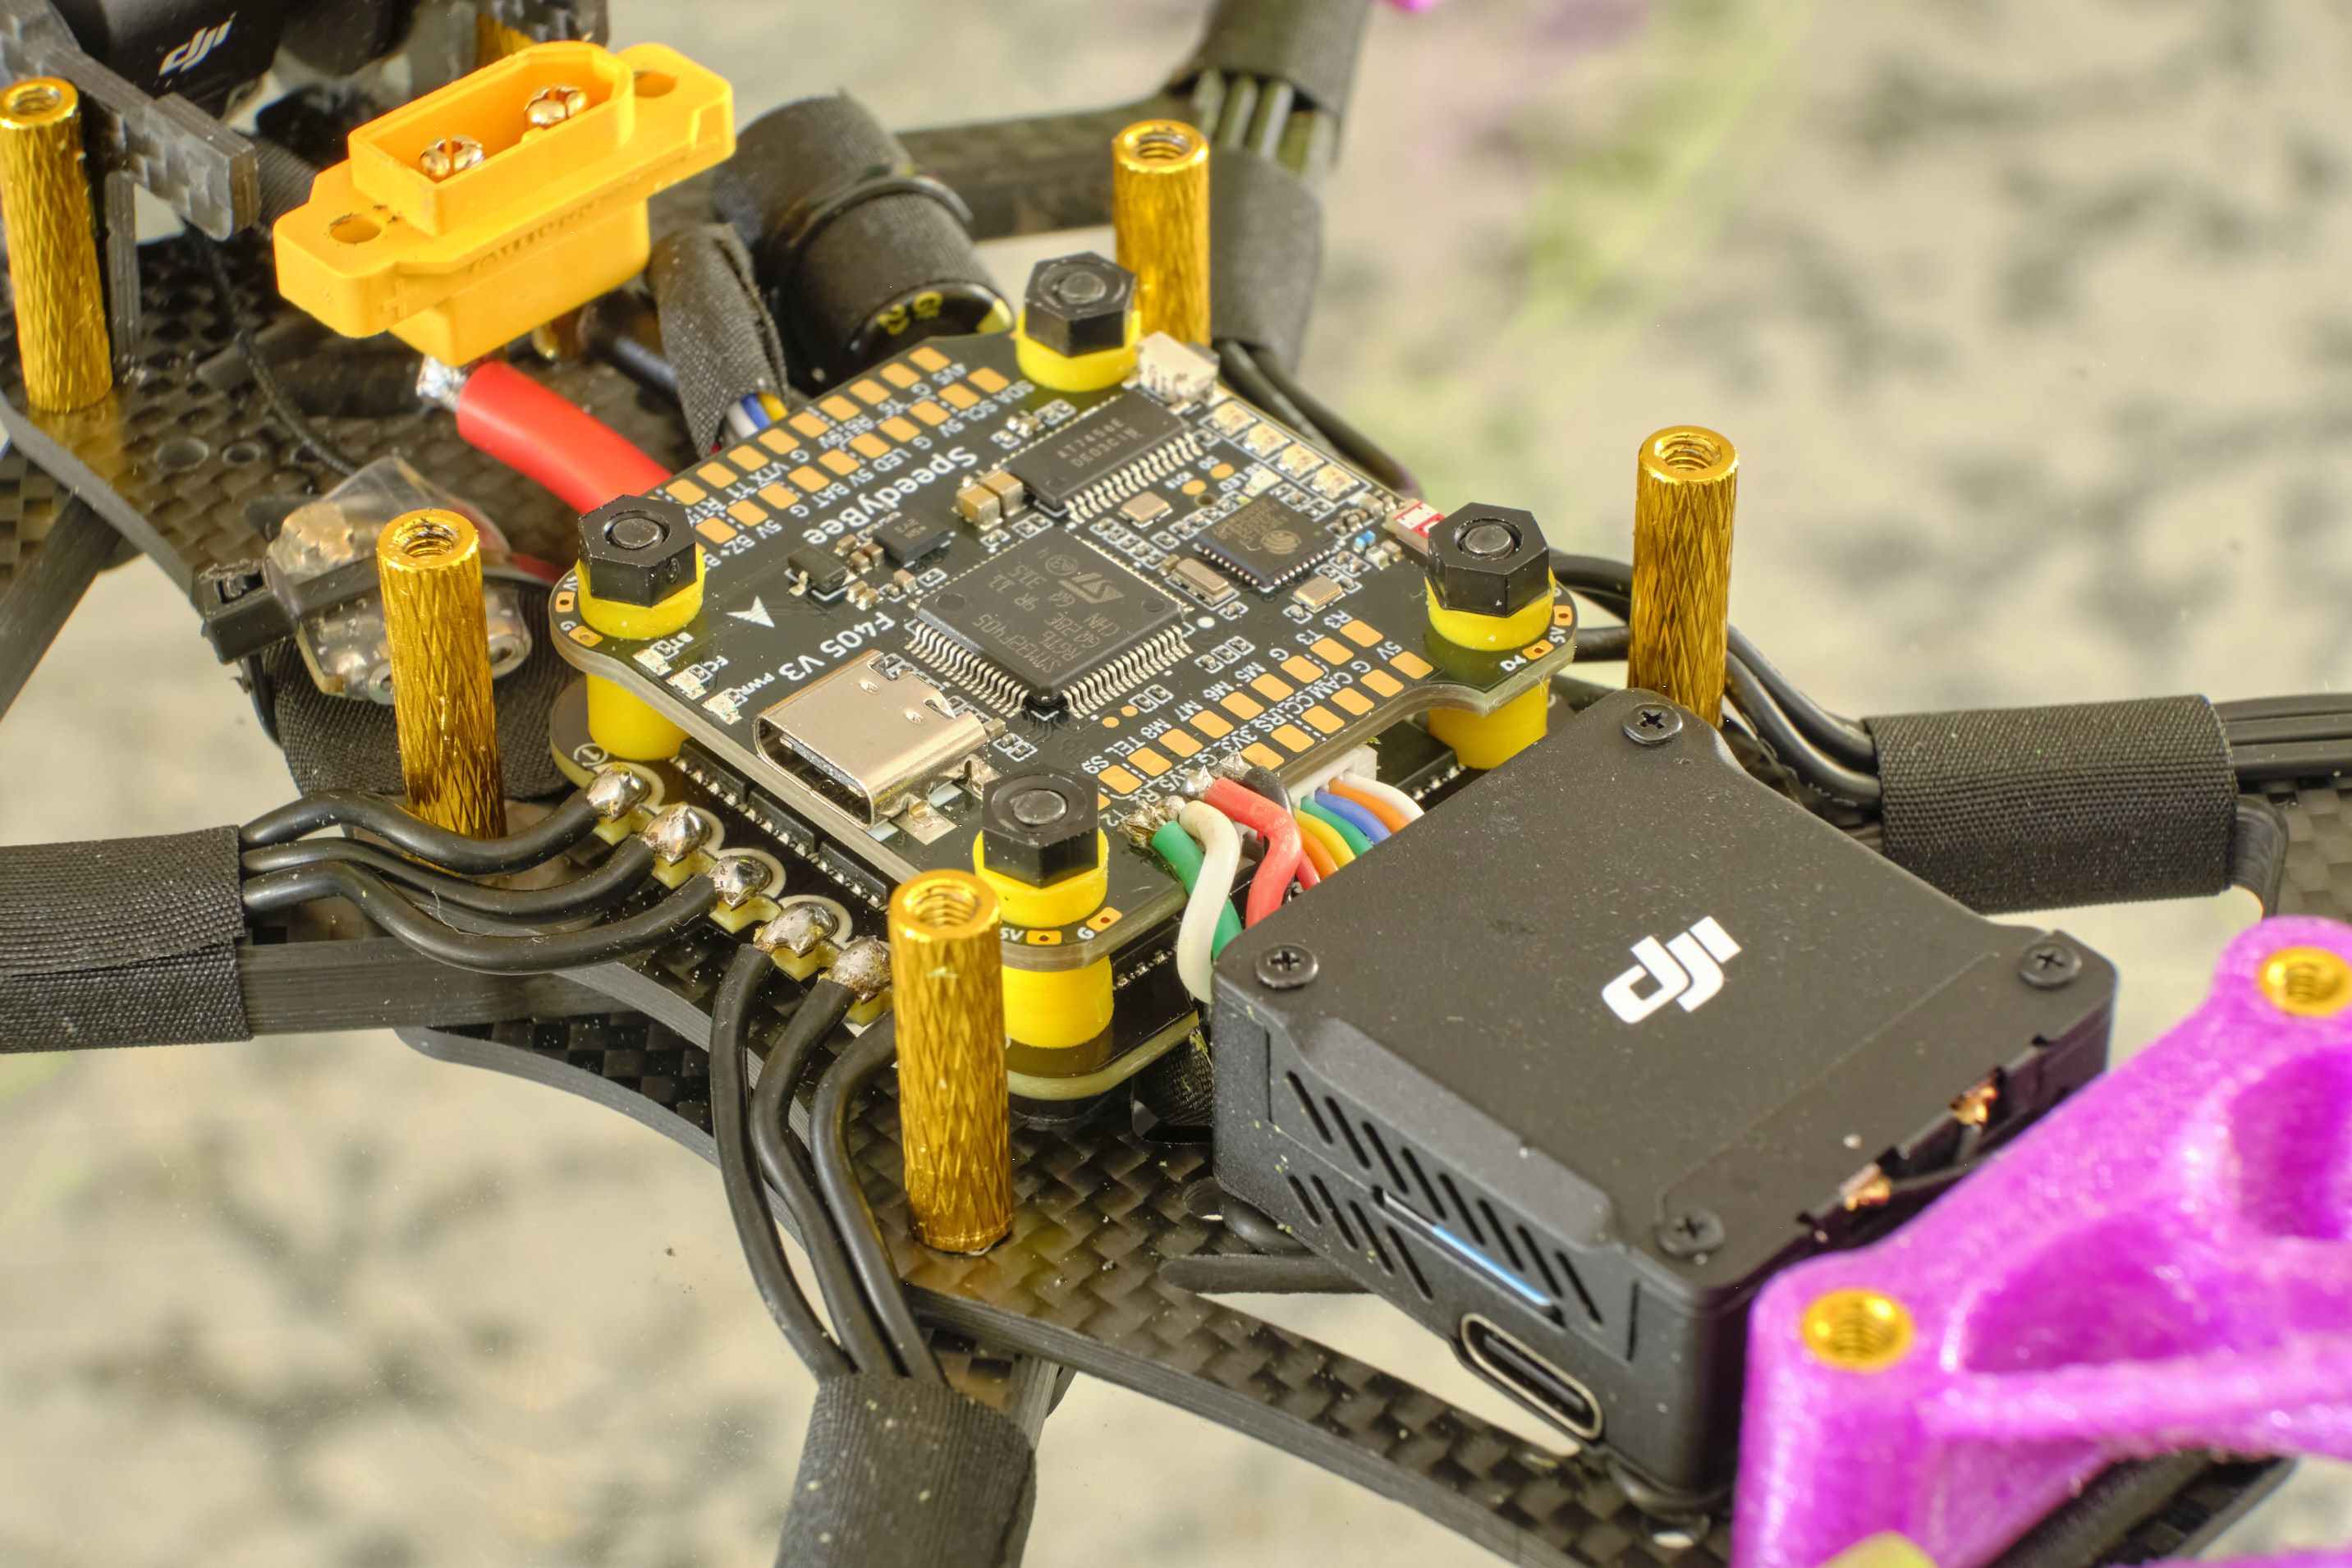
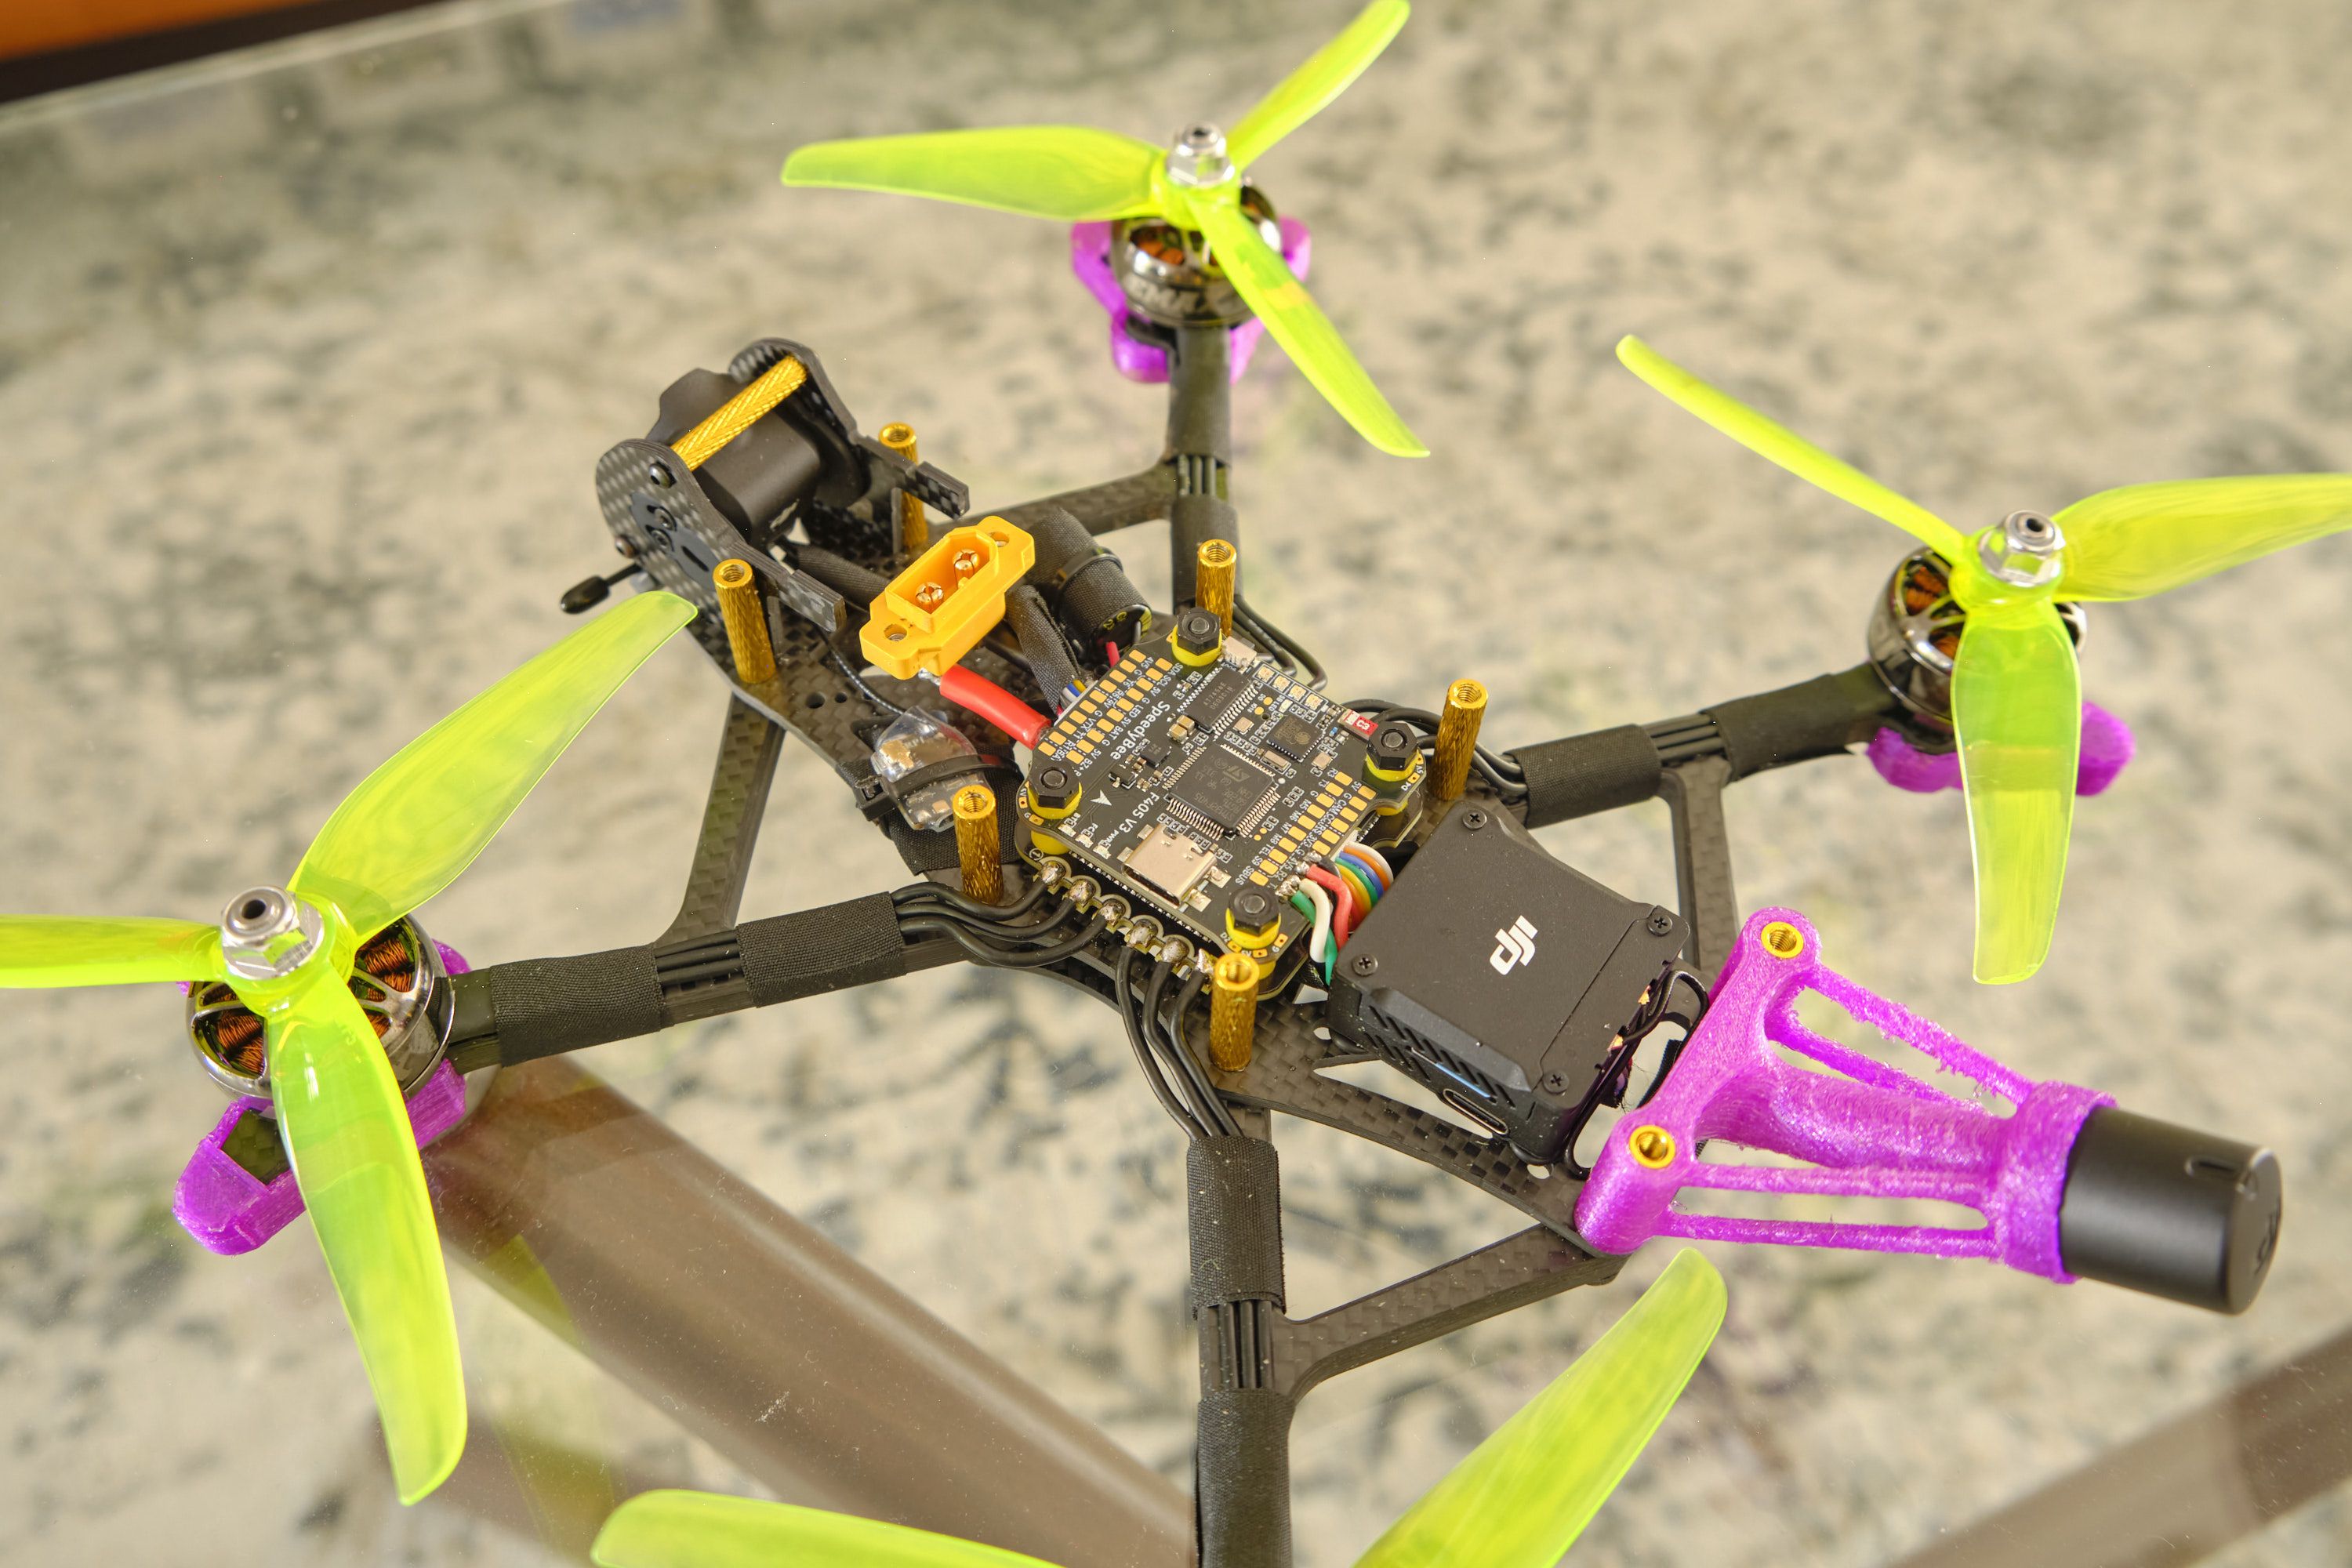
It took me a while to figure out how to organize the components in the frame while not making any significant compromizes in what I perceived to be important to performance. I mounted the Speedy Bee FC/ESC in the middle, the O3 air unit in the back, and the receiver in the front. This required a custom cable from the O3 air unit to the plug on the FC. I created one from a kit on Amazon that used the right connector for the FC and O3AU. The connectors for that are JST SH1.0 MM. I also used what's called Tesa Tape to wrap the freshly made cable to prevent abrasion from cutting the wires.
One of the most important parts of assembly is to properly deburr the frame. As mentioned earlier I had a significant crash and had I deburred the frame a little better, I may not have cut my battery straps in half...Spend a lot of time on this step, get mini files or sand paper and be extra sure to wash the frame (soap and water) to get all the conductive carbon dust off. It would be tragic to short your electronics with carbon dust...

Refer to the photos to the right for how the frame was laid out. I ran cables through the bottom of the frame to connect the receiver, DJI O3 Air Unit, and DJI Camera. One of the trickiest parts was figuring out where the battery would go. I hate plugging and unplugging the XT-60 connectors, so I wanted a frame mounted battery plug, it makes it much easier to plug and unplug the battery in my opinion. This made it very difficult though, since the FC/ESC stack is 30x30, there was almost no room for the battery leads to connect to the ESC. I ended up carefully eye balling this and getting lucky. After I crashed the frame I had to re-do the battery connector and I did not nail the dimensions the second time around. I ended up soldering the connector, cables, and ESC off the frame, then assembling fully and then re-soldering to reduce the stress on the components. This was effective but very difficult, I would not reccomend this battery cable setup to new drone builders. However, you can run the cable for the battery around the side of the drone (see the AOS 5 EVO page for a 3D printed part that is perfect for a side mounted battery), or through the top of the frame. There are lots of options.
The drone with the batteries listed weights just over 600 grams (600.2) ready to fly.
Other than that, please refer to the photos below for more information on the final configuration of the drone! So far it has been flying very well, and I would be happy to answer any questions about the build or the hobby in general!
I can be reached on Youtube at https://youtube.com/@EProFPV where I have a few videos of this drone (and some others) flying or I'll try to answer any questions in the comments below. Happy Flying!
Photos


Part List
Show stores (6)Guides & Reviews

AirbladeUAV has done it again and this time they've brought long range to the 5" class! Based on the popular Transformer Mini, the new Transformer 5" Ultralight adopts a lot of the same design philosophies with larger props and more payload capacity. It can fly upwards of 20 minutes on a 4 cell Li-Ion battery pack and in ideal conditions it's got a range of over 4 to 5 miles. In this guide I'll walk..
Read more
With the release of the DJI FPV Drone cinematic FPV has become a lot more accessible, but you certainly don't want to crash a $750 drone! The QAV-CINE Freybott is a compact, lightweight cinematic FPV drone that can take a hit and keep going. It's a lot safer to fly indoors and around people. With a naked GoPro or the SMO 4k you can capture some great stabilized footage. In this guide I'll show you..
Read more


how do you think this build would do with a 6s liion pack on it? im wanting to build a medium range mountain surfer
For 6s mid-range I'd recommend the T-Motor P1604 (2850kv), those are pretty efficient in my experience. Also probably bi-bladed props. Happy flying!