Standard Racing/Freestyle Drone w/ Martian 2 frame
 By iamspankyFPV on Oct 27, 2017
Standard Racing/Freestyle Drone
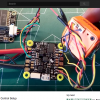
So after trying out the DYS F4 FC + DYS 4-in-1 ESC, I've come to the realization that to replace that combo would be too costly if I was to damage either one of those SO.... I switched up my FC to the CL Racing F4 "S" which has larger solder pads AND there is a lot of space between each pad. It comes with all the usual goodies such as OSD and voltage monitoring in addition to a built in PDB. I also decided to go with the Makerfire 4 piece ESC because they support BL-HELI 32 and Dshot1200 for a great price. Also, if i break an esc, to replace it would cost me $12 instead of replacing an entire 4in1 board for ~$45. (The only thing that sucks about these ESC is that if you have a MAC, you cannot connect to the ESC using their BLHeli Suite. It's only available for Windows so you'd have to use a virtualization machine or borrow a friend's PC computer).
What I loved about using these parts was that my stack basically is just the FC since the ESCs were attached to each arm. I used the provided top stackplate to complete the stack and then, using some double-sided ESC tape and a zip tie, I attached the AKK VTX to it. I then zip tie the antenna that's connected to the VTX to the top plate. To provide more rigidity to the antenna, I bring the antenna in as close to the body as possible to keep the top of the antenna at around the same height as the motors. (See photo) This is the one reason why I like this martian 2 frame over the chameleon or its clone. The chameleon's frame doesn't provide enough space for the antenna cord to be hidden within the body of the frame and leaves it too exposed for a beginner pilot like me. I am planning on crashing my drone pushing it to the limits and if i'm going to crash it, I'm going to do my best to protect any exposed parts as best as possible.
For the antennas coming from the R-XSR receiver, I like to have one antenna go straight up using a heat shrink and a cutoff piece of a ziptie and wrap it around one of the stand-offs in the back of the frame. The other, I run a zip-tie that is tied to the back of the bottom plate and the zip tie is going straight backwards. I then use another piece of a cutoff zip tie and sandwich the antenna inbetween both zip ties and heat shrink that together to provide structure, support, and rigidity to the antenna.
With the CL Racing F4 S Chip, you can also control your OSD through your transmitter if you connect the camera's OSD & GROUND to the FC. Wire for the OSD goes into the pad CAM_C & and the OSD Ground goes into the CAM-
I use Oscar Liang's Eagle 2 settings which are:
- Sharpness, manual, +5 (reduce if you have aliasing)
- Edge, auto
- Saturation, manual, 15
- Brightness, 48 for better WDR, 36-40 for better color (I'm at 48 because I have WDR set)
SIDE NOTE
- UART 1 should be switched to SERIAL
- Make sure to enable FAILSAFE
- Make sure to check that motors are running in the correct orientation
- Clean up the OSD
- In CLI write: set small_angle = 180, then SAVE
- In CLI write: set tlm_halfduplex = off, then SAVE (this is for FRSKY telemetry to work properly)
- in CLI write: set beeper_frequency = 0 (if you have an external beeper and on betaflight 3.2.1)
UPDATE
SUCH A COOL EXPERIENCE!! Spoke to Mr. Cheng Lin himself!! The man that designed and created the CL Racing F4 S Chip that I am using in this build. He taught me a couple of things of this FC that I'd like to share:
- Hold the boot button BEFORE you insert the USB cord in to make the FC enter into DFU mode to flash to betaflight 3.2.1.
- This FC has everything all inverted for you so no hardware inverting necessary which means:
a. You can solder the S.Port wire from the R-XSR directly to the TELEMETRY pad. Then in betaflight, under ports, in the TELEMETRY section, turn on SMARTPORT (Uart 3)
b. You can solder the SMART AUDIO cable from the VTX directly into TX4 pad and then in betaflight, under ports, in the PERIPHERALS section, turn on TBS SMART AUDIO.
UPDATE #2
So my camera was getting a small amount of noise so I had to do a small modification. I installed a 1000uf Low ESR Capacitor which I wired straight into the battery lead. I also UNNECESSARILY, but for good measure, also installed a LC FILTER which I also soldered straight into the battery lead.
I power the VTX by connecting the POWER & GROUND into the LC FILTER (if you don't have a LC FILTER, you can power the VTX directly from the VTX+ and VTX- that is on the FC) and then I connect the VTX CAM Power and Ground with the Camera's POWER & Ground. That way, the camera is powered by FILTERED Power and the noise is going to be extremely reduced. **Props to SteelRainFPV on youtube for showing me this. His video is linked below:
https://www.youtube.com/watch?v=F1fDIRuXOB0&lc=z22vdnigzob2hvfzd04t1aokglhrlvipuy54mdftzuqebk0h00410.1509754582443548
UPDATE #3
Updating to Crossfire Micro v2 Rx.
CL told me to use the SAT pad which is RX6 and the TX6 is on the bottom of the FC
Power the Micro v2 RX off of a 5V then attach: CH1 to RX6 and CH2 to TX6
In BETAFLIGHT, enable SERIAL on UART 6
To bind w/ receiver:
- Power on Transmitter
- Power on RX.
- Short press the crossfire button on the TX (light should go from yellow to blinking green)
- Short press button on RX (light should go from red to green)
- If the crossfire button on the TX starts to blink blue, short press the crossfire button again and it should turn SOLID blue. That means it's updating the RX
- Once crossfire rx is fully updated, both lights should be solid green. Disconnect the battery and turn off and turn back on transmitter and everything should be bound.... THEN....
- Execute crossfire.lua script and CROSSFIRE MICRO RX should be available.
- go into MICRO RX, change OUTPUT 1 to CRSSFIRE TX & OUTPUT 2 to CRSSFIRE RX. Scroll down and change channel 12 to LQ.
- go back into betaflight in the receiver tab. change the RSSI tab to channel 8 (Why not 12? well AETR are channels 1-4, then channel 1 is channel 5, etc
Channel 8 will represent channel 12 and you'll get RSSI).
Photos


Part List
Show stores (4)
I agree, stick with separate ESCs :)
Btw, you sound a lot like me as a beginner - you're on a mental spiral into becoming an obsessed droniac!
Into becoming obsessed was about a month ago. Now I’m already deep in the rabbit hole lol. Yes I’ve been flying for about 2-3 months now and needed a reference guide. What’s your favorite build and any other suggestions on mine? I realized I gotta put in a LC filter cuz the fc doesn’t filter it as well as I thought
No suggestions other than make sure the blheli is flashed to the latest, otherwise you should be good to go. Just keep with what you are doing which is coming up with your own ideas. Favorite builds – lots for many different reasons. Yours is a great starter and you put thought into it, a great frame since there is a lot of room, it is easy to swap out parts, and is durable. I build my own frames now, but I do have one off the shelf frame which is the geprc lx5. Mostly bought it to have a good solid reliable frame. The Mokaframe Jadina is a very interesting frame. As far as particular electronic components to use, it’s mostly preference. Although I’ve been running Cobra’s lately, I think Emax has the best in terms of quality.
Guides & Reviews

AirbladeUAV has done it again and this time they've brought long range to the 5" class! Based on the popular Transformer Mini, the new Transformer 5" Ultralight adopts a lot of the same design philosophies with larger props and more payload capacity. It can fly upwards of 20 minutes on a 4 cell Li-Ion battery pack and in ideal conditions it's got a range of over 4 to 5 miles. In this guide I'll walk..
Read more
With the release of the DJI FPV Drone cinematic FPV has become a lot more accessible, but you certainly don't want to crash a $750 drone! The QAV-CINE Freybott is a compact, lightweight cinematic FPV drone that can take a hit and keep going. It's a lot safer to fly indoors and around people. With a naked GoPro or the SMO 4k you can capture some great stabilized footage. In this guide I'll show you..
Read more


Do you like the Boldclash motors?
Yeah, they're fine for the job. I haven't flown RR motors yet or steele's since I'm still starting out but these haven't failed me at all. Never had a bad motor out of the box, just always worked well.