
This guide will walk you through the process of building your first FPV quad. The goal with this design was to build a low-cost, lightweight quad, yet powerful enough to safely carry a GoPro in close proximity areas. I chose these parts to minimize the amount of soldering at no cost to the quality. A typical build requires around 30 solders while this only needs 25. It's not a huge difference, but it certainly helps reduce frustration!

Tools
This build requires some soldering experience, but could also be a great way to learn. I highly recommend a flux pen, 63/37 leaded solder and a quality soldering iron. Here are the tools and supplies you'll need.
- Soldering iron
- 2.0mm hex driver
- Industrial Tweezers
- Wire cutter/stripper
- Scissors
- Ruler and cutting mat
- Multimeter
- Drill and 3/16" bit
Additional Supplies
- A variety of heat shrink tube sizes
- Blue Loctite
- Zip ties (small)
- 63/37 leaded solder
- Liquid soldering flux pen
- Painter's tape
Hardware
You won't need to order any additional hardware as the frame kit comes with everything you need. I did replace the 28mm blue aluminum standoffs with 25mm black aluminum standoffs for aesthetic purposes. I just don't like the light blue color.
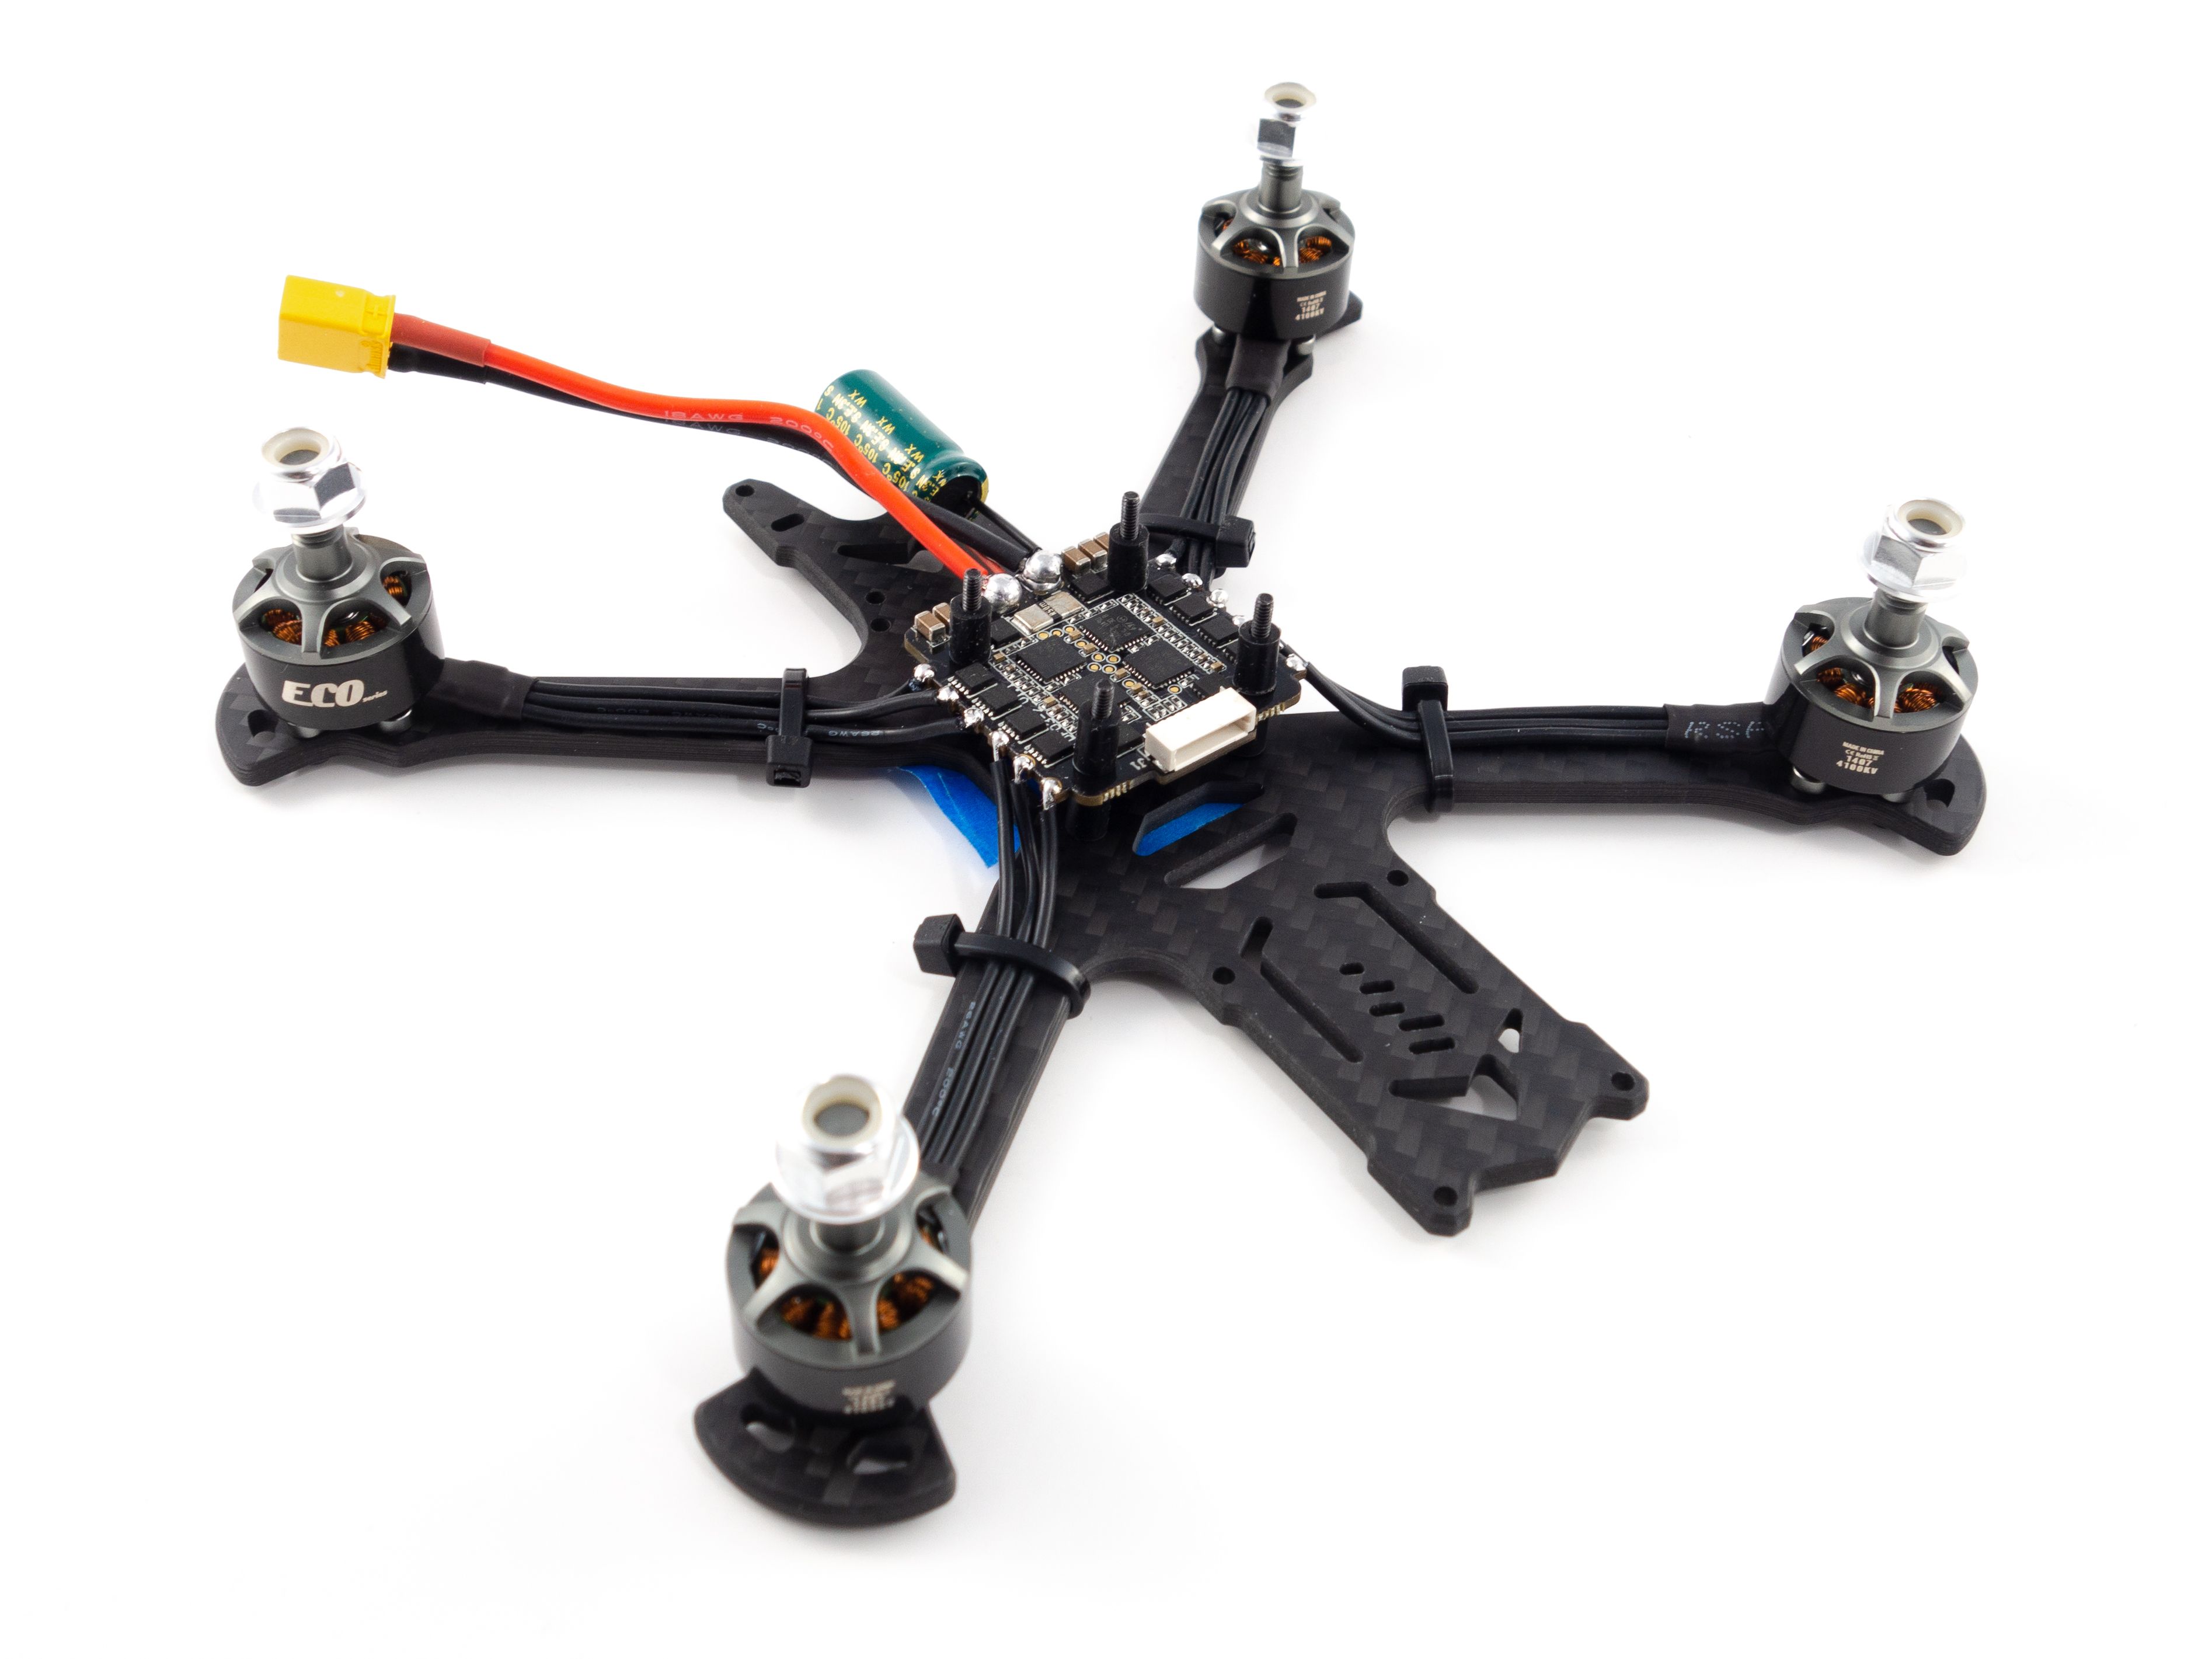
Frame Assembly
Very important! Make sure you've got the frame rotated the correct way.
I made a mistake and built according to my assumptions rather than referring to the product photos. There's a notch at the rear of the frame and I assumed that was the front, so I built this whole thing backwards and had to go back and redo it. Always check and double check the photos as you go.
This frame is a bit different in that it's not designed for a 3rd row of standoffs. This is so you can mount two 20mm stacks internally with the DJI air unit, but we won't be doing that. Since I bought a set of 8x25mm black standoffs I just used them all. This is mainly to give the power lead a zip-tie anchor. The only problem is you're limited to a single screw through the bottom. The holes on top are for the DJI air unit cradle and don't match the holes on the bottom.
Motors
I used the 4100kv motors, but the others should work fine. These will likely stay coolest.
If you plan to use the prop guards just temporarily mount the motors to the arms using a pair of screws. You don't want the prop guards getting in the way of your soldering. Zip-tie the wires to the arms to keep them nice and tidy.
This stack uses metal screws and rubbery spacers. To prevent the screws from falling out through the bottom add some painter's tape to hold them in place. You don't want to mount the flight controller quite yet. The stack came with red spacers but I chose to use the black ones included in the frame kit.
Make sure you've got the 4-in-1 ESC mounted at the correct orientation and solder the motor wires to each of the 12 pads.
- Flux and add a small ball of solder to each motor pad.
- If you're right-handed start from the rightmost motor pad and solder all 6 wires from right to left. (If you're left handed start from the left)
- Cut each wire to length as you go, not all at once. Be careful not to cut them too short.
- Tin each wire before soldering.
- Take your time and lightly tap the tinned wire to the solder on the board.

Power Connector
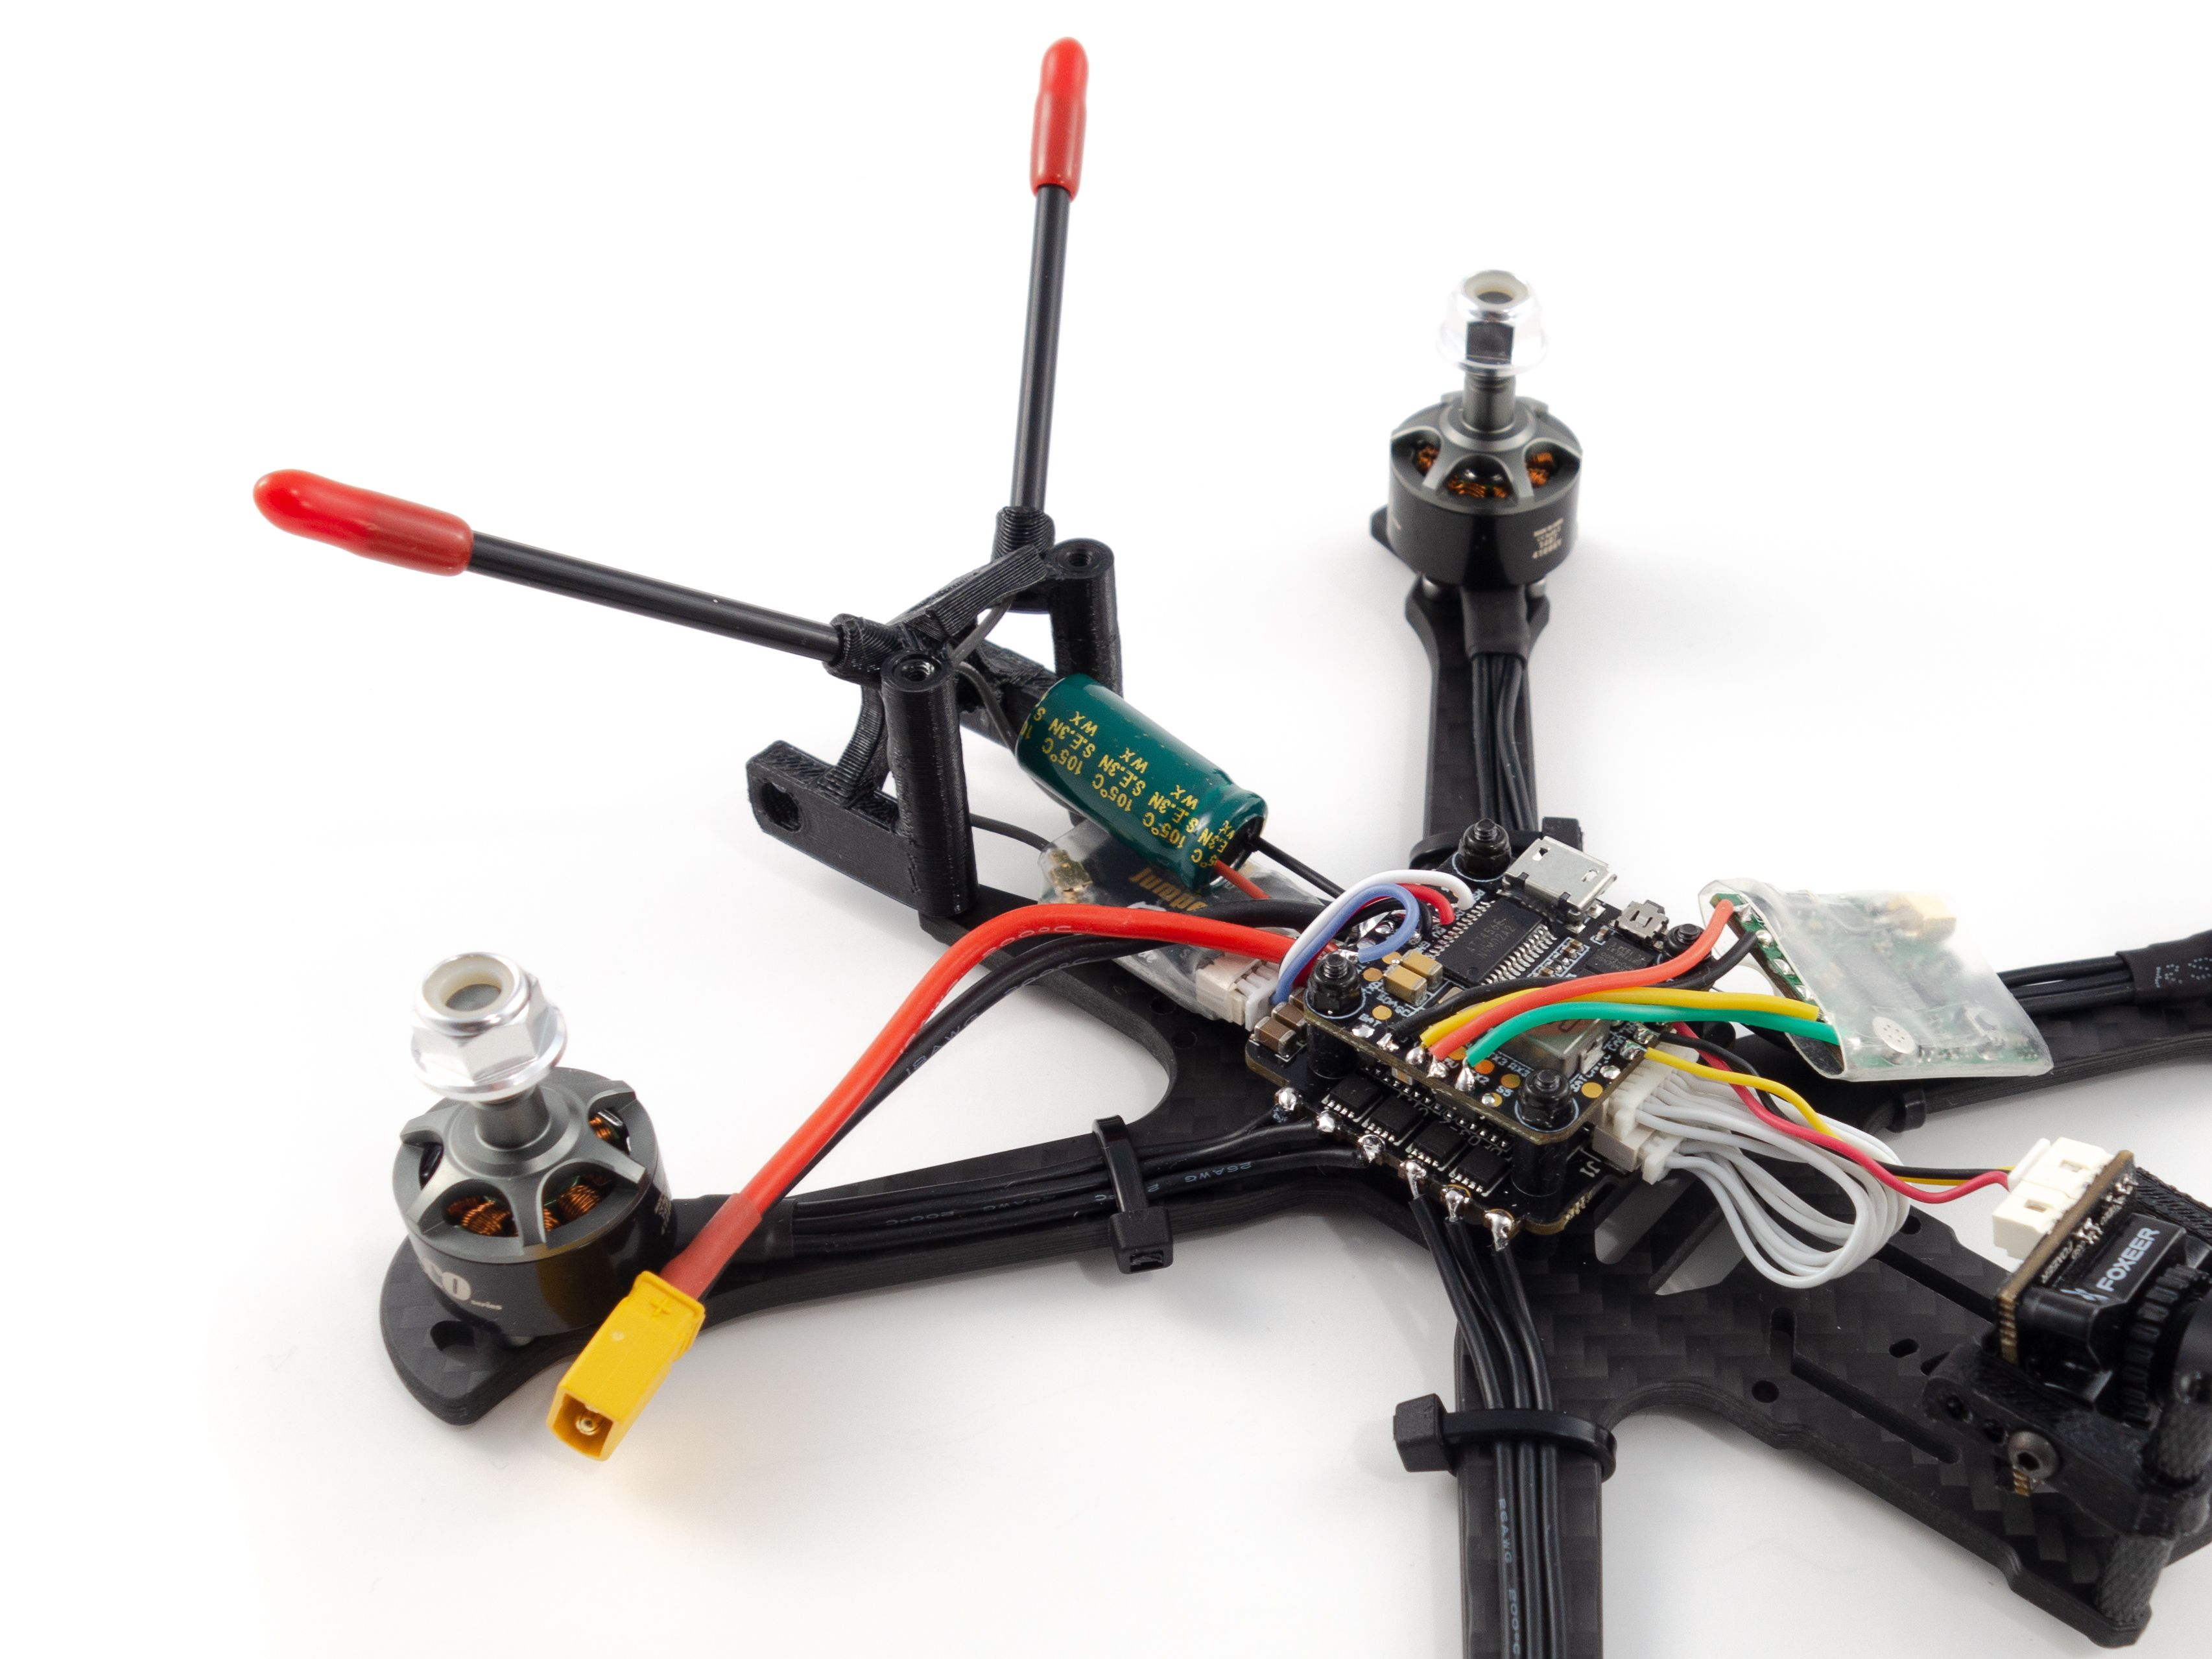
Fortunately HGLRC included a pre-built XT30 power lead. All you need to do is solder it to the board. Use the same process you did with the motors and add enough solder to fully cover the pads. You may need a broader iron tip to fully melt the wire into the solder. Make sure you've got the polarity correct! There are small positive and negative marks screen-printed onto the board.
Once you've done that you can add the capacitor. HGLRC included a nice beefy 1000uF capacitor. Place it under the main power leads and bend the wires up so they touch the tops of the solder balls. Tap them with your iron to solder them in place and add a little more solder to smooth it all out. You may need to cut the tips off if they protrude. Again, make sure you've got the polarity correct!
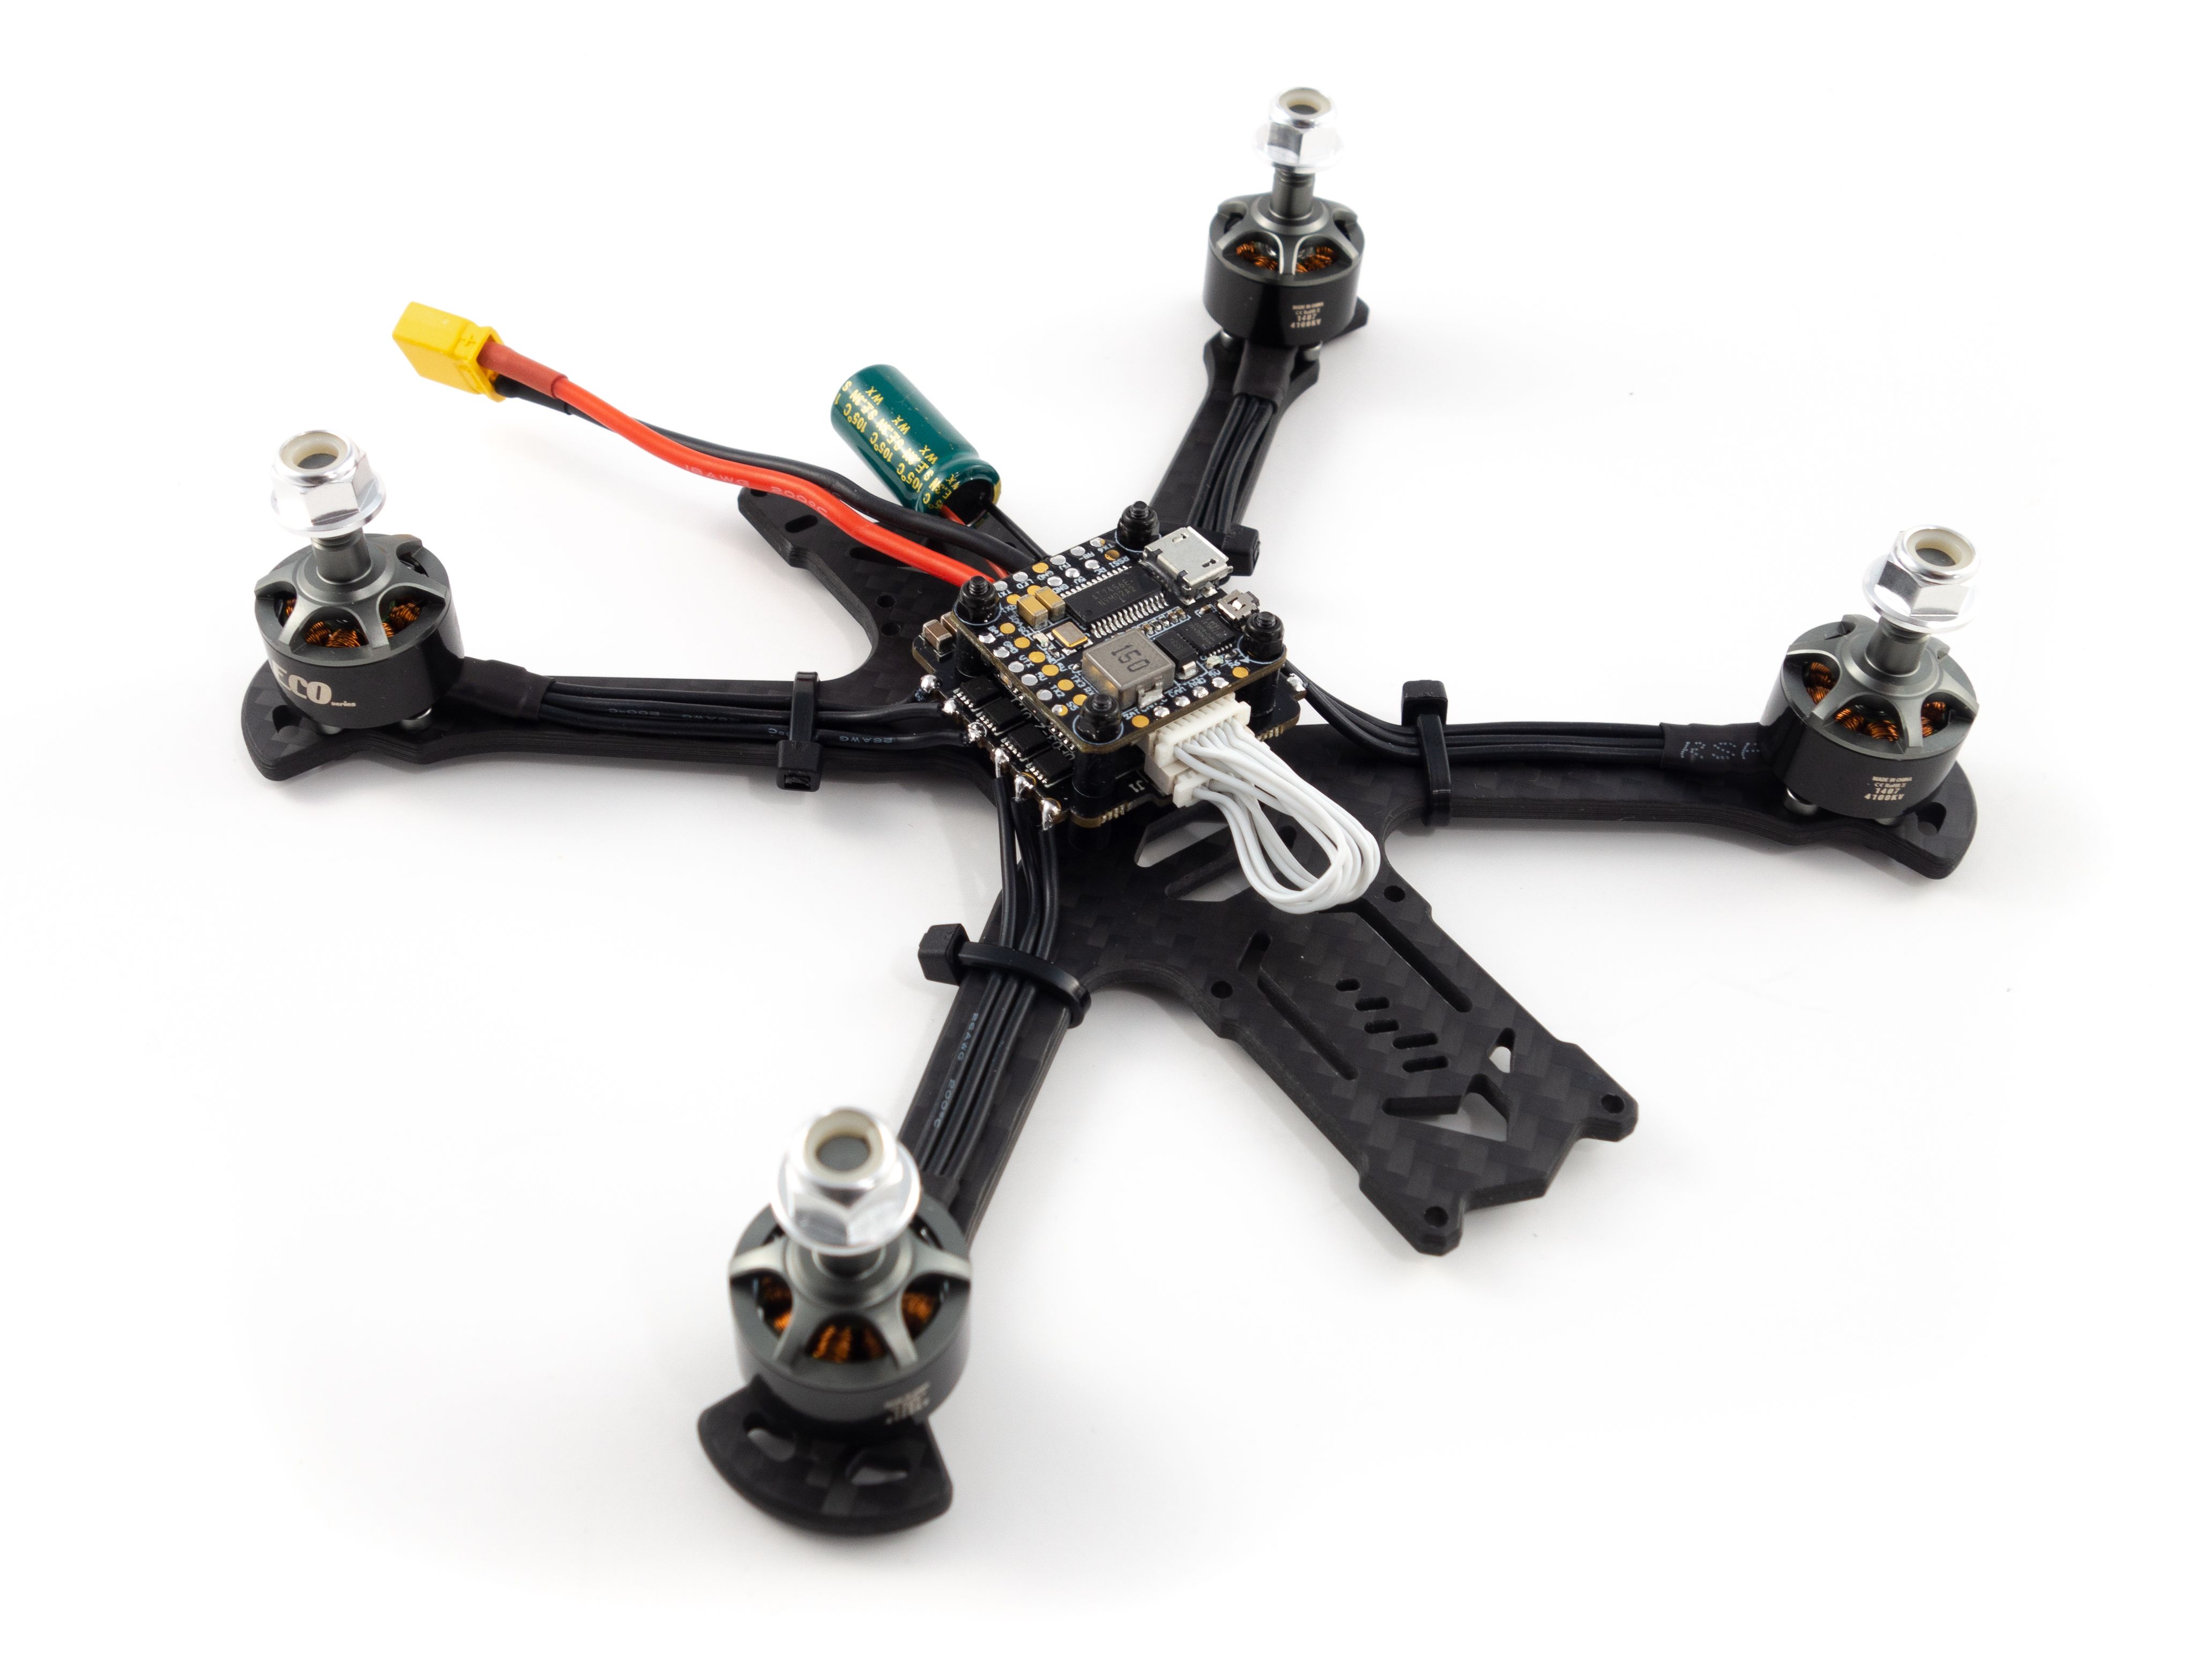
Mounting the Flight Controller
Now you can add the flight controller and fix it in place with the small nylock nuts. Use the same rubber spacers on top of the 4-in-1 ESC and make sure you place the board at the correct orientation. The white connector between the boards needs to be at the front of the frame. Be careful tightening the nuts. I gripped them with a small set of pliers and used my electric screwdriver to tighten them. Let the screws protrude from the nuts by about 2-3mm until the screws don't wiggle under the frame. Add the white wire connector between the flight controller and ESC board.
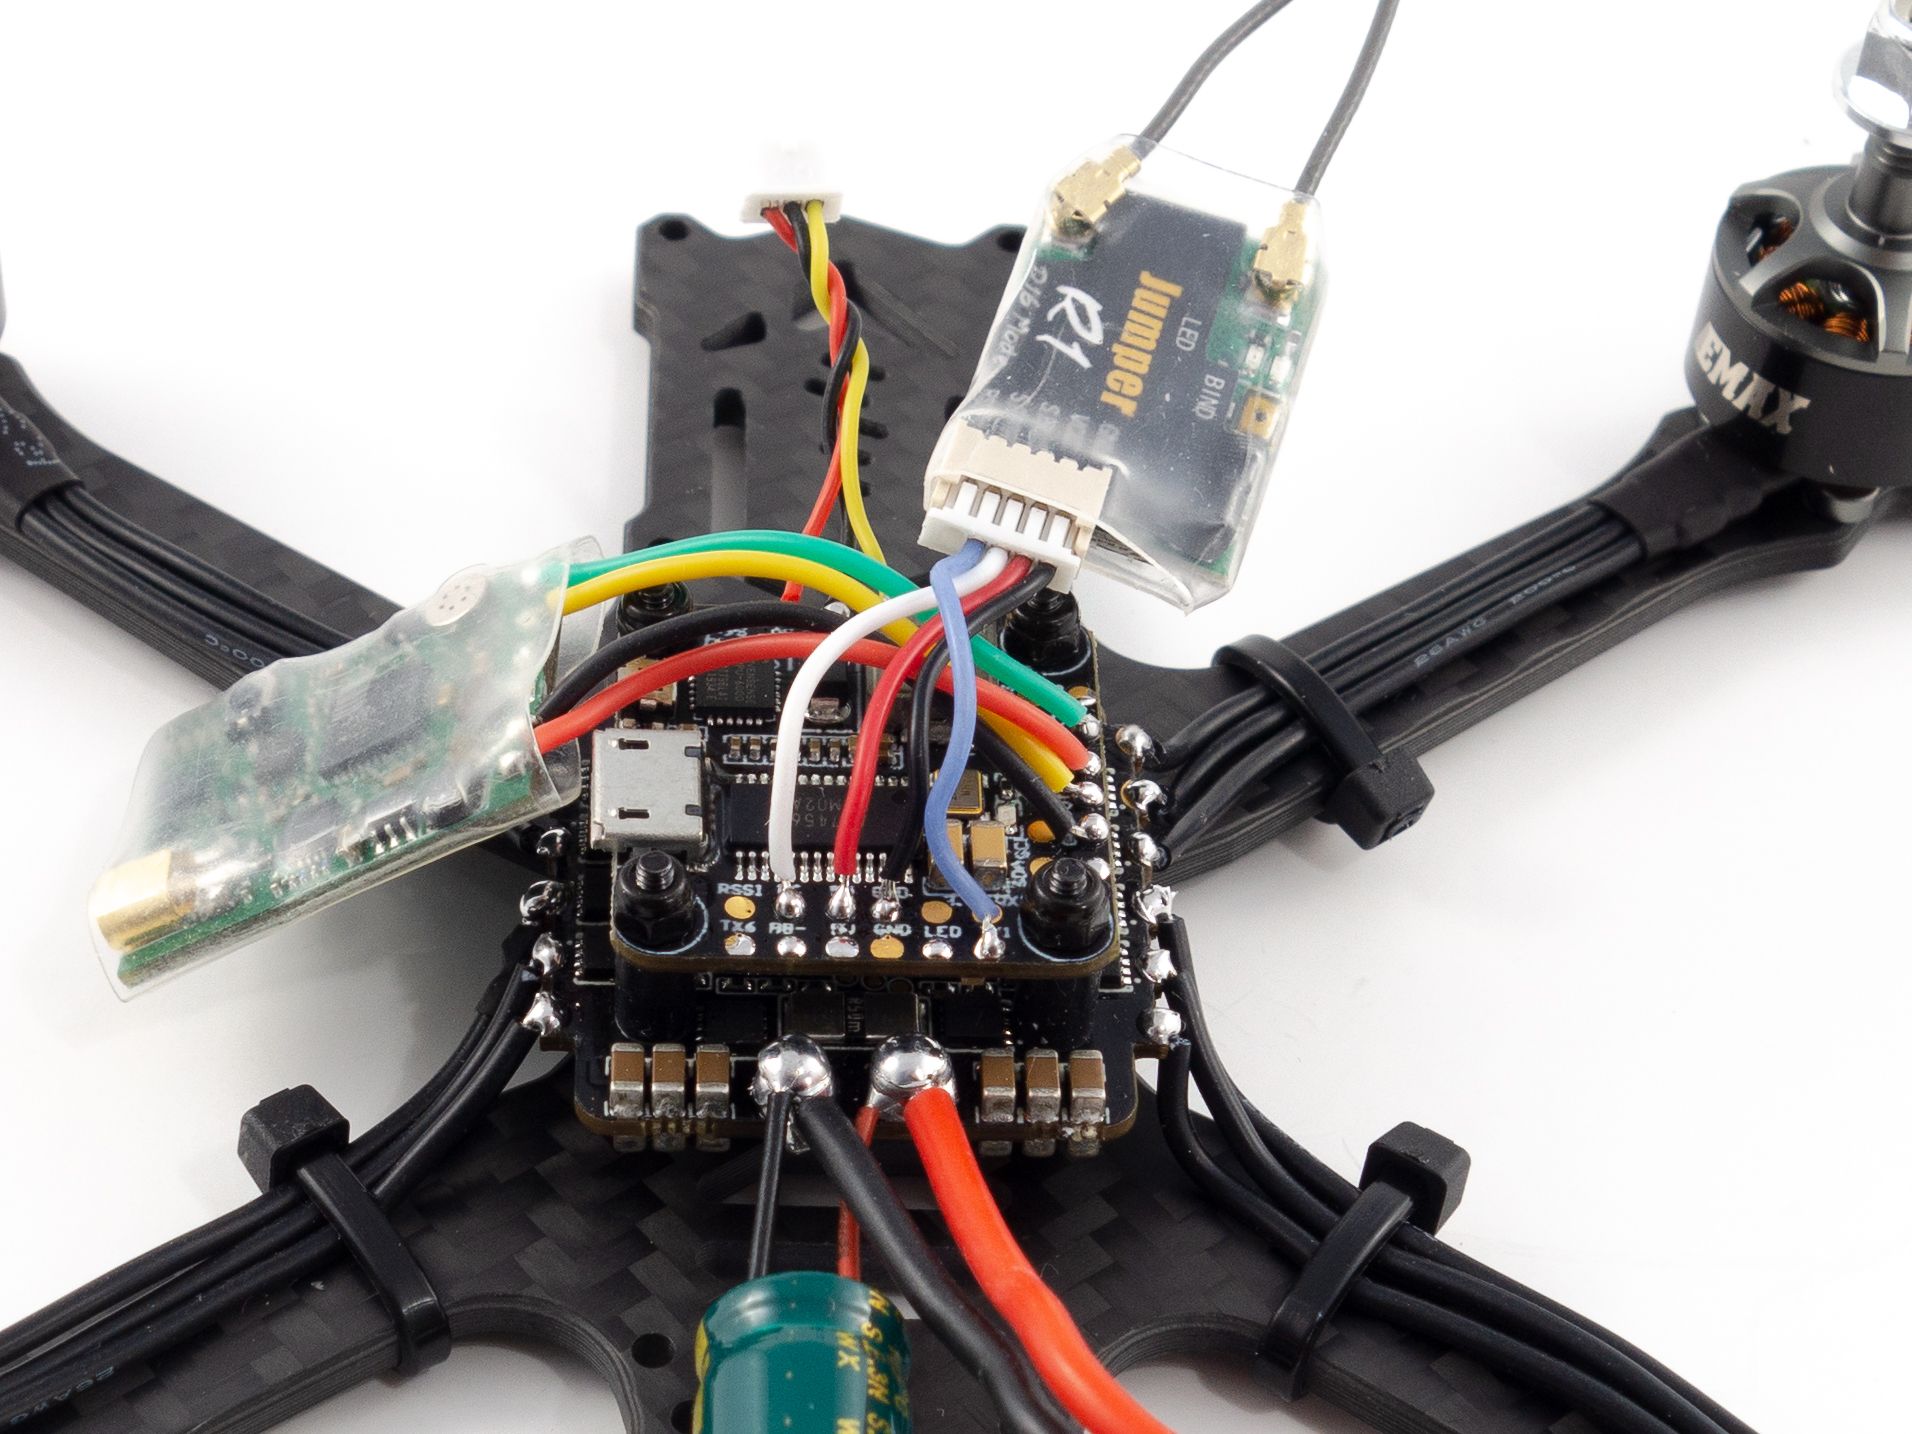
Binding the Receiver
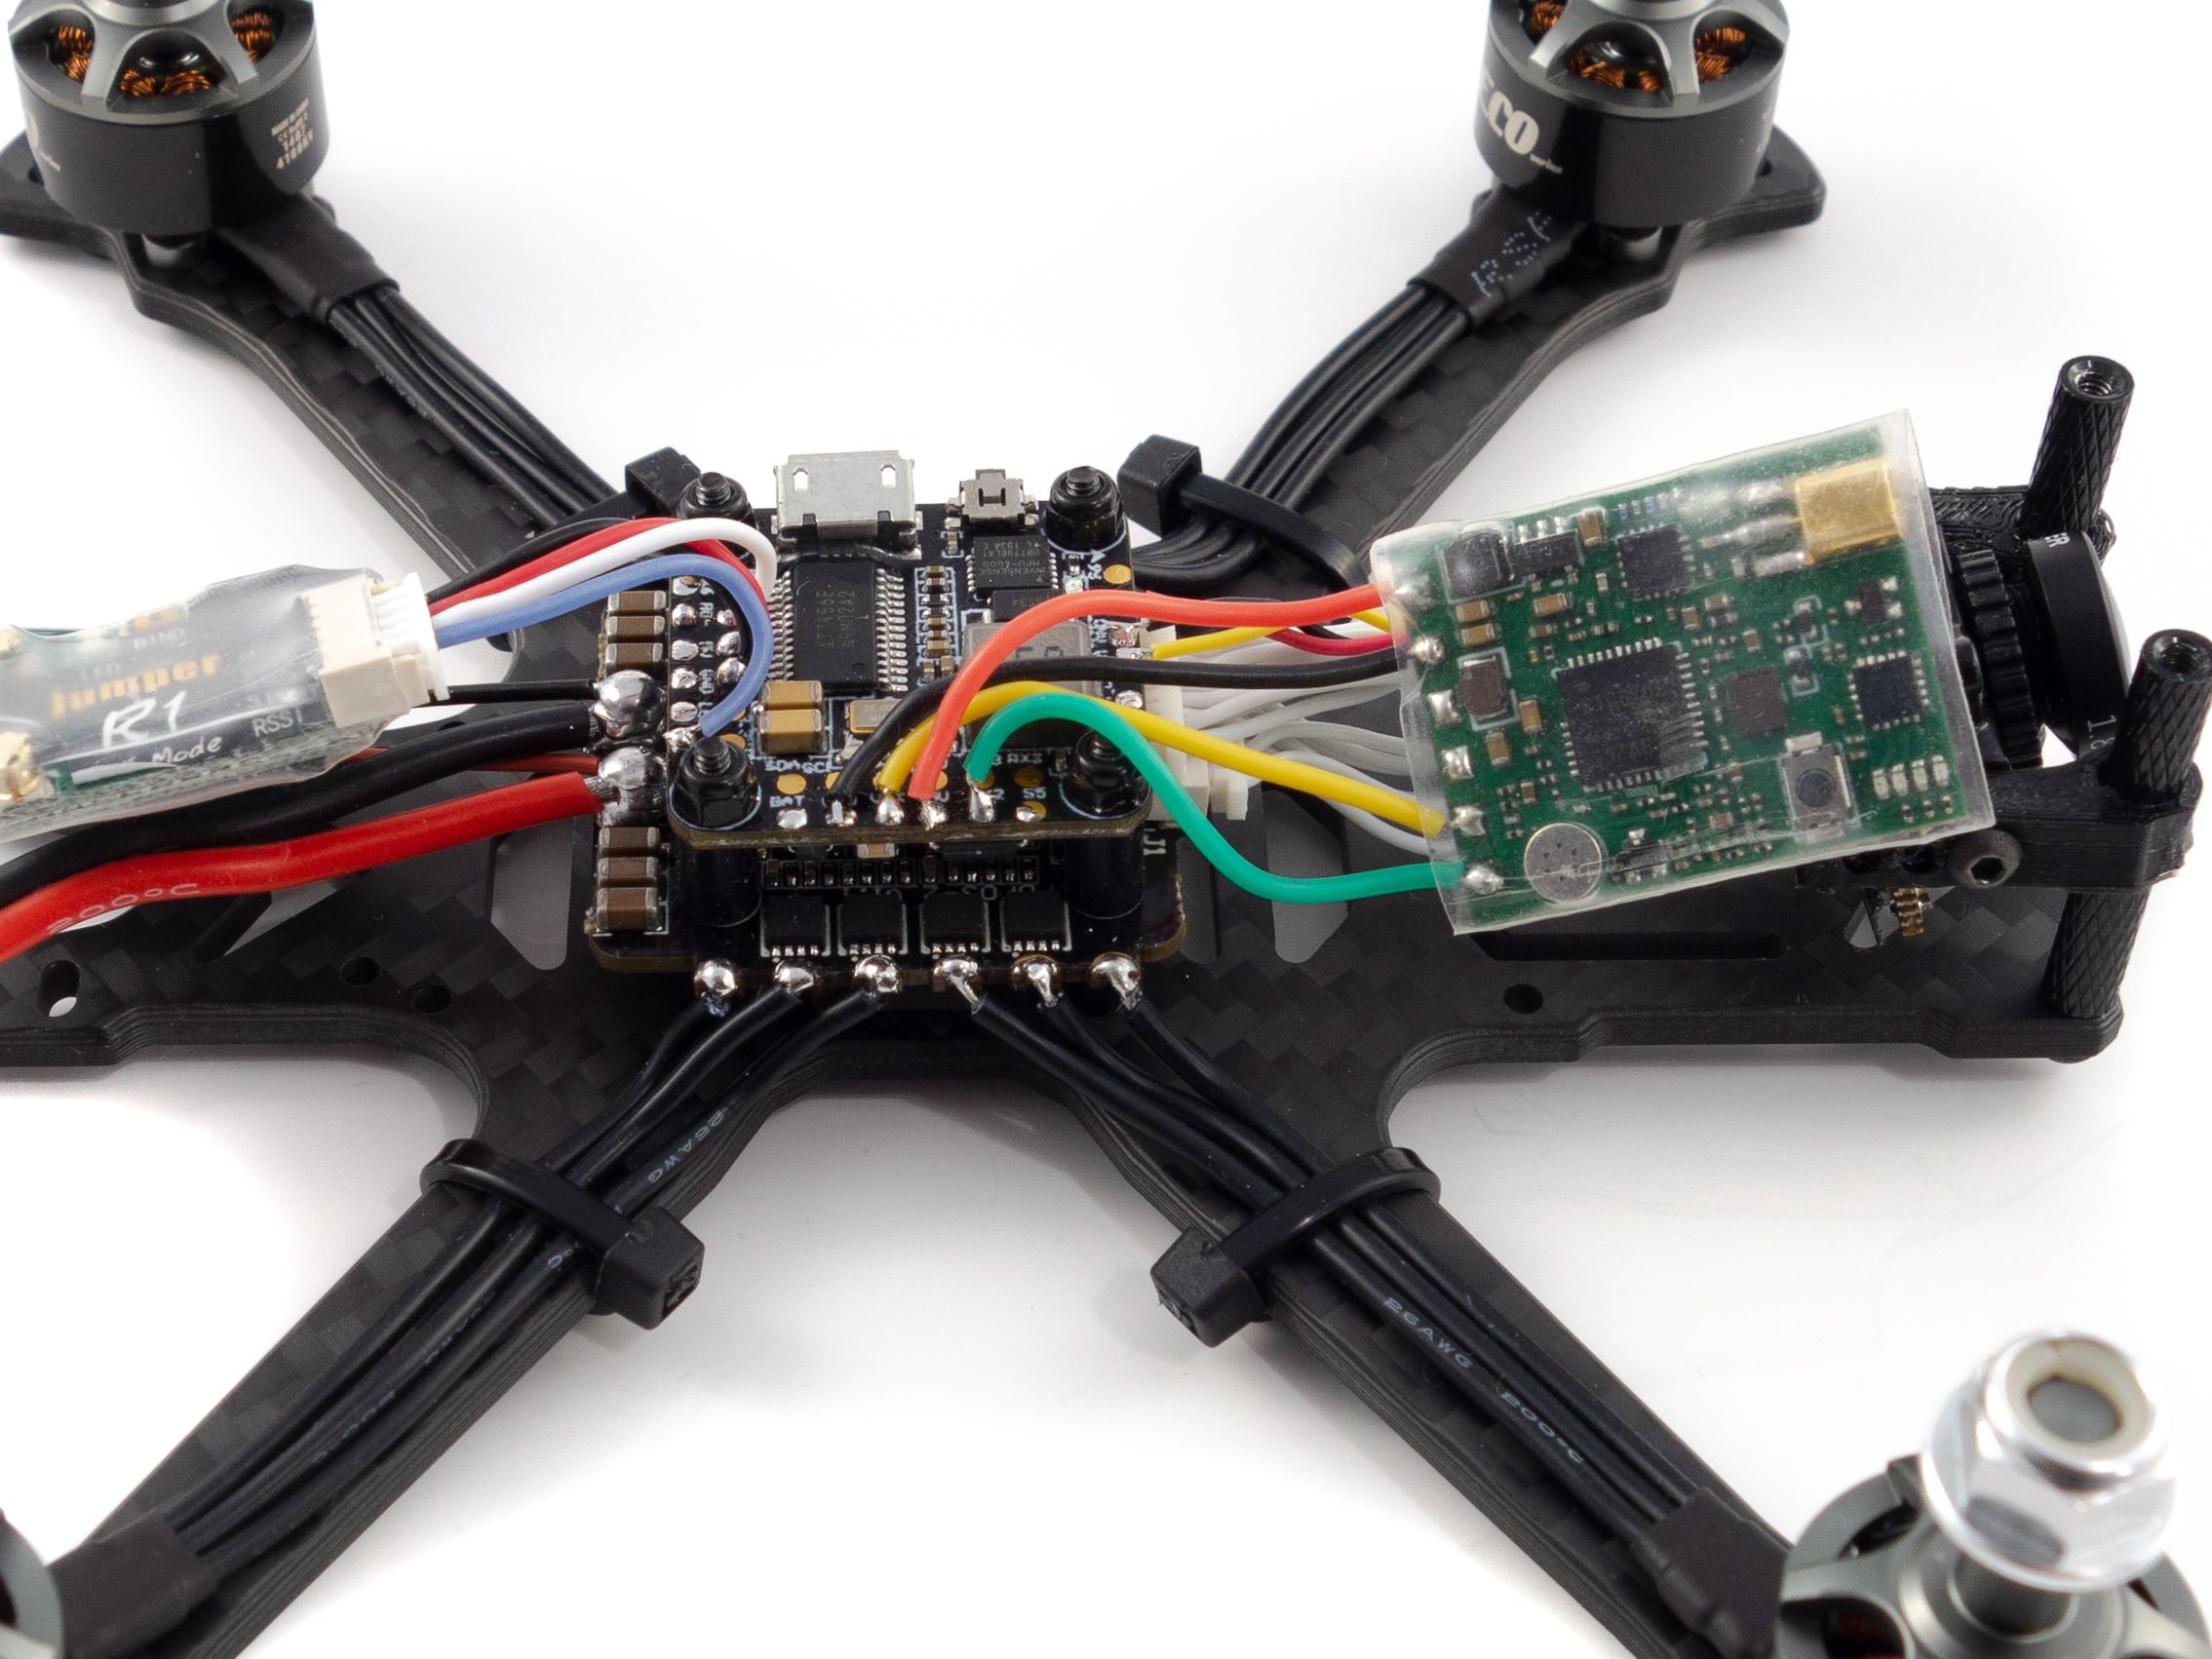
Now we can add the receiver. This particular receiver came with two connectors. Use the one with 5 wires. I removed the green wire for RSSI as I never look at it on the OSD. If you want RSSI to show up in your goggles you can keep this wire and solder it to the RSSI pad. You can still relay the value through your radio inputs and mixer without the wire, but it's a somewhat convoluted process.
- Cut the wires to about 3-4cm and solder them to the RC, 5V2, GND and TX1 pads on the flight controller.
- Refer to the photo for wire placement.
- Cover the pads first with solder and tin the wires.
- It just takes a light tap of the iron to solder the wires.
- Bind your receiver
- Be sure to double check that you don't have continuity between your main battery leads and use a smoke stopper if you have one.
- Hold the bind button on the receiver while you plug the main battery in. (It's helpful to clamp this button down with tweezers to free your hand)
- Put your radio in bind mode and make sure you're bound.
- Once bound you can slide the receiver under the capacitor to hold it in place.
Camera
Now for the camera. Use a pair of M2x6mm screws from the frame kit to mount the camera to the TPU mounts. You may need to poke the holes out with your tweezers to get the screws to fit. For this particular camera you'll want to mount it at the holes nearest to the front. Screw the front two aluminum standoffs to the frame and slide the camera down over them. Cut the camera wires to length giving yourself a little slack to adjust the camera angle and solder them to the CAM, GND and 5V pads at the front of the flight controller.
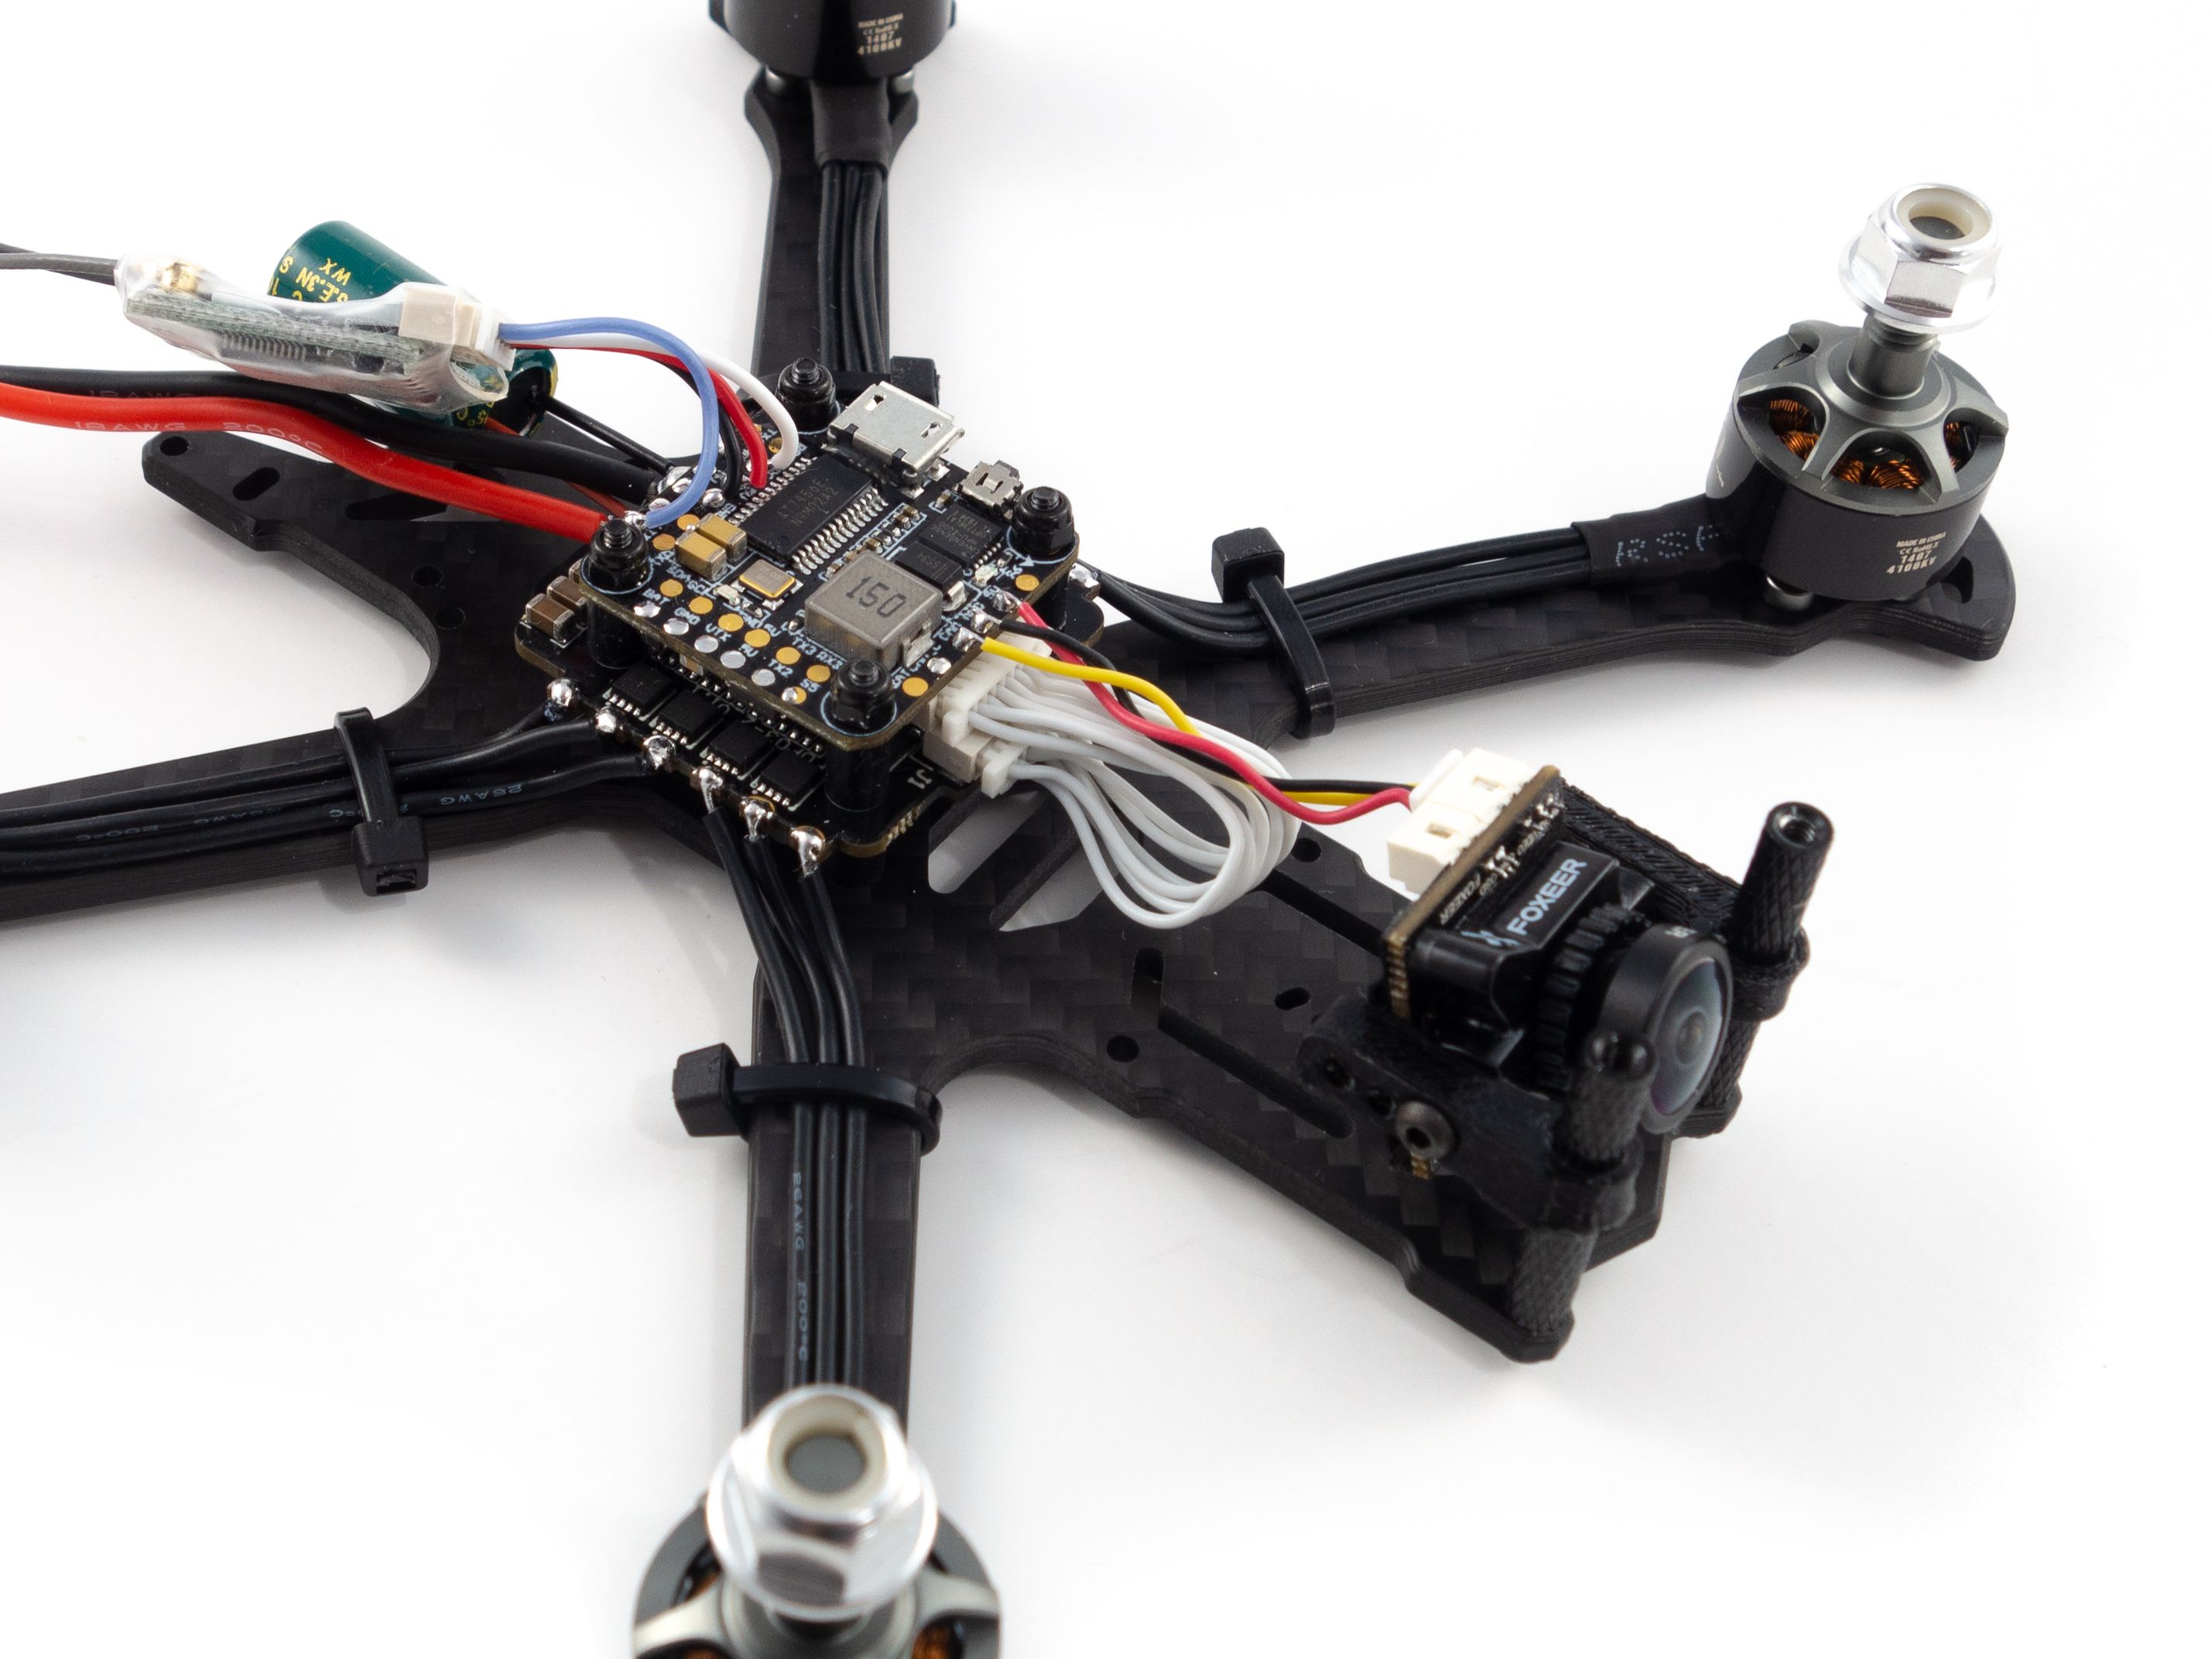
Video Transmitter
De-solder the 5v output and GND wires from the VTX as we won't be using those. Cut the remaining wires to about 3-4cm and solder them to the GND, VIN, 5V and TX2 pads on the side of the flight controller. Add some 26-30mm shrink tube to protect the VTX from shorts. The VTX doesn't come with it, so you'll need to buy it separately. I linked some below.
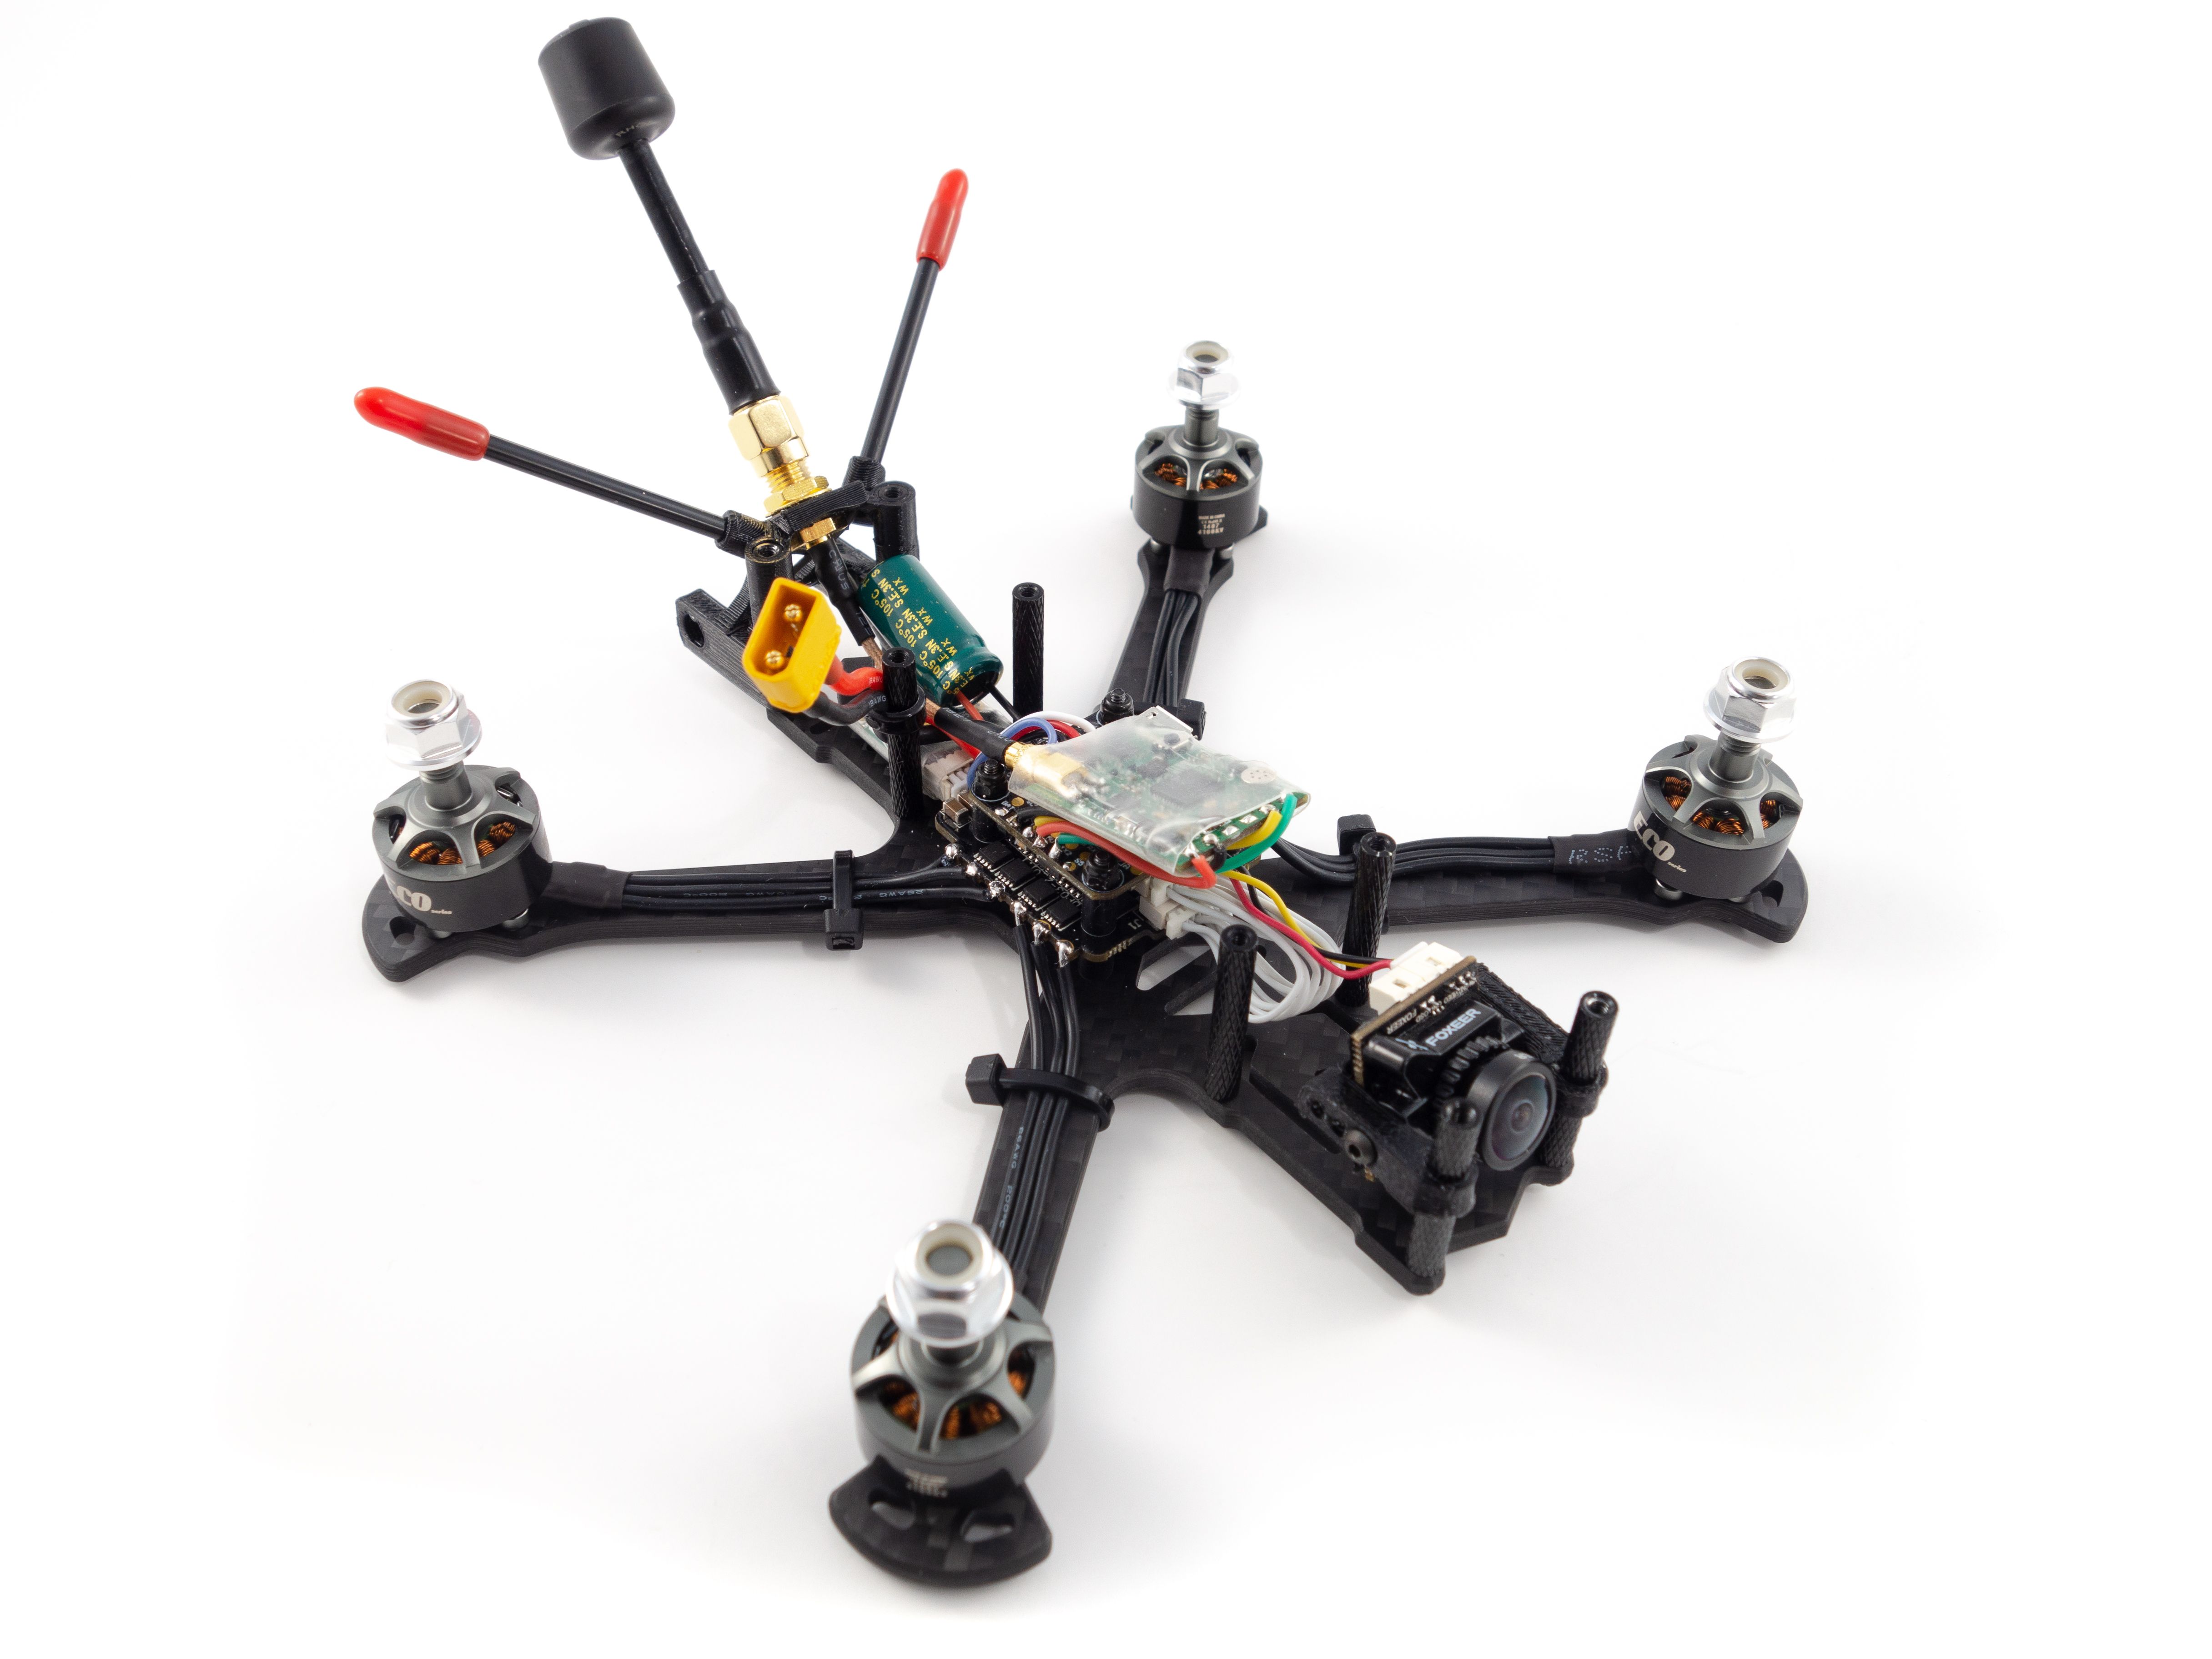
Finishing Up
Now it's time to wrap it up! I've compiled a little checklist to make sure you don't miss anything:
- Add the remaining aluminum standoffs.
- If you add a 3rd row of standoffs, zip-tie the battery lead to one to relieve stress on the stack in the event of a battery ejection.
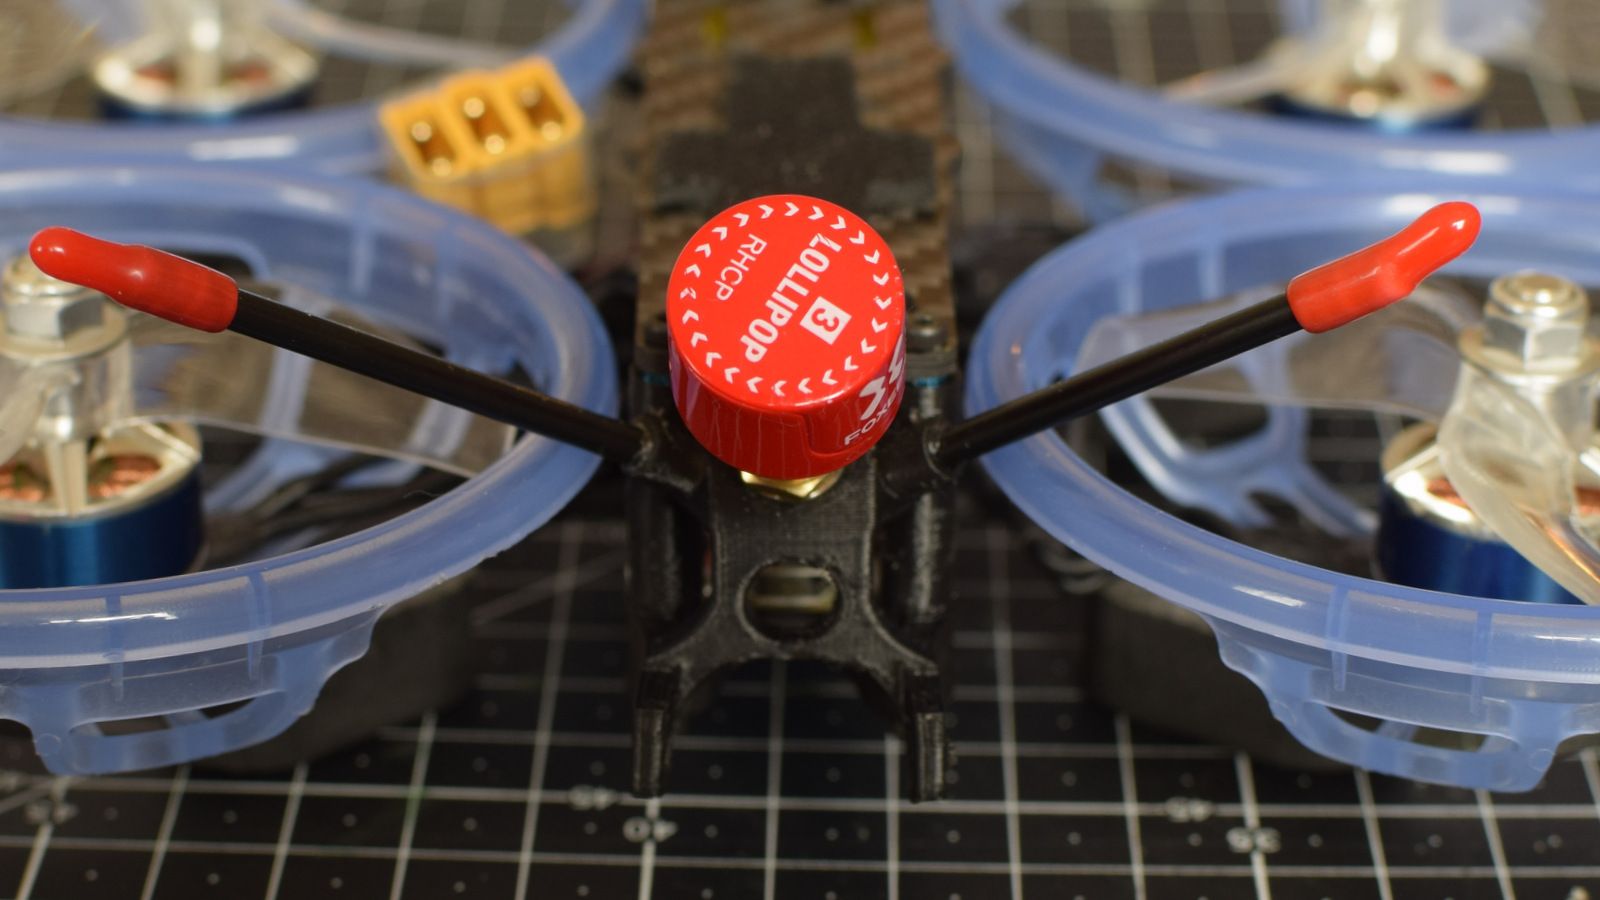
- Slide the TPU antenna holder over the rear standoffs, feed the receiver wires through the holes and cap them with the included caps.
- Add the SMA pigtail to the antenna holder using the gold nuts to hold it in place.
- Screw on the antenna.
- Before you plug the pigtail into the VTX, cover the end with shrink tube to prevent it from shorting to the flight controller.
- The VTX can loosely fit above the flight controller. Just make sure no metal from the MMCX connector or VTX can make contact with the flight controller.
- Before you close everything up you may want to test your VTX. Power up your quad and look for the video feed in your goggles.
- Add the top plate and secure it with the included M2x6mm screws.
- Stick the battery pad to the top. (The square edges face forward)
Optionally you can use the GoPro mount if you plan to fly with an HD camera.
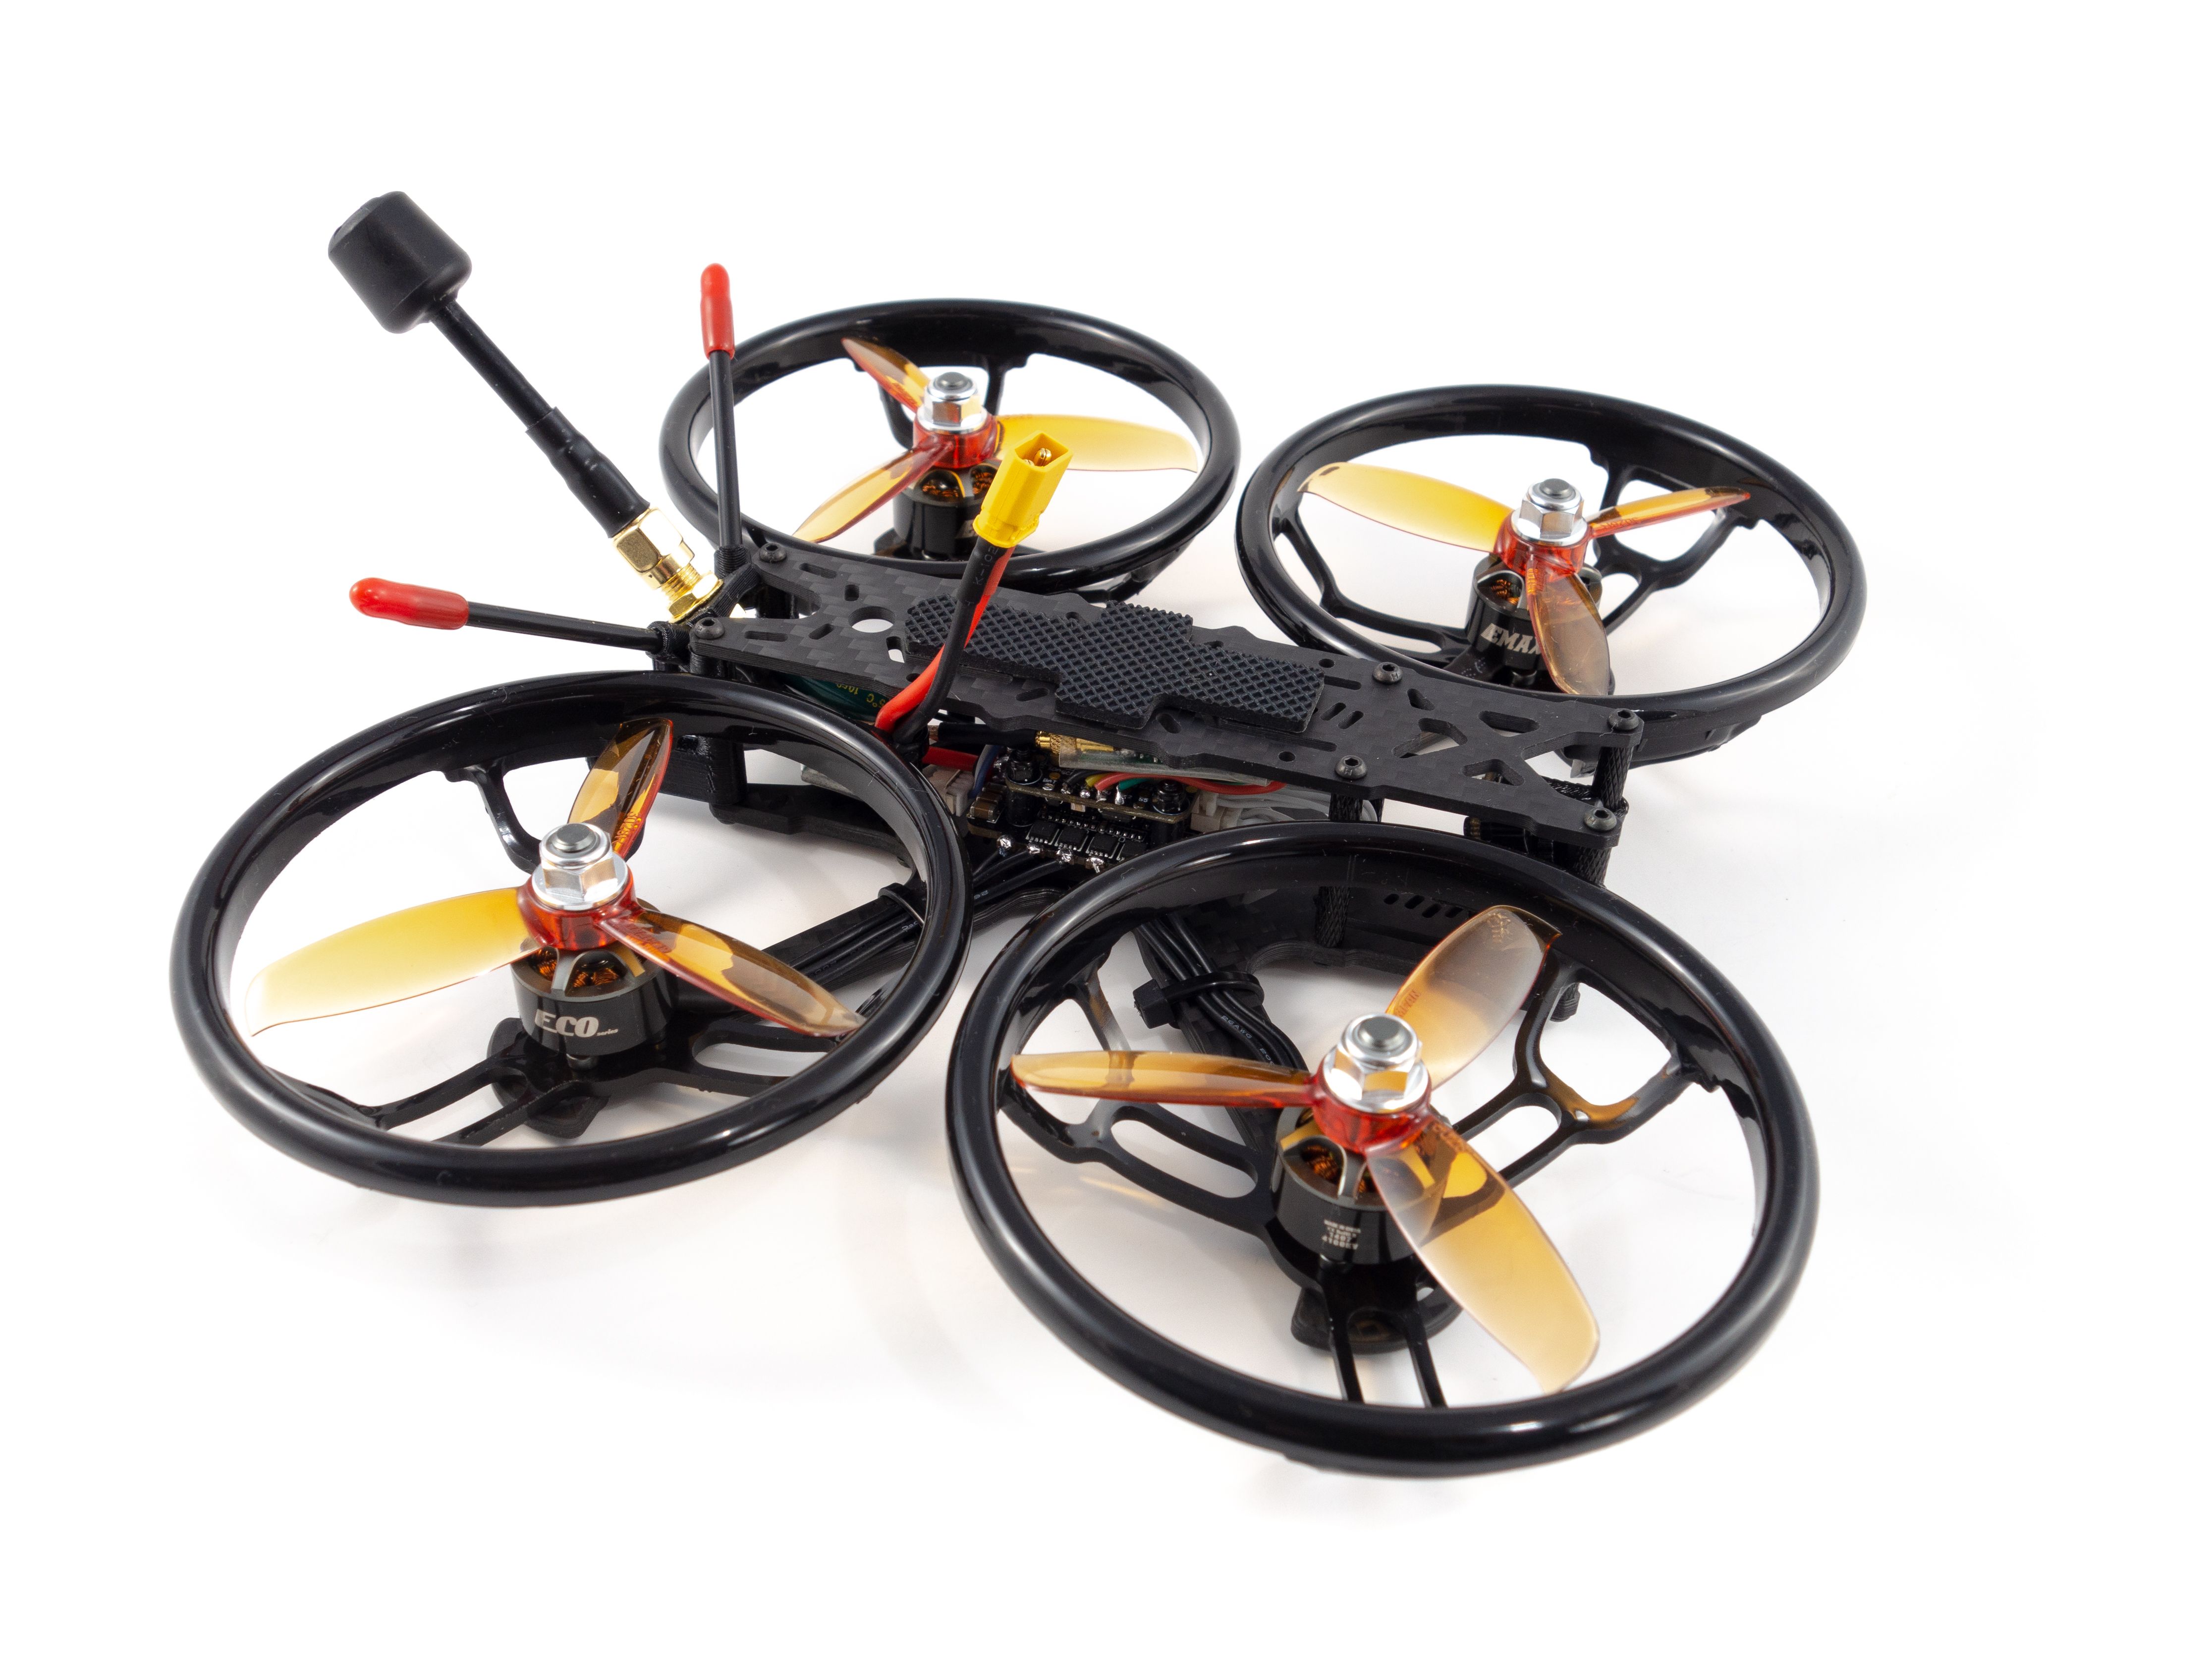
Prop Guards
These are optional, but they do provide a lot of protection in close proximity flying. I strongly recommend them.
Important! The holes at the center of the guards are a little too snug for these motor shafts. I fixed this by drilling them out with a 3/16" bit. The motors do rotate, but there was some friction. You don't want to risk blowing an ESC!
Also pay close attention to how you orient each of the prop guards. There is exactly one position that gives you a uniform look around the frame. Use the 7mm screws included in the frame kit. It'd be a good idea to use blue Loctite, but dry fit two screws first, add Loctite to the 3rd and 4th and go back to add it to the first two. It can be a little tricky to hold everything in place.
Betaflight Configuration
If you don't already have them, you'll need to download Betaflight Configurator [Download] and the BLHeli_32 Configurator [Download].
- First go to the Firmware Flasher and choose "Release", "HGLRCF405" and the latest stable release of Betaflight (At this time 4.1.6)
- Leave the remaining options unchecked.
- Click "Load Firmware [Online]" and then "Flash Firmware" to update your flight controller. Once complete, click "Connect"
- On the Configuration tab
- Under ESC/Motor Features select DSHOT600
- Under System configuration set Gyro update frequency & PID loop frequency to 8 kHz.
- Under Receiver choose your receiver. If you used the Jumper R1 choose "Serial-based receiver" and "SBUS"
- Under Personalization set your FPV handle
- Under Arming set the Max arm angle to 180 (Only if you keep the accelerometer turned on)
- Under Other Features enable: Softserial, Telemetry, Airmode, OSD, ESC Sensor, Anti Gravity and Dynamic Filter
- Under DSHOT Beacon Configuration enable "RX_SET"
- Click Save and Reboot
- To set up radio telemetry and to arrange your motors into the proper positions go to the CLI tab and paste:
resource SERIAL_TX 11 A09
resource motor 1 A03
resource motor 2 B05
resource motor 3 B00
resource motor 4 B01
save
- On the Ports tab
- Set the UART2 Peripherals to "VTX (TBS SmartAudio)".
- Set the UART4 Sensor Input to "ESC"
- Make sure UART6 is has Serial Rx enabled
- Set SOFTSERIAL1 Telemetry Output to "SmartPort"
- Click Save and Reboot
- On the Video Transmitter tab
- Choose your preferred band and channel.
- Set the power to 25mw while you work on your quad to avoid overheating the VTX.
- Under the VTX table set the number of power levels to 2 and set the values to 25 and 200.
- On the OSD tab
- Check all of the values you want and arrange your OSD as desired.
To complete the remaining steps you'll need to apply lipo power and turn your radio on:
- On the Receiver tab ensure your pitch, roll, throttle and yaw are being applied correctly. Adjust your transmitter and Channel Map as needed.
- I like to add about 4 or 5 to both deadbands to smooth out gimbal jitter.
- On the Modes tab
- Assign an Aux switch to arm and disarm your quad.
- Assign another Aux switch to enable Horizon or Angle mode if you need them, but Airmode should be default.
- Assign the Beeper and "Flip over after crash" to a 3rd and/or 4th switch. I like to assign them both to a single 3 point switch with the beeper on the last position. Otherwise it'll beep when you don't have your radio on.
- On the Motors tab enable the motor test and check the rotation of each motor.
- Do this by sliding the master to around 1030 so you can rub the side of each motor with your finger to determine the rotation.
- Refer to the image on top and take note of any that need to be reversed.
- You might also want to ensure each motor is in the correct position by referring to the numbers in the image and powering them one by one.
- Disconnect from Betaflight Configurator and open BLHeli_32 Configurator
- Connect and Read Settings
- Reverse each ESC that needs to be reversed. This is done by de-selecting the ESCs with the correct motor rotation at the bottom, and changing the motor direction for the motors that need it. Click "Write setup" to save.
- As an added bonus you can change the ESC startup music.
- Reconnect to Betaflight Configurator to test the motor rotations.
- Go to the Telemetry page on your radio and Discover sensors. You should see all your telemetry data appear.
- Go ahead and set your Video Transmitter to 200mw if you feel you need the power output.
And that's it! The default Failsafe settings are generally fine, but make sure they work by arming your quad, applying a small amount of throttle and turning off your transmitter. It should shut down after a short moment.
RPM Filters
You can optionally enable RPM filters to improve performance, but you may want to fly without them first to see how you like it. To do this you'll need to follow these steps:
In BLHeli_32 Configurator update your ESCs to Firmware version 32.7 or higher.
- This takes a few minutes, so be patient with the process.
- You'll need to power your quad to do this.
Back in Betaflight you'll need to make a couple adjustments:
- On the Configuration tab under ESC/Motor Features turn on Bidirectional Dshot.
- Set Gyro update frequency & PID loop frequency to 4 kHz.
- The RPM filter needs more CPU resources, so you'll want to lower these.
- On the PID Tuning tab under Filter Settings make sure the Gyro RPM Filter is on and set the "Harmonics Number" to 1.
- On the same screen just below set the "Dynamic Notch Width Percent" to 0 and set the "Dynamic Notch Filter Range" to LOW.
This may require some fine tuning, so proceed carefully. For more details check out Joshua Bardwell's video about setting up RPM Fiters.
PID Tuning and Rates
Generally you want to use the stock PIDs and take it for a quick flight. Check your motor temps and if they're getting too hot reduce the D Max of both your pitch and roll by about 10-20%. I set mine to 30 and 32 and the motors don't get too hot carrying a GoPro. Just be sure to check your motor temps frequently. They may get warm and even hot, but they shouldn't burn you to the touch. If you can keep your finger on a motor for several seconds without any pain it's probably fine.
As for the rates, I recommend low rates for a quad like this. Try setting your Super Rates & RC Rates to the same value of .6 to .7 with an expo of 0. This is for pitch, roll and yaw. You'll get smooth, flowy flight. If you want something more snappy you can try higher values.
To change your PIDs and rates in the field: power up your quad, put your goggles on and move your throttle to the center, yaw left and pitch forward. This will bring up the Betaflight OSD menu. You can make a number of changes including PID and rate adjustments. Just be careful not to take too long as you might overheat your VTX. To be safe you can switch it to Pitmode to reduce the power output while you work. Just be sure to switch it back before you fly. This is under "Features" and VTX SA menu. Don't forget to save your settings when you're done.
Challenges
Good thing you've got this guide because I flubbed this up so many times! First, I build it backwards so I had to remove everything, rotate the stack and re-mount it. This meant my camera wires were too short, so I had to find a replacement wire harness for the camera. Second, I wired the VTX to the BAT+ pad forgetting this particular VTX requires 5V. Good thing I had a spare! Fortunately it all came together and I'm really happy with it. It's a nice little frame and I think it looks great!
Maiden Flight
When installing your props make sure to pay attention to the rotation direction illustrated on the Configuration tab in Betaflight. If you're flying "props in" then the leading edges of each prop needs to rotate toward the front and rear of the quad. If you are flying "props out" then the leading edge need to rotate toward the sides of the quad. Make sure the lock nuts are tight but not extremely tight.
Photos


Part List
Show stores (4)
Hey,
My Friend and I are trying to build the exact drone you built. We're struggling with the Binding of the Receiver with the Radio. We have a FrSky Taranis T9 Lite Radio. Thanks a lot for the great instructions.
This looks awesome. Haven't fully built a quad yet (mostly BNF to date), but with this guide it looks like a great one to attempt as a first. Especially since it looks like it will work with the QX7. If I pull this one off, I'm definitely going after that Reptile Cloud Build you posted
hello, great build: wasn't too happy withe the included camera mount (mine broke after a couple of flights). Designed a 15 degree camera mount myself. Search for "HGLRC sector 150 fpv gopro mount 15 degrees" on thingiverse. (PS: apparently I cannot copy links in comments??)
Kind of new to this, how would the flight characteristics of this quad differ from the one they are selling rtf on their website?
So I'm looking to build my first quad. Do you think this would be a good start? (e.g. learning to fly one and do some cinematic video)
I work with electronics, so soldering and wiring won't be an issue for me.
Also, what would the average flight time be if you're flying it relatively conservative?

Sorry I missed your comment! I think this is a pretty easy build to do as a first build, but you do want some simulator experience before you fly it. It's got some power. It depends on the battery but if you fly an 850mah pack conservatively you can get 4-5 minutes and even more with a 1300mah battery.

Hi Whiffles, the suggested batteries seem out of stock in banggood and many other places. Would you be able to recommend an alternative?
Many thanks!
You could try this, but it really depends on where you live. BG can't ship these to certain countries. You may want to find a local shop that has a similar battery. Just be sure to check the connector as the flight controller comes with an XT30 connector. Some of these batteries come with an XT60 connector which isn't compatible.
Very nice build!
I flight classic wings until now. My son flies with 5" copter and I could try it. I bought E010 for testing my abilities and now I am able to fly (carefully) with my son's copter - only LOS.
I very like your build - do you mean that it is suitable for beginner as I am?
Great guide!!! How does this compare to your Reptile Cloud and Donut 3" whoops, in terms of performance and durability?
The prop guards do break in a hard crash, but replacements are cheap. It's much lighter than either the Reptile or the Donut, so I personally enjoy flying this more. I think the Reptile is probably the most durable, but it's just so heavy. Full ducted quads don't handle freestyle very well, so this one is more versatile.

hi does anyone know if i can use a xbox controller on velocidrone ???

I am very new to drone builds. i have largely been in the consumer side.
I love this build, is there any way I can substitute the pricey things like goggles etc. for a more affordable option?
If so, what are your suggestions?

Great Build! Would you suggest 6s to increase flight time a bit and maybe run cooler? If so what motors and KV should I be looking for?
What a great build and write up! One question, would it be possible to mount a Caddx Tarsier or other split camera? Thanks!


If you find that accessing the usb is painful, you can mount the flight controller at the back of the quad like I did for my build.
QUESTION : does your frame have a lot of flex or they corrected this issue in newer batches ?

I don't have any problem accessing the USB if I come in under the prop guards. The frame does have some flex, so the best application is slow cinematic flight. I'm not sure I'd recommend this frame for fast freestyle, especially with the prop guards on. Now with lighter 11xx motors it might be good for freestyle.

thanks for the write up. i am looking for a build i can use for internal inspection of tanks. might want a better camera though. any input on restrictions..weight or size?
Hi thanks for wonderful guide. I was wondering what KV or morots you used? I'm looking at doing this as a first build.
Hey so I'm trying to get into FPV, and I was looking for a small, resilient, well-rounded build to start. Would this be a good one? One more question, is it possible to add GPS functionality to this?


Do you think the frame would fit 3.5" props if you removed the ducts?
Yes it looks like 3.5" will just miss the standoffs without the ducts.
Has anyone tested this? Really wondering, not many 3.5" frames around 40/45g.
For sub250 freestyle. I am now seeing that there is some flex in the frame. Would it be durable enough?