
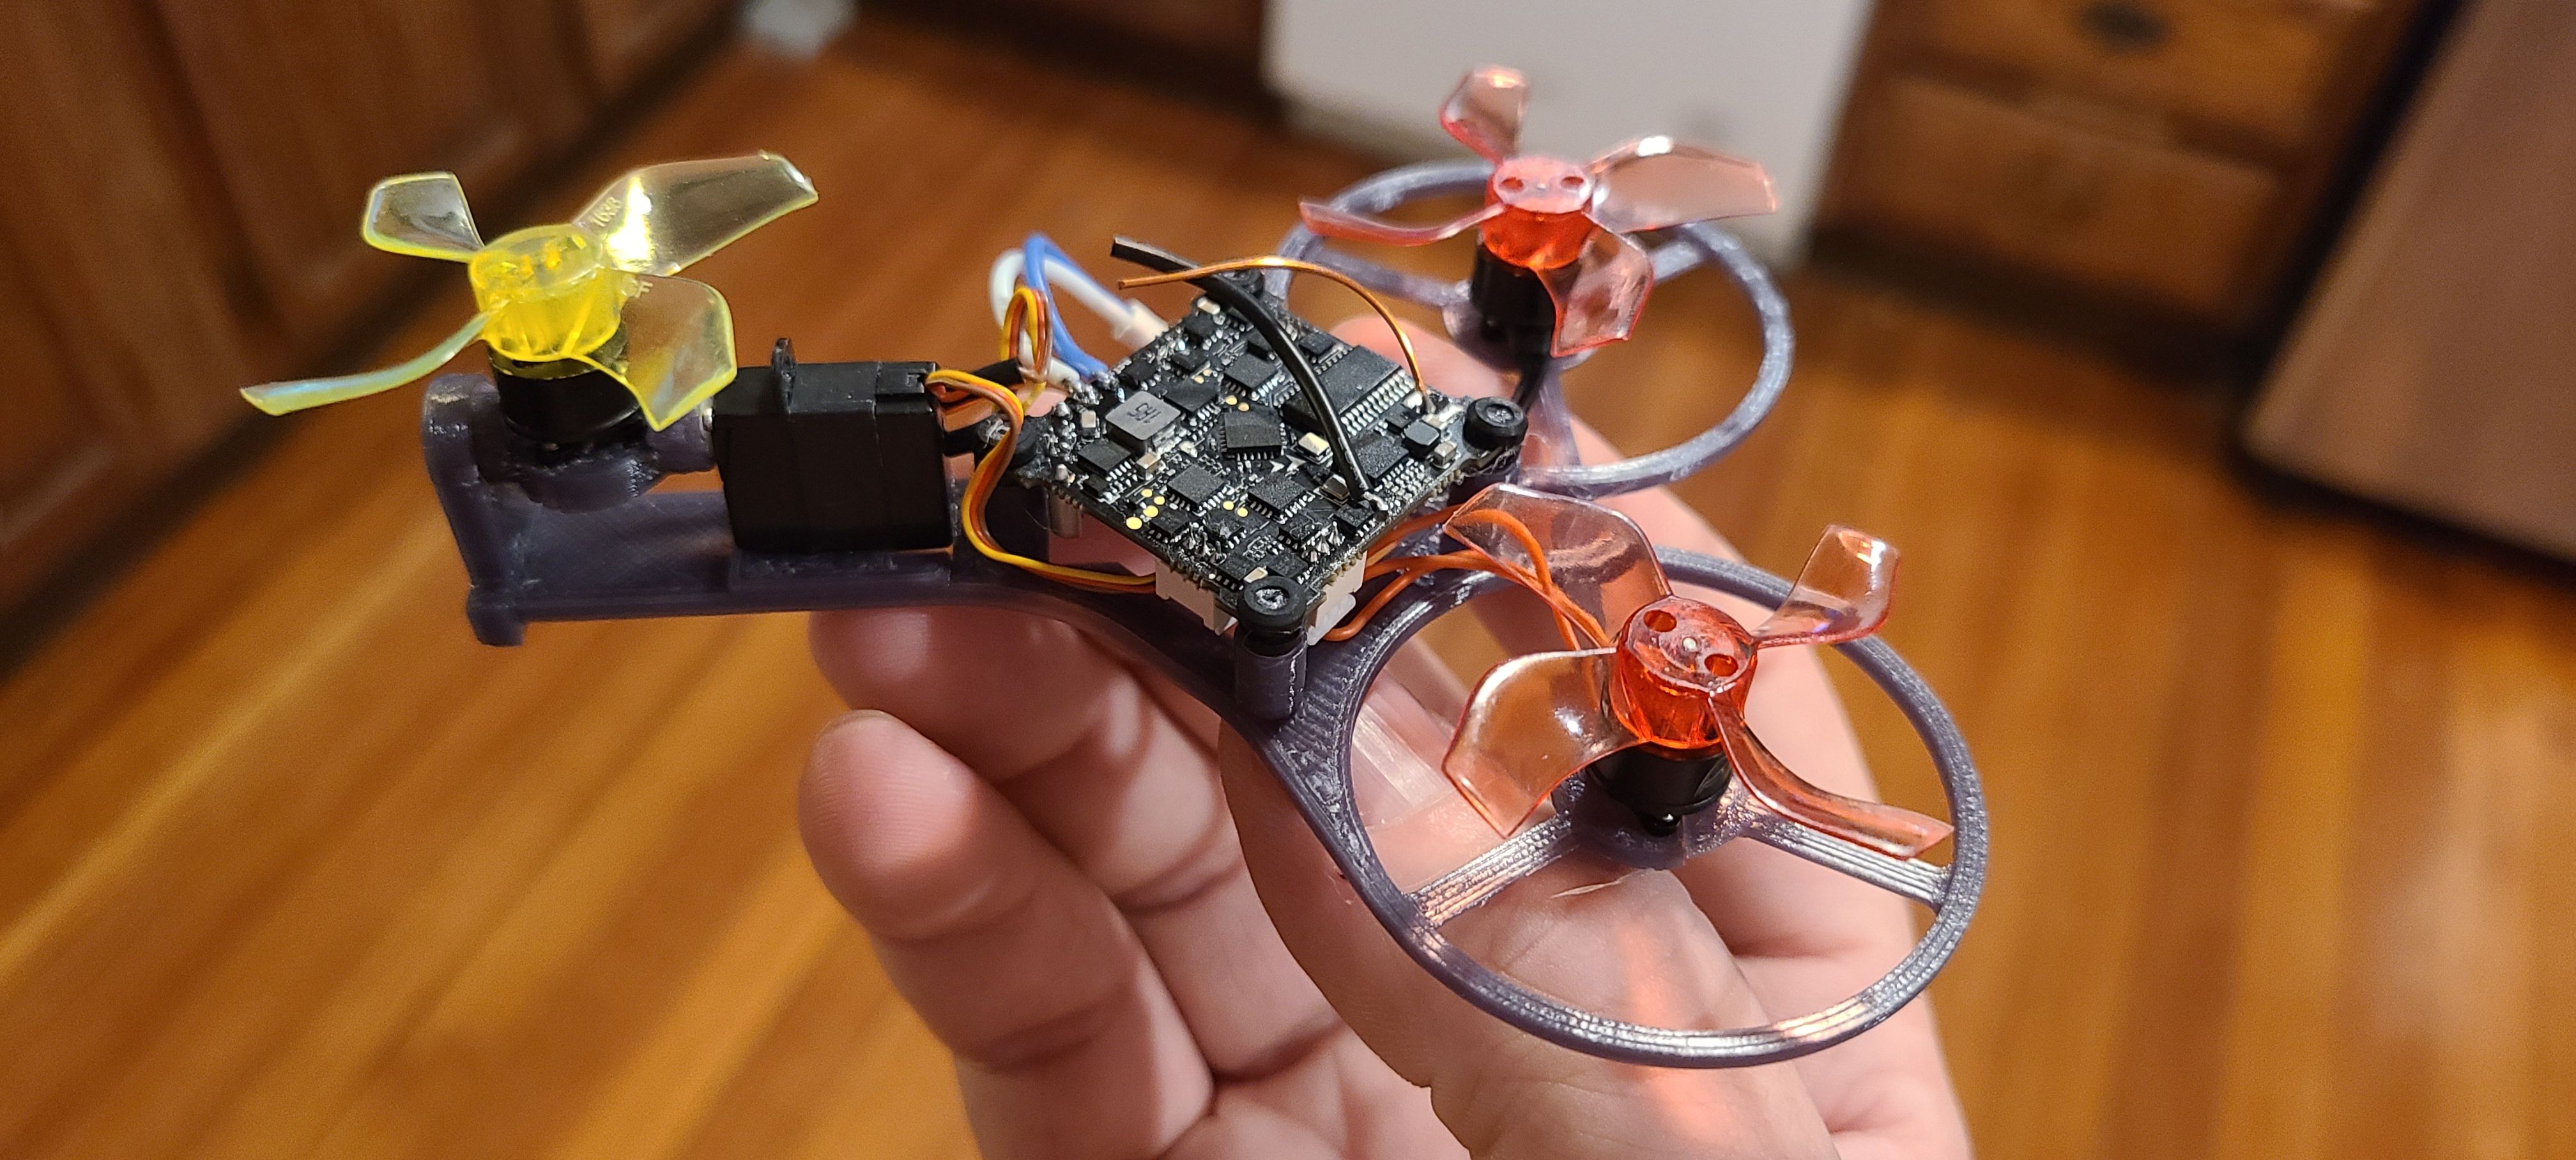
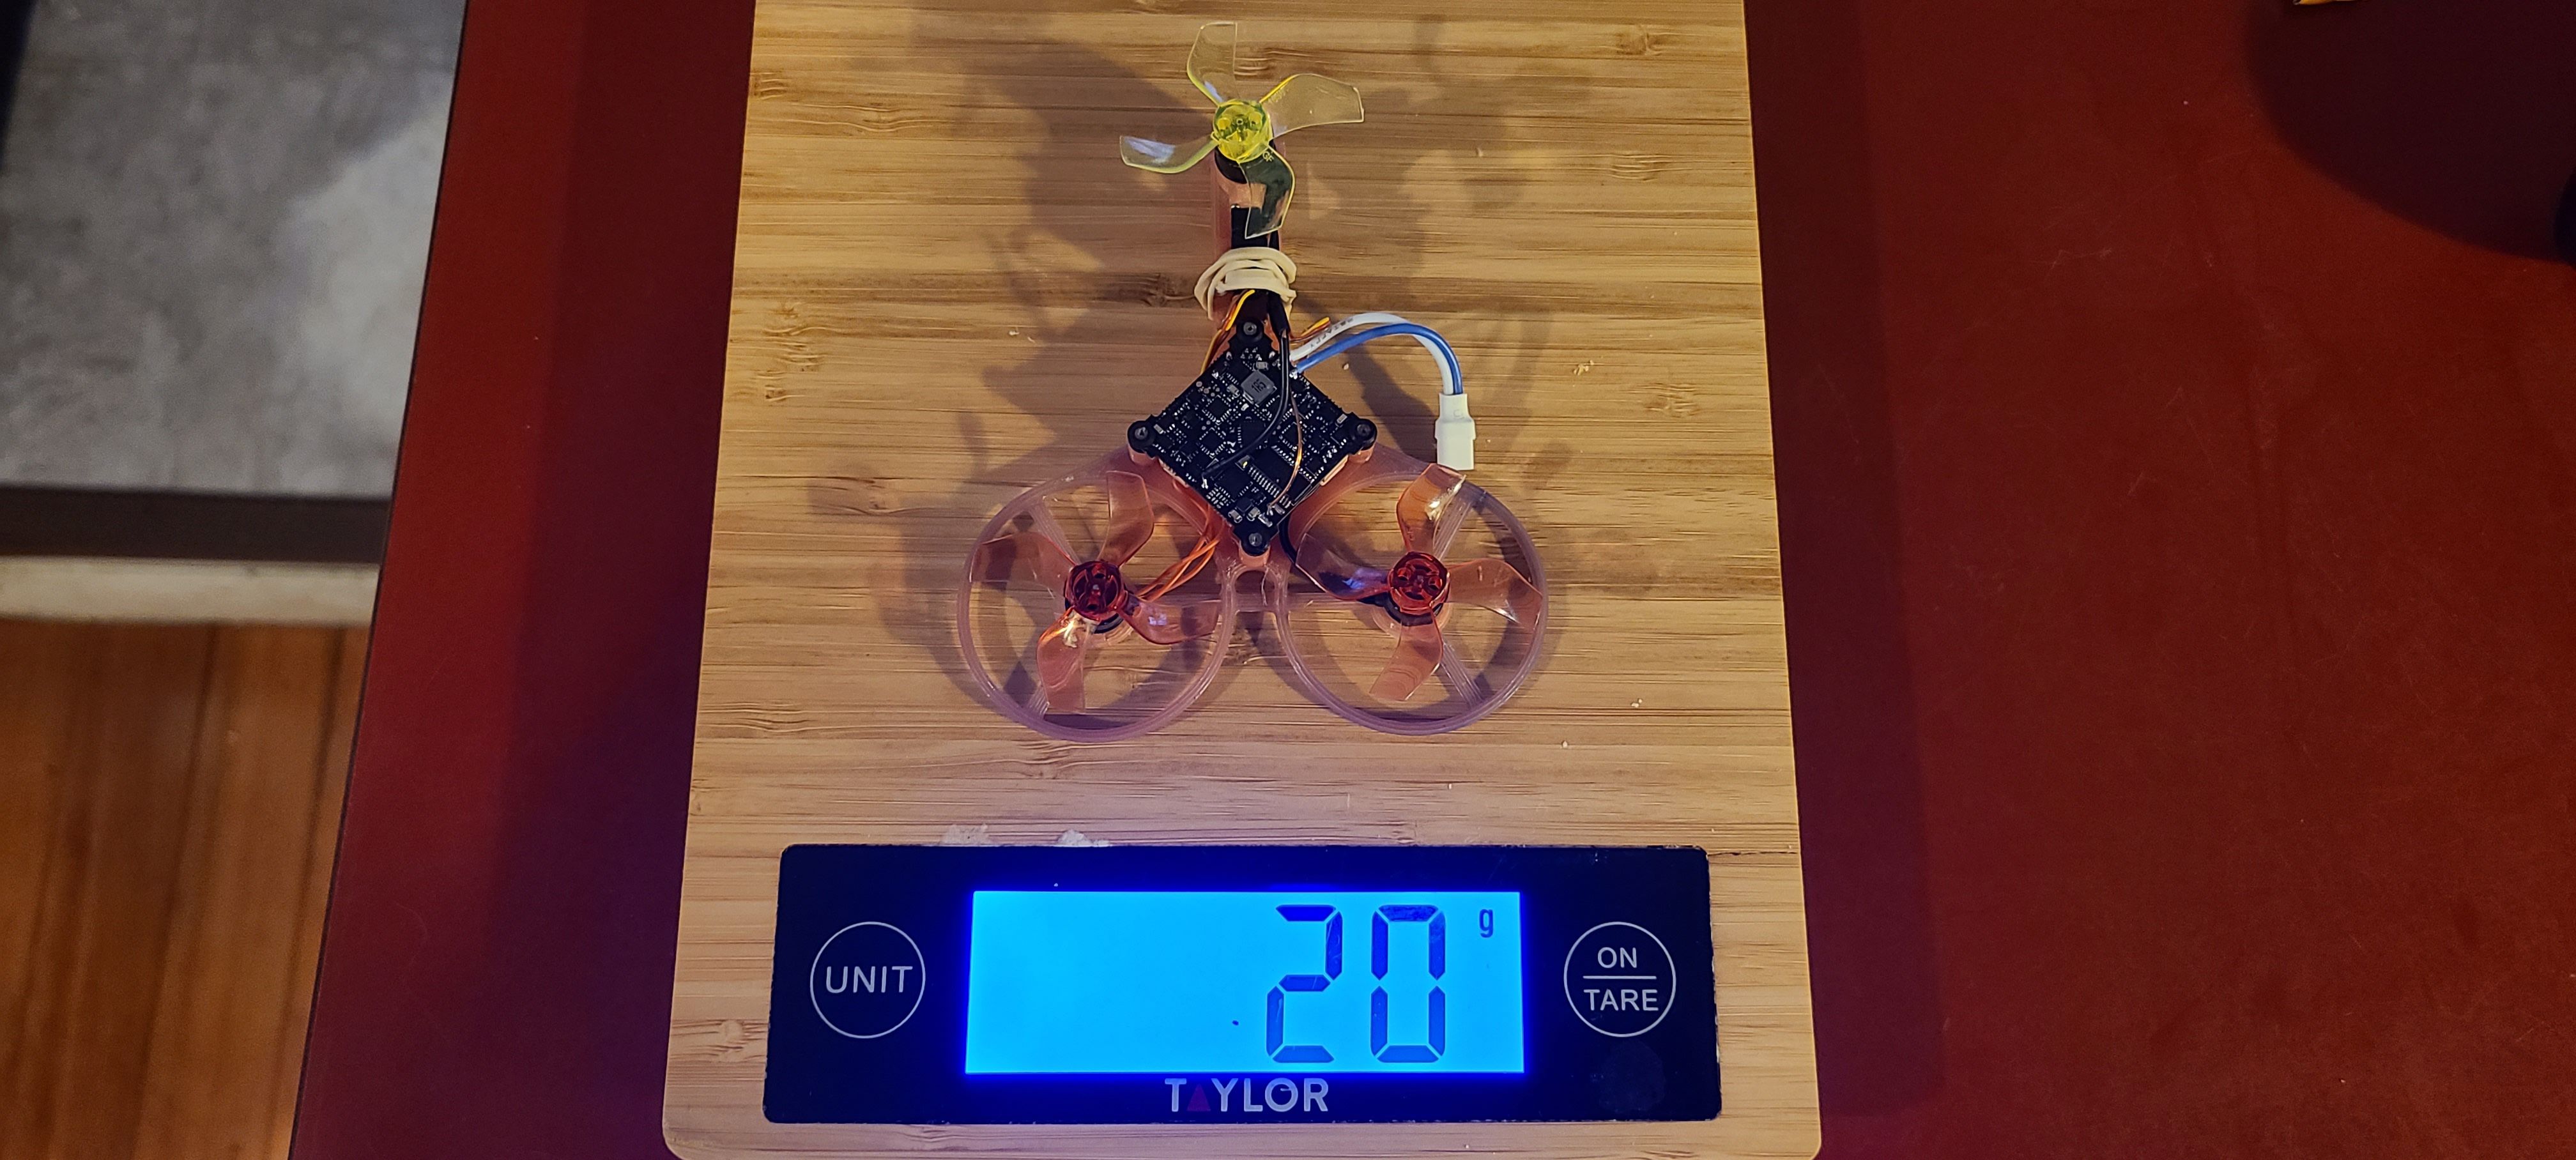
The NanoTri is my attempt at a 1S whoop-sized tricopter for 36mm AIO boards. This is my first blush at designing my own (save for my failed brushless concept this was born from). Weighing in at 21 grams sans camera, it was tricky to tune but turned out surprisingly well once I based some of my numbers off 1Smug_Bastard's tune. Huge shoutout to 1smug_Bastard and Kera, I wouldn't have finished this project without looking at their builds.
Flight video, mostly showing off that the PIDs aren't garbage:
This project is still in development, but I'm happy enough with the flight characteristics to post it now while I do some fine-tuning. Fusion360 tells me I've gone through 13 iterations, most centered on the tail and tail servo. The way the tail servo is designed now took inspiration from the impossible tilt mechanism as well as David Windestahl's on the Baby Tricopter. The interface between the tilt mechanism and the servo is actually a piece of one of the original servo arms, with all the arm parts cut off. This results in a very strong fit while still being removable. The original idea was to make a whoop tricopter, though that may have to wait for a carbon-fiber version, as the cowls were incredibly heavy.
The servo used is a 1.7g low-voltage servo operating at 333 pwm; I currently have it running off the onboard BEC which I hear is a terrible idea, so I'm looking into a small BEC for it. I'd prefer to run it at 5v since it increases the response rate but there are mixed results as to whether or not it'll burn out at that voltage. A viable alternative would be to connect it to the battery with a decoupling cap, which I'm going to try as well.
There could definitely be better motors / props for this; the files are designed for 3-screw brushless motors but it should be pretty easy to modify to work for 4-screw motors. These were just the motors I had lying around the house.
While I don't have an FPV camera on this yet, that was always the intention. the FC has VTX and there are tons of camera mounts for 36x36 FC boards on Thingiverse, I just had to tune the tail wag out first so I didn't get sick from the video feed.
Next steps (after the camera) are to probably get this fabbed out of carbon fiber and then perhaps explore a 2s ducted build. I have some extra Tina Whoop ducts, maybe that's the direction I should go.
Assembly
Assembly is straightforward with the only exception being the tail motor, which we'll get to. You'll need a soldering iron, an xacto knife, some superglue, and a steady hand.
- Print all the parts. Recommended .4mm nozzle or smaller; My parts were printed with a .6mm nozzle and have multiple thin wall extrustions.
- Before you install anything, clean up the prints. Remove any support material (you should print the tail with supports), clean up any blobs (like at the top of the recess for the servo arm piece in the tail), and also run a knife or awl gently inside the motor post holes to widen them just a tad. you may not need this, but I did; it's a very tight fit.
- Install the front motors, do not install the props yet. The wires should face inwards, on the betafpv motors the wires run along the horizontal support spar. Make sure both rotate freely; as you rotate them they should spring away from your finger, if you have to push them all the way you need to go back and widen the tail holes further.
- dry-fit the FC and the servo, and cut the servo wire to length. SAVE the extra servo wire, we'll be using it later.
- solder the servo wire to the flight controller. The yellow wire should go to the LED pad; the red and brown should go to vbatt + and - respectively, or 5V and ground if like me you'd prefer to burn out your flight controller
- Screw the servo into place with one of the larger screws provided. The screwhole is located on the bottom of the quad. Note that the wires face upward.
- Test-fit the tail motor by screwing in one screw and make sure it rotates freely. If it doesn't, check if the motor bell is contacting the tail piece. If it is, sand the tail piece; if it is not, try widening the motor post hole further.
- Once the tail motor fits well, cut of the plug and take the extra end of the servo and solder it onto the motor. If you bought different motors than I did you might be able to not do this, but I had to. The ordering of the wires doesn't matter, though if you know the direction of the motor and keep them in the same order it will spin in the same direction.
- Cut the arms off one of the provided servo arms with an xacto knife, and round the sharp edges a bit by shaving them off. Dab a bit of super glue into the hole on the side of the tail piece and insert the servo arm piece. Make sure the glue didn't ooze out into the cavity too much, if it did it might actually be best to install the piece now. It'll get glued in but you should be able to free it, and the servo shaft will make sure the glue doesn't harden into a blob on the bottom of the cavity and prevent you from installing the arm onto the servo.
- Otherwise, once the glue is dry, install the motor onto the arm and install the arm onto the servo. The motor's wire should go on the left side of the quad (front facing away), towards the quad. plug the motor into the back left port.
- Install the end cap over the back of the quad. It should snugly fit onto the back of the quad and just hover over the tail.
- Plug the front motors into the front left and right ports of the flight controller.
- You're almost there! wait to configure your quad before you install the flight controller and props.
Configuration and Tuning
There are a few parts to configuring the quad:
Flashing to 4.2 and RPM filtering
the CrazyBee F4 Lite ships with Betaflight 3.x, but we want to take advantage of the RPM filtering in 4.x to run our motors cooler with less filtering. Tricopters are more susceptible to filtering and noise because it is harder to quickly and correctly drive the tail servo, so while RPM filtering is not necessary, it's even more helpful than normal.
Joshua Bardwell's 4.1 RPM Filtering video is the best place to go for this info; the steps should be the same for 4.2. In this video he upgrades the firmware version and walks you through the ESC upgrade and enabling RPM filtering in Betaflight. If you buy the same FC and motors as I did you can skip the RPM filtering step as the config will take care of it. If not, you should do the next step, then go back to Bardwell's video and enable RPM filtering. it's possible your
JESC firmware is not free; you can look into JazzMaverick if you want free bidirectional ESC software.
Config and Motor Direction
After JESC has been flashed to your ESCs you can load up my settings into the quad. My diff is on the Thingiverse page. Go to the CLI tab in Betaflight, click "load from file", and select the diff. This will load all the changes I made from stock Betaflight 4.2.0. Bidirectional DSHOT300 and RPM filtering should still be enabled; you can go ahead and confirm if you want.
Before you put the props on any quad you should double check your motors are hooked up correctly. This is all the more important for DIY quads because you set the motor resource mapping yourself.
You'll already have to have the quad prepped to make sure bidirectional dshot is working, so why not check the resource mapping as well. With the props off and the quad connected to Betaflight, go to the motors tab, plug in the quad, flip the "I understand the risks" toggle and give motor 1 a little juice. Make sure the motor that's spinning matches the diagram and the direction on the motors tab. If it's not spinning it might be that the resource mapping is wrong / the motor is plugged in wrong, or it might be the motor binding on the frame. Do this for all the motors.
Servo direction / setpoints
the servo should be in the correct direction, but if it is somehow not you can set the rate back to 100% in the servos tab.
The setpoints may need to be tuned. I just eyeballed these. make sure to do tri_unarmed_servo = ON in the CLI so you can see the servo moving without arming the quad, and flick on "live mode" in the servos tab. You'll be editing servo #5. You want the midpoint to be exactly center and the min and max to be 45 degrees deviation to the left and right. Stay within 1000-2000 as I can't find documentation on this servo's response.
Final assembly!
Now it's time to finish assembly!
- install the props
- install the dampeners onto the flight controller
- push the flight controller directly downwards onto the shafts on the frame; be careful of the USB
- you're done!
Etc
Pids have already been tuned but I'm far from an expert, and I tuned them on 5v input for the servo. If you wish to attempt your own tune this post by 1Smug_Bastard has some insights as to why it's a bit different with tricopters.
Other things that have been handled in the diff, that you might want to know about:
Timers
Timers are an internal feature to STM flight controllers; certain update loops are tied to certain timers. For tricopters you just need to have a separate timer for your servo resource. In our case, we took the LED timer for the servo. This is why you can't just use the fourth motor pad to power any part of the servo, it's tied to the motor's timer.
Servo PWM
I was having a hell of a time tuning the PID until I upped the servo PWM. Servo PWM is at 50 HZ by default; we have a digital servo which I have reason to believe supports up to 333 hertz. This makes the servo much more responsive
Yaw deadband
Someone else said this helped, so I added some too. It'll make the copter ignore small inputs
That's it!
Thanks for reading, let me know if you have any questions
Photos
Part List
Frame |
NanoTri Mini Tricopter by rsheldiii
Thingiverse.com
|
See Site |
Flight Controller |
Crazybee F4 Lite 1s flight controller for tiny whoop FC/ESC/RX/VTX 4in1
(8 builds)
Quadcopters.co.uk
|
See Site |
Motors |
4 x 0703 1S Brushless Motors
(11 builds)
Betafpv.com
|
$99.96 |
Propellers |
Gemfan 1636 Durable Quad-Blade 40mm Micro/Whoop Prop 8 Pack (1mm Shaft) - Choose Your ColorClear Red
(5 builds)
Racedayquads.com
|
$3.99 |
Batteries |
Gaoneng GNB 1S 520mah HV 3.8V 80C PH2.0 Lipo Battery
(16 builds)
Pyrodrone.com
|
$4.99 |
Goggles |
Eachine EV800D 5.8G 40CH Diversity FPV Goggles 5 Inch 800*480 Video Headset HD DVR Build in Battery
(22 builds)
Banggood.com
|
$89.99 |
Hardware |
Mamba Micro USB L-shaped Adapter for Flight Controller RC Drone FPV Racing
Banggood.com
|
$7.99 |
Misc Parts |
2Pcs 1.7g Low Voltage Micro Digital Servo Mini JST Connector for RC Model
(3 builds)
Banggood.com
|
$9.63 |

You can rotate the flight controller so that 2 of the motor ports point forward and 2 point backwards. This eliminated the need to extend the motor cables. You may need to remap the motor resources and rotate the gyro in betaflight, though.
An issue i see after looking at this again is that the front motors are too far forward. This will make the CG / power unbalanced. Thus as a result, the tail motor will have to work harder to maintain level flight. Case in point... the servo weights as much as a motor / prop, yet there is only the one motor to support its weight.
Offsetting the motors rearward will increase your flight times and make the craft easier to handle. Either that or shift the battery mass forward as much as possible.
Try one of mine... https://rotorbuilds.com/build/21545
All up its 54g running 2S and its a blast to fly.
That's awesome, let me know how it goes! It should work perfect, though I didn't actually have a mobula6 to test it on.
I just uploaded a zip to the Thingiverse page with updated parts, you should be able to skip splicing the servo wire onto the tail motor if you use those parts and rotate the FC 90 degrees (have to make sure you set that after applying the diff or the copter will go crazy). I've got some more QOL upgrades on my latest frame but it's way too heavy now, I'll post that once I can slim it down.

Guides & Reviews

AirbladeUAV has done it again and this time they've brought long range to the 5" class! Based on the popular Transformer Mini, the new Transformer 5" Ultralight adopts a lot of the same design philosophies with larger props and more payload capacity. It can fly upwards of 20 minutes on a 4 cell Li-Ion battery pack and in ideal conditions it's got a range of over 4 to 5 miles. In this guide I'll walk..
Read more
With the release of the DJI FPV Drone cinematic FPV has become a lot more accessible, but you certainly don't want to crash a $750 drone! The QAV-CINE Freybott is a compact, lightweight cinematic FPV drone that can take a hit and keep going. It's a lot safer to fly indoors and around people. With a naked GoPro or the SMO 4k you can capture some great stabilized footage. In this guide I'll show you..
Read more


going to build this if i have AIO with burned esc