
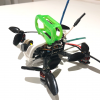
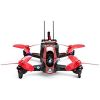
FPV has had quite a journey. Just a few years ago we started racing drones around a track and doing flips over trees, but professional cinematic FPV is a more recent development. DJI has always owned the drone photography market, but smaller acrobatic drones are starting to enter the market. They have the advantage of close proximity flight indoors and around people. There's more artistic freedom and the result can be captivating. In this guide I'll show you how to build such a drone.
Buy Pre-Built
You can buy this model pre-built, but this guide seeks to improve upon the original design. Most notably the BNF model comes with the Caddx Nebula camera which is inferior to the DJI camera used in the guide. On top of that you'll get better antenna placement, a more accessible USB and the experience of building your own drone.
Tools
This build requires some soldering, but compared to most builds it's minimal. I highly recommend a flux pen, 63/37 leaded solder and a quality soldering iron. Here are the tools and supplies you'll need. My preferred tools are listed in the Gear section below.
- Soldering iron
- 1.5mm hex driver
- Precision Tweezers
- Precision Screwdriver set
- Wire cutter/stripper
- Scissors
Additional Supplies
- Blue Loctite
- 63/37 leaded solder
- Liquid soldering flux pen
3D Prints
This guide uses custom 3D printed parts. Most are based on this .stl set. This store has shown interest in selling these parts pre-printed, so please contact them to request such a product. I think it would really help others who follow this guide in the future. Otherwise you can submit the $1.50 .stl set to a 3D printing service as outlined in this video by Joshua Bardwell.
Video Transmitter
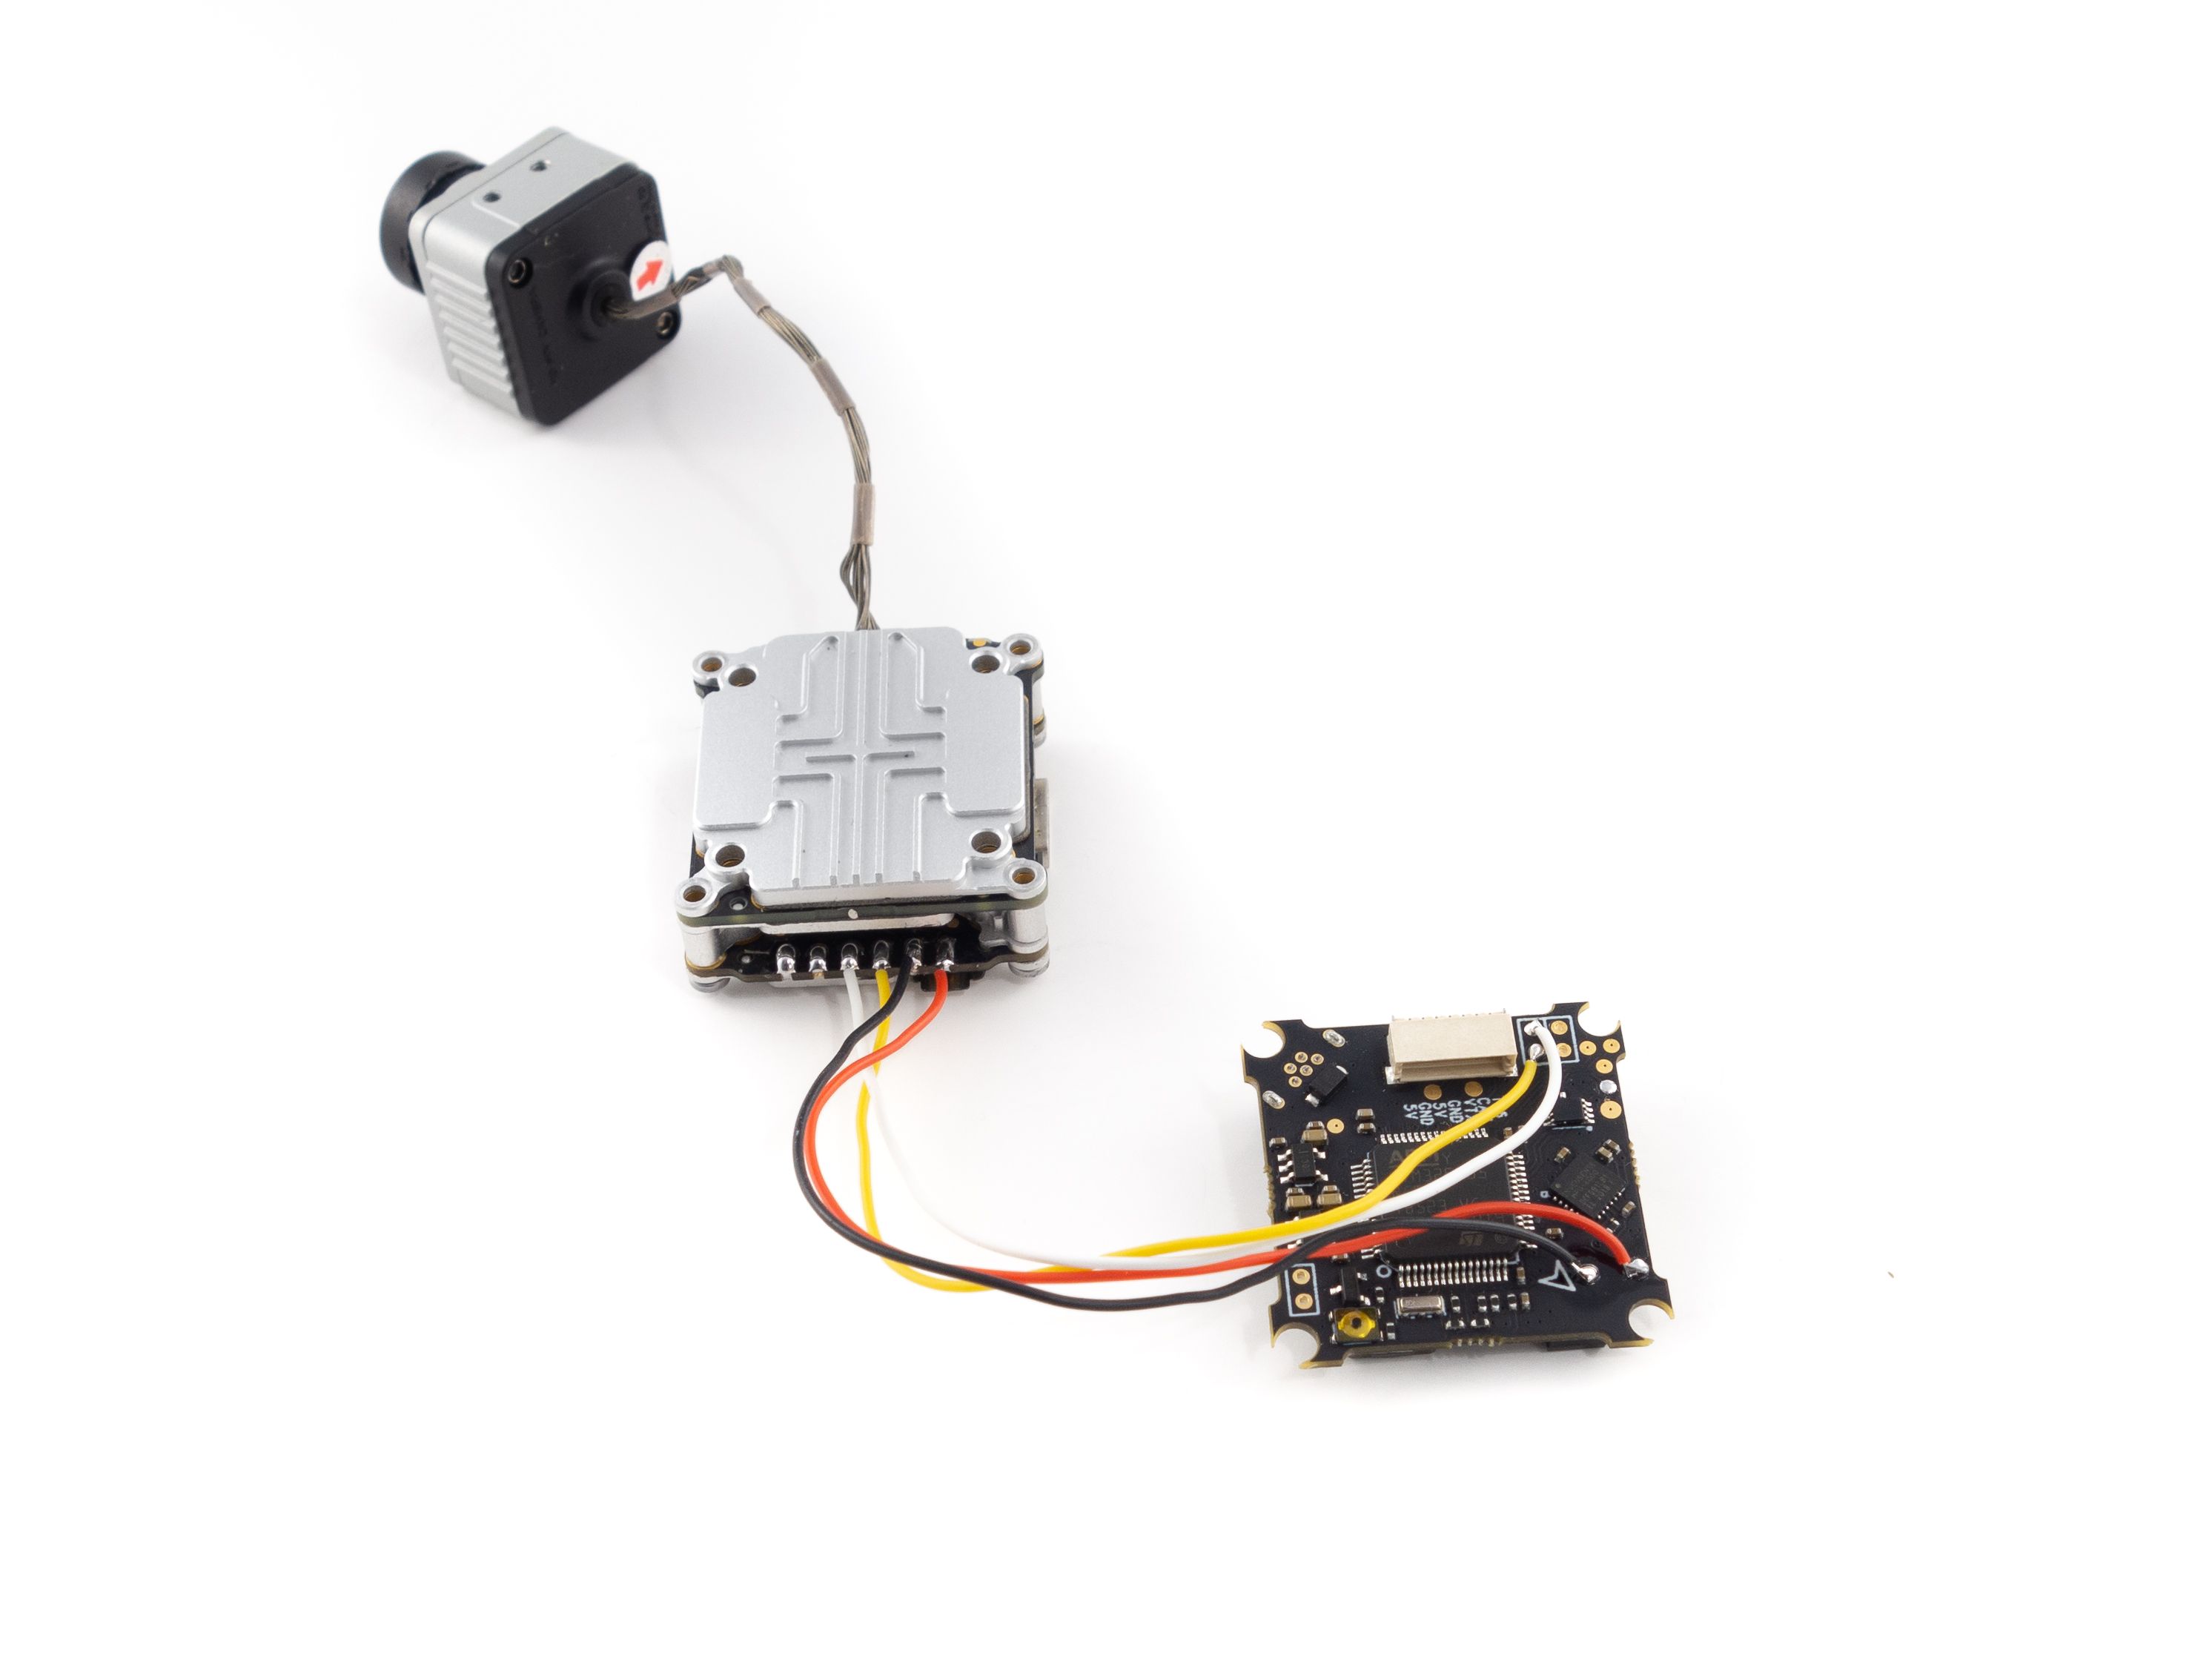
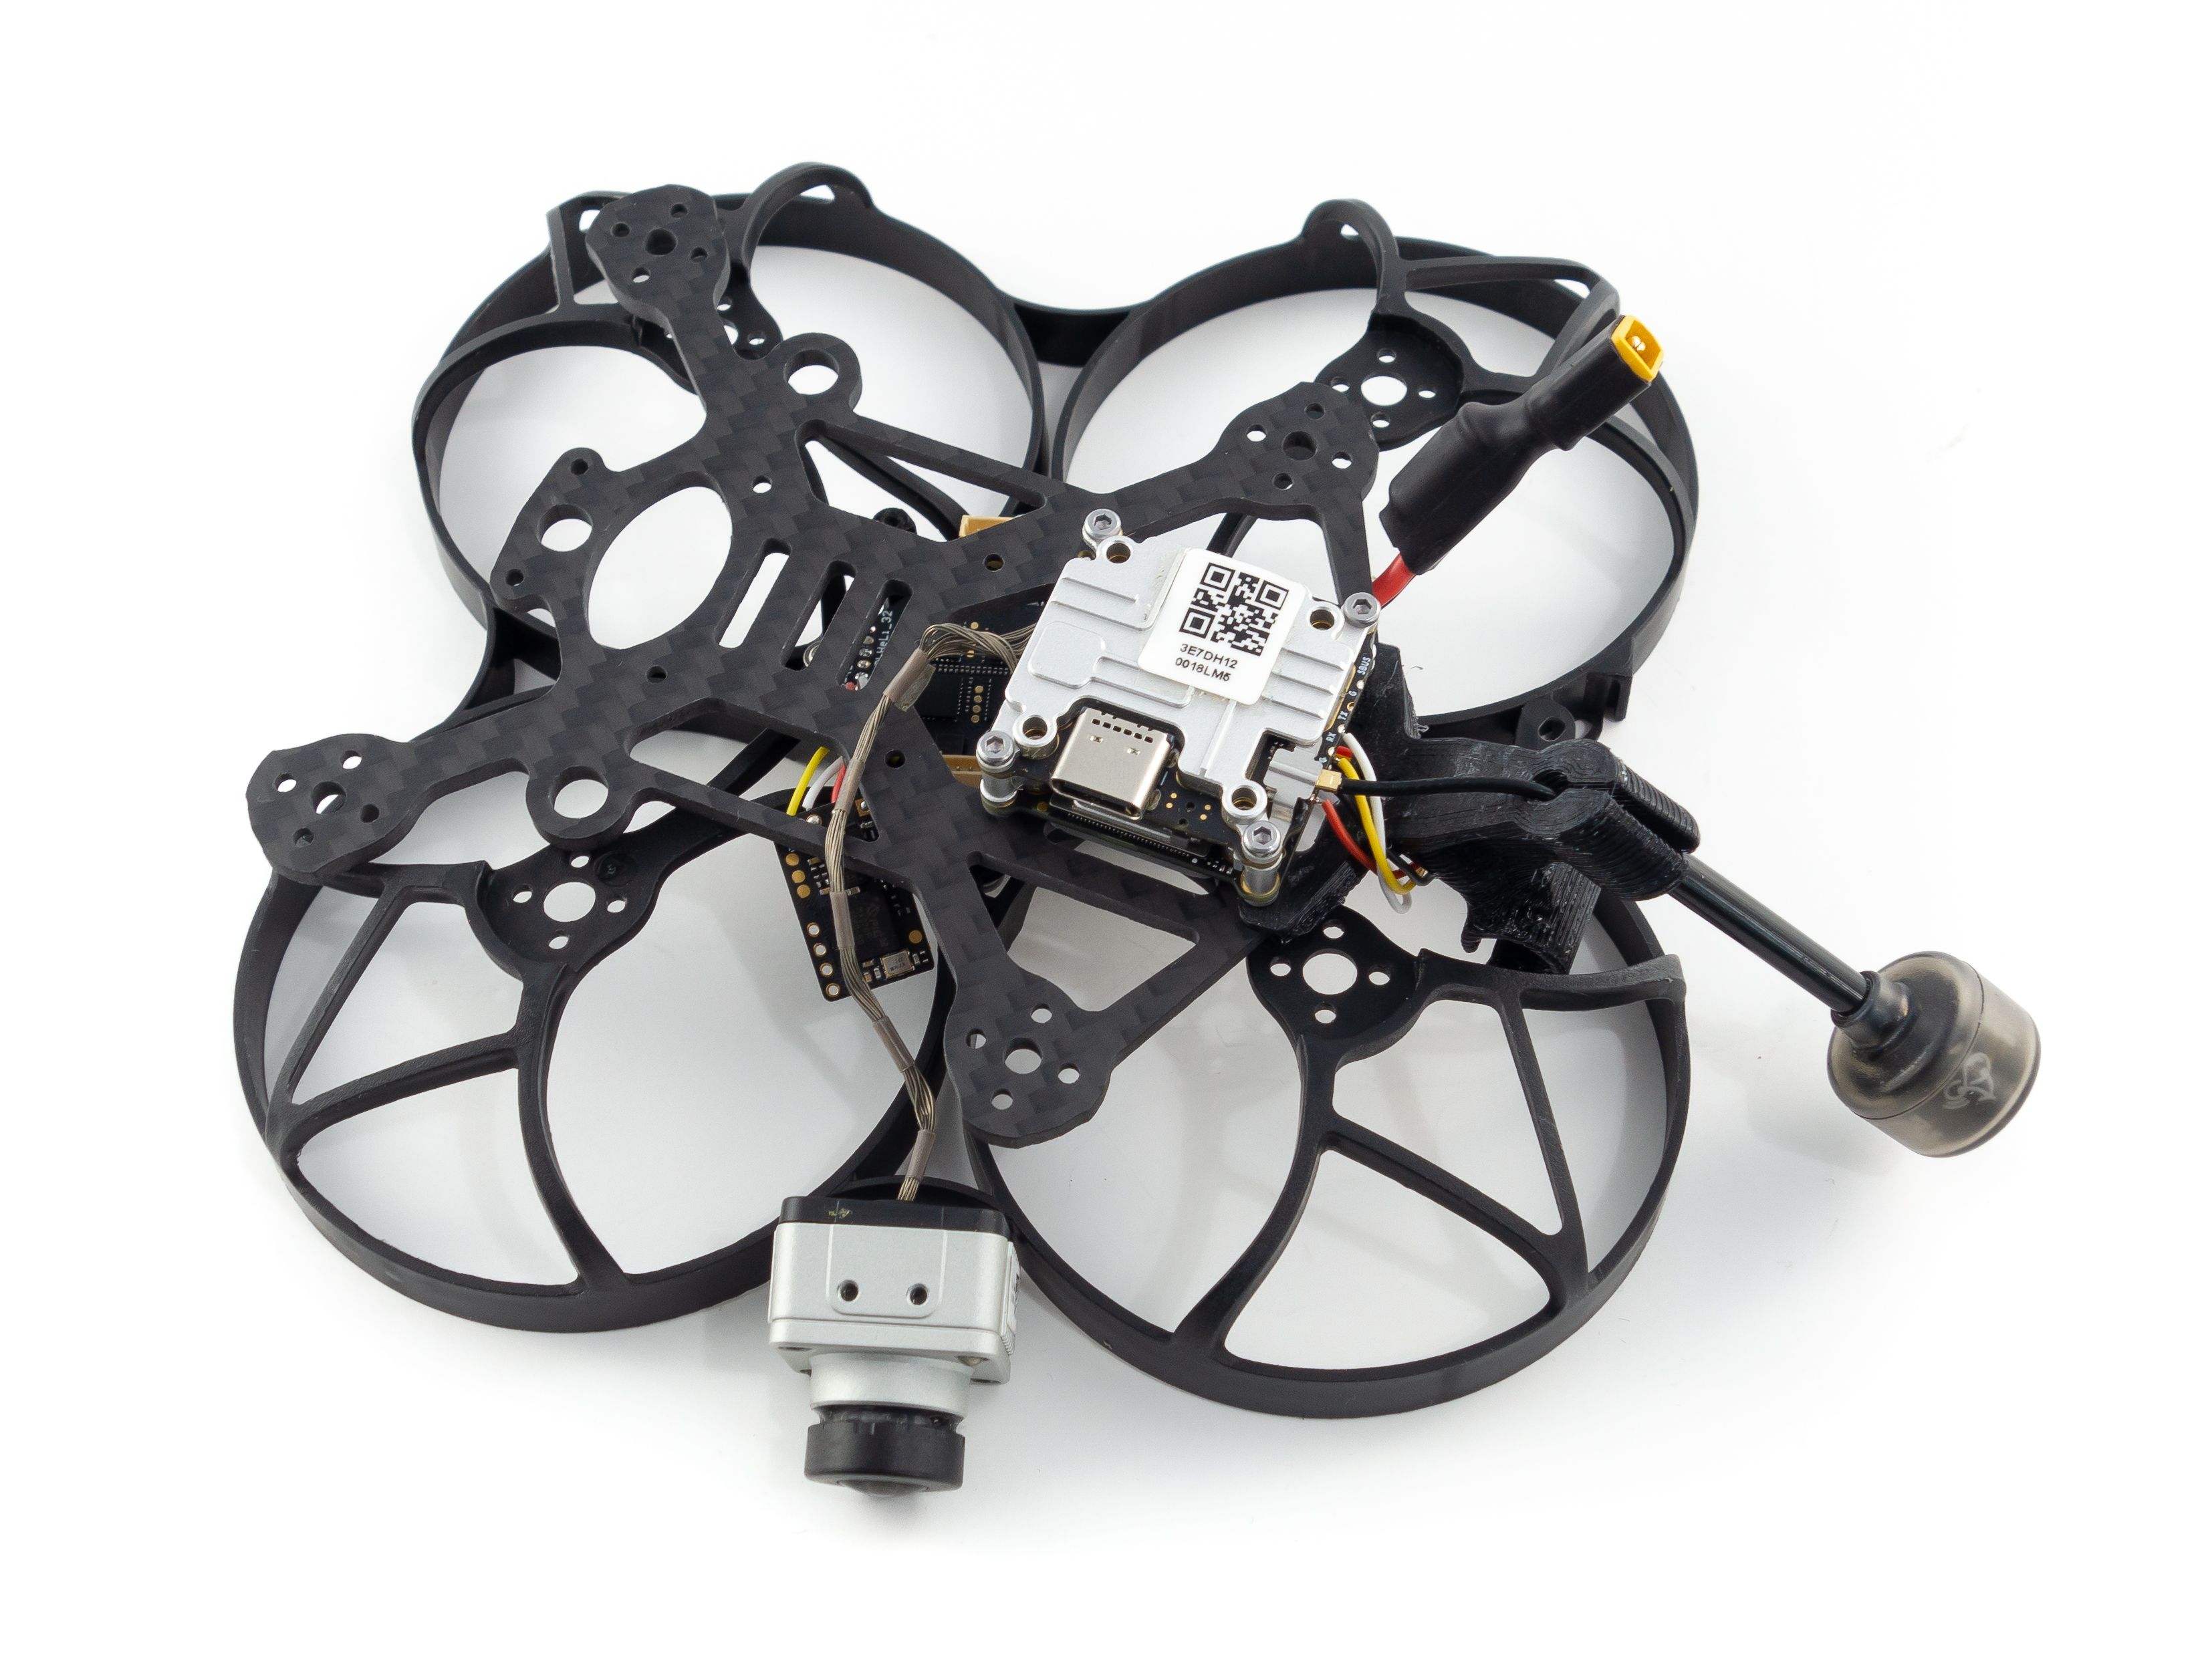
Let's start by wiring up the video transmitter. If you flip the unit over the pads are much larger. If you're using Crossfire you can exclude the SBUS and Ground pads at the outside edge. Solder the included wires to the Bat, Ground, RX and TX pads. Refer to the photos for wire placement on the flight controller.
If you're using the DJI remote use the RX connector included with the flight controller. Remove all the wires except the white wire (RX3). This goes to the SBUS pad on the Caddx Vista air unit. I'm not sure how long this wire is so you may need to join it to the wire included with the Caddx Vista. You need a fair amount of length. You can exclude the 2nd ground as one is sufficient.
Before you mount the Vista air unit you need to activate it and ensure the firmware is up to date. The USB-C plug is difficult to access once the air unit is installed, so it's best to do this now.
- Download DJI Assistant V2 (FPV)
- Remove the corner screw from the Vista to release the bracket covering the antenna plug and plug the antenna in. You don't need to put the bracket back on just yet.
- Plug your 4-in-1 ESC into the flight controller.
- Plug your Vista into your computer using a USB-C cable and plug a battery into your 4-in-1 ESC to power the Vista air unit.
- Follow the prompts in DJI Assistant V2 to activate and update the firmware.
Once that's complete you can unplug the battery, disconnect the 4-in-1 ESC and remove the antenna from the Vista air unit.
Crossfire Receiver
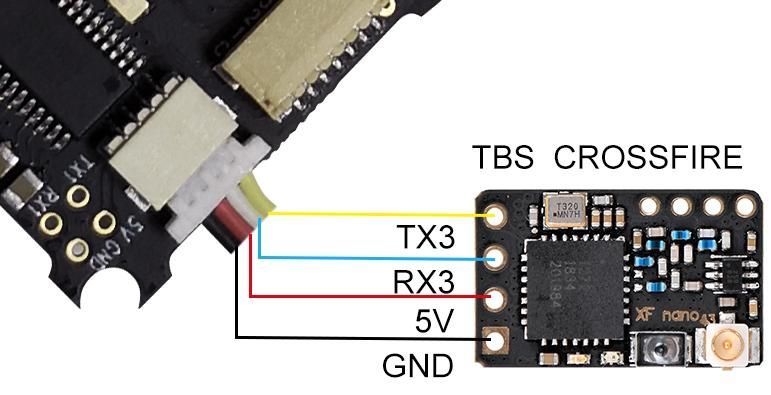 If you're using Crossfire you'll need to solder your receiver to the RX cable that came with the flight controller. The wiring is pretty straightforward. In fact they line up directly. Channel 2 goes to TX3 and Channel 1 goes to RX3. After you've wired the receiver you can attach the antenna and bind it to your radio. If it's a new receiver you just need to apply power to the flight controller and put your radio into bind mode. It should bind automatically. If the receiver was previously bound you'll need to press the bind button after powering it up. It may need to do a firmware update, so give it a moment. Add some shrink tube to the receiver to protect it from shorts.
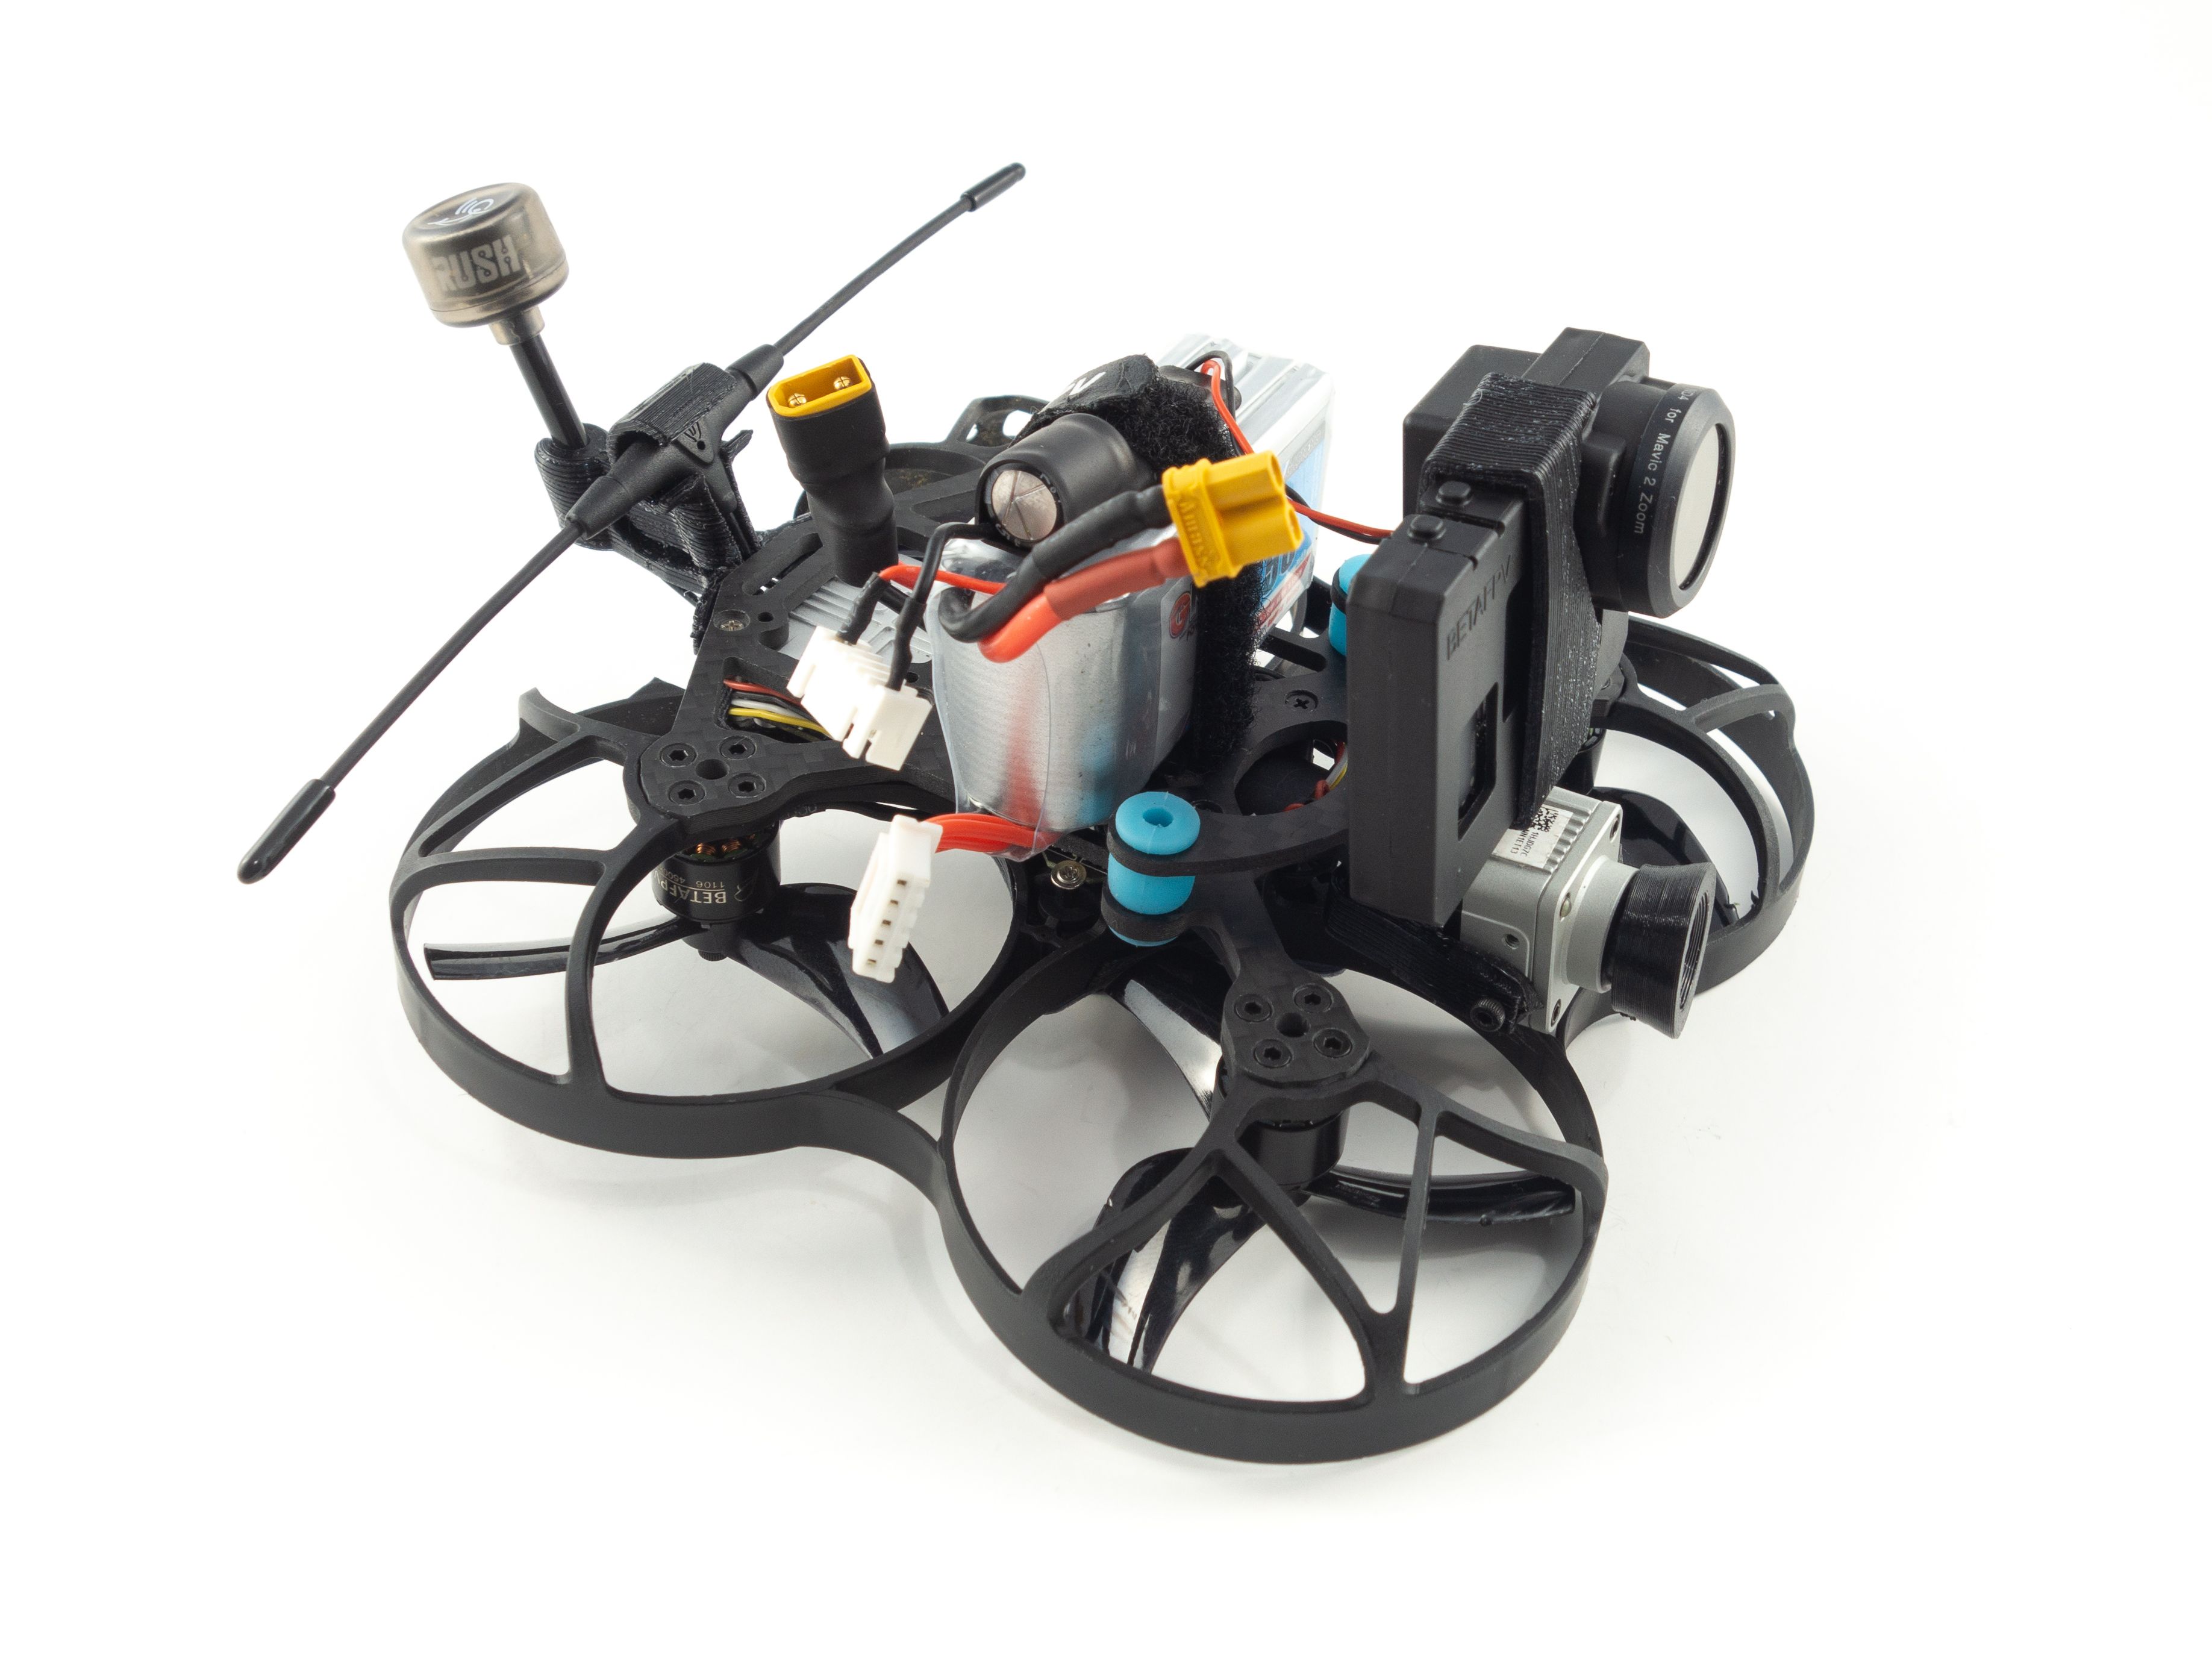
Assembly
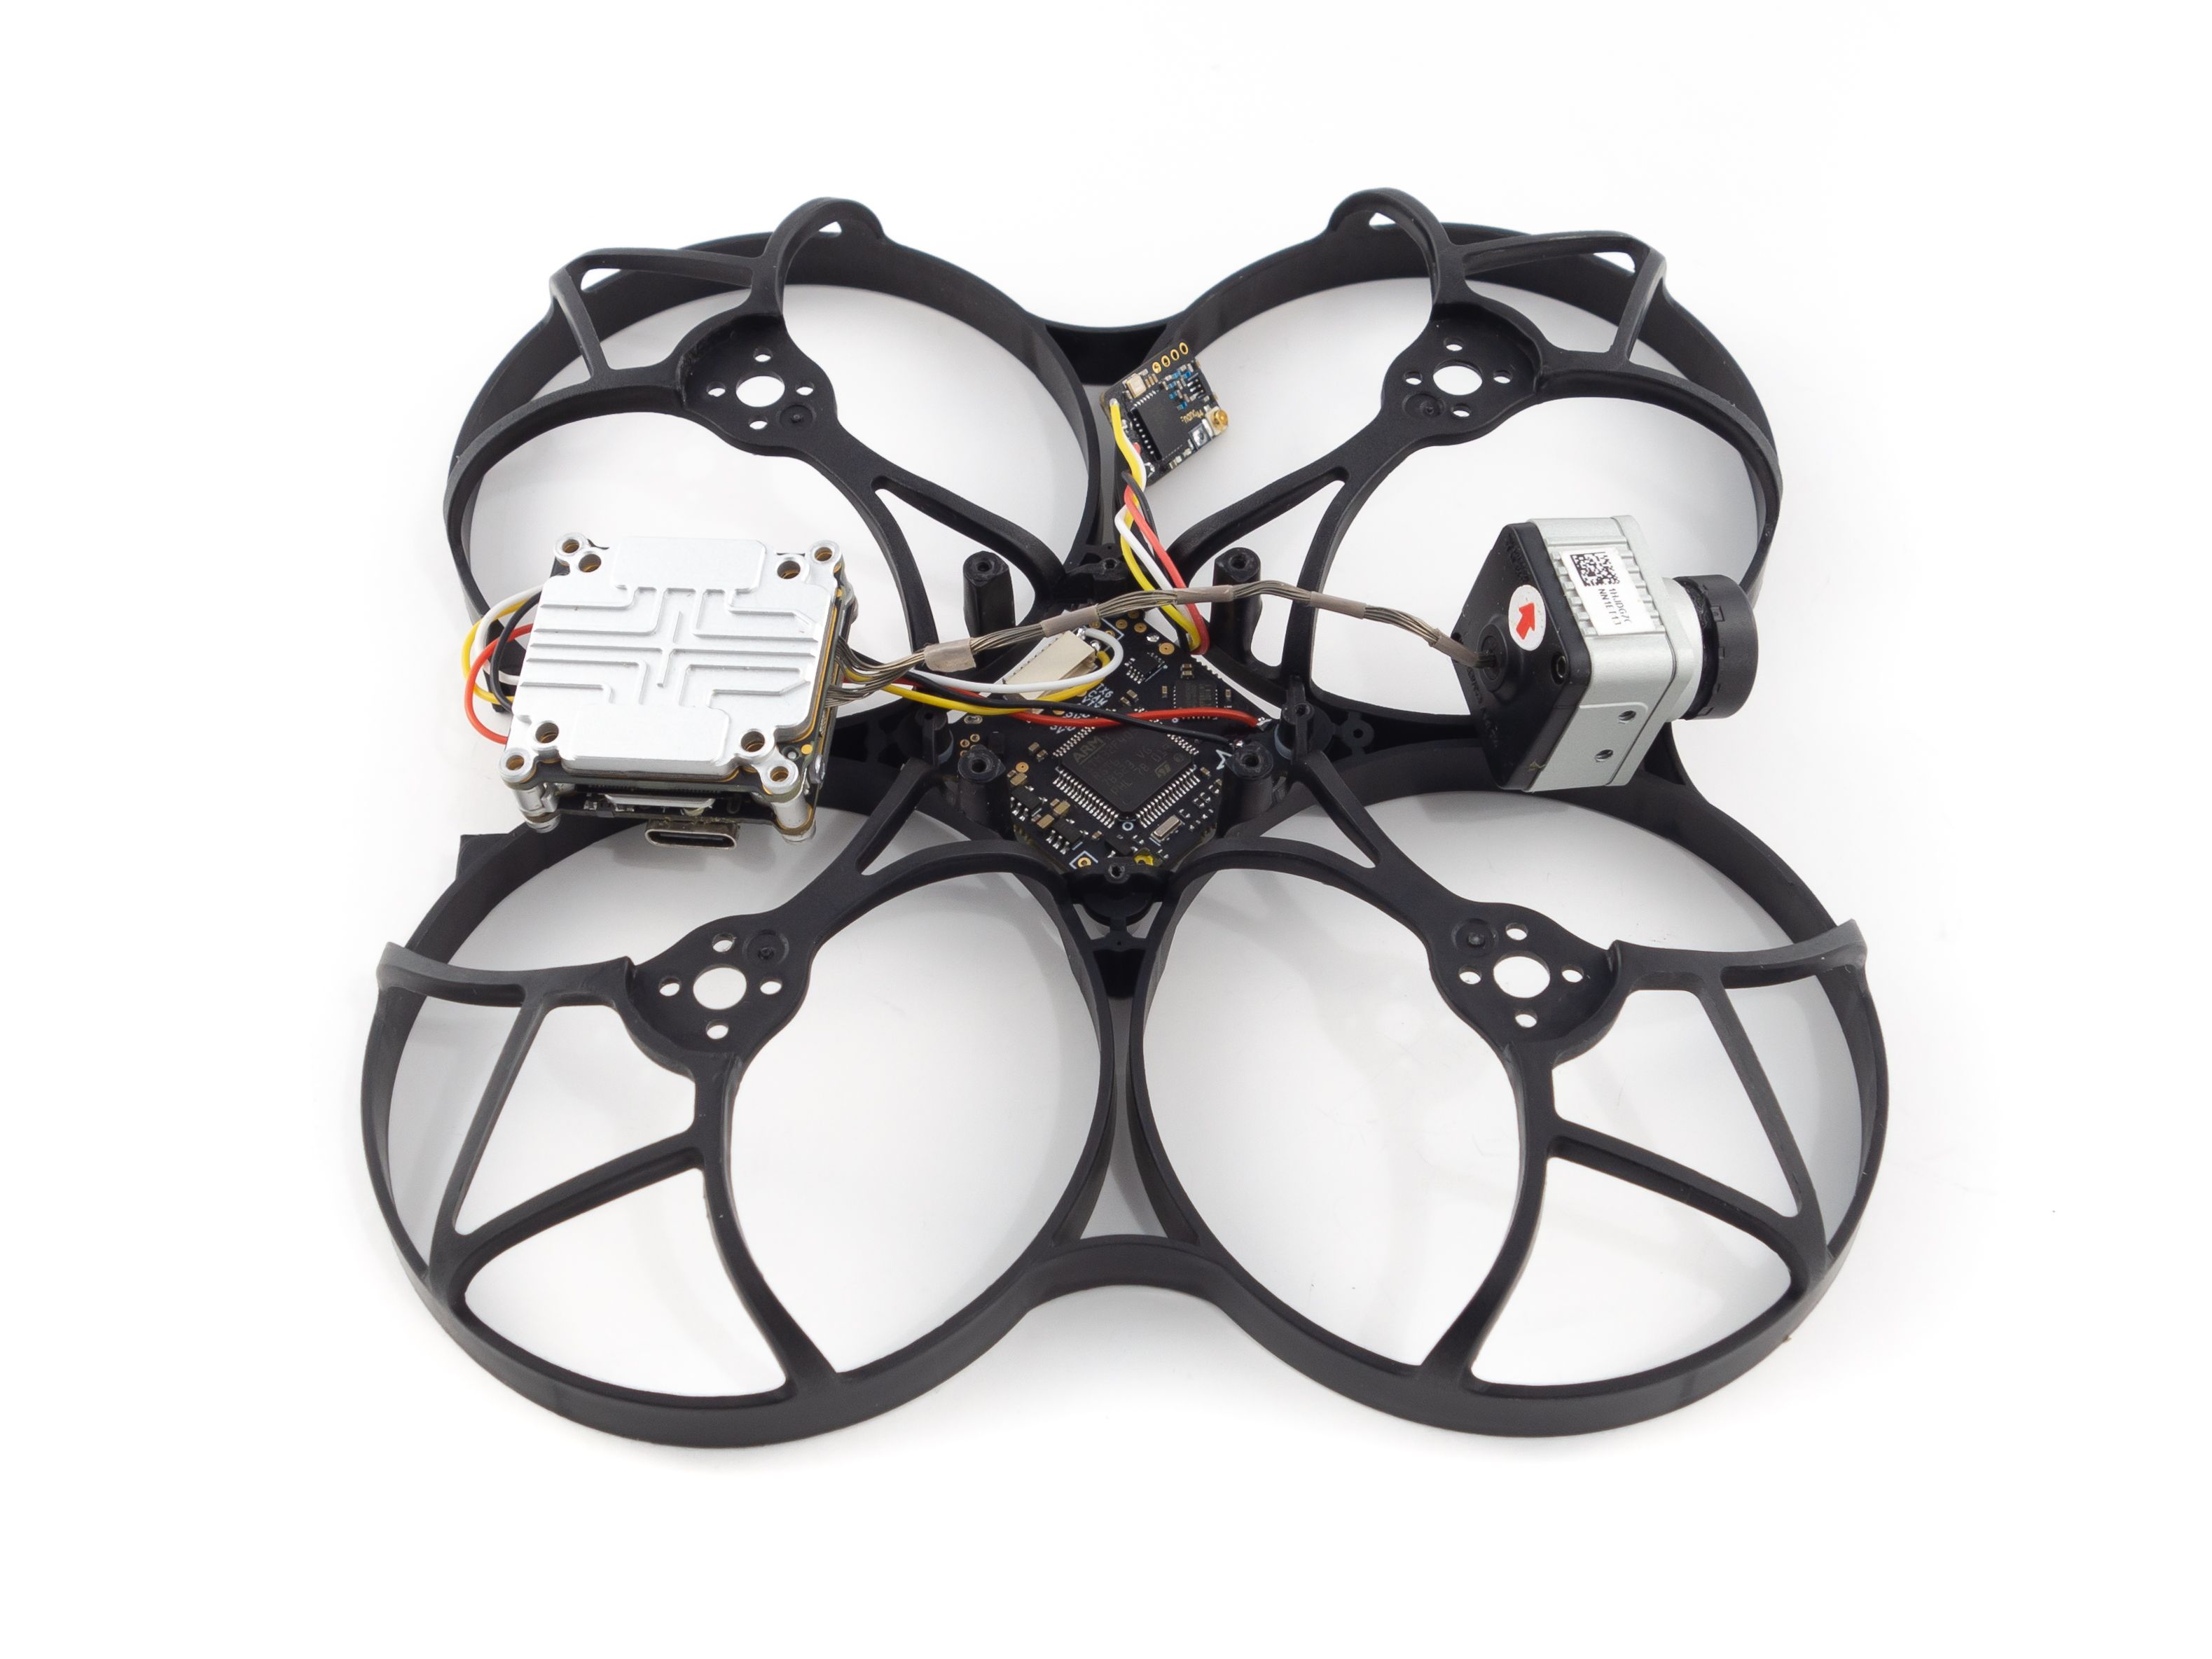
Assembly requires a fairly particular series of steps. The air unit needs to be mounted upside down while the wires wrap around from the back. The flight controller mounts to the bottom of the frame and the ESC board mounts to the top. All the while the top of the frame is the bottom and the bottom plate is now a top plate. Confused? Hopefully I can walk you through it.
- Pass the flight controller through the center of the frame to the bottom. Keep the Caddx Vista on top.
- If you're using the Crossfire Nano receiver wrap the wires around so it rests on top of the flight controller.
- Flip the frame over and attach the dampeners to ther corners of the flight controller. Make sure the USB is pointed downward and toward the back of the frame before you seat the flight controller onto the plastic pegs.
- Flip the frame back over and feed the ESC cable through the front left gap between the frame and the flight controller. Screw the ESC board in place using three silver washer-head screws.
- Flip the frame over to the bottom again and carefully bend the ESC cable over the connector to plug it in. It's a tight fit.
- OPTIONAL If you plan to use a naked GoPro and want to power it through the flight controller you can attach the naked GoPro wire to the same pads used to power the Caddx Vista. Remove the yellow wire as it's somewhat problematic. I prefer not to power the GoPro this way though because I killed a GoPro before powering it directly from the battery. I'll outline my solution below.
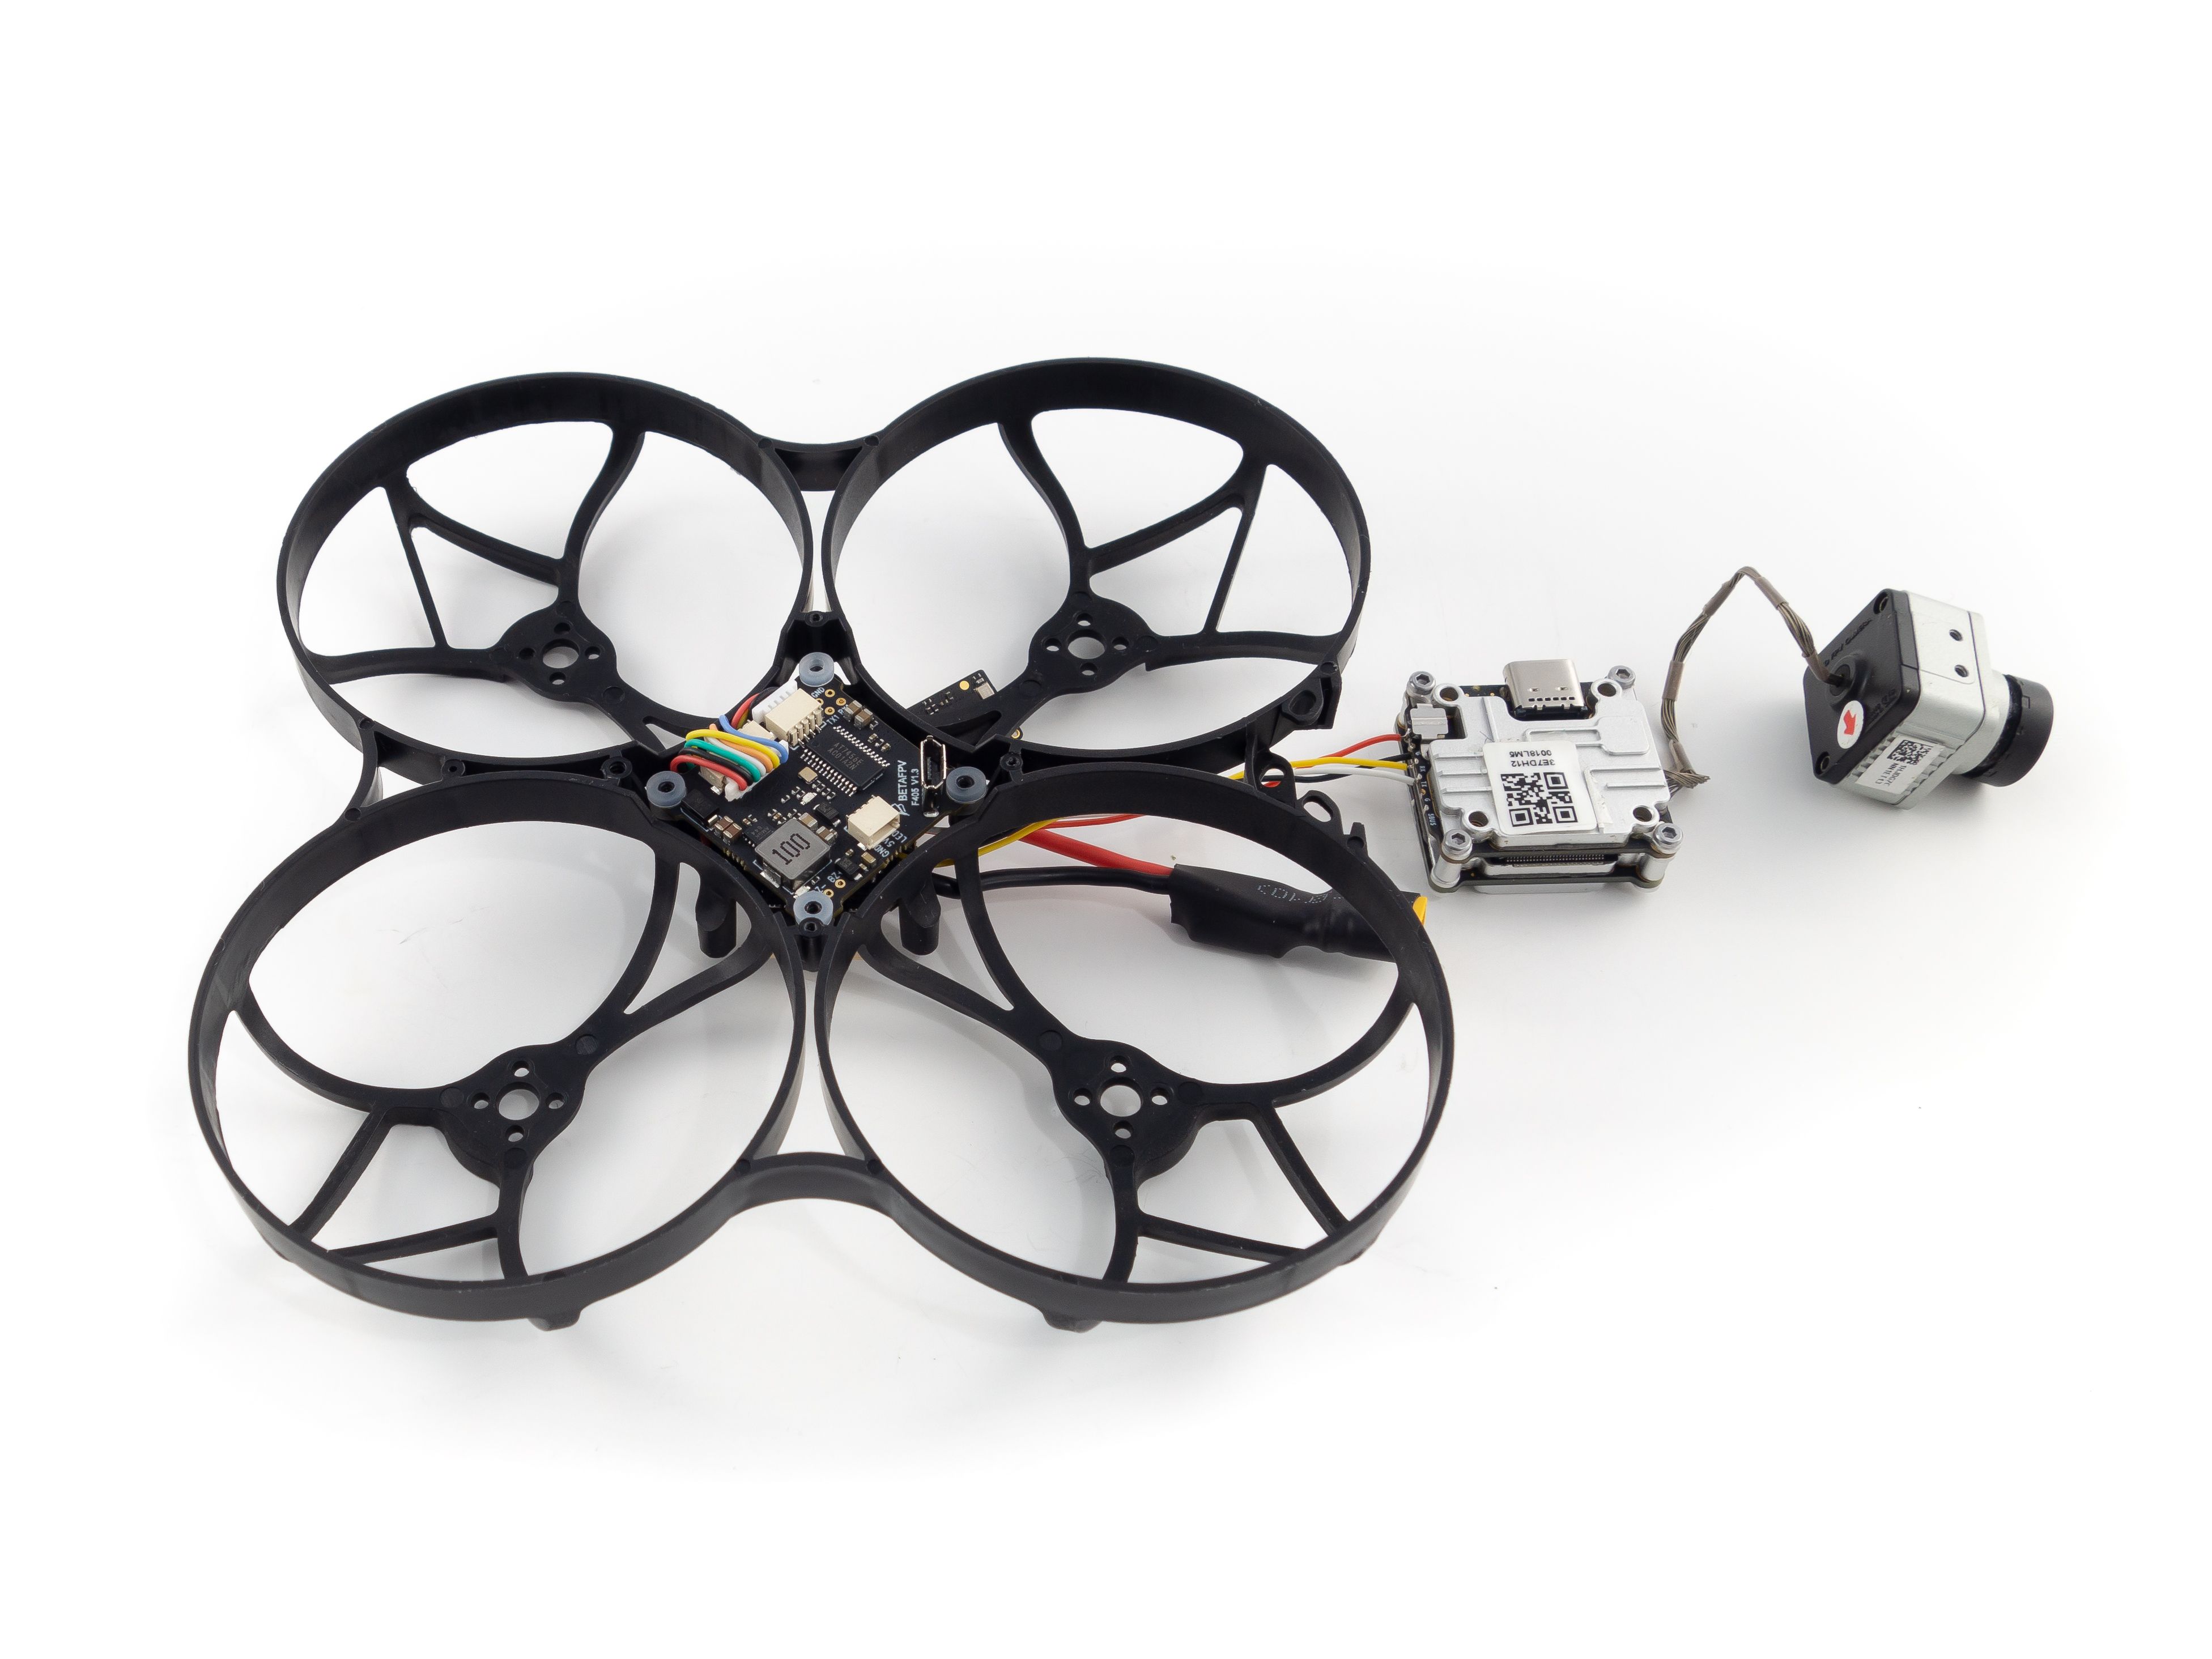
- Now use the M1.6 screws included in the Beta95X V2 kit to secure the antenna mount to the top plate.
- Remove the corner screws from the bottom of the Caddx Vista and mount it to the top plate using the remaining M1.6 screws, not the original screws.
- Flip the Vista over and feed the antenna cable through the TPU mount and plug it into the Vista. Put the bracket back over the plug and screw it back in place. (You should have already removed the bracket earlier to activate the Vista)
- Flip the Vista back over and pass the battery lead from the ESC board through the top plate.
- If you're using Crossfire, feed the Immortal-T antenna through the mount and plug it into the Crossfire Nano receiver.
- Mount the camera to the top plate by first securing the TPU mount to the camera with the longer M2 screws. Then mount it to the top plate using the black pointy screws.
- Carefully seat the top plate onto the frame making sure not to pinch the Crossfire antenna cable. Screw it into place using the black counter-sunk screws included with the kit.

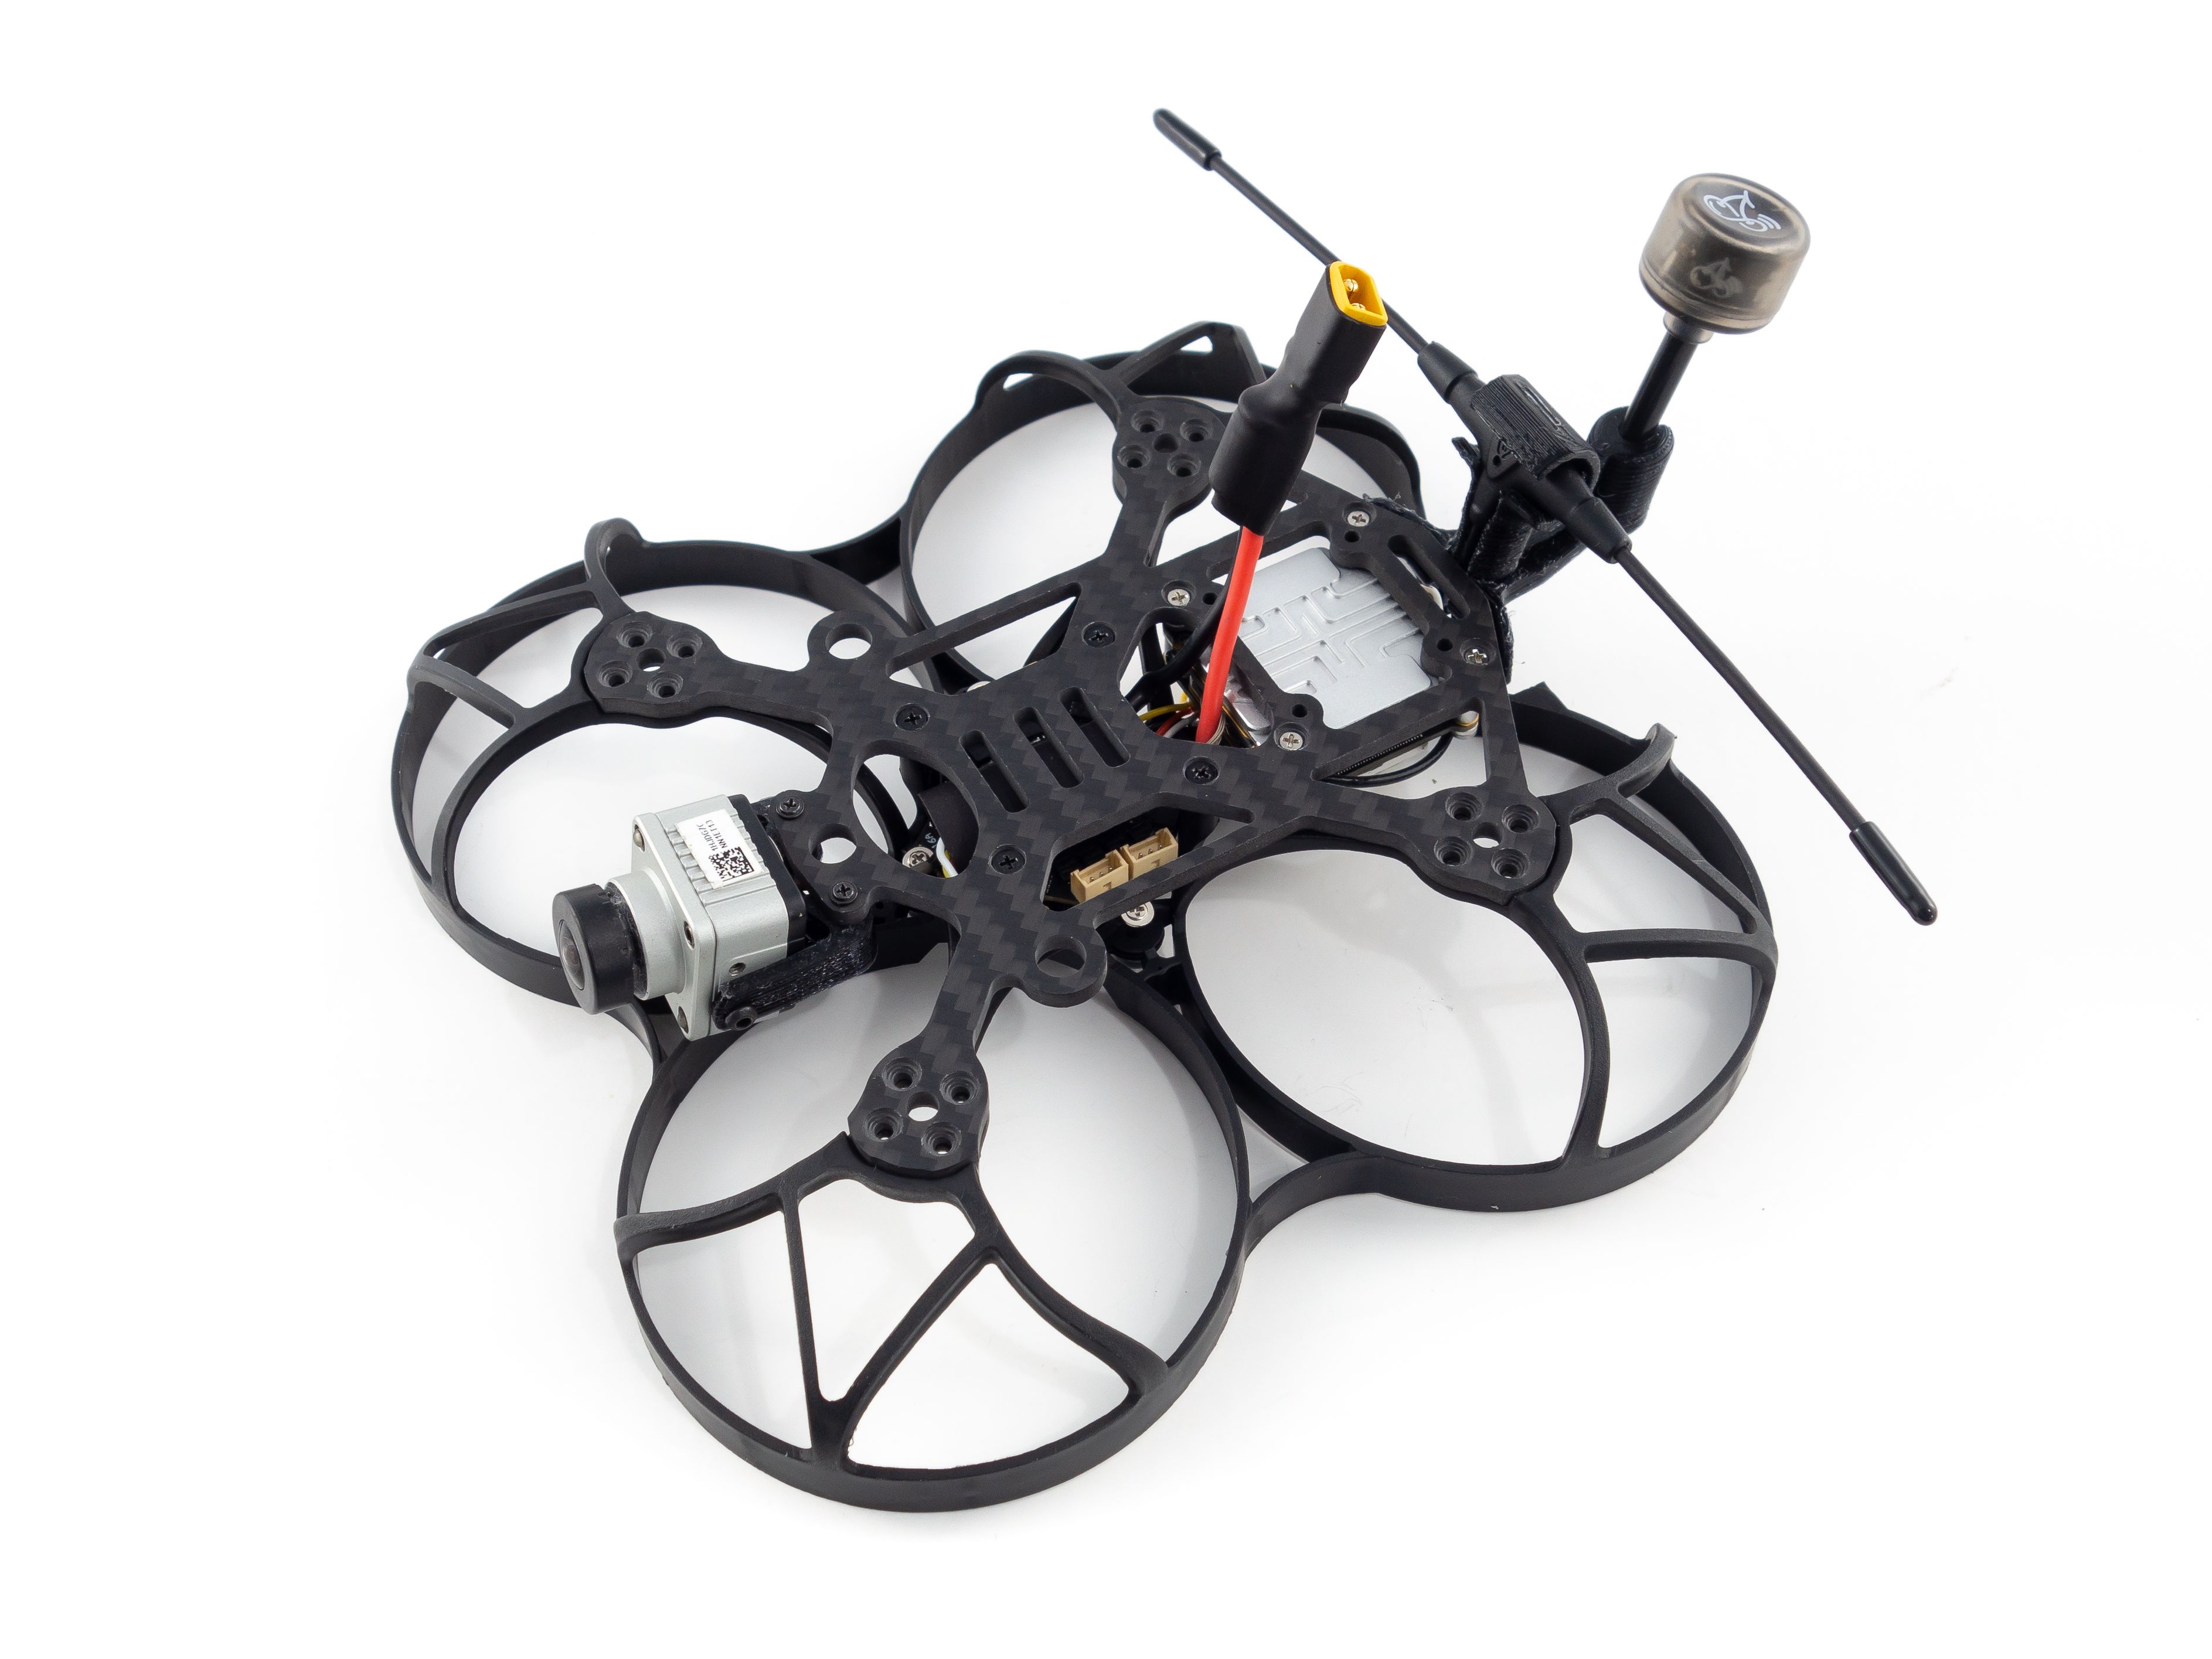
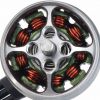
Next you'll need to mount the motors. This is fairly straightforward so I won't go into much detail. Screw each motor onto the frame, feed the wires through and plug them into the ESC board. It helps to use tweezers to manipulate the wires through the frame and into the plugs.
Finishing Up
Now we're down to the nitty gritty. Let's wrap this thing up!
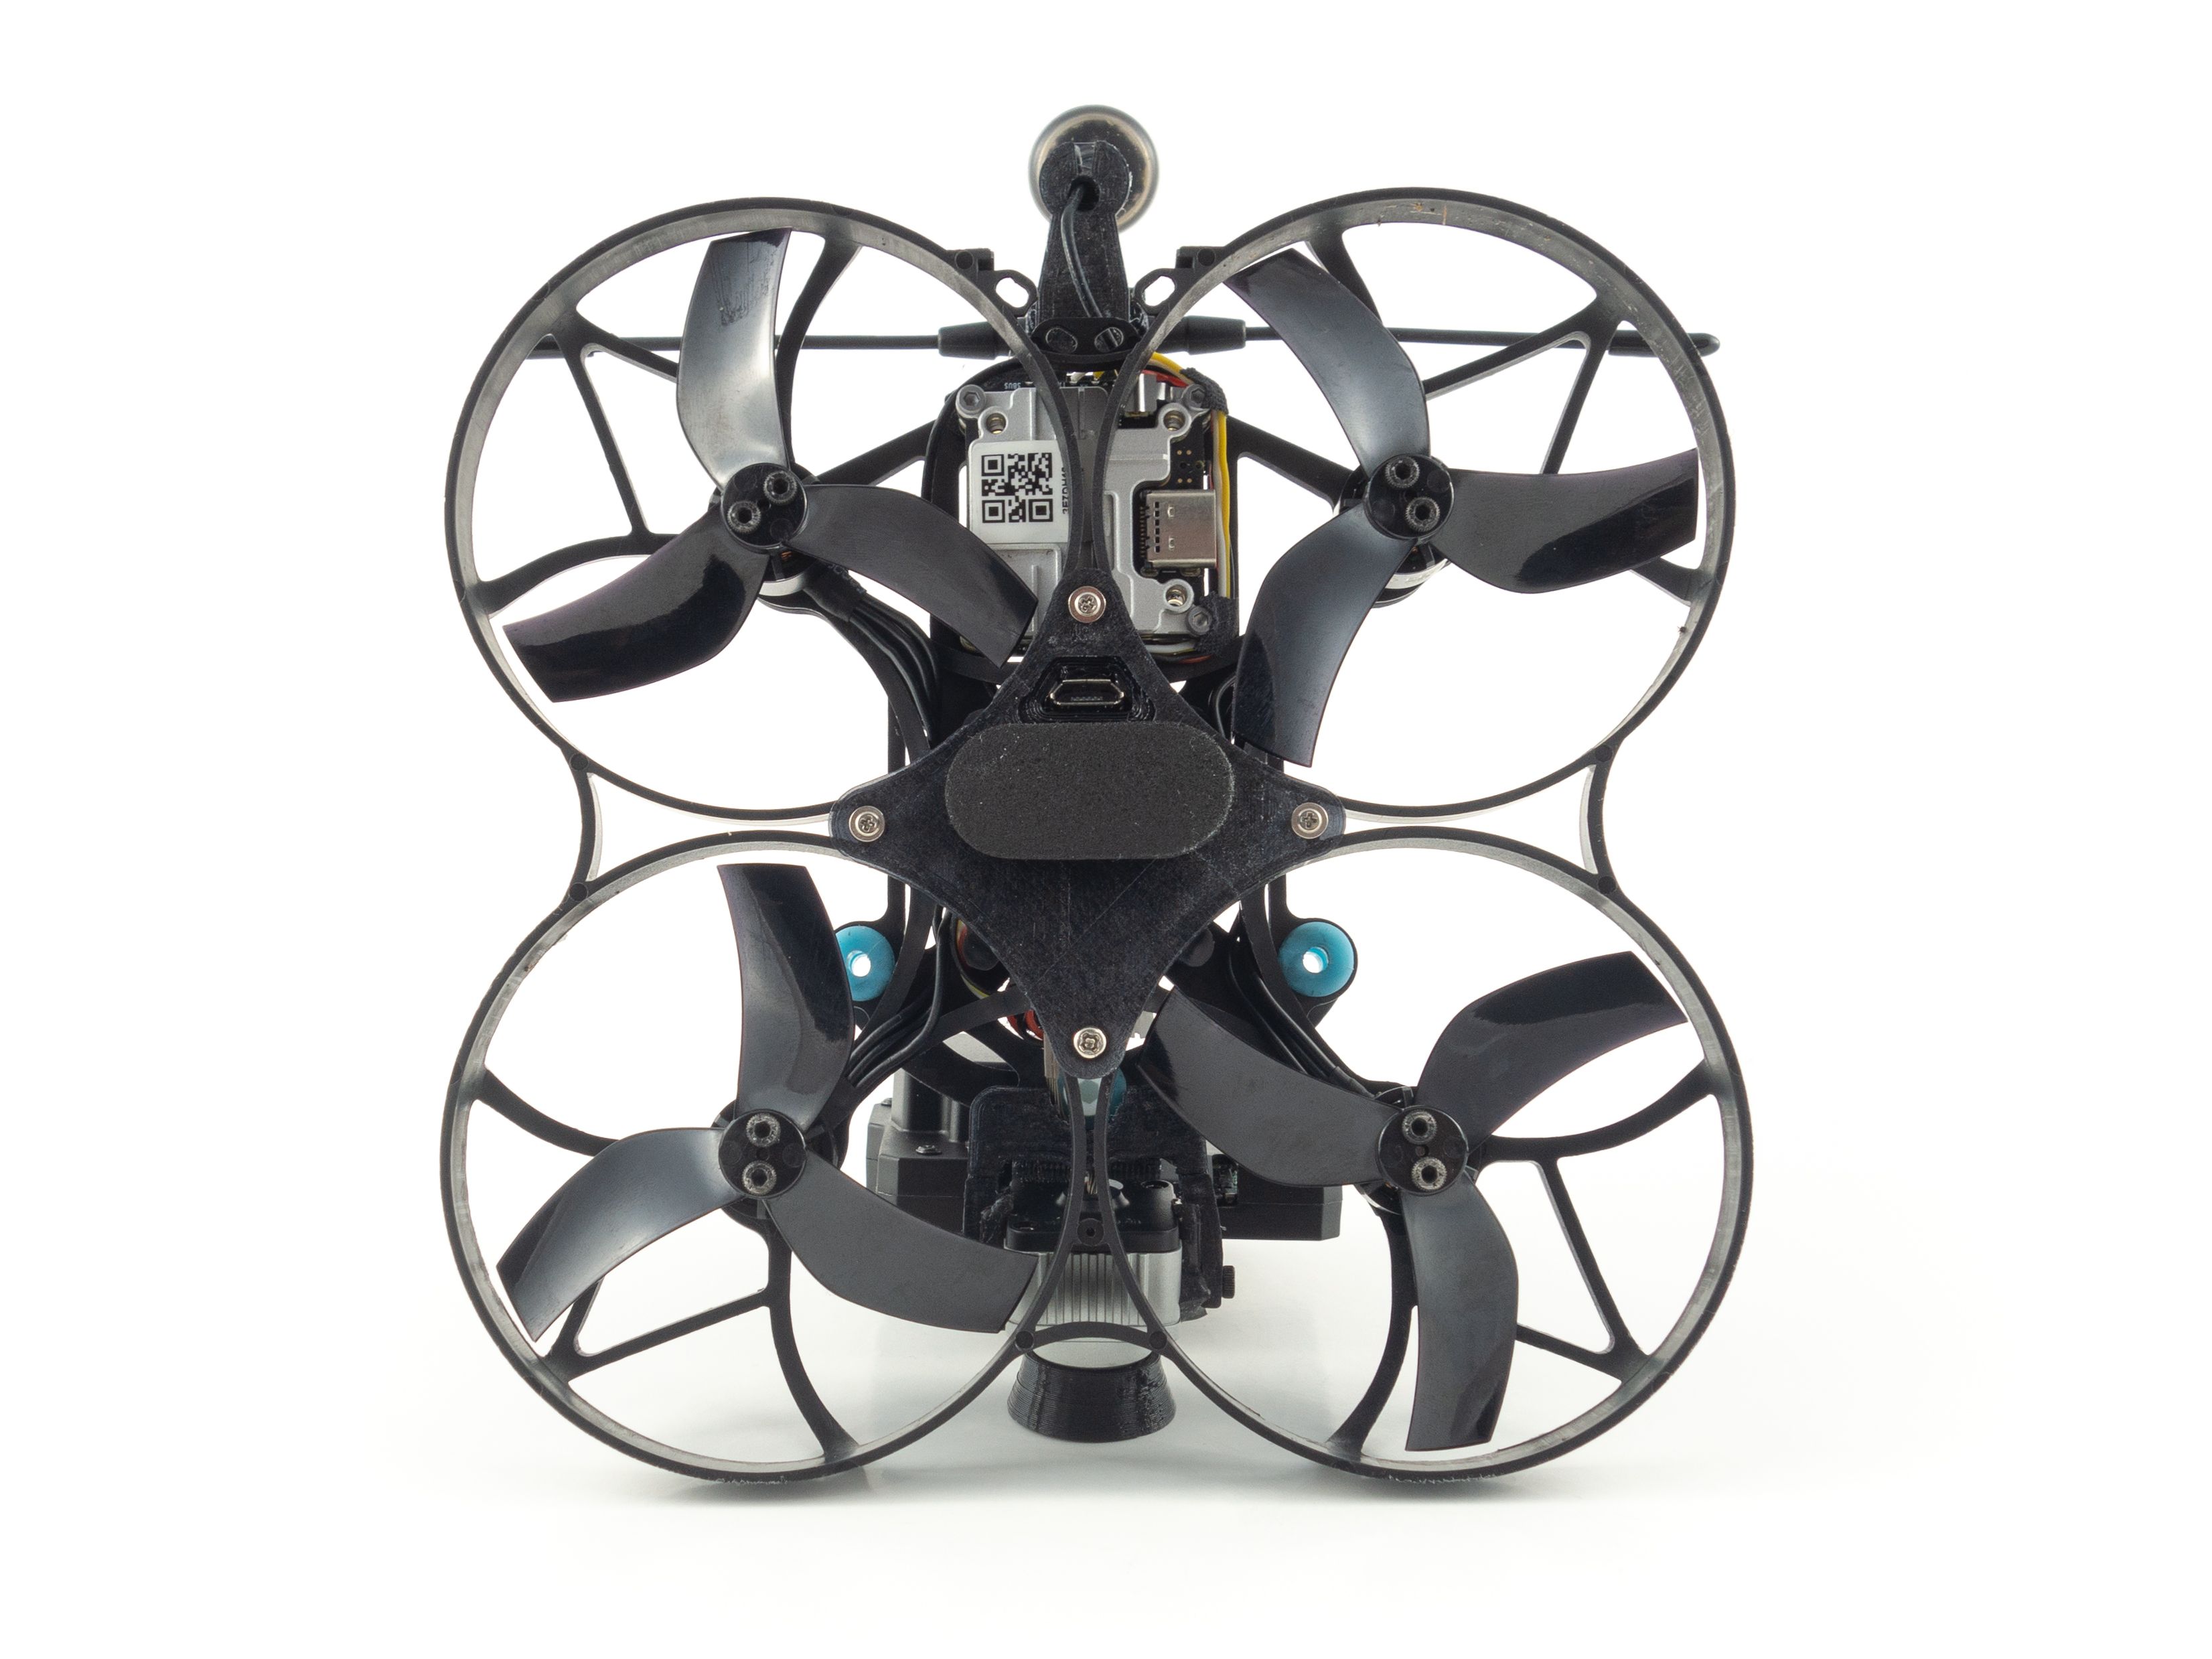
- Using your tweezers tug at the Caddx Vista wires through the top plate to make sure there's no slack around the side of the air unit. Use electrical tape to secure them to the side of the Caddx Vista so they're protected from the props.
- Screw the cover over the bottom of the flight controller.
- Stick the battery pad to the top plate.
- If you plan to use an Insta360 Go or naked GoPro put the blue vibration dampeners onto the top of the frame. It helps to wrap some dental floss around the tops of them to pull them through the holes.
- Mount the Insta360 or GoPro mount to the carbon fiber plate by screwing the pointy black screws up through the carbon into the TPU.
- Use the dental floss method to mount the plate to the vibration dampeners on the frame.
- Use the long nylon screw to put a little tension on the front dampener. Secure it in place with the nylon nut which goes on top. You don't need much tension, but it should be enough that the camera doesn't wiggle around too much.
- Slide the battery strap between the top plate and the receiver with the buckle toward the rear. If you don't want to mount the battery sideways you can put the battery strap on before you secure the top plate, but it'll be a little more difficult to manipulate later on.
- Add a foam landing skid or something similar to the bottom of the quad to raise the motors off the ground.
- Add a TPU lens protector to the DJI camera.
Keep your props off for now. You still need to test the motor orientation and positions.

Betaflight
Now let's plug it in and get it set up! If you don't already have them, you'll need to download Betaflight Configurator Download and BLHeli_32 Configurator [Download].
Flash the Firmware
This is optional, but if you'd like the latest version of Betaflight you can flash it.
- Go to the Firmware Flasher and choose "Release", "BETAFPVF405" and the latest stable release of Betaflight (At this time 4.2.4)
- Leave the remaining options unchecked.
- Click "Load Firmware [Online]" and then "Flash Firmware" to update your flight controller. Once complete, click "Connect"
Ports Tab
- Set UART1 to Configuration/MSP
- Set UART3 to Serial Rx
Configuration Tab
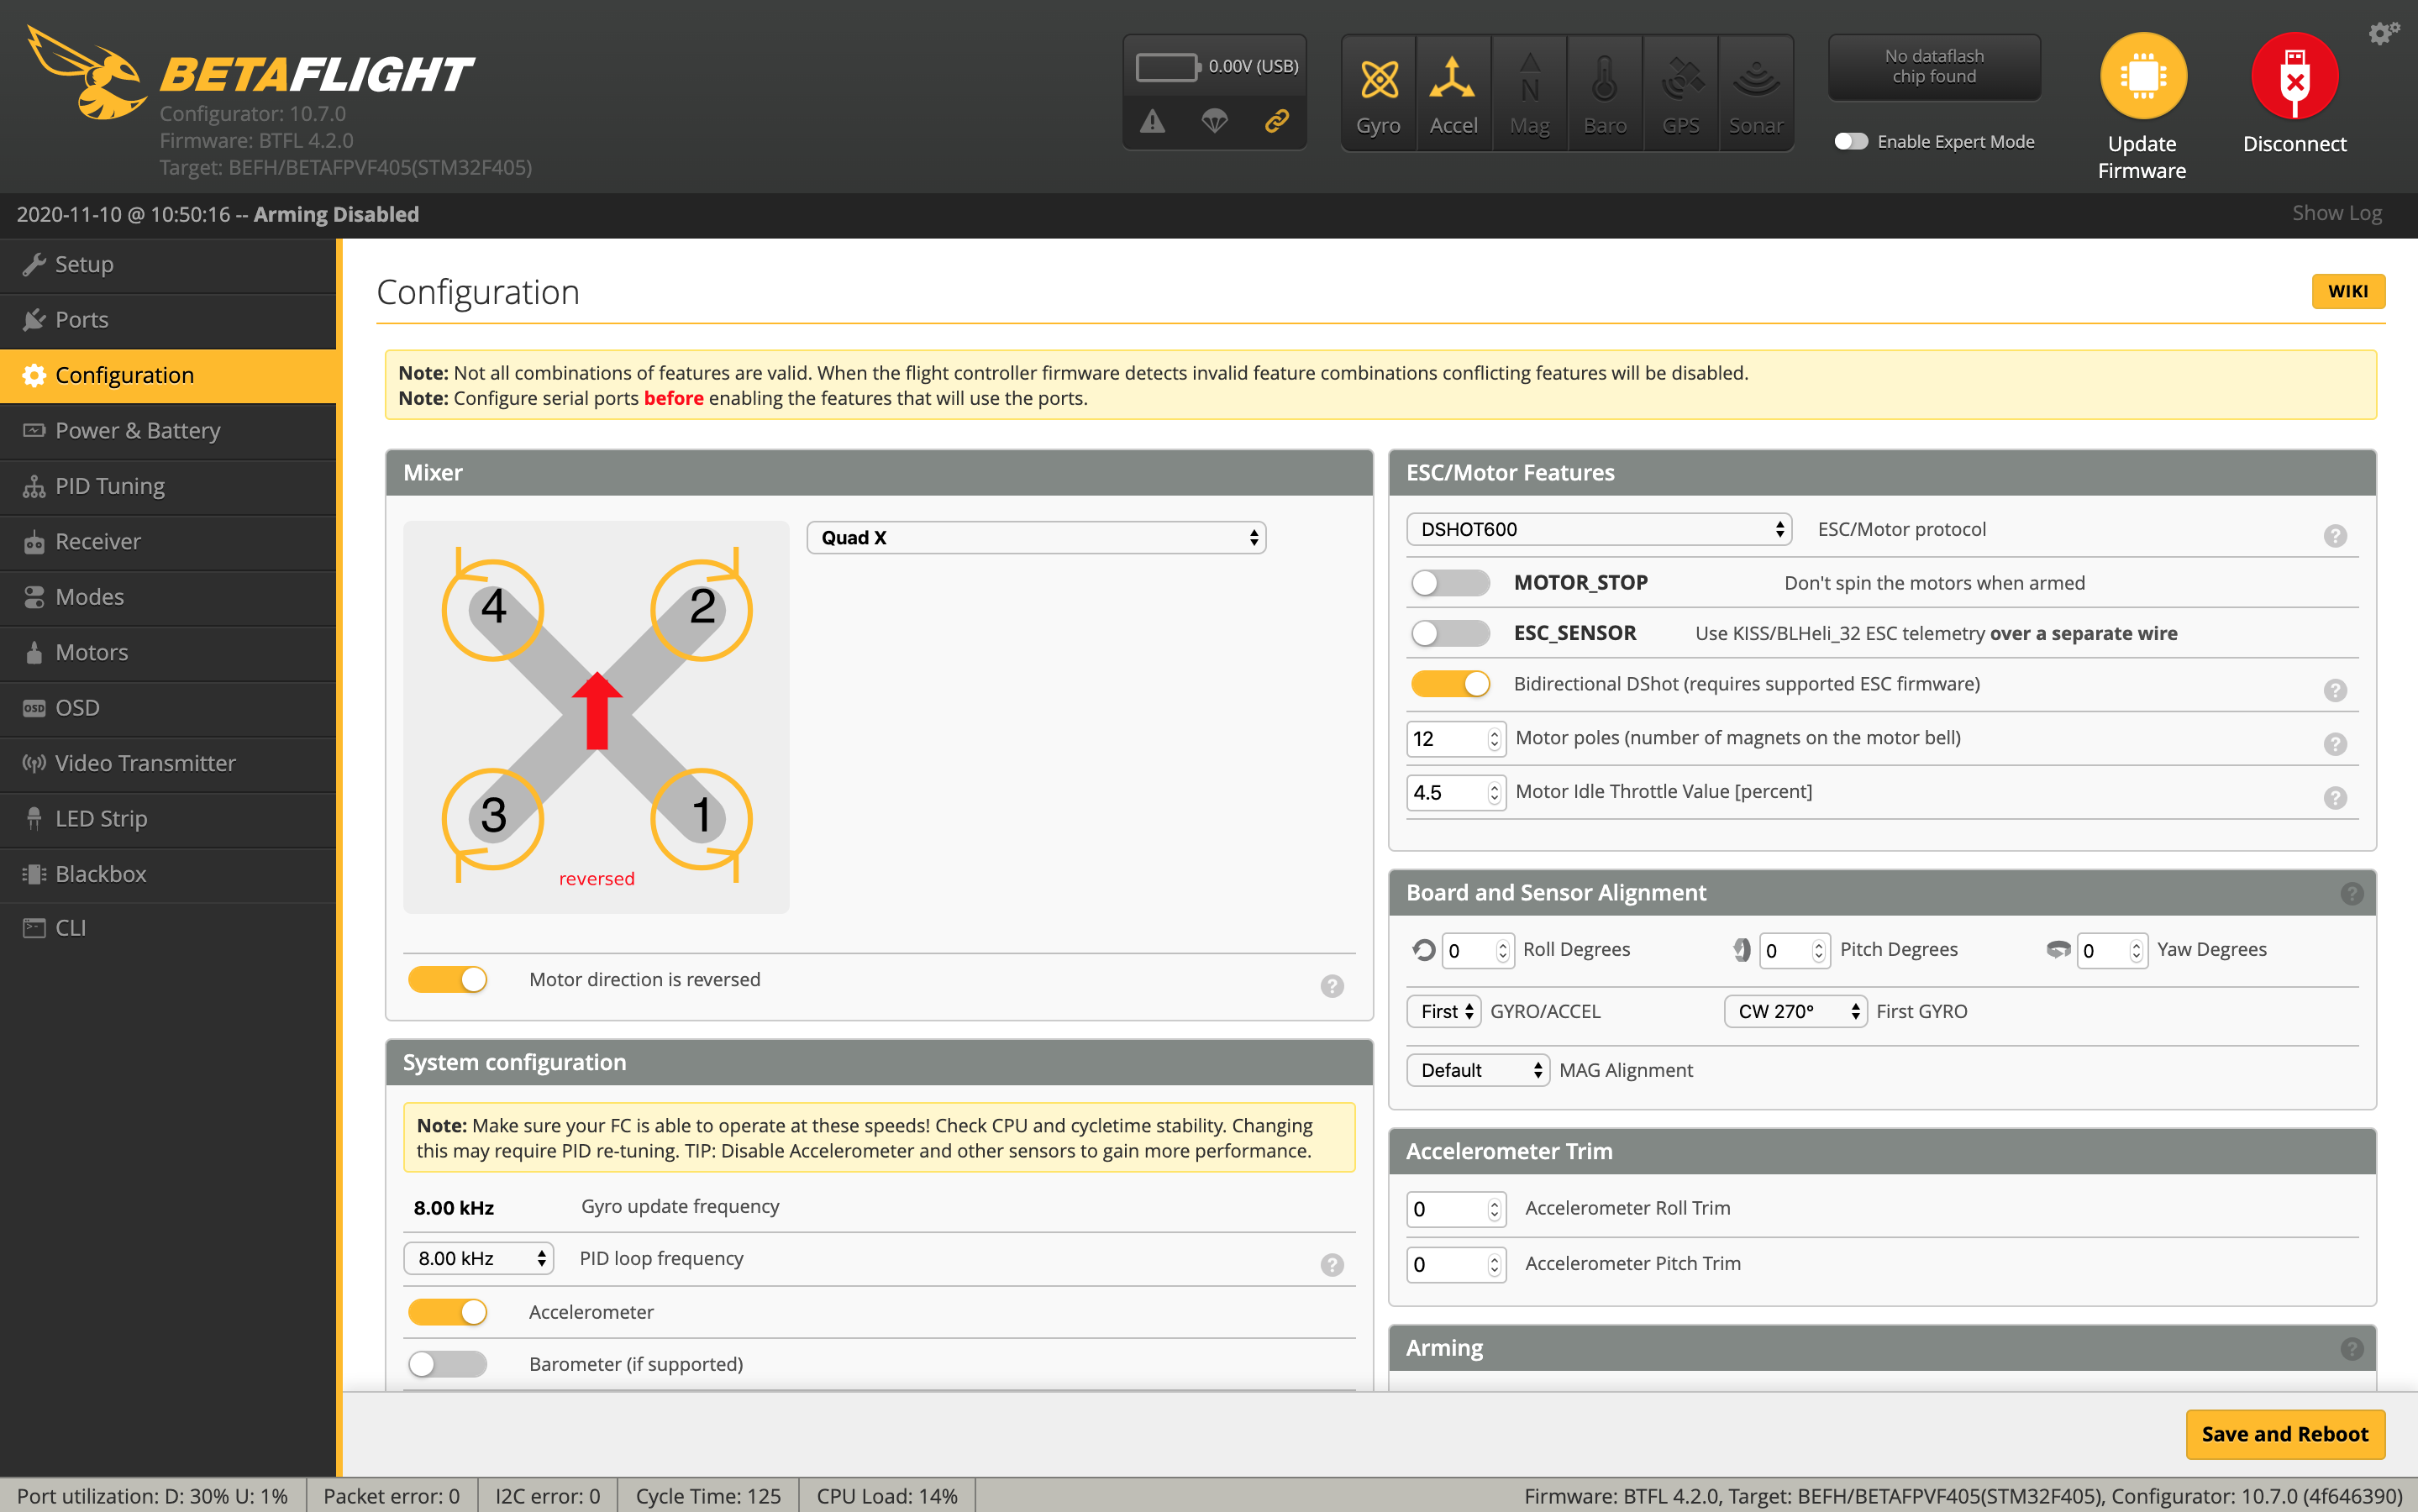
- Under Mixer set "Motor direction is reversed" if props are in the props out configuration.
- Under ESC/Motor Features select "DSHOT600" and enable "Bidirectional DShot".
- Under Board and Sensor Alignment set First GYRO to "CW 270°"
- This is only if you flipped the USB down. If you're using a BNF model and the USB is pointed up, this would be "CW 270° Flip".
- Under System configuration set Gyro update frequency & PID loop frequency to 8 kHz.
- Under Arming set the Max arm angle to 180 (Only if you keep the accelerometer turned on)
- Under Personalization set your FPV handle
- Under Receiver choose your receiver. If you used Crossfire choose "Serial-based receiver" and "CRSF". If you used the DJI remote choose "Serial-based receiver" and "SBUS"
- Under Other Features enable: Telemetry, Airmode, OSD and Dynamic Filter
- Under DSHOT Beacon Configuration enable "RX_SET" and change your beacon tone to 2.
Click Save and Reboot
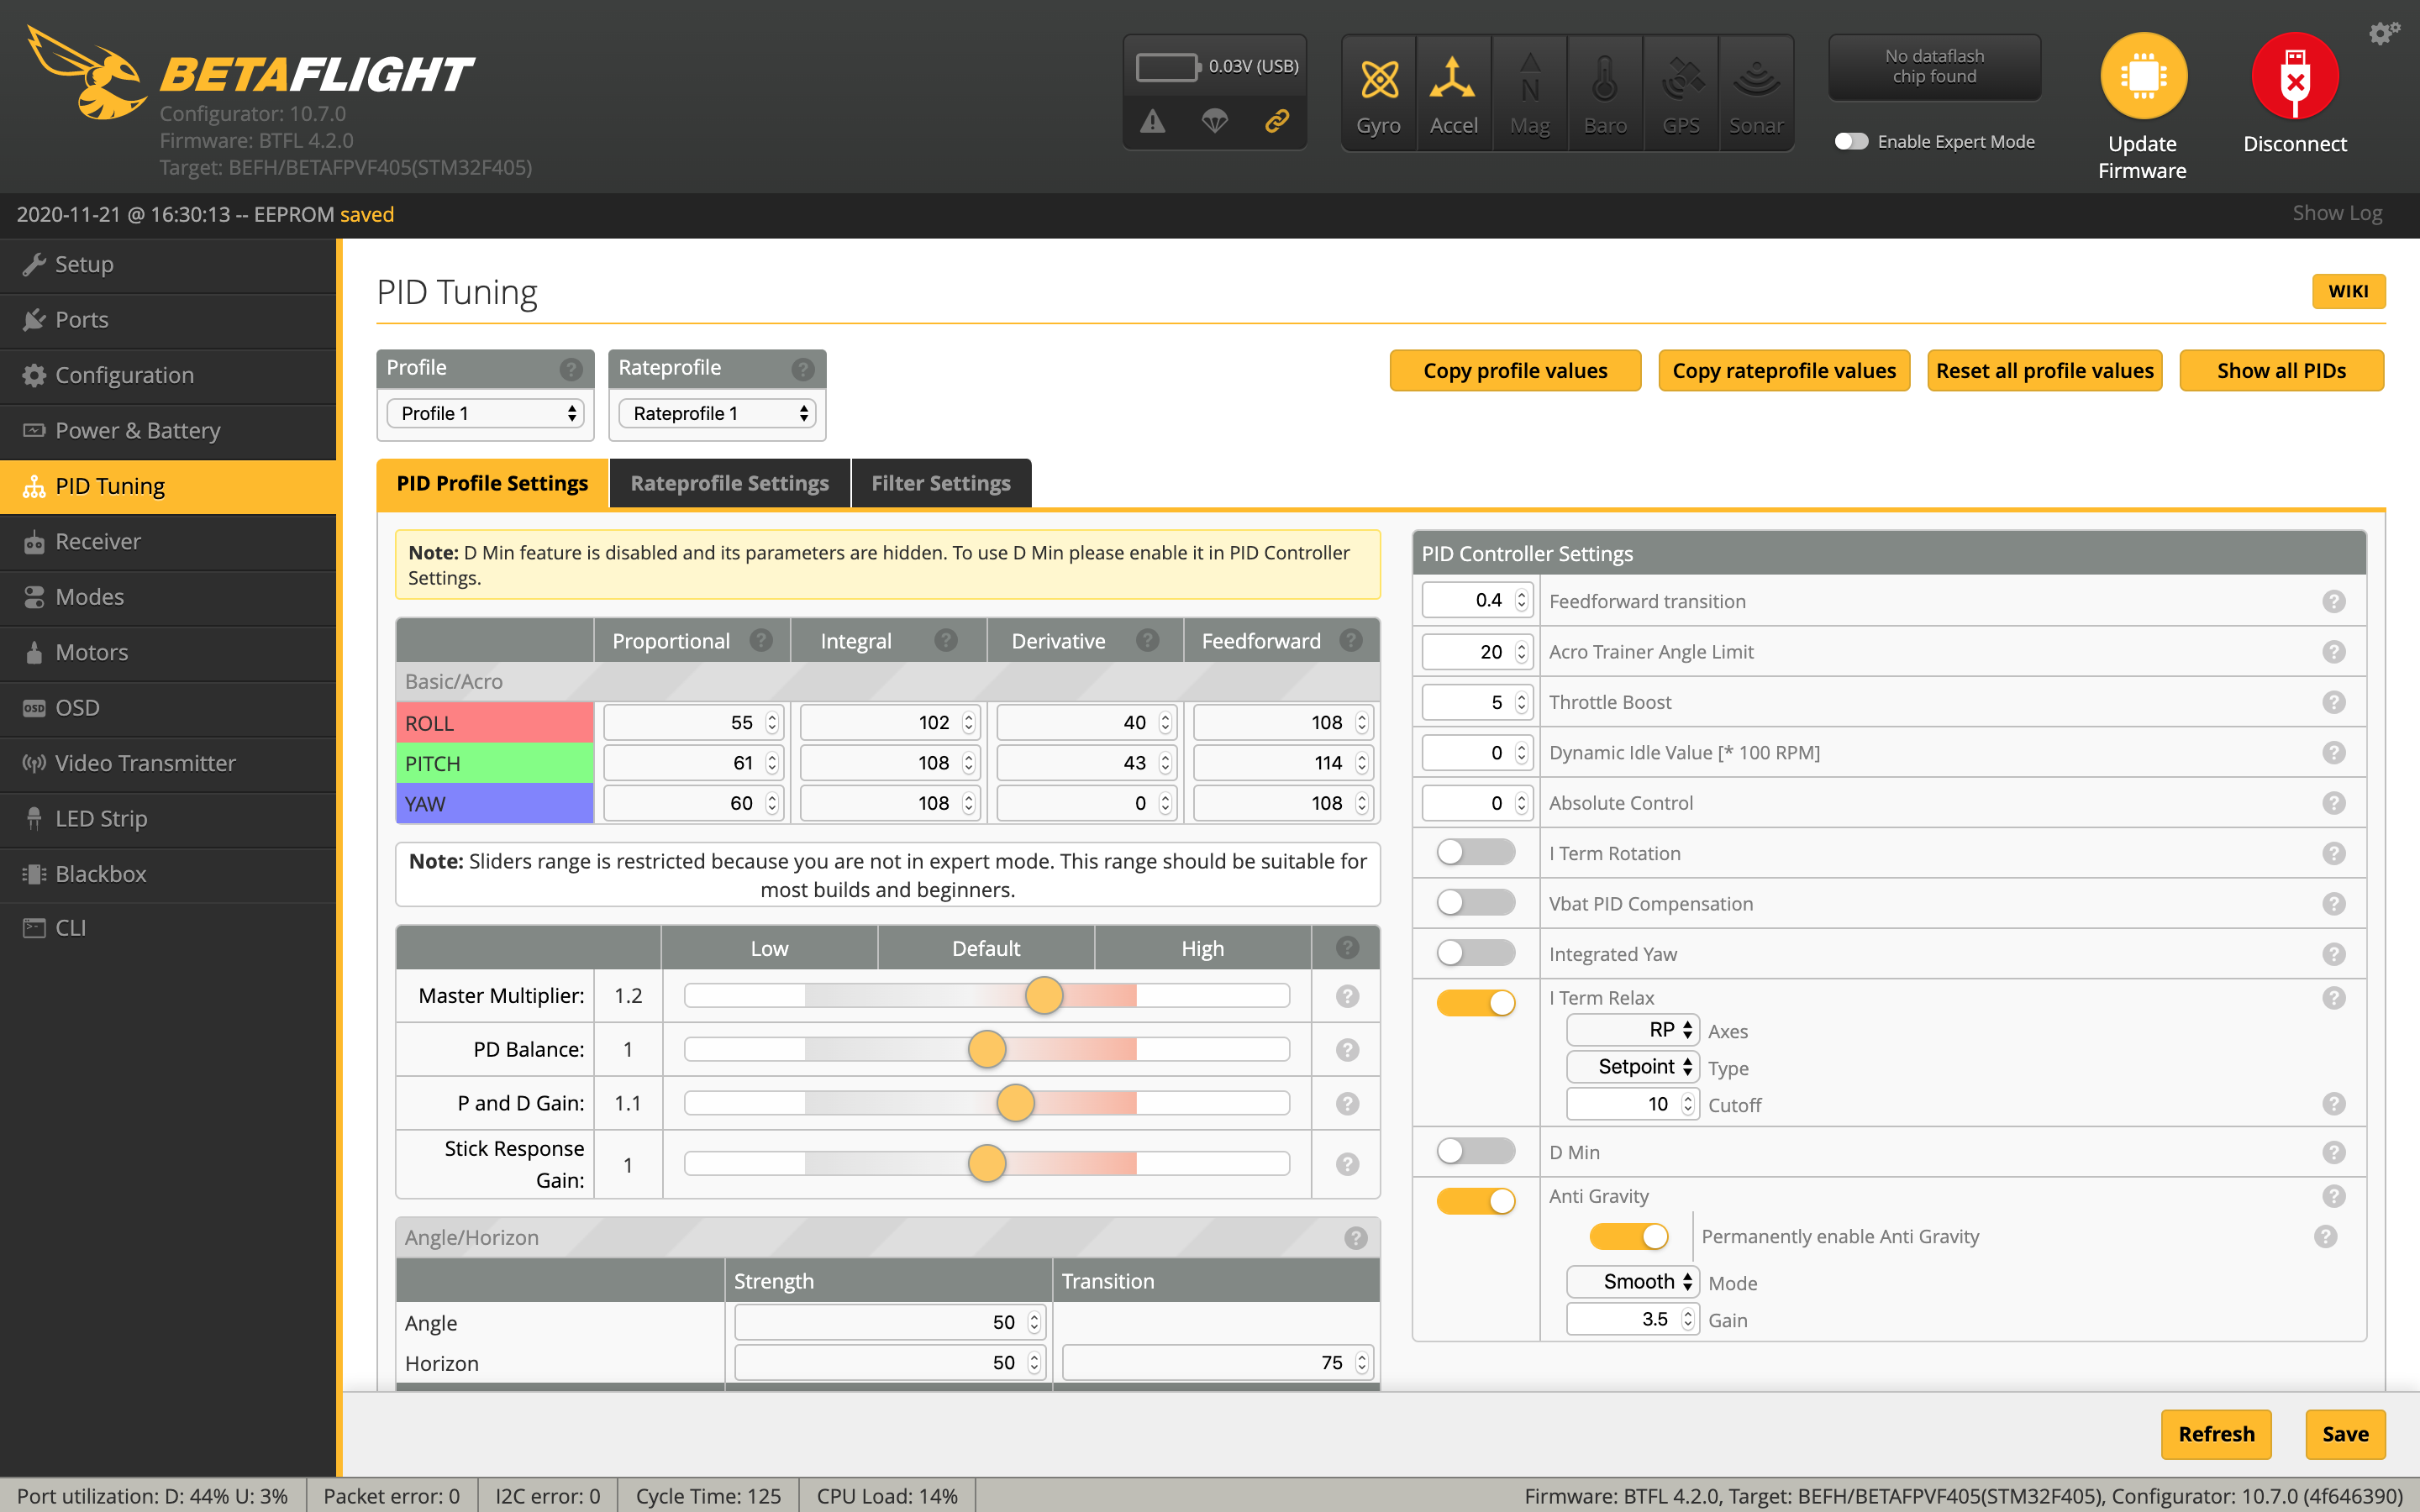
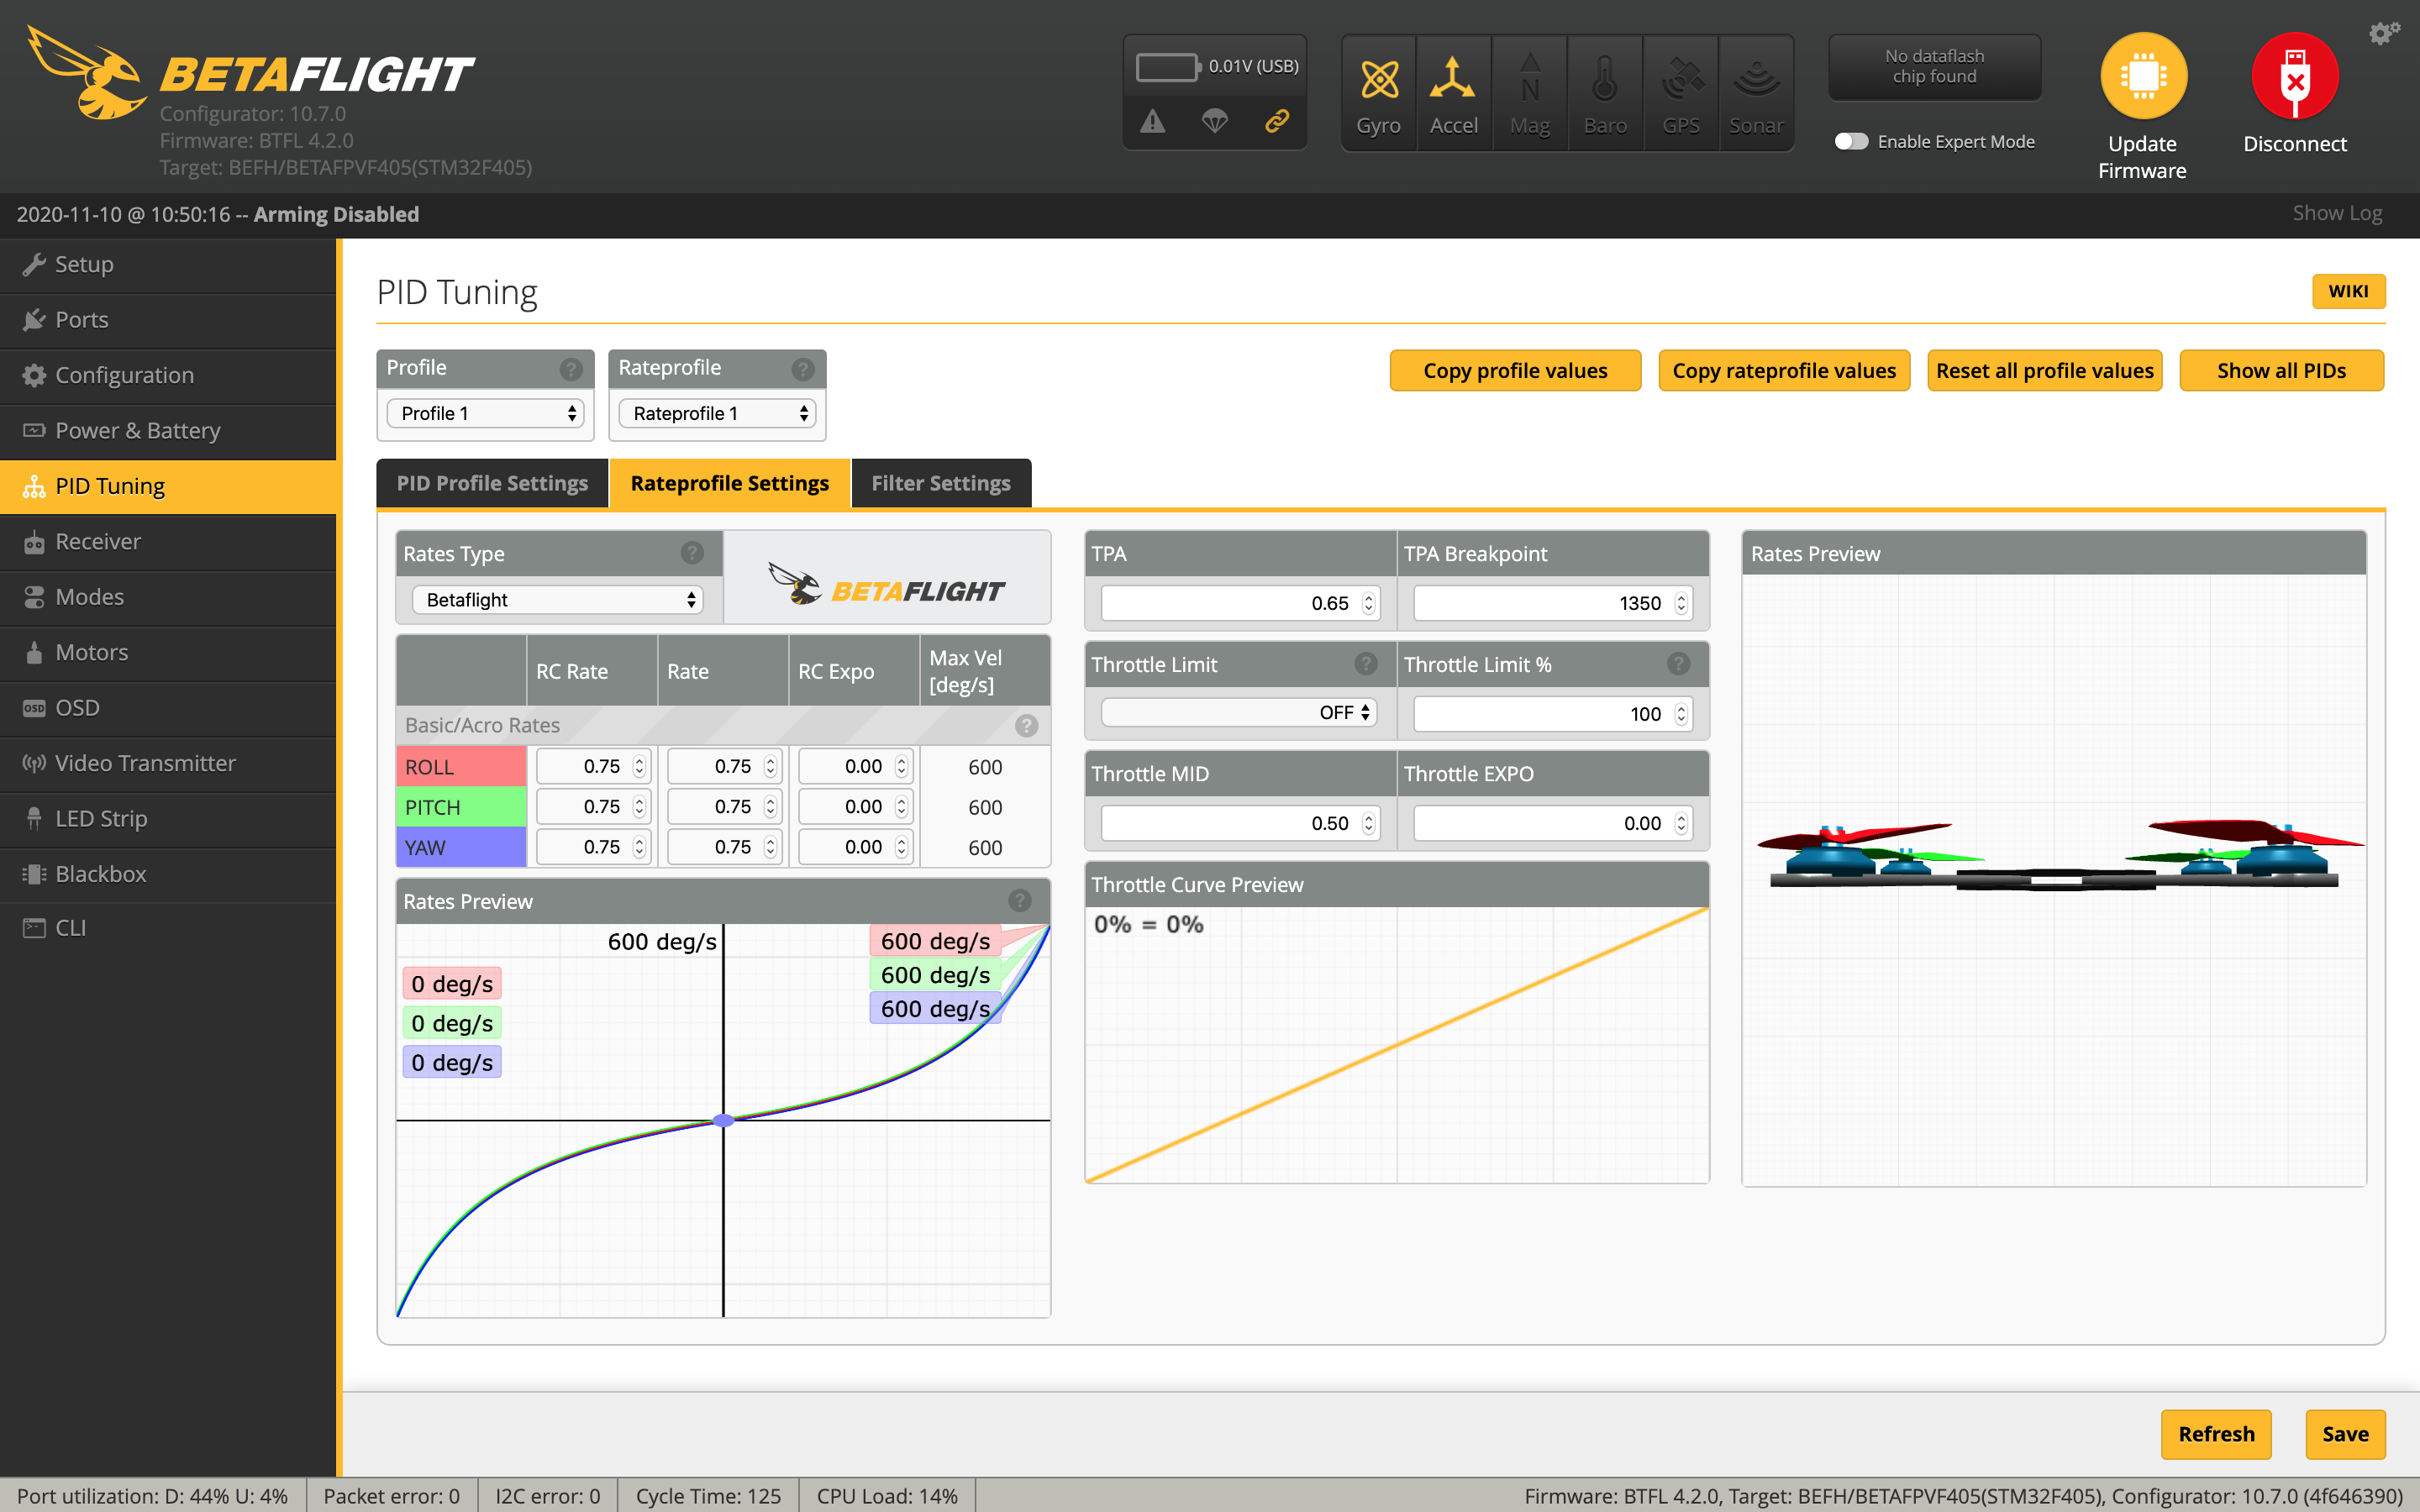
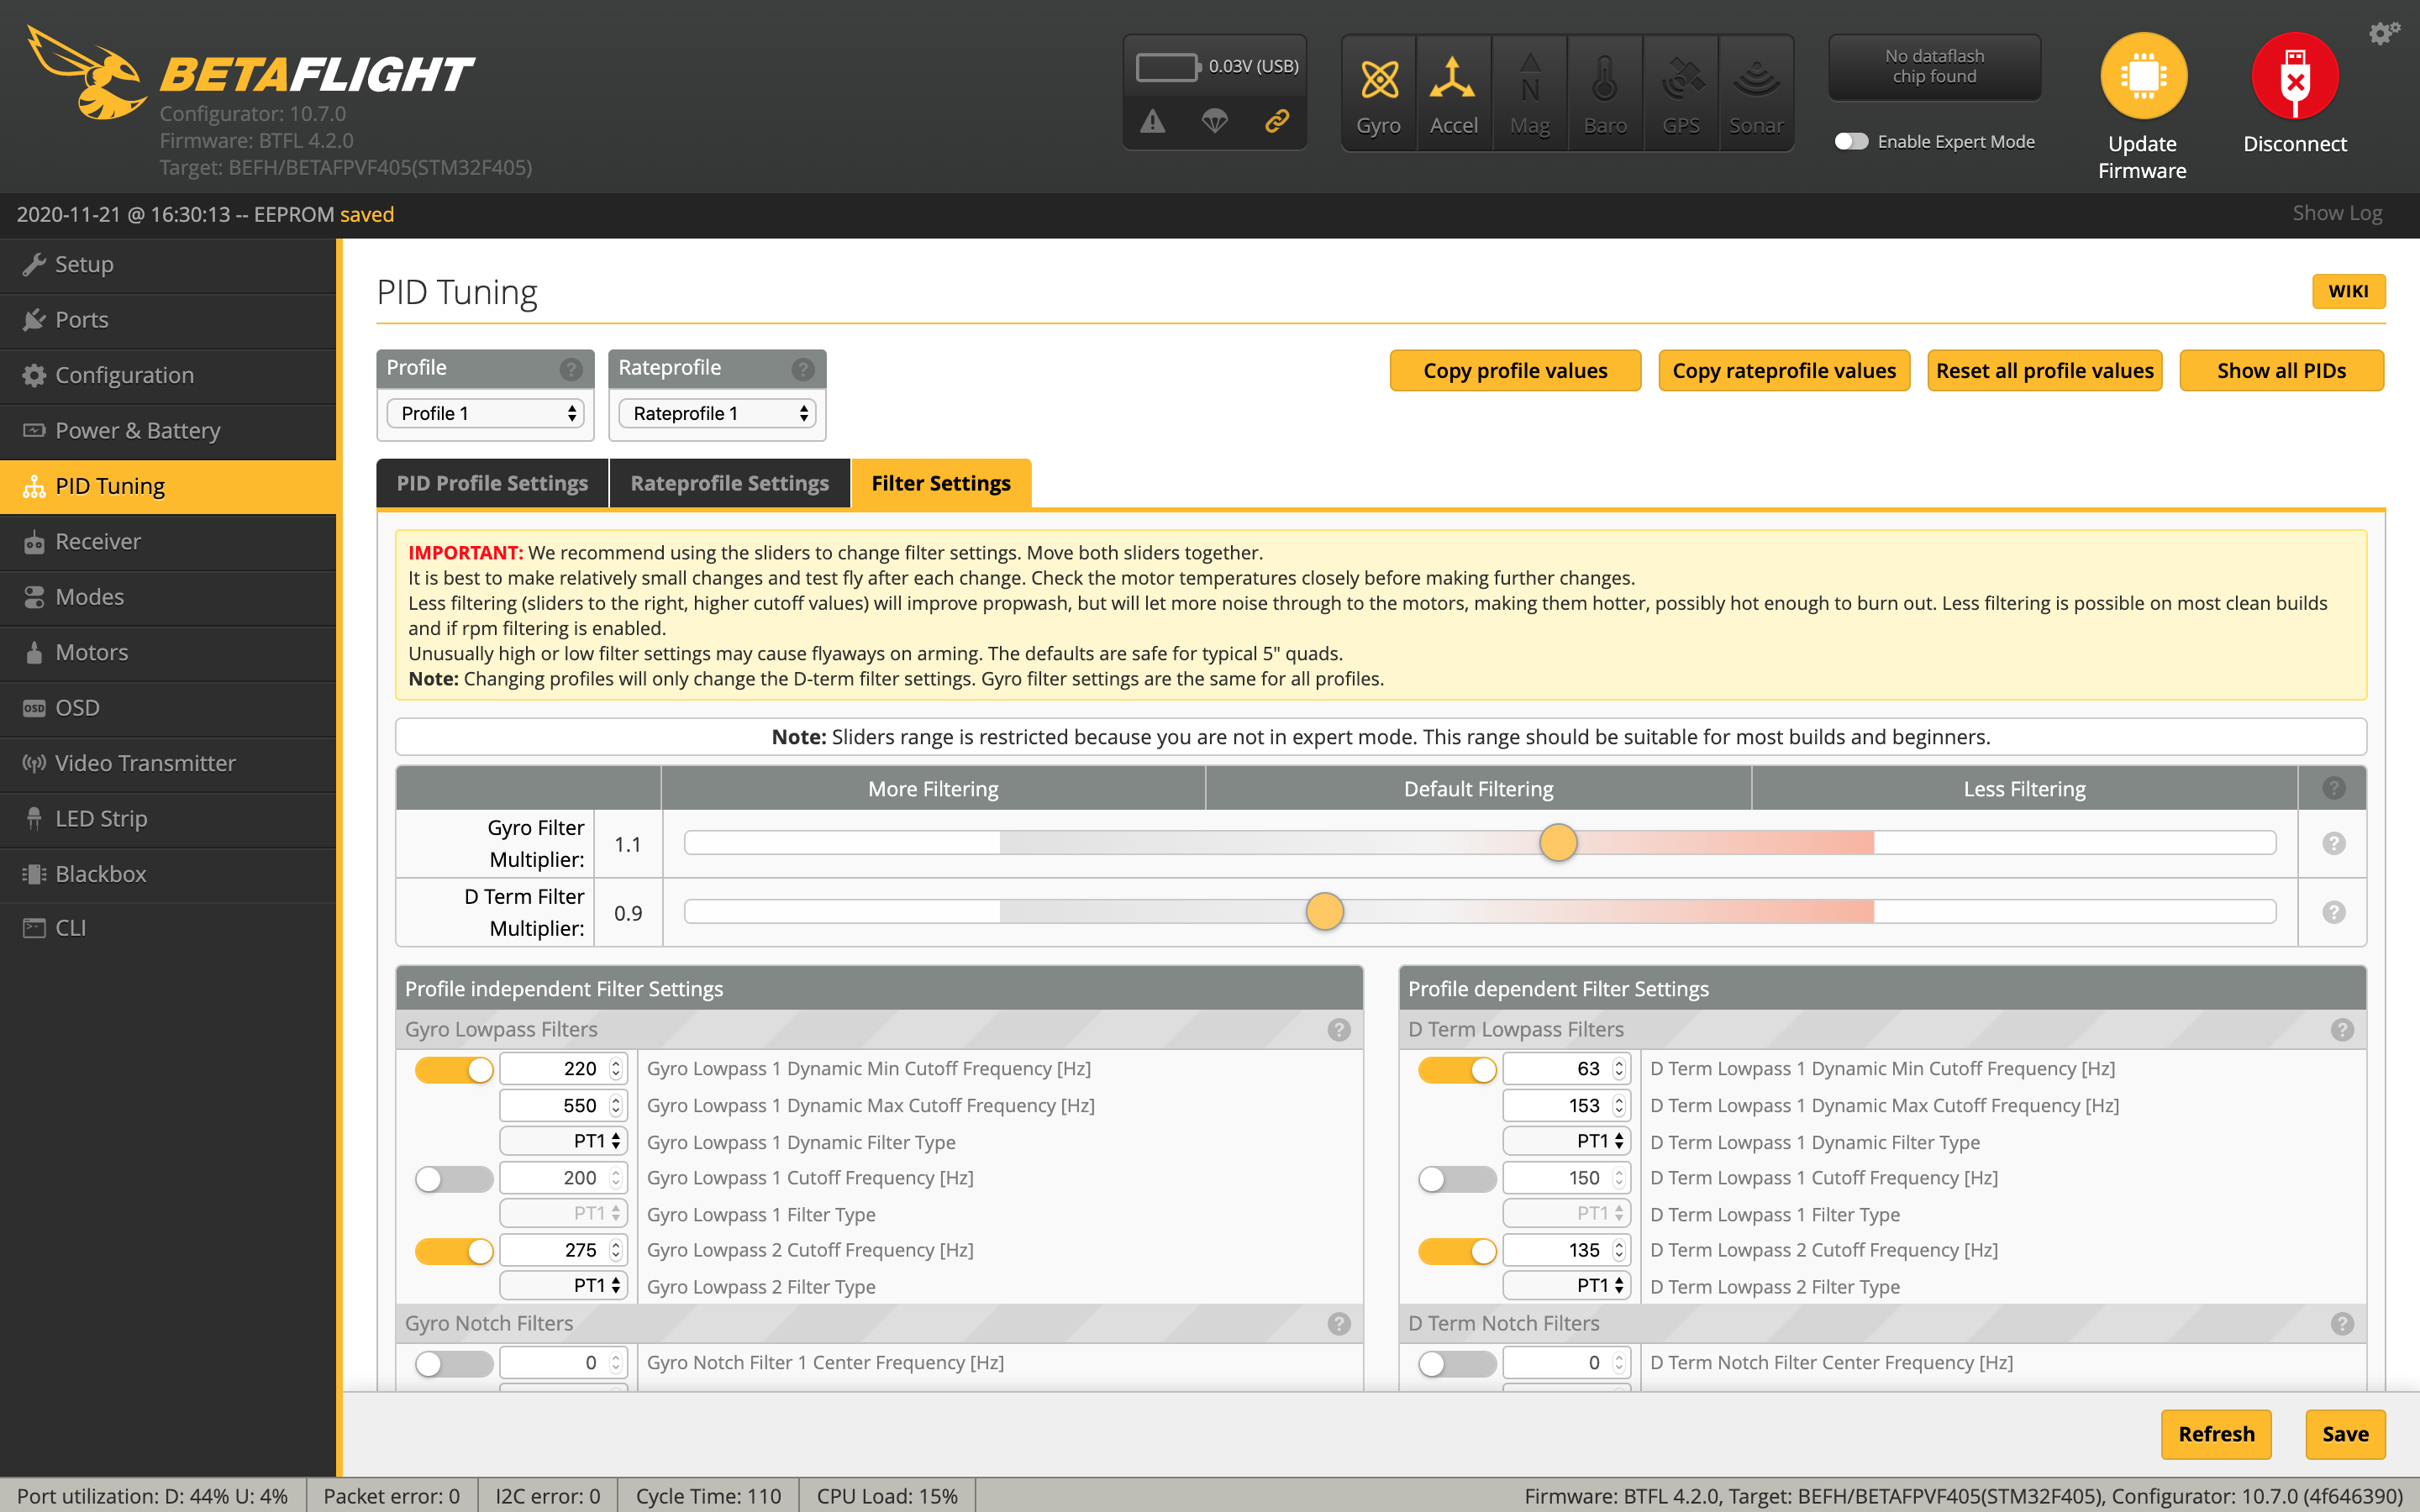
PID Tuning Tab
I tuned this from the stock Betaflight 4.2 PIDs using the sliders. This tune is mainly targeted toward 4S batteries, so you may need a slightly different tune to run a 3S pack. It's a tad aggressive on the motors, particularly with the D min turned off and the higher filter values, but my motors are only a little warm to the touch. If you find yours are getting too hot you can try dropping the filter sliders one notch to the left or you can turn D min back on. I really do like how this tune flies though!
The rates are according to my preference, so if you have different rates that you prefer go ahead and use those.
OSD Tab
On the OSD tab check all of the values you want and arrange your OSD as desired. I've only got the RSSI/LQ value enabled and I refer to the DJI goggle OSD to monitor the voltage.
CLI Tab
You'll need to paste these commands into the CLI to ensure the correct motor positions are known to the flight controller.
resource MOTOR 1 A03
resource MOTOR 2 A02
resource MOTOR 3 B00
resource MOTOR 4 B01
save
To complete the remaining steps apply lipo power and turn your radio on
DJI Bind
- Bind your Caddx Vista to your DJI goggles by pressing their respective bind buttons.
- Make sure you've got a video link and choose a Player channel.
- Set your display preferences. I like High quality on 50mbps with Focus mode off.
- Bind your remote if you're using the DJI remote.
Receiver Tab
- Ensure your pitch, roll, throttle and yaw are being applied correctly. Adjust your transmitter and Channel Map as needed.
- I like to add 3 to both deadbands to smooth out gimbal jitter.
- Set your RSSI channel
- For Crossfire go to the Crossfire menu on your radio, choose your receiver and set a channel to "LQ". I put it on channel 12 which is AUX 8 in Betaflight.
- Go to the Telemetry page on your radio and Discover sensors. You should see all your telemetry data appear.
Modes Tab
- Assign an Aux switch to arm and disarm your quad.
- Assign another Aux switch to enable Horizon or Angle mode if you want them.
- Assign the Beeper and "Flip over after crash" to a 3rd and/or 4th switch.
Save
Motors Tab
Enable the motor test and check the rotation of each motor.
- Do this by sliding the master to around 1040 so you can rub the side of each motor with your finger to determine the rotation.
- Refer to the image on top and take note of any that need to be reversed.
- You might also want to ensure each motor is in the correct position by referring to the numbers in the image and powering them one by one.
- If any motors need to be reversed continue on to BLHeli_32 Configurator.
BLHeli_32 Configurator
Disconnect from Betaflight Configurator and open BLHeli_32 Configurator
- Connect and Read Settings
- Reverse each motor that needs to be reversed. This is done by de-selecting the ESCs with the correct motor rotation at the bottom and changing the motor direction for the motors that need it. Click "Write setup" to save.
- Reconnect to Betaflight Configurator to test the motor rotations.
Testing
Mount the props to the motors using the included M2 screws. I used the "props out" orientation so the front left and rear right props spin counter-clockwise. Make sure the props are mounted right-side up. That means the top of each prop should be touching the motors.
You might want to conduct a test hover indoors just to make sure it doesn't flip out. If it does then you've likely got your motors in the incorrect positions, the rotations aren't correct or the props are on wrong. Double check each of these.
Naked GoPro Power Lead
If you're using a naked GoPro you might want to power it through a backup BEC and capacitor connected to the balance lead of your battery. I prefer to do this because it further protects my GoPro from voltage spikes. You can use a 9v or 12v BEC with at least 1.5A of current. Make sure you pay close attention to the polarity of your wires when doing this.
- Get a 4S balance lead kit and remove all the pins from the male plug.
- Solder red and black wires to two of the pins that you removed and push them back into the plastic connector.
- If you try to solder to the pins while they're still in the plastic connector it'll melt
- Solder these wires to the input pads on the BEC.
- Solder a 470uF Low ESR Capacitor to the same pads ensuring the polarity is correct. The capacitor should have a minus sign along the negative side.
- Remove the yellow wire from the naked GoPro power lead and solder the wires to the output pads of the BEC.
- Add shrink tube to the power lead.
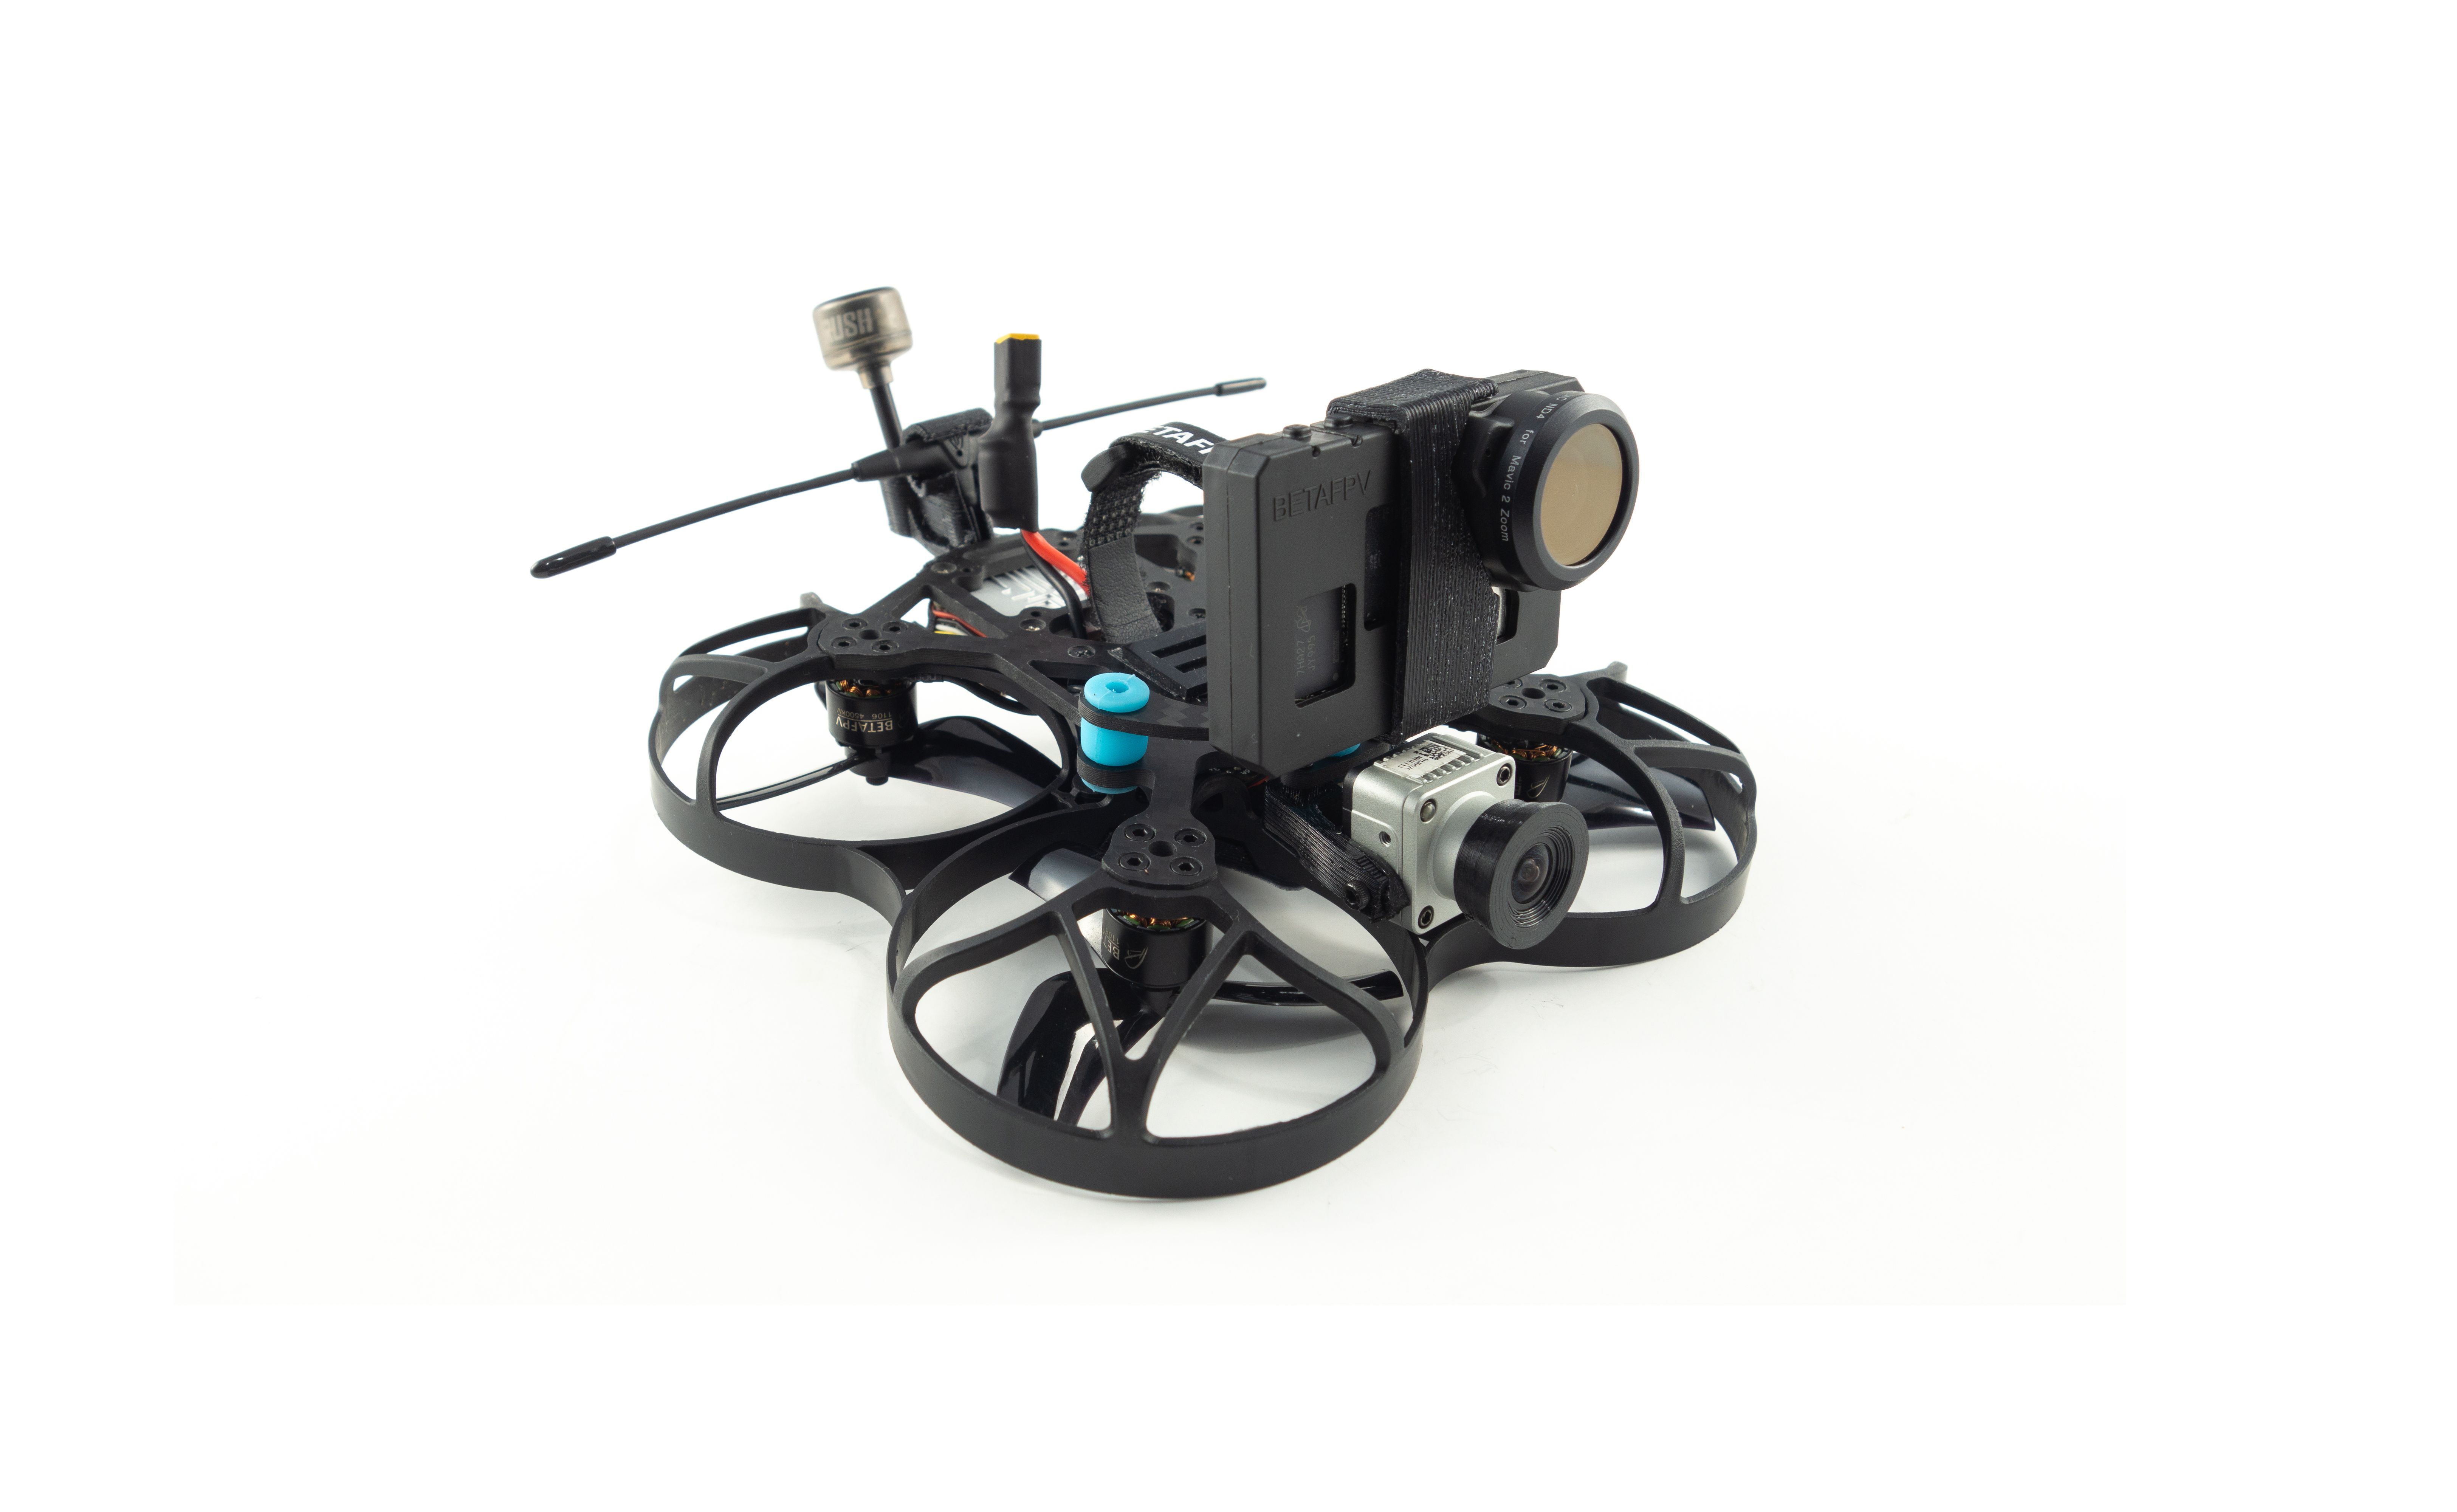
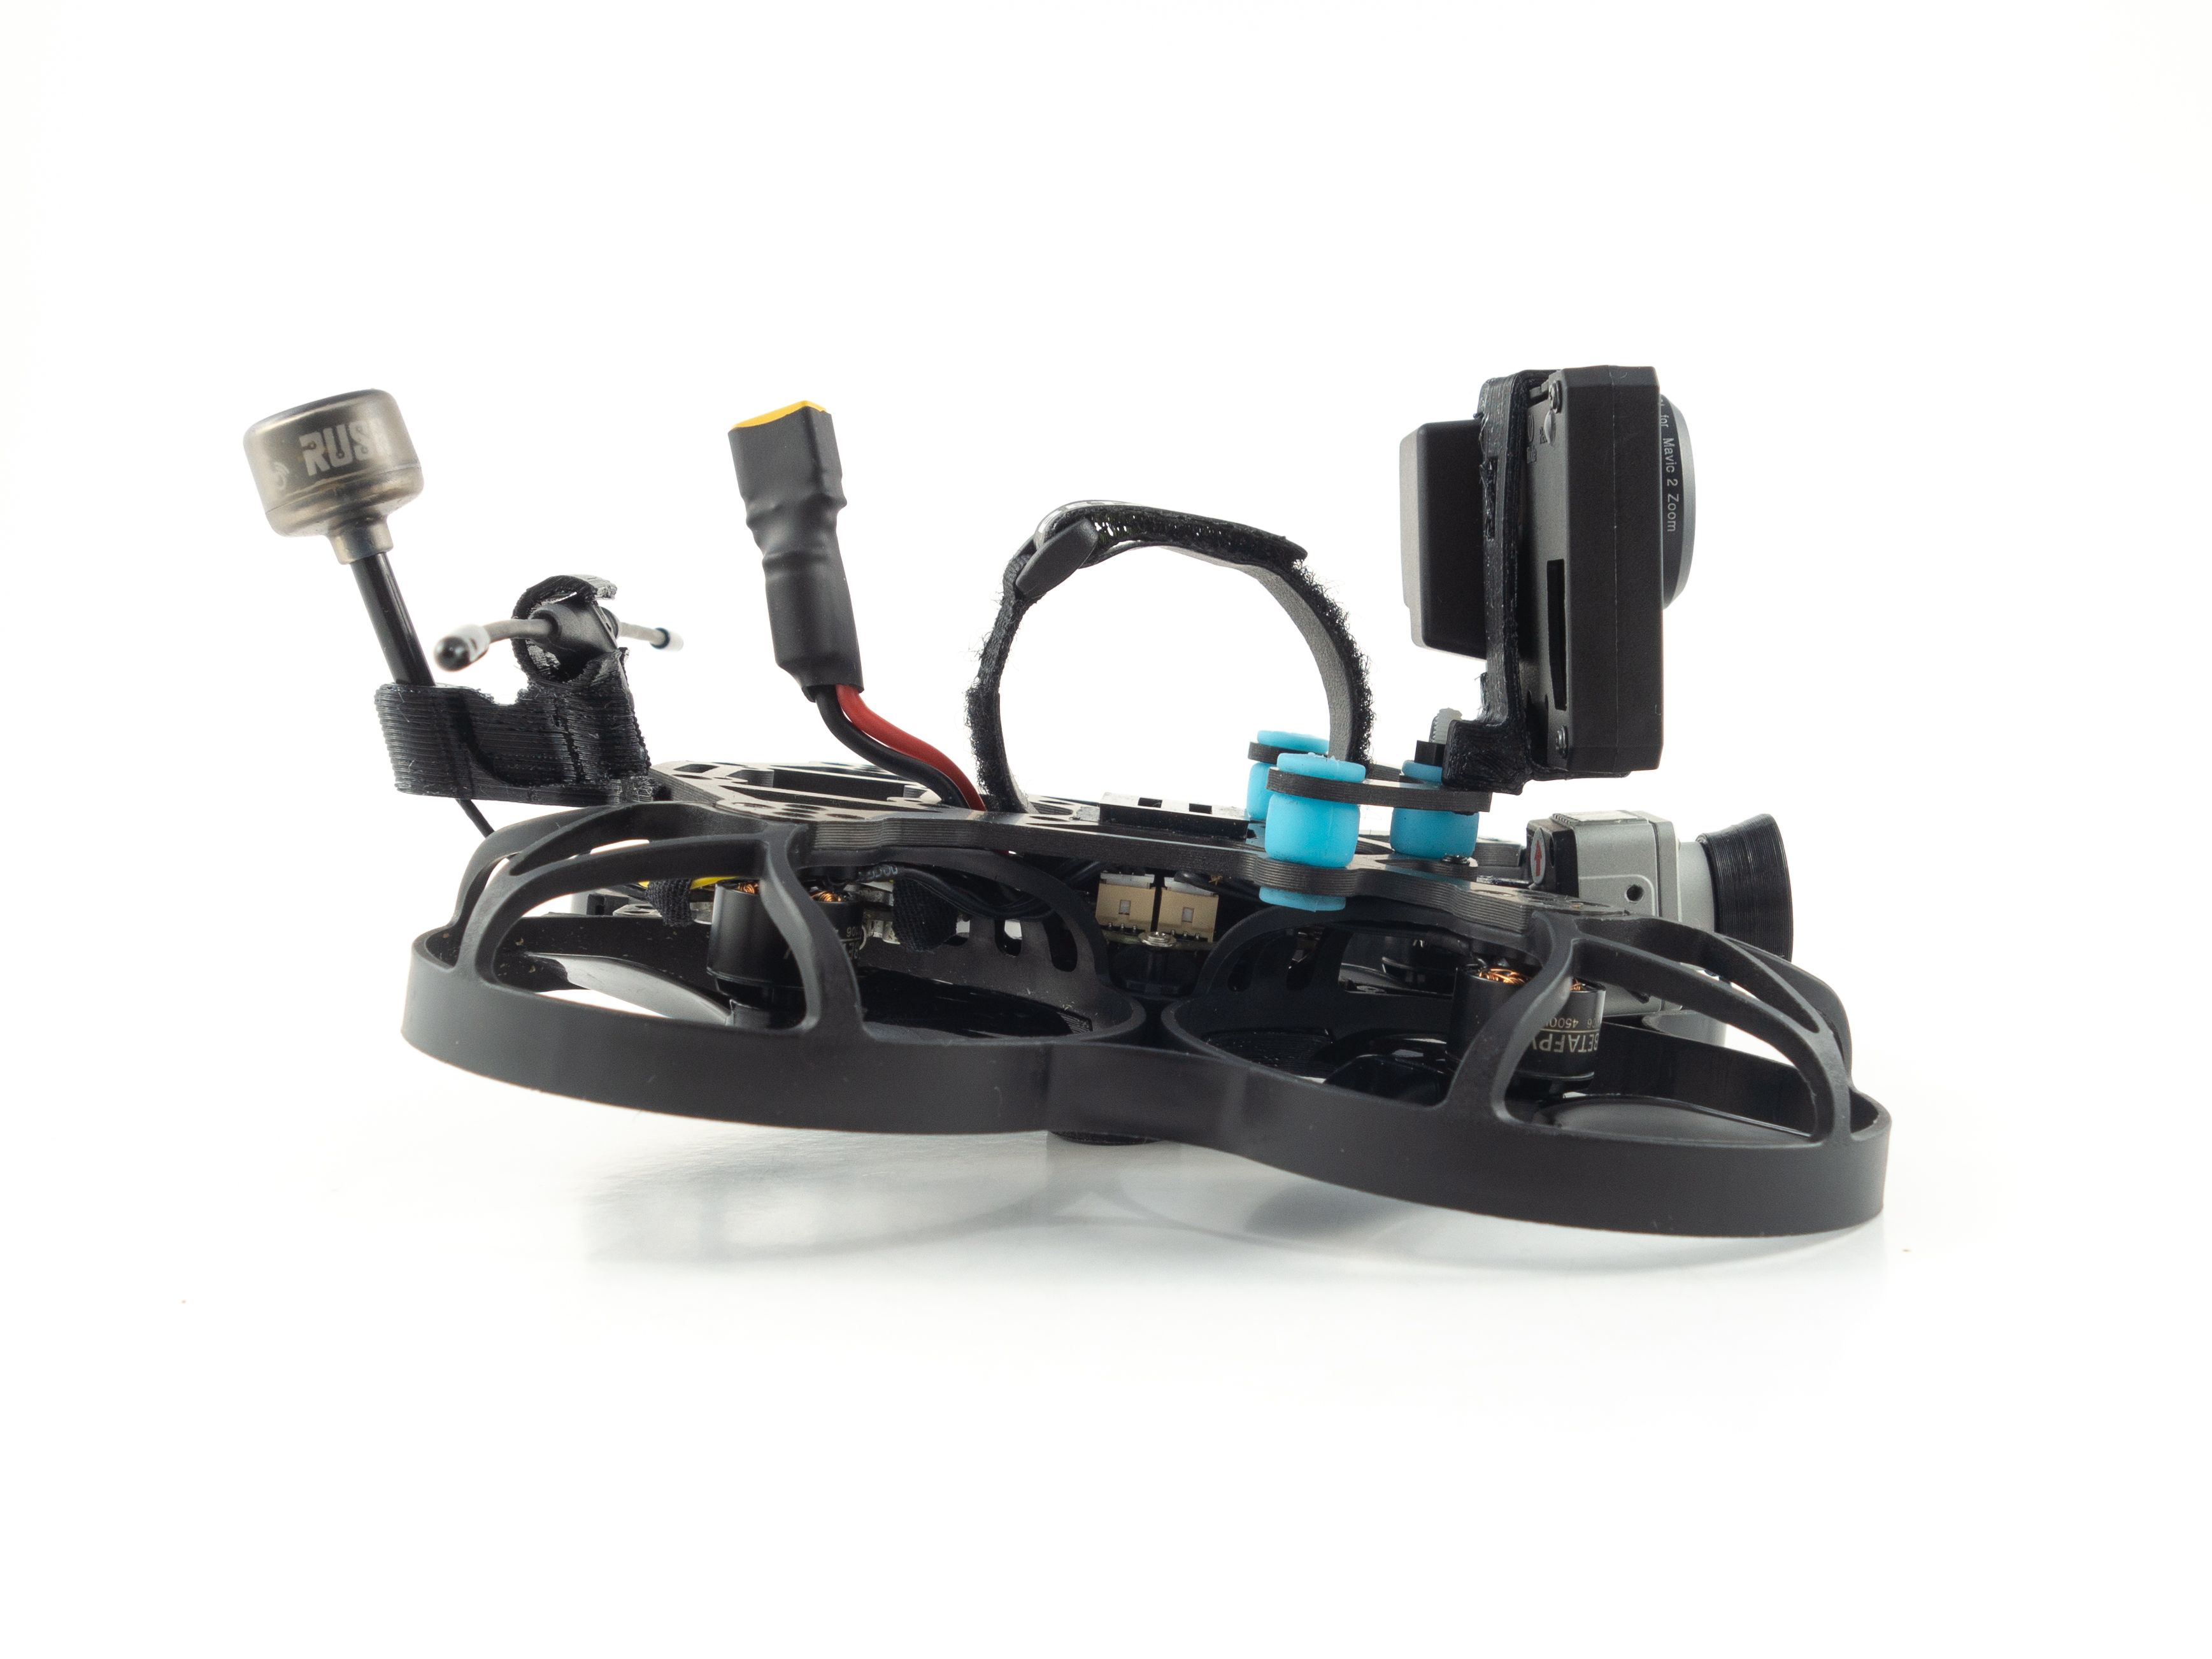
Photos


Part List
Show stores (9)
Thank you for the guide to the construction! I'm searching for my first drone and wondering if that's going to fly off shelf with a standard, GoPro? If necessary, I wouldn't want to take off my GoPro, but still want to test out a film drone. Thank you for your answers!

This such an amazing build. I wish i had built it myself rather than purchasing it :(. I have a little challenge that i wonder if anyone here has manage to solve. it? I have DJI set-up Caddex, but for the life of me i can't get the OSD information into the googles. I'm using TBS Tango 2 set-up too. I have done all the required steps e.g. enable custom display in the googles. I have re checked the RSSI set-up. I have looked at the the UARTS etc... Would love to know if anyone here has managed to crack this, if so please could you let me know how you didn it!
hey guys, I'm totally new on this :) the video is not for a beginner like me, so do you have any video where I can do step by step?
Hey Whiffles, Thanks for the great build guide!
I just built my 95xv2 with the same components, only I have the F405 2-4S AIO Brushless Flight Controller (BLHeli_S) V3.
This one does not seem to work with Dshot 600 or 300 as the motors won't spin or just twitch at max throttle.
Which ESC protocol would you recommend? Using cadxx vista.
Thanks!
hi Whiffles , about to change camera to dji , will the mount that come with the beta v2 fit? i am sure will not. your kit should fit?
You've built exactly what I want in a UAV!! Since I dont have the tools or money to invest all $1,300 right now, is purchasing the RTF version and upgrading as I am able a viable option? Is the RTF version able to be modularly upgraded in that fashion?
Hello, thank you for your very detailed infos. I just finished building my 95xV2 with the same components like yours, but at a first test flight I noticed that the propeller on the side of the Vista usb port is making a slight contact with the port when turning. This can also be heard by the noise its making while the motors are spinning. Tried to lift it up anyway just for a few seconds and it flew quite well but it came down with that motor quite overheated. Even on the opposite side of the Vista the clearance is almost nothing but at least its not making contact. I wonder if you are having enough clearance between that prop and the usb c port. Thanks in advance for your help!

Thanks for the build guide! I'm looking to build my first drone and was wondering if this would fly with a regular, off the shelf, GoPro? I don't want to take apart my GoPro if possible but would still like to try out a Cinematic drone. Thanks for any answers!
hi man! can you help me? i'm building a beta85x v2 im kinda lost on how the vtx wiring can you help me? please.
i want to buy this...please tell me how can i buy...?
Hey man, thank you so much for putting this together. Exactly what I was hoping to do with my analog 95x v2. I don't see the info available on Rotorbuilds yet (maybe you're still putting it together), but if you could, please also include a CLI dump on your config. Did you by any chance update the board to BF 4.2?
i might mod to v3 frame, how about you guys?

I'm still making up my mind about the V3 frame. I don't like the antenna mount as it doesn't support the stock Caddx Vista antenna. I imagine a 3D printed plug with a hole might do the trick though. I'm also not sure it supports the two board stack, but it's been discontinued anyway. Might just have to do a fresh build.
Where can you get that TPU lens protector?
your pid very nice . i need sugestion in upgrade motorany spefic sugestion. that will fit. the beta motor i bought is to short to clear props from hitting vista
Very nice build, as usual!
I've been thinking about building something similar to carry an Insta360 GO. I have a spare flight controller that I would like use if possible, a Crazybee F4 Pro V3 10A. Trying to figure out whether the integrated ESC in that FC would be enough for this sort of quad, possibly with a 3S 450mAh battery, or similar. Perhaps using a 2.5" frame?
Cheers!
Whoa! thanks for posting this! I bought one and had to send it back to RDQ as it would not arm. I have an other Beta 95X (the right side up one) and it flies great! You are right though the vista cam is way superior to the caddx. I run crossfire so I'll probably remount that as well. What a great detailed post!!
nice guide thanks!!! what is the final weight (with and without battery) and flight time with your chosen battery? again thanks for the guide very helpful for a beginner like me ;)
While looking forward to receive parts to start my own 95X build with the invaluable help of your guide, i'm still puzzled about providing the correct voltage to my naked gopro.
While browsing around, I keep reading different opinion about betafpv BEC, someone says is good enough while some other say it has its weakness and it is prone to kill Gopro mainboard, due to not being able to regulate voltage spikes.
The solution you provided (haven't found any info regarding the external BEC you are using tough) seems to add an additional layer of safety but isn't there any chance that when plugging the lipo in, a voltage spike could possibly run through both becs because there isn't enough time for the voltage to be regulated?
I'm not sure that's a concern, but another option is to make a power lead using a spike absorber. I haven't tried this but it's also a viable option.
Guides & Reviews

AirbladeUAV has done it again and this time they've brought long range to the 5" class! Based on the popular Transformer Mini, the new Transformer 5" Ultralight adopts a lot of the same design philosophies with larger props and more payload capacity. It can fly upwards of 20 minutes on a 4 cell Li-Ion battery pack and in ideal conditions it's got a range of over 4 to 5 miles. In this guide I'll walk..
Read more
With the release of the DJI FPV Drone cinematic FPV has become a lot more accessible, but you certainly don't want to crash a $750 drone! The QAV-CINE Freybott is a compact, lightweight cinematic FPV drone that can take a hit and keep going. It's a lot safer to fly indoors and around people. With a naked GoPro or the SMO 4k you can capture some great stabilized footage. In this guide I'll show you..
Read more


An interesting option for shooting sports competitions.