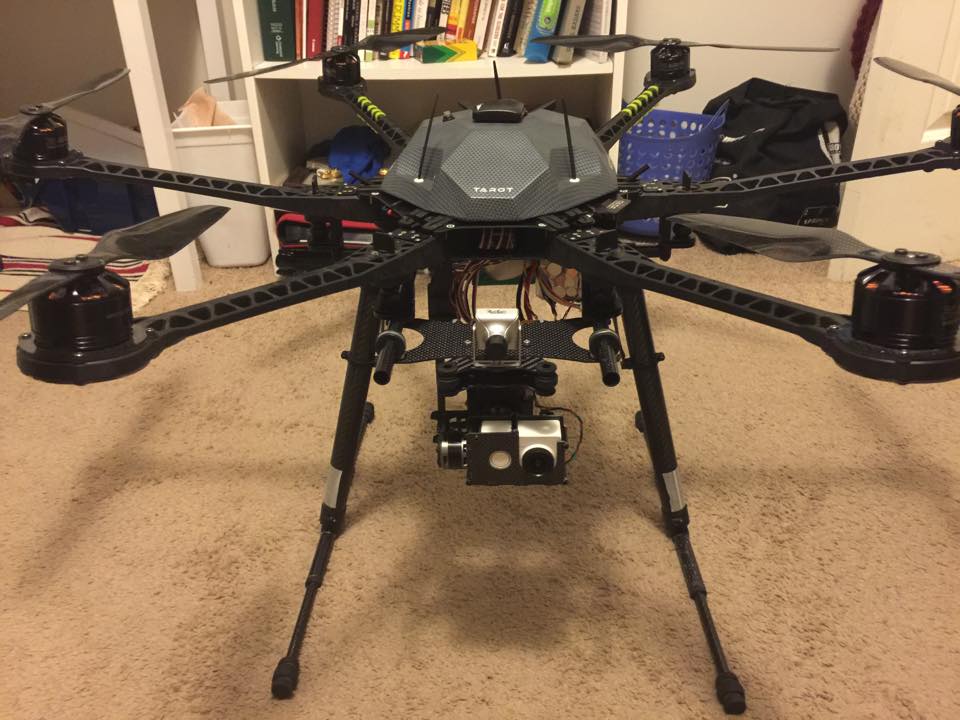
DJI S800 clone, also known as the RCTimer F800.
Being a photographer, I quickly realized after building my ZMR250 that I would absolutely love a Aerial Photography Rig. I had originally planned to build a HMF S550 hexacopter. However, around the same time that I was planning to order the frame, I stumbled across a deal on a used F800 frame that I could not pass up. It certainly seemed like overkill, but who cares!
The F800 included the RCTimer motors, ESCs, and even a official 3DR Pixhawk flight controller. Sadly after doing some initial testing, the Pixhawk decided to die. Instead of dropping $200 on another Pixhawk, I decided to give one of the many clones a try. I received a number of recommendations on the Pixhawk Lite, so I figured id give it a try. It was a about 1/4 the price, and had a great reputation in APM/Pixhawk community. The only issues I've found with the Pixhawk Lite was that the pin-outs on nearly all the ports were not the same as APM/Pixhawks. So every wire needed it's pins rearranged. I consider that a small price to pay for the amount I saved on the controller. So far it has been performing wonderfully, even with the limited amounts of ports on this device. I have been able to connect an external GPS/Compass, Telemetry radio, OSD, and even an external LED.
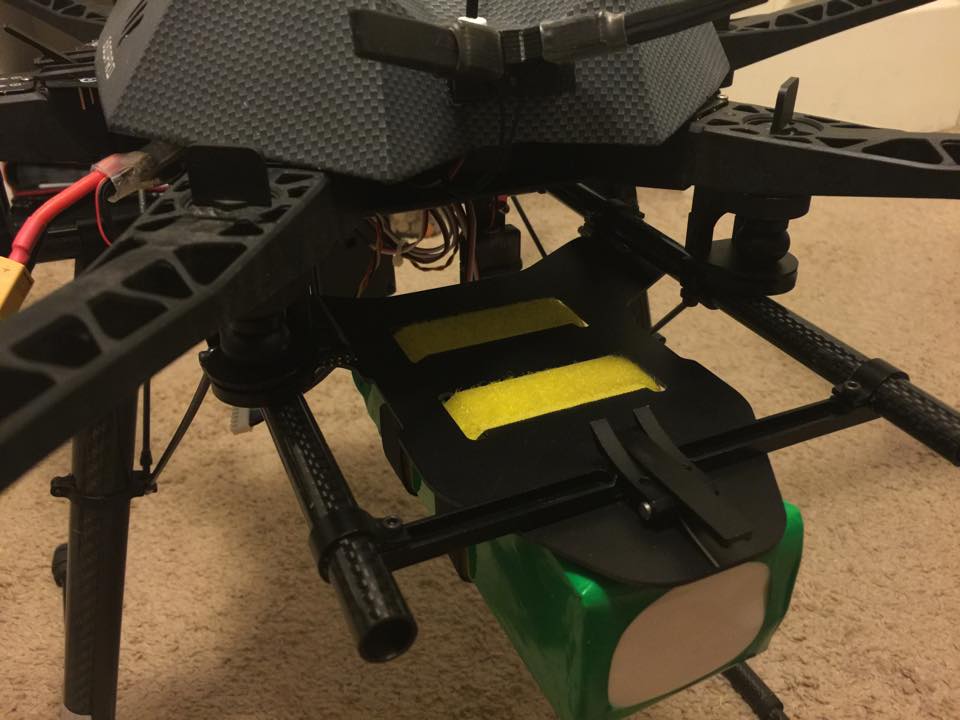
The Arris CM3000Pro gimbal was another great deal I came across. After reading a few threads on RCGroup, I knew it was a no brainer that I had to have this awesome 3-axis brushless gimbal. The only problem is, the gimbal is made for a GoPro Hero3, and I really did not want to drop a bunch of money on a new GoPro, However, I did have an inexpensive XiaoMi Yi camera. Let me go on record and say that this camera is absolutely amazing. Nearly identical performance to a GoPro, at a fraction of the cost. Certainly the best bang for the buck action camera out there. With it's ever growing popularity, I figured I could certainly find a way to retrofit the camera with the Arris gimbal. Low and behold, after some quick searching I found a gentleman in New Zealand who owned the same gimbal, and was in the beginning stages of making custom carbon fiber parts for it. The first part he had fabricated was an adjustable arm that allowed you to adjust the roll balance of the camera. I contacted him about making a custom frame to hold the XiaoMi Yi camera, and he was excited to give it a try. I sent him some measurements, and a few weeks later I had a solution for mounting the camera.
The outdoor photos had the XiaoMi Yi installed without the adjustable arm. Which is why the camera is not balanced properly. Indoor photos has the adjustable arm installed, hence why it is level.
I am waiting on a few miscellaneous parts to arrive, but I should be back in the air very soon. So be on the look out for some videos soon! Once I gain some confidence with this aircraft, I plan on adding a larger gimbal, and bigger/better camera. :)
Photos


Part List
Show stores (8)
Will your Pixhawk keep this bird in the air if a single rotor fails? I know an octocopter can handle two motor failures, but I think it depends on the FC to compensate.

By the way, as far as CG balancing... I was able to move the main battery a bit forward, but I was limited by the length of my power module, so I couldn't take it all the way forward. I have a few items that I will be adding soon that should increase the front weight. For example, I ordered some black sticky wheel weights, so I can balance my gimbals yaw. I also needed a larger capacity battery for my FPV/Video gear, so that should help. Finally, I was seating here looking at what else I could add if I needed more counter weight, and I came up with the idea of filling the front CF rails with stainless steel balls (slingshot ammo). I ordered some that will be an exact fit... It all sounds overkill, but I will experiment with it all, and get this bad boy balanced. Then I will have to re-do my PID Autotune. ;)
Wow! That's quite a rig. Do you have a youtube channel? I'd love to see what sort of video you're making with this.
Sounds good! Here's what I've been working on for the past few months, http://rotorbuilds.com/build/24
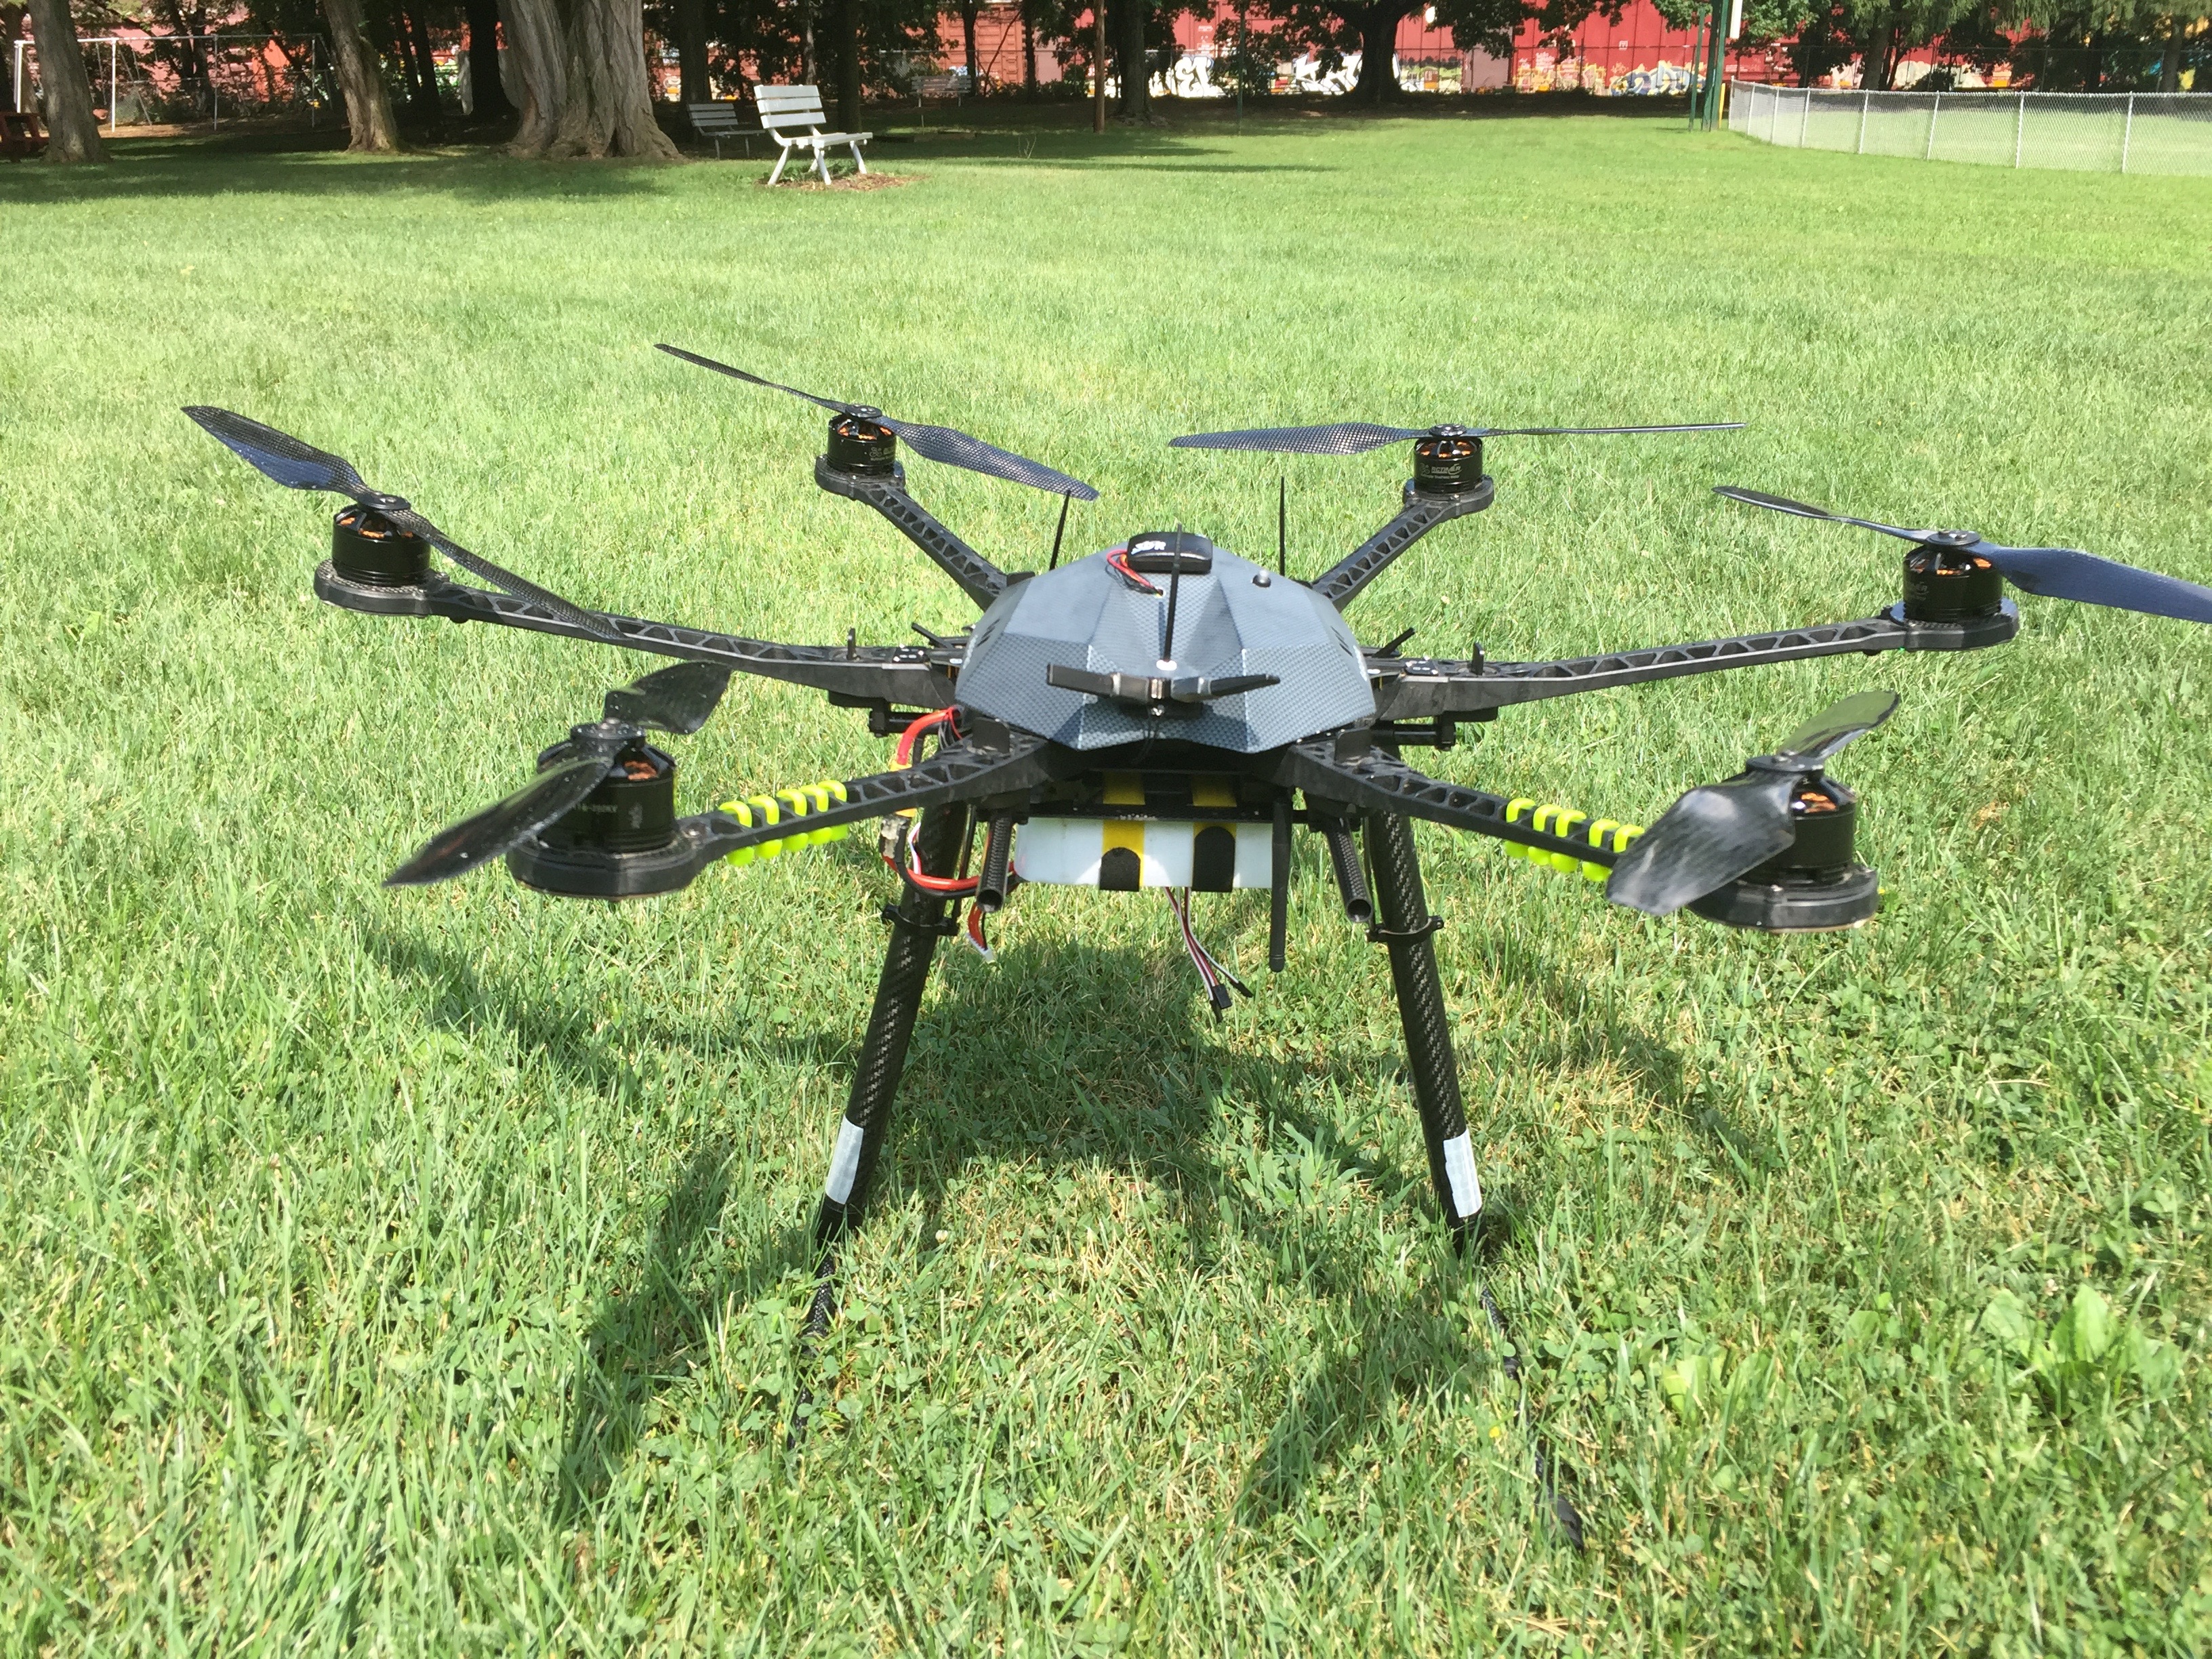
Impressive! I like the Tarot canopy much more than the clear dome the kit comes with. With all that thrust, ”we” need to get to carrying around something better than a Yi...;-)
I had seen someone retrofit the canopy on a different hexa, so of course I had to borrow the idea. It really helps clean up the top plate, especially with a messy Pixhawk. I completely agree about the Yi, I just happened to have a 3-axis gimbal, and the Yi. I absolutely love the Yi, however, once I gain some experience flying, I will certainly look at upgrading to a larger gimbal and camera. :)
I hear ya about the messiness of Pixhawk. It's my least favorite part of my Y6 build. I'm wondering if I might be able to use that canopy on mine...it's smaller, though...580mm. Could you help me with learning the overall dimensions and distance between mounting holes?
EDIT: Nevermind, I found the dimensions on the HK site. My 6" center plate is laughably too small for it.
There are a few canopies on HK I believe. This one is probably the nicest. The two front horizontal mounts are 120mm apart. The 3rd rear mount is 160mm diagonal apart from the front. The canopy came with the mounting hardware, but I did not want to drill into my top plate, as it is a PDB. So I was able to use zip ties. At first it was only a temporary solution, until I could epoxy the posts on. However, I've deiced to continue using the zip ties they work fantastically. I'm not sure if the canopy acts as a shield, I'm sure you could line they side with some sort of material that could help. I ran a CompassMot test in Mission Planner, which checks for compass interface. Mine interface was well below the recommended threshold.


So I went out recently and did some testing. I am still learning to fly this beast, but more importantly I am still tuning PIDs for both the hexacopter and the gimbal. There is still some jello wobble in the video that I am trying to eliminate. I have a feeling it is likely due to unbalanced props. My Du-Bro prop balancer should arrive tomorrow. Here is a quick video of the test flight.
I need to add support for those special youtu.be links. For now just paste the youtube.com link.
Cool, I was able to fix it. Let me know what you think of the video. It's boring I know, but hopefully once all the kinks are worked out, I can attempt some actual quality footage, lol.
Looks extremely stable! Once you get those props balanced you should see a huge improvement with the jello. The focus doesn't seem too sharp though.
Yeah, I feel the video quality is a bit muddled. Some Xiaomi Yi cameras had focus issue. I'm actually in the process of adjusting mine, hopefully that's the issue with the sharpness. Unless it's some sort of export issue, or YouTube compression?
If you haven't focused your Yi then you definitely need to do that. It took me a while to get mine geared in, but I'm really happy with the sharpness now. You also want to get a script in there to reduce the noise reduction. I reduced mine to 200 which works quite well.
During your focus correction, did you set an object a certain distance away from the camera? I will look into the script ASAP.
I used a very crude method. I took the faceplate off, went outside and twisted the lens vocalizing each twist while doing a pan around the yard at each position. Eventually I found a position that looked good. If you have an HDTV and a cable then that might be a better method. I have neither.
Yeah, I ordered a super cheap Mini-HDMI cable to aid in the process. However, my only display that has HDMI is my 50" HDTV. I can easily focus on items a few feet in front of me, but I find it difficult to gauge sharpness on stuff that is further away. The cable really isn't long enough for me to step back and examine the entire TV. I may get a cheap HDMI to DVI adapter, and connect it to one of my computer monitors.
I read that you mainly want to focus at 7ft.