Update April 2020
This was originally completed back in early spring of 2018. Since then, it has taken lots of beatings, gotten a new FC (CLRacing F7), new VTX (TBS Unify Pro), burnt one ESC, added a GPS unit, moved to 5143 T-motor props, switched to the R9MM reciever and most recently had a frame swap (for the identical spare I bought). But the thing is still flying great and is my regular flyer. Honestly, its crazy to think back that this thing is 2 years old now!
Goals goals:
-Low deck/low CG frame
-Acro focused, race capable
-Balance of budget and performance
Build Notes
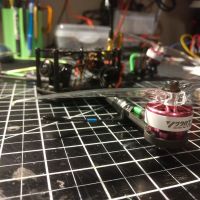
Frame:
Before ordering the PUDA 240 frame, I saw several reviews that mentioned the top plate will not sit level on the frame. From the pictures available online, it looked like this was due to the camera plates being slightly too tall. Other builders tried to fix this by inserting a couple of small washers on 2 on the front standoffs. After receiving the frame kit I confirmed that the camera plates were too tall, so I simply filed both sides of the top tab on each plate until they fit level. This maintains a level top plate and a clean, even look.
I also sanded the edges of all the plates and arms to slightly round them. I do this in the sink with a trickle of water to avoid any risk of carbon dust.
Finally, I decided to add some 3D printed parts to help with the build and bring in some additional color to a very black build. I used neon green TPU to print Arm Protectors and a GoPro Hero Mount. The Hero Mount adds several millimeters, so I used some longer screws I had on hand for those standoffs. I also wanted a clean way to mount my RX antennas, RX, and VTX. Since I couldn't find a good fit for the parts I was using, I designed my own Rear Frame Mount.
Camera:
Unfortunately, the Foxeer Arrow V3 does not fit well in this frame. The issue is that the side tabs are too wide and prevent the camera from tilting past about 10 degrees. Luckily, I had an old case from a Foxeer Night Wolf. The case is the same size, but plastic and without the extended side tabs. It is still a very snug fit, but it does work.
ESC:
I mounted the ESC with the pin connector on the bottom and pointing to the left side, with the battery connector on the right. I used about 25mm for my XT60 connector, but may need to make is slightly longer. I also wired the motors straight to the closest corner of the ESC. This means the motor order will be incorrect. I will be either remapping motors in Betaflight, or just moving wires on the ESC to FC in order to correct this.
Antenna Mounting:
Using the 3D printed part I designed, I routed the receiver wires through the mount and out to each corner. Then I placed the zip ties for mounting. The left one gets looped in the back and out the top, then pulled tight, and heat shrink goes over the zip tie and antenna wire. On the left, I simply cut the zip tie to length and pushed it down into the hole on the corner to be friction fit in place.. The antenna wire should already be coming in and up the same hole, so heat shrinking is very straightforward.
I tried to incorporate a VTX antenna mount, but with the space and wiring used on the antenna, I couldn't get the bend that I needed to make it work. Instead, I installed the antenna and bent it to come out the back and placed a single zip tie through the top plate to hold it in place. Note that this is the only thing attached to the top plate, so to remove the plate, the antenna just needs popped loose (which is why I went with the MMCX connector).
Motors:
Before mounting the motors, I stole Whiffles idea of using paracord for wire wrap. It worked fantastically but requires some patience in feeding the wires through. Motors are mounted straight to the frame. I installed the Arm Protectors first, then the motors, and used all four bolts cause loose motors=no fun.
Photos


Part List
Show stores (4)Guides & Reviews

AirbladeUAV has done it again and this time they've brought long range to the 5" class! Based on the popular Transformer Mini, the new Transformer 5" Ultralight adopts a lot of the same design philosophies with larger props and more payload capacity. It can fly upwards of 20 minutes on a 4 cell Li-Ion battery pack and in ideal conditions it's got a range of over 4 to 5 miles. In this guide I'll walk..
Read more
With the release of the DJI FPV Drone cinematic FPV has become a lot more accessible, but you certainly don't want to crash a $750 drone! The QAV-CINE Freybott is a compact, lightweight cinematic FPV drone that can take a hit and keep going. It's a lot safer to fly indoors and around people. With a naked GoPro or the SMO 4k you can capture some great stabilized footage. In this guide I'll show you..
Read more


New Message for FalcoFPV