
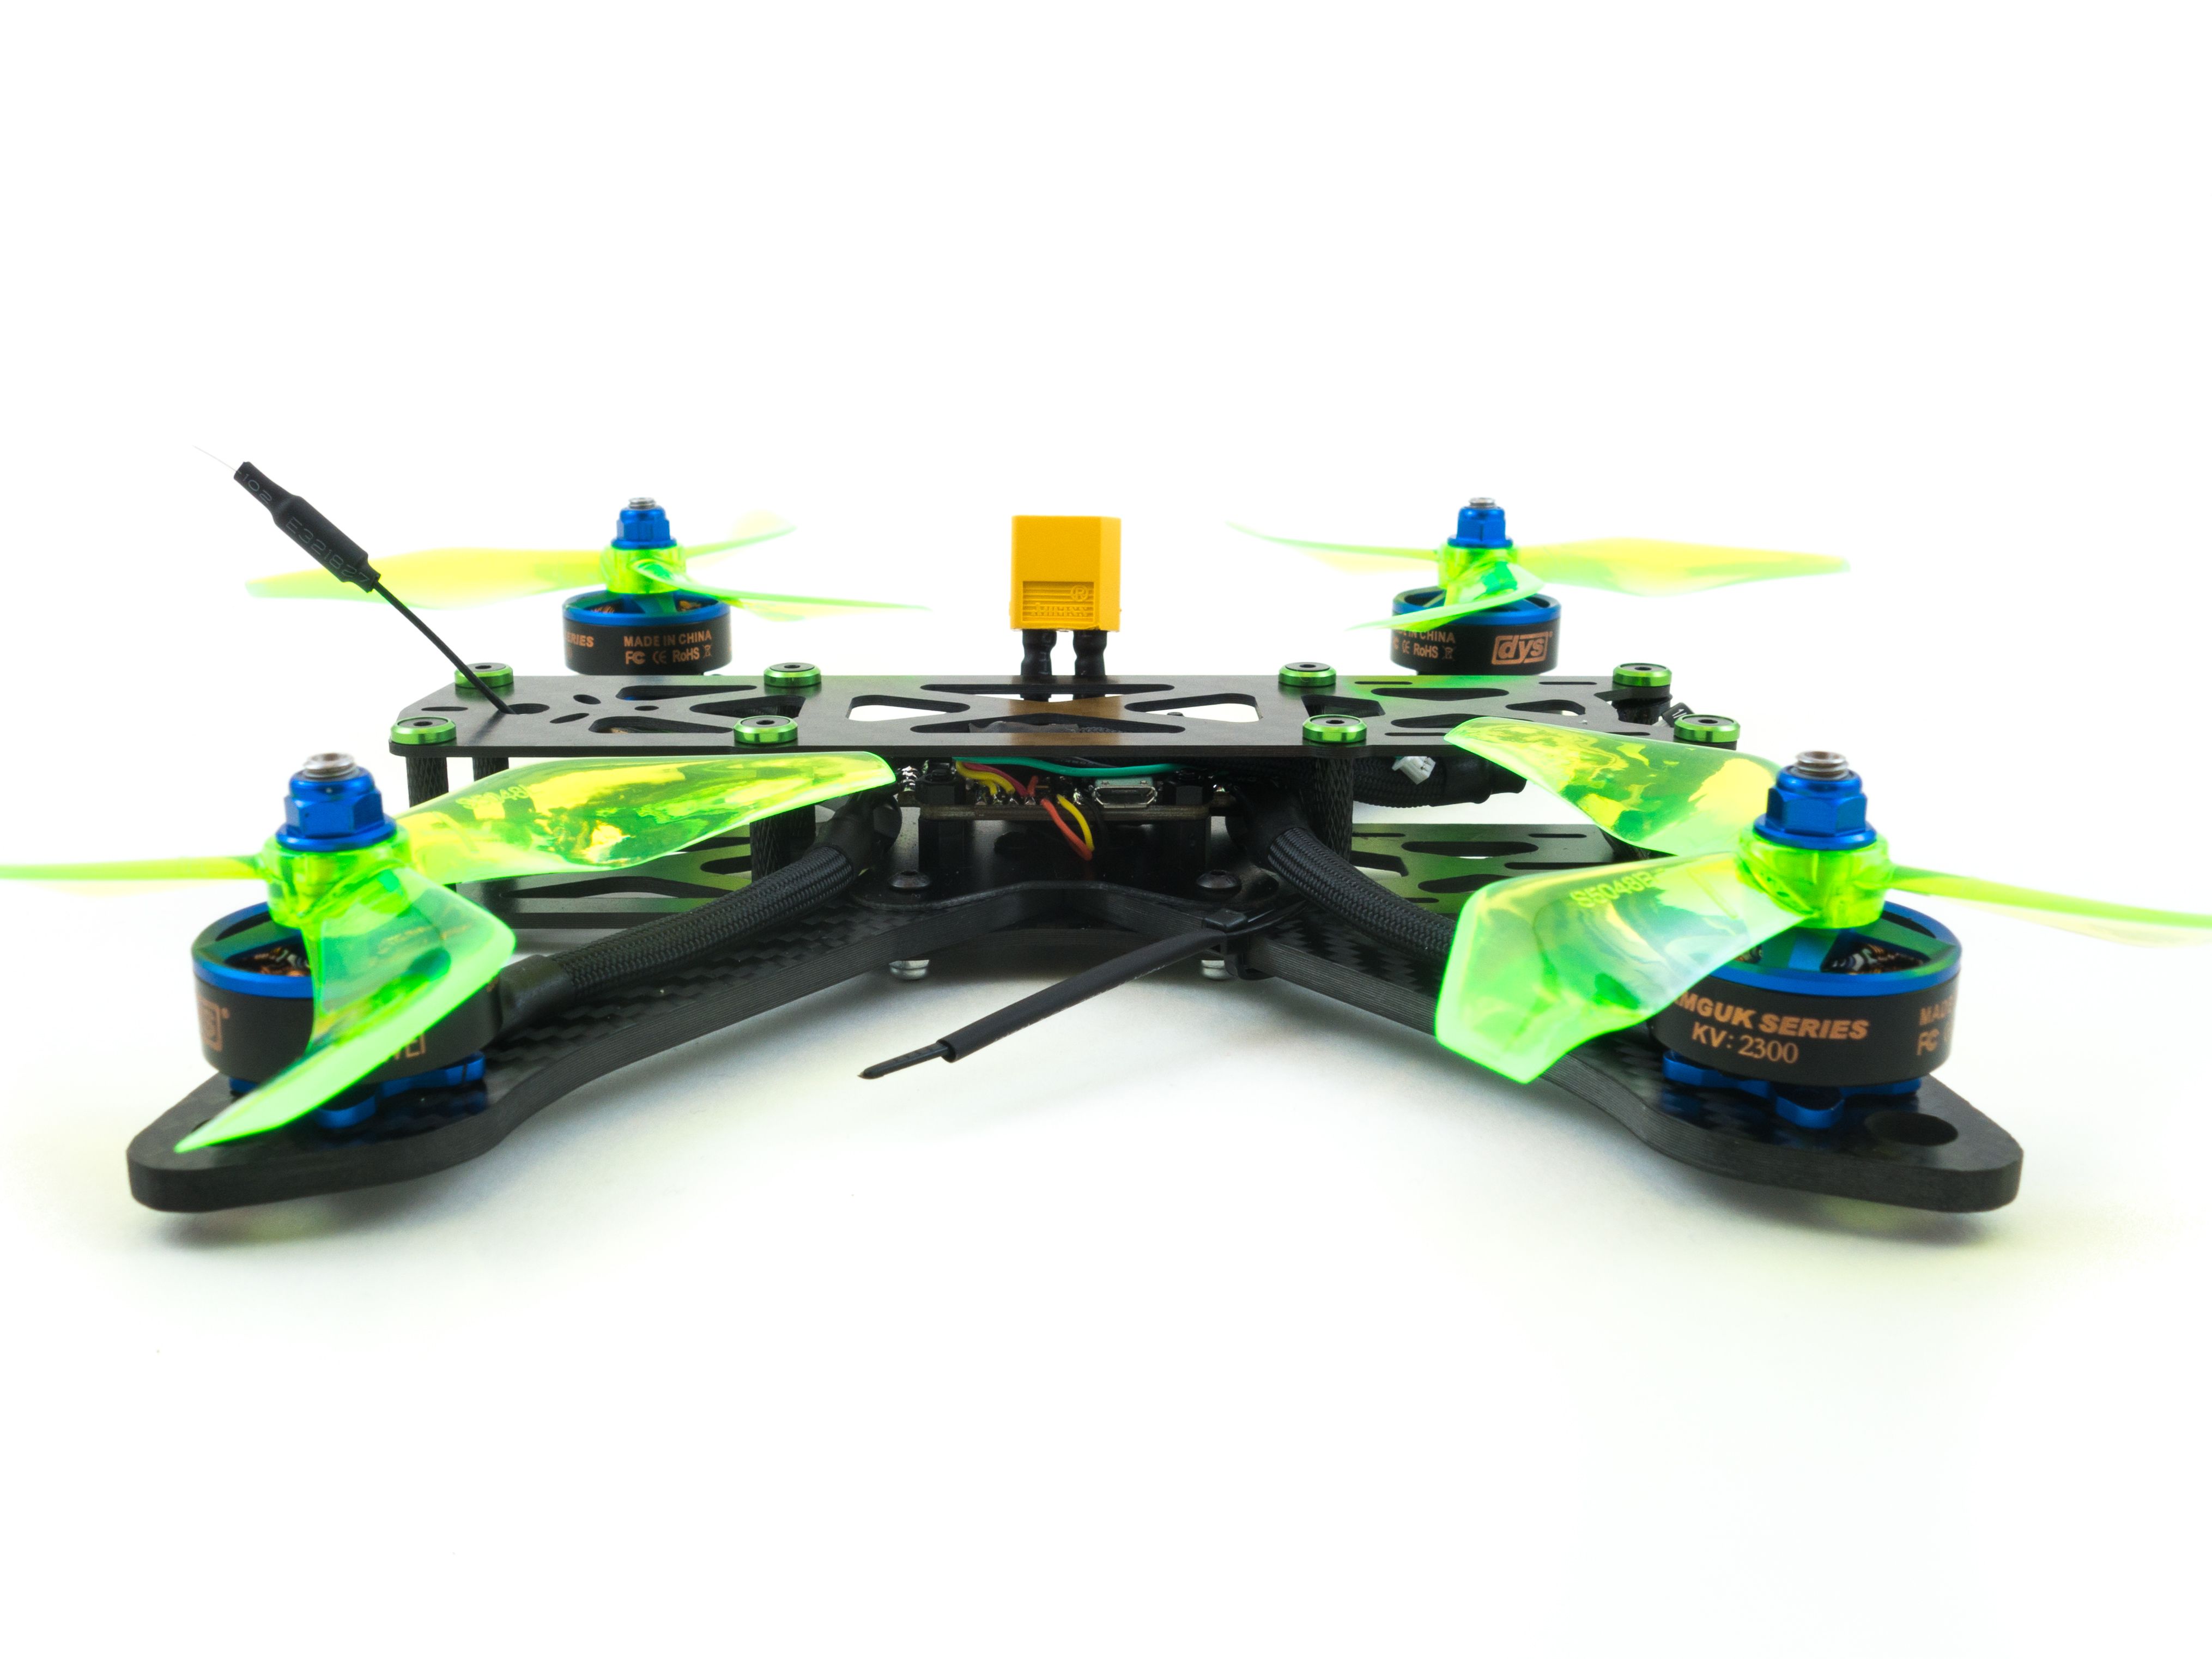
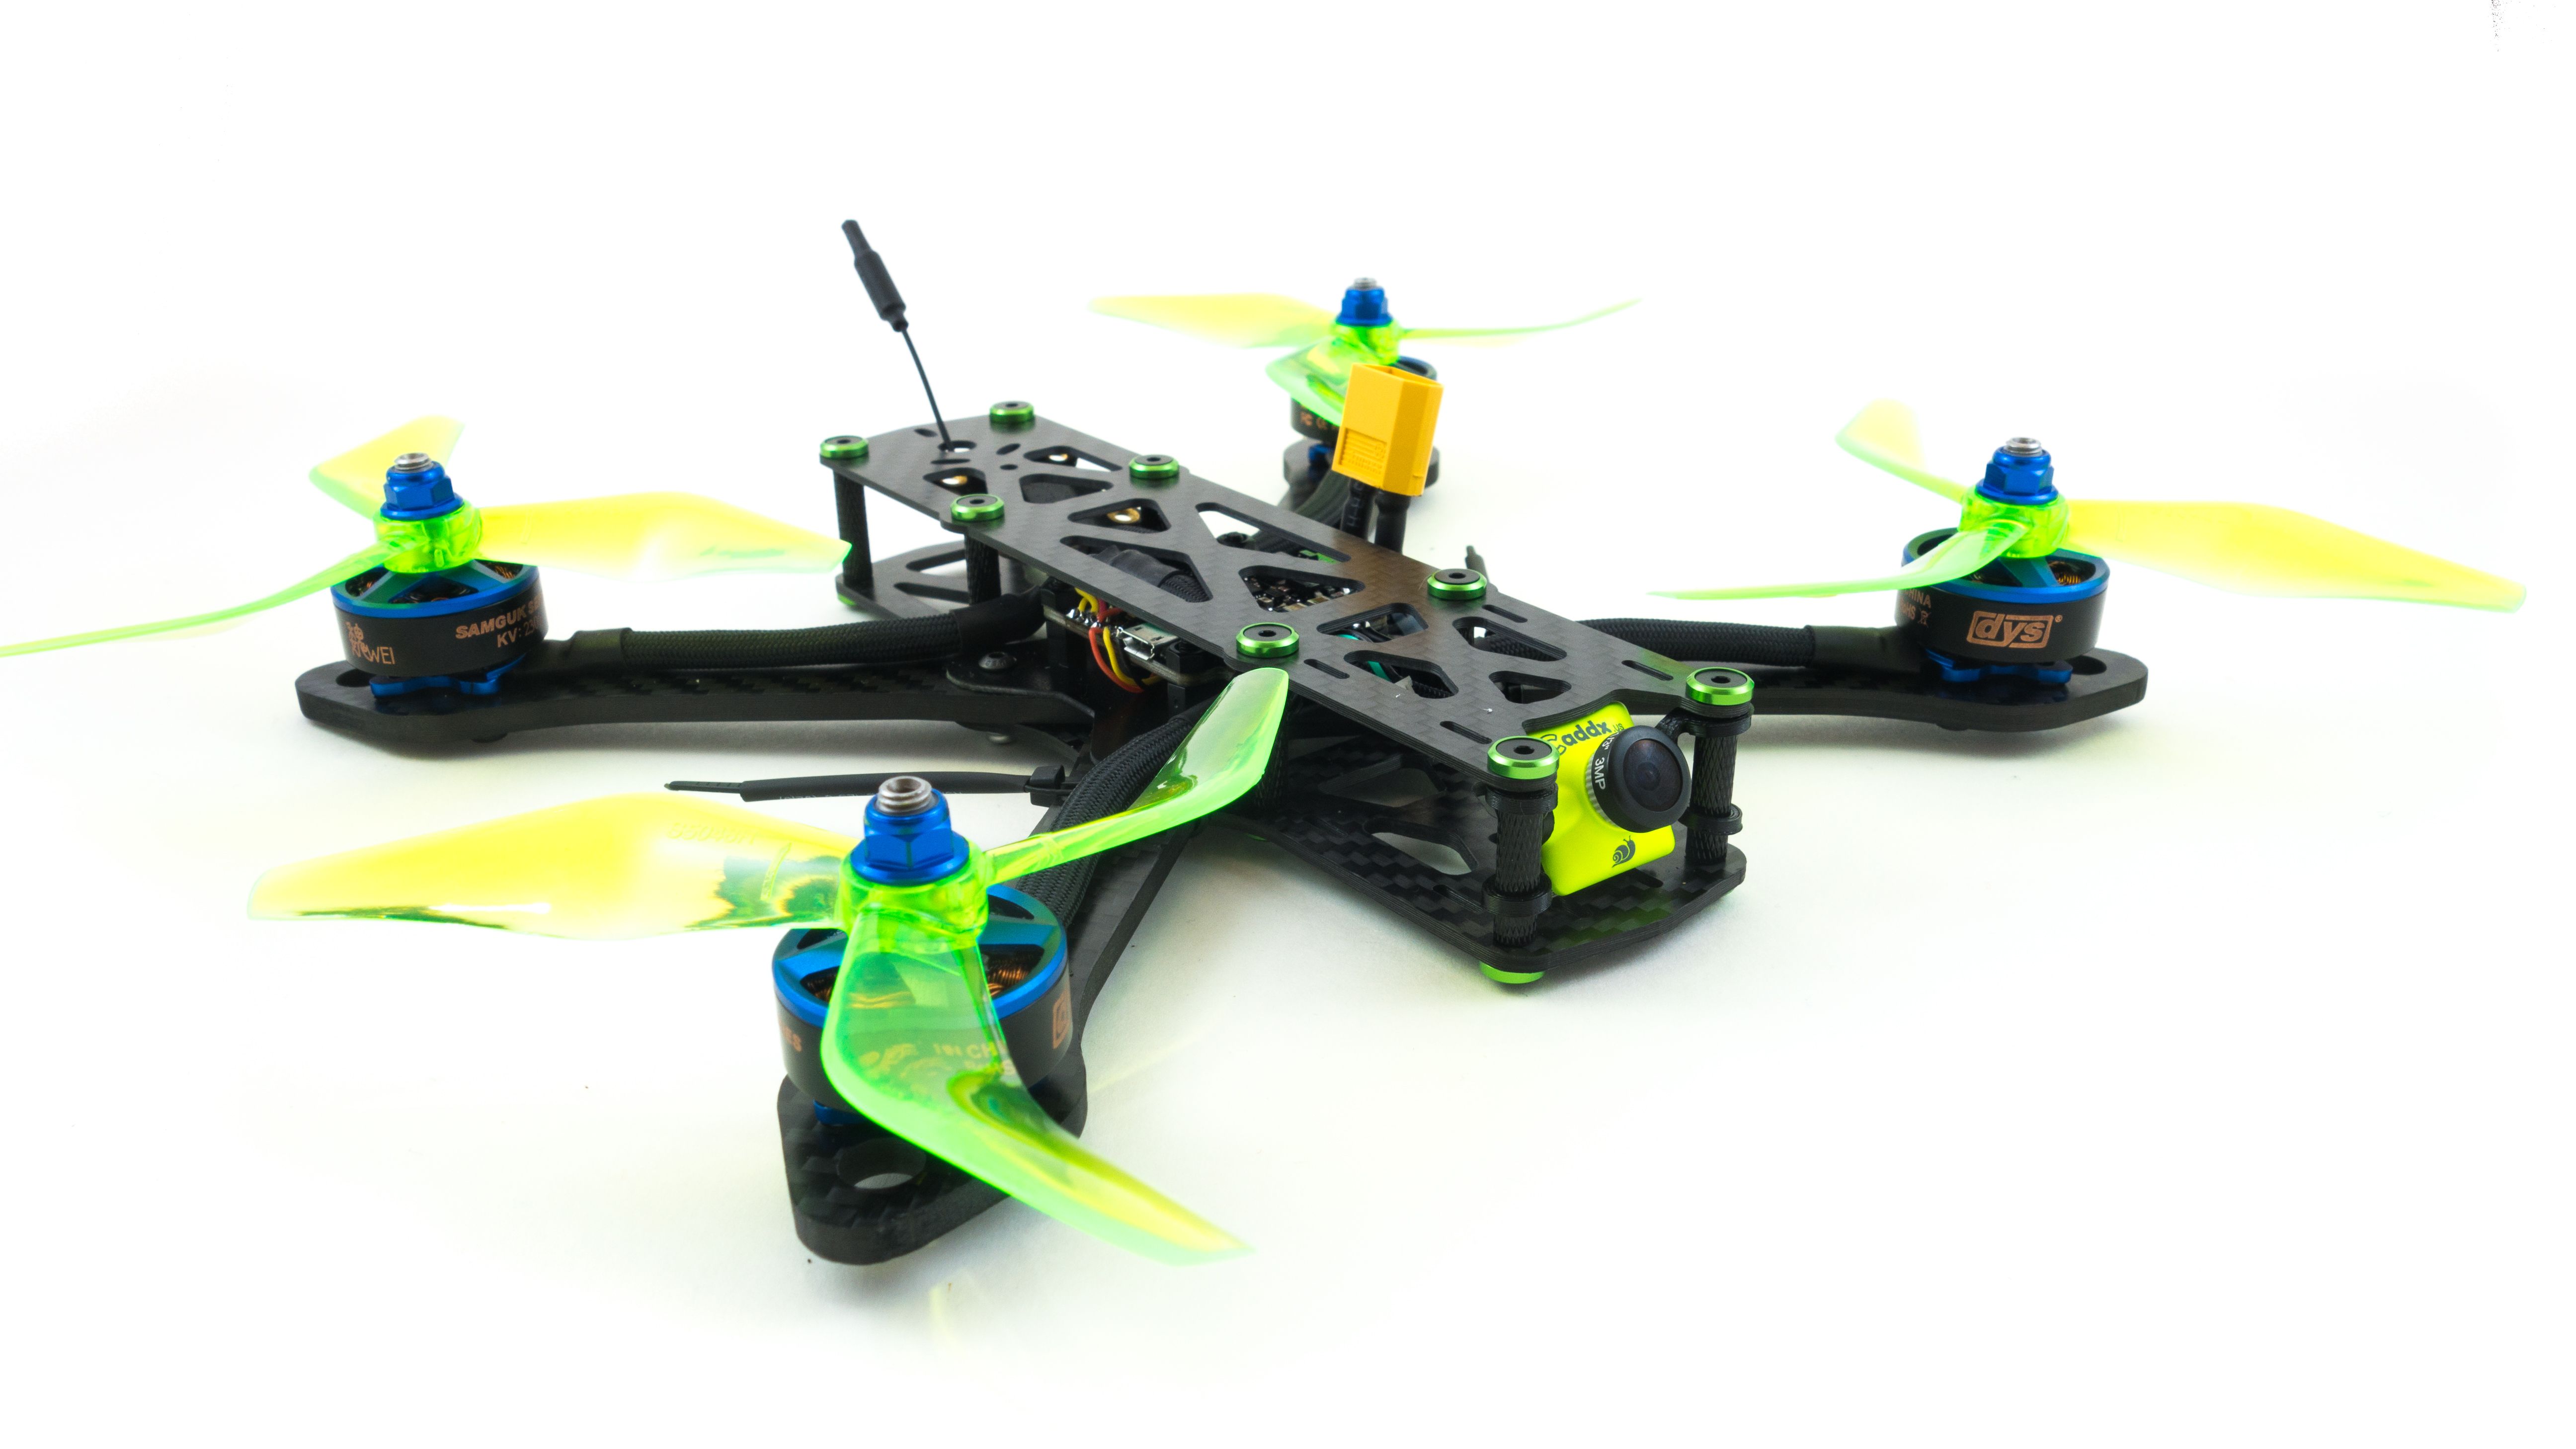
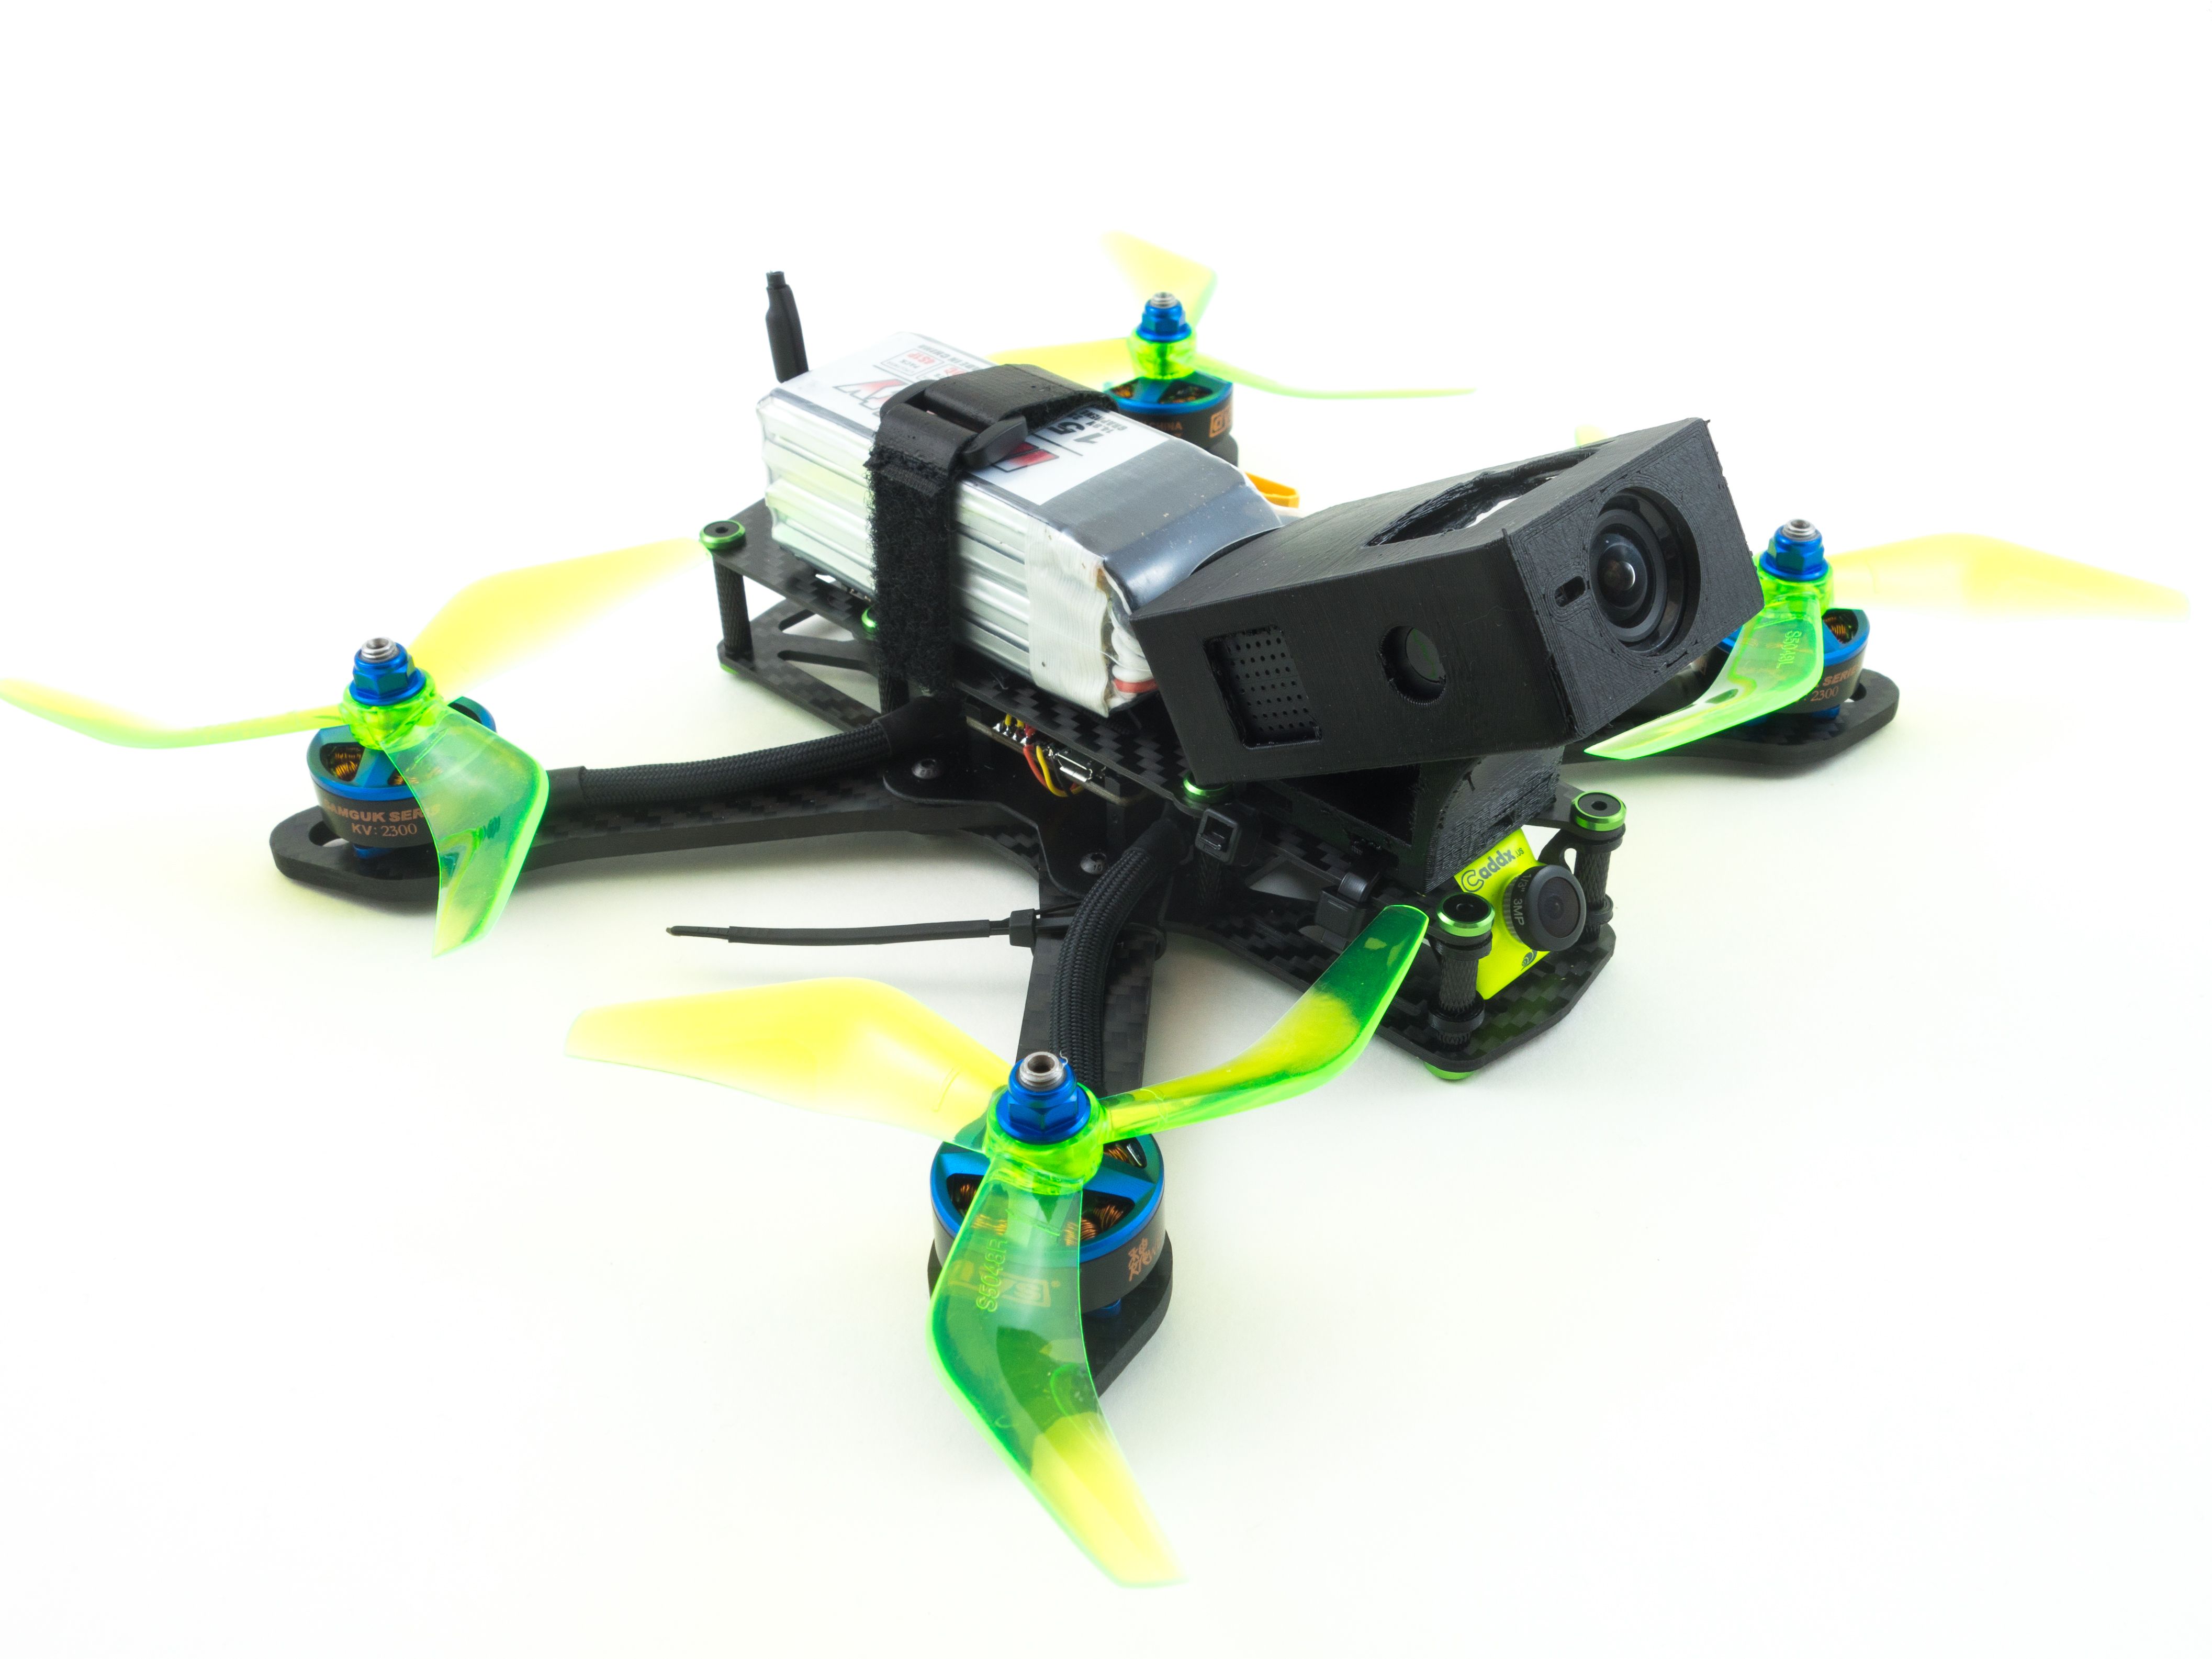
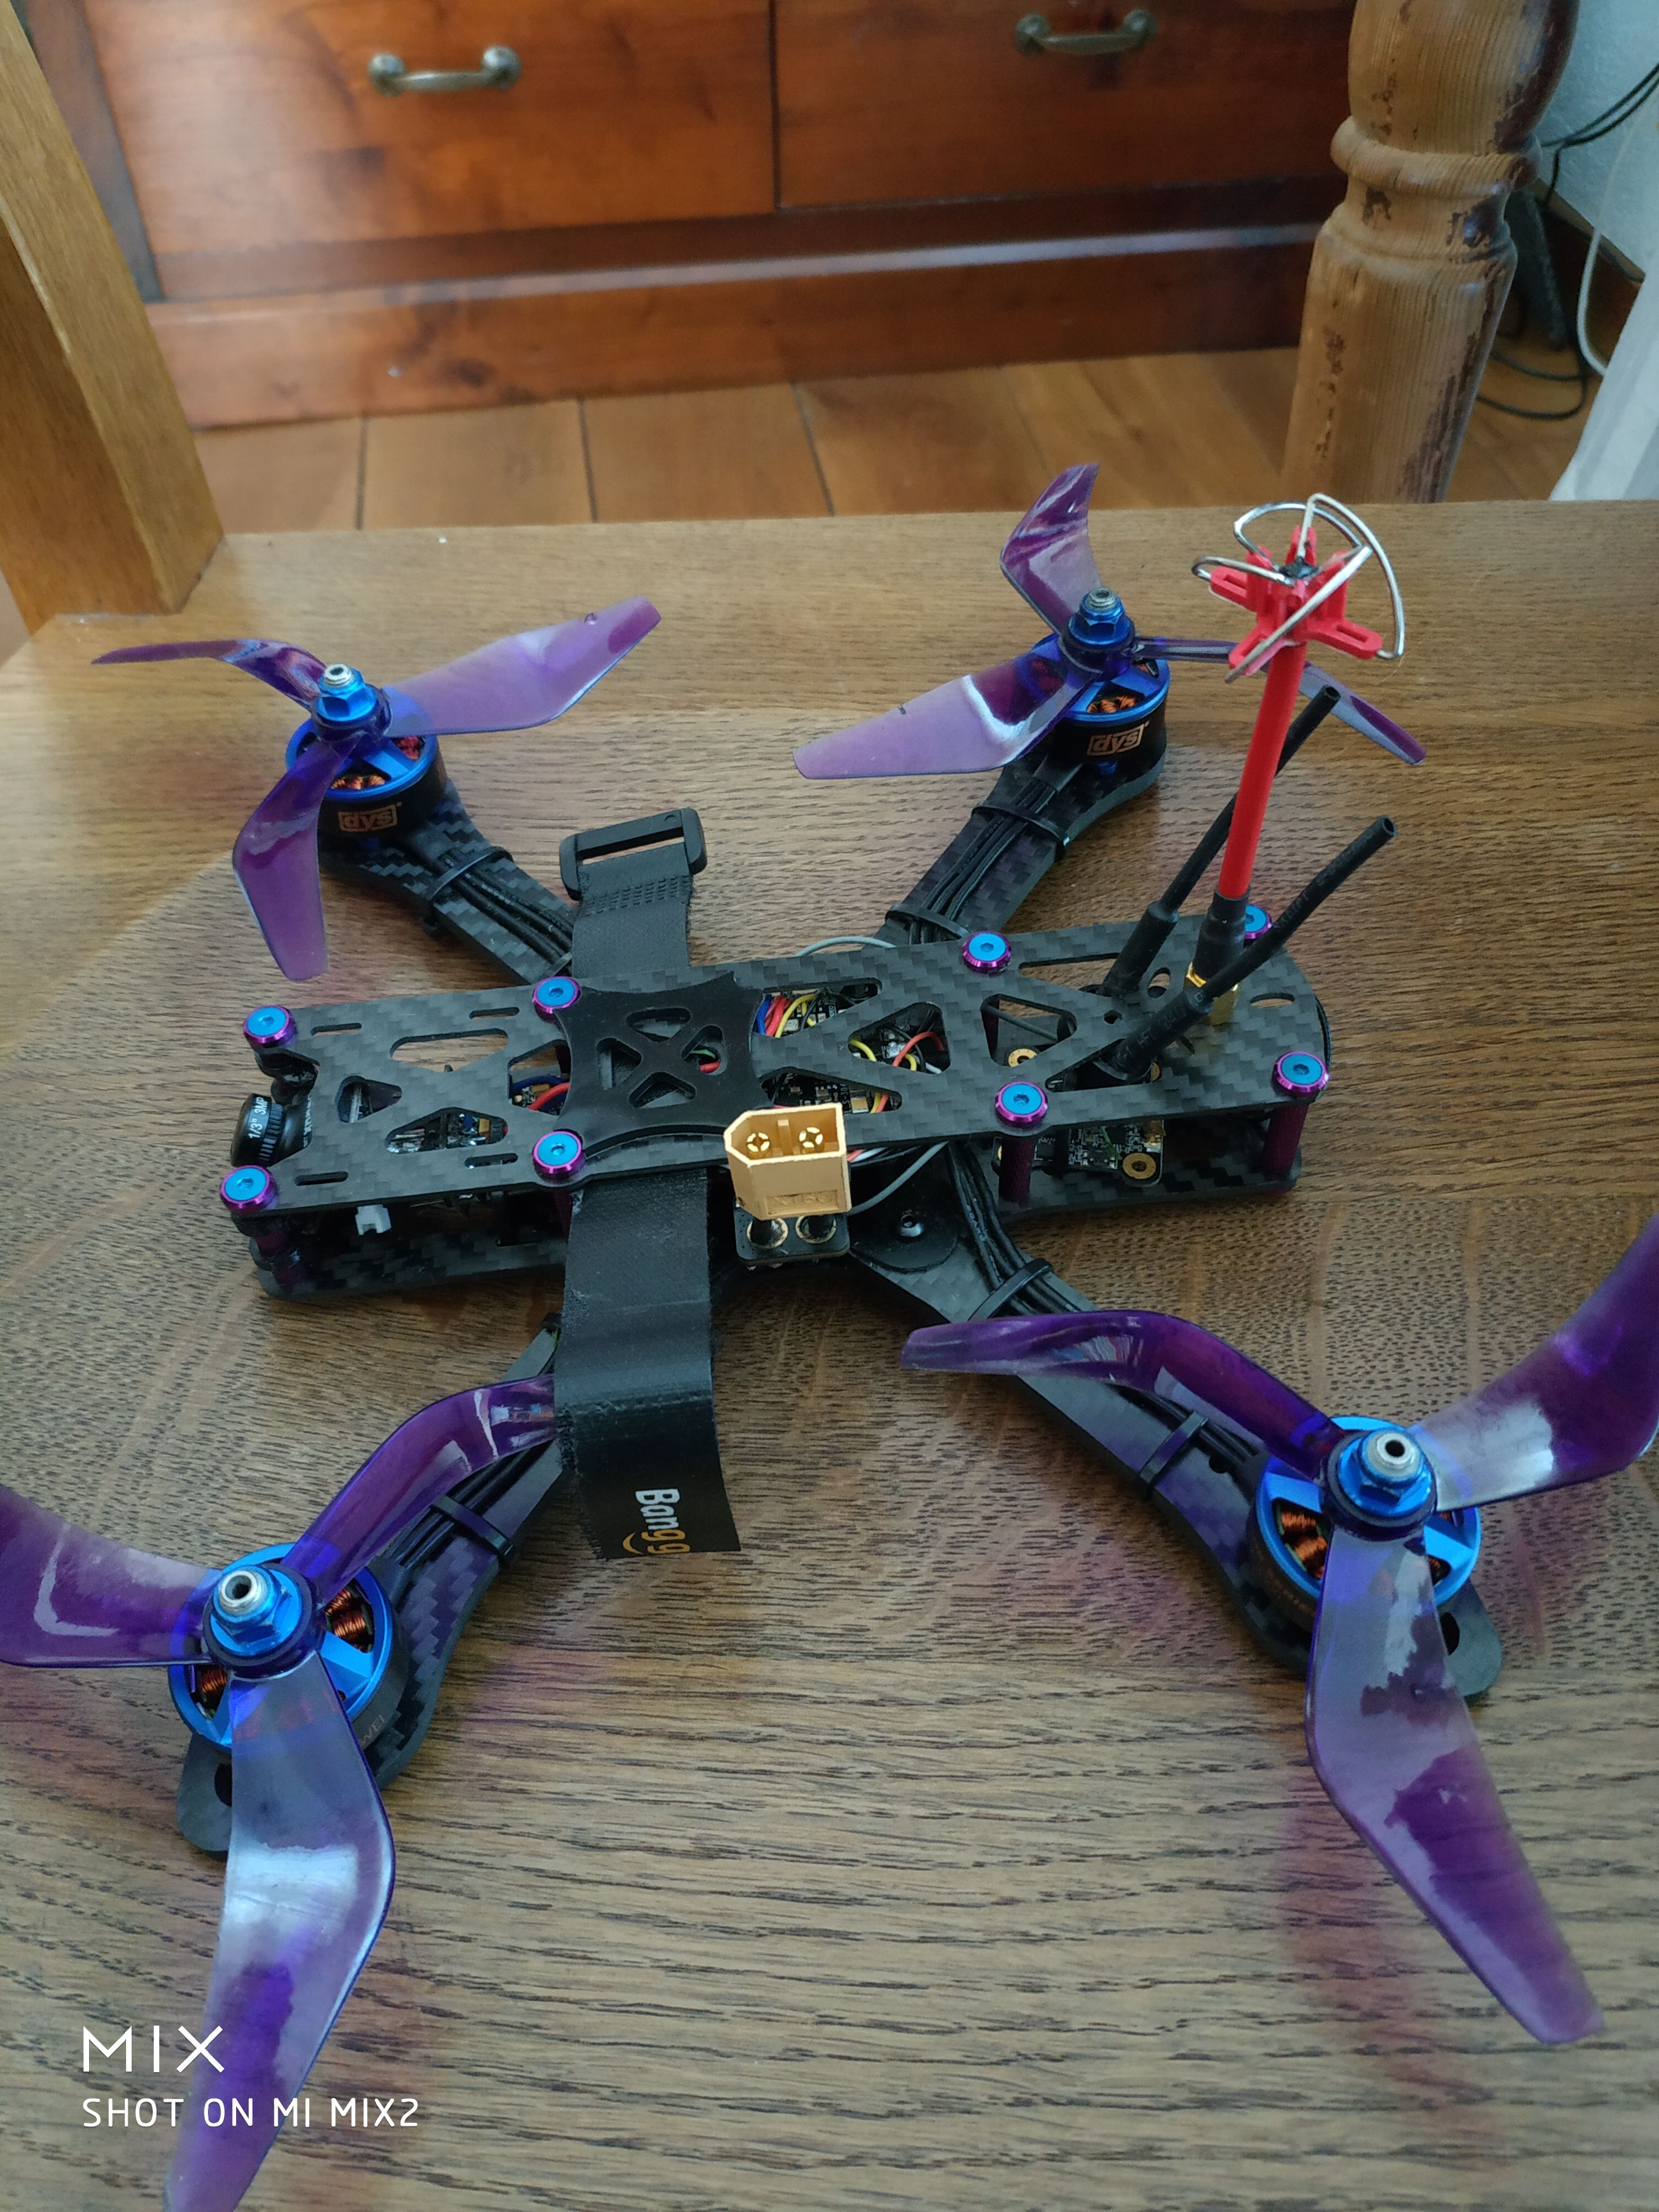
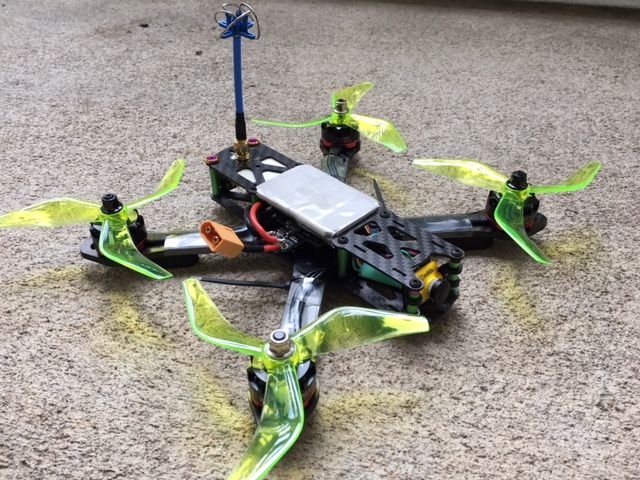
This is the 3rd revision in the "Wizard Killer" series of builds based on the Martian II frame. The original Wizard Killer was my response to the successful Eachine Wizard RTF quad. The Mark III supersedes the more budget oriented Wizard Killer Mark II and is the most featured packed, simple to build and powerful of the three. The base weight with props is about 326g and fully loaded with a battery and Legend 3 it's nearly 600g.
Here are a few of the improvements over the previous versions:
- Supports 20mm standoffs
- CMOS WDR 2.1mm camera with OSD config
- Current sensor for OSD
- OSD VTX controls and pit mode
- More powerful DYS Samguk motors
- Very simple to build
Not to mention a few other useful features:
- OSD tuning
- Dynamic filters
- Flip over on crash
- ESC beeper
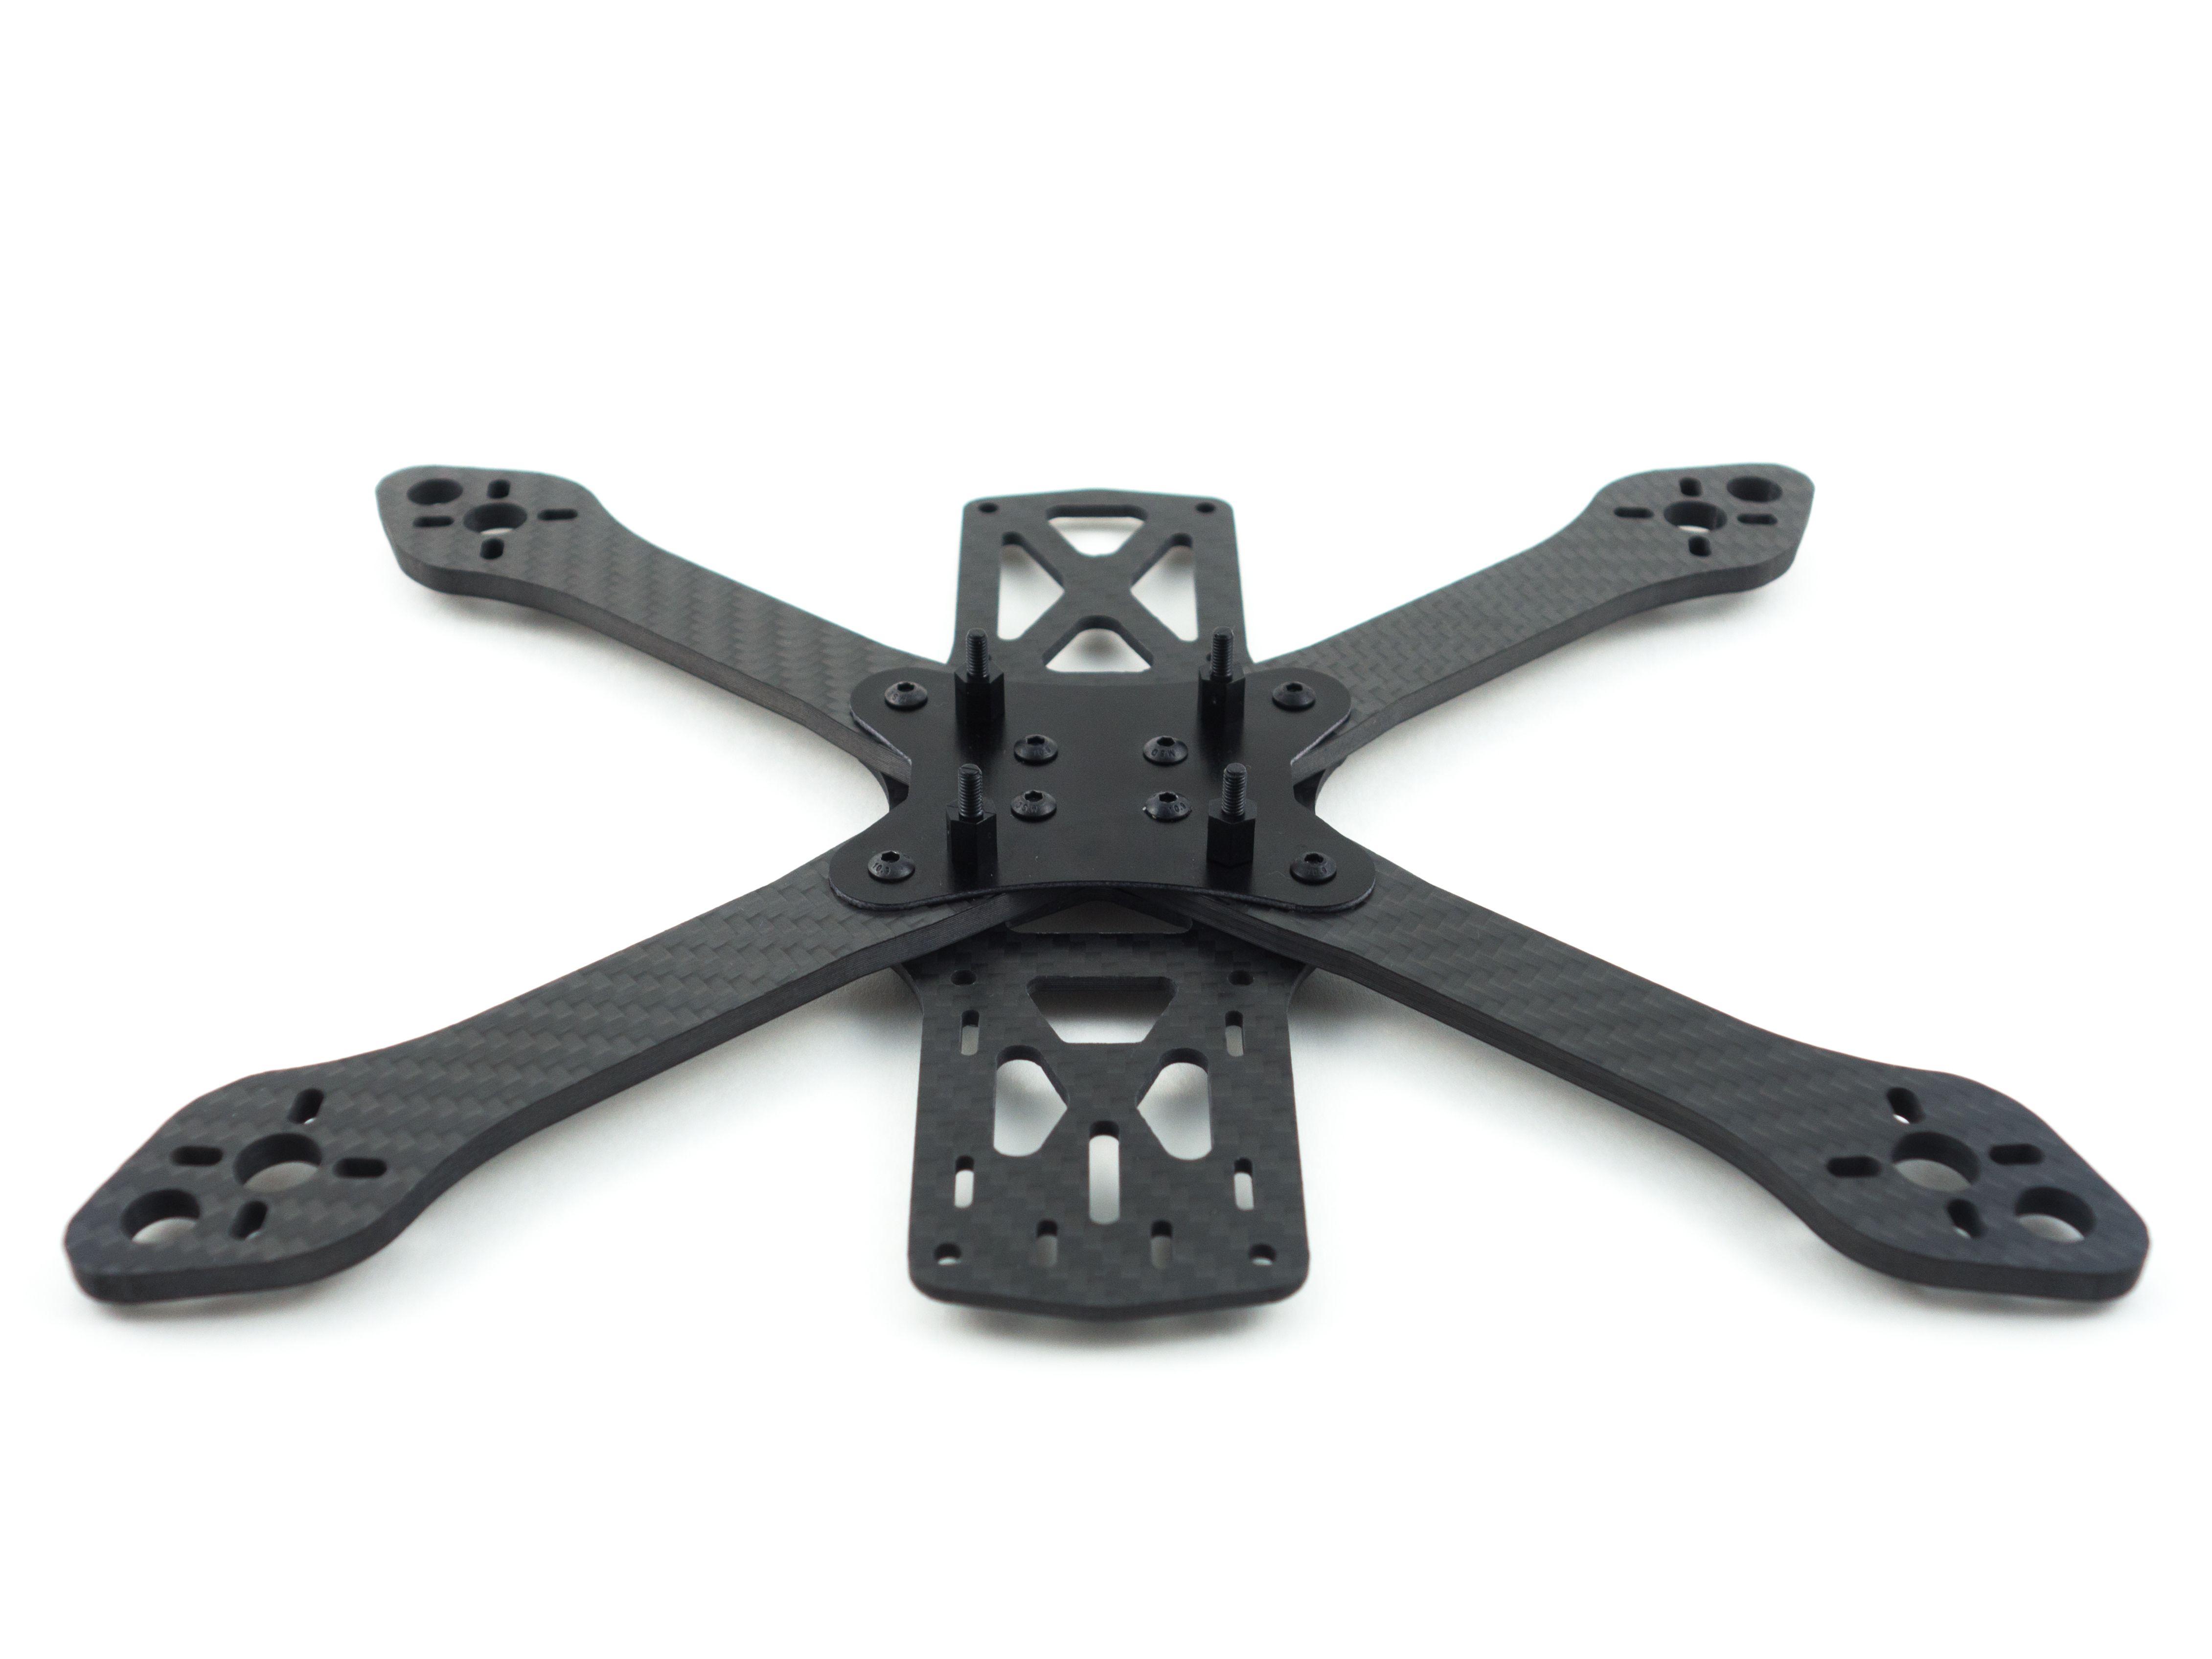
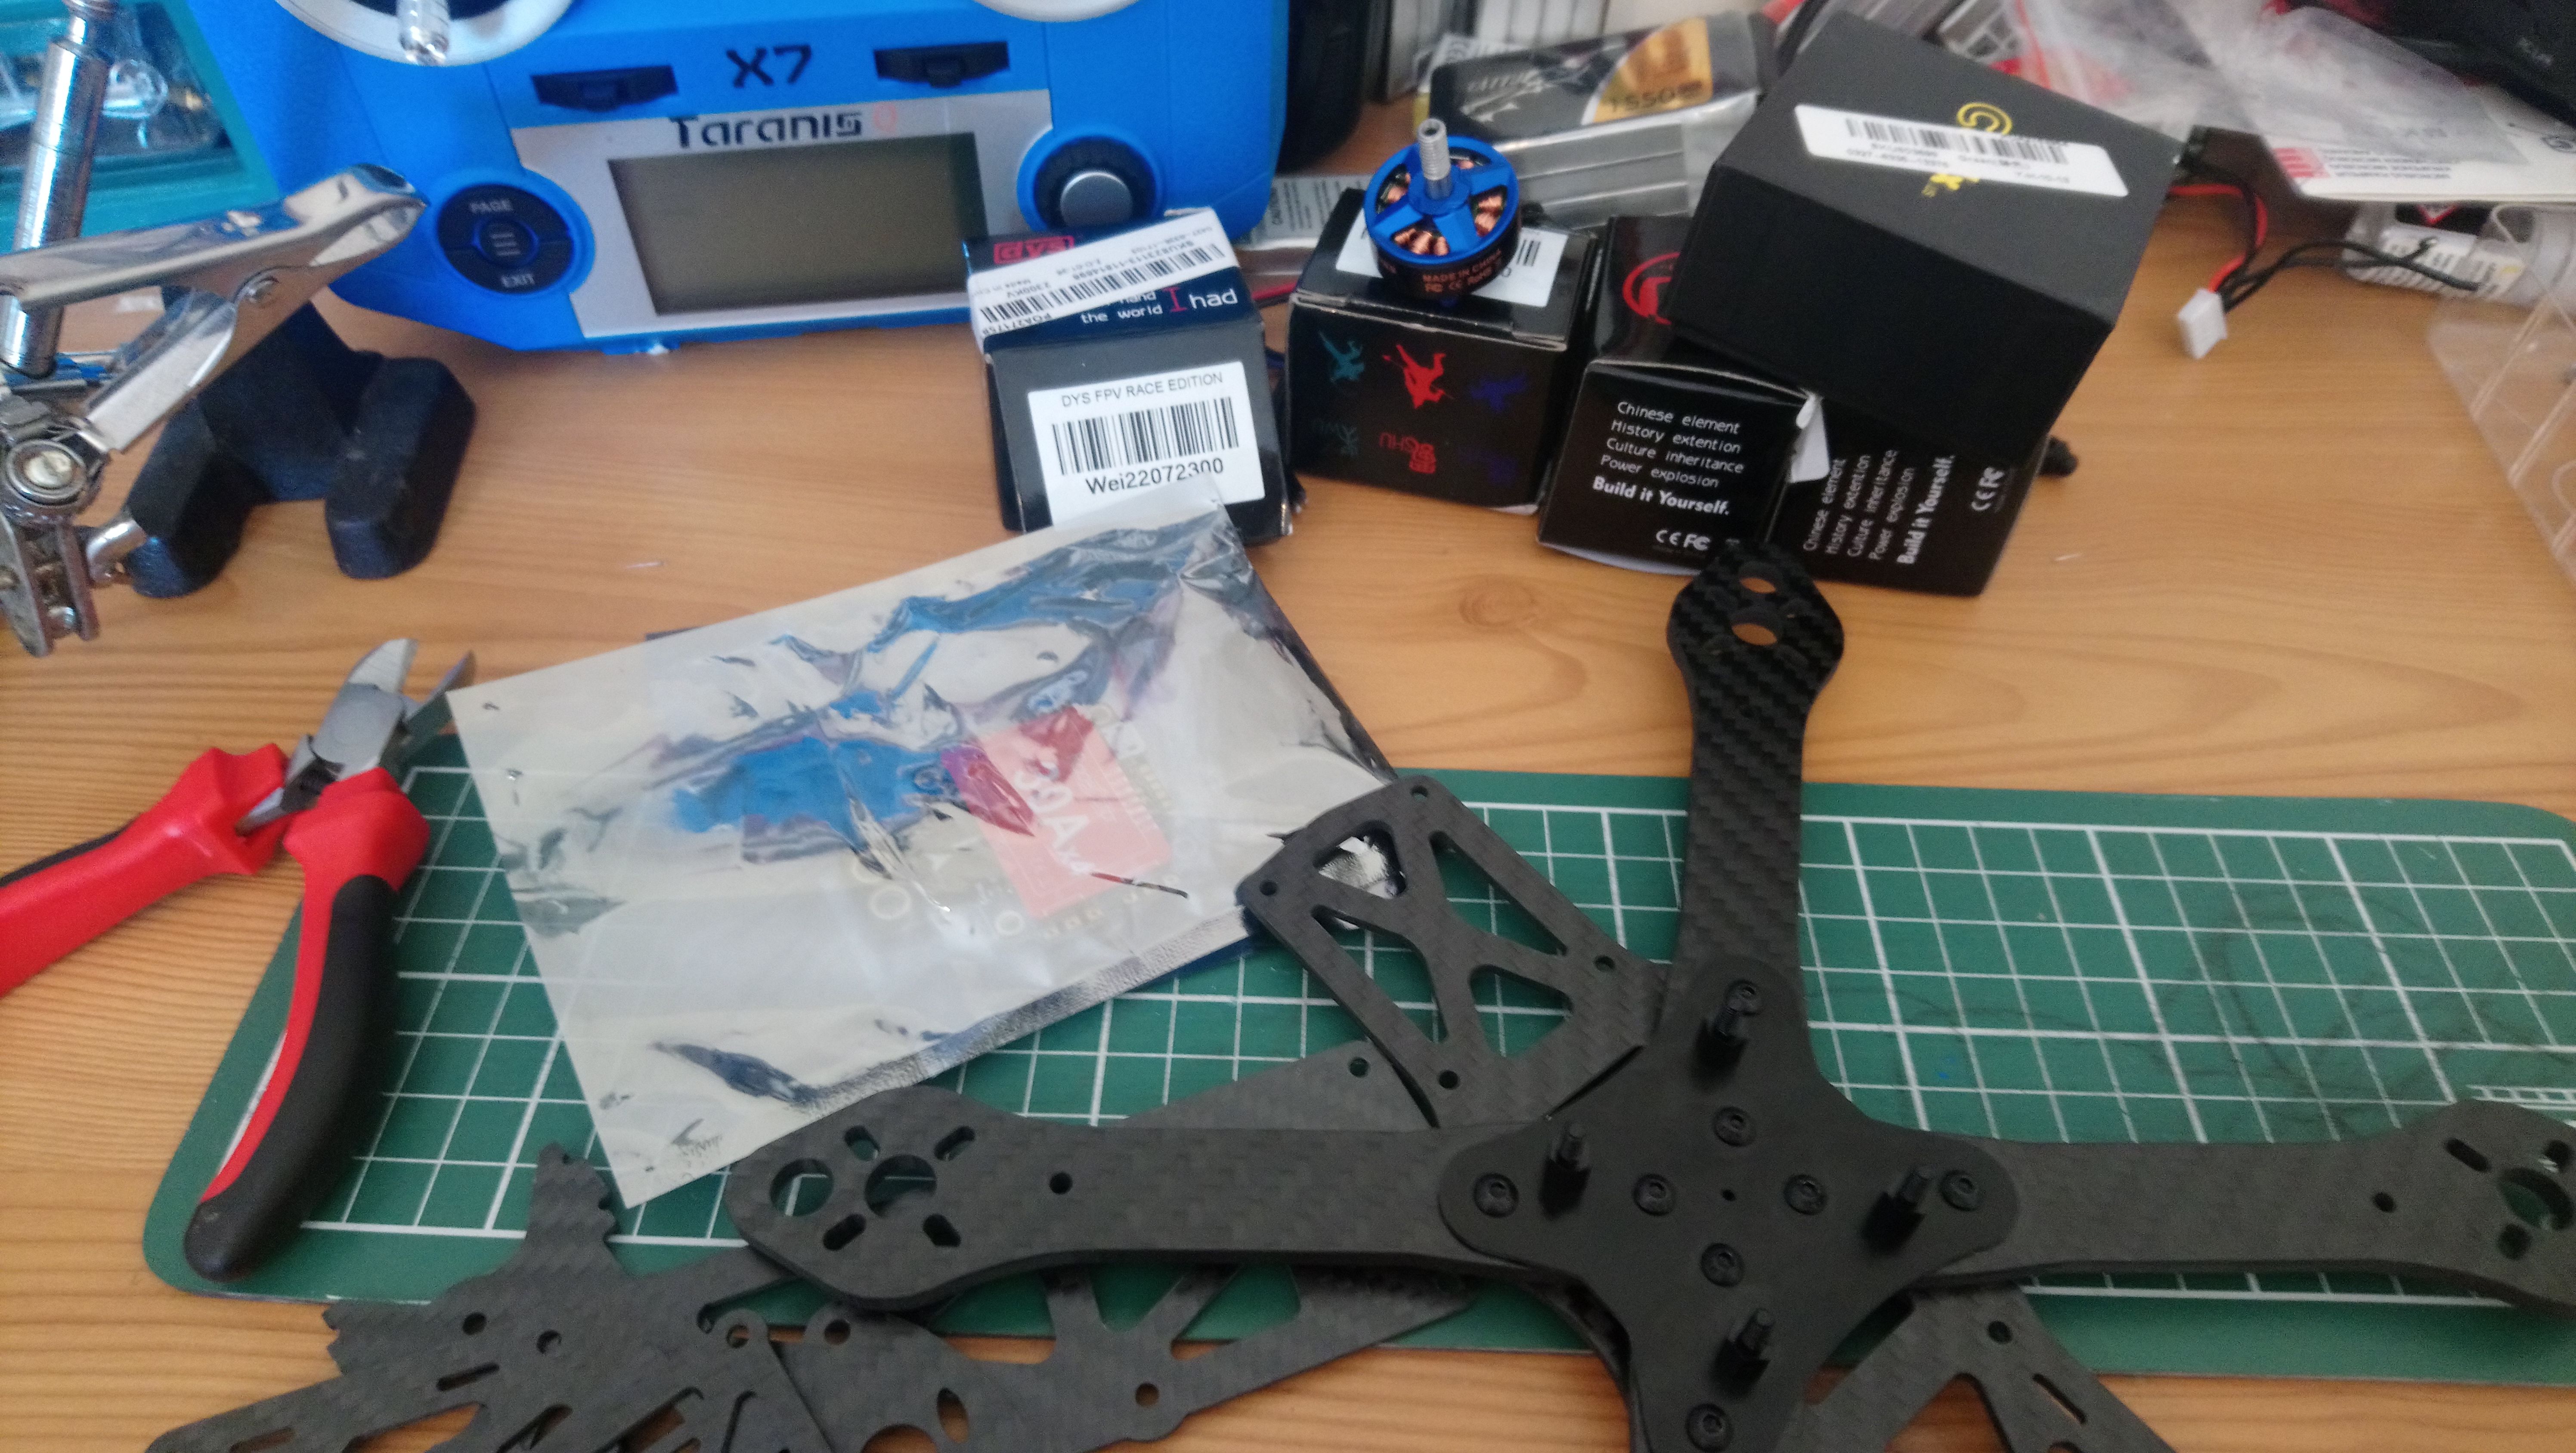
Frame Assembly
While the frame assembly is fairly straightforward there are a few tricks I've learned to make the process go smoother.
- Start with the bottom plate and loosely fit a single screw down through the small carbon plate and through the inner and outer screws of each arm.
- Loosely attach a nut to the bottom of each screw to keep the arms in place. You want a little wiggle room.
- The screw holes of the 4th arm may not line up quite right, so you may need to use a hex driver to screw through the carbon. It's a tight fit.
- Once all the arms have been fit into place send the same type of metal screw up through the middle holes and cap them with the included nylon standoffs.
- Tighten everything.
This process can be somewhat frustrating as there's virtually no tolerance between the arms. They fit together quite tight and sometimes the holes don't line up quite right. Fortunately this makes for a very solid build that's much less likely to break in a crash.

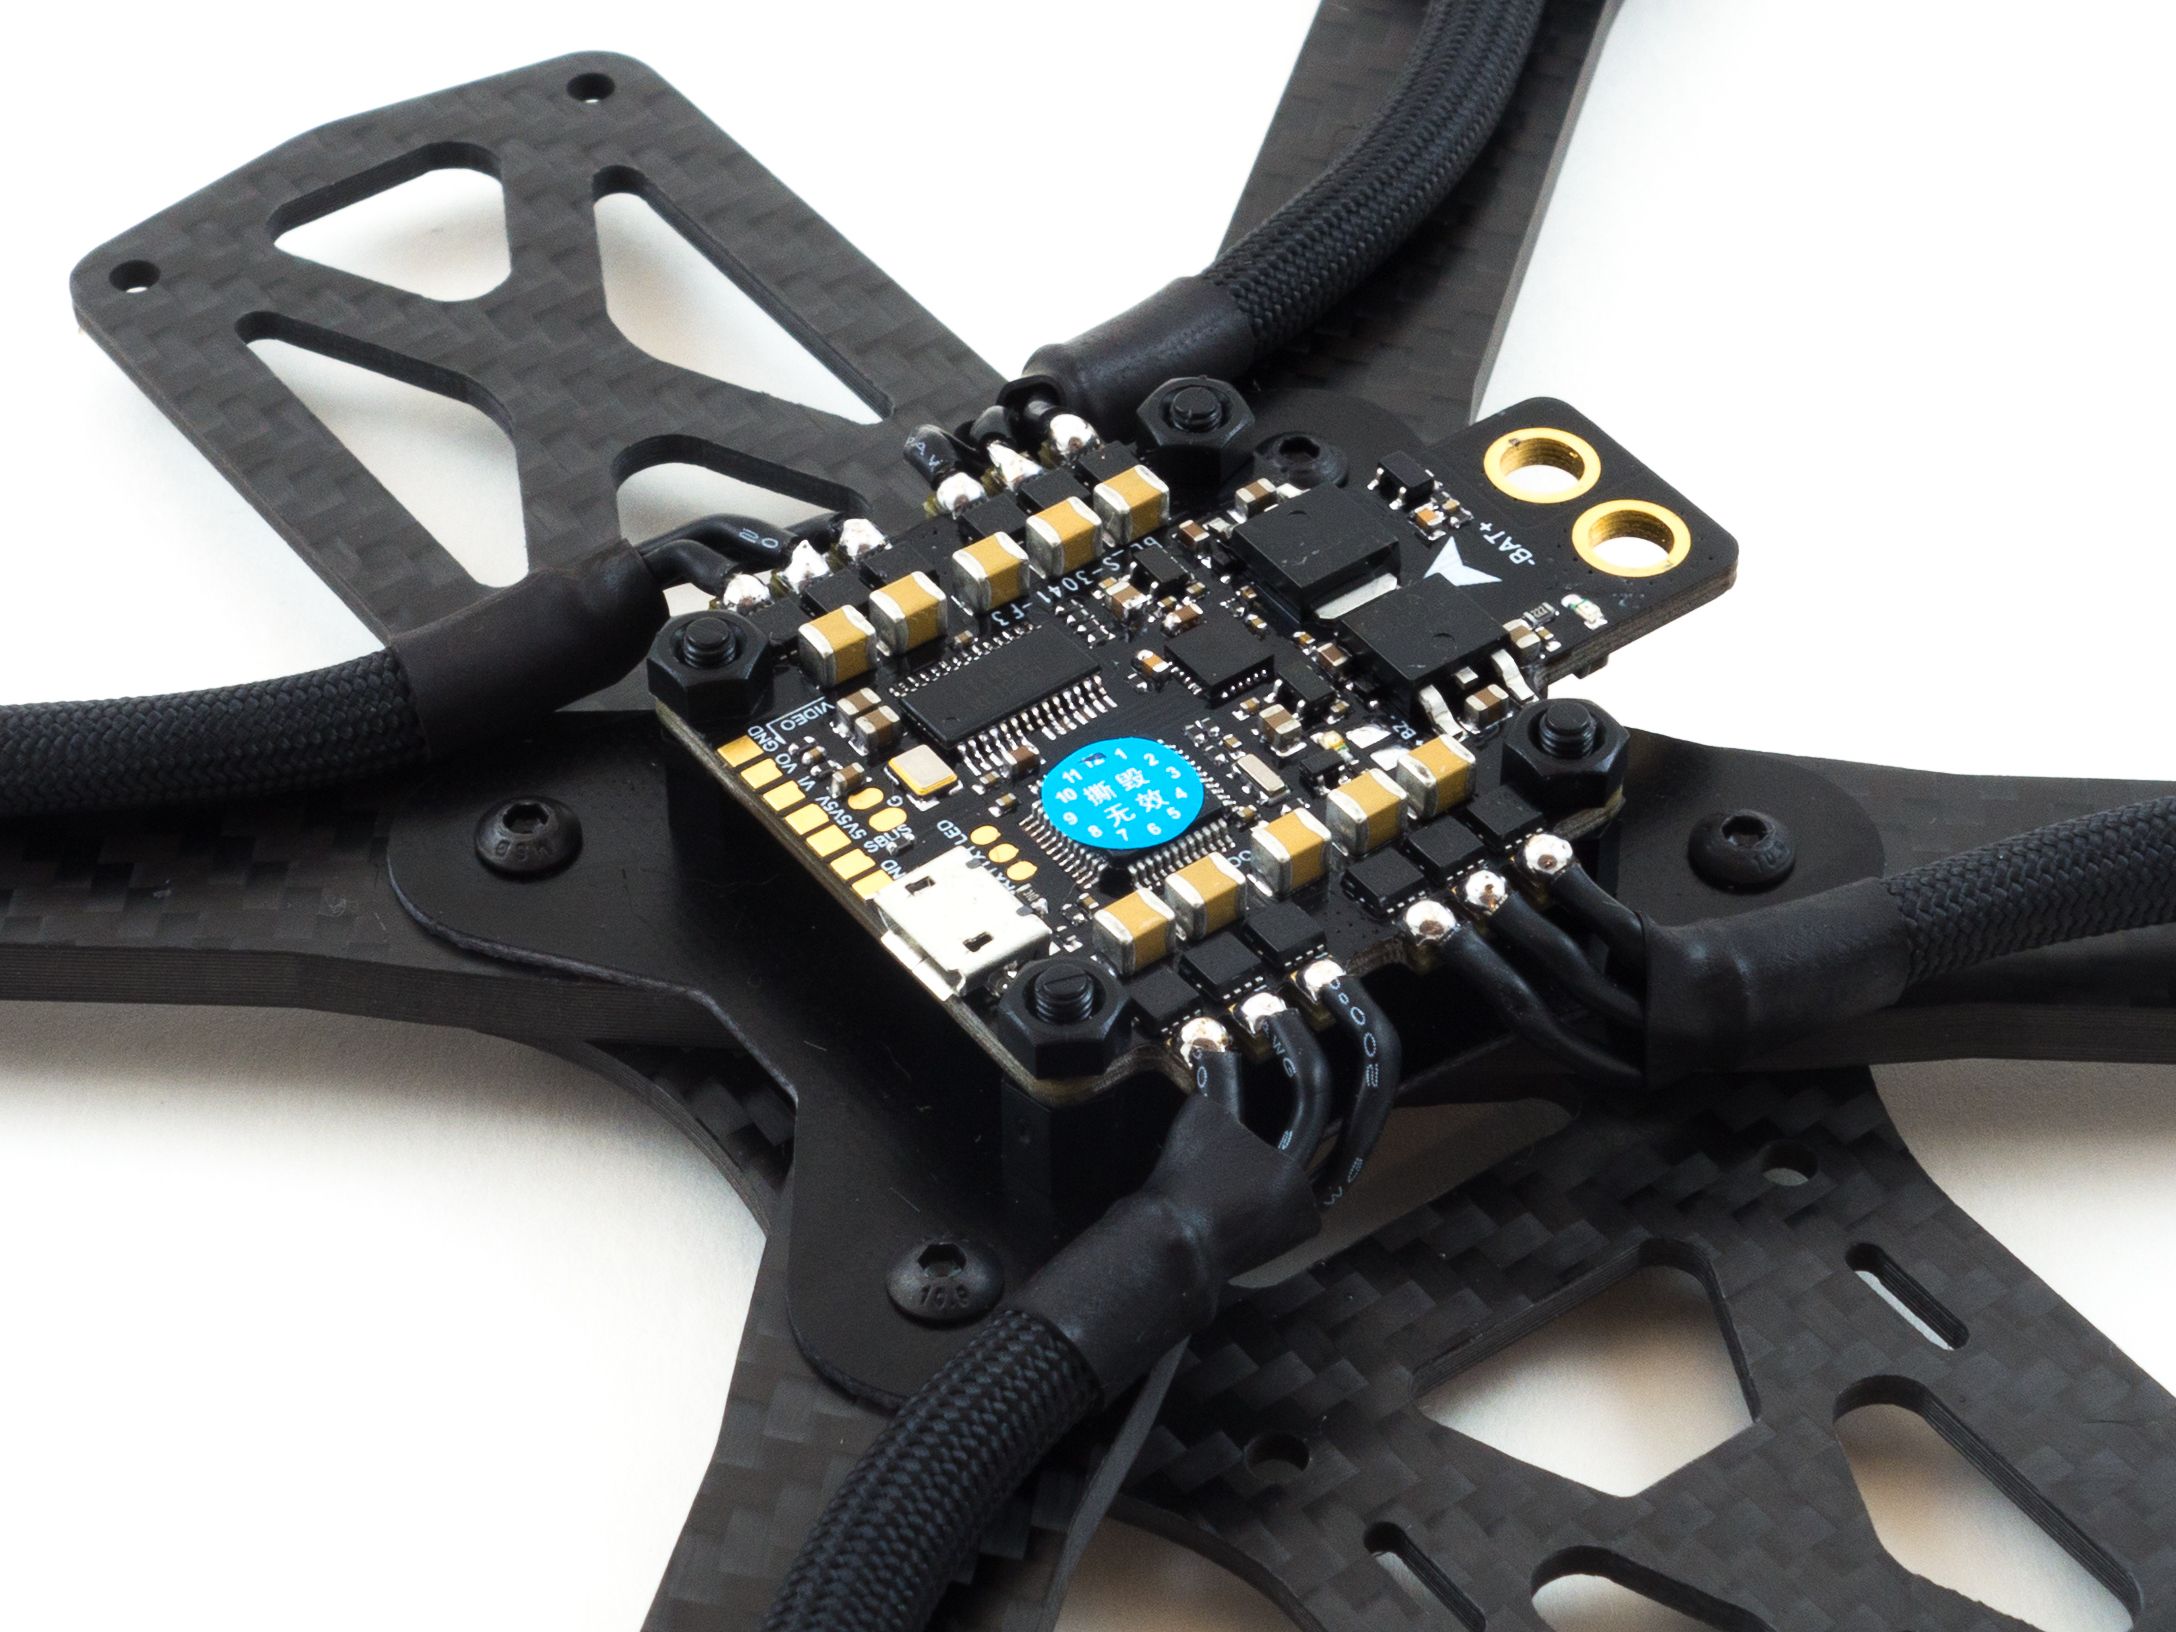
Motors
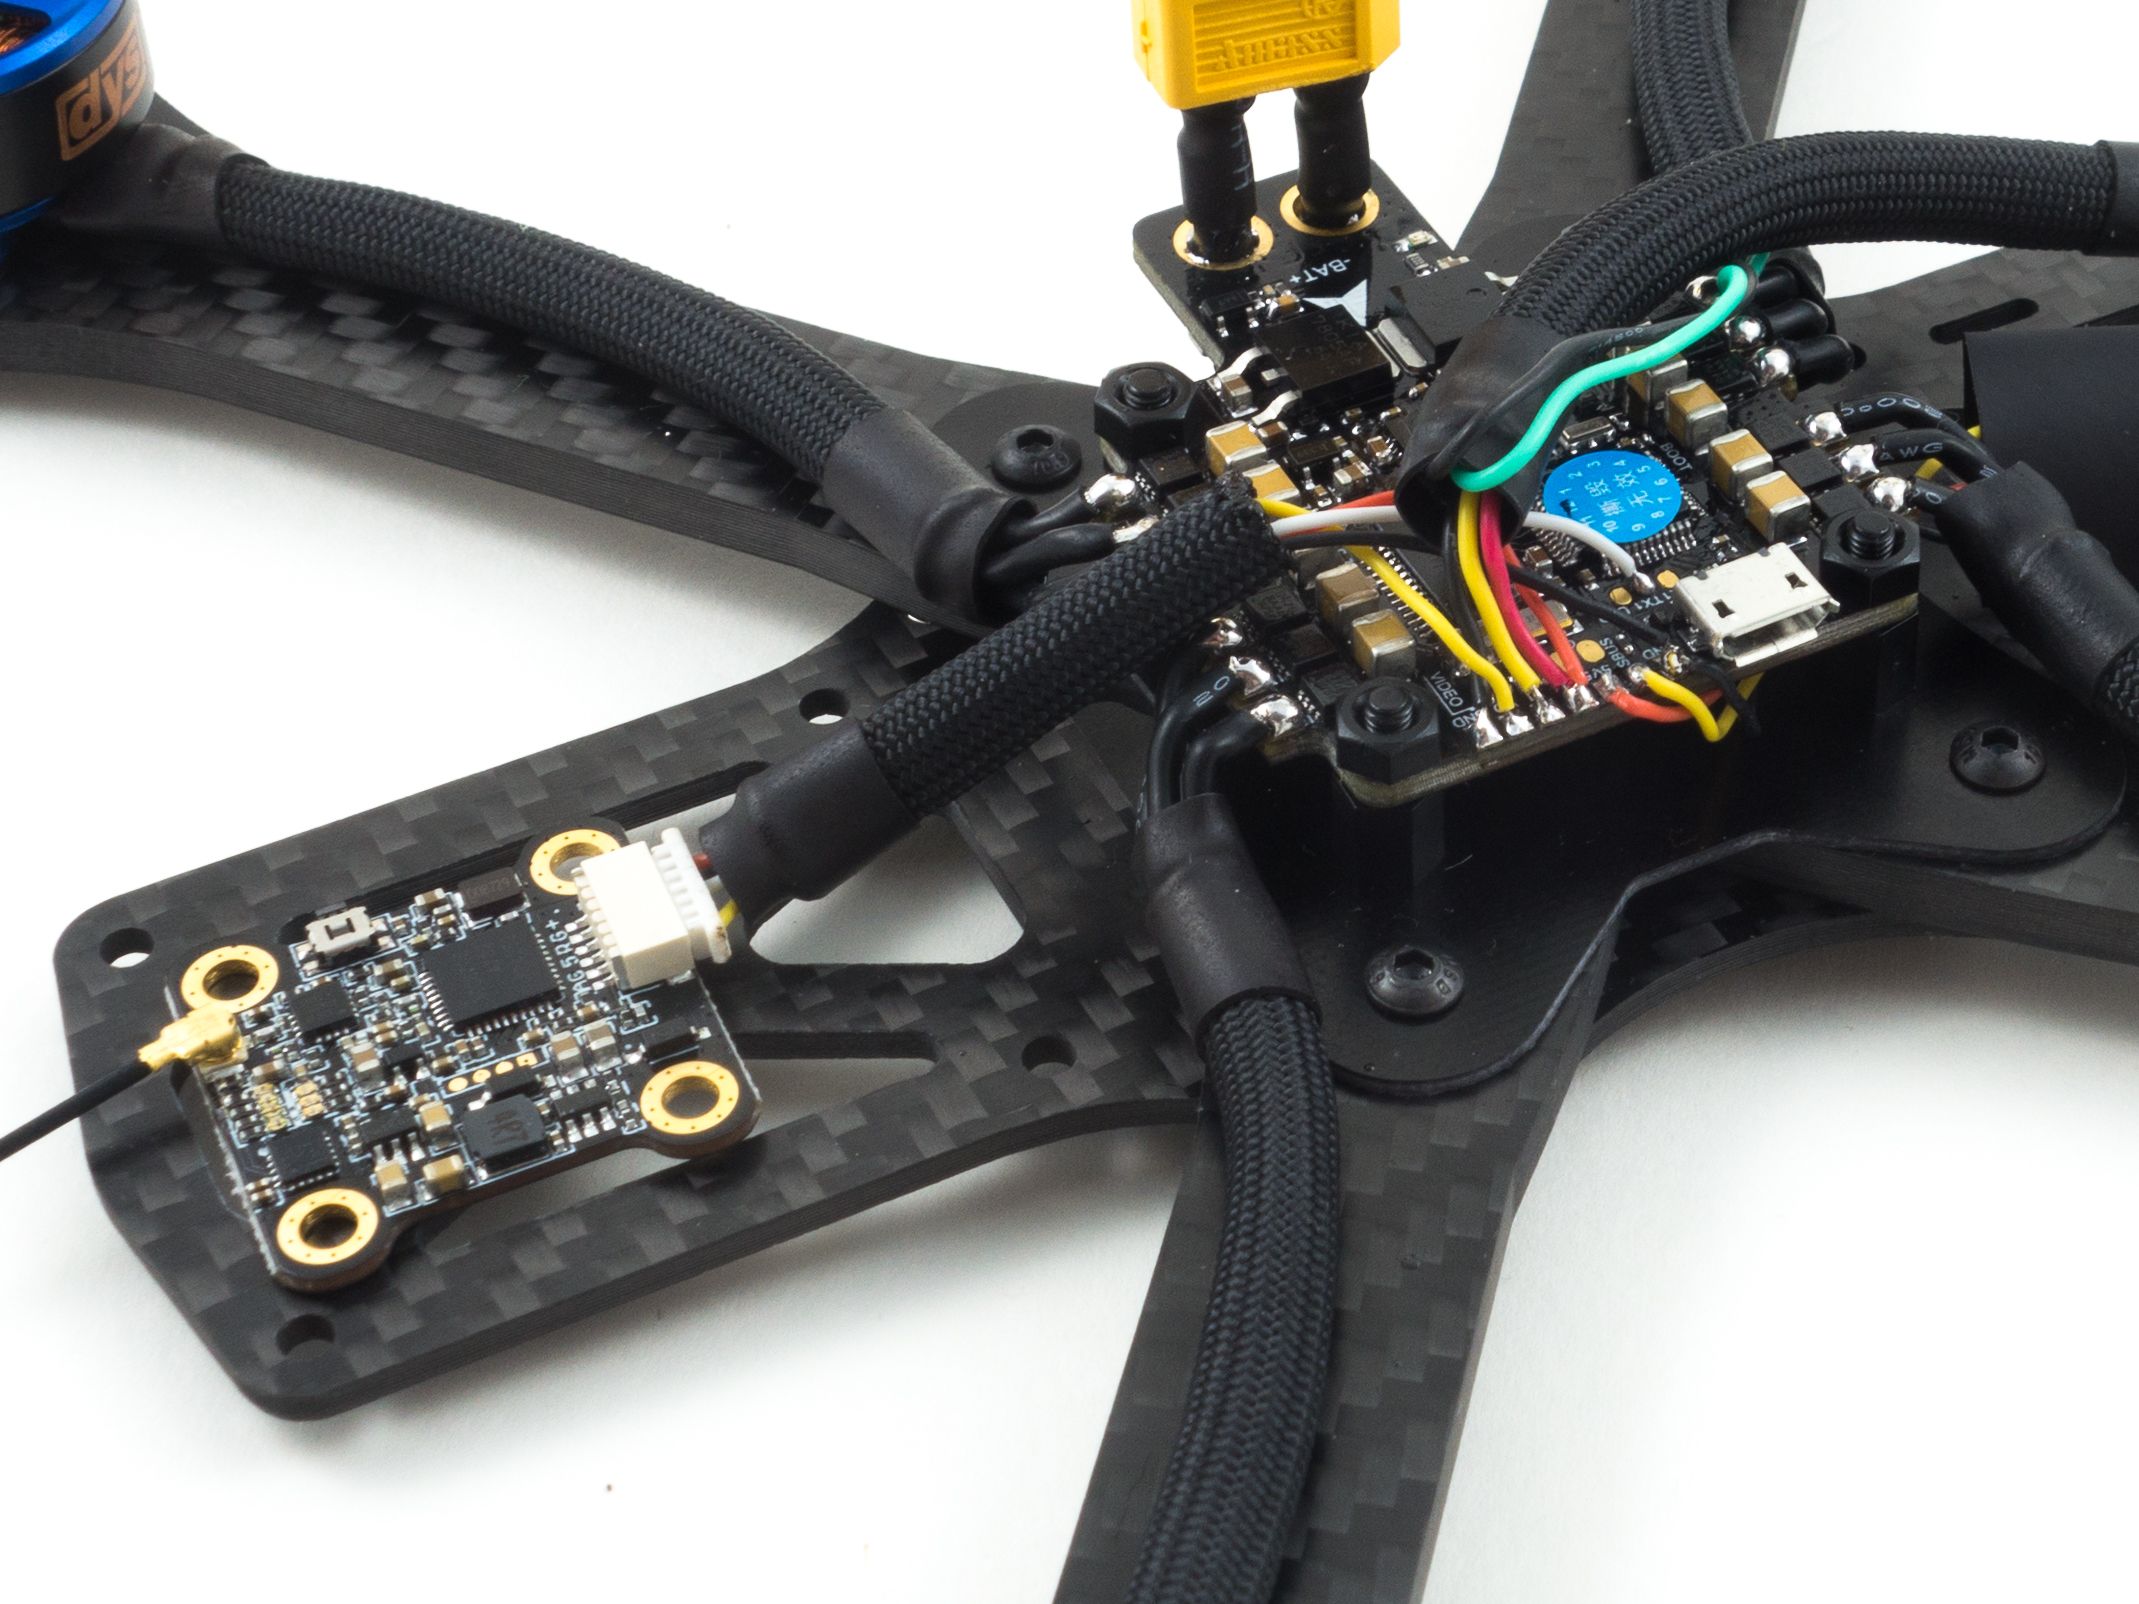
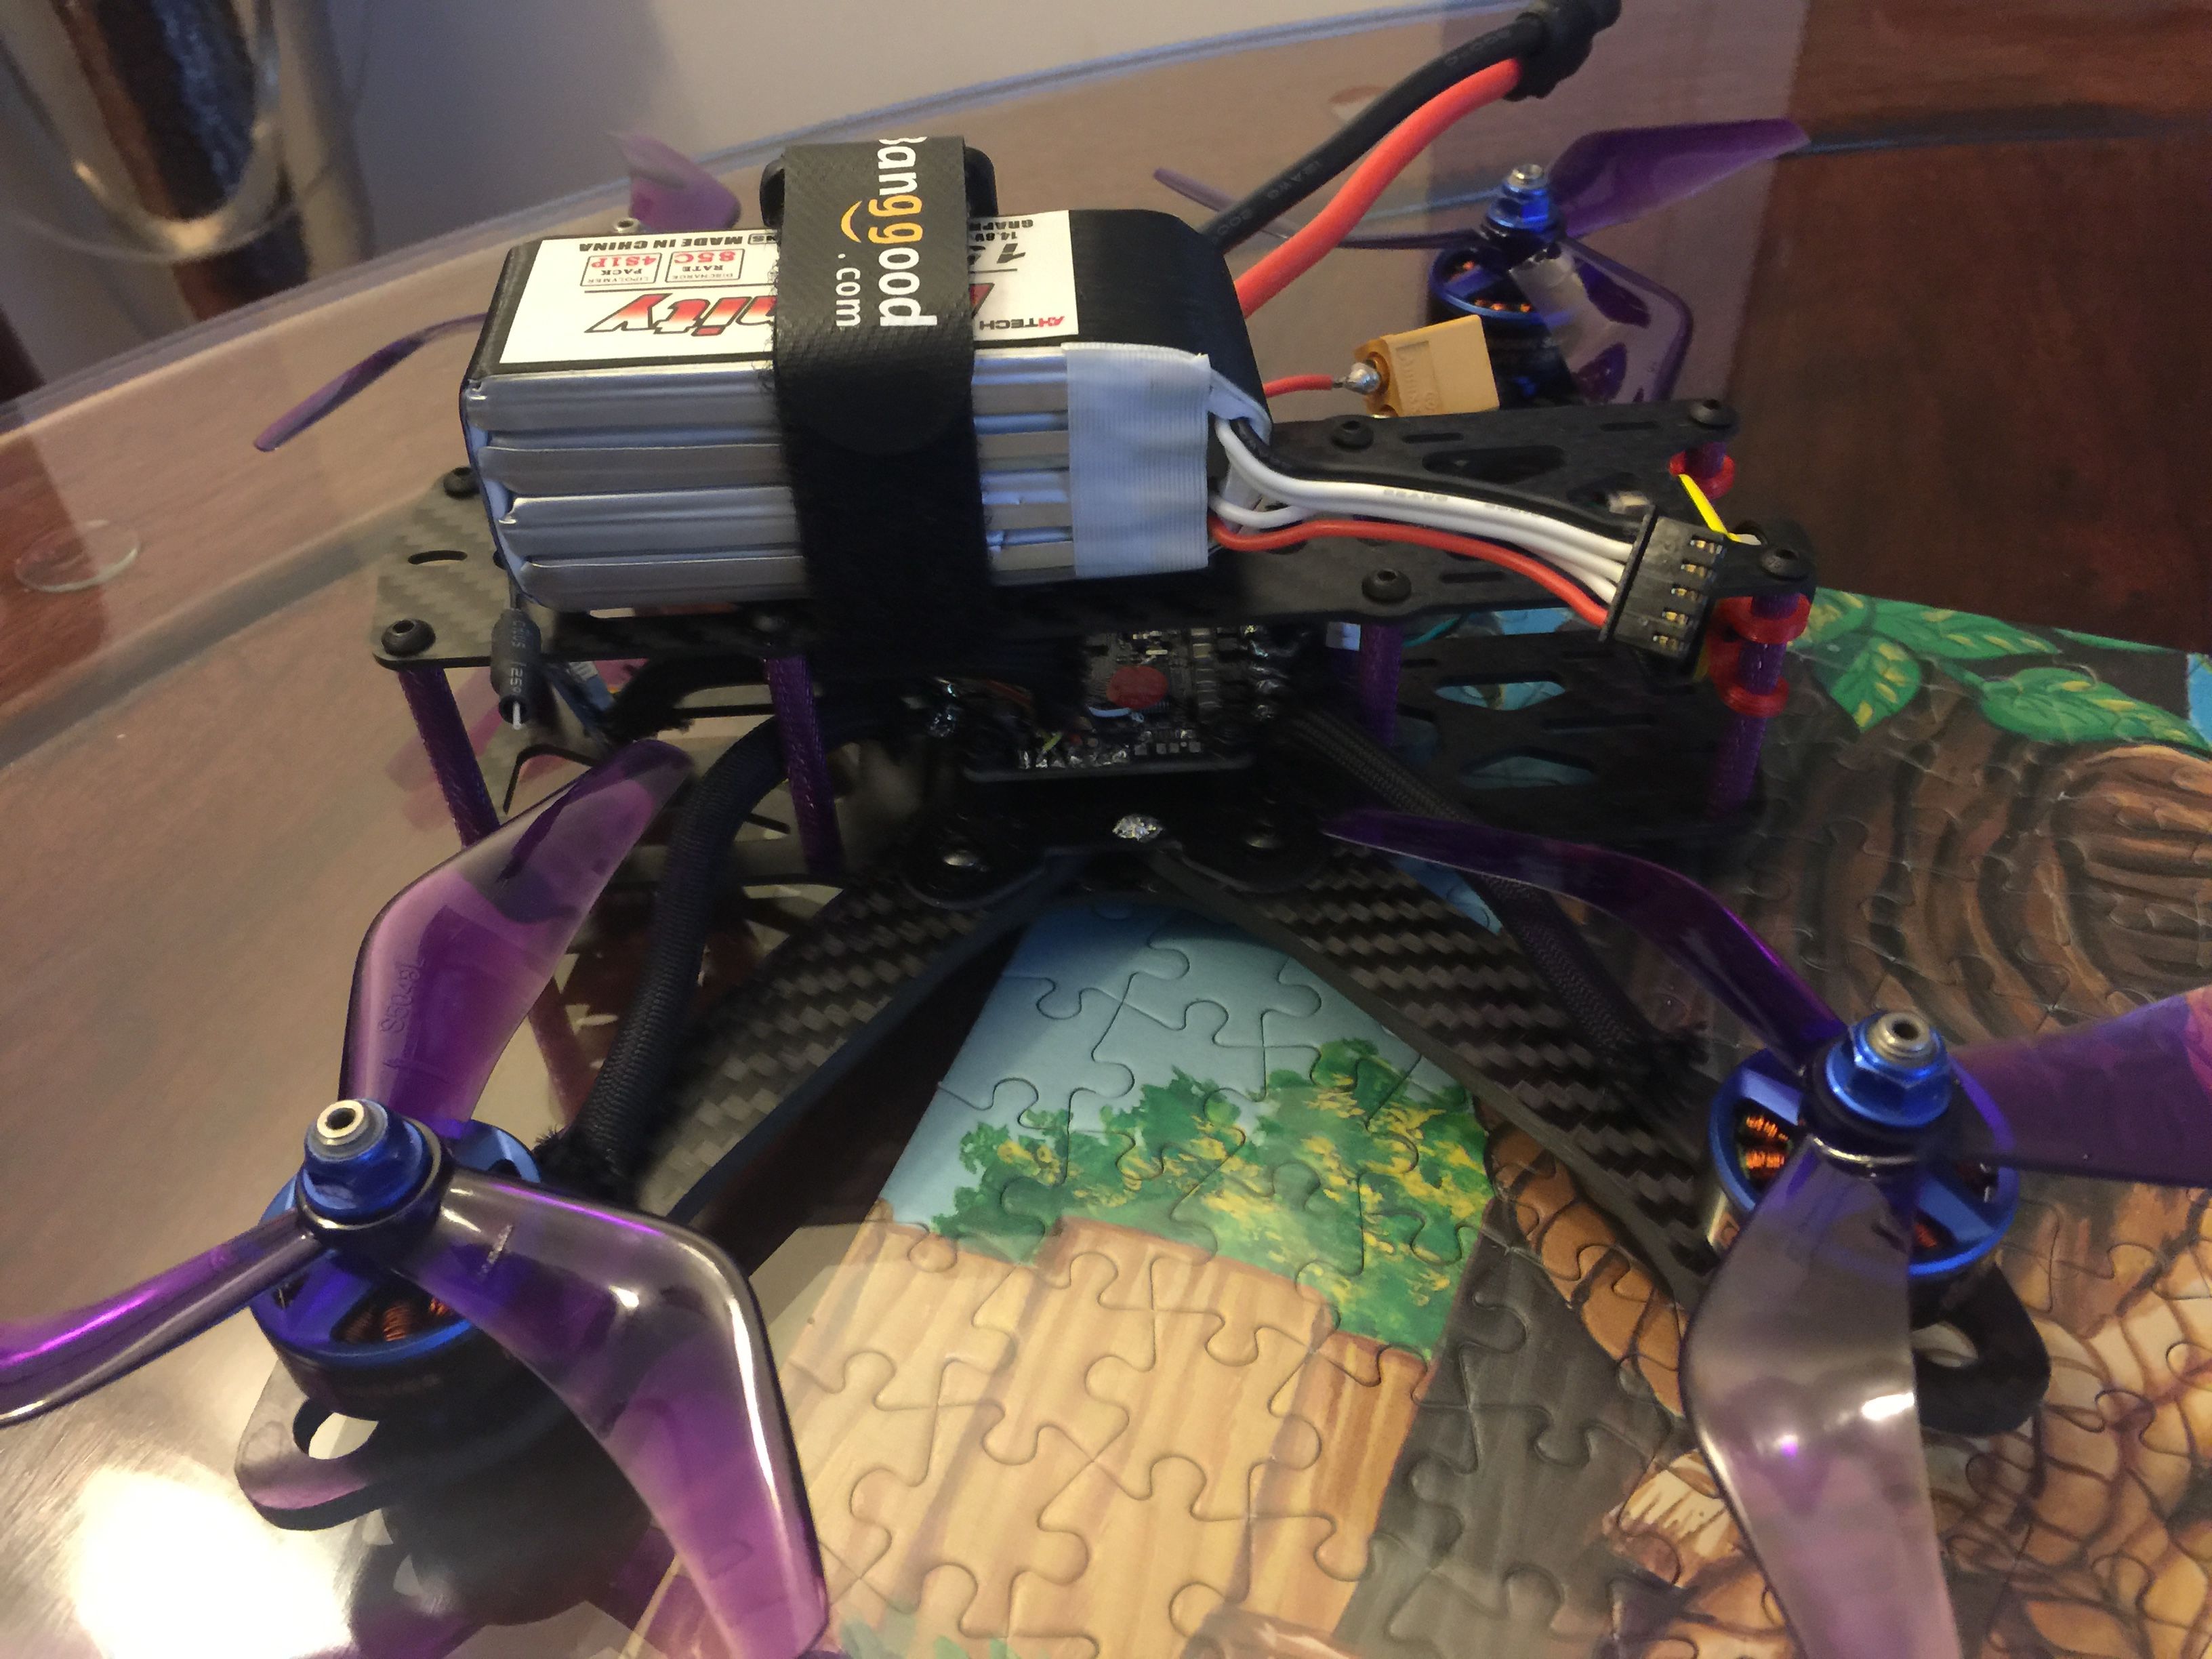
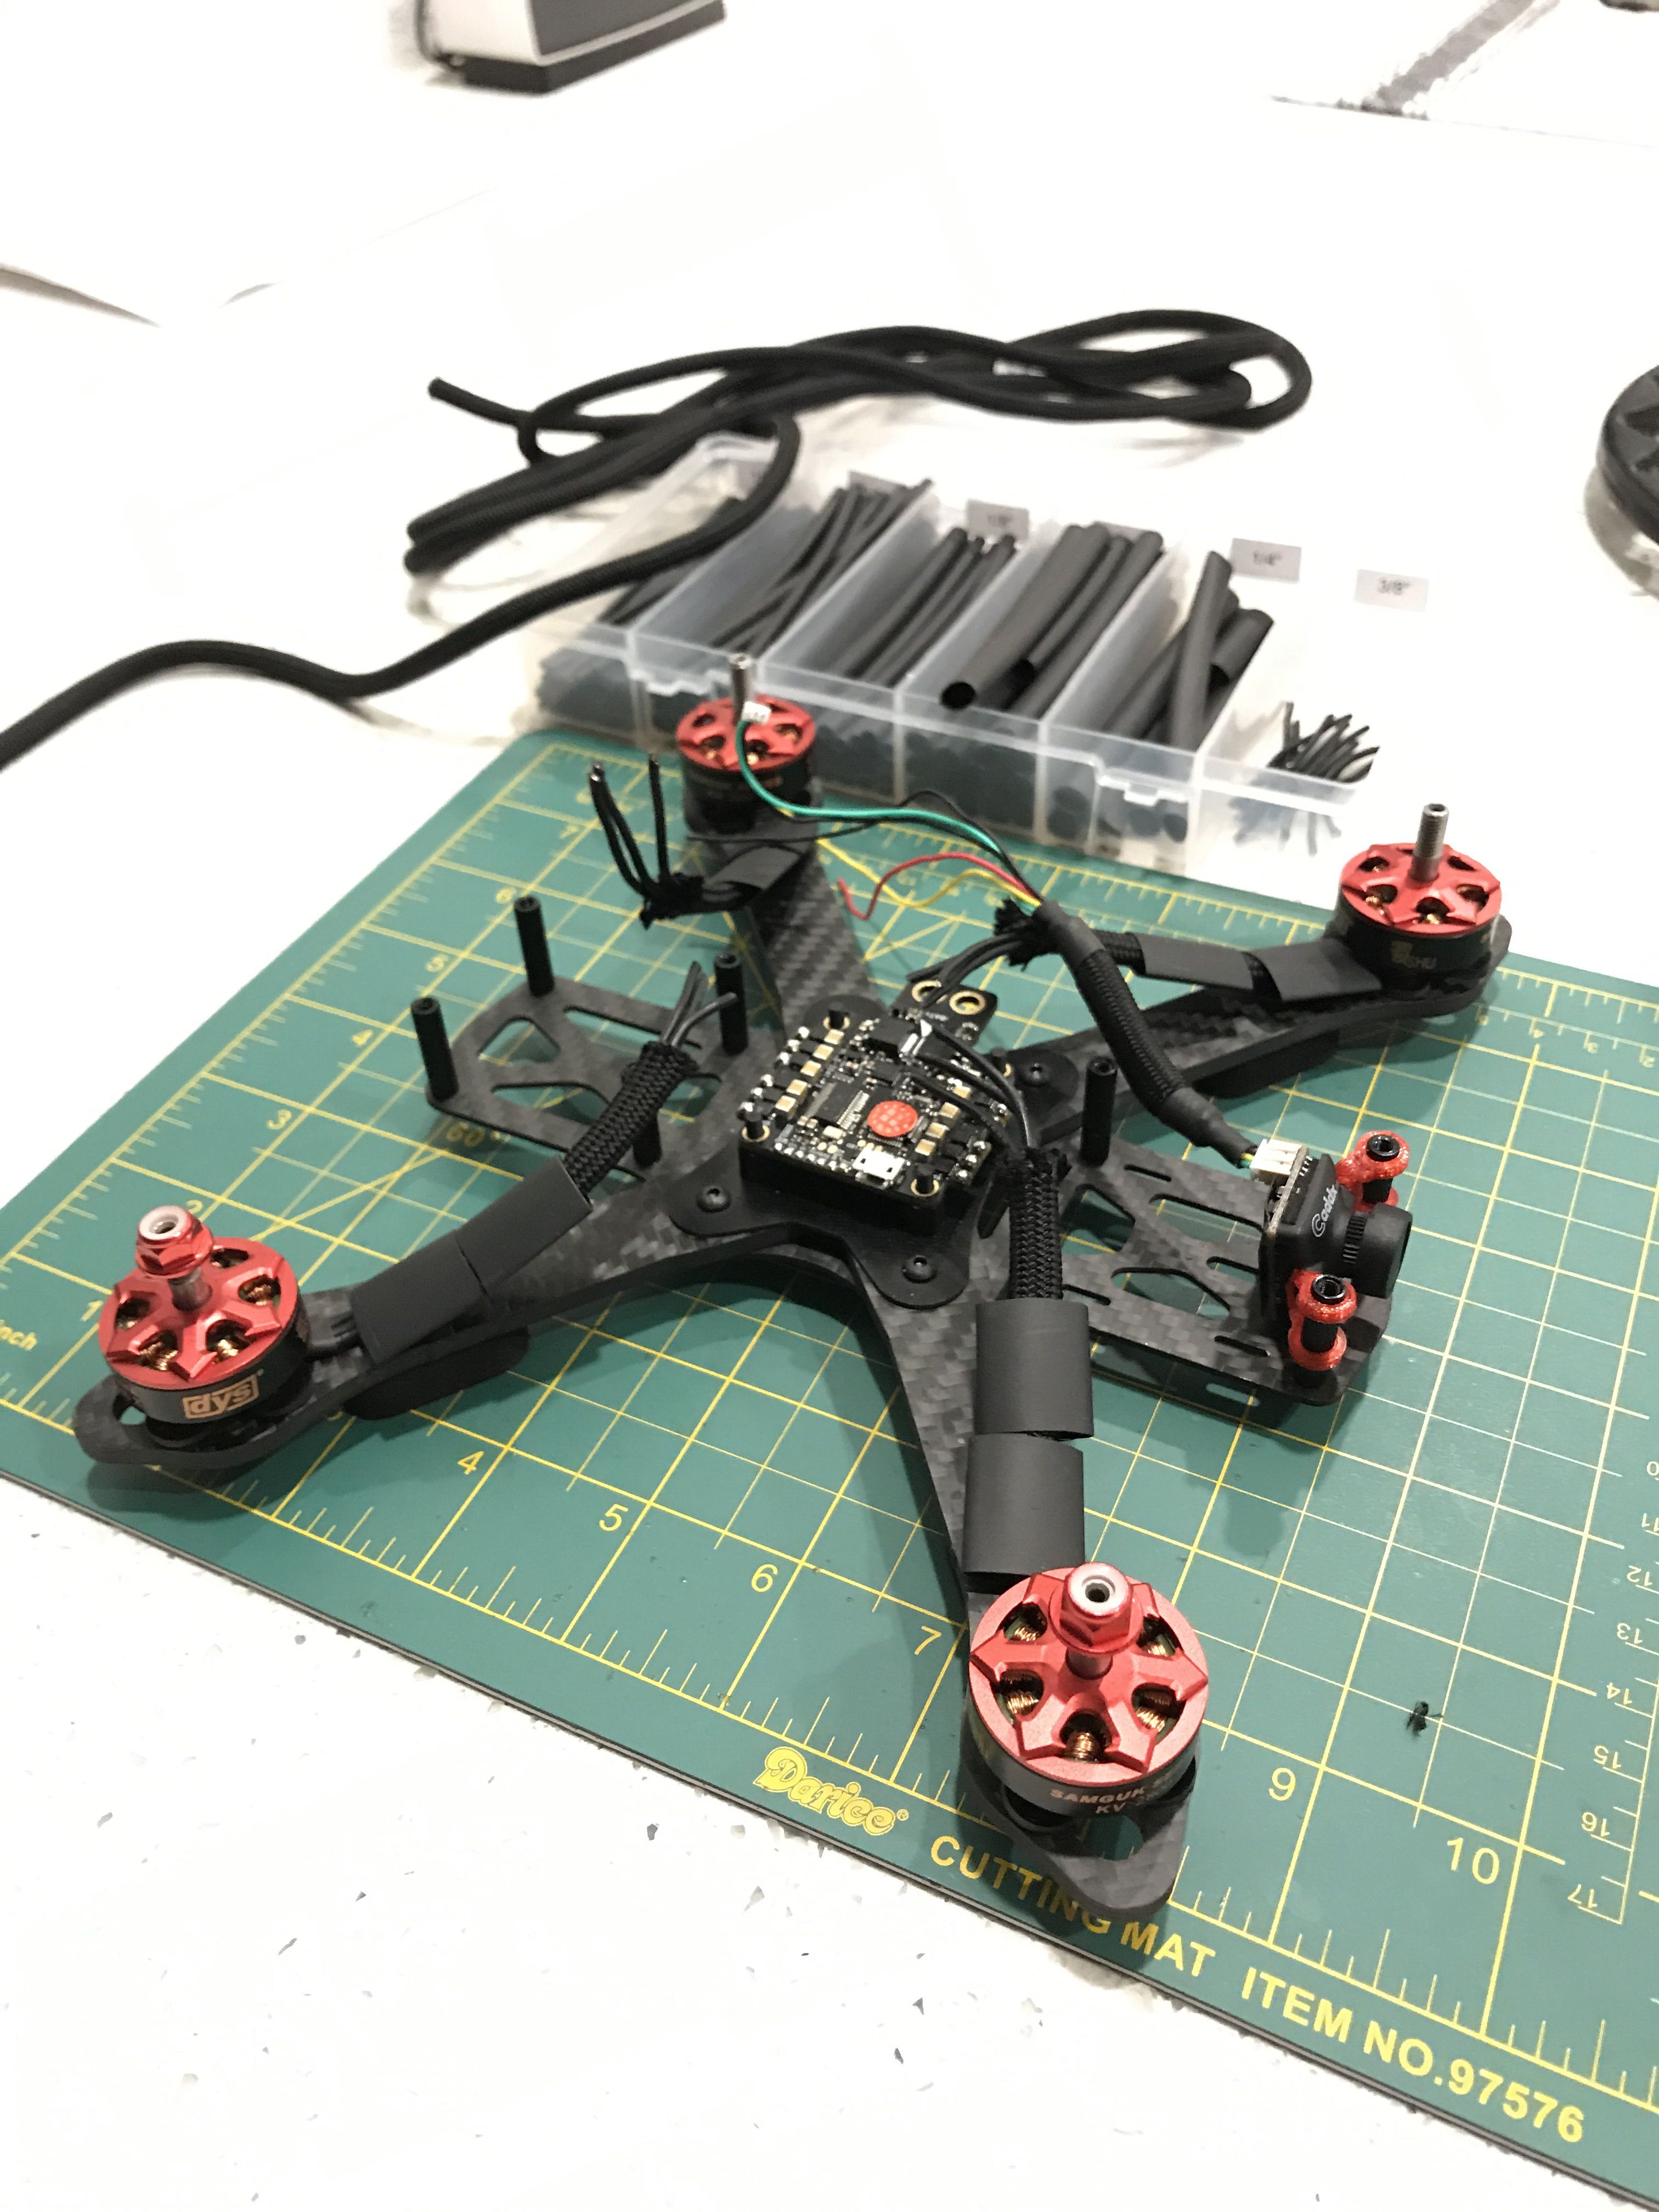
Now you can slide the flight controller onto the standoffs and screw the motors onto the arms with blue Loctite. I like to rotate the flight controller to set the power tab off to the side rather than the back. This does require adjusting the yaw rotation in Betaflight later, but it makes for a much more tidy build and a more accessible USB port. I used Battle Cord to protect the wires, but this is entirely optional. I cut 7cm lengths of rope, removed the nylon strands and melted the ends to avoid fraying. You'll also need some shrink tubing to cover the ends.
To solder the wires to the board it's a good idea to flux each tab first and add a ball of solder. To attach the motor wires it's easiest to start from the rightmost tab and work your way left. That way the previous wire won't get in the way of your tweezers. Of course if you're left handed you can start from the left. Cut each wire to size, one at a time, to ensure you don't cut any too short.
Camera, Video Transmitter and RX
To use 20mm standoffs you can use the linked TPU camera mounts, but if you've got a TPU-capable 3D printer you can print them yourself. The Thingiverse page is also linked below. First screw the TPU mounts onto the camera then bend them over the standoffs to situate the camera. The Caddx F1 comes with two wires. I chose to use the wire with the OSD connector to make camera adjustments an option later. I also sleeved the wires with more Battle Cord, but this is again entirely optional. Refer to the photos for wire placement.
To wire the VTX it's a good idea to remove the 5v output and the second ground from the wire harness as we won't be using those. This VTX says it requires 7V, but it seems to work just fine running on 5V. There is always the potential for a brownout running at a lower input, so if you are concerned you can wire this directly to the rings around the main power leads.
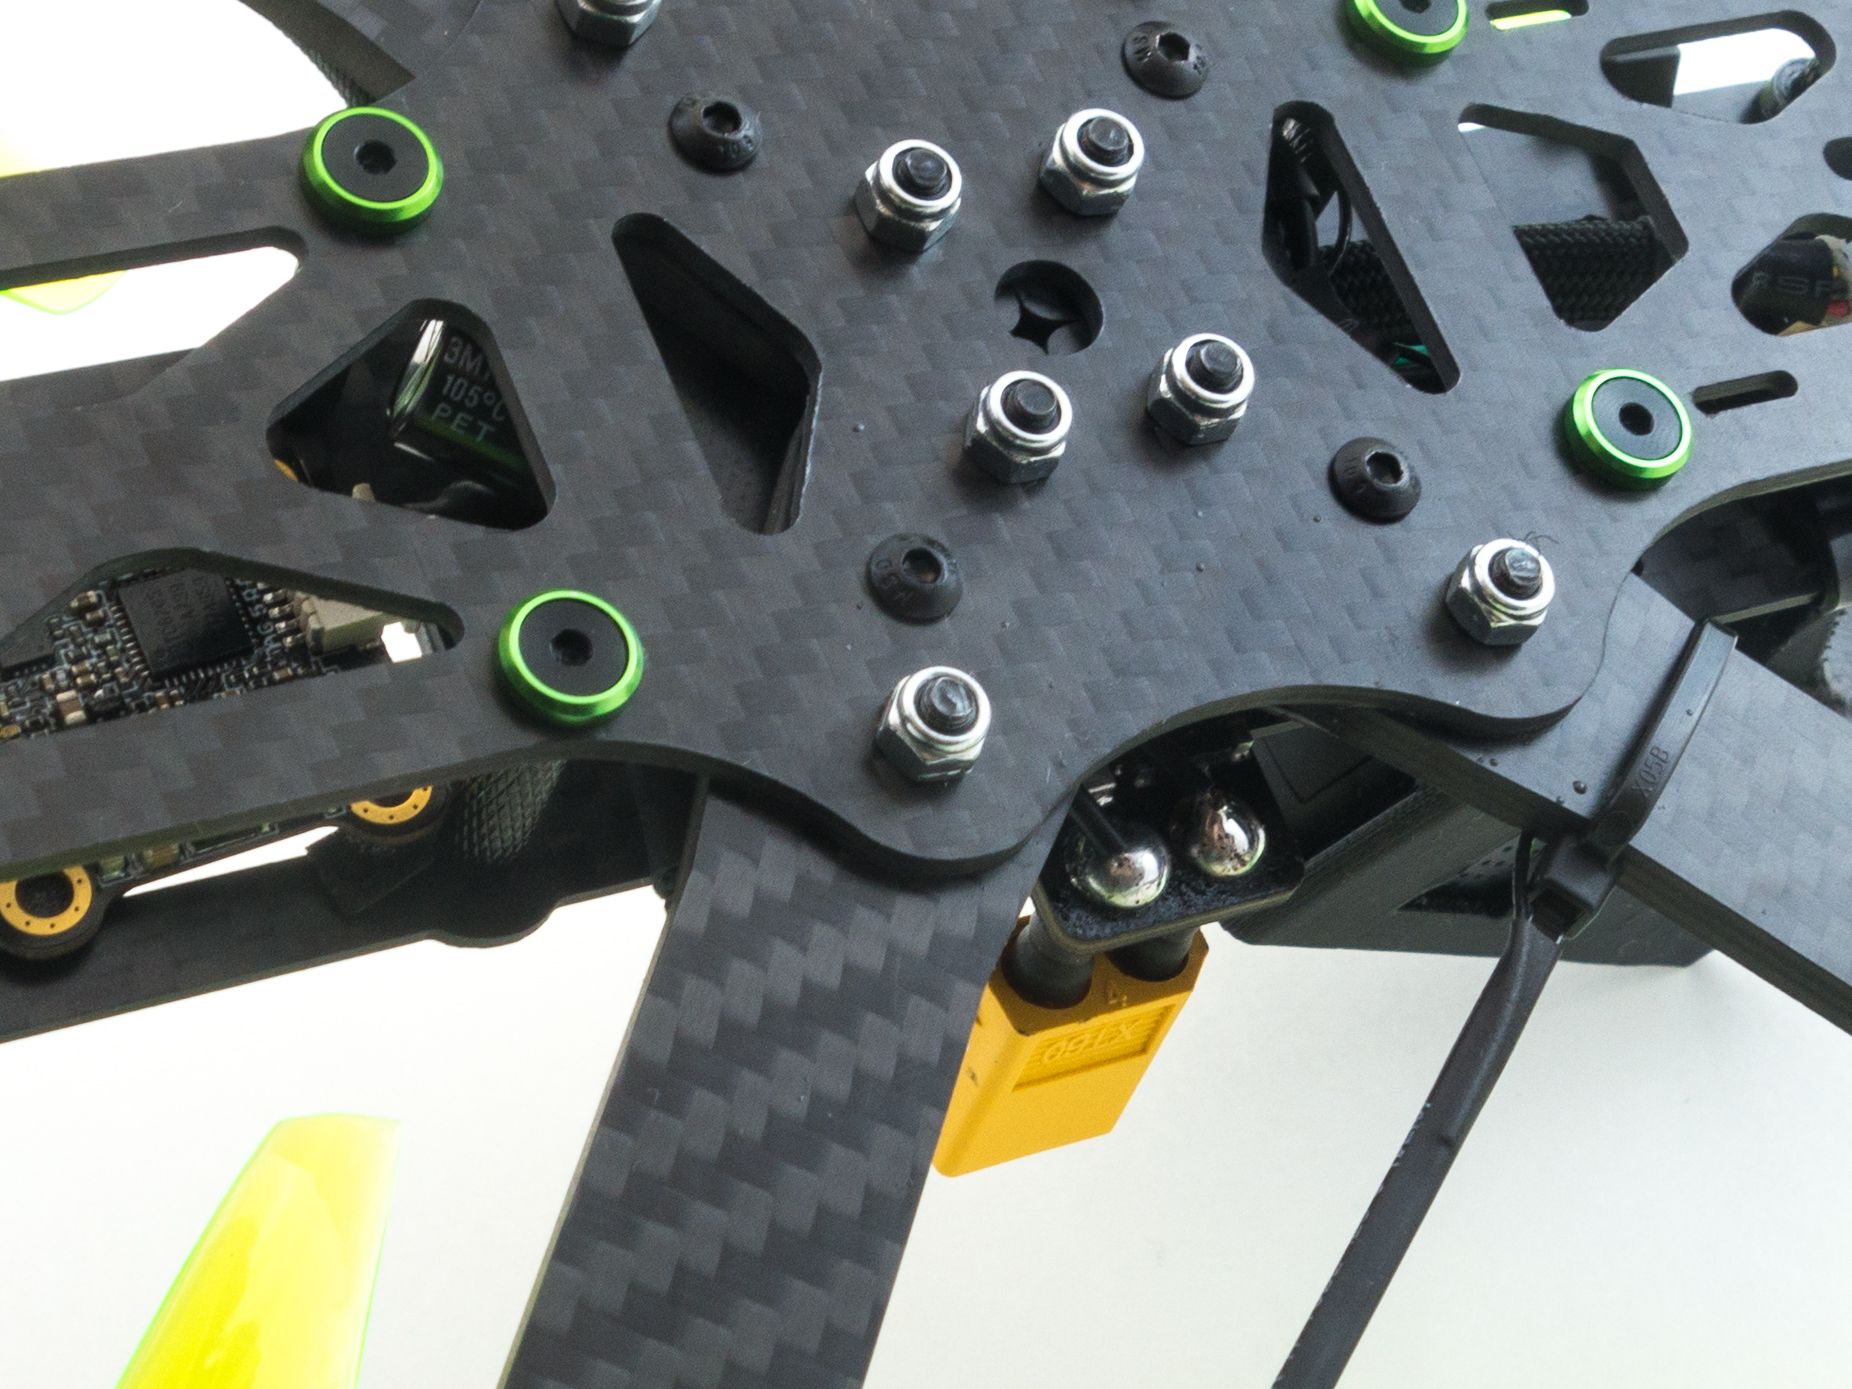
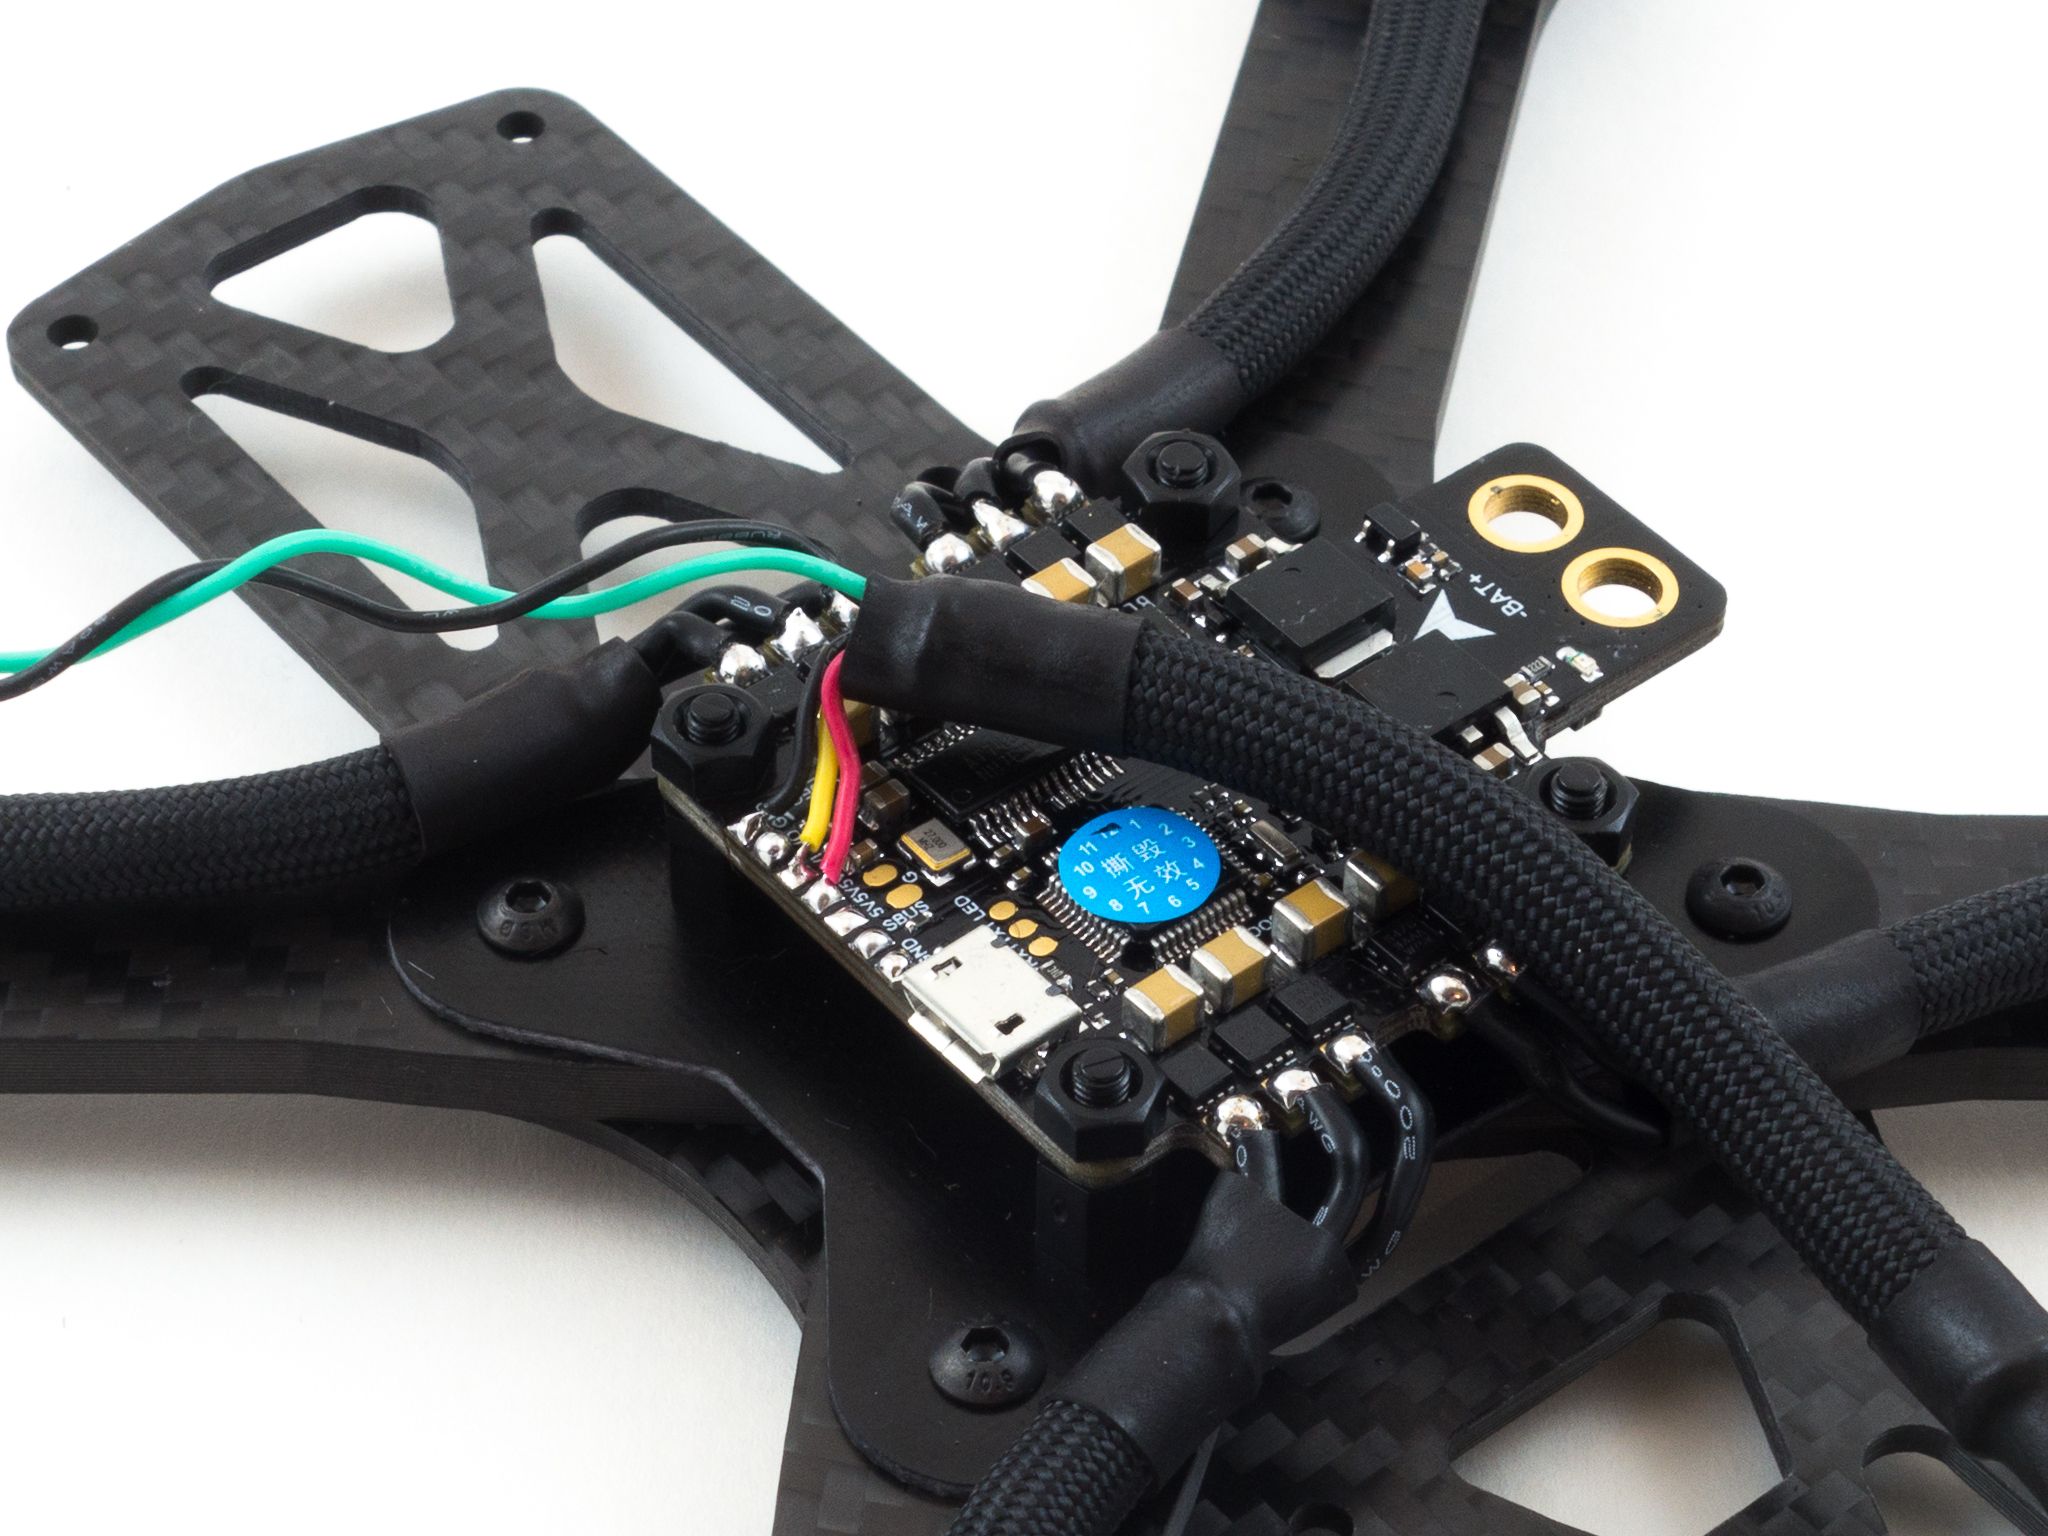
Now you'll want to add an XT60 to the power tab. The frame kit expects you to solder the XT60 directly to the tab, but it's much safer to add some 14AWG wire between the XT60 and the tab. This will better protect the tab from breakage and increase the height of the XT60 for shorter battery leads. To do this first solder about 1.5cm of wire to the XT60, add shrink tube and then solder the wires into the holes while the quad is upside down. You can also add a capacitor as it greatly helps reduce noise to the gyro and creates a much cleaner electrical environment for all of the components. You can solder a pair of motor wire trimmings onto the capacitor and slide them under the flight controller from behind. Solder them directly under the main power tab. Be sure to match the polarity.
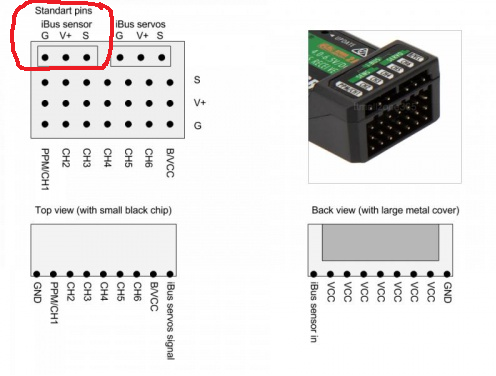
If you're using the XM+ the RX is very straightforward to attach. You simply add wire between each of the Sbus, 5v and Gnd pads. If you're using an R-XSR or S.Port capable receiver and you want to use telemetry it is possible to use the LED pad as a 3rd UART for the VTX controls. It does require some CLI resource commands, so please search this RCGroups thread for further details. Considering this build does OSD I don't think a telemetry receiver is necessary. If you are using an IBUS or Spektrum receiver you can still use the Sbus pad and un-invert the signal via the CLI using the set sbus_inversion = off command. Please note that this board does not have a 3.3v regulator, so if you are a Spektrum user you will need something like this to power your receiver.
At this point you'll need to apply power using a lipo battery to bind your receiver. It's always a good idea to test for continuity between each of your solders to ensure you didn't create any accidental bridges. Make sure you don't have any props on and apply power while holding the receiver bind button. Once you've successfully bound to your transmitter you can slide the receiver under the flight controller and add shrink tube to the receiver itself. To secure the antennas add zip-ties to the front arms pointed back toward the read motors. Add shrink tube to sling the antenna wires under the zip-ties to protect them from prop strikes.
Final Touches
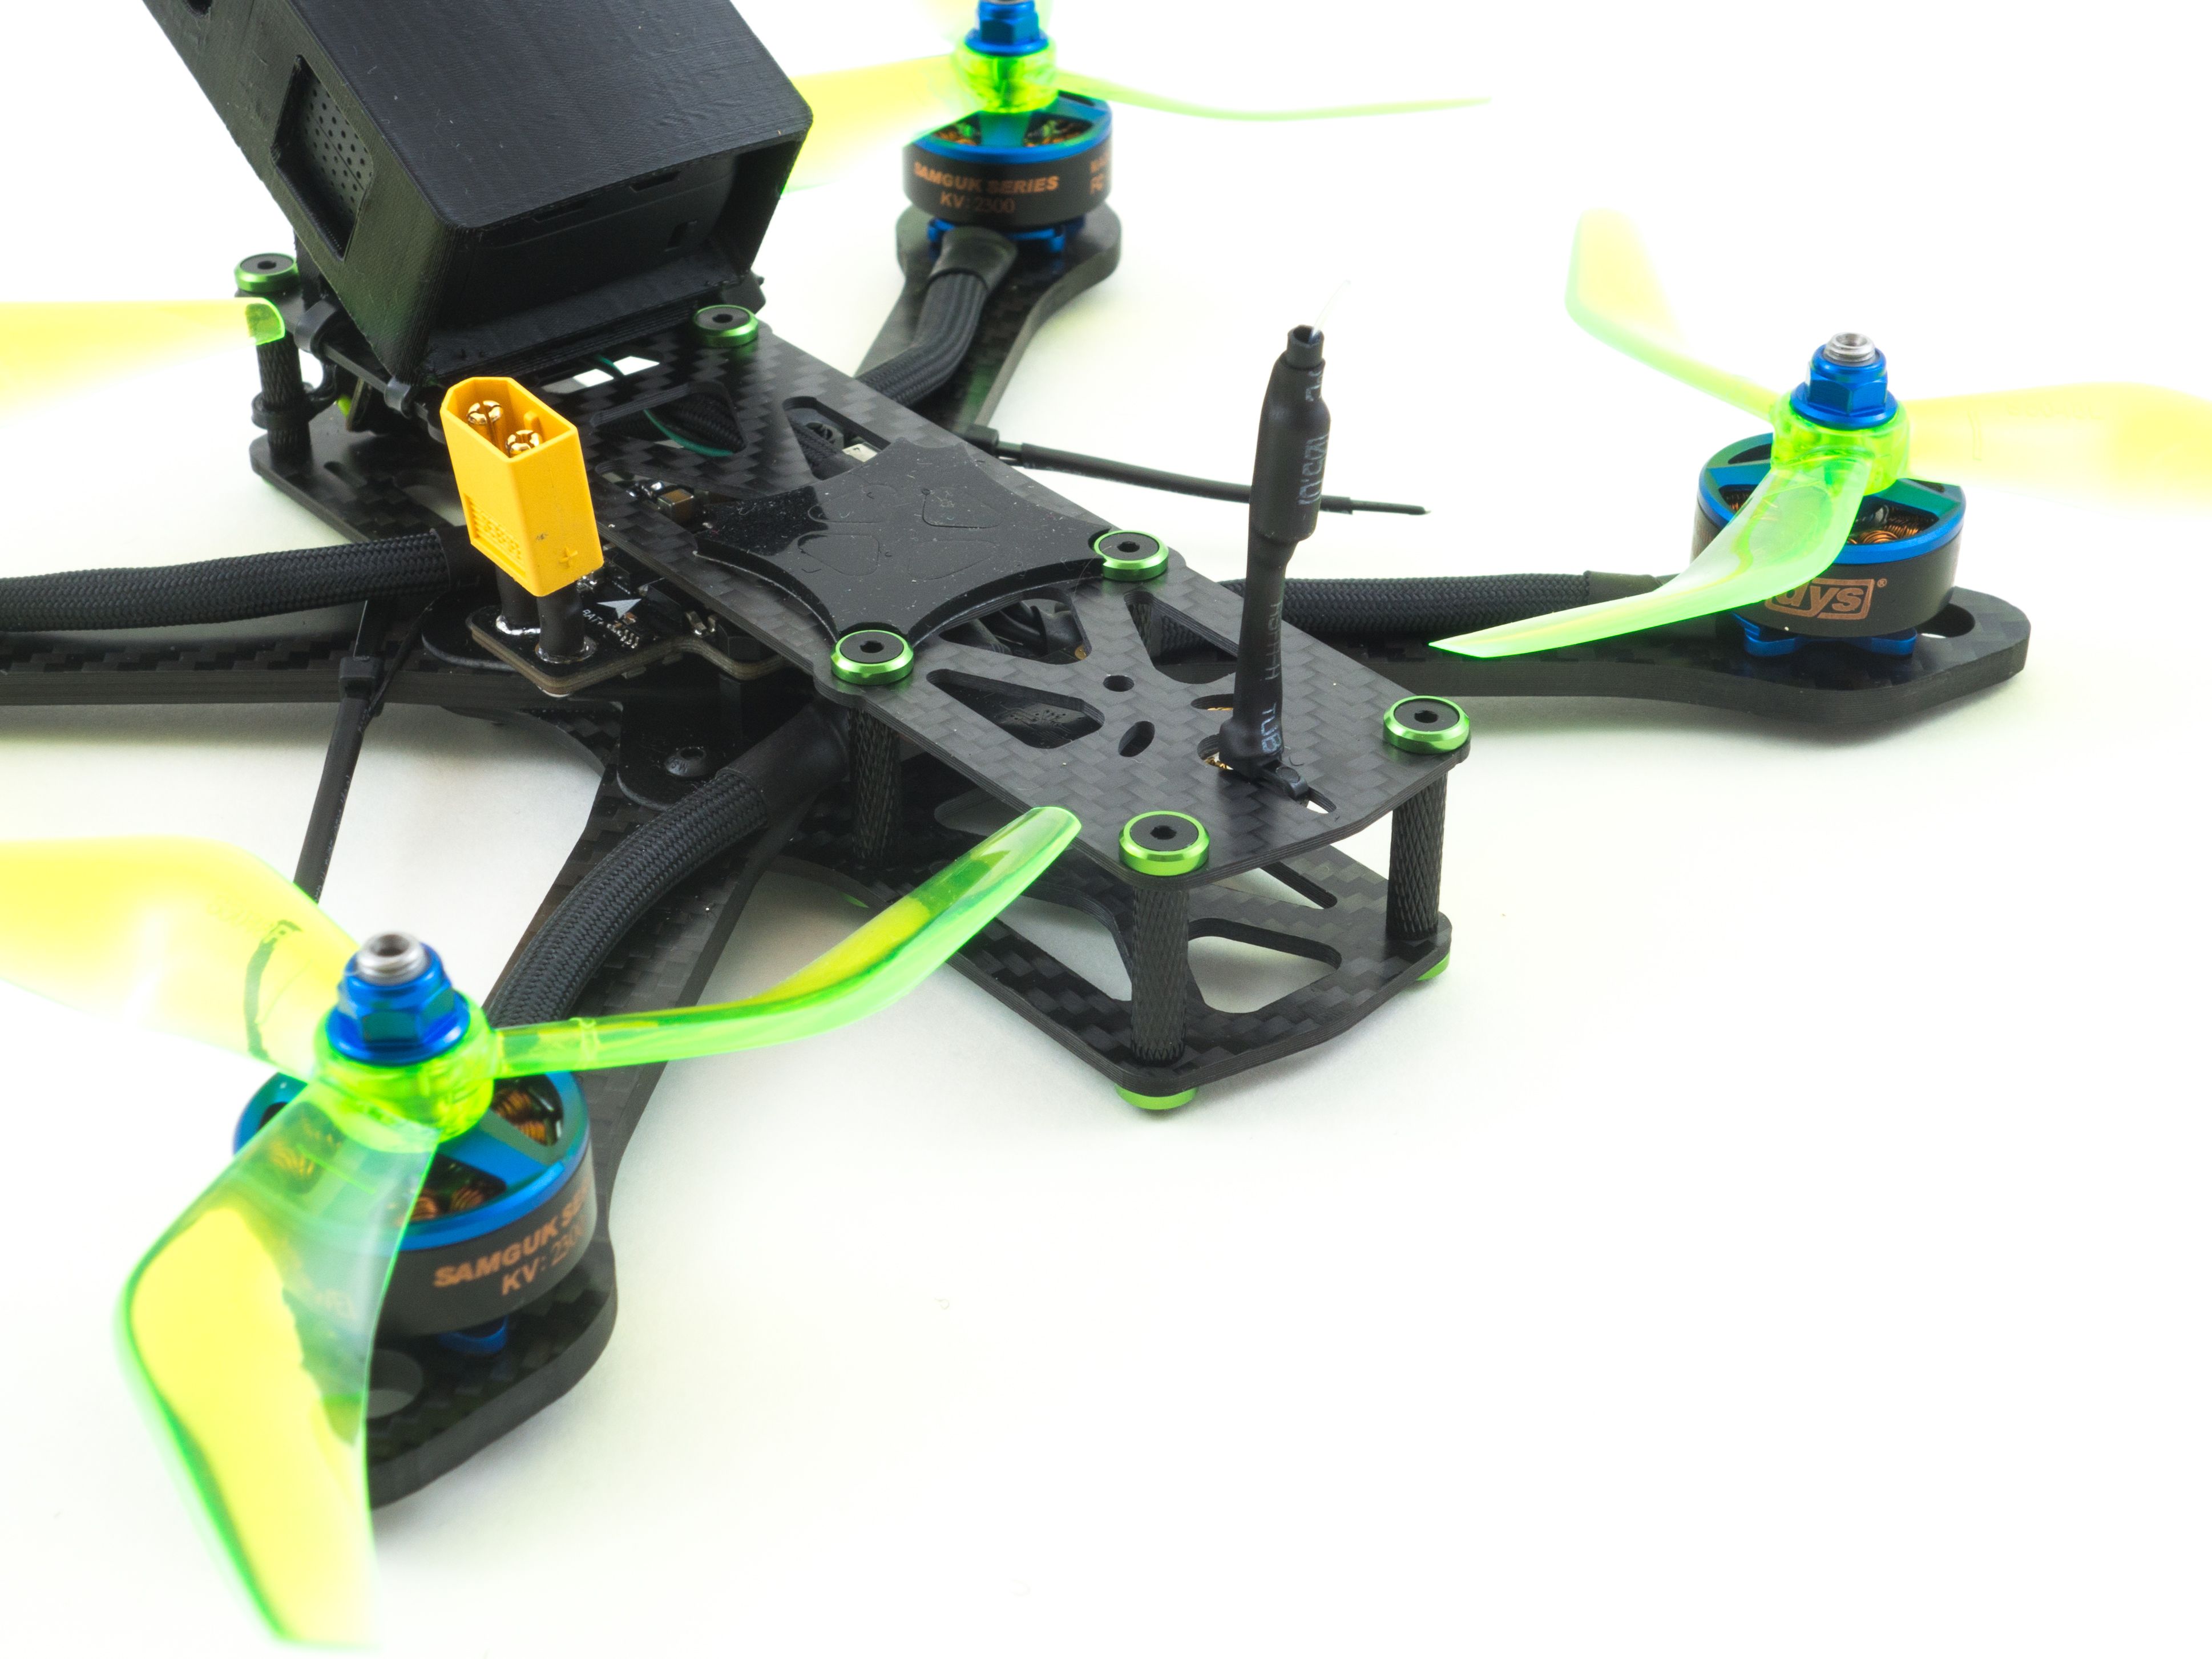
Now you can finish adding the standoffs and mount the VTX. Flip the VTX upside down and use some foam tape to attach it to the underside of the top plate in a way that the antenna can protrude through the circular hole in the back. Add a zip-tie to parallel the antenna and use some shrink tube to affix the antenna to the zip-tie to keep it rigid and protected. Attach the top plate and add a non-slip battery pad and your assembly is complete!
Betaflight Configuration
Betaflight Configurator is now available as an executable here as well as the BLHeli Configurator. This is a change in light of a move away from Google Chrome extensions. Download both programs and plug your flight controller into your computer to begin.
- Go to the Firmware Flasher and choose "Omnibus" as well as the latest stable release of Betaflight.
- Click "Load Firmware [Online]" and then "Flash Firmware" to update your flight controller. Once complete, click "Connect"
- On the Ports tab
- Set the UART1 Peripherals to "IRC Tramp".
- On UART3 click Serial RX for your receiver.
- On the Configuration tab
- Under ESC/Motor Features select DSHOT600
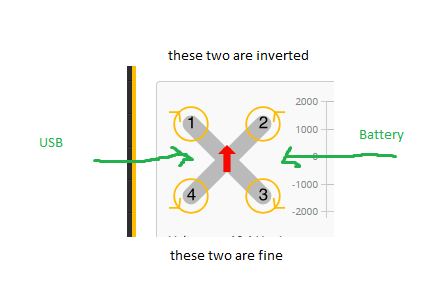
- If want to fly "props out" with reversed motors, select "Motor direction is reversed" below the illustration. (This is optional)
- Under Board and Sensor Alignment set Yaw Degrees to 90 to address the rotated flight controller.
- Under Receiver choose your receiver mode. For the XM+ choose "Serial-based receiver" and "SBUS"
- Under Other Features enable: Airmode, OSD, Anti Gravity and Dynamic Filter
- Click Save and Reboot
- Go to the CLI tab and enter the following commands to place the motors in the proper positions and enable the DShot ESC beacon:
resource MOTOR 1 B09
resource MOTOR 2 A02
resource MOTOR 3 B08
resource MOTOR 4 A03

set beeper_dshot_beacon_tone = 2

save
To complete the remaining steps you'll need to apply lipo power to your build:
- On the Receiver tab ensure your pitch, roll, throttle and yaw are being applied correctly. Adjust your transmitter and Channel Map as needed.
- On the Modes tab
- Assign an Aux switch to arm and disarm your quad.
- Assign another Aux switch to enable Horizon or Angle mode if you need them.
- Assign the Beeper and "Flip over after crash" to a 3rd and/or 4th switch. I like to assign them both to a single 3 point toggle switch.
- On the Motors tab enable the motor test and apply a small amount power to check the rotation of each motor. Take note of any that need to be reversed.
- Disconnect from Betaflight Configurator and open BLHeli Configurator
- Flash all ESCs to the latest firmware release.
- Reverse the motor direction of any motors that need it.
- Save and reconnect to Betaflight Configurator to test the motor directions.
- On the OSD tab
- Uncheck all of the features you do not want and arrange your OSD as desired.
And that's it! The default Failsafe settings are generally fine, but make sure they work by arming your quad, applying a small amount of throttle and turning off your transmitter. It should shut down after 4 seconds.
Final Thoughts
This was, by far, the easiest build I've done. It requires a minimal amount of soldering and the short standoffs really give it a nice, low profile look. I love the way it turned out! This is a proven frame and should take some heavy hits. You don't need to use the countersunk washers, but I think they add a nice touch. These motors were just released so the durability has yet to be seen, but they've proven themselves in the power department. This build was courtesy of Banggood.com, and all the parts were selected by me.
Photos


Part List
Show stores (3)
Hi Whiffles, I am a complete noob here and I built your model as my first build. I followed all instructions (except the video trasmitter part) since I want to get comfortable flying it in front of me first before going FPV. I am having trouble flying it tho, I am using taranis X9D plus transmitter and FRsky R-XSR receiver. When I put throttle up, the power does not go evenly to all 4 motors (I check by connecting the drone to betaflight and observing from motors tab). On the other hand, when I use the master scroller in the motors tab, the power gets distributed 100% evenly. Air mode is off, and angle mode is on. If I arm the drone (propellors go slowly), and I rotate it, the right motors get more/less powerfull accordingly to keep the drone stable (angle mode is working). But when I push the throttle up, it behaves randomly and if I go all the way up, some times one motor hovers at 10% power, 2 motors would go around 50-60% and only one motor goes to 100%.
airmode is not enabled, it is responding quickly, and default pid is 100% the problem.
when put I and D to 0 and P high, it can fly okay.
Betaflight does not have docs for pid tuning for betaflight 4.0, do you have a video showing how you tune yours?
I backed up some settings, and when restoring, (the motors usually turn on slightly to signify turning on/off) one motor smoked and one of its 3 wires got disconnected, I soldered it back on but it is still not working properly.

I wonder if it could be vibrations. I recommend swapping the nylon standoffs for vibration dampening standoffs. You may be experiencing gyro noise from the motors. I used the stock PIDs on this and it flew just fine, so it sounds like the problem is possibly the vibrations. That's unfortunate about the motor. Is it dead?
Hello Whiffles, great build! I found your instructions, pictures and buying links very useful. The drone is done and looks great. The only problem I am having is that it randomly jitters and shakes a little during hover. I tried replacing the propellers and playing around with gyro and D-filters but nothing helps. I am in airmode and have all sensors except gyro turned off. I have run out of ideas what the problem might be. Since you are way more experienced than me do you have any suggests on what I can try next to resolve? Thanks!
Have you tried vibration dampening standoffs? Those usually do the trick. It's likely motor noise interfering with the gyro.

How did you end up wiring the OSD control wires? I'm not sure which pads or if i need to do anything in BF to allow it to work. I dont know how to adjust camera settings with the micro eagle at all at this point. Thanks!
Howdy! Thank you for the great write up, it went quite well for my first build. The only problem I am running into is that I cannot get any video from the VTX and unfortunately there is not a lot of manufacturer documentation for troubleshooting this part. The Panda VTX when powered up has a blinking red light and a solid blue light. When I try to go through any of the button sequences to change things, it does respond and the LEDs to change, but it seems like every time I change a setting, it reverts back to its original state. When looking in my goggles, there is one channel that has a pinkish hue to it for a second and then goes away. When I am pressing buttons on the VTX, the snow in my goggles is bright and intense, and then it goes back to an inactive background snow. So the VTX must be pushing out some sort of signal that is blasting the area with waves for a second. You mentioned in your article that there was potential for a brown out, could it be that and I need to solder directly to the main battery terminals? Or with the blinking red light, do I just have a bad board?
Thank you in advance for your time.
Spenser
So if you scan for the frequency with your headset you can't find it? I wouldn't bother with the button on the VTX itself and adjust everything via the OSD. I doubt it's a brown out issue as the 5v from the FC is ample. I haven't had any issues over several months of use. My only guess is you aren't on the correct frequency.
Sorry for the late reply, got completely sucked up in the holidays. It turned out to goggle operator error on my part. I made the assumption that the VRX module frequency scan jumped to that frequency that was highest. It does not. I found the band and channel that the VTX was transmitting on and voila there it was. Then I was having problems getting OSD to show up on the video feed...turned out all that required was connecting the little caddix joystick to the green and black wires and changing it from PAL to NTSC and bam there was OSD. I'm finally all good to go...now if only it wasn't winter and pouring outside. Thanks again for such a great build, it made for a perfect first time.

Hi!
Love this build and it has given me more confidence in selecting parts for my first quad! Thanks for that!
I have made a Buildlog in which I have placed the list I have compiled. Could you give it a once over?
Thanks for this and cant wait to get into this IRL (although liftoff will have to do for now :P)
hey brother. im new to this site and already i am intreaged about what you built here. Thank you buddy. my email address is famms00@aol.com if you would like to discuss anything at all.

Hi Whiffles, I'm about to build my first drone but I want to upgrade a few things from the Wizard Killer Mark III. I was thinking about replacing the drone frame for the Rotor Riot CL1, the camera for the Foxeer Arrow Micro Pro 1/3" and maybe a better transmitter/antenna. Few questions:
- Is the Foxeer Arrow Micro compatible with the Racerstar StarF4S ? Do you think I will have enough space even with the 20mm standoffs?
- Is it worth to upgrade the transmitter to the Eachine TX5258 ? Or is the one you proposing good enough? Should I upgrade the drone antenna? Which ones do you recommend?
- Is there enough space to put anti vibration stand offs ?
Sorry for all the questions thank you!
Jose
You might have to have a look at my CL1 Build Guide as it does a lot of what you're asking here. I wouldn't say the TX5258 is an upgrade. It's a much older style VTX and much more bulky. There is enough space for anti-vibration standoffs on the CL1, but you'll need to move the arms under the bottom plate of the Martian II if you want to use 20mm standoffs.
Thanks for the detailed write up! Would you say you still stand behind all of the parts on this list since you first made it or is there anything you recommend that may have come out since? Also anything else I should pick up while I'm at it that wasn't on the list? Thank again!
I'm still flying this and it flies great. The main thing I'd upgrade is the camera. Maybe consider the Runcam Sparrow 2 as that's a great little cam. If you have the budget you can upgrade the motors, but these are suitable for a first build. I'd also suggest soft-mounting the flight controller with some anti-vibration standoffs. That'll slightly increase the height of the stack, so you may want to consider mounting the arms below the top plate. That's what I ended up doing.
Hey Whiffles :-)
this was my first build i've done. it was sometime frustating but now its finished. But i have 2 problems now. when i turn on my quad the video-feed stops after a couple of time. The quad itselves is still reacting on controls, but video-signal is lost. Could it be a problem of heat?
The other problem i have, how can i change raceband and mw? When i try yaw lef + pitch up i can change everything i want, but nothing remains after plugging the batterie off and on again. Set / Exit / Save - Exit / Save - Reboot it still stands on the same default raceband and 25 mw.
Any suggestings so far? could it be a problem of heat
best regards
Vala
Hey Whiffles! Love your builds! I'm going to use this one as the framework to do my first build (really my second, but a lot has changed in 2 years).
I'm wondering if you think the EMAX RS2205-S motors are compatible with this build? I was more interested in those over the DYS because they are always out of stock and QC issues. Also would this build benefit from a capacitor to the battery connection like in your CL1 build? Sorry if these are pretty noob questions.
~Edit: I'm wondering if upgrading to the F4S FC is ok (or worth it)? I know there's a difference with no built-in inversion with the F4S but I'm not sure if that affects this build. Also, any good replacement for the FPV TX which is OOS?

Hey, so I'm trying to bind my Flysky i6 with the receiver. I Turn on the transmitter while pressing the bind key and it says RC Binding. Then I connect the battery to power the XM+ receiver while holding the small button. After that I Turn off both the receiver and the transmitter but for some reason they didnt bind. What am I doing wrong?
Thank you so much for your help! Its finally flying now, but I have a few questions. Im not really satisfied with how I mounted the antennas of the receiver(2black ones). Do you have a better option? Also, I want to learn to fly with goggles on but I dont have any experience with VR flying. How can I learn this the best way?
Awesome! I like what you did with the blue and purple countersunk screws and washers. Try mounting the antennas like I did off the arms. You want them to be at a 90 degree angle and it's safer to mount them horizontally as they won't get crushed.
Download a sim like Liftoff and practice acro for several hours before you try actual FPV. Make sure you've got a lot of open space before you try FPV for the first time.
Great build, love the idea paracord to protect the wires. I built the same quad myself and i am suffering with a problem. Every time i try to do a snap roll with it, it spins violently to the ground. Aside from flips it flies like perfect. I was just wondering if perhaps there was a way to resolve this.

I have finished assembling this drone, but I have now spent like 30 minutes trying to get the flash firmware to work, but in no success. The coms always change from COM3 to COM1 when I flash firmware. I can always load online firmware though, when I press flash firmware, it always displays: No response from the bootloader, programming: FAILED
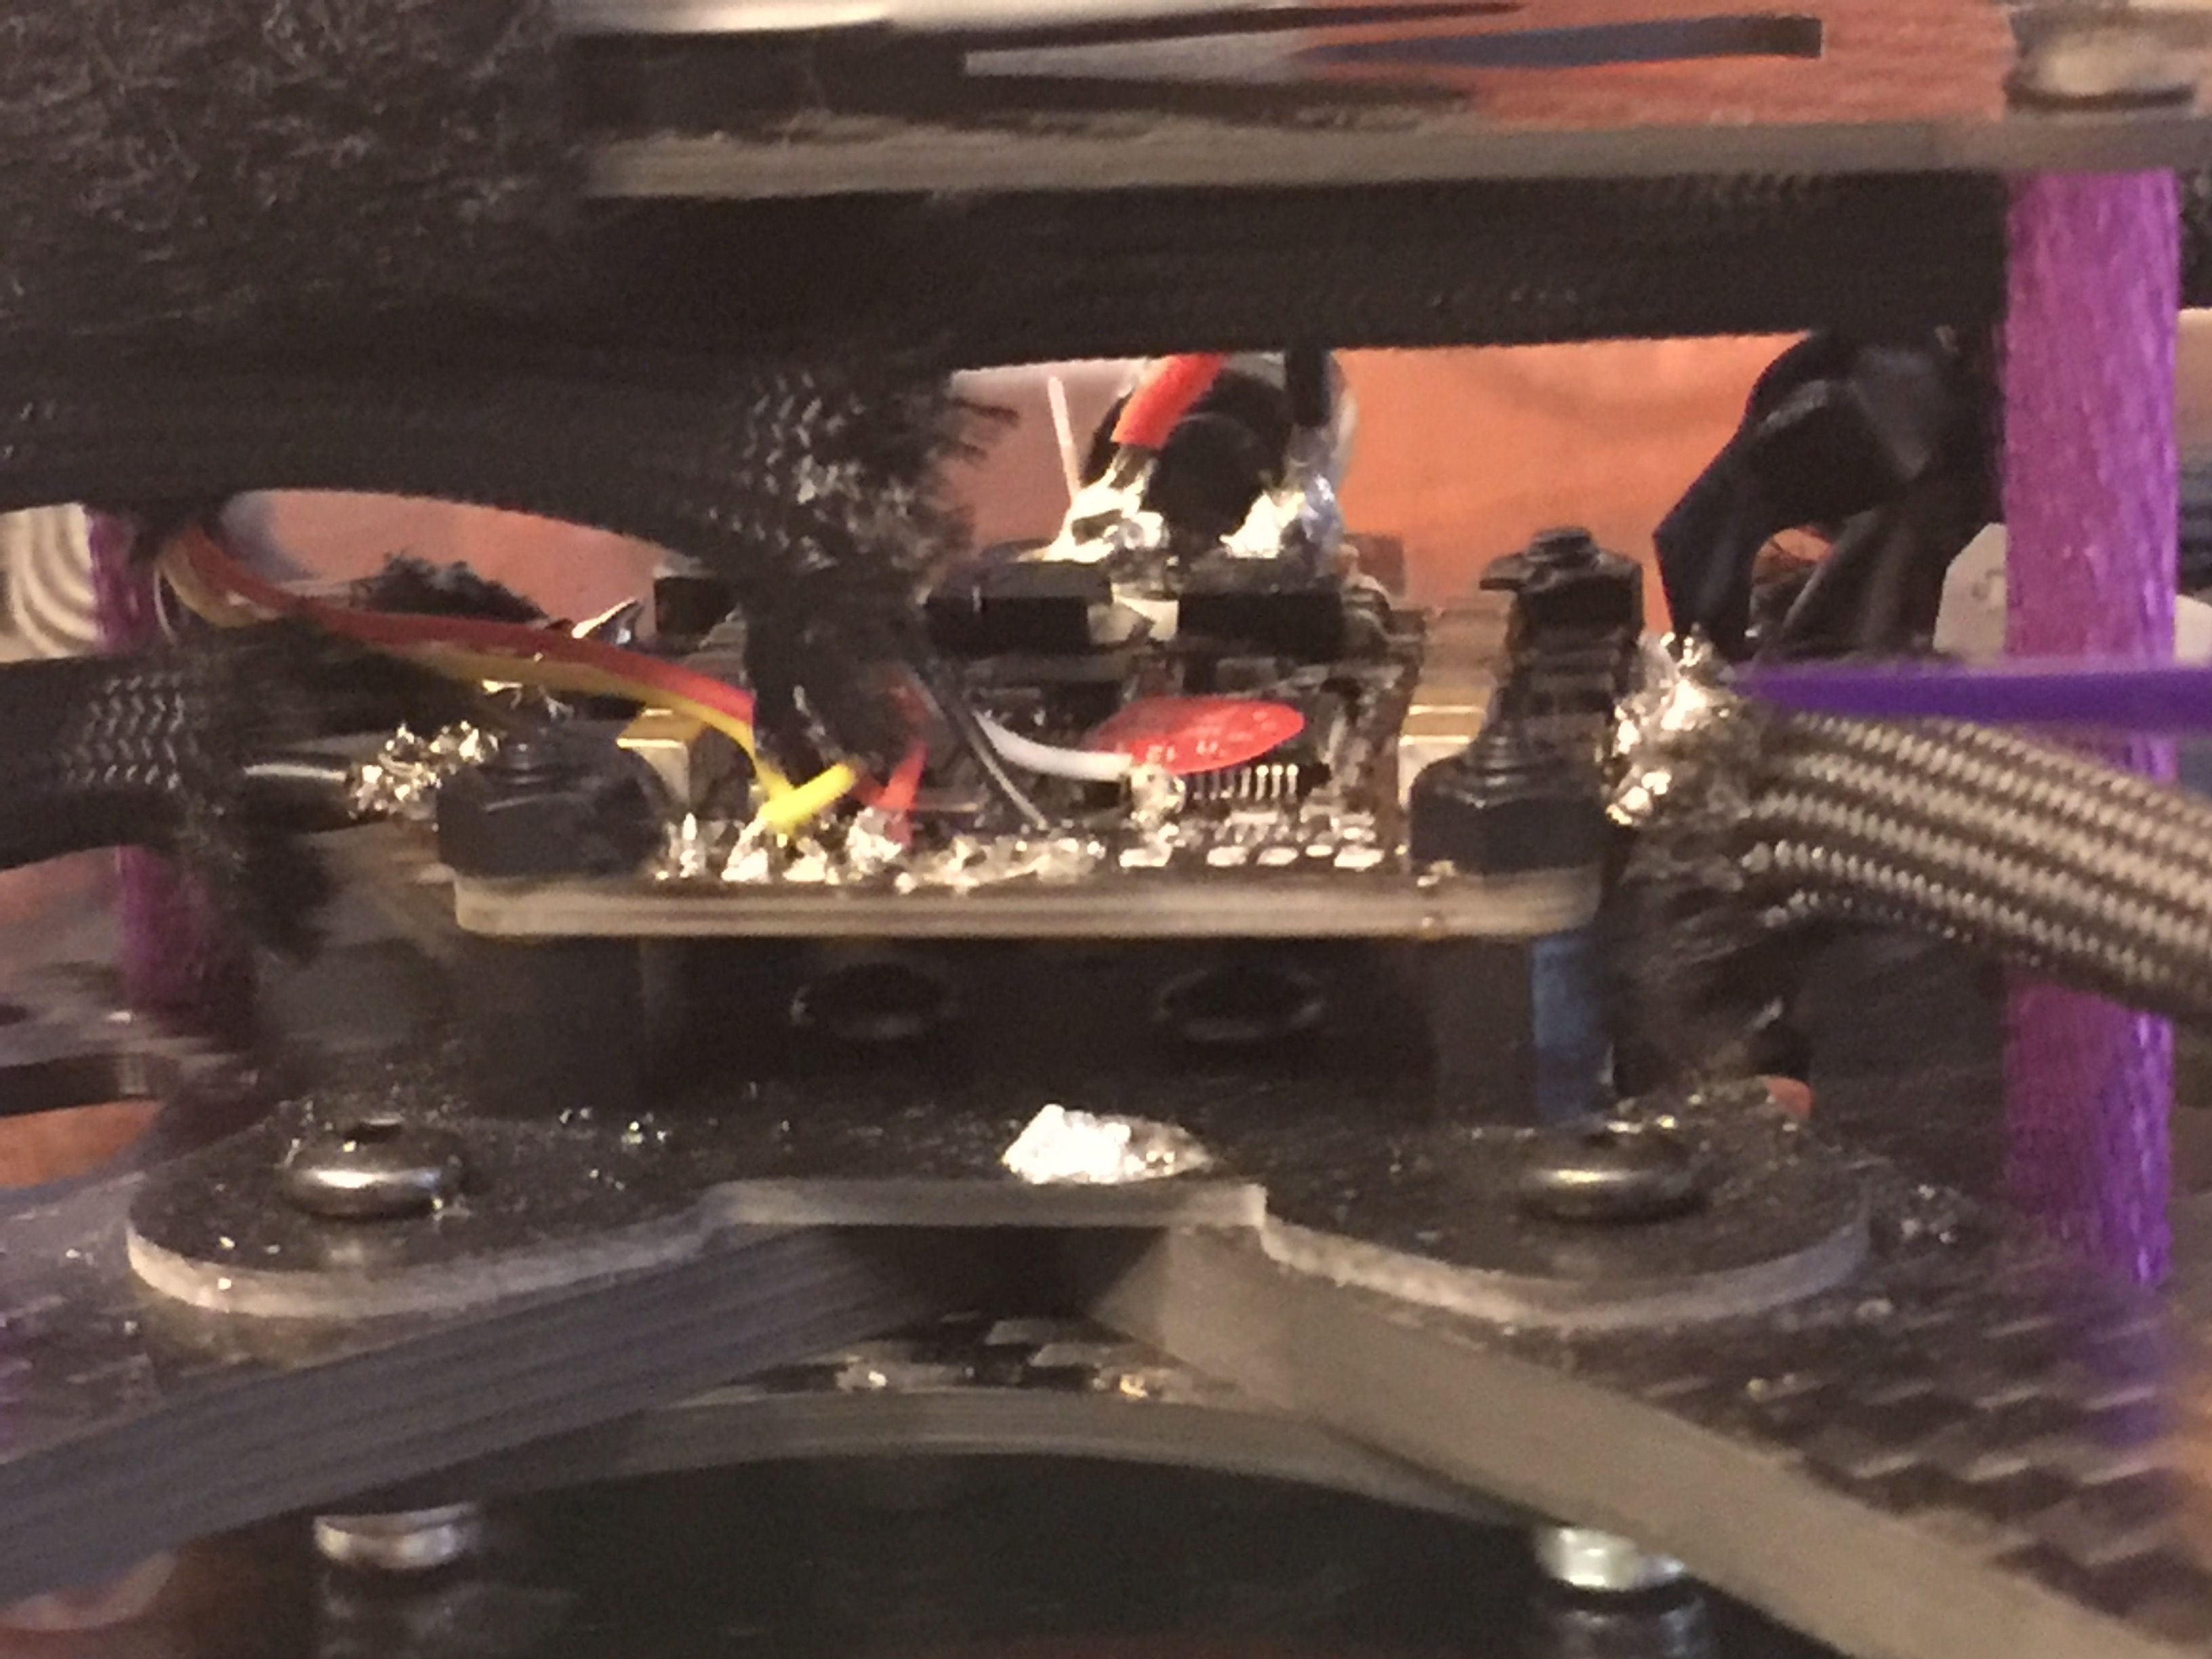
Also, what soldering iron are you using? Those joints look pretty jagged. You need a good iron that can maintain 450C. I'd apply some flux to those joints and clean them up with a hot tip. It looks like your iron isn't powerful enough and maybe your solder isn't the best quality. You may need to practice soldering and clean some of that up with solder wick.
First off...thanks so much Whiffles for these great build instructions! Quick question...do you think the micro-eagle camera will fit into this frame with 20mm standoffs? I love the low height but I'm concerned the camera might not fit. Thanks!
Where are all the tabs in the Betaflight configurator?
Dear Whiffles,
This is my first drone I'm building and my introduction to drones, some of the directions are a bit confusing and hard to follow for newcomers to the drone world. It would be great if you posted a video of you building it so everyone can see and follow your steps. Thank you for the drone parts and list, and have a good day!

I was looking to buy ARTF quad, but your guide has just changed my mind to build my own! I am fan of 110, 150, 180mm's but this also is a monster. One quick question. I have my radiolink tx and rx. I think I can plug and play?
The size of the quad really depends on how much space you have. 5" quads are the most common and you'll find the most support, but some people just don't have the space to fly them. I'm not very familiar with Radiolink, but you'll want an Sbus receiver. I'm not sure if Radiolink receivers use an inverted signal, so that's something to keep in mind. If you use an F3 flight controller like this then you can un-invert the Sbus pad via the CLI. If you use an F4 flight controller you cannot and you'll need to use a different UART. Not much in this hobby is plug and play though. You'll have to get really handy with a soldering iron.
Please, I have been racking my brain over this for days and I dont know where else to go. I've got this beauty assembled and rearin' to go but I'm having receiver/betaflight issues. My taranis X7 is bound to the receiver but none of my inputs are showing up in betaflight's receiver tab. It feels like I've looked everywhere for a solution and everyone who has exhibited a similar predicament has found a solution...not I. Only other thing I can think of is a DOA receiver.
Things I have tried as per my exhaustive internet dig:
-redone all my soldering and checked especially that my signal wire is in the right place on both the receiver and FC
-bound and rebound
-I have all the necessary drivers running for betaflight
-flashed current firmware 3.3.3....flashed and reflashed, full chip erase, the works
-tried the serialrx_inversion on and off cli command
-tried different betaflight versions
-watched every youtubes and read every forum describing a similar situation
Made sure that..
-my cpu load is good - high of like 24%
-running D16 on taranis
-UART3 is set to serialrx
-UART1 is set to IRC tramp
-serial-based reciever and sbus are selected
-my channel map on my taranis matches the betaflight one TAER...also tried AERT among others
-my engines work, camera feed in good, gyros and accel are all working (can rule out bad FC?)
I am at a complete loss. I appreciate your time to no end.
Thank you


First off, this a great build and I really appreciate you taking the time to create this site and share such detailed information. Many of the builds on here assume a lot of prior knowledge, some are no more than a part listing and some pictures of the finished quad!
One small thing not clear to me at first was the receiver placement though I figured it out by going through all the pictures in the album.
I did make one mistake with this build in that I used the Betaflight backup button which created a .json file. After updating Betaflight the settings were gone and the backup file did not work! I a manged to restore my settings (which was a useful learning exercise in its self) by following this guide:
https://www.propwashed.com/betaflight-configuration-guide/
So, if you're about to build or configure this, I suggest you also go to the CLI tab for the command line and type "diff" then save to file.
https://www.propwashed.com/betaflight-backup-restore/
Another thing to remember is to Save and Reboot or Save before moving onto the next settings tab.
Oh, and to flash the new firmware you need the Flight Controller in Device Firmware Update (DFU) mode, for some reason my drivers were not setup right and it would not do it. I ran the exe tool linked here and that fixed it:
As far as I know, this a trustworthy tool from Impulse RC and is not installing anything bad, but you should do your own research.
Other things:
- My receiver needed the battery connected to work - USB power was not enough
- For Aux buttons on your Taranis, you need to add those using the inputs and mixer options in the Taranis menus
Tarinis Switch Setup - One weird issue I had was with the binding, it just would not work and someone suggested taking the transmitter further away from the quad, so I moved it to the other side of the room and was able to bind
- If you use clear heatshrink on your receiver you can still see the LED status :)
- Get two bags of those props - they tend to bend easily when you crash...so I'm told...
Finally, I had some issues getting BLHeli to connect. I think partly it does not like it if you still have the Betaflight Configurator open, even if you are disconnected.
Here are my settings which are probably wrong, as this is my first quad build! However, it does fly!
# Betaflight / OMNIBUS (OMNI) 3.4.1 Aug  2 2018 / 08:18:10 (1d99444d9) MSP API: 1.39

name Wizard III
resource MOTOR 1 B09
resource MOTOR 2 A02
resource MOTOR 3 B08
resource MOTOR 4 A03
resource PWM 1 D07
resource PWM 2 C08
resource PWM 3 K05
resource PWM 4 D04
resource PWM 5 B02
resource PWM 7 B01
resource PWM 8 A02

feature -RX_PPM
feature RX_SERIAL
map TAER1234
serial 2 64 115200 57600 0 115200
aux 0 0 0 1900 2100 0
aux 1 1 1 1425 1575 0
aux 2 2 1 1925 2075 0
aux 3 28 1 900 1075 0
set acc_calibration = -15,-30,-41
set serialrx_provider = SBUS
set blackbox_device = NONE
set dshot_idle_value = 200
set motor_pwm_protocol = DSHOT600
set align_board_yaw = 90
set beeper_dshot_beacon_tone = 2
profile 0

rateprofile 0

Hey Whiffles. I finally got my parts and I ended up building my quad. I have the FC sideways like you did, except it is put the other way (battery on the left instead of the right as you did)
I adjusted the yaw 270 degress as I figured I'd have to do that.
There's only 2 Quad configs (Quad X and Quad X 1234) and both of them aren't correct. Either what betaflight thinks is 'front' is my side or similar. What should I do/troubleshoot from here?
I tried pretending it was backwards (ex 90 degree yaw/exactly the same as your guide) and still 2 motors are the wrong numbers
Did you try setting your yaw degrees to -90? That may be what you need. You'll also need to change the motor positions with a different set of resource commands. The resource commands in the guide assume the FC is in the same orientation I used. Check this guide to learn how to adjust the motor positions.

Awesome build and write-up Whiffles! Quick question on motors: could I use D2307 2500KV's? (using 30A FC Board in build list)
Hi Whiffles, the indicated battery is out of stock, the same version but then 70c instead of 85c is available. Do you recommend to wait 2 weeks before it's back in stock or do you think it's fine to order the 70c version. (also 1500mAh, 4S model, 14.8v, XT60 support etc.
Hey - nice builds, love the way to discover & collect parts lists on this site!
I've "mix&matched" a total starter build based off the 3 wizard killer builds you made, but using 4 separate ESCs since I expect to break a lot of stuff while getting started. Would love to get some input from you!
awesome build! i can't find the thingiverse link for the micro cam mounts anywhere here. i scrolled all the comments too- maybe I'm blind? Â Thanks!
Your tutorial made me purchase almost the exact same parts and made me create an account here. For the motors being soldered to the flight controller, is there an order/specific way to solder them? They all look black/the same.
Also I have a FlySky 2.4GHz 6 Channel Digital Transmitter. Will this work with the 16 channel reciever? I don't play to ever really fly around other remote control quads/need to worry about interference
Welcome to the site! Nope, the order doesn't matter. I just like to make sure they don't cross over each other. You'll want to change the motor direction in the BLHeli Configurator after you're done building. There's always a motor or two that spin the wrong direction.
I'm not very familiar with Flysky, but just make sure your receiver supports ibus and not PPM. Be sure to note that you'll have to disable sbus inversion from the command line as mentioned in the build guide.
Thanks for putting this together.
Ive got all the parts in and have put everything together. Except i left off the camera and VTX for now because i dont have my googles yet. I wanted to do some flying by LOS but i plugged in my battery and flew off the ground just a little then landed. Now when i plug in the battery nothing happens. There are no lights on or anything. I didnt crash or hit anything. Any ideas why its not powering up? When i plug into my computer it will connect to betaflight. Please help!! Thanks!
All your Wizard Killer builds look awesome. I ordered the parts for UAVfutures $99 build and only the Racerstar RS20Ax4 20A was delivered (I think due to ordering batteries to the UK). Your builds look miles cleaner and better so out of the three which would you recommend (bearing in mind I would ideally like to use the ESC I currently have but if the difference is significant am happy to leave it). Your advice would be greatly appreciated as i would love to build this drone over summer
It uses an F4 processor which allows for 8khz gyro and PID loop frequencies. It's also a bit better at noise reduction with the capacitors and it uses a switching regulator so it doesn't get hot like the StarF3S. Yes, it is a high price to pay for a single component, so you could consider a separate 4-in-1 and a separate flight controller.

thanks a mill for this build plan! flys like a dream. my vendor upgraded me to RACERSTAR f4 when the spec'ed f3 was out of stock .
The banggood link for the FC notes that the mounting holes are linked to positive power and that you need non conductive screws. Did you have to work around this in any way or is the included hardware for this frame good to go?
Thanks!

Im trying to build this quad but im not sure where and how to mount receiver and fpv transmitter.
The receiver just needs some shrink tube so it can slide under the flight controller. It doesn't need anything to hold it in place once you've got the antennas in place on the zip ties. For the VTX I just used some double sided foam tape to stick it to the top plate. Be sure to use the flat side without any components.

Just about to start on the build yey! Whiffles do you know of any 3D printed antenna mounts that i can buy or download the files off www.thingiverse.com for the martian 2 frame. I want to use the TBS unify U.fl pigtail SMA i have seen a few but they all seem to be made for the original standoffs not the 20mml standoffs or do you know of any other way to mount a SMA antenna. Again thanks doing such a neat build guide and answering my previous questions.
Hi Whiffles i have had all the parts deliver finaly so about to start on this build the only thing i am strugeling to get here in the uk for a reasonable price is the battlecord i have seen this on Amaozon (100ft 550 Paracord Parachute Cord Lanyard Mil Spec Type III 7 Strand Core) https://www.amazon.co.uk/100ft-Paracord-Parachute-Lanyard-Strand/dp/B01EUIHZN2/ref=pd_sim_200_4?_encoding=UTF8&refRID=9XH6564H0VRDN45Y9ZMS do you think this would work? thanks
That's not wide enough for all three motor wires. You need something like these:
http://www.amazon.com/gp/product/B014GCNJUU
http://www.amazon.com/gp/product/B07BK8298Q
HEY! i am building my first drone and am thinking about using your build. i just wanted to ask how these motors have held up? I saw some reviews saying they werent very durable. i was thinking about using Racerstar 2205 2300 kv motors. Do you think there would be any problem with that? THANKS!
Hi, thanks for this great build! You are awesome! Is it worth to upgrade FC to F4? For example this one:
https://www.banggood.com/Racerstar-StarF4S-30A-Blheli_S-Dshot-4-in-1-ESC-AIO-F4-OSD-Flight-Controller-w-BEC-Current-Sensor-p-1165076.html?rmmds=detail-left-hotproducts__2&cur_warehouse=CN ? It's just a few dollars more. I am beginner, currently training with hubsan 107p. Will it be good for the first FPV quad? Do you recommend the 3s battery for begginers? Or is there an option to reduce motor power? Thank you.
That'll work and with F4 you'll be able to run 8k/8k on your gyro and PID loop. That should help with the new stage2 filter. But if you haven't flown an FPV rig you might want to start smaller. Maybe something like the Babyhawk-R to get comfortable with the controls. You could also try learning on a sim. I'd start with 4S because eventually your 3S packs will just collect dust.
Thanks for this nice information, i am rather new into this and want to buy all the items described above. The only info that is missing is what controller (to one you keep in your hands) to use. Can you maybe give some info on a good controller you recomment for beginners?
Are there any videos of this thing flying? How would this compare to the RTF Emax Hawk5?

Just finished this as my first build, it looks and flies great! Super glad I follow your build.
Thanks for the amazing guide and answering all my questions!

Very nice build and write-up! I'm looking to get back into 5 inch and this one feels safe. :-D Everthing looks like the old 250 style with a new spin. I do have one question that I can't find the answer to. What is the width of the arms? Thinking about using individual esc's if the overhang is minimal. Thanks!
Hi Whiffles i am doing this as my first bulid i have orderd all the parts so i am just waitning for them all to be delivered! the only thing i have ordedrd diffrerently was the camera i got the Caddx Turbo micro SDR1 do i just wire it up the same? cannot wait to get started. I will upload some pictures when it is done and will probably be back to ask questions when i get stuck lol. great great bulid and write up by the way.
Dear Whiffles,
how durable is this build? I orderd the same camera fc and motors. How do they hold up in bigger crashes?
Yes I heard the same. Just to be safe I ordered 5 of them and some fushi abec 7 bearings. Got a friend who got 2 of those bords and both of them blow up after couple of flights. How many packs have you flown with this build? Did the esc survive? I have the 5040 kingkong props hope the escs/motors will last long.
I'm trying to build this build as my first and I'm kinda having trouble following along the xt60 part. What are the wires going beneath the board in this picture? https://rotorbuilds.com/pictures/f_1_55EFcJT71bOGqdkLN4BjuBnG4.jpg
Also, would the board still be able to support the xt60 if it wasn't turned 90 degrees?
Hi i am planning on doing this for my first build dose it have a low bat buzzer or how would i do this thank
Where are the boot pads or button?
Is there any other way to mount the camera than the tpu 3d printed mounts
i use 25mm standoffs eact same design as the ones shown, and i use the metal stand that comes with the caddx camera. You just need 2*M2 nut/bolt to secure it to the holes pre drilled on the martian frame. Hope that helps. (5mm extra height is nothing to worry about)
As for a gool soldering iron: i use a copy of a hakko, 939d. Heats up fast, cheap, nice quality, free shipping on ebay. And the copy fits the real Hakko tips so you can buy replacements.
Whats the difference between base and total?


Thx whiffles for this build using it as base for my first build with few upgrades.. Looking for clear heatshink to fit ovet arms to protect some leds for non fpv flying any ideas? As well trying to find good mount for sessions hero5.
You'll probably need some very wide heat shrink to get over the arms. You may just want to check your local hardware store. Bring the arm to see what'll fit. Most people will 3D print a Session 5 mount. There are a number of models on Thingiverse. If you don't have access to a 3D printer then you can order one from any number of FPV shops.
I know this is a million years late, is weight the only reason not to use a standard stick on Go Pro mount that screws into the standard Go Pro frame instead of a 3d printed one?
Weight is part of it and it's nice to have the shock protection of TPU.