
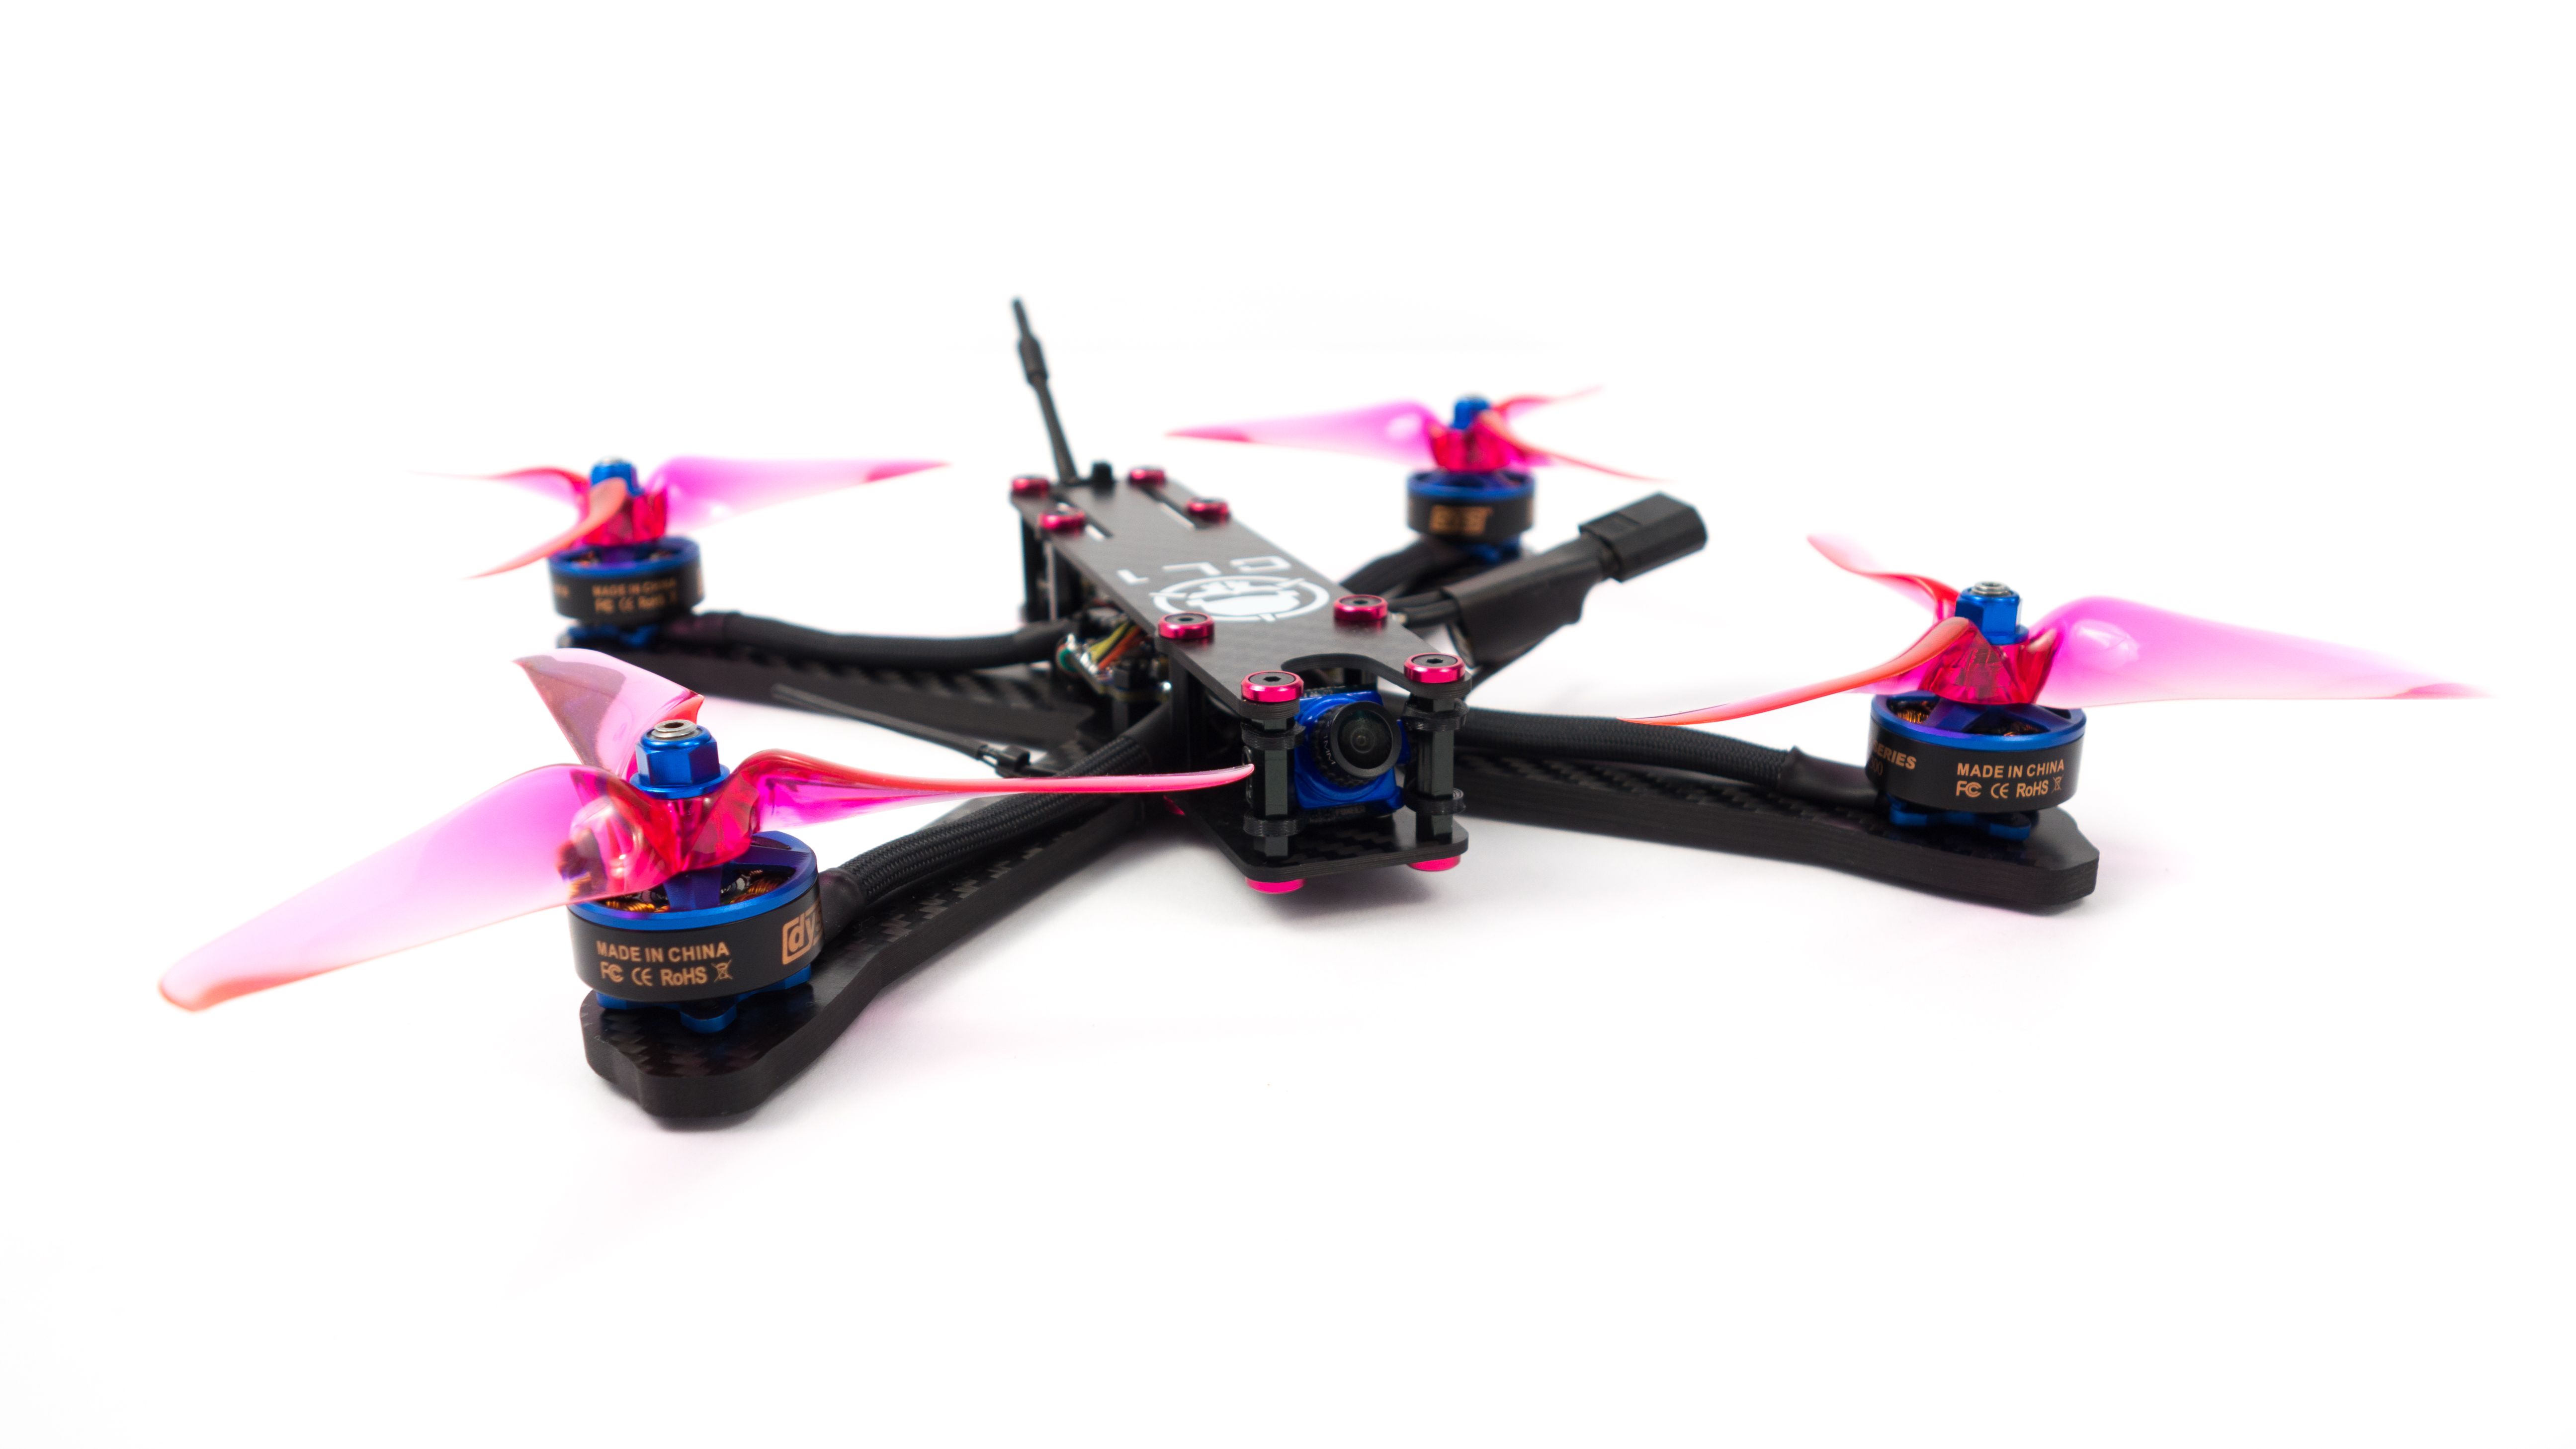
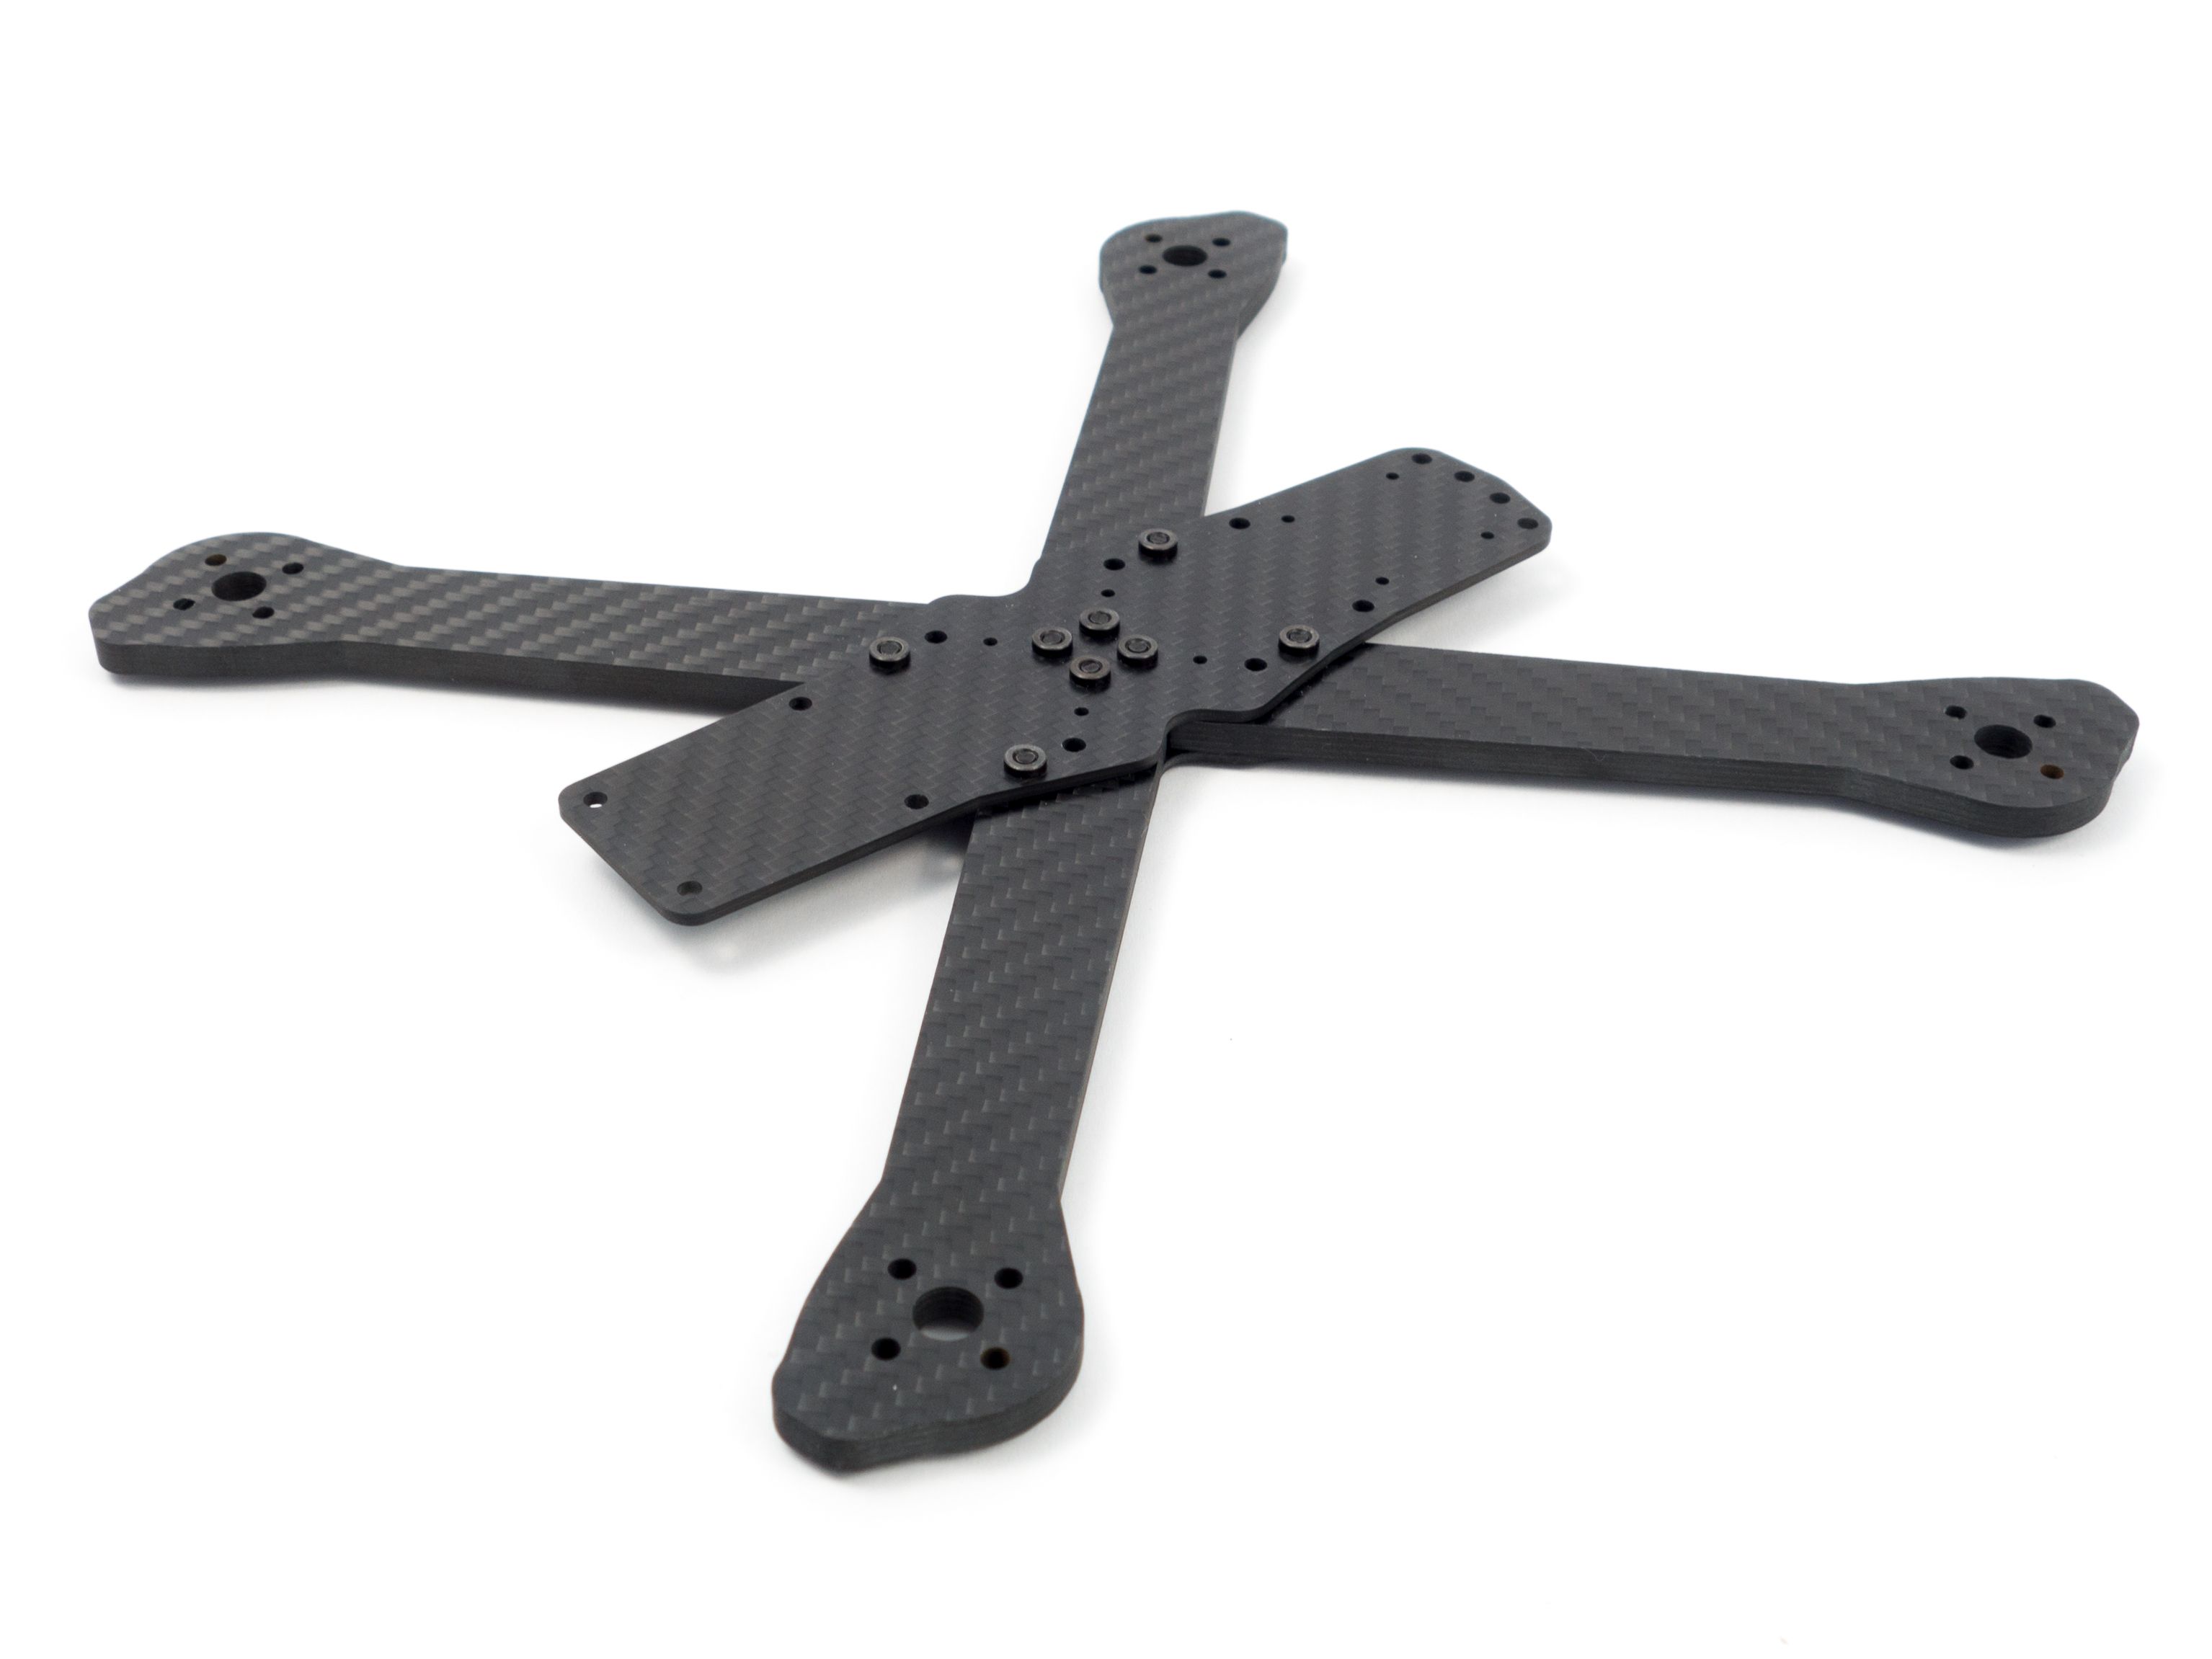
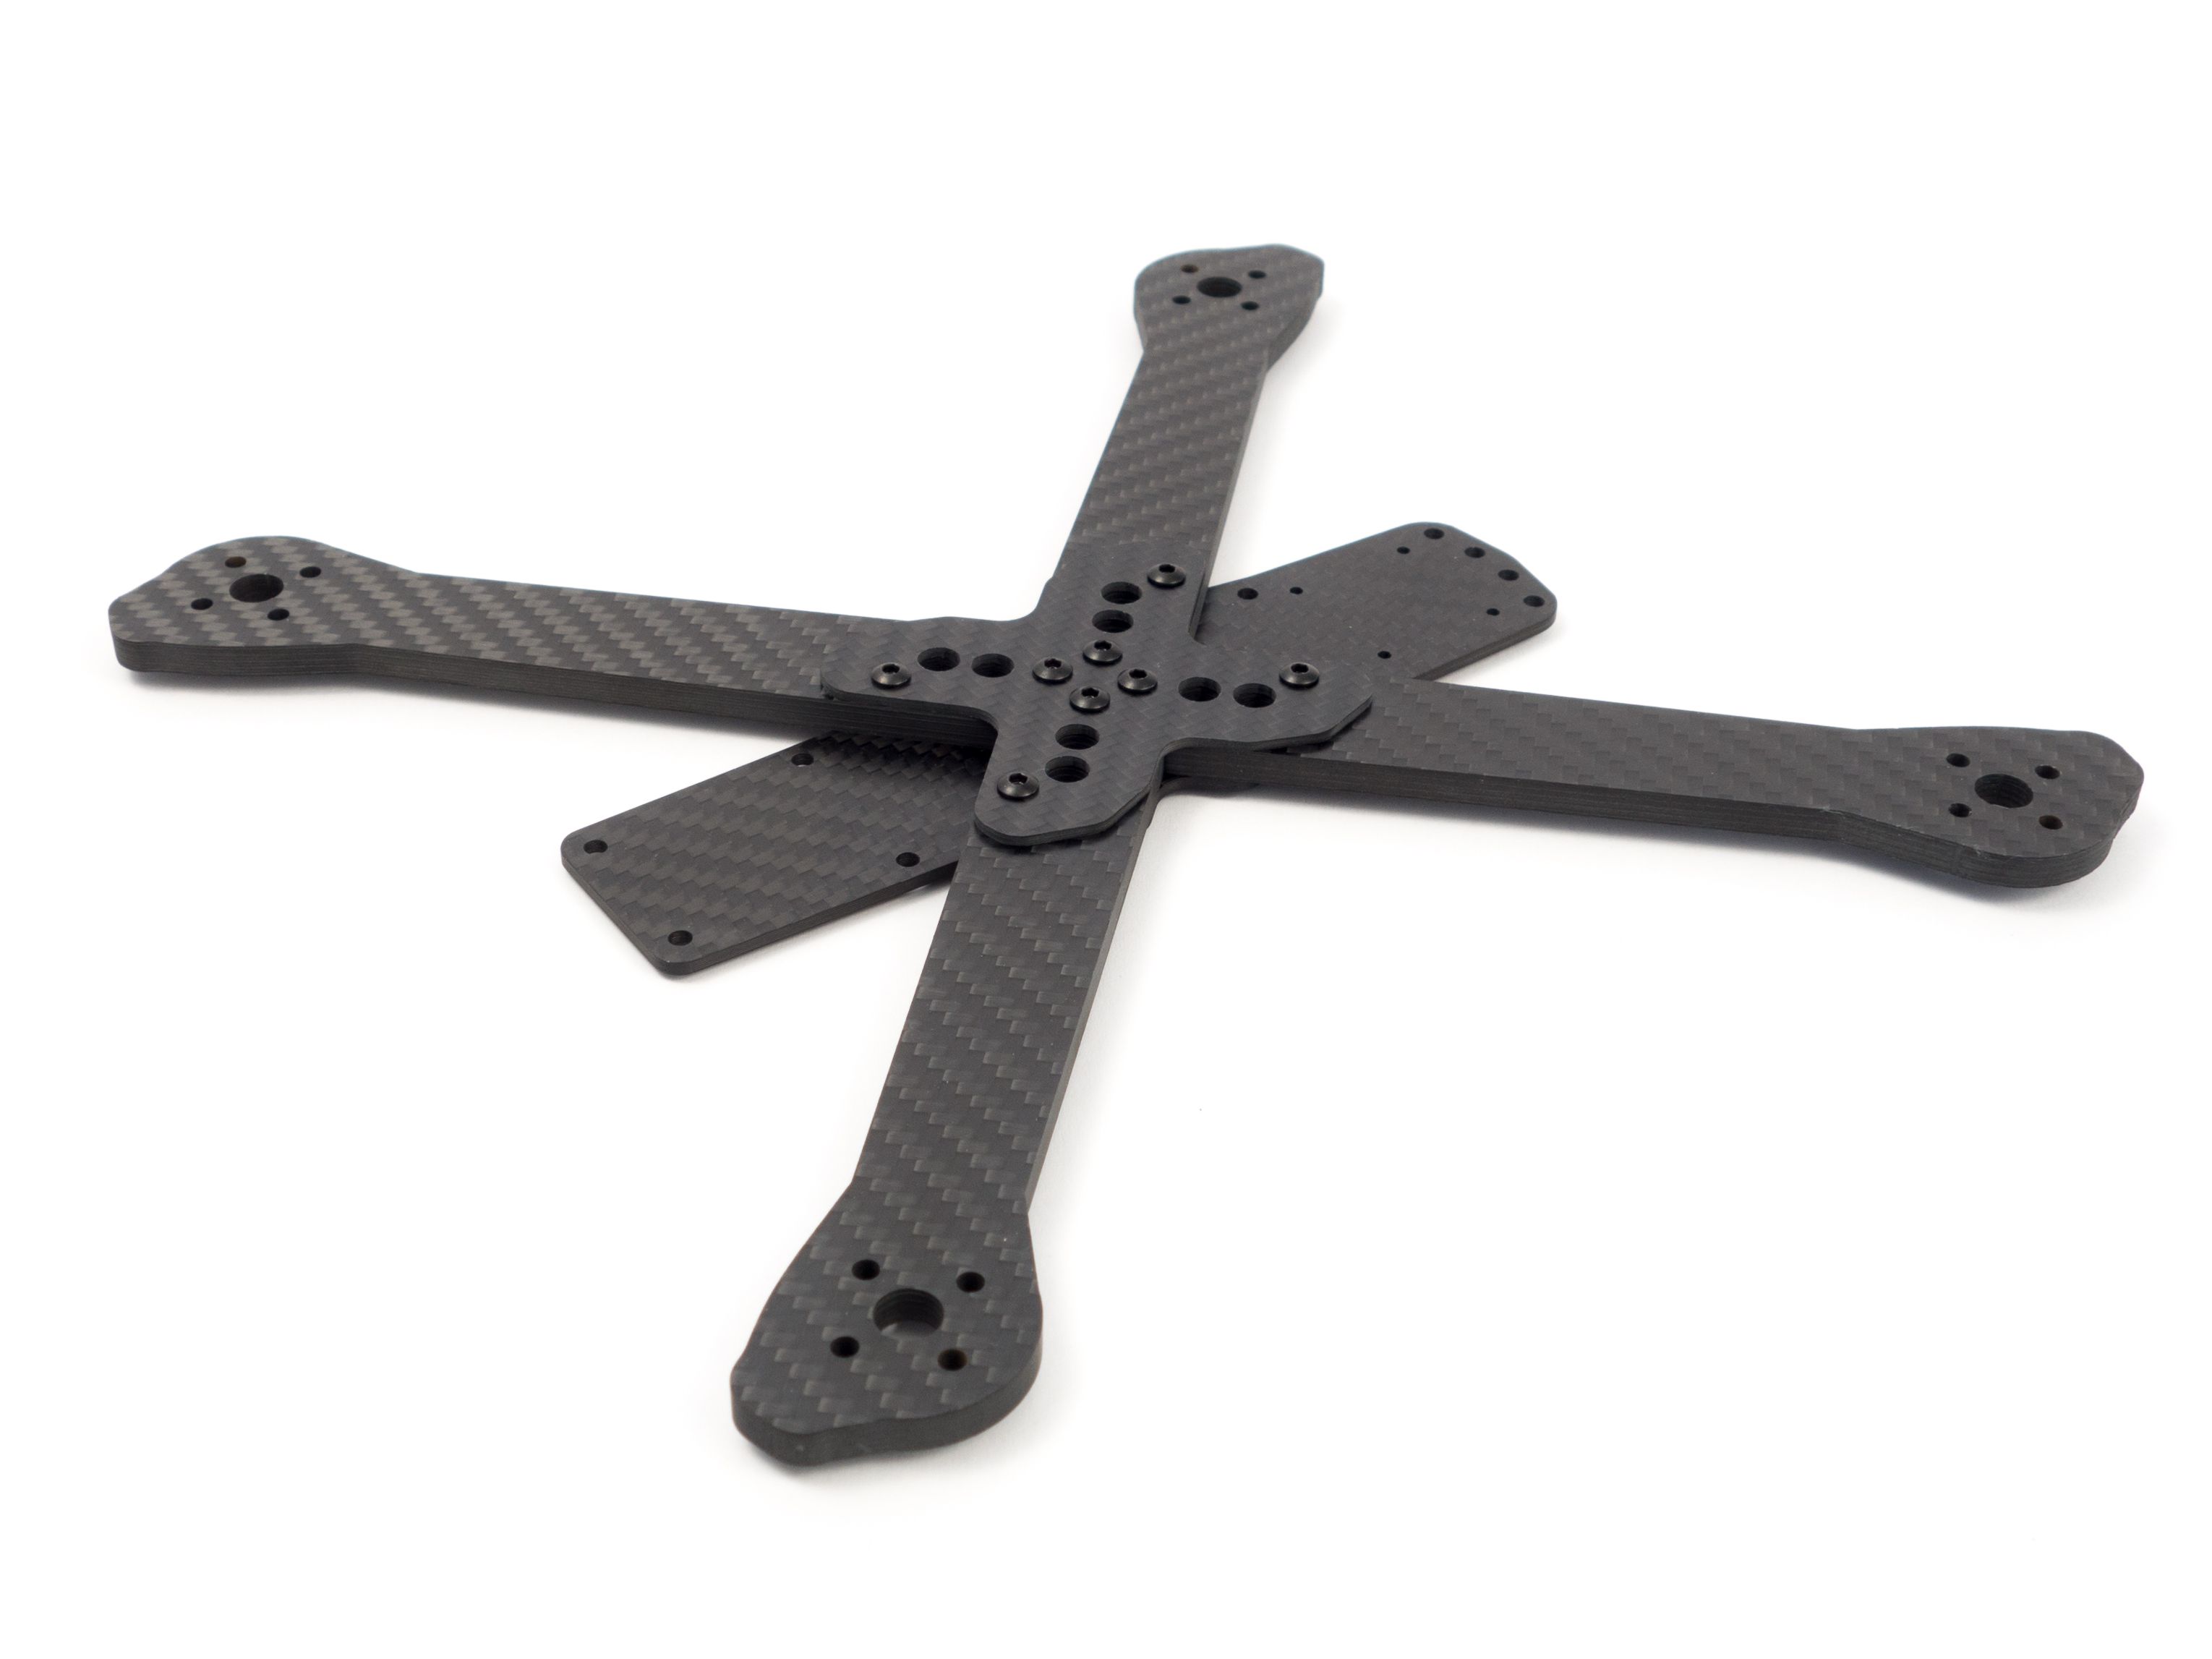
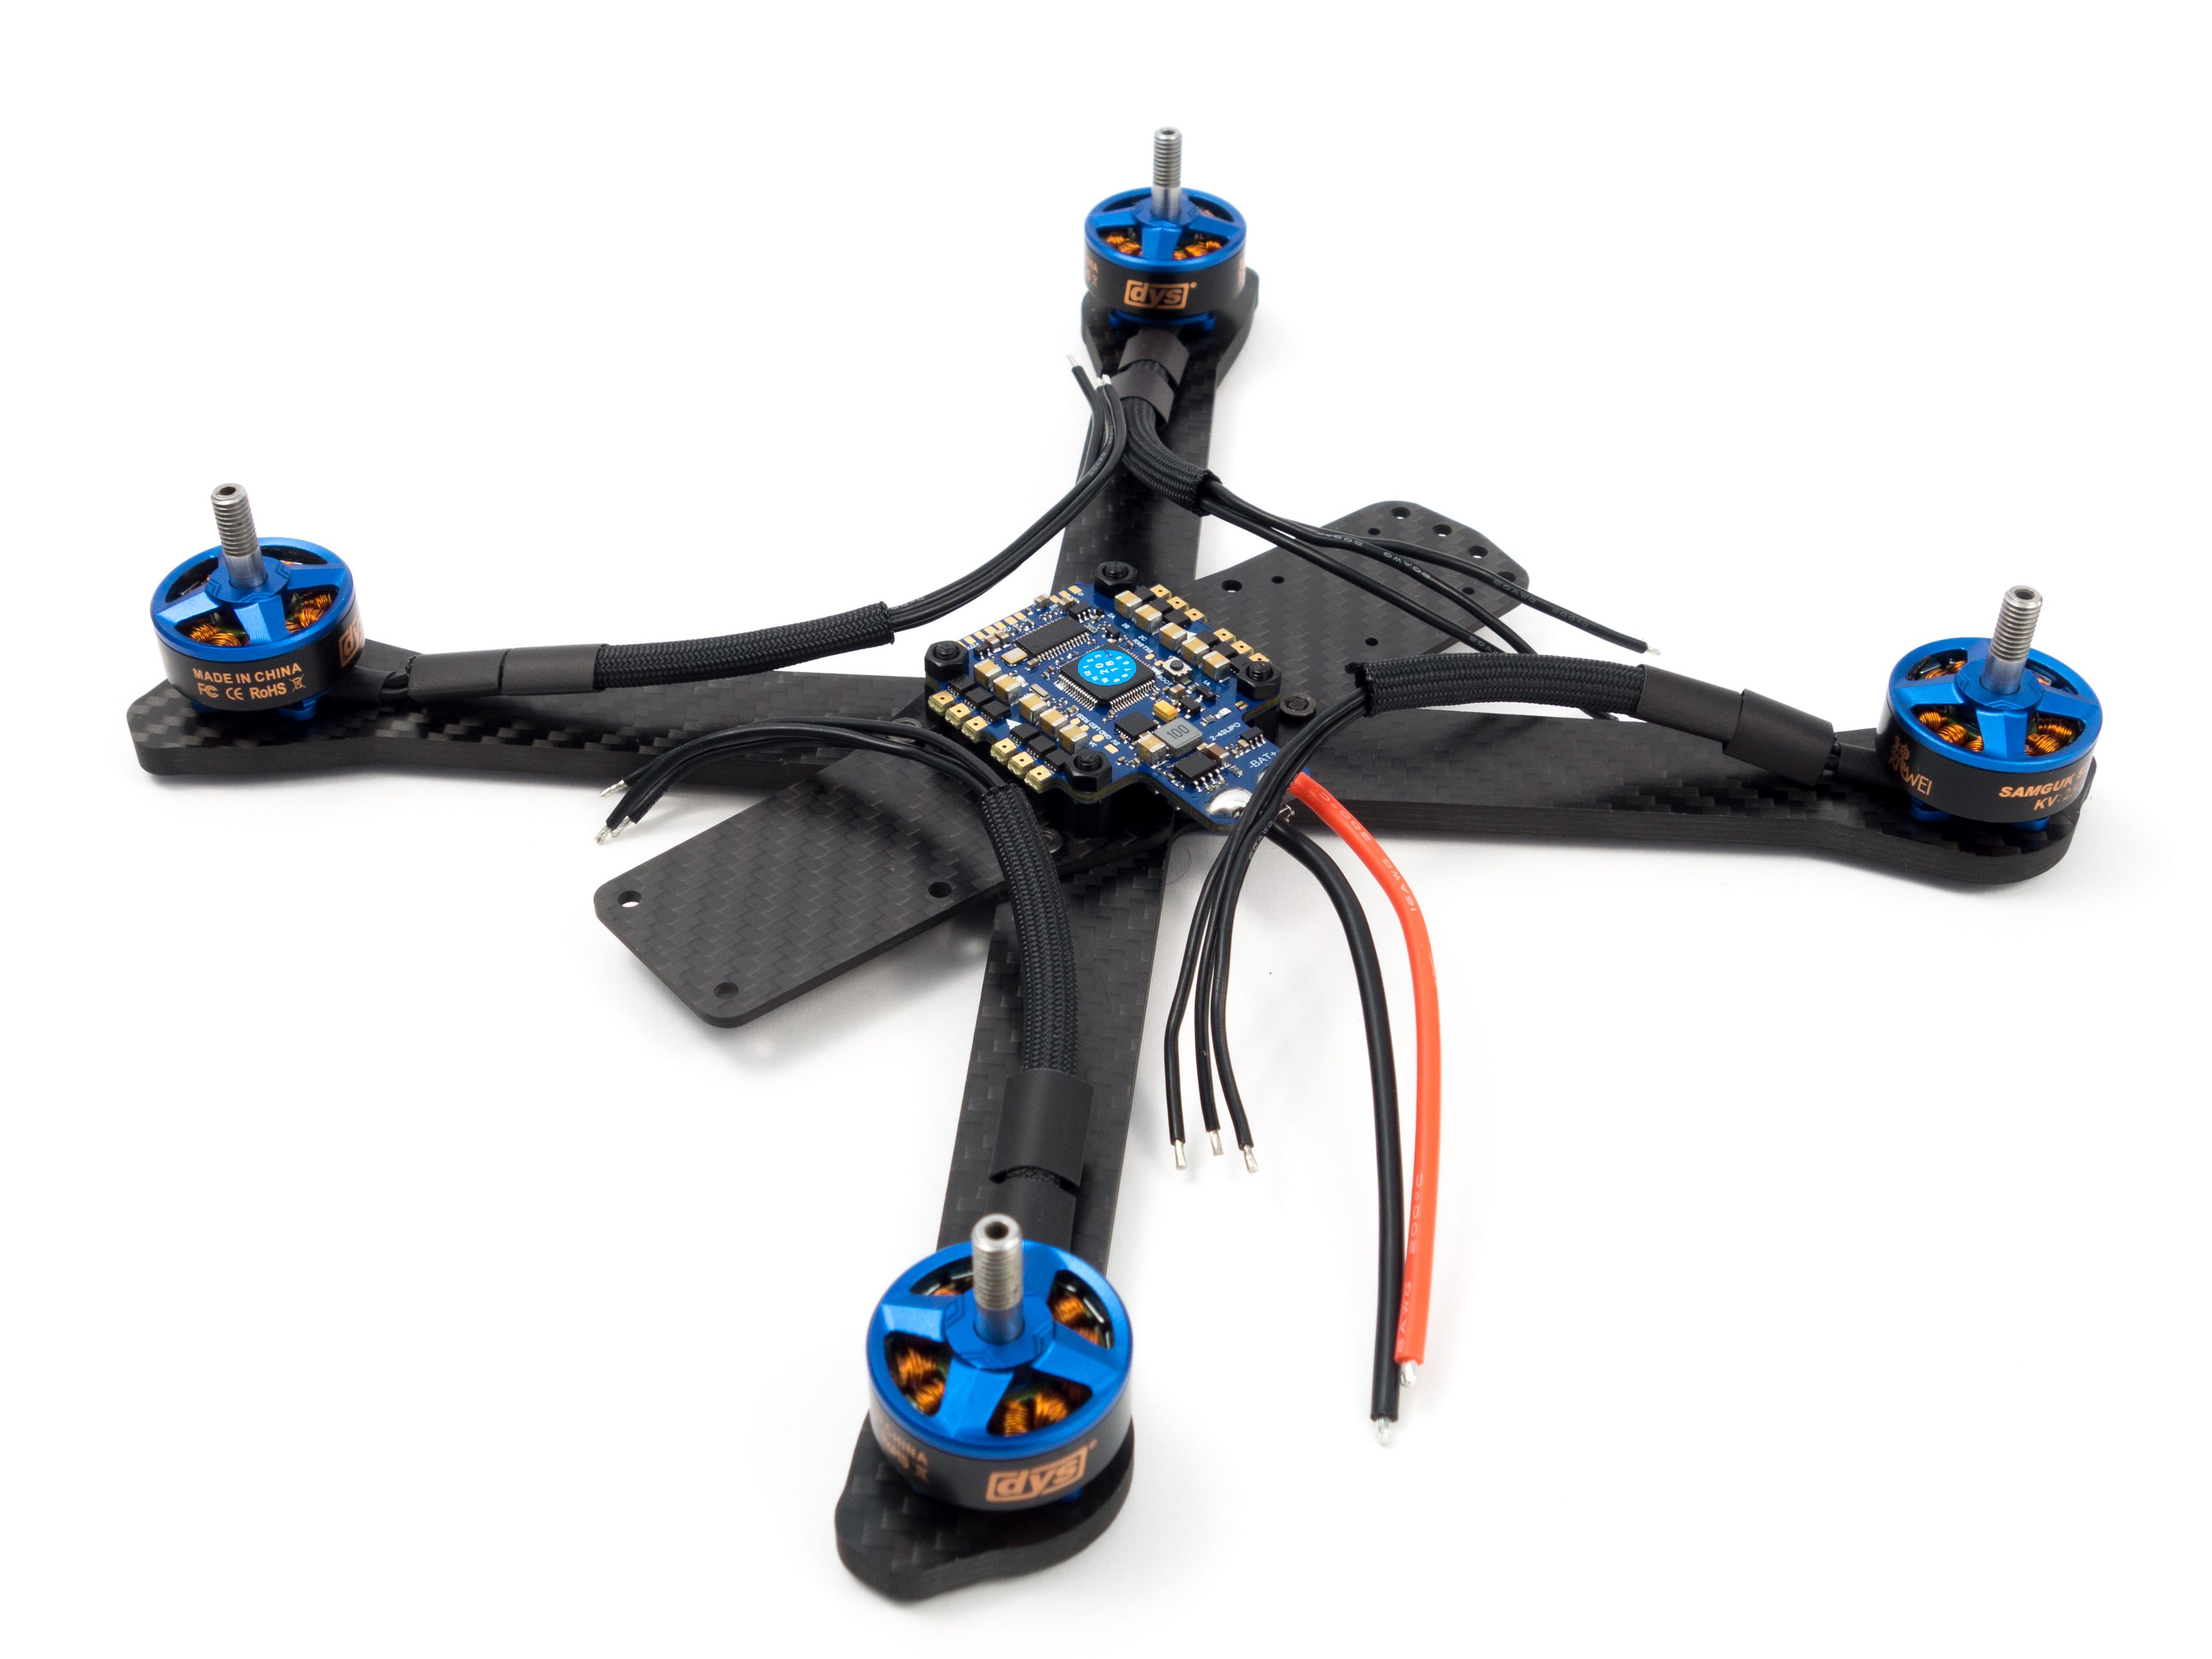
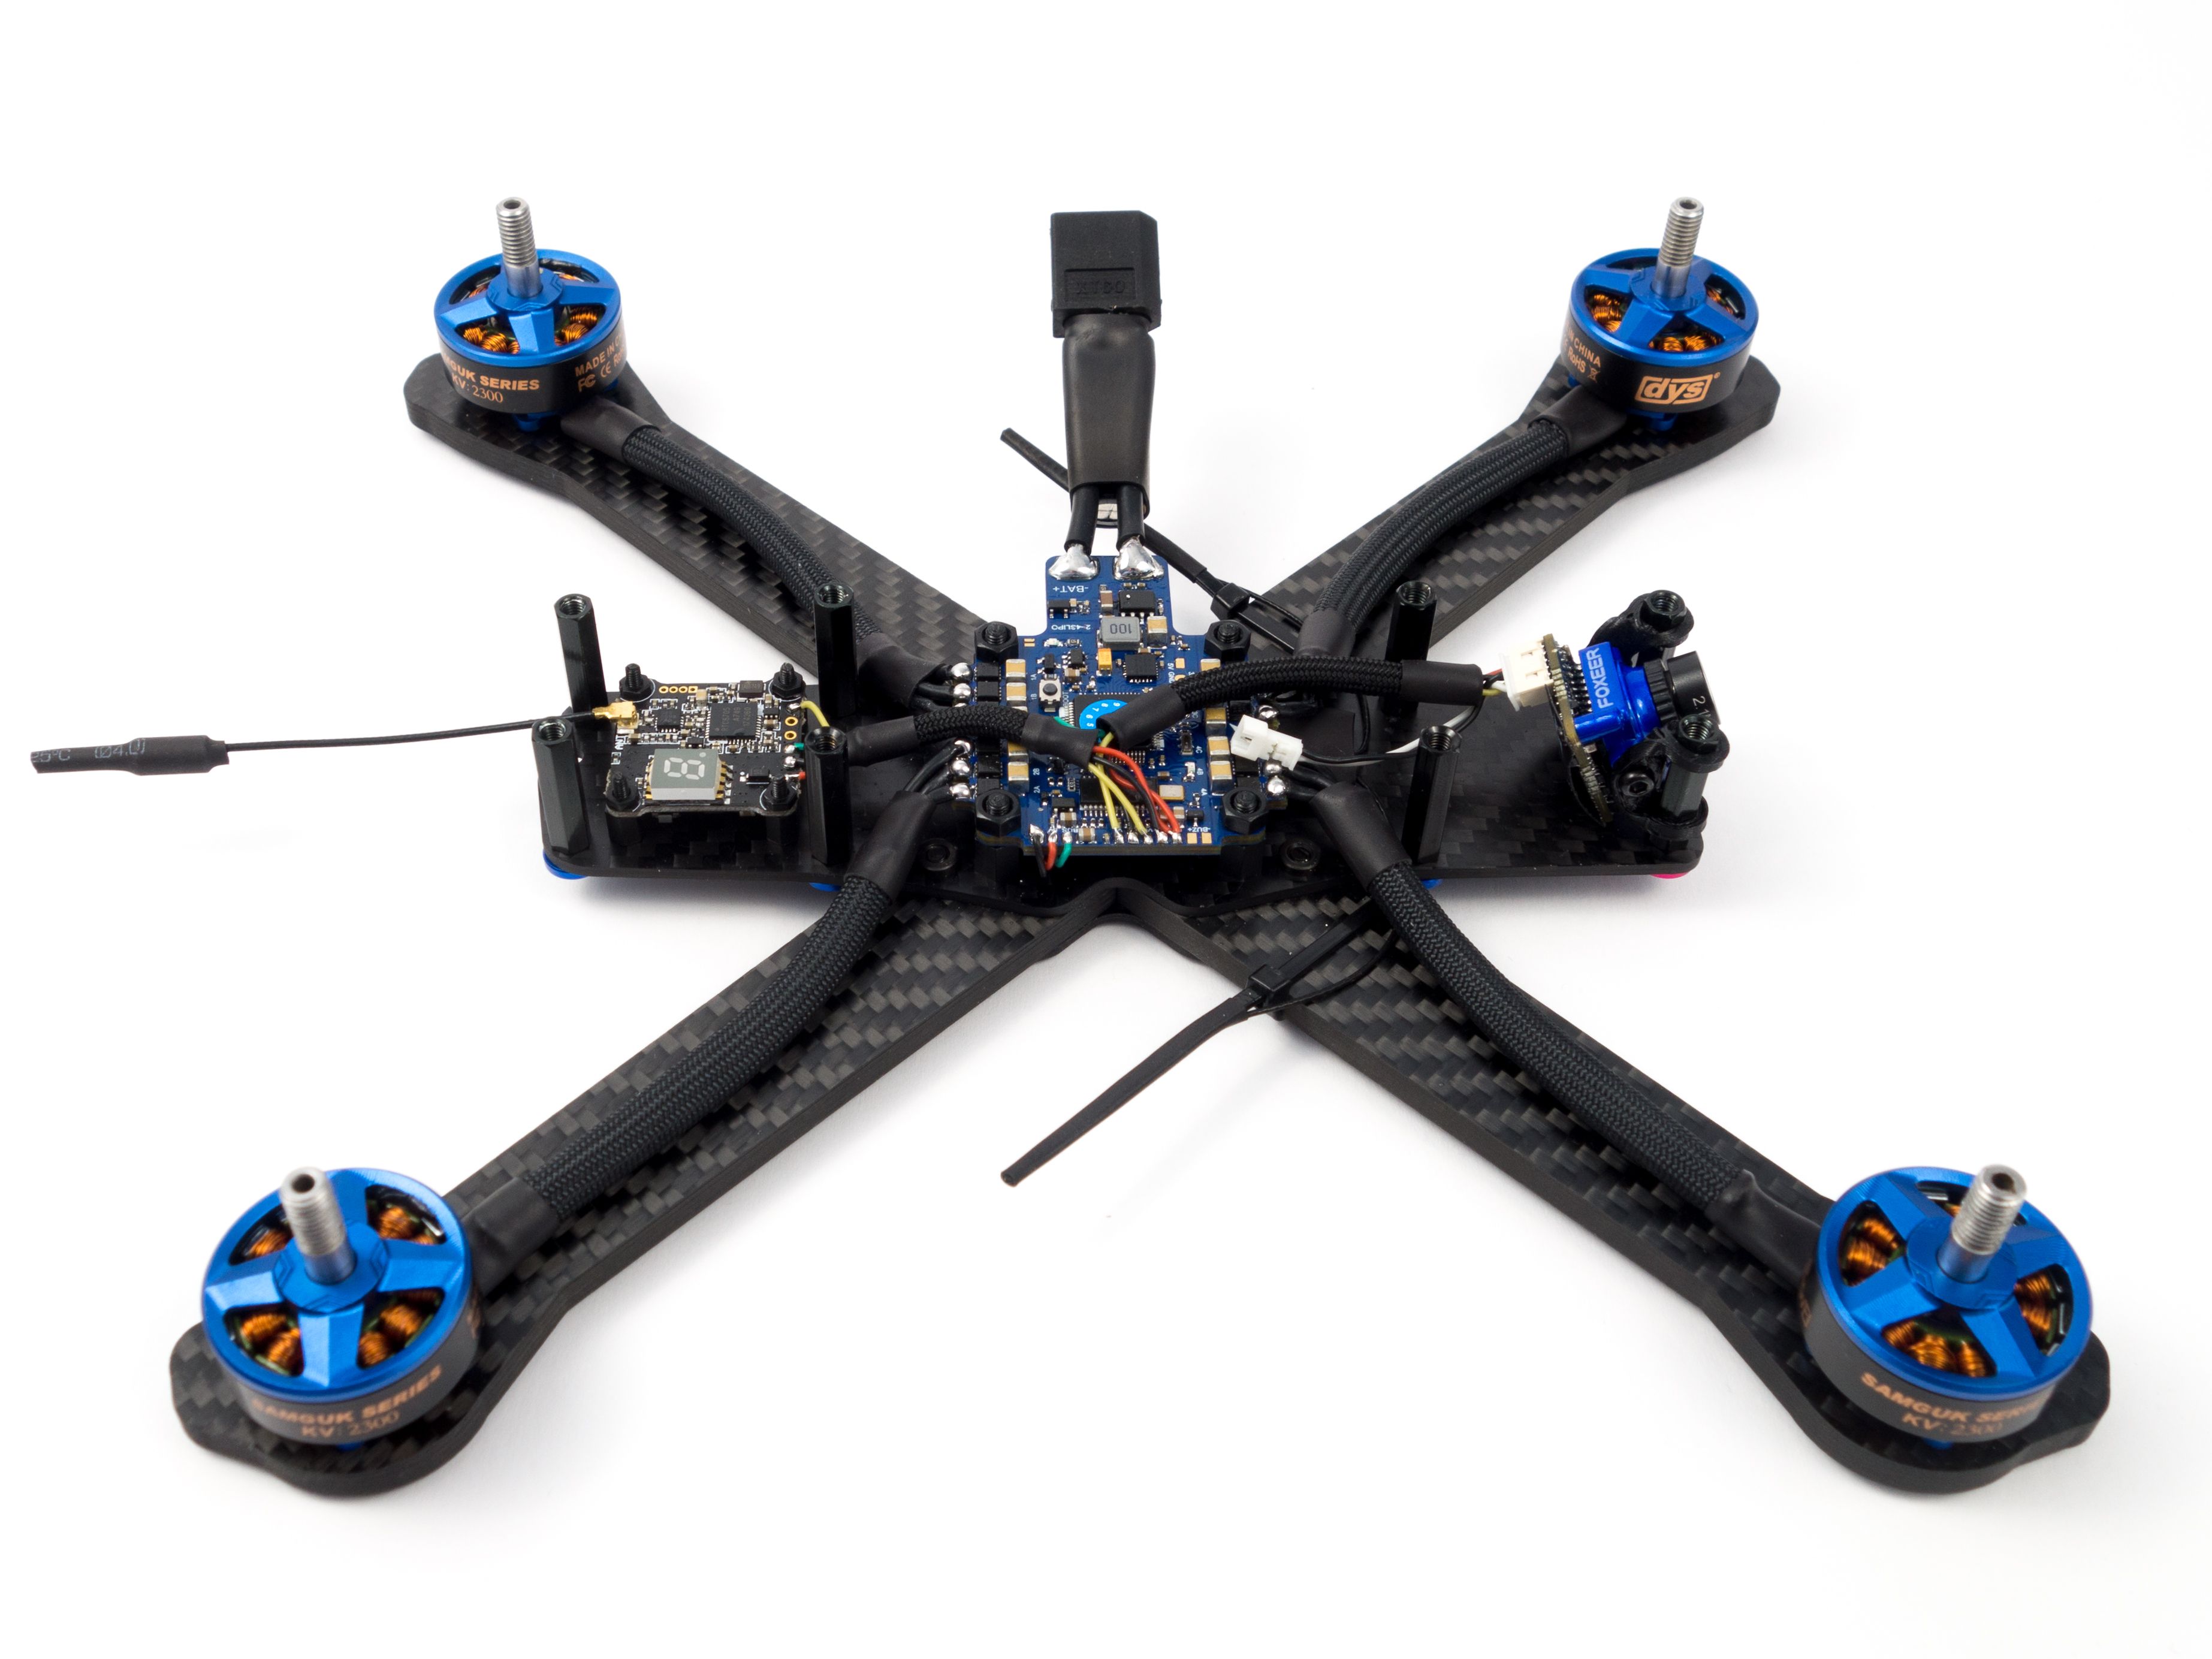
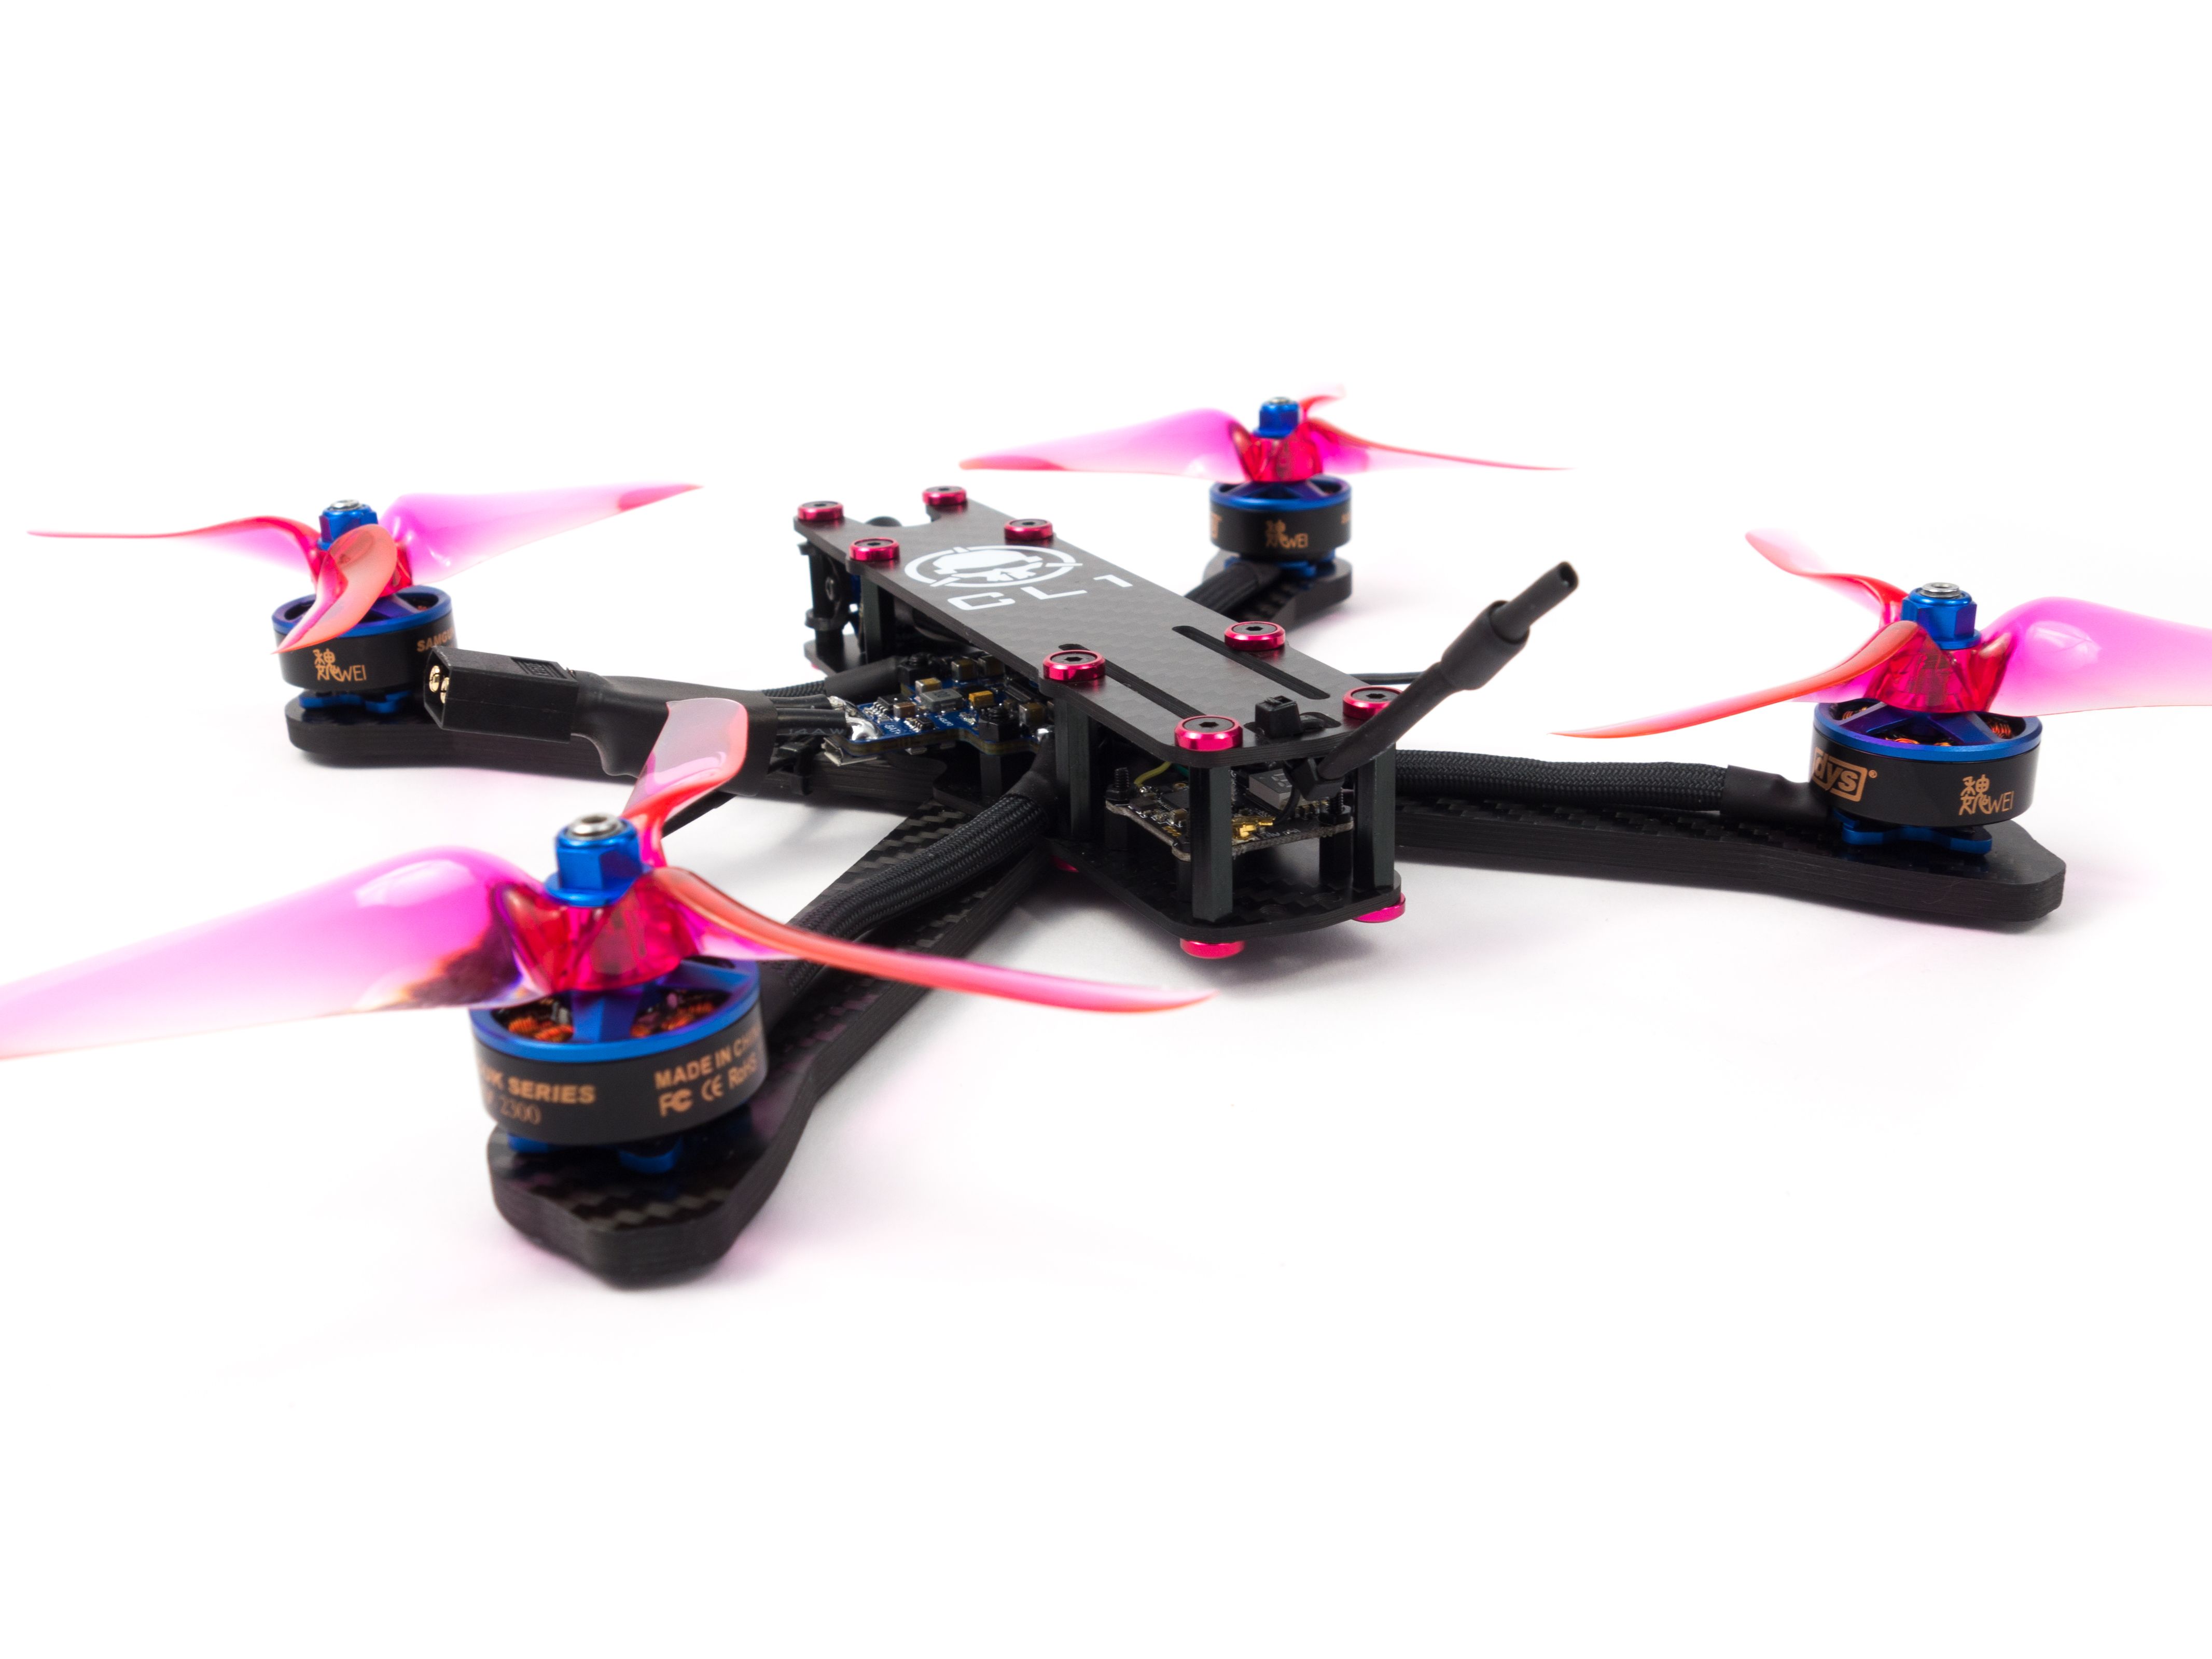
The Rotor Riot CL1 is a community collaborated design based loosely on the popular ImpulseRC Alien and the Martian II. It's a low-budget freestyle frame with thick 5mm x 20mm arms, so it should take quite a beating. Additionally it provides 20mm mounting in the rear for a VTX which is a nice touch. It's very easy to build and perfect for a first build. The parts I chose for this build are a balance between peformance and price. They offer a lot of modern features yet keep the price reasonable.
Features
- Swappable 5mm arms
- Press nuts for lower profile
- 20mm VTX mount in rear
- OSD VTX control and tuning
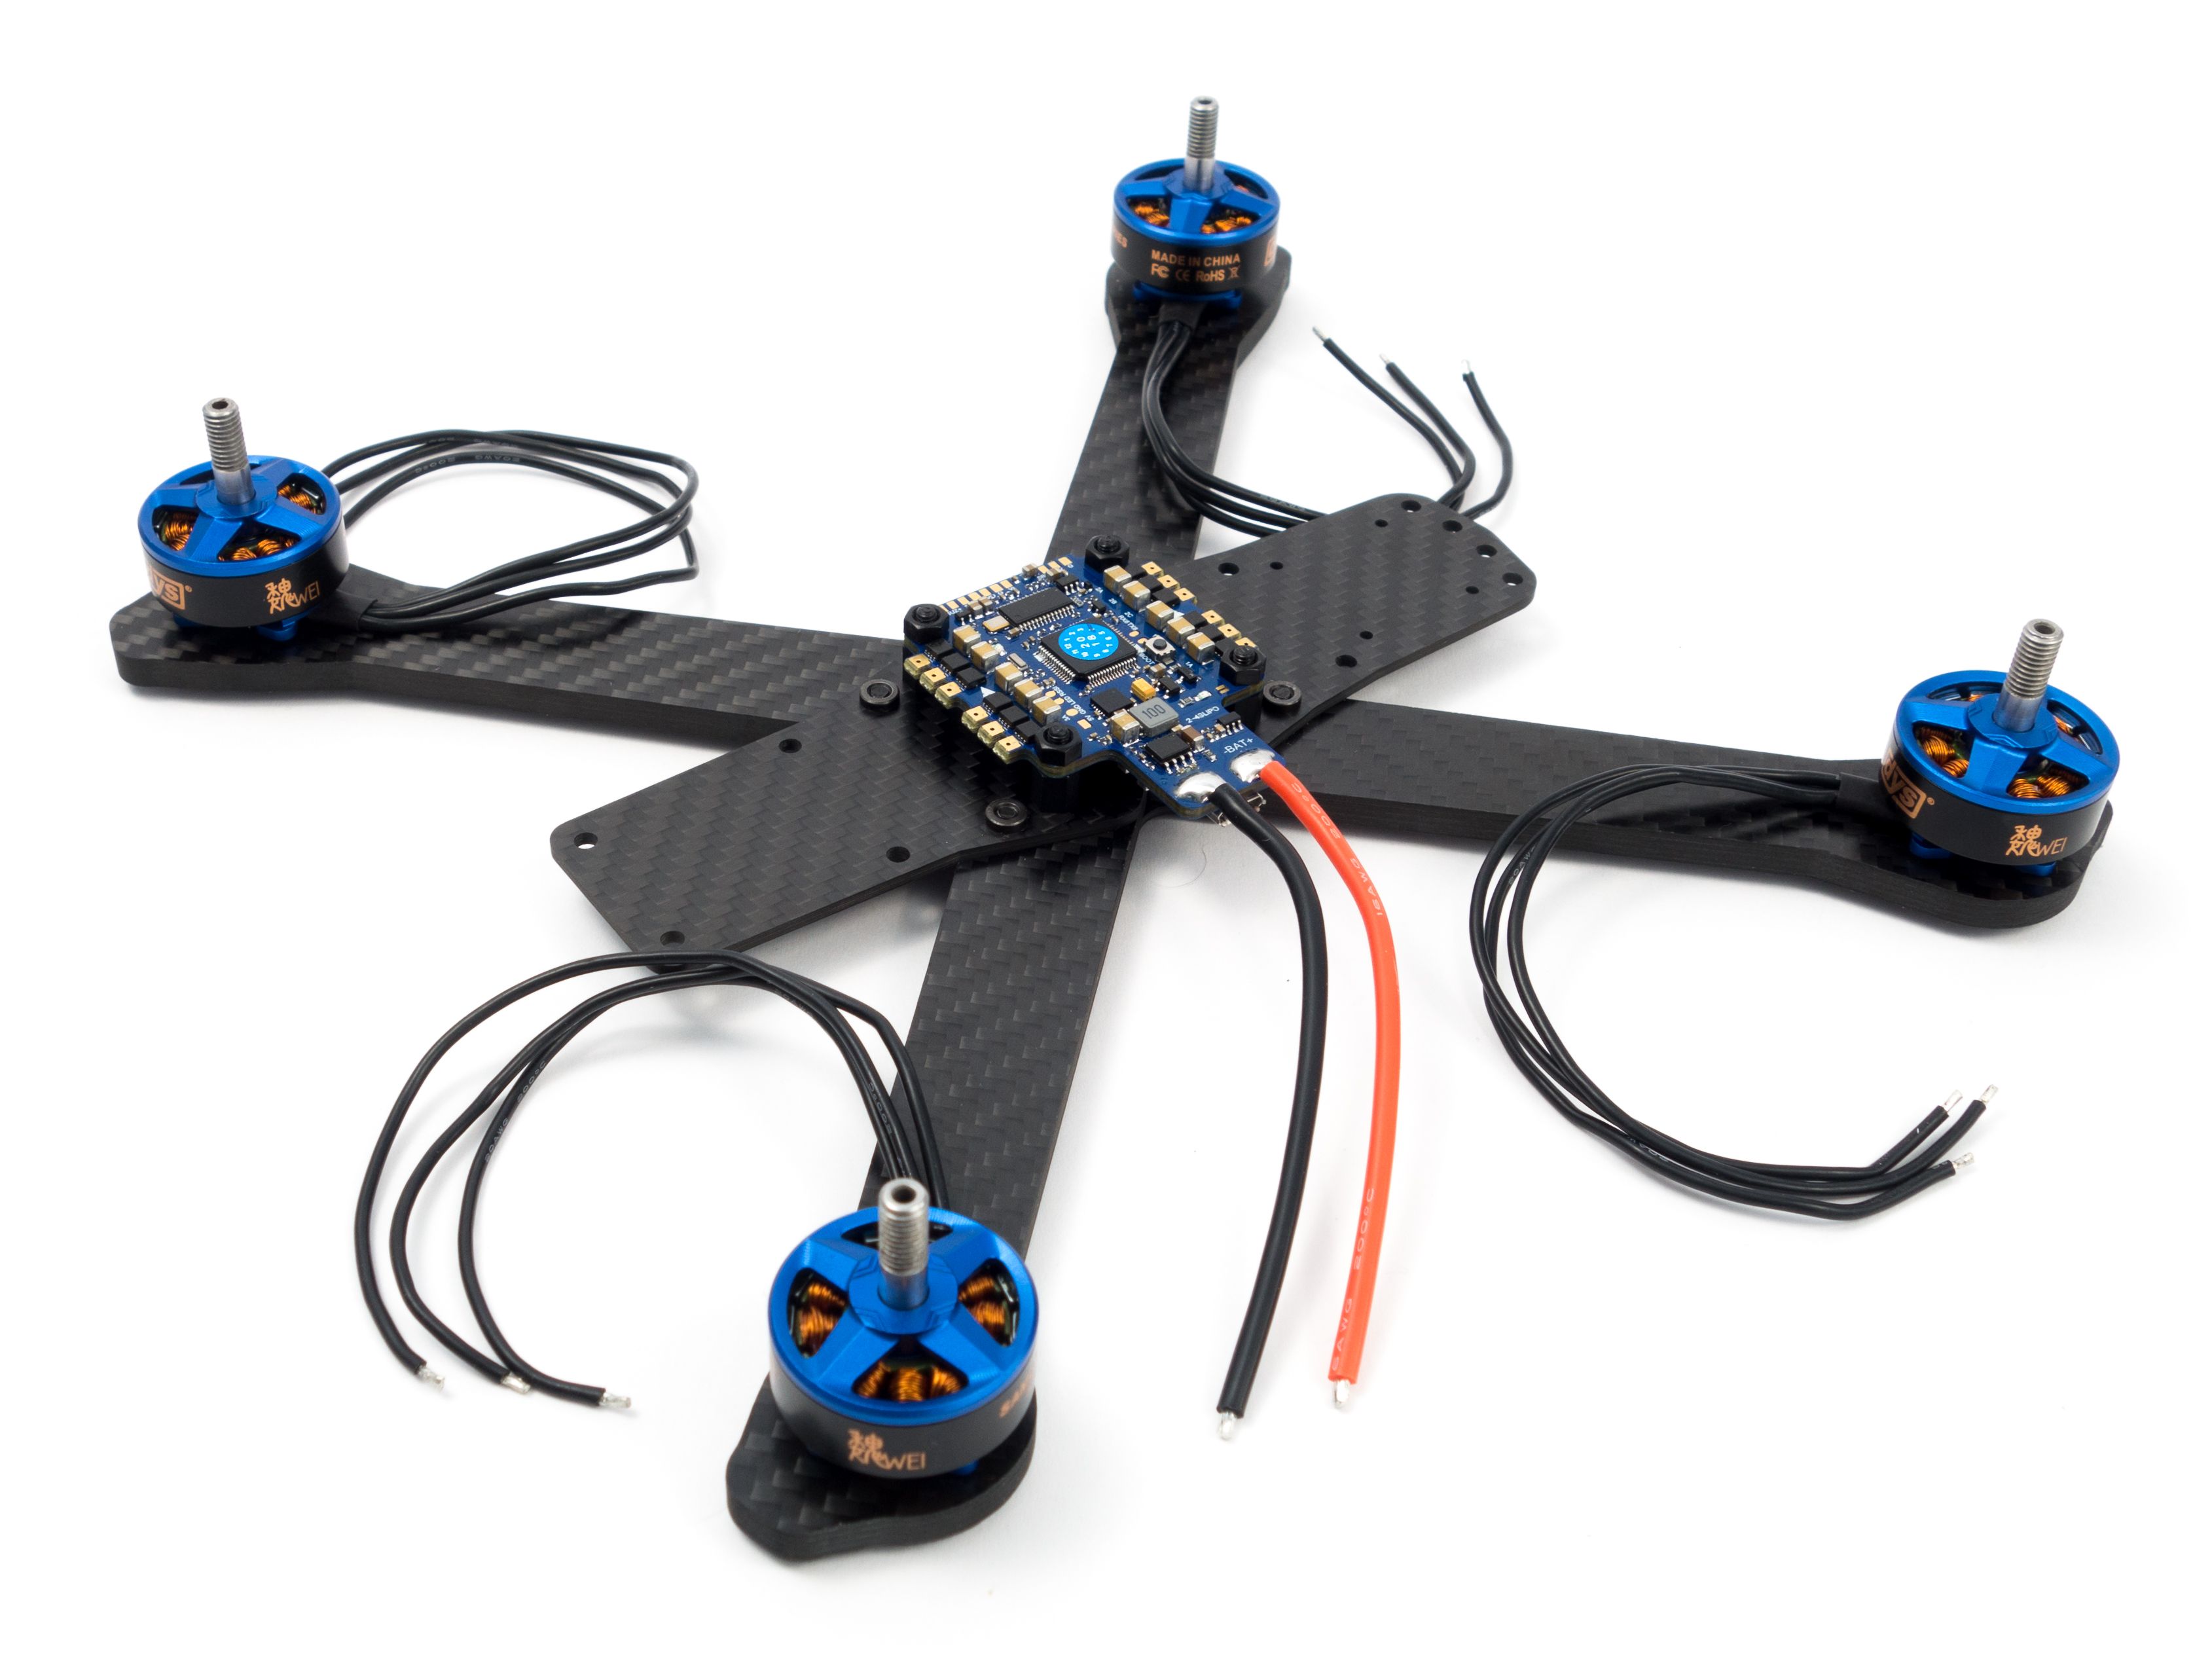
- F4 8k/8k flight controller
- Current sensor
- Powerful 2207 motors
Tools
Be prepared for some very fine soldering work. Some of these pads require a lot of finesse and dexterity. That being said it's a good idea to use quality tools. They'll make a difference. I recommend a good iron like the Hakko FX-888D, but there are cheaper alternatives. Here are a number of required tools:
- Soldering iron with broad and fine tips
- 2.0mm hex driver
- Industrial Tweezers
- Jewelers Precision Screwdriver
- Wire cutter/stripper
- Scissors
- Heat gun or lighter
- Ruler and cutting mat
- Multimeter
Additional Supplies
- A variety of heat shrink tube sizes
- Blue Loctite
- Zip ties (small)
- 63/37 leaded solder
- Liquid soldering flux pen
Hardware Considerations
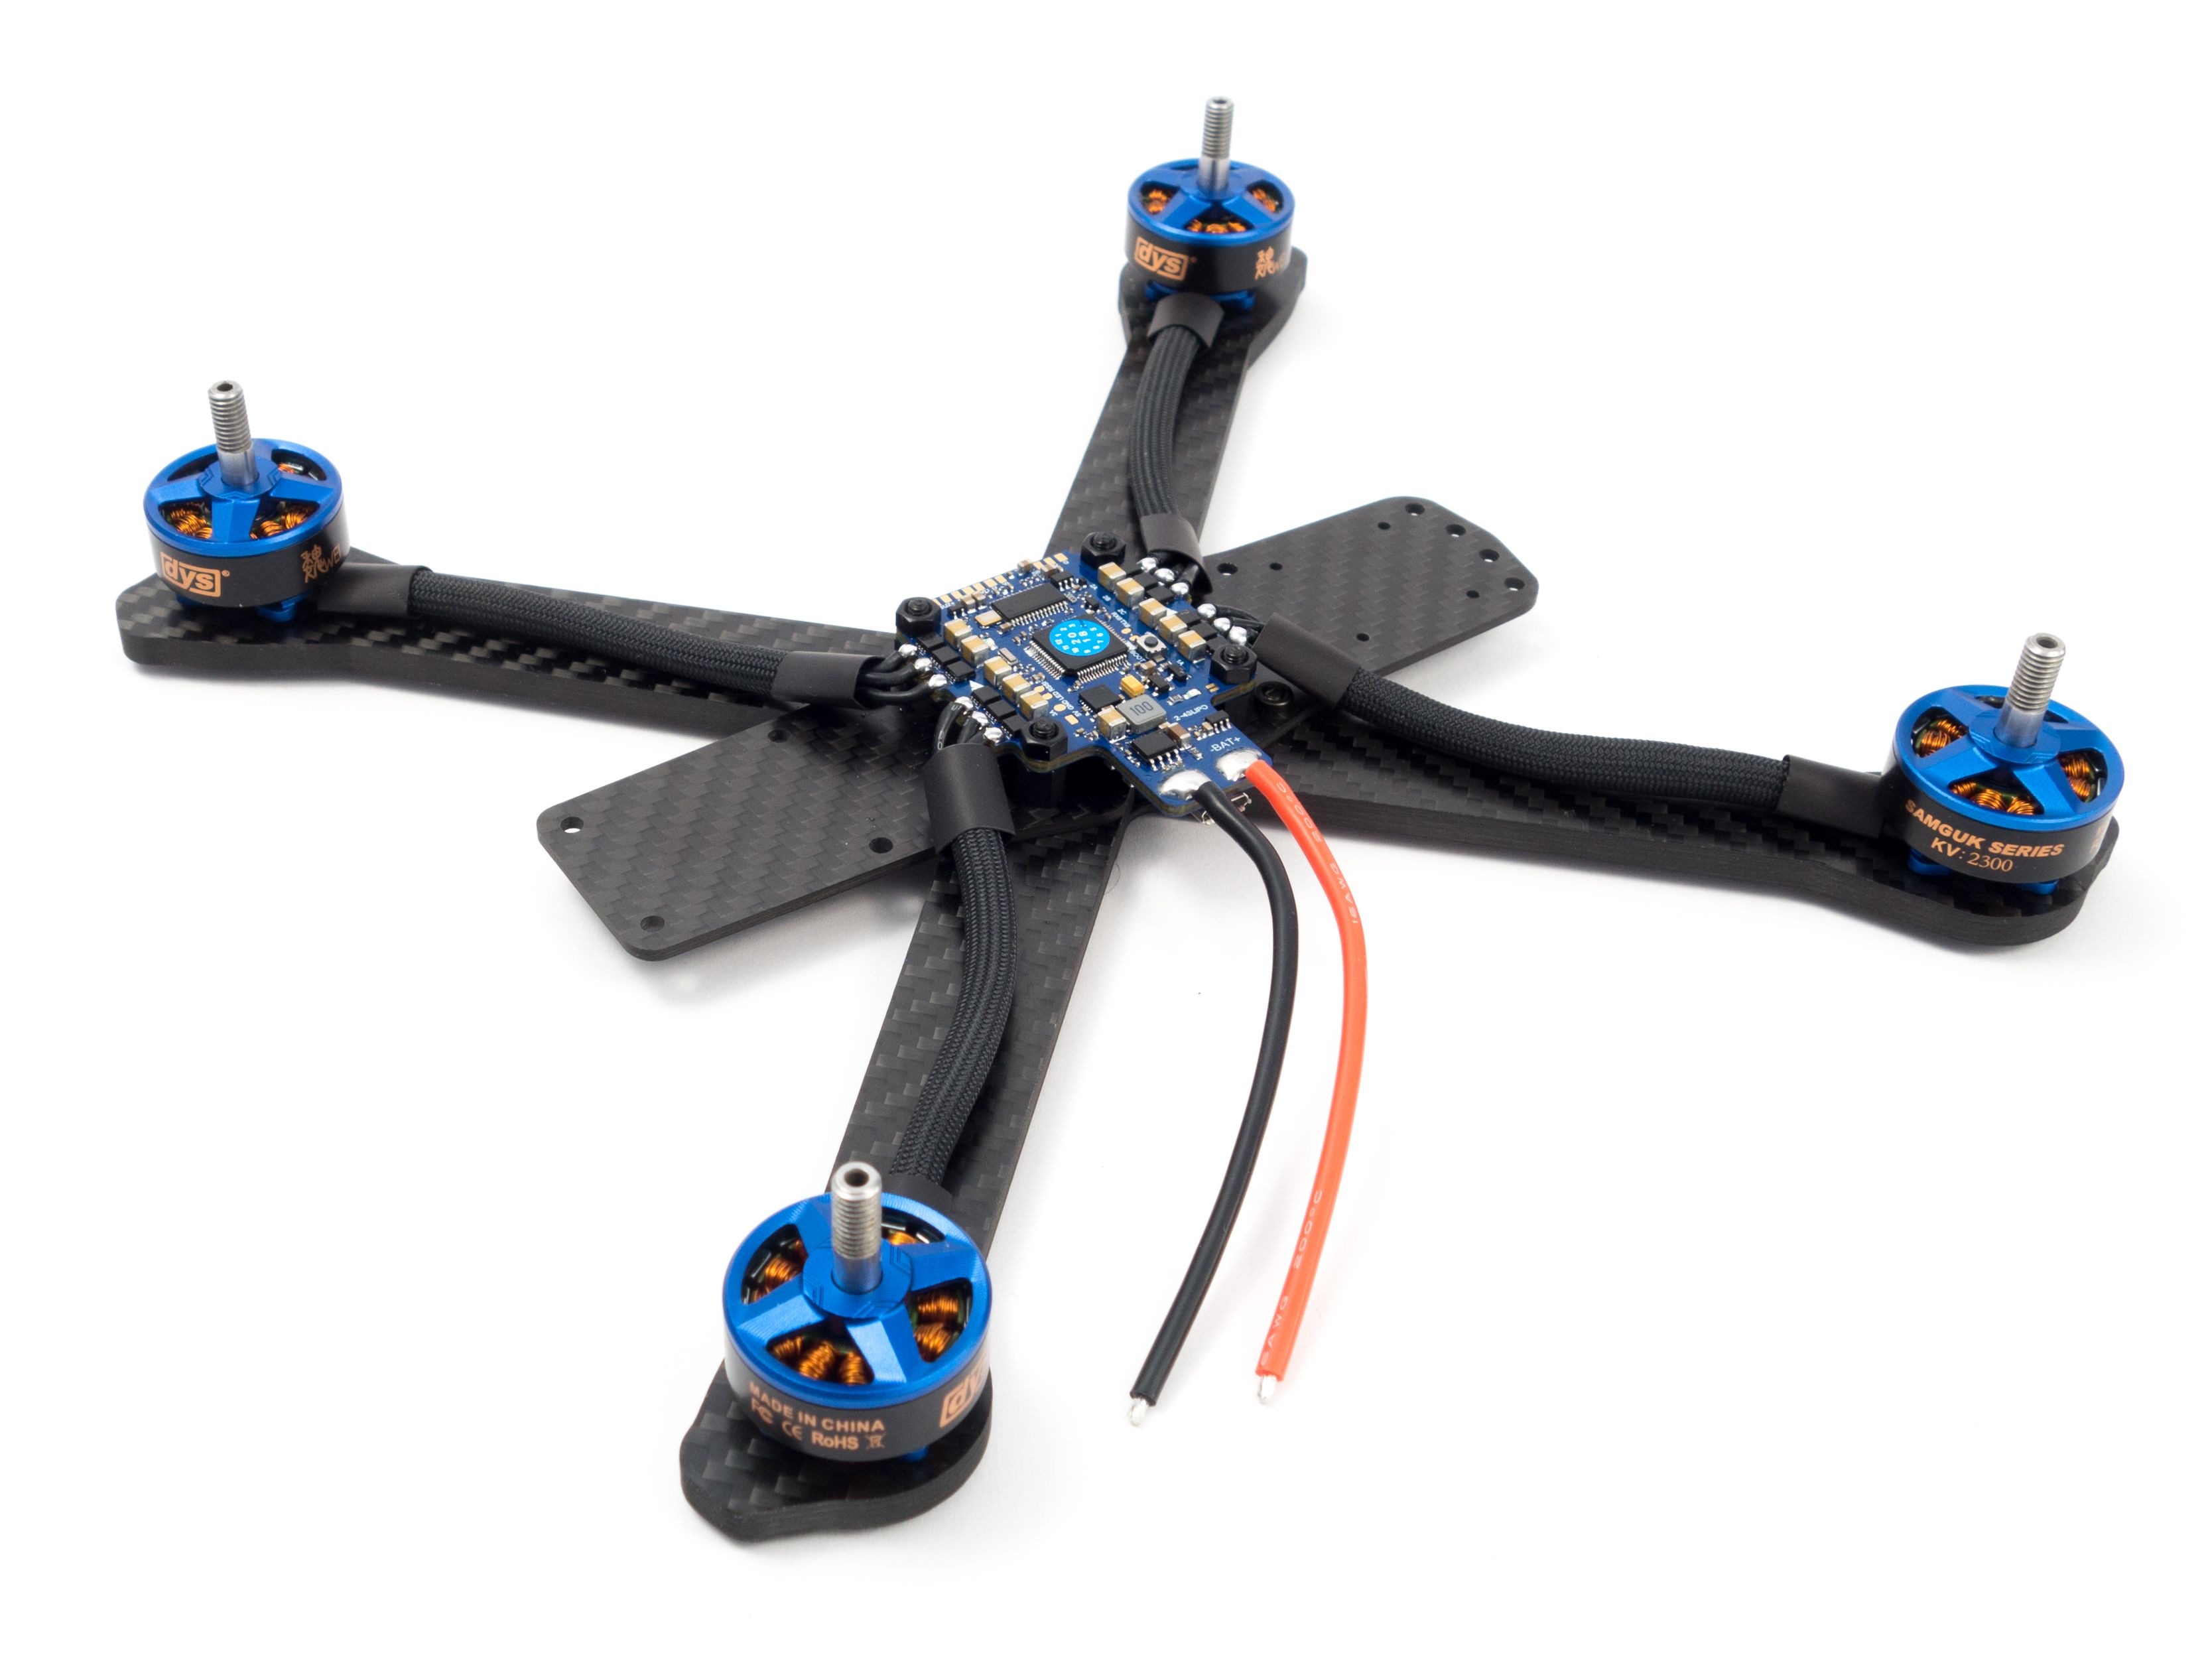
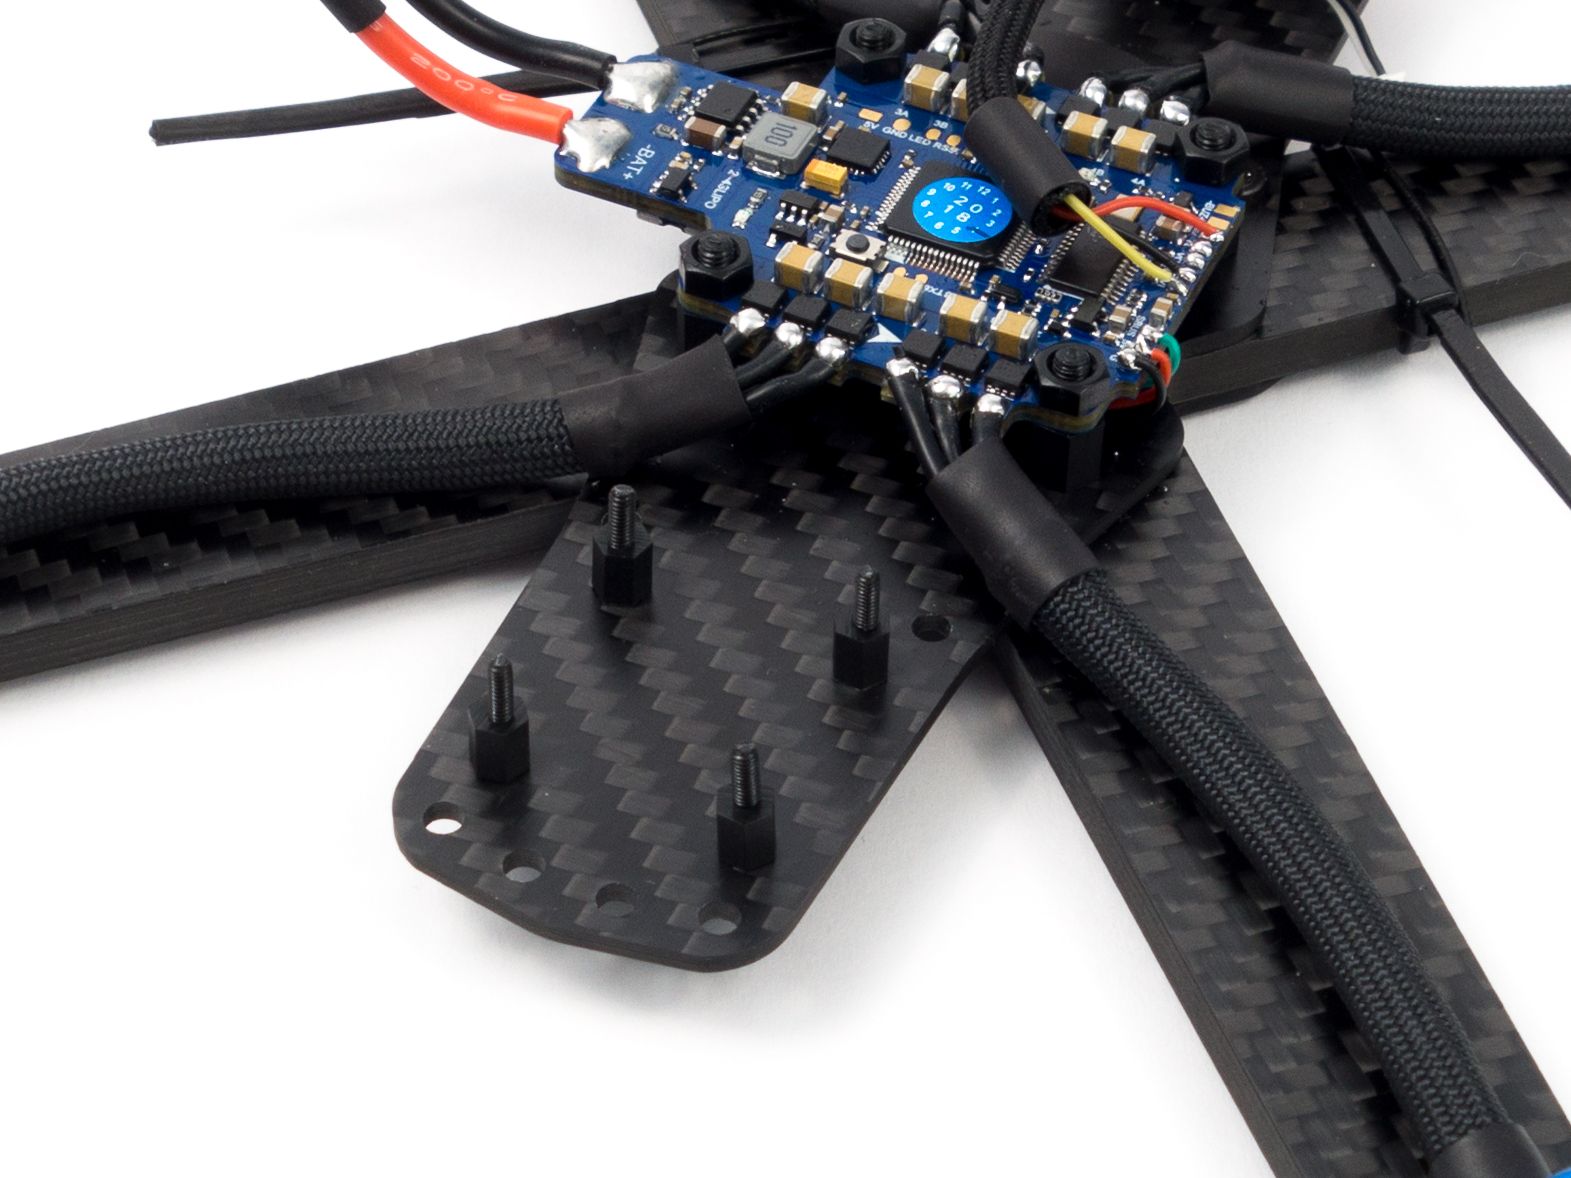
The screws are something you need to keep in mind when planning this build. The frame comes with 16 M3x8mm and 10 M3x10mm screws. These are for securing the top and bottom plates and the arms respectively. Unfortunately the motors only come with M3x6mm screws which aren't long enough. You need to order 16 additional M3x8mm screws. Now you've got a couple options here. I added anodized countersunk washers to the top and bottom plates to add a splash of color. These are entirely optional, but they require M3x8mm screws as well, but they need to be countersunk. So, if you want to add the washers you only need to buy the countersunk screws. Then you can use the 16 included M3x8mm screws to mount the motors. Otherwise you'll just want to buy 16 button top M3x8mm screws.
Also, I opted to swap the standoffs out for 20mm hexagonal standoffs. They're a little shorter than the included standoffs and offer a more low-profile look. Generally the shorter you build these the more rigid they'll be.
And finally there are the M2 screws. The VTX comes with a set of standoffs and nuts, but no screws. Fortunately the camera comes with a couple spare M2 screws, but you need 4. They can be nylon or steel. I've never had to buy M2 screws, but if this is your first build you may need to. If not then any of your other FPV cameras should have spare screws.
Frame Assembly
This has to be one of the easiest frames I've ever assembled! The press nuts save a lot of time and trouble. Typically you need a second tool to hold the nuts while you screw everything together. Here you only need a 2.0mm hex driver and a couple minutes. There's not much to say here except that you mount the arms below the base plate with the smaller plate at the bottom. Use the 10mm screws while the press nuts are pointed up toward the stack.
I used my own 6mm nylon screws and standoffs to mount the flight controller. It comes with some really long nylon screws which will work, but you'll need to cut them down to size.
Update September 12, 2018: After a few test flights I found that the flight controller was a bit twitchy. After adding anti-vibration standoffs it flew great! The only thing is the flight controller M3 holes are too small for these. I used a drill to widen them which should also help reduce vibrations. Alternatively you can purchase some O-Rings and use nylon standoffs, but I still recommend drilling out the holes. Keep in mind that this flight controller powers the M3 holes, so the metal anti-vibration standoffs aren't ideal. I just didn't have the O-Rings on hand.
Motors
While it's entirely optional I like to sleeve my motor wires with Paracord, but you'll need either a 7/32" cord like BattleCord or a 1/4" cord like Paracord Para-Max. The smaller 550 cord isn't big enough for all 3 motor wires.
- Screw your motors onto the arms using 8mm screws and blue Loctite.
- Cut 4 pieces of cord to 7 cm lengths, remove the inner core and, with a lighter, melt the ends to prevent frays.
- Sleeve the motor wires and cover the ends of the cord with two 1cm pieces of 12mm shrink tube. One for both ends.
- Flux and tin each motor pad ensuring each is completely coated with a nice silver bubble.
- If you're right-handed start from the rightmost motor pad and solder all 6 wires from right to left.
- If you're left handed start from the left.
- Cut each wire to length as you go, not all at once.
- Position the shrink tube over the ends of the cord and melt it.
- You can use a heat gun to make quick work of this, but don't hold it over your FC too long.
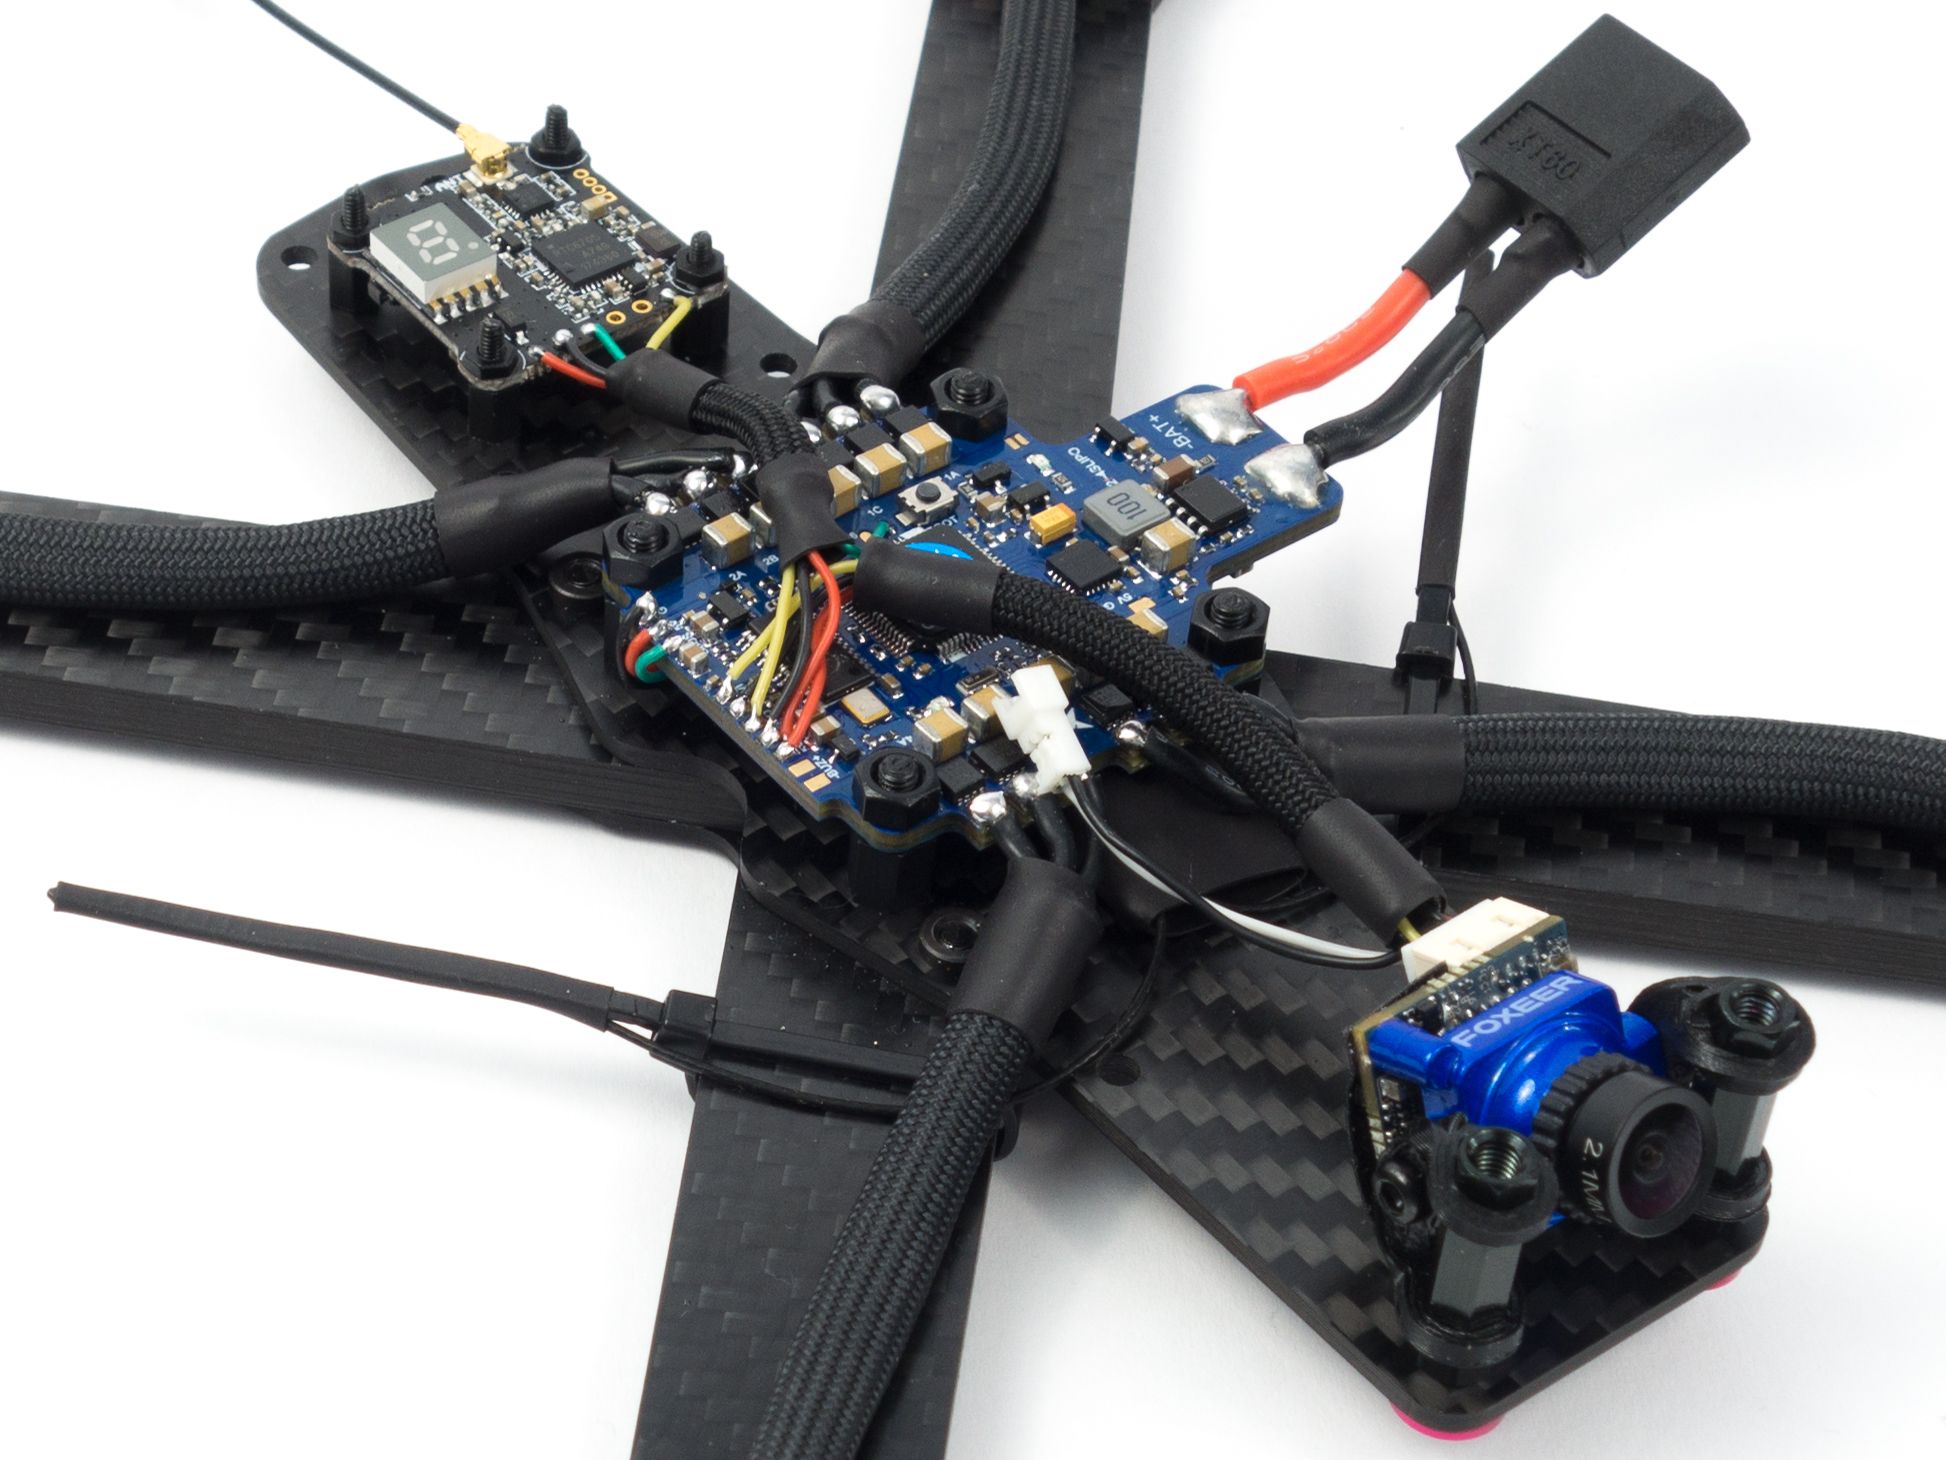
Receiver
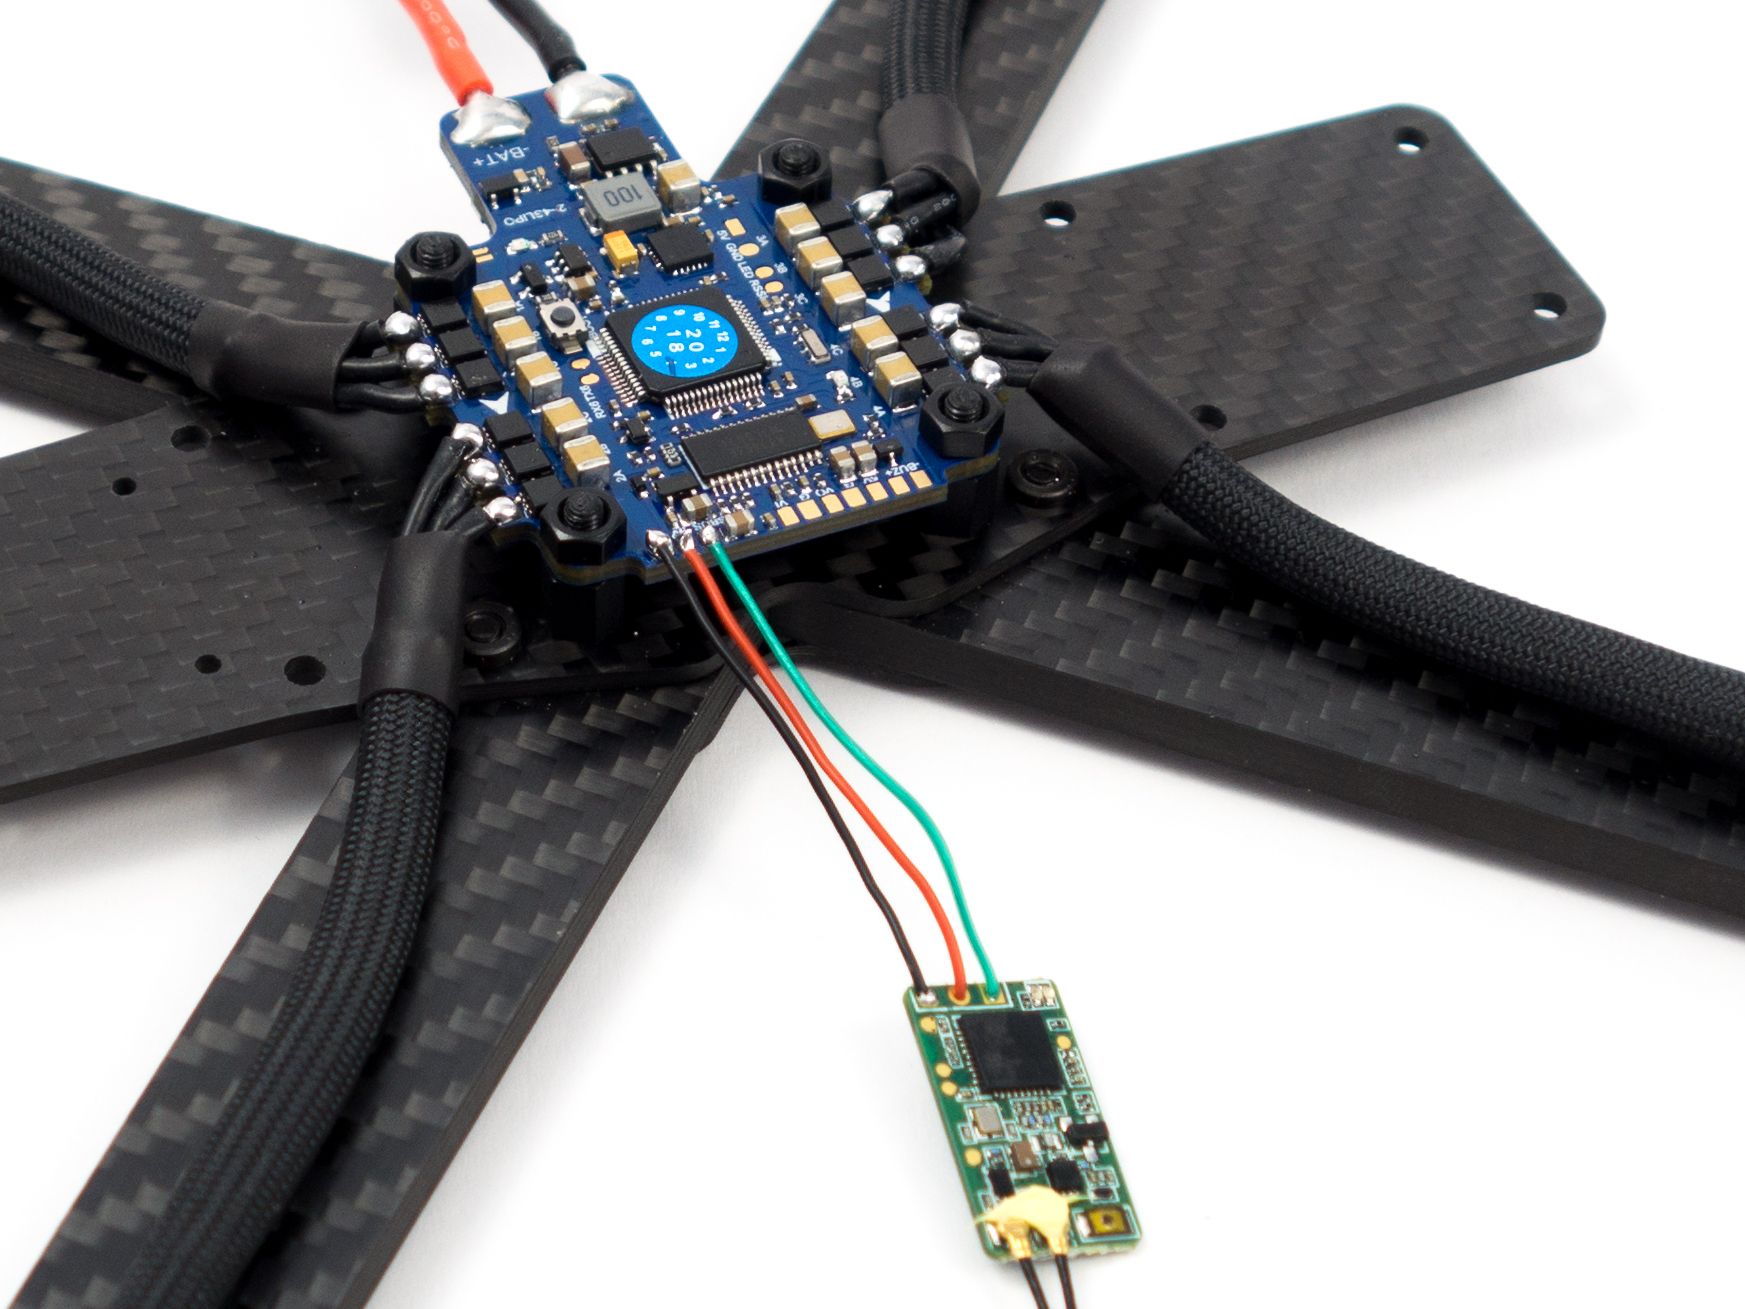
Now you can add the receiver. It's always a good idea to get this out of the way early so you can bind it and tuck it away. I installed the FrSky XM+, so your wiring may vary depending on the receiver you chose. One thing to keep in mind is I used the inverted SBUS pad on the flight controller. If you're using an un-inverted IBUS recever for a Flysky radio you'll need to do things a little differently. You'll likely want to solder your control wire to the TX6 pad toward the middle of the board.
- First solder 3 wires to the receiver.
- I borrowed the wire from the camera wire harness. Use the black, red and green wire from the end.
- Make sure you give yourself enough wire slack to slide the receiver under the flight controller.
- Solder the wires to the 5v, Gnd and SBUS pads.
- Slide the receiver under the flight controller so the bind button and antennas pointed forward.
- Add shrink tube to the receiver to protect it from shorts.
- You don't need to shrink the tubing or even tape the receiver down. The wire and antennas should hold it in place.
- Add small zip ties to the front arms and use shrink tube to hold the antennas in place.
Power Connector
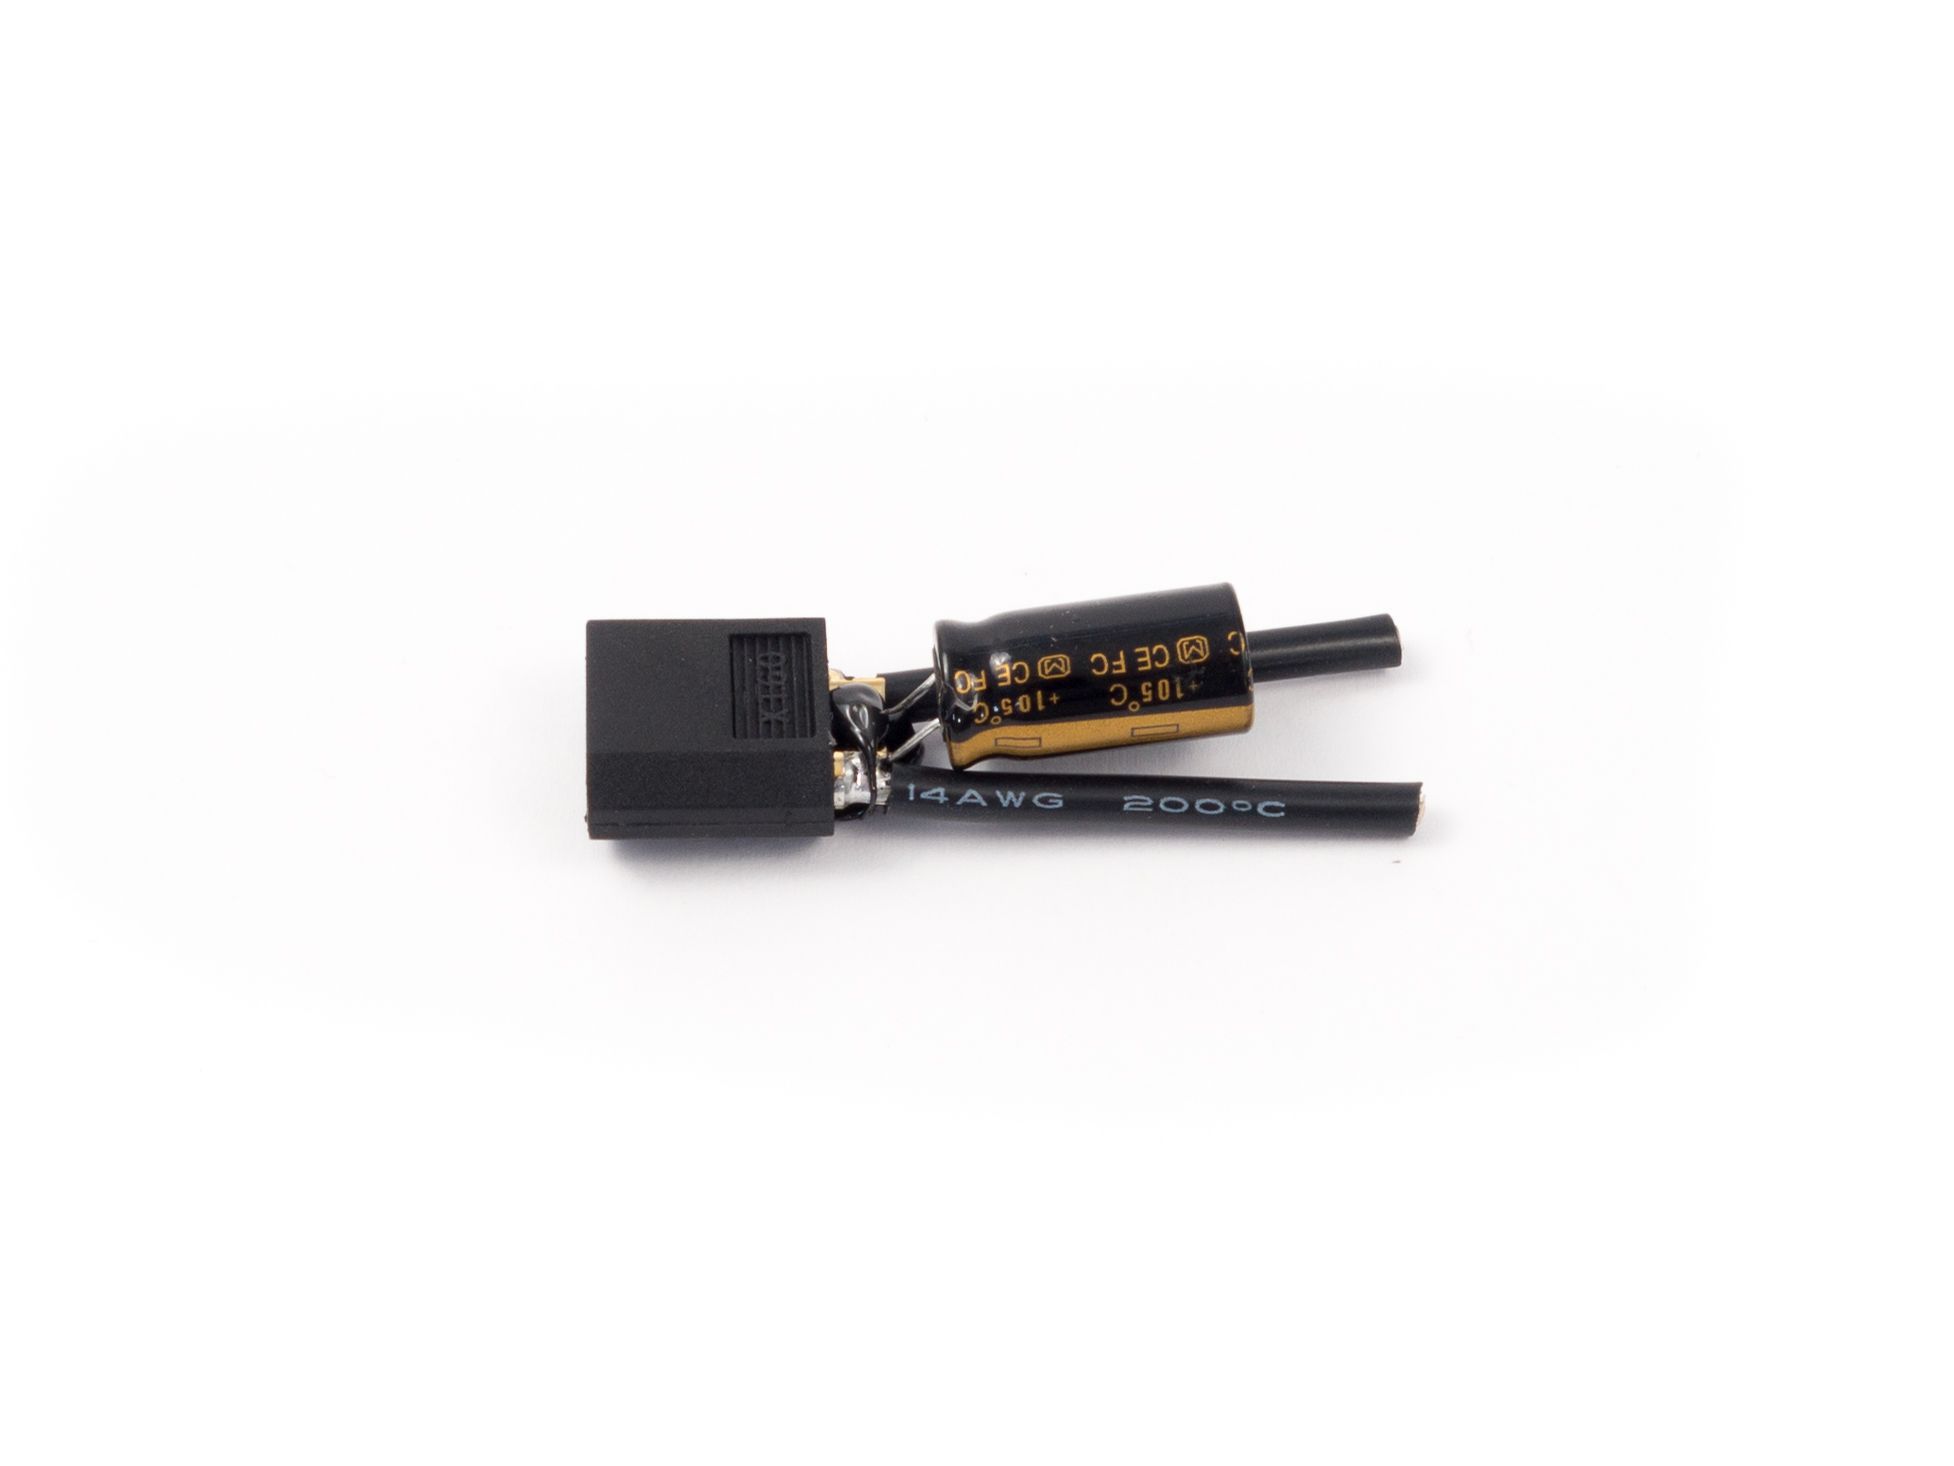
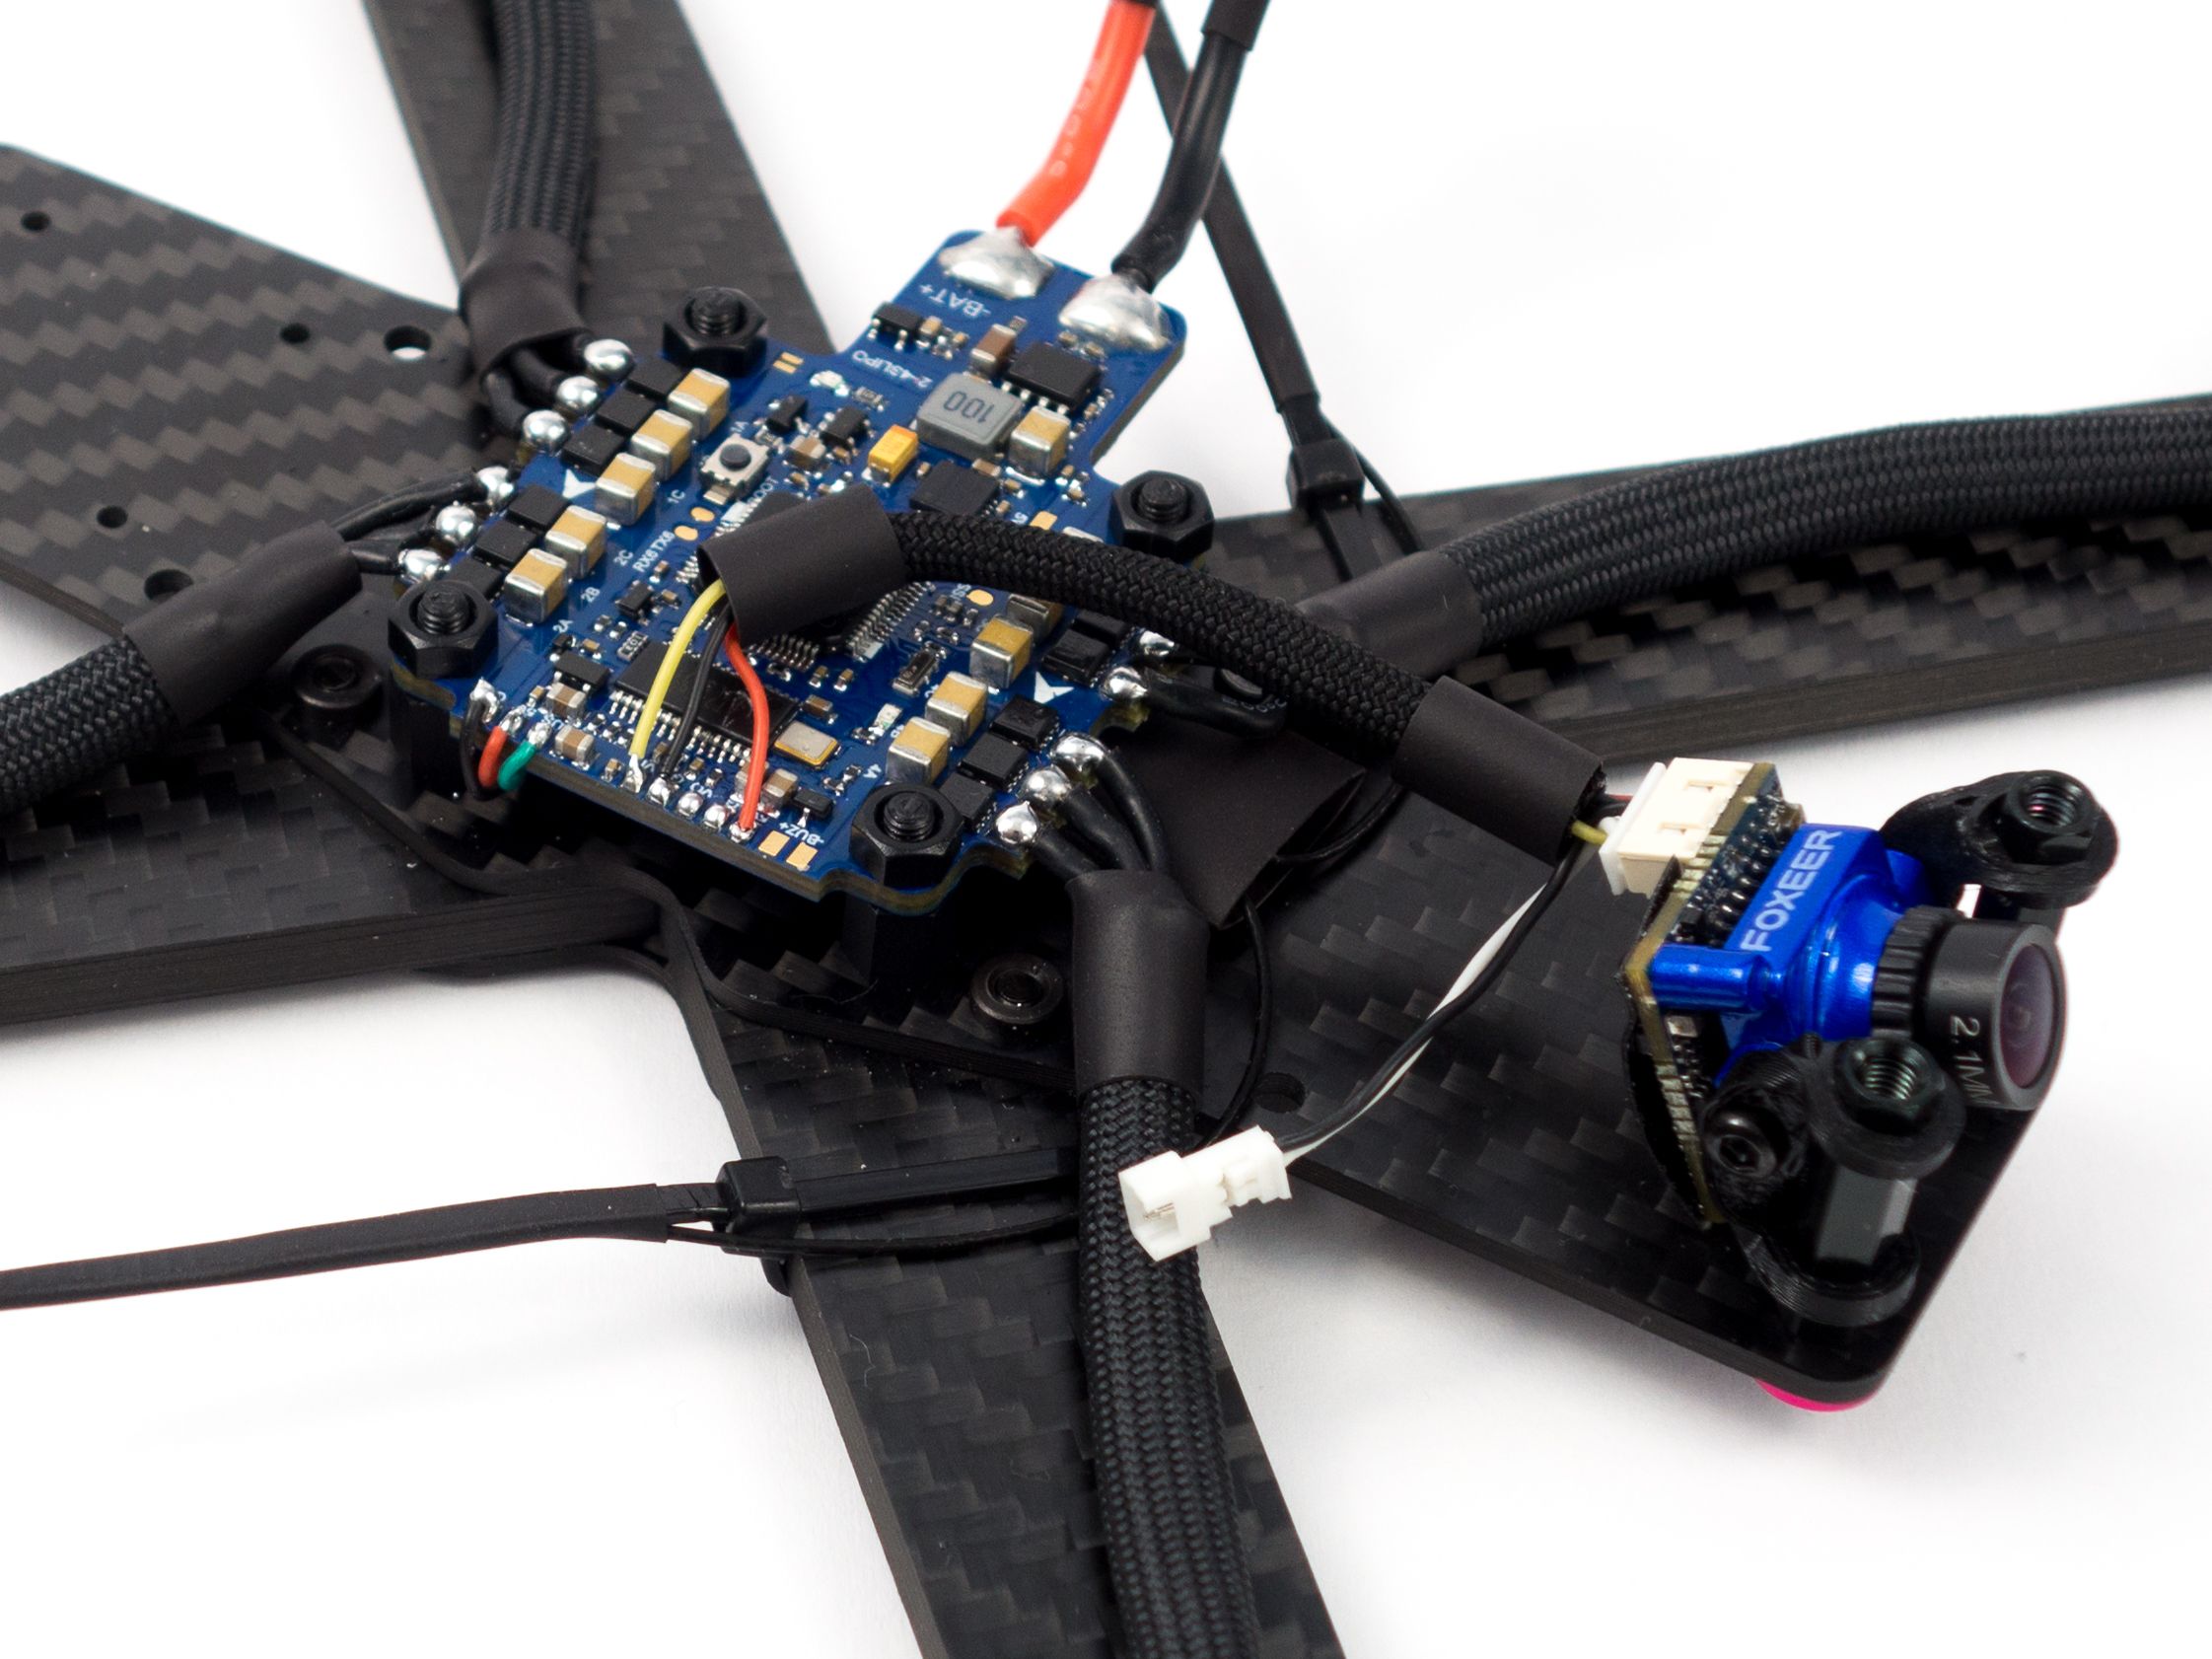
Before you bind you need power. This board comes with 16awg wire pre-soldered which is fine, but 14awg is more common. Also, it's a good idea to solder a capacitor to your XT60. This helps filter electrical noise and can help eliminate random twitches during flight. You might also want to remove the pre-soldered wires to make this a little easier. I used my own 14awg wire, soldered the capacitor and XT60 and then attached them to the board.
I used short battery leads, but if you're prone to crash often you may want to add some stress relief. With enough force the battery may eject and break the flight controller tab. To do this use longer battery leads and zip tie them to the frame.
- Snip and bend the capacitor so the wires dip into the XT60 wells.
- Make sure the polarity is correct.
- Fill the wells with solder.
- Solder one wire at a time into the wells in addition to the capacitor wires.
- I used about 4cm of wire for either side.
- Add hot glue between the XT60 wells to prevent shorts.
- Cover it up with heat shrink.
- Solder the wires to the flight controller.
You might notice I added the XT60 without a capacitor at first. I thought I might find a better place for it later, but it turns out this is the ideal location. It needs to be as close as possible to the battery.
Finally, be sure to test your main power leads for continuity with a multimeter before powering up. Once you're sure there aren't any shorts you should bind your receiver. Instructions vary depending on your radio, but generally you want to put your radio into bind mode, hold the receiver bind button, power up, wait for the lock and power down.
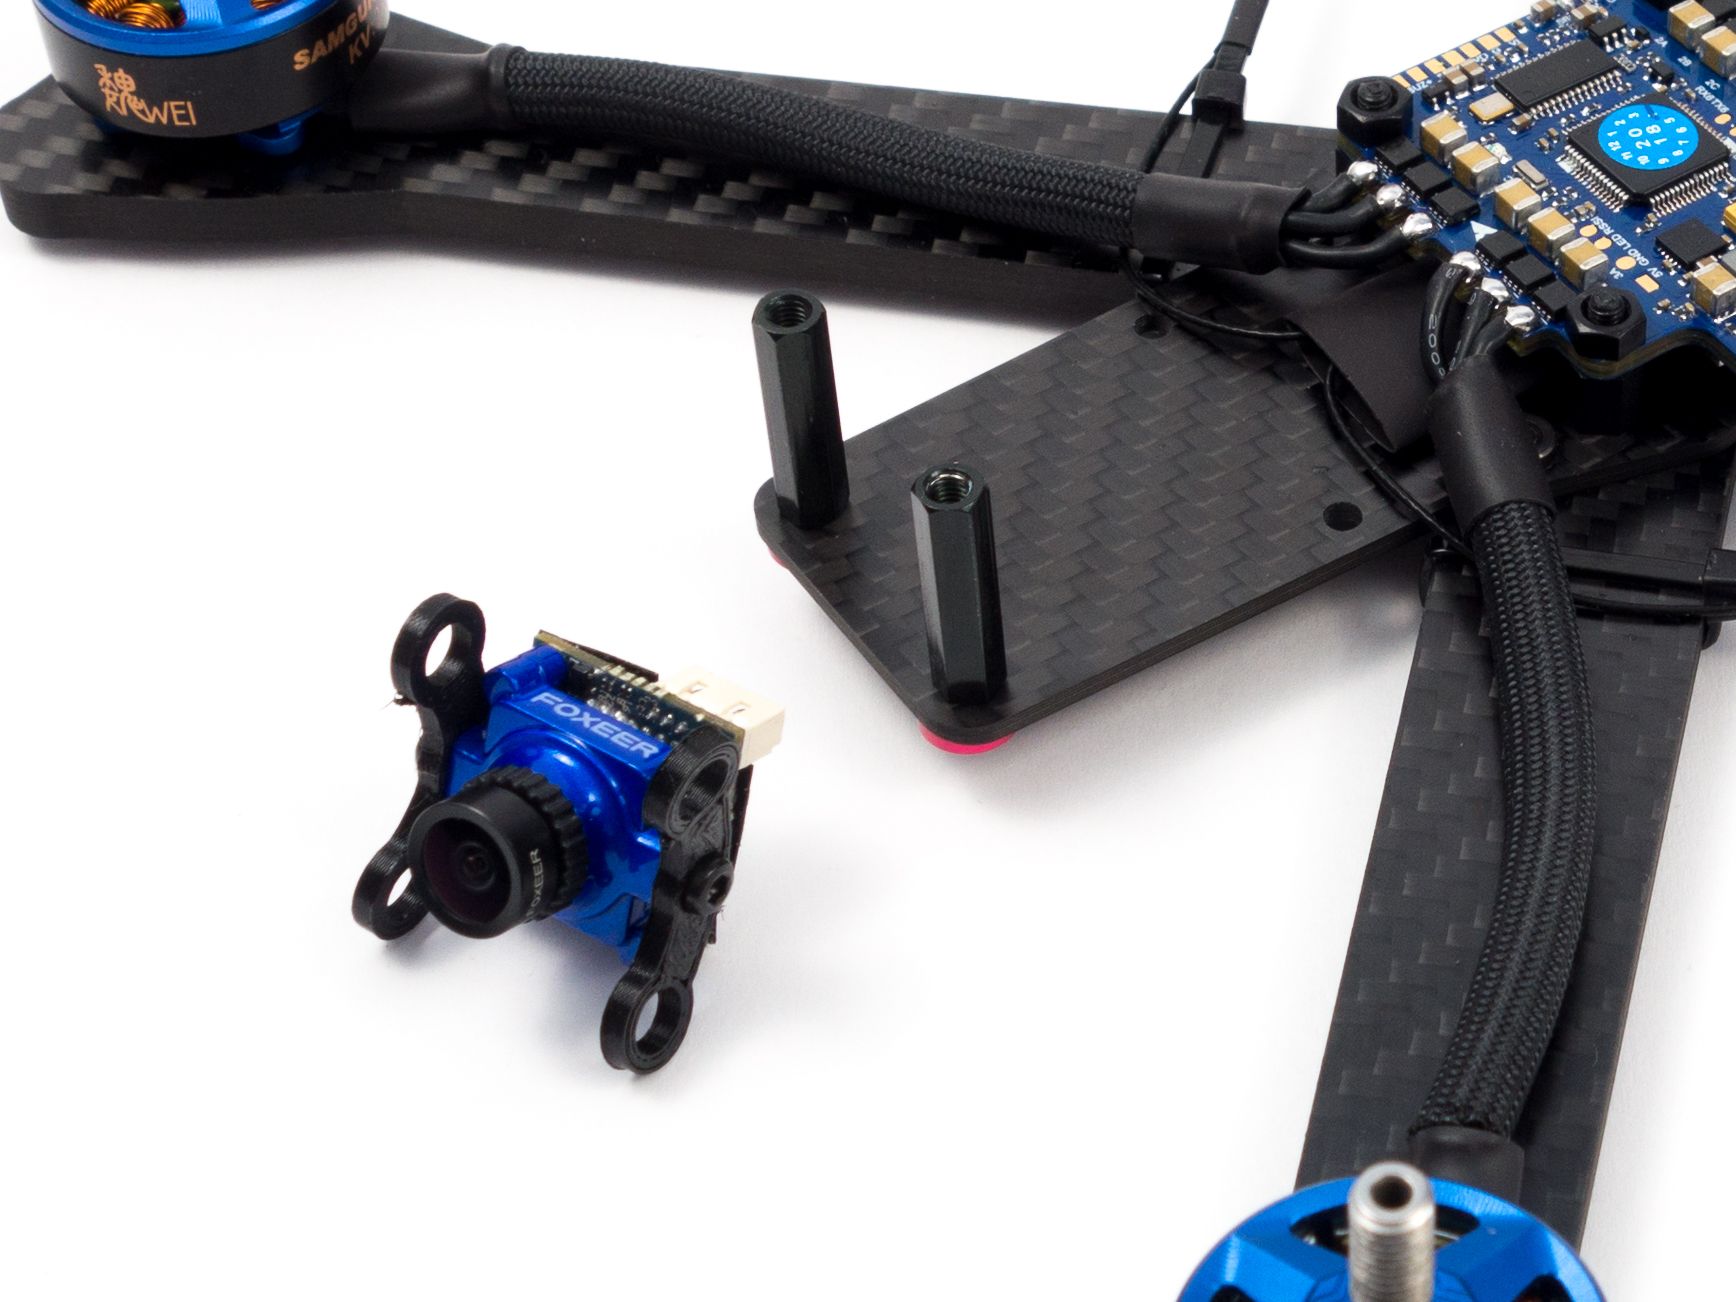
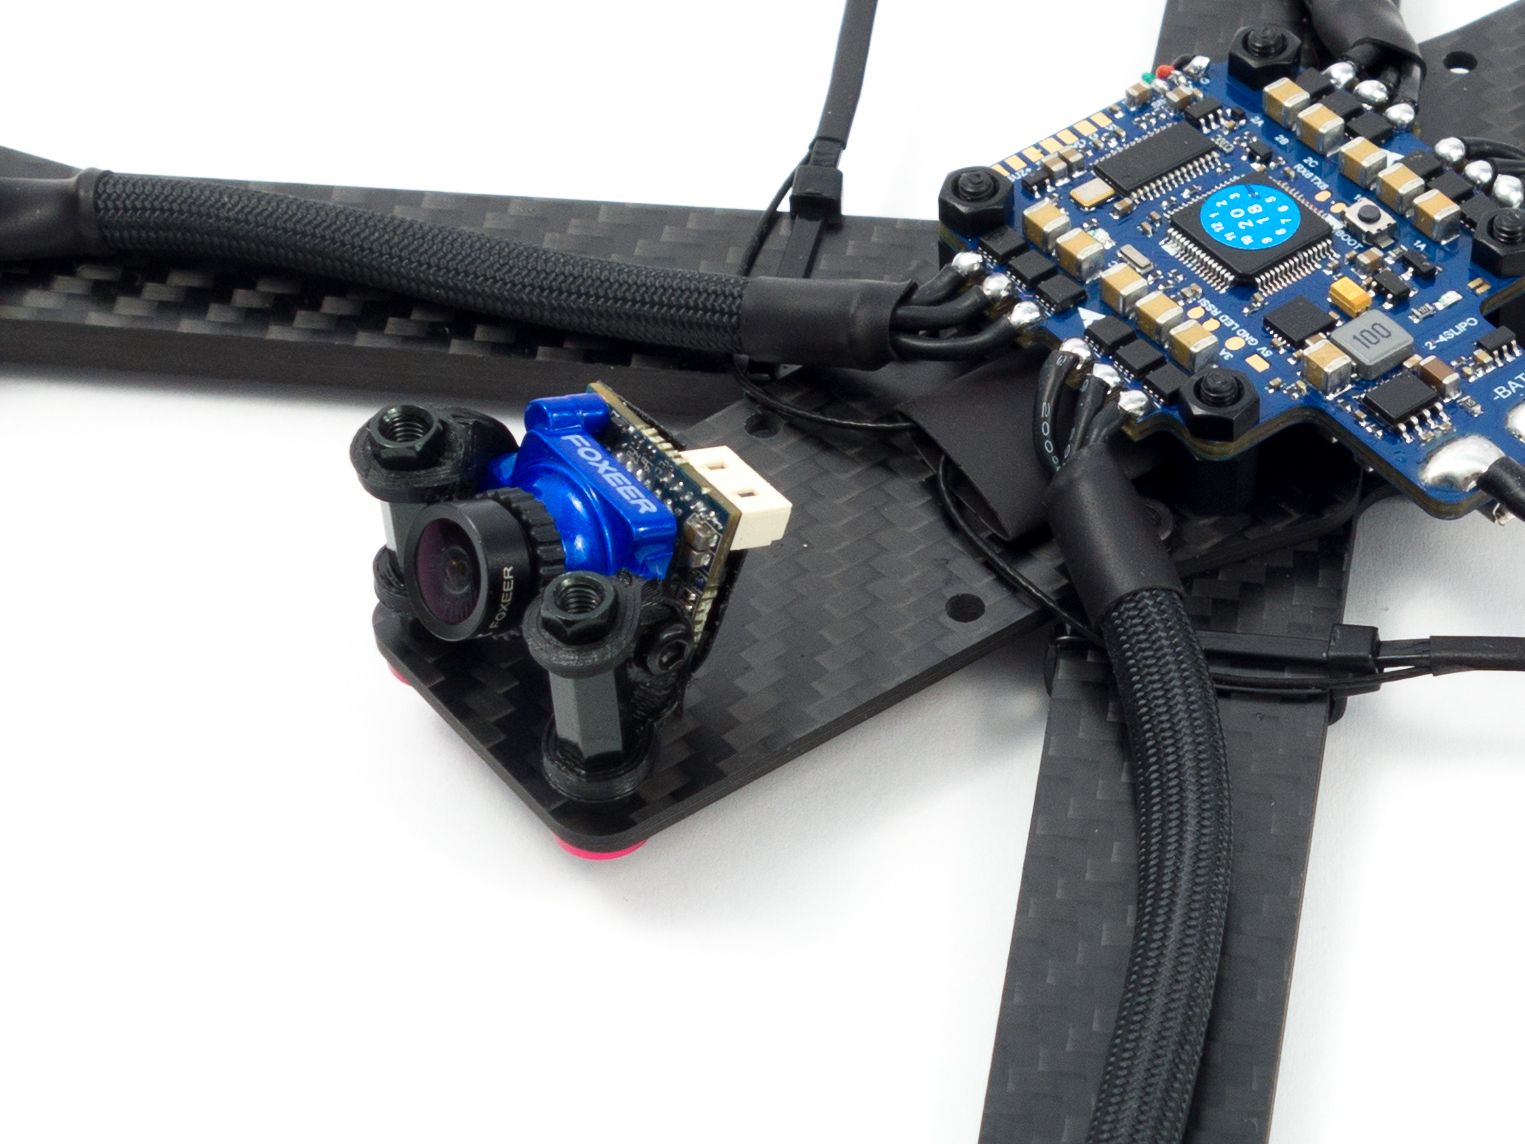
FPV Camera
This frame comes with camera brackets, but they're blue so I used a 3D printed variation in black. It's listed below in the part list. I found it easier to screw the brackets onto the camera before attaching them to the frame, but the stock brackets should work fine either way. Once the camera is mounted you need to solder the wires to the flight controller.
- Remove the purple wire from the wire harness as the voltage reading is redundant.
- Plug the wire harness into the camera and cut the wires to length to their respective pads, offering a little slack.
- You can optionally add some 550 Paracord and shrink tube to cover the wires.
- Solder the wires to their respective pads.
Update September 12, 2018: I found that the 5v output of the flight controller introduces a little camera noise. I suggest powering the camera via the 5v output of the VTX instead. Then, in-turn, you'll need to power the VTX by piggybacking the power leads onto the main battery leads. This produces a nice, clean picture.
Video Transmitter
I love that this frame includes holes for the VTX mount. Mount the standoffs using the aforementioned M2 screws and attach the VTX. Those tiny M2 nuts can be a bit finicky, but it works well to twist them down with your thumb. Make sure the VTX pads are pointed toward the flight controller so you can wire it up.
- Using the spare wire from the camera add wire to the Video, OSD_RX, Gnd_in, and 7-26v pads.
- Again you can optionally add 550 Paracord to protect the wires.
- Solder the wires to the flight controller.
- OSD_RX needs to be soldered to the very tiny TX6 pad in the middle of the board.
- I just doubled up on the 5v pad to give power to both the VTX and camera.
While the VTX says it takes 7-26v it works on 5v. I've done this in the past on other builds and it hasn't been a problem.
Camera Configuration
Now that you've wired the camera and VTX you can adjust your camera settings. Plug in your quad and check that the video feed is functioning. Then, using the included joystick you can plug into the wired connector behind the camera. Mainly all you want to do here is disable the camera OSD. We'll be using the OSD provided by the flight controller instead. Press and hold the up button to access the OSD menu. Disable each option and save.
Finishing Up
Finally, you need to attach all the standoffs and the top plate. I used a slightly longer dipole antenna instead of the included one. While this isn't entirely necessary, it's a good idea to stand your antenna as tall as possible to clear the battery. To mount the antenna I used a pair of interlocked zip ties to give it a rigid surface to latch onto. The antenna runs along the zip tie with shrink tube to hold it in place. This helps reduce stress on the U.Fl connector and keeps the antenna away from the props. You might be tempted to use hot glue to hold the U.fl connector in place, but it'll most likely melt under the heat of the VTX. The zip ties should prevent the antenna from pulling away from the board.
To mount the battery it's a good idea to use a battery pad like Ummagrip or Nomojel to prevent it from sliding out. For added protection you can use two battery straps. You don't want a battery ejection!
Betaflight Configuration
If you don't already have them, you'll need to download Betaflight Configurator [Download] and the BLHeli Configurator [Download].
- First go to the Firmware Flasher and choose "LUXF4OSD" as well as the latest stable release of Betaflight.
- Click "Load Firmware [Online]" and then "Flash Firmware" to update your flight controller. Once complete, click "Connect"
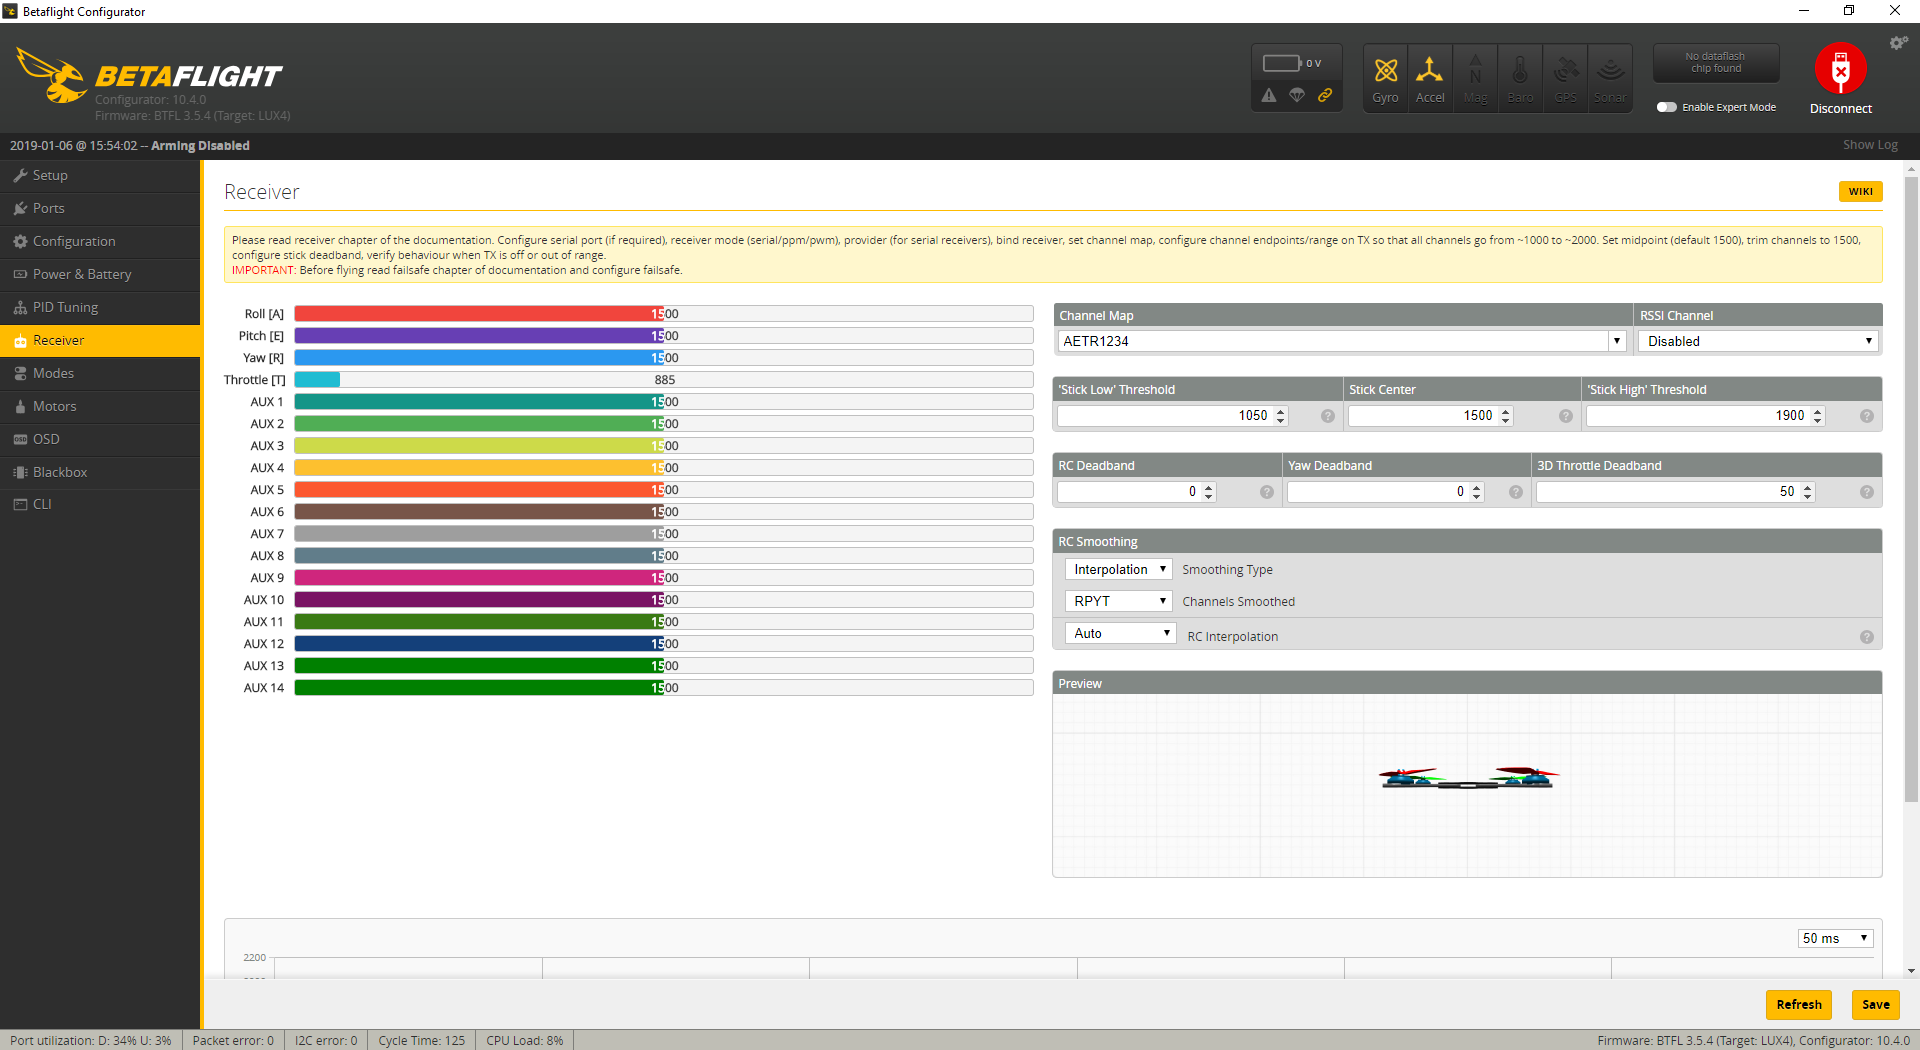
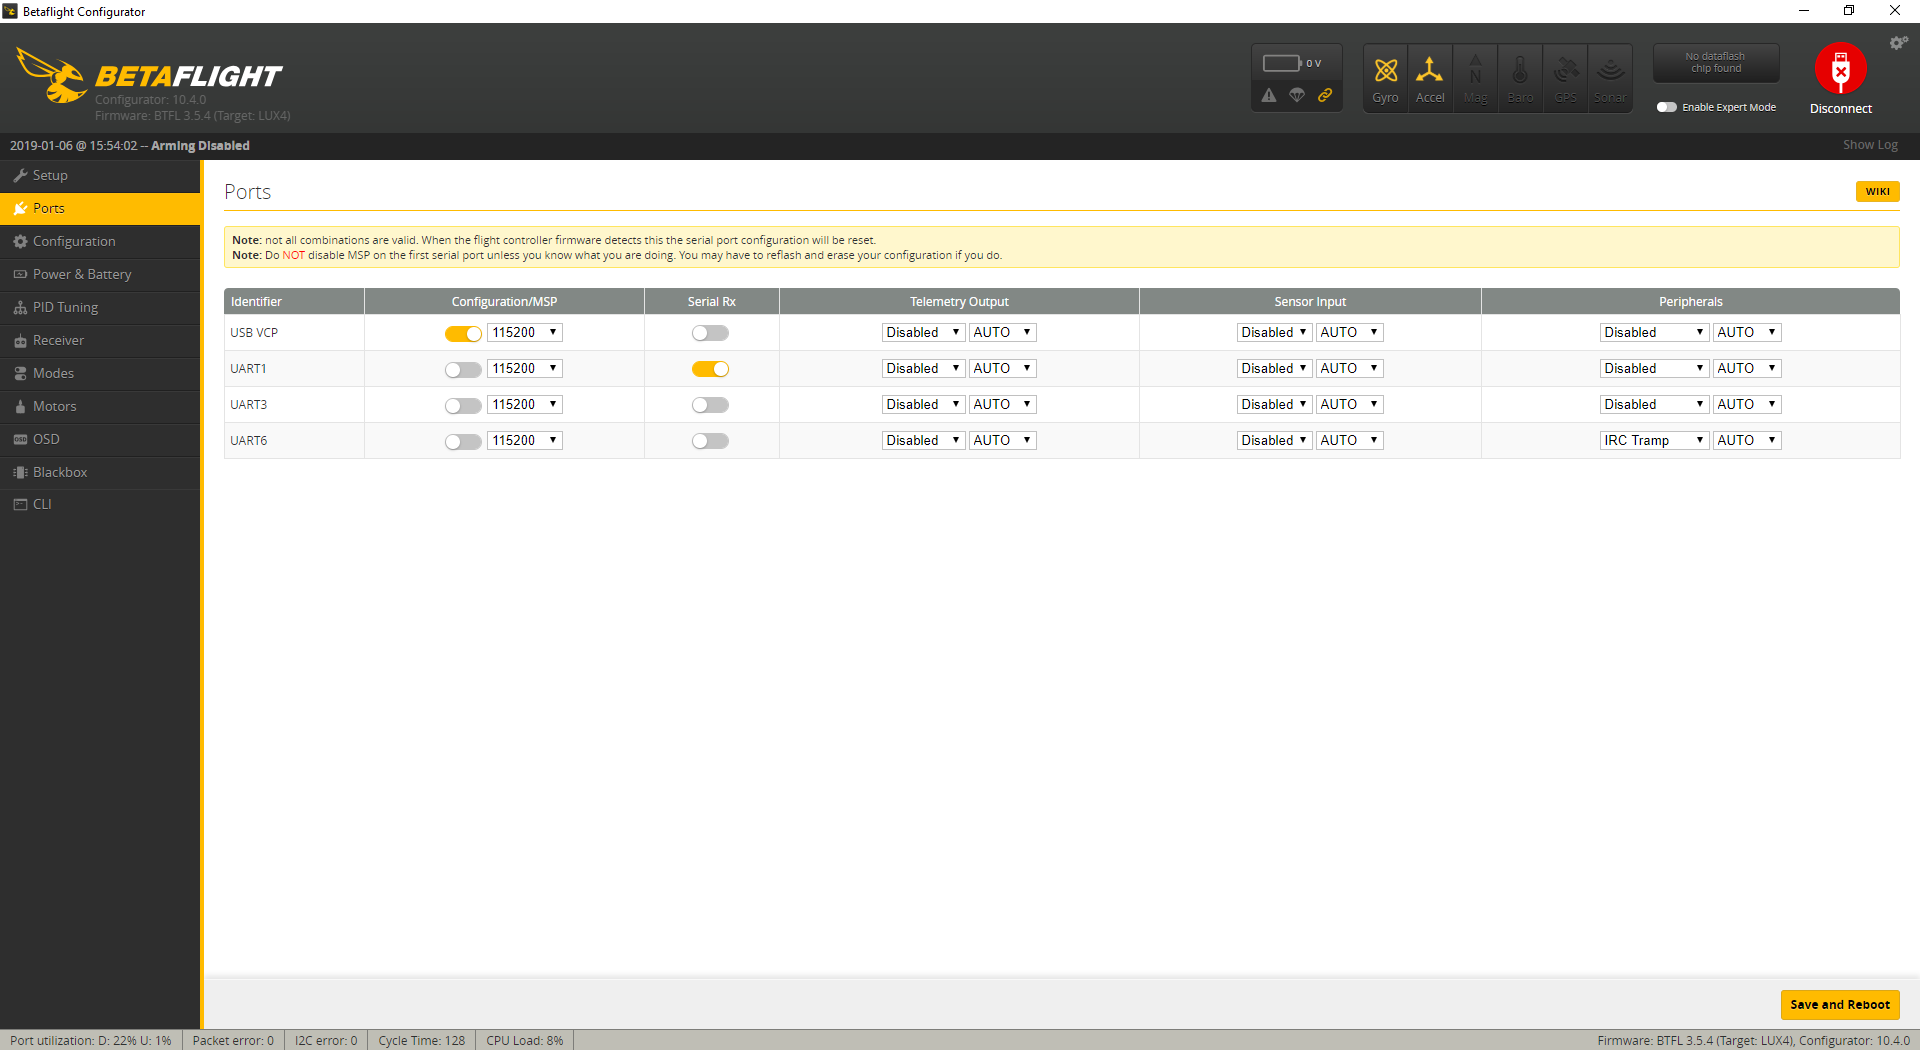
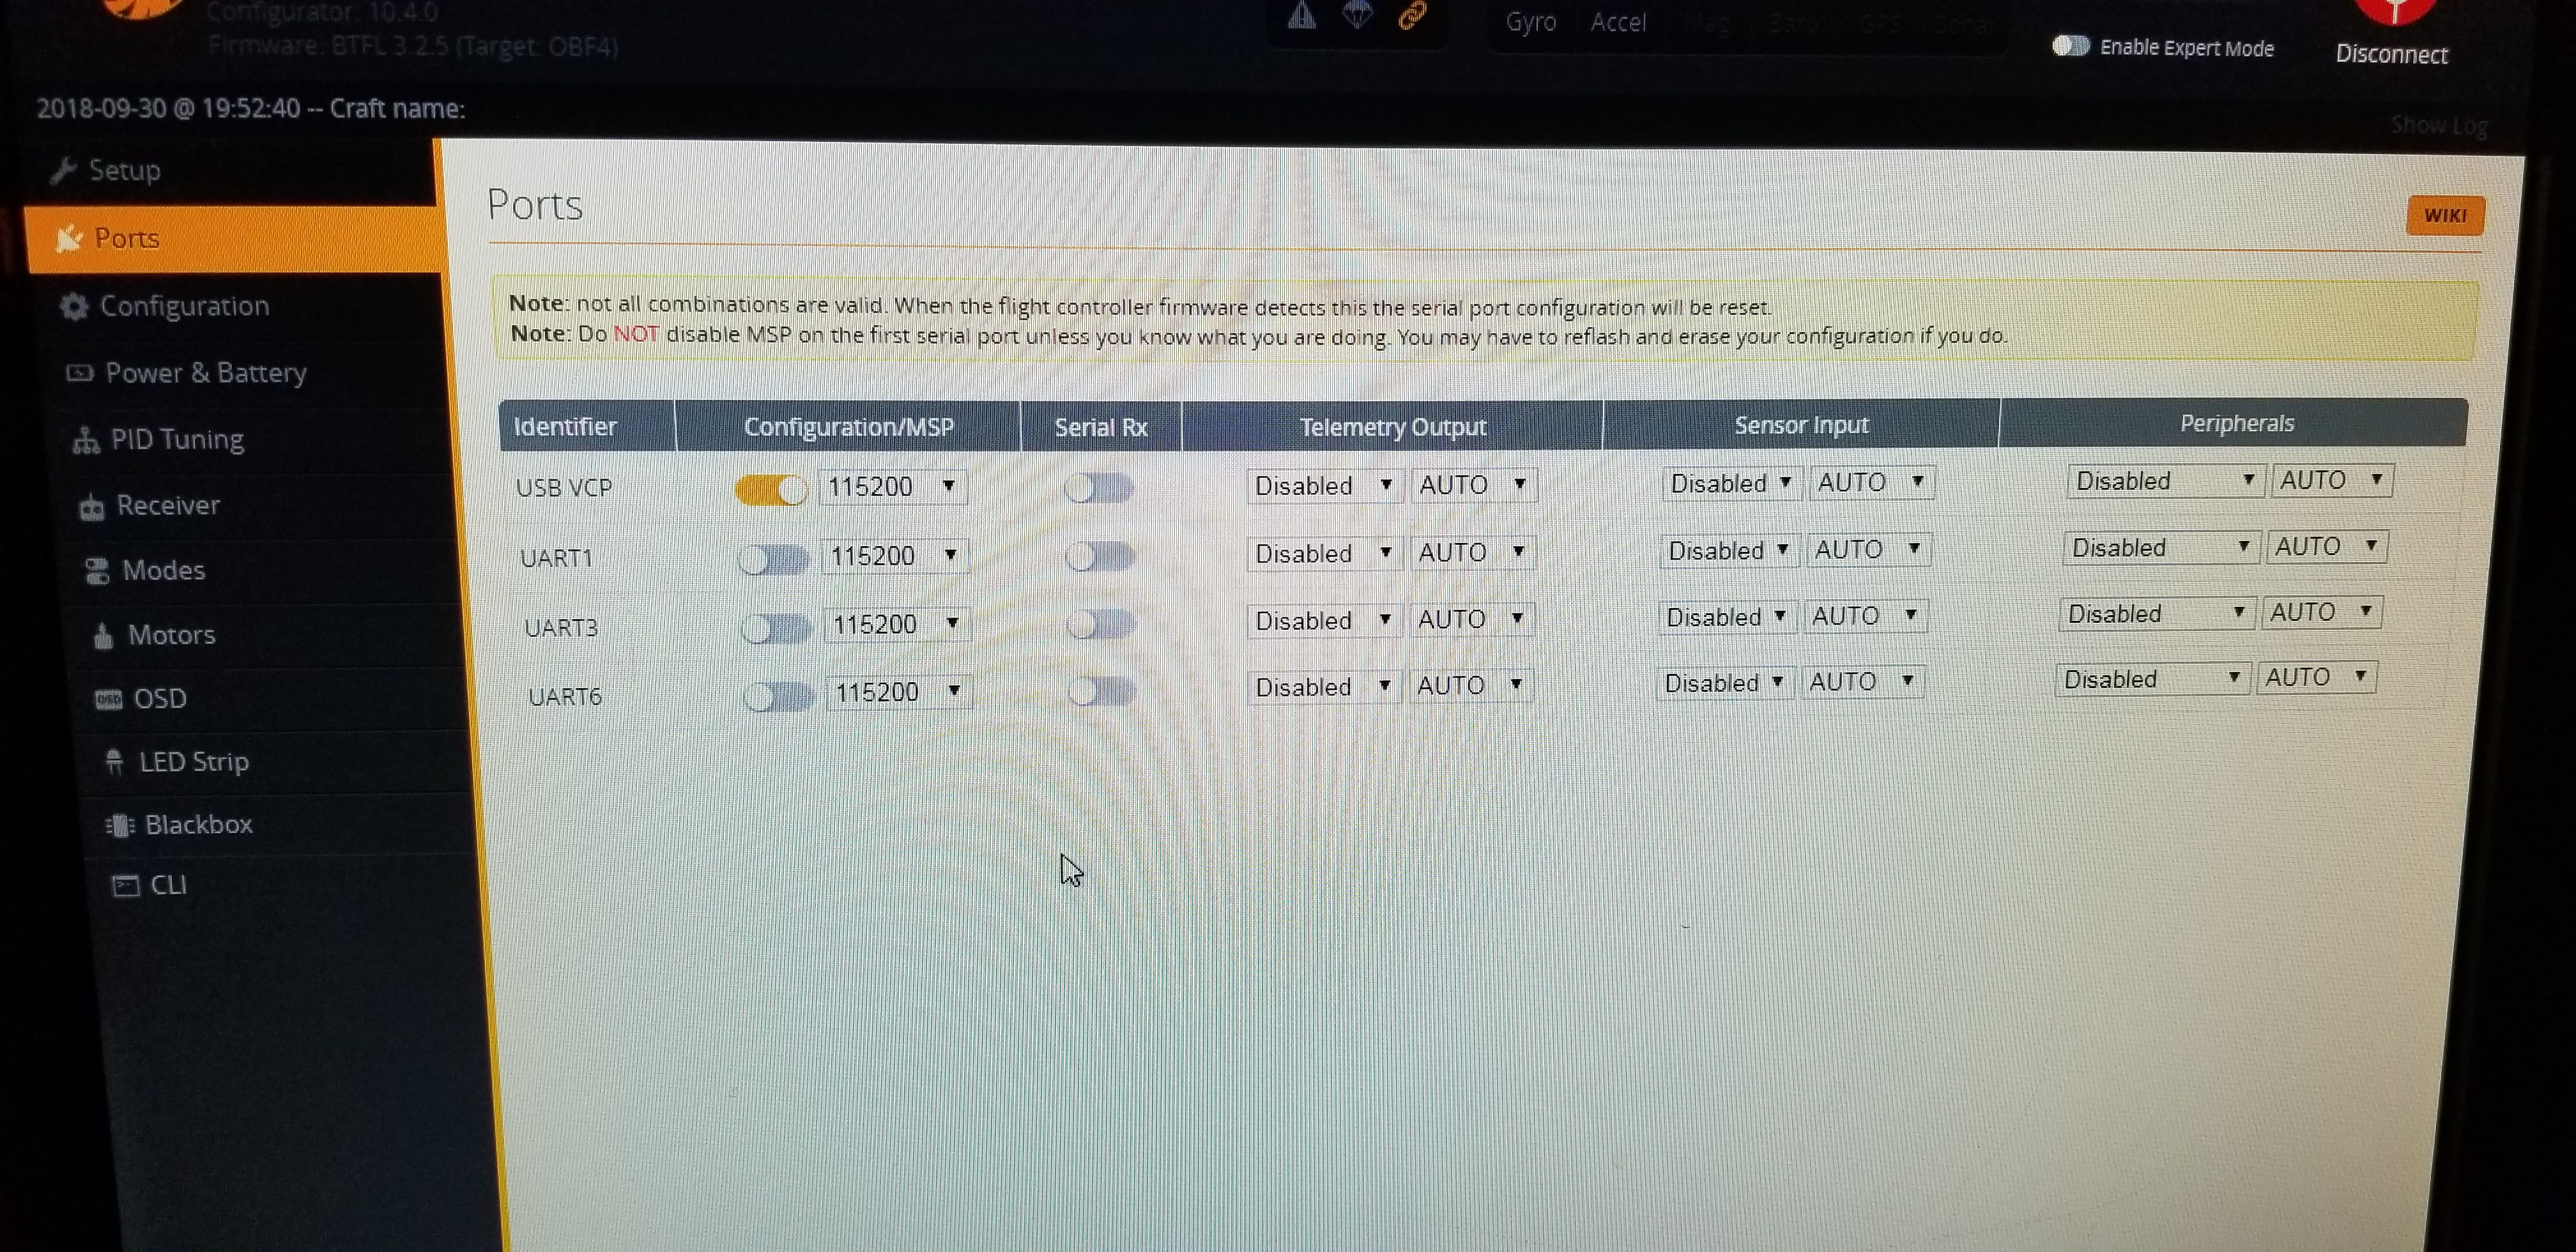
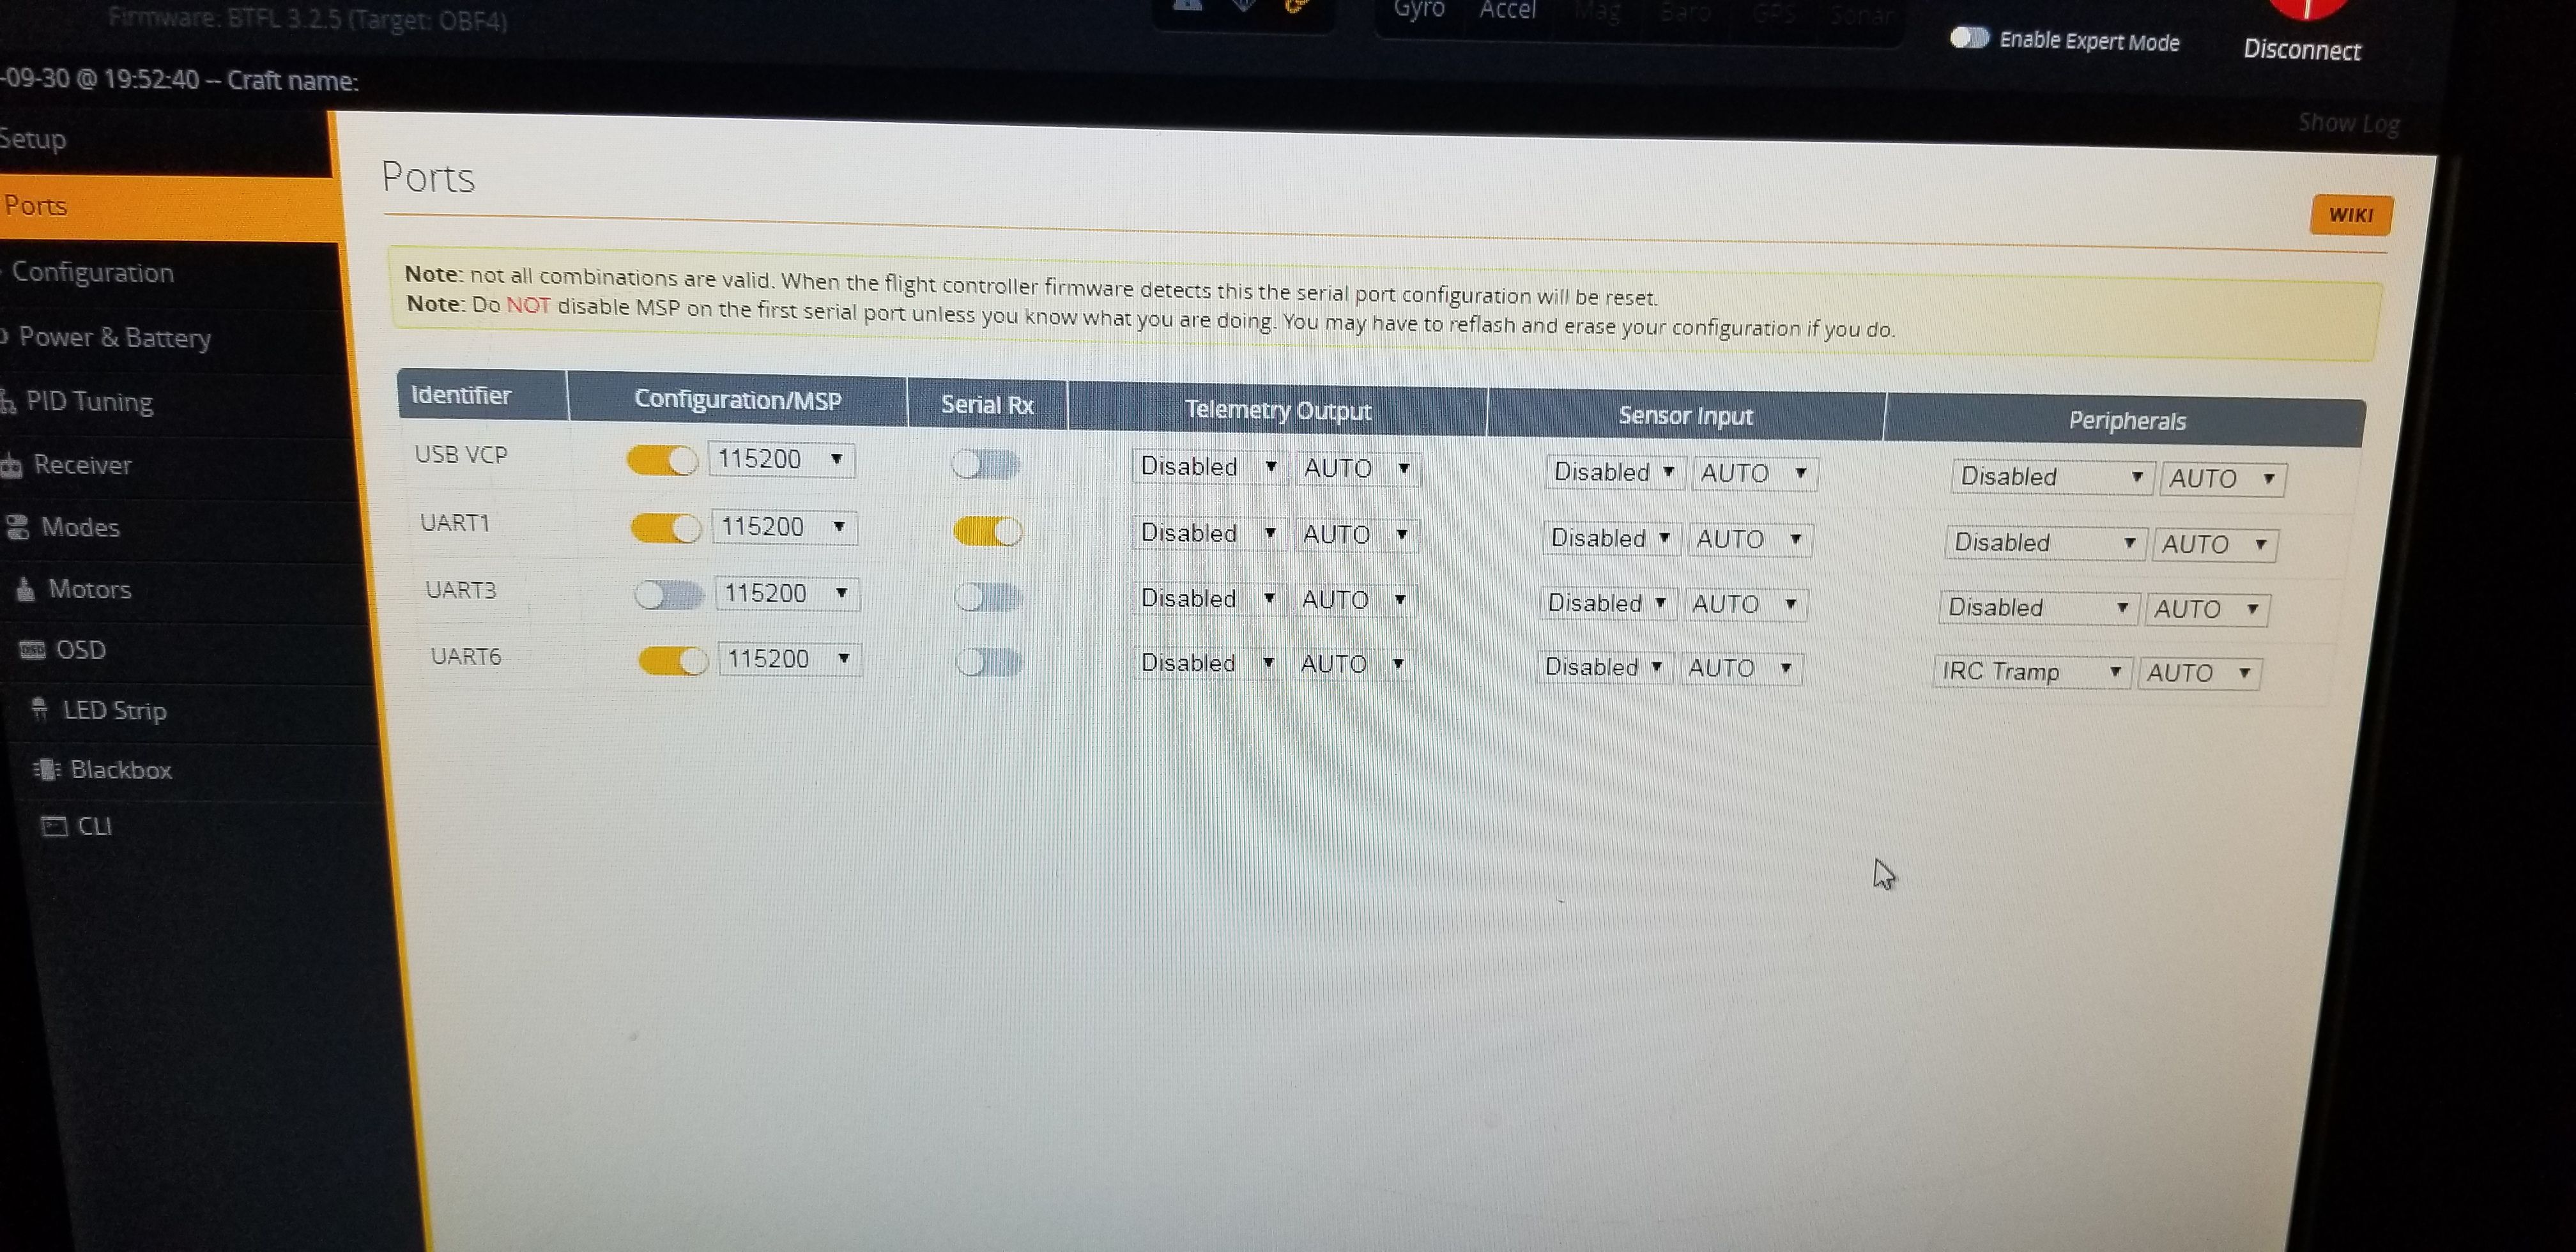
- On the Ports tab
- On UART1 click Serial RX for your receiver.
- Set the UART6 Peripherals to "IRC Tramp".
- Click Save and Reboot
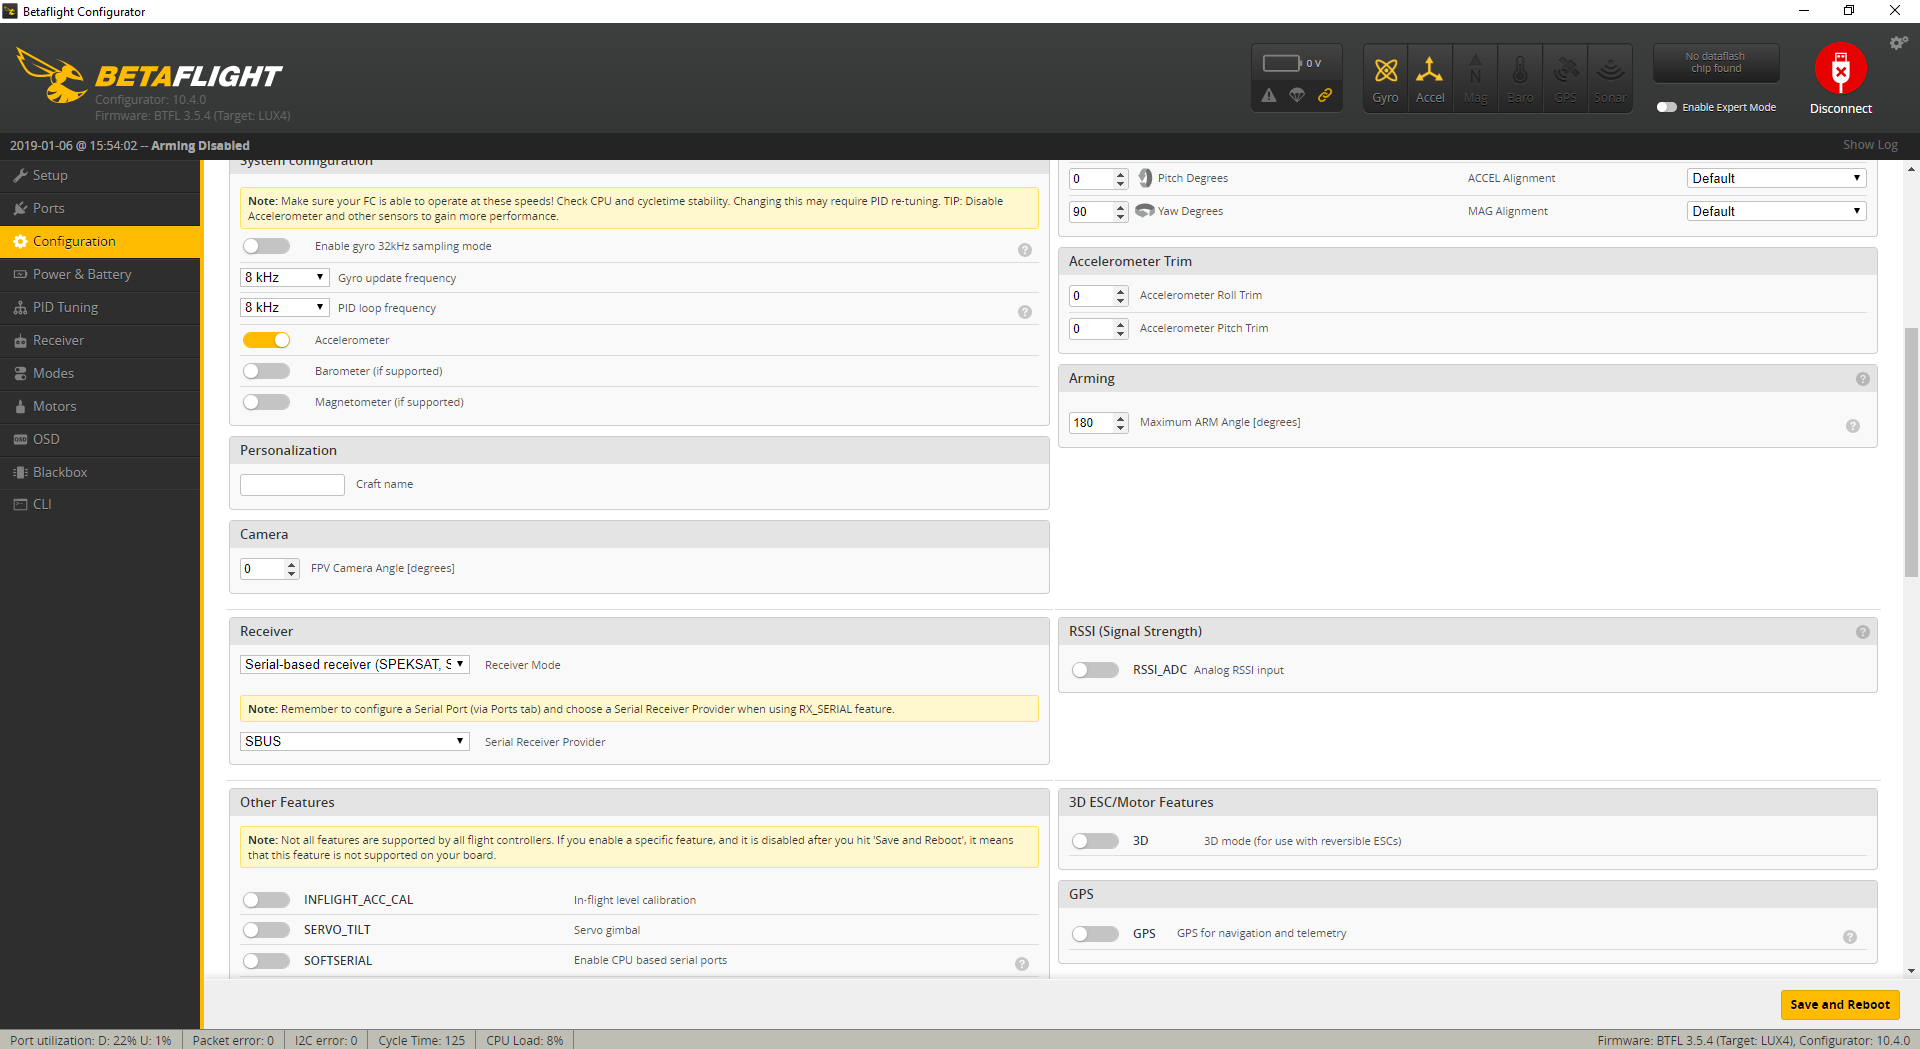
- On the Configuration tab
- Under ESC/Motor Features select DSHOT600
- If want to fly "props out" with reversed motors, select "Motor direction is reversed" below the illustration. (This is optional)
- Under Board and Sensor Alignment set Yaw Degrees to 90 to address the rotated flight controller.
- Under System configuration set PID loop frequency to 8 kHz.
- Under Receiver choose your receiver mode. For the XM+ choose "Serial-based receiver" and "SBUS"
- Under Arming set the Max arm angle to 180 (Only if you keep the accelerometer turned on)
- Under Other Features enable: Airmode, OSD, Anti Gravity and Dynamic Filter
- Under DSHOT Beacon Configuration enable the beacon
- Click Save and Reboot
- Go to the CLI tab and enter the following commands to place the motors in the proper positions:
resource MOTOR 1 B01
resource MOTOR 2 A02
resource MOTOR 3 B00
resource MOTOR 4 A03
save
To complete the remaining steps you'll need to apply lipo power to your build:
- On the Receiver tab ensure your pitch, roll, throttle and yaw are being applied correctly. Adjust your transmitter and Channel Map as needed.
- On the Modes tab
- Assign an Aux switch to arm and disarm your quad.
- Assign another Aux switch to enable Horizon or Angle mode if you need them.
- Assign the Beeper and "Flip over after crash" to a 3rd and/or 4th switch. I like to assign them both to a single 3 point toggle switch.
- On the Motors tab enable the motor test and apply a small amount power to check the rotation of each motor. Take note of any that need to be reversed.
- Disconnect from Betaflight Configurator and open BLHeli Configurator
- Flash all ESCs to the latest firmware release.
- Reverse the motor direction of any motors that need it.
- Save and reconnect to Betaflight Configurator to test the motor direction.
- On the OSD tab
- Check all of the features you want and arrange your OSD as desired.
And that's it! The default Failsafe settings are generally fine, but make sure they work by arming your quad, applying a small amount of throttle and turning off your transmitter. It should shut down after 4 seconds.
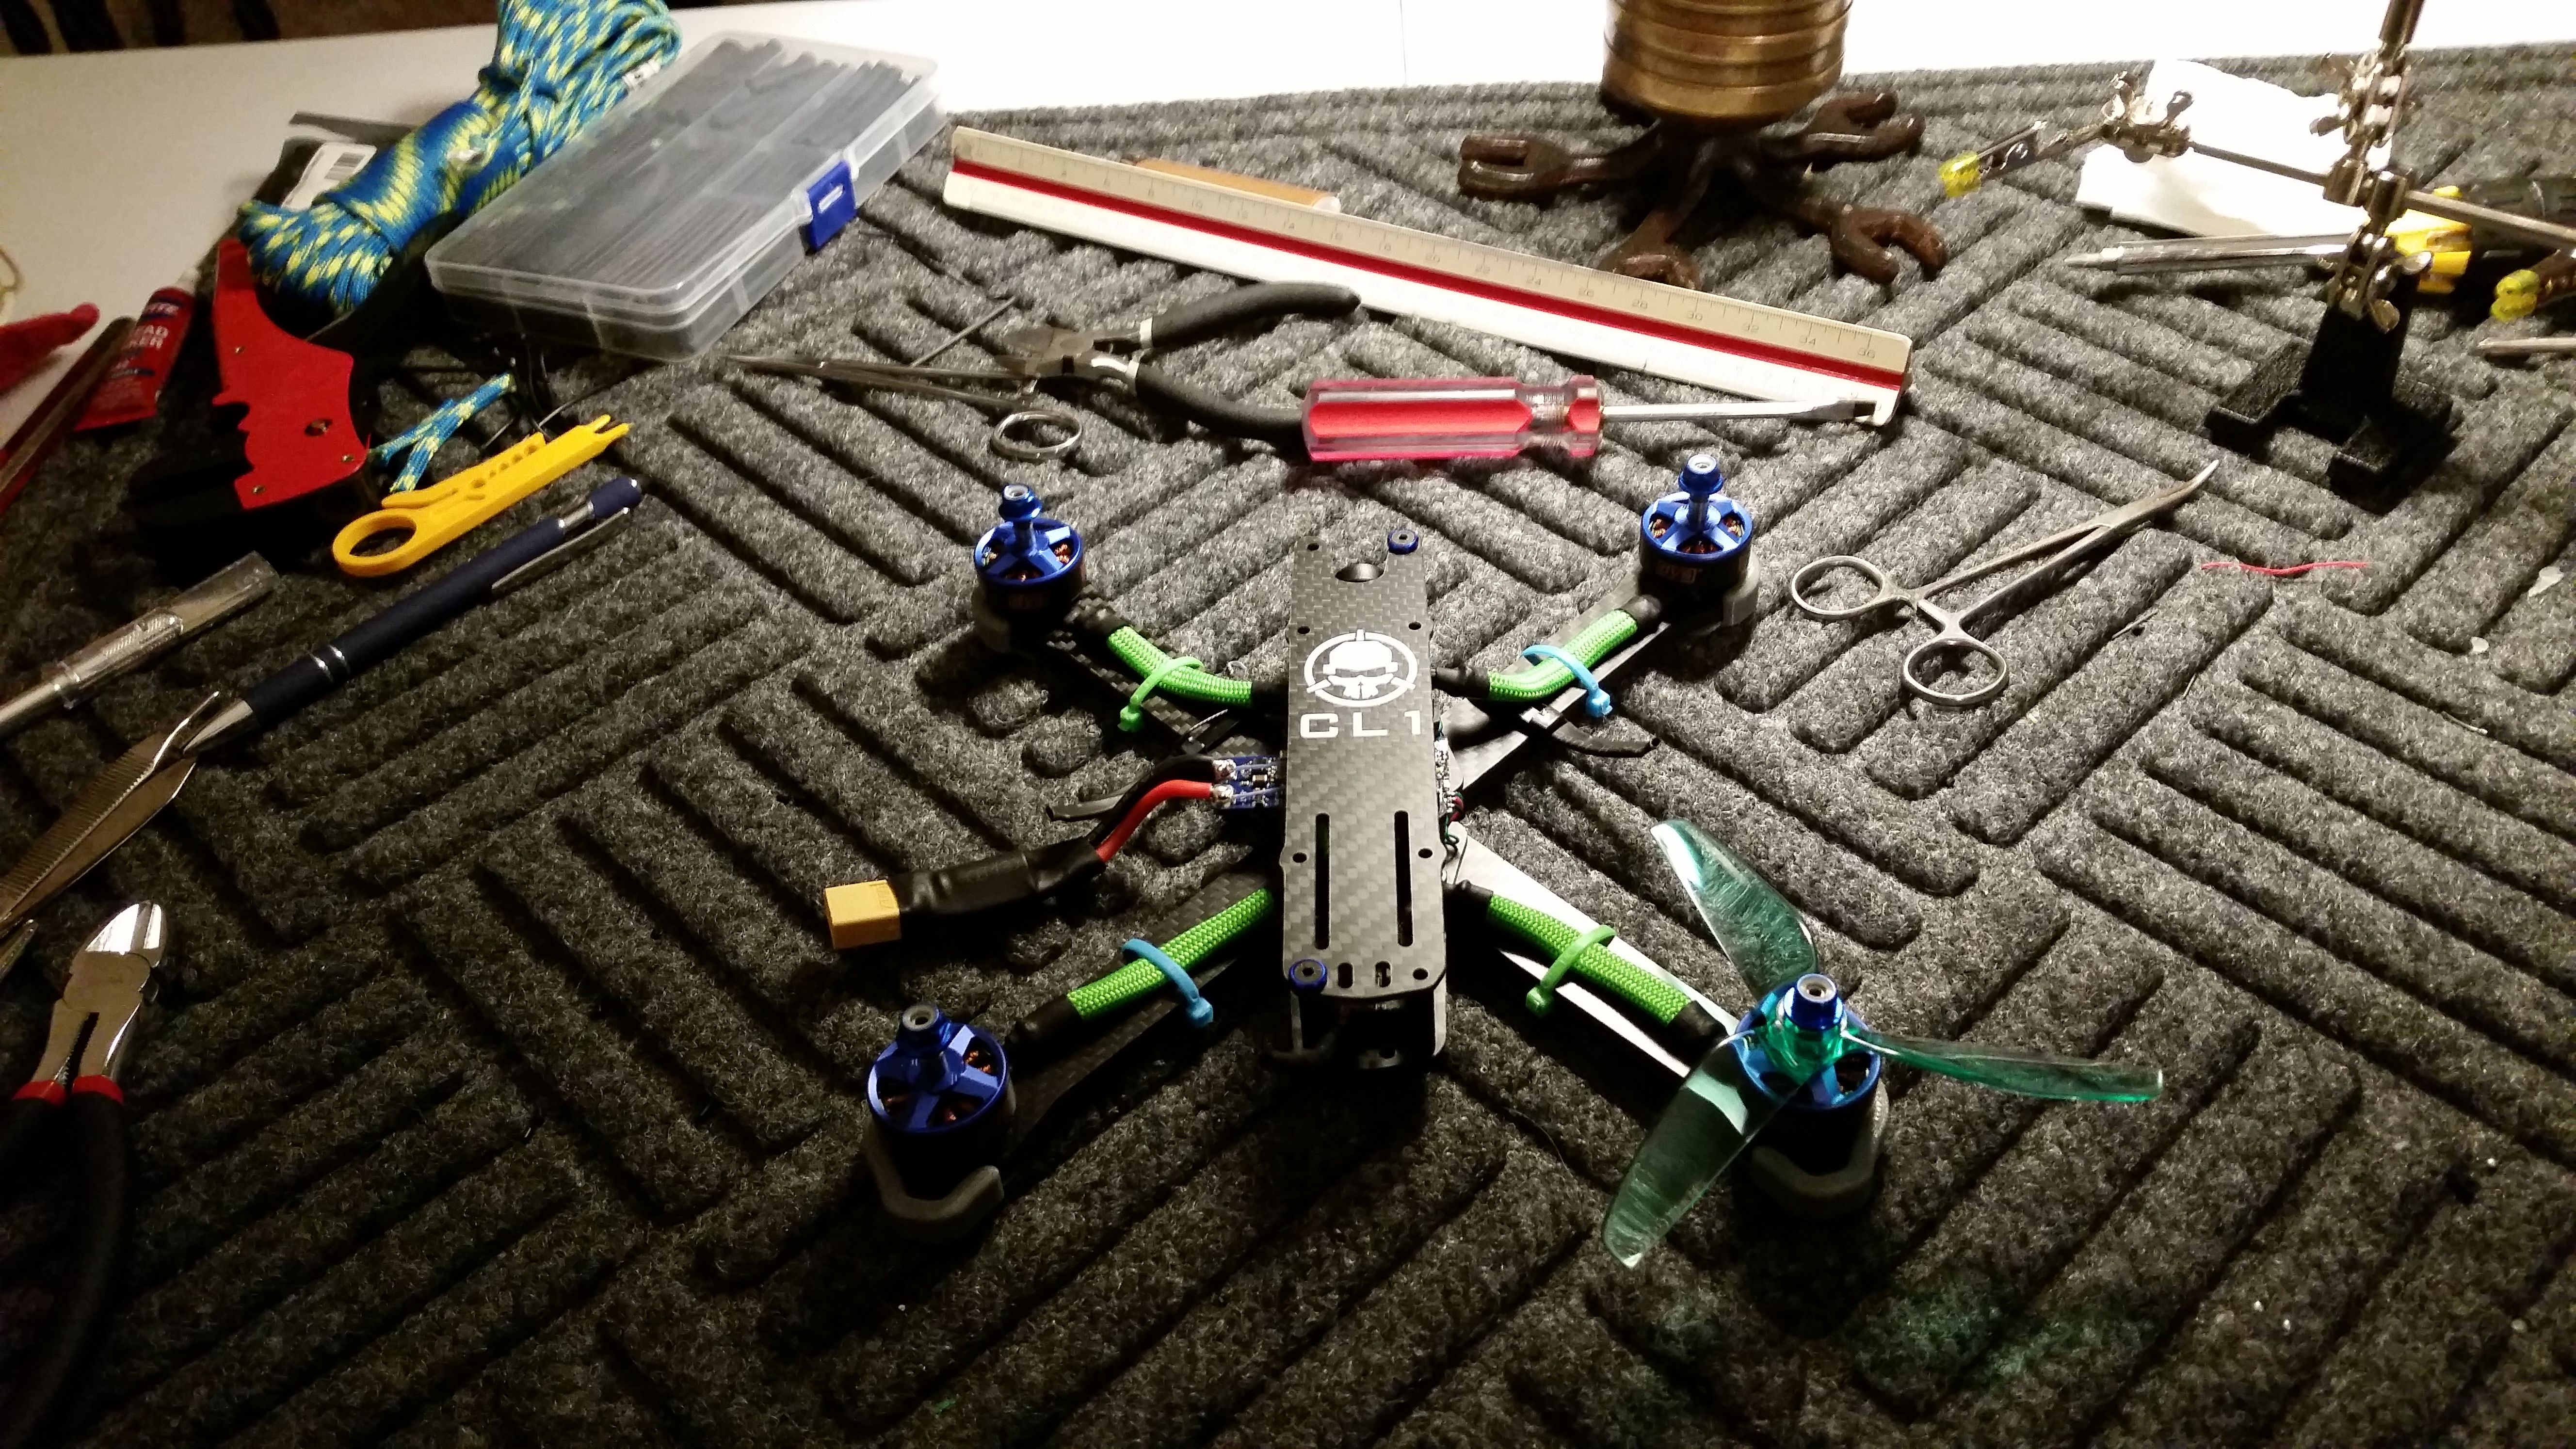
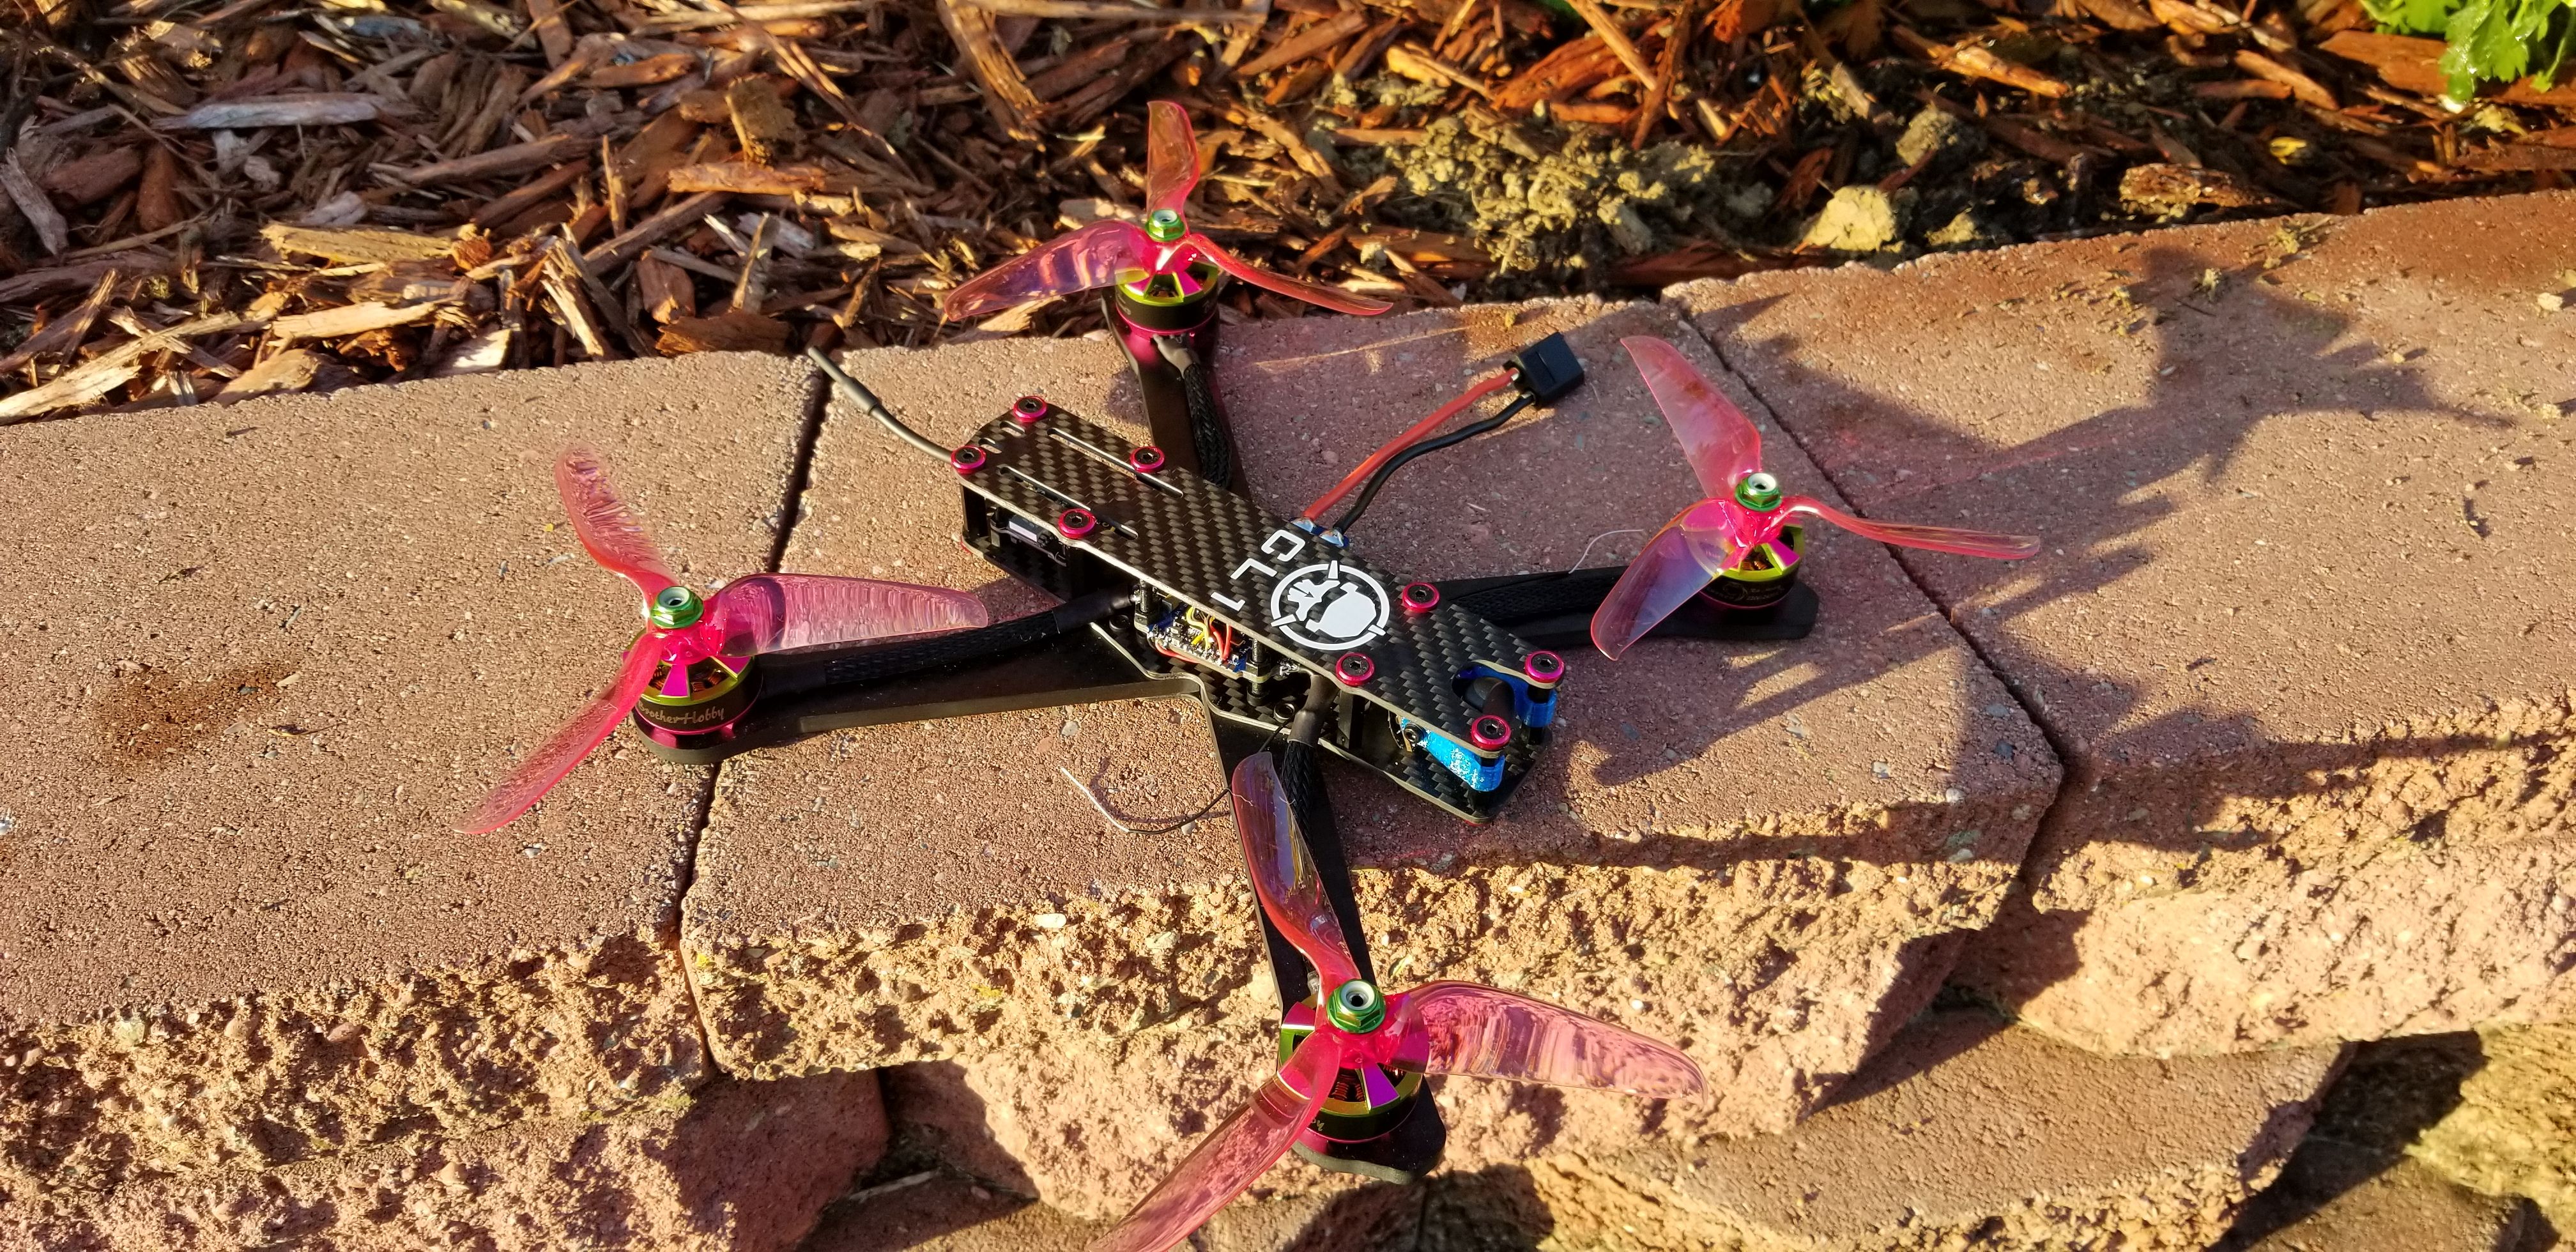
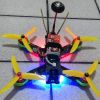
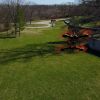
Photos


Part List
Show stores (5)
Love the color scheme and build. About the motor wires, do these wire wraps work well to protect them from prop strikes or are they more just for looks?

hey there im making this kwad but with diffrent stuff im using the bardwell F4 v2 DYS 32bit 35A ESCS, Rush Tank VTX MB PRIMO 2207 2650kv and CADDX SDR2 freestyle. i was wondring what size paracord did you use for this build?? i want mine to look good n be protected as much as possible

Hi,
Is there an advantage in taking a FC without built in ESCs? Or is it recommended to have a AIO?

The Tramp HV is an older VTX. It's a lot larger and I don't see much benefit to using it over any other VTX. These video transmitters more or less all function the same. The only big difference is the features such as OSD control, output power, cost and size. What matters most to me is how well it'll mount onto the frame and cost. I pretty much expect everything to support at least 200mw and OSD control at this point.

Hi Whiffles,
I finished this build and it looks amazing but I have an issue.
Quick summary:
Soldering complete.
I flashed the most up to date firmware into my frksy qx7, my receiver and my flight controller.
I tested the googles and the camera, both working fine.
I bind the remote and the receiver.
I tested all the motors as you suggested no issues at all.
When I test the frsky qx7 inside the betaflight nothing moves. Not sure what am I doing wrong ...
Few pictures below.
Thank you.

Yes, you need to make sure the props are installed correctly. I believe you're configured for "props in" so make sure the leading edges rotate inward toward the middle of the quad, both front and back. Betaflight illustrates the prop directions on the Configuration page. Make sure you can identify the leading edge which is the part that bends upward.

Best CL1 ive seen so far. am thinking of a similar build but with 15mm standoffs. do you think that would be possible?

Almost complete, some work left on betaflight and I'll be in the air. Coding the motors is my next step.
I do. I attempted to program motor location last night, first time with AO1 then realized it was a A01, zero not O's, typed save, upper left status bar said device rebooting and waited 25 minutes, it was real late so I left it plugged in. Guess the computer went to sleep before it finished because at 3 am it was still rebooting so I disconnected. How long should it take to reboot after motor program? Trying it again this evening.

Hi Whiffles, I flashed the ESCs in BLHELI Configurator and used the G-H-30 target with version 16.65 blheli-multishot. Is this correct? It's my first build. I used the same components as referenced in your build posted on getfpv. Thanks!!

is the target of "luxf4osd" correct for the cicada? see other people using omnibusf4 and getfpv suggested vgoodf4?

What size m2 screws for the standoffs? Thank you for doing this build looking to do this together with the mancub for a fall/winter build.

think im going to try this build depending on parts for uk would a run cam split fit on this ?
Thank you i will look into getting the parts, cost ect i used to fly Trex 450 dominator helis and build them but i got too busy at work. Since then i have watched fpv videos on utube and really want to get into it and start my youtube up again ! https://www.youtube.com/channel/UCvquy_EtJDXu3lmZGgThDAA


maybe i am doing or, have ordered something wrong but I cannot get my motor screw holes to line up on the CL1 frame. i can only get 2 screws in, the other 2 holes are cut too close together. Any tips for a work around? First build ever and not 100% sure on what to expect.
Awesome, glad you got it flying! You just need to use a lot of finesse when throttling. I wouldn't bother trimming it as that'll just throw you off. Have you practiced on a micro brushed quad yet? Those can really help you learn throttle control. Another option is to fly a sim like Liftoff for a few days. I wouldn't just jump into flying this one without some practice.
Which goggles are you considering?
once I get in to a big open space and have some room to play I think I'll get it down. I have flown a Phantom 4 for a couple years now, even though it's not the same. The phantom has about the same flights mechanics. I did fly on velocideone a few times to get the hang of it while waiting on parts. I am looking at getting the Fat Shark HD3 set since most people say the field of vision is better than the new HDO and the video quality isnt a big enough difference to justify spending the extra 100 bucks. One thing I really need to figure out with this build is how to Top mount the battery so that it isnt near the props and so that the center of gravity is correct. I tried a couple different things tonight but both my test flights was with a temporary bottom mount. I haven't used the sticky pad yet so I hope to make the top mount before my next attempt to fly. any suggestions?
Definitely go top mount with this one. I just cut a strip of Ummagrip and I strap my battery just behind the CL1 logo on the top plate. That gives me just enough room for my HD camera up front.
You can't go wrong with the HD3, especially for the warranty. You might also want to look at the EV200D or the Aomway Commander V2. Those are very good goggles as well.
what flight times would I expect with this set up ? Im looking for the best lower budget long flight time fpv free style drone.


I just wanted to say THIS BUILD ROCKS soldering was a little difficult but turned out sound. Also may i add the frame is extremly durable, smoked a park bench going full throttle with no concequinces. Excellent choice of parts and FC. Thanks Whiffles.

do you think a 2 stack would fit, or should i get 25mm standoffs

So beautiful build, again !!!
Thanks for the paracord tip. I use other thing, sort of plastic one, but paracord is so more beautiful.
do u know how much just the frame weighs


What is the little button on the fc for?

Looks nice! Someone can tell me the measure if the front-top screw for maybe design a GoPro support? :)

@whiffles,
If I wanted to make the 5s capable, what AIO fc would you reccomend I use instead?
Thanks,
-Sam

I have the same setup all but frame are you getting any noise in your video by any chance ?
very nice build! i see you like the aio fc/esc boards. i have the one from droneracingparts.com but havent installed it yet but this post gave me some ideas on finishing the build it was going in!
What is the actual motor to motor measurement?


Beautiful build as always Whiffles. I love how you went with the shorter standoffs. This looks like a beast!!! Nice job!! <3


Beautiful work, I also like the blue and pink style. So why no concern for battery lead strain relief?
I have been running a sticky pad and double straps on my top mount for a year and a half now, I haven't thrown a battery in a LONG time. I have similar thoughts on the issue, but I haven't been able to divorce myself from the notion of the necessity of strain relief. I just still have that "what if, and it'll destroy your board" idea running through my head like a scrolling marquee.


Hey Whiffles! I've looked at a few of your builds and I want this one to be my first build. It looks like you made it a couple years ago so I was wondering if you have any suggestions/alterations you would add now that some time has passed. Also I don't see any goggles on your gear list. What kind of goggles would you recommend?
I'd change most everything about it now. I'd go for the iFlight Xing-E motors with a Diatone Mamba stack and maybe a Foxeer Toothless 2 or Caddx Ratel camera. The frame is fine and it'll hold up to a beating. Also, you might want an AKK VTX that'll fit the 20mm spacing in the back. As far as goggles are concerned, what's your budget? They run the gamut. If you've got a decent budget get the DJI goggles and build this with a Caddx Vista.
So based on these recommendations, it sounds like I could use your TransTEC Laser S build (May 31, 2019) as a guide for my first build. This is also a great place for me to start. As for the goggles, I'd like to start out with a more economic option before I buy anything better. Maybe around $200? also what are your thoughts on the FrSky Taranis 2.4 Ghz radio controller?
Sure, the TransTEC build is still very relevant. You could even save a little money with the Xing-E motors instead. For $200 the Fatshark Scouts are pretty good goggles. Otherwise you can have a look at the Eachine EV800D or the FatShark Recon V3. As far as the radio, take a look at the Radiomaster TX16S. The Taranis X9D is pretty outdated.
Hey Whiffles, I got all my parts in and completed the build. I followed your directions very closely and have 99% of everything working smoothly. For some reason the drone isn't reacting to any of the inputs from the Radiomaster tx16s. This is strange because in Betaflight under the receiver tab, I can visibly see the inputs change as I move the sticks around. Do you have any suggestions?
It sounds like it may not be arming. Is your arm switch configured and responding on the modes tab?
The arm switch is greyed out. I have it set to aux 2 and a range of 1300 to 1700. I'm not sure how to fix it.
I just found a switch on the radio that made it light up red, but only to tell me its disabled.
It should indicate that you armed by flipping the switch when the quad is powered and plugged in via USB. Always good to have your props off when you do this though.