
After spending time drooling over some brushless whoop builds and learning that the first wave of issues with whoop-sized brushless motors was more or less resolved (0603 vs 0703, laser-welding the shafts) I realized the time has come.
Flight Footage
I know you will ask for it, so here you go.
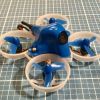
The first video contains a little lie. That white whoop-style quad shown on the thumbnail is actually the second, improved iteration of the build, while the footage was taken with the first one, which was heavier and had some insteresting issues. It flew well nevertheless.
First Iteration
The only place that had 0603 16000KV motors in stock was the BetaFPV shop, so for the first iteration I decided to just take off-the-shelf parts they offer, put them together and see what the result looks like.
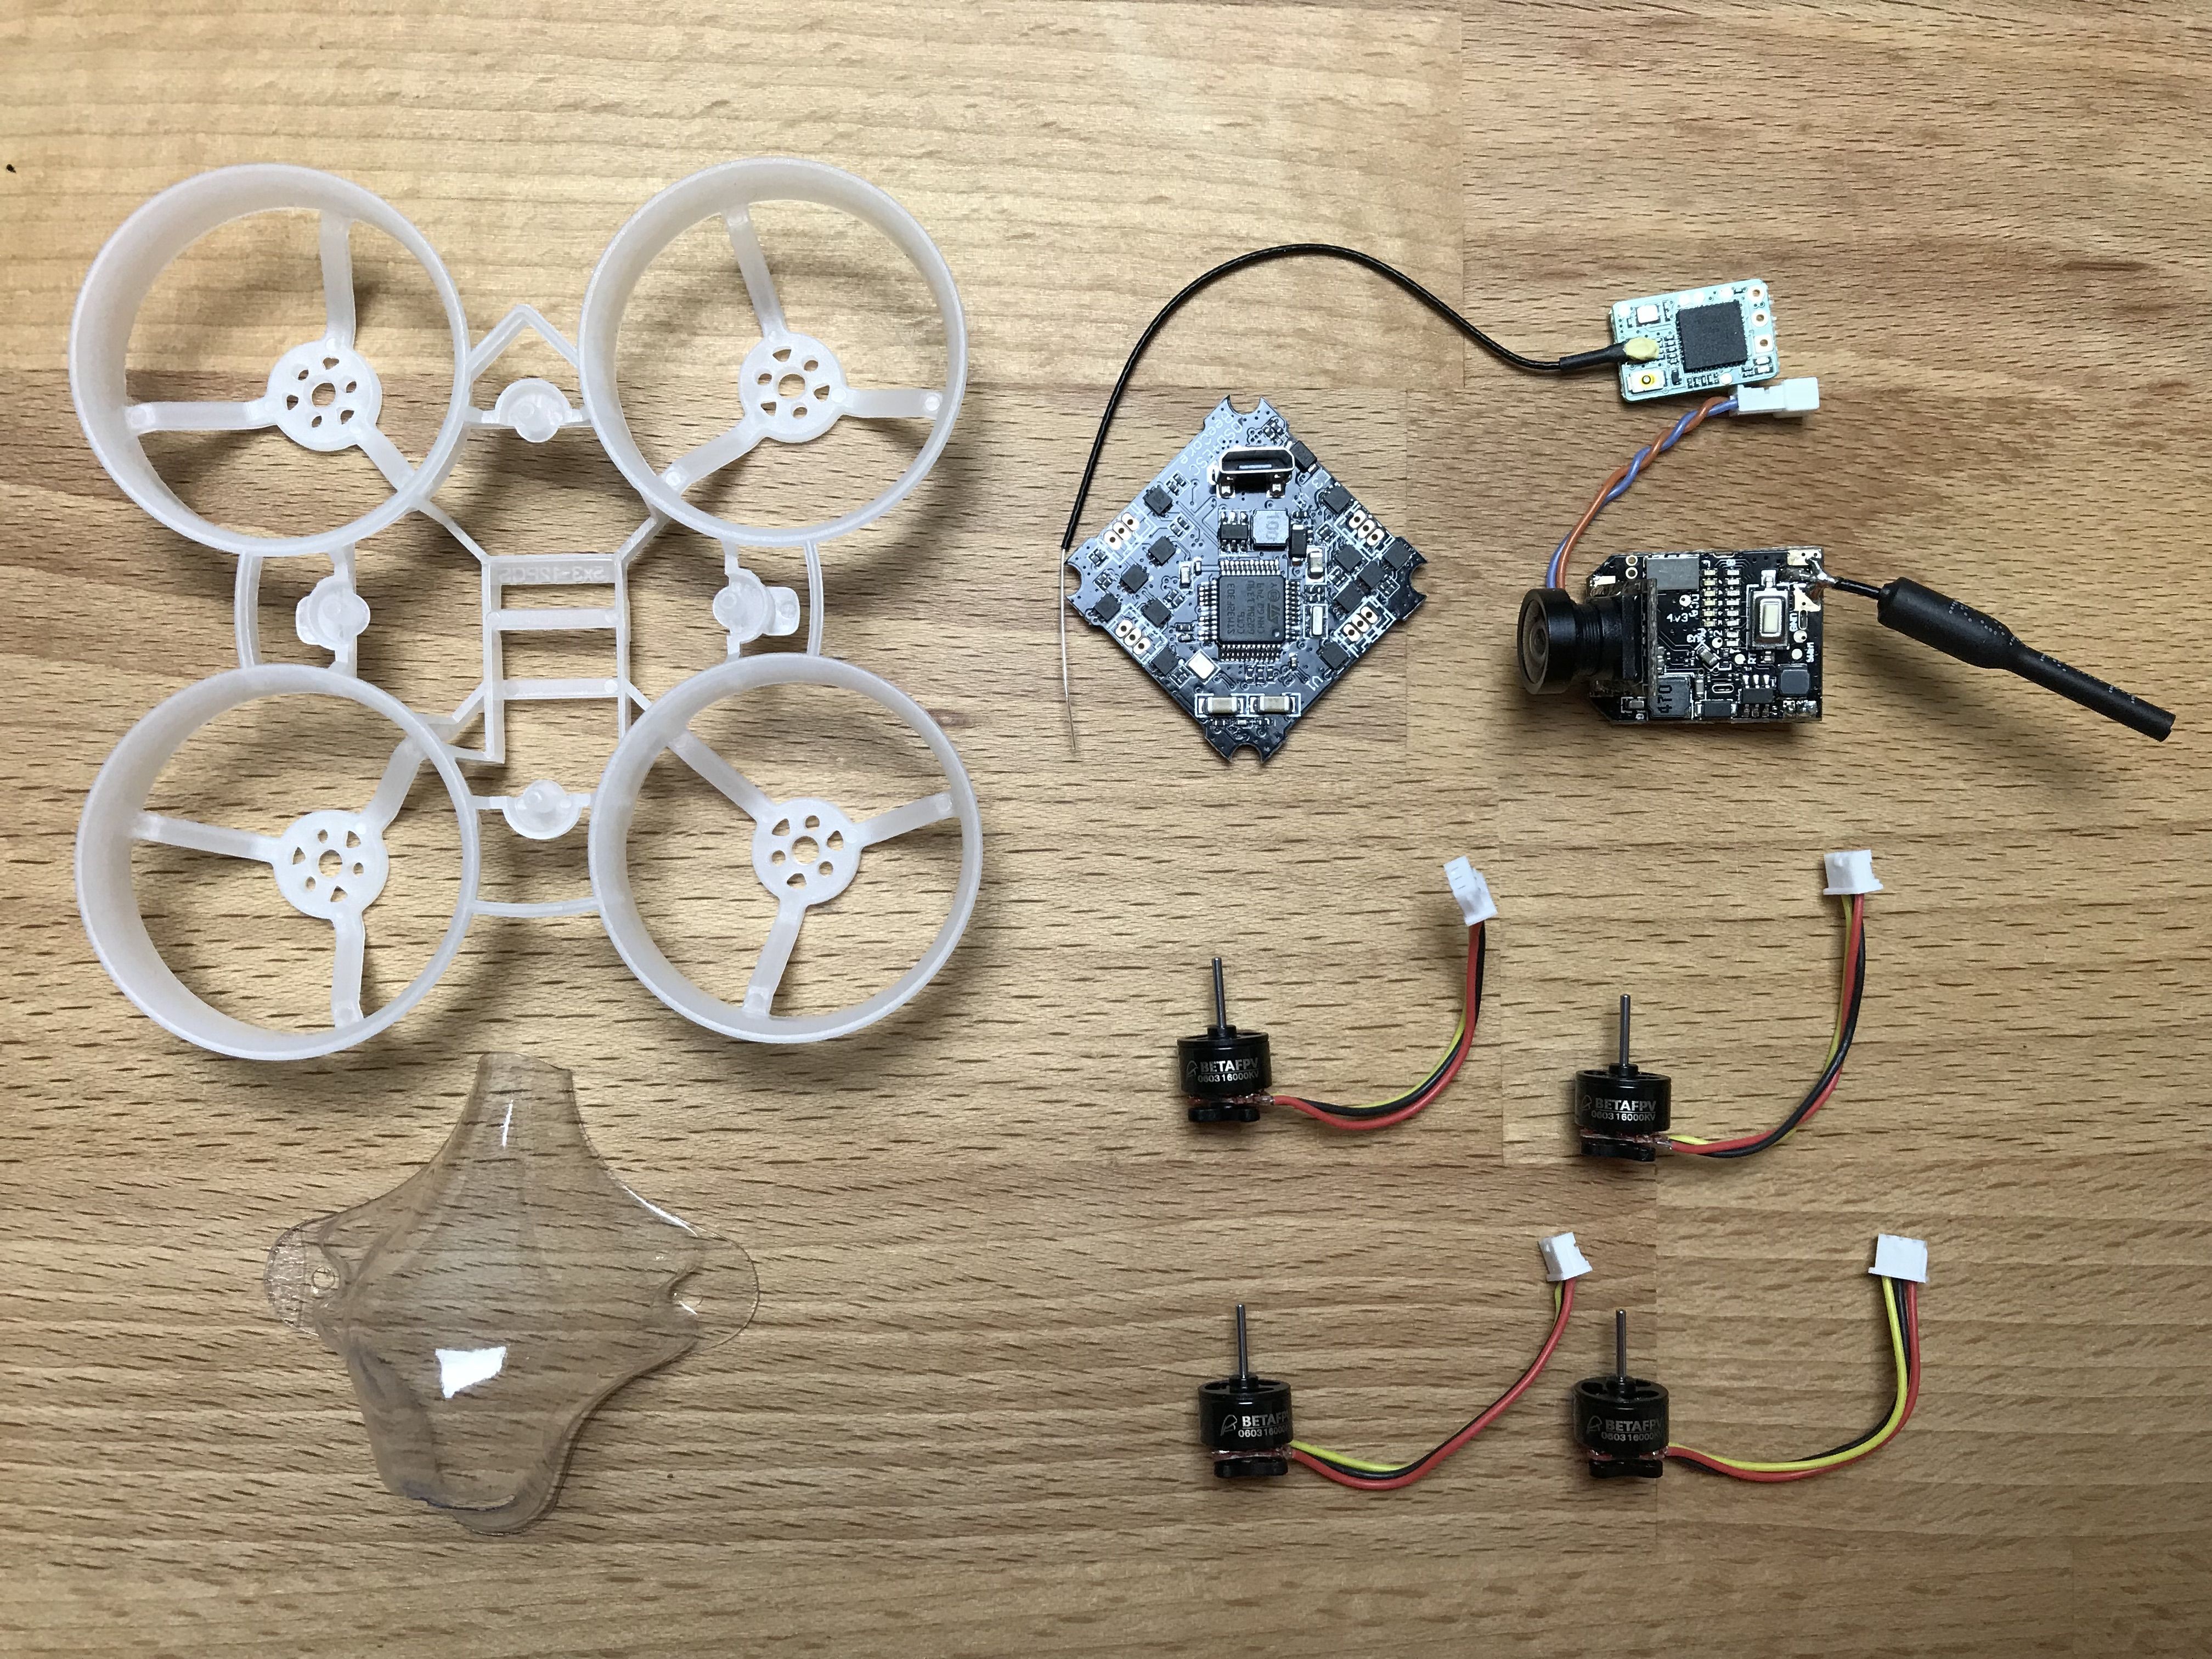
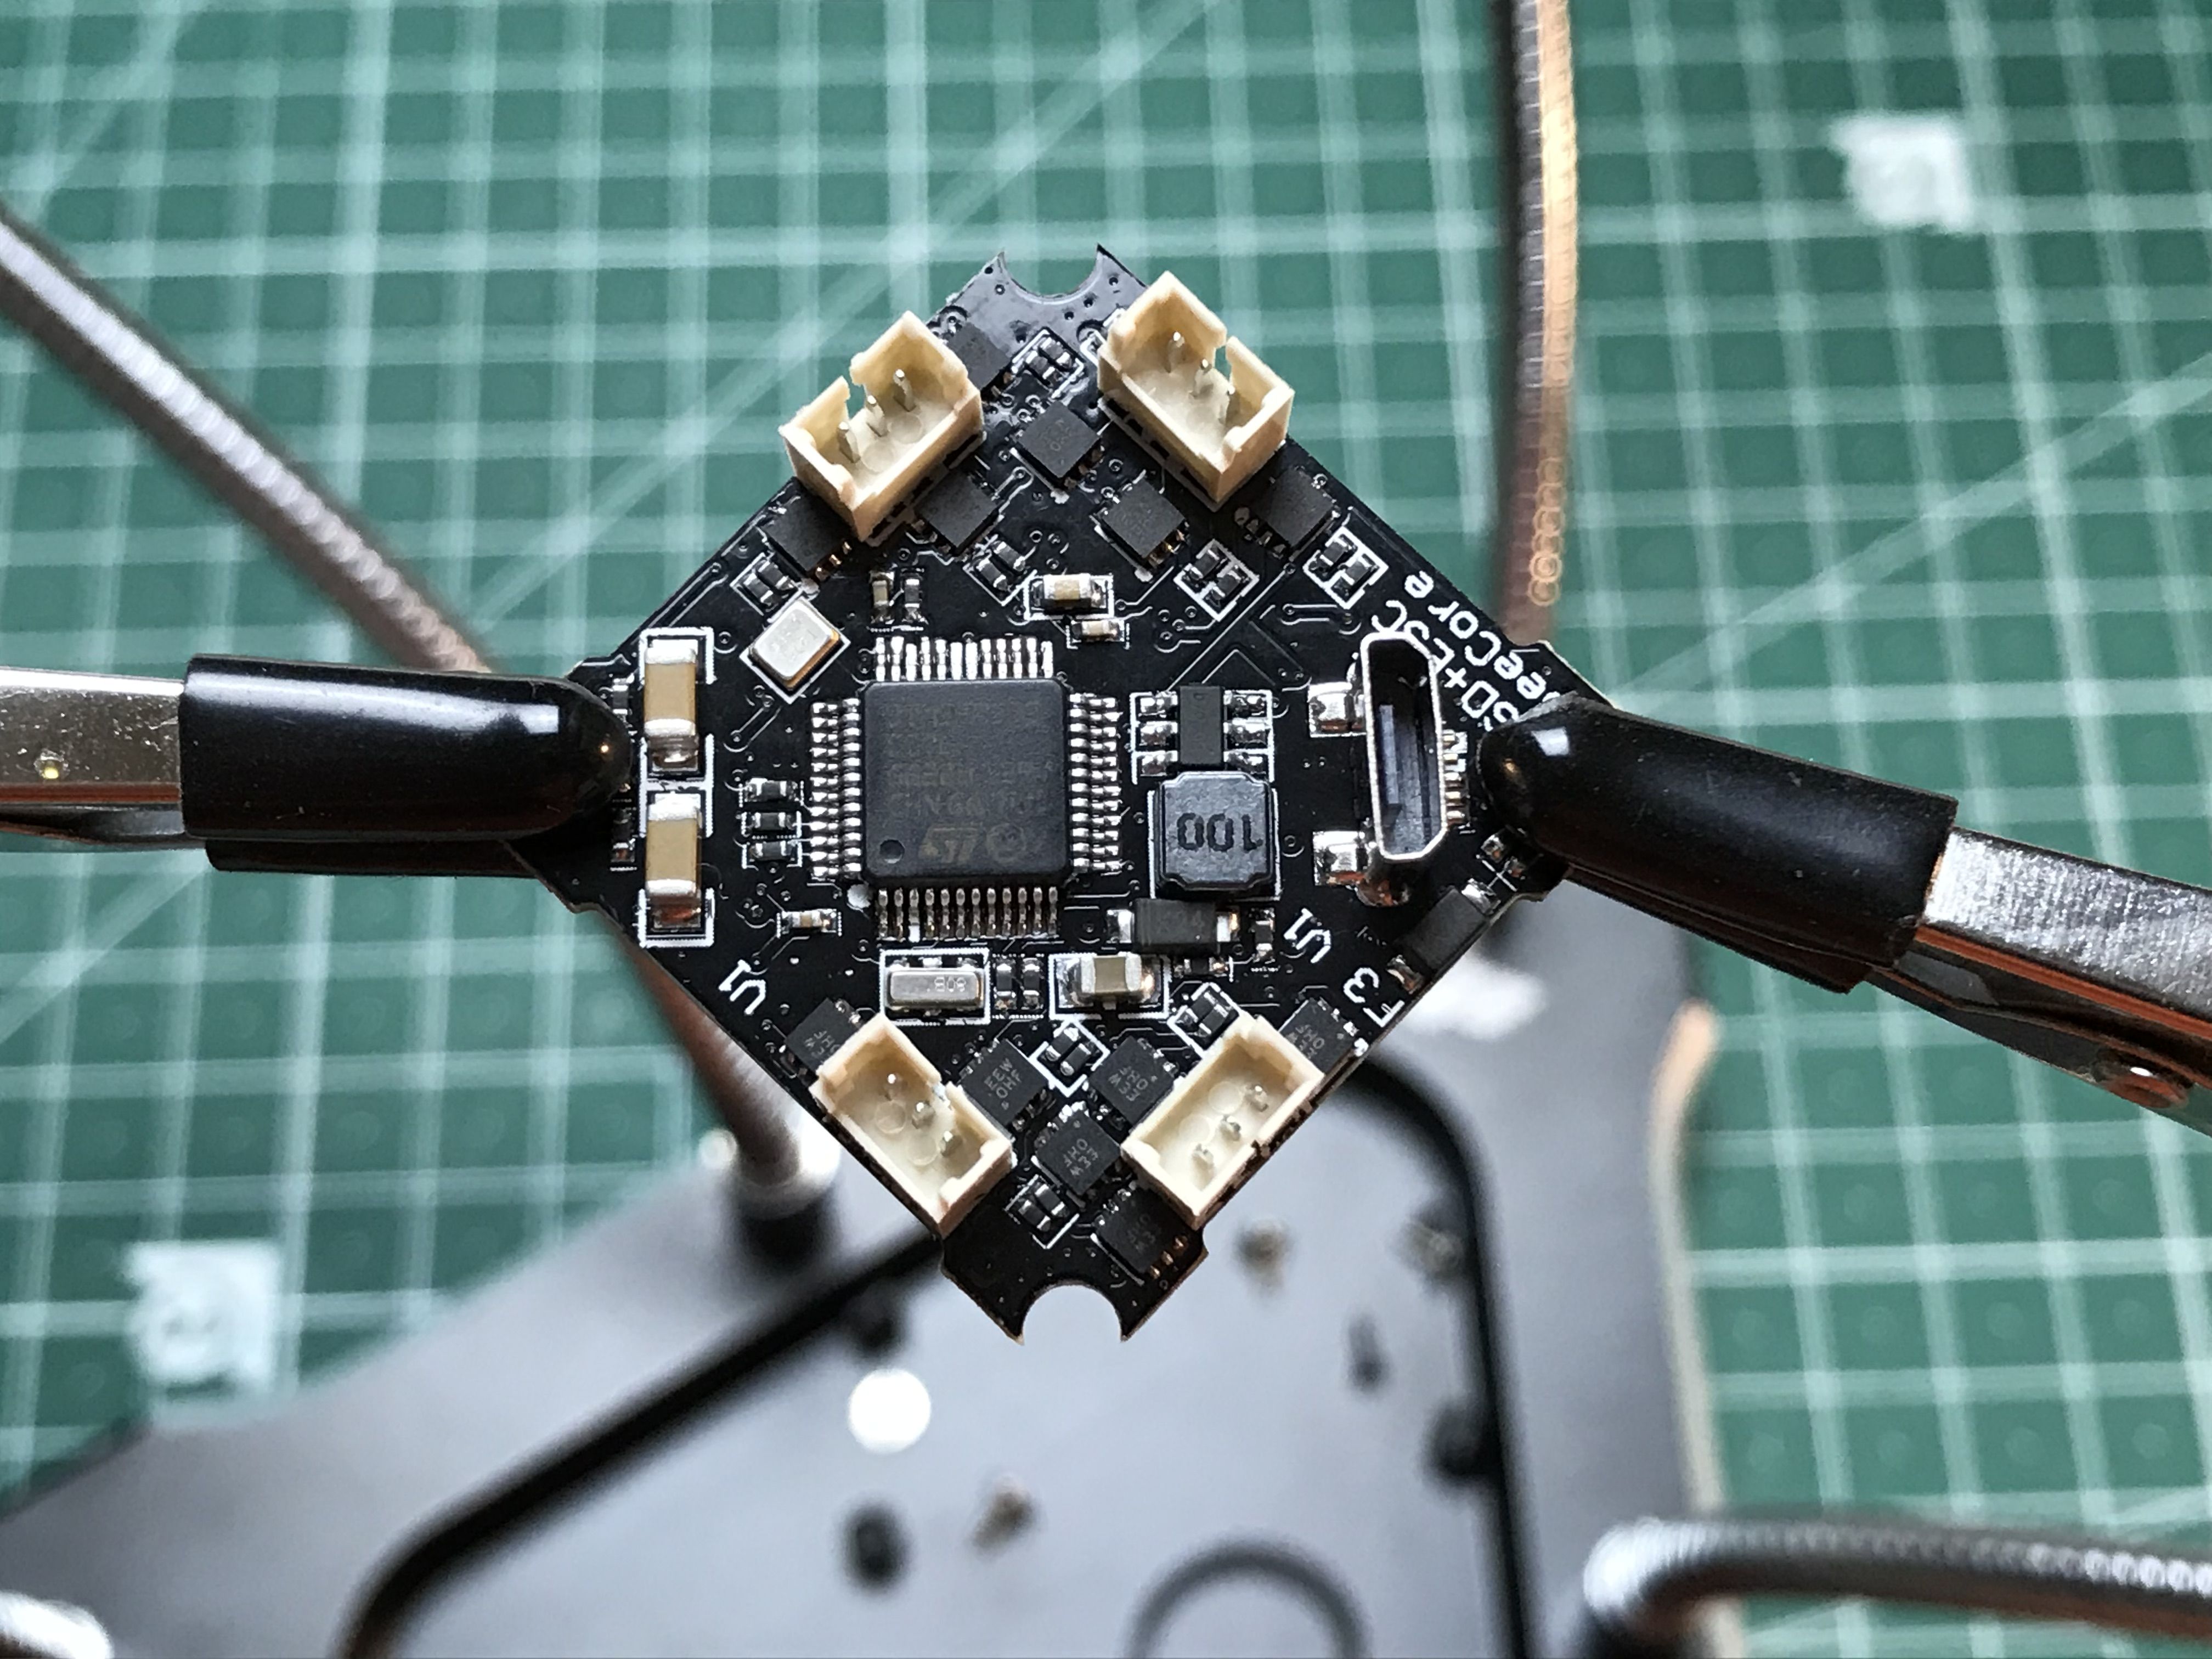
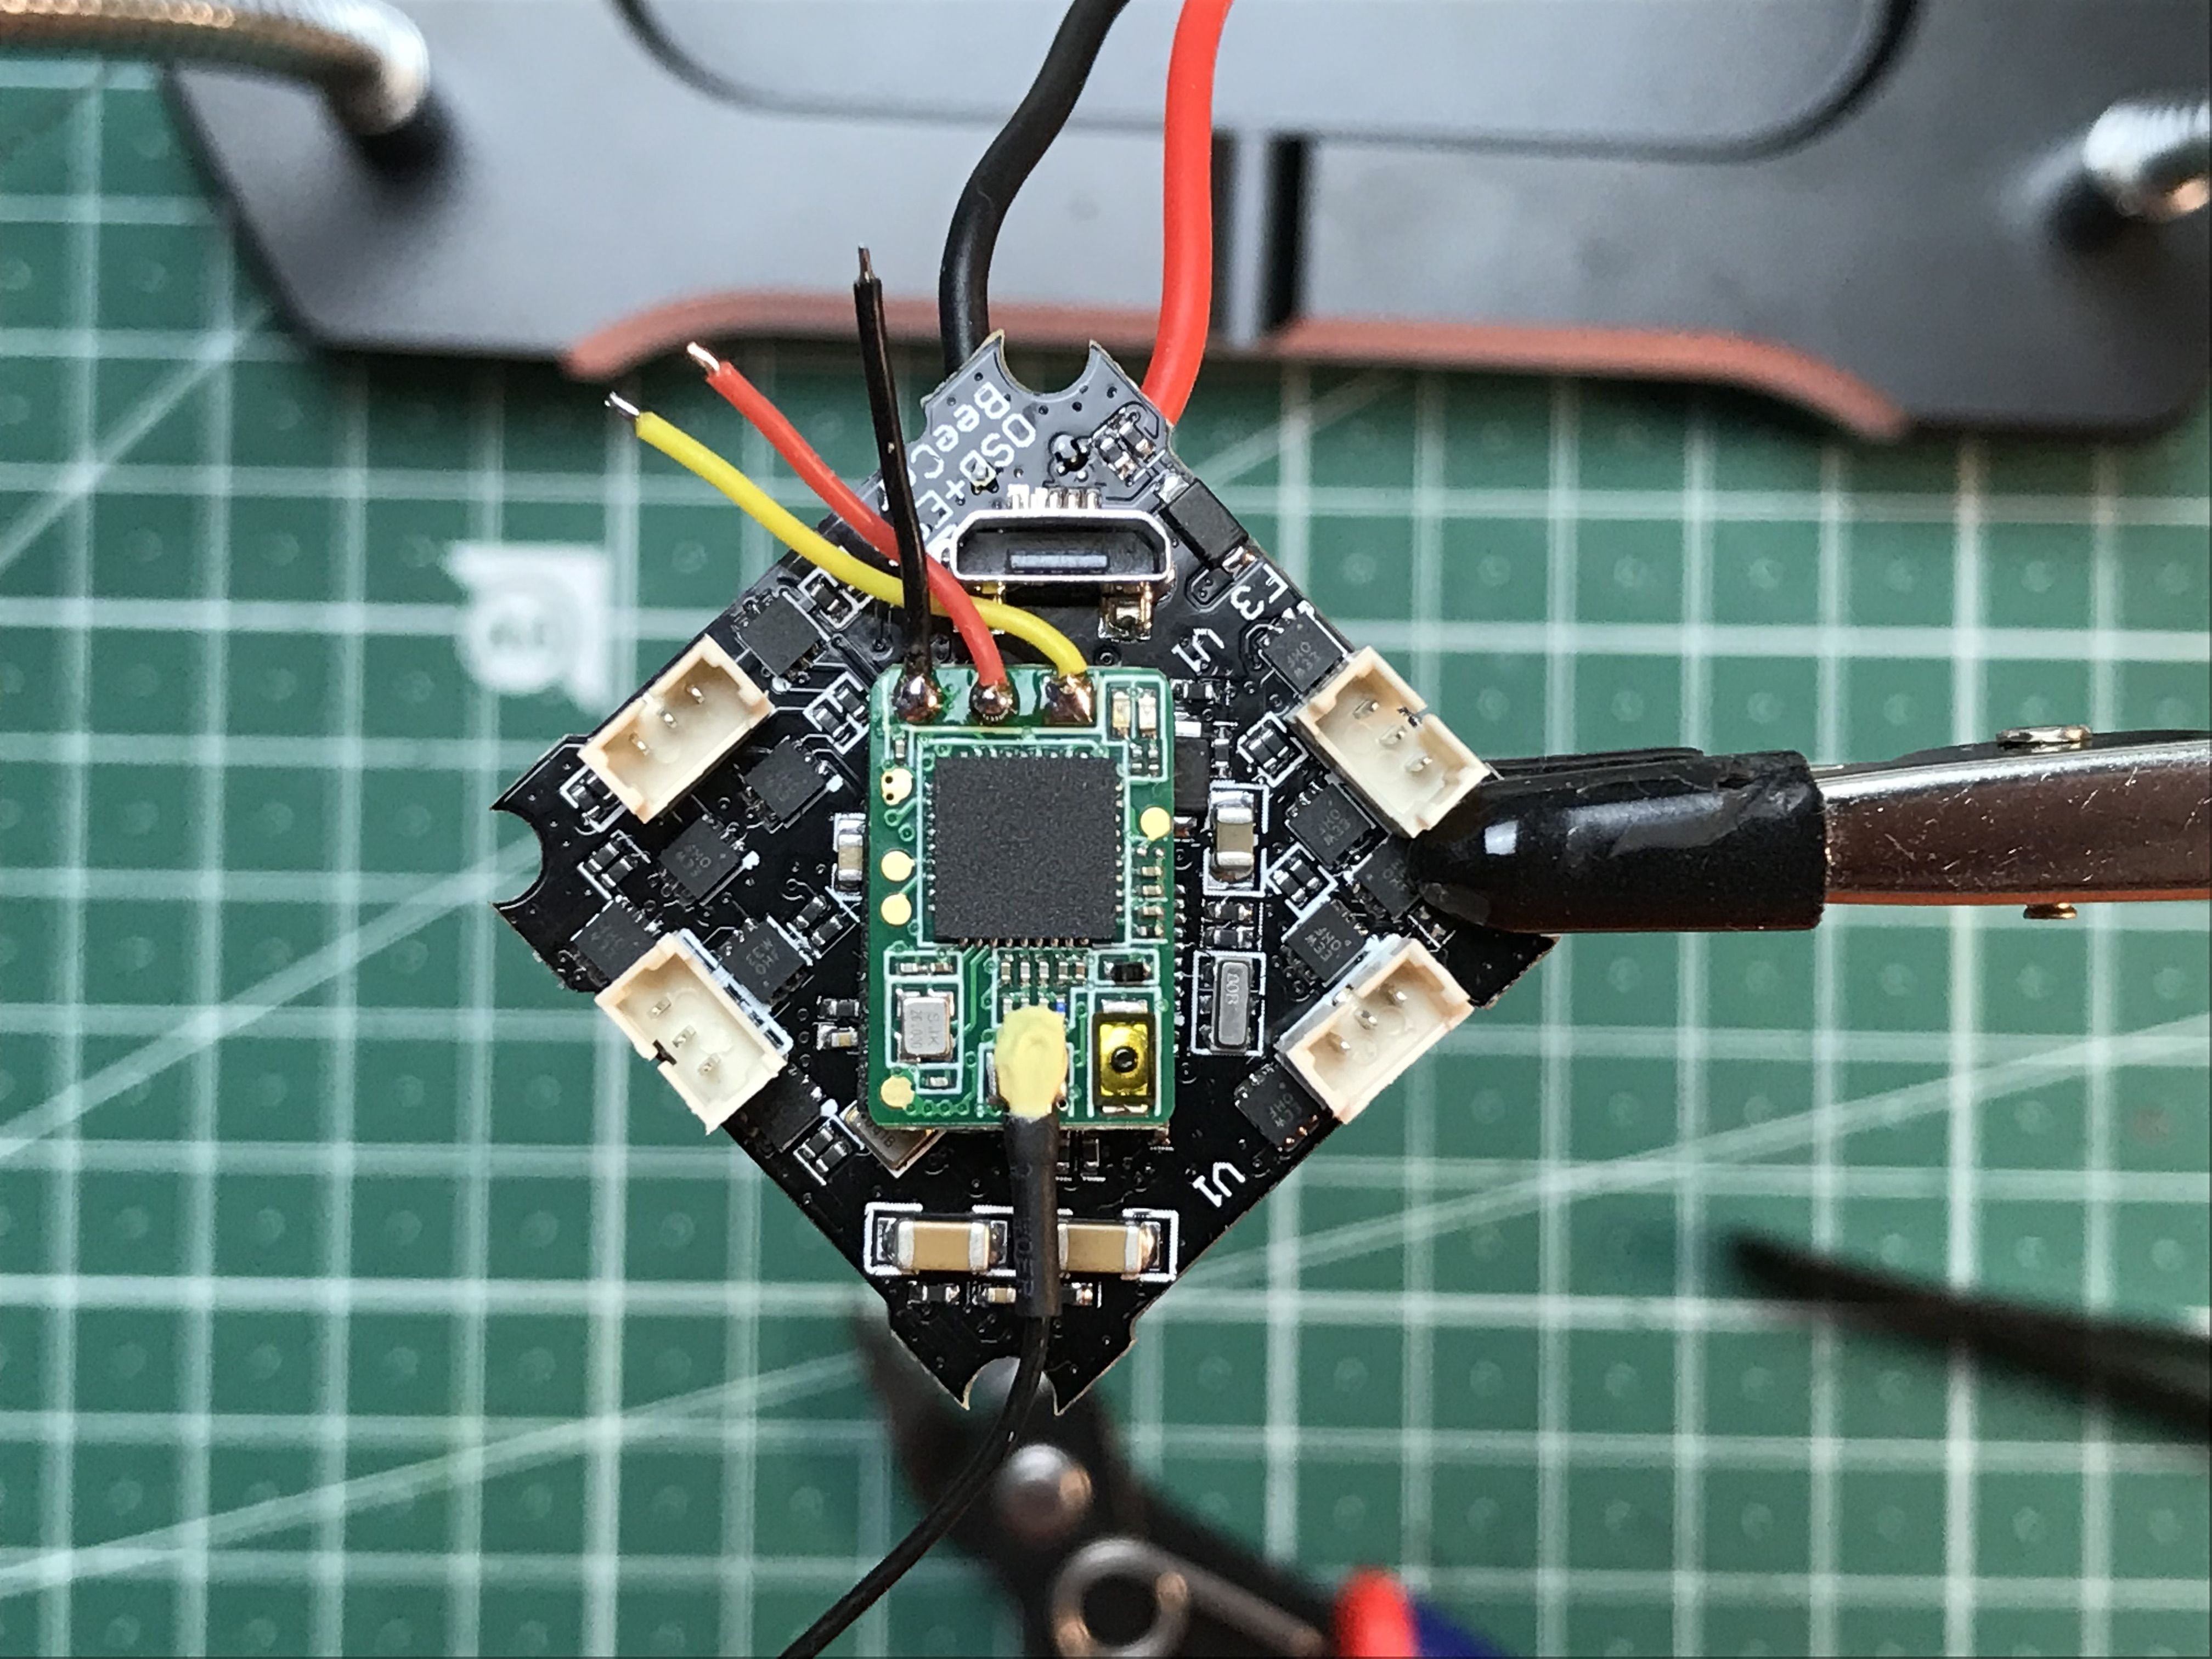
The flight controller came with motor connectors in a plastic bag, so I soldered them on because I wanted the ability to change motors quickly.
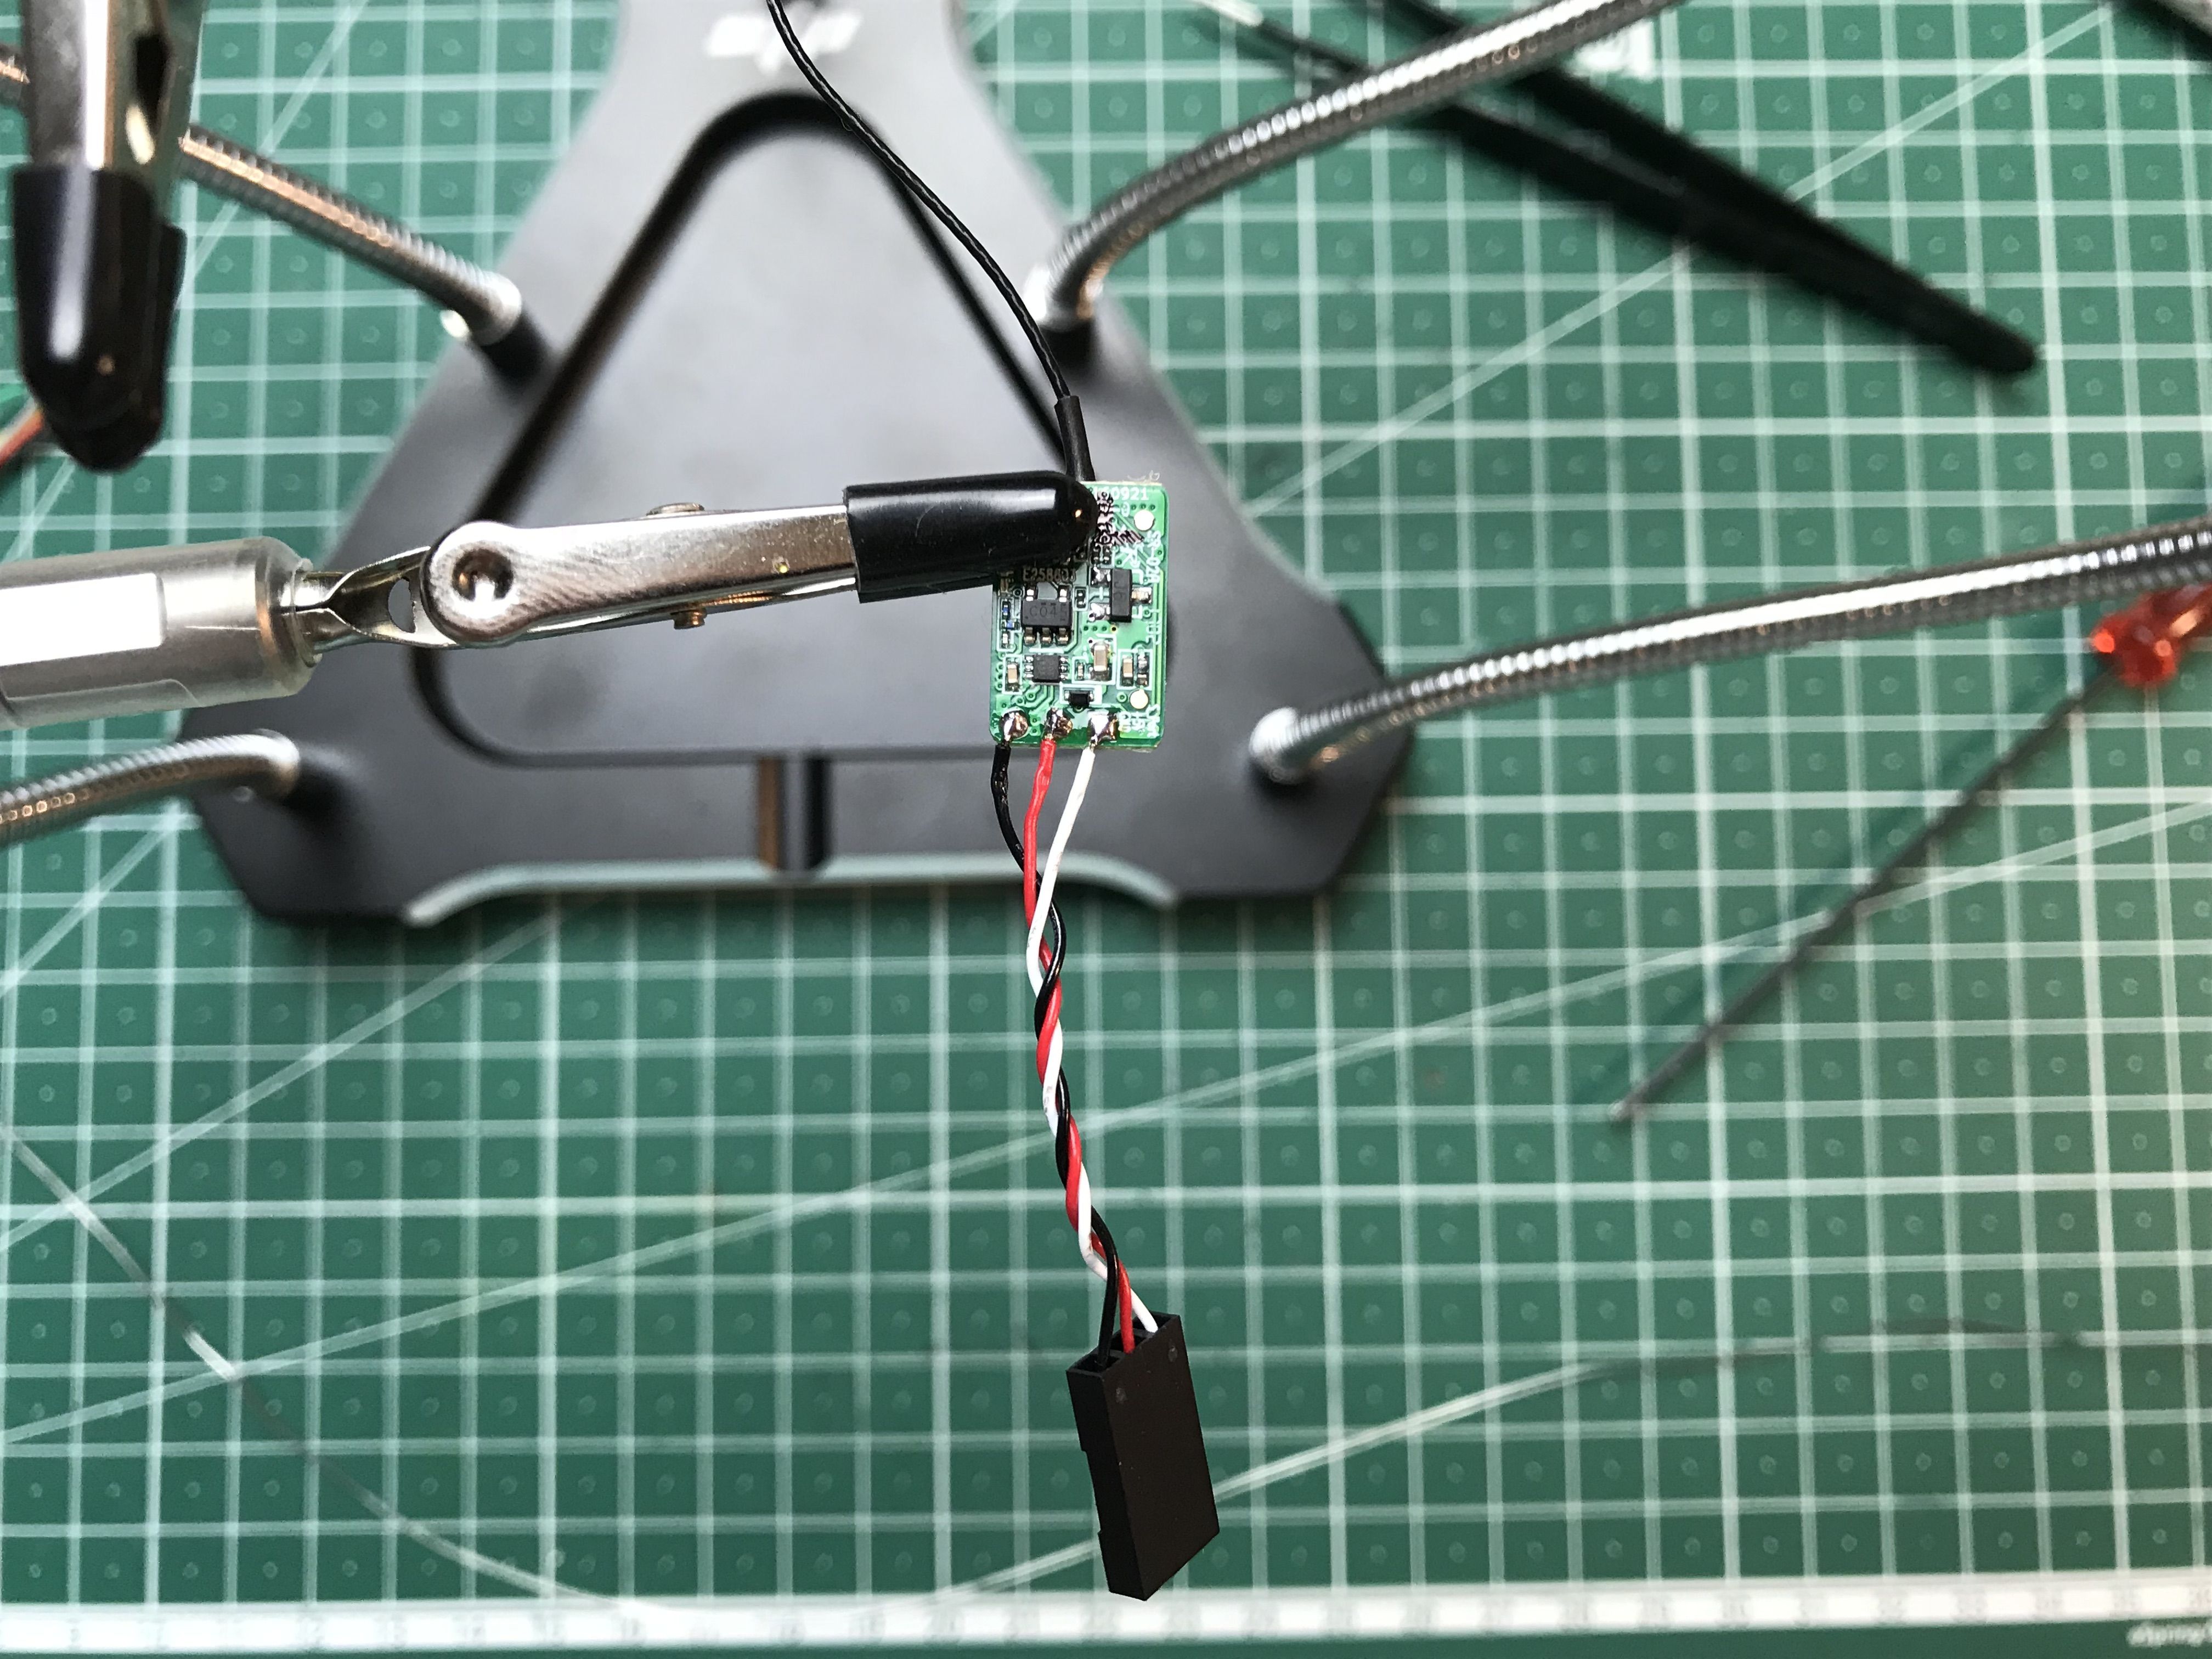
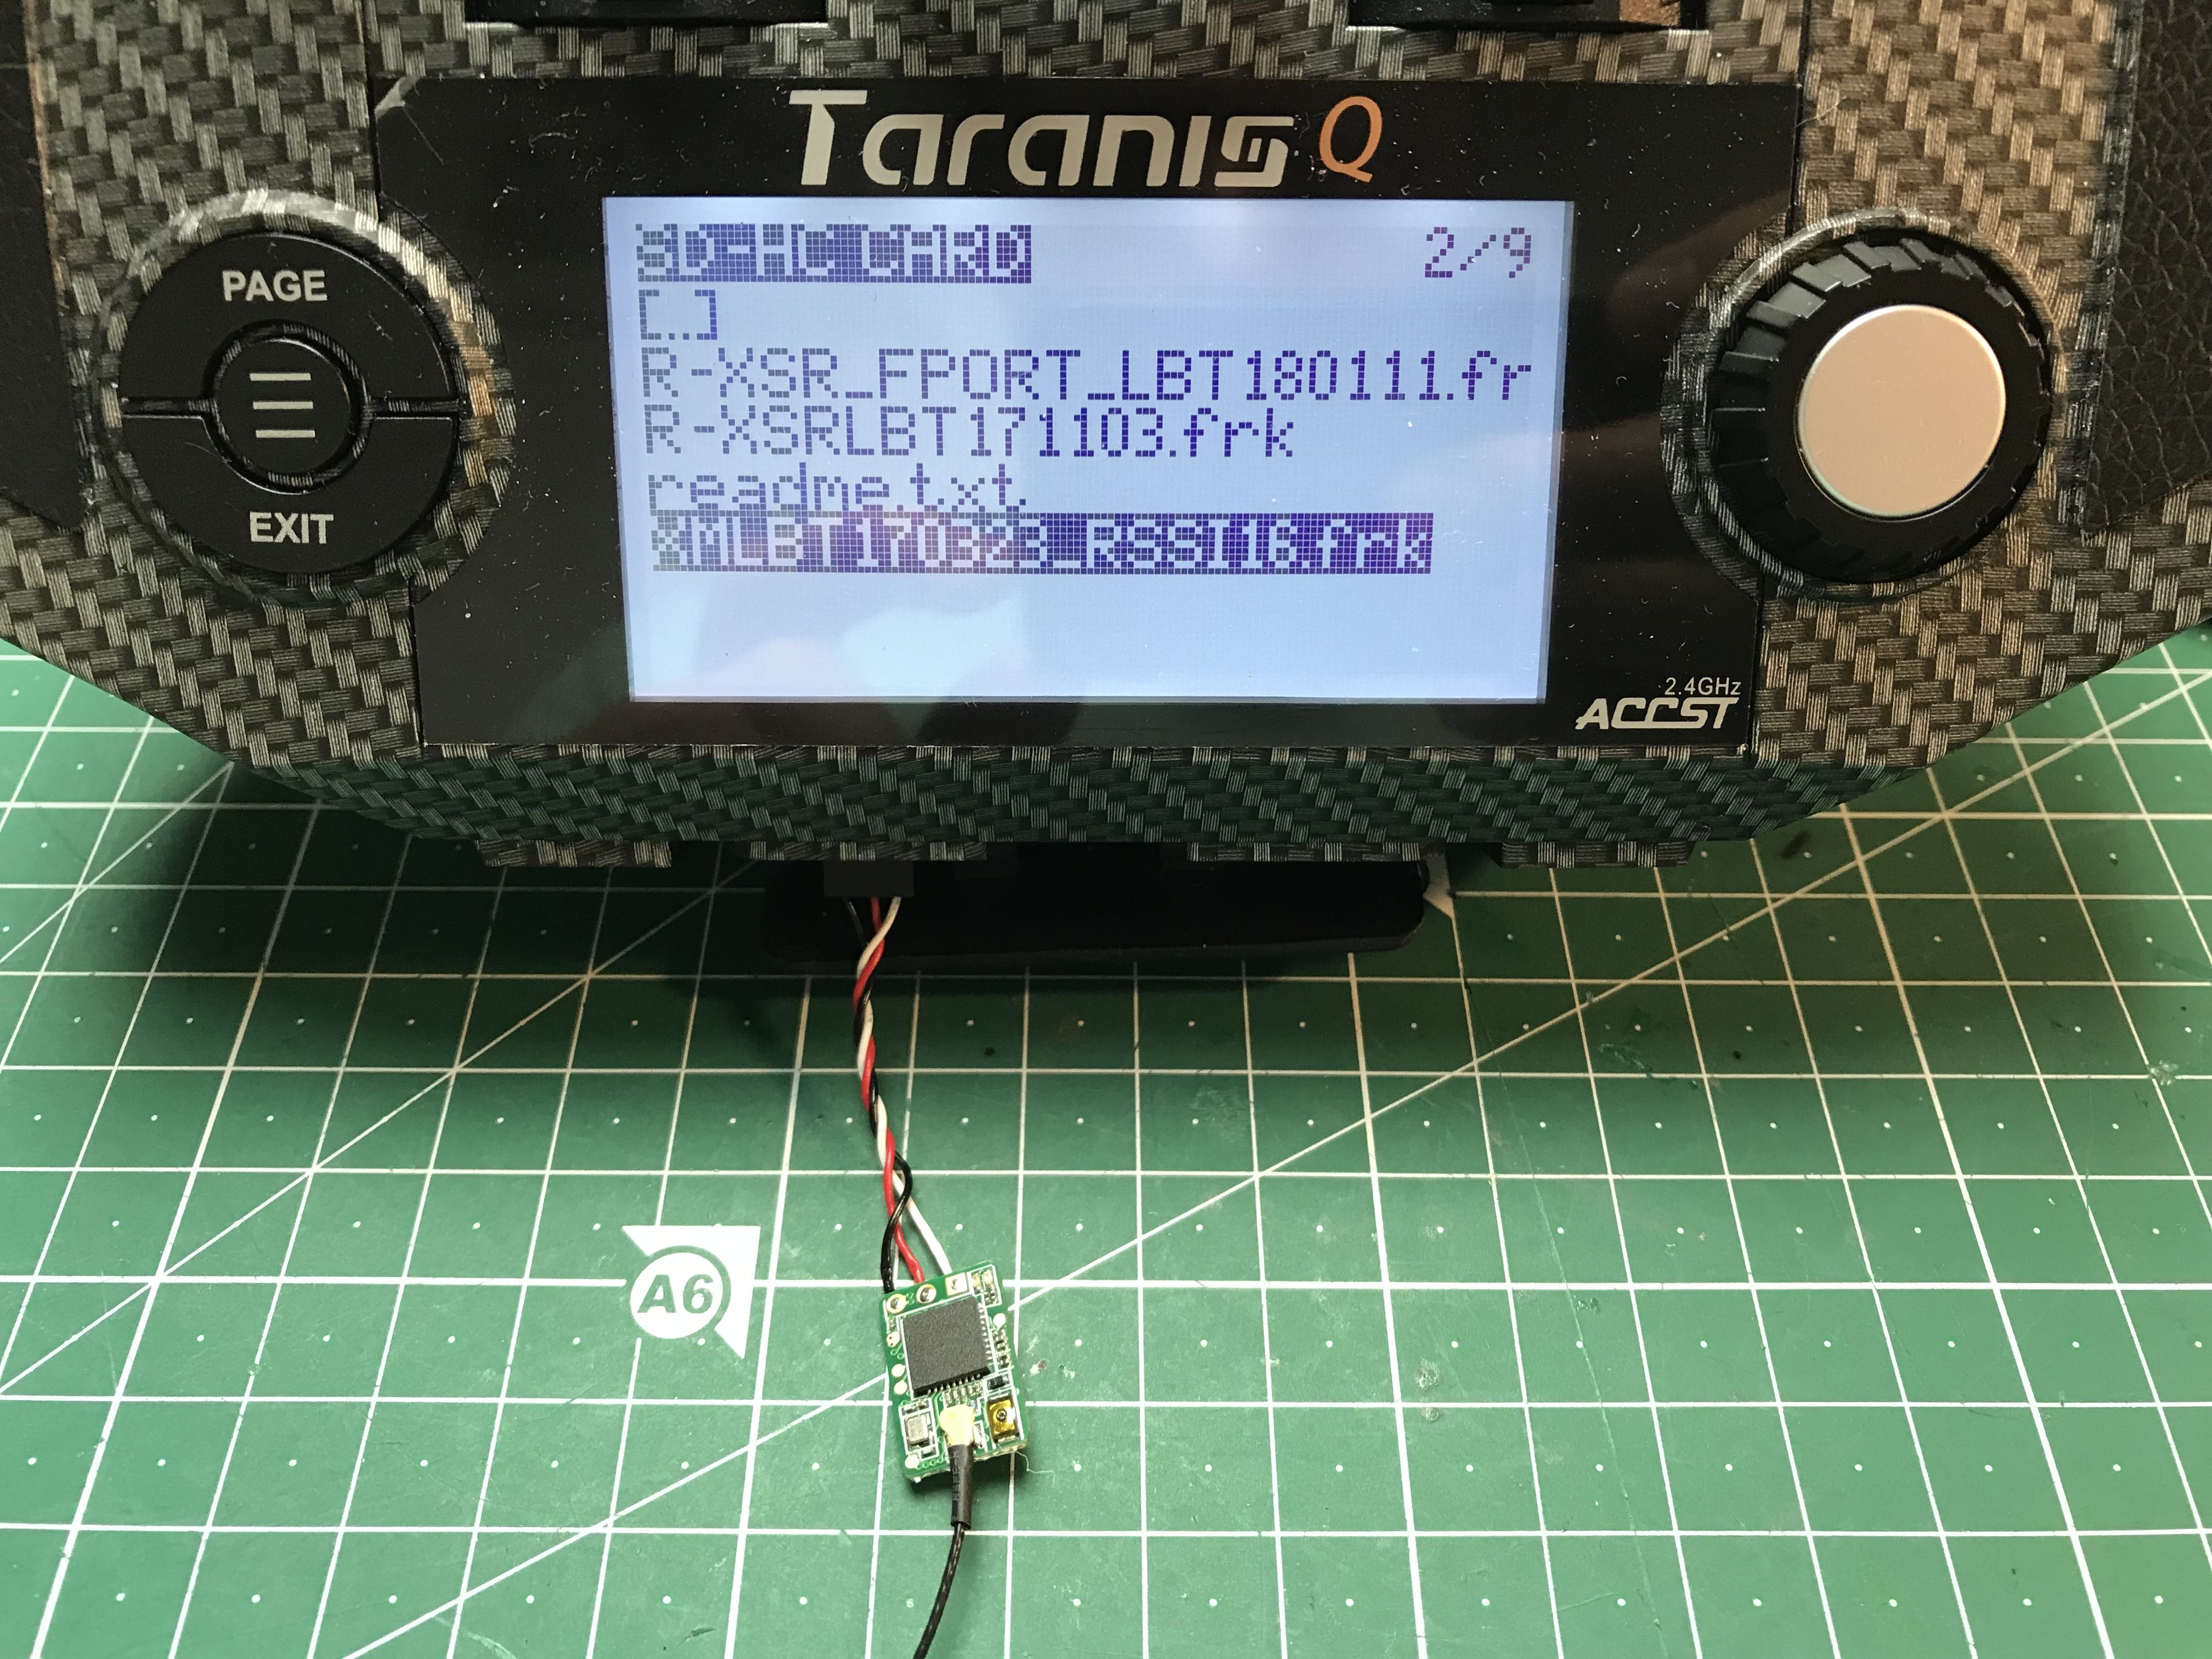
I wanted my receiver to output RSSI, so I soldered a temporary servo wire to it and updated the firmware. Here is a great tutorial on that.
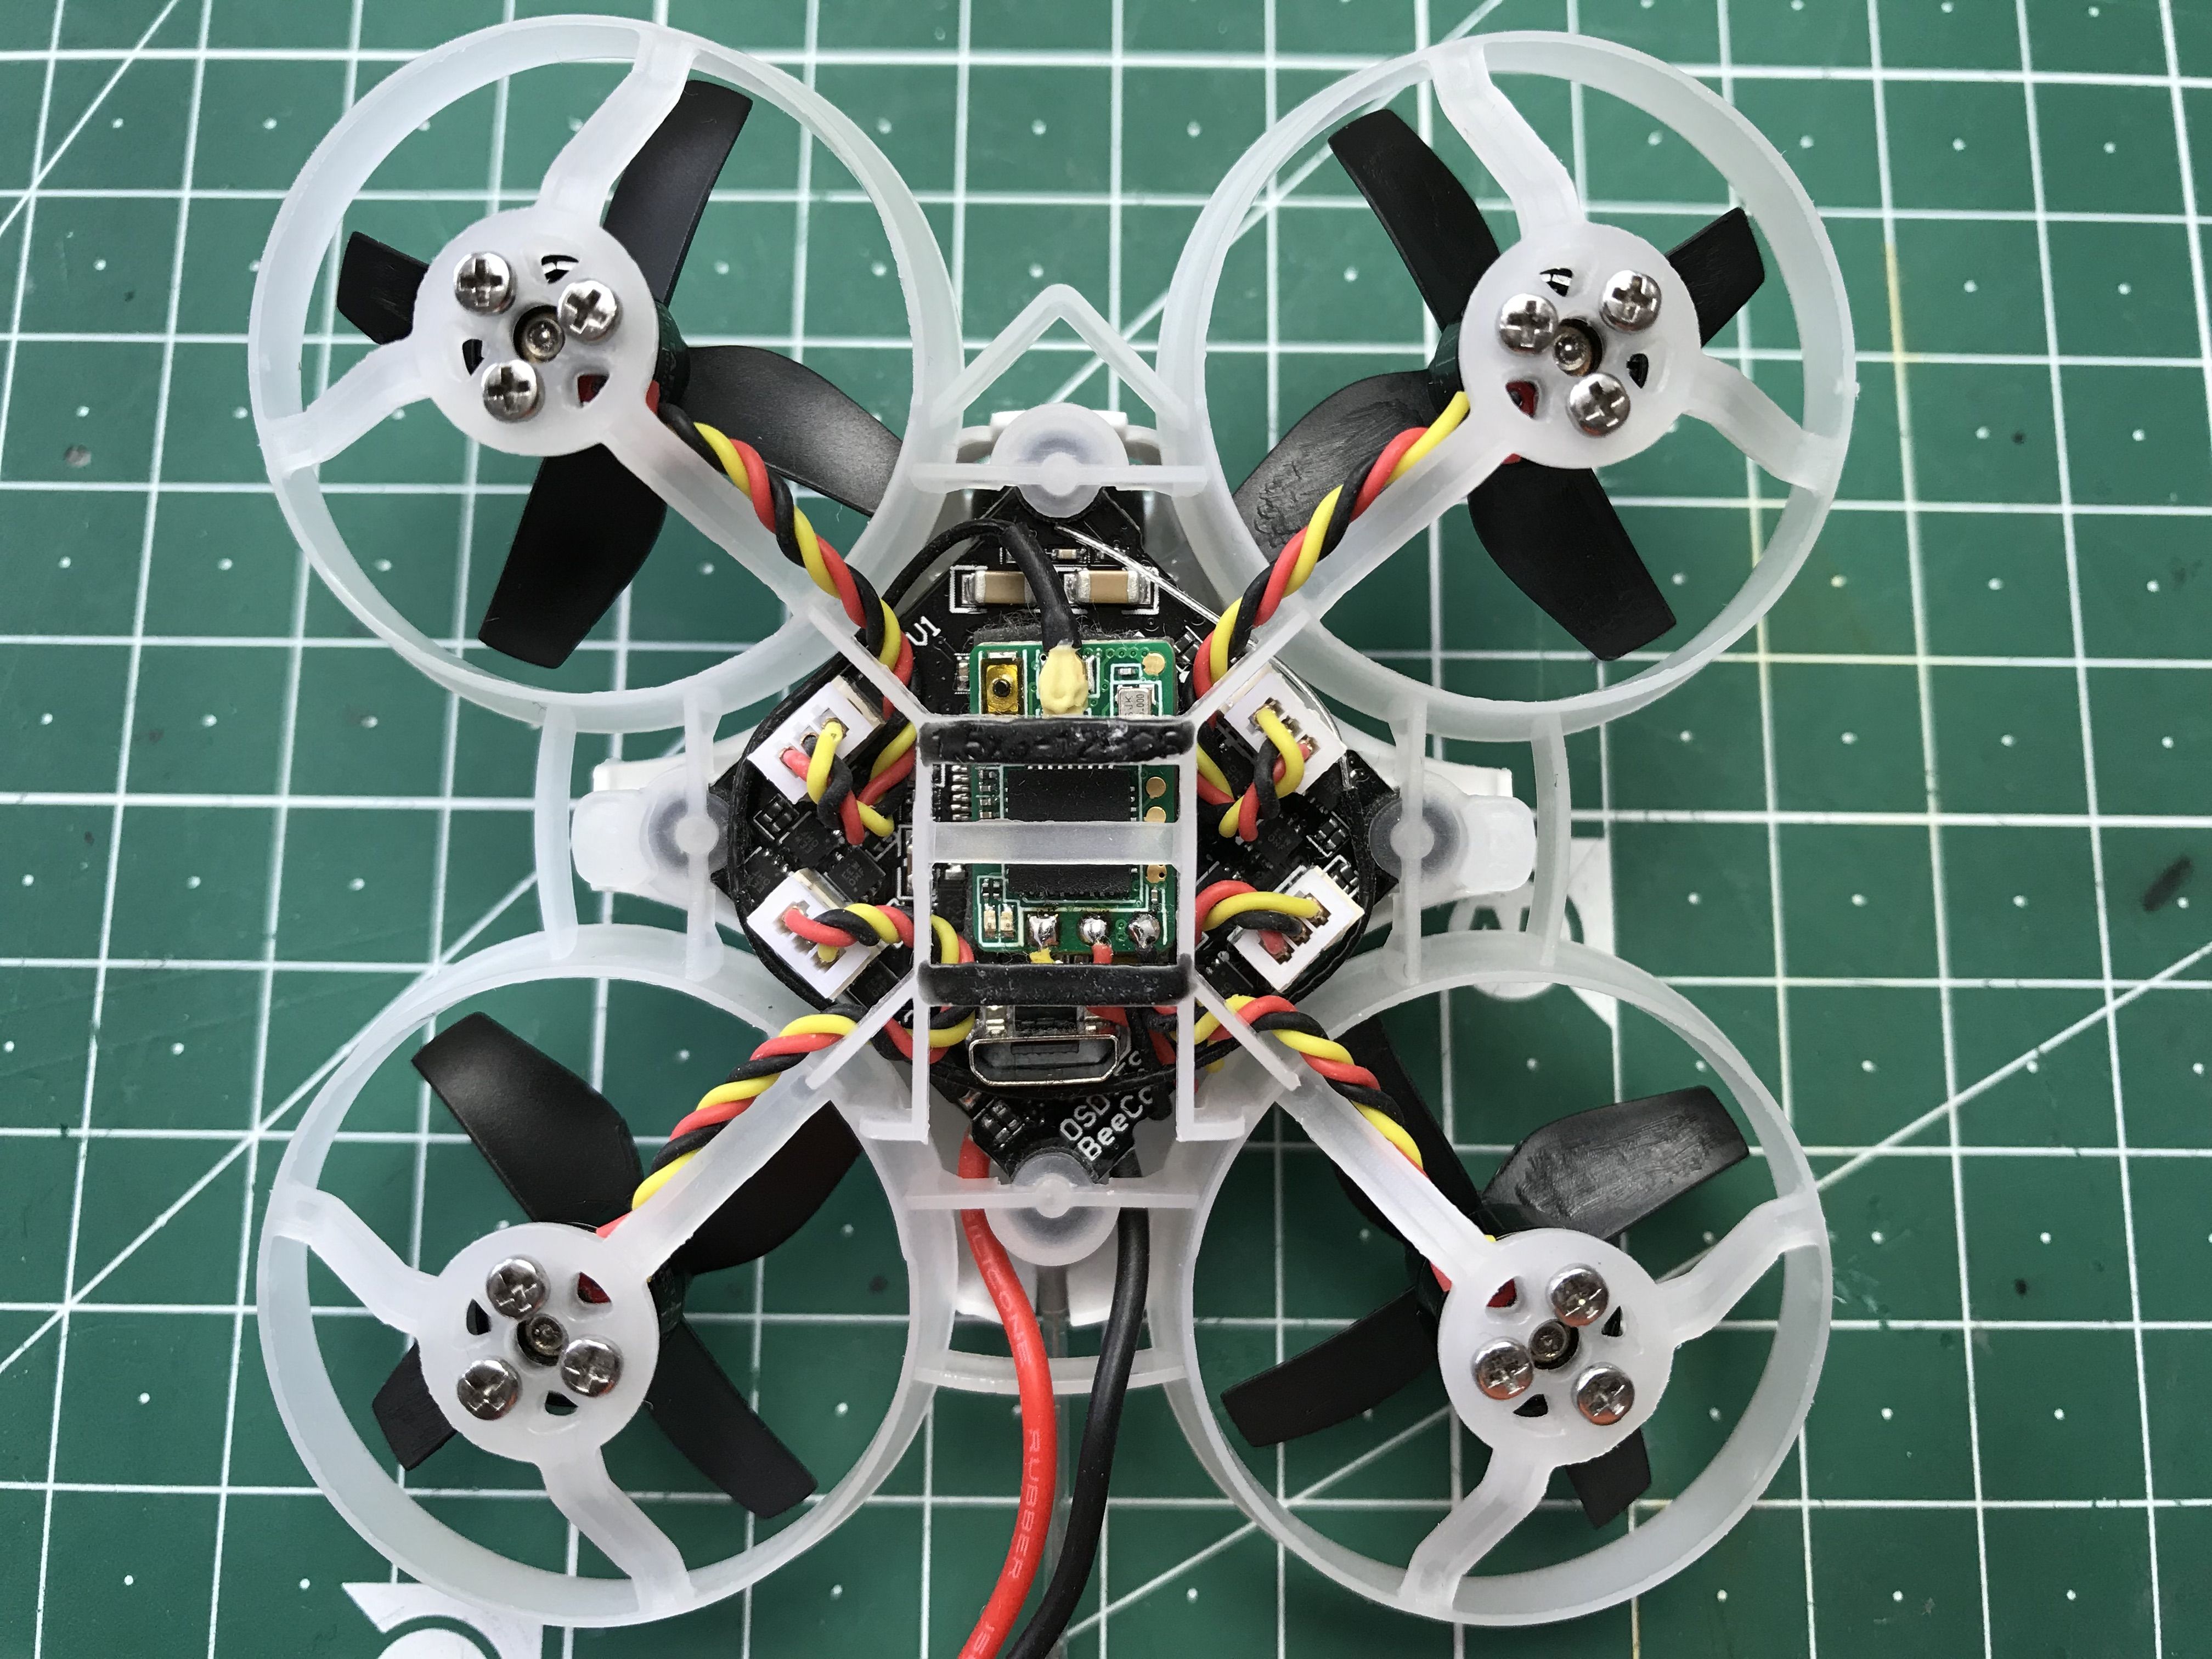
Next, I mounted the receiver on the bottom side of the flight controller with double-sided adhesive tape and soldered the wires to the receiver pads. I also soldered the battery leads on.
The Z01 camera/VTX came with a power connector, which I desoldered and replaced with wires, red and black.
I inserted the camera into the plastic mount it came with, measured and cut the wires to length, and soldered the camera to the flight controller.
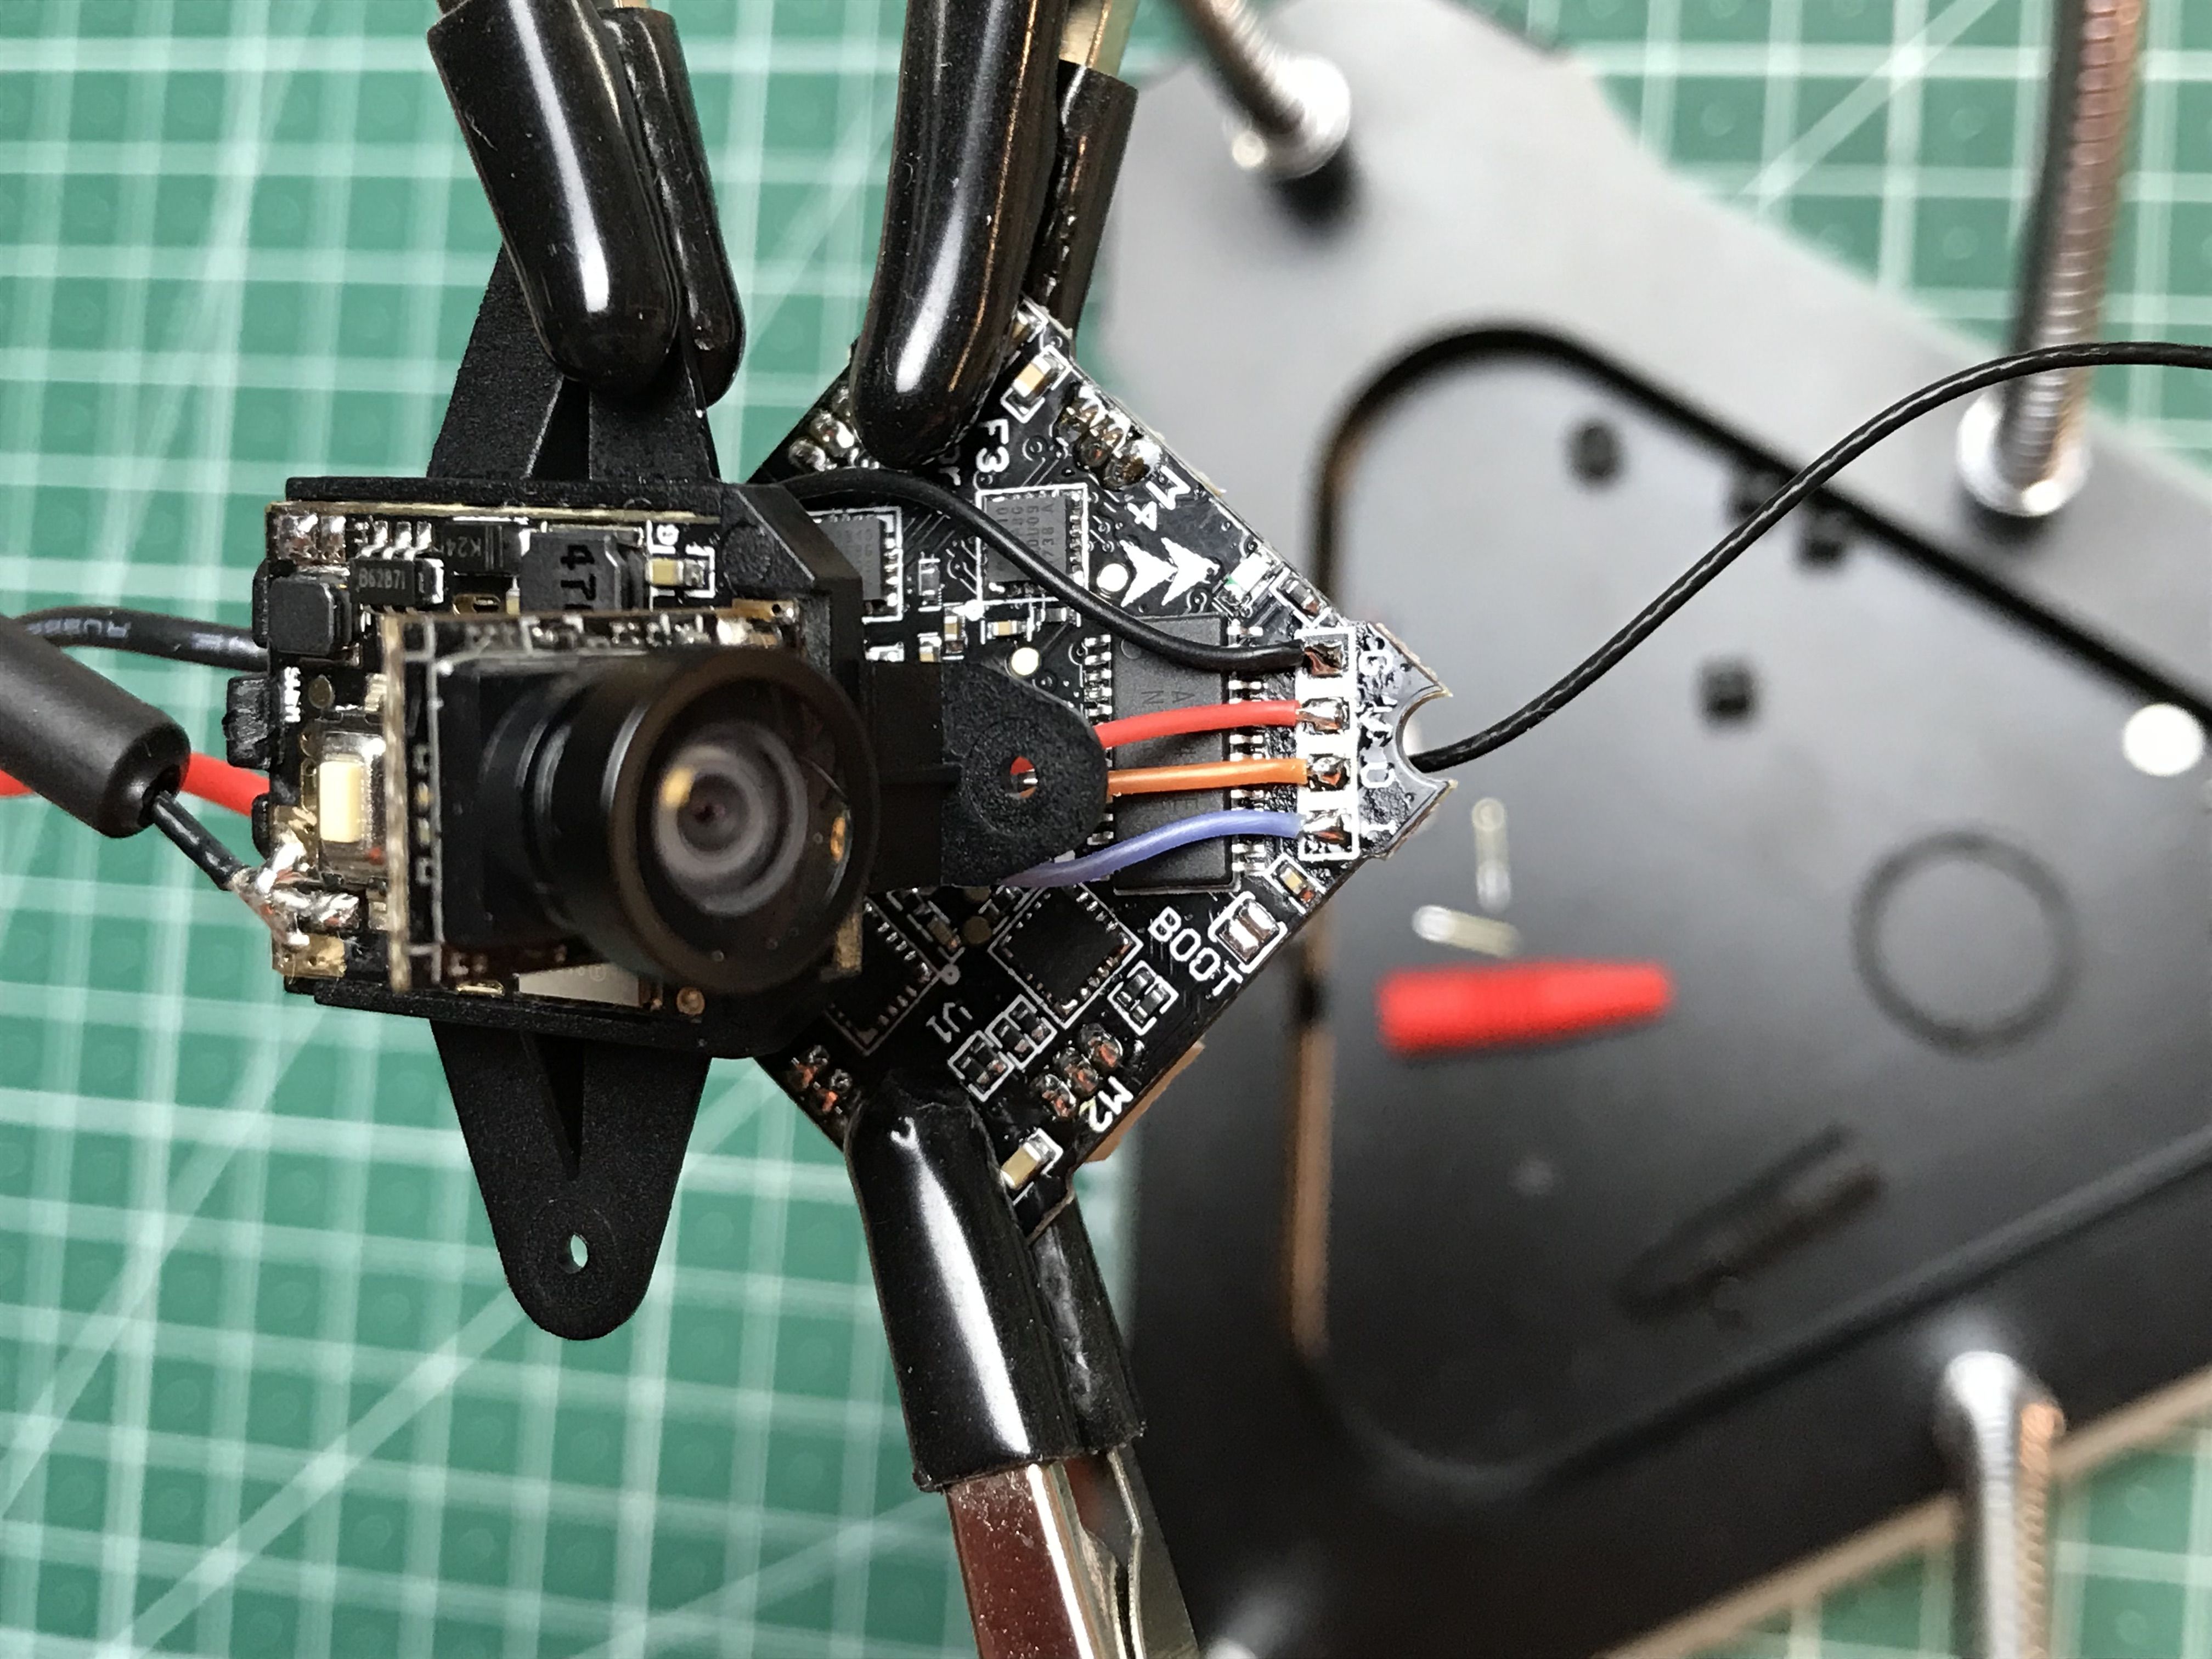
The soldering part was done. I used the rubber bobbins and screws that came with the flight controller to mount the electronics on the frame.
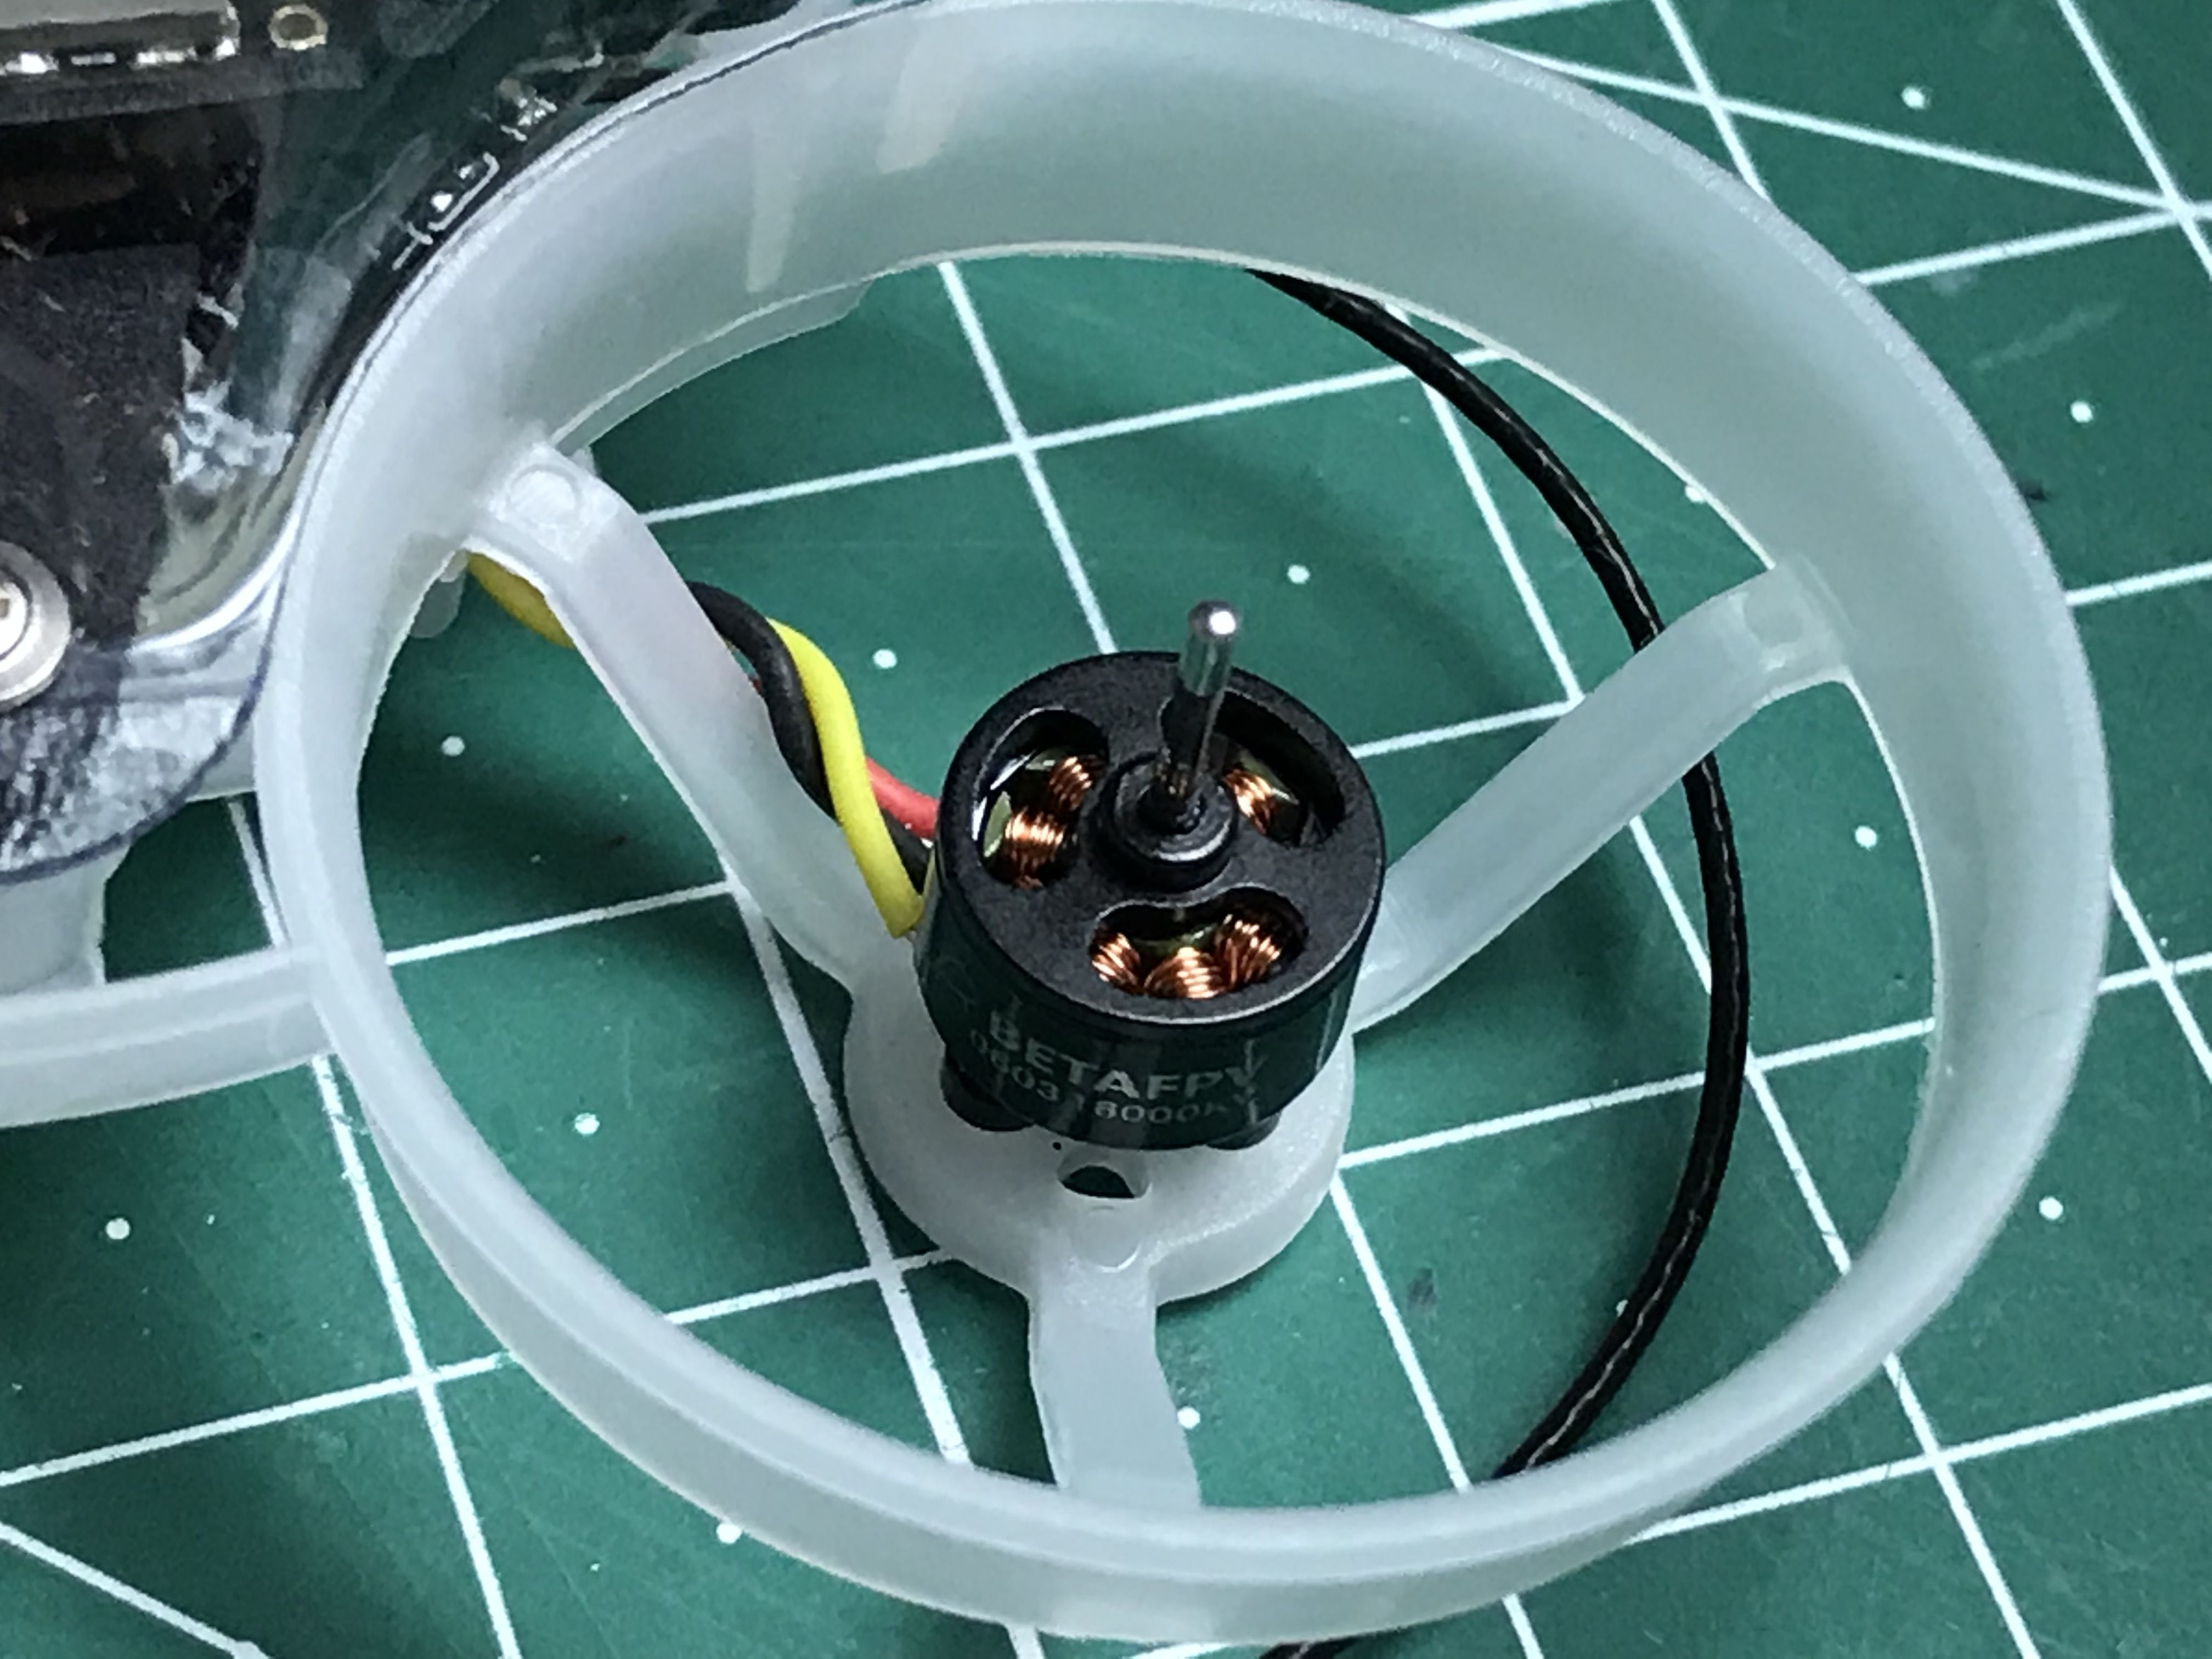
Mounting the motors was pretty straightforward – you screw them on, thread the wires around the frame posts and plug the connectors into the flight controller.
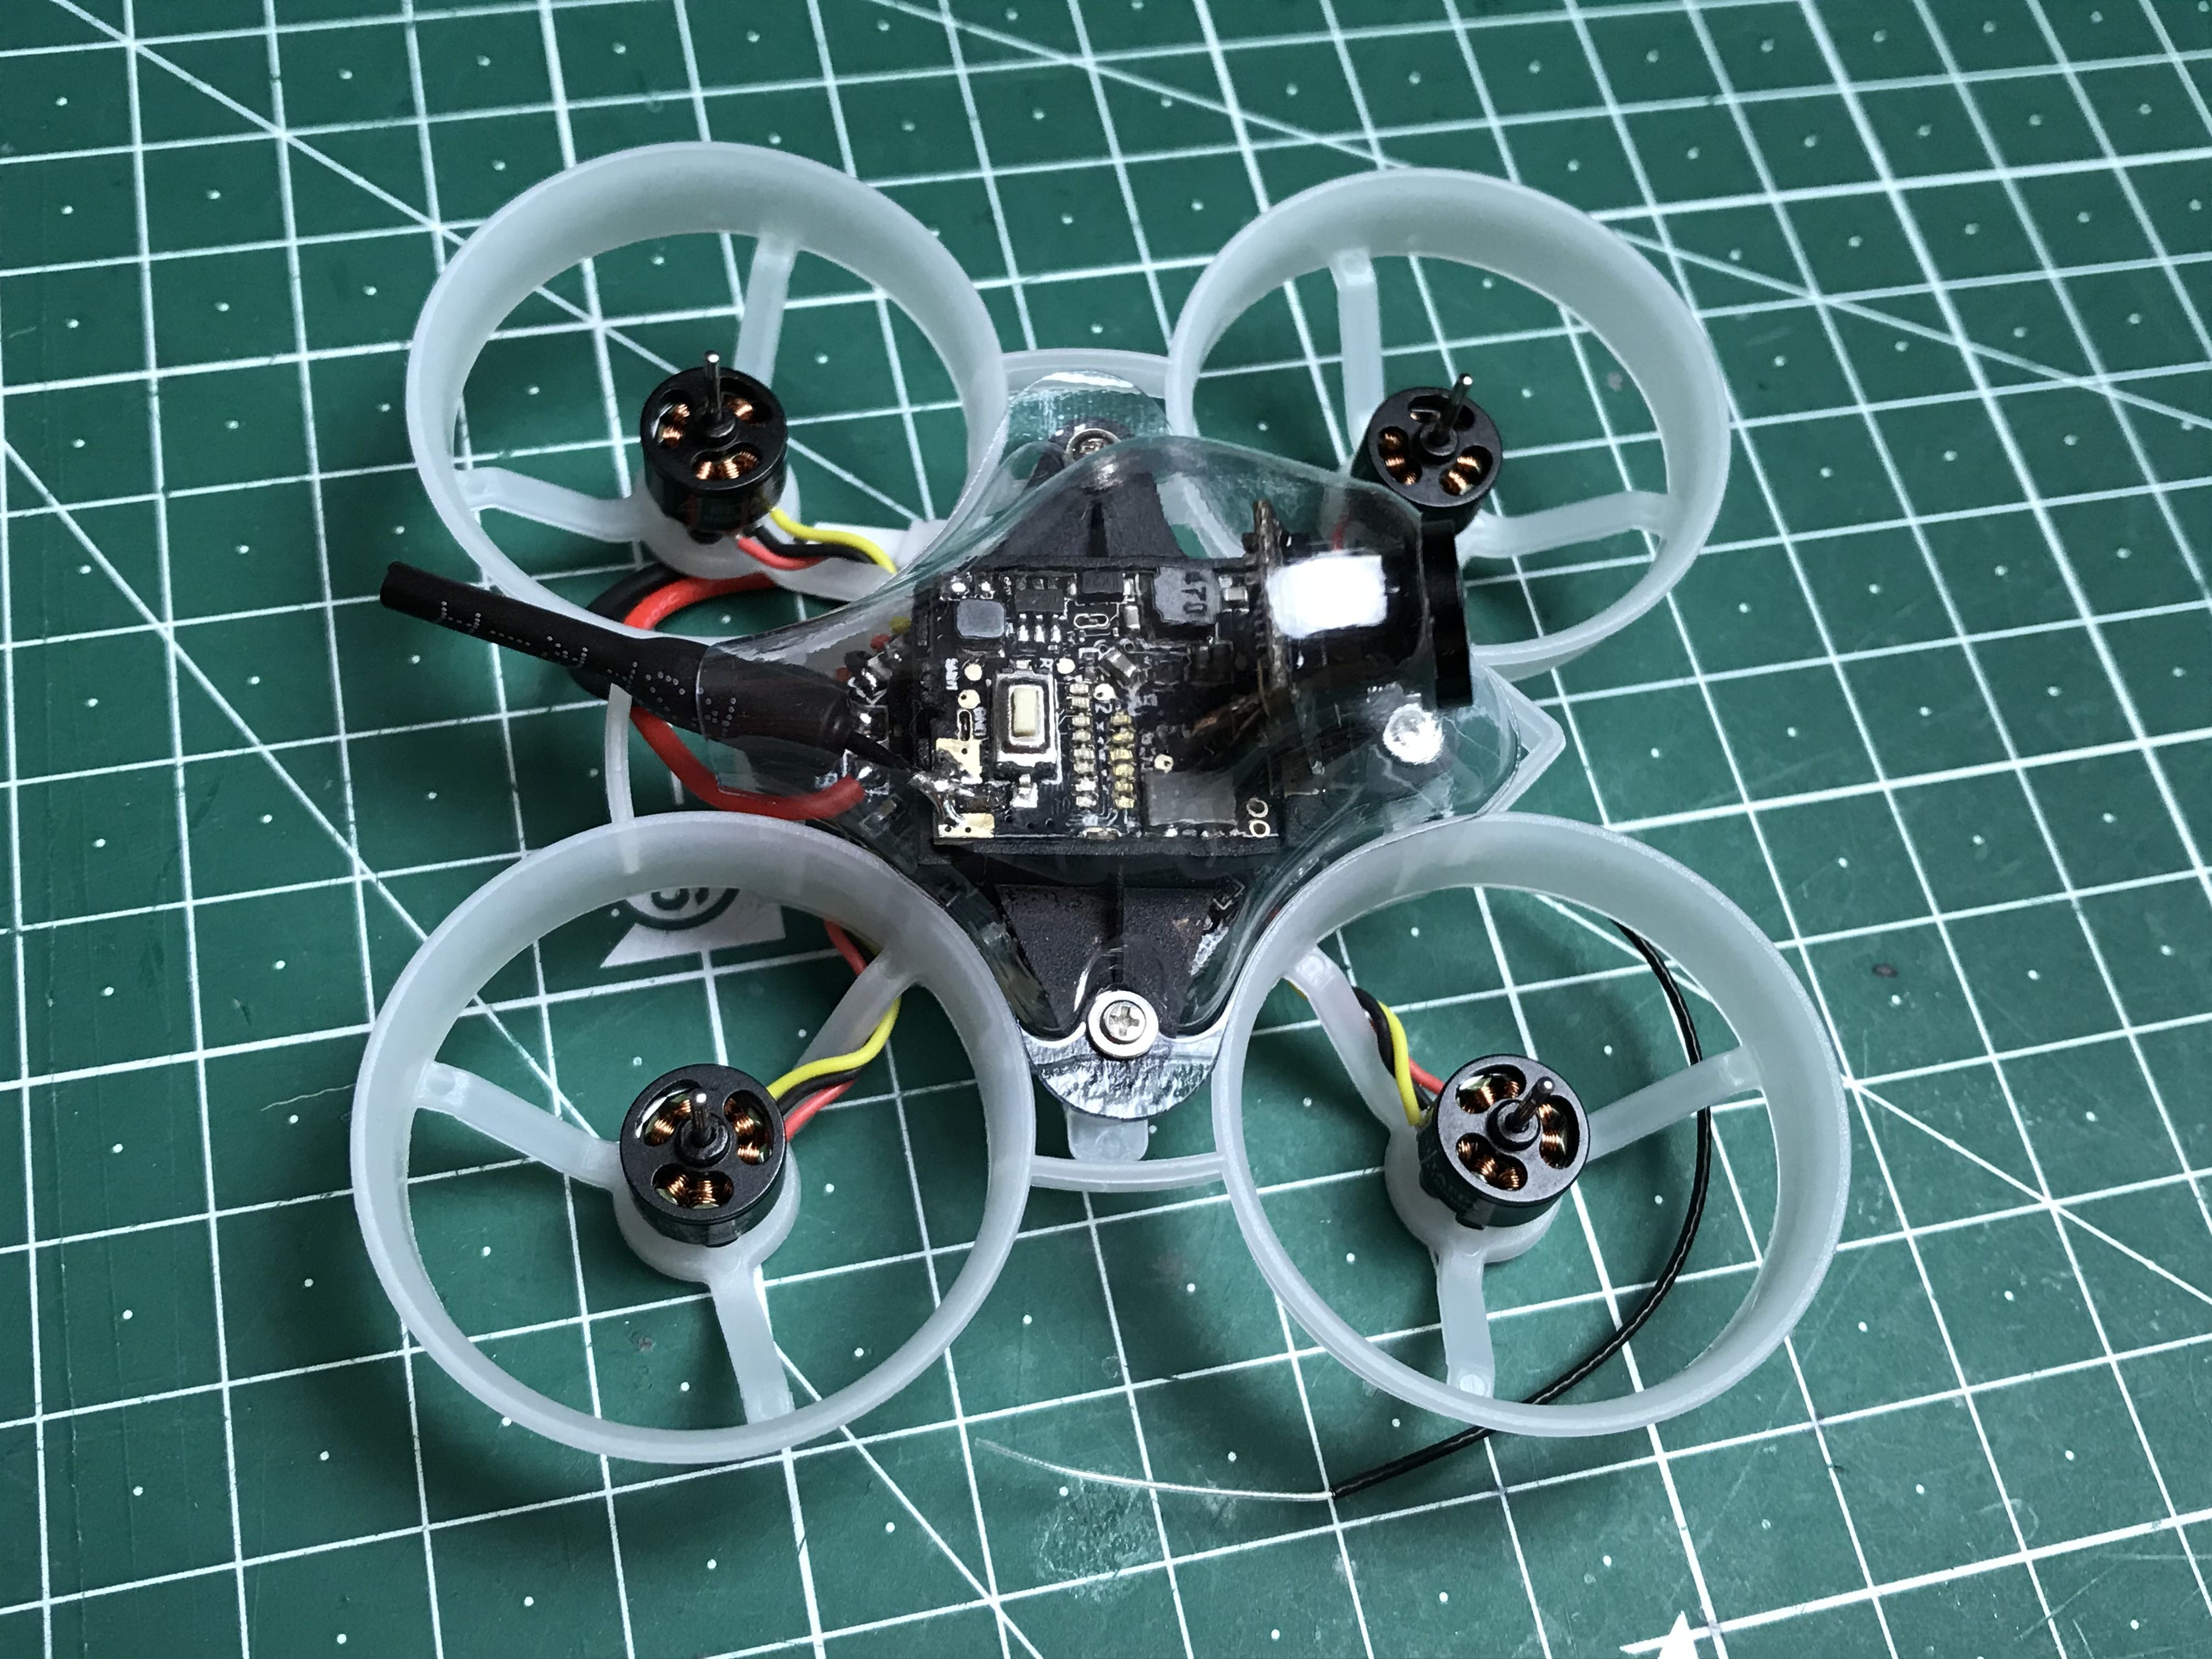
That was basically it except for the receiver antenna. I I made it stick out of the frame with a zip tie and heatshrink because I wanted to see how far I can go before I have a failsafe.
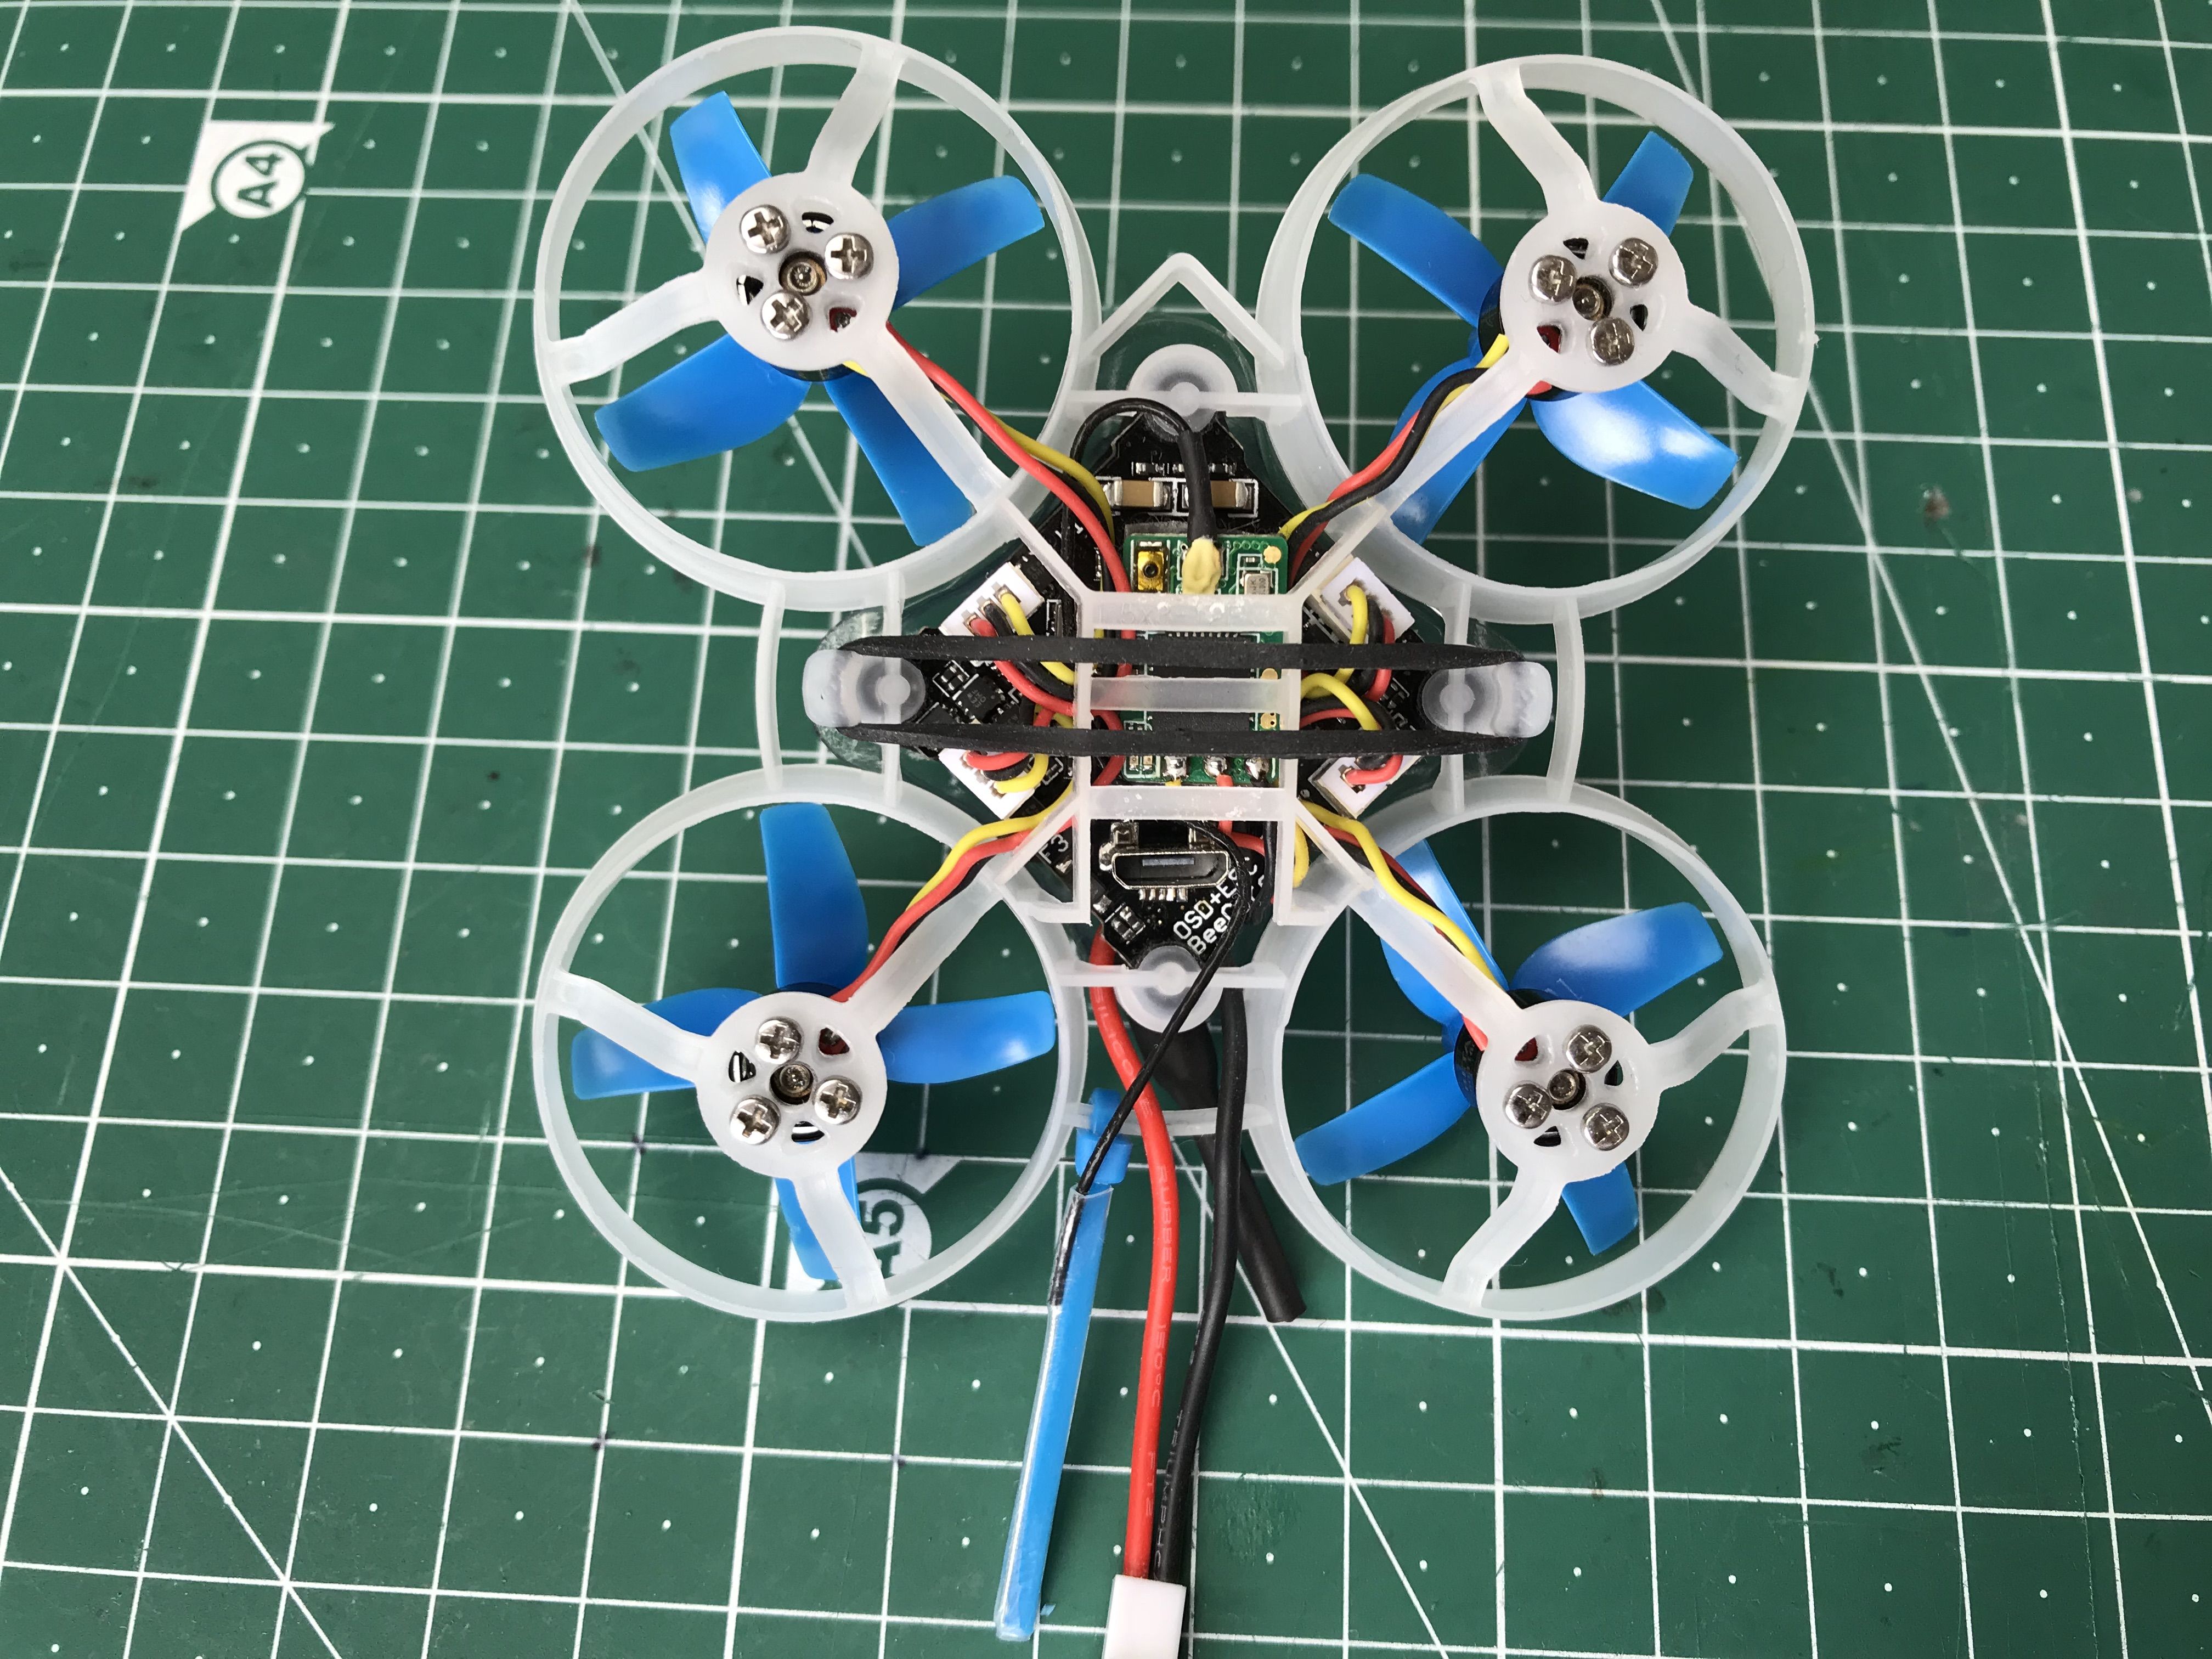
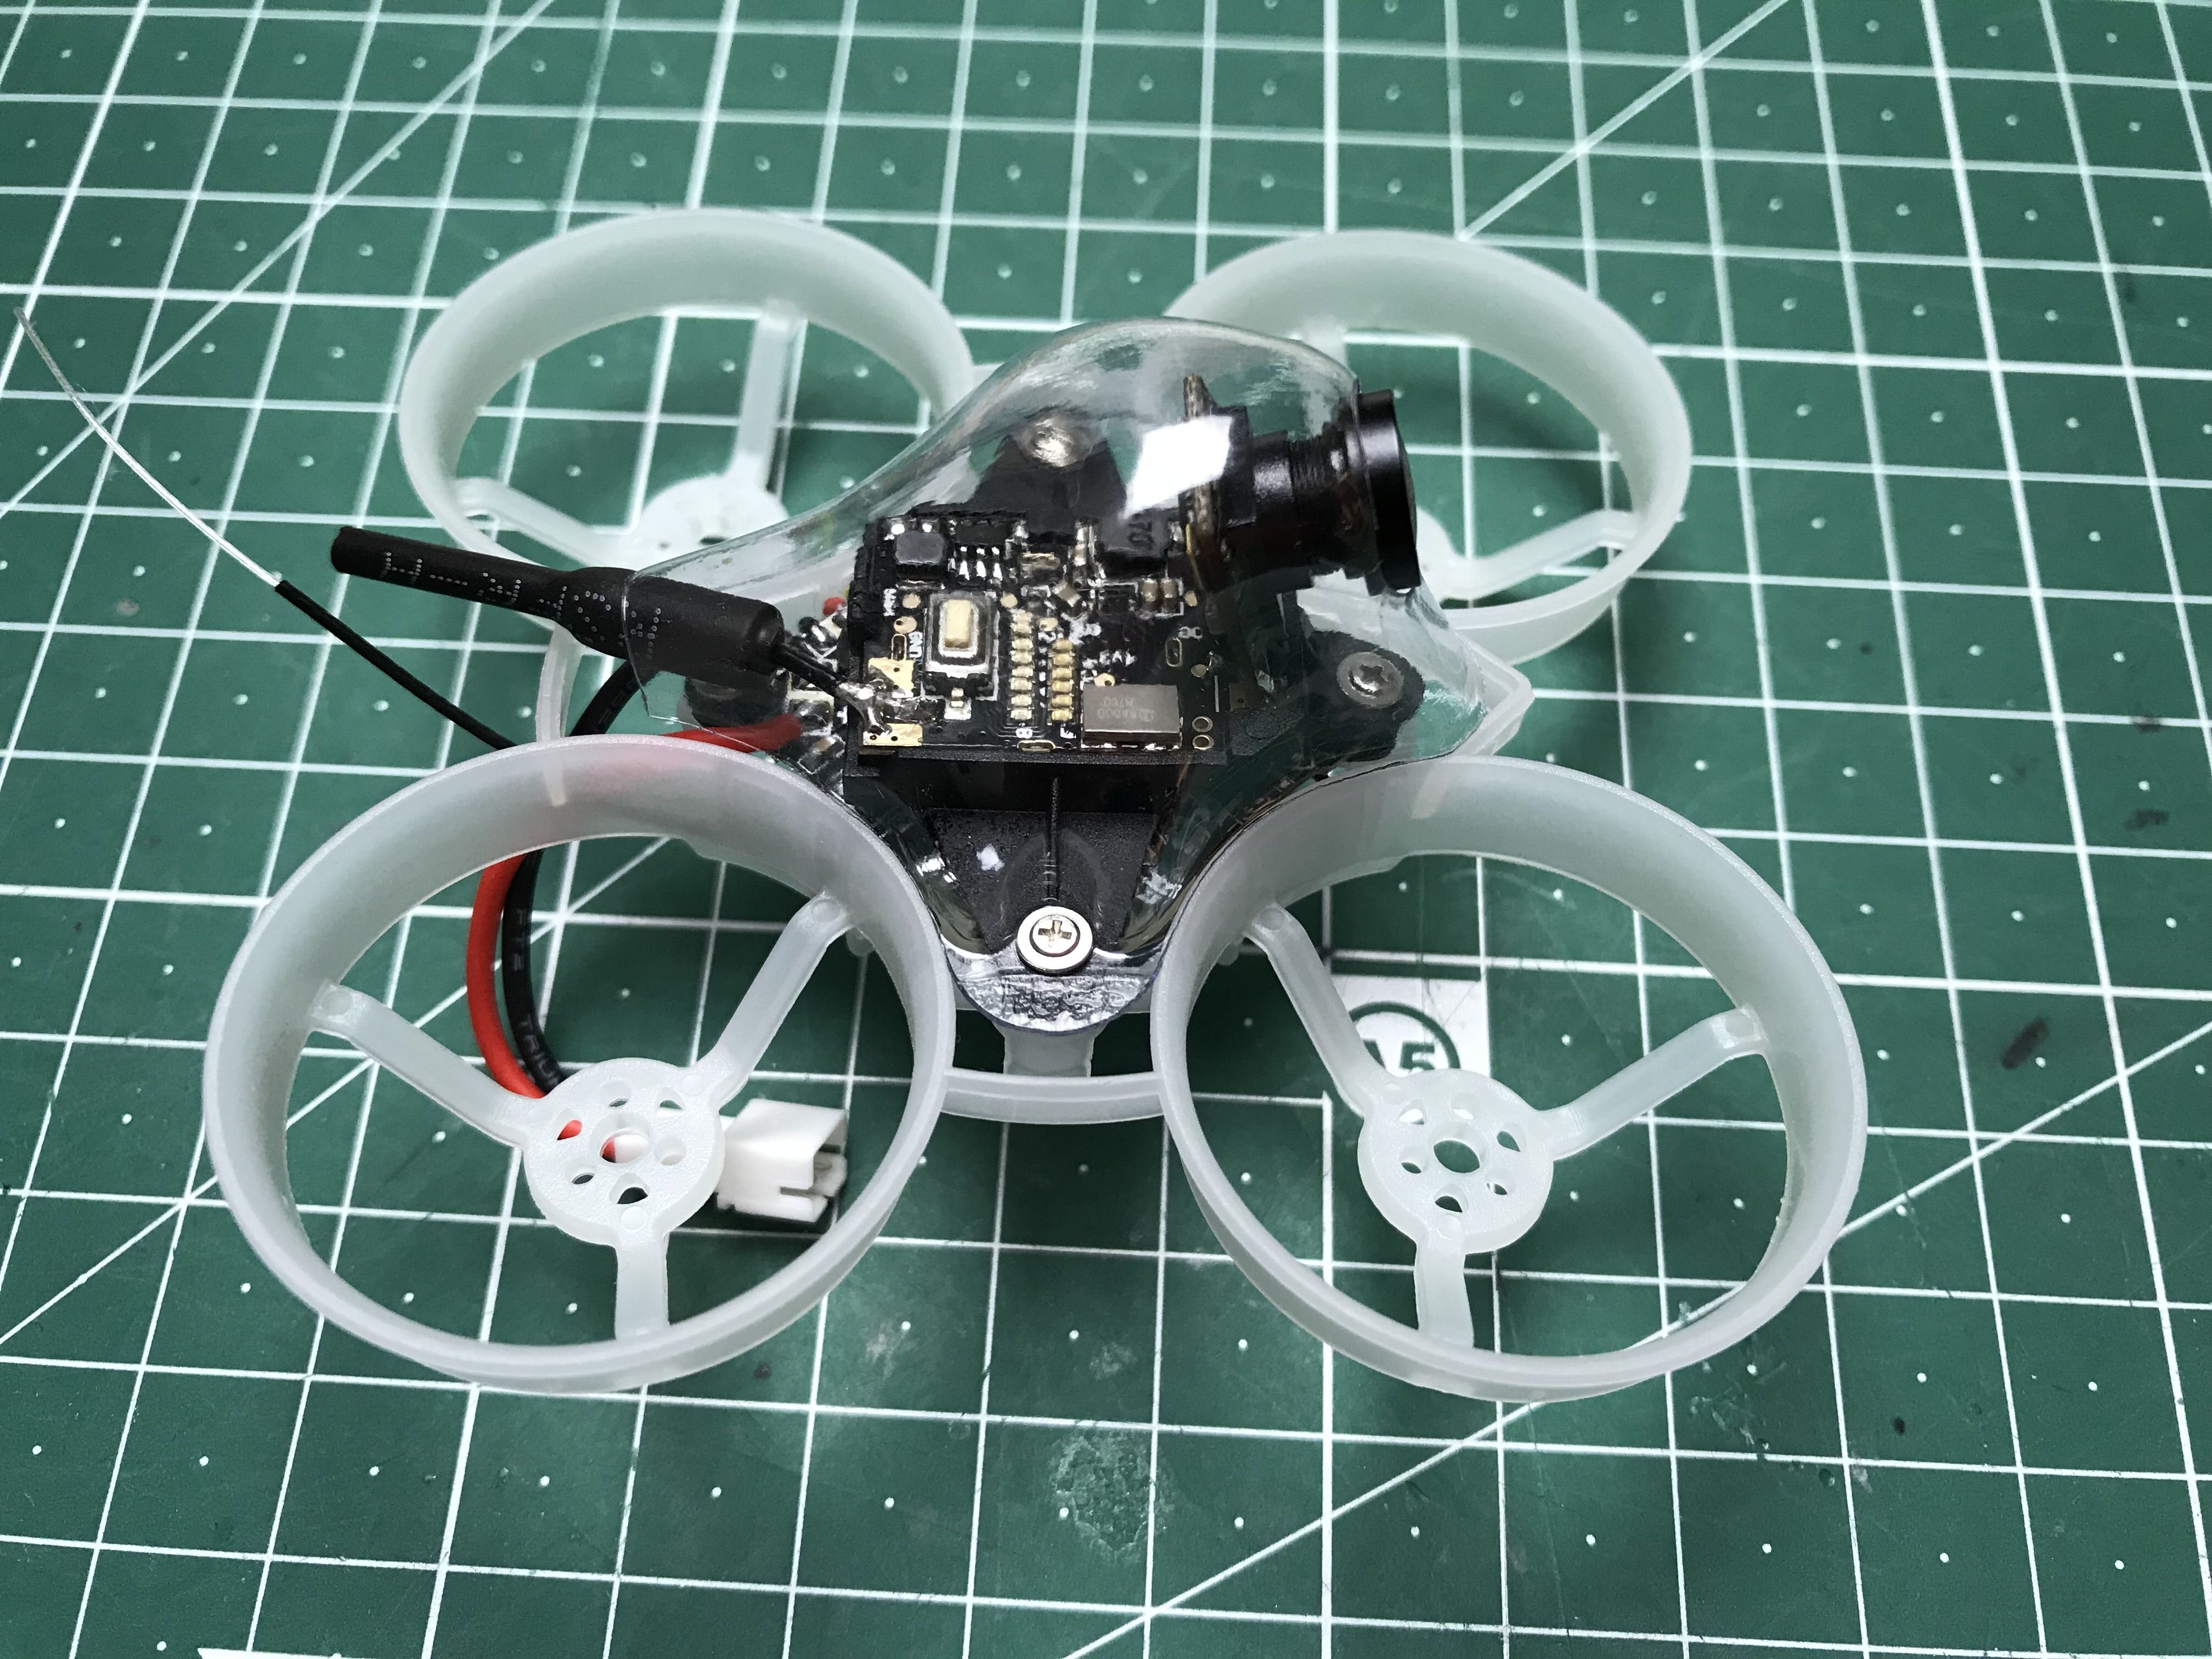
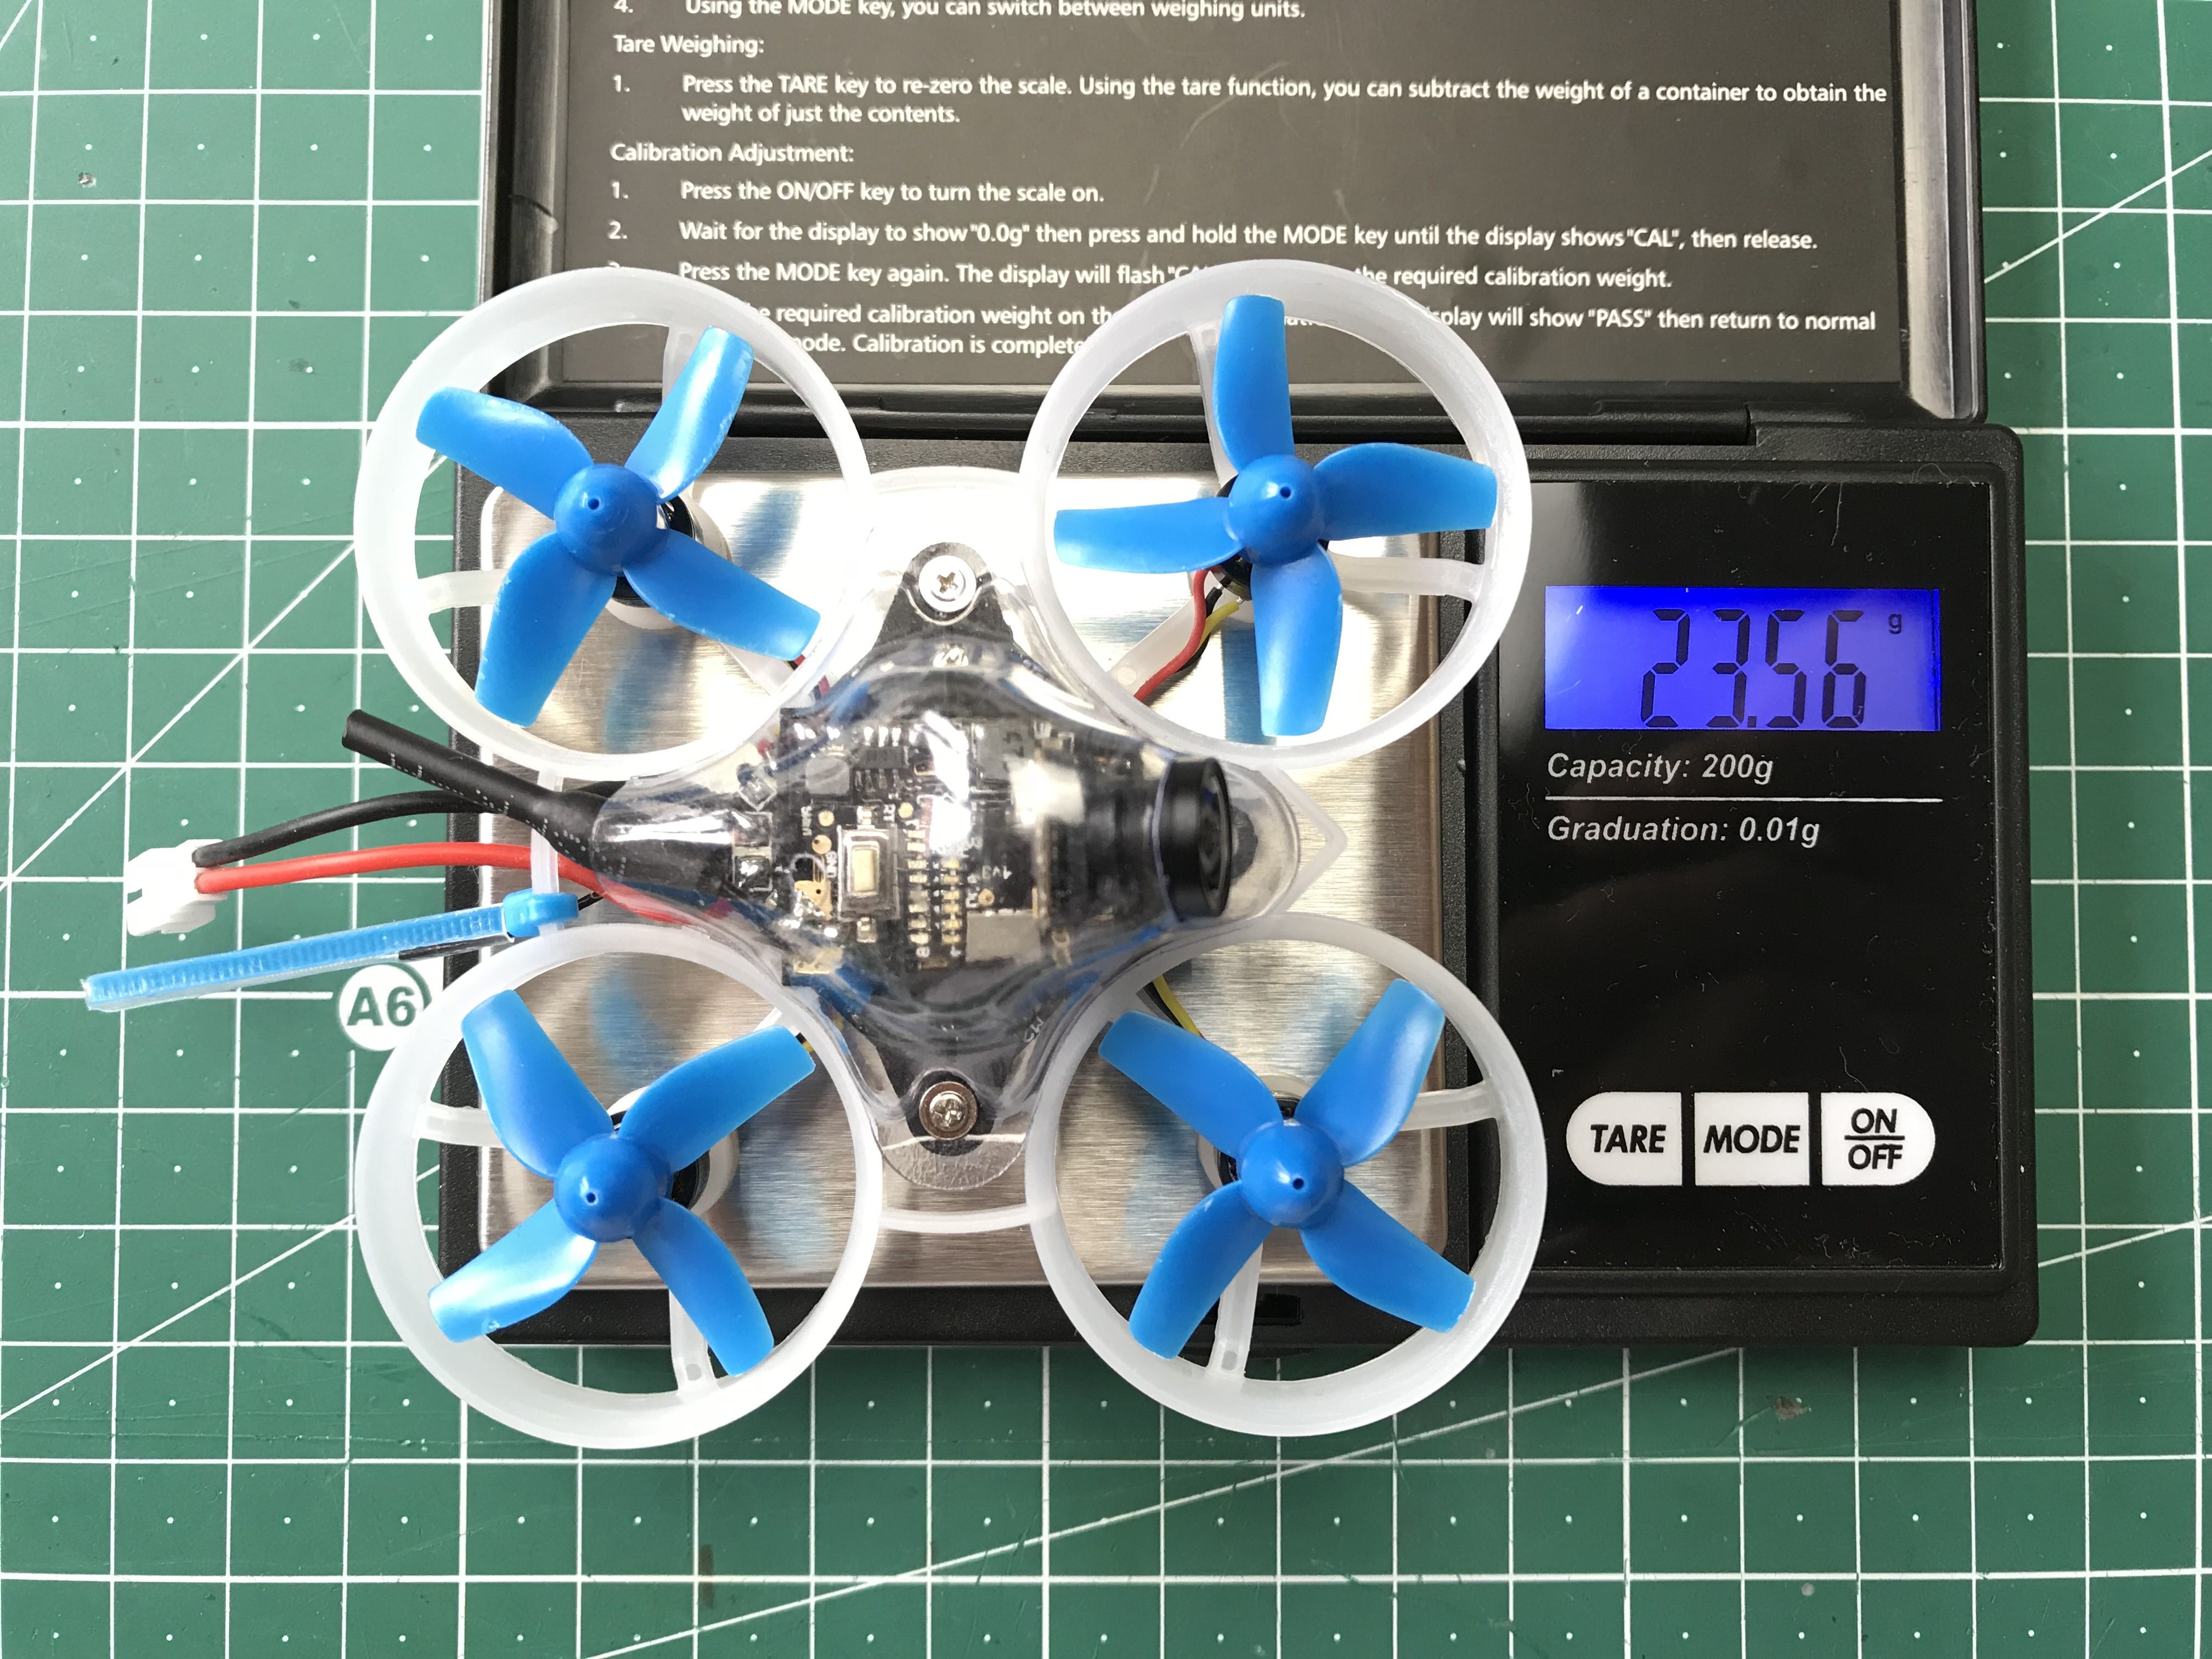
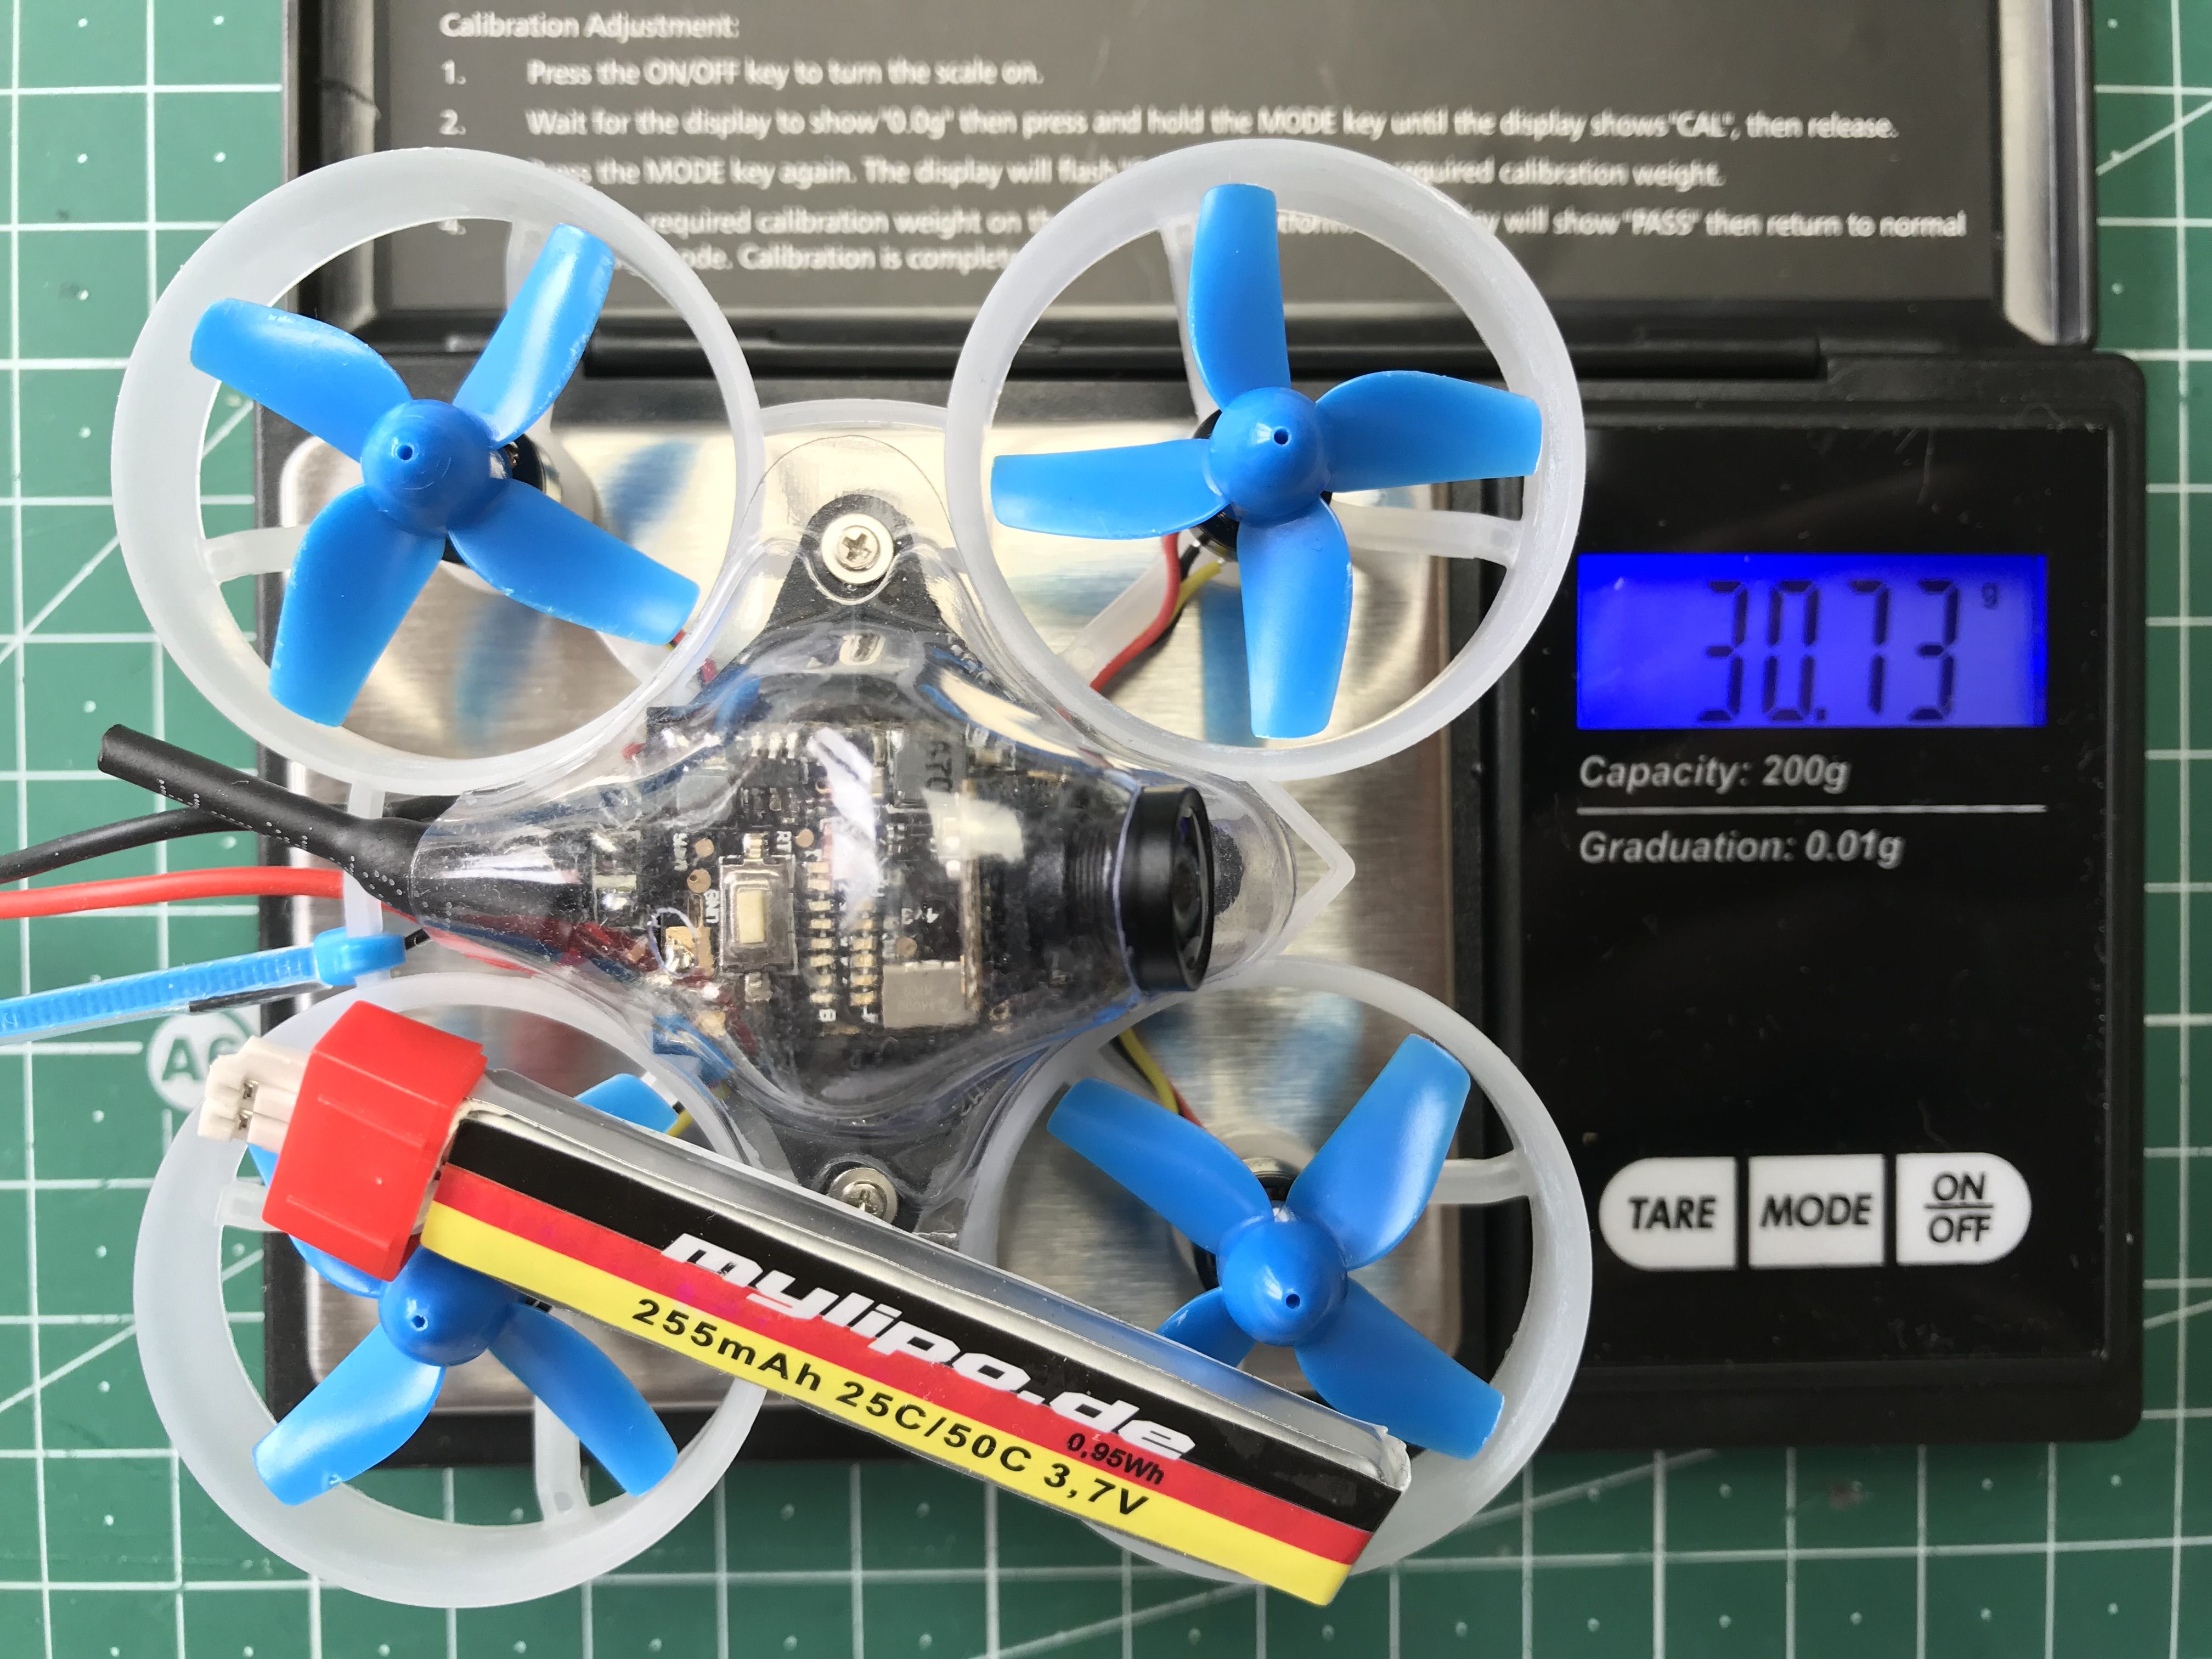
That was the configuration I maidened it in.
It came out being quite heavy for a whoop, but at that point I did not care much about the weight.
Maiden Flight And Problems
During the first flight I discovered the quad was producing loud grinding-like noize. It was coming from something else than proppellers touching the frame. I also found she needed D-Term lowpass filter set to BIQUAD and all the notches on, otherwise it was shaking in the air as if some vibrations were reaching the gyro.
After careful inspection I found the source of that noise. It was the canopy grinding on the frame in a same way a plastic bottle makes grinding noise when you cut it with a knife. Probably the vibrations generated by the motors were close to the resonant frequency of the canopy or the frame and caused vibration spikes that produced the noise and made the gyro freak out.
I loosened the screws a bit so the canopy did not touch the frame and played with the gyro notches. As a result the noise was almost gone and the quad flew smoothly. The video at the top was taken at that moment.
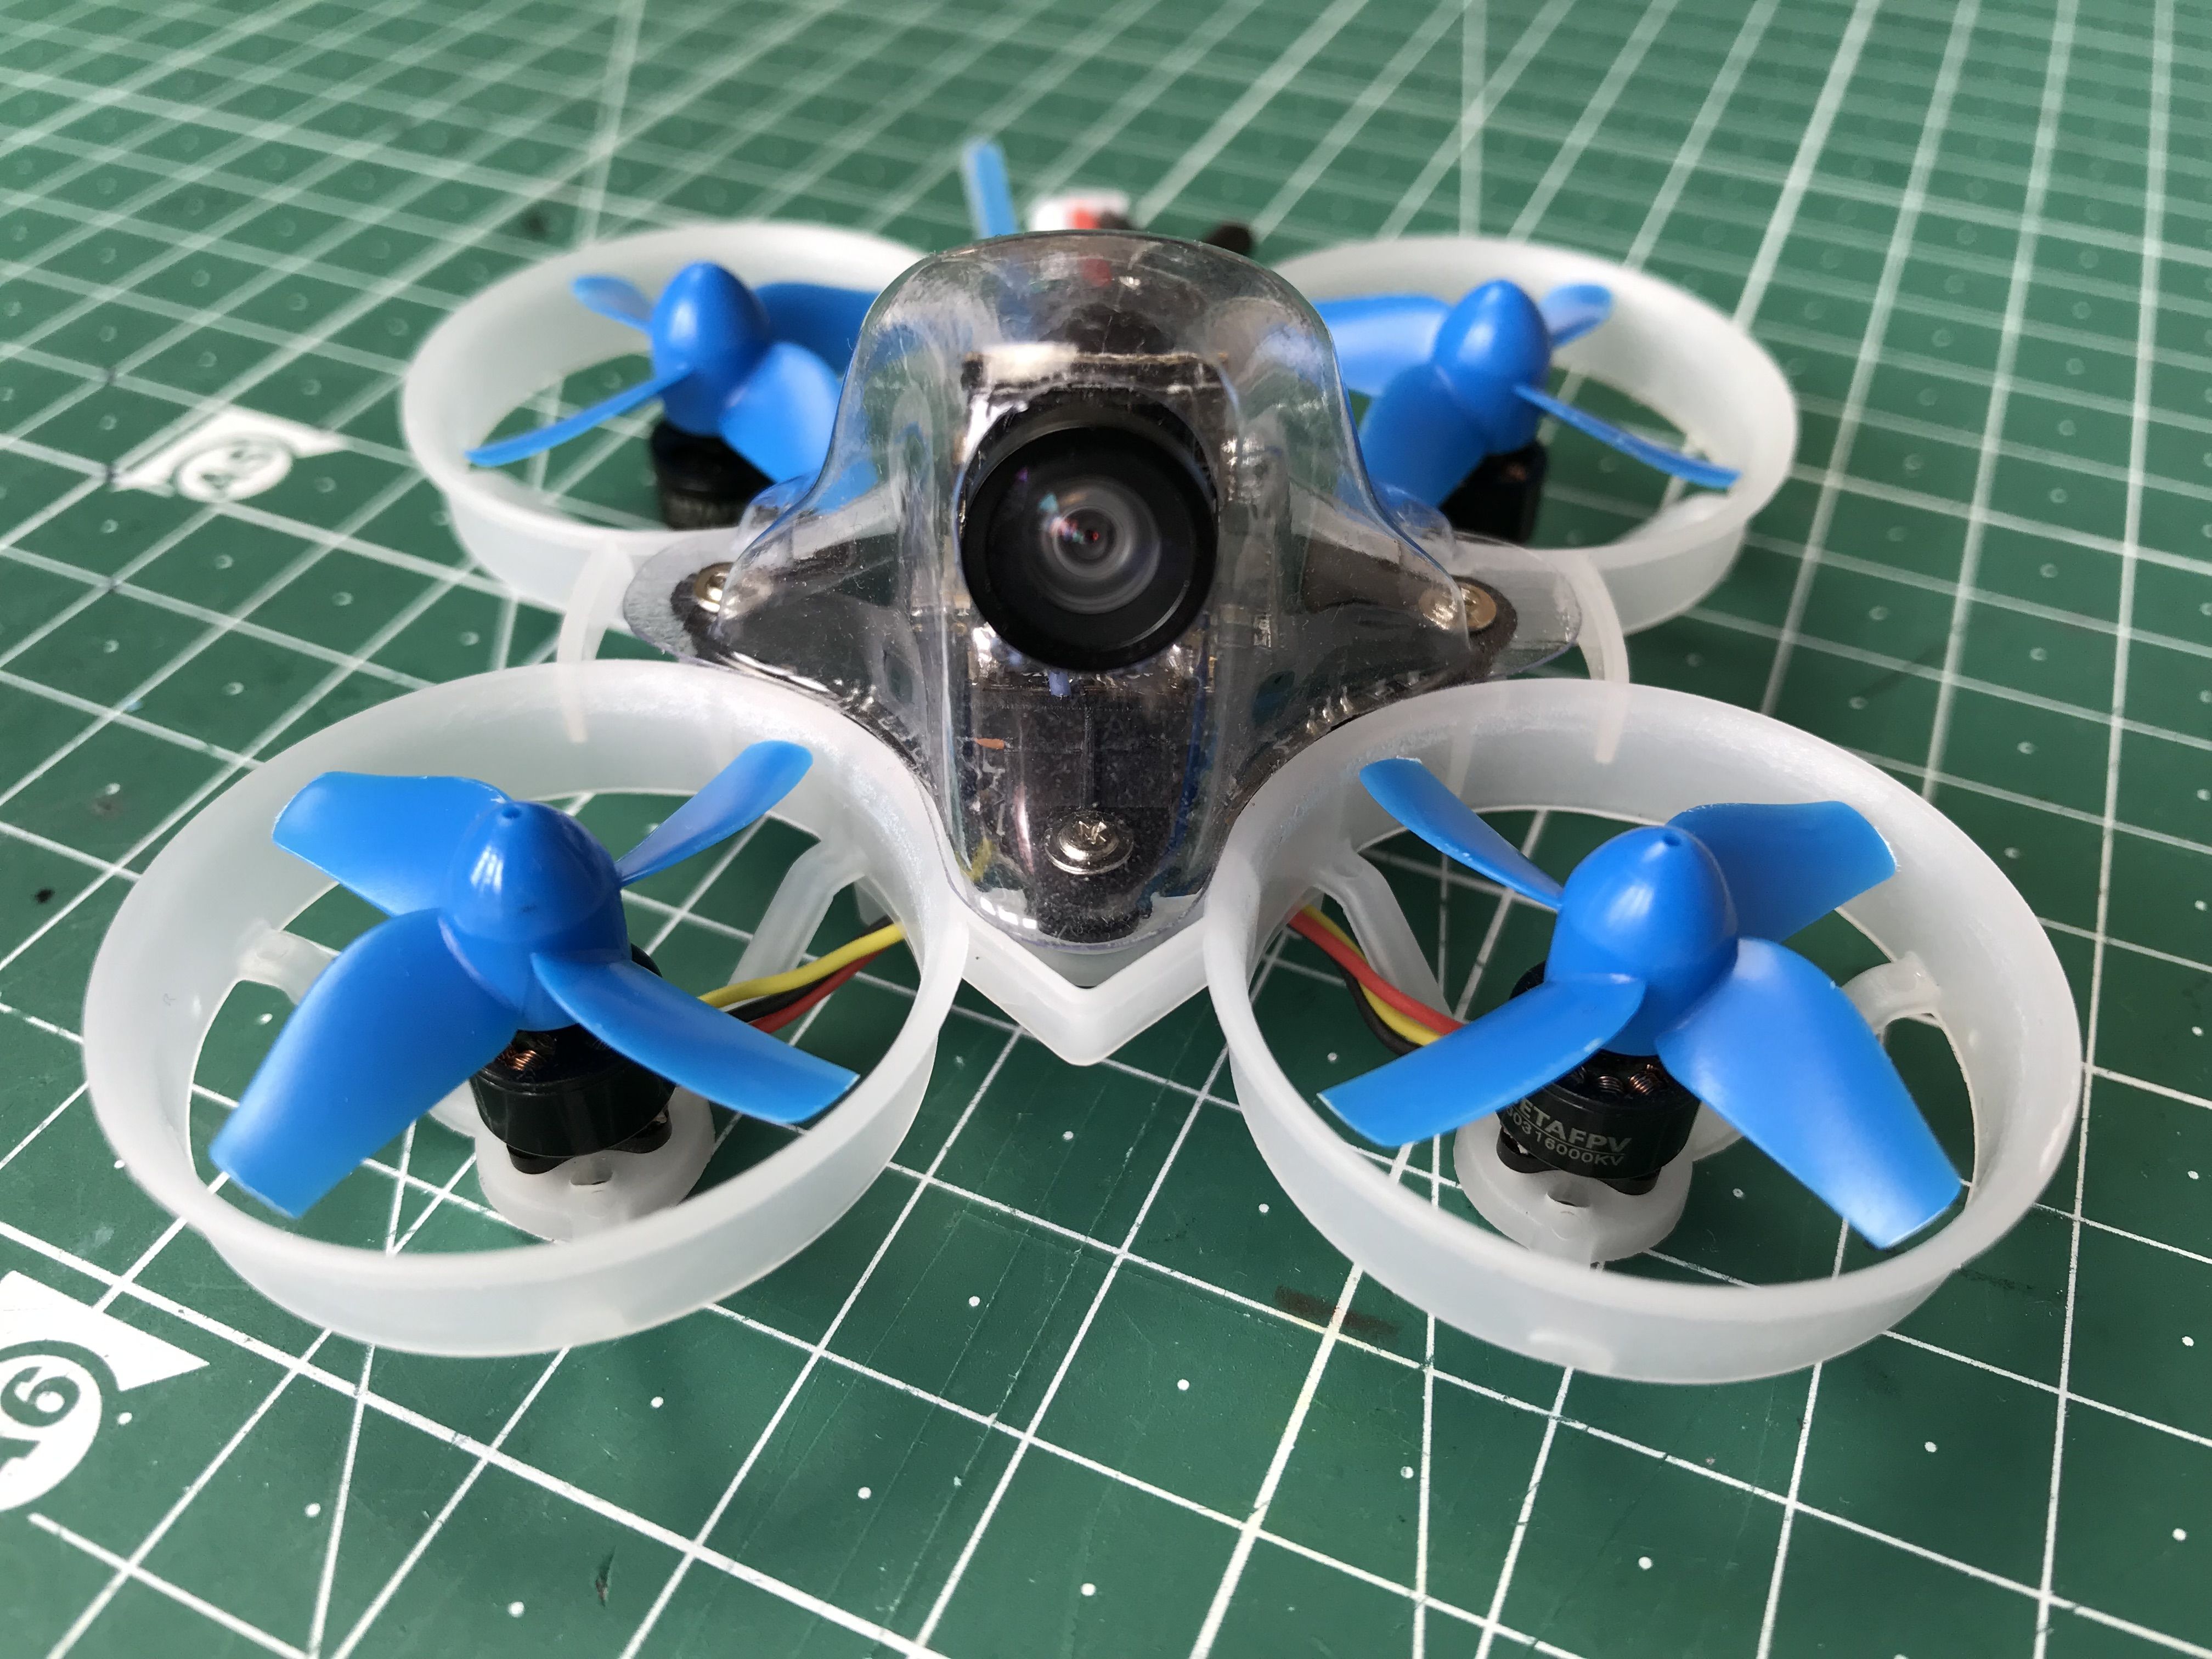
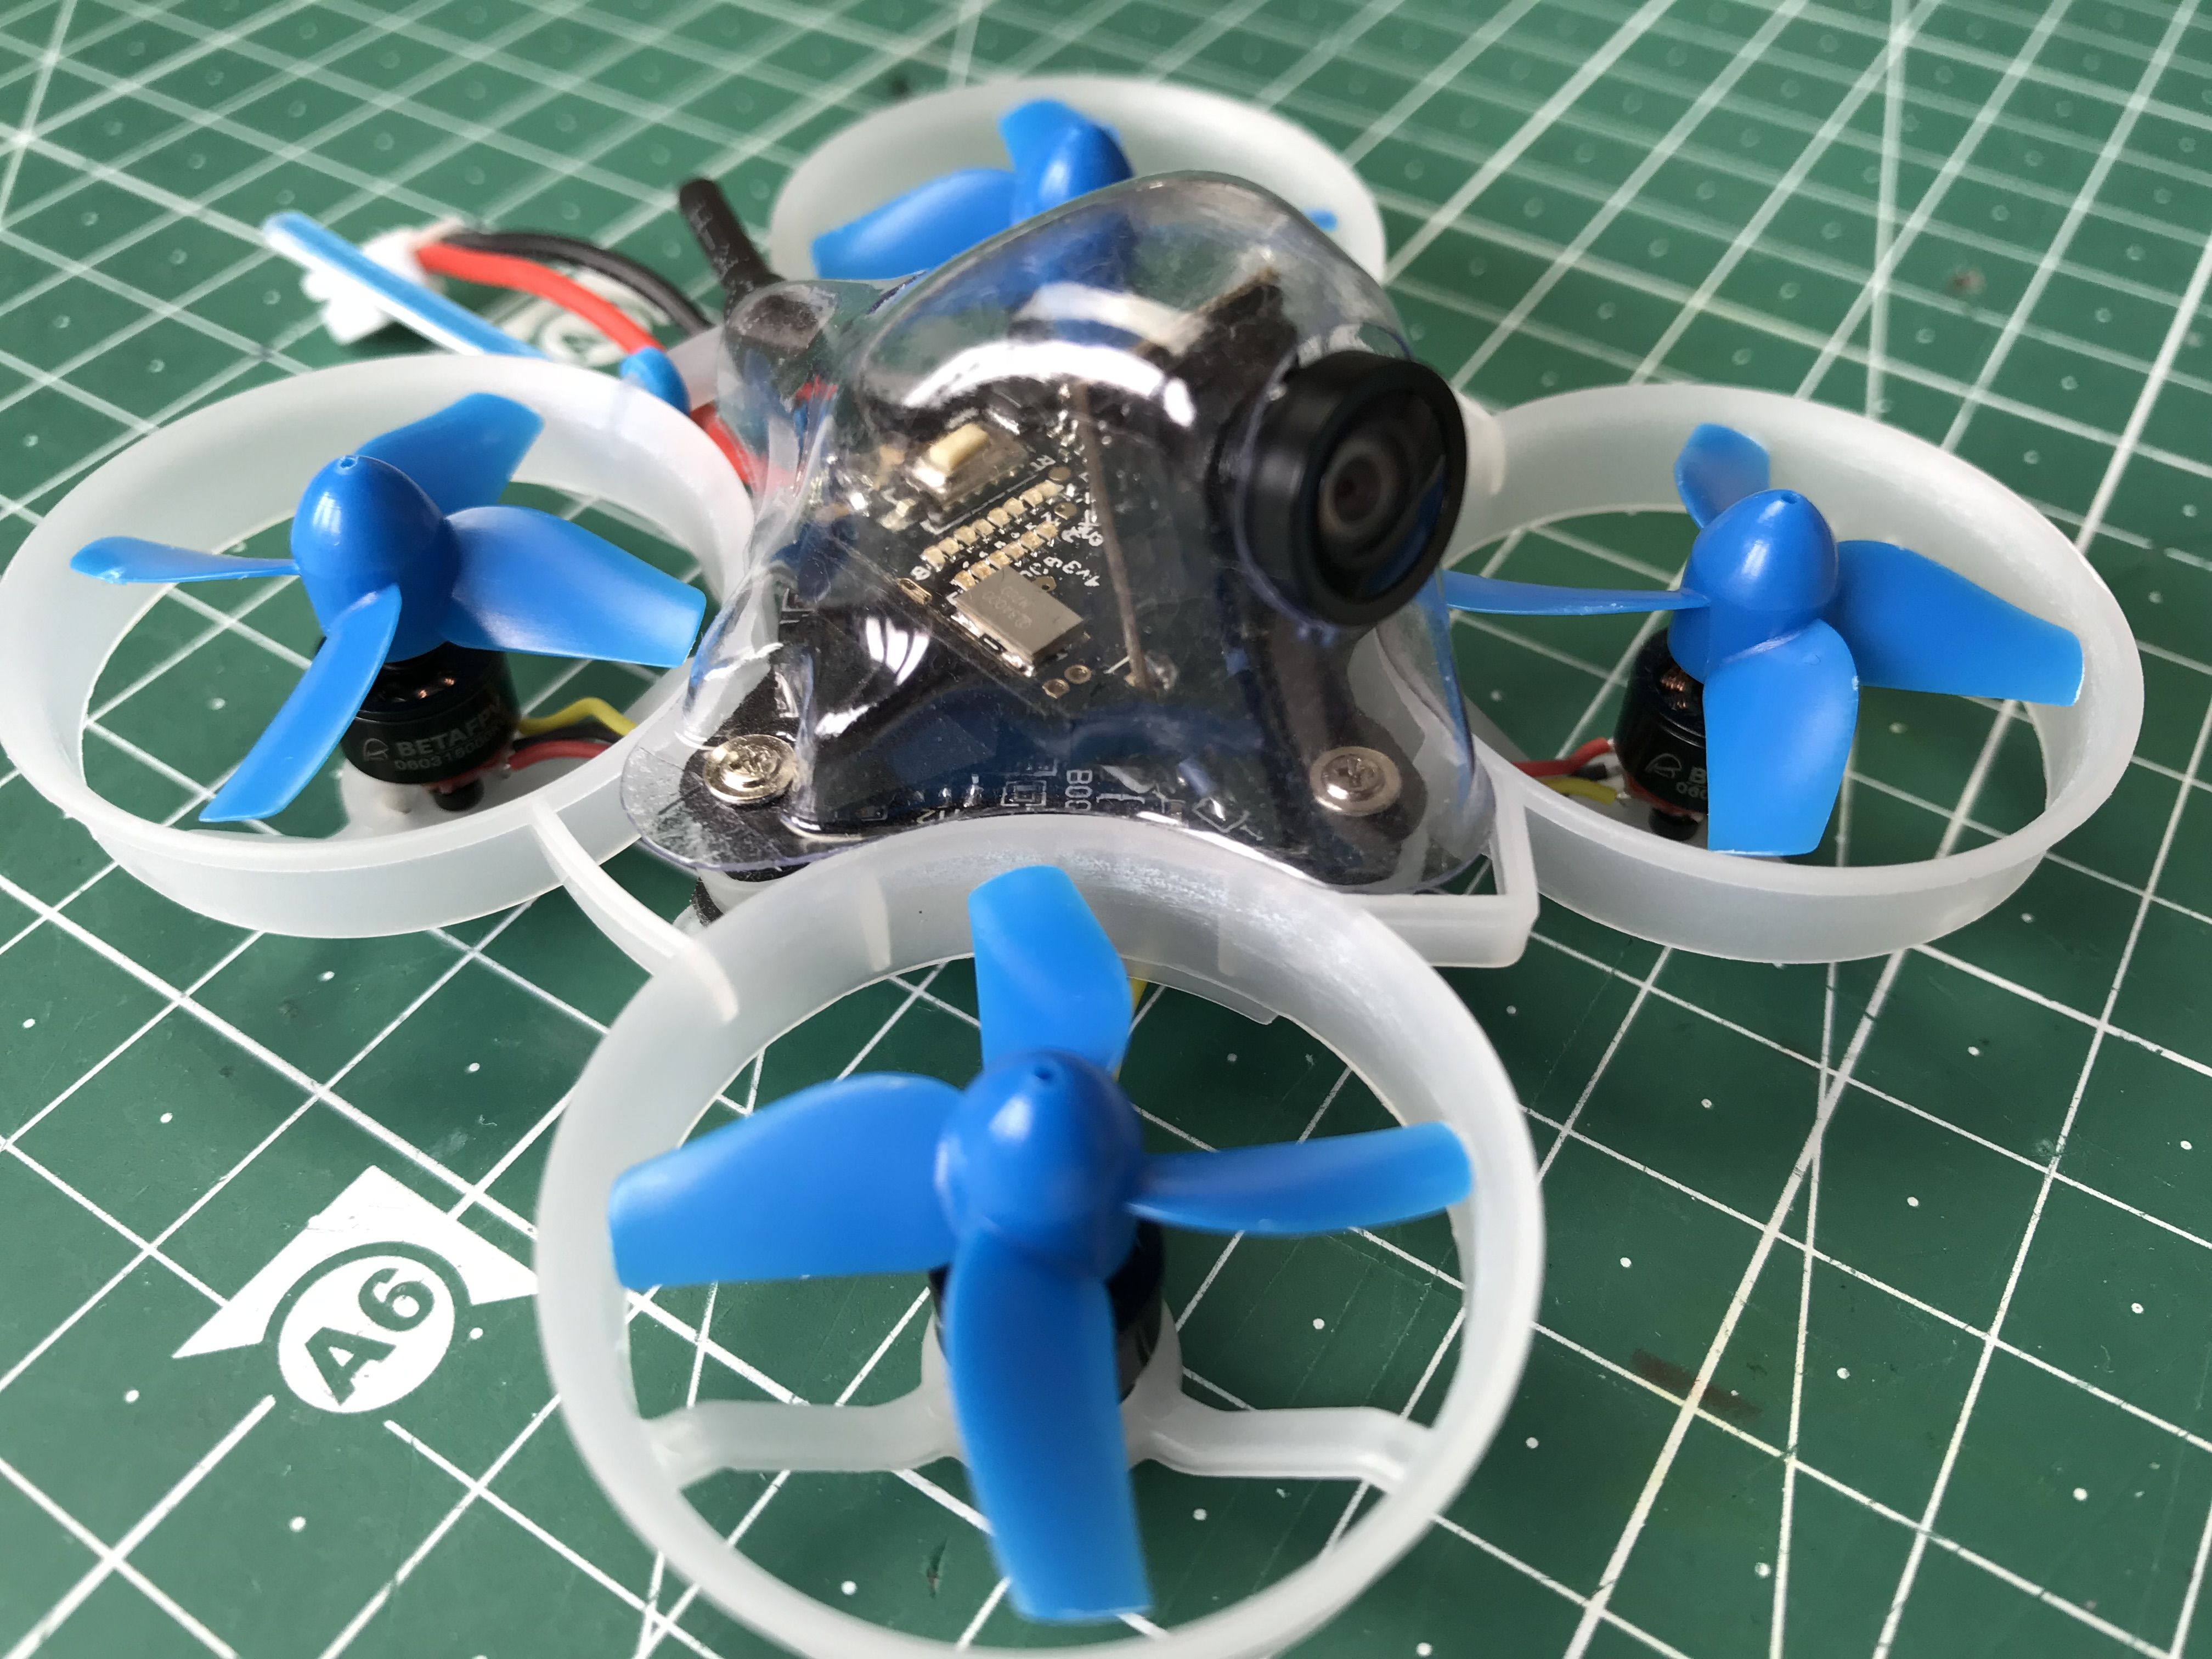
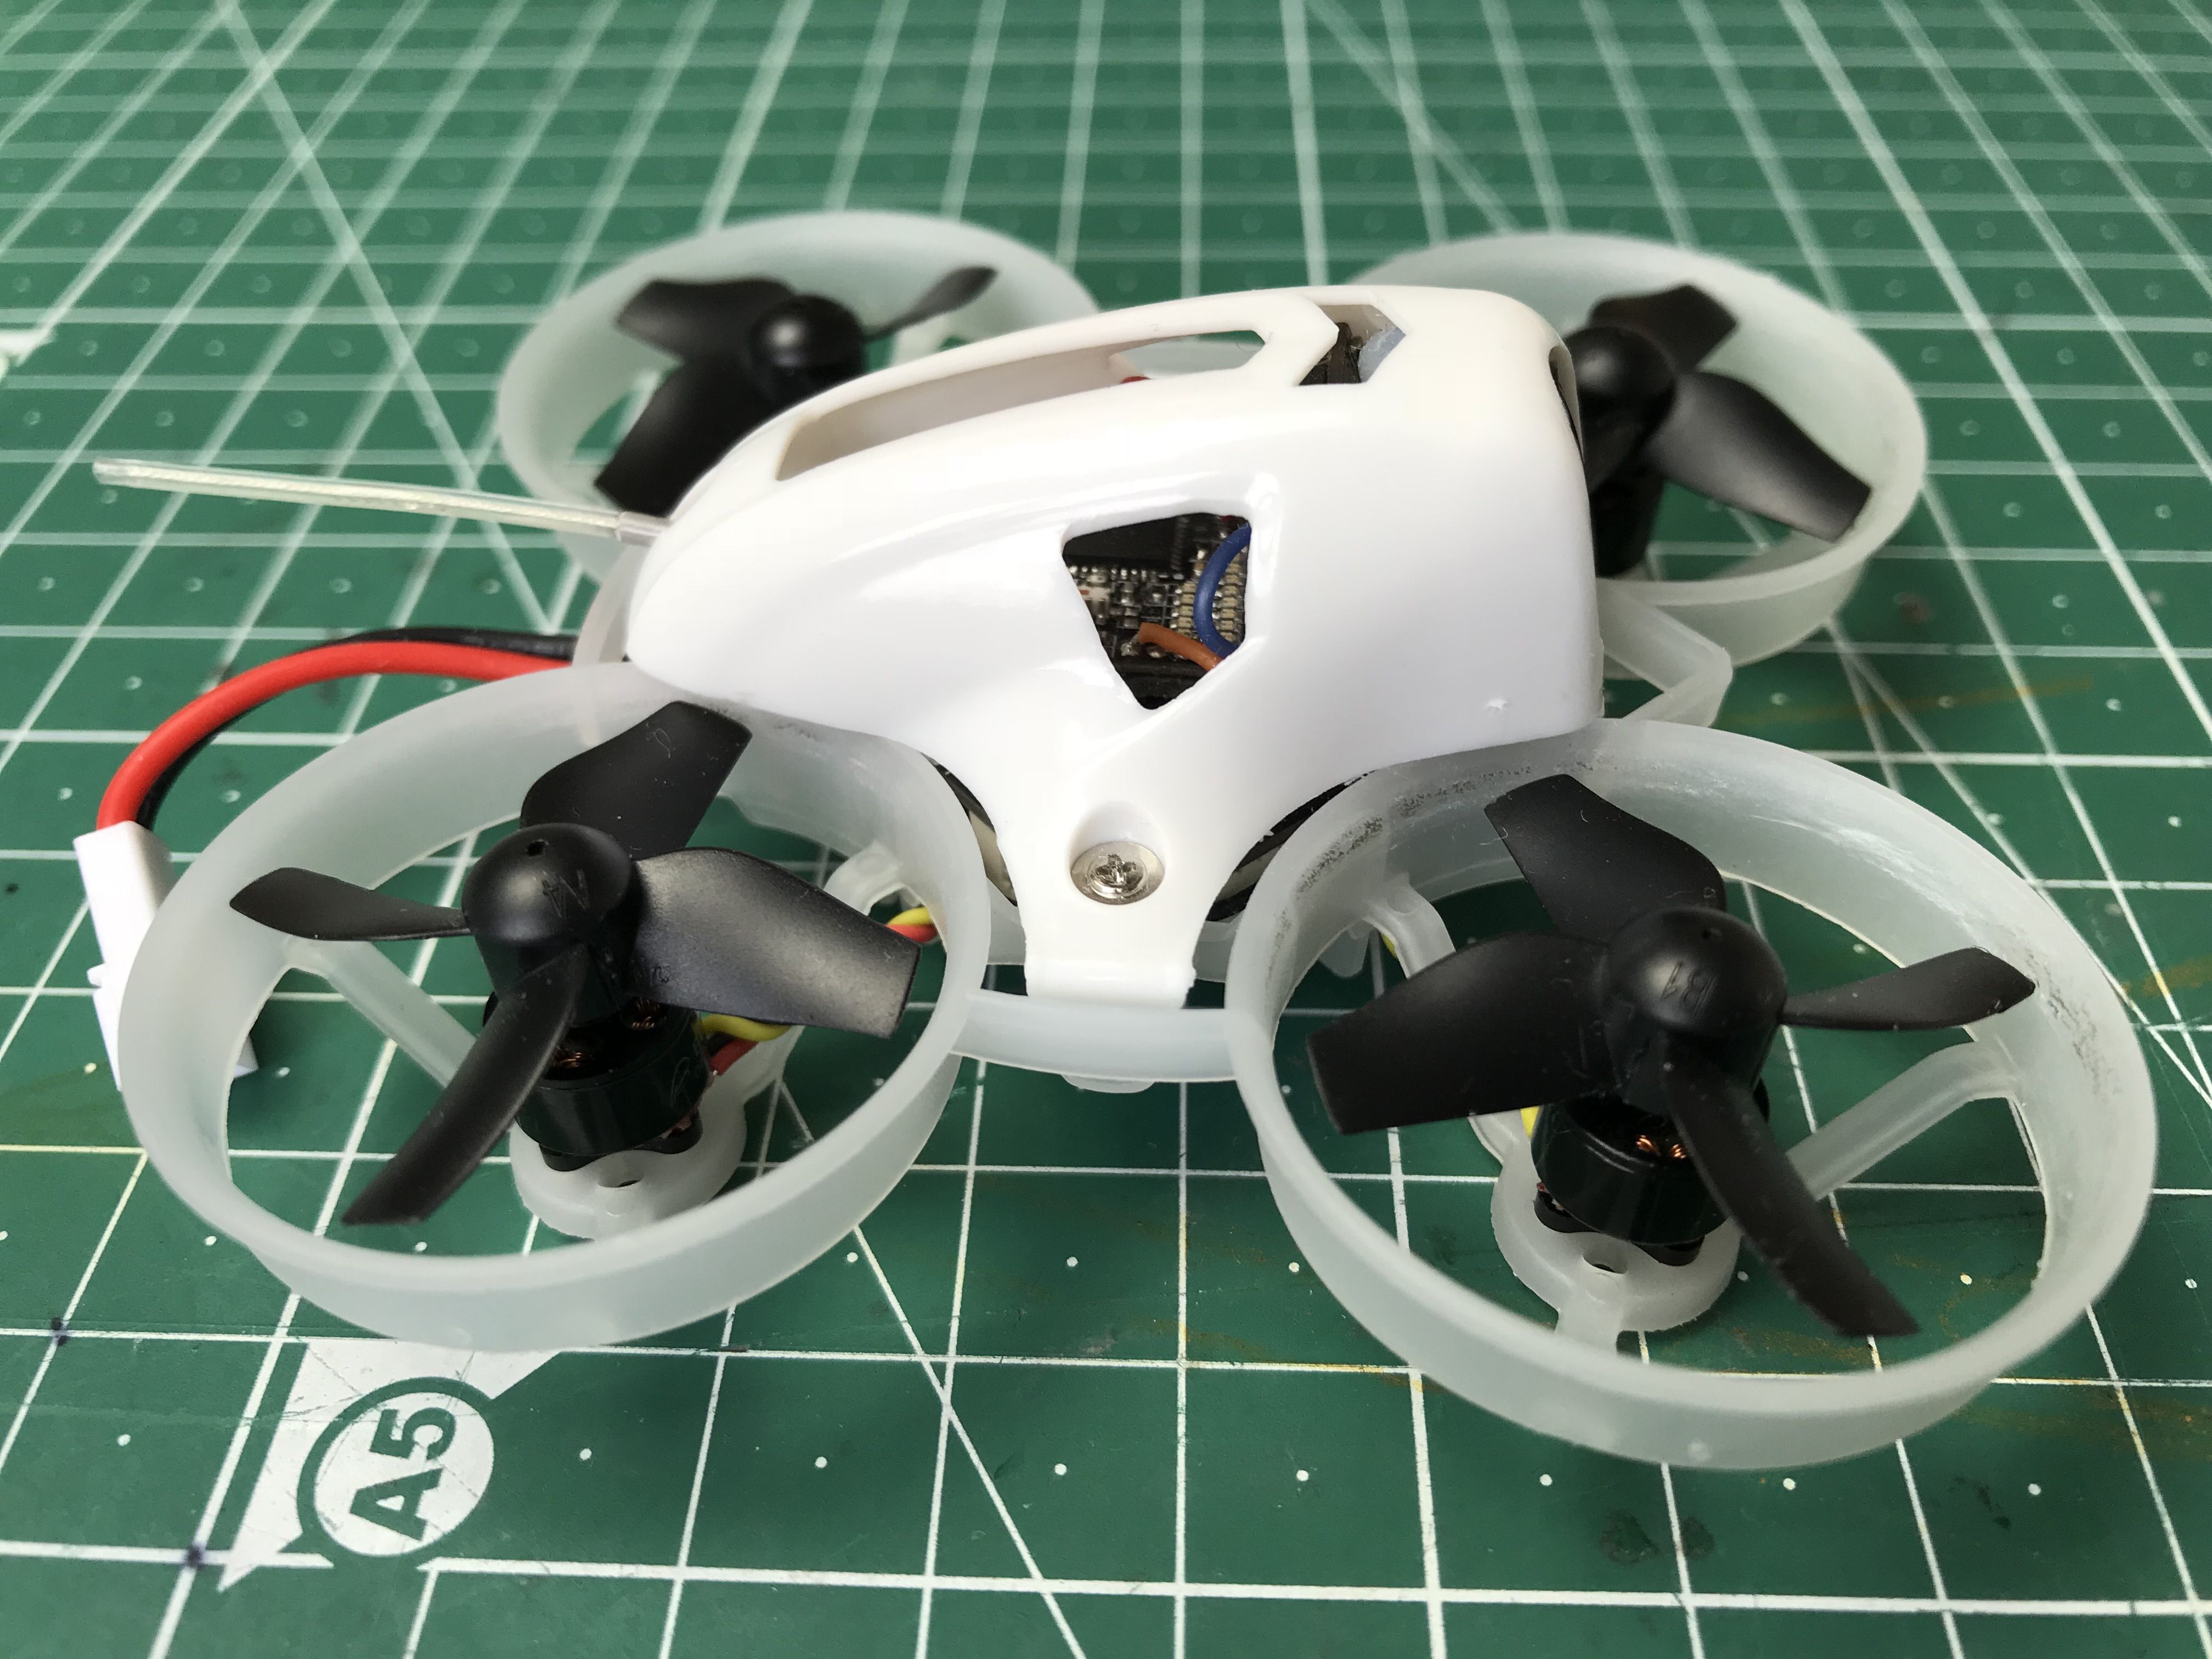
Second Iteration
After getting her flying well, I wanted to reduce weight. I also felt like getting rid of the original canopy because I suspected it was causing the vibrations.
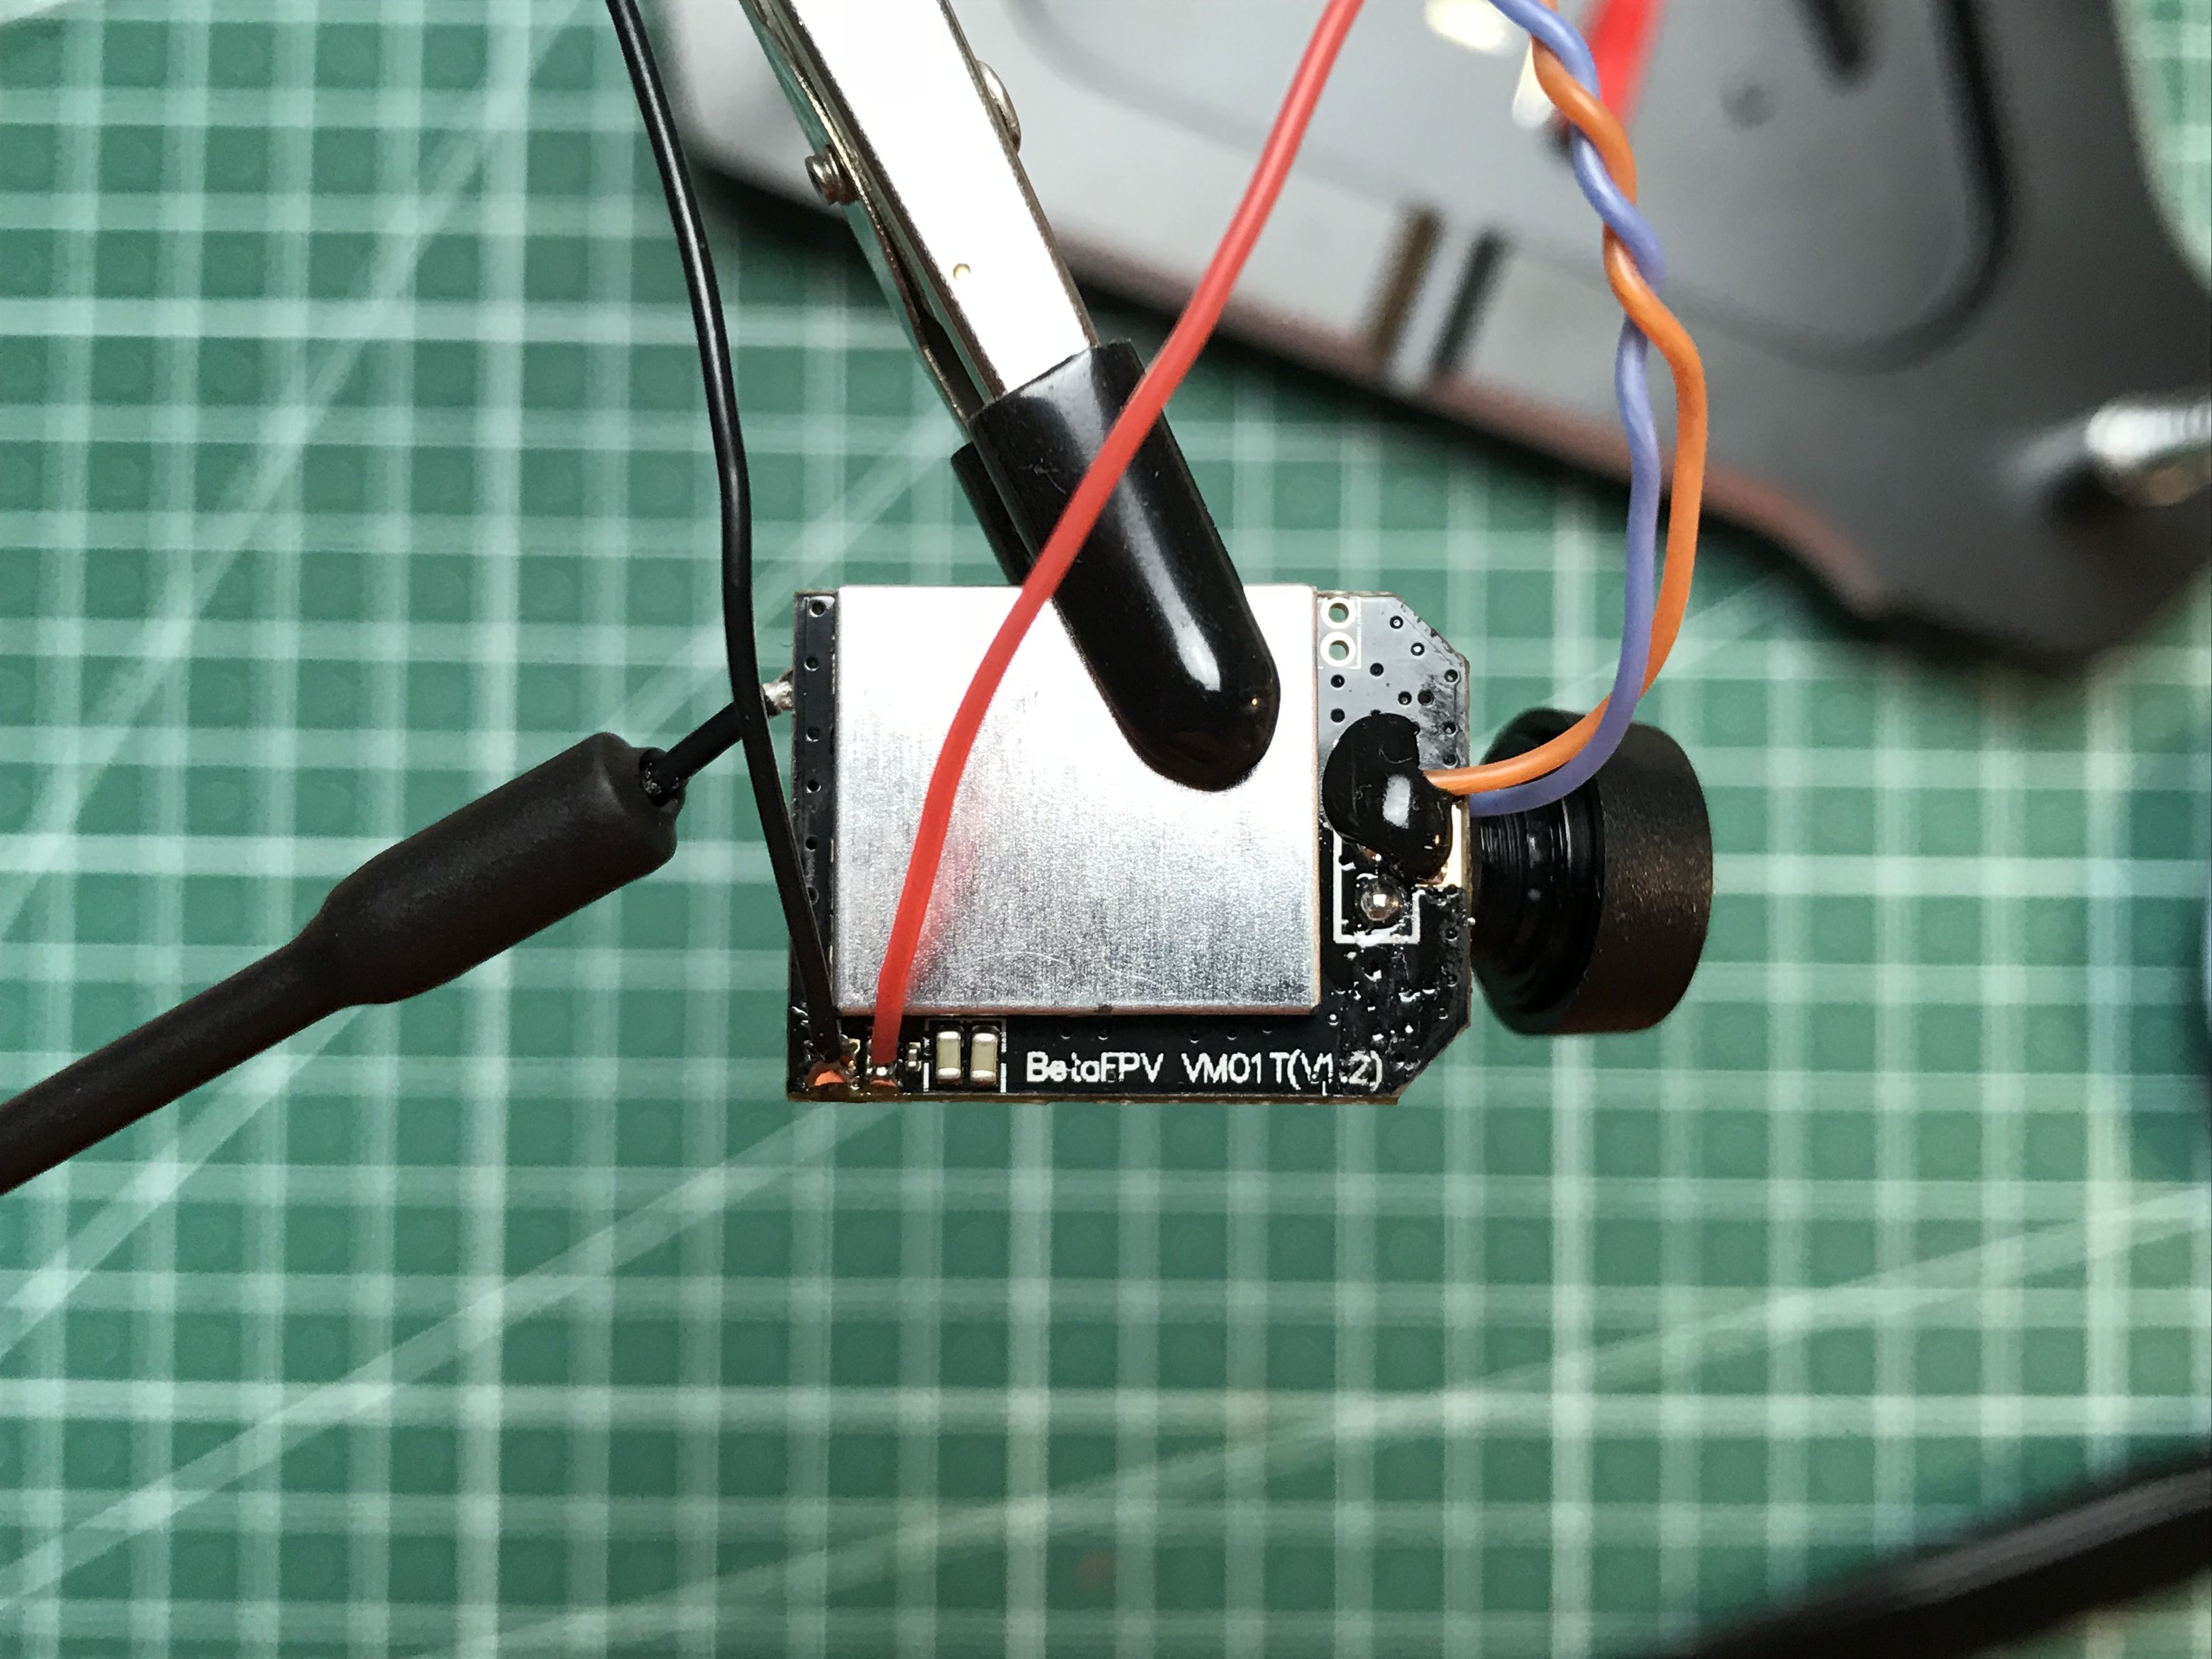
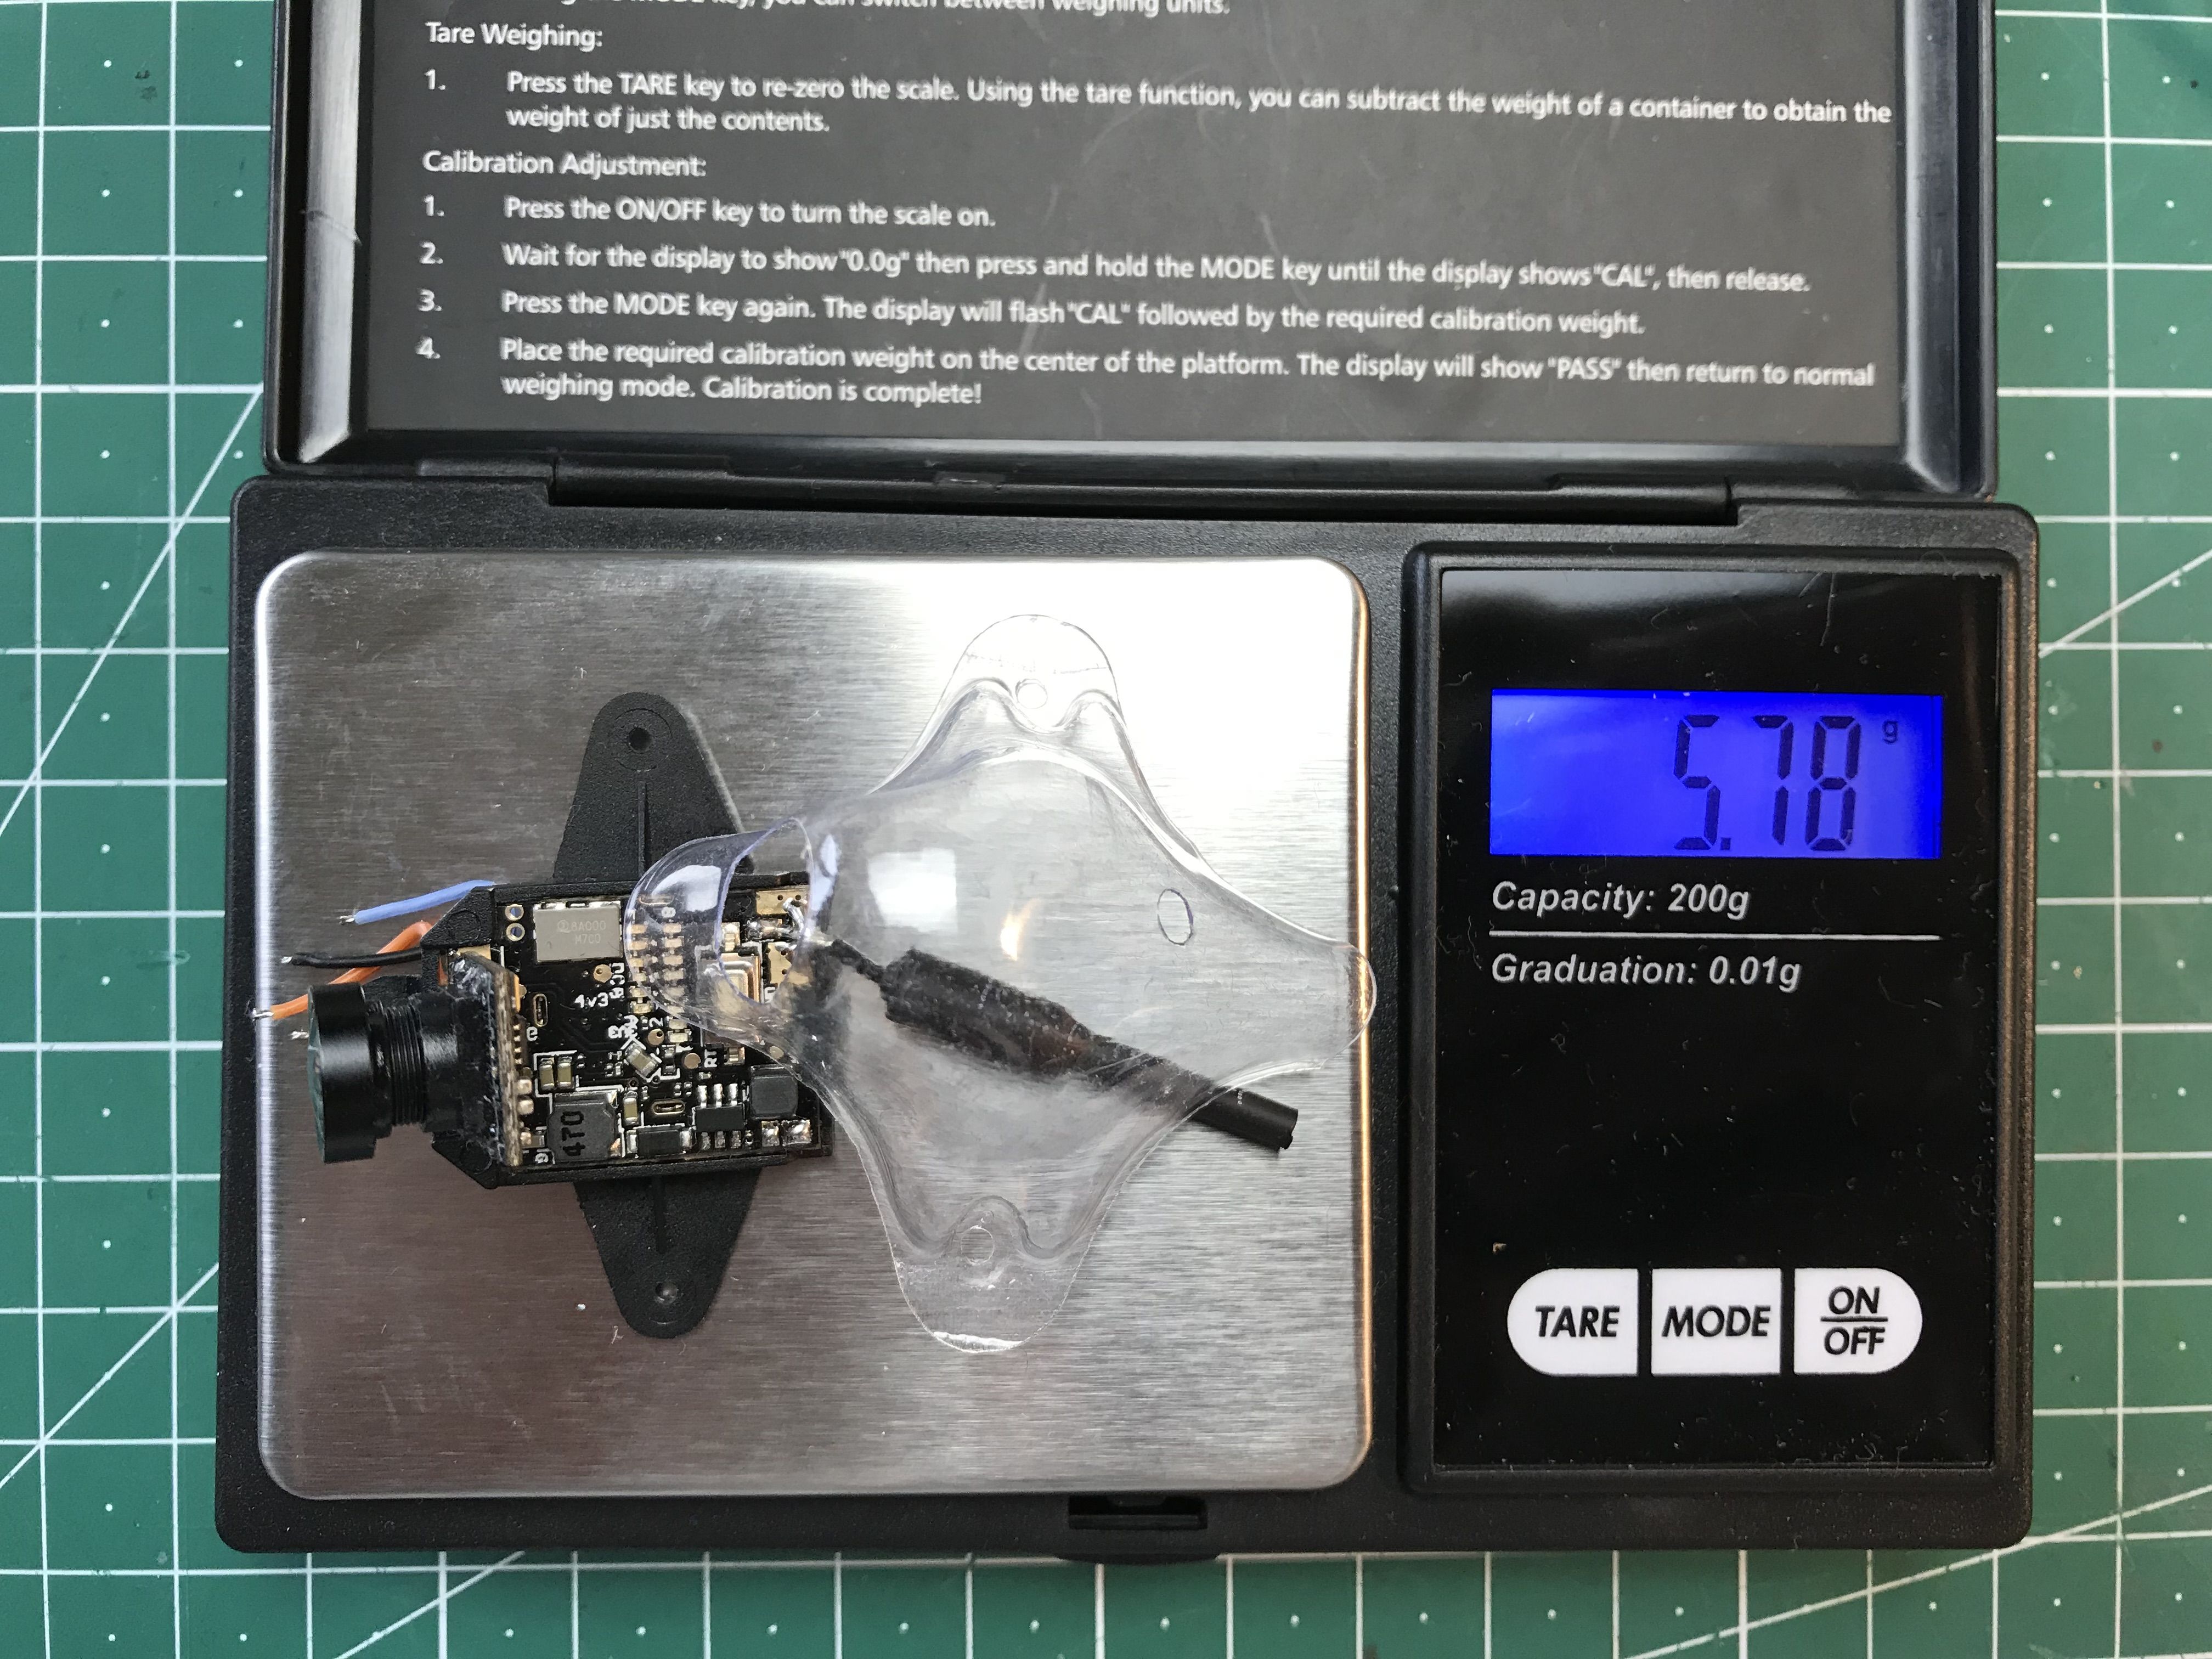
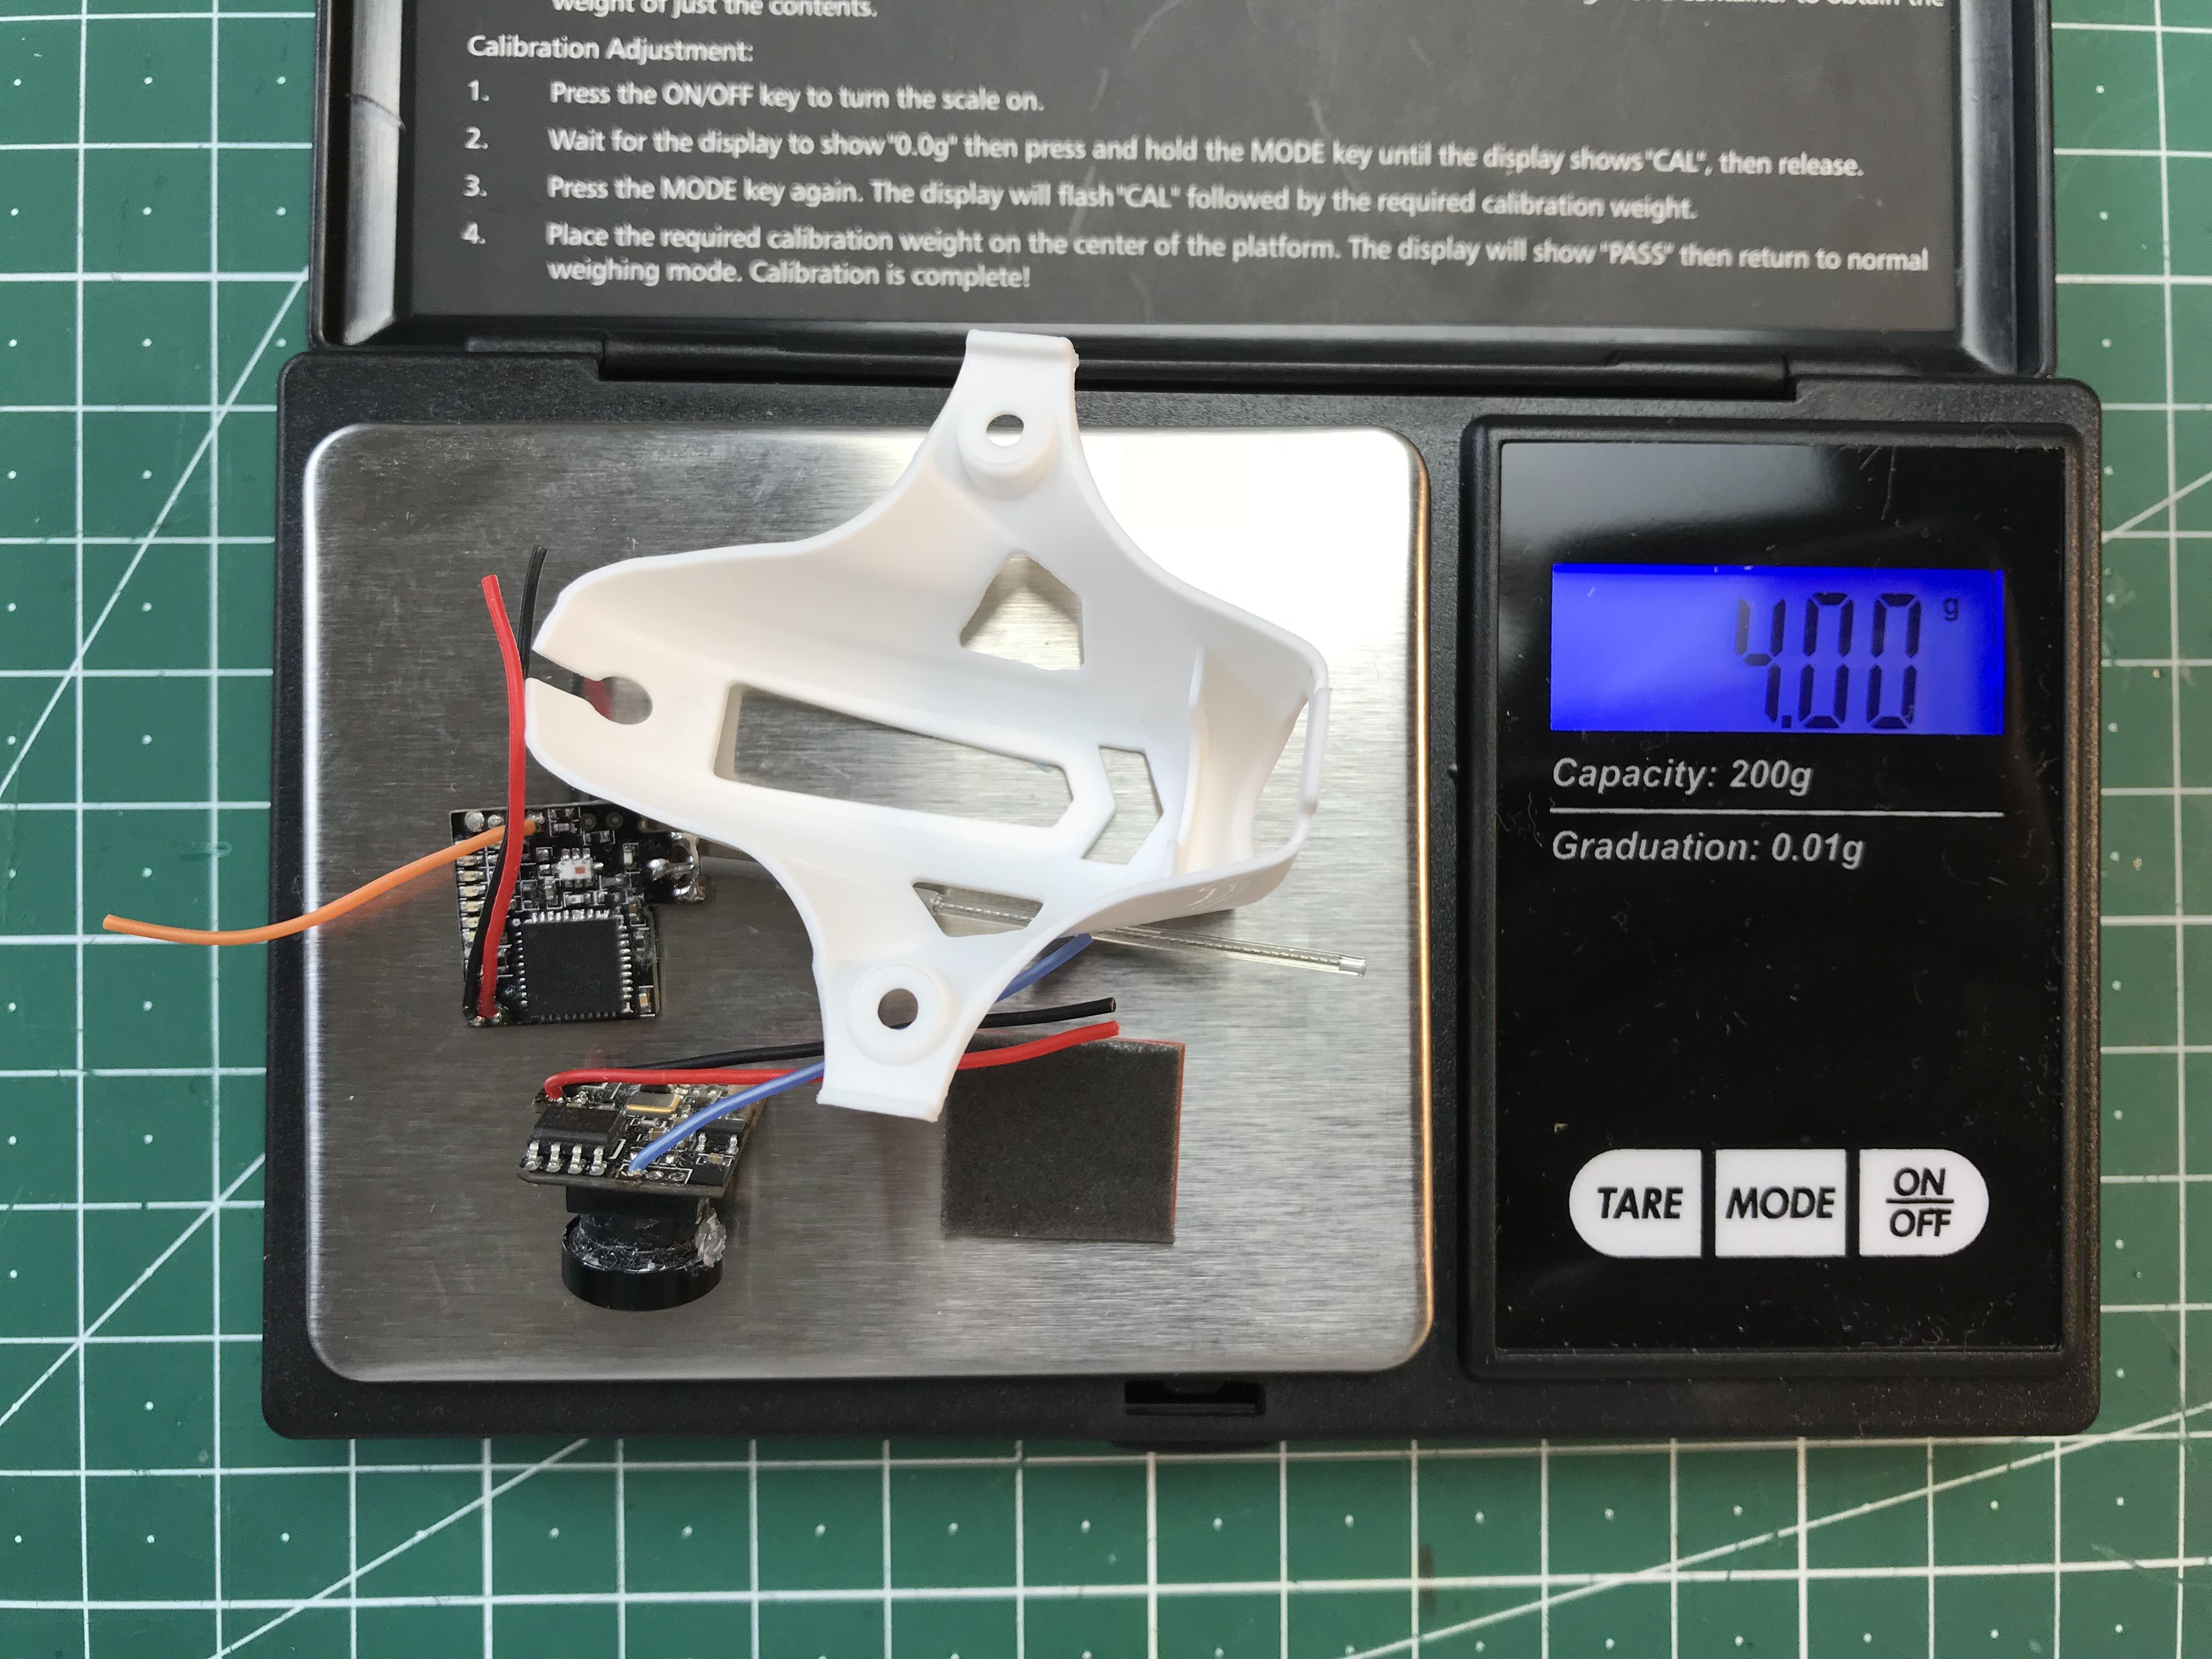
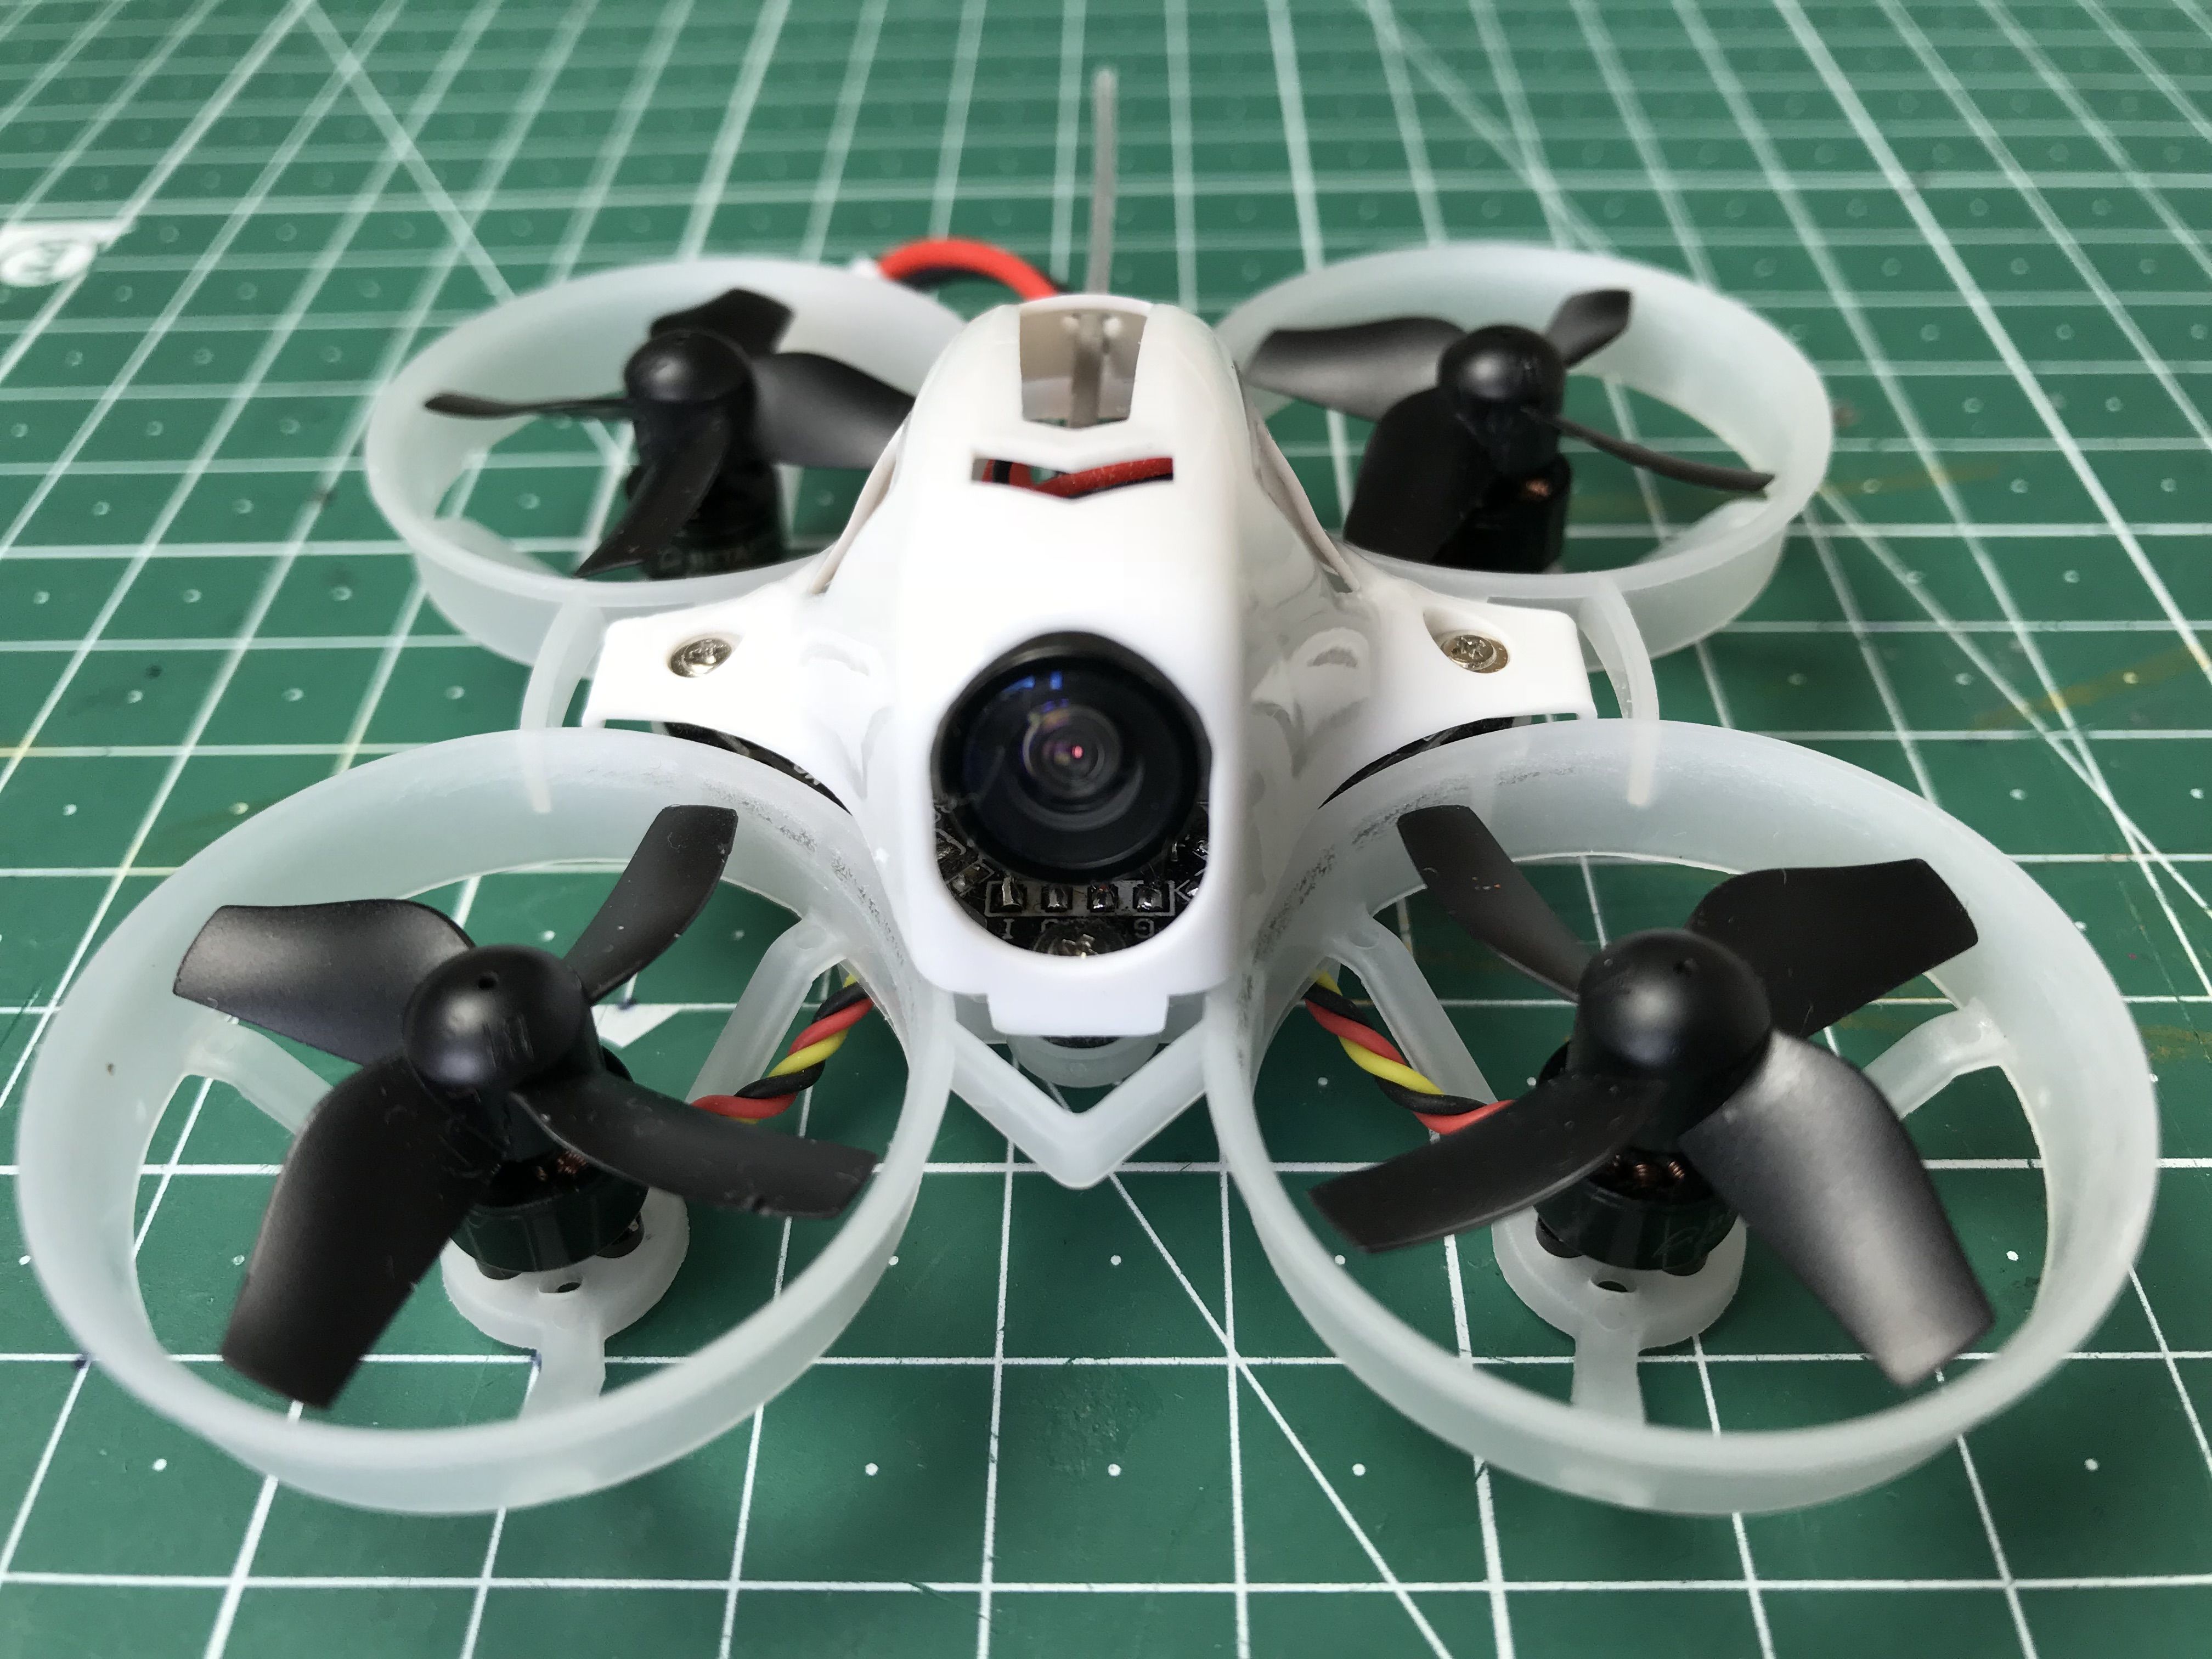
I had a desoldered Eachine EF-02 AIO laying around, so I decided to put a monopole antenna on and stick it into the Kingcong Tiny6 canopy I also had. That would have given me almost 1.8 grams of weight reduction.
The EF-02 camera had a BEC on the camera PCB, which meant there should have been two more wires between the camera and the VTX supplying the latter with 5 volts. Since the flight controller had its own BEC, I decided to solder the VTX to the flight controller instead, so it would have been easier to manipulate the camera fixed inside the canopy.
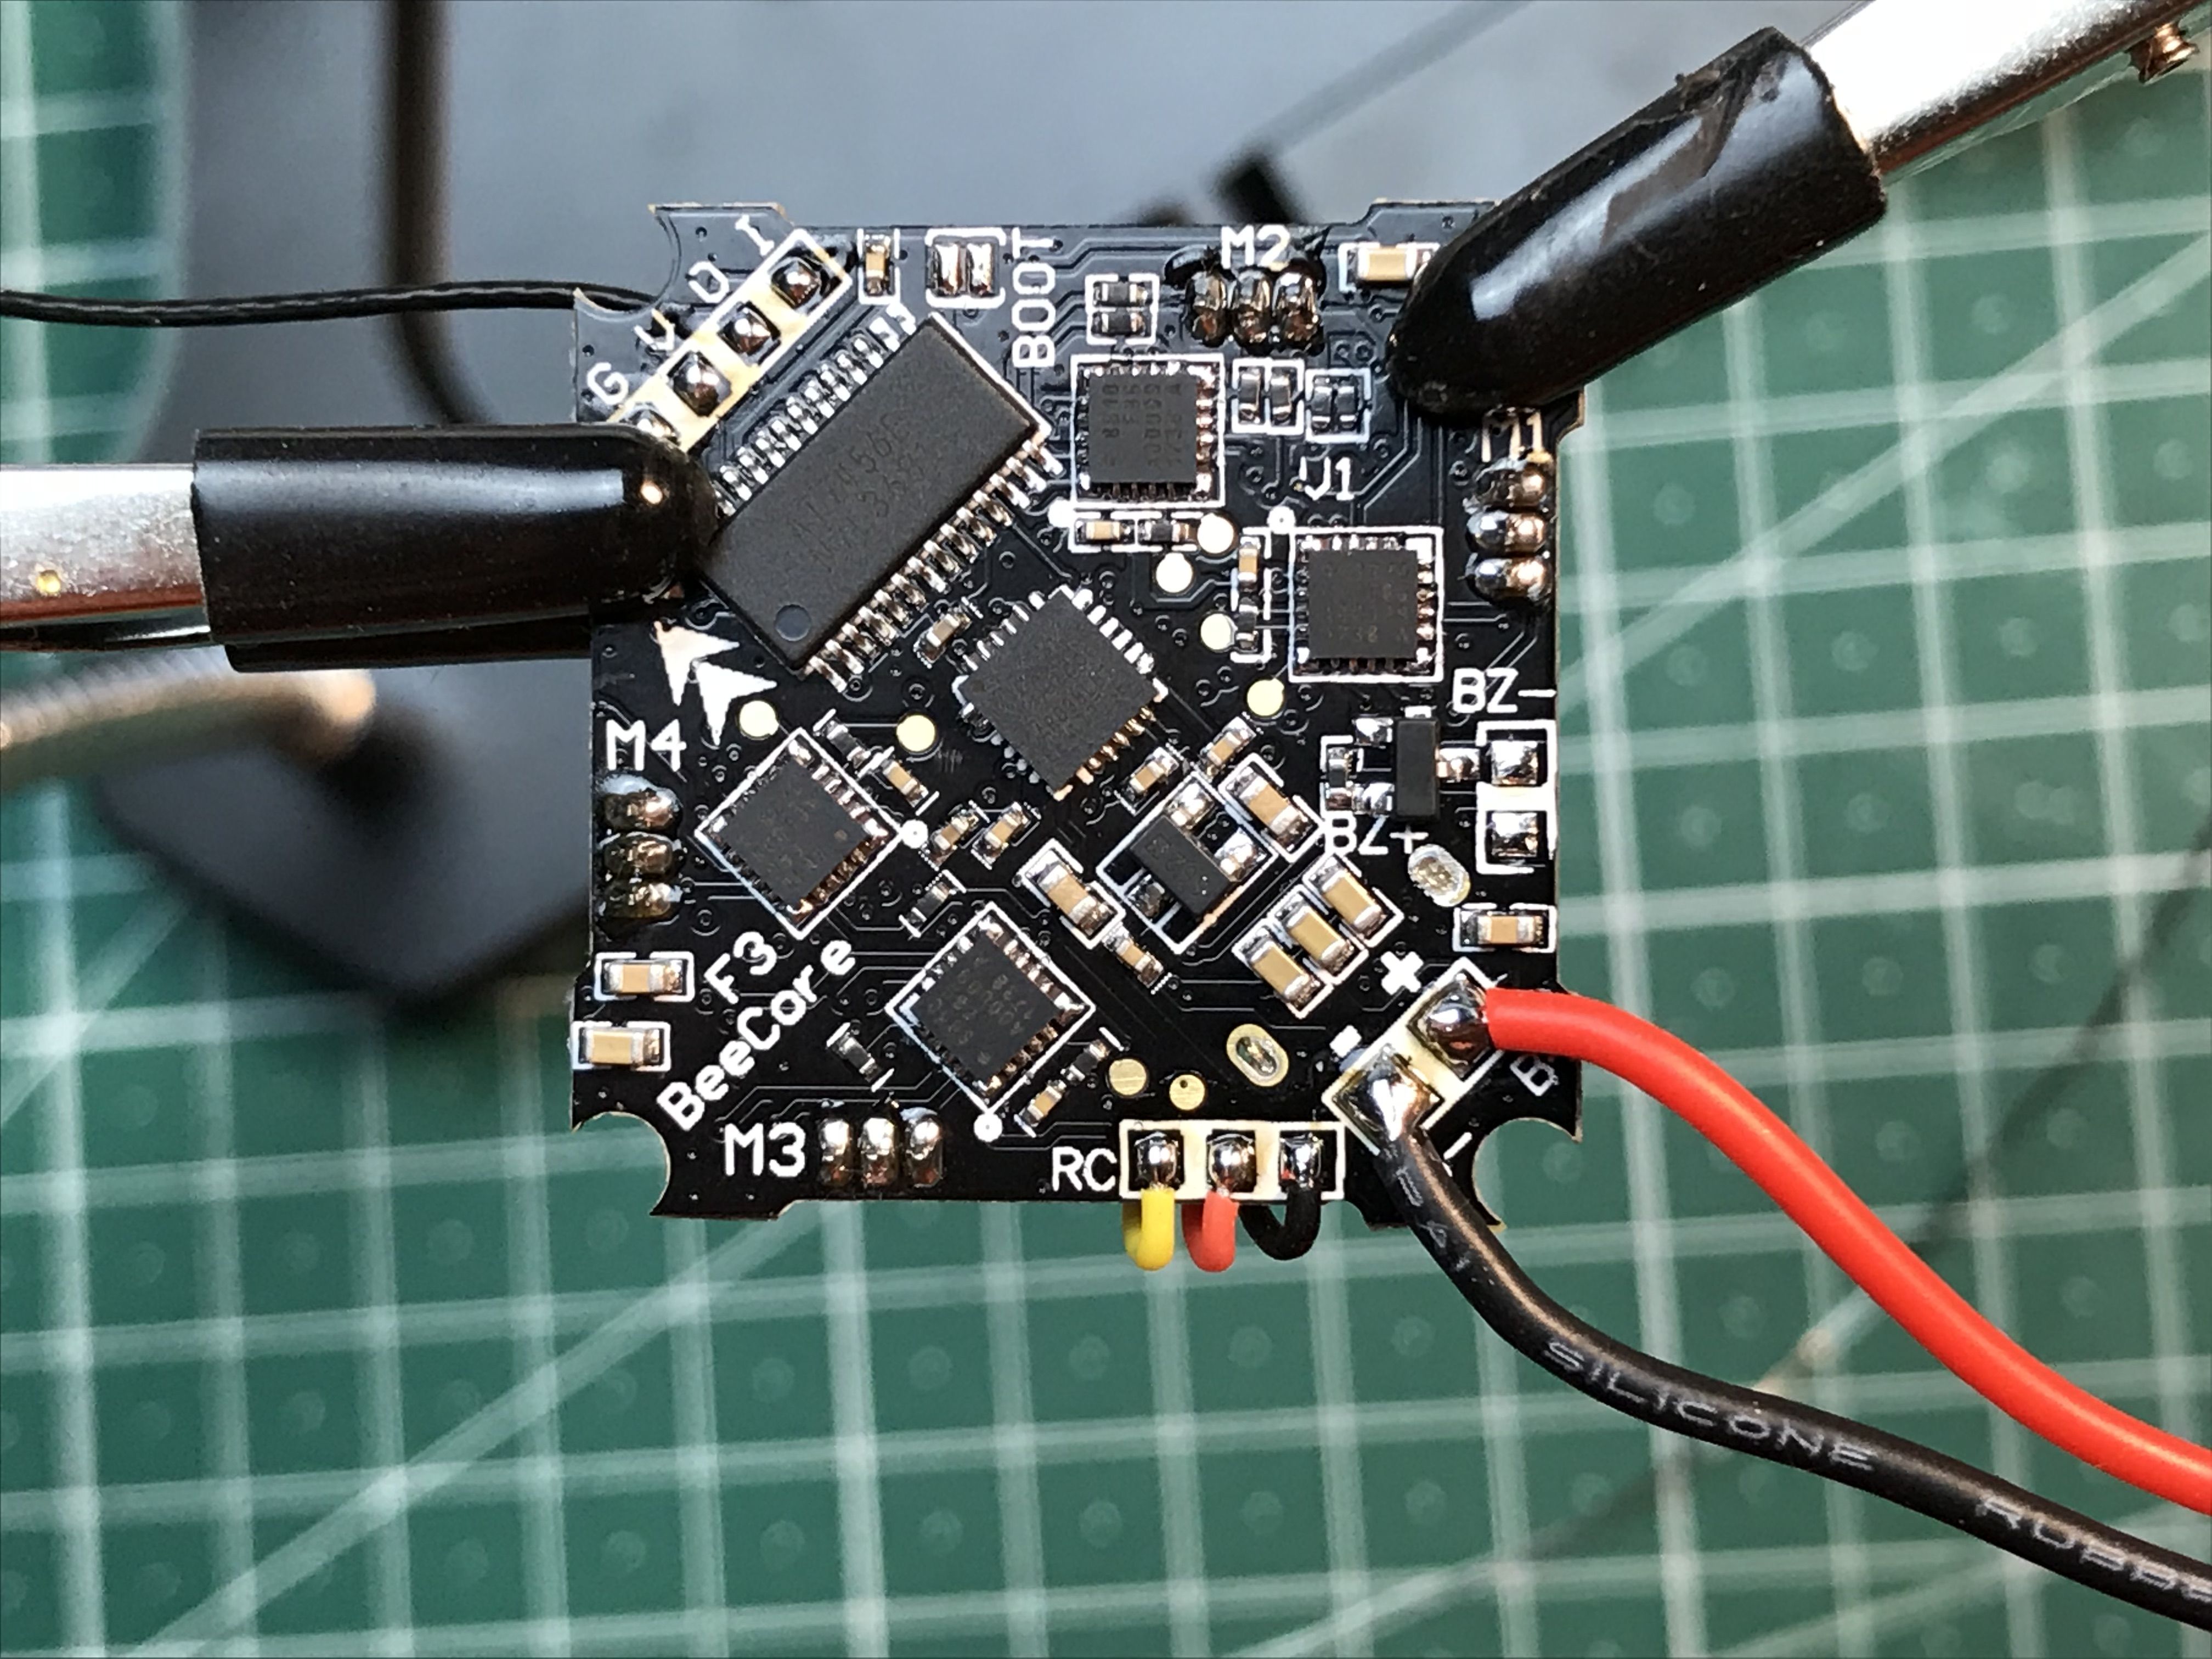
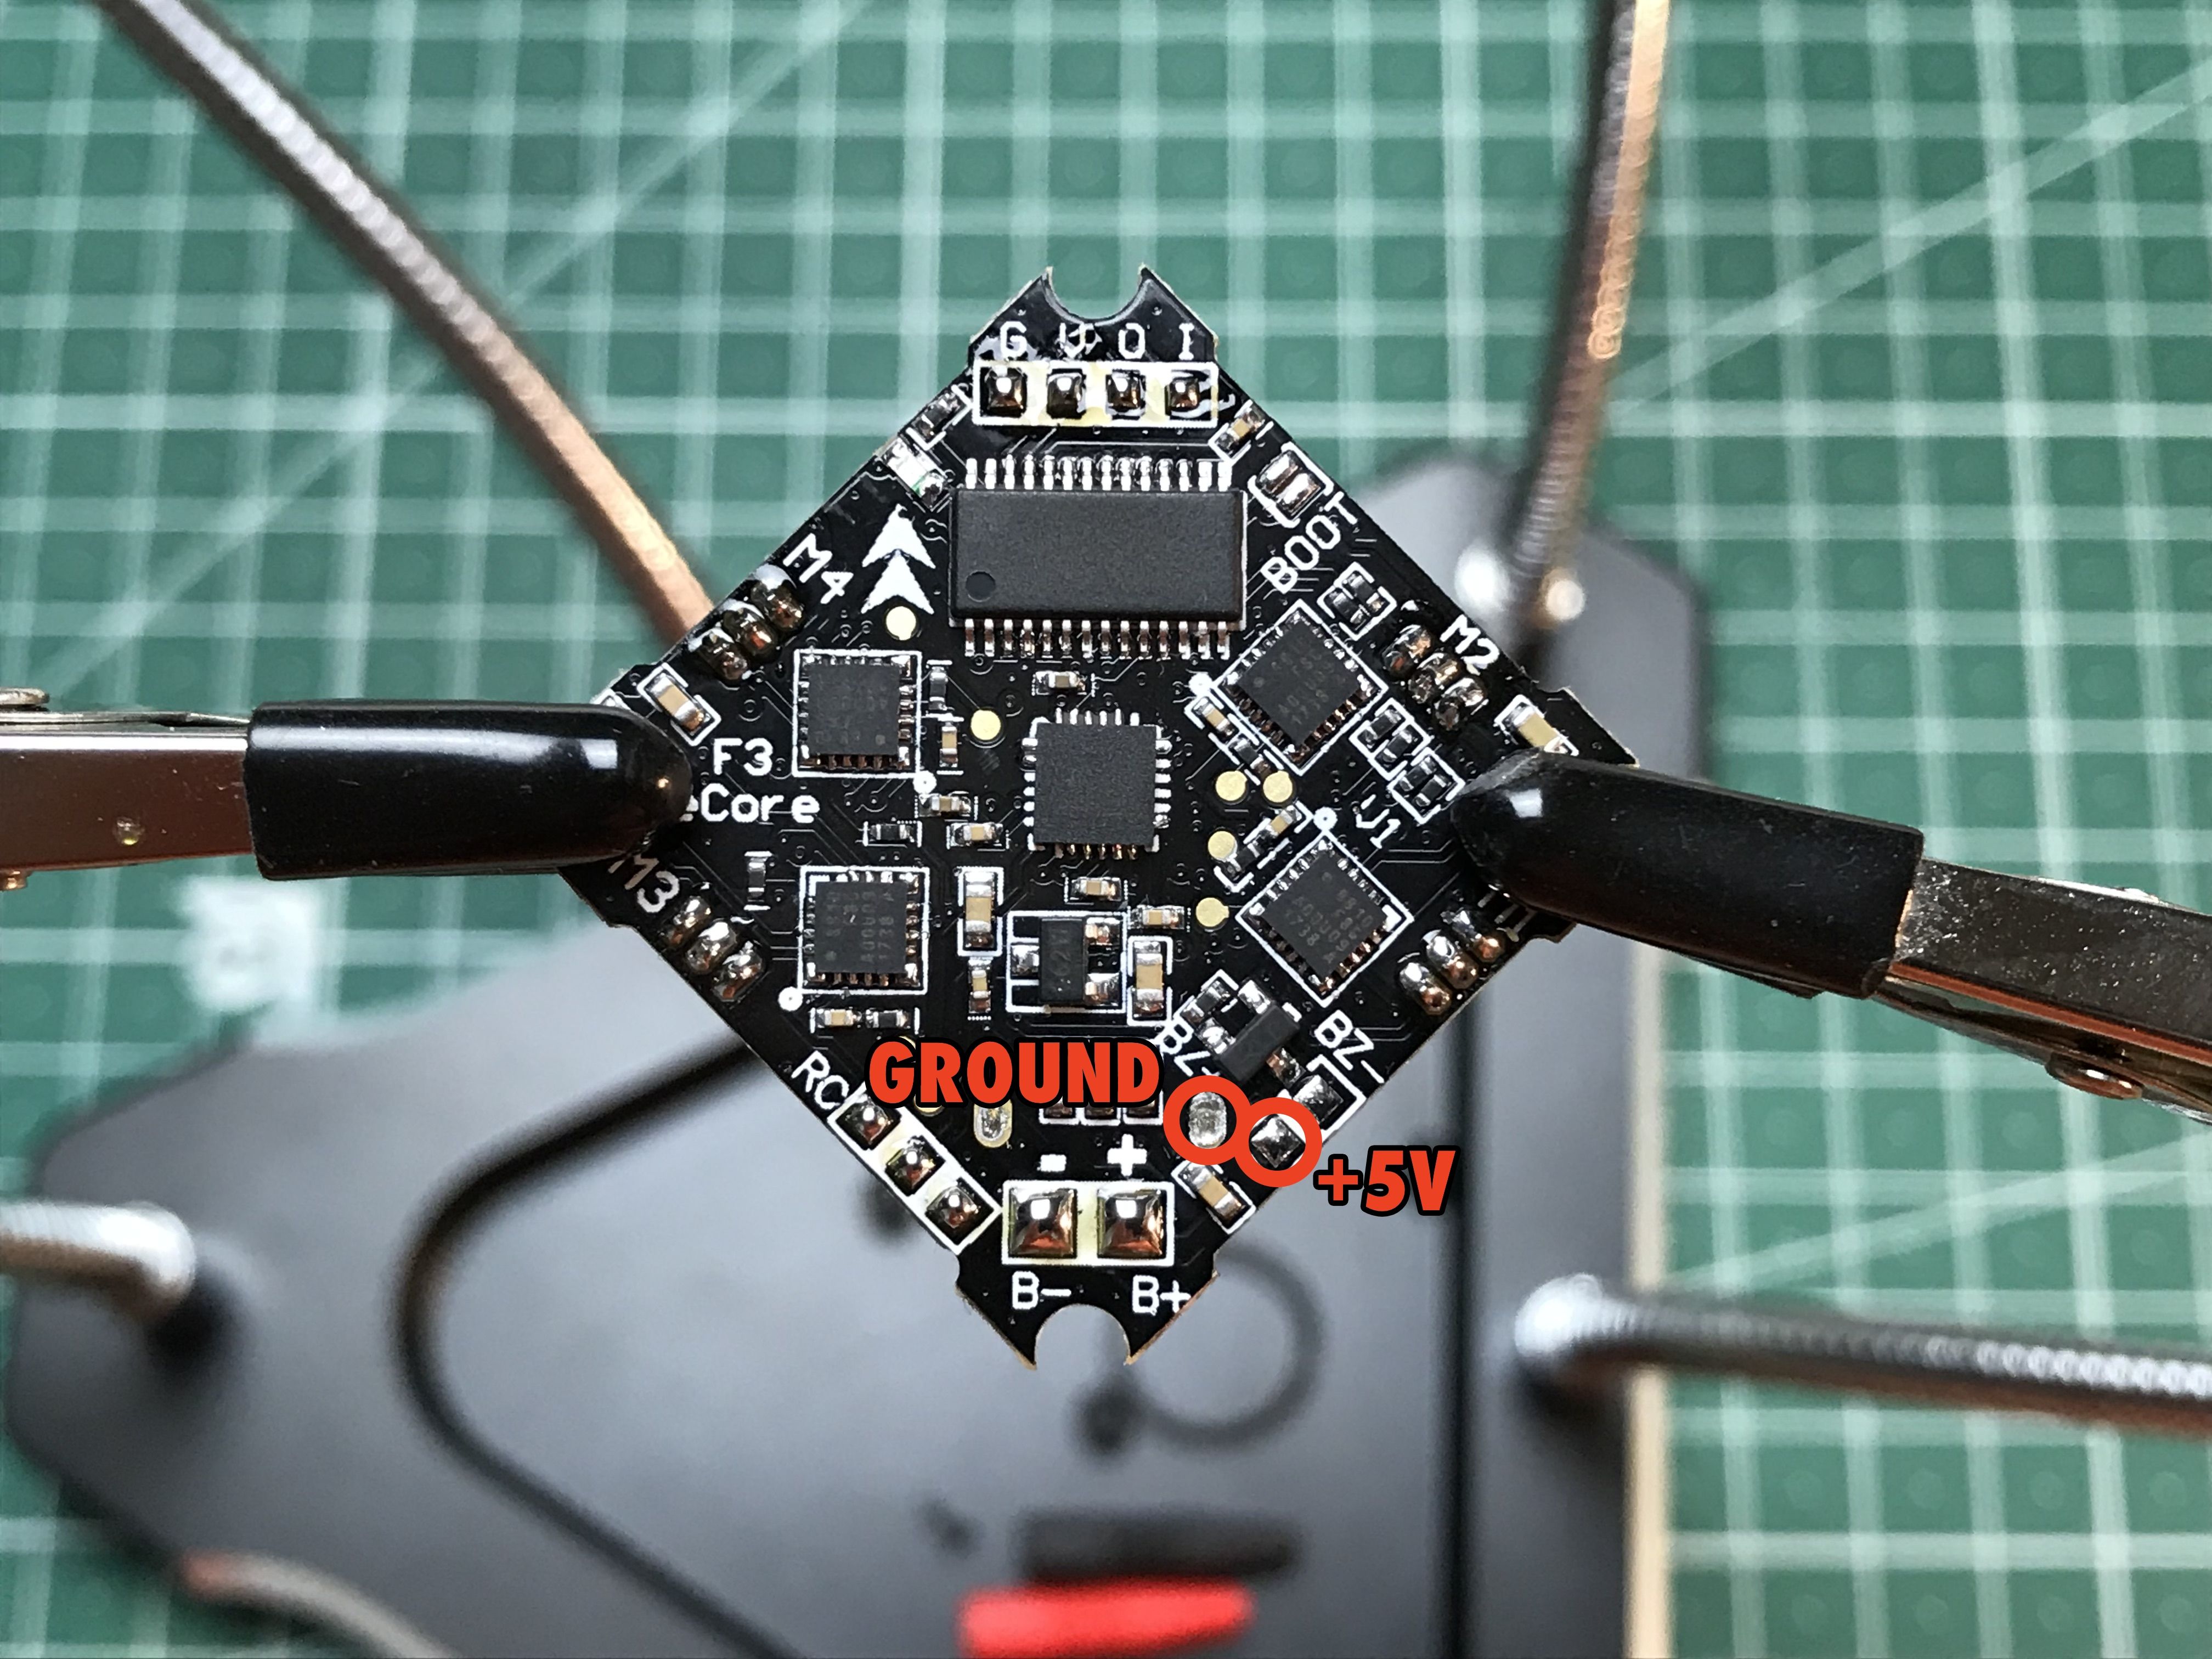
The problem was the flight controller did not have extra 5V and GND pads broken out so I had to get a bit creative. +5V was found pretty easily on +BZ pad, but there was no dedicated ground pad left except for the hole where the USB connector housing was soldered to. Obviously, it was connected to the main ground, so I pretinned it and used as pad to solder a wire to.
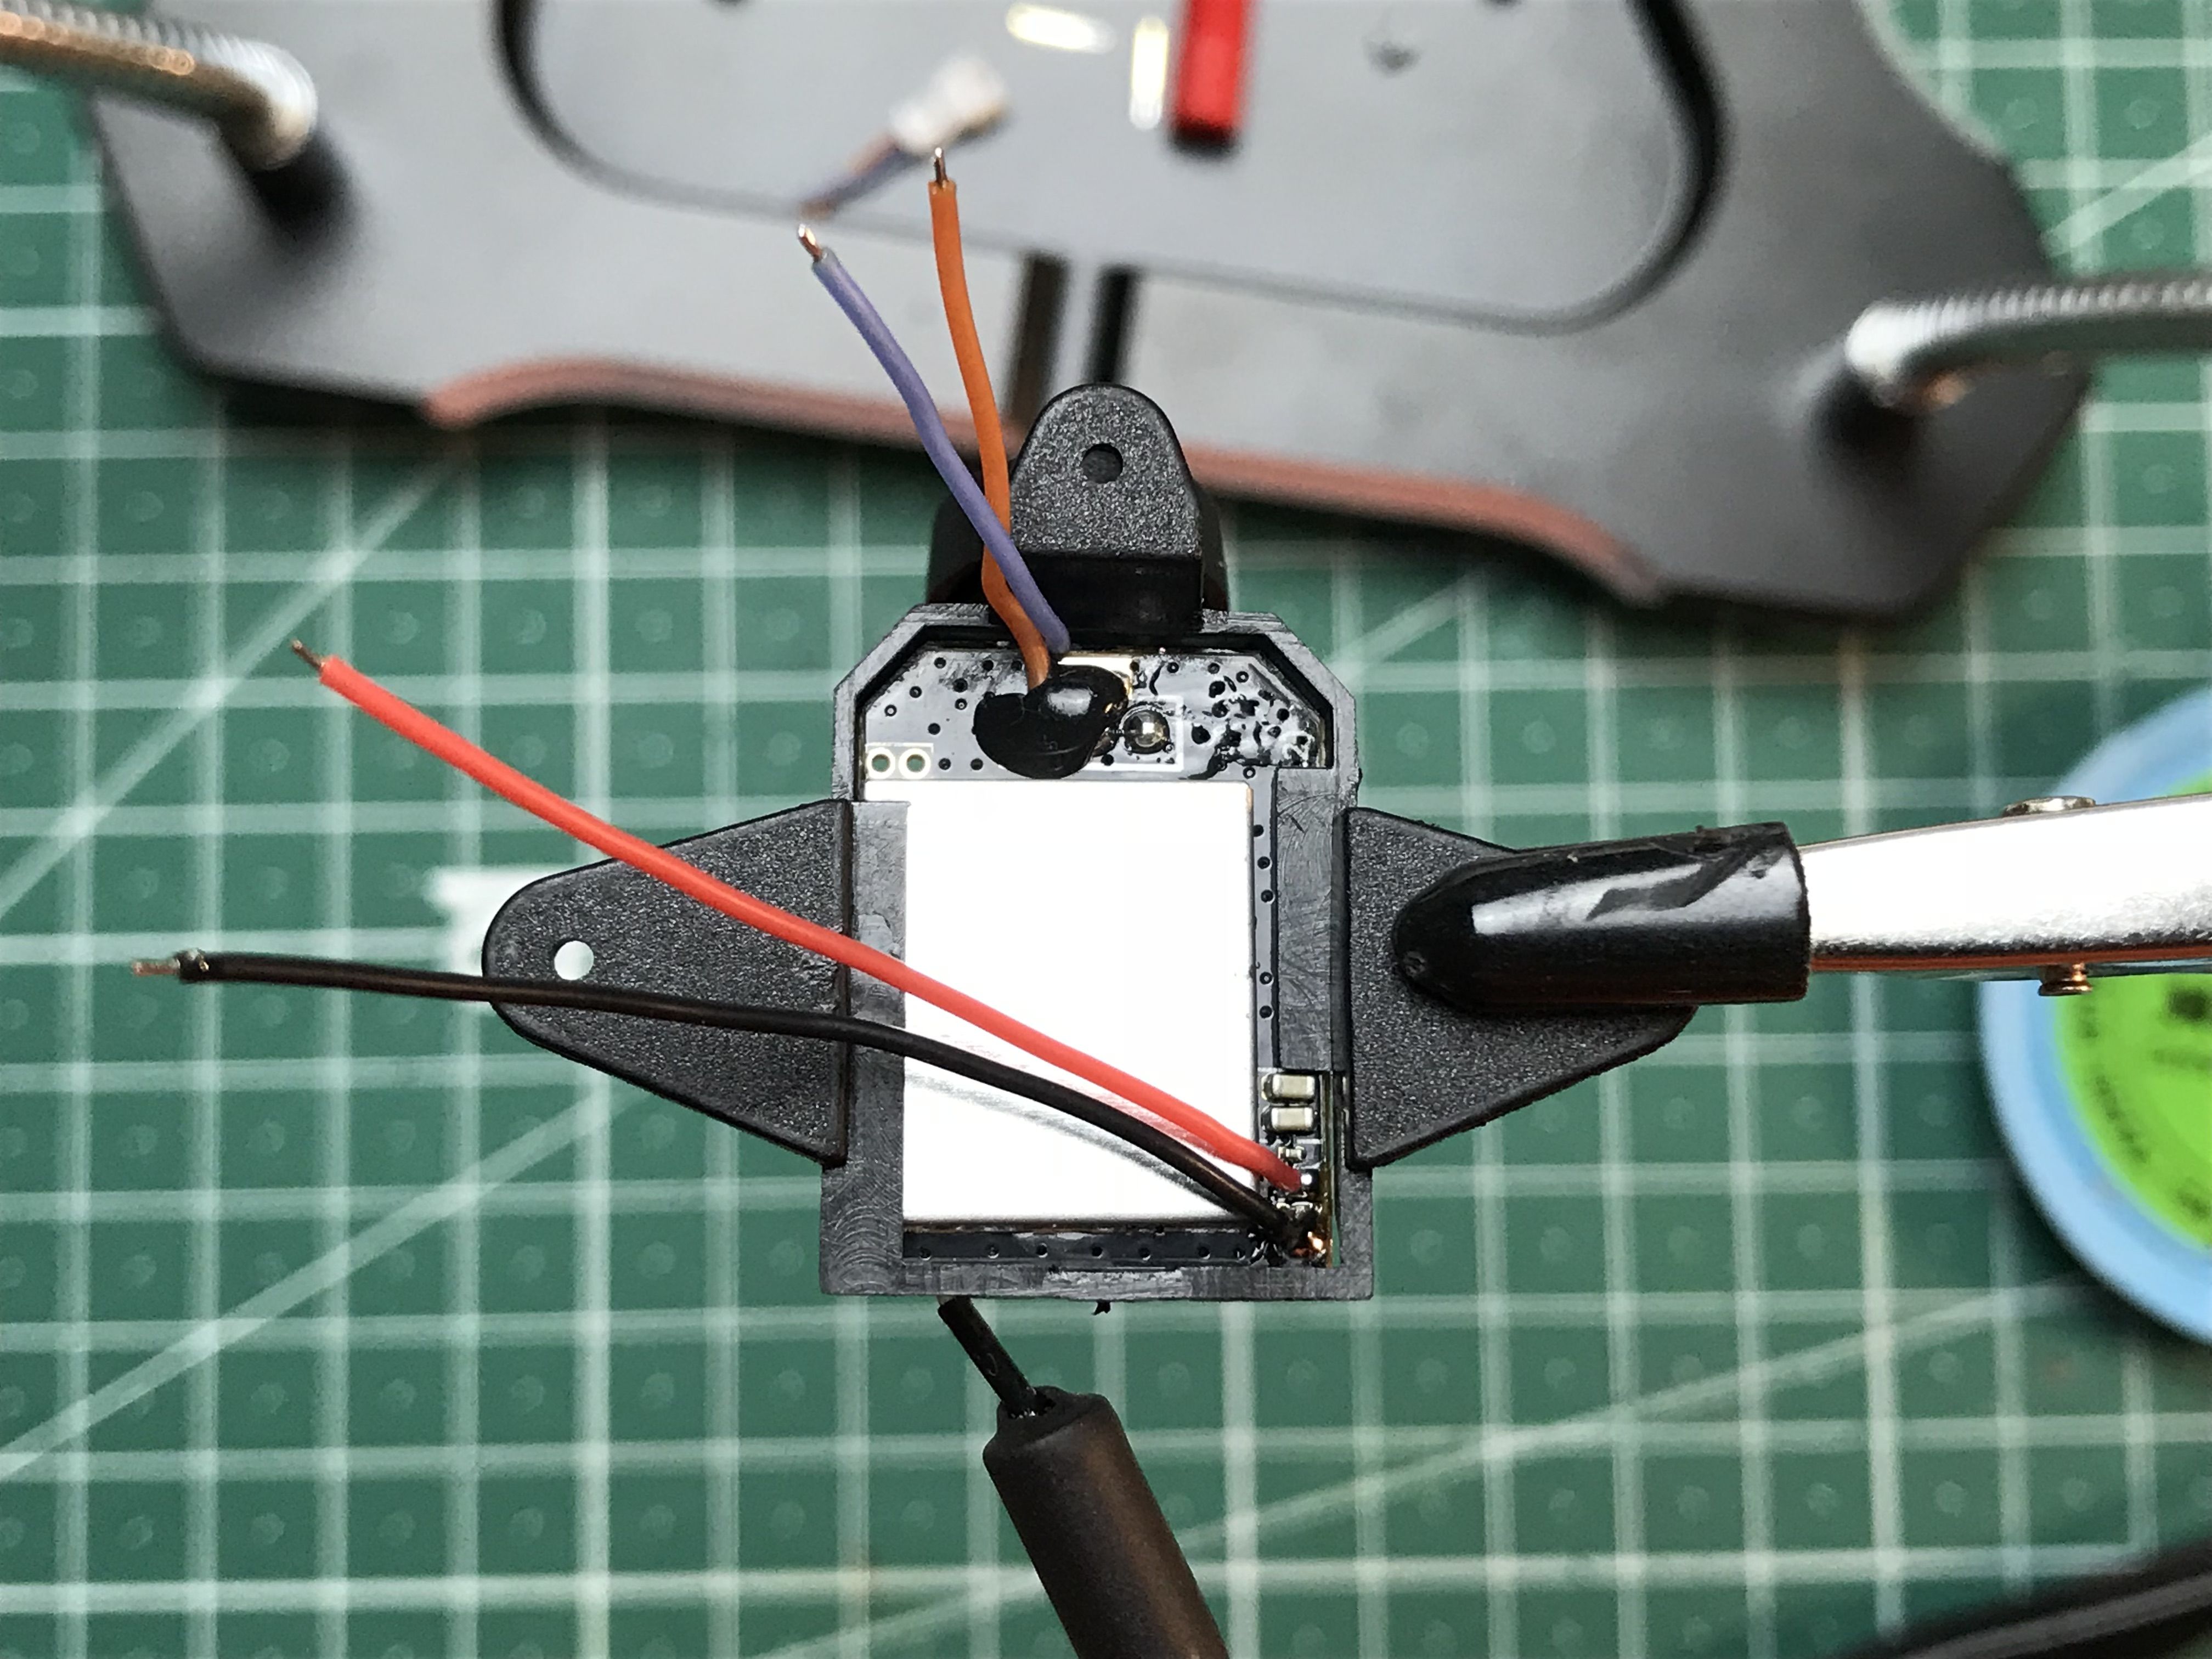
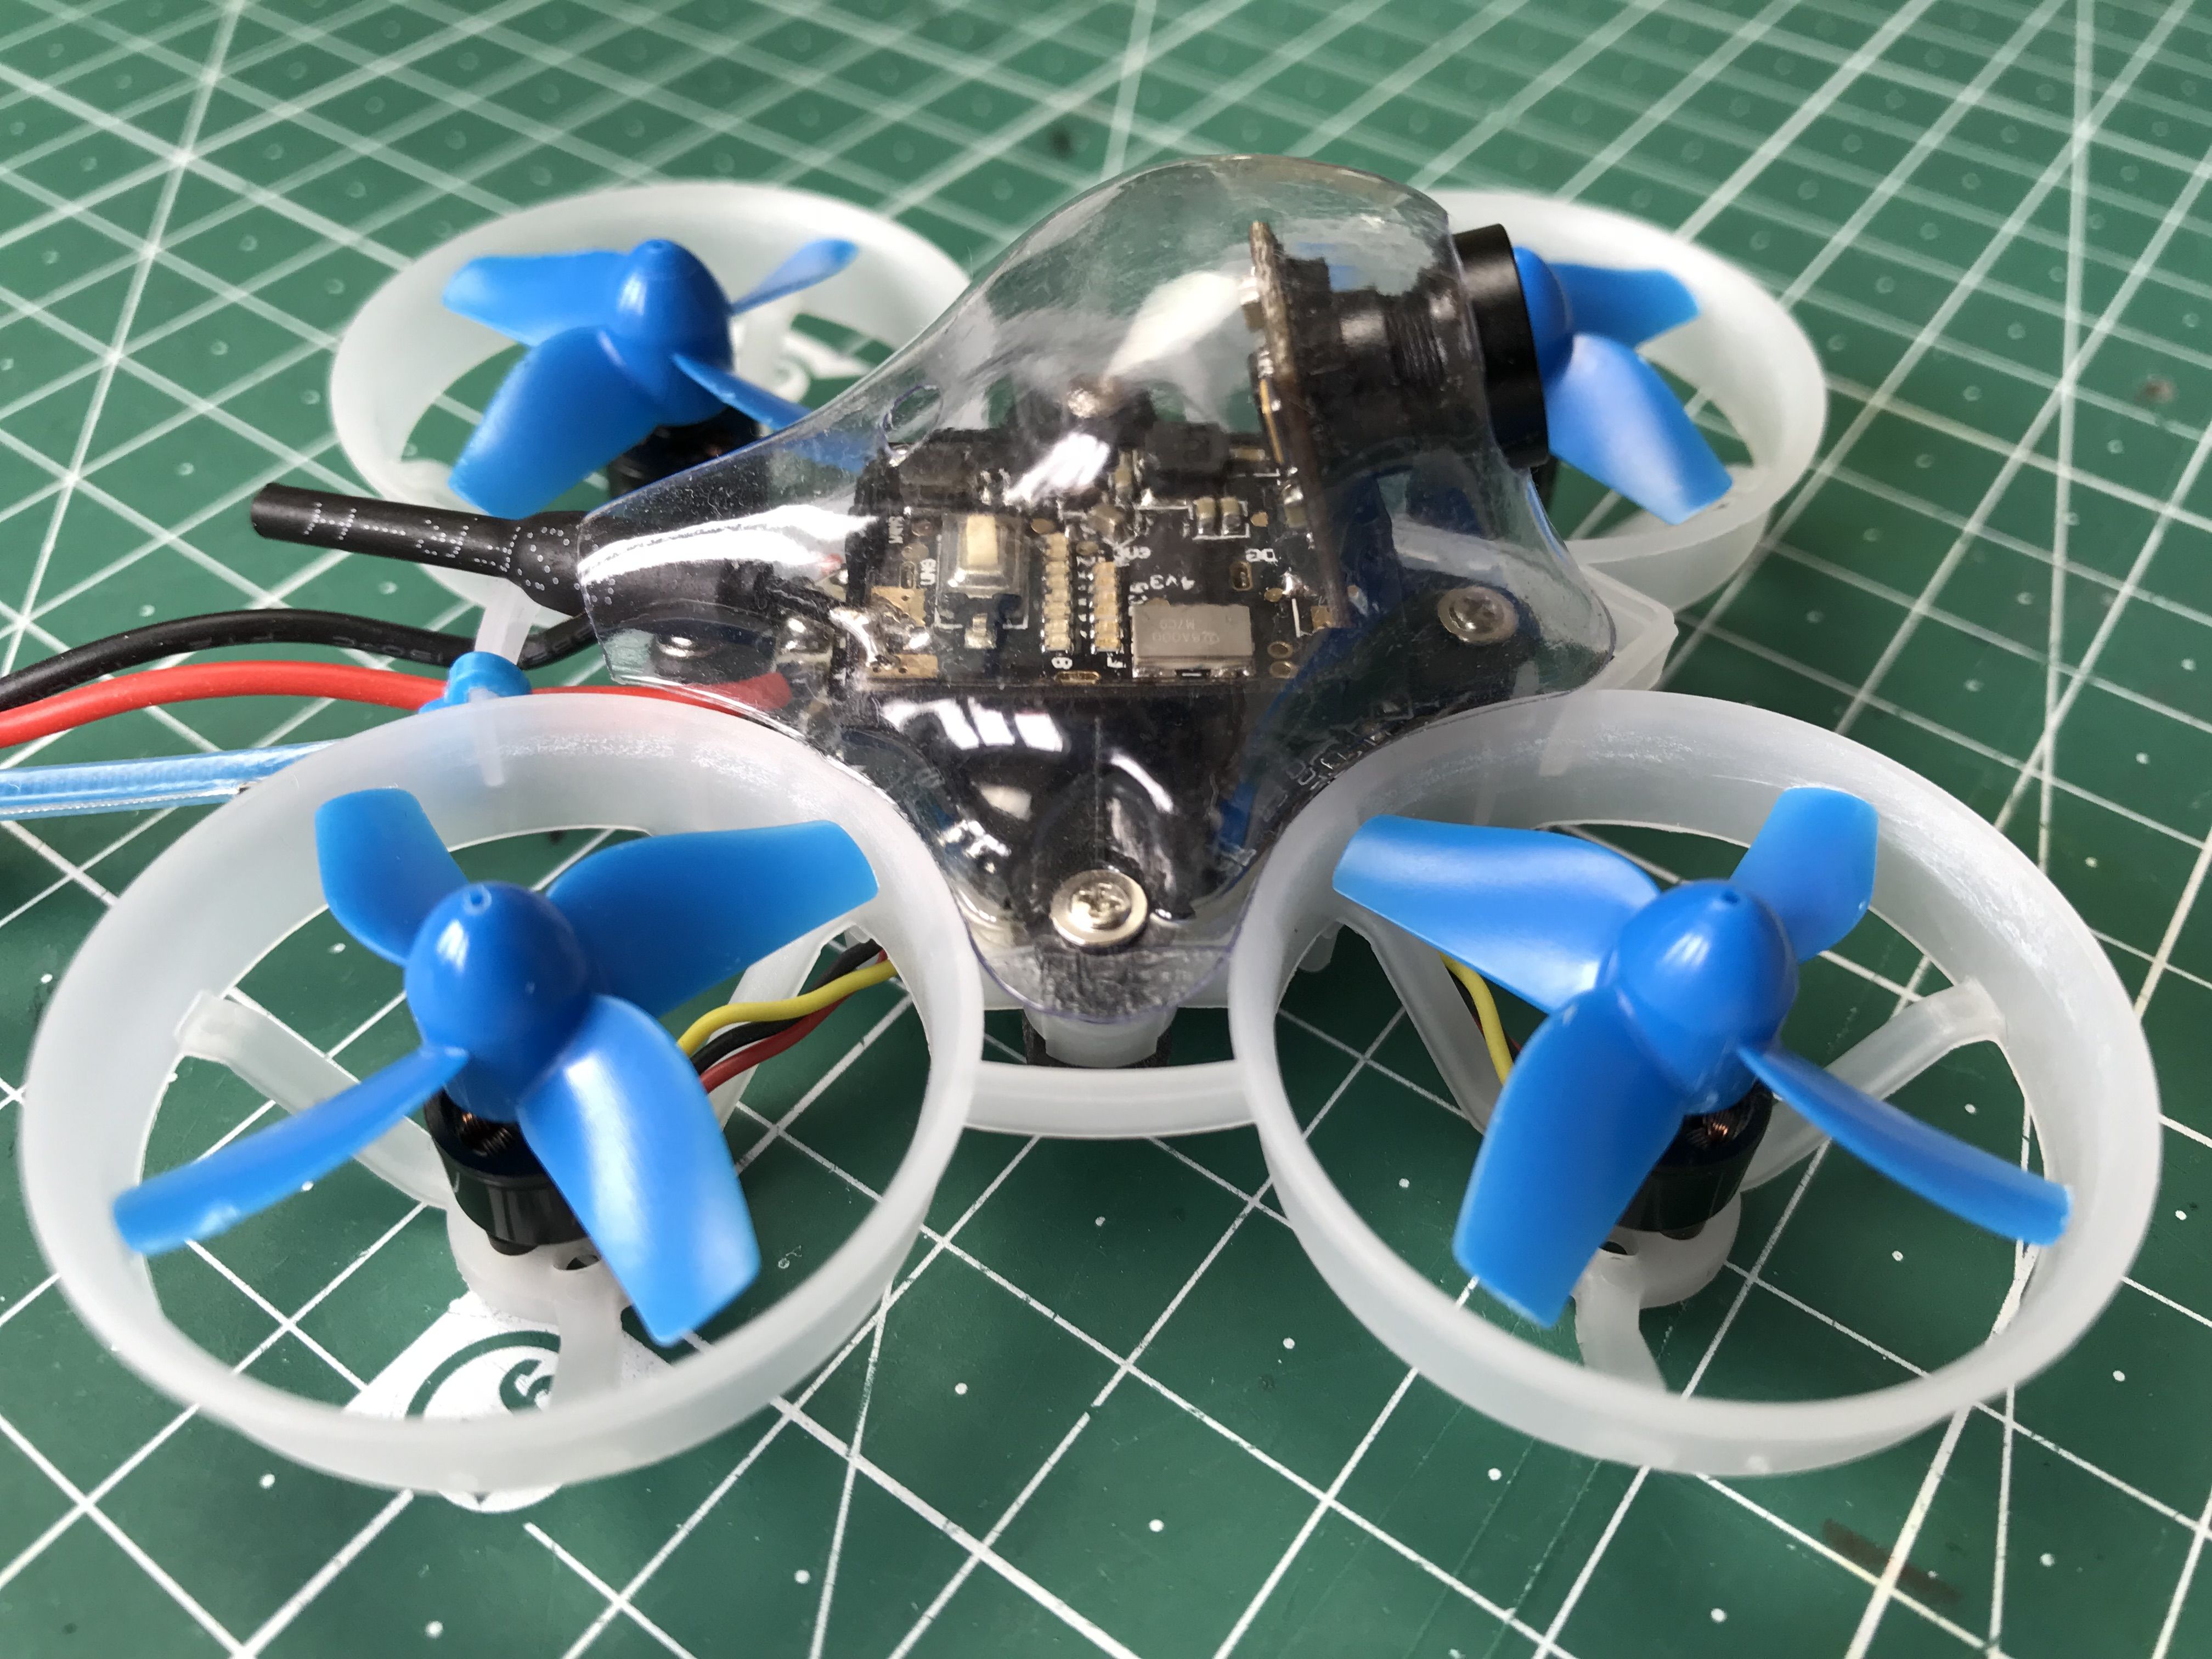
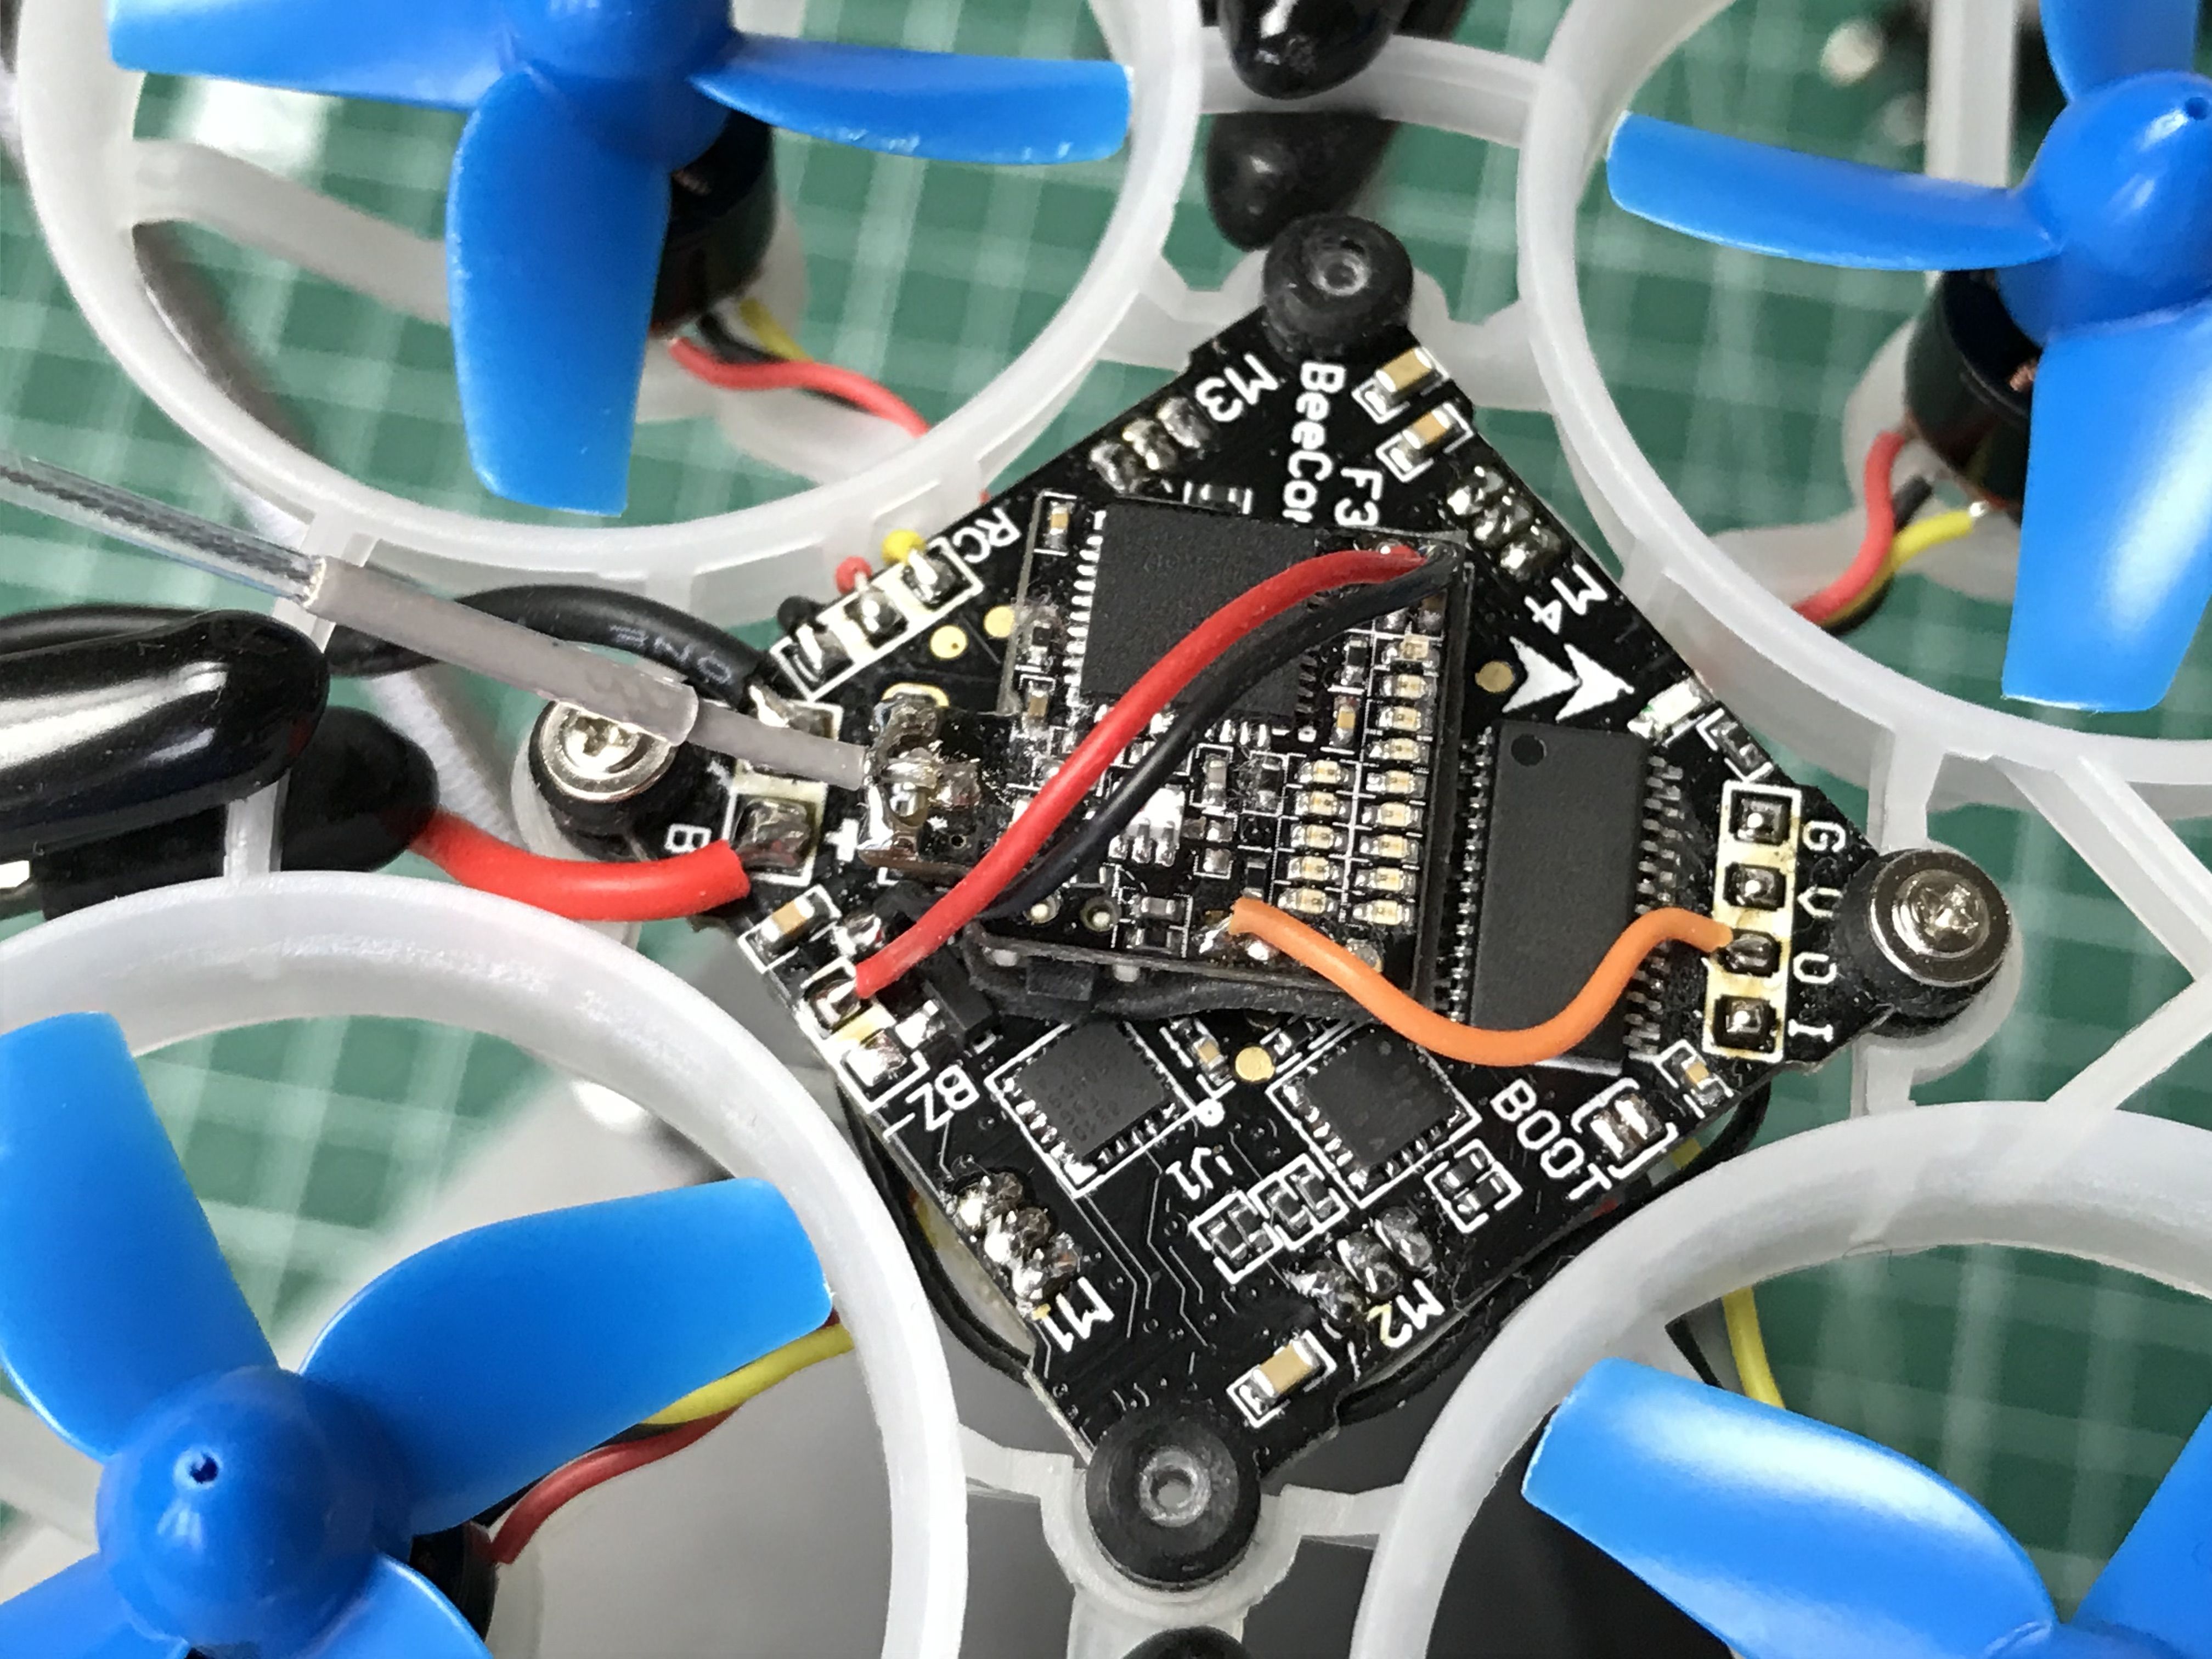
I mounted the VTX with double-sided adhesive tape and soldered power and signal wires to the flight controller.
Some hot glue got the camera fixed inside the canopy.
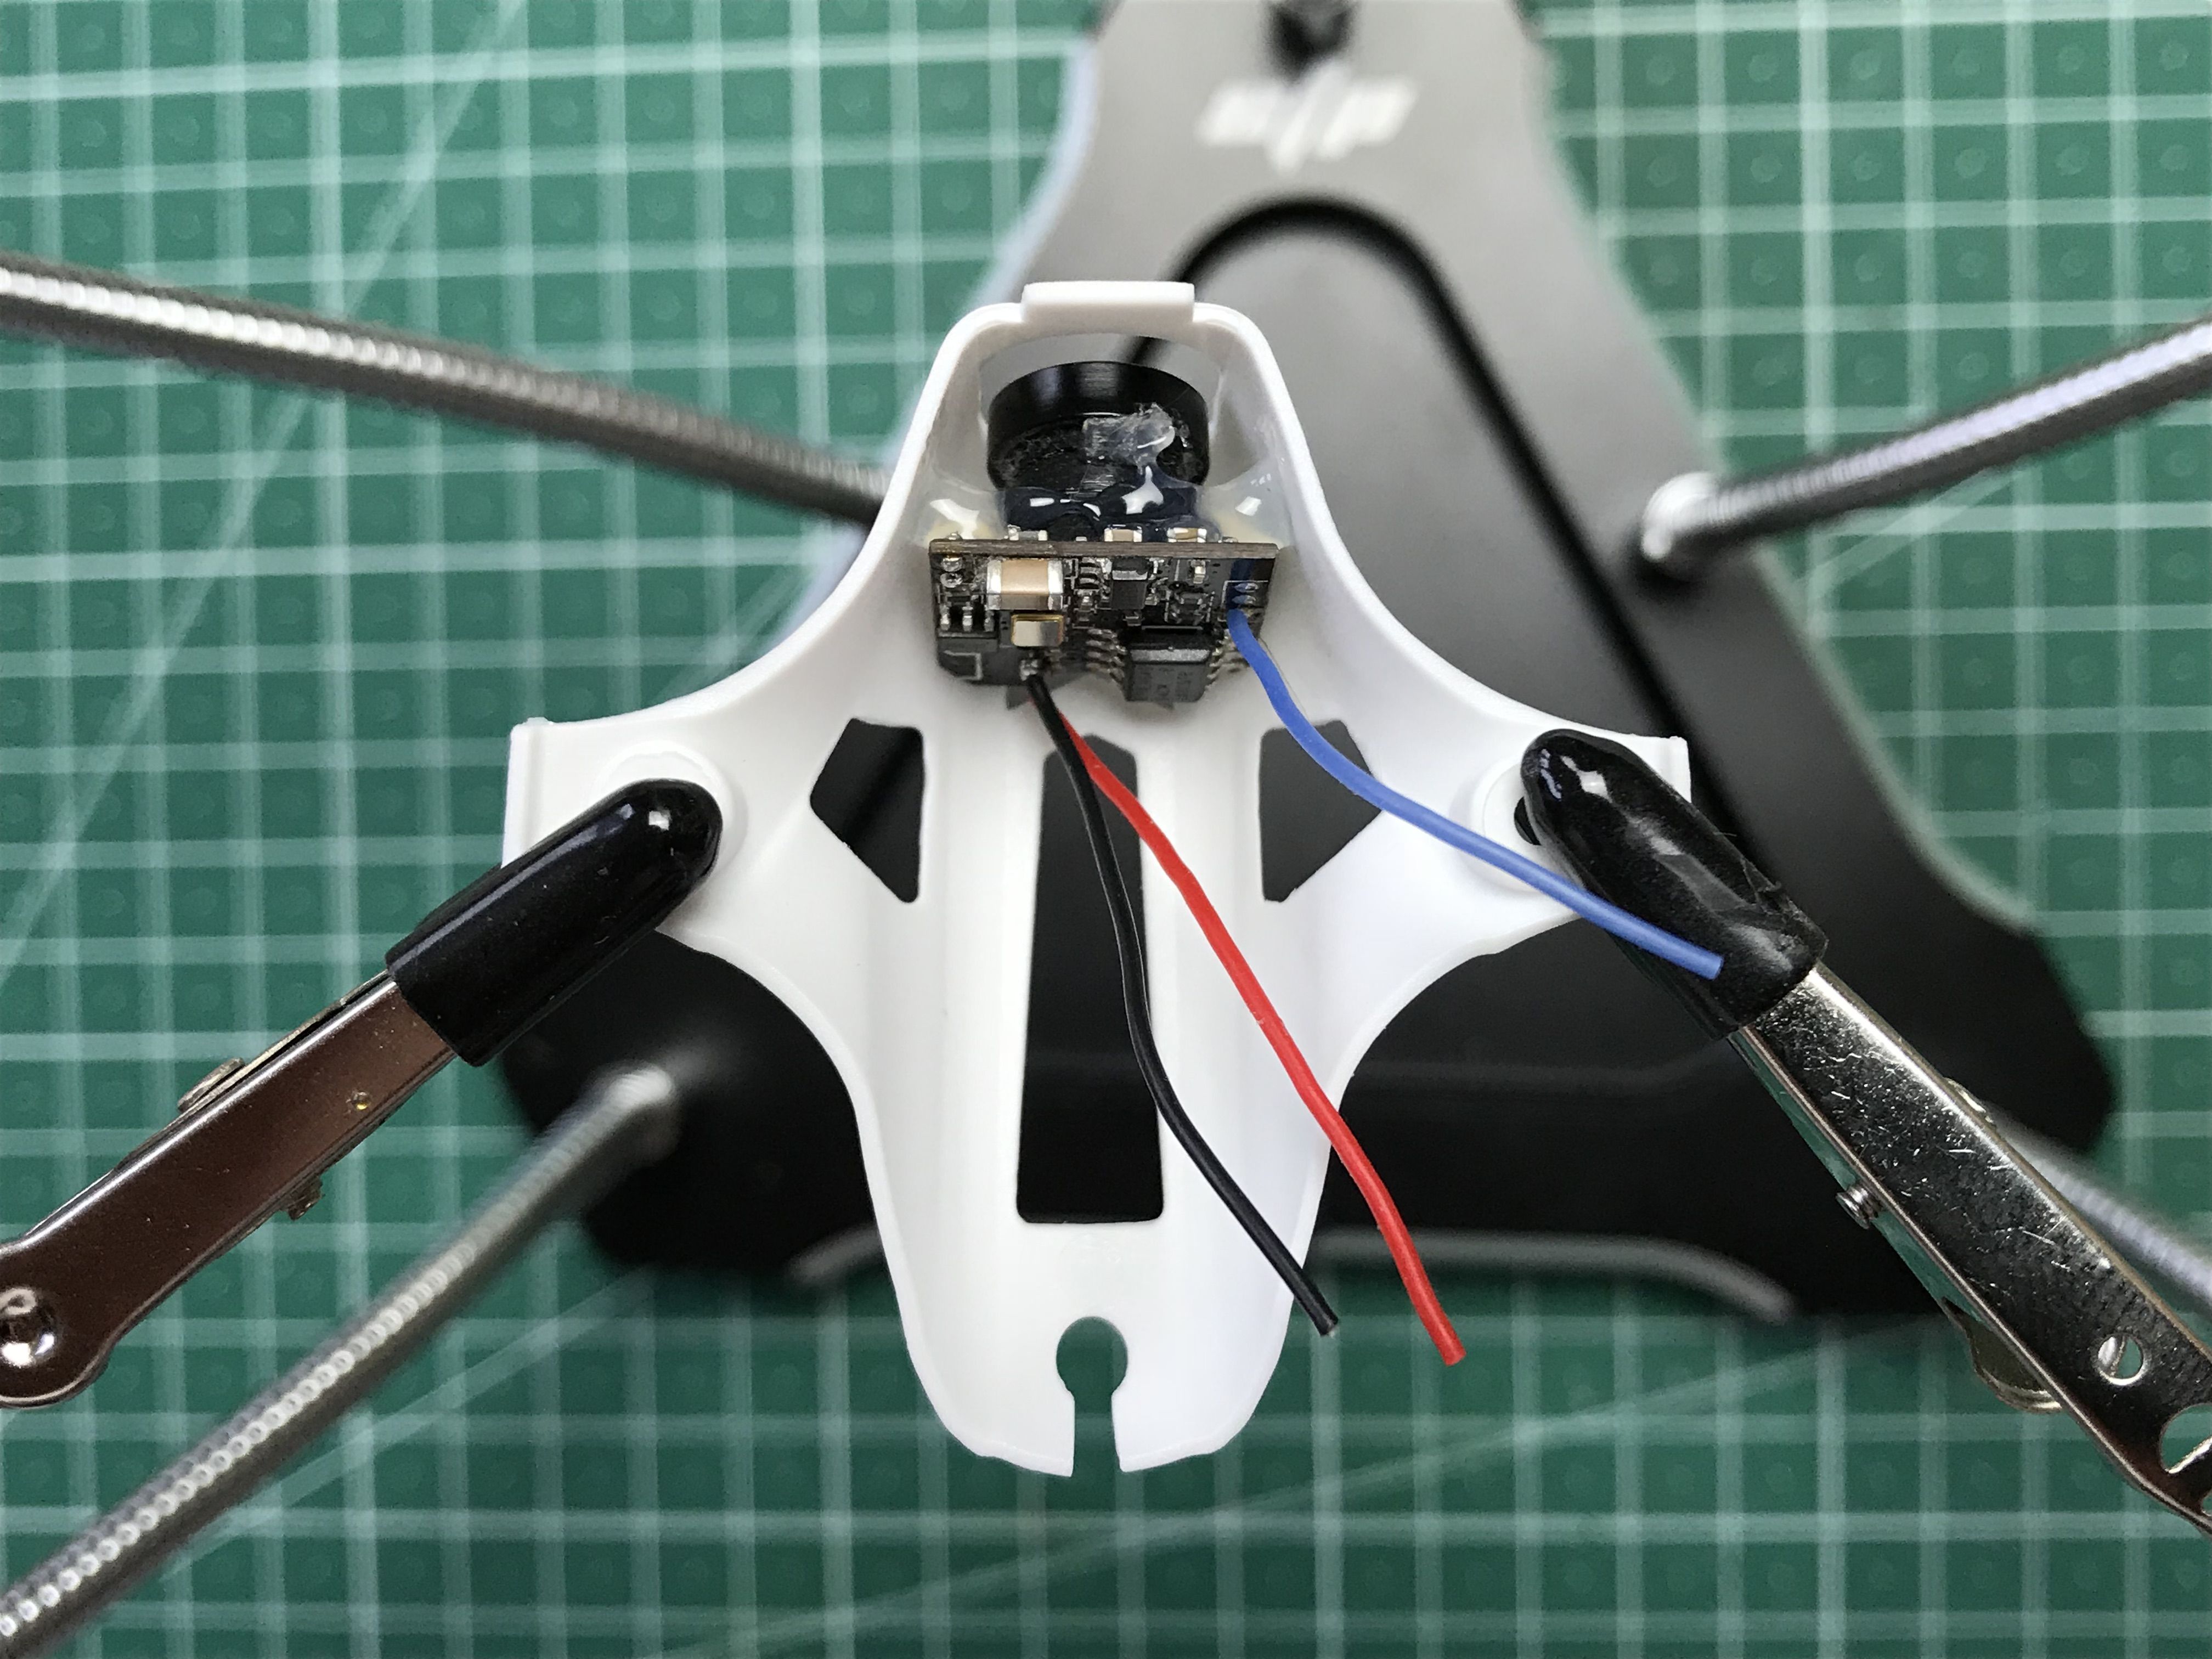
I soldered the camera wires to the pads at the front of the flight controller.

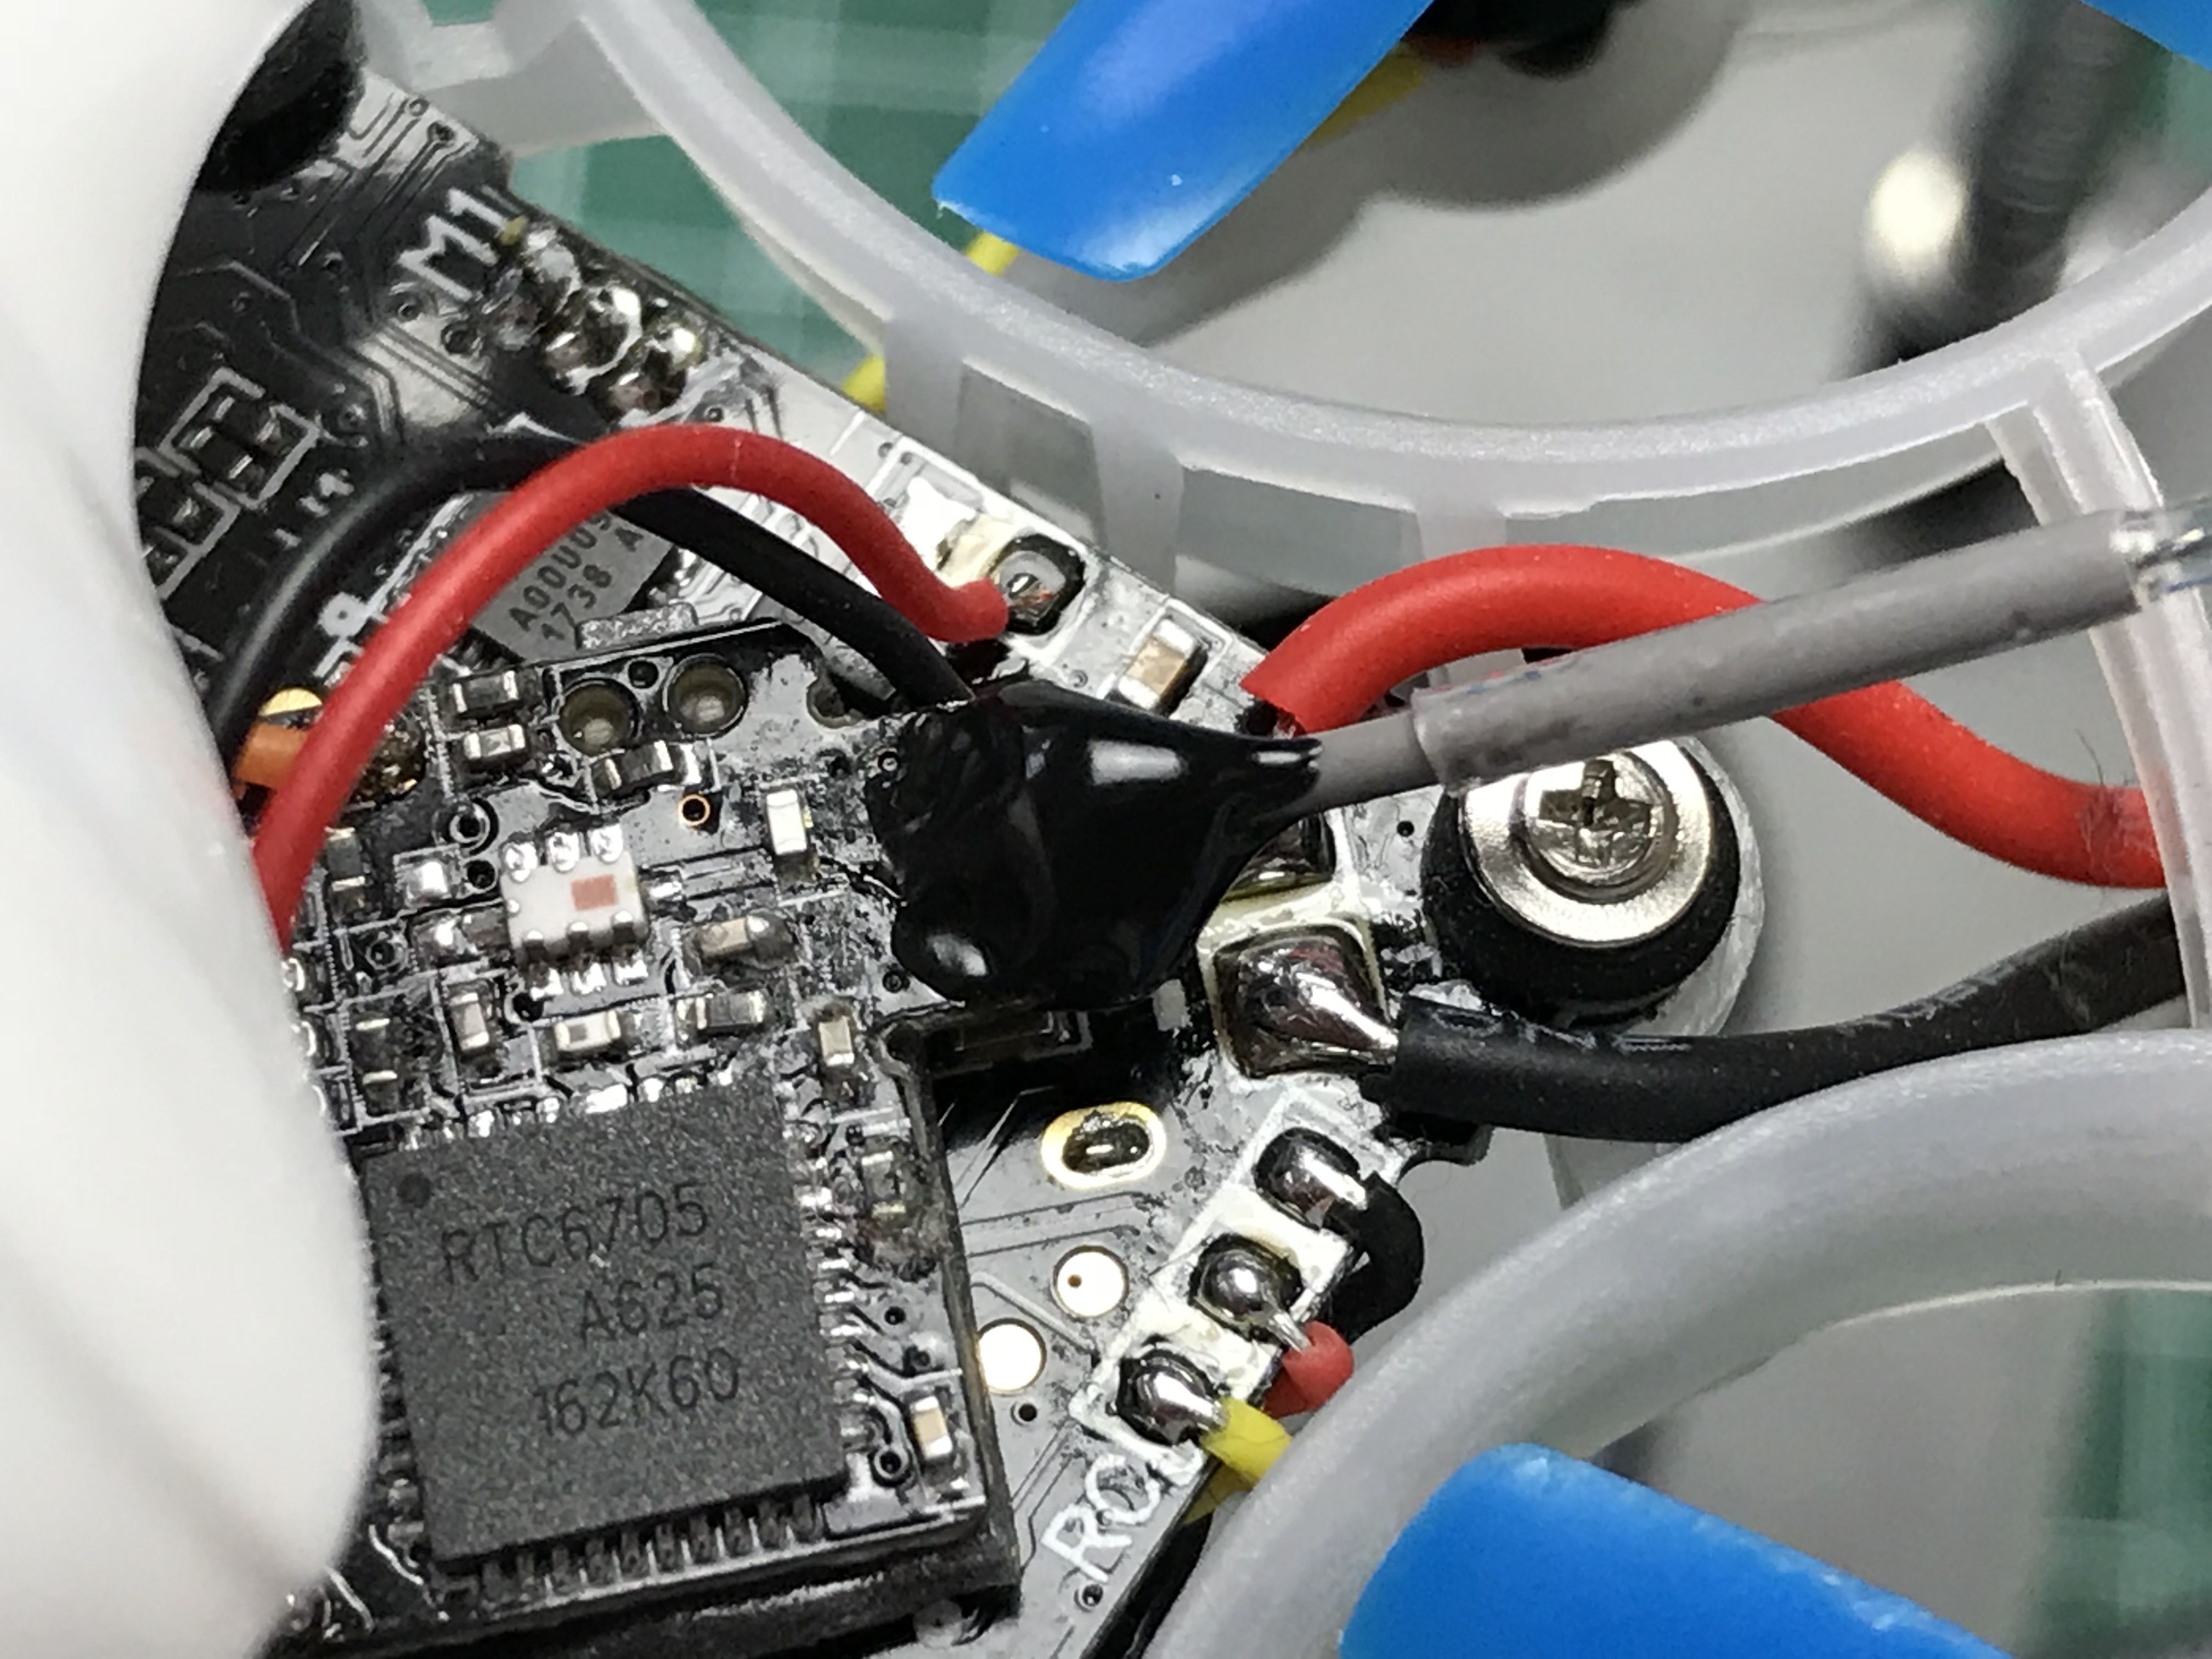
Several layers of liquid electircal tape on the VTX antenna joint provided some stress relief.
The receiver antenna was coiled around the flight controller in order to get rid of extra mounting solution, and more liquid electrical tape applied to the battery holder made it less slippery.

I did not like the BetaFPV propellers for the hubs that protruded higher out of the ducts increasing the probabilty of getting a hit at the motor, so I drilled regular whoop propellers with a 1mm bit and put them on. One final touch was twisting the motor wires for nicer looks.
The dry weight was reduced by 1.76 grams.
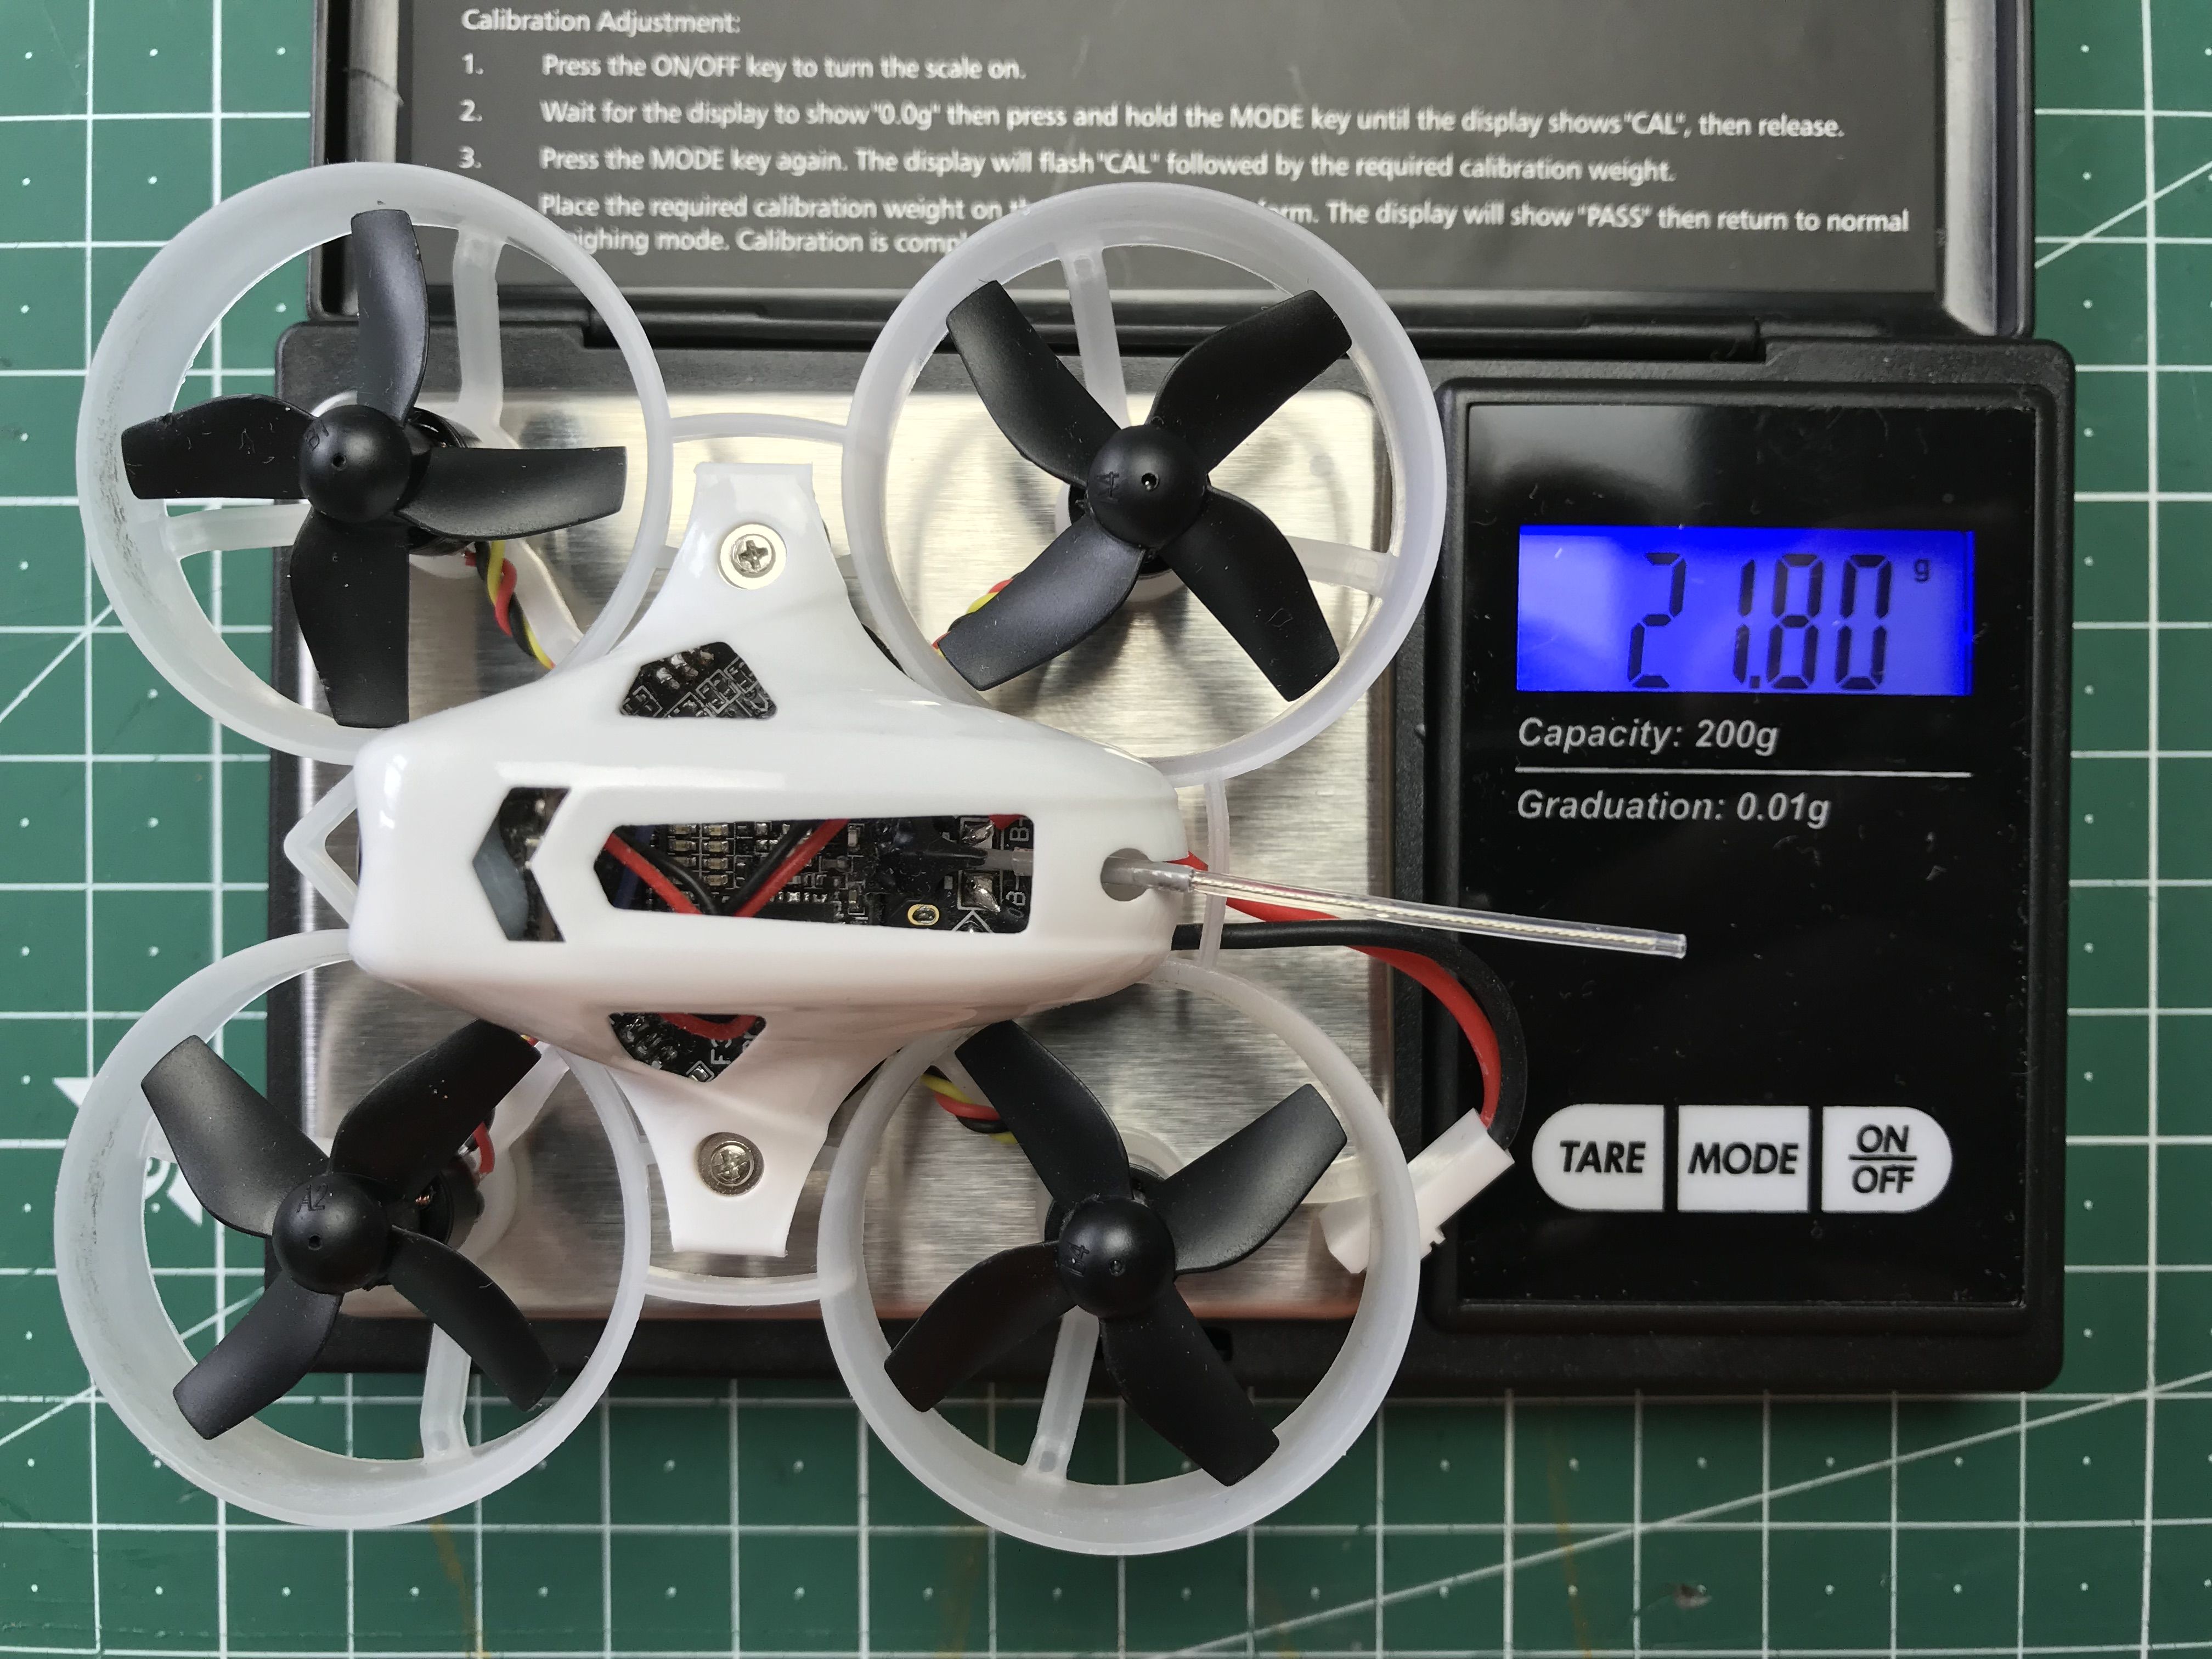
The vibrations were gone as well and I was able to switch to PT1 gyro lowpass filter and turn the gyro notches off.
Throttle Situation
The second iteration quad was hovering at around 63% throttle. Surprisingly, it did not mean she was too heavy: 35% of throttle stick movement that was left had quite some extra power, and it was controllable. It felt more like those tiny 0603 motors had significantly nonlinear response in the lower end of throttle. So I decided to fix it with a custom throttle curve.
Being a big fan of Project Mockingbird I wanted to keep the part of the throttle curve above the hover point linear, so I set up a custom curve in my Taranis.
Here is how I calculated it. The copter hovered at around 63% of throttle output. I wanted that output to be somewhere above 30% of throttle stick deflection, linear up to that point and also linear above the point, but with less steep angle. I wanted the hover point to be already at that less steep part of the curve, so I a break point on the curve should have been placed a bit lower, say 60%. To make that happen, I had to set up a 3-point throttle curve with the middle point returning 60% output at 30% input and the end points being at usual 0 and 100% of input and output respectively.
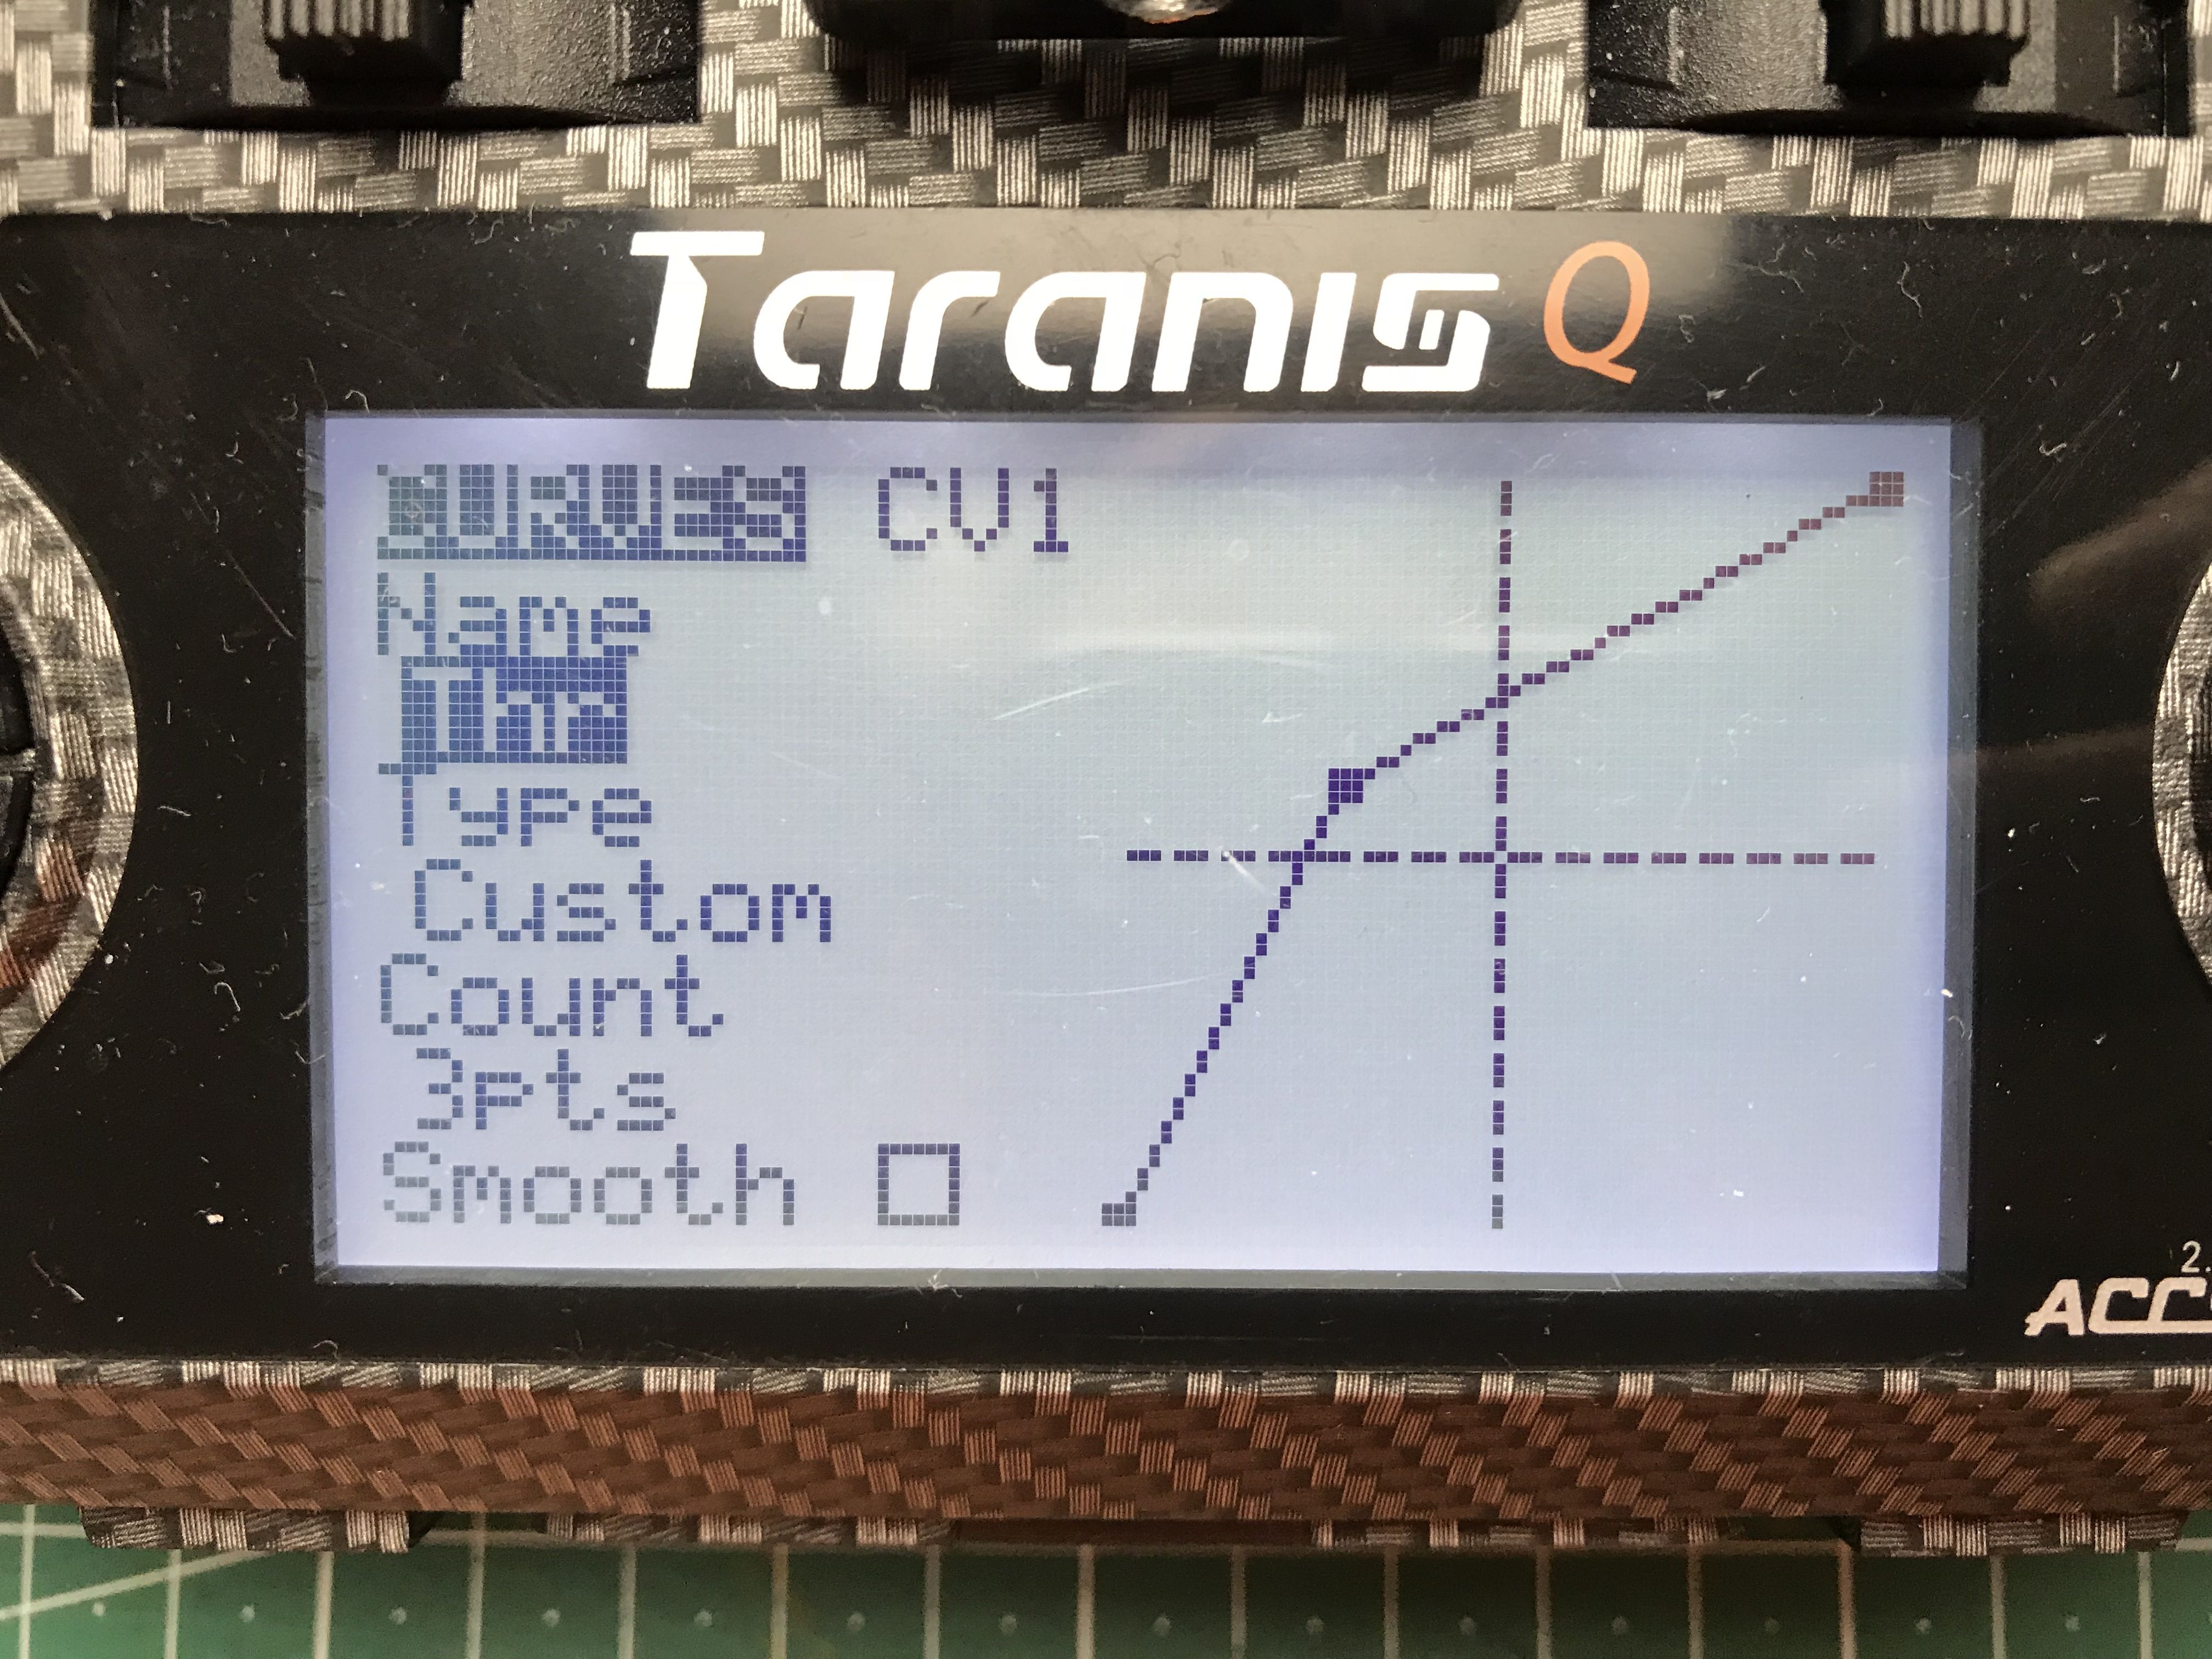
OpenTX defines curve input and output values on the range [ -100, +100 ], which meant the 60% output at 30% input point was at 20 output, -40 input point using the OpenTX definition. I navigated to the Curves page, opened CV1 for editing and entered these values:
Name: Thr
Type: Custom
Count: 3pts
Smooth: [] (no)
pt1 x=-100, y=-100
pt2 x=-40, y=20
pt3 x=100,y=100
Then I navigated to the Outputs page, edited the channel outputing throttle and selected the Thr curve that I defined.
The curve worked out perfectly. Height control became much easier and that weird situation of throttle stick being almost always at the maximum deflection was gone.
Betaflight Configuration
One thing that changed the Betaflight whoop experience for me personally was Project Mockingbird. If you never heard of it or you think flying whoops in angle mode is for beginners only, I seriously recommend you giving it a shot. At least watch this video Joshua Bardwell made on the matter.
So I followed the Mockingbird v1 instructions to set up angle mode with linear stick response. The rest of the configuration was not spectacular at all. Down below are the major parts of it.
Motor direction: reversed
Gyro/PID loop frequency: 4K/4K
ESC protocol: DShot600
Motor idle throttle value: 10
Airmode: ON
Anti gravity: ON
Anti gravity gain: 5
Dynamic filter: ON
Gyro notches: both OFF
Gyro soft lowpass frequency: 95Hz
D term lowpass filter: PT1
D term lowpass frequency: 55Hz
Motors were always cool with this configuration, but there were some twitches on pitch/roll axis with PT1 and default D term lowpass frequency. They disappeared after I lowered the D term lowpass frequency to 55Hz.
Here is a full diff of my configuration. Use it at your own risk and do not blame me if you ever break/smoke/destroy anything :)
# Betaflight / OMNIBUS (OMNI) 3.3.0 Mar  2 2018 / 03:56:08 (177472b4f) MSP API: 1.37
defaults nosave

feature -RX_PPM
feature RX_SERIAL
feature AIRMODE
feature ANTI_GRAVITY
feature DYNAMIC_FILTER
beeper -GYRO_CALIBRATED
beeper -DISARMING
beeper -ARMING
beeper -ARMING_GPS_FIX
beeper -BAT_CRIT_LOW
beeper -BAT_LOW
beeper -ACC_CALIBRATION
beeper -ACC_CALIBRATION_FAIL
beeper -READY_BEEP
beeper -DISARM_REPEAT
beeper -ARMED
beeper -SYSTEM_INIT
beeper -ON_USB
beeper -BLACKBOX_ERASE
beeper -CRASH FLIP
serial 2 64 115200 57600 0 115200
aux 0 0 0 1950 2050 0
aux 1 1 1 950 1050 0
aux 2 13 2 1950 2050 0
aux 3 35 2 1450 1550 0
adjrange 0 0 1 1400 1625 12 1
set gyro_sync_denom = 2
set gyro_lowpass_hz = 95
set gyro_notch1_hz = 0
set gyro_notch2_hz = 0
set gyro_notch2_cutoff = 95
set acc_trim_pitch = 6
set acc_trim_roll = 6
set baro_hardware = NONE
set min_check = 1005
set max_check = 2000
set rssi_channel = 16
set max_aux_channels = 12
set serialrx_provider = SBUS
set min_throttle = 1055
set dshot_idle_value = 1000
set use_unsynced_pwm = ON
set motor_pwm_protocol = DSHOT600
set motor_pwm_rate = 32000
set vbat_min_cell_voltage = 31
set vbat_warning_cell_voltage = 32
set current_meter = NONE
set beeper_dshot_beacon_tone = 5
set yaw_motors_reversed = ON
set small_angle = 180
set pid_process_denom = 1
set osd_warnings = 63
set osd_rssi_alarm = 47
set osd_tim1 = 1
set osd_tim2 = 0
set osd_vbat_pos = 2497
set osd_rssi_pos = 2489
set osd_tim_1_pos = 2518
set osd_tim_2_pos = 33
set osd_flymode_pos = 333
set osd_throttle_pos = 455
set osd_vtx_channel_pos = 377
set osd_crosshairs = 200
set osd_ah_sbar = 200
set osd_ah_pos = 200
set osd_current_pos = 385
set osd_mah_drawn_pos = 353
set osd_craft_name_pos = 17
set osd_gps_speed_pos = 218
set osd_gps_lon_pos = 82
set osd_gps_lat_pos = 65
set osd_gps_sats_pos = 51
set osd_home_dir_pos = 302
set osd_home_dist_pos = 303
set osd_compass_bar_pos = 266
set osd_altitude_pos = 247
set osd_pid_roll_pos = 423
set osd_pid_pitch_pos = 455
set osd_pid_yaw_pos = 487
set osd_debug_pos = 1
set osd_power_pos = 321
set osd_pidrate_profile_pos = 345
set osd_warnings_pos = 2465
set osd_avg_cell_voltage_pos = 76
set osd_pit_ang_pos = 257
set osd_rol_ang_pos = 289
set osd_battery_usage_pos = 392
set osd_disarmed_pos = 2433
set osd_nheading_pos = 311
set osd_nvario_pos = 279
set osd_esc_tmp_pos = 82
set osd_esc_rpm_pos = 83
set osd_stat_max_spd = OFF
set osd_stat_min_batt = OFF
set osd_stat_min_rssi = OFF
set osd_stat_max_curr = OFF
set osd_stat_used_mah = OFF
set osd_stat_bbox = OFF
set osd_stat_bb_no = OFF
set osd_stat_tim_2 = OFF
profile 0

set dterm_lowpass_type = PT1
set dterm_lowpass = 55
set anti_gravity_gain = 5000
set setpoint_relax_ratio = 40
set dterm_setpoint_weight = 160
set p_pitch = 79
set i_pitch = 55
set d_pitch = 55
set p_roll = 72
set i_roll = 45
set d_roll = 50
set p_yaw = 110
set i_yaw = 125
set d_yaw = 15
set p_level = 100
set i_level = 30
set d_level = 0
set level_limit = 60
profile 1

profile 2

profile 0
rateprofile 0

set roll_rc_rate = 190
set pitch_rc_rate = 190
set yaw_rc_rate = 160
set roll_srate = 0
set pitch_srate = 0
set yaw_srate = 0
set tpa_rate = 20
rateprofile 1

set roll_rc_rate = 163
set pitch_rc_rate = 163
set yaw_rc_rate = 123
set roll_expo = 2
set pitch_expo = 2
set yaw_expo = 2
set roll_srate = 72
set pitch_srate = 72
set yaw_srate = 73
set tpa_rate = 20
rateprofile 2

rateprofile 3

rateprofile 4

rateprofile 5

rateprofile 0
save
Part List
Frame |
Beta65 Pro Micro Brushless Whoop Frame
(17 builds)
Betafpv.com
|
$4.50 |
Flight Controller |
F3 Brushless 1S Flight Controller (ESC + OSD)
(7 builds)
Betafpv.com
|
$29.99 |
Motors |
0603 1S Brushless Motors
(5 builds)
Betafpv.com
|
$36.99 |
Propellers |
31mm 4-blade Micro Whoop Propellers (1.0mm Shaft)
(7 builds)
Betafpv.com
|
$0.79 |
FPV Camera |
Z01 AIO Camera 5.8G 25mW VTX
(11 builds)
Betafpv.com
|
$23.99 |
Receiver |
FrSky Ultralight XM Receiver Up To 16CH for RC Drone FPV Racing
(71 builds)
Banggood.com
|
$11.99 |
Batteries |
Lipo 255mAh 3,7V 25C/50C spezial Stecker PWconnector TinyWhoop
(2 builds)
Mylipo.de
|
See Site |
HD Camera |
Foxeer Legend 3 UHD 4K FOV 155 Degree Wide Angle WIFI FPV Sport Action Camera with OLED For RC Drone
(5 builds)
Banggood.com
|
$149.90 |

Thanks so much for the great write up! I tried to replicate your build with these parts, but am having some trouble.
Flight Controller: BetaFPV F3 1S, ESC + OSD
Motors: BetaFPV 0603 1S Brushless Motors
Reciever: Hobbyking micro R616 CPPM
Transmitter: OrangeRX 6ch T-SIX
I tested the motors in betaflight and they work, but when I try to control the copter with my transmitter, it doesn't work. I think the rx and tx protocals all line up, but I might be wrong. Am I missing anything?

Hey! I have never used that radio or CPPM receivers, so I cannot tell you the exact instructions, but in general there are several things to check.
- Receiver should be bound to the transmitter. The procedure is different for different radios and receivers, so I suggest googling for something like "Hobbyking micro R616 bind" and following the steps. After the procedure is done, the radio can send signals to the receiver and the receiver outputs them to the flight controller.
- Flight controller should be set up to work with the CPPM receiver. Typically, the first part is to open the Ports tab of the Betaflight Configurator and enable the "Serial RX" switch for the UART which the receiver is connected to (UART2 in your case). However, I'm not sure if CPPM receivers require Serial protocol since I've never used them. I guess you can try both off and on or google it. The next part is to go to the "Configuration" tab, find the "Receiver mode" group of options and select "PPM RX Input". After saving the configuration, go to the Receiver tab of the Betaflight configurator, power on the radio and see if the channel values in the configurator move when you move the radio sticks. Make sure the channels are set up correctly (throttle on the radio controls throttle channel in the configurator and so on).
- Arming switch should be set up. Go to the "Modes" page and make sure you have a switch on your radio set up to arm the quad. There are tons of instructions for that on Youtube, you can find them with something like "Betaflight modes setup".
To sum it up, you have to make sure these three parts are figured out:
- The radio is configured to talk to the receiver.
- The flight controller is configured to accept the signal from the receiver in the required format (PPM).
- Radio channels are set up to arm and control the quad.
Good luck!
Thanks so much for the speedy reply. I checked all the things you talked about. It appears that the transmitter is bound to the reciever, because when I change stick positions or shut of the transmitter, the recievers lights change. But the stick movements don't actually show up in the Betaflight reciever window. I don't really know what could be wrong other than that the reciever might be faulty. I have an extra flysky RX2A that I will solder to the FC and try with a different transmitter.
I'll post to update if that works.
Thanks again for the help!
You're welcome! Flysky RX2A shoud definitely work. Use the IBUS pad on the receiver, turn the Serial RX switch on on the Ports tab in Betaflight configurator, then go to Configuration tab, find the Receiver (or Receiver Mode) group of options, select Serial-based receiver in the Receiver Mode drop-down and then IBUS in the Serial Receiver Provider drop-down below it. That should do the trick.
Thank you for this write up! I have two Beta75 pros and that throttle curve really helped! Before I could hardly hover - the throttle was almost on or off and this helped smooth it out big time.
This is just amazing work. Sooo much information here; Just what I was looking for to start tweaking my spanking new UR65. Thanks mate!

So the throttle curve is the real issue with these motors being "underpowered". I just got some and they feel weak. Same exact build as you. Is yours faster than a brushed whoop?
The motors definitely felt weak with a linear throttle curve, but a custom one pretty much solved it. It is on part with a brushed one that I have (Purple Racerstar 67000RPM motors, <19g dry). I exclusively run two-bladed props on the brushed, which improves efficiency a lot and gives pretty much the same thrust, but I found that you really want 4 blades on a brushless. Wider motor bells and lower KV provide more torque, so it actually can swing more agressive props. The ones I like the best are TBS Whoop Props clones from Banggood. Here are the originals. They are more aggressive than "regular" whoop props. The flight time went down from 2:40 to 2:10, but I really like how punchy they are.

This is a very well thought out and well-documented write up. Thanks for for taking the extra effort to show all your steps and for the great photos. Your build is amazingly clean! Do you prefer black liquid tape over hot glue? Seems like the permanent flexibility would be a big plus.
Thank you! To be honest, I never tried reinforcing antenna connections with hot glue because all the VTXes I had were running pretty hot. I might be wrong with this assumption, but I have a feeling hot glue would be half-melted all the time. On the other hand many people seam to be using hot glue, so I really might be wrong. Another consideration for this build in particular, as you said, is that the spot where the antenna would be exiting a hot glue blob would be stressed when the quad crashes and the antenna is hit. Liquid tape should be better in that regard because of its flexibility, that should help distributing the stress. At least that's what I think it should do :) So far it works well. I fly her a lot and the antenna is perfectly fine.

Nice write-up and awesome flying! Did those settings get it close to a brushed MB setup?
Yeah, brushless definitely feels like the way to go these days :) You also get a buzzer for free with DShot, which I find really useful when whooping a large office. I cannot tell much about any stock PIDs 'cause I really like tuning my quads. Flashing the latest BF version is, like, the first thing I do to every flight controller that ends up in my hands. The second thing is a PID tuning session on a maiden flight.
Thanks! I have a pretty cheap one from Banggood with this tip set. For me the biggest difference was made by high quality solder I bought at some local shop. Right tip size and right temperature are also required for a good joint. I run my iron at 400C, but I do a joint in just a really quick touch and always wipe the tip clean so there's no flux burning on it. When I need more time to get the parts to the right tempreature, I apply extra flux from a flux pen similar to this.
Guides & Reviews

AirbladeUAV has done it again and this time they've brought long range to the 5" class! Based on the popular Transformer Mini, the new Transformer 5" Ultralight adopts a lot of the same design philosophies with larger props and more payload capacity. It can fly upwards of 20 minutes on a 4 cell Li-Ion battery pack and in ideal conditions it's got a range of over 4 to 5 miles. In this guide I'll walk..
Read more
With the release of the DJI FPV Drone cinematic FPV has become a lot more accessible, but you certainly don't want to crash a $750 drone! The QAV-CINE Freybott is a compact, lightweight cinematic FPV drone that can take a hit and keep going. It's a lot safer to fly indoors and around people. With a naked GoPro or the SMO 4k you can capture some great stabilized footage. In this guide I'll show you..
Read more


hello