
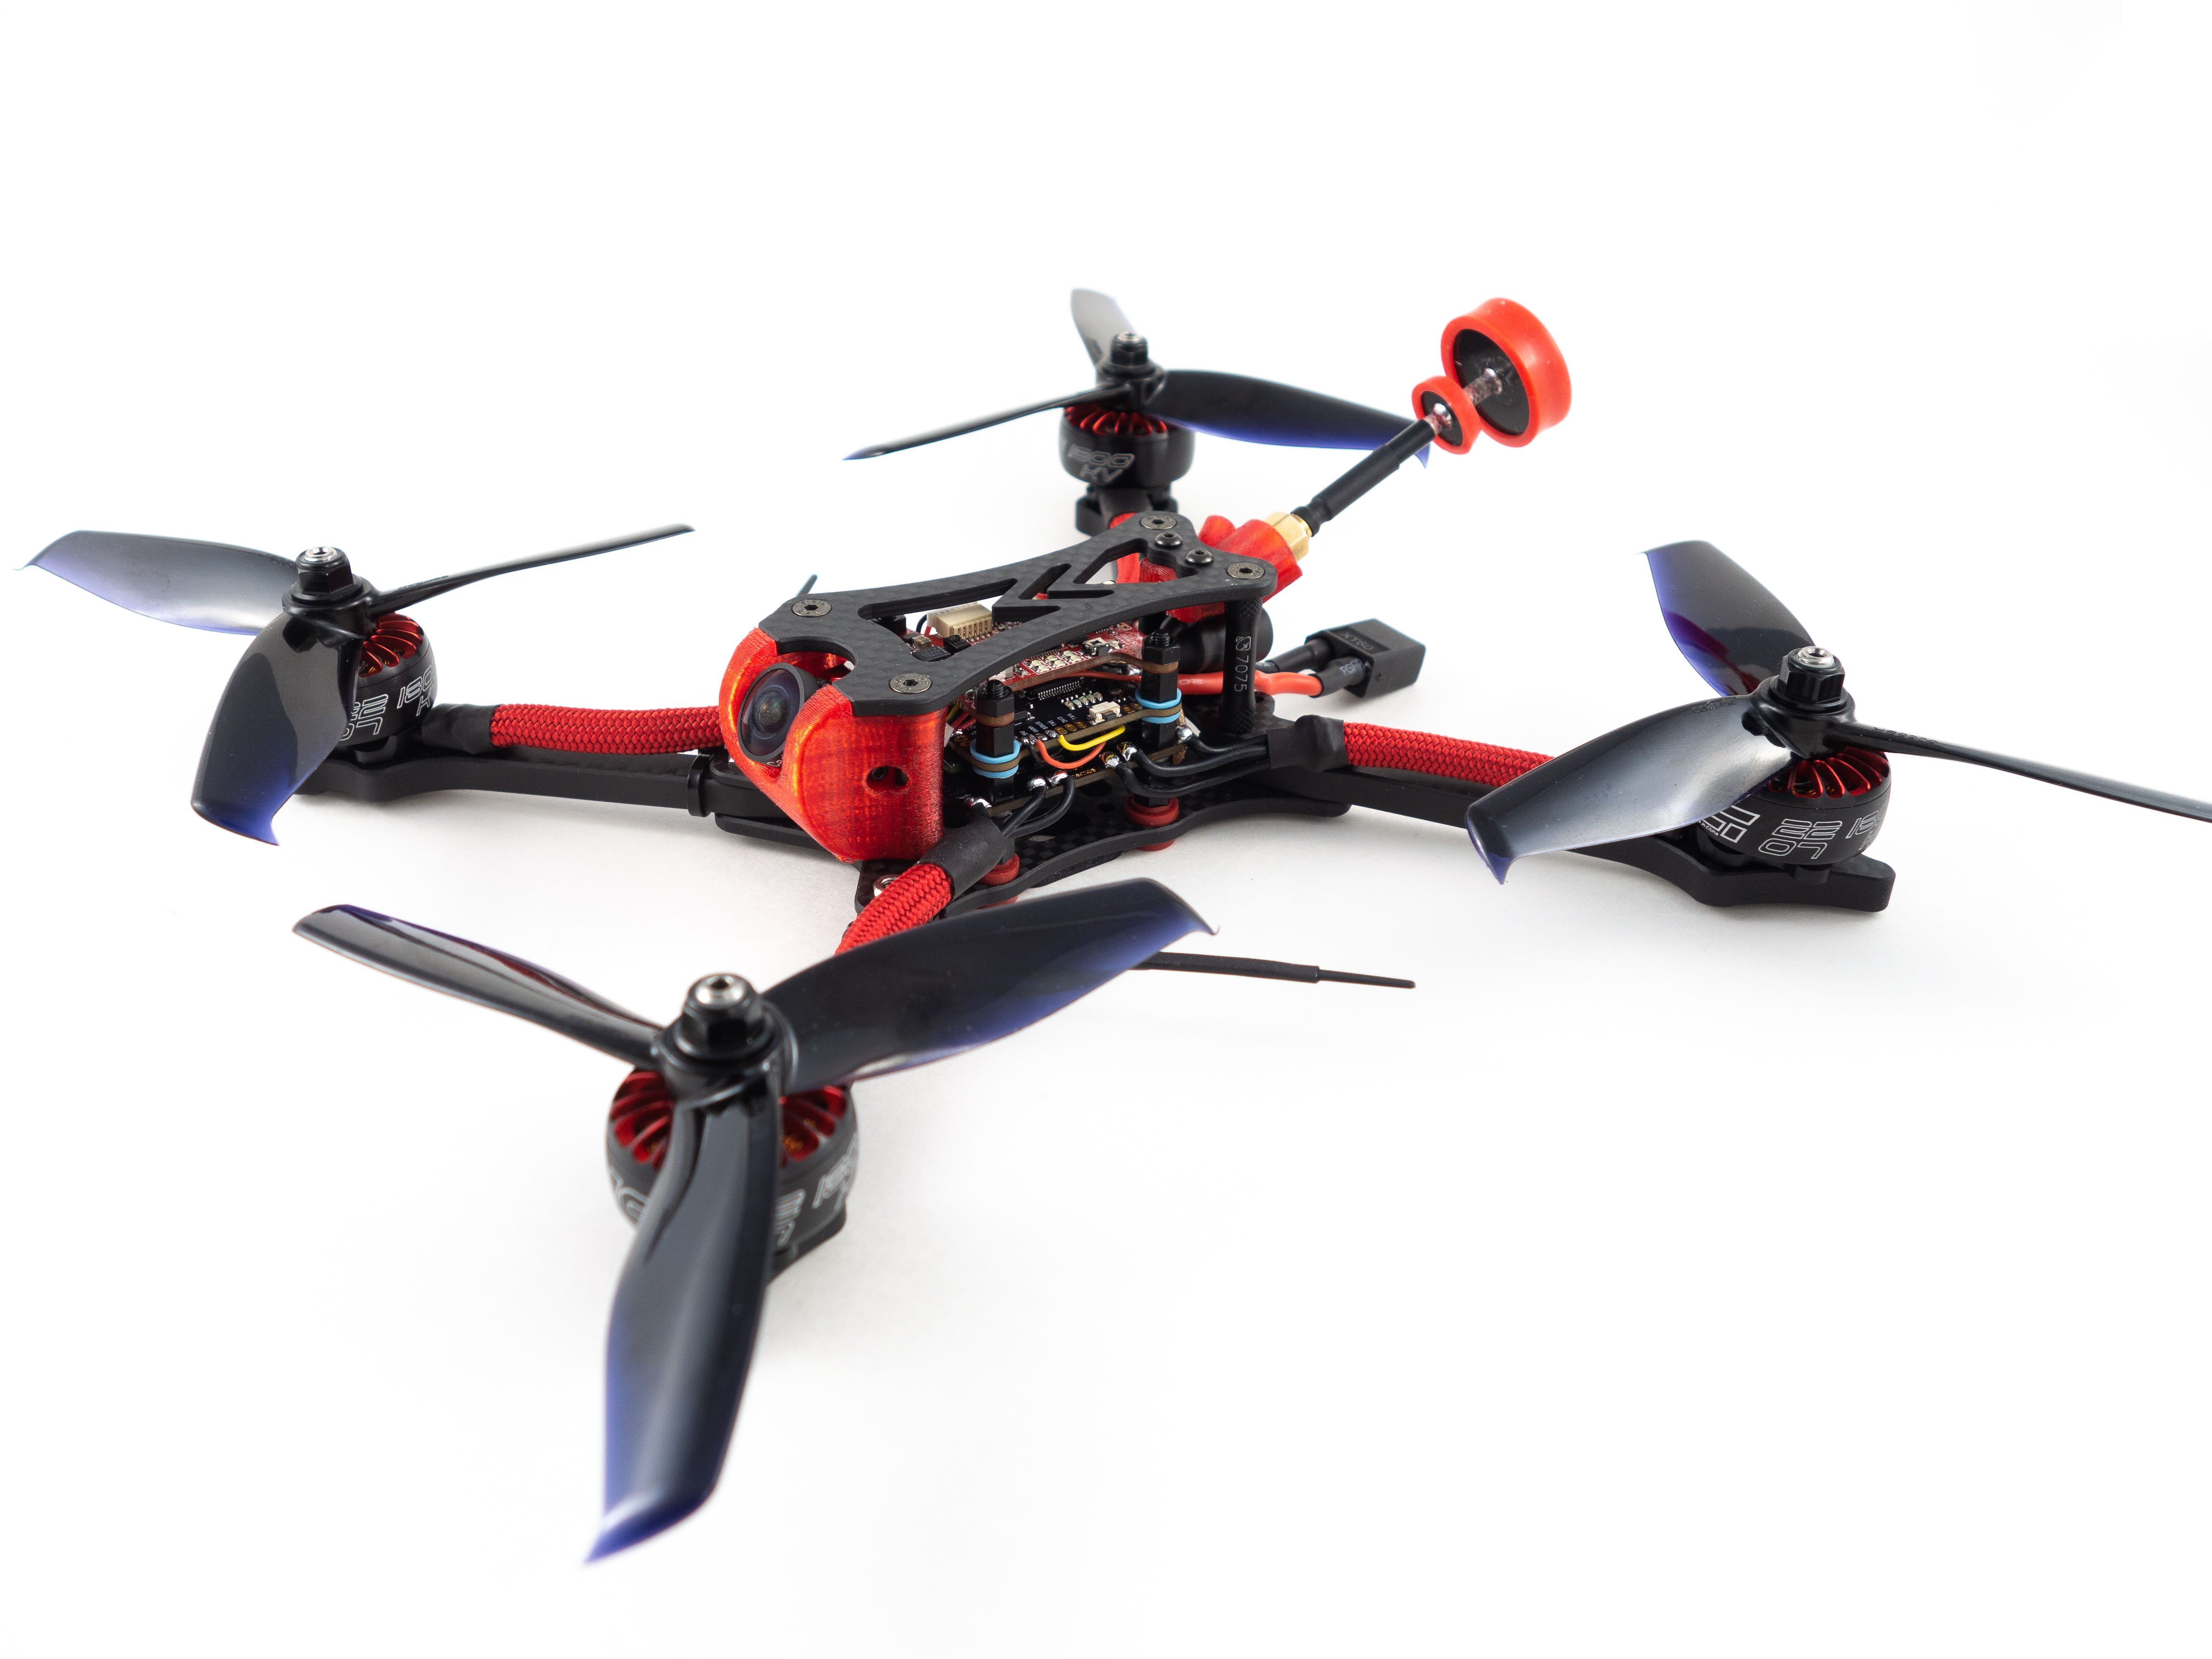
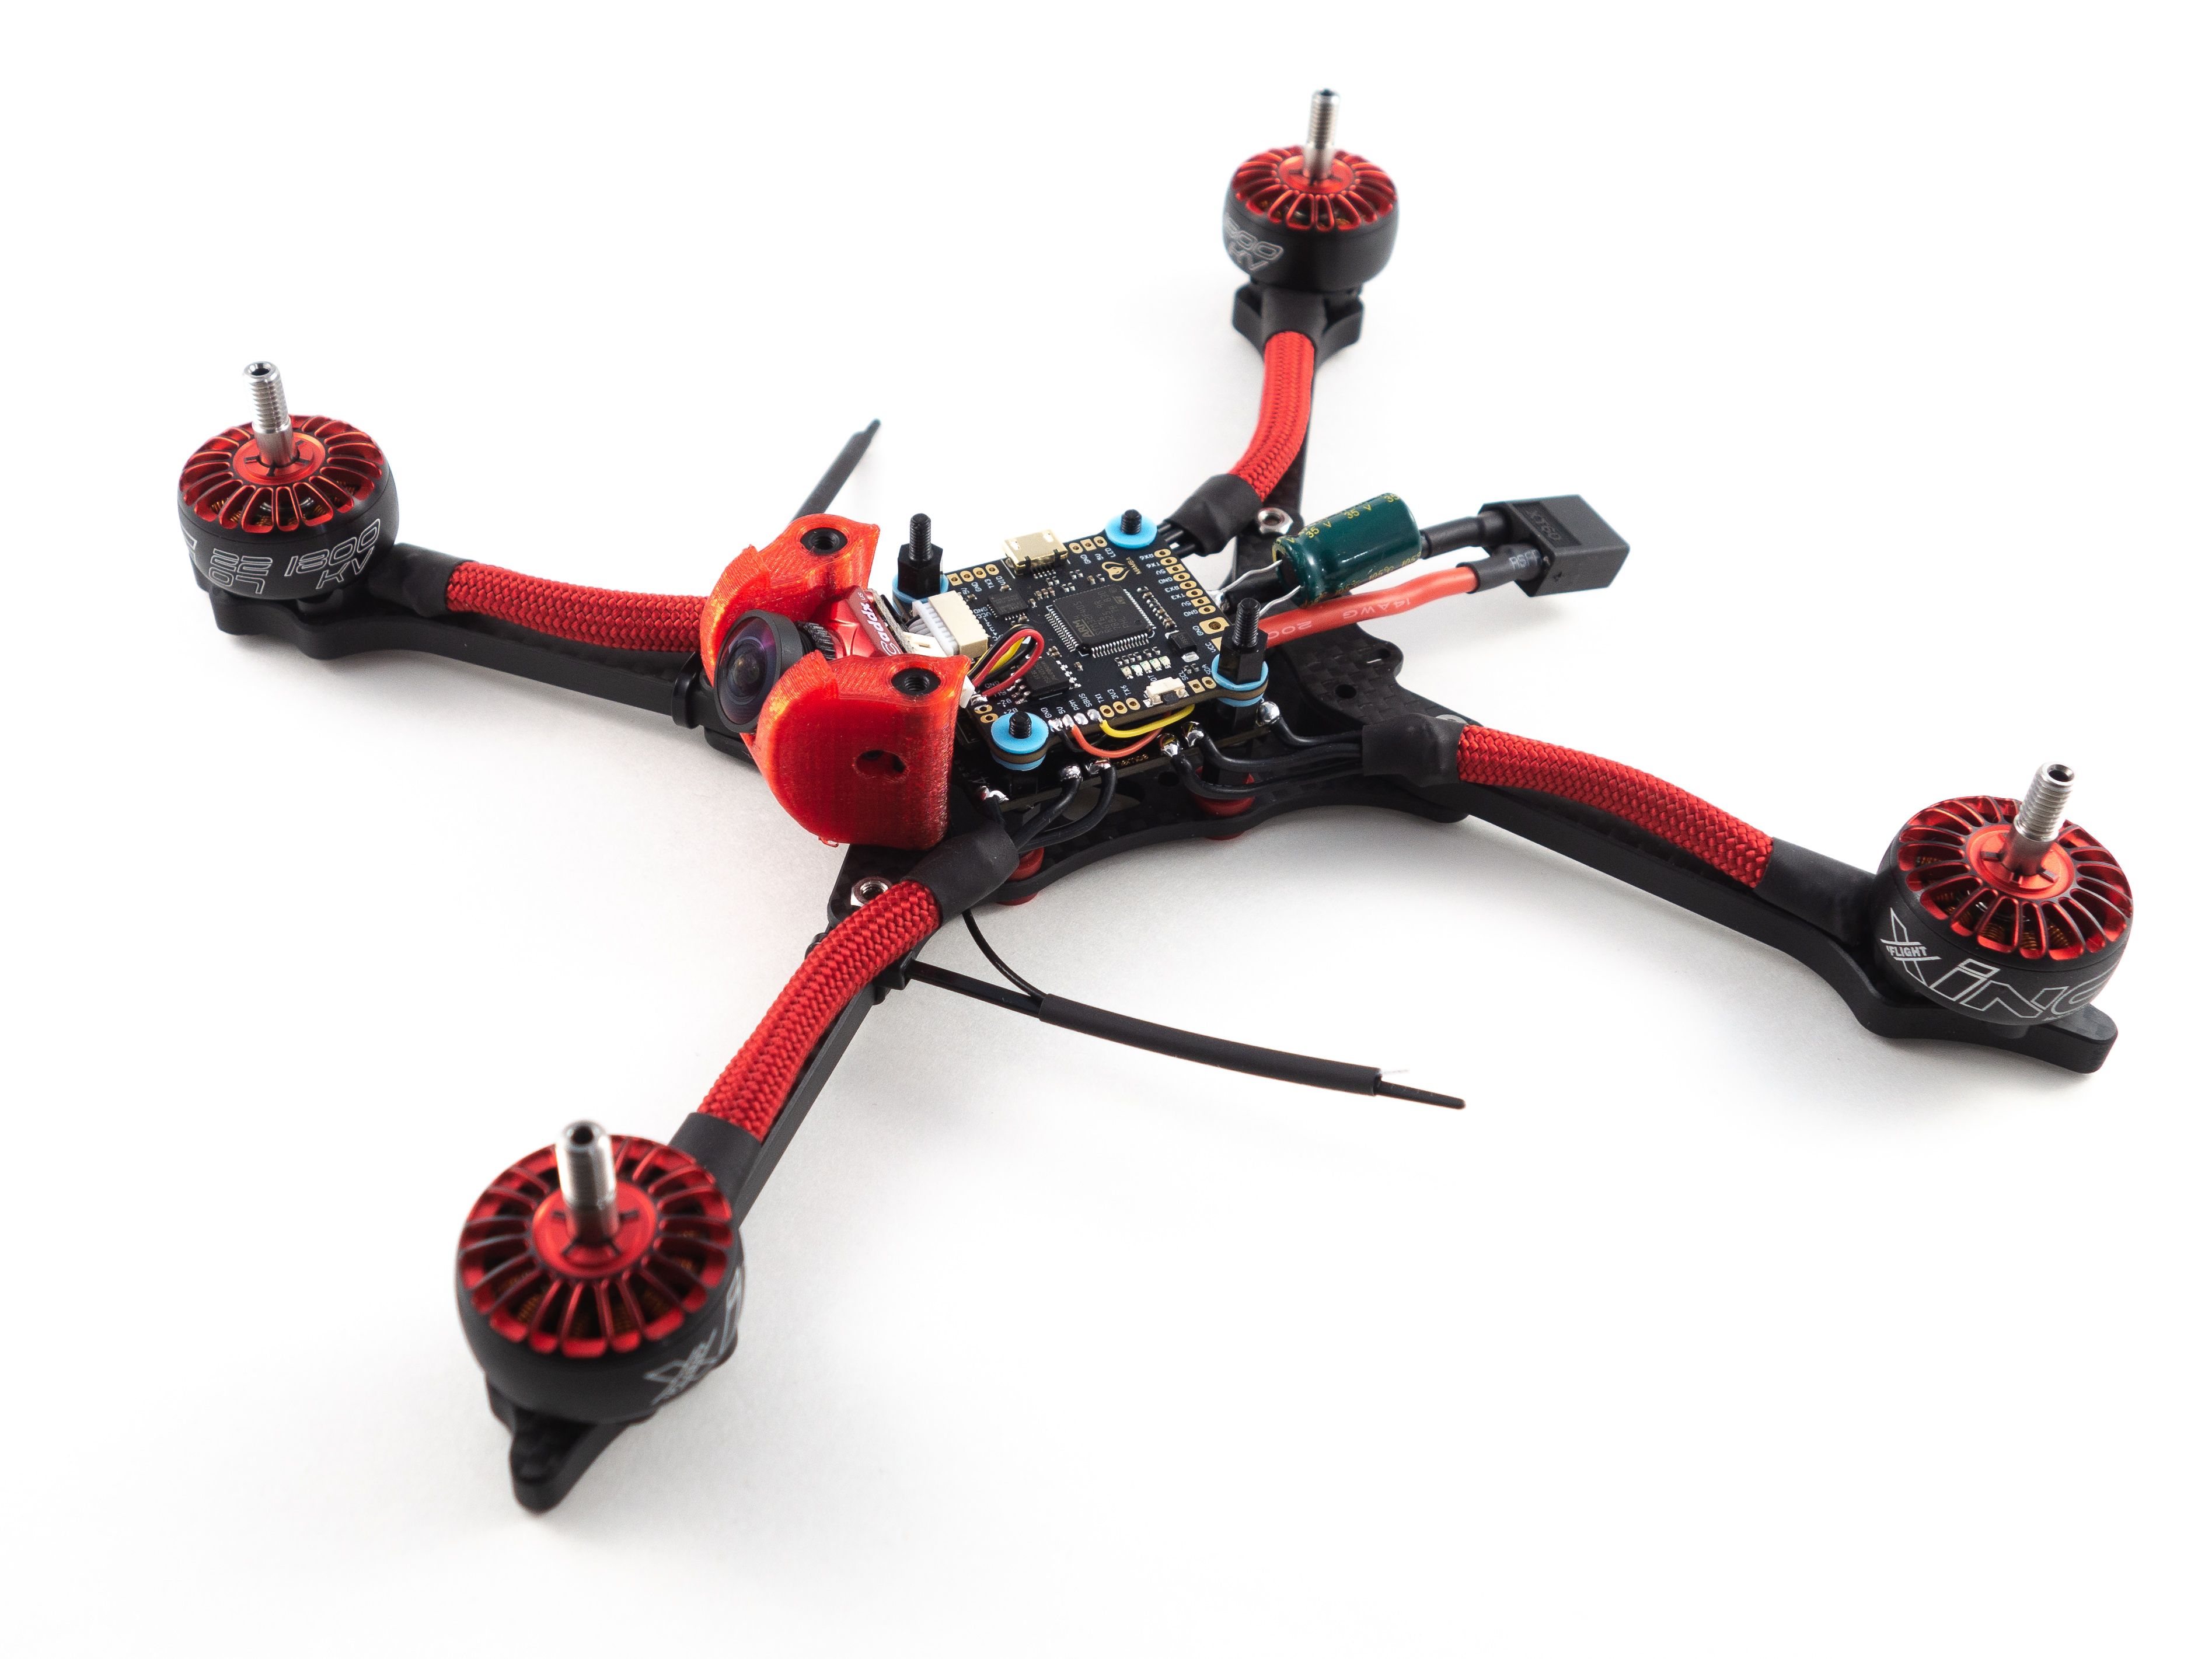
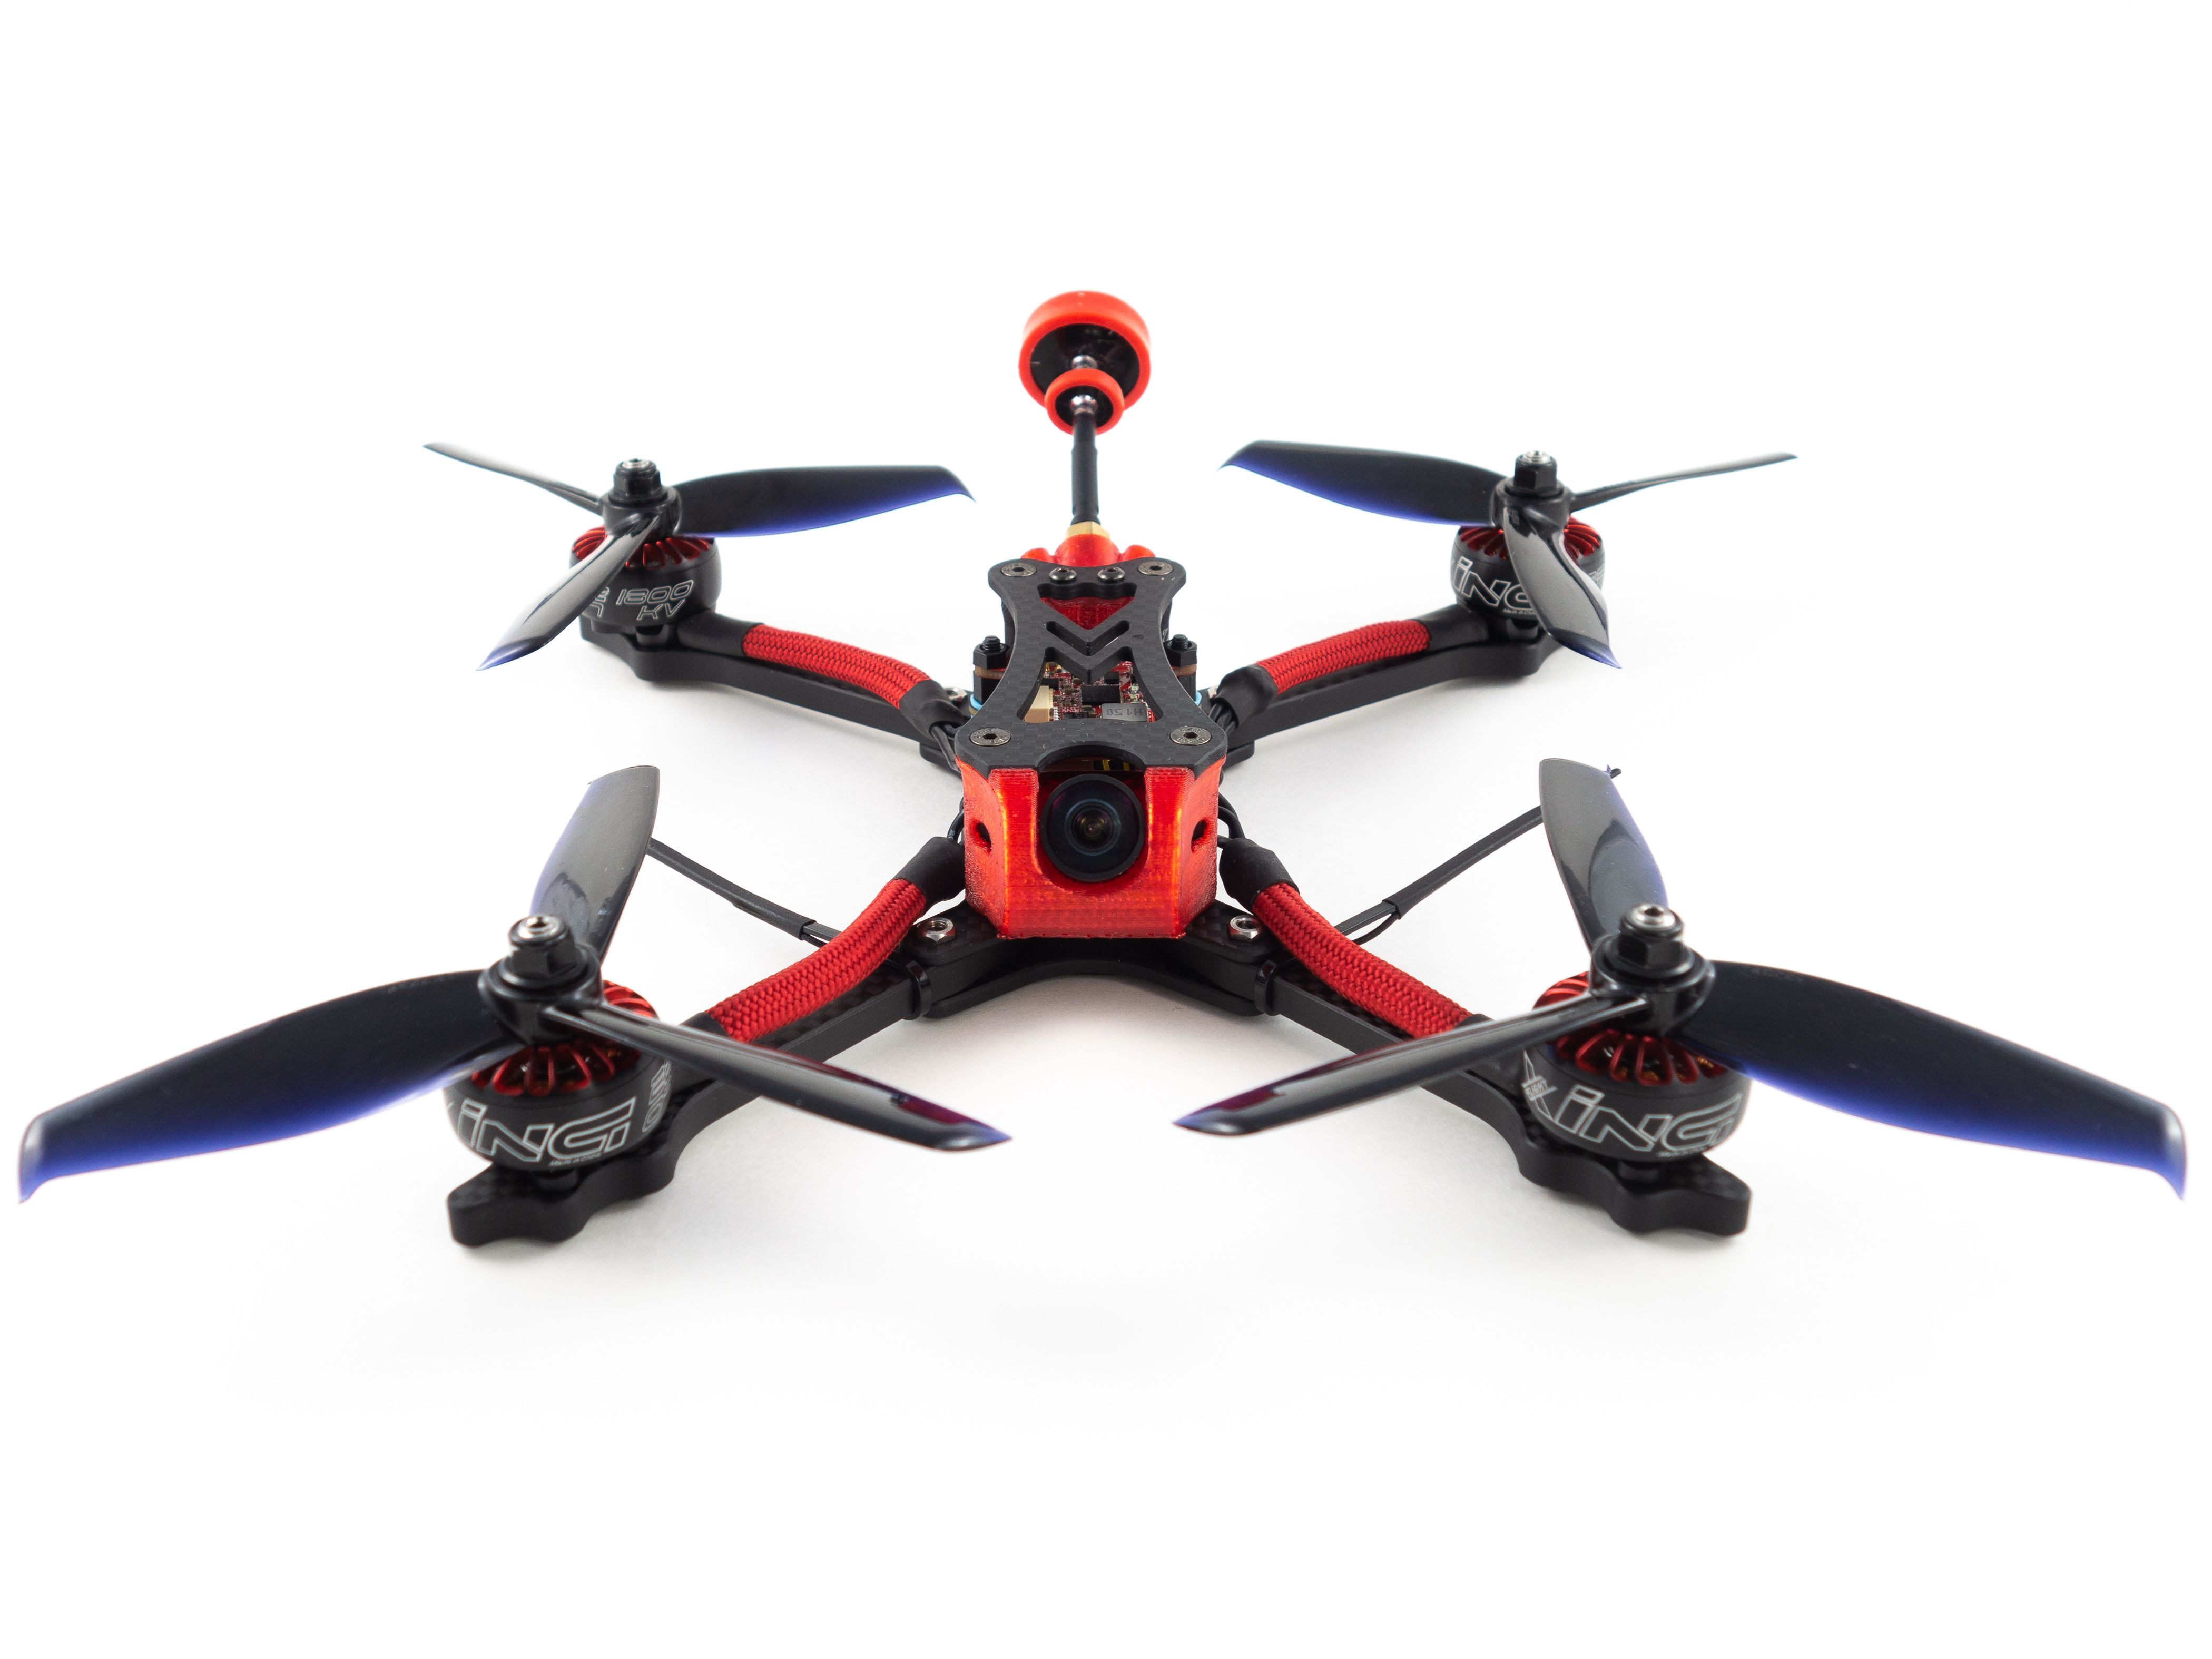
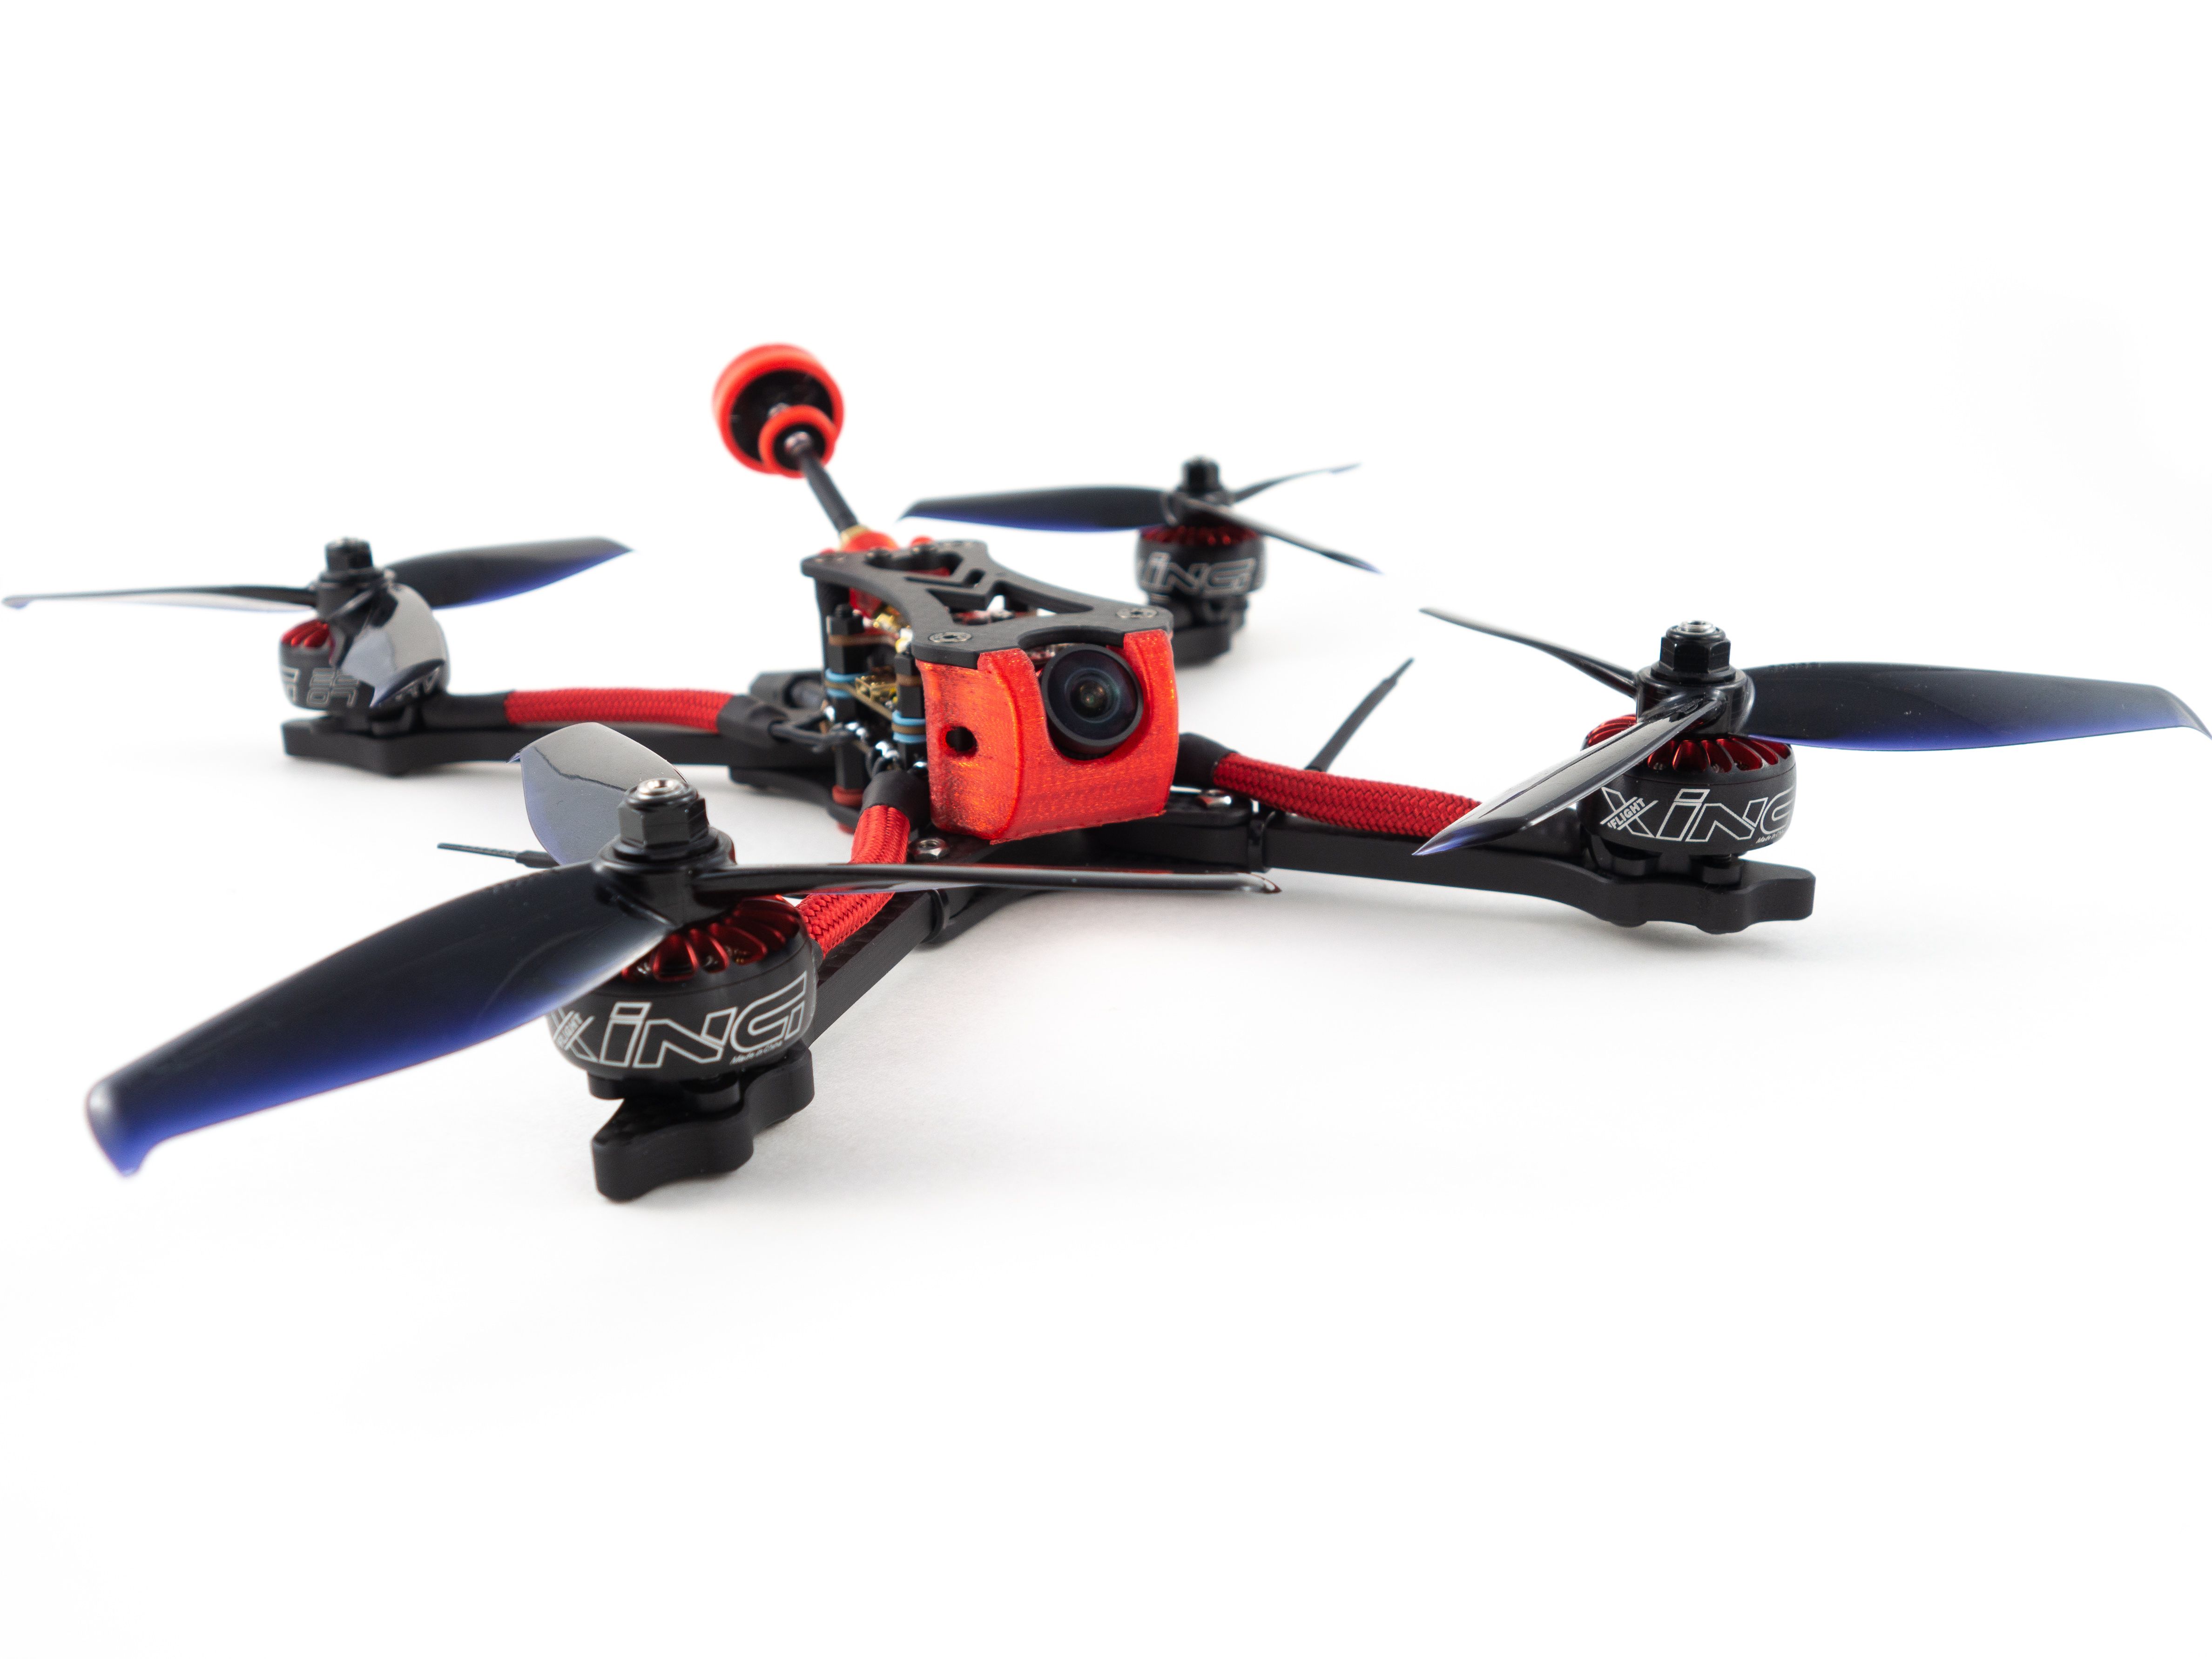
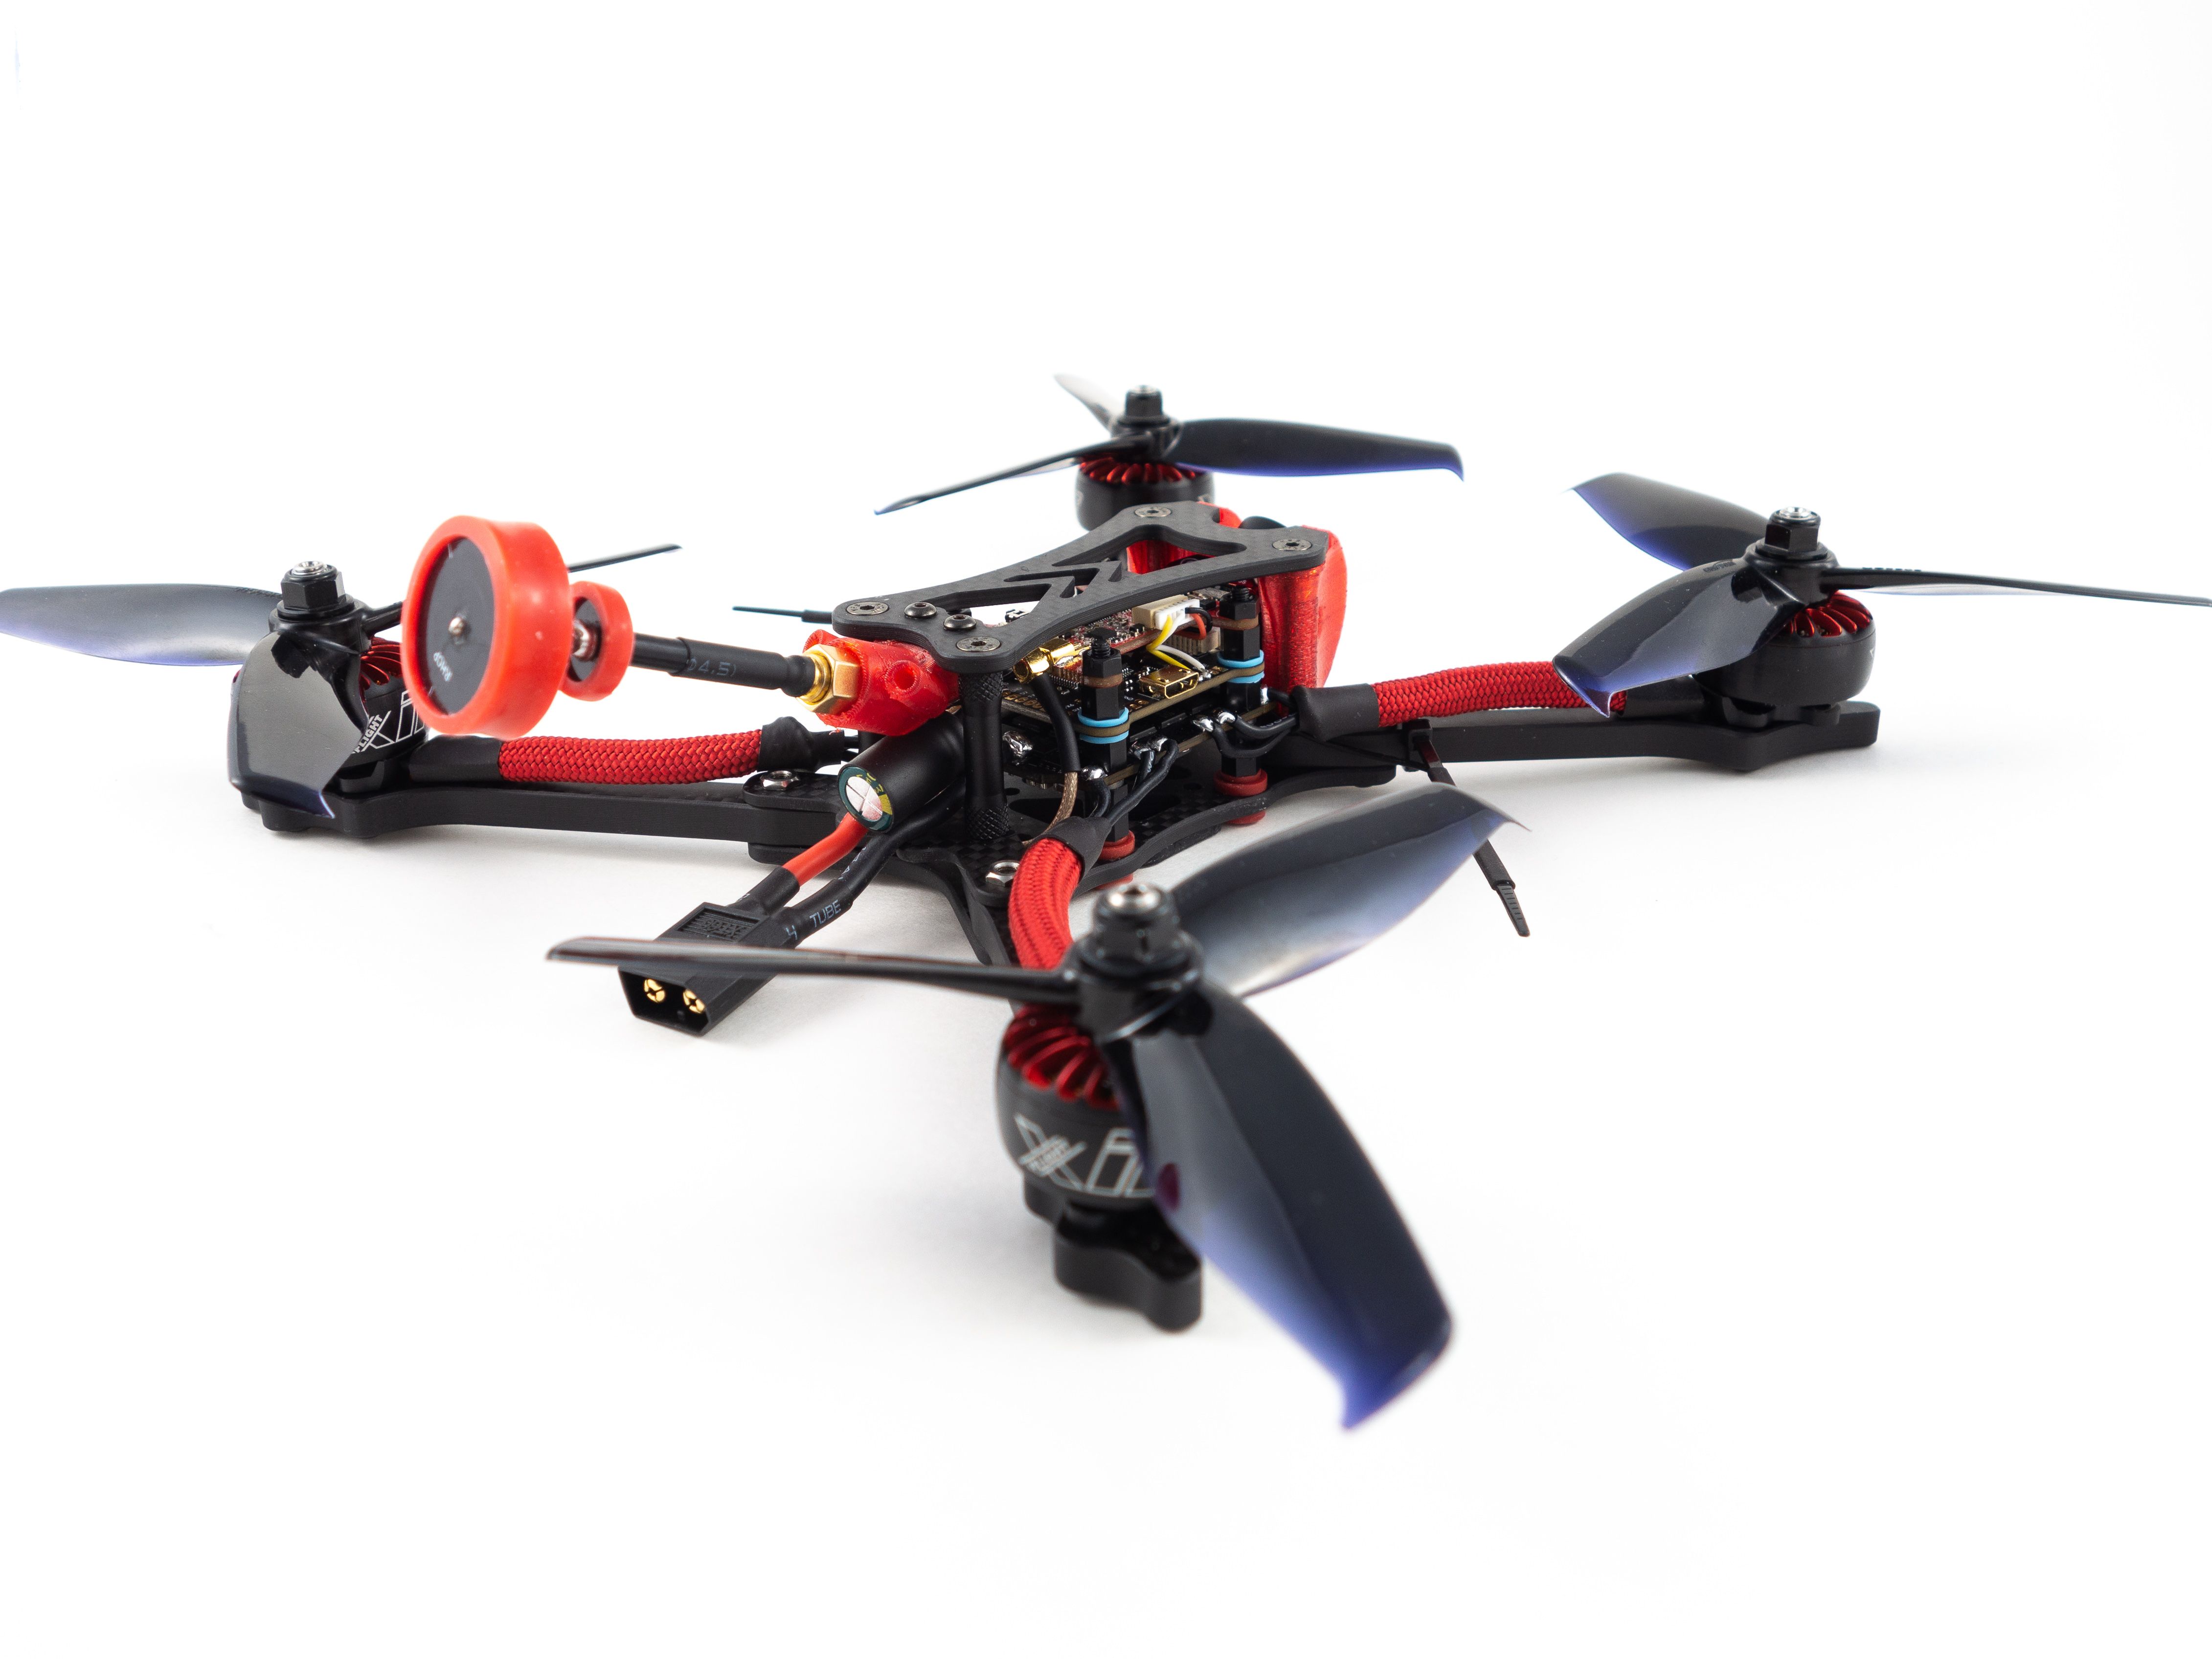
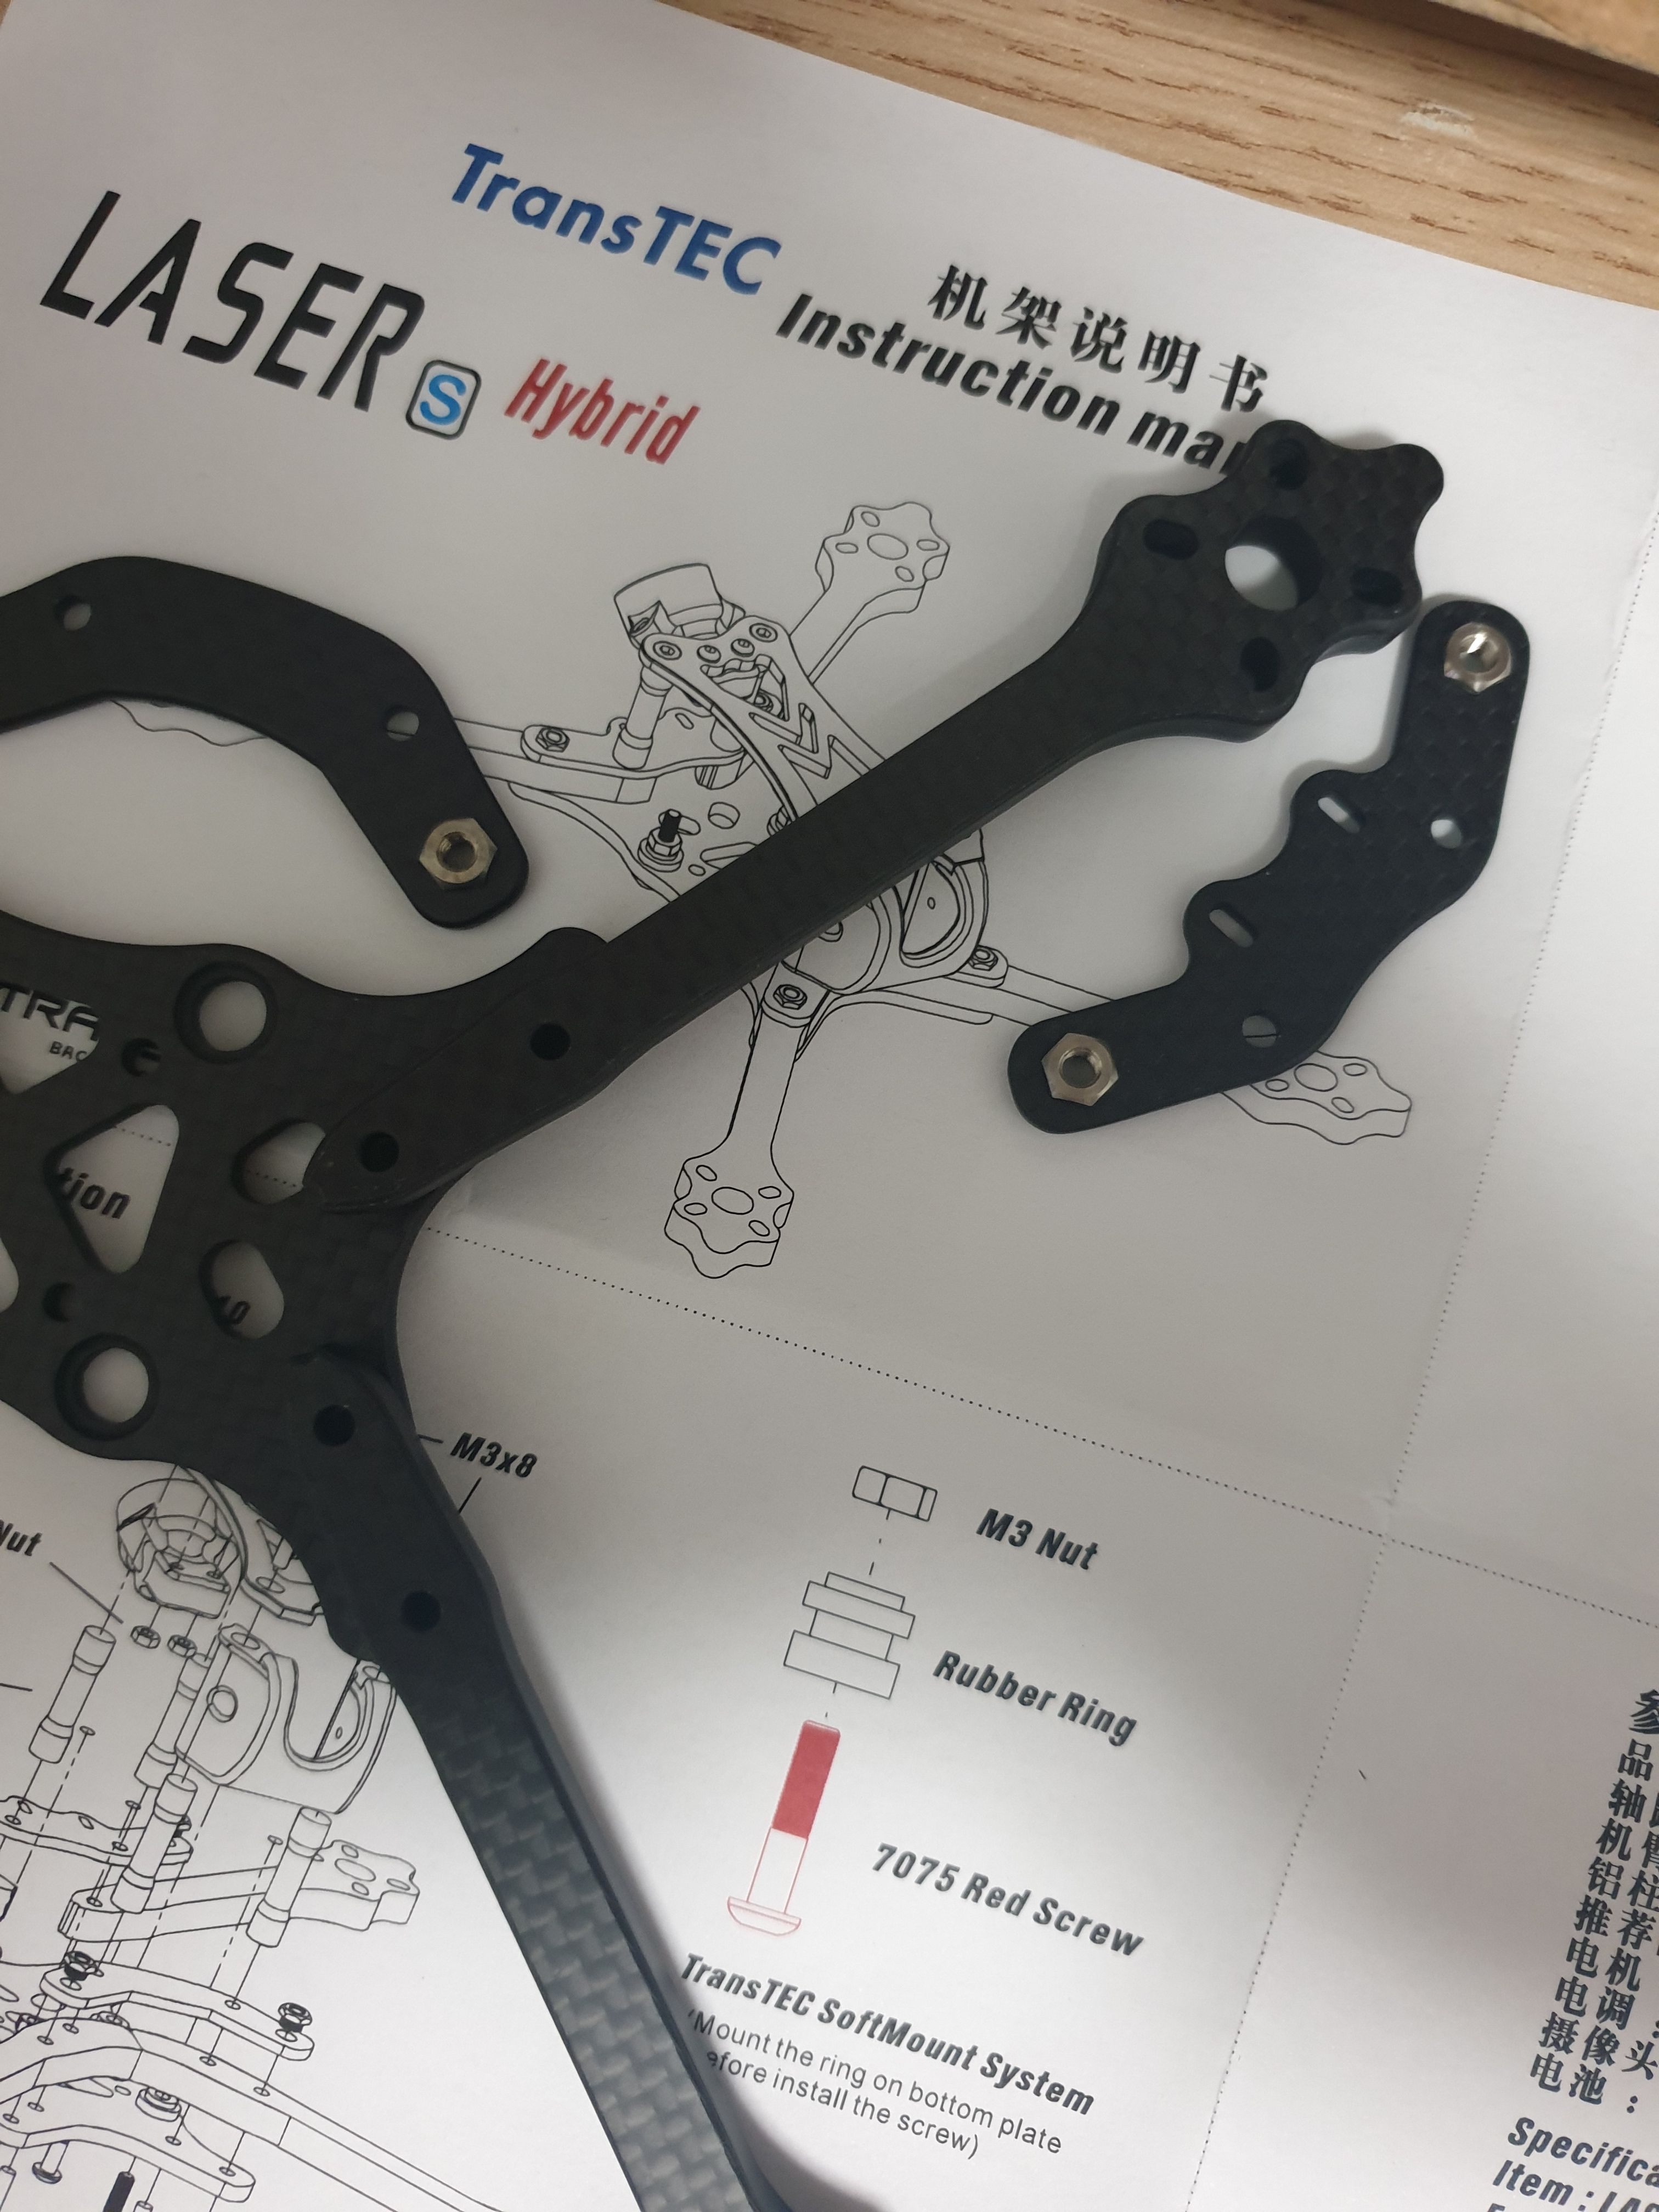
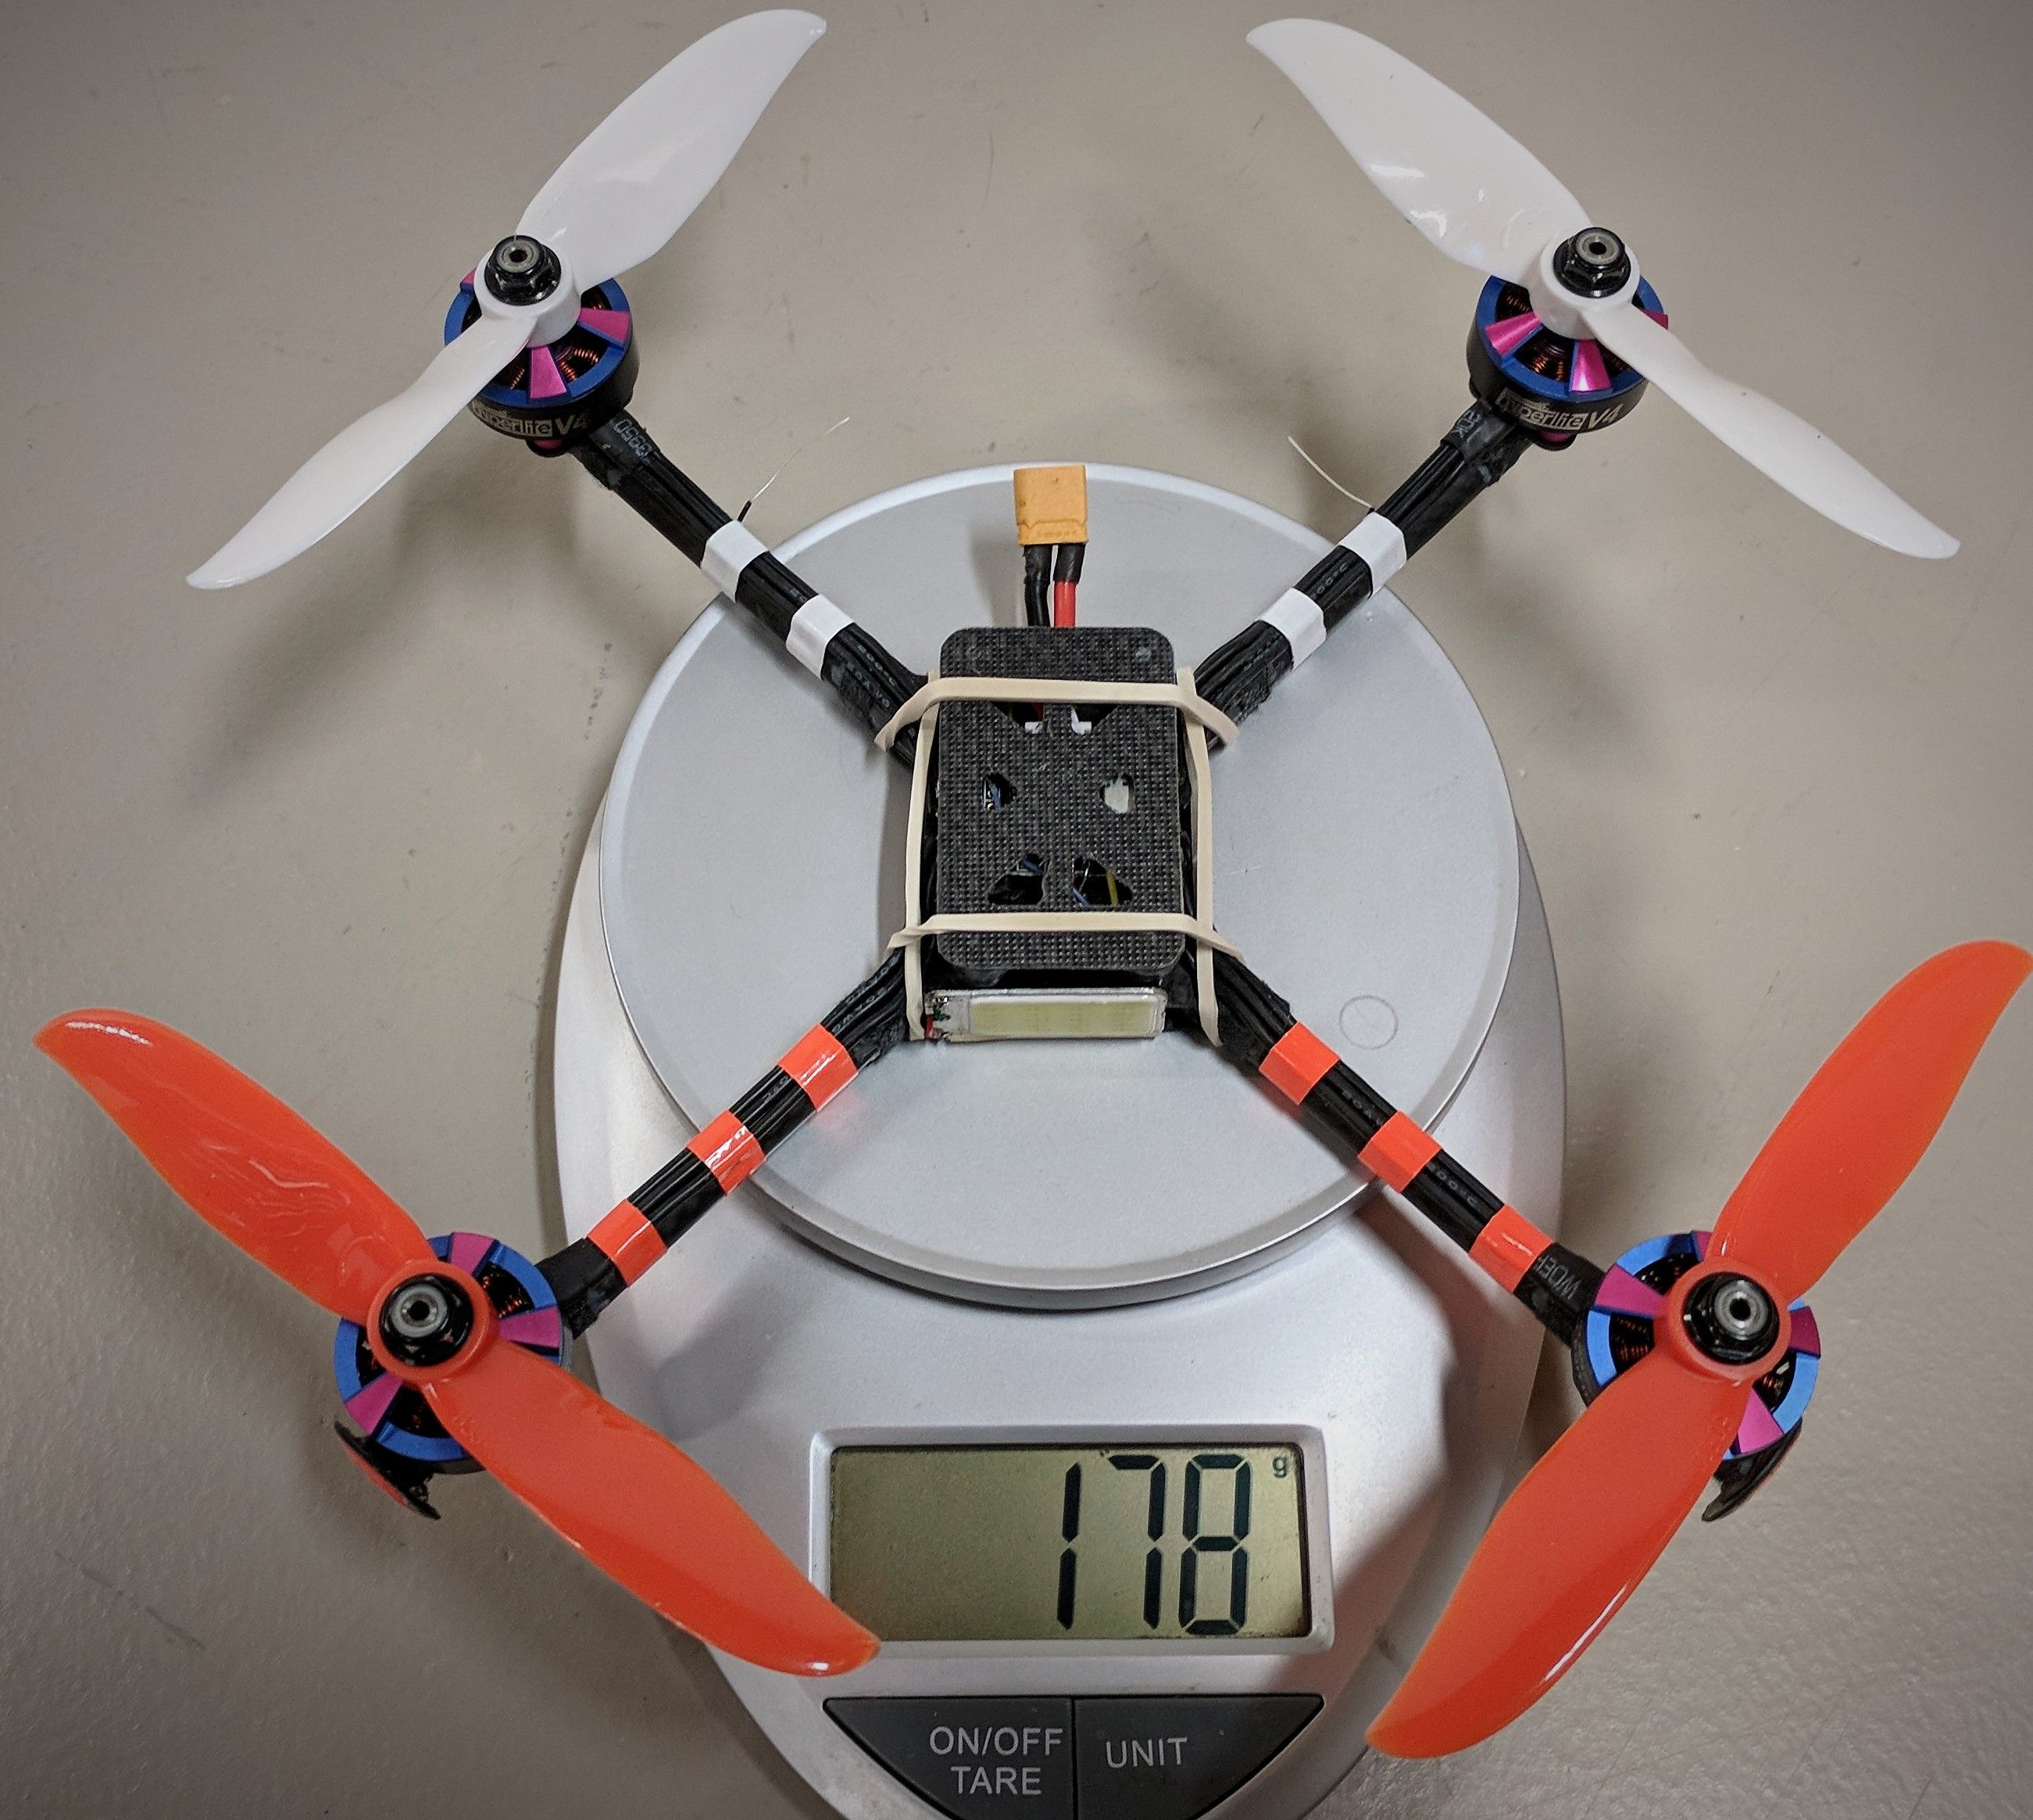
A couple years ago I built the TransTEC Frog and since then I've been patiently waiting for another TransTEC frame to catch my eye. Fast forward to today and the TransTEC Laser S is that frame. It's a 82g racing frame that features 6mm arms, a TPU micro cam mount, 30.5mm and 20mm stack mounts and 3K carbon and 7075 hardware. My goal here was to build a high quality 6S racer at a reasonable price.
I'd like to thank XT-Xinte for sponsoring this build and keeping their prices low enough to make this so affordable. They're offering a $5 coupon for RotorBuilds users by following this link.
Tools
This isn't a super challenging build, but it does require some fine soldering and an attention to detail. It's certainly doable as a first build, but keep in mind that you may find some pads frustrating to solder. With that being said here are the tools you'll need, and I've included direct links to the tools I use below.
- Soldering iron
- 1.5mm, 2.0mm, 2.5mm hex drivers
- Industrial Tweezers
- Wire cutter/stripper
- Scissors
- Heat gun or lighter
- Ruler and cutting mat
- Multimeter
Additional Supplies
- A variety of heat shrink tube sizes
- Blue Loctite
- Zip ties (small)
- 63/37 leaded solder
- Liquid soldering flux pen
Hardware
You'll need to buy some additional hardware. The motors come with 6mm screws which are insufficient for the 6mm arms. You'll want to buy some 8mm screws to mount the motors. Regarding the stack, the red screws included in the kit don't give the 4-in-1 ESC enough clearance. I spent quite a while figuring out a solution and I ended up using 10mm screws and 8mm nylon standoffs to mount the stack. A better solution would be to use 18-20mm screws and an 8mm female-female standoff for better impact resistance. I linked some hardware options below.
It's also worth noting that my VTX came with an RP-SMA pigtail which doesn't match the antenna. I had to find an MMCX to SMA pigtail to use instead.
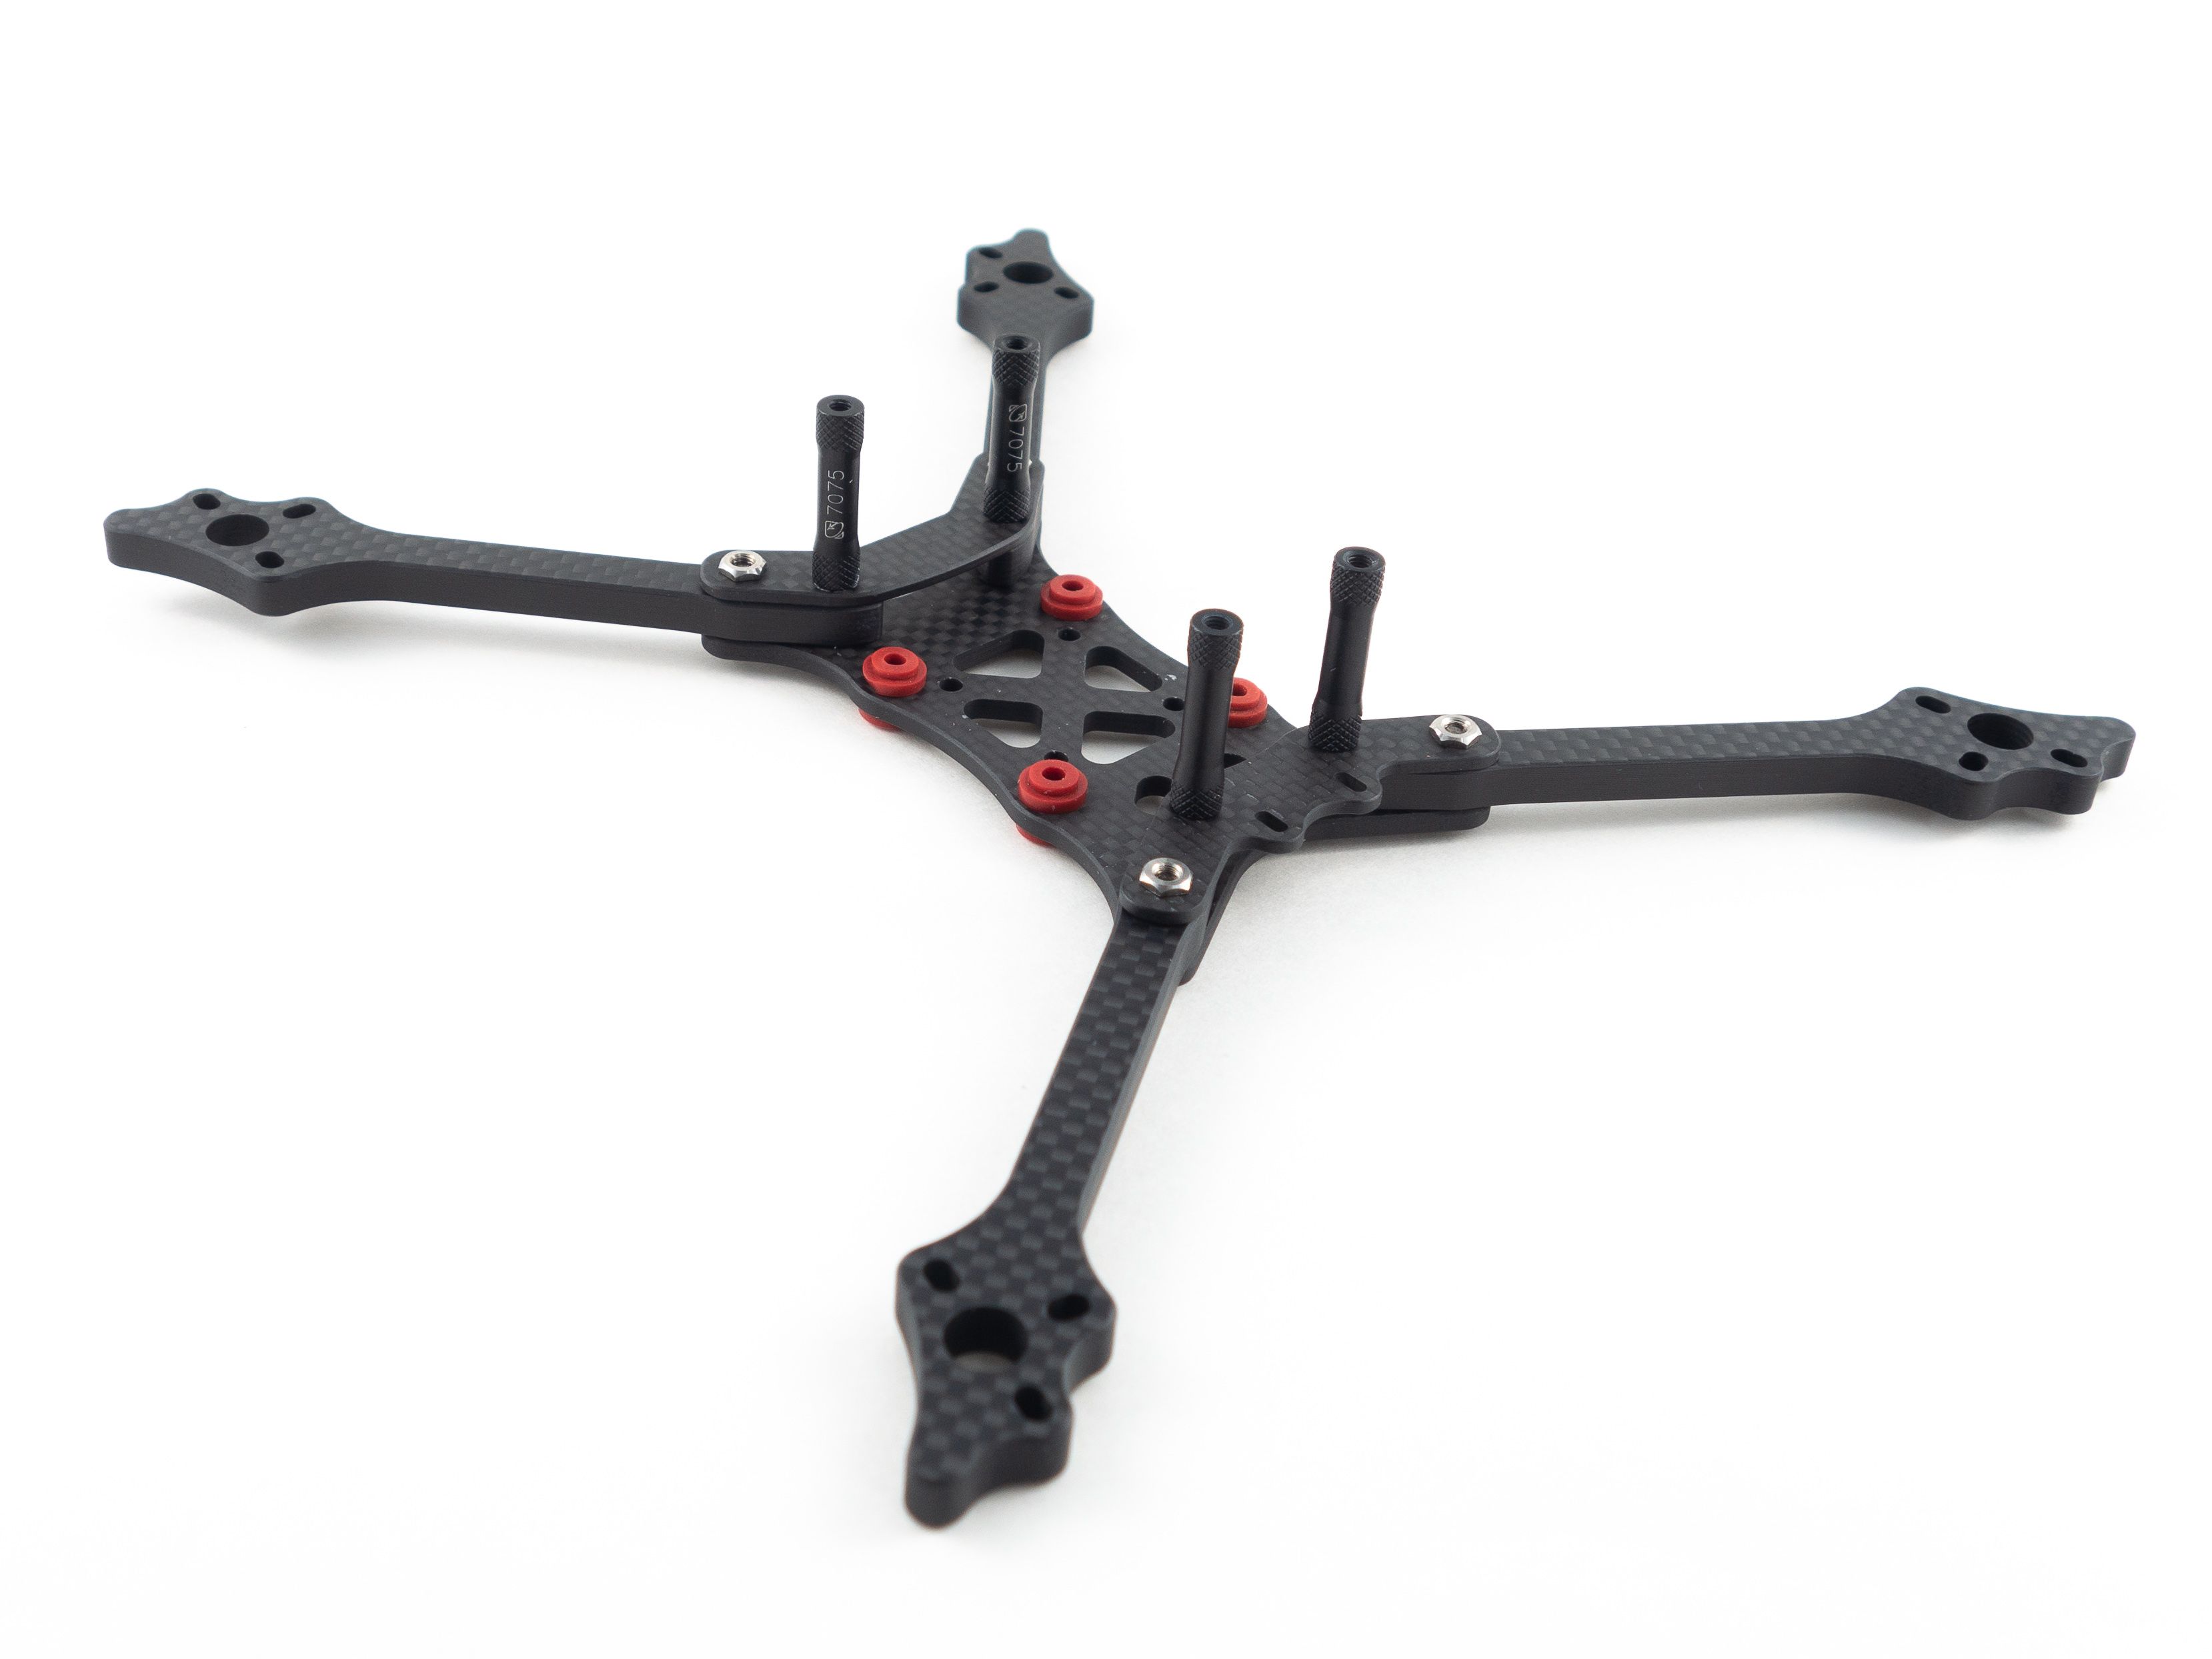
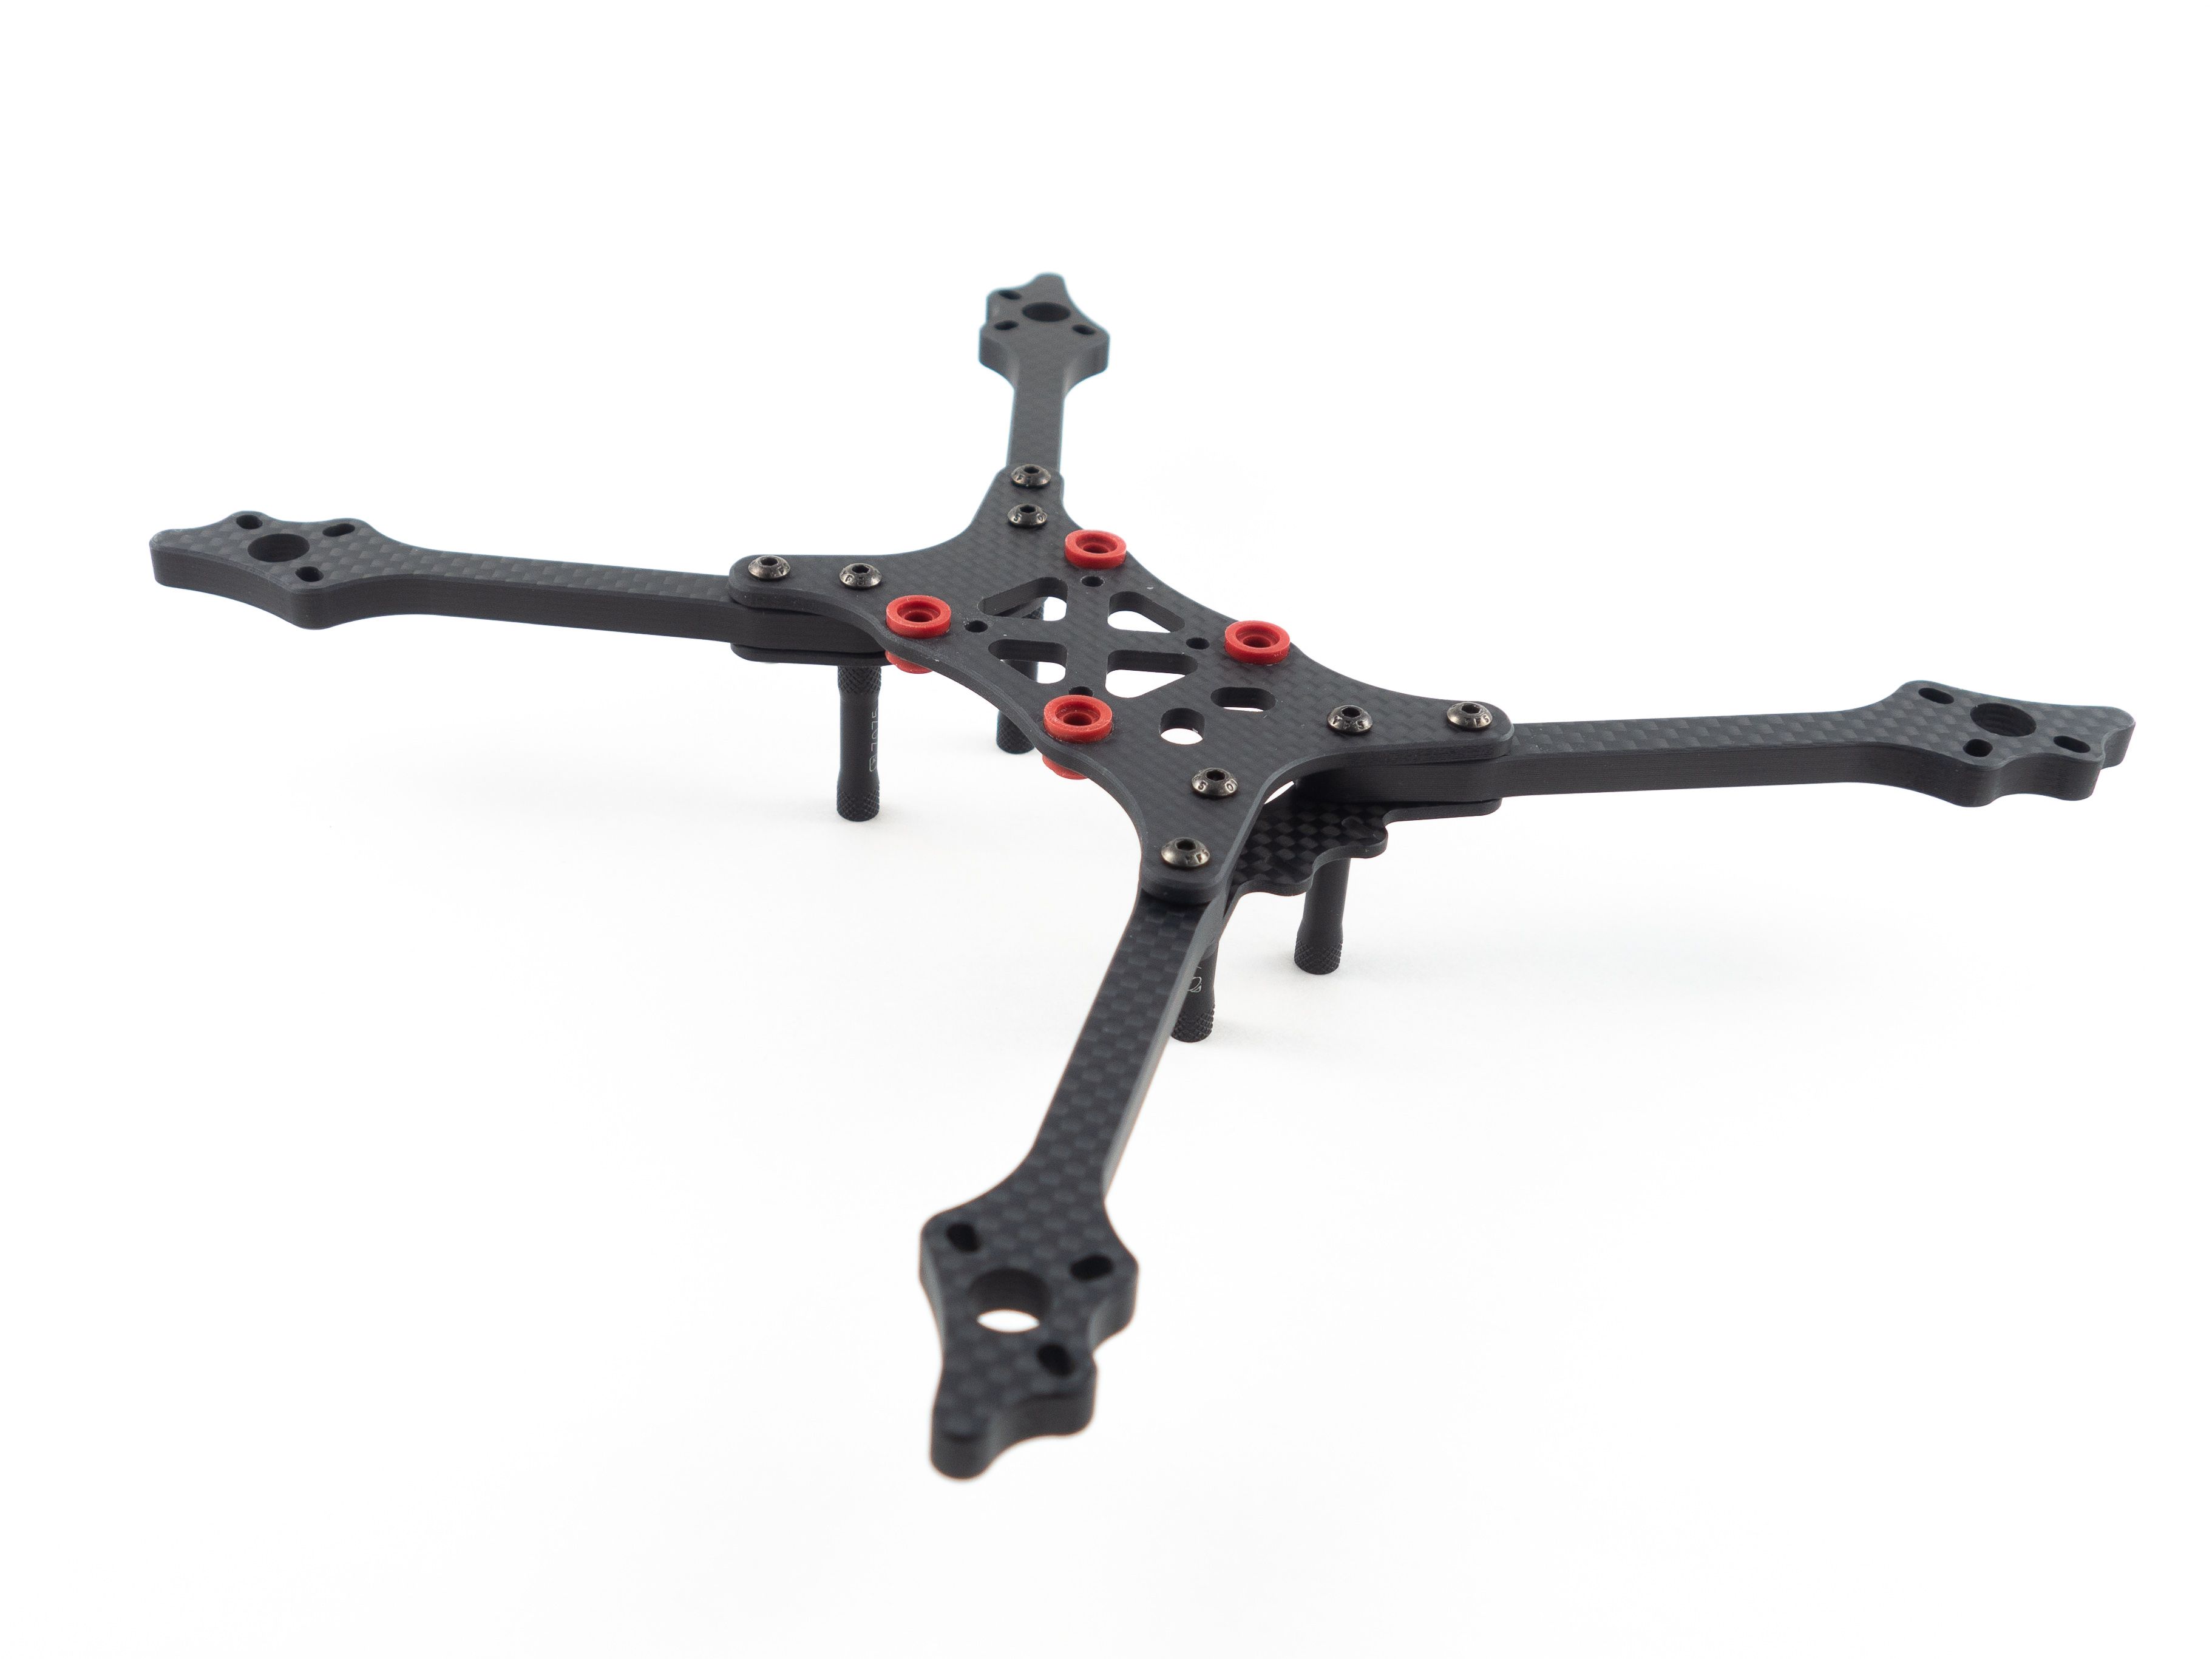
Frame Assembly
The frame doesn't have many parts, but you'll want to pay close attention to the instructions. The baseplate has holes for the rubber dampers, but only one side has an indentation. This side faces down. Try to put these in first before adding the arms. The thicker part of the rubber sits in the indentations. To get them in I found it best to squeeze them, push one end up through the hole and forcibly twist from the bottom until they pop through the top. Try not to push them through with a tool as you may poke a hole in them.
Also, make sure you orient the arms correctly. While you can't put the front arms in the back or vice versa you might accidentally mount them upside down. Make sure the curved ends of the arms face out toward the sides. Also, you may want to exclude the metal standoffs at this stage to give yourself space to solder, but get the arms in tight so they don't move around.
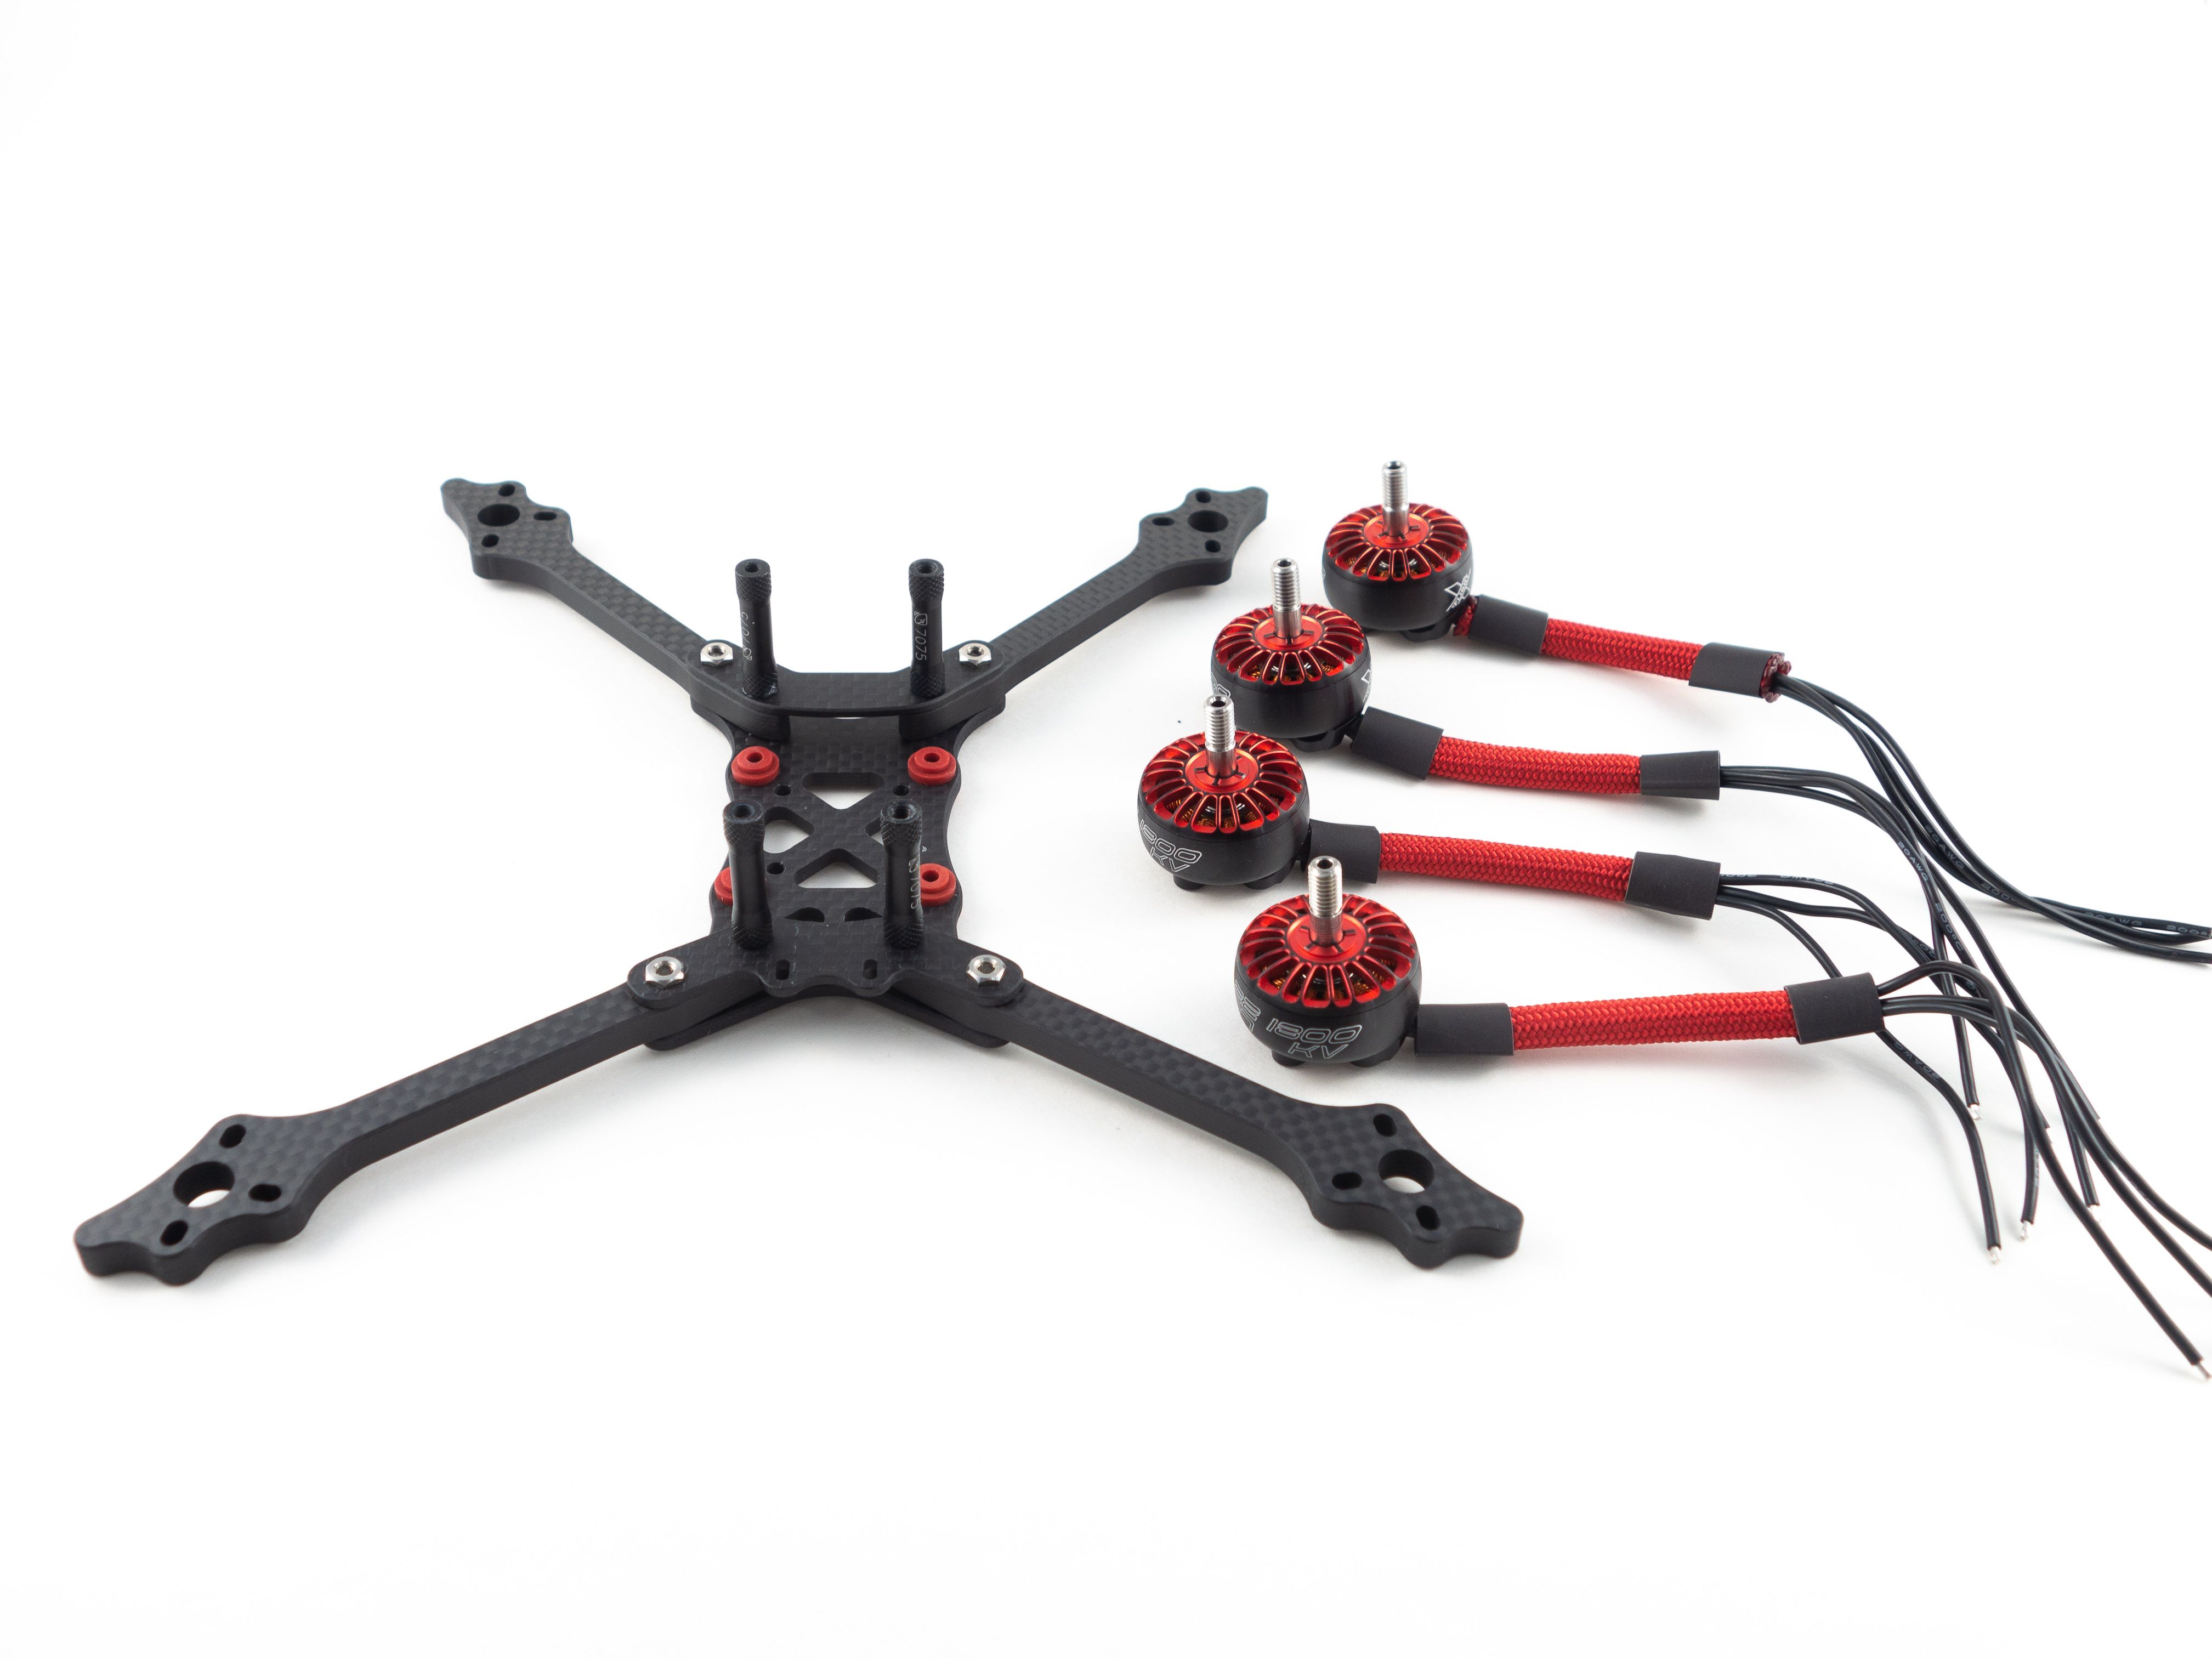
Motors
While it's optional I like to sleeve my motor wires with 1/4" Para-Max. It's also a great way to add a little color to your build. Keep in mind that the traditional 550 Paracord is too narrow for all 3 motor wires.
- Cut 4 pieces of cord (2x6cm & 2x7mm), remove the inner core and, with a lighter, melt the ends to prevent frays.
- The rear motor wires have a little more ground to cover, thus the two different lengths.
- Sleeve the motor wires and add a couple pieces of 14mm shrink tube to cover the ends.
- Screw the motors onto the arms using 8mm M3 screws and blue Loctite.
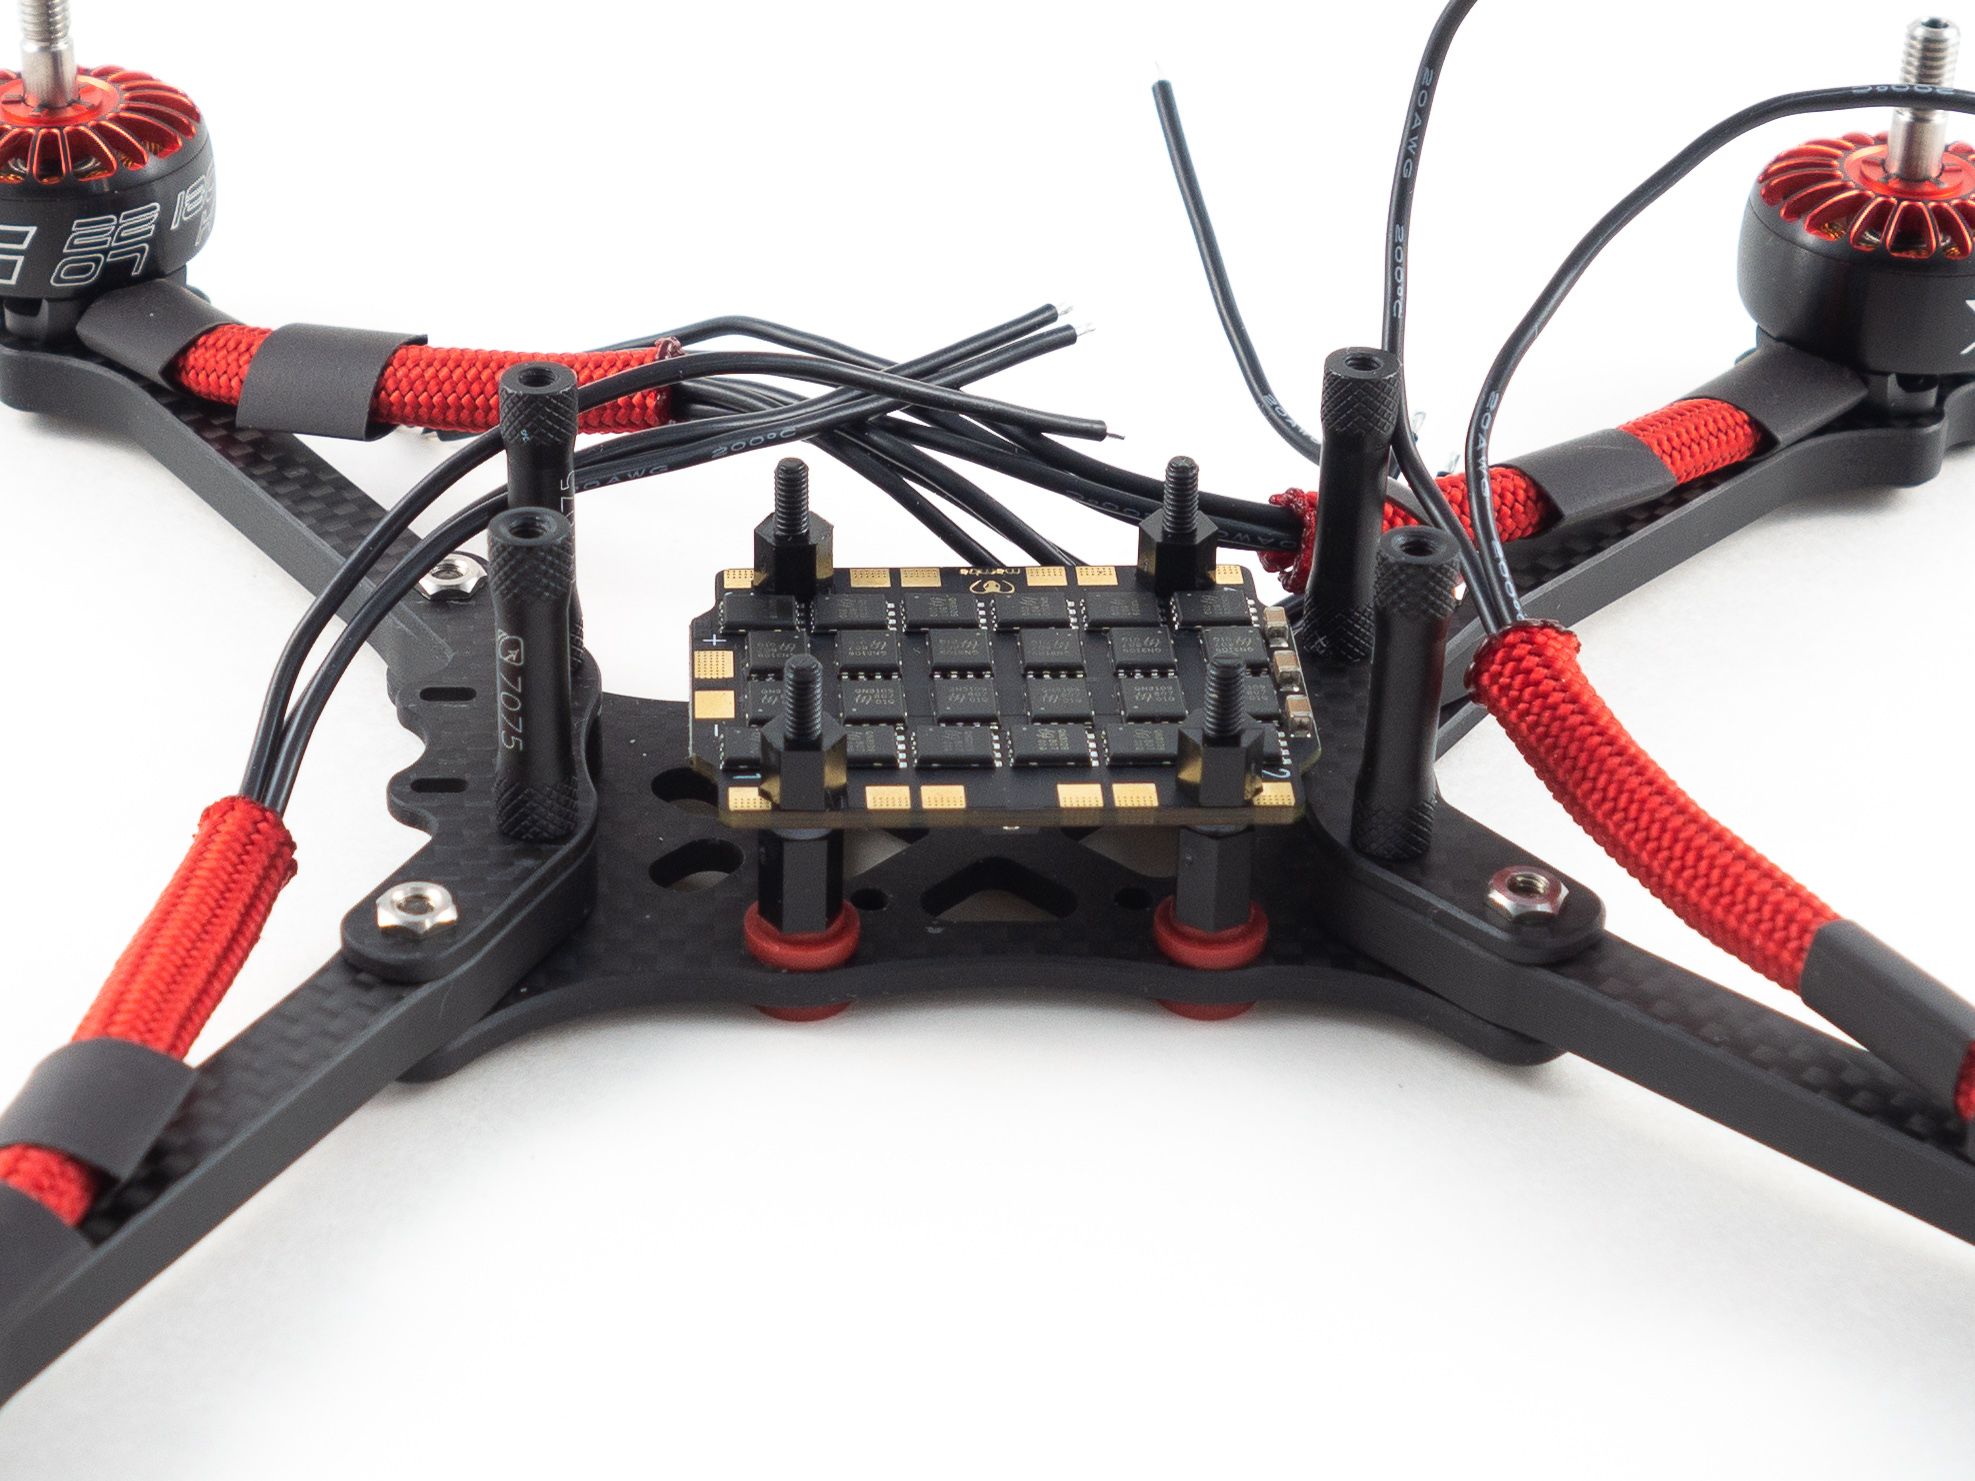
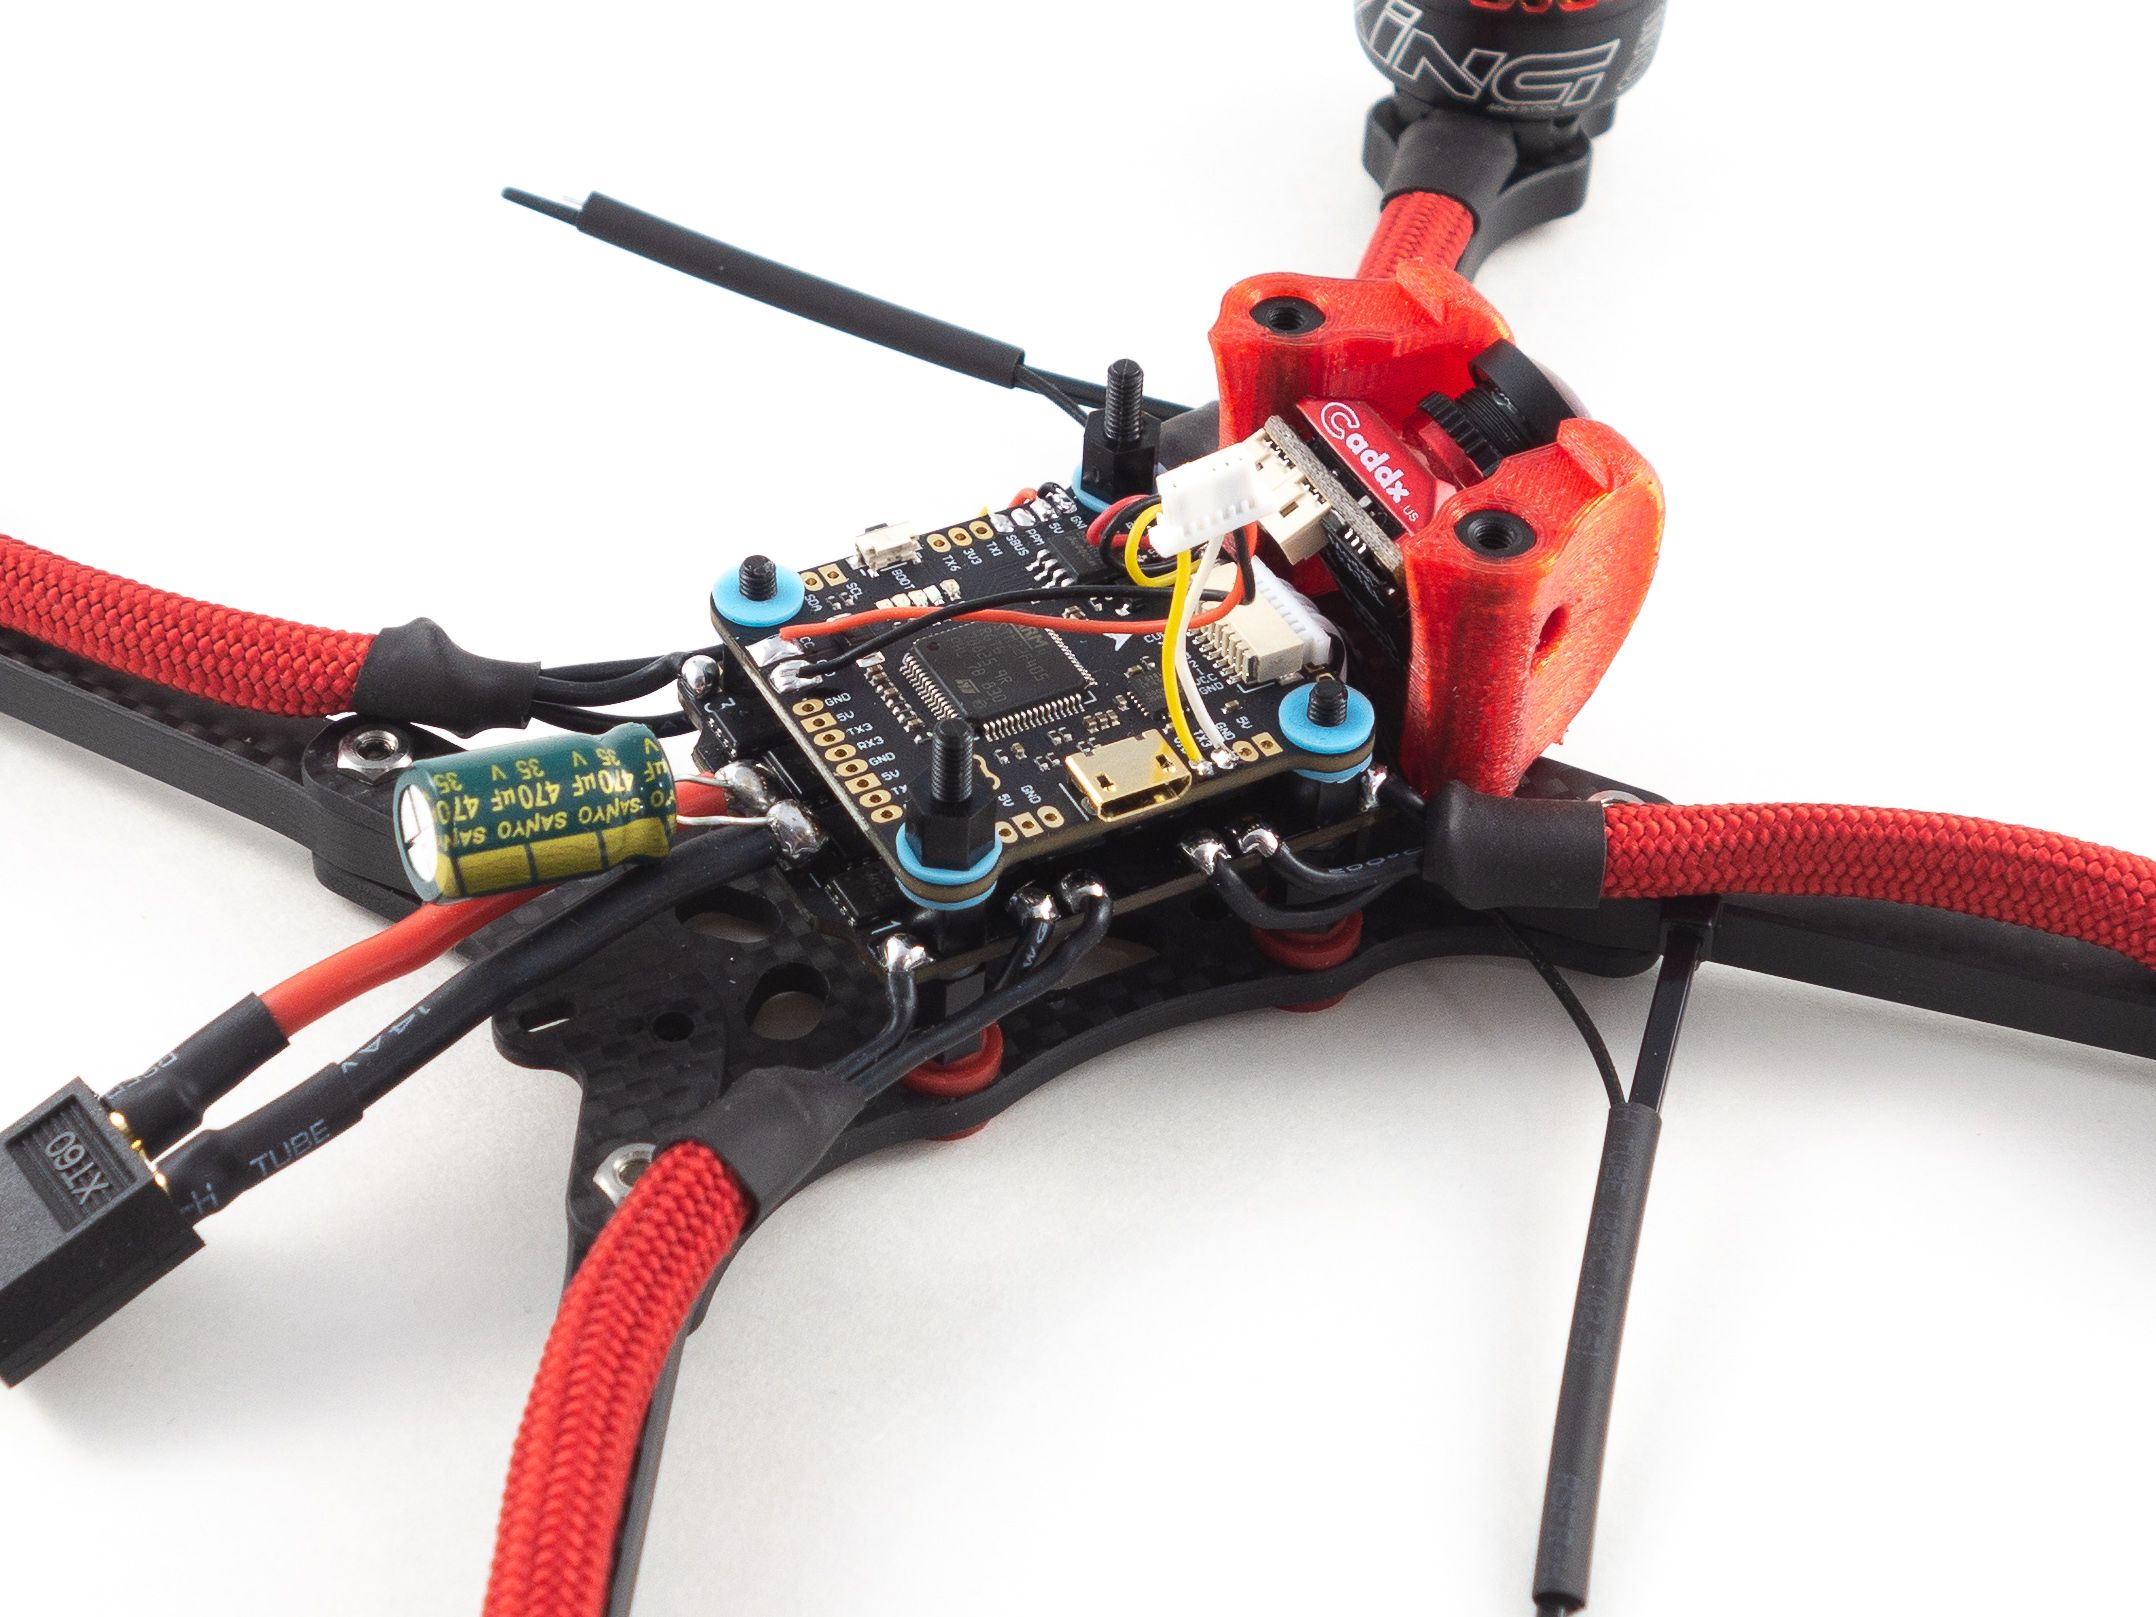
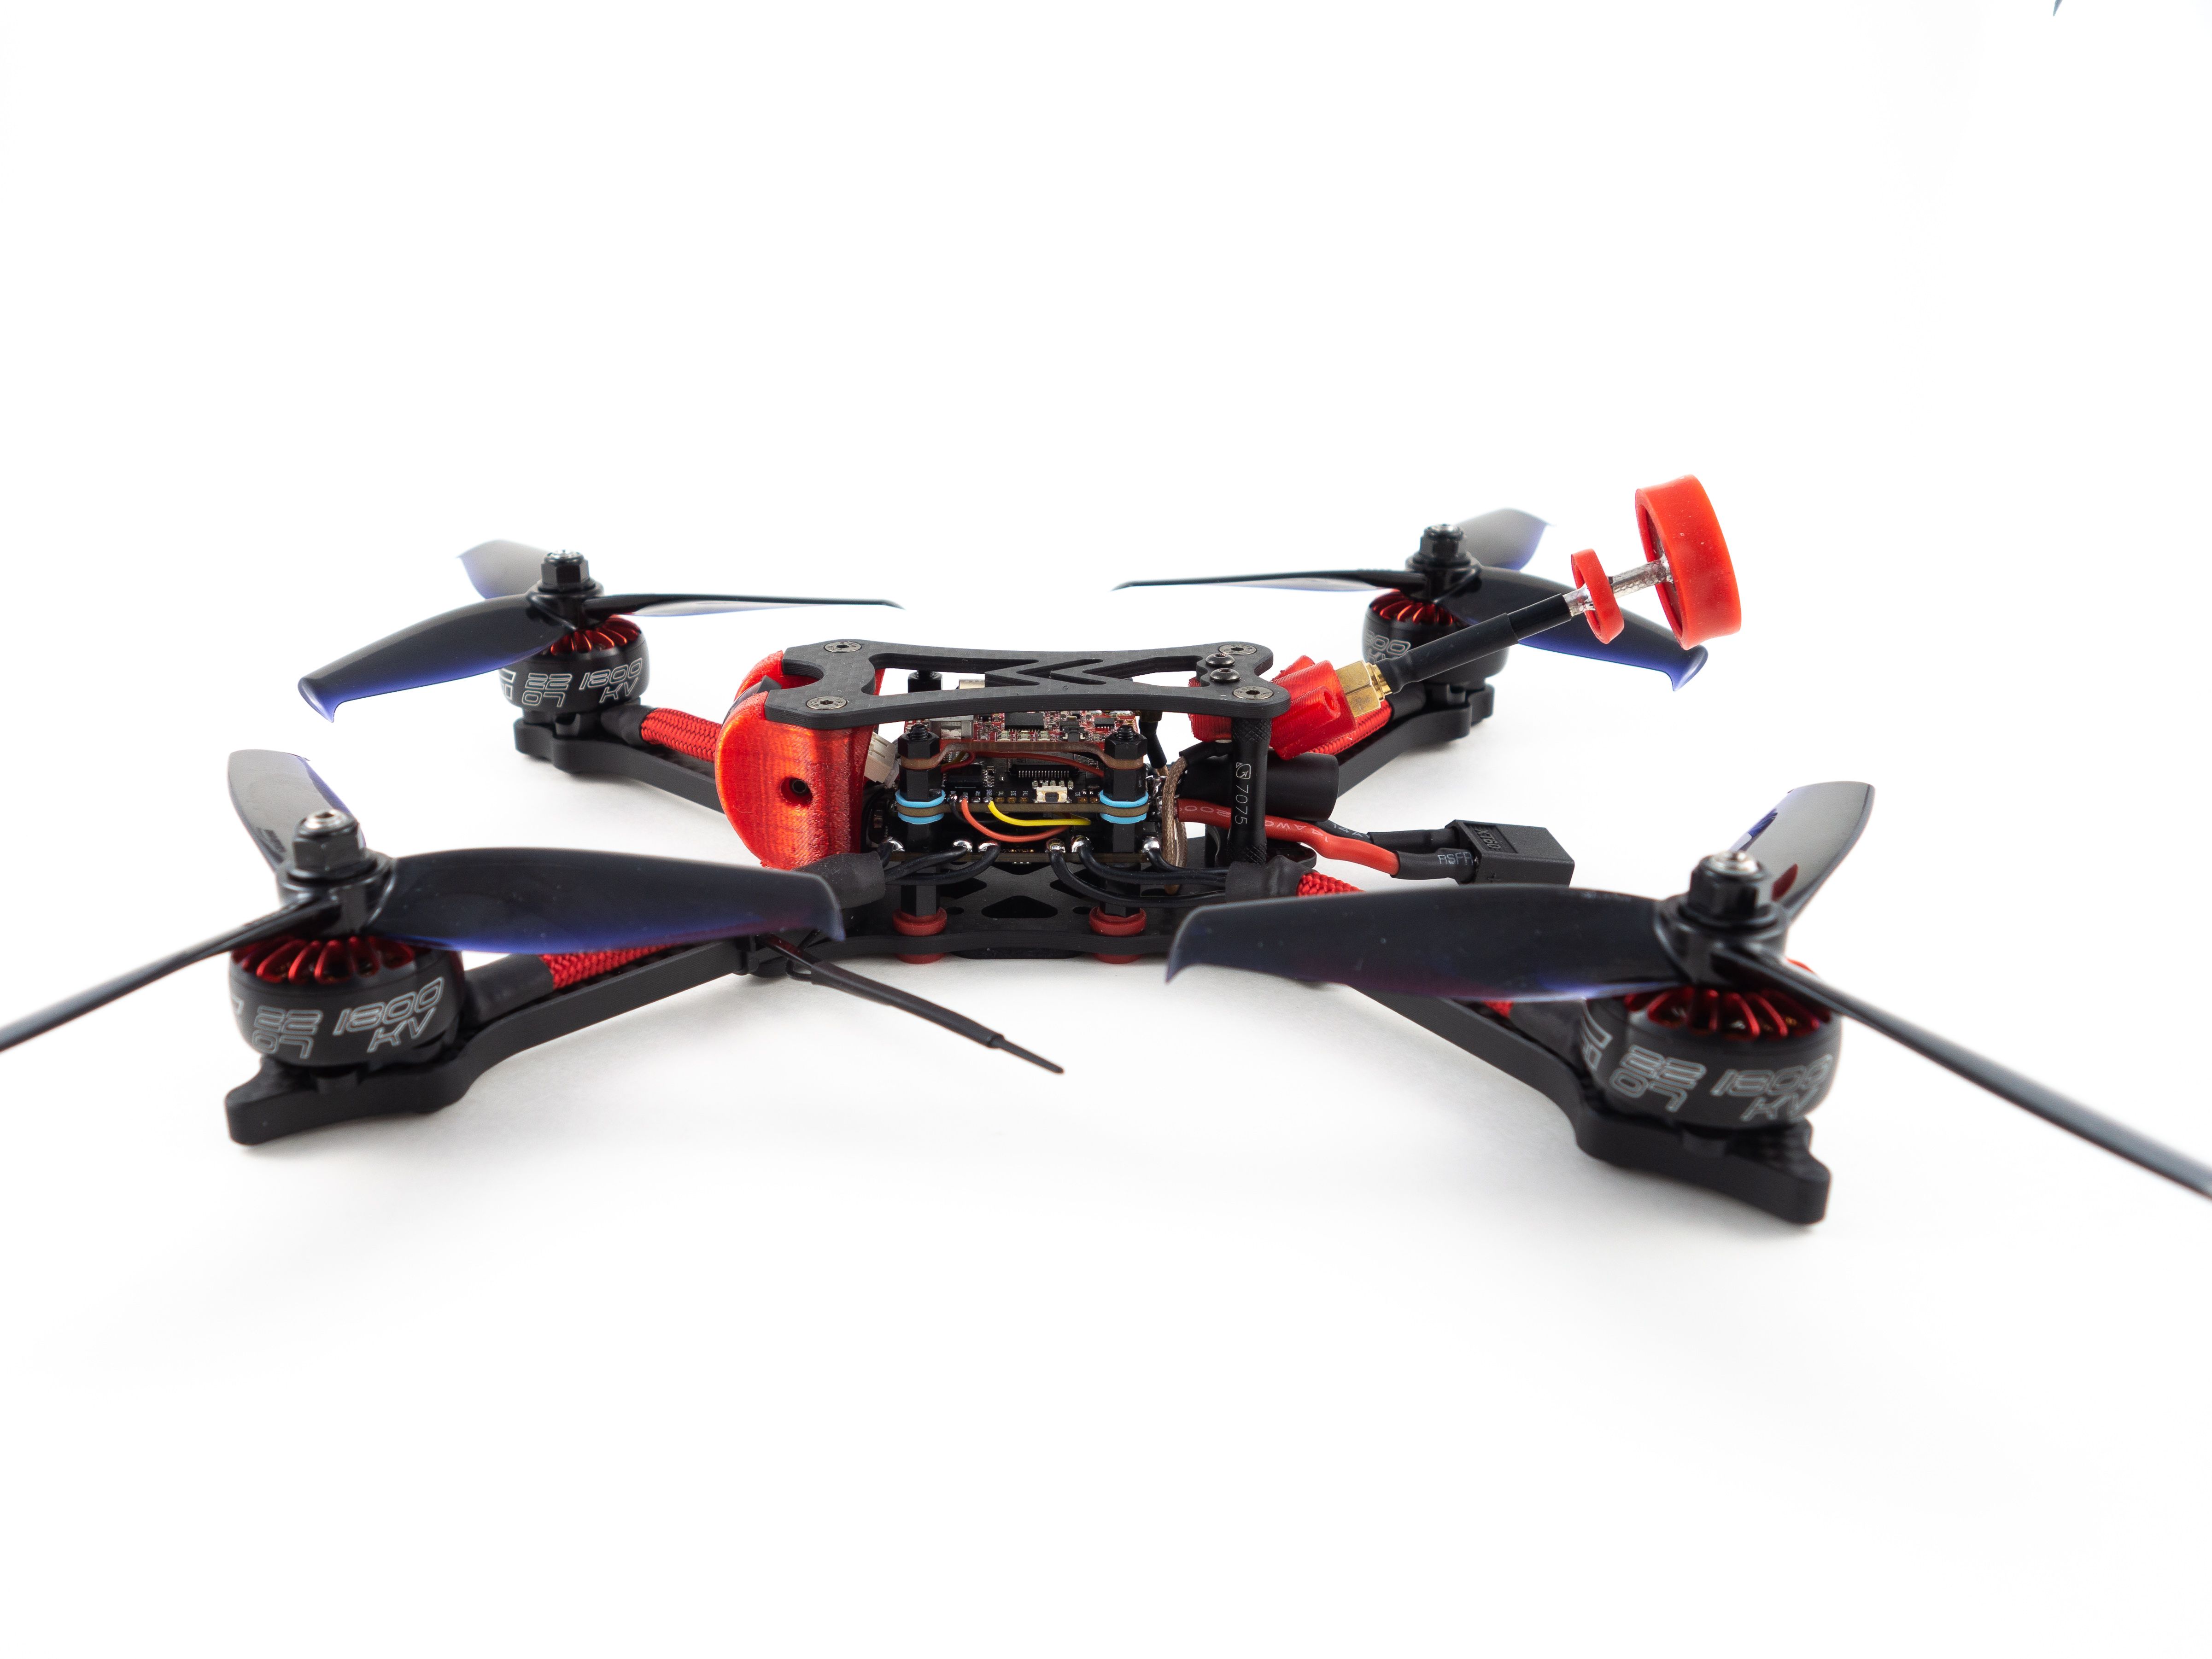
Now the order that you do the next few steps is very particular. You can't build the stack from the bottom to the top due to the clearances between the standoffs and the components on the boards.
- Remove the bottom standoffs from the Mamba stack and replace them with 8mm standoffs instead, keeping the small washers.
- Mount the stack on the red dampers and screw it in place with 10mm screws from below the frame. (Not too tight)
- Unplug and remove the flight controller leaving the standoffs on the 4-in-1 ESC.
- Flux and tin each motor pad ensuring each is completely coated with a bubble of solder.
- If you're right-handed start from the rightmost motor pad and solder all 6 wires from right to left.
- If you're left handed start from the left.
- Cut each wire to length as you go, not all at once.
- Keep a flux pen handy because the middle pads are fairly close together and tend to bridge if you aren't careful.
- Position the shrink tube over the ends of the cord and melt it. You can use a heat gun to make quick work of this.
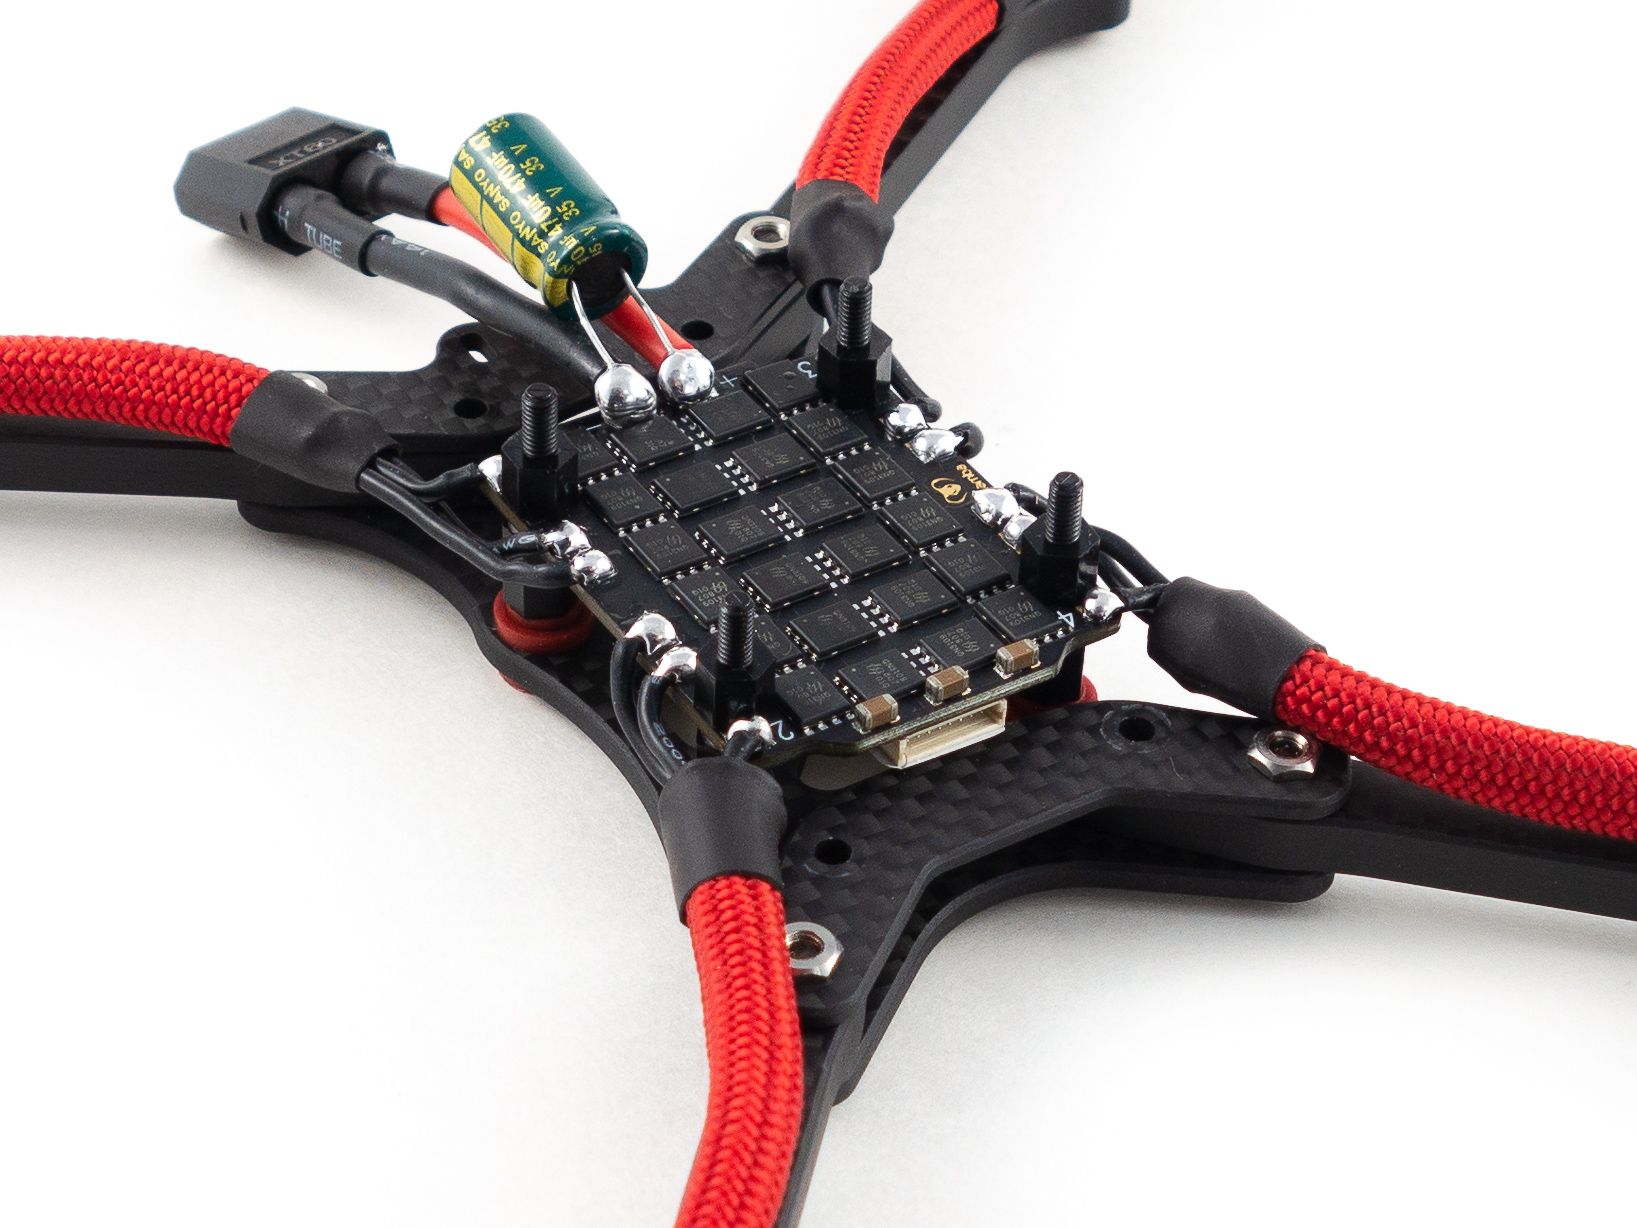
Power Connector
The flight controller comes with everything you need: an XT60, wire and a capacitor.
- Solder the wires to the XT60 connector first and make sure you've got the polarity correct. Add shrink tube to cover the joints.
- Flux and add solder to the battery pads on the 4-in-1 ESC and solder the wires to the pads.
- This requires a fair bit of heat and a good iron. Also be sure to re-tin the wires and add flux to help with heat dissipation.
- Solder the capacitor on top of the battery leads.
- The striped side of the capacitor is negative.
- The amount of wire you leave on the capacitor is crucial here. Depending on which antenna mount you decide to use it may get in the way. A little extra length won't hurt. You may also want to add shrink tube to the wires to insulate them. I used hot glue and covered the wires + capacitor with shrink tube.
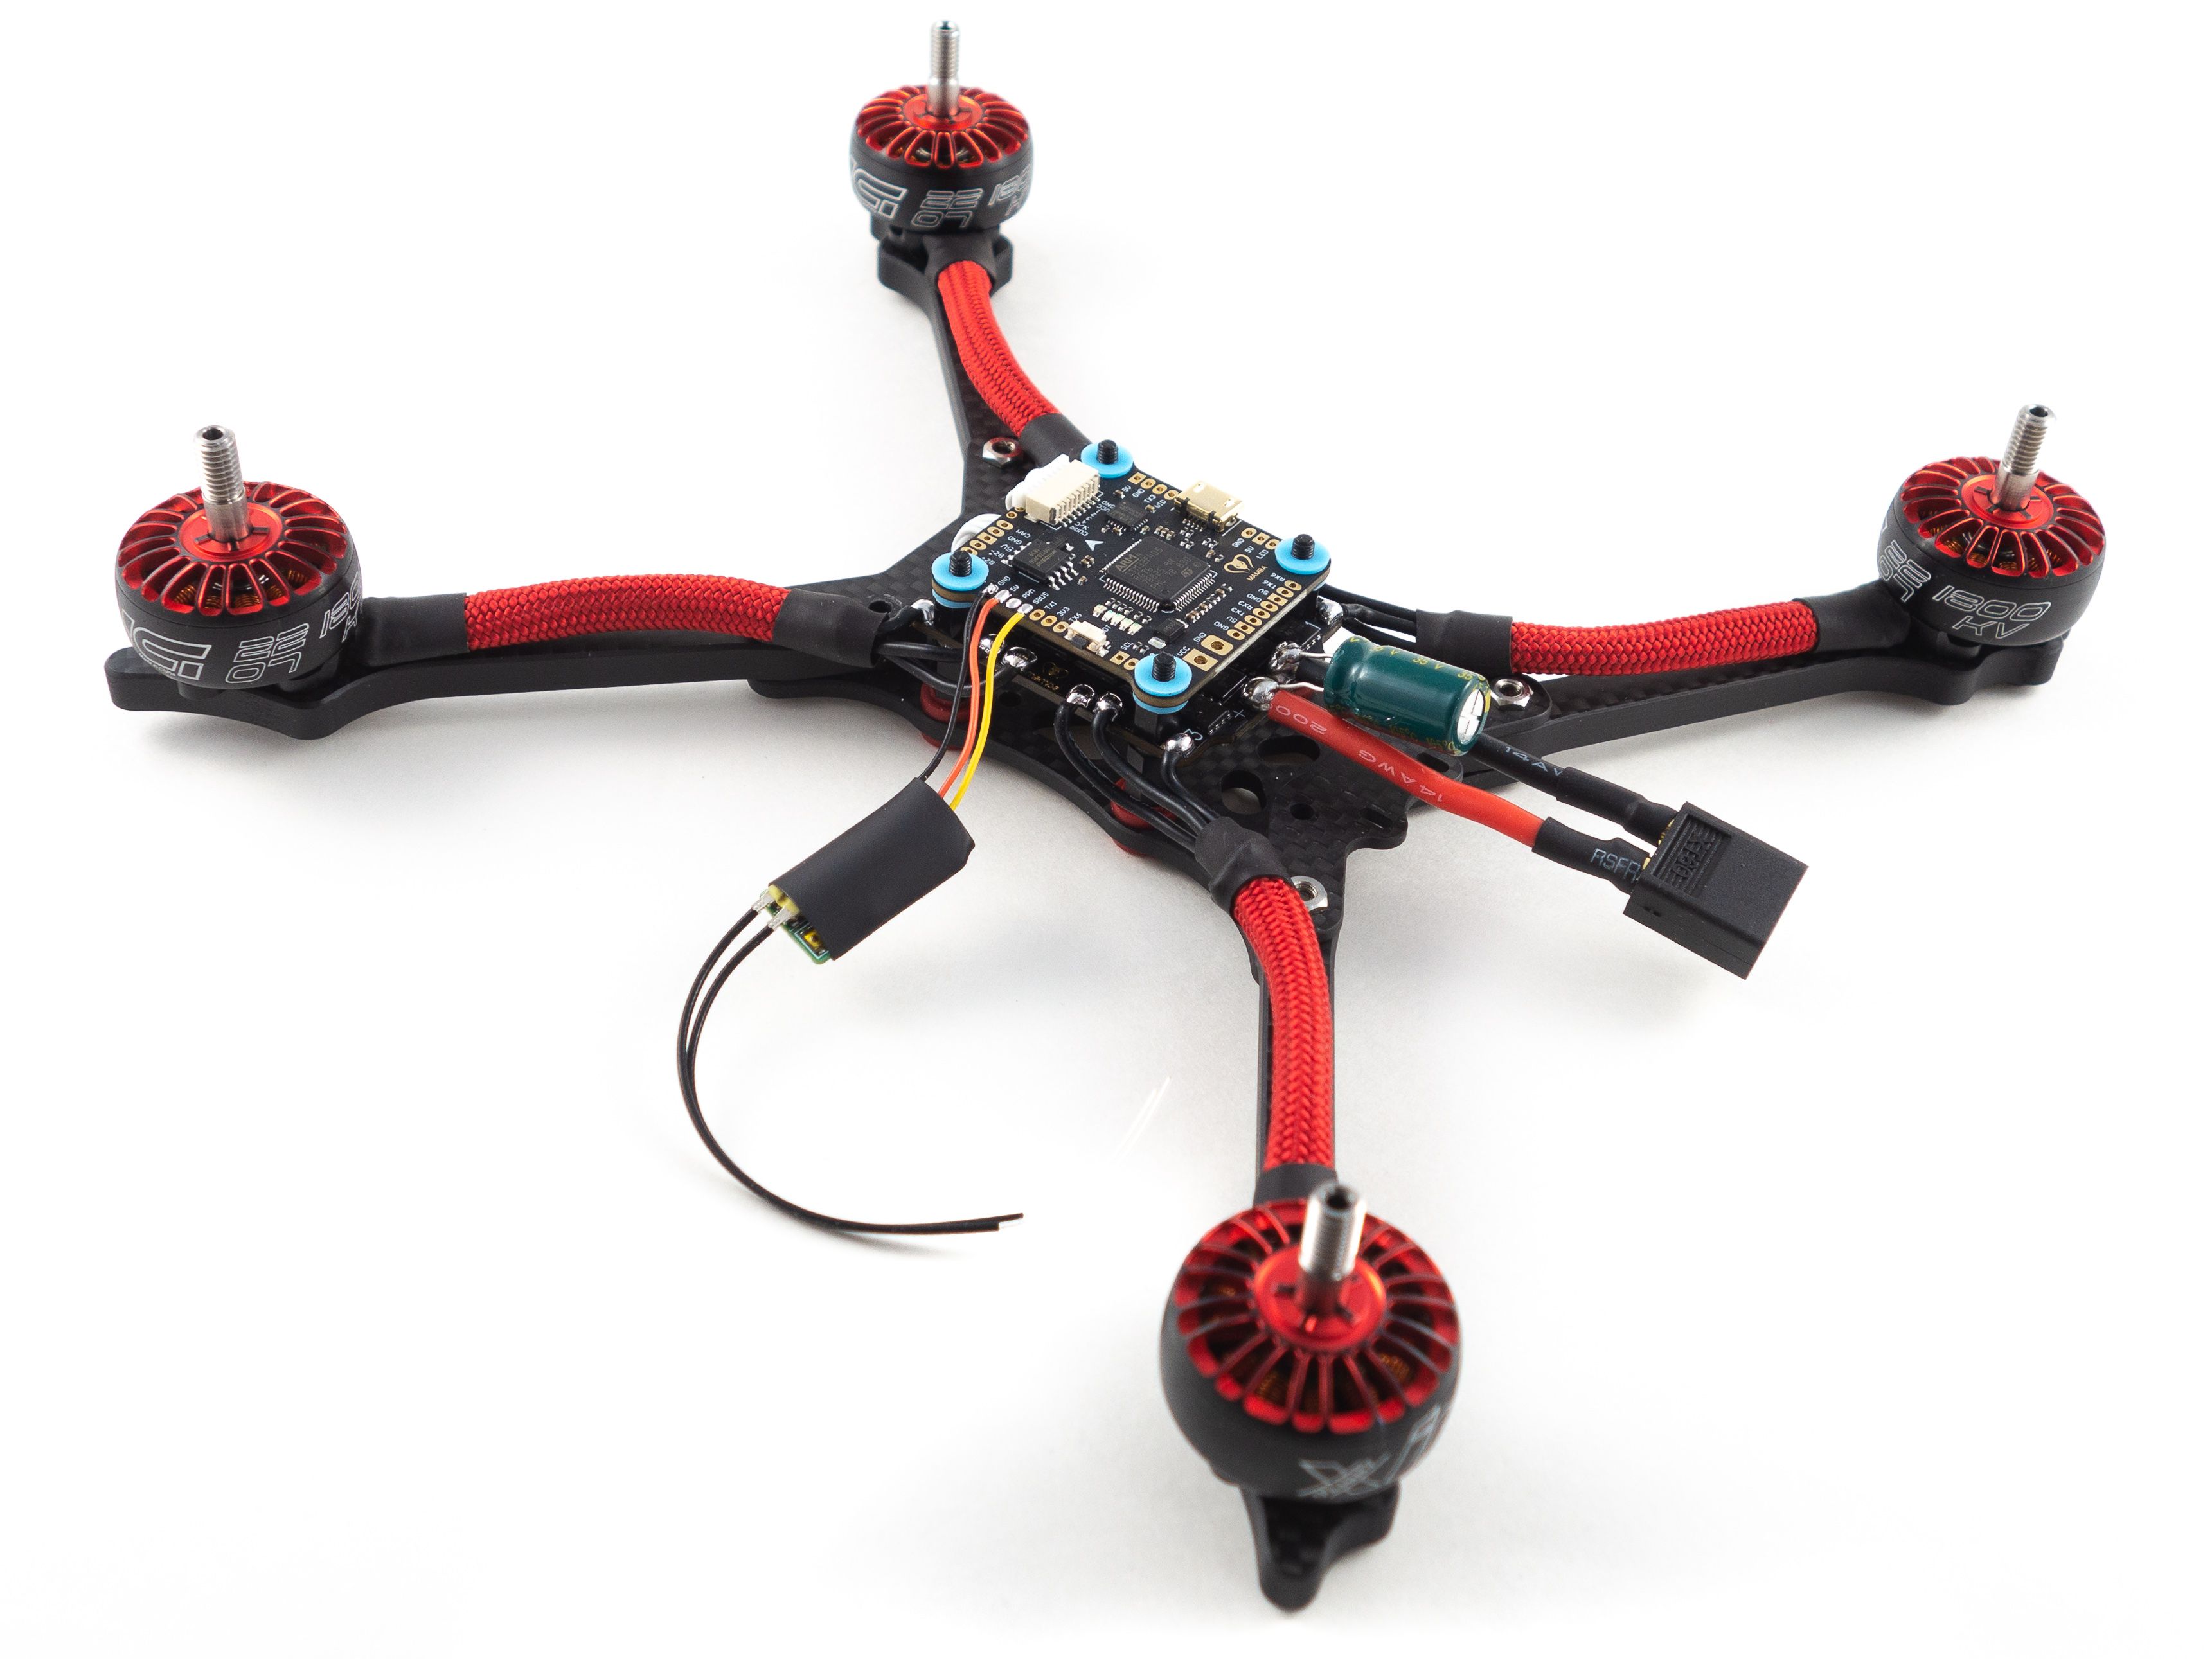
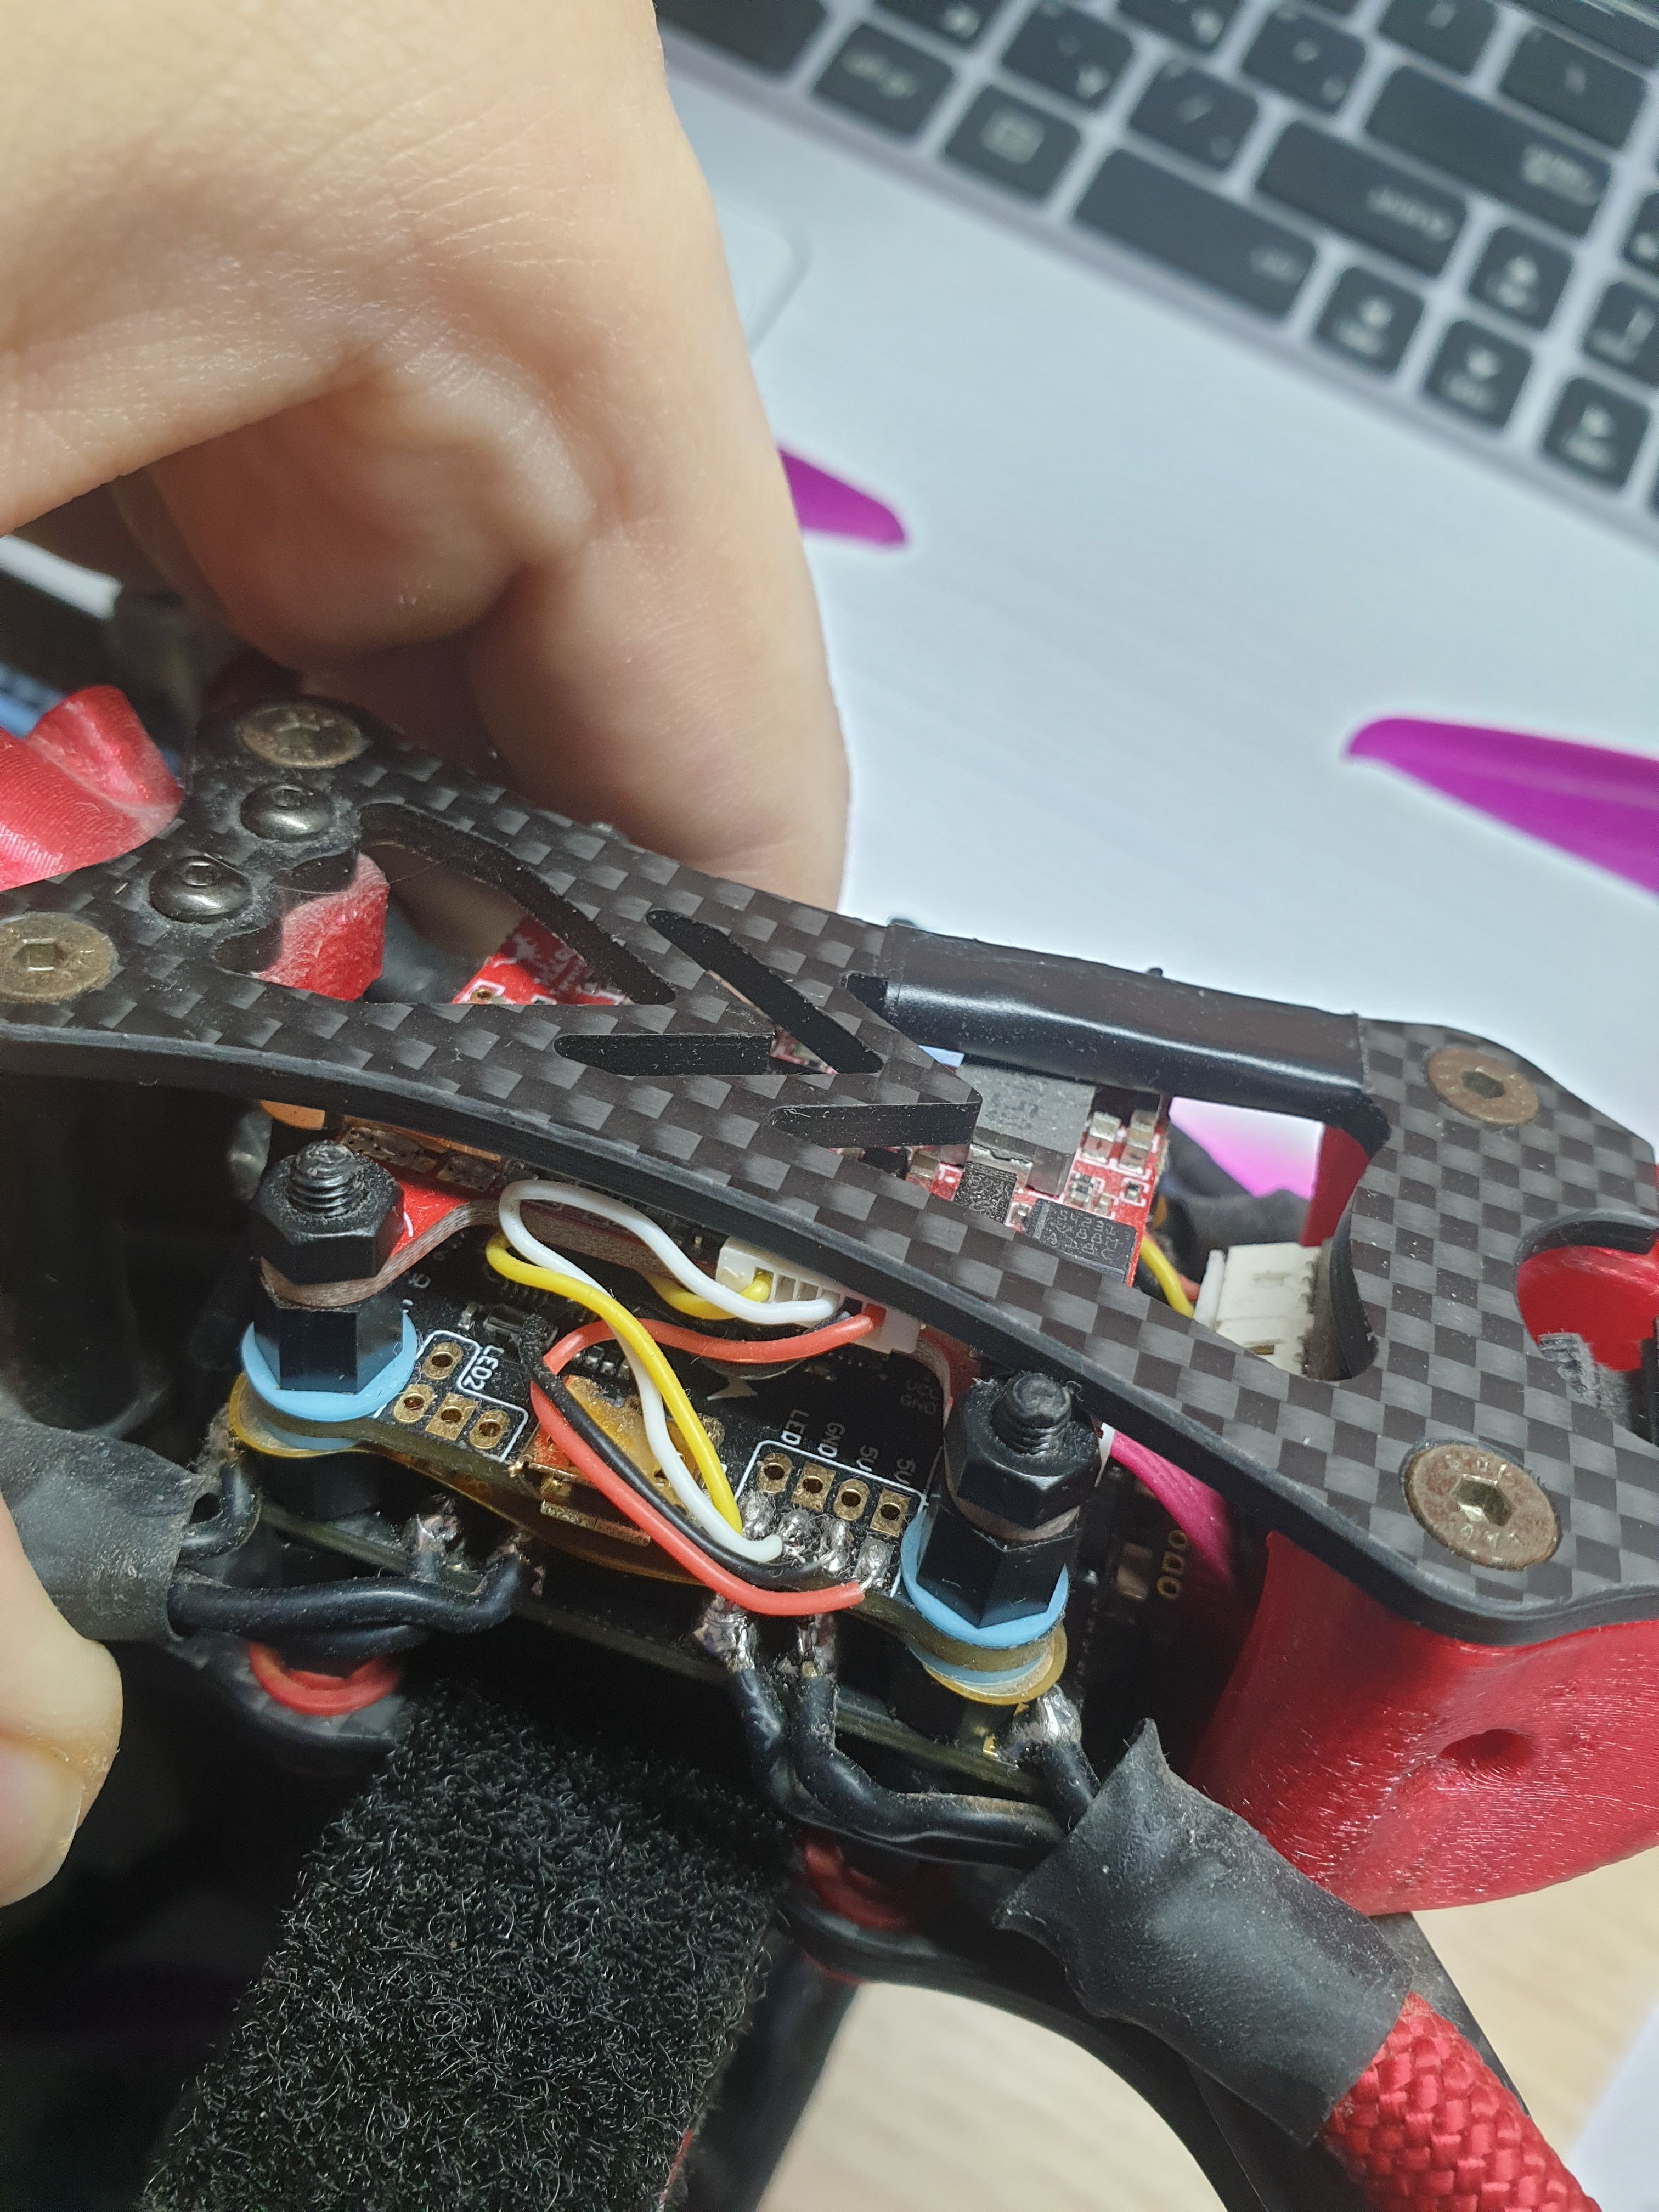
Binding the Receiver
Now that you've got power you can add the receiver and bind it. I used the FrSky XM+, but you'll need to choose a receiver that matches your radio.
- Solder 3 wires to the 5v, GND and SBUS pads on the receiver.
- I borrowed some wire from the VTX. It's got enough to spare.
- Solder these wires to the 5v, GND and SBUS pads on the flight controller.
- Add your flight controller to the stack and re-connect it to the 4-in-1 ESC with the included wire harness.
- Bind your receiver
- Be sure to double check that you don't have continuity between your main battery leads and use a smoke stopper if you have one.
- Hold the bind button on the receiver while you plug the main battery in. (It's helpful to clamp this button down with tweezers to free your hand)
- Put your radio into bind mode and make sure you're bound.
- Now that you're bound you can add some shrink tube to your receiver and tuck it under the flight controller.
- Attach small zip-ties to your front arms and shrink tube the antennas to the zip ties.
- Secure the flight controller with the included nylon nuts.
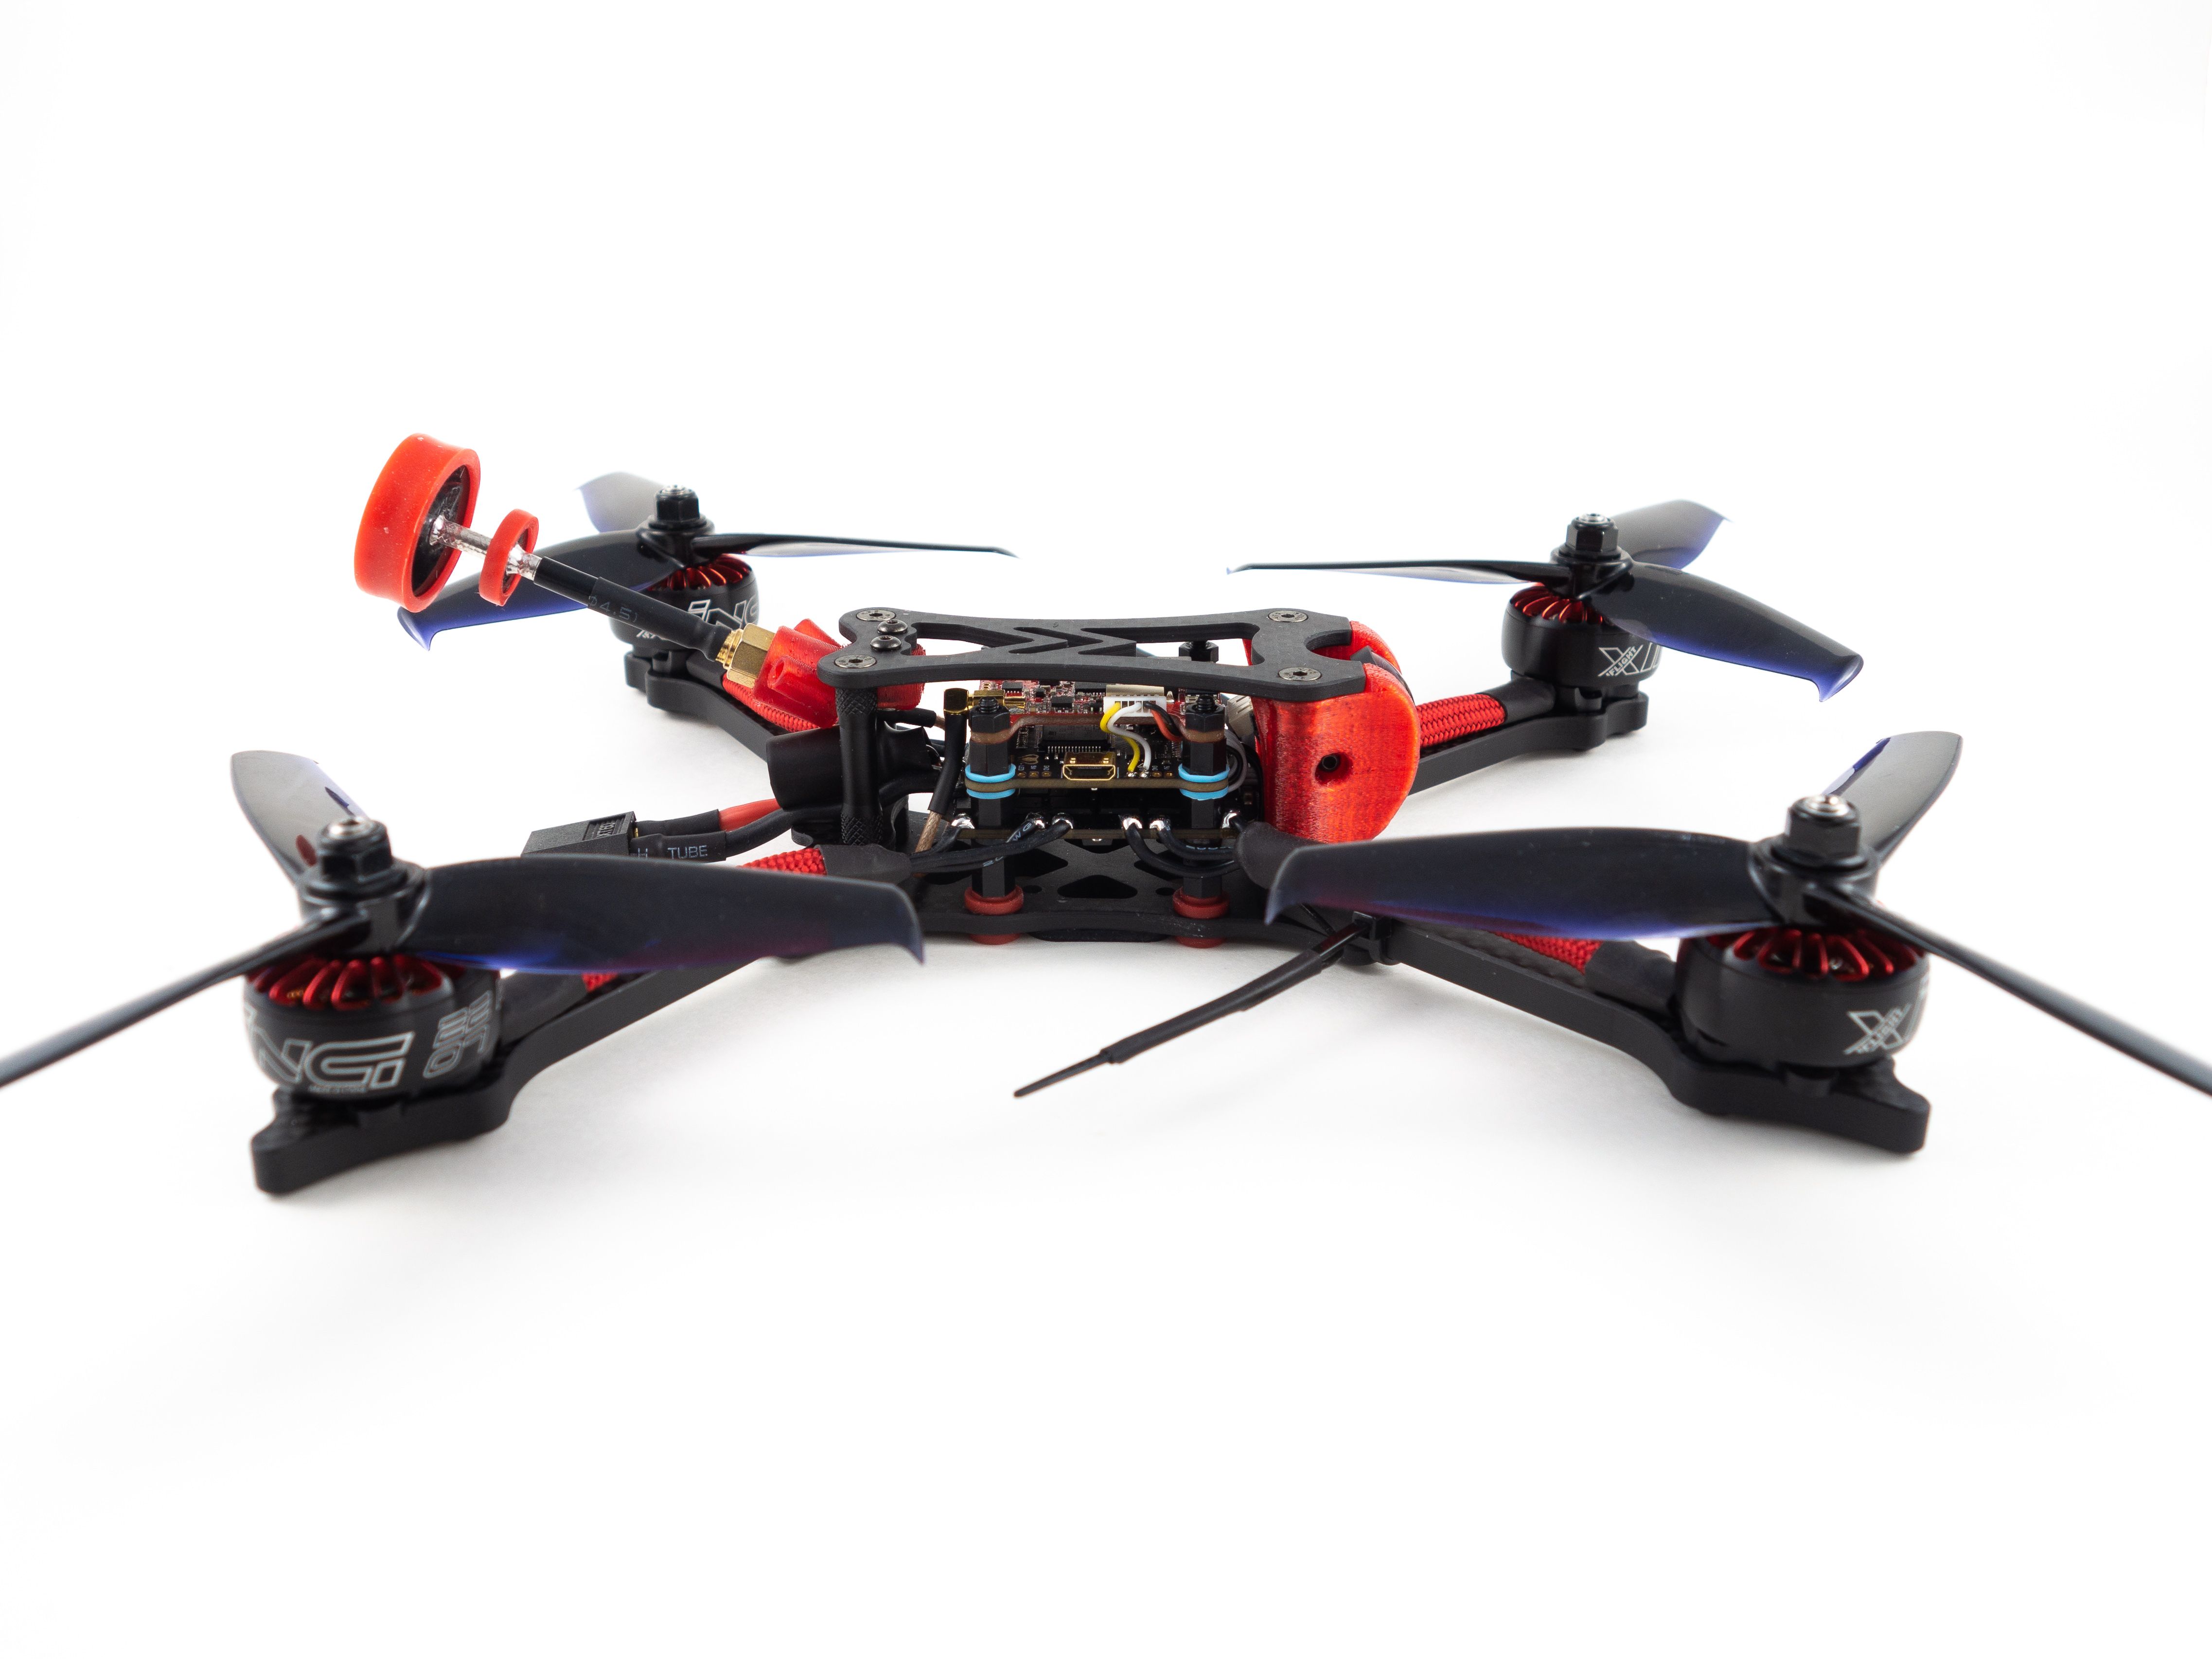
Camera
This kit puts the camera very close to the flight controller, so you'll want to solder the wires before you mount the camera to the frame. I soldered the wires so they curve back and up toward the camera. You want a little slack so the camera angle can be freely adjusted. The wiring is very straightforward. Just solder the 5v, GND and Video wires to their respective pads directly adjacent to the camera.
Screw the camera into the TPU mount and slide the aluminum standoffs into the slots on both sides of the TPU mount. Now you can screw it onto the frame. Just make sure you don't pinch your receiver antennas!
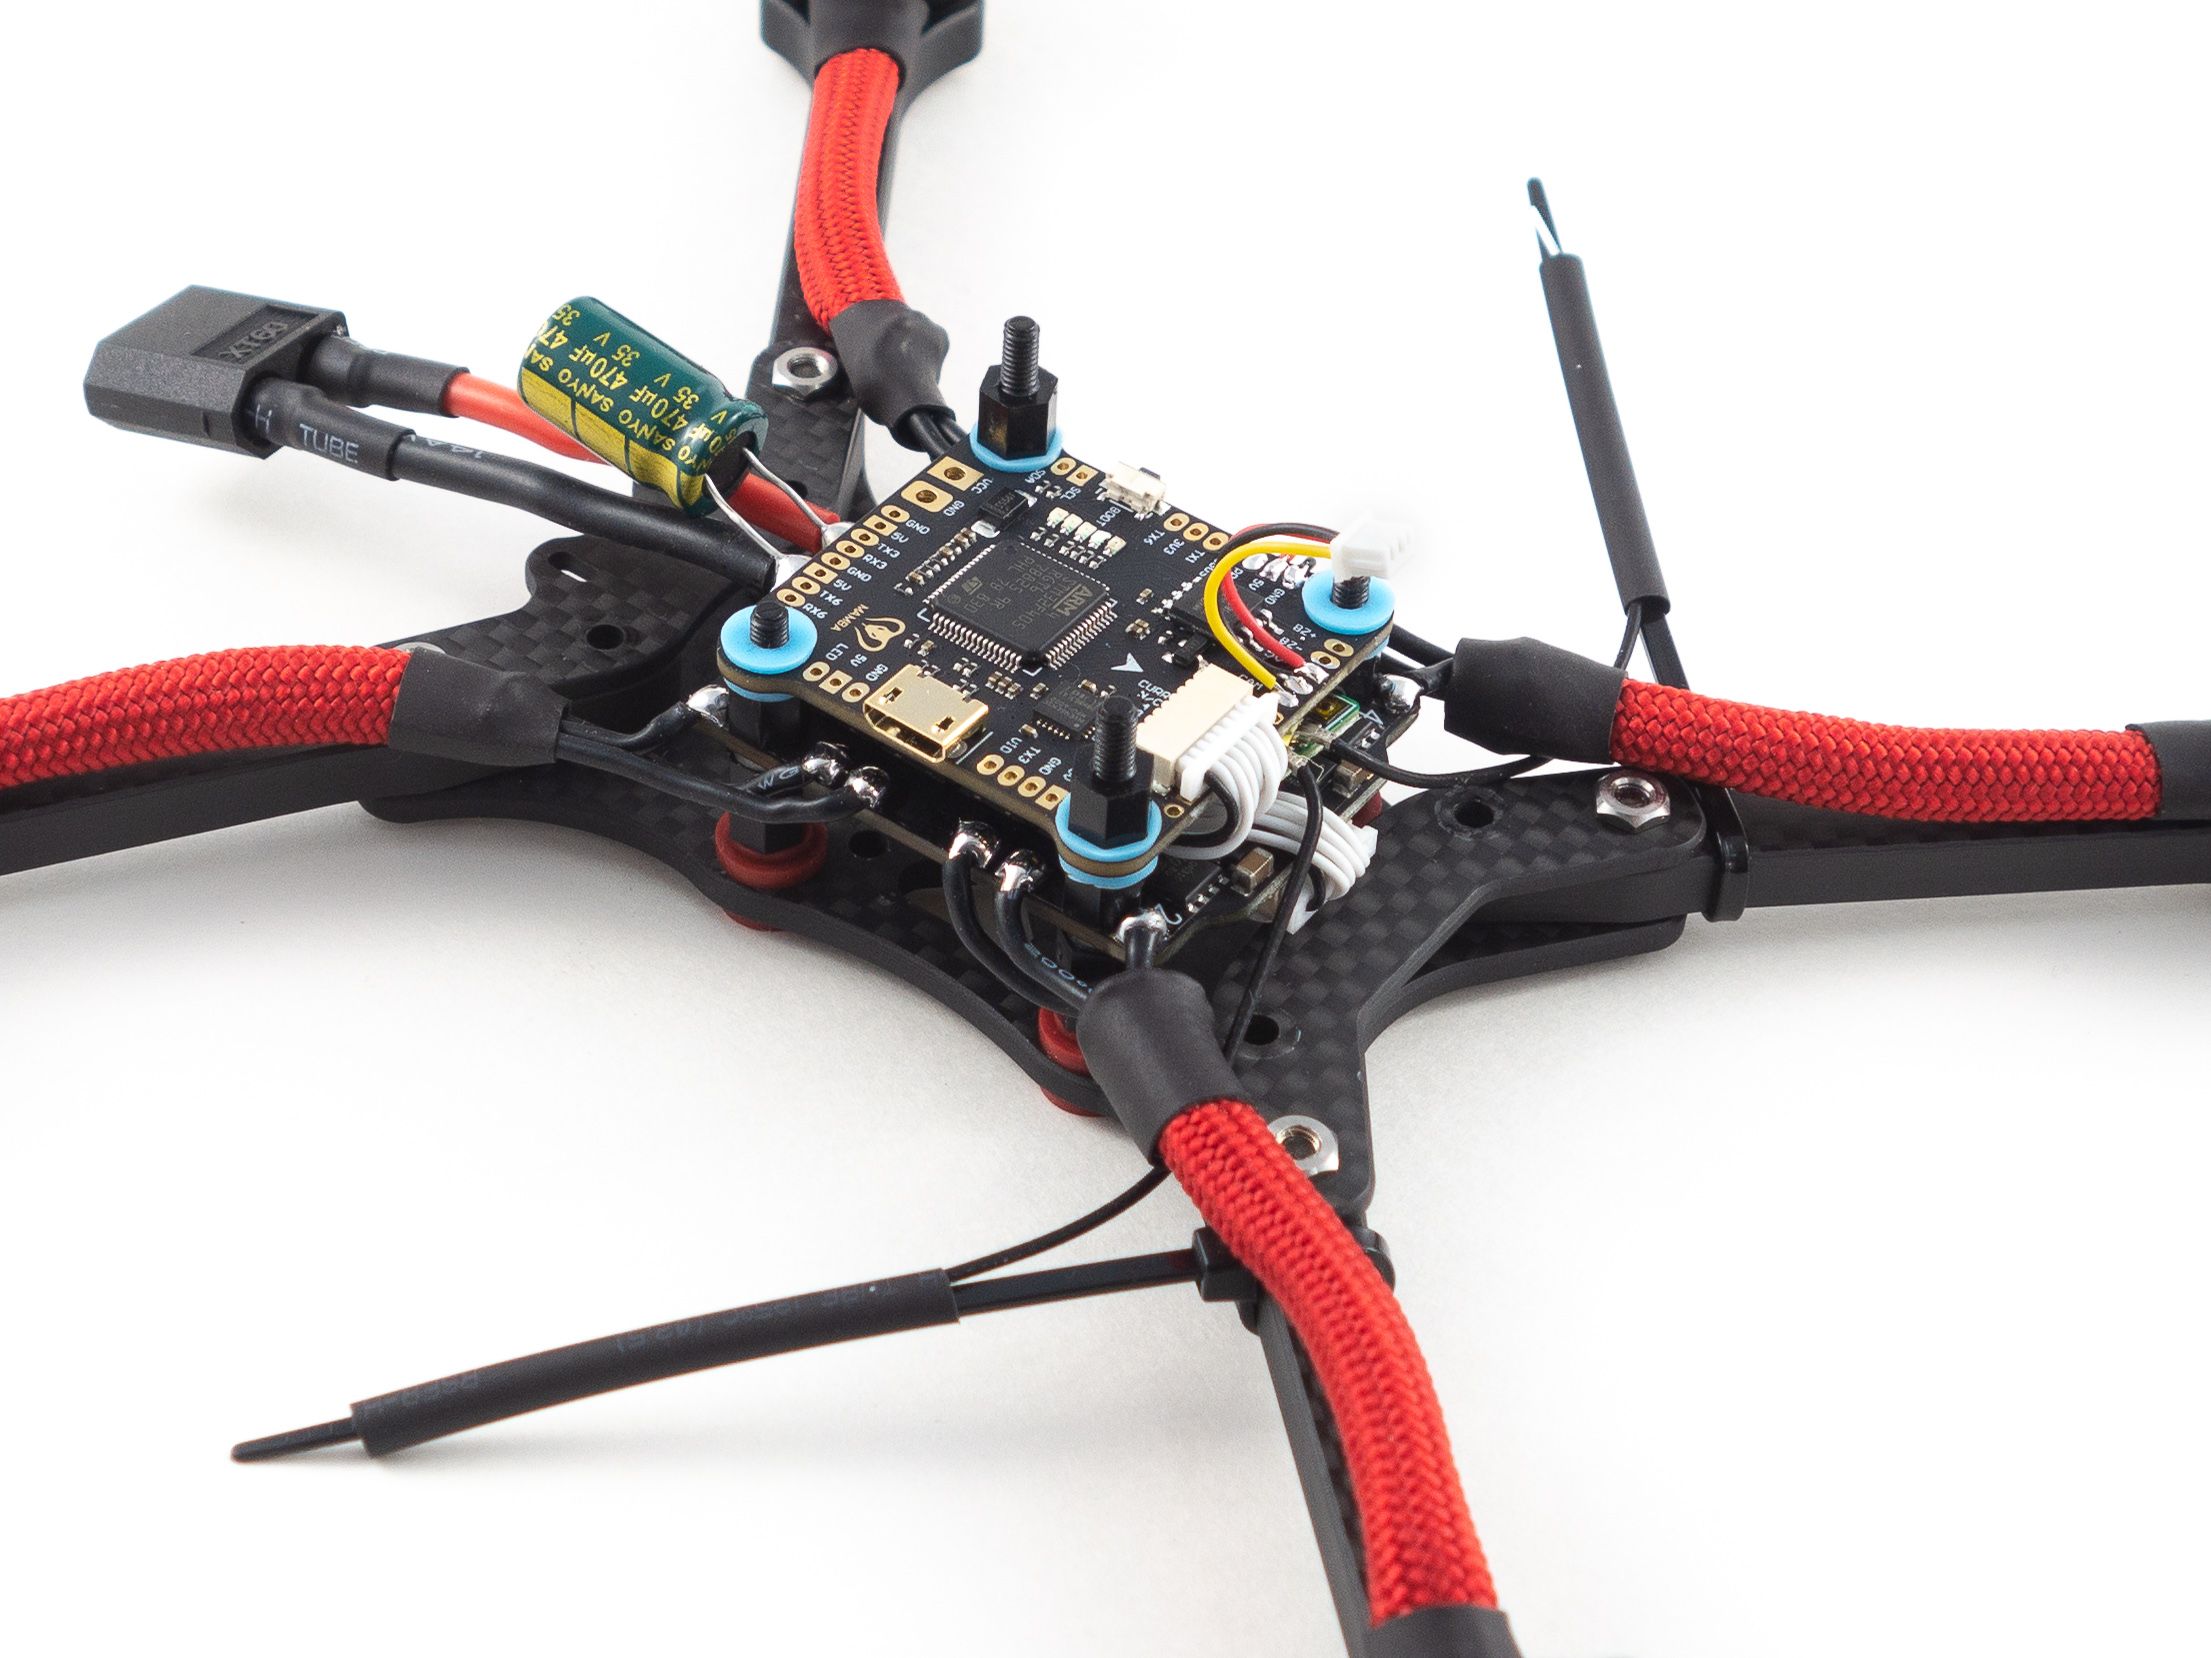
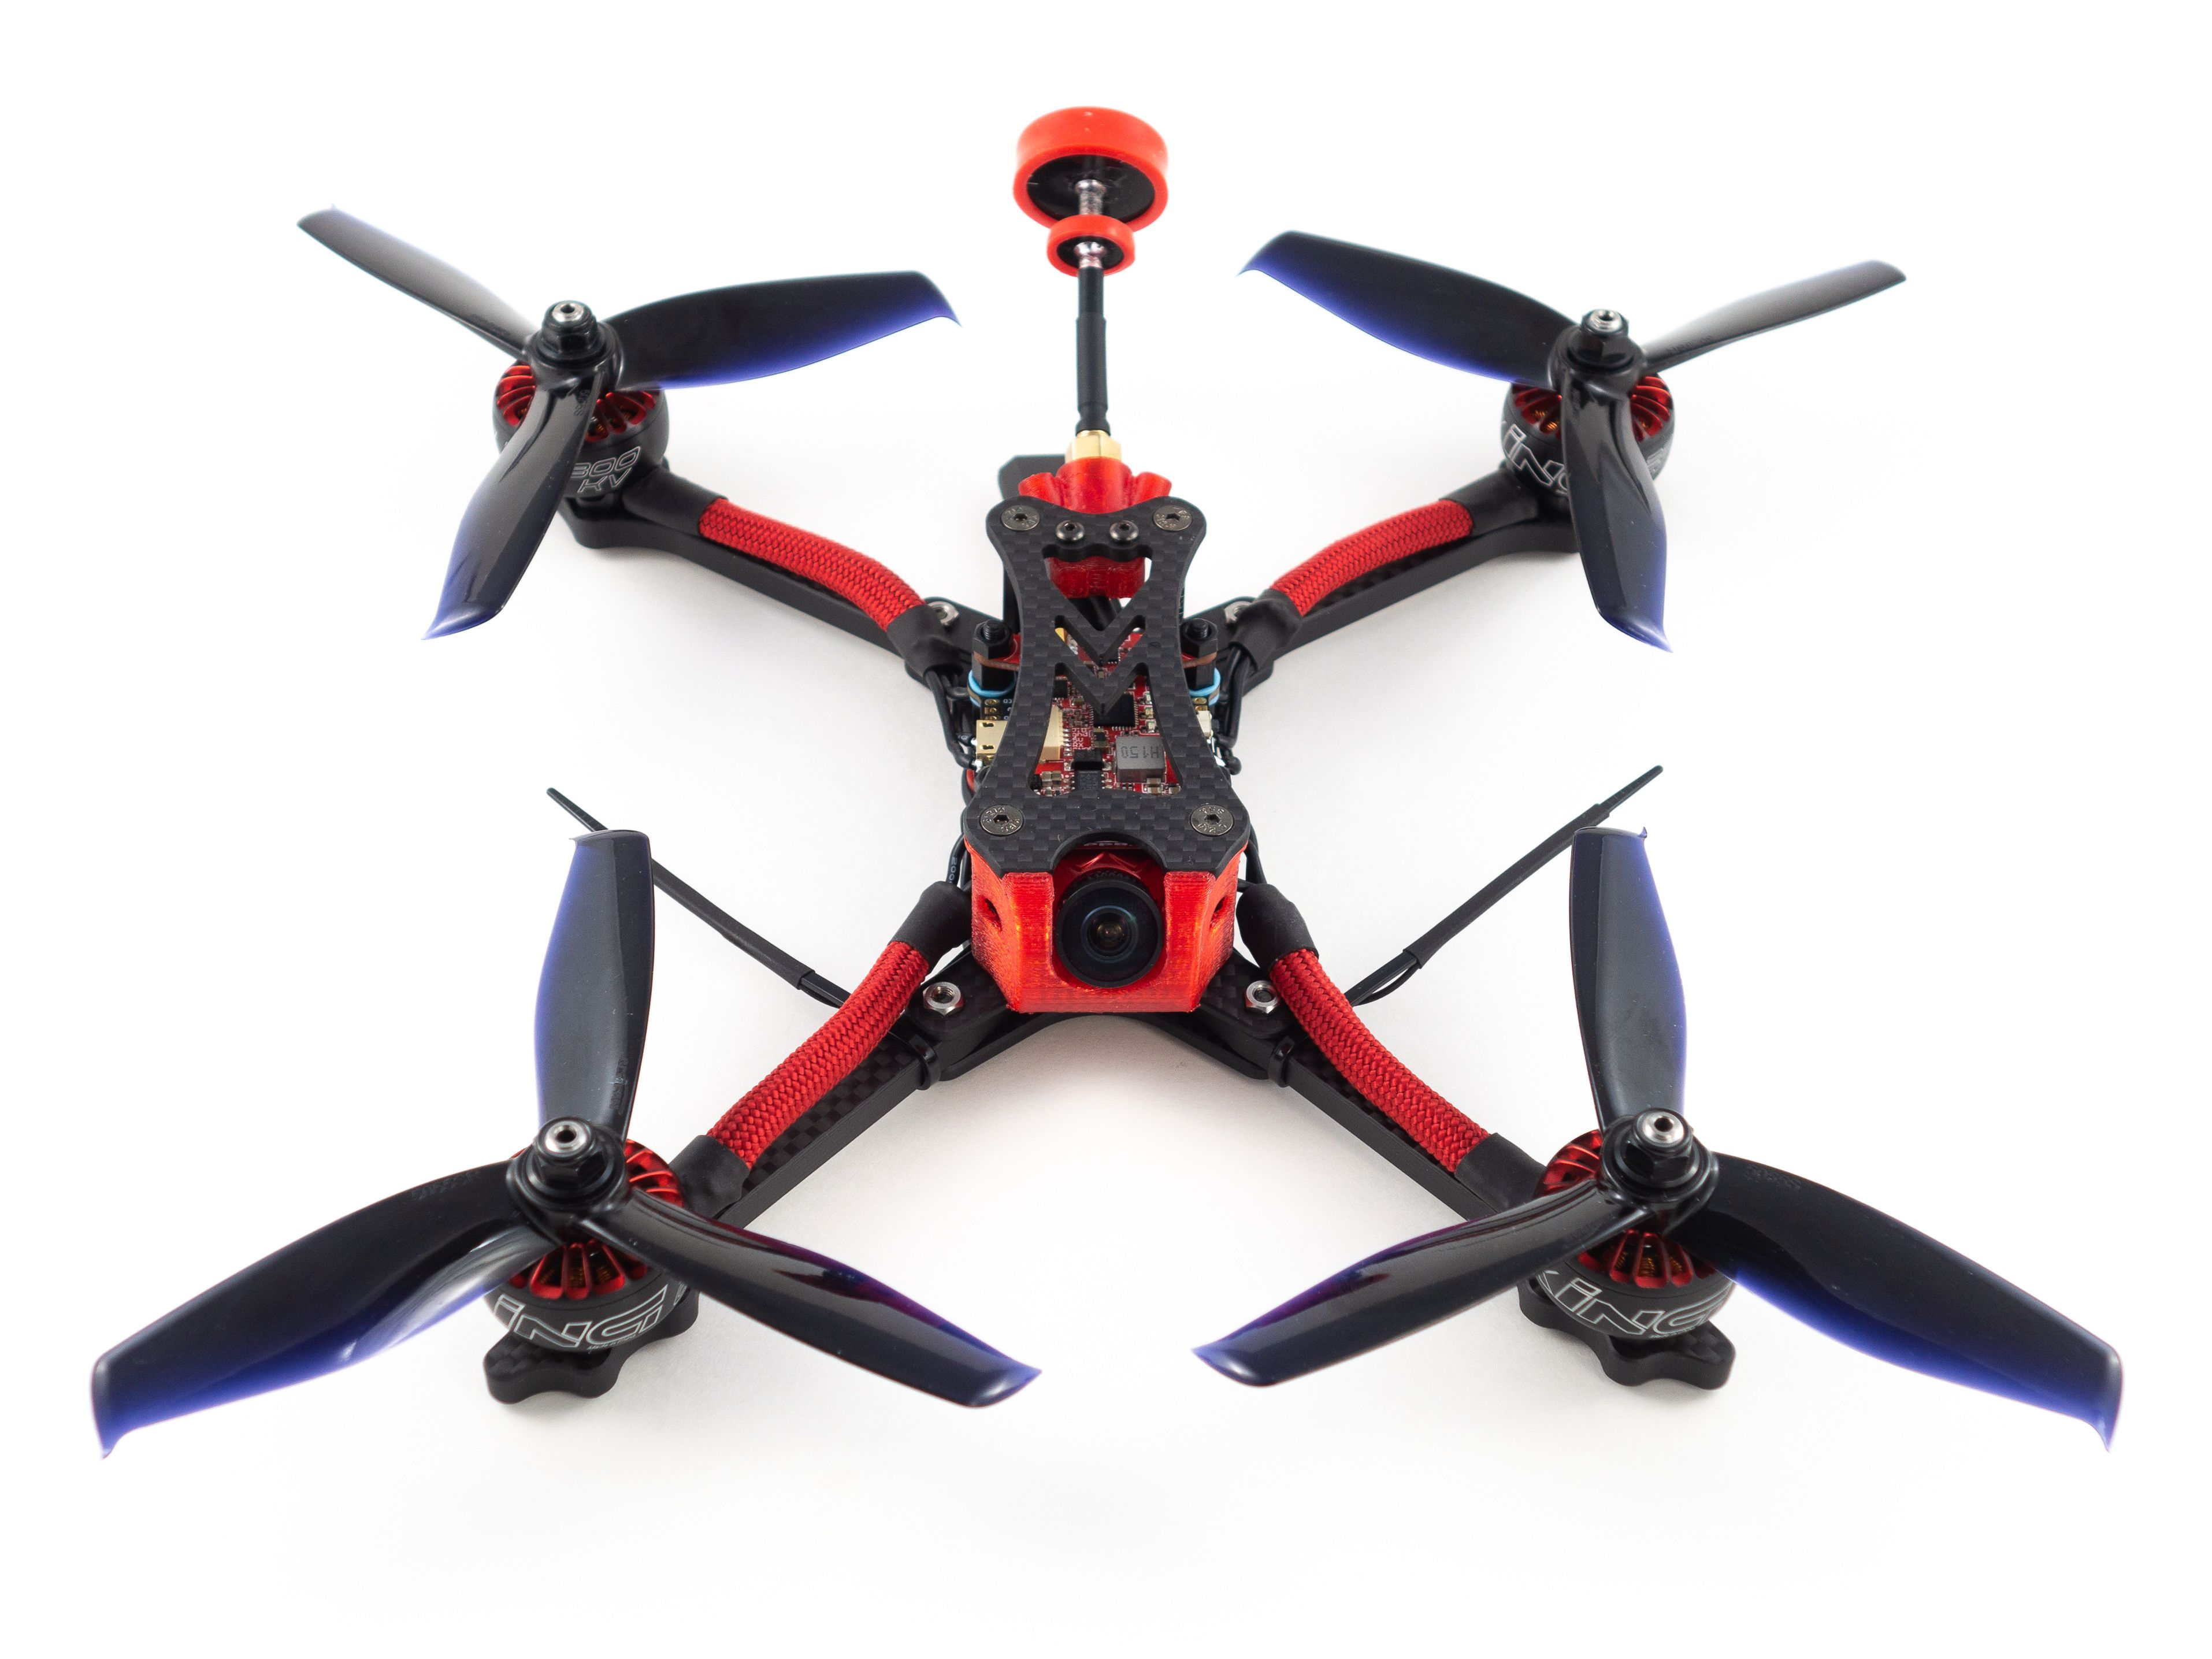
Video Transmitter
Finally we need to add the VTX. This mounts directly above the flight controller, and you can use the standoffs you removed from below the 4-in-1 ESC to mount it. Before you do that, you'll need to solder the wires.
- Remove the extra GND and 5v output wires from the connector.
- Wire the VCC and GND wires to the large VCC and GND pads toward the rear of the flight controller.
- Wire the TX and Video wires to the pads directly adjacent to the USB connector.
- Mount the VTX and plug it in. Just don't forget the nylon nuts to hold it in place!
Now if you've got an SMA antenna like mine then you'll want to use the smaller TPU antenna mount.
- Using the 1.5mm hex screws and the nuts attach the mount to the top plate. Just make sure the countersunk holes are facing up.
- Strip the SMA connector down by removing the nut and washers and push it through the TPU mount. This might require a little force or even pliers.
- Route the SMA pigtail down under the power lead and back up to the VTX so the MMCX connector points down.
- Attach the top plate and screw on your antenna.
Finishing Up
Now it's time to wrap it up! Here are a few extra steps to better secure your wires and components.
- Zip-tie the main battery lead to the bottom plate using the provided holes. This helps reduce strain on the stack if the battery ejects.
- Zip-tie the motor wires to the arms so they don't get snagged by a branch.
- Add the provided battery pad to the underside of the quad.
Betaflight Configuration
If you don't already have them, you'll need to download Betaflight Configurator [Download] and the BLHeli Configurator [Download].
- First go to the Firmware Flasher and choose "FURYF4OSD" as well as the latest stable release of Betaflight.
- Click "Load Firmware [Online]" and then "Flash Firmware" to update your flight controller. Once complete, click "Connect"
- On the Ports tab
- On UART1 click Serial RX for your receiver.
- Set the UART3 Peripherals to "VTX (Tramp)".
- Click Save and Reboot
- On the Configuration tab
- Under ESC/Motor Features select DSHOT600
- If want to fly "props out" with reversed motors, select "Motor direction is reversed" below the illustration. (This is optional)
- Under System configuration set PID loop frequency to 8 kHz.
- Under Receiver choose your receiver mode. For the XM+ choose "Serial-based receiver" and "SBUS"
- Under Arming set the Max arm angle to 180 (Only if you keep the accelerometer turned on)
- Under Other Features enable: Airmode, OSD, Anti Gravity and Dynamic Filter
- Under DSHOT Beacon Configuration enable the beacon
- Click Save and Reboot
To complete the remaining steps you'll need to apply lipo power to your build:
- On the Receiver tab ensure your pitch, roll, throttle and yaw are being applied correctly. Adjust your transmitter and Channel Map as needed.
- On the Modes tab
- Assign an Aux switch to arm and disarm your quad.
- Assign another Aux switch to enable Horizon or Angle mode if you need them.
- Assign the Beeper and "Flip over after crash" to a 3rd and/or 4th switch. I like to assign them both to a single 3 point toggle switch.
- On the Motors tab enable the motor test and apply a small amount power to check the rotation of each motor. Take note of any that need to be reversed.
- Disconnect from the Betaflight Configurator and open BLHeli Configurator
- Connect and Read Settings
- Flash all ESCs to the latest firmware available.
- Reverse the motor direction of any motors that need it. (The numbers correspond to the same numbers in Betaflight)
- Save and reconnect to Betaflight Configurator to test the motor direction.
- On the OSD tab
- Check all of the features you want and arrange your OSD as desired.
And that's it! The default Failsafe settings are generally fine, but make sure they work by arming your quad, applying a small amount of throttle and turning off your transmitter. It should shut down after a short moment.
Challenges
I didn't run into any technical challenges, but I had a hard time getting the stack spacing just right. The connector on the 4-in-1 ESC had to clear the front-most arm bracket. I needed exactly 8mm to make it happen. Any more would have caused the VTX to touch the top plate. I also struggled to solder the RX wires to the flight controller, but I eventually got them. I kept joining the pads with excess solder. Otherwise I accidentally screwed an arm in upside down and cut the rear sleeving too short. All-in-all it was a successful build!
Maiden Flight
When installing your props make sure to pay attention to the rotation direction illustrated on the Configuration tab in Betaflight. If you are flying "props in" then the leading edges of each prop needs to rotate toward the front and rear of the quad. If you are flying "props out" then the leading edges need to rotate toward the sides of the quad. Make sure the lock nuts are tight, but they don't need to be extremely tight. Conduct your first hover test in a safe place where you won't damage anything or hurt yourself.
Photos


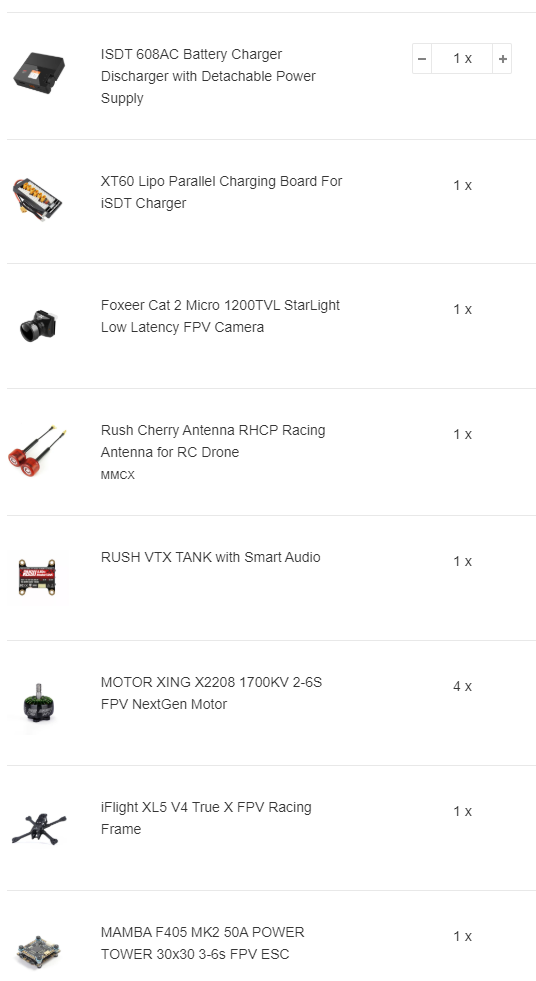
Part List
Show stores (3)
Hey Whiffles, I'm having a problem setting smartaudio and hoped maybe you can help, I followed your build guide with same components except the FC which I think I have a newer version maybe(Mamba F405 MK2). On betaflight, I did set IRC Tramp on UART3, the problem is when I go to VTX tab I see "Device Ready: No", I followed some vids on youtube maybe the problem is the connections. I saw I have slightly different connections from your FC on the video. My TX3 and VID cables are connected to the same pads location as yours, but my red and black cables connected to the pads next to the TX3 and VID pads, which are red - 9V, black - GND. This maybe the problem? (btw the VTX works and everything is fine)
Thank you!

Soldered the VTX to GND and VCC like you said, actually now the VTX doesnt power at all, should I undo it? or maybe connect it to somewhere else? thank you for your help!
Edit: Resoldered to different VCC and GND pad, actually didn't help, BUT resoldered the VID cable again on the same pad and suddenly got YES on Betaflight, appreciate your help!!! BTW i'm working on another build of yours, keep going! :D

You know what, I just realized the original pad is 9v, not 5v so that one should be fine. Sorry for the trouble! I should have looked at the label more closely. I'd probably just go back to that. The only other thing I can think is maybe the connector isn't making a connection to the white wire. Check that you have continuity from one end of the white wire to the other.

Hi Whiffles I really like the build im trying to rebuild it using slightly different parts i just want your professional opinion and make sure everything is still compatible and overall a good build.
I will also be using a Jumper T18 Radio and the FatShark Recon V3 goggles.
Also what parts would you change?


Don't get such large 6S batteries. You only need 1100mah or maybe 1250mah. I'm not too familiar with the FrSky R9 system, but I think as long as you don't get an ACCESS receiver it should work with the T18 with the 5-in-1 module. Concerning the other parts the Starlight camera will require an adapter to fit that frame. It's too small. Are you only planning to fly this at night? I'd probably opt for a more traditional camera.
https://www.phaserfpv.com.au/collections/6s-batteries/products/cnhl-ministar-1250mah-6s-70c-lipo-battery
https://www.phaserfpv.com.au/products/foxeerfalkormini1200tvlfpvcamera43169palntscg-wdrosdhs1219?variant=12908746833997
Thanks for the feedback
what about these would they do better
(for the camera the 2.5mm version)
https://www.fpvfaster.com.au/products/mamba-f405-40a-power-tower-30x30-3-6s?_pos=2&_sid=71ba9033d&_ss=r
should i use blheli suite for this
this is slightly different to yours
Hey Whiffles love the build
just wondering if i can efficiently fly this quad on a 4s battery ?
Thanks
Also wondering if an esc says that it is 6s can i still fly the quad off a 4s battery ?
https://www.fpvfaster.com.au/collections/flight-controller/products/diatone-mamba-f722s-stack-506-50a-dshot1200-6s-esc?variant=31629260259410
Hello !!, what a great job !!!, I consult you .., which model is the one you used from Cam mount ???, from Thingiverse ?. Another question is to know If you had no problems with the VCC / GND of the FC Mamba that you used to feed VTX ?. Thanks in advance !!!

Really nice and clean, I would heat shrink the legs of the capacitor though, incase it twists in a crash and shorts everything out.
Hey Whiffles, this is the 3rd FPV drone i'm planning to build, I have some rookie questions before ordering everything:
-Camera: order 1.66mm or 2.1mm? and what is ND filter? is it neccessery? searched some comments and someone recommended not to take the filter so it will fit right.
-F4 V5PRO MMCX to SMA / RP-SMA Antenna Pigtail Cable: buy RP-SMA or SMA?
-Pagoda 3B Antenna: buy RHCP or LHCP? inner hole or needle?
-Hardware: the screws you offered is sufficient for this build? I saw you wrote 18-20mm screws and I saw in those kits only 20mm is it enough?
Thanks for your help.
Looks great! Excellent job putting it together! Be sure to post it here on the site. You're running DSHOT600 right? You also need to enable the beeper on the Configuration page. Test your switches on the modes page to make sure the beeper and flip modes are triggering. To flip you have to disarm, enable flip mode, arm your quad then roll left or right to flip back.

Really Kool drones. What kind of distance will travel and how long will they stay in the air
what would be the perfect prop for that motor? i was thinking azure 5150
so xt-xinte is a safe site to buy from?
how do they keep prices so low?

Had any mamba stack explosions on 6s yet? Today I had a motor unsolder itself when I hit a tree, but after resoldering the wire it worked fine, which surprised me.
Hey Whiffles, I was already considering a racing rig as my next build. I'm running 4S right now. Will this run well on 4S? If so, I might build it and practice on it using 4S, then step up to 6S when I gain the confidence. Thanks for another great build!
wow very nice build. im about to get this same transtec laser frame but i think its not the S model. seems like a durable and reliable air frame. cant wait to fly it. thanks for the info and build review you supplyed.

I felt like with some of the previous transtec frames, like the frog, you could fly absolutely fearlessly and you could really push them without worrying about the frame beaking, to what degree do you get that sense of security with this laser frame, or any kind of sleek modern race frame? its not like they're built super light either imo so idk. Ive had a few fragile frames but I dont tend to crash much, but I do love the thrash-abiliy of a chunky frame

As a frame designer myslef, I will say that while the FPV gear its self isn't too heavy, the accomidations for it that are required weigh a lot. In order to have room for a well protected FPV camera, you need to either lengthen the body and recess it, print a beefy TPU protector, or use carbon mounts that jut out a lot and make room on the frame for the carbon plates.
I agree a little bit but a simple bulletproof tower configuration on top can be made sub 15g easily for the entire fpv assembly incuding protection. heck, you could go down to about 4g with a nano cam like the caddx or runcam (so you dont stoop to aio quality) paired with a lightweight vtx if you dont care about protection. or strap an aio on, cos hey it works I guess.
(dude, you gotta try a tubular frame, get some cheap arrow chafts or 8mm carbon tubes and attack it with a dremel and epoxy, their handling's next level compared to typical frames :D ) (also apologies whiffles, deviating from the topic a bit)


what's the difference between xing 2207's and xing 2208's? Wouldn't the 2208's give superior performance?