
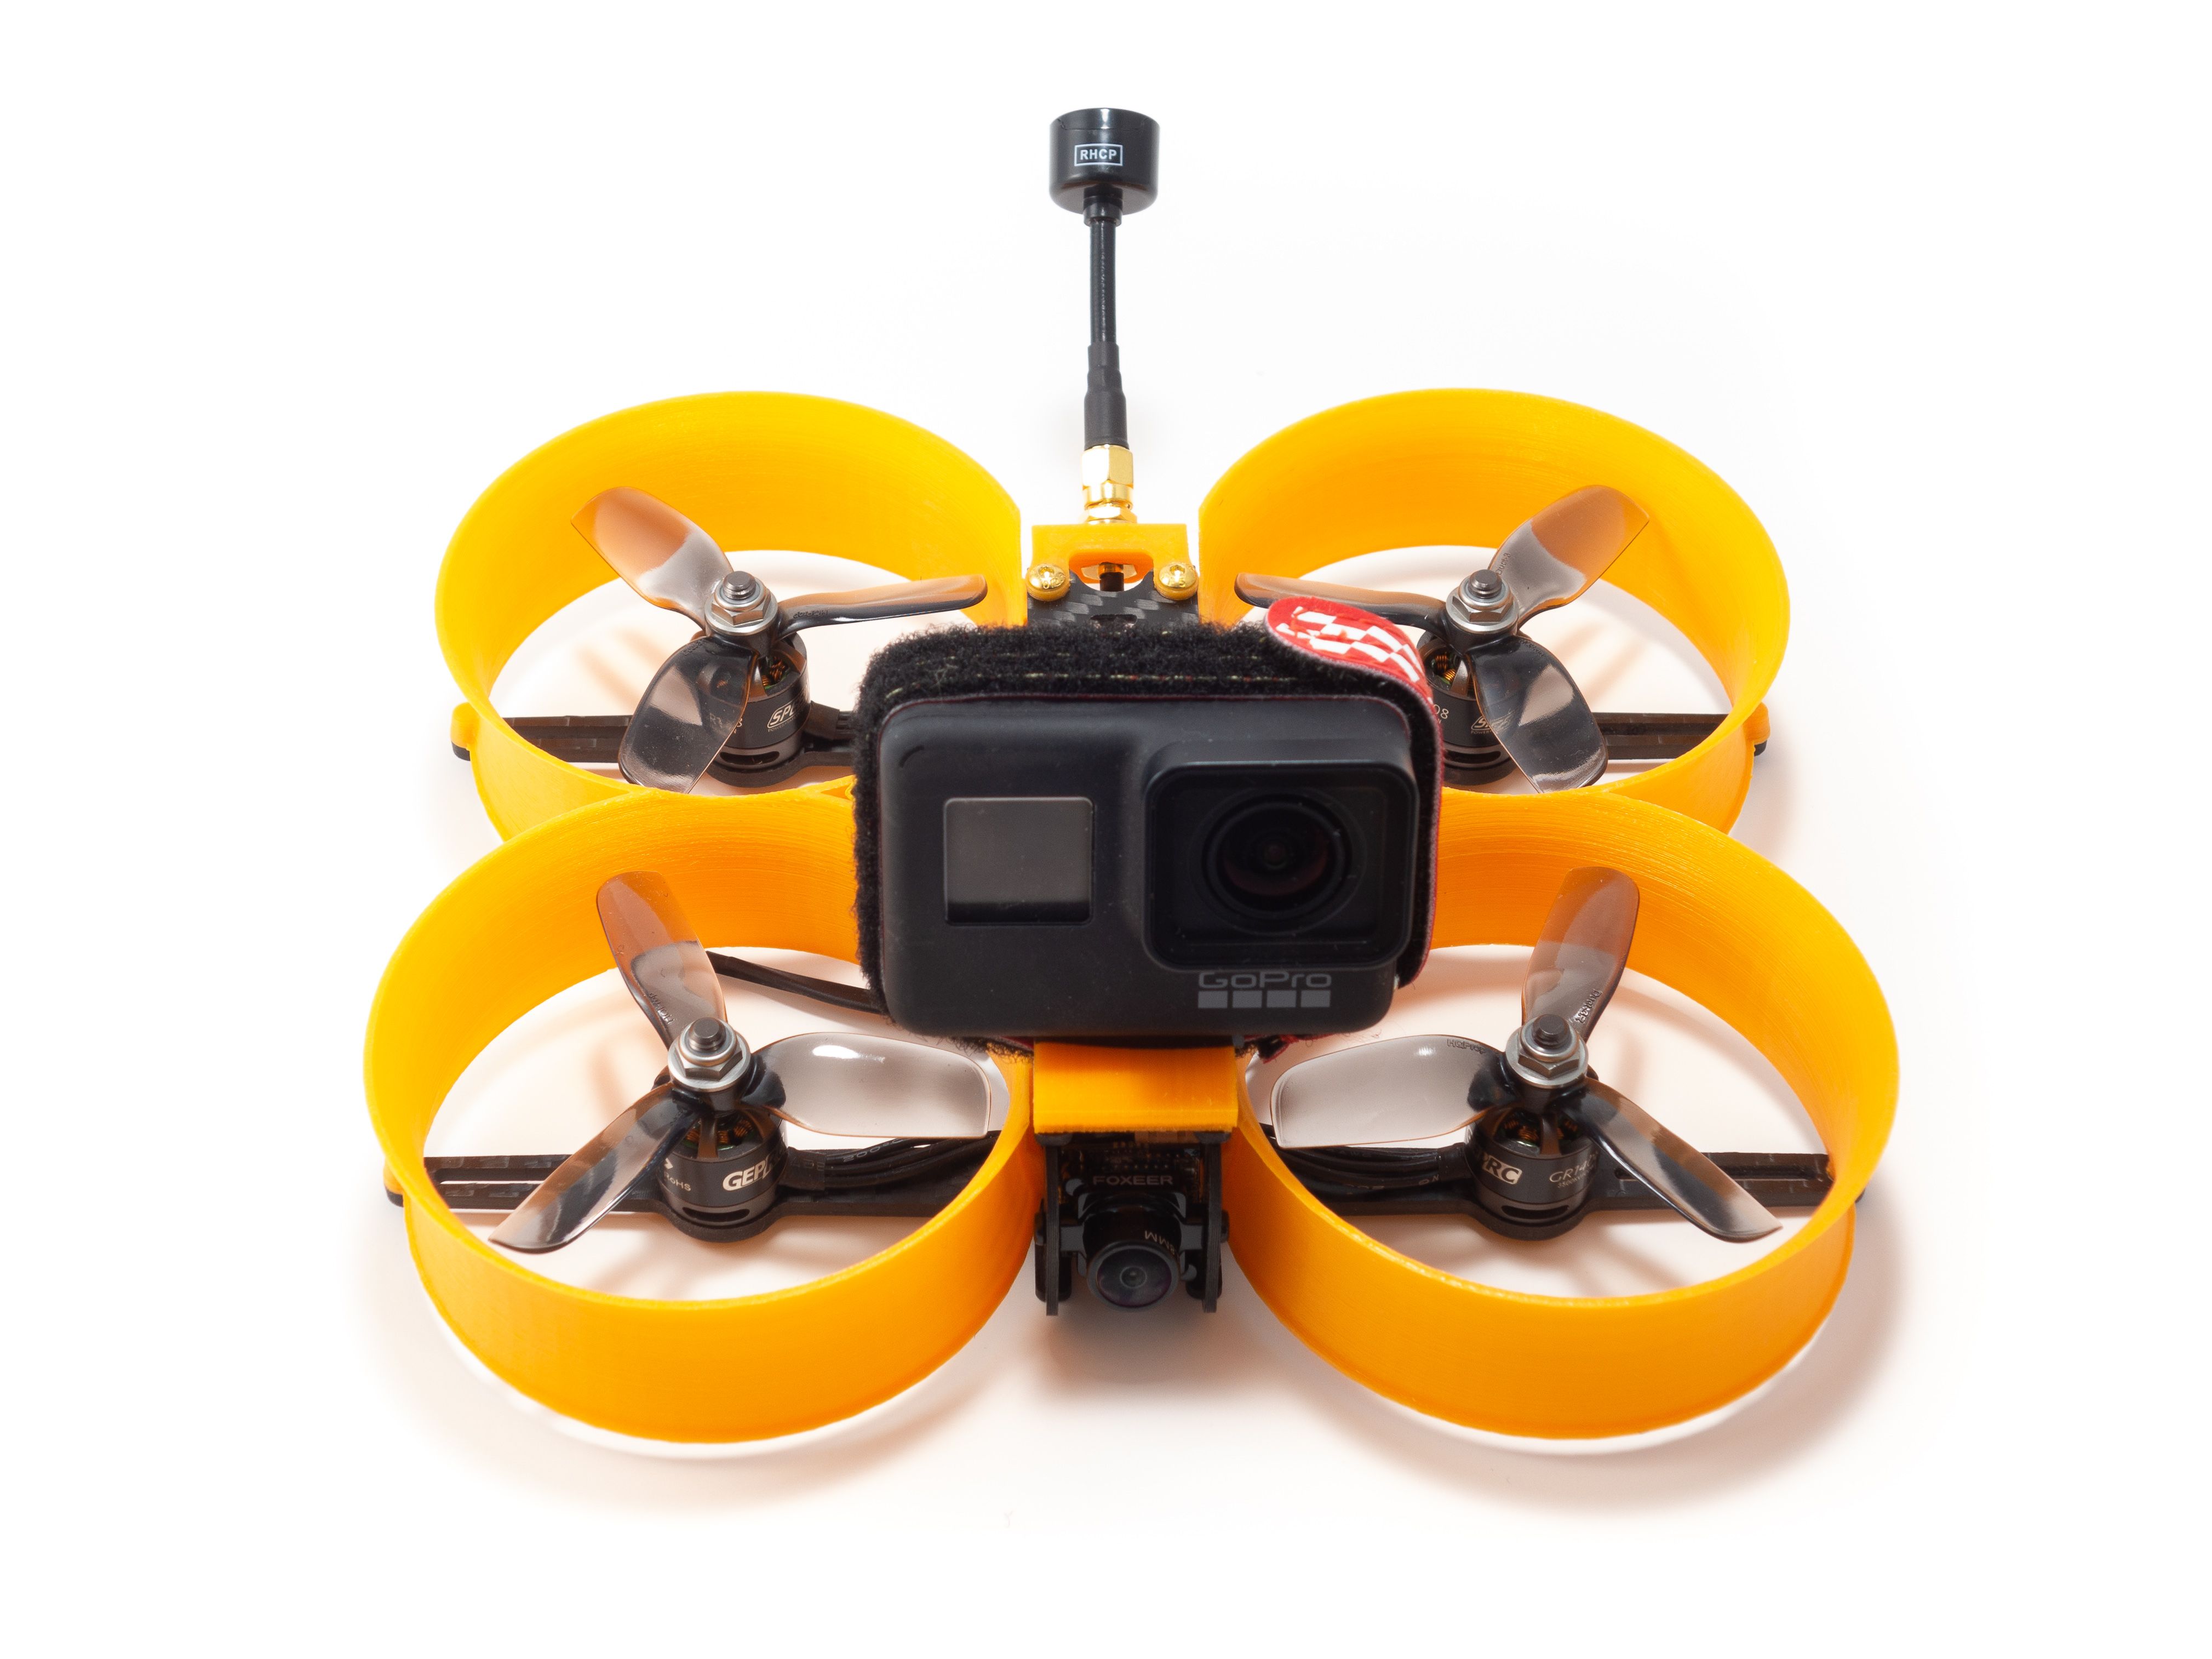
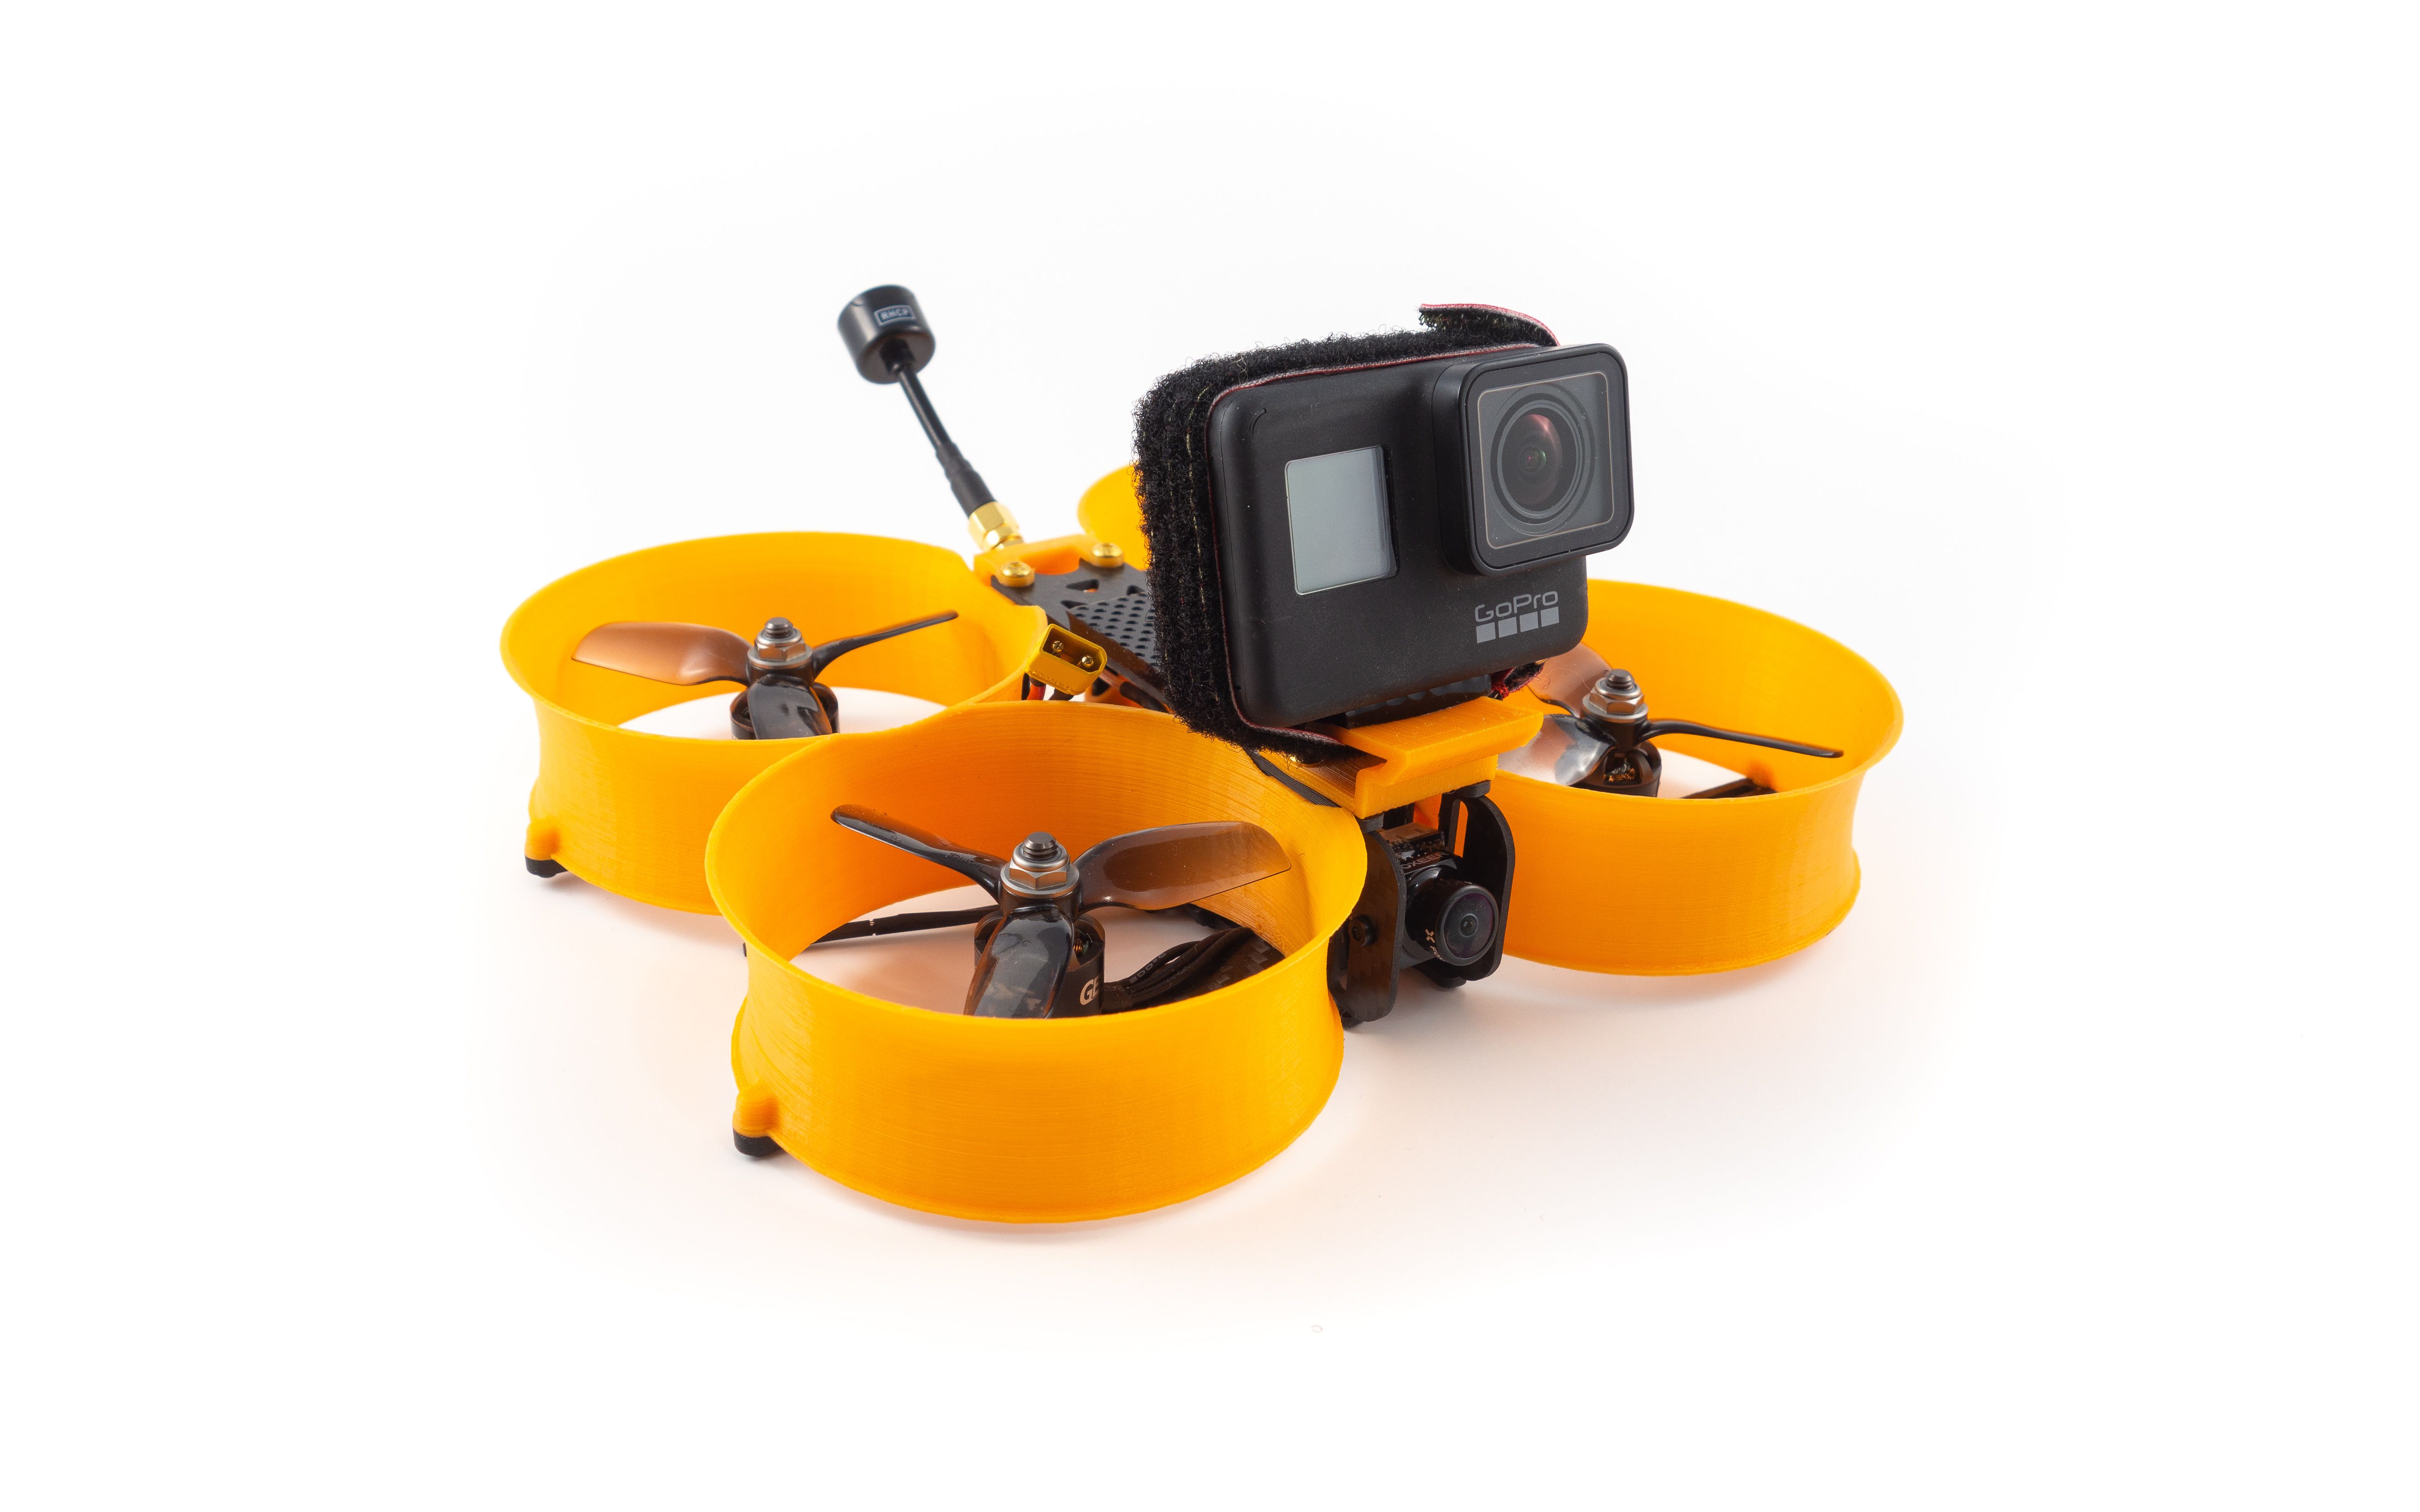
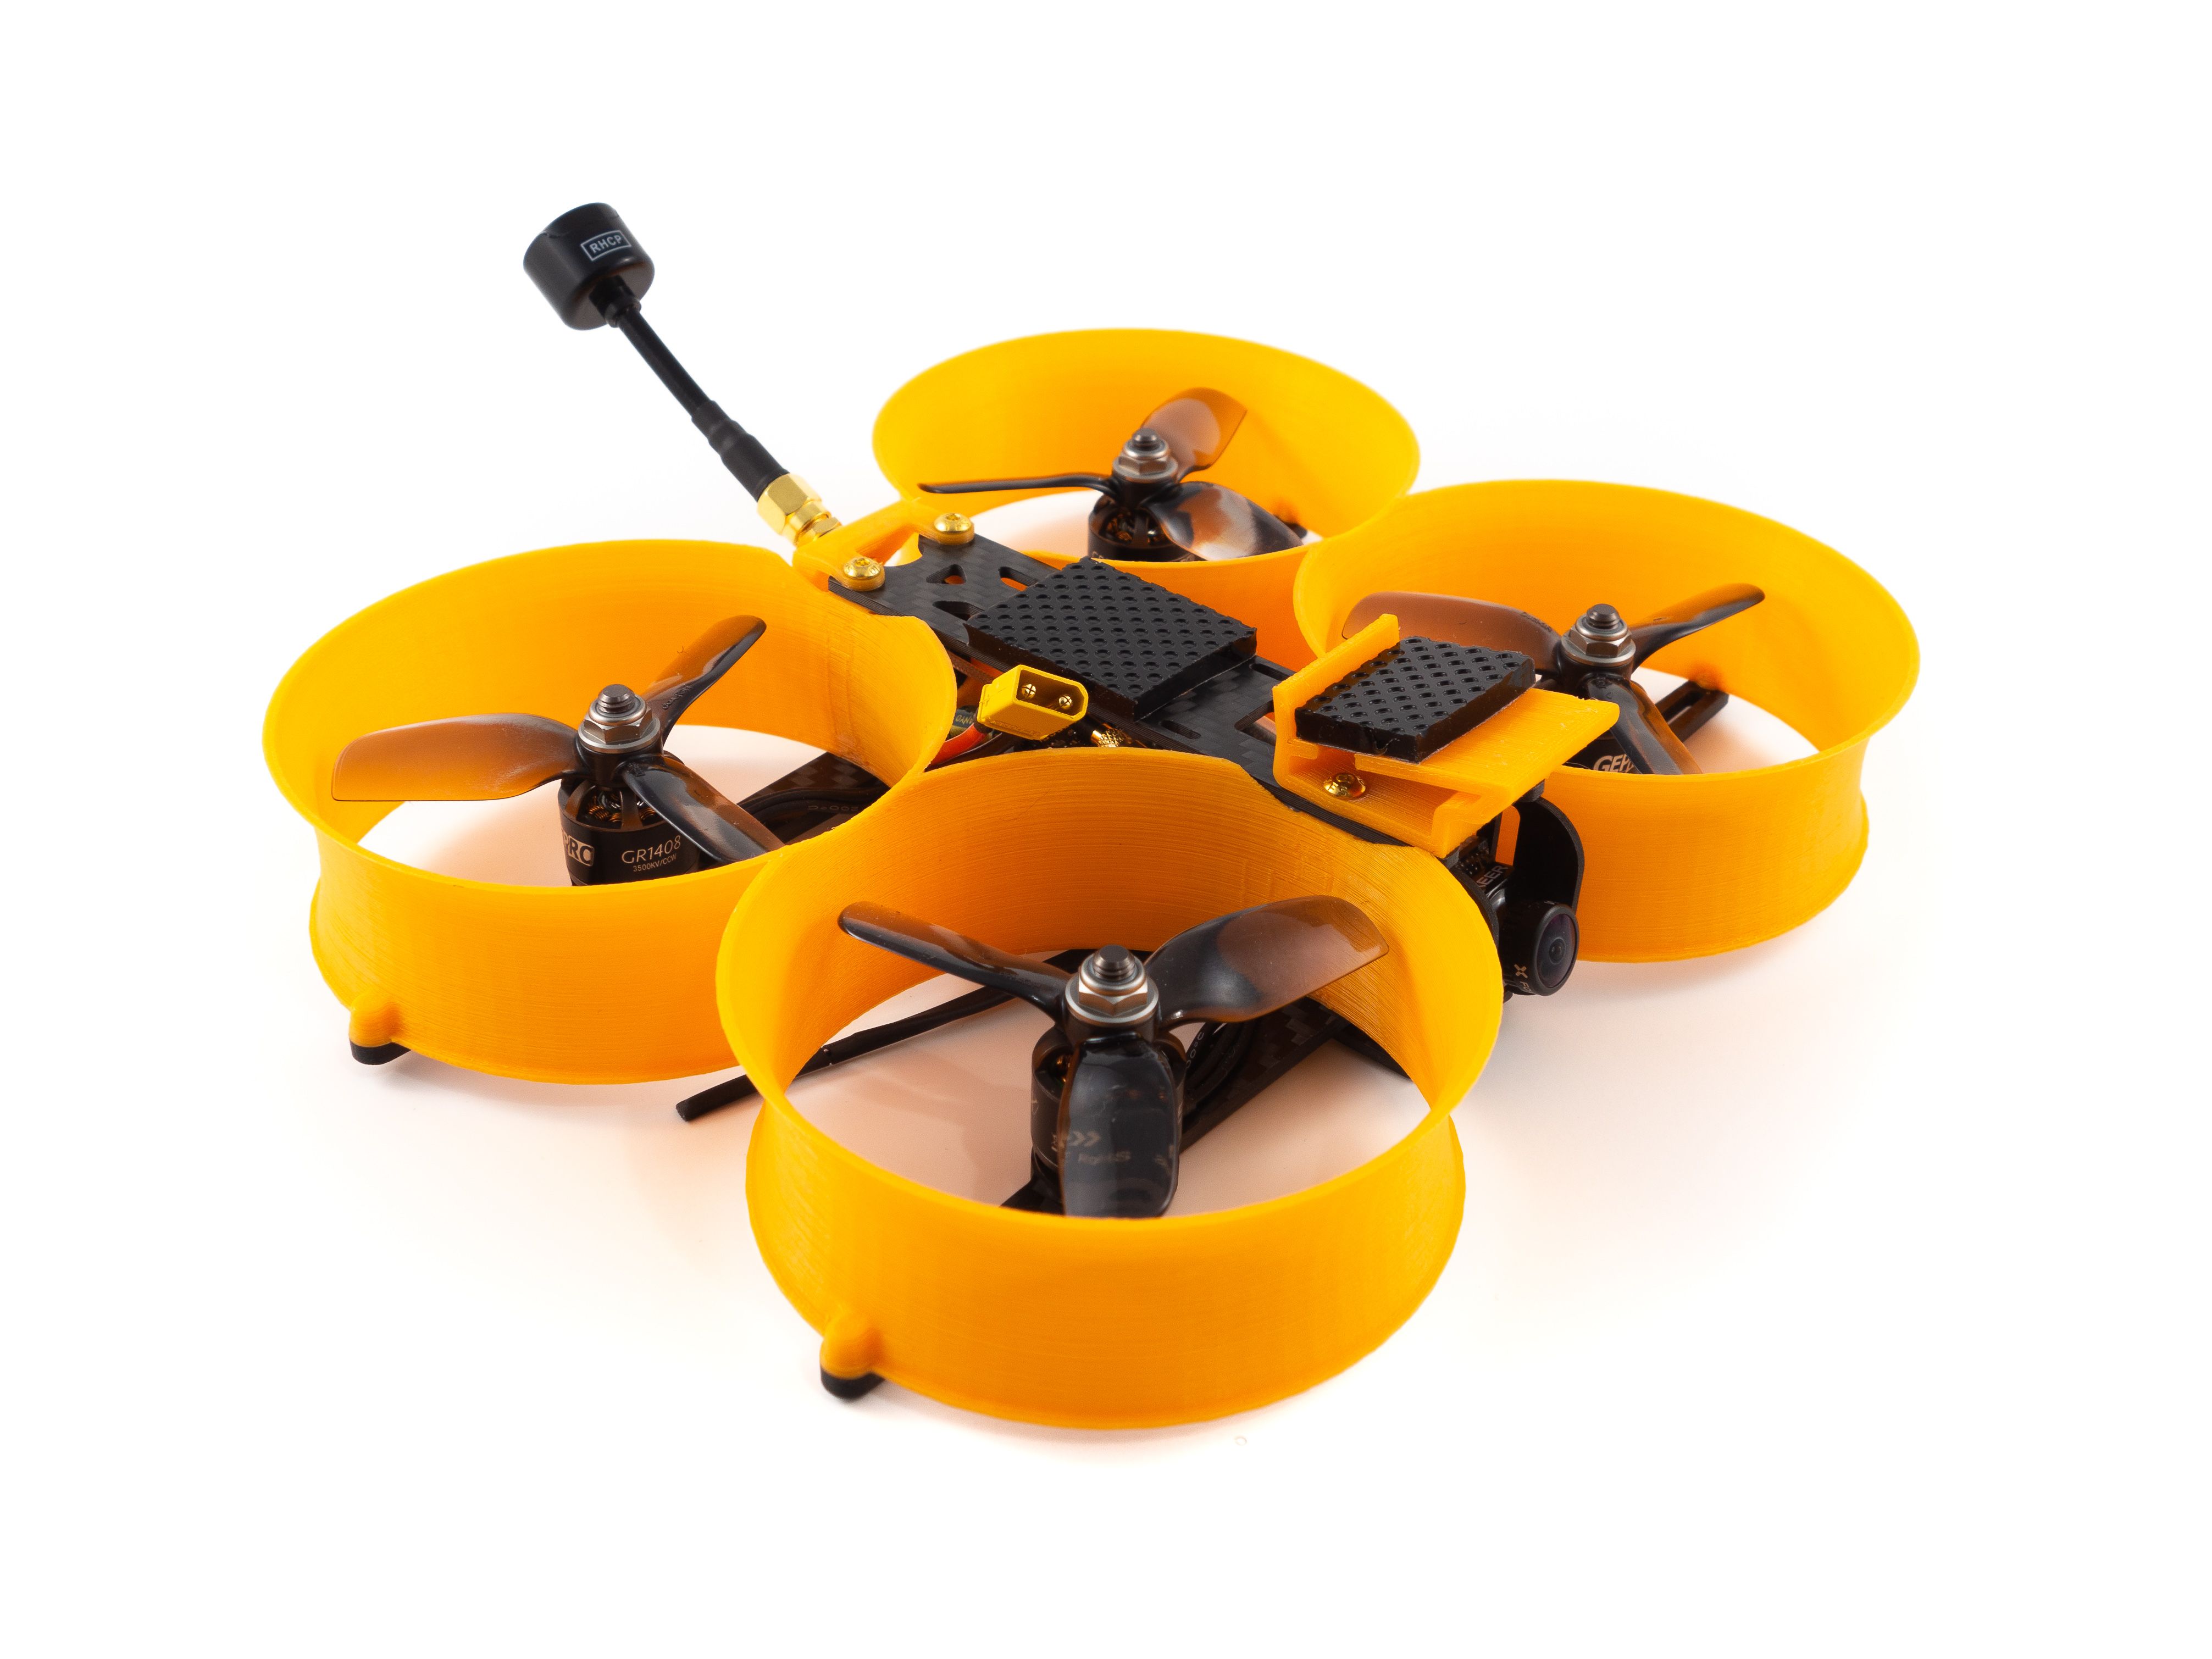
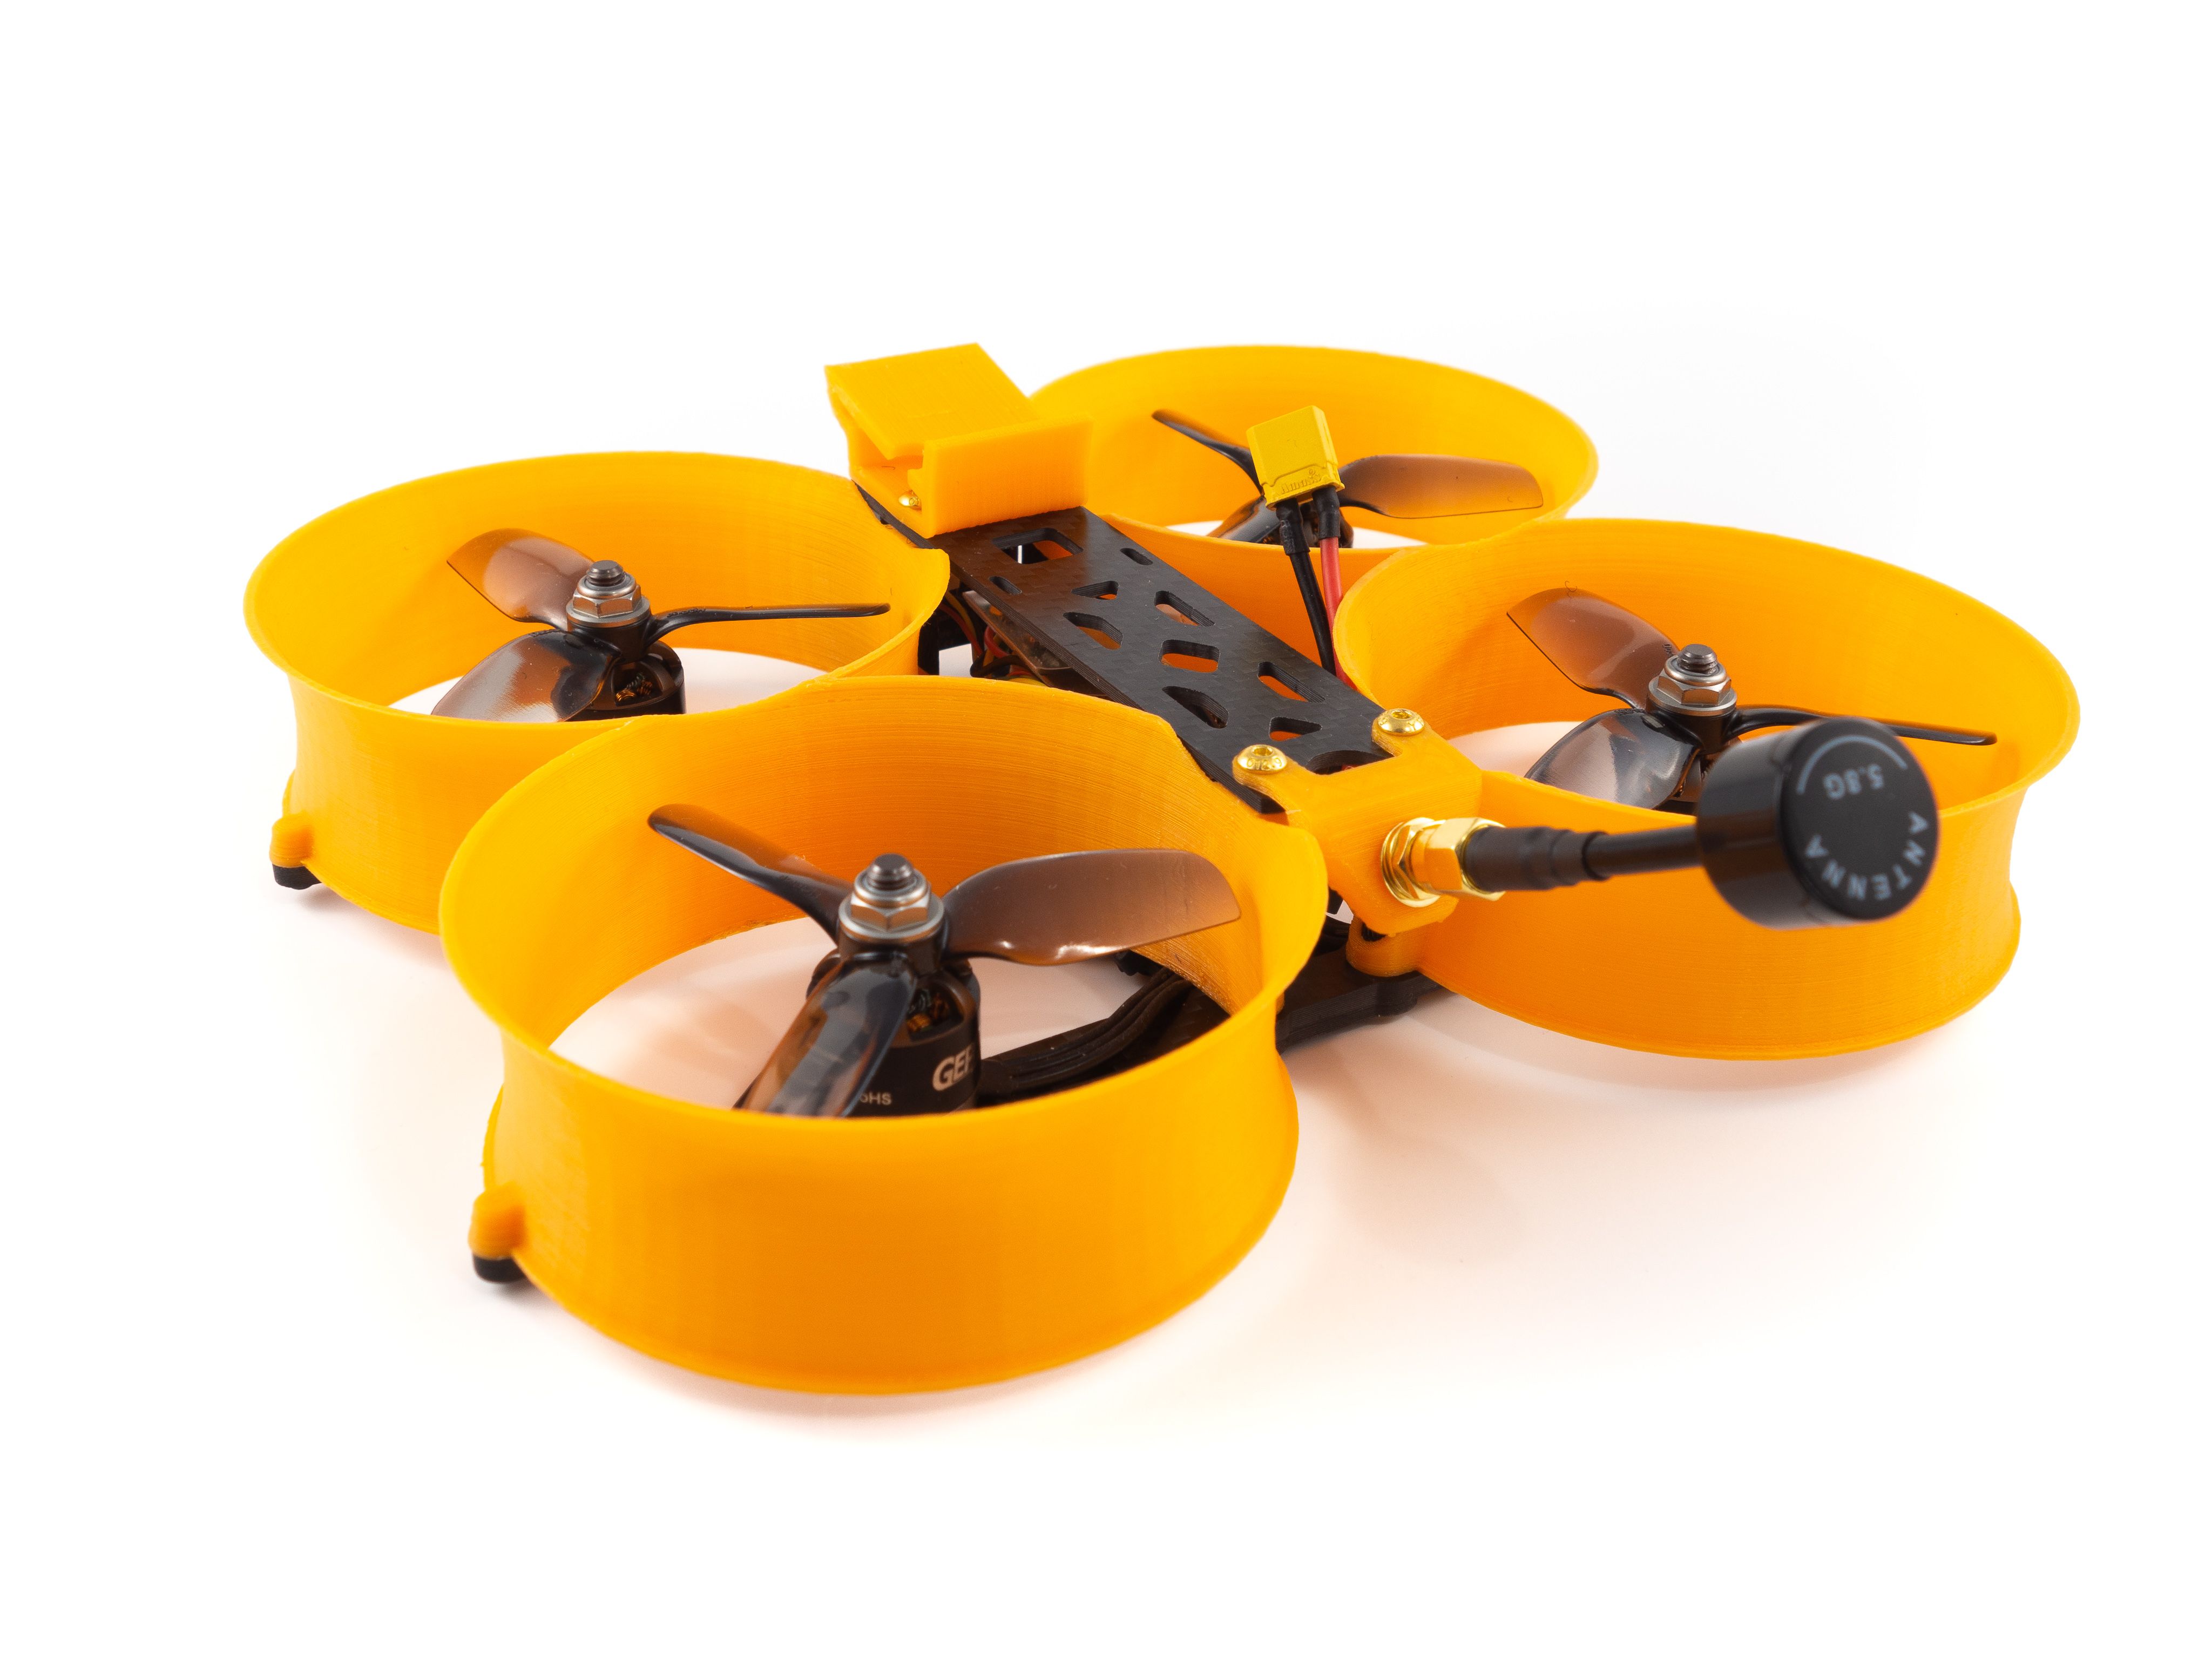
You've probably heard the term "Cinewhoop". Traditionally it's a 3" ducted quad capable of carrying a GoPro Hero7 Black at a low 10 degree angle. More recently the term "Cine" has been applied to a number of RTF quads ranging from 85mm to 3". They all focus on their HD capability, but none compare to the stabilization of Hypersmooth (only available on the Hero7 Black). This is what really offers that cinematic style footage. Now there's also ReelSteady Go which applies a similar stabilization algorithm to previous GoPro models, but Hypersmooth is what popularized this style of build.
Now a traditional Cinewhoop isn't cheap. The most popular frame, the Squirt 2 commands a high price. This build is my attempt to build a Cinewhoop at a budget price, yet still offer the same cinematic style footage. It weighs in at 217g dry and 443g AUW with an 850mah 4S battery with a GoPro Hero7. I'm running the 3500kv motors.
Tools
This is a moderately challenging build and does require a lot of fine soldering. With the proper tools and a lot of patience you can pull through. I highly recommend a flux pen, good 63/37 leaded solder and a quality soldering iron. Here are the tools and supplies you'll need. I've included direct links to my gear below.
- Soldering iron
- 1.5mm and 2.0mm hex drivers
- Industrial Tweezers
- Wire cutter/stripper
- Scissors
- Heat gun or lighter
- Ruler and cutting mat
- Multimeter
Additional Supplies
- A variety of heat shrink tube sizes
- Blue Loctite
- Zip ties (small)
- 63/37 leaded solder
- Liquid soldering flux pen
Hardware
The frame kit comes with everything you need except for enough 6mm M2 screws to mount your stack. In fact, it's only one screw short. The stack doesn't come with hardware so I recommend buying an M2 screw kit. I linked my kit below. Other than that you don't need to purchase any additional hardware.
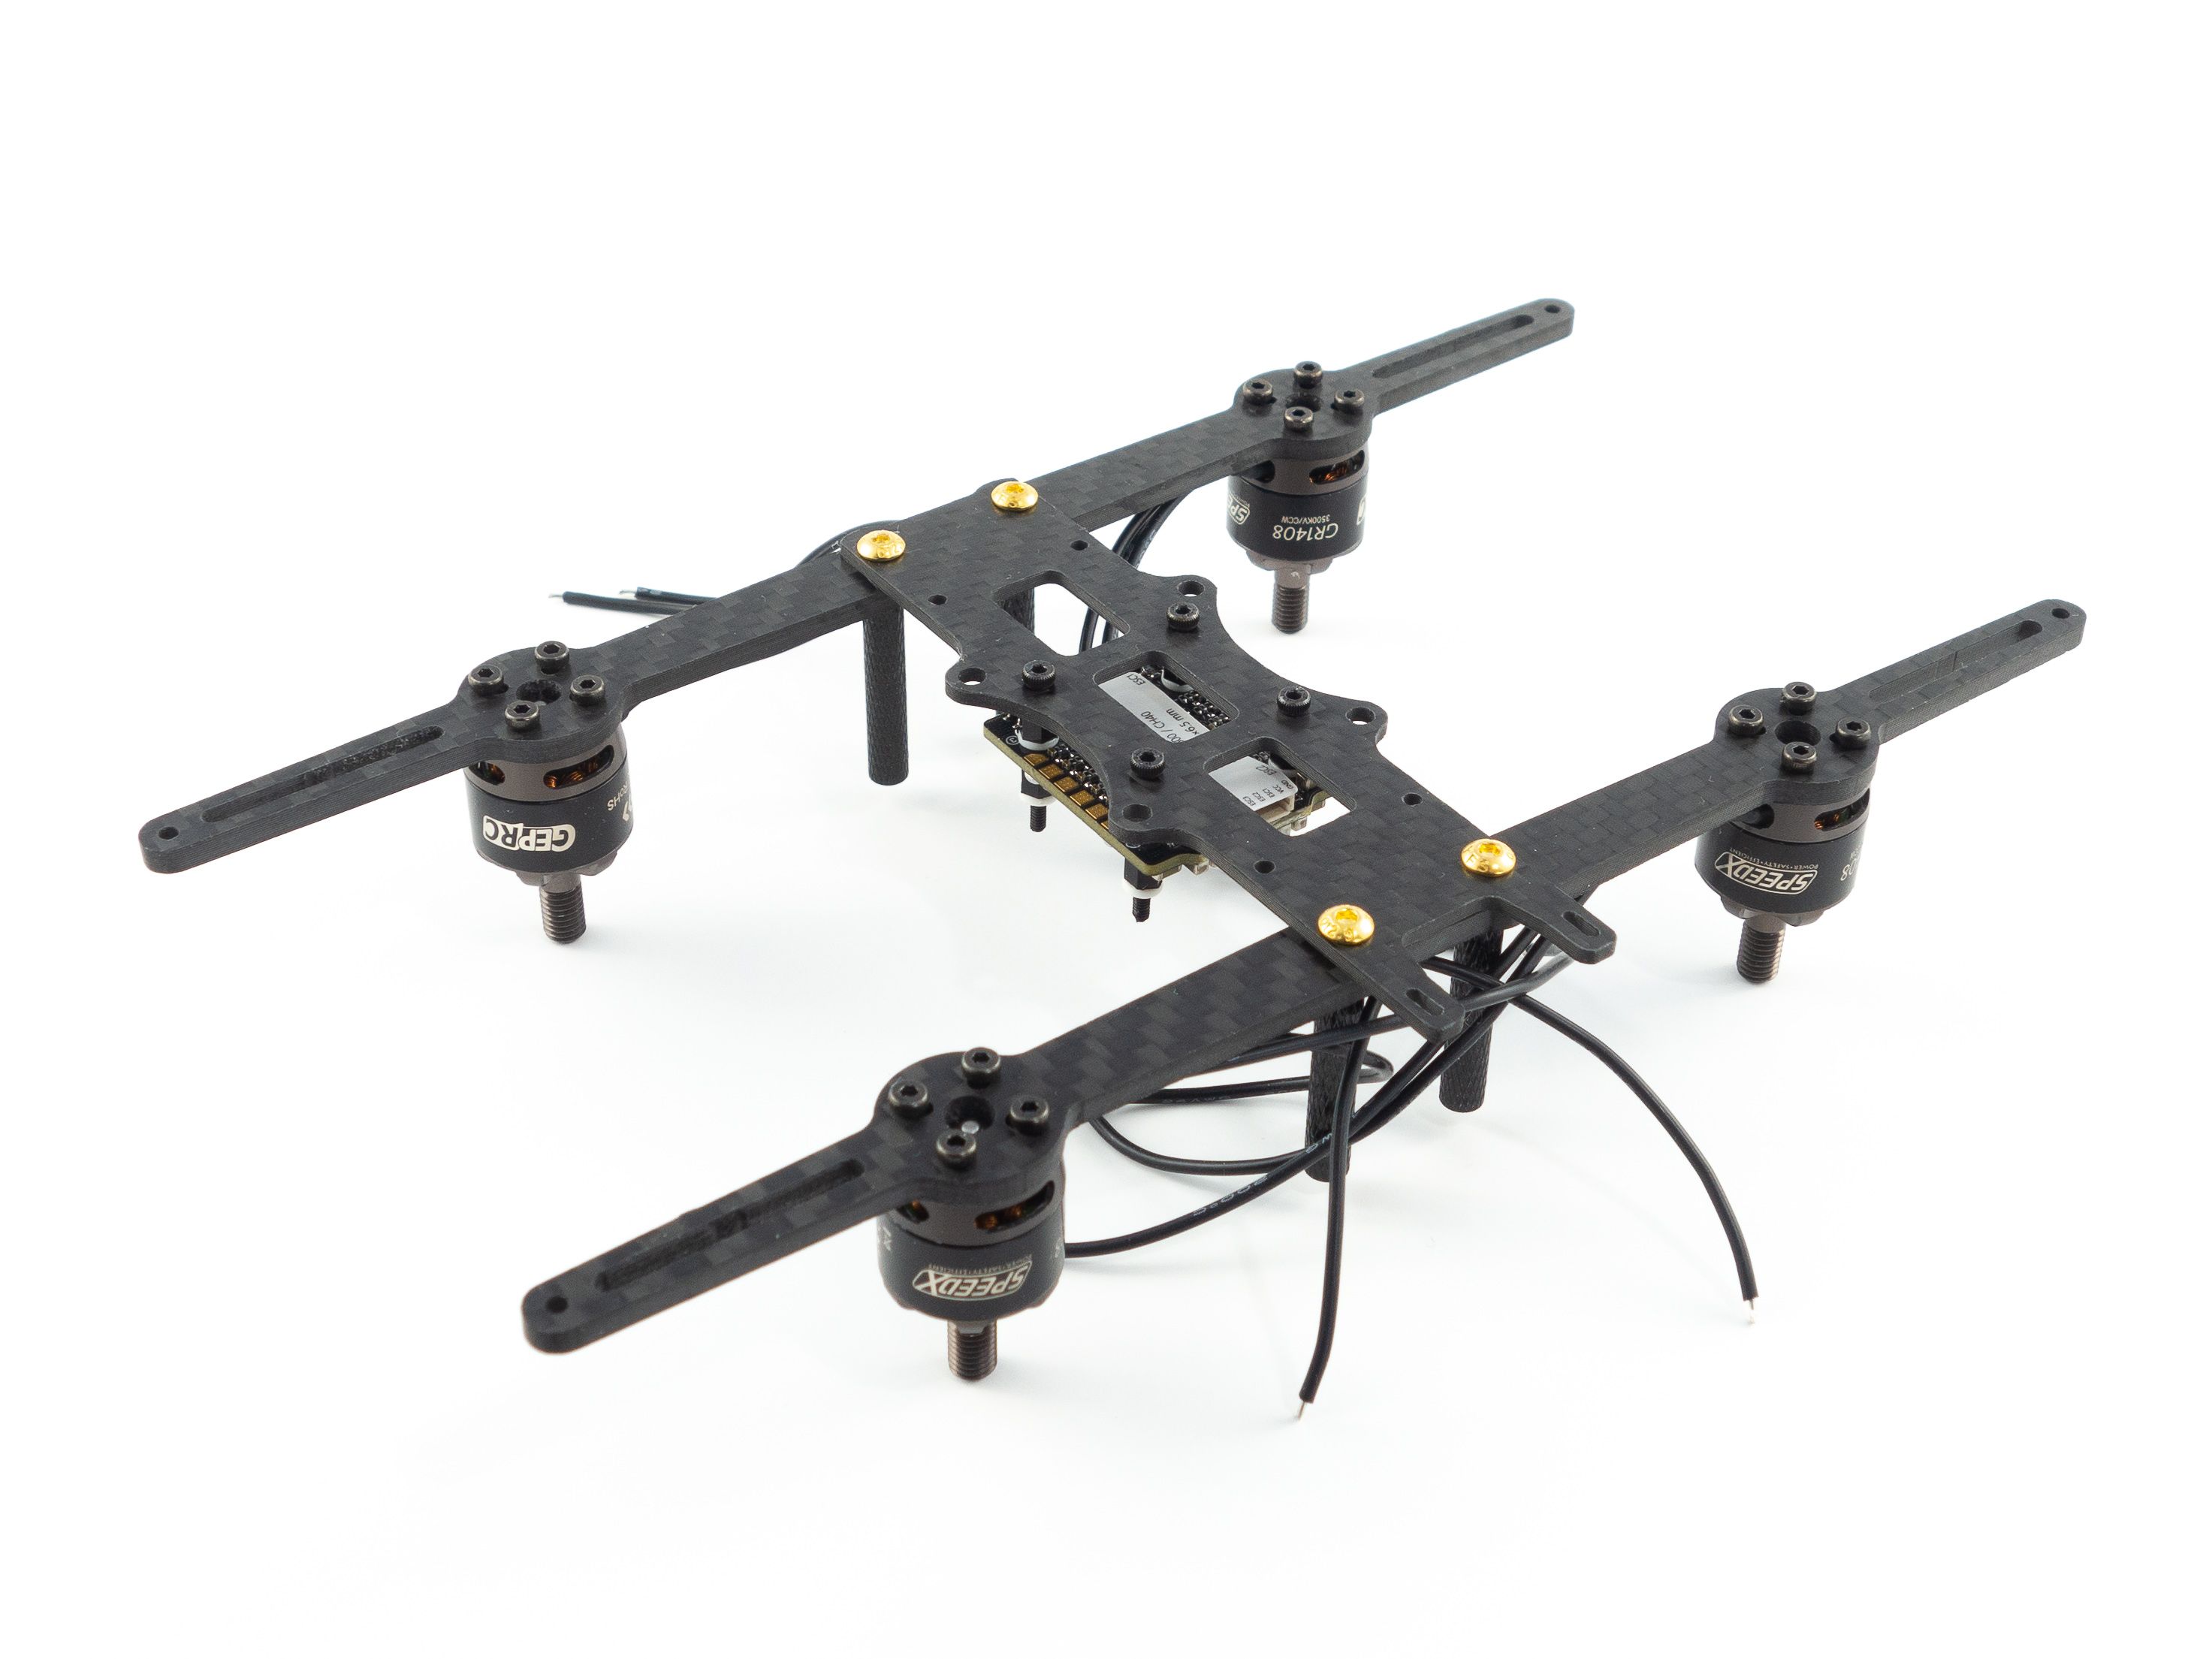
Frame Assembly
This frame is really easy to assemble. You don't need the ducts or any of the TPU parts just yet, so save those for the end. To start you only need the base plate and the arms. Use the included gold screws to mount the arms on top of the base plate. Screw the black standoffs above to hold everything in place.

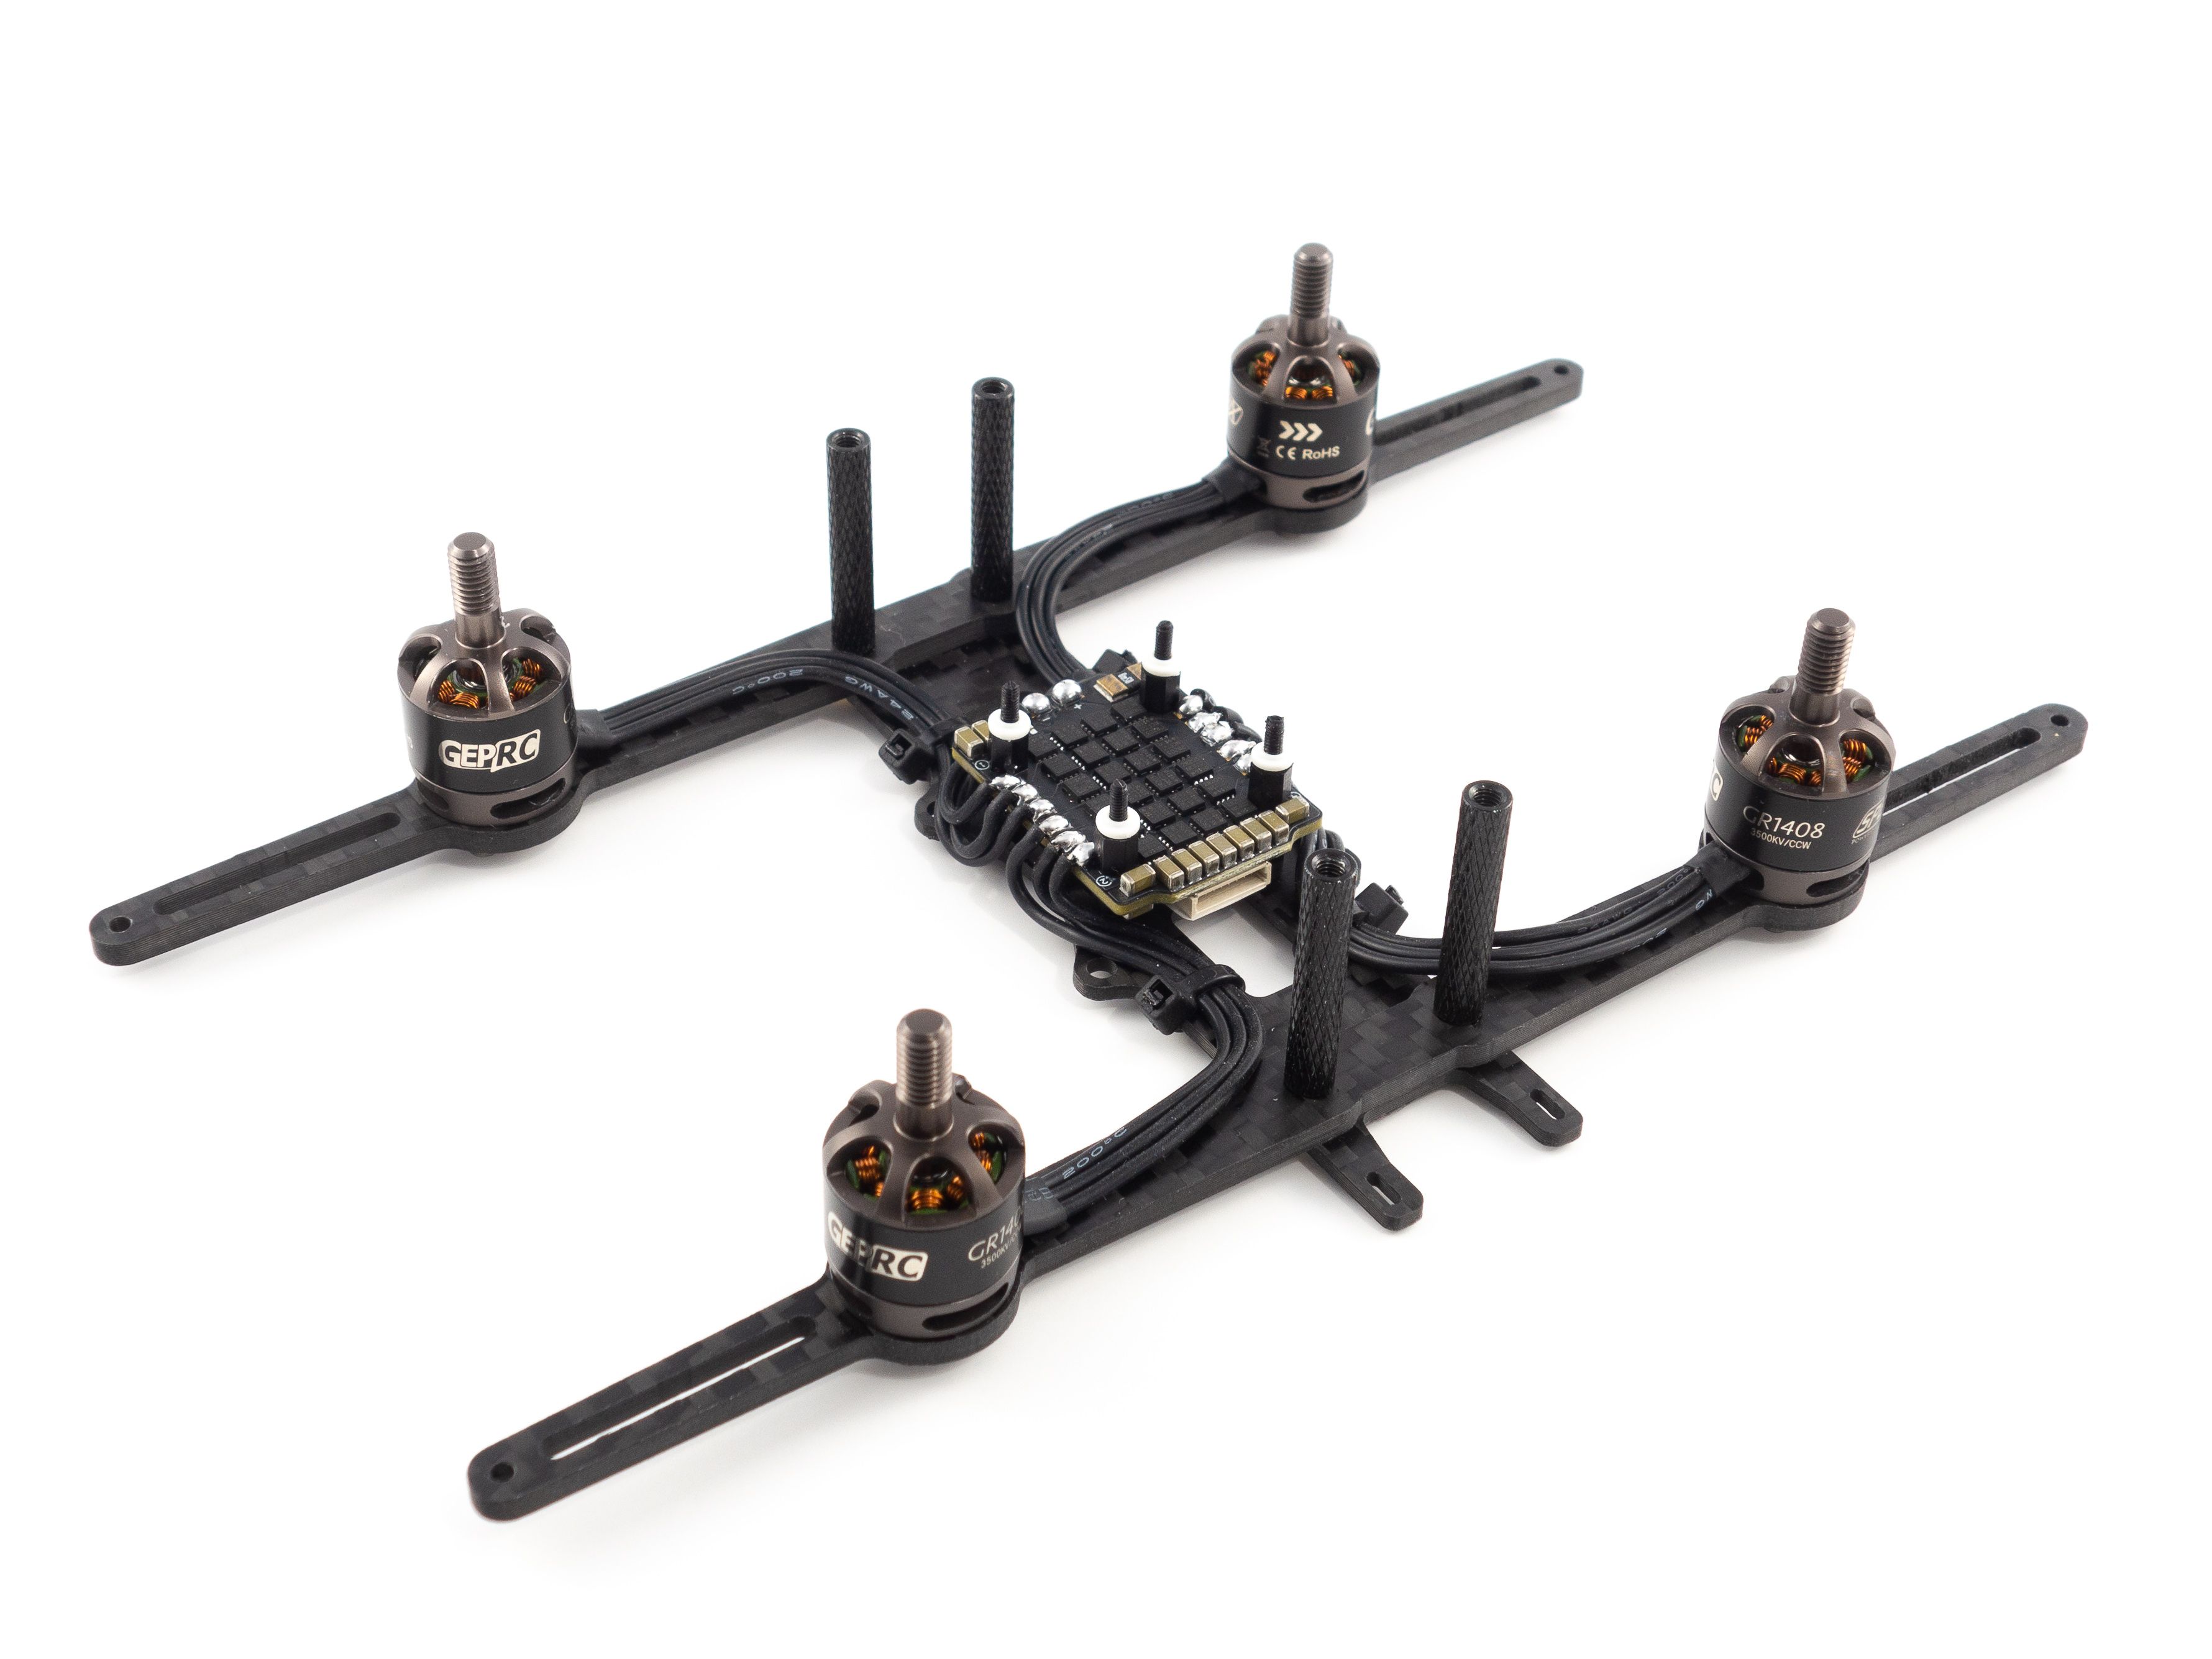
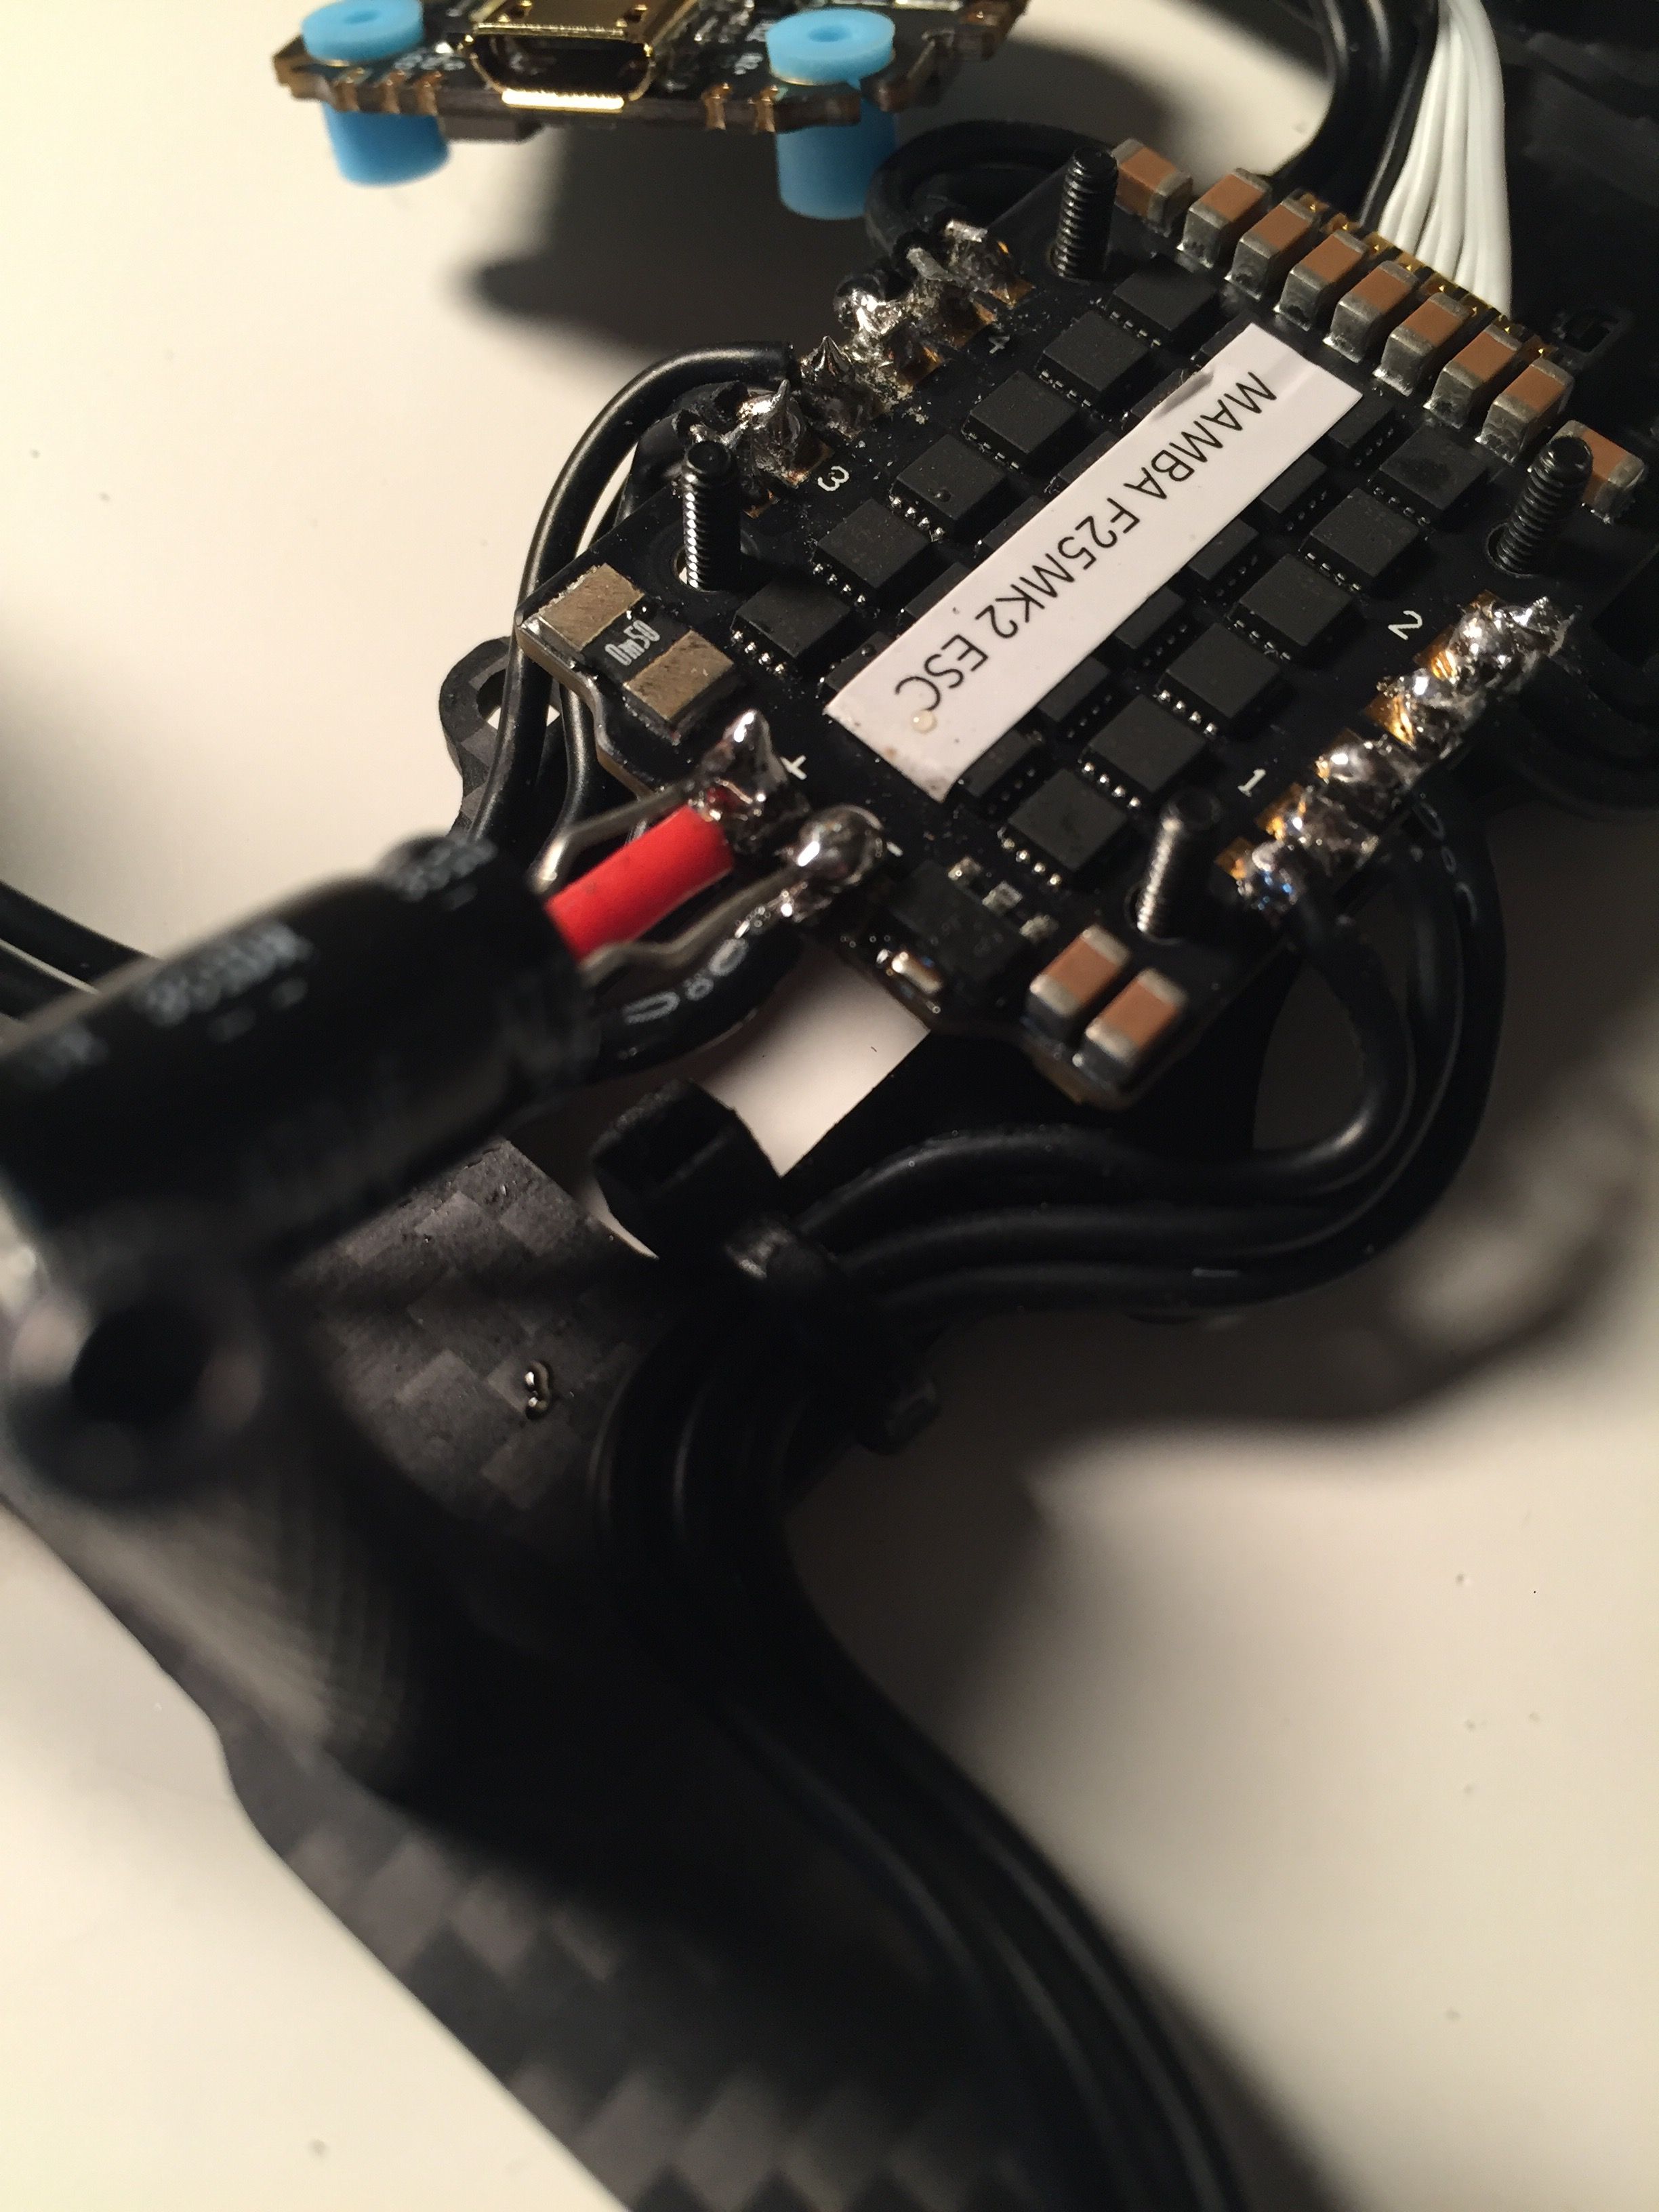
Motors
Now this is where things start to get a little tricky. Mount the motors onto the arms using the included screws. It's helpful to use blue Loctite to ensure the screws don't vibrate out. Once you've done that it's prudent to do a little wire management. I used zip ties to direct the wires across the bottom plate. You want the wires to follow the arms, but not all the way to the standoffs. They need to drop down off to the side so the ducts don't pinch them later. The zip ties help hold them in place so you can solder them to the ESCs.
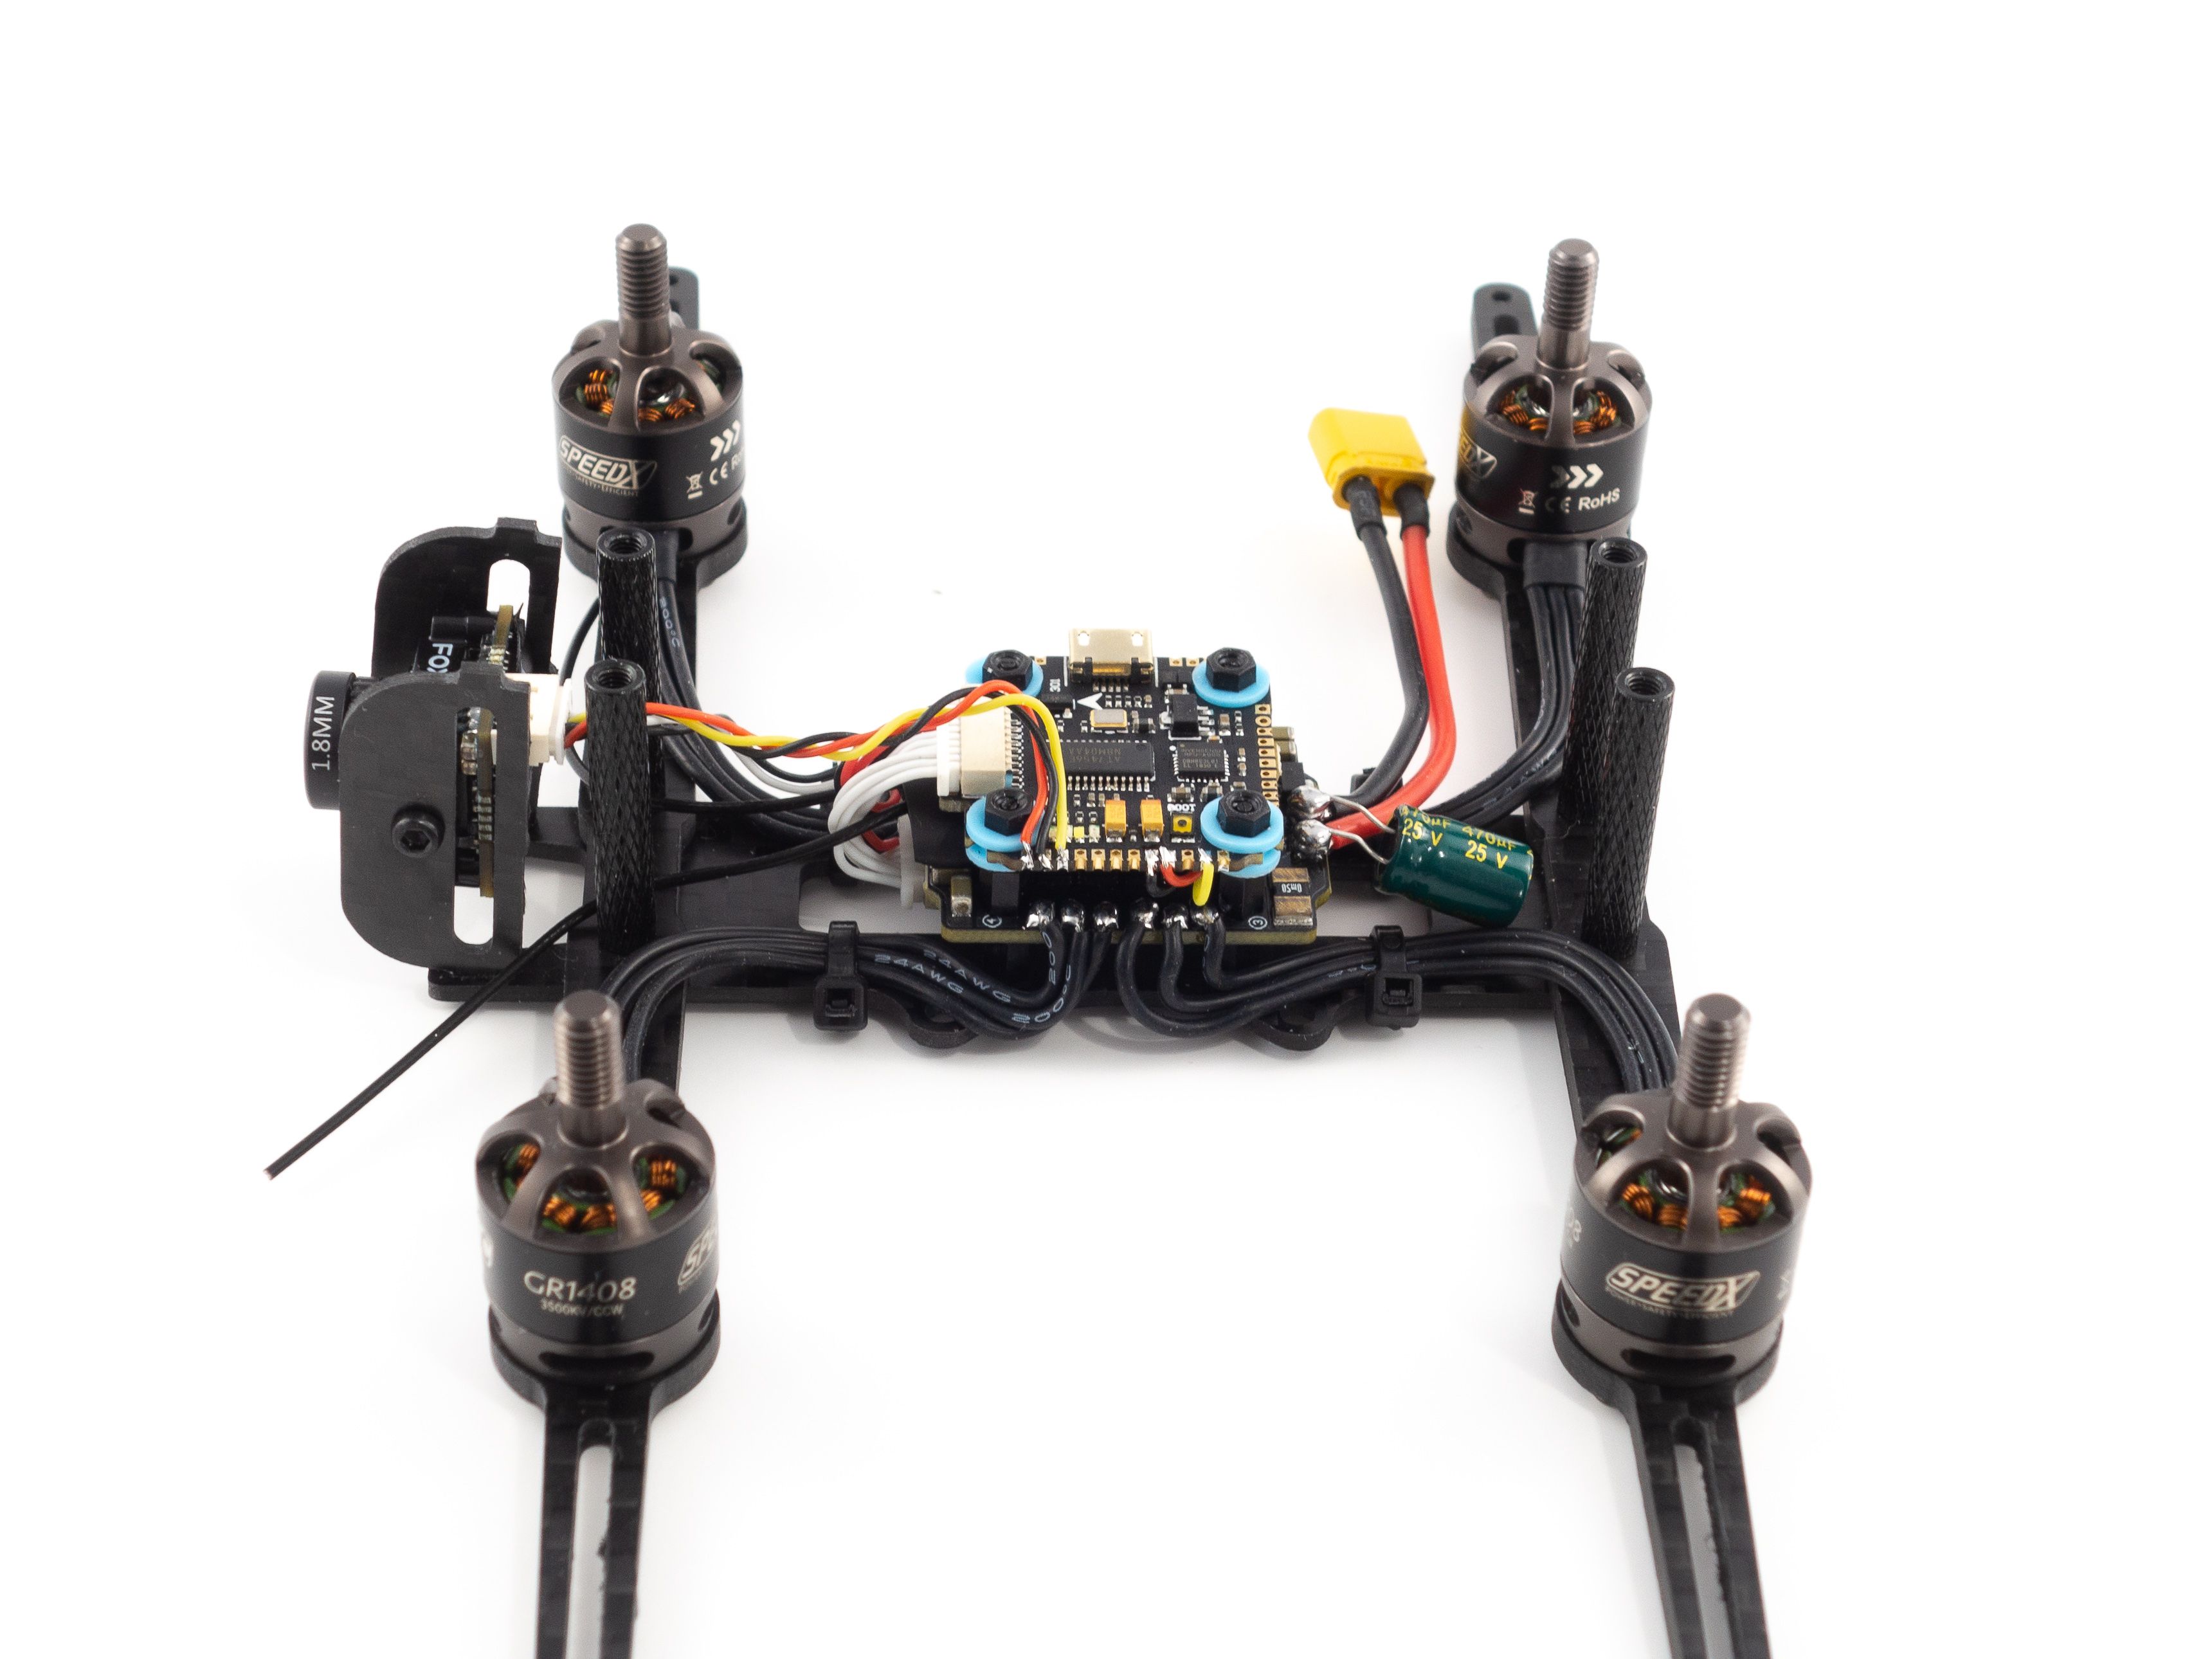
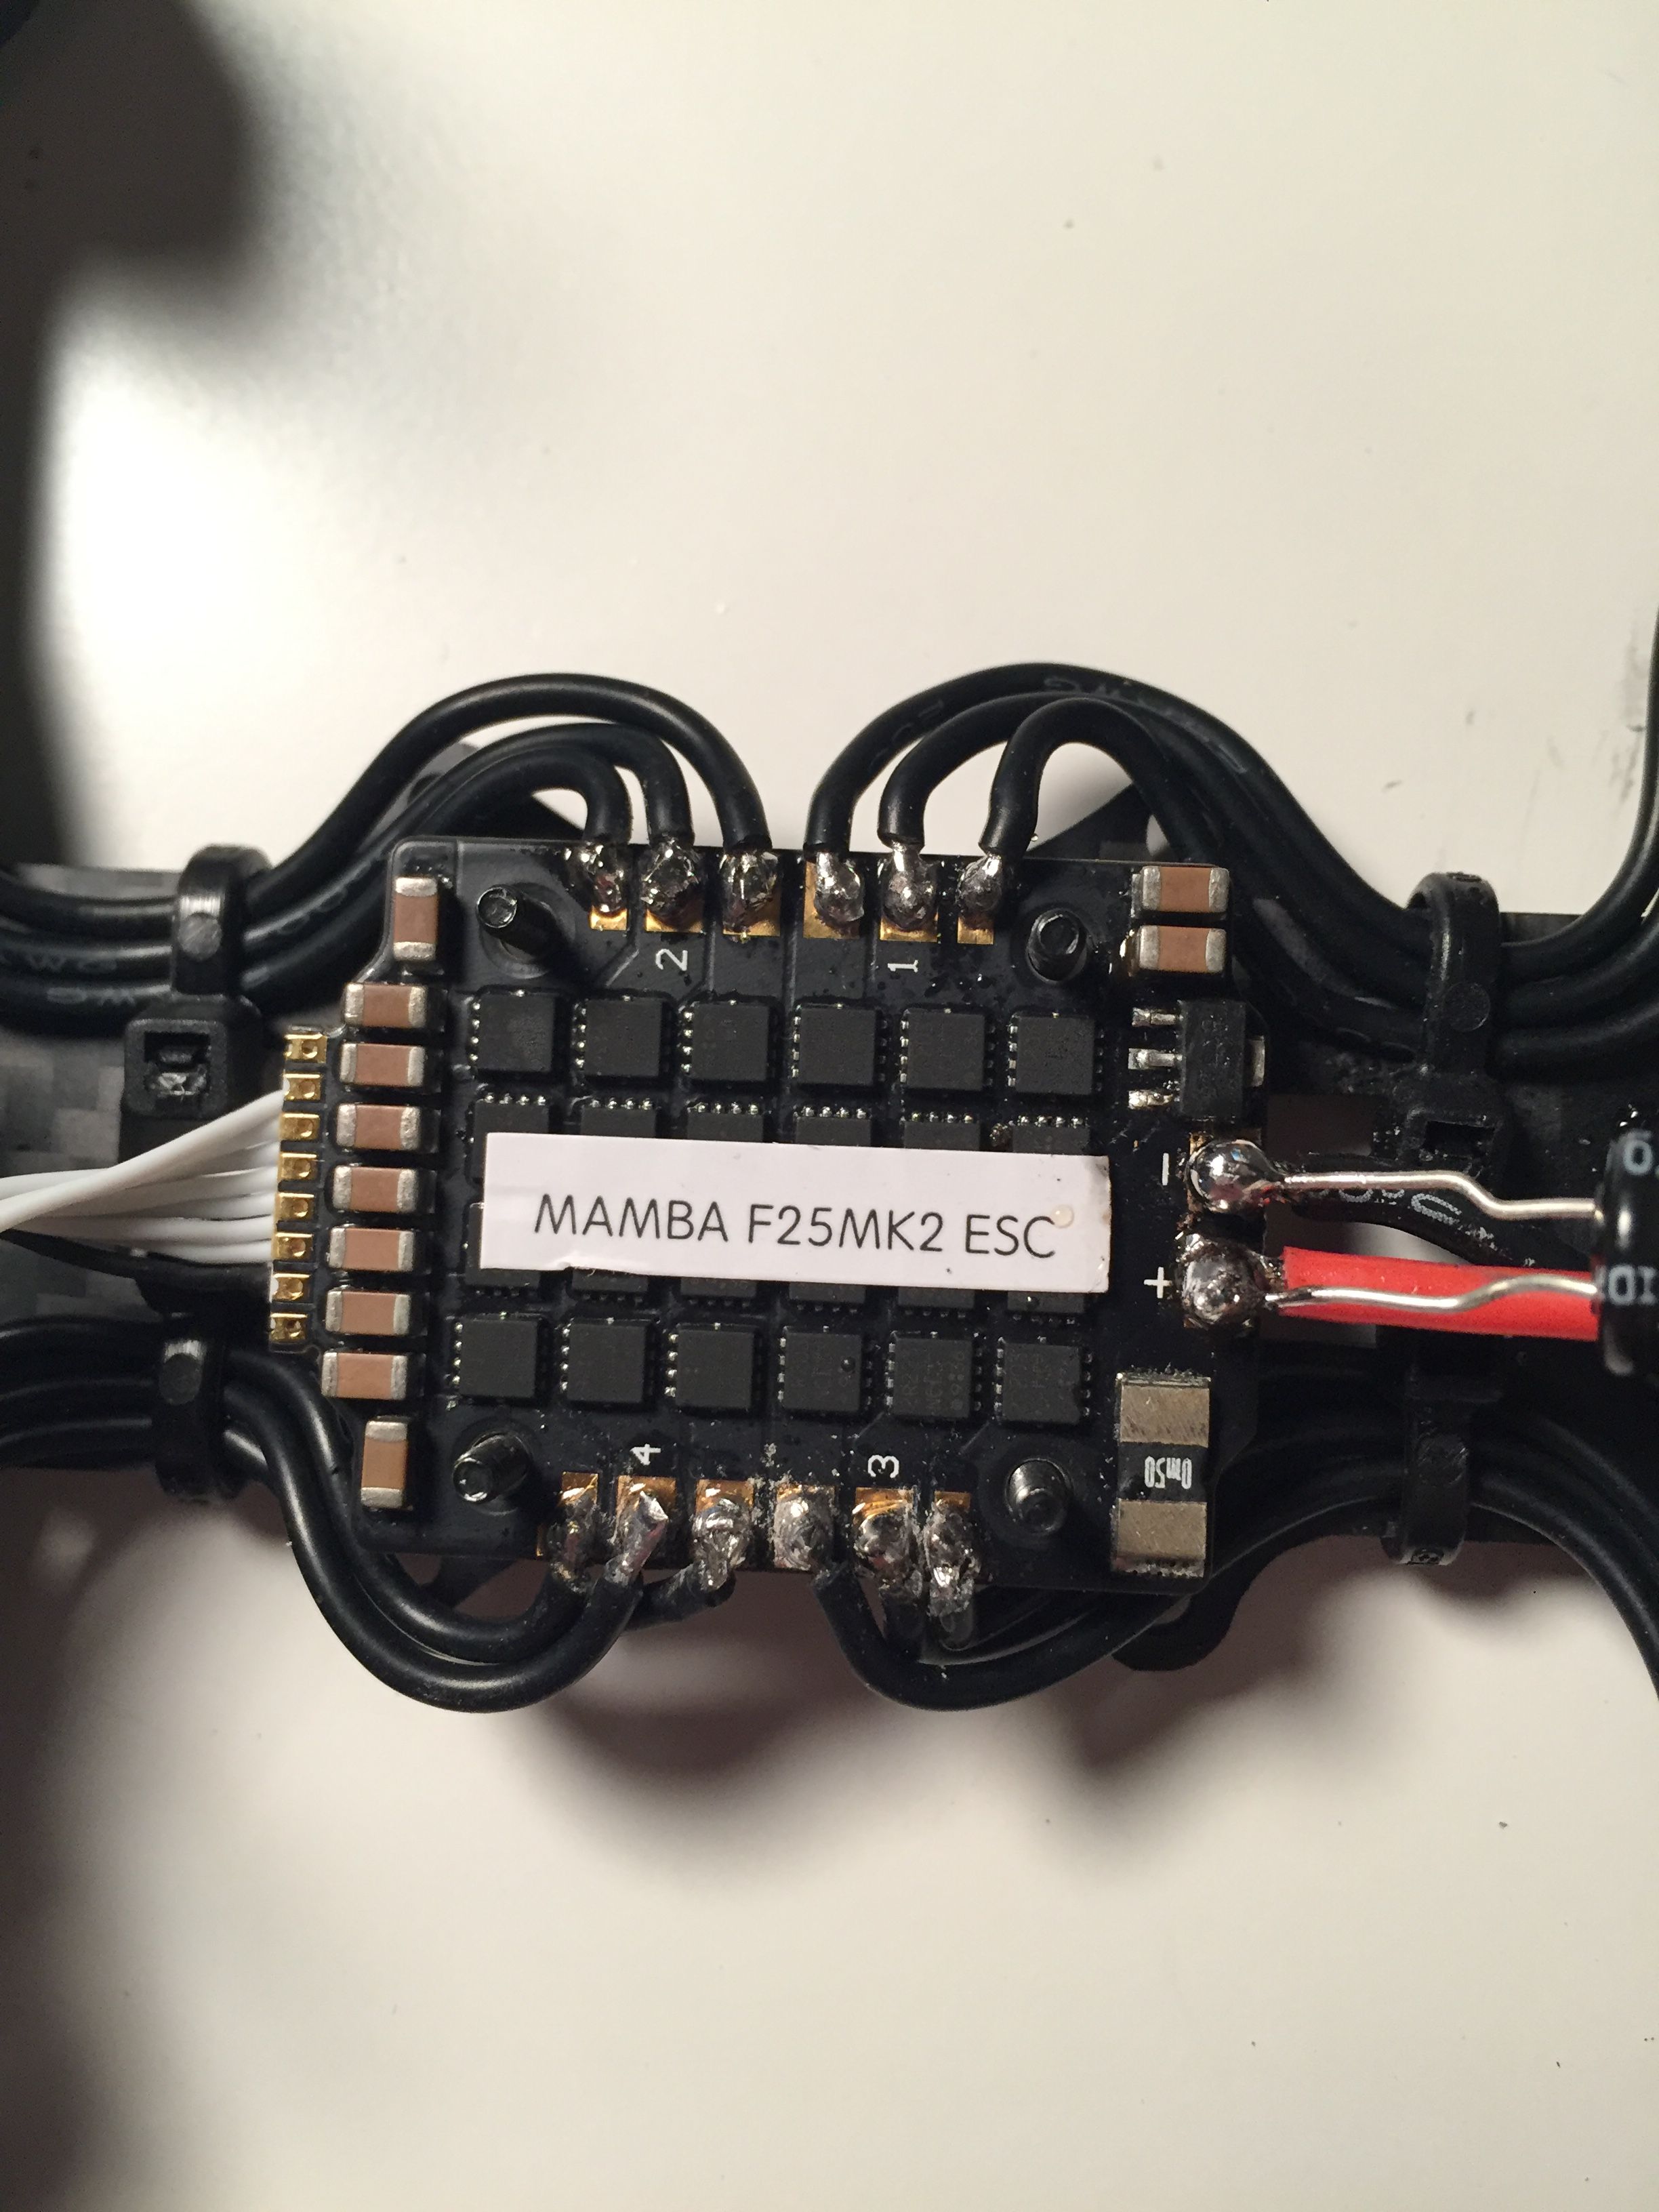
Once you're ready to solder you need to remove the flight controller from the stack. Do this by unscrewing the nylon nuts on top and unplug the FC from the 4-in-1 ESC. Now you can mount the 4-in-1 ESC to the frame using the aforementioned M2 screws. Make sure the battery tabs point toward the rear of the frame. The front has the camera mount tabs.
Before soldering it's a good idea to flux all the motor tabs then apply a ball of solder to each tab. The pads are really close together, so you may accidentally bridge them. To fix that just apply some flux and slice through the middle with your iron. Now if you're right-handed start with the rightmost pad and solder your motor wires to the pads one at a time. Cut each to length as you go and be sure to give yourself a little slack. Again, if you accidentally bridge the pads just apply some flux and be patient. This can be a tedious process.

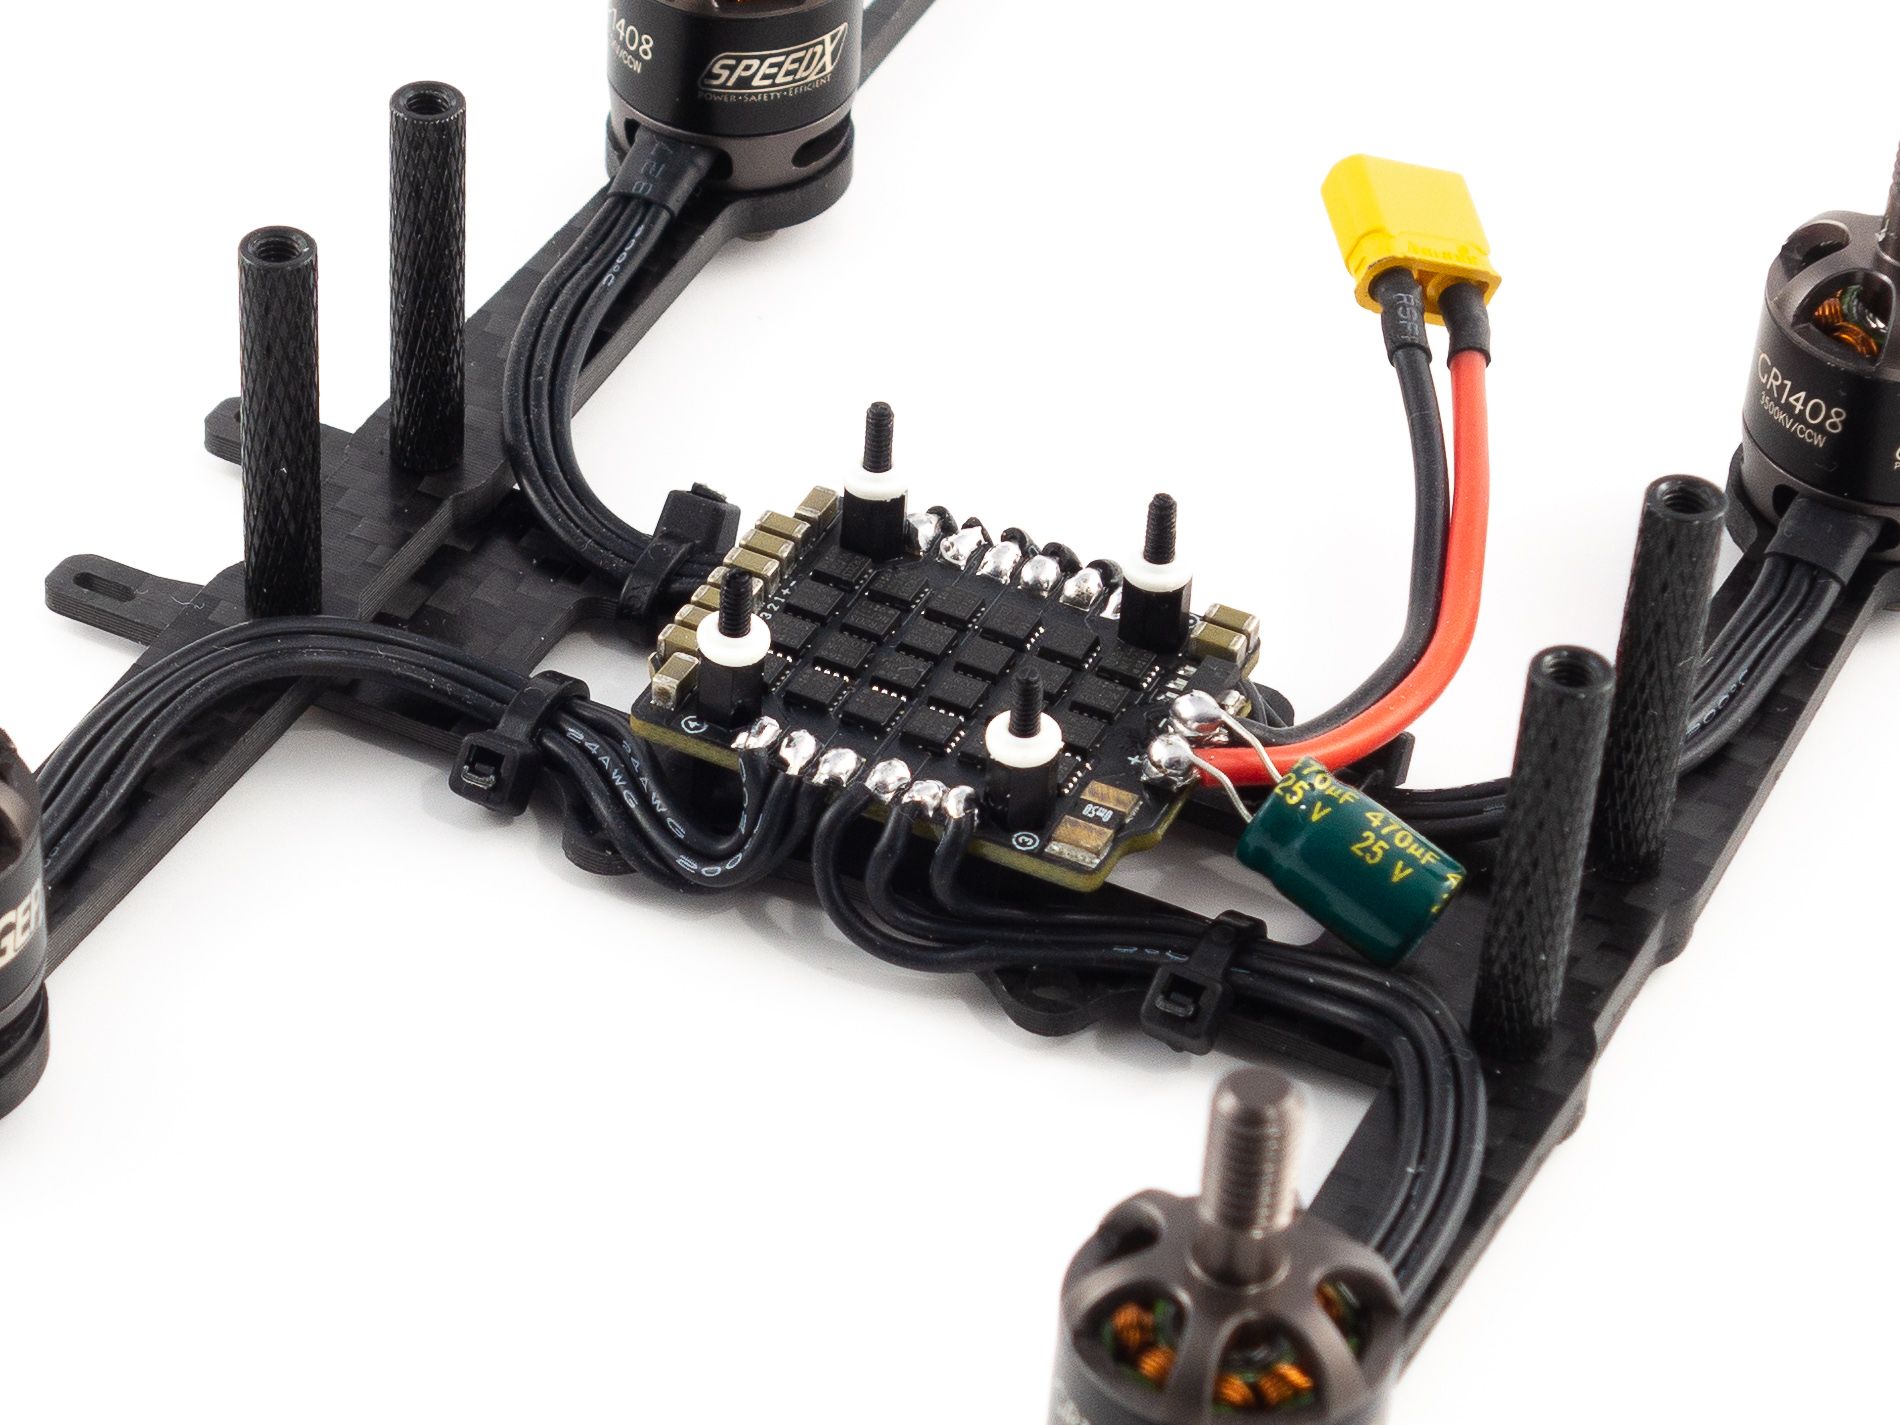
Power Connector
Congratulations! You've just completed the most difficult part of the build. Now you can solder the power leads. Everything you need is at the bottom of the Mamba container.
- Solder the wires to the XT30 connector first and make sure you've got the polarity correct. Add shrink tube to cover the joints.
- We want the battery lead to come up to the side of the battery between the ducts, so measure the wire and cut it to length. Keep in mind that one wire should be cut a little shorter than the other to allow the wires to run to the side.
- Flux and add solder to the battery pads on the 4-in-1 ESC and solder the wires to the pads.
- Use a steady hand and be very careful not to accidentally bump the components on the board with your iron.
- Solder the capacitor on top of the battery leads.
- The striped side is negative.
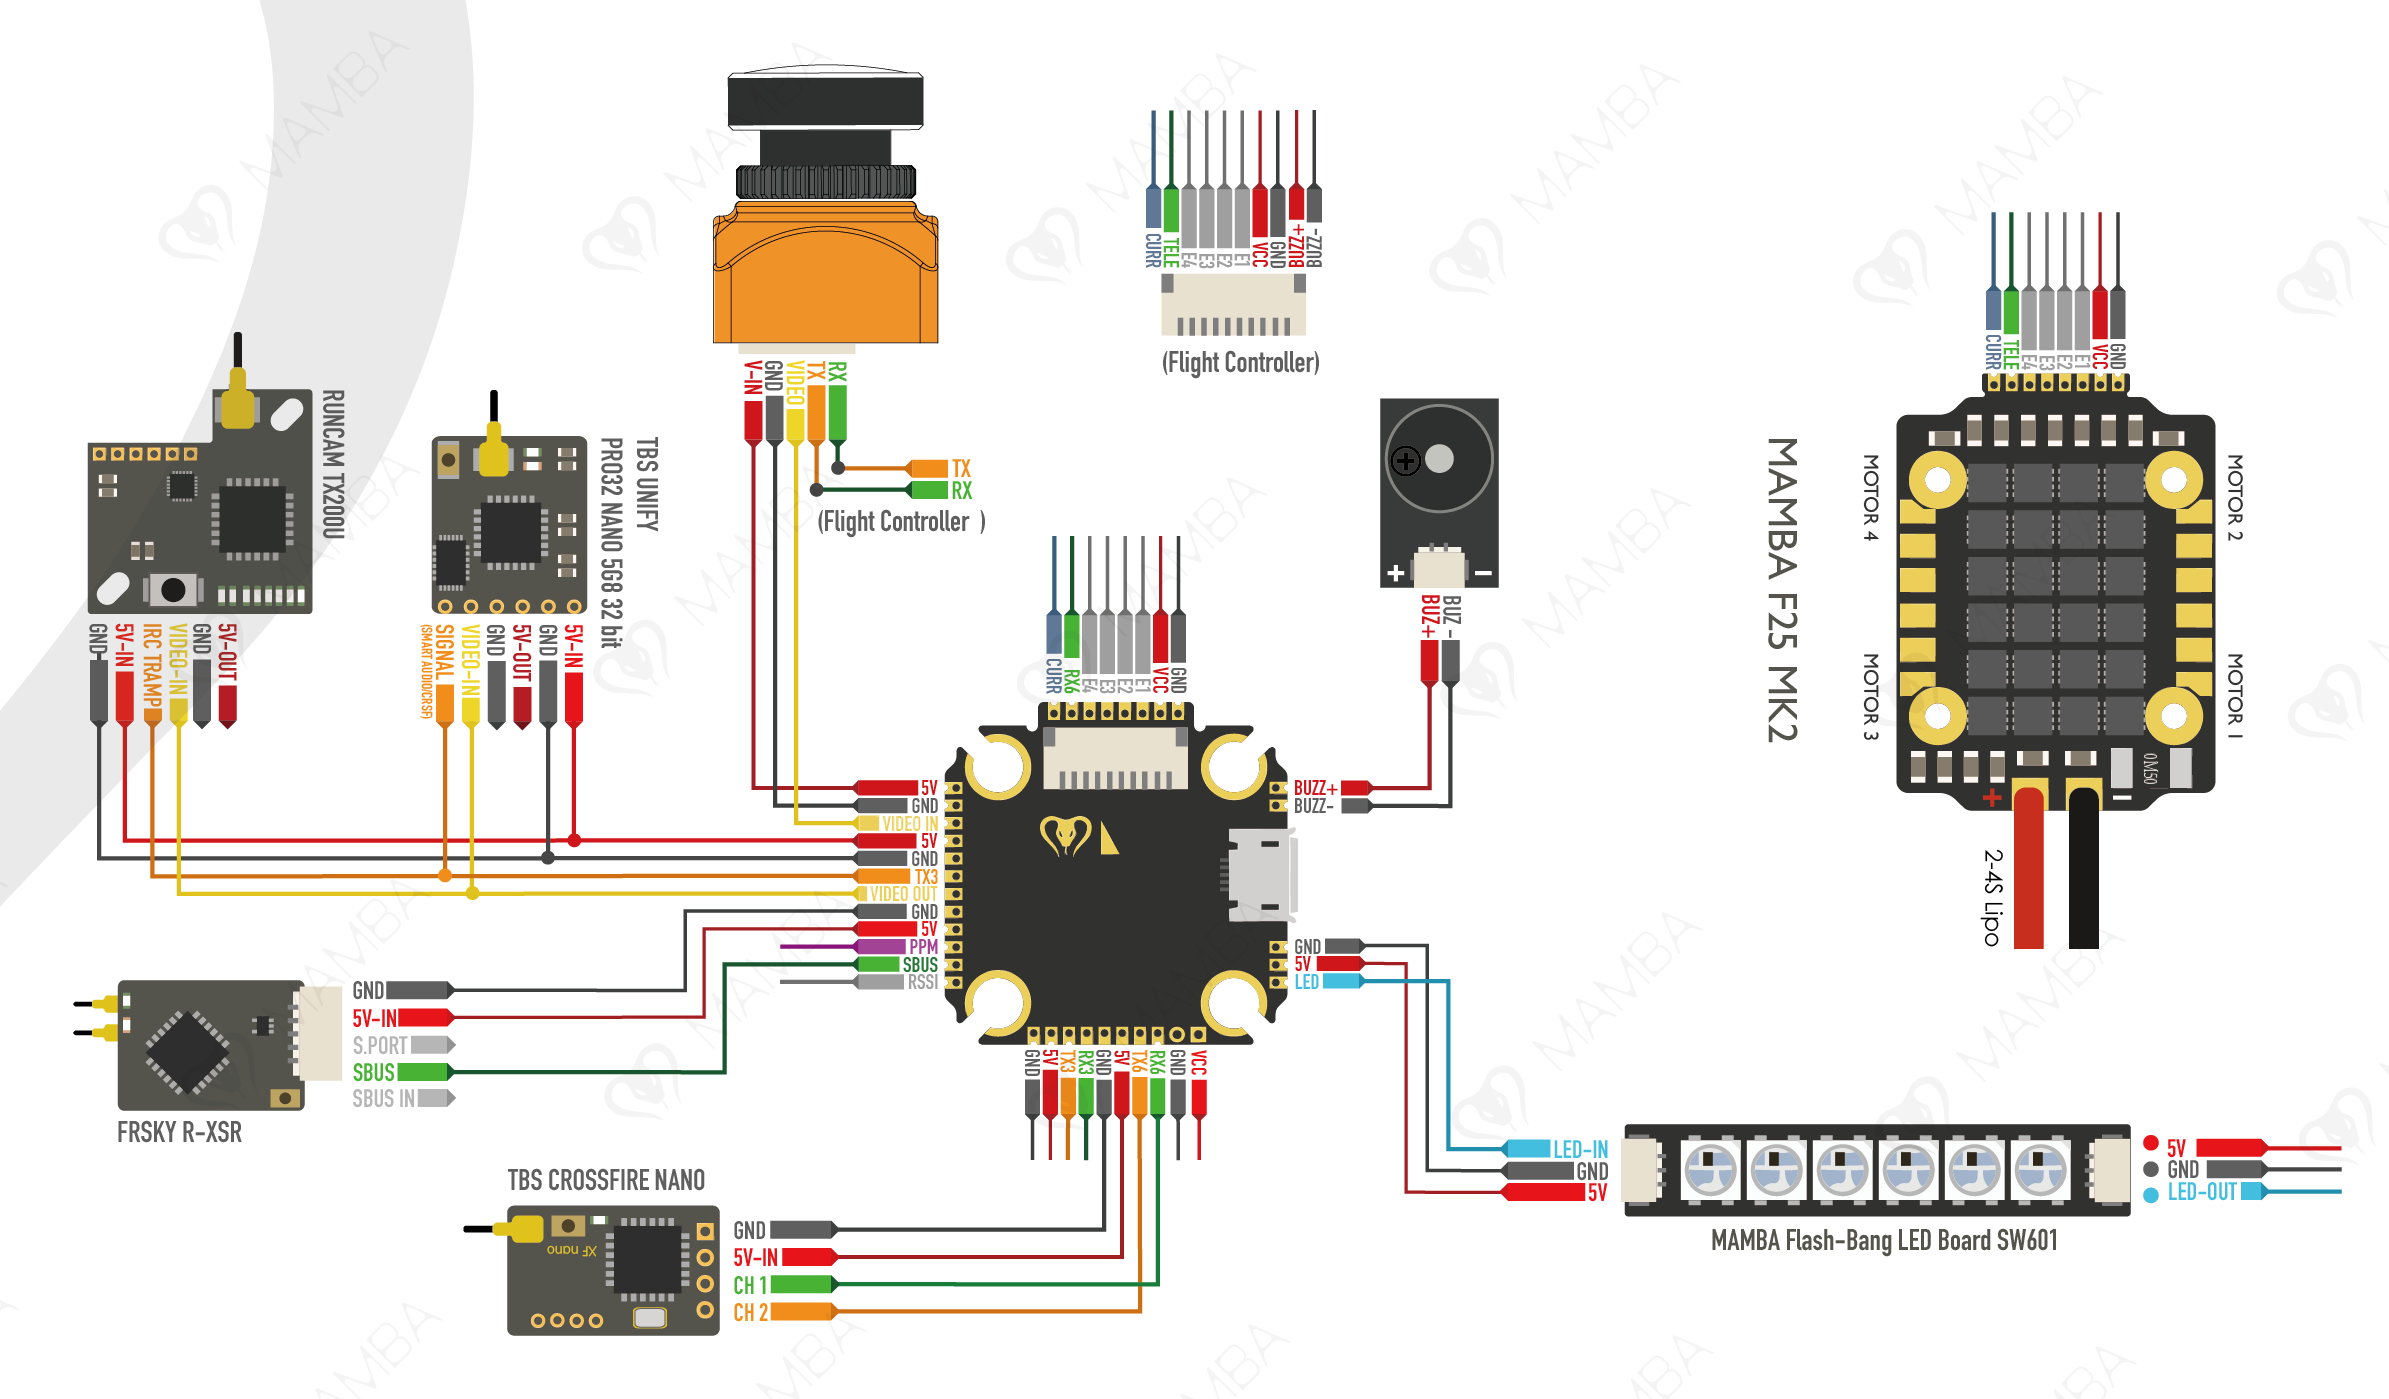
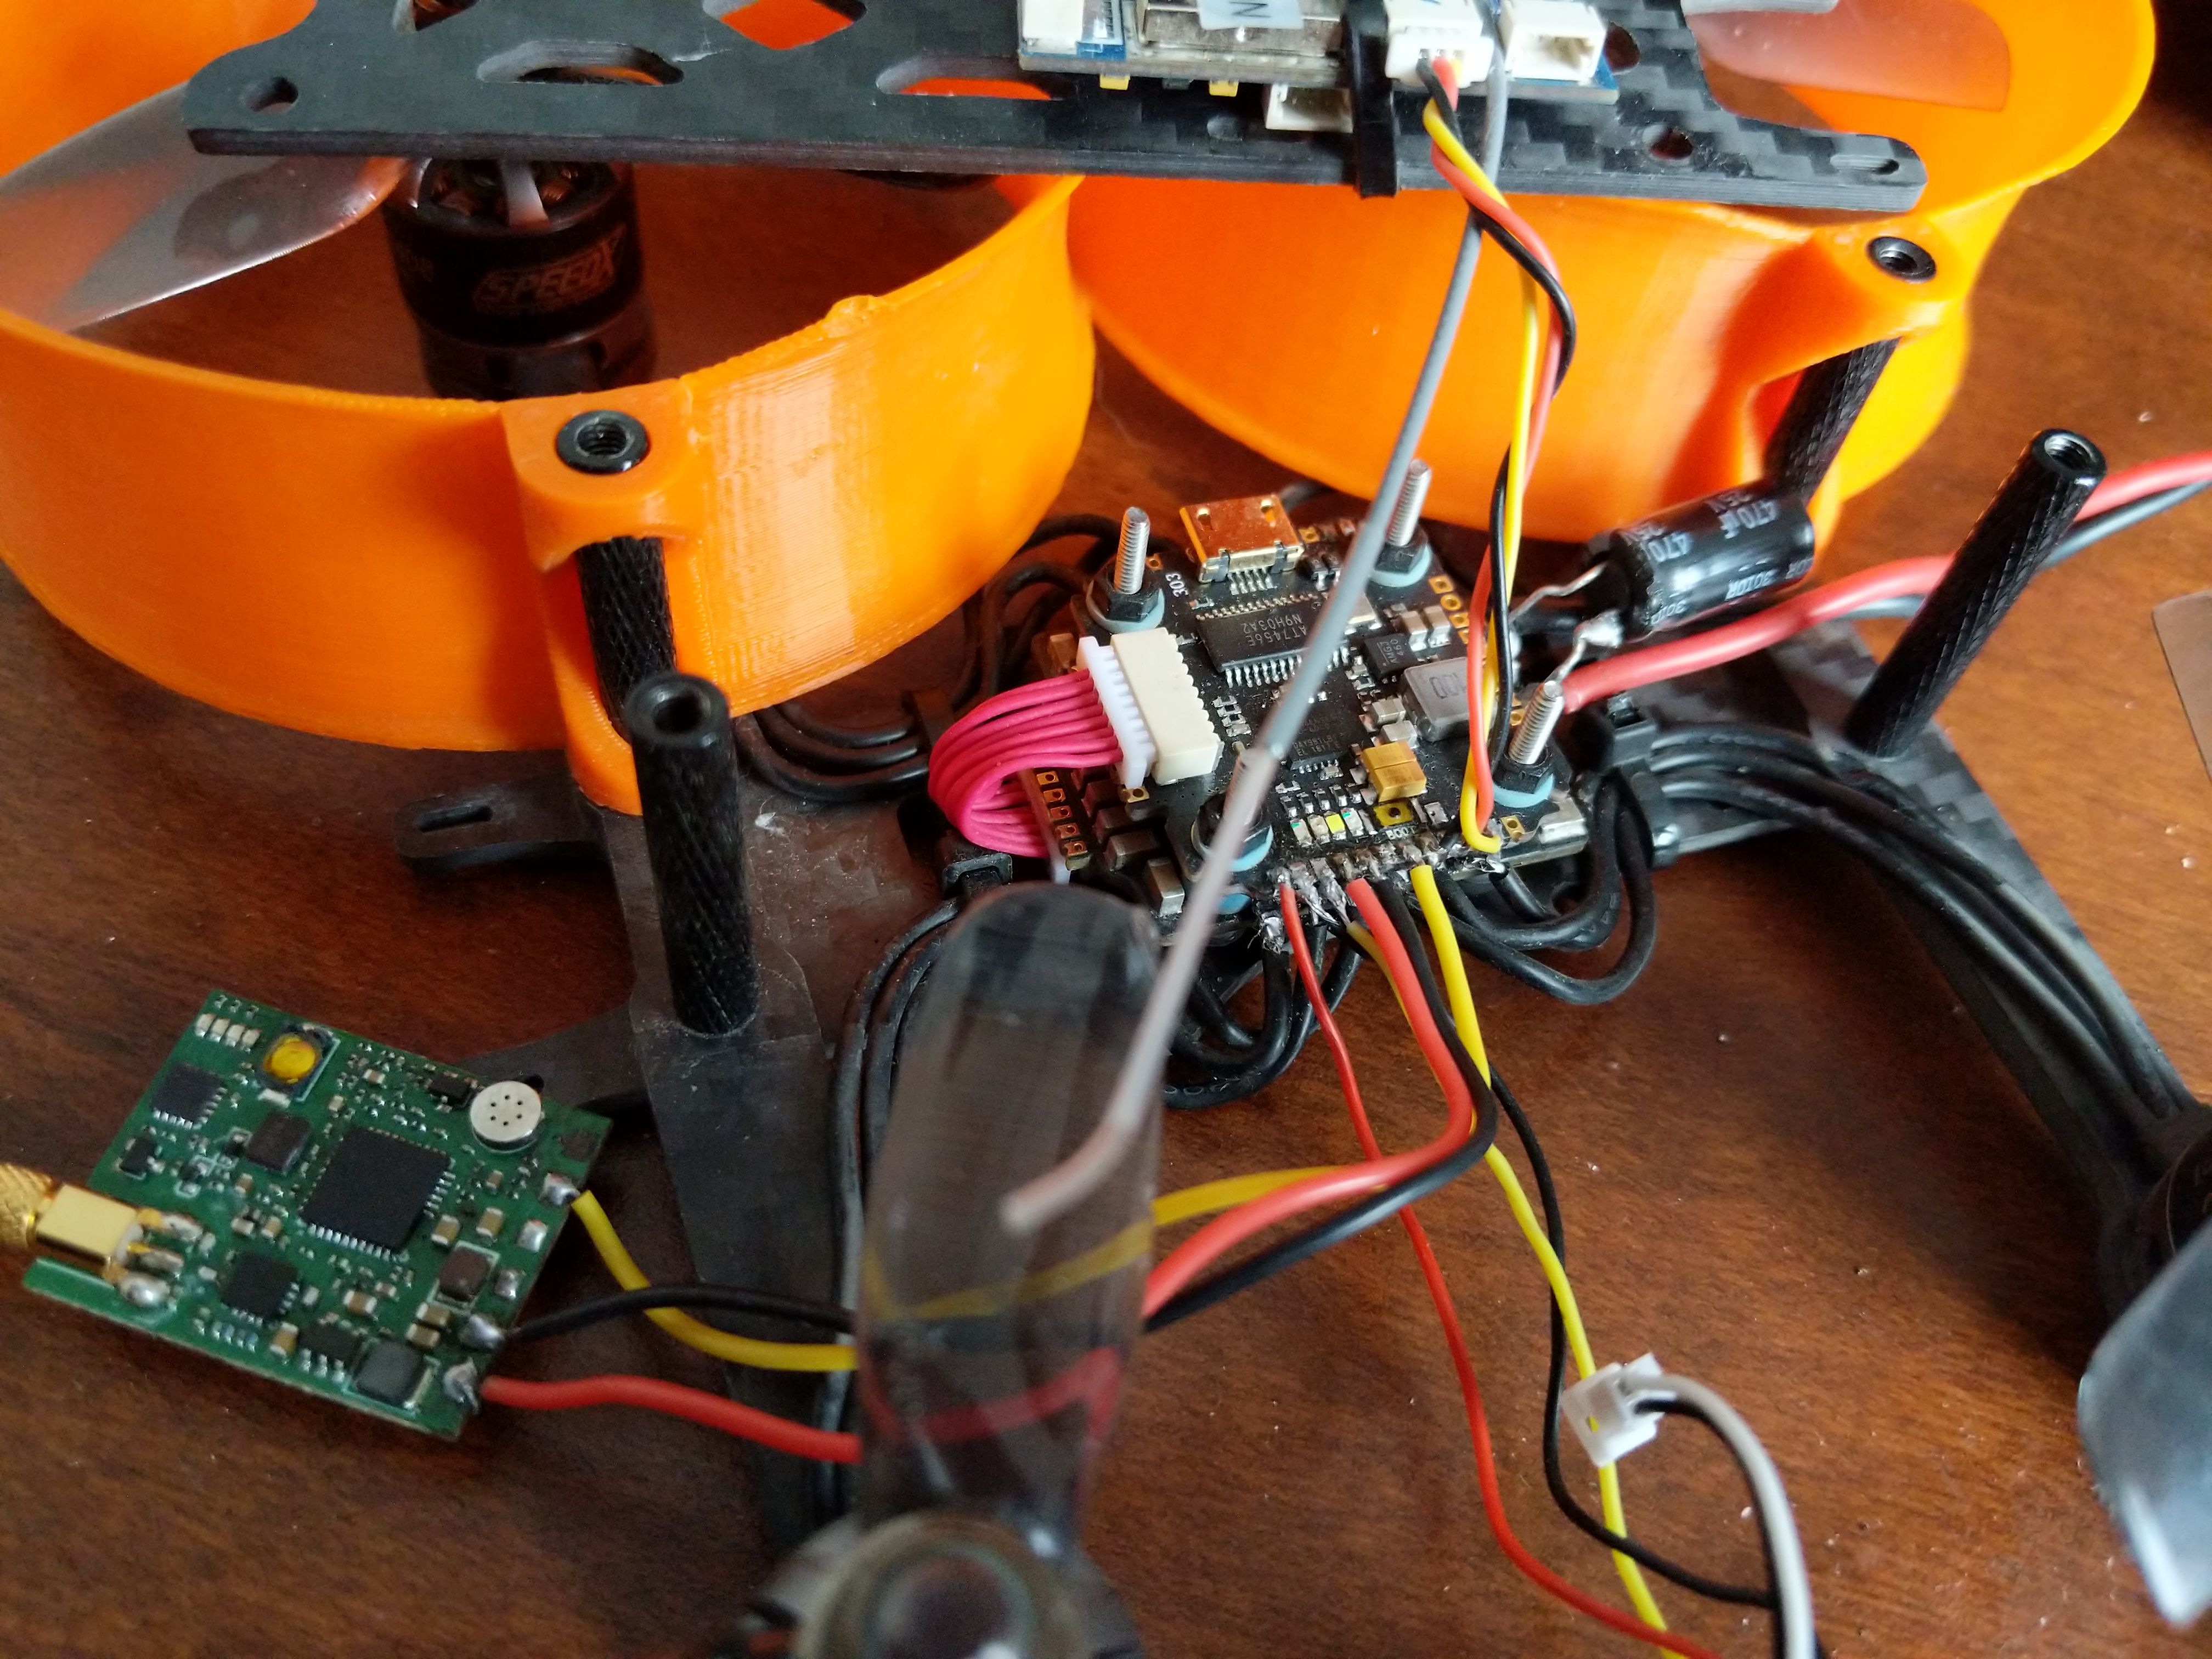
Wiring Diagram
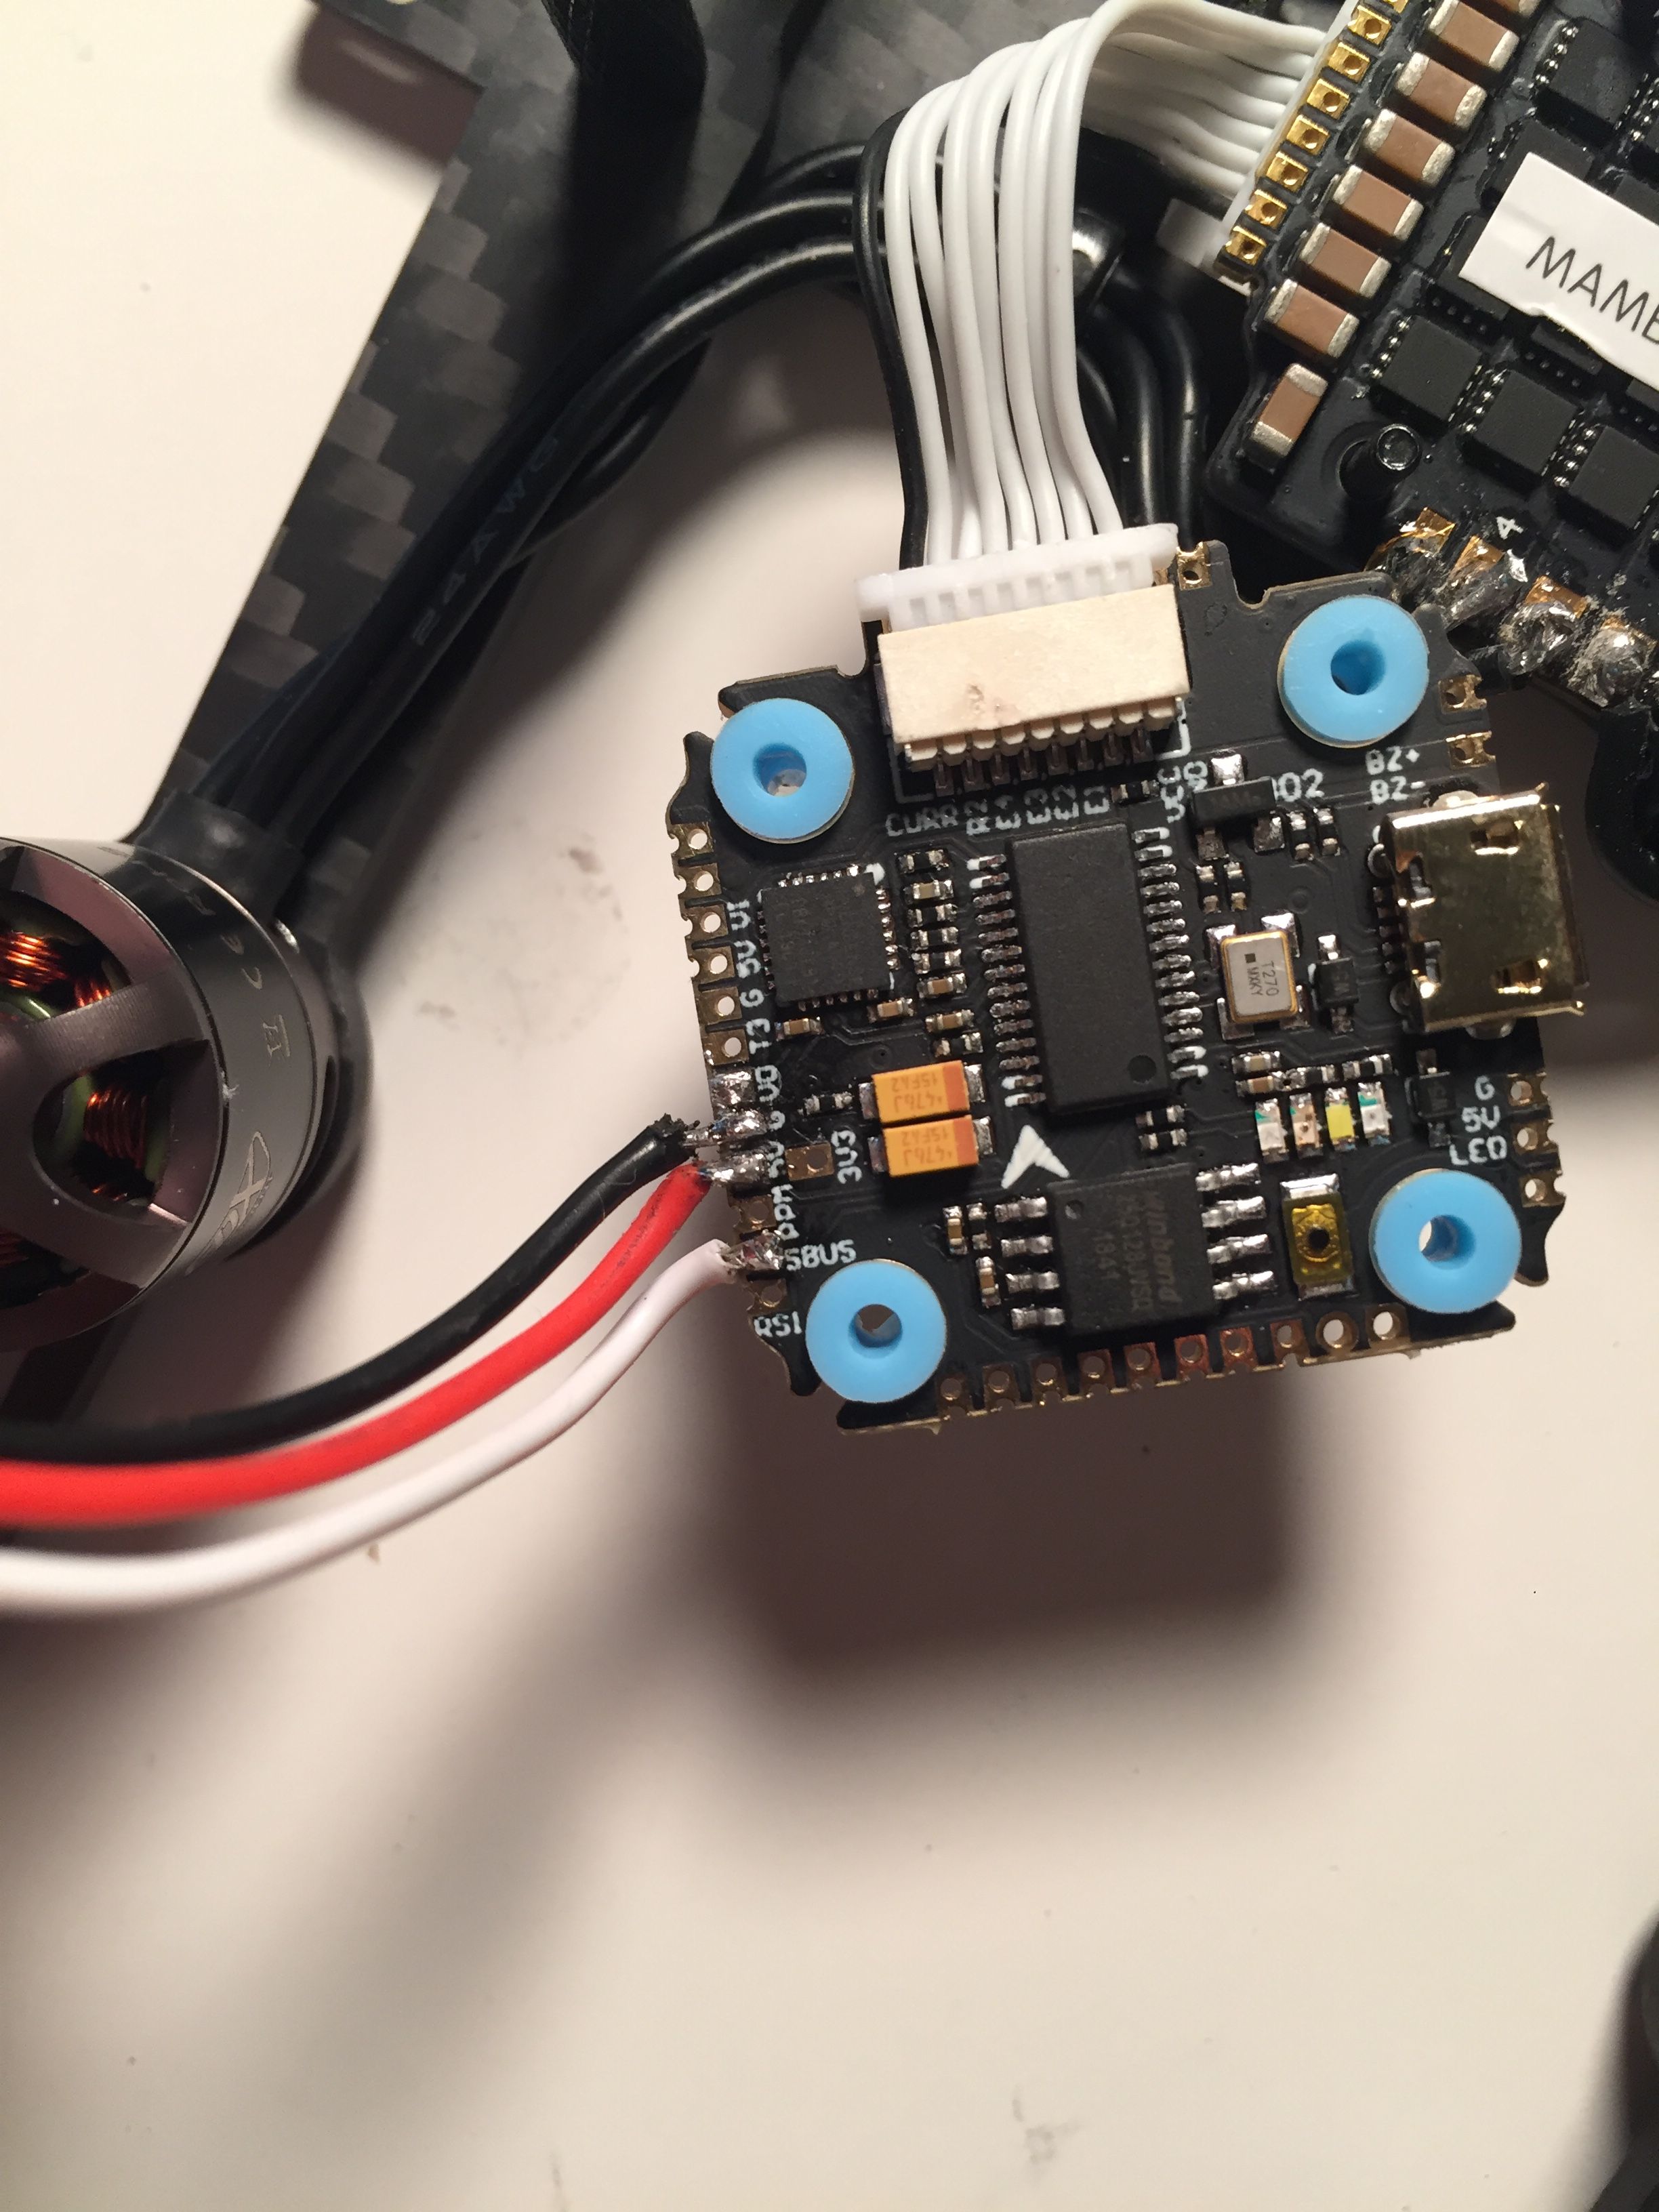
The flight controller doesn't come with instructions, nor are there labels on the pads, so it's crucial to reference the wiring diagram. For this build you'll need to use just about every pad on the left side of the board. Refer to the diagram below. These pads are really tiny, so don't apply too much solder and use plenty of flux. I found it easiest to solder the wires to the little grooves on the sides of the pads.
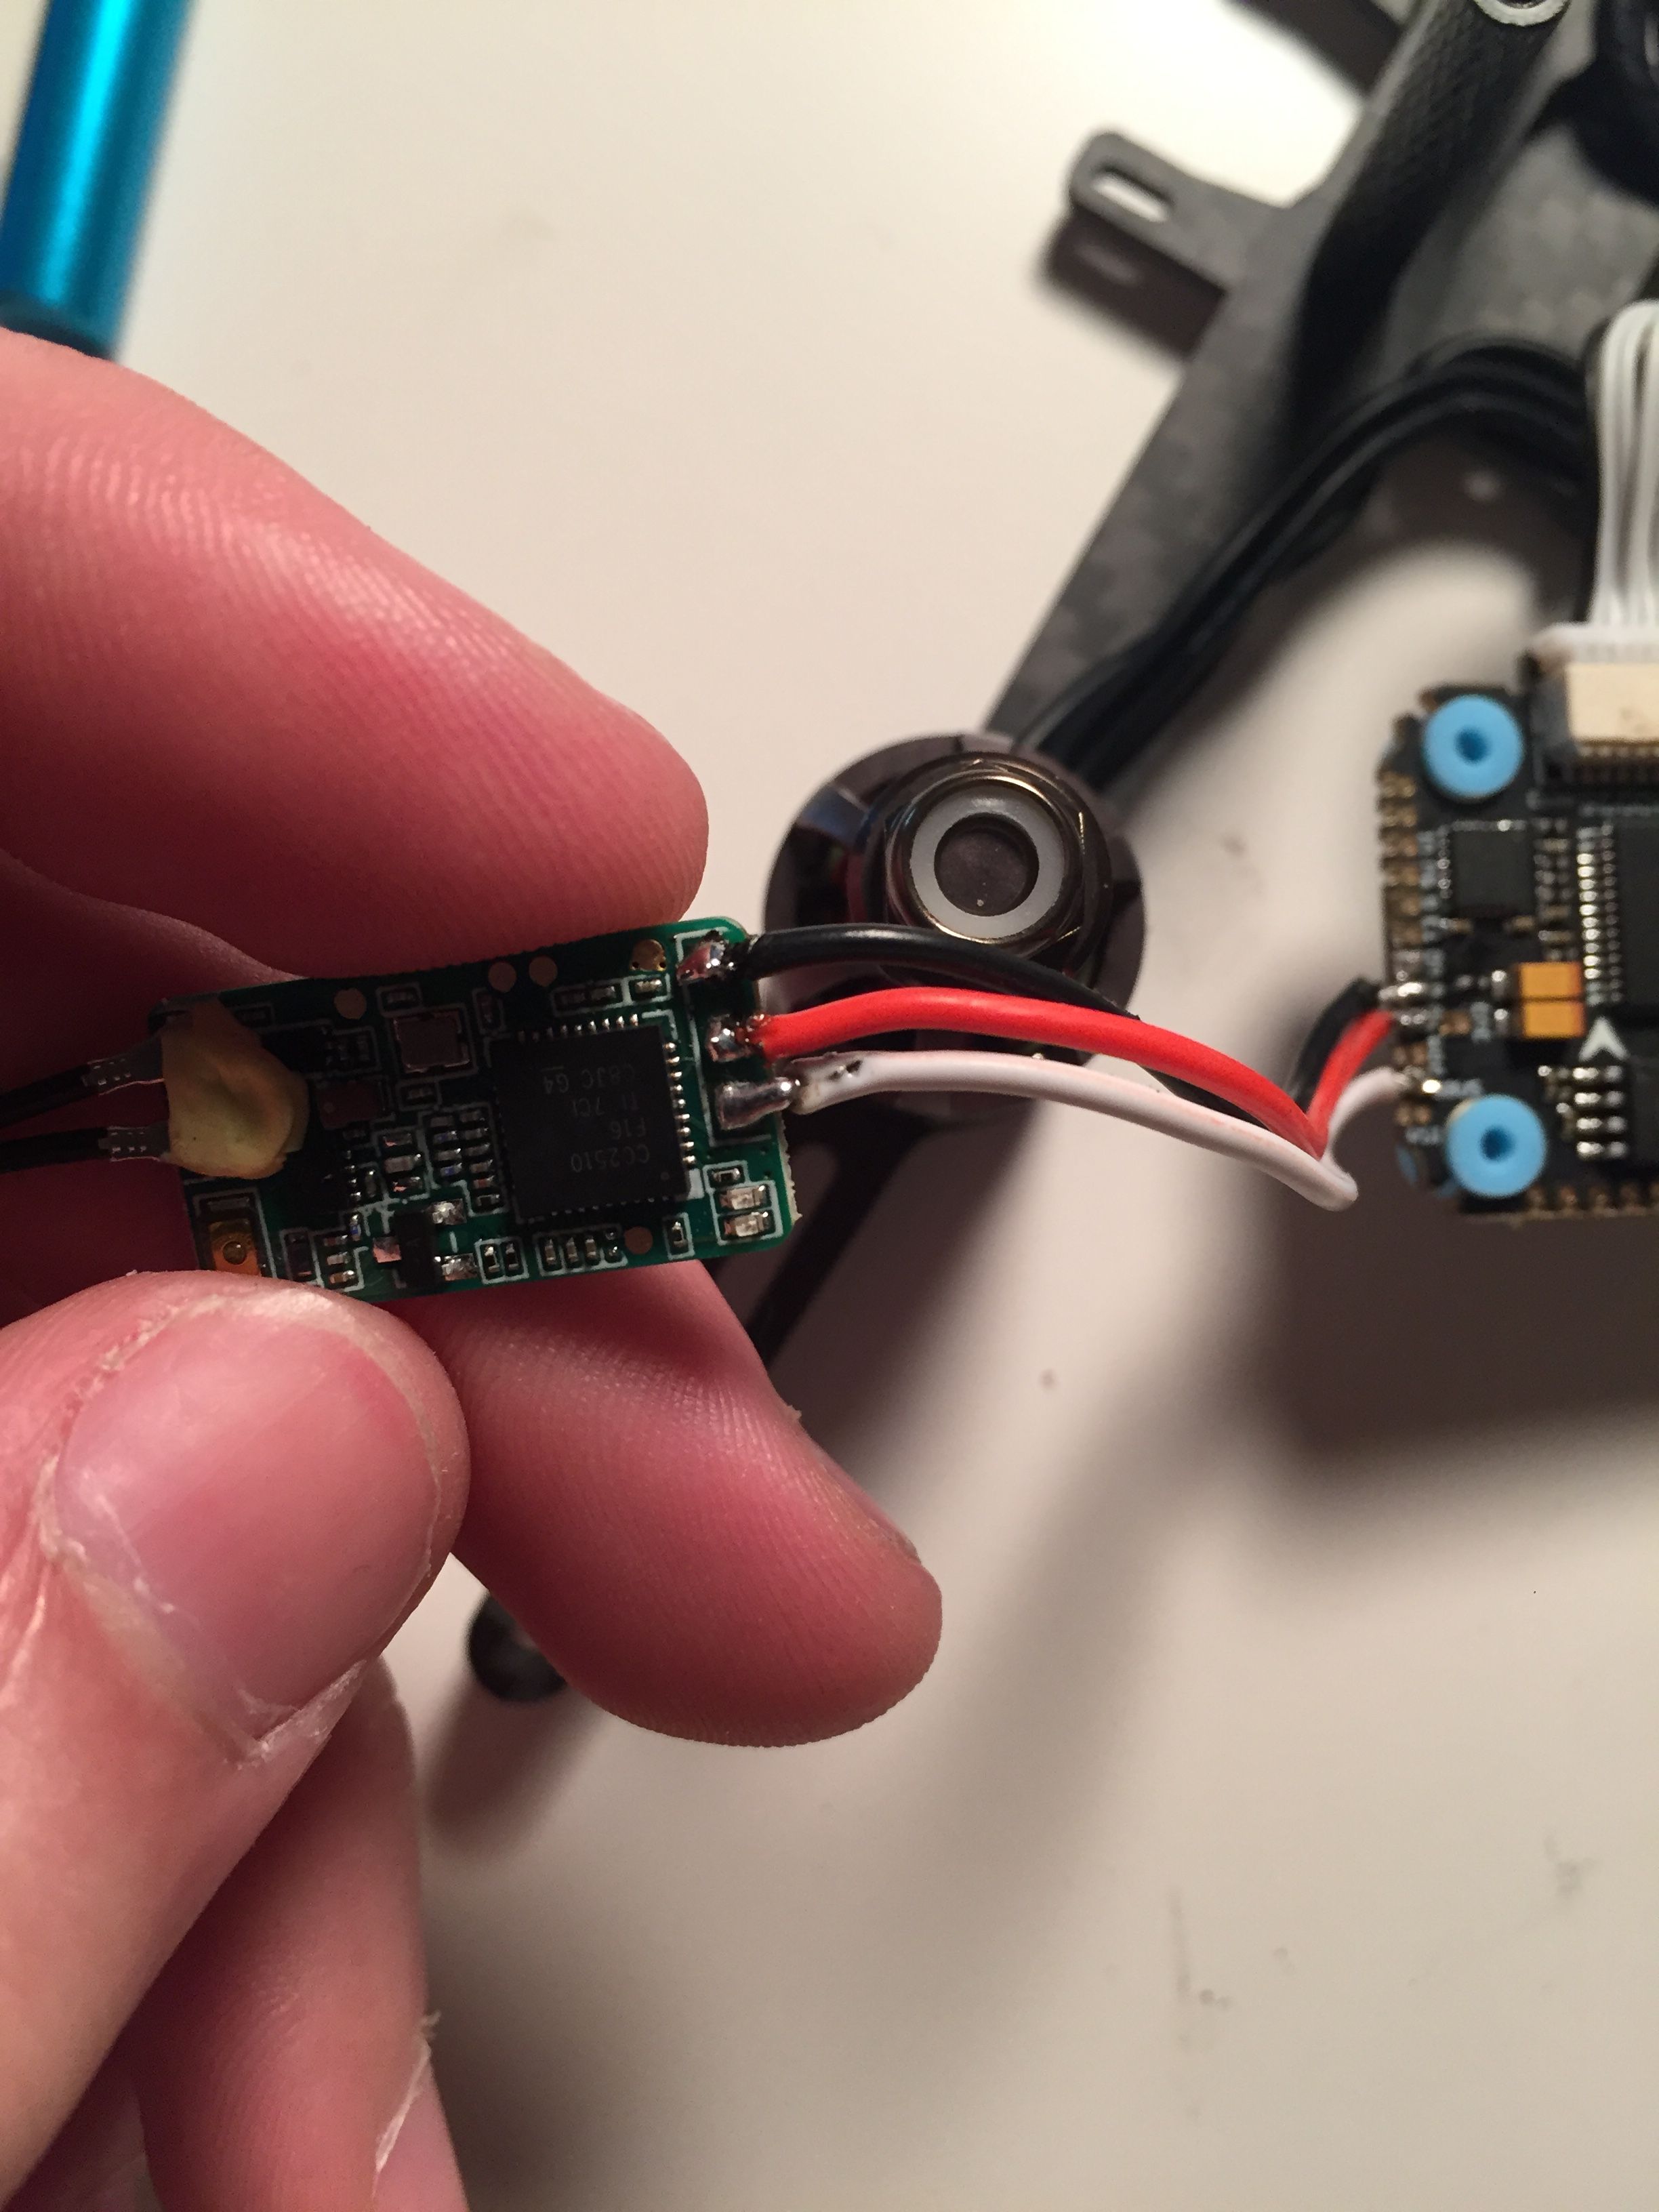
Binding the Receiver
Now that you've got power you can add the receiver and bind it. I used the FrSky XM+, but you'll need to choose a receiver that matches your radio.
- Solder 3 wires to the 5v, GND and SBUS pads on the receiver.
- I borrowed some wire from the camera. It's got enough to spare.
- Solder these wires to the 5v, GND and SBUS pads on the flight controller.
- Add your flight controller to the stack and re-connect it to the 4-in-1 ESC. Don't secure it with the nuts just yet.
- Bind your receiver
- Be sure to double check that you don't have continuity between your main battery leads and use a smoke stopper if you have one.
- Hold the bind button on the receiver while you plug the main battery in. (It's helpful to clamp this button down with tweezers to free your hand)
- Put your radio into bind mode and make sure you're bound.
- Now that you're bound you can add some shrink tube to your receiver and tuck it under the flight controller. Now secure it with the nylon nuts.
I had a hard time finding a place to mount the antennas. The arms are parallel to each other. Ideally we want the antennas to be at a 90 degree angle from one another, so I found a nice solution. The 30.5mm stack mount holes are perfect for a couple small zip ties. Just tighten them at a 45 degree angle toward the rear of the quad and you're all set! Secure the antennas to the zip ties with shrink tube.
Camera
Next we can add the camera. First you'll want to screw the side plates to the camera and mount it onto the frame to measure the wire. Remove the purple wire and connect the wire harness to the back of the camera. Cut the wire giving yourself a little slack to adjust the camera angle. Refer to the wiring diagram for wire placement. You'll use the first three pads.
Video Transmitter
Now for the VTX! De-solder the 5v out and GND wires from the board because we won't be using those. Give yourself enough slack to mount the VTX just behind the camera on the top plate. You'll want the antenna to point toward the rear of the quad. Again, refer to the wiring diagram to solder the wires to the flight controller. These will be the 4 remaining pads between the receiver and camera wires.

Camera Configuration
Now that you've wired the camera and VTX you can adjust your camera settings. Plug in your quad and check that the video feed is functioning. Then, using the included joystick you can plug into the wired connector behind the camera. Mainly all you want to do is disable the camera OSD. We'll be using the OSD provided by the flight controller instead. Press and hold the up button to access the OSD menu. Disable each option and save.
Finishing Up
Once you've added the ducts it'll be difficult to reach the USB port, so I recommend a USB extension to avoid removing the ducts later on. If you don't have one you should skip ahead to the Betaflight Configuration section below and configure your quad before the final assembly. You may also want to put the props on before adding the ducts. The motors can be tricky to grip with the ducts in place.
- To finish up slide the ducts over the standoffs being careful not to squish the motor wires. You may need to adjust the wires to get a good fit.
- Make sure the ducts are right-side up so you can screw them onto the tips of the arms.
- Remove nuts and washers from the SMA pigtail and fit it through the TPU antenna mount. Put them back to secure it to the mount.
- I recommend getting some very wide shrink tube (~26mm) to cover the VTX. That way you don't need to tape it to the frame and it can float above the flight controller. That'll give you more flexibility with your battery strap.
- Screw the top plate into place with the TPU components for mounting the antenna and camera.
- Screw your SMA antenna onto the pigtail.
- Add a battery pad to the top to prevent battery ejections and slide a battery strap under the top plate.
Betaflight Configuration
If you don't already have them, you'll need to download Betaflight Configurator [Download] and the BLHeli Configurator [Download].
- First go to the Firmware Flasher and choose "FURYF4OSD" as well as the latest stable release of Betaflight.
- Click "Load Firmware [Online]" and then "Flash Firmware" to update your flight controller. Once complete, click "Connect"
- On the Ports tab
- On UART1 click Serial RX for your receiver.
- Set the UART3 Peripherals to "VTX (SmartAudio)".
- Click Save and Reboot
- On the Configuration tab
- Under ESC/Motor Features select DSHOT600
- Under System configuration set PID loop frequency to 8 kHz.
- Under Receiver choose your receiver mode. For the XM+ choose "Serial-based receiver" and "SBUS"
- Under Arming set the Max arm angle to 180 (Only if you keep the accelerometer turned on)
- Under Other Features enable: Airmode, OSD, Anti Gravity and Dynamic Filter
- Under DSHOT Beacon Configuration enable the beacon
- Go to Power & Battery and choose Onboard ADC for the Current Meter Source
- Click Save and Reboot
To complete the remaining steps you'll need to apply lipo power to your build:
- On the Receiver tab ensure your pitch, roll, throttle and yaw are being applied correctly. Adjust your transmitter and Channel Map as needed.
- On the Modes tab
- Assign an Aux switch to arm and disarm your quad.
- Assign another Aux switch to enable Horizon or Angle mode if you need them.
- Assign the Beeper and "Flip over after crash" to a 3rd and/or 4th switch. I like to assign them both to a single 3 point toggle switch.
- On the Motors tab enable the motor test and apply a small amount power to check the rotation of each motor. Take note of any that need to be reversed.
- Disconnect from the Betaflight Configurator and open BLHeli Configurator
- Connect and Read Settings
- Flash all ESCs to the latest firmware available.
- Reverse the motor direction of any motors that need it. (The numbers correspond to the same numbers in Betaflight)
- Save and reconnect to Betaflight Configurator to test the motor direction.
- On the OSD tab
- Check all of the features you want and arrange your OSD as desired.
And that's it! The default Failsafe settings are generally fine, but make sure they work by arming your quad, applying a small amount of throttle and turning off your transmitter. It should shut down after a short moment.
Challenges
The biggest challenge was soldering the tiny pads. I found it worked best to rest my wrist on a flat surface to steady my hand. The more steady you are the better. You just want to avoid bumping adjacent solders causing them to flow together. Other than that I spent a fair bit of time finding a place to mount the receiver antennas. It wasn't the most difficult build, but it did require some patience.
In terms of motor heat, between the HQProps and the Gemfans I found the Gemfans to run cooler. The motors do tend to get hot on these ducted builds, but with very low d-term values on the Gemfans they're coming back reasonably warm, but not burning hot.
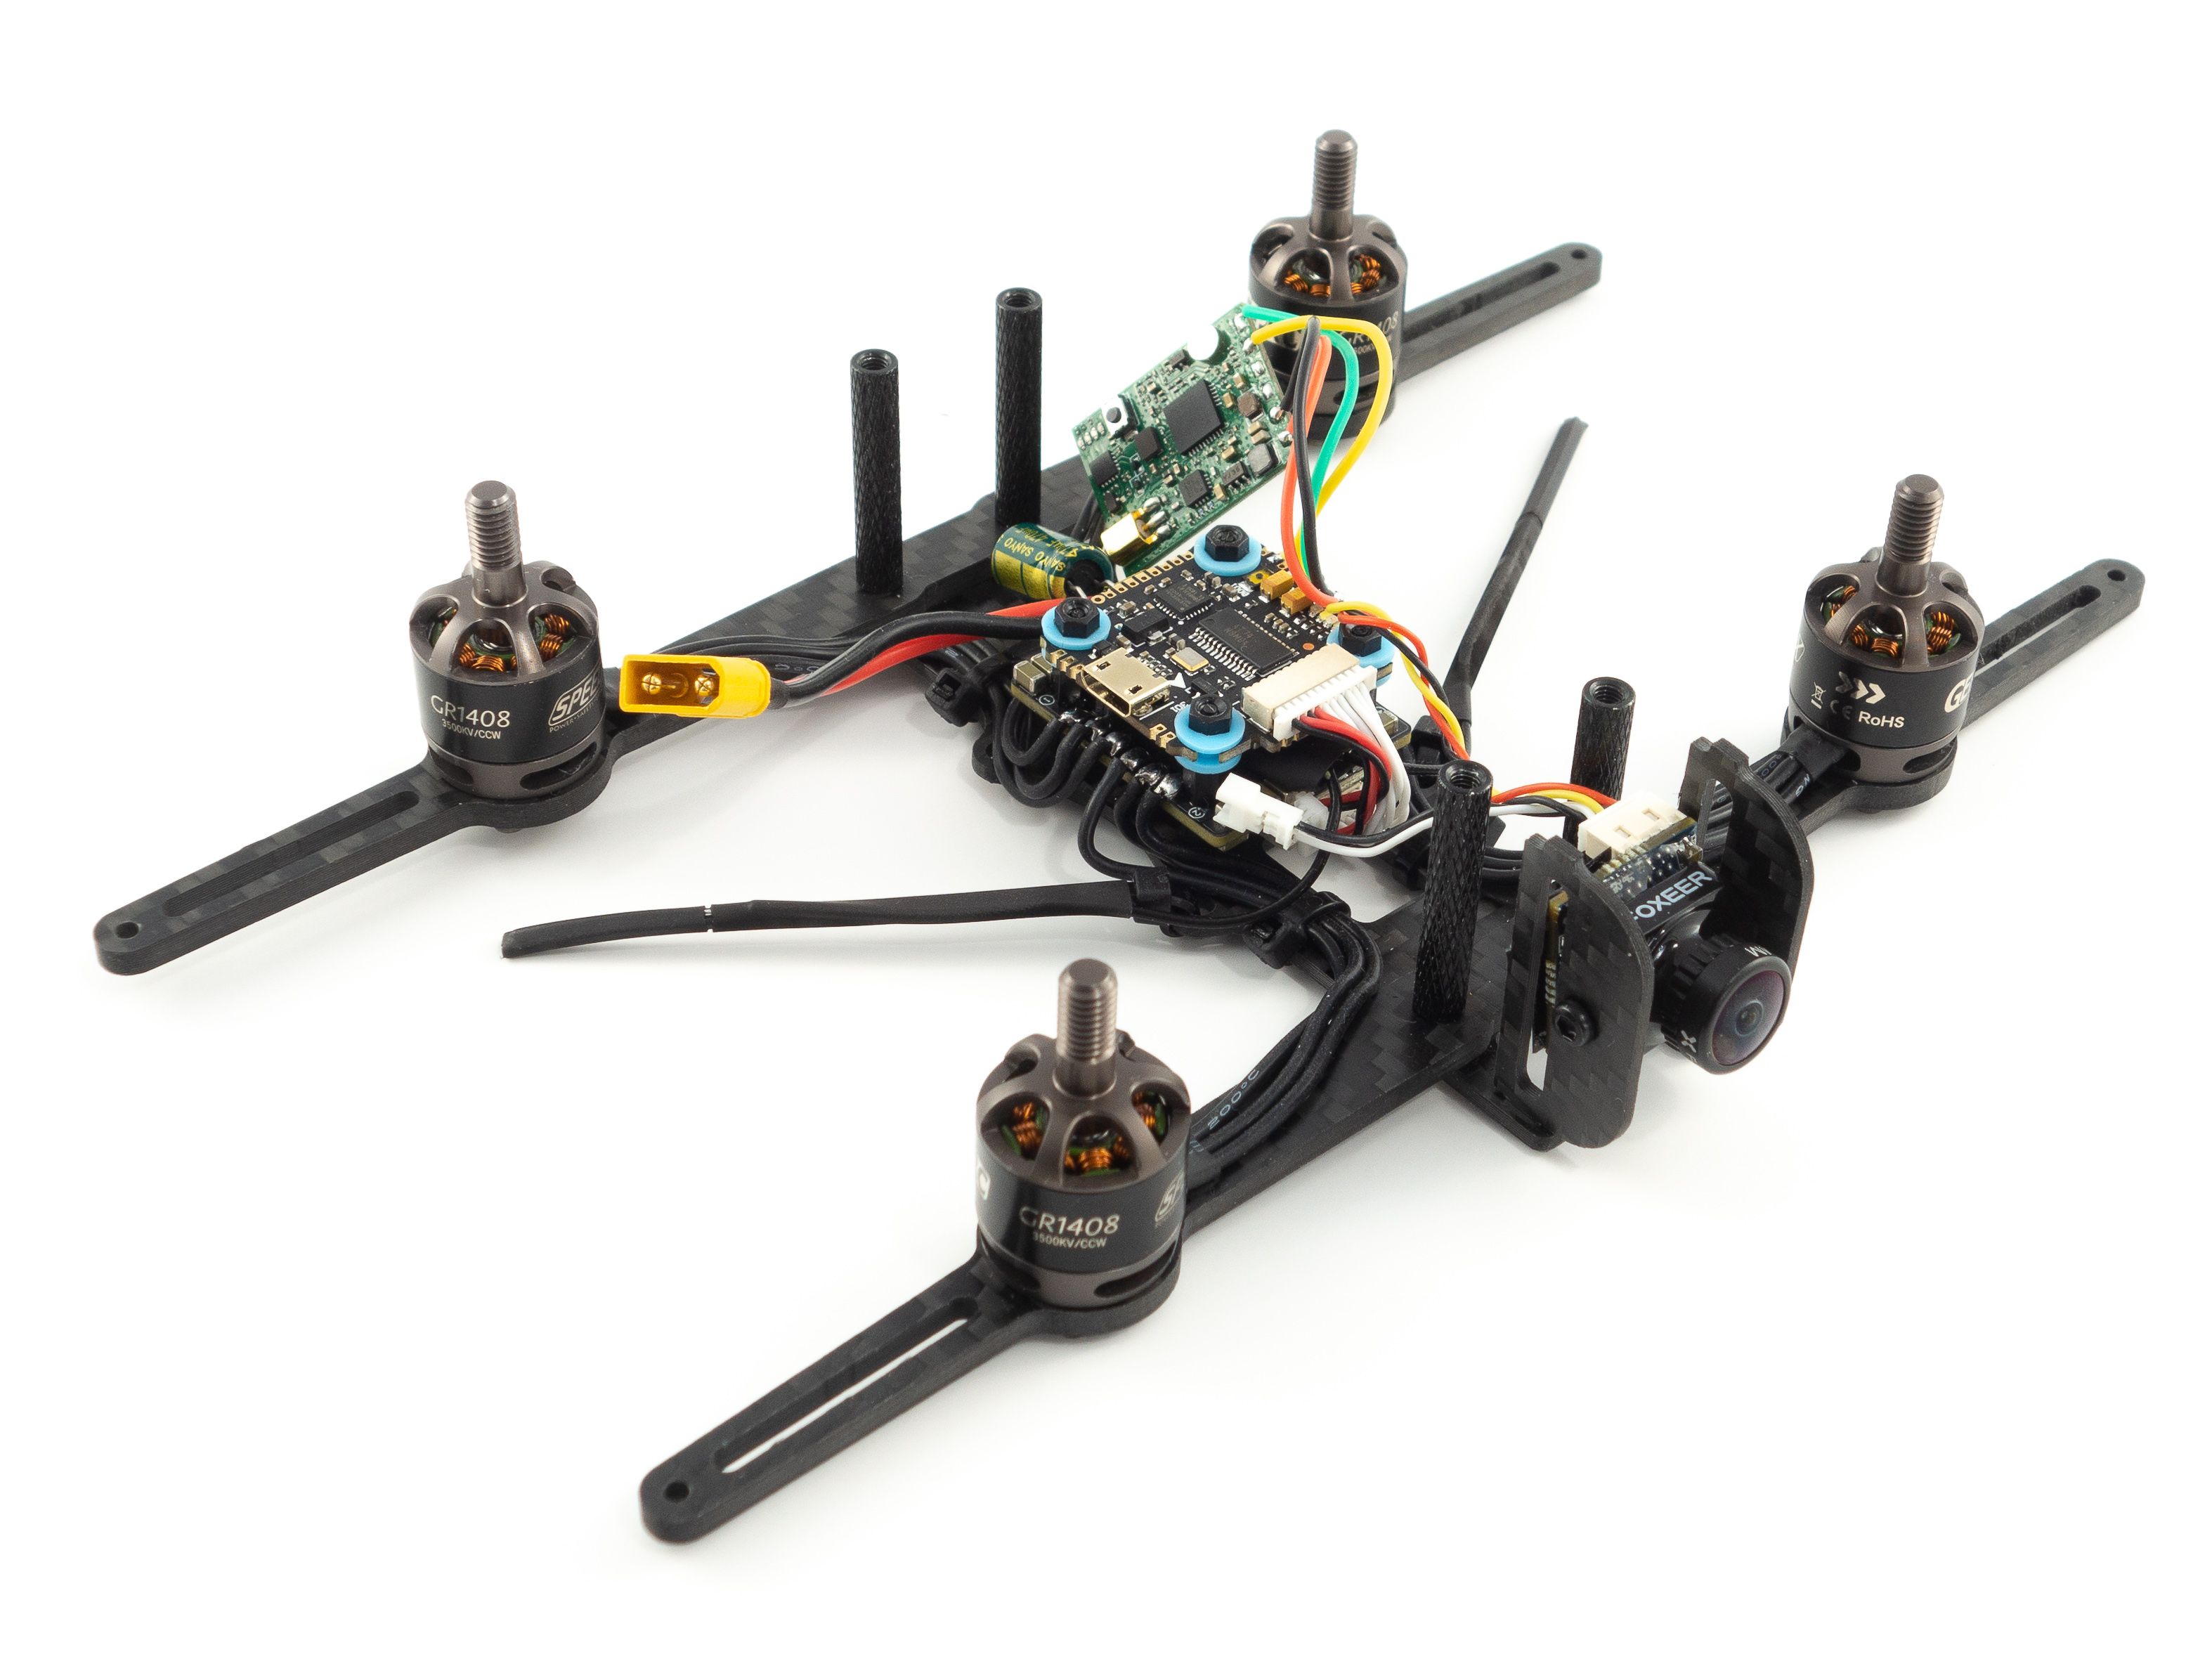
Photos


Part List
Show stores (3)
Hello! I,m new to cinewhoops, and the Donut looks like something I would like to build as my first. I was excited at the prospect of doing this until I got to your "Gear List" and saw that the the Goggles were quite expensive, and I was wondering if there was another option (radio/receiver/googles combo) that was a little more 'affordable'? LOL.
I actually didn't even know what a cinewhoop was until about a week ago. Just tryin to figure this all out...!
Hey guys, this is an awesome project for me to work on. I have all the parts bought and started soldering the components together but I am stuck. I soldered the reciever to the FC, but going through the binding process nothing is happening. Specifically, my reciever isn't showing any lights showing power. Did I get the wiring wrong?

Looks like your images got blocked due to a lack of points. I was able to recover the links though and looked at your photos. It looks like you soldered to the incorrect pads. I used the older MK2 version of this board and it seems you have the newer MK3 version. Hopefully the receiver is still good. Here is the updated wiring diagram, https://cdn.shopify.com/s/files/1/0027/2708/4144/files/MAMBA-__F405MINIMK3_F25MK2_DJI.jpg
i used same products as mentioned above but 2 of my motors just smoked out.. what should i do now?
I am in process of this build!!! What other antennae would be compatable other than bangood ordered? Bangood always takes forever to arrive. Is there a compatable antennae on amazone I could order?
It flies!!!
So this was my first Quad Build.
After jockeying back and forth a bit between Betaflight and the Spektrum SPM4650 RX / DX6i TX
I got it up in the Air!
It's might be noted that when you flash the Controller in Betaflight with FURYF4OSD you will want to hit Reset Settings.
I was Having a slew of issues getting the Controller to recognize the ESC and this fixed it.
Now I just need to install the camera.
Will install when Antennae comes in
hello is it possible to install a crossfire receiver to this build? and replace the camera with a hd one? if so which camera? i dont want to use dji digital because of the cost but i need a good analog camera as i have problems with my eyes
thanks
You mean you're looking for an analog camera that records in HD? I see. You can look at the Runcam Split 4 or the Tarsier V2. I'm not sure how well the Tarsier will fit with the double cameras so you may want to go with the Runcam. It'll be tricky to remove the microSD card every time you want to pull footage though. The ducts will get in the way.
Hello everybody,
I have a questiion......are there anyone like to give me an ideal. I bought a DJI Mavic mini....but it does not have 4k camera. I like to change to 4k camera. Anybody know how to do it? Please let me know.
Thanks
Does anyone else have issues with the Gemfan props rubbing the ducts real bad? I've flown this awesome drone several times but occasionally find myself dealing with the ducts rubbing and wasn't sure if that was a heat thing making the ducts flex into the props or what.
Is there alternative product for Aomway mini antenna? Don't want to wait 30 days for the product to arrive.
please does the xt30 battery lead and connector came with the Stack or you used you own wire and xt30 connector
can I use a 1500mah battery (XT60 type)?
when I use an XT60 connection for this build does it make a difference
please could you recommend a battery charger for the battery?
wen i built it i got hot motors. any tips. running stok betaflight 4.1
Hey thanks for the build. I recently changed my rates and since I did motor number 3 doesn´t start and when it does it turns off after a secod or two after liftoff. When connected to betaflight it works okay but sometimes the FC seems to reboot. any ideas on what the solution is? thanks
Love this! Great write up. Im using the same frame for a build.
What is the width of the top plate, specifically the mount holes spacing on the camera mount?
I want to get a printed mount but need the spacing of the screws.
What is that anti vibration material too?
I don't have the frame anymore, but you can look at some 3D models on Thingiverse to get the measurements. I believe the anti-vibration material is this.
is there any need to put the capacitor?
Hi, First of all, thank you so much for this build tutorial. My drone fly pretty well. my problem is the vtx. My first one just stop working due to overheating. I buy another one. The green light turn on. The video is working about 20 sec and after that nothing. Any help ?
Awesome description. We could easily follow along the video and finish the drone in 8 hours (first build ;).
Unfortunately i am having issues with my fpv video feed.
I am using the fatshark dominator v2 with this receiver: https://www.team-blacksheep.com/tbs-dominator-rx-manual.pdf and the antenna and video transmitter from your guide.
I am experiencing "snow" after like 10meters already.
Are the components not compatible? Do i need another receiver module?
Increasing the vtx power in betaflight did not bring any improvements :(
Can you fit the DJI Unit in this build?
hi there! I just built one of these and haven't quite flown it yet. Is everyone finding that the Hero 7 stays in with a strap and the mount that came with the kit? Or does it fall out with a small bump? Is it steady enough?
Thanks
Hi First of all thank you very much for your dedication, sincerity and hard work in taking a lot of efforts to spread some knowledge to our Community. Your video and this Article is one of the thick reason I got hope and confidence that I too can build my Drone if everything done with Proper handling and care.
It took nearly 4 months to earn money and buy all the mentioned products. Though for Goggles currently i purchased Eachine EV800D thinking in my mind to upgrade later. I am excited and nervous a little if i think I am going build my very first drone with no knowledge on Electronics (I never touched soldering iron before). Tried my level best to learn and improve my knowledge everyday these day. Also Im am flying reasonable good in Acro mode after playing in Velocidrone for a period of 3 months occasionally. So cant wait to fly for 'Real'.
Before going to the build process, I have few 2 doubts which I thought off clearing it.
-
I made a mistake with my purchase while buying the motors. I bought 3750kV instead of 3500 kV. Is that going to hurt me a lot?
- I haven't bought a receiver for the transmitter as i already had X8r receiver (which came aliong) with X9D Purchase. Is that fine to use with instead of the mentioned Frsky XM+ receiver?
currently i have only these 2 doubts. Hope to disturb you more when i enter the build process.
Thanks and Regards,
Hi , if i may answer, motors will be good. reciever will work just fine.
Good luck with the build. Just one tip . practice soldering on an old broken pc board . anything with components on that you can practice on , dont go on the drone parts untill you are confident with soldering, even then cover the parts of the flight controller not being soldered to with tape . ONE BLOB of solder falling on the board WILL RUIN IT
Hi Kwadkenstine,
Thank you for your wishes and reply as well. Today I am going to practice on old broken PC board like you said. That seems a very important caution tip on flight controller. I have 1 more doubt. How long my 850mah lippo battery will come? just 5 to 6 mins?
What battery should i use incase if i fix a tbs crossfire in future?
- You should be fine with 3750kv but be sure to use the Gemfan props I listed. They'll help keep motor temps down as they hug the ducts better.
- The X8R might be a little large. You'll have to see if it fits. I'd try to de-case it if it won't fit between the standoffs. Worst case you'll need to buy a smaller receiver.
i just finished this build. the only substitution i did was replacing the frame with a squirt.
im running into an issue with the vtx. it appears to always boot into race mode with pit mode on. I can turn it off in the OSD, but its annoying to do Everytime I fly. and pit mode isnt really needed on a cinematic build.
i saw a video about another vtx where you had to power cycle immediately after changing to freestyle. I tried this but it keeps in race mode with pit on every reboot.
Otherwise it seems to fly good. I've only flown it (and crashed it) in my garage so far.
Hi, i'd love to know if you got to the bottom of this issue. Im having a very similar issue except that i cant even get out of pitmode via the osd. by the time i save and exit it already resets. Only success i seem to have is physically long pressing the akk vtx mode button but its working when red which is 200 and not legal where i am flying unfortunately. any help??

Should I use a smoke stopper when I bind my reciever to the transmitter?
what is the weight of this drone?? I want to know the weight of the aircraft itself,excluding the GoPro, battery, camera mount, etc.

I'm having seriosu issues with the build. I followed your build video down to the finest details, and when I plugged in my battery nothing happened, not lights no nothing. I plugged the FC into my computer and the lights turned on, but the reciever lights do not come on. Did I get a bad FC or ESC? It took a month to ship and I really don't want to have to return it.
Yes! I opened up the heat shrink inside the battery coonnector and the solder I had put in there somehow formed a big ball instead of melting to the connector. When I tugged on the lead it wouldn't come off so I figured that it was on but after resoldering it everything works! Thankyou for your time and help!
Hi! First of all, thank you so much for this build tutorial! It’s one of the only ones out there that I can follow really well. (And trust me when i say I’ve watched a lot of them recently ha)
Now, while I do know all of the components that goes into a FPV build by now, knowing which wire to solder is just setting my brains on fire. I just don’t get it.
So i was really hoping to buy all of your components that you used in your video, so i could just follow along, but some of them i can’t find in my local shop and I kinda want to make my cinewhoop as quick as possible, so i can take it with me on my travel in 2 weeks. I tried to come up with some replacements that my local shop does sell. I changed the Frame (Got it second hand), Motors, Camera, Transmitter and the Antenna from your list.
So these are the items that you used and that I am able to buy in my shop aswell (yey!):
Flight Controller: MAMBA F405 Mini MK2 Betaflight Flight Controller & F25 20A 3-4S DSHOT600 FPV Racing Brushless ESC
Props: Gemfan 75mm Ducted Props
Receiver: FRSKY XM+ EU LBT RECEIVER
And these are the items that I had to replace from your build:
Frame: SHENDRONES SQUIRT V2
Motors: Brotherhobby Tornado T1 1407 Motor - 3600kV
Camera: Foxeer Predator Micro V4 - Plug Versie
Transmitter: TBS Unify PRO 5G8 V3
Antenna: Foxeer Lollipop V3 5.8Ghz FPV Antenne (2 stuks) - RHCP - SMA
Could you please tell me if this setup is gonna work? Or if I should change it?
In case it should work;
The motors are always 3 wires going into the ESC right? So i should be able to follow you in the video for that. The Camera seems like it kinda looks like yours so I hope the wire setup will too. And the Antenna is just plugging it in I guess?
So as for as my knowledge goes, I think that the Transmitter is gonna be the hardest part for me, as it looks totally different then yours. But I guess i could just ask people on the forum which wire I should solder to be sure.
Some extra info that might be usefull:
I use a X-lite Pro EU LBT version. And will be using a HERO 7.
My shop only sells antenna’s from Foxeer.
My shop also only sells Camera’s from Foxeer. (Sadly not your version)
Transmitters: my shop only sells TBS UNIFY ones and RUSH tanks.
I’m also totally cool with my setup being a little more expensive, I guess after all the searching I would just be happy if I could finally order all of the gear haha!
Thank you so much in advance for your time!
Greetings

Where are the battery lead and capacitor located on the parts list?
Hey, did someone tried that build with 4s 1300mah ?
I got about 10 of these and i dont know if i should buy 850mah or stay with them .
hello ! i just got mamba mini from my old brother, and i only have toad90 frame. can i just put the mamba to my toad90 frame? thx before :)

Great writeup, its inspired me to build one.
I've just bought one of these frames, and another Tyro79. Looking to put the Tyro hardware in mine and run 4s 650mah CNHL cells as my other Tyro freestyle rig.
Hopefully will be good enough to fly with a Session 5.

Seems to fly pretty good! What betaflight version are you running?
Hello, very nice build! I have planned to build one ultralight Cinewhoop with caddx tarsier under 250 gram including battery. I have ordered the donut frame and some 1306 motors with 3100 kv. With all components the complete weight without battery will be exactly 150 grams, with the planned 2s at around 220 grams. What do you think about this project? I do not need extreme thrust, this should be only for really relaxing cinematic cruising.
Heyho!
Thank you very much for the Guide!
Beginner Question: Will this setup be compatible with the new access protocoll?
Thanks in advance!
Is it really necessary to have hypersmooth on your camera, can't you get the same look just by flying smoothely? I just have a gopro hero 5... Also, do you think 1404 6000kv motors would work?
Sorry I missed your comment! Hypersmooth looks a lot more "floaty" than normal flight. A lot of people are getting even more floaty footage using Reelsteady Go. I know it's compatible with the Hero5, so you might want to look into it. It might require mounting the camera on looped zip-ties though. Check youtube for Hero5 Reelsteady Go footage.
As for 1404 6000kv motors I don't think those are a good choice for one of these. The sweet spot is 1407 3600kv or 1408 3500kv on 4S. These builds are typically overweight and under-propped so the motors tend to get really hot. I think 6000kv is far too high.

hi . can use 3.23.2 mm holes Fc and Esc on this frame ?
I have the following pieces . Can I use them?
FC : kiss v 1.3 ( Mounting Holes: 3x3cm pattern, with 3.2mm holes )
ESC : an esc 41 with 3.23.2 holes or 22 holes
vtx : ewrf e7082c
Wouldn't it be better to use a ESC 25 amp? as :
https://www.aliexpress.com/i/33015157840.html?spm=2114.12057483.0.0.4320108fv4VlK6
Hi, I'm very happy with the way you provide information and tutorials. Very clear and good. I want to ask. for the BR1407-3500KV motor. Is it still ideal for a cinewhoop class equipped with gopro season? What firmware is recommended? I use betaflight. and prop gemfan 3052? please enlighten me. thank you

Really good looking build and thanks for the work on the guide. Curious if we can find those ducts on Thingverse so we can print them in nylon or tpu. I don't quite like the quality of them from BG. Earmarking this one though, top contender for next build.
Thank you! I believe somebody designed a remix of the ducts but I haven't tried them myself: https://www.thingiverse.com/thing:3802928

Very nice article and clean build. I have quite similar build and it's working ok but I don't know anything about pid configurations and I am pretty sure that my quad would fly a lot better if I know how to tune pids. Do you have any advices what to tweak from stock settings?
I am flying in acro mode, I use angle mode only for landings.
I have "build" my quad by just moving all the parts from Diatone R349 to Donut frame. The R349 was flying perfectly and that's why I tought that maybe the issues are related to Betaflight settings but it can be also props which are causing those quirky moves.
One real example of the issue was when I was chasing mountain biker and did some consecutive turns the quad refused to do the next tight turn when at the same time I was lowering the altitude. Quad acted a bit like when trying to turn hard in angle mode and it tries to force to stabilize it. There was also quite a lot of prop wash even in mellow dives.
Any reason why not go with the full 30.5 x 30.5 Mamba F405 stack? I've seen some other guys use that instead for cinewhoops.. Asking because I just want to know what makes more sense... So far all I've purchased was the shendrones squirt v2 frame (carbon and hardware only). Starting to plan out the build now.


hi i have 3 questions:
thanks,