Build a Micro Long Range Rig - AirBladeUAV Transformer Mini
 By Whiffles on Aug 26, 2020
For the longest time we've been limited to 3 to 4 minutes of flight and lots and lots of batteries. With more efficient motors and frame designs it's now possible to push the envelope much further. This guide will walk you through the process of building a micro long range quad capable of flying 8-30 minutes and more than 4km. The build is moderately difficult, but with the right tools and steady hands it's possible for a beginner. Let's get started!
Design Philosophy
The Transformer Mini frame has a unique design philosphy. The goal of this frame is to rival the DJI Mavic Mini in both flight time and weight. With the Transformer Mini you can build a sub 150g rig even with the DJI FPV system allowing for up to 100g of battery weight. With a similar 2S 18650 battery like the Mavic Mini this can remain under the 250g limit in most countries and still fly for upwards of 20-30 minutes. Not only that but you get all the advantages of real time FPV and manual control.
Tools
This build requires some fairly fine soldering. I highly recommend a flux pen, 63/37 leaded solder and a quality soldering iron. Here are the tools and supplies you'll need. My particular tools are listed in the Gear section below.
- Soldering iron
- 1.5mm and 2.0mm hex drivers
- Precision Tweezers
- Precision Screwdriver set
- Wire cutter/stripper
- Scissors
- Ruler and cutting mat
- Multimeter
Additional Supplies
- A variety of heat shrink tube sizes
- Blue Loctite
- Friction/Cloth tape
- Zip ties (small)
- 63/37 leaded solder
- Liquid soldering flux pen
- M2 screw and nut kit
Hardware
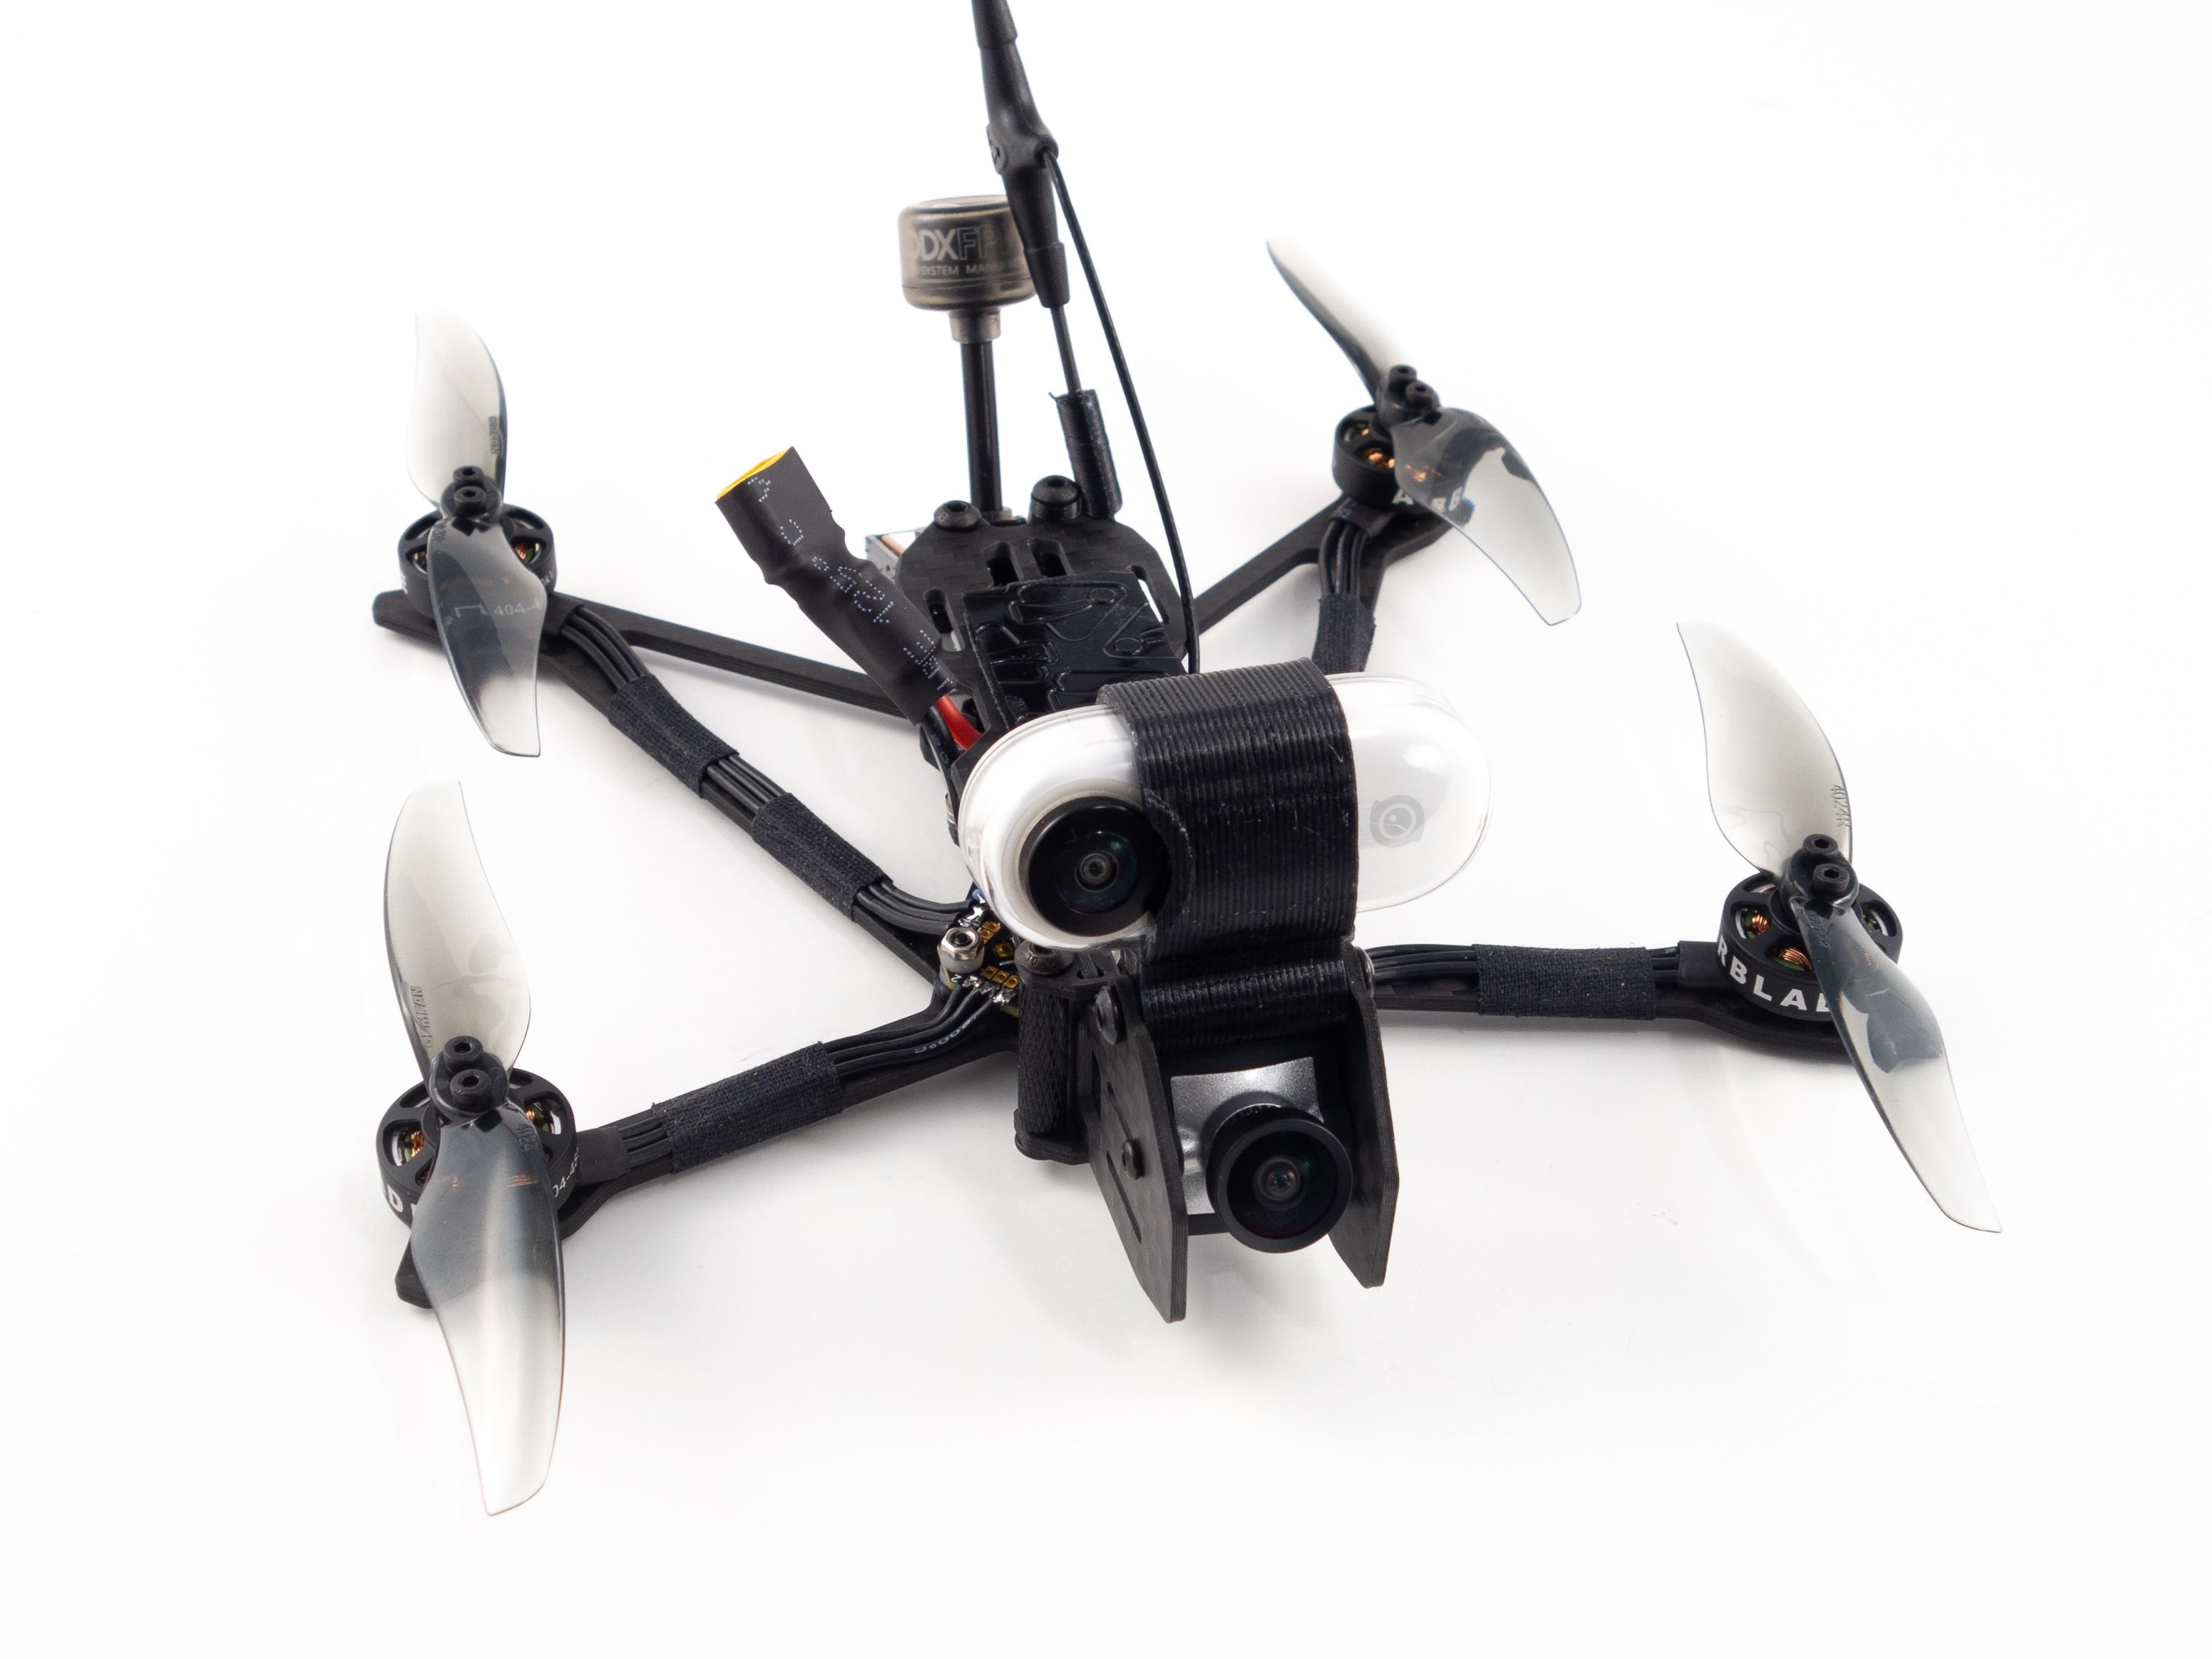
The frame doesn't come with any mounting hardware for the components so you'll need a set of M2 screws and nuts to mount the Caddx Vista. The flight controller comes with mounting hardware but I recommend using M2 nuts or grommets to give it a little more space above the frame. The HD camera mount requires a 20mm aluminum standoff and additional M3 screws. These are also not included.
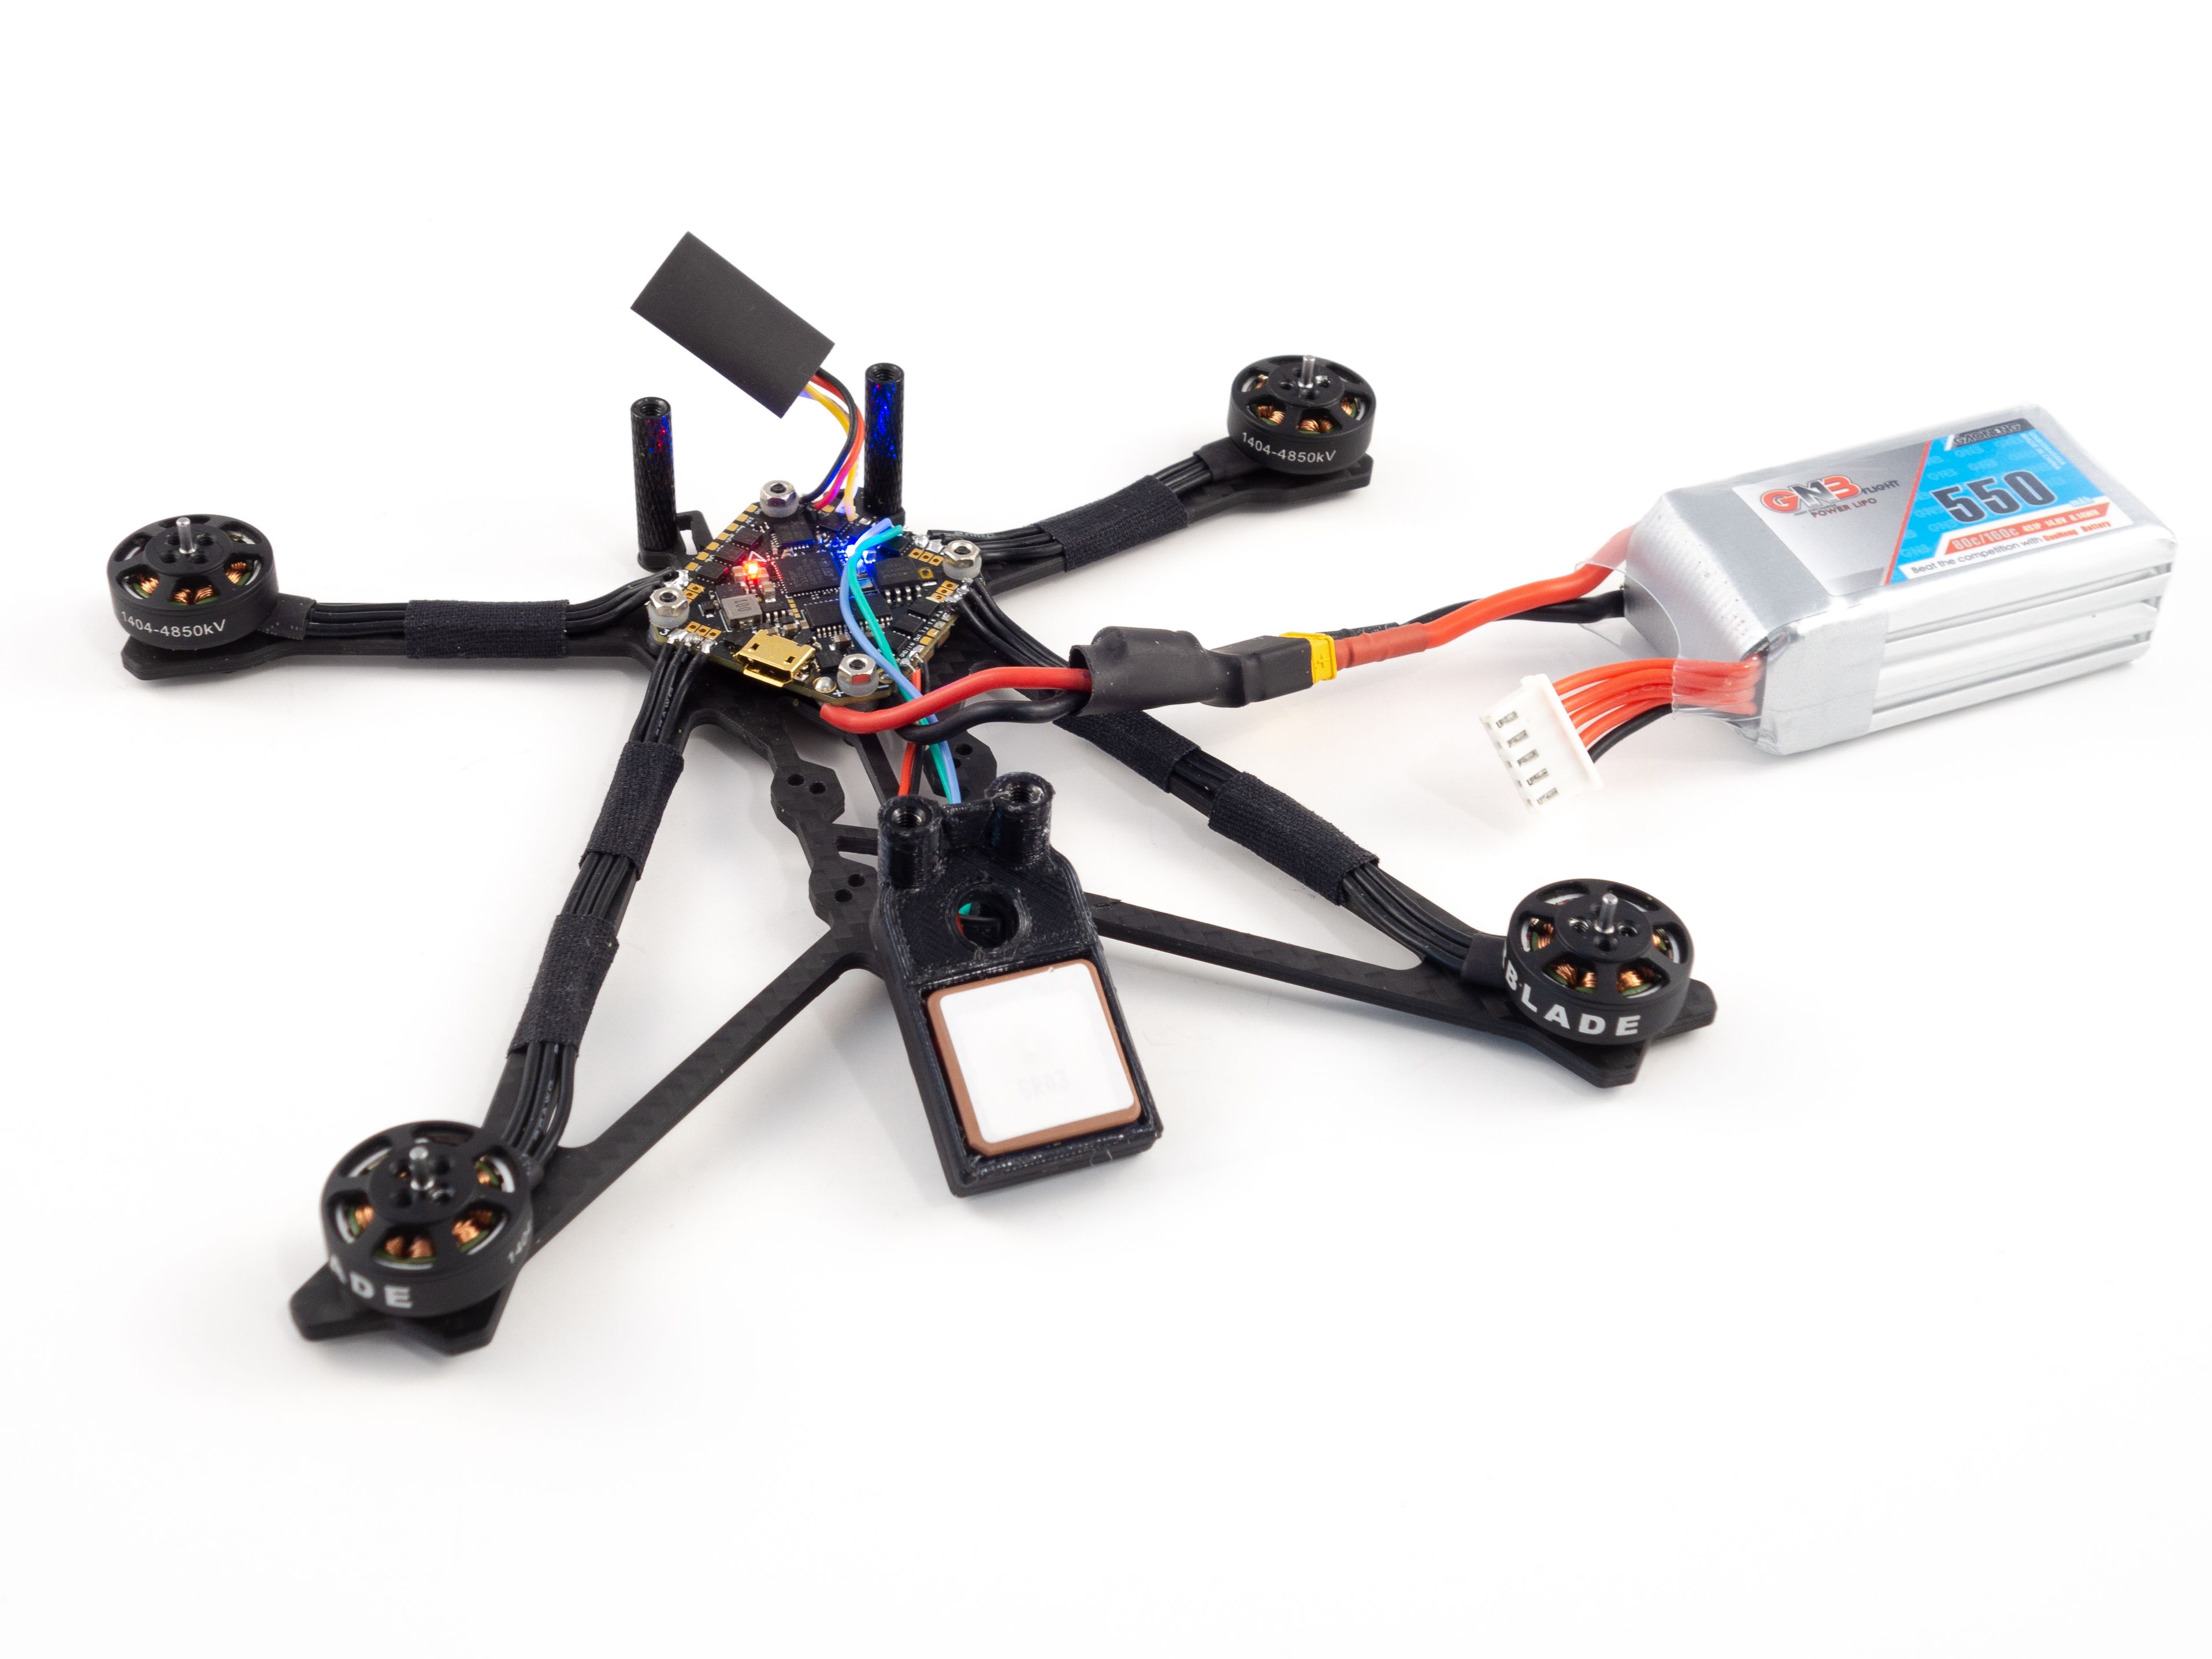
Motor kv Selection
Here I've got the AirBlade Superman 1404 4850kv motors which are best suited for 2S-3S batteries. They'll also work fine on 4S but if you want to make this rig exclusively 4S you might want to choose the 2500kv motors. The middle ground motors are the 3850kv which will work on 2S, 3S and 4S. It really depends on how heavy you want to go with your AUW. If you want to go as light as possible with 2S batteries then 4850kv are the way to go.
Mount the Flight Controller
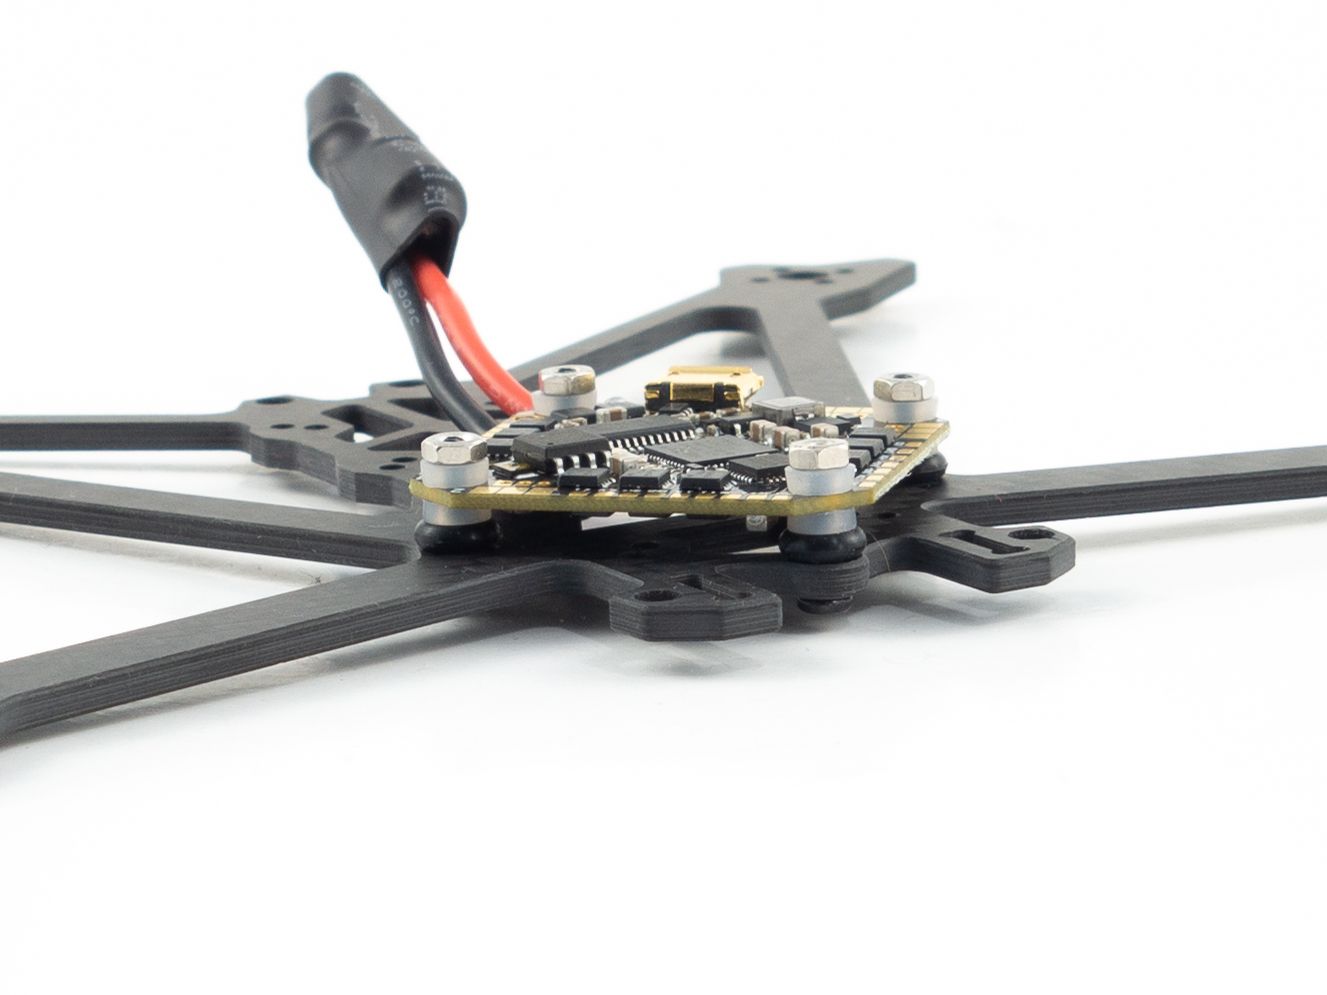
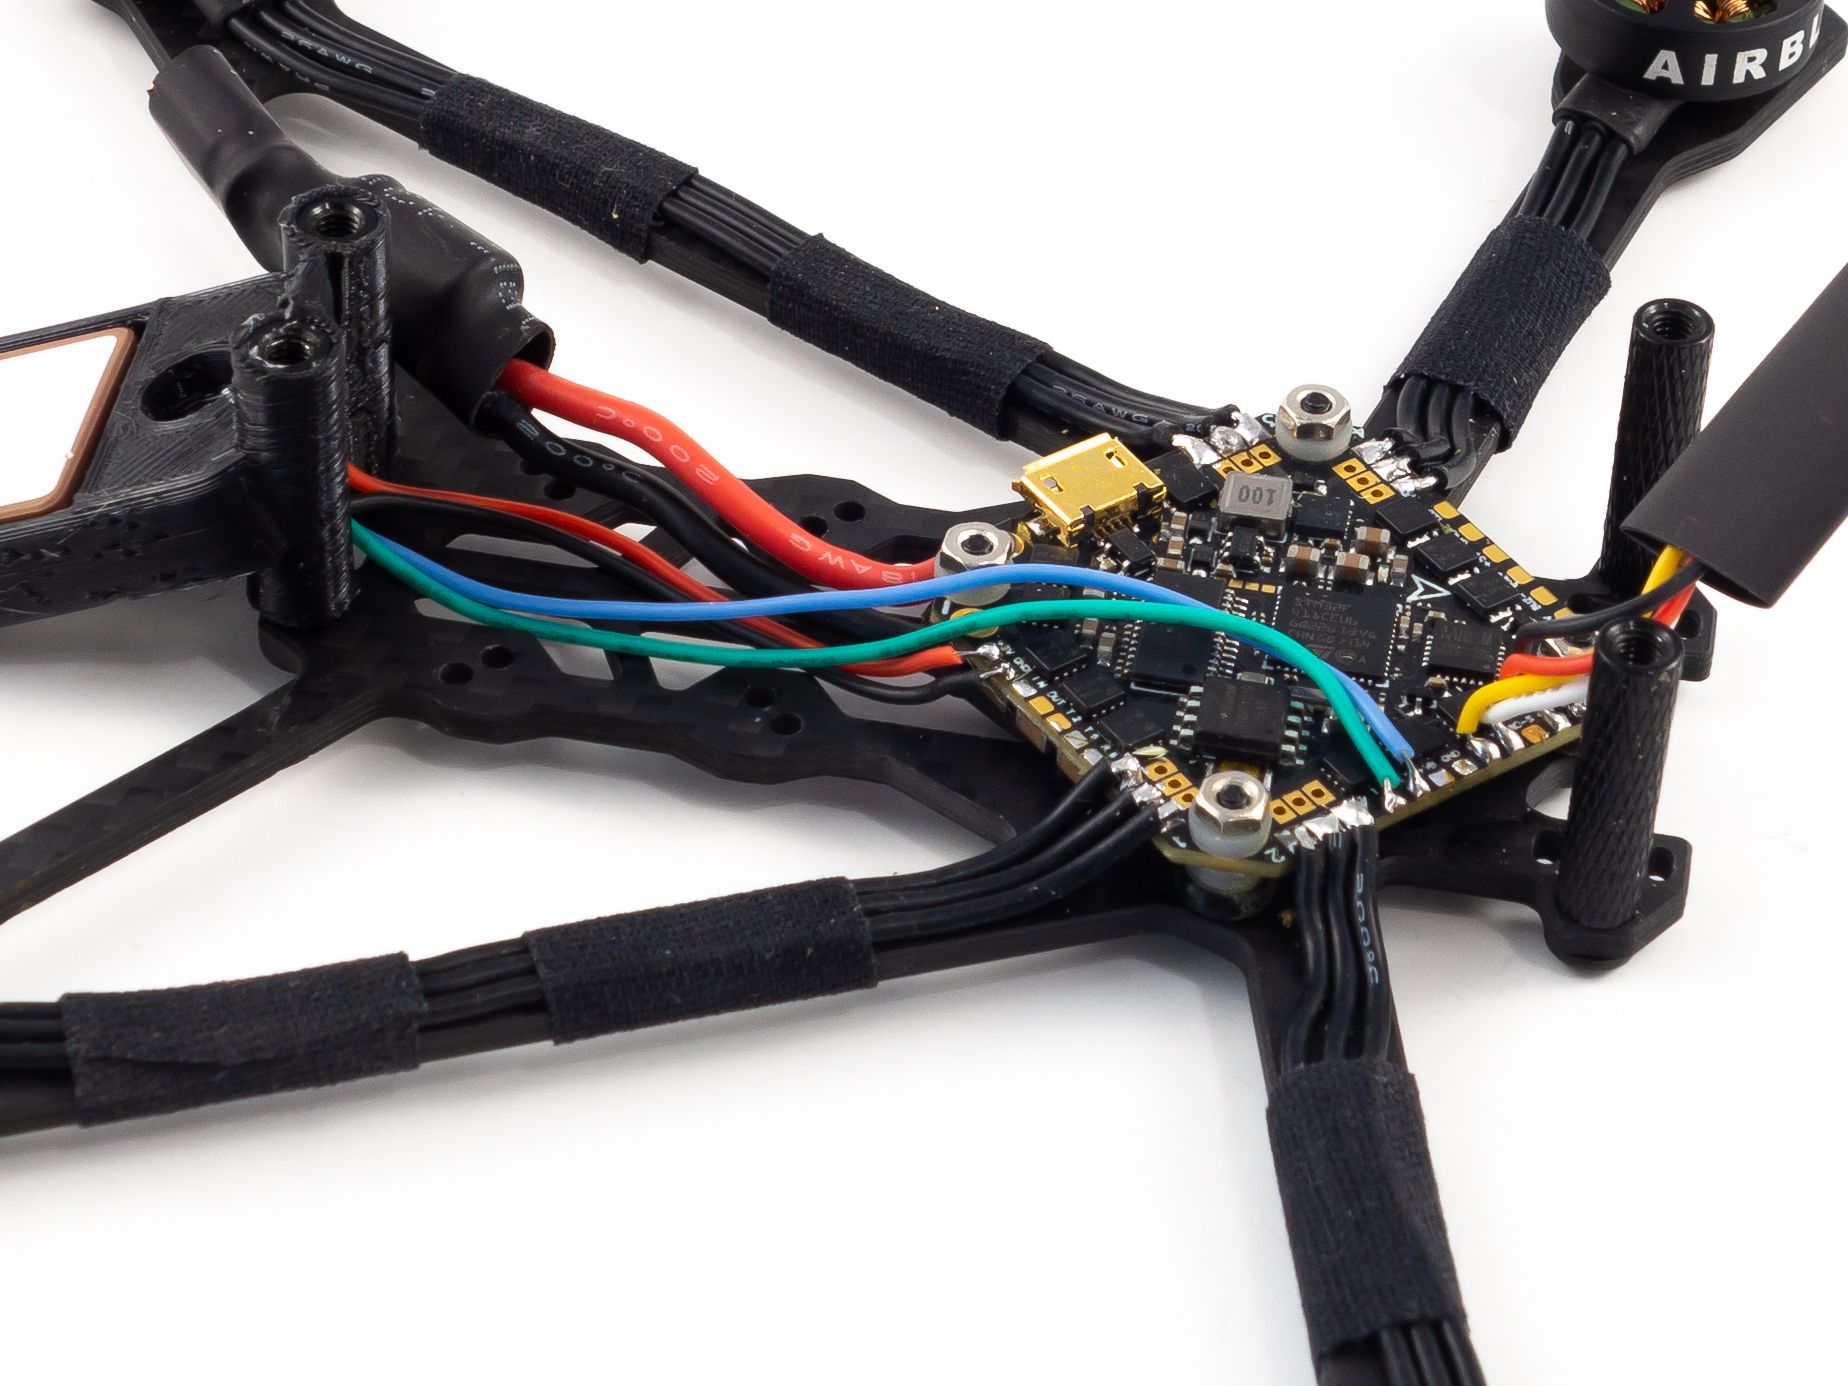
The first thing you want to do is mount the flight controller. You'll have to squeeze the clear dampeners into the holes first. Pinch them and push one half in then carefully push the other end through with a dull screwdriver tip. Just be careful not to puncture them. Now the flight controller doesn't come with any spacers so it's a good idea to use a set of M2 nuts to secure the screws to the frame and to give the FC some breathing room below. I used M2 grommets. Secure the board with the included nuts.
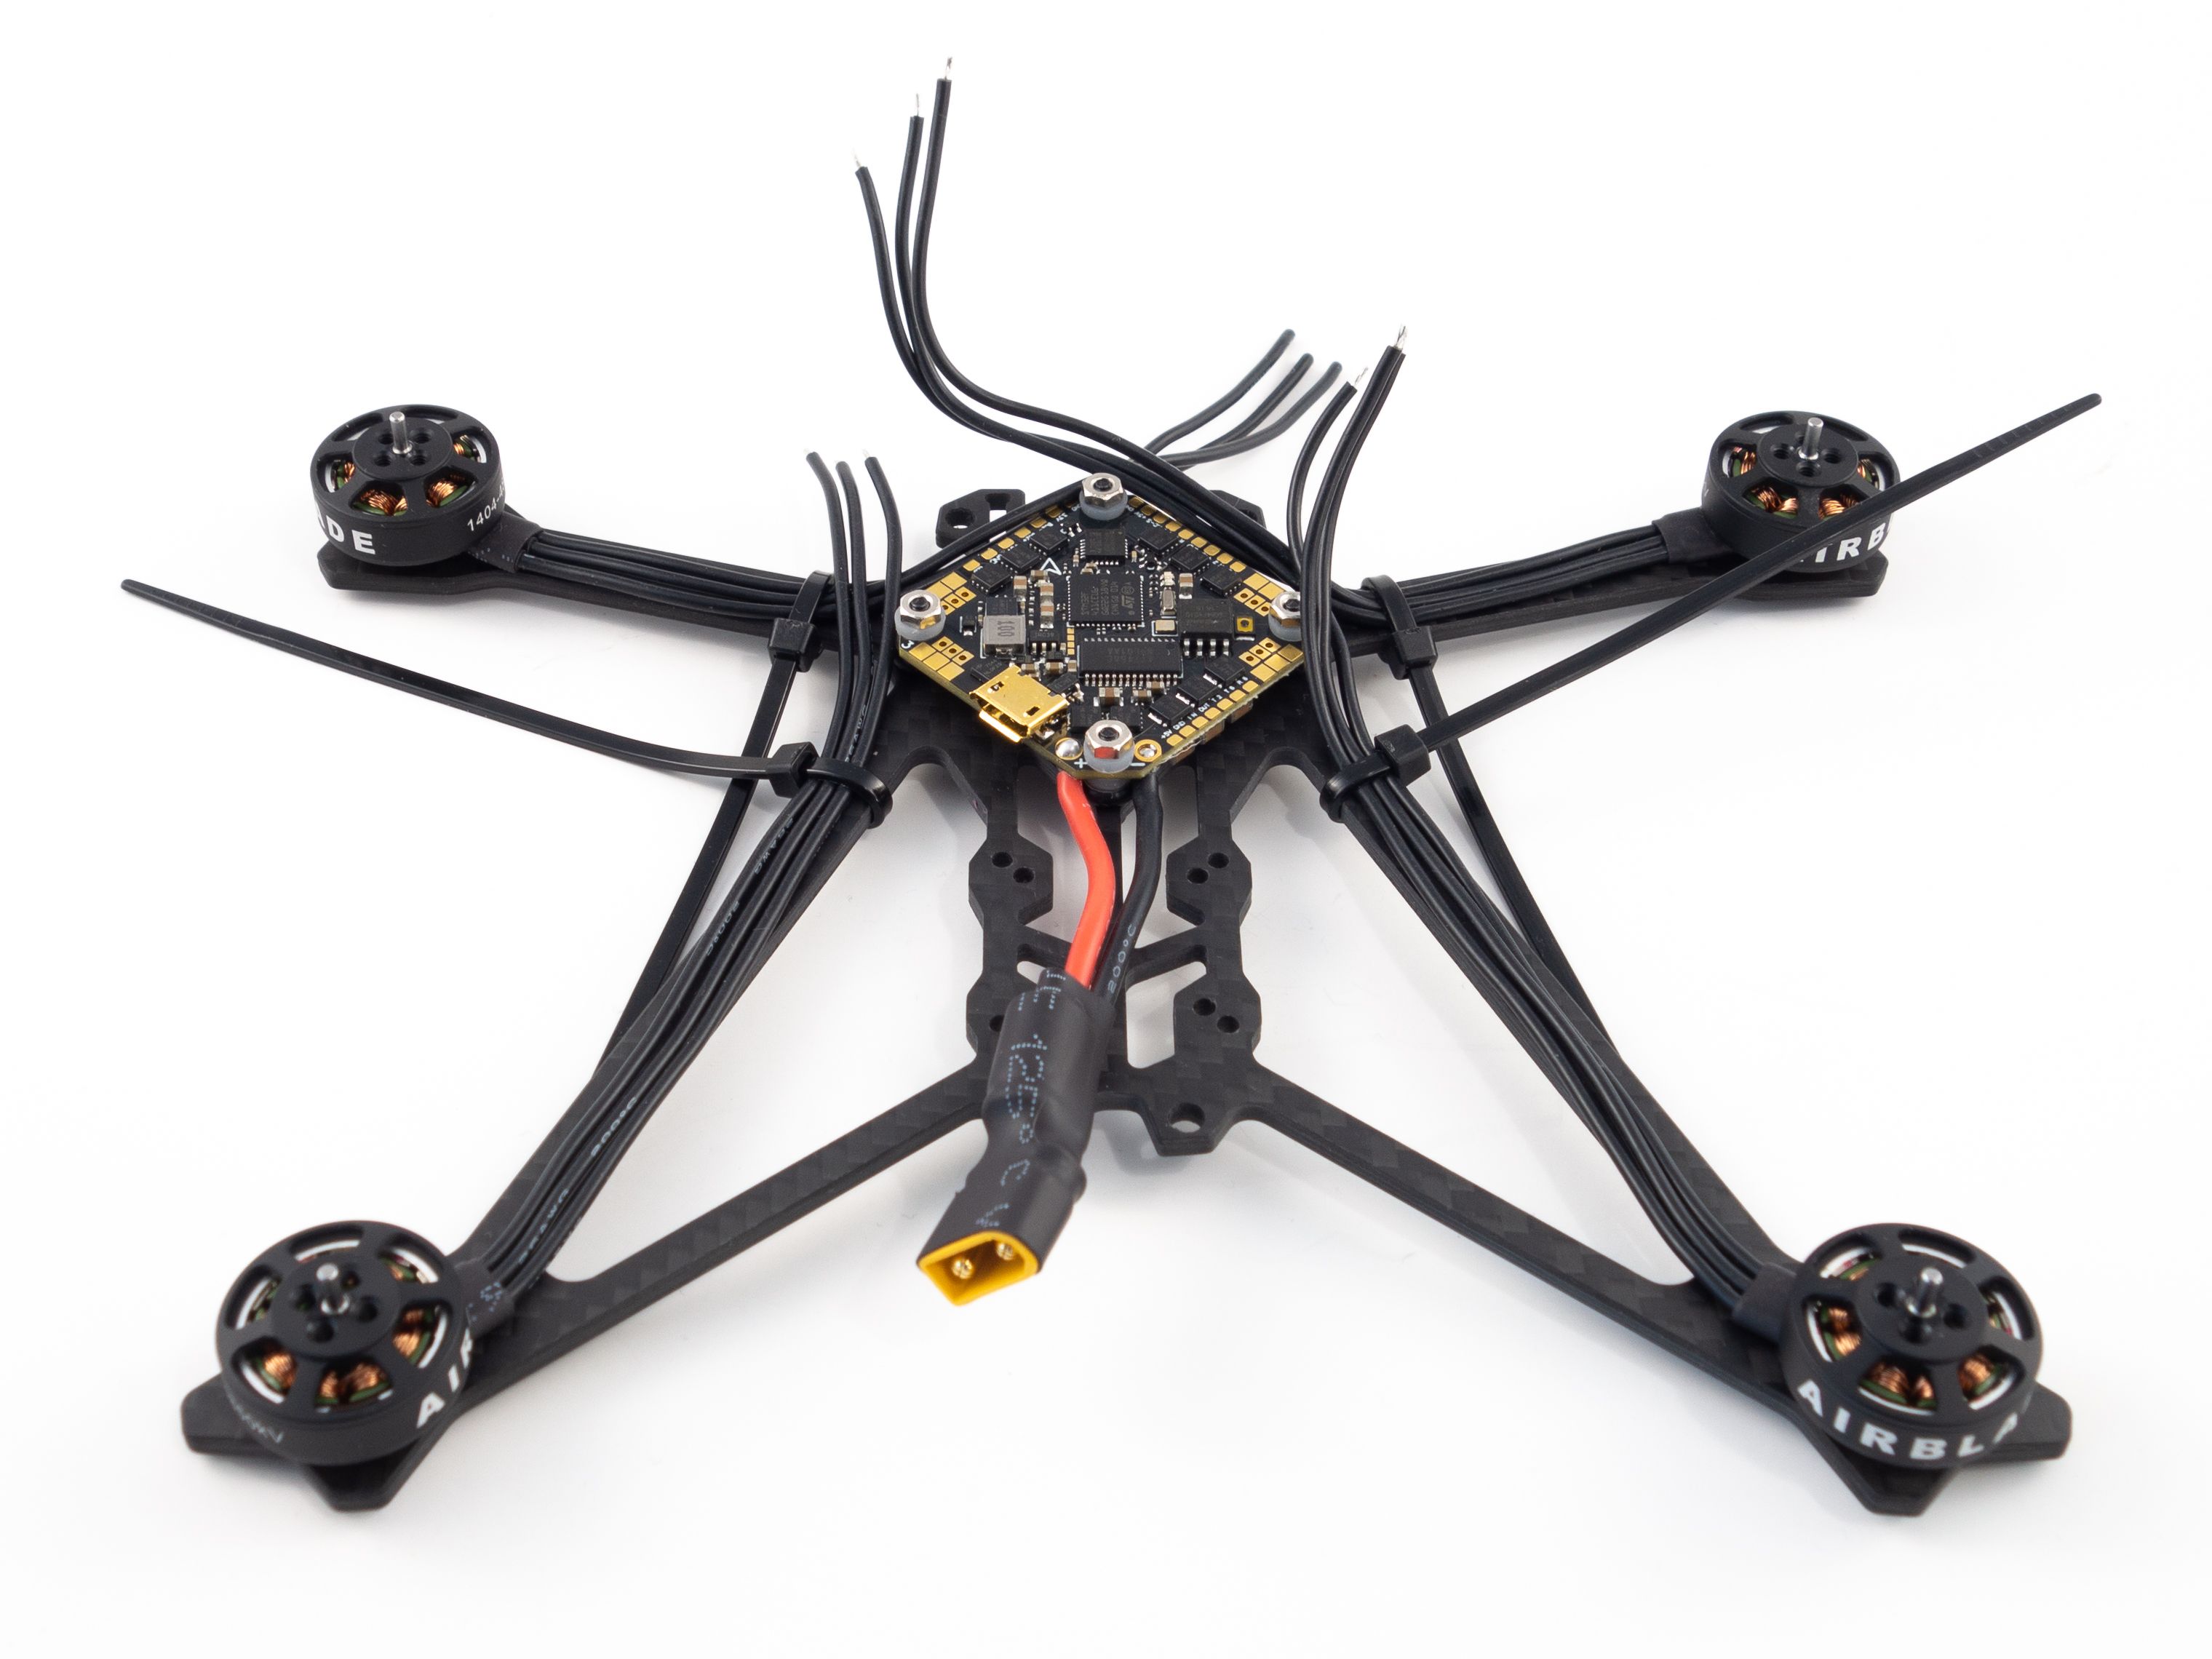
Motors
Next you need to mount the motors. Try the 5mm screws, but check that they don't make contact with the coils of the motor or compress the motor wires. If they're too long use the 4mm screws from the screw and nut kit I mentioned above. Once you've decided on a screw length use blue Loctite to secure the screws firmly.
It's a good idea to use zip-ties to hold the wires before soldering. Put them on there tight so you can get a little tension on the wires and make them nice and straight. The closer you do this to the flight controller the easier it'll be to cut each wire to length.
Now you can solder the motors to the board. The pads are very close together so be careful not to add too much solder. Here's the process:
- Flux and add a small drop of solder to each motor pad.
- Cut each wire to length as you go, not all at once. Be careful not to cut them too short.
- Tin each wire before soldering.
- Take your time and lightly tap the tinned wire to the solder on the board.
Don't worry if you bridge a couple pads. Just clean your iron tip, add a little flux to the solder and slice through with your iron. You may want to run the iron through a couple times to try to remove some of the solder. The key here is to use as little solder as possible.
Once this is done you can wrap the wires with tape. I used friction tape, but you can also use cloth tape or even electrical tape. Be creative.
Binding the Receiver
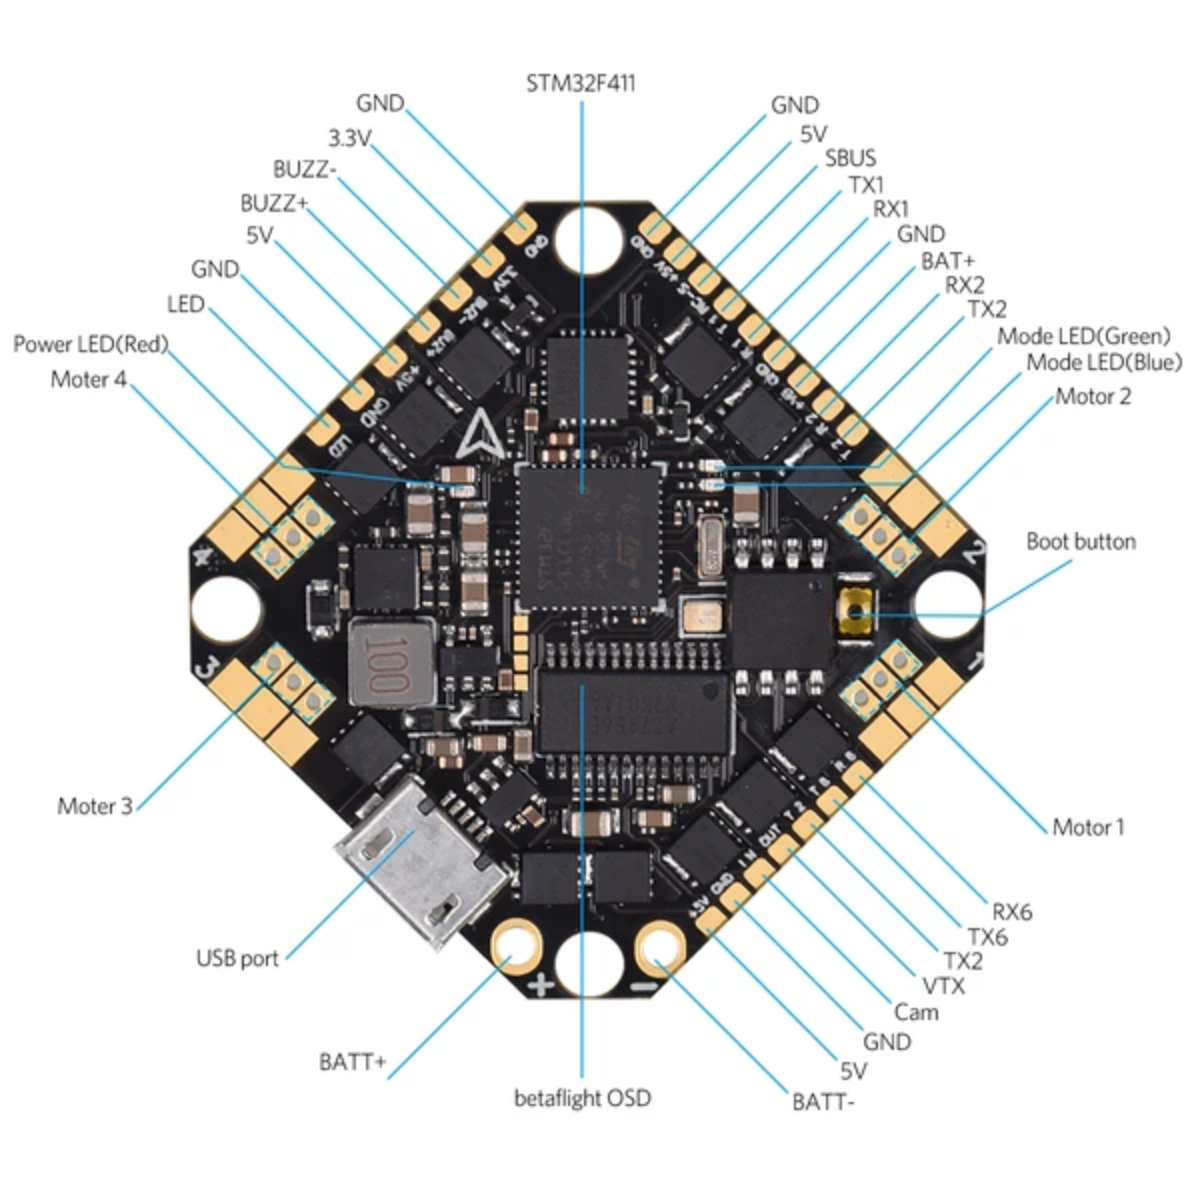
You can build this without TBS Crossfire and use the DJI Remote if you have it. Here's how to wire up the TBS nano receiver. The wiring is pretty straightforward. The 5V and Ground wires are simple enough, so all you need to know is:
Channel 1 -> RX1
Channel 2 (outside pad) -> TX1
Channel 2 isn't necessarily required, but it allows your flight controller to talk to the receiver and offer telemetry data. No reason to exclude it really. Once everything is wired you can bind the receiver. The TBS Nano goes into bind mode automatically so you don't need to press the button. If it was previously bound you can press the button or wait 1 minute for it to go into bind mode.
Make sure your Crossfire transmitter is configured to the correct frequency, 915 MHz in the US, and your Max Power is set.
- Turn your radio on and put it into bind mode.
- Power up the quad with a lipo battery.
- The radio should indicate a successful bind and it may request a firmware update for the receiver. Let that complete.
- Unplug the battery and plug it back in to make sure you've got a bind (green light).
You can use the shrink tube that came with the receiver or some of your own. I prefer to use a more narrow shrink tube for a tigher fit. This makes it easier to remove in case the antenna needs to be replaced. Take the antenna off so it wouldn't get in the way for the rest of the build.
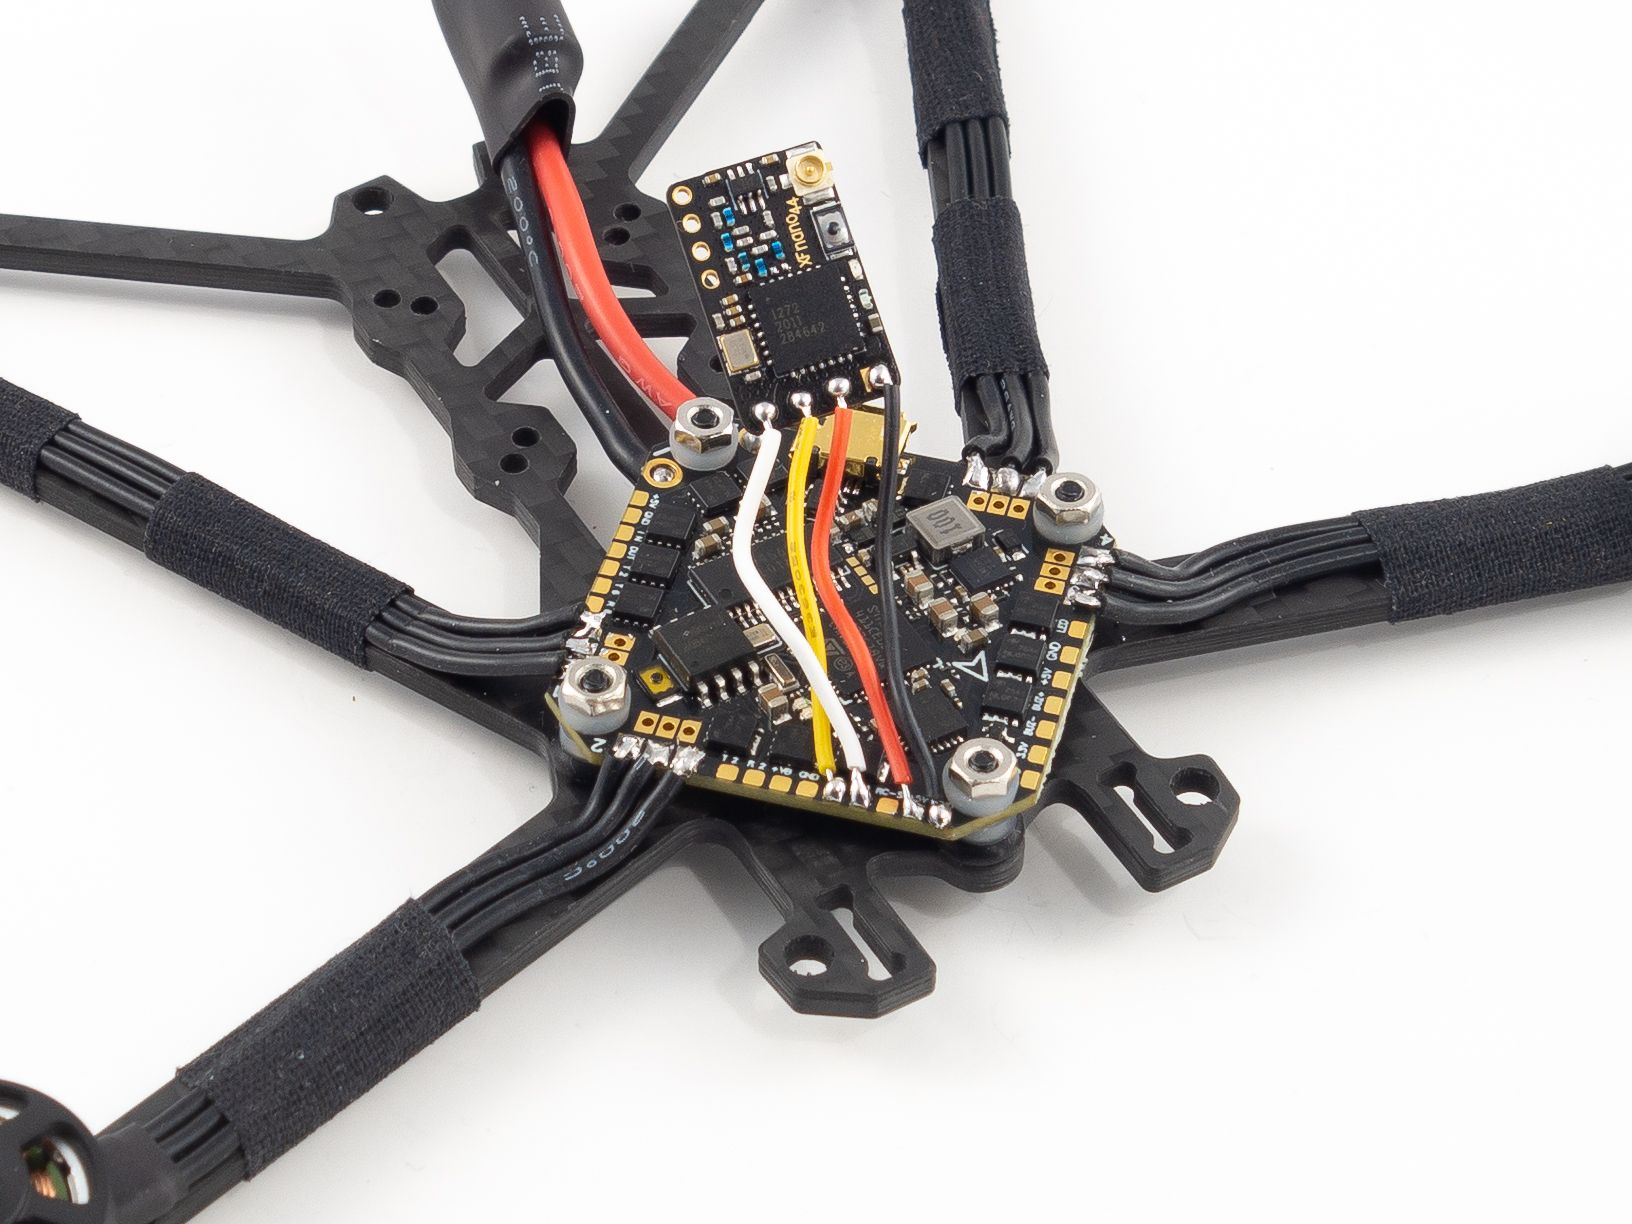
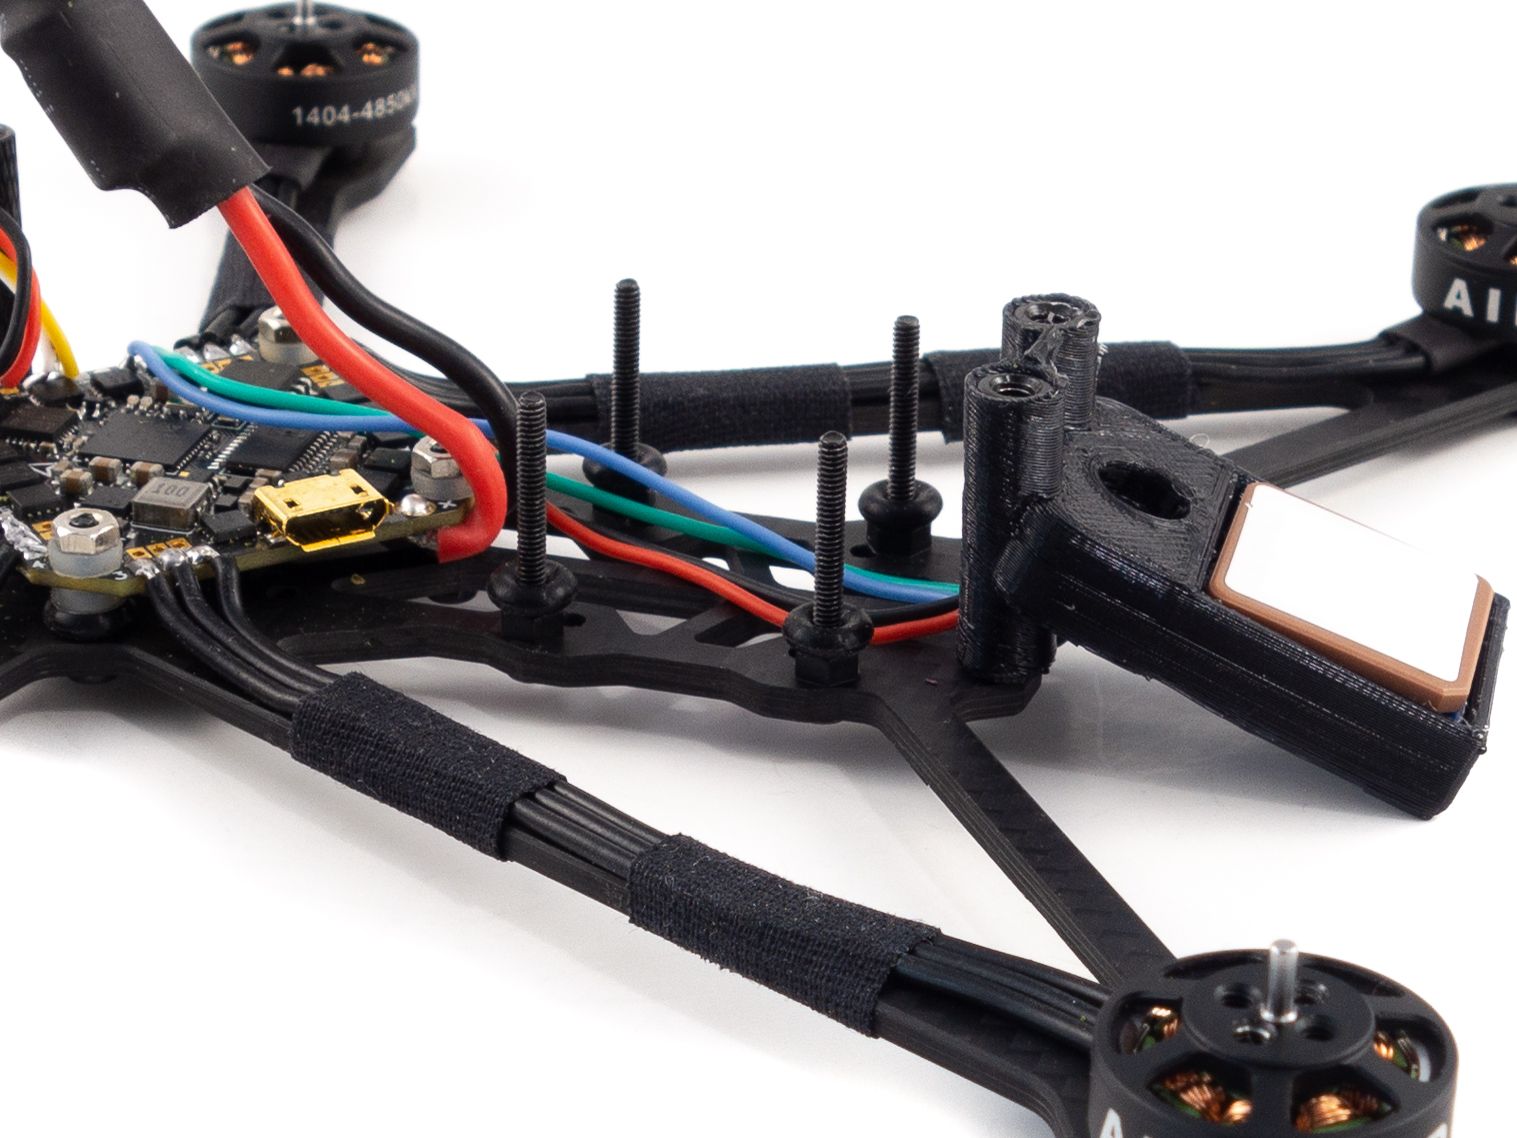
GPS
The GPS is even easier than the receiver because you only need to solder 4 wires. It's best to solder this to the hardware UART2 rather than the softserial pads at "UART6". This is because GPS needs more bandwidth than softserial can provide. It will work over softserial, but you may experience latency or even worse, incorrect GPS data.
- Plug the wires in and feed them through the hole in the TPU mount. The TBS logo faces down into the mount.
- Add the rear aluminum standoffs to the frame and slide the TPU mount over them.
- Solder the wires to the 5v, Ground, TX2 and RX2 pads. Whenever you wire a GPS to a flight controller it's always TX -> RX and RX -> TX. In this case the blue wire goes to RX2 and the green wire goes to TX2.
- Be sure to give the wires enough slack to lay across the bottom of the frame. The Caddx Vista will go above them.
- Use some double sided tape to hold the GPS in place.
After you've wired the GPS you may want to give it some time to download your local satellite data. Since you haven't wired the Caddx Vista yet you don't need to worry about overheating issues. Plug a battery in and let the GPS sit for 10-20 minutes outdoors. You'll get a 3D fix much faster when it comes time to fly. No need to set it up in Betaflight yet. All it needs is power.
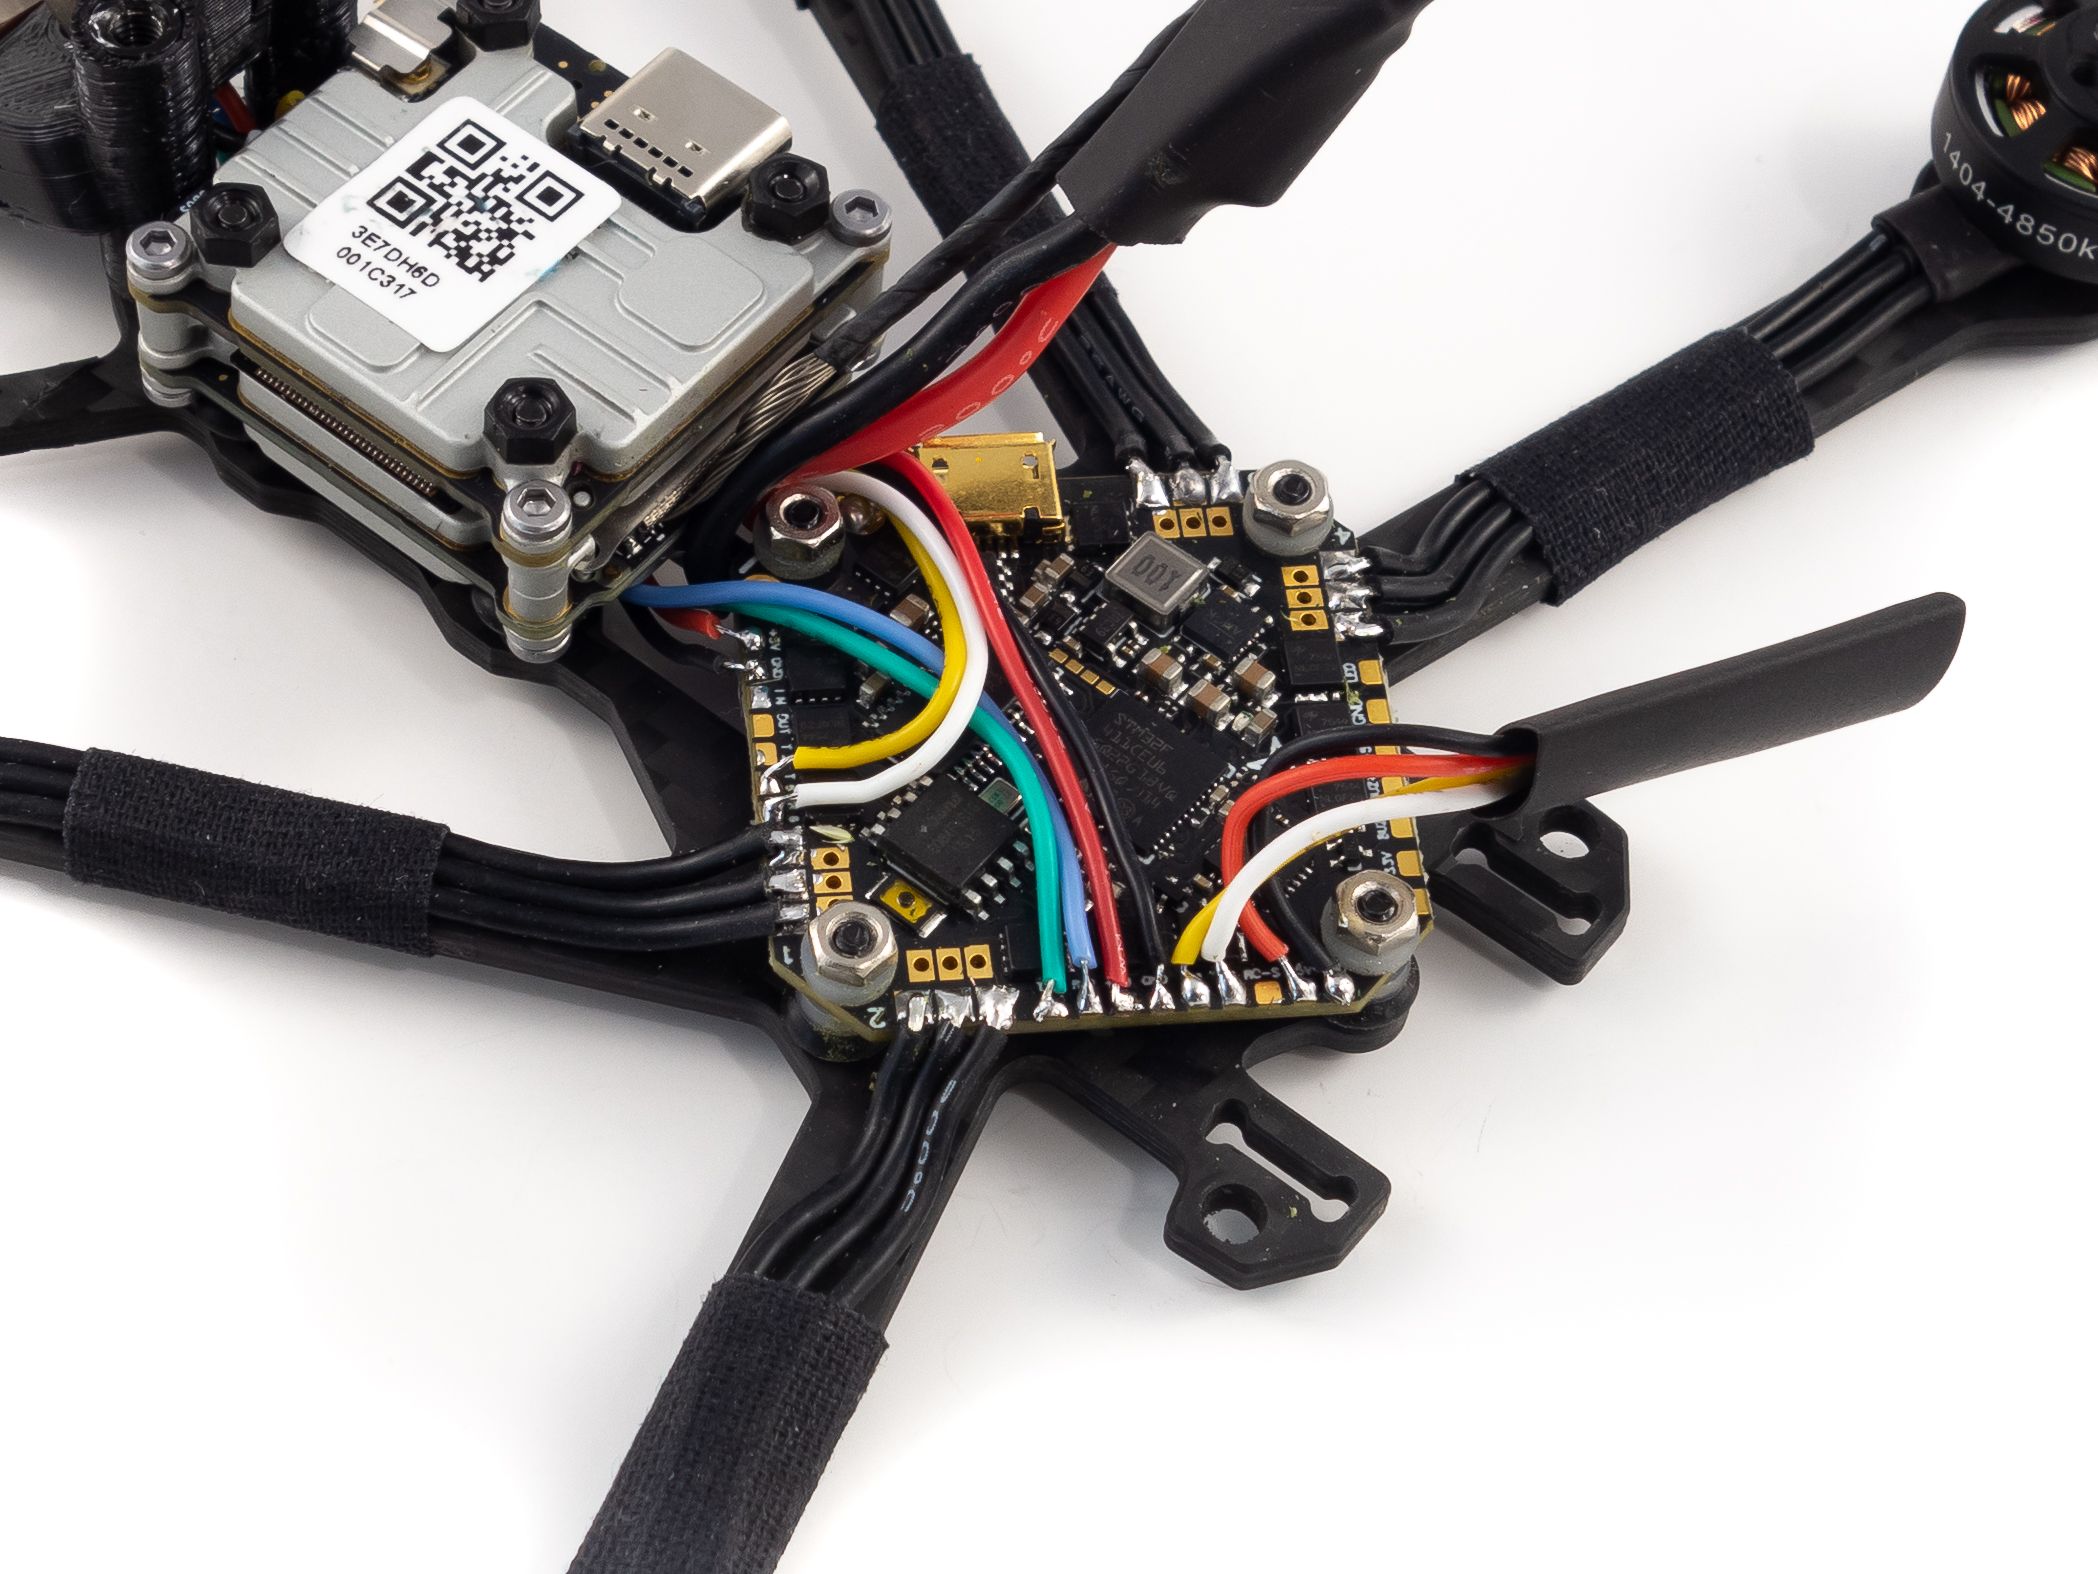
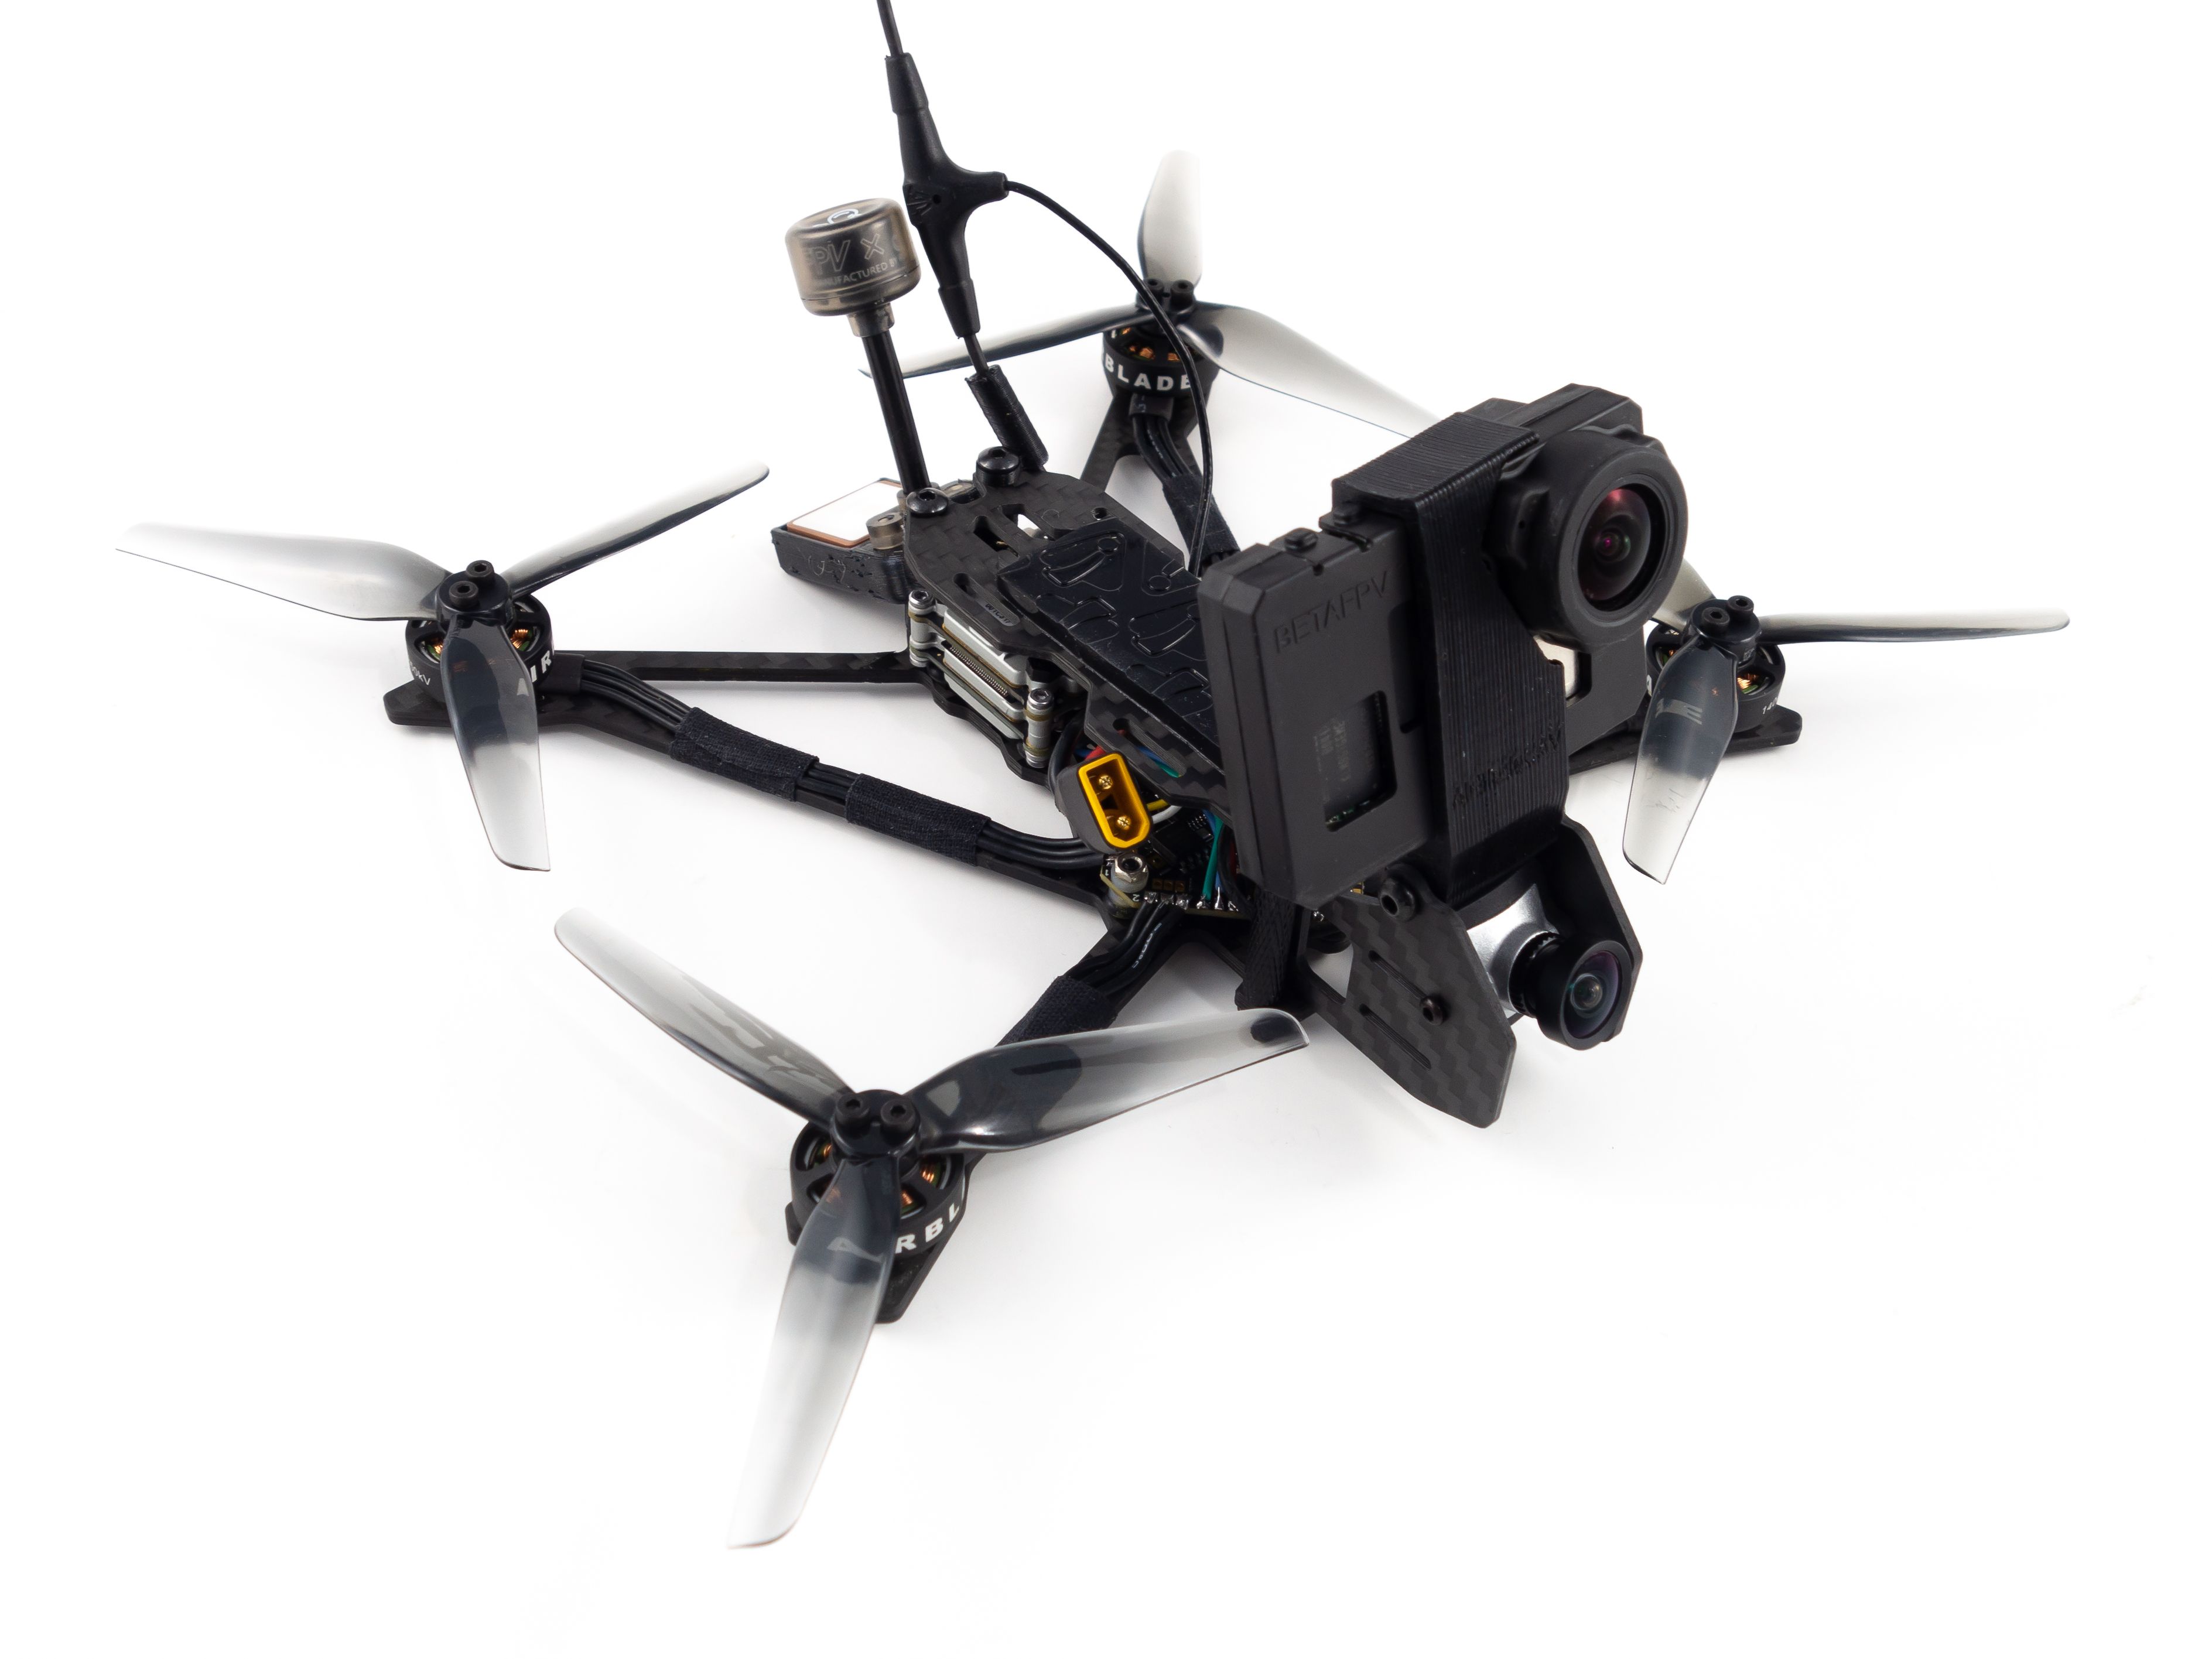
Video Transmitter
Now for the Caddx Vista air unit. If you flip the unit over the wiring pads are a lot bigger and easier to solder to. If you're using Crossfire you can exclude the SBUS and Ground pads at the outside edge. Solder the included wires to the Bat, Ground, RX and TX pads.
Mounting the air unit can be a little tricky so here's the process I suggest:
- Get 4 M2x20mm screws and secure them to the frame with M2 nuts. Use either M2 grommets or a second set of M2 nuts on top of those to give the air unit some breathing room below.
- Attach the plastic bit that came with the antenna and feed the U.fl connector through the hole on the GPS mount.
- Slide the air unit down over the 20mm screws and secure it with M2 nuts.
- Feed the wires under the air unit alongside the GPS wires.
- Make sure the power lead on the flight controller is bent upward to make room for the camera cable.
- Here's the tricky part. Now you need to connect the antenna to the air unit. It helps to unscrew the left, rear standoff so you can swivel the GPS mount out. Unscrew the antenna bracket on top of the air unit and carefully plug the antenna in. Secure it with the metal bracket and secure the standoff.
The hole in the GPS mount was intended for an SMA antenna, so you can upgrade to either the TrueRC OCP 5.8 SMA Long or the TrueRC Singularity SMA 5.8Ghz Antenna (Long) LHCP antenna for better video range. You'll just need a short U.FL to SMA adapter.
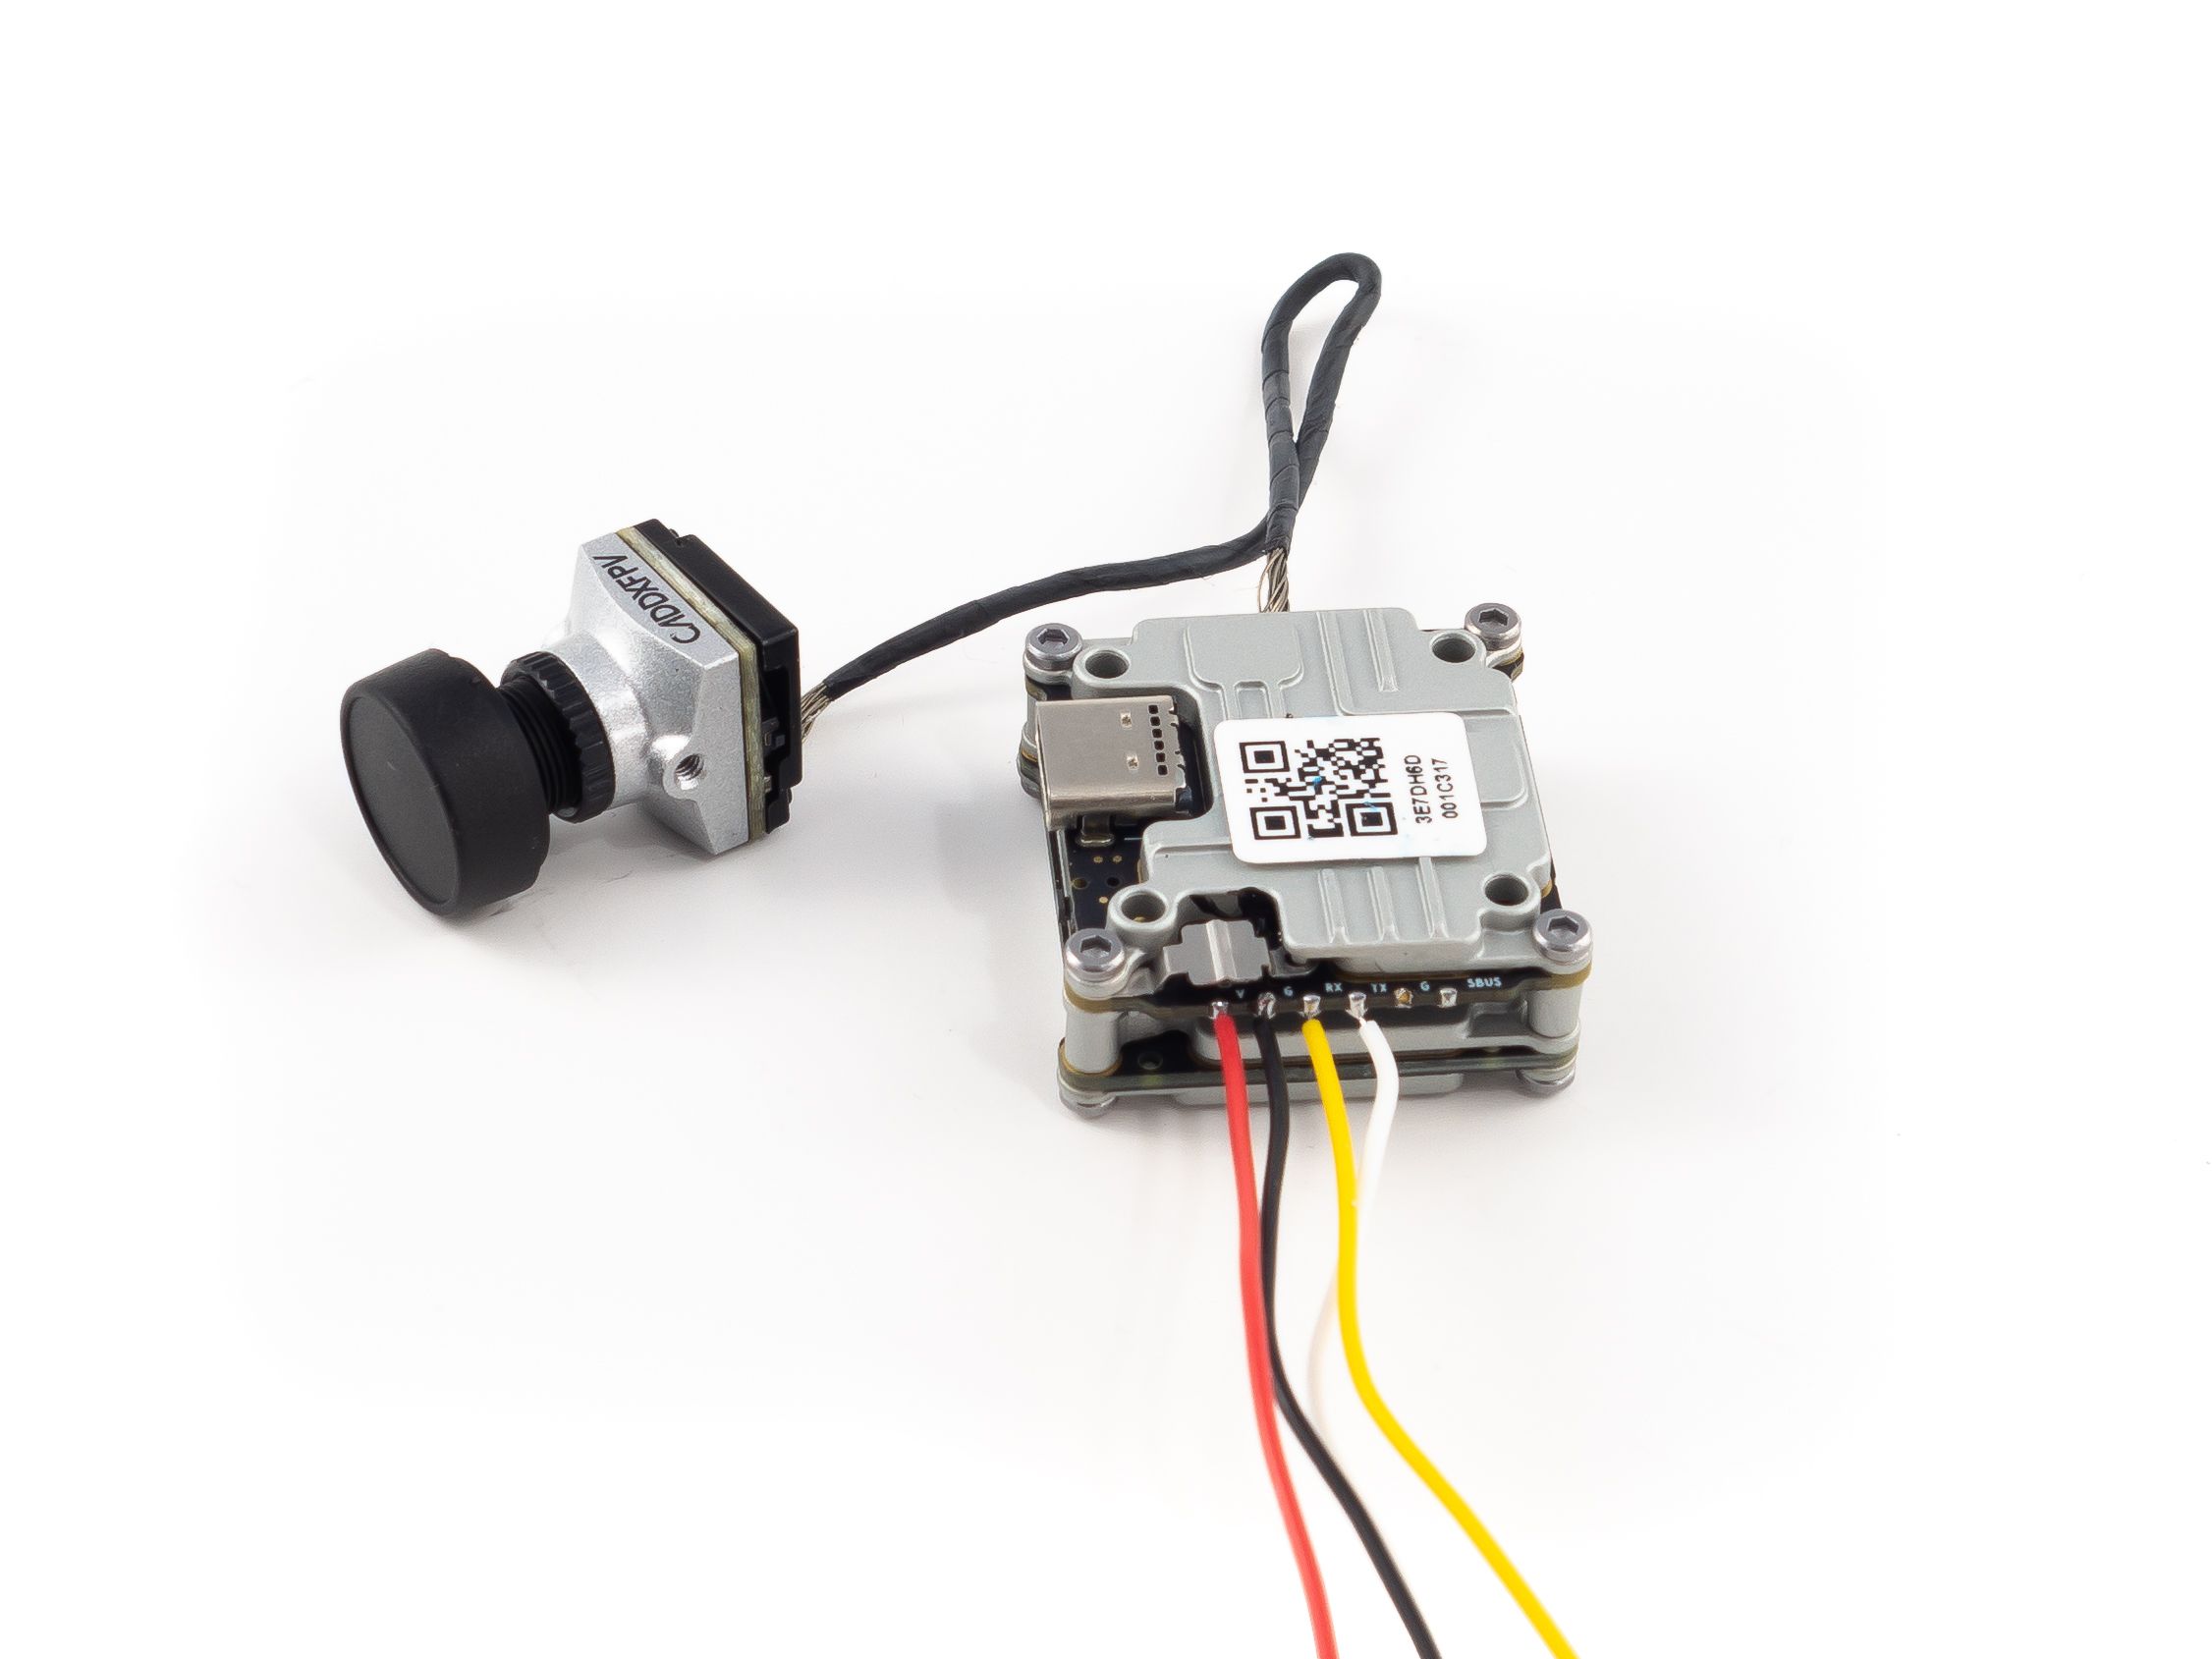
Now you need to solder the wires. If you're using the DJI remote you can solder the SBUS wire to the SBUS pad at the front of the board. You don't really need the 2nd ground. The other wires need to be soldered to the Ground, BAT+, RX6 and TX6 pads. Just like the GPS you need to solder TX -> RX and RX -> TX. In this case the yellow wire goes to TX6 and the white wire goes to RX6.
If you're using the Caddx Nebula camera you need to use the rubber adapter. Otherwise the DJI camera fits perfectly. Attach the side plates to the front camera and insert them into the bottom of the frame.
Betaflight
Before you button everything up it's a good idea to double check that it works. If you don't already have them, you'll need to download Betaflight Configurator Download and the BLHeli Configurator Download. Plug your quad in to your computer with a micro-USB cable.
Flash the Firmware
This is optional. At this time Betaflight 4.1.1 is most stable for this build and works great! The OSD elements are unstable on newer versions of Betaflight using this particular board and configuration. If you would still like to try a newer version you can follow these steps:
- Go to the Firmware Flasher and choose "Release", "BETAFPVF411" and the latest stable release of Betaflight (At this time 4.2.3)
- Leave the remaining options unchecked.
- Click "Load Firmware [Online]" and then "Flash Firmware" to update your flight controller. Once complete, click "Connect"
CLI Tab
I hate to start out with the CLI, but this board has a slight firmware issue we need to fix first. Go to the CLI tab and paste the following commands:
resource MOTOR 5 NONE
resource SERIAL_TX 11 B03
resource MOTOR 6 NONE
resource SERIAL_RX 11 B10
save
Ports Tab
- Set UART1 to Serial RX
- Change the Sensor Input to "GPS" for UART2
- Set SOFTSERIAL to Configuration/MSP
Configuration Tab
- Under ESC/Motor Features select DSHOT600
- Under System configuration set Gyro update frequency & PID loop frequency to 4 kHz.
- Under Personalization set your FPV handle
- Under Receiver choose your receiver. If you used Crossfire choose "Serial-based receiver" and "CRSF"
- Under Arming set the Max arm angle to 180 (Only if you keep the accelerometer turned on)
- Under Other Features enable: Softserial, Telemetry, Airmode, OSD and Dynamic Filter
- Under DSHOT Beacon Configuration enable "RX_SET" and change your beacon tone to 2.
Click Save and Reboot
PID Tuning Tab
Here you can ignore most of the settings unless you really know what you're doing. Mainly you want to go here to change your Rateprofile Settings. Choose some rates that feel comfortable to you. I prefer slower rates like .75, .75, 0.
Configure the GPS
- Go to the Configuration tab and toggle GPS on.
- Set the protocol to UBLOX.
- Save and Reboot.
- Check the "Enable Expert Mode" box on top.
- Go to the Failsafe tab and change stage 2 to GPS Rescue. Use the default settings.
By default the quad won't arm until a GPS 3D fix has been met. This may require some waiting time. If you'd like to disable this you can go to the CLI and type set gps_rescue_allow_arming_without_fix = on and save. Keep in mind that if you do this and take off before you've got a 3D fix GPS rescue won't work. Your starting position wasn't determined. Your distance to home and home direction arrow won't work either. It's best to wait for the 3D fix which is indicated by at least 6 satellites in your OSD.
Another thing to keep in mind is GPS rescue won't bring your quad back and land where it began. It'll steer the quad back toward you and once an RX link has been recovered you'll regain full control. Don't let it drop. You can avoid this by putting GPS rescue on a switch in the Modes tab. If you do have a failsafe flip the switch and it'll continue to return to you even after recovering the RX link. You always want to land manually though. It won't land gracefully on its own.
OSD Tab
On the OSD tab check all of the values you want and arrange your OSD as desired. I like to line them up across the top, one row down. These are the values I use from left to right:
- GPS speed
- Home distance
- Home direction
- RSSI value
- GPS sats
To complete the remaining steps apply lipo power and turn your radio on
DJI Bind
- Bind your Caddx Vista to your DJI goggles by pressing their respective bind buttons.
- Make sure you've got a video link and choose a Player channel.
- Set your display preferences. I like High quality on 50mbps with Focus mode off.
Receiver Tab
- Ensure your pitch, roll, throttle and yaw are being applied correctly. Adjust your transmitter and Channel Map as needed.
- I like to add 3 to both deadbands to smooth out gimbal jitter.
- Set your RSSI channel
- For Crossfire go to the Crossfire menu on your radio, choose your receiver and set a channel to "LQ". I put it on channel 12 which is AUX 8 in Betaflight.
- Go to the Telemetry page on your radio and Discover sensors. You should see all your telemetry data appear.
Modes Tab
- Assign an Aux switch to arm and disarm your quad.
- Assign another Aux switch to enable Horizon or Angle mode if you want them.
- Assign the Beeper and "Flip over after crash" to a 3rd and/or 4th switch.
- Assign GPS Rescue to a switch.
Save
Motors Tab
Enable the motor test and check the rotation of each motor.
- Do this by sliding the master to around 1040 so you can rub the side of each motor with your finger to determine the rotation.
- Refer to the image on top and take note of any that need to be reversed.
- You might also want to ensure each motor is in the correct position by referring to the numbers in the image and powering them one by one.
- If any motors need to be reversed continue on to BLHeli Configurator
BLHeli Configurator
Disconnect from Betaflight Configurator and open BLHeli Configurator
- Connect and Read Settings
- Reverse each ESC that needs to be reversed.
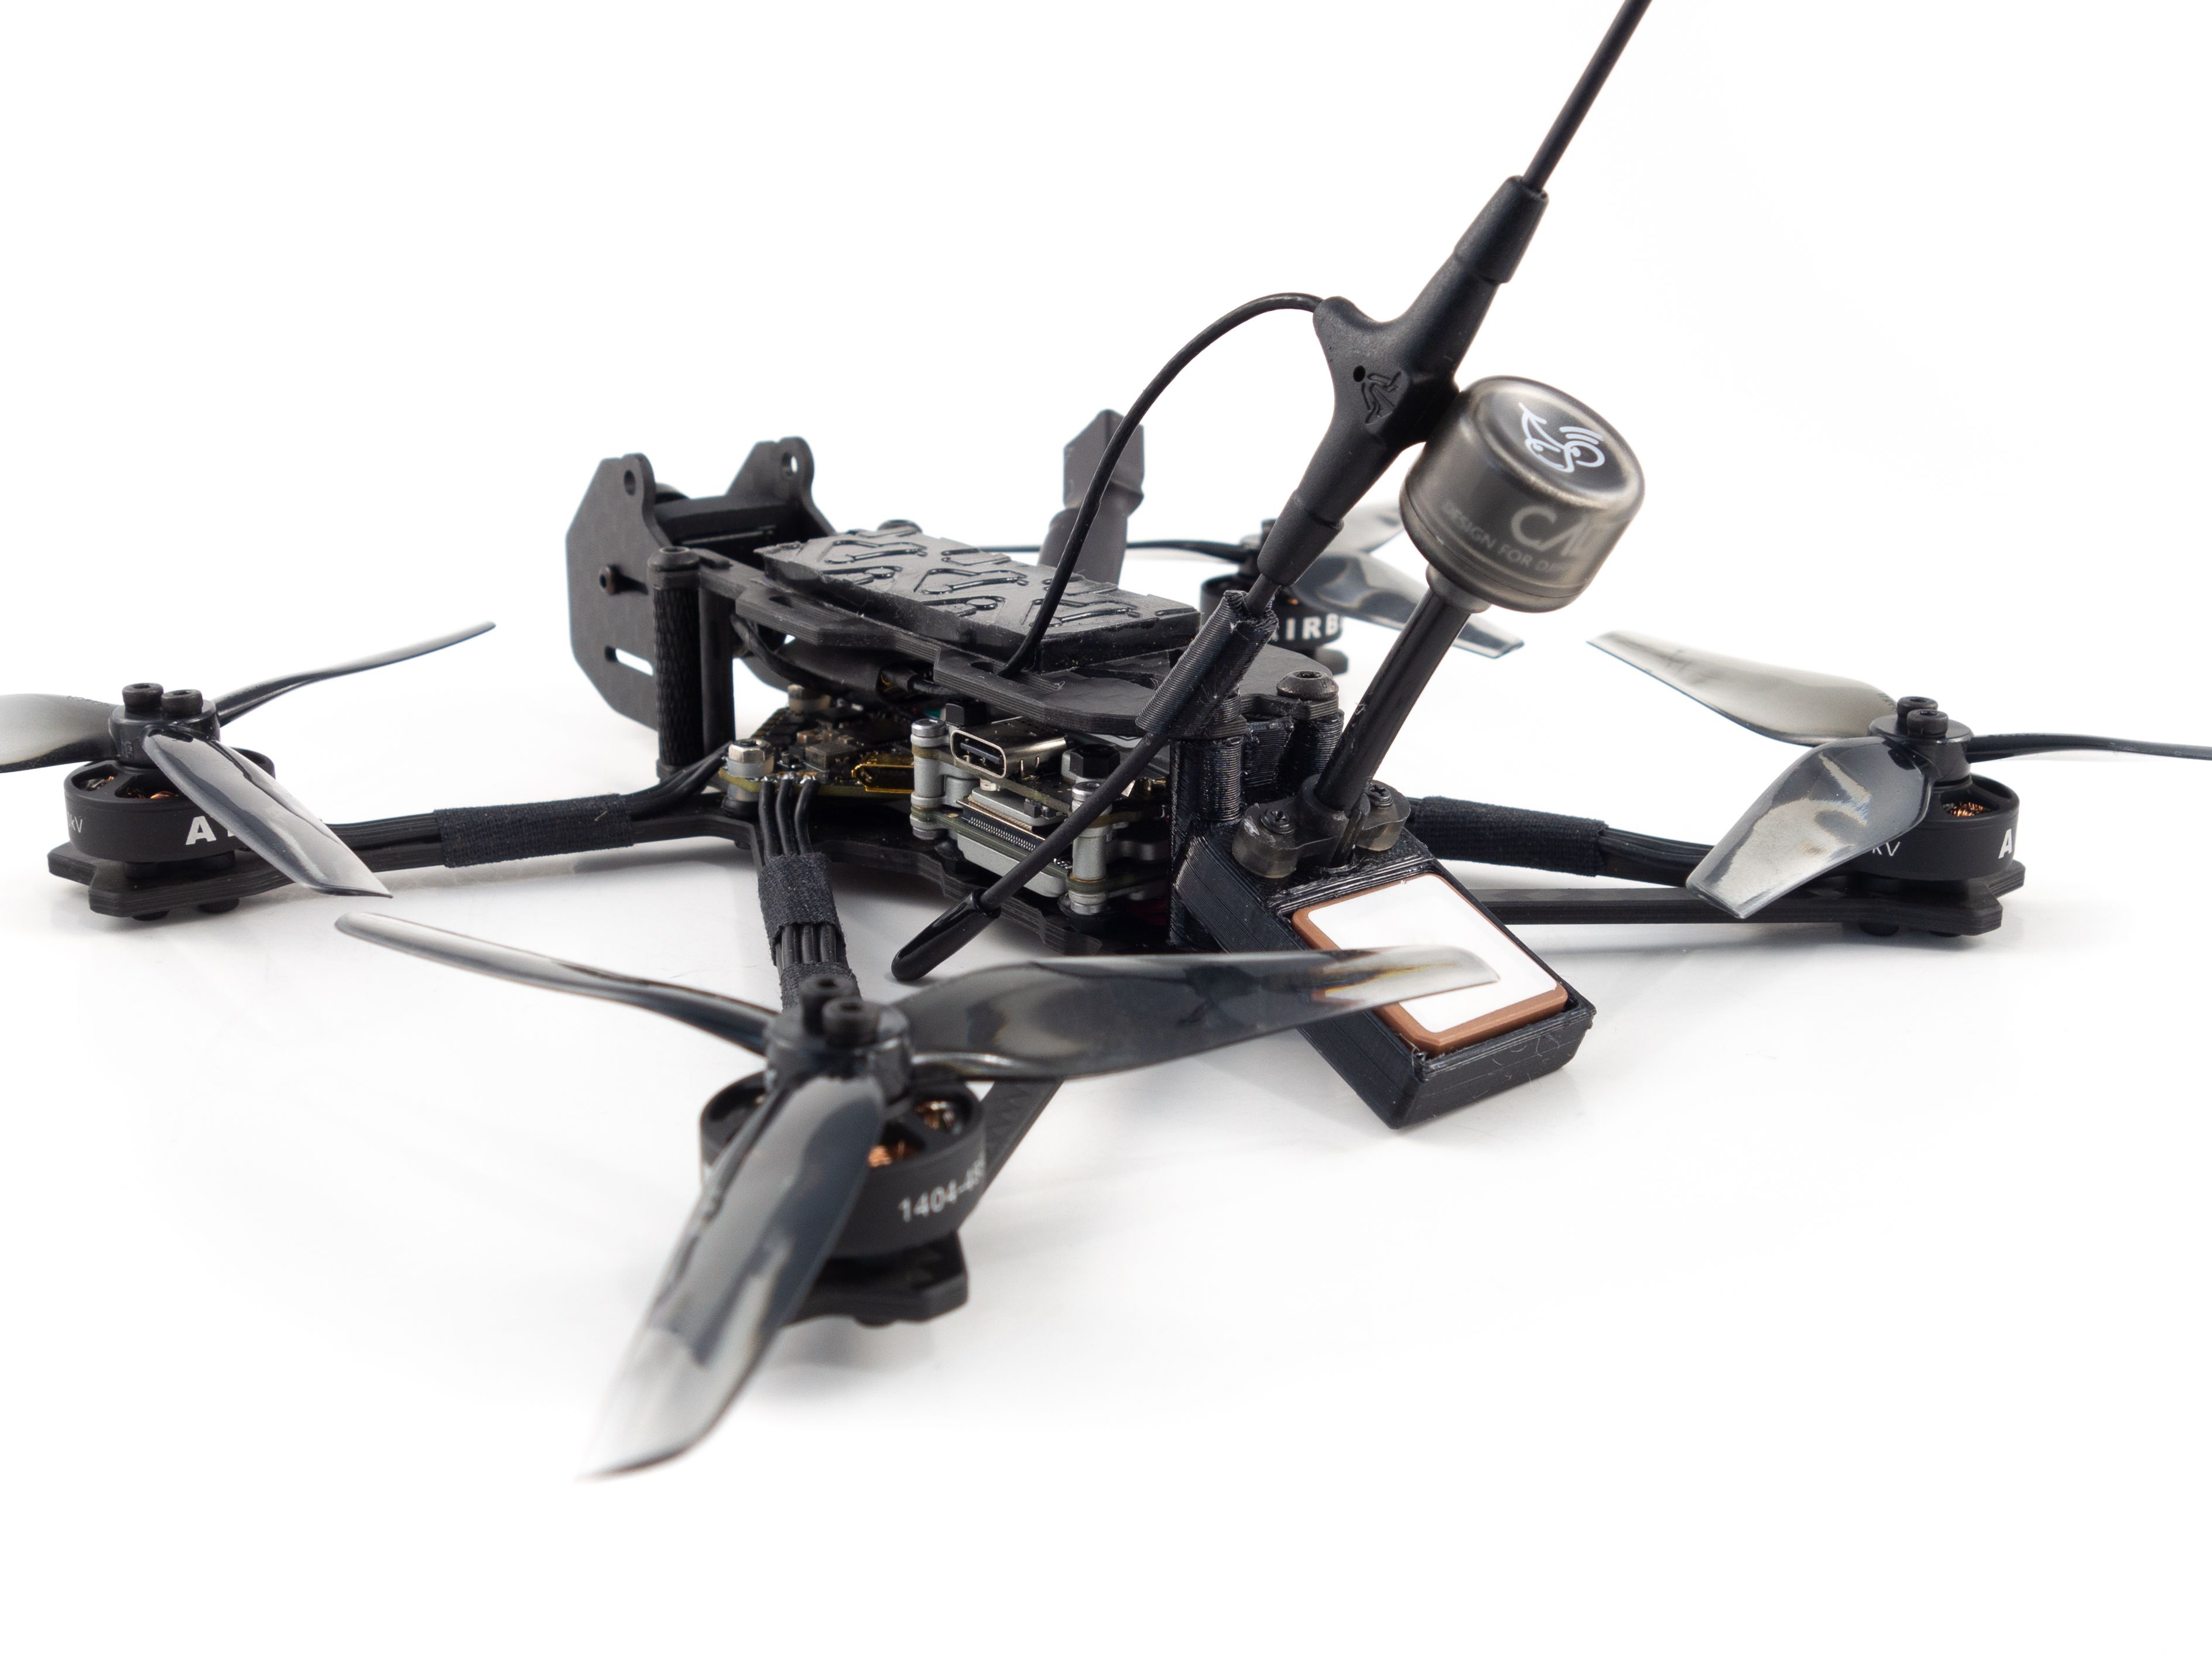
Finishing Up
Now that you know everything works it's time to button it up!
- Add the standoffs to the front of the frame.
- Add the top plate and secure it with the included M3 screws.
- If you're using Crossfire attach the antenna holder to the top plate with one of the M3 screws.
- Take off one of the antenna caps and slide the antenna through the holder. Put the cap back on.
- Send the antenna cable through the top plate to prevent the receiver from falling out.
- Connect the antenna to the receiver and slide the shrink tube over.
- If you've got some pointy M2 screws you can screw the antenna mount onto the TPU holder. Otherwise use a dab of hot glue on top to hold it in place.
- Add a sticky battery pad and a battery strap.
- Add your props and screw them down with 7mm screws.
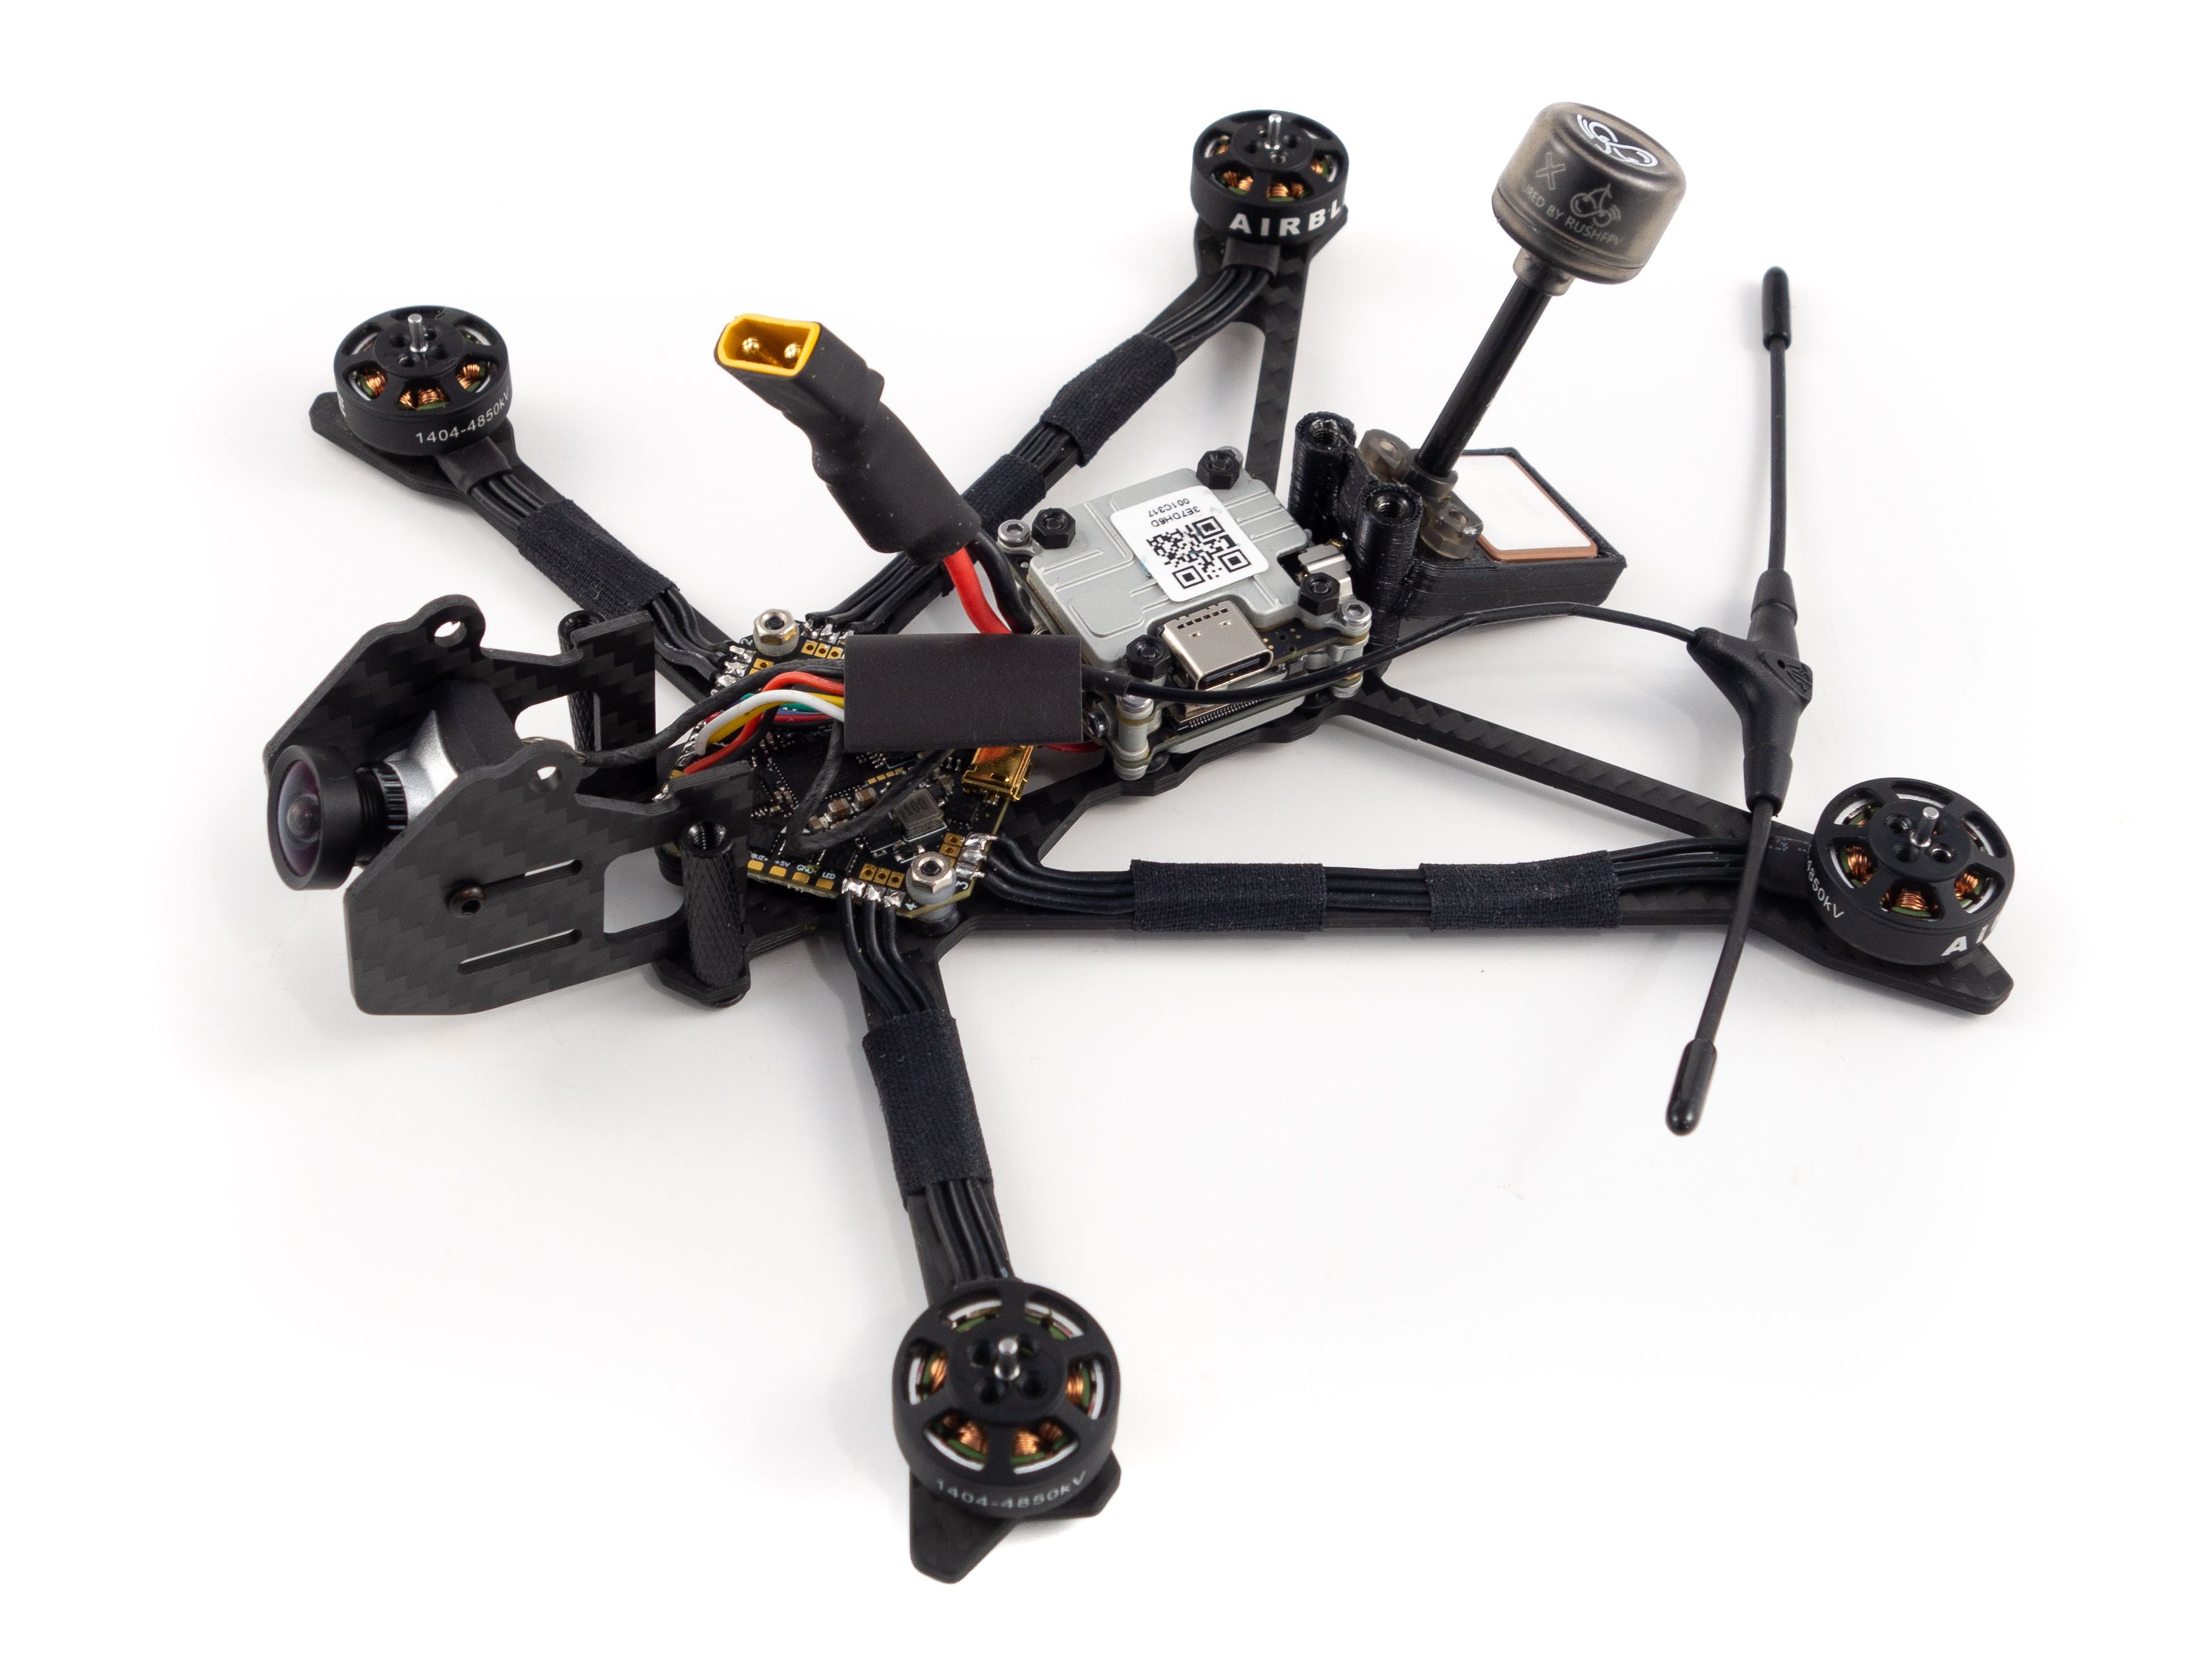
HD Camera Mount
You can mount a GoPro Lite or an Insta360 Go up front with a 20mm aluminum standoff and M3 screws above the flight camera. I've linked the models to print the mounts in the part list below.
Photos


Part List
Show stores (6)
Great build. Used Emax Eco 3700kv motors. Got around 20min and 245g on a 2s lion, then around 30 min and 290g on a 3s lion. 3S definitely flew better but the 2S was still possible to fly with some tuning. Unfortunately, the blackbox dataflash chip was missing on my FC. This was my first FPV build and it came out great and is perfect for my flying style!

I used a different GPS, a GM8 Mini (v.1), and my altitude readings bounce around like crazy. It's not unusual to see -120ft or +175ft at ground level after a proper start up. Otherwise, it's working well for coordinates and direction. From what I gather, these are usually used with Goku FCs that have built in barometers for altitude sensing, so not a problem.
Long story short, not knowing how Betaflight handles altitude during return to home, I haven't dared to test RTH. If Betaflight relies on the GPS altitude readings, which it seems it must, RTH isn't going to end well.
Is the TBS M8.2 any better at pinpointing altitude, at least to the level where RTH might succeed? Or is there something else at work here that makes GPS altitude readings unnecessary?
No. I turned on the DVR last night and did a full flight and altitude was reading high anywhere from about 10 to 50 feet. But nothing was done to improve it; it just happened to be better. That's flight #40 so far and finally I can land the thing pretty well. Focus! Wow, the DVR video is choppy and jerky. It makes the pilot look bad.
I'm collecting gear to build a digital sharkbyte version and I think I'm going to mod the frame design to carry a Goku flight controller with integrated barometer, if only I can find the time. The weight calculates out at 249g with GoPro and 500mW VTX and I know where I can cut away another gram to be sure.

I don't understand, you sad:"the blue wire goes to RX2 and the green wire goes to TX2.
In "GPS" tbs prospect they say different?


Such a great build! This is my first FPV build and its been such a steep learning curve. Mad to get it out for a flight but I am having trouble in Beta flight where it wont show up the DJI radio as an option in configurations. I follewed the guid for the port configuration but I have not soldered in an SBUS wire as it was optional on the guide. Feeling like this might be the issue. Goggles, air unit and radio all bind and able to calibrate the radio in the goggles but no input at the serial port section. Any tips would be great as I am a bit swamped!
Air unit, Radio + Googles: 01.00.0600
Beta FPV: 10.7.0
Flight Controller: BetaFPVF411 4.2.8
(I also tried betaflight 4.2.3)

This was more than a little helpful in getting my long range mini cruiser finished. It's ready for maiden now - finally. Thanks so much for the guide; there's so much to consider.
There was no worries about the big honkin piece of shrink wrap being tight enough for the nano RX. Surprise, it shriveled up to nano size in a flash.
Instead of tape to wrap the motor wires onto the arms, I used canopy glue. It's a white glue that (I hope) will be easily removable if ever necessary. The wires were held in place with twist ties for 24 hours while it cured. Potentially messy, but it turned out OK.
I used a Ratel 2 camera and an analog VTX. The SmartAudio lead from the VTX connected to TX6 on the Toothpick. Could not get the OSD to work, no matter what I tried, but there was nice clear video. The problem? The camera was factory set to PAL. That proved to be the best picture, so went with PAL on all components. Once the FC's setting in BetaFlight matched the camera, the OSD began to function. The VTX didn't seem to care. SmartAudio works like a charm to set VTX power and frequency.
(edit: corrected name of camera)
FWIW, after adding a naked GoPro 6, flight times dropped to 11-1/4 minutes with the VTX set at 200mW and a little over 10 minutes at 800mW. That's with the two blade 4" props, 20% battery reserve and AUW under 250g. Keep in mind that every minute it spends on the ground trying to lock in satellites is burning up power. I'm still pleased with this rig and everyone who sees it starts drooling uncontrollably. LOL, a little embellishment there.
I was having a jello issue with the GoPro. A ND16 filter fixed that for most bright light flights (ISO min 100 max 400, shutter Auto); you simply cannot allow the shutter speed to get too high in response to bright light or jello will ruin your shots. Take care of it and Reelsteady can then be free to spit out milk and honey.

I see some comments here about using a 2S Lion as a battery. Do you think it would be possible to make a Lion 2S powered quad while keeping the weight below 250 grams?

After having tried for some time now to get a 2s Li-Ion LR setup working, i must say that sadly it's not worth the pain. Apart from what Whiffles said about it being difficult to tune, as soon as the voltage goes below 6.5v, i was getting very weird behavior (probably motor/esc desyncs). Also at 6.0 the flight control just turns off.
It's 3s+ for me now for LR probably.
One question @Whiffles Have you noticed and drops in your OSD running on Softserial? With a simlar build, I have set mine up in the same Uart configuration as you and have noticed a few times where the custom OSD elements dissapear for a few seconds at a time. I only have a 4 batteries through it so I don't have any systematic testing yet to see when it happens. Hope to get out again this weekend if the weather cooperates.
Nice! I'm excited to build one of these myself. I'm not a freestyle guy (too old for that) , I prefer cruising around so I'll likely aim towards the lightest build I can pull off and go 2S . With that being said, did you make any tuning changes when flying 2s? Any chance you can post those if you did?
In reading farther through I see that you stated it's difficult to get a good tune on 2s. Tuning is not something I enjoy at all so it looks like I'll want to go with the 3s lipo and be content with @10-15 mins of easy cruising around. I don't anticipate having the funds to go digital any time soon so it's going to be an analog build.

FYI, I´ve build the same quad using following components:
-Emax ECO 1404 3700kv
-Kakute F7 mini + Mamba 30A 20x20 esc
-Caddx Nebula running lightweigt prodrone.pl Vee Antenna
-Crossfire Nano RX + minimortal Antenna
-HQ 4025 Props
-BN 180 GPS
I stripped down the Vista for saving some weight. Dry weight is now @133,9g. Flight time 13min using Turnigy nanotech 850mah 45C 4S (95g). Still lots of room left to 250g. I´m waiting right now for the lightweight GNB 1100mah 4S to arrive (88g weight), that should be enough for at least 15-16min of flight time being at only 222g AUW.

I'm new to cinewhoops so excuse the question if its really stupid: is it possible to make a "longe range" cinewhoop cruiser? Want to kill two birds with one stone. Thanks!
What do you think about using the Caddx Tarsier 4K ? Would the weight reduction of not using a gopro (with case) improve flight time? Or would the now oboard HD Camera drain the battery reducing flight time?
Do I have these flight times and batteries correct?
Using 3850Kv motors you got:
2s Li-ion 18650 pack got avg 25 min flight time but hard to tune and didn't fly as well
3s Li-ion got 20 min flight time and flew alright after some fiddling with tune
4s li-ion is (same?) flight time as a 3s pack but flew well on stock settings
your advice is to go for a 3s build, if one could make li-ion packs
If one is just going to buy li-ion packs then 4s is what is easily available so one should build with 2500kv motors?

I used the 4850kv motors, so I think 3850kv will get better flight times on 3S. If you just want to buy a pre-made 4S Li-Ion battery then yes 2500kv is the way to go. The only thing is you're locking yourself in to 4S and those are heavy packs. You can still fly 4S just fine on 3850kv but you'll have more optimal flight times when 3S Li-Ion packs do become more readily available.

Do you see any benefits with going with a 6s battery and lower kv motor?
Hey Whiffles, awesome build! I'm just another beginner looking to maximize flight time. Specifically, I'd like to use 3850kV Supermans with a 3S 18650 pack as you recommend in the second video. Have you considered replacing your Molicel P26A batteries (2600mAh, 35A) with the LG HG2 (3000mAh, 20A)? I'd like to get the extra ~15% mAh but I'm wondering if 20A isn't enough for these motors.
Also, would you recommend sticking with the 4850kV Supermans if I end up going with a 2S 21700 pack?
I'm not familiar with the LG HG2. That doesn't mean it wouldn't work, but I went with the Molicels because they've got a good reputation for quality in the community. You can try both and compare. I don't really recommend 4850kv with 2S mainly because it's really hard to get a good tune on 2S. I think 3850kv + 3S Li-Ion is the way to go.
I am trying to design a drone like yours. Can you give this beginner some tips.
Thank you for this build and your
Lil_flyer
Delightful write-up, thank you for this! Any thoughts on the EMAX Eco 1404's vs the Airblades for long-range cruising? The Airblades are out of stock at the moment.
Excellent writeup. I'm sold. though, if I build this I need to make sure it comes under 250g. Has anyone done an AUW with a 2S 18650 pack? I'm really just looking for the best
it has been asked, but I have to ask again. why do you remap softserial to tx6? betafpv advertising 3 Full Uarts on the v3 AIO. So UART6 should be fully functional.
edit:
after some reading I noticed that they trick people, uart 6 is no hardware UART, just softserial. what a shame asking such a price for a slow ass F411 with 2 hardware uarts. Better go with the Hifionrc F7 AIO, 5 full UARTS, F7 MCU and 25 or ever 45A ESCs.
What is the dry weight. I am looking to build something under 250 gms with 3s Li-Ion if possible. Could go analog if thats achievable.
go with the 4S version, its 88g @1100mah.
what's curious, my 3" with nearly same setup (full size caddx vista, 1404 emax 3700kv , 20x20 stack) has exactly same flight time, about 7min on 650 4s and 9min on 850.
I thought 4" should be more efficient.
I will transplant those parts into this frame and see if flight time gets any better.
very clean build. But one thing needs to be changed. GPS over Softserial is absolutely unreliable, be careful. You can run MSP for DJI Telemetry via softserial just fine, it will have some hickups but it works and is far less critical than gps. so please use hardware uart for gps.
what's exactly the problem with uart6 on this FC, since I wanted to buy it because IT HAS 3 hardware UARTs. if on)

It depends on the battery. It gets about 4-5 minutes on 4S 525mah, 8-9 minutes on 4S 850mah and 15 minutes on 4S Li-Ion 2000mah. I'm still experimenting with the batteries though. I've got the 4850kv motors so I need to run this on 2S to get more efficiency. I should be able to manage 20-30 minutes on 2S 21700 4500mah Li-Ion.

Fantastic writeup. Awesome build. I wonder if a Lion 18650 2S battery would fit and provide long flight times, was thinking of trying that on a similar lightweight build.


Antenna placement. Will there be any issues with the ant. that close to the VID TX. Is this the final placement for the TBS Ant. ? I would appreciate feedback, im looking to build this in the near future.


Can i use afhds?